Smashwords Formatting Guide - WordPress.com · while I Google that...' 1 day ago Smashwords...
15
Smashwords Formatting Guide Posted by Ross Harrison on 18 Mar, 2013 Ok, it’s not a clever title, but that’s what it is. Quite a lot of people seem to have trouble with formatting their ebooks for Smashwords, so I am writing this guide. It isn’t exhaustive, but it details everything I’ve done for both of my novels and my short story, so I know it works (feel free to check this outrageous claim for yourself by downloading my works here…)! And I want to make it as simple and easy to follow as possible. For introducing me to Notepad++ and for simplifying the table of contents process, I’d like to thank Paul Salvette. A disclaimer of sorts: I’d like to note that I will be assuming you are formatting a novel. I don’t know about the formatting of non-fiction, or how it differs. So if that is what you are doing, it will be up to you to know how it differs, and make those changes to the guide (it’s not difficult – just change the styles accordingly). Also, it’s always a good idea if you have, or can borrow, some kind of e-reader to test the finished product on to ensure everything looks the way you want it to look. Lastly, this is only a basic-formatting guide – I’ll tell you how to have italics, bold, underlined, images, but nothing particularly fancy. If you want fancy, this guide can still be your base, but you’ll need to find out the rest elsewhere! The more fancy you get, the less I can guarantee it’ll pass the Meatgrinder, though. Apologies for the rough red circles round things in some screenshots – I don’t have a tablet or a mouse, and using the laptop’s trackpad to draw circles isn’t easy. NOTE: Some screenshots here of Word will be very slightly different to what you see, because I used a new document for most of it, and didn’t save as a Word 97-2003 document (which you have to do), which minutely changes the layout of some menus. By minutely, I mean that I may say something is on the left of the toolbar, but you’ll see it on the right. Nothing more major than that. What We’ll be Doing: What we’re doing here is known as the ‘nuclear option’. It means getting rid of every last bit of formatting, and starting again, basically. Smashwords’ Meatgrinder (their converter) isn’t all that fantastic. It’s not Smashwords’ fault – there’s a lot of different formats for it to convert your manuscript into, so the more messy it is, the harder Meatgrinder finds it to get everything right. This guide will get you into the Premium Catalogue, making your ebook available from lots of websites, such as Barnes & Noble, Kobo, iBookstore, etc. Basically, all we’re doing is cleaning up the Word document so that it will pass the Meatgrinder and Autovetter. So you’ve probably spent ages making your manuscript look pretty with different formatting, but unfortunately, all that has to go. The less formatting, the lower the chances Meatgrinder will mess things up for you. NOTE: I will be using quotes around things you need to type in order to make it clearer. Please don’t be a
Transcript of Smashwords Formatting Guide - WordPress.com · while I Google that...' 1 day ago Smashwords...

● About● NEXUS�❍ Shadow of the Wraith�❍ Temple of the Sixth
● Other Works�❍ Kira
● Reviews
NexusesesThe infrequent, but often disjointed, garbled ramblings of…well, me.
RSS
Smashwords Formatting GuidePosted by Ross Harrison on 18 Mar, 2013
Ok, it’s not a clever title, but that’s what it is. Quite a lot of people seem to have trouble with formatting their ebooks for Smashwords, so I am writing this guide. It isn’t exhaustive, but it details everything I’ve done for both of my novels and my short story, so I know it works (feel free to check this outrageous claim for yourself by downloading my works here…)! And I want to make it as simple and easy to follow as possible.
For introducing me to Notepad++ and for simplifying the table of contents process, I’d like to thank Paul
Salvette.
A disclaimer of sorts: I’d like to note that I will be assuming you are formatting a novel. I don’t know about the formatting of non-fiction, or how it differs. So if that is what you are doing, it will be up to you to know how it differs, and make those changes to the guide (it’s not difficult – just change the styles accordingly). Also, it’s always a good idea if you have, or can borrow, some kind of e-reader to test the finished product on to ensure everything looks the way you want it to look. Lastly, this is only a basic-formatting guide – I’ll tell you how to have italics, bold, underlined, images, but nothing particularly fancy. If you want fancy, this guide can still be your base, but you’ll need to find out the rest elsewhere! The more fancy you get, the less I can guarantee it’ll pass the Meatgrinder, though.
Apologies for the rough red circles round things in some screenshots – I don’t have a tablet or a mouse, and using the laptop’s trackpad to draw circles isn’t easy.
NOTE: Some screenshots here of Word will be very slightly different to what you see, because I used a new document for most of it, and didn’t save as a Word 97-2003 document (which you have to do), which minutely changes the layout of some menus. By minutely, I mean that I may say something is on the left of the toolbar, but you’ll see it on the right. Nothing more major than that.
What We’ll be Doing:What we’re doing here is known as the ‘nuclear option’. It means getting rid of every last bit of formatting, and starting again, basically. Smashwords’ Meatgrinder (their converter) isn’t all that fantastic. It’s not Smashwords’ fault – there’s a lot of different formats for it to convert your manuscript into, so the more messy it is, the harder Meatgrinder finds it to get everything right. This guide will get you into the Premium Catalogue, making your ebook available from lots of websites, such as Barnes & Noble, Kobo, iBookstore, etc.
Basically, all we’re doing is cleaning up the Word document so that it will pass the Meatgrinder and Autovetter. So you’ve probably spent ages making your manuscript look pretty with different formatting, but unfortunately, all that has to go. The less formatting, the lower the chances Meatgrinder will mess things up for you.
NOTE: I will be using quotes around things you need to type in order to make it clearer. Please don’t be a
Main menu
Smashwords Formatting Guide | Nexuseses
Skip to content
file:///C|/Documents%20and%20Settings/RossHarrison/Desktop/gggf.htm (1 of 18) [20/03/2013 16:51:35]
Skip to
toolbar
Log
Out

Smashwords Formatting Guide | Nexuseses
fool and type the quotes too! I will also try to put anything you need to click on in bold. Hopefully that will help too. Click the screenshots for a larger image if you need to compare with what you’re seeing.
What You Will Need:1. Microsoft Word (I’m using 2007)2. Notepad++ – you can other text editors, but I’ll be showing you how to get rid of everything you don’t want
with this one. It’s free here
Special Characters:To make your work look nicer, you’ll want that nice curved speech marks and proper dashes and ellipses and so on. Word should automatically do this as you go. Skip this section if you already have these, otherwise:
1. Click the big yellow button in the top left, then Word Options at the bottom of the drop down list2. Click Proofing and then AutoCorrect Options3. In both the tabs Autoformat and Autoformat as You Type, uncheck all boxes except ‘Straight Quotes
with Smart Quotes’ and ‘Hyphens with Dash’. NOTE: If you have Ordinals or Fractions, check them too, but I haven’t used either, so I can’t guarantee it will work
Click OK until you get back to your manuscript. Now we’ll use Find and Replace. NOTE: It’s very important that you change the em dashes BEFORE the en dashes, otherwise you will lose the former.
1. Press Ctrl+H to bring up the Find and Replace window.2. Find: ” and Replace: ” (double quotes will now automatically be changed to the nice curved ones)3. Find: ‘ and Replace: ‘4. Find: ‘–’ and Replace: ‘^+’ (This creates an em dash)5. Find: ‘-’ and Replace: ‘^=’ (This creates an en dash. Remember to do this second!)6. Find: ‘…’ and Replace: ‘…’ (In Find, type three full stops (periods). In Replace, press either Ctrl+Alt+. or
Alt Gr+. for a proper ellipsis)
Now check your manuscript to ensure the changes have taken effect.
Intelligent Layout:With Smashwords, potential readers can read a sample of your work. With that in mind, it may be advisable to make the story itself available as close to the front as possible so they won’t feel cheated (and because they want to know what the story is like, not who you want to thank). That said, it’s advisable to make the Table of Contents (if you have one) easy to get to for the a reader who actually has the book. Being at the front rather than the back is the more obvious thing, although if it is the very last thing in the book then they need simply select ‘Go To End’ to get to it. In short, aside from the title and copyright pages, it’s up to you what order you put things.
This is the order I’ve gone with:
● Title● Copyright● Table of Contents (also known as NCX)● Author’s Note (I have a number of special characters in the book which won’t show on some e-readers, so
because I can’t make a file for each file type, I took them all out. I need the reader to know this right away, and to apologise if I missed any!)
● The story itself● About the author● Anything else you want to put in
Recent Posts
● Smashwords Formatting Guide ● The Next Generation ● Giveaway!
Follow my Blog via Email
Click to follow this blog and receive notifications of new posts by email.
Latest Tweets
● One of the hardest things about writing is not giving in to the allure of the scene of a new book that just popped into your head #amwriting 1 day ago
● How did Shakespeare manage to do all his writing without the internet? Even my computer's dictionary tells me 'wait while I Google that...' 1 day ago
● Smashwords Formatting Guide wp.me/p2qH2s-3O #Smashwords 2 days ago
● The Next Generation wp.me/p2qH2s-4u 3 days ago
Ross Harrison's books on Goodreads
Shadow of the Wraith (Nexus) reviews: 5 ratings: 11 (avg rating 4.45)
Kira reviews: 3 ratings: 3 (avg rating 4.67)
Temple of the Sixth reviews: 1 ratings: 1 (avg rating 5) On Facebook
Worthwhile Blogs
SammyHKSmith
Zigzag Timeline
That Girl Tyson
Tea and Text
file:///C|/Documents%20and%20Settings/RossHarrison/Desktop/gggf.htm (2 of 18) [20/03/2013 16:51:35]

Smashwords Formatting Guide | Nexuseses
This might be frowned upon by some, since the potential reader will have to skip though all that to start reading, but it’s how I did it…so there. Also, because of the way my ‘chapters’ are done, I only have about three or four entries in the TOC. Others may be multiple pages on their own, in which case putting it last may be the best choice. As I said, it’s up to you.
Another thing worth noting about the TOC is that it is optional. Kind of. Most places will accept the book without one – Smashwords itself certainly will, and it will be put in the Premium Catalogue without one. However, my second novel was rejected by Apple due to not having a TOC. This confuses me, because my first novel didn’t have one either. Apparently they changed their requirements soon after, or some such. So in short, I’d recommend putting in a TOC. If you have abnormal chaptering like I do, you could try putting ‘Title, Table of Contents, Author’s Note, Story Begins’ or something of the like.
At this point in the process, don’t bother with actual links for the TOC. Just the text itself for now.
NOTE: It is essential that ‘Smashwords Edition’ be added to your copyright page. If it is not, it will be rejected. A simple copyright page is fine, and it can even be a part of the title page if you want. Simply putting ‘Copyright 2013 [Your Name]‘ is sufficient. I went a bit further with this:
Copyright © 2012 Ross Harrison Cover copyright © 2012 Ross Harrison Cover design by Mark Williams Smashwords Edition The right of Ross Harrison to be identified as the author of this work has been asserted in accordance with the Copyright, Designs and Patents act 1988. All the characters in this book are fictitious, and any resemblance to actual persons, living or dead, is purely coincidental. All rights reserved. No part of this publication may be reproduced, stored in a retrieval system, or transmitted in any form or by any means, electronic, mechanical, photocopying, recording, or otherwise, without the prior permission of the author.
It is unnecessary, but it’s what I wanted to put in!
Preserve Your Thick Slanty Stuff:The nuclear option will remove all formatting. That means your italic, bold and underlined text will become normal text. So here is how to preserve those. This is only for body text, so remove these from headings first, as they’ll be done separately later. There’s a small annoyance with this method. Take italics for example. If you had a word in italic, but then you deleted it, or decided to remove the italics, there’s likely a blank space that is still italic. It’s tedious, but the way I do it, is to search through the document to ensure only the text is italic. No random white space italicized. If you want to do this, the best way is to press Ctrl+F, click in the Find box, and then press Ctrl+I so that beneath the box it says ‘Font: Italic’. Click Find Next. Then click Cancel and use Ctrl+Page UP/Page Down to cycle through the italicized text, removing any white space. You may decide this is unnecessary, but I like to be as clean and tidy as possible.
Next, press Ctrl+H to bring up the Find and Replace window. During the following, you can either do each manually to ensure precision, or you can click Replace All. If you do the latter, I recommend taking italics, bold and underline off headings. If you do the former, then simply skip them. Remember not to type the quotes in the following!
● In the Find box, press Ctrl+I so that it says ‘Font: Italic’ beneath. Leave this box empty and go to Replace. Type something like ‘II^&II’
● In the Find box, press Ctrl+U so that it says ‘Underline’ beneath. Leave empty and go to Replace. Type
file:///C|/Documents%20and%20Settings/RossHarrison/Desktop/gggf.htm (3 of 18) [20/03/2013 16:51:35]

Smashwords Formatting Guide | Nexuseses
‘UU^&UU’● In the Find box, press Ctrl+B so that it says ‘Font: Bold’ beneath. Leave empty and go to Replace. Type ‘BB^&BB’
Preserve italics
The reason I say ‘something like’ is that it’s the ‘^&’ that’s important. It simply refers to whatever is in the Find box. In this case, it’s simply whatever font formatting you have chosen. So now your italics will have ‘II’ on either side, and ‘UU’ and ‘BB’ respectively for underlined and bold. So ‘Bring back Firefly!‘ will now say ‘IIBring back Firefly!II‘. As you’ve guessed, we’ll do something similar after the nuclear option to reverse that. You can change ‘II’, ‘UU’ and ‘BB’ to whatever you want. It could say ‘JamesEarlJones’ and so long as you have the ^& in the middle, it will work.
Going Nuclear:Now we have everything preserved and laid out correctly, it’s time for the nuclear option. This removes every last bit of formatting and hidden crap from your manuscript.
1. Open Notepad++ and create a new file if necessary2. In Word, press Ctrl+A to select everything. Then Ctrl+C to copy it3. In Notepad++ press Ctrl+V to paste in your manuscript
Notepad++ with rough text
Now it will look a bit of a mess. Every paragraph should be on a single line. Everything will be the same size and there will be no italics, bold or underline. There will also be a lot of white space. So let’s get rid of it:
1. Press Ctrl+F and click on the Replace tab. Click ‘Extended’ under ‘Search Mode’ at the bottom. In the Find box, type ‘\t’ and leave the Replace box blank (make sure there isn’t a space in there by default). Click Replace All. This deletes tabs
2. In the Find box, now type ‘\n\r’ and again leave the Replace box blank. Click Replace All. This deletes blank lines. NOTE: You may need to perform this step last
3. In the Find box, type ‘ ‘ (two spaces) and in the Replace box type ‘ ‘ (one blank space). Click Replace All. This removes any double spaces. Close the Find and Replace box
file:///C|/Documents%20and%20Settings/RossHarrison/Desktop/gggf.htm (4 of 18) [20/03/2013 16:51:35]
Smashwords Formatting Guide | Nexuseses
4. Click Edit -> Blank Operations -> Trim Leading and Trailing Spaces. This will delete space before and after paragraphs
Now your work will look equally confusing, but less messy. There should be no blank lines at all. The title line should be immediately followed by the copyright line followed by whatever comes next, with NO BLANK LINES between. Check the document over for white space that shouldn’t be there.
Deleting Blank Lines
Trimming Blank Space
Cleaned Up Text
Back To Word:Now we can take that cleaned up text back into Word. Before you do so, create a new file and check that the AutoFormatting options you choose at the start are still the same. In other words, only the opens about dashes and quotation marks should be checked. Also make sure ‘Replace Text as You Type’ is deselected, under the tab AutoCorrect.
Next, check your page layout. Margins should be ‘Normal’. That is ‘Top: 1″, Bottom: 1″, Left: 1″, Right: 1″‘. Ensure that the style selected is ‘Normal’ and that there are no Headers or Footers.
IMPORTANT: Save your document as a Word 97-2003 document (.doc). Firstly, this is what Smashwords file:///C|/Documents%20and%20Settings/RossHarrison/Desktop/gggf.htm (5 of 18) [20/03/2013 16:51:35]

Smashwords Formatting Guide | Nexuseses
accepts. Secondly (and less importantly), as I mentioned earlier, doing so slightly changes menus, so it’s best to do it now before you get confused.
Style ‘Normal’
Margins 1″
Now, in Notepad++, press Ctrl+A to select everything. Go to your new Word document and press Ctrl+V to paste it all in. It won’t look anything like you want it too, but it does look how it’s meant to, for now. Resist the urge to start clicking things and putting in tabs, etc. We will do all that shortly.
Restoring Your Thick Slanty Stuff:So now we’ll use special codey type things to undo what we did earlier with the italics, bold and underlines. We need to tell the find and replace utility that it needs to replace any text with ‘II’ tags with only that text, italicized. We’ll that like this:
1. Press Ctrl+H to open the find and replace window. Click More. Check the box Use Wildcards2. In the Replace box, type ‘\2′. This will be the same for all three.3. Now press Ctrl+I so that it says ‘Font: Italic’ under the Replace box. In the find box, type ‘(II)(*)(II)’. Press
Replace All4. Go back to the Replace box and press Ctrl+I until nothing is written under the box. Now press Ctrl+B
until it says ‘Font: Bold’ underneath5. In the Find box, replace the ‘II’ with ‘BB’. Press Replace All6. In the Replace box, press Ctrl+B until there’s nothing written under it. Now press Ctrl+U until it says
‘Underline’ beneath the box7. Surprise, surprise, you now need to replace the ‘BB’ in the Find box with ‘UU’. Press Replace All
file:///C|/Documents%20and%20Settings/RossHarrison/Desktop/gggf.htm (6 of 18) [20/03/2013 16:51:35]

Smashwords Formatting Guide | Nexuseses
Restoring Underline
Now all your italics, bolds and underlines should have been restored. Basically what we did with all that was tell it to find any text with ‘II’, ‘BB’ or ‘UU’ on either side and replace the whole thing with whatever that text is, and make it italic, bold or underlined, respectively. Check your manuscript to ensure it has worked properly.
A Note About Styles:We’re all used to using the toolbar at the top of Word to change font size and type, and underline, and justification and so on. But that isn’t how we’ll be doing it for Smashwords, or else it might not make it through the Meatgrinder. We’ll be defining Styles. We’ll also be keeping it simple so as to make sure that it doesn’t get spat back out of the Meatgrinder either badly converted, or telling you to do it again. As I said, I’m using Word 2007. Anyone using a different version may not be able to follow the steps as easily, but the same process applies. If this is the case, then you should just Google how to find and edit your styles.
The other thing I wanted to note is that this may cause some issues if you have to come back to it. I mentioned earlier how the TOC/NCX is optional. Well, I didn’t use one for either of my novels. Apple allowed the first one through, but rejected the second because it didn’t have one. So I went back into my Smashwords .doc file to insert one. I found that Word had helpfully got rid of most of the styles I had created for it. This doesn’t seem to happen to everyone, and even when I checked the file for my short story, the styles were all still there, so hopefully it won’t be a problem for you. But, just to be safe, I strongly recommend that from this point, you continue straight through to the end of your file creation without quitting Word. It probably won’t be an issue, and can be fairly easily rectified (it’s mostly time consuming), but it’s best to be safe.
Defining Your HeadersThis style will be applied to your title as well as your chapter headings (and other headings such as About the Author, etc). We will base it on the existing style Heading 2, as recommended by the Smashwords Style Guide.
This is how we define the style:
1. In the Styles section of the toolbar, there is a darker strip at the bottom. At the end of that strip is a little arrow. Click this for a new box titled ‘Styles’ to pop up
2. Hover your mouse over ‘Heading 2′ and an arrow will appear for a drop down box. Click it3. Click ‘Modify…’4. Make the following changes under the ‘Formatting’ heading (some may already be set):
�❍ Font: Times New Roman�❍ Font size: 14pt (Smashwords’ Style Guide recommends no larger than 16pt)�❍ Bold (and underlined, if you wish)�❍ Colour: Automatic (which is black)�❍ Align: Centre
file:///C|/Documents%20and%20Settings/RossHarrison/Desktop/gggf.htm (7 of 18) [20/03/2013 16:51:35]

Smashwords Formatting Guide | Nexuseses
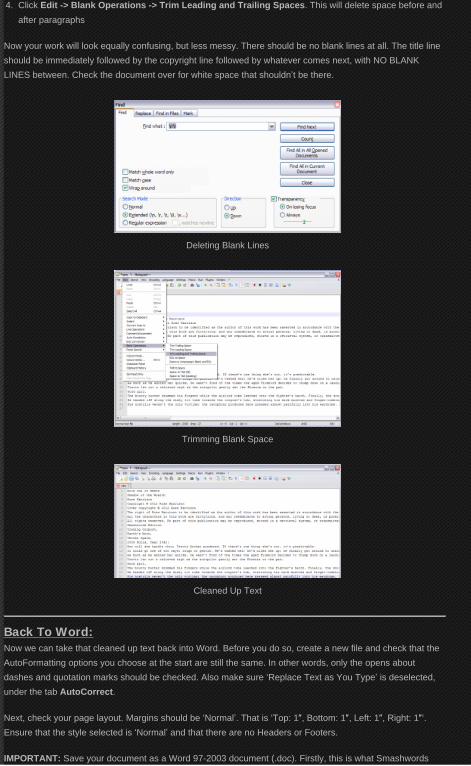
5. In the bottom left, click Format > Paragraph6. In the ‘Indents and Spacing’ tab, make the following adjustments:
�❍ Indentation – Left: 0″, Right: 0″�❍ Special – (none), By: leave blank�❍ Spacing – Before: 14pt, After: 14pt�❍ Line Spacing – Single, At: leave blank
7. Click OK8. You can leave the style’s name as ‘Heading 2′ if you want, or you can change it to something more
personalised, such as ‘My Headings’9. Click OK
Style Box
Modifying Heading 2
file:///C|/Documents%20and%20Settings/RossHarrison/Desktop/gggf.htm (8 of 18) [20/03/2013 16:51:35]
Smashwords Formatting Guide | Nexuseses
Paragraph Options
That’s the first style defined. Not hard. I actually created two Heading 2 styles, as I wanted my title to be slightly larger than the chapter headings, and I wanted those to be left aligned, not centred. If you want to do the same, then in the ‘Styles’ box from step 1, go right to the bottom and click on the left button showing two ‘A’s with what appears to be a little sun behind them. Then select ‘Heading 2′ beside ‘Style Based On’, give it an obvious name (like ‘My Title’) and then change your font size. We’ll be doing other styles by this method, so if that confused you, leave it until later.
Page Breaks:I’m putting this right after the headings style because we’ll edit that style for this, but I’m making it separate to ensure it doesn’t get buried in a mess of instructions. Apparently, simply pressing Ctrl+Enter will create a page break (i.e. force a new page) and will still get you through the Meatgrinder. You can do that if you want, but I like to make it a built in part of my heading style to make certain it works they way I want. NOTE: The guide I cited earlier says that the Meatgrinder gives the Ctrl+Enter method ‘erroneous errors’.
So if you’re not going to use the Ctrl+Enter method, do this:
1. Click the little arrow in the styles section again to bring up the Styles box. Go again to ‘Heading 2′ (or whatever you have renamed it) and bring down the drop down menu. Click Modify…
2. Again, click Format > Paragraph3. This time, go to the Line and Page Breaks tab4. Under the ‘Pagination’ heading, check the box ‘Page Break Before’5. Click OK and then OK again
This does not affect the first page, so if you apply this style to your title, it won’t give you a blank page before it. But from then on, it will put your Heading 2 text on a new page.
Defining A Centred Style:You may not need this, in which case, skip this section. You can use this style for the asterisks used for section breaks. Also apply it to the series name and author name on the title page, and copyright information.
Remember that I said not to set anything using the toolbar, so we need to define an entire style for centred text.
1. Click on the little arrow in the style section again.
file:///C|/Documents%20and%20Settings/RossHarrison/Desktop/gggf.htm (9 of 18) [20/03/2013 16:51:35]

Smashwords Formatting Guide | Nexuseses
2. Go to the bottom of the resulting styles box and click on the left hand button showing two ‘A’s with what looks like a sun behind them. If you hover the mouse over it, the tooltip will say ‘New Style’
3. Now make these changes, where needed: �❍ Give it a name, such as Centred (simply putting ‘My’ before any name will make sure you won’t get
confused about whether or not it’s one you created�❍ Style Type: Paragraph�❍ Style Based On: Normal�❍ Font: Times New Roman�❍ Font Size: 12pt�❍ Colour: Automatic�❍ Alignment: Centre
4. Now go to Format > Paragraph5. Under the Indents and Spacing tab, make the following changes:
�❍ Indentation – Left: 0″, Right: 0″�❍ Special – (None), By: leave blank�❍ Spacing – Before: 10pt, After: 10pt�❍ Line Spacing – Single, At: leave blank
6. Click OK and OK again
Creating A New Style
The one problem with this style is if you have a separate page for copyright information. Some people put it on the title page, but I have it separate. That means I have to create another style, identical to this one, but with the same ‘Page Break Before’ option as we did for the headings.
Defining Your Main Text Style:Now, the first line after any kind of break should not be indented. This means that we’ll need to create two styles: one for the first paragraph of each section and one for the rest of the text.
1. Click on the little arrow to bring up the Styles box2. Go to ‘Normal’, bring down the drop down menu and select Modify…3. Make these changes:
�❍ Rename to something like ‘First Paragraph’
file:///C|/Documents%20and%20Settings/RossHarrison/Desktop/gggf.htm (10 of 18) [20/03/2013 16:51:35]

Smashwords Formatting Guide | Nexuseses
�❍ Font: Times New Roman�❍ Font Size: 12pt�❍ Colour: Automatic�❍ Alignment: Left (not Justified)
4. Now go to Format > Paragraph5. In the Indents and Spacing tab, make these changes:
�❍ Indentation – Left: 0″, Right: 0″�❍ Special – (none), By: leave blank�❍ Spacing – Before: 0pt, After: 0pt�❍ Line Spacing – Single, At: leave blank
6. Click OK and then OK again
Creating A First Paragraph Style
That’s the style you’ll apply to the first paragraph of every chapter and after every break. For the rest of the text, do this:
1. Click on the little arrow to bring up the Styles box, then create a new style with the left hand button at the bottom
2. Rename this style something like ‘Main Text’3. Style Type: Paragraph4. Style Based On: Normal5. Set the rest of the options the same as we did in the previous style, with one difference:
�❍ Under the Indents and Spacing tab, go to the ‘Indentation’ heading�❍ Special – First Line, By: 0.25″
6. Click OK and then OK again
Style For Main Paragraphs
You now have a second style, almost identical to the last, except that the first line of every paragraph will be indented. You’ll apply this to every paragraph from the second of every section to the last.
file:///C|/Documents%20and%20Settings/RossHarrison/Desktop/gggf.htm (11 of 18) [20/03/2013 16:51:35]

Smashwords Formatting Guide | Nexuseses
Applying Your Styles:Now it’s time to apply all these styles you’ve created. Remember to be careful not to slip into the familiar use of the toolbar at the top to change fonts and so on. Only do this through styles. Also remember to use only the styles that you have created/modified. You can create as many as you want, but the more fancy you make them, the less I can guarantee the manuscript will make it through the Meatgrinder.
NOTE: A helpful thing to know/remember is that if you want to force your text onto a new line, you can use Shift+Enter. For example, I set my copyright style to make a page break before, so that it wouldn’t be on the title page. That meant, however, that each line was on a separate page. That was easily fixed by deleting the line break I’d created by pressing Enter the first time I wrote it, and instead pressing Shift+Enter. On the surface, it appears to do the same thing, but when I apply my style to the whole of the copyright information this time, it all stays on the one page.
These are the styles I used for the different parts of my own books:
● Title: A slightly larged fonted version of Heading 2 (which I imaginatively named ‘My Title’)● Author and series name (directly under the title): Centred● Copyright information: A style identical to ‘Centred’, but with a page break before● Author’s Note: Main Text● Chapter headings: Heading 2● First paragraph of every section (in new chapters and after section breaks): First Paragraph● All other paragraphs: Main Text● Section breaks: Centred
This is pretty time consuming, but take your time and make sure everything looks the way you want it to.
Table of Contents (NCX):Supposedly, Smashwords generates a NCX itself based on what you applied the Heading 2 style to. It did not do this for any of my three works, but it occurs to me as I type that this may be because I renamed the style. But it doesn’t matter because apparently, it’s a bit unreliable.
I’ll point out here that the NCX is the Smashwords table of contents, rather than your own table of contents, but I’ve shoved the terms together in case you’re looking for the term NCX.
According to the blog cited earlier, the .mobi file has a problem with doing the Table of Contents the way we’ll be doing it. It works fine, but when a link is used from the ToC, the chapter heading is put into the ‘normal’ style. It’s not a big problem, so it’s up to you. Either put up with that little problem, or don’t put in a ToC and have your book rejected by Apple.
So you should already have in the text for the Table of Contents (title page included). I’ll show you what my ToC looks like. As I said before, I have abnormal chaptering: the ToC would have been far too long, and it would have made no sense to anyone. A Smashwords member of staff suggested that I make a very simple one, like this:
file:///C|/Documents%20and%20Settings/RossHarrison/Desktop/gggf.htm (12 of 18) [20/03/2013 16:51:35]

Smashwords Formatting Guide | Nexuseses
Very Simple ToC
Like I said, very simple, but acceptable to Apple. So once you’ve got the text of your ToC laid out, do the following:
1. Apply the style Heading 2 (or whatever you’ve renamed it as) to the heading2. Go to the first place your ToC will link to (the title)3. Click somewhere in the title text and then go up to the Insert tab, then in the ‘Links’ section, about
halfway across the toolbar, click Bookmark (If you’re not using Word 2007 or later, then you just go to Insert > Bookmark…
4. Check the box Hidden Bookmarks at the bottom of the new window. Delete anything that is there5. Name your bookmark. It could be anything, but I named them to correspond to whatever was in the ToC
text (‘Title’, in this case)6. Click Add7. Do the same for everywhere the ToC points to8. Go to the ToC text9. Highlight the first entry (‘Title’, presumably)
10. Press Ctrl+K to bring up the Insert Hyperlink window11. On the left hand side, click Place In This Document12. In the central box, you’ll see your bookmarks. Select the corresponding one and click OK13. Repeat for every entry in the ToC
Inserting Bookmarks
file:///C|/Documents%20and%20Settings/RossHarrison/Desktop/gggf.htm (13 of 18) [20/03/2013 16:51:35]

Smashwords Formatting Guide | Nexuseses
Ctrl+K To Insert Hyperlinks
You can now test that the ToC entries all link to the correct place by holding Ctrl and clicking on each one.
NOTE: If for any reason you want external hyperlinks, perhaps to somwhere where all of your books can be purchased, use the same Ctrl+K method, except that you’ll click on Existing File or Webpage on the far left, and simply type in the address at the bottom (the full address, including ‘http://‘). If it is an
email address, type ‘mailto:’ followed by the address.
Adding ImagesThe last thing this guide will cover is adding images to your file. Generally, fiction won’t have any images, but perhaps you’ve written an epic fantasy tome and need a detailed map of the realm/s inserted. Or a photo for the About the Author page. NOTE: Bear in mind that there is no need to add your cover, as it will automatically be put into the front of the file the reader downloads. Also bear in mind that most e-readers are black and white.
For photographs, use JPEG (.jpg) format. For anything else, use PNG. The last time I checked, these were the only formats Smashwords accepts. Also last I checked, Smashwords does not allow for text wrapping.
1. Click the Insert tab, and then click on Picture2. Select your image and click Insert3. Select your image and apply one of the styles we created earlier to it (it doesn’t matter which, but it must
have one of these applied)4. Adjust your image to get the right size, etc5. With the image still selected, go to the Format tab and click on Text Wrapping6. Make sure it says ‘In Line With Text’, or the Meatgrinder will reject it7. Arrange your image and text so that it looks presentable despite the flaw of being unable to wrap text
Inserting An Image
file:///C|/Documents%20and%20Settings/RossHarrison/Desktop/gggf.htm (14 of 18) [20/03/2013 16:51:35]

Smashwords Formatting Guide | Nexuseses
Adjusting and (not) Wrapping
Now, something else to consider with images is size. Smashwords allows a limit of 5mb for images in the file. That isn’t much for an image. The example I used in the screenshots is just over 1mb. So we need to compress the image.
Note that if you have not saved your document as a Word 97-2003 document, what you see when you click ‘Compress Pictures’ will be different. But you should have done that right at the start, so it’s your own fault!
1. With your image still selected, go to the top left of the Format tab and click Compress Pictures2. Set the following:
�❍ All Pictures in Document�❍ Web/Screen�❍ Check the box ‘Compress Pictures’�❍ Check the box ‘Delete Cropped Areas Of Pictures’
3. Click OK
Compressing Images
And that is that. If you have any questions, or think I’ve missed anything, leave a comment. I hope this has helped!
Spread the word: ● Press This ● Twitter ● Facebook ● More ●
Like this:Like
file:///C|/Documents%20and%20Settings/RossHarrison/Desktop/gggf.htm (15 of 18) [20/03/2013 16:51:35]