Smartphone Monitor Software - Welcome VACRON of … Monit… · Smartphone Monitor Software...
32
Smartphone Monitor Software Installation & Operation Manual Support System: iPhone / Android / BlackBerry 2013 JAN V2.0
Transcript of Smartphone Monitor Software - Welcome VACRON of … Monit… · Smartphone Monitor Software...

Smartphone
Monitor Software
Installation & Operation
Manual
Support System:
iPhone / Android / BlackBerry
2013 JAN V2.0

Smartphone Monitor Software Installation & Operation Manual
ii
Bibliography
A. iPhone VacronViewer ............................................................... 1
1. Installation Procedure ............................................................ 1
2. Operation Procedure ............................................................. 3
B. Android VacronViewer ............................................................ 14
1. Installation Procedure .......................................................... 14
2. Operation Procedure ........................................................... 16
C. BlackBerry VacronViewer ....................................................... 28
1. Installation Procedure .......................................................... 28
2. Operation Procedure ........................................................... 30
Smartphone Monitor Software Installation & Operation Manual
1
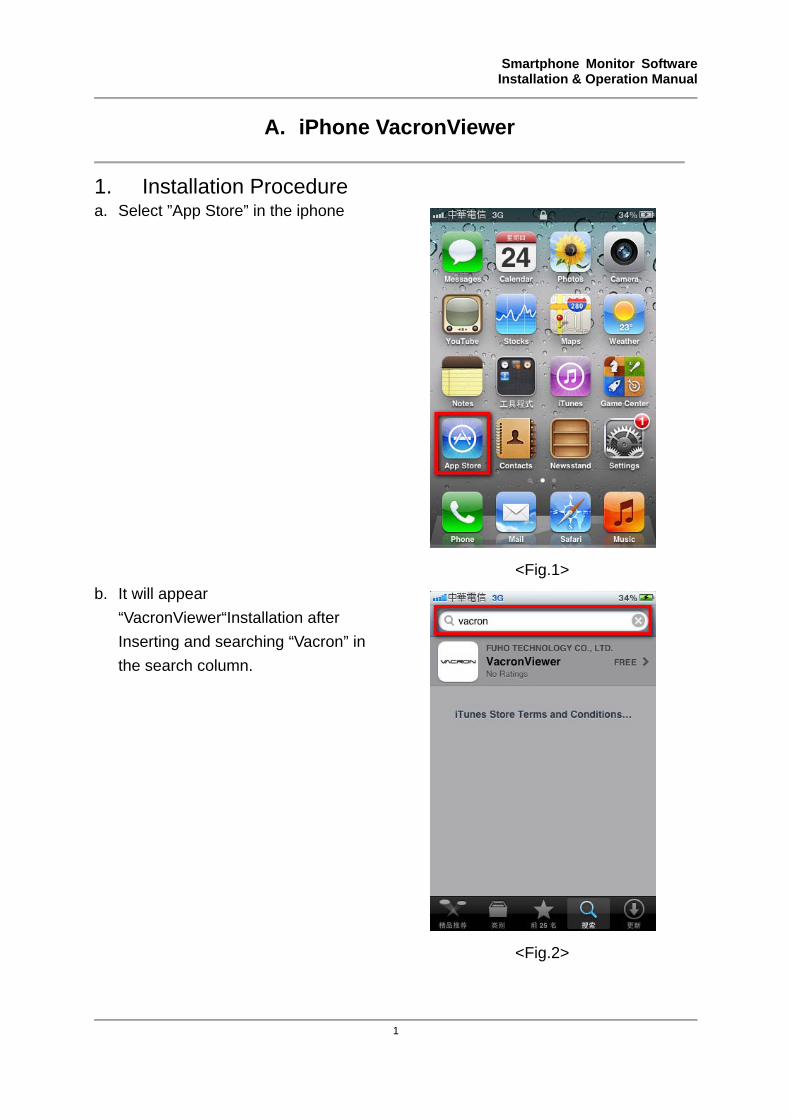
A. iPhone VacronViewer
1. Installation Procedure a. Select ”App Store” in the iphone
<Fig.1>
b. It will appear
“VacronViewer“Installation after
Inserting and searching “Vacron” in
the search column.
<Fig.2>

Smartphone Monitor Software Installation & Operation Manual
2
c. It will start installing after “Installation”
is selected.
<Fig.3>
d. It will request users to insert Apple ID as first time installation. It will directly
proceed to install process if users have already done installation before. (Fig.4 &
5)
<Fig.4>
<Fig.5>
Smartphone Monitor Software Installation & Operation Manual
3
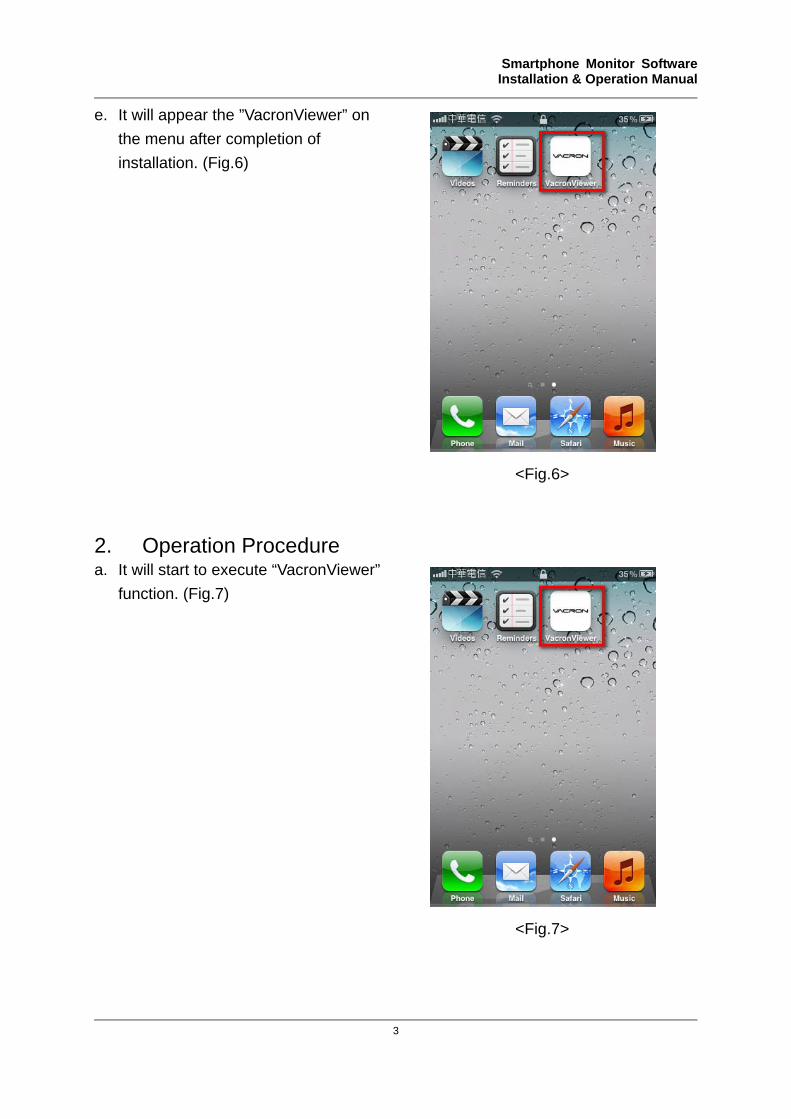
e. It will appear the ”VacronViewer” on
the menu after completion of
installation. (Fig.6)
<Fig.6>
2. Operation Procedure a. It will start to execute “VacronViewer”
function. (Fig.7)
<Fig.7>

Smartphone Monitor Software Installation & Operation Manual
4
b. Device information set up
1. :Create or manage
device information and setting in the
device list.(Fig.8)
2. :it can create new device
information when”+” is selected.
<Fig.8> c. Create DVR4 / 8CH(DVR) device instruction
1. Device Name: It can be set up device name regarding to users’ request.
2. Device location: Insert “DVR IP” or “Domain Name”
3. Media Port: Insert DVR Media Port ; preset value:9000。
4. CMD Port: Insert DVR command port ; preset value: 8000.
5. User Name: Insert DVR setting User Name.
6. Password: Insert DVR setting password.
7. Done: It will save all the setting when selecting it.(Fig.9)
8. Device list: it will return back to device list page when selecting it. (Fig.10)

Smartphone Monitor Software Installation & Operation Manual
5
<Fig. 9>
<Fig. 10>
d. Create Vehicle(Vehicle DVR)device
instruction
1.Device Name: It can be set up device name
regarding to users’ request.
2. Device location: Insert “3G Server IP” or “Domain
Name”
(Example: 3G Server Domain Name
taipei3g.mobilekore.com).
3. Media Port: Insert Vehicle Media Port; preset
value: 24680.
4. CMD Port: Insert Vehicle command port ; preset
value: 24681.
5. User Name: Insert 3G Server setting User Name
(Example: Demo bus).
6. Password: Insert 3G Server setting password
(Example: Demo 123456).
7. Bus code: Insert Mobile DVR setting code.
8.Done: It will save all the setting when selecting
it.(Fig.11)
<Fig. 11>

Smartphone Monitor Software Installation & Operation Manual
6
e. Create IP CAM(TI Series) device
instruction
1. Device Name: It can be set up device name
regarding to users’ request.
2. Device location: Insert “IP CAM IP” or “Domain
Name”
3. Media Port: Insert IP CAM Media Port ; preset
value:80。
4. CMD Port: Insert IP CAM command port; preset
value: 80.
5. User Name: Insert IP CAM setting User Name,
preset value: admin.
6. Password: Insert IP CAM setting password, preset
value: 9999.
7. Done: It will save all the setting when selecting it.
8. Device list: it will return back to the device list page
when selecting it. (Fig.12)
<Fig. 12>
f. It can be edited the original device setting values when select “red circle”
sign.(Fig.13)
1. :It will save the device setting information when it is selected. (Fig. 14)
2. :Delete device setting information. (Fig. 14)
<Fig. 13>
<Fig. 14>

Smartphone Monitor Software Installation & Operation Manual
7
g. :It will appear all channels when “Live views” is selected. (Fig. 16)
<Fig. 15>
<Fig. 16>

Smartphone Monitor Software Installation & Operation Manual
8
h. Function appearance (Fig.17):
1. Appearance:It will be individual channel when double click on a channel and it will
start recording snapshot or PTZ setting as blue appearance around the channel.
2. Keypad area :It will proceed to PTZ control panel area as left sliding the keypad
(Fig.18) and it will be back DVR area as right sliding the keypad.
<Fig. 17>
<Fig. 18>
<Fig. 19>

Smartphone Monitor Software Installation & Operation Manual
9
PTZ Function:
It needs to set up the PTZ preset points on DVR side in advance.
1. :Control PTZ direction。
2. :the PTZ will perform the auto-patrol in 360° when it is selected.
3. :It can select 1~16 preset points and PTZ will start processing according to
the setting preset points in the DVR. (Fig. 19)
4. :It can control PTZ speed.
5. :It can adjust zoom in or out when or is selected.
6. :Focal length can be adjusted when or is selected.
7. :Aperture can be adjusted when & is selected.

Smartphone Monitor Software Installation & Operation Manual
10
f. Split Screen
It will appear all channel status for monitoring when is selected.
It will appear the quad display when or is selected.
Users can slide screen or select keypad for channel monitoring. (Fig.17 & 20
& 21)
<Fig. 20>
<Fig. 21>
It can select individual channel by channel when or is selected and it can have cycle screen monitor by sliding cell phone screen. (Fig.22)
It can take picture when is selected. (Fig.21)
It will start recording when is selected. (Fig.23)

Smartphone Monitor Software Installation & Operation Manual
11
<Fig. 22>
<Fig. 23>
g. Stored Data
Users can check all the recording and pictures data in the . (Fig.24)
<Fig. 24>
<Fig. 25>

Smartphone Monitor Software Installation & Operation Manual
12
Users can see the pictures data when “Picture data” is selected. (Fig.25 &
26)
Users can see the recording data when “Recording data” is selected. (Fig.25
& 27)
<Fig. 26>
<Fig. 27>
1. :It can edit the stored data after clicking to appear the sign .
(Fig.28)
2. Users can delete the stored data when is selected. (Fig. 29)
3. :Users can delete all the store data when “Clear All” is selected. (Fig.
29)
4. :It will return back to the stored data screen when “Complete” is
selected. (Fig. 29)

Smartphone Monitor Software Installation & Operation Manual
13
<Fig. 28>
<Fig. 29>
h. :It will show out Vacronviewer version. (Fig. 30 & 31)
<Fig. 30>
<Fig. 31>

Smartphone Monitor Software Installation & Operation Manual
14
B. Android VacronViewer
1. Installation Procedure a. Select “Play Store” on the manual of
cell phone. (Fig. 1)
<Fig.1>
b. It will appears “VacronViewer”
after keying in and searching
“Vacron” in the search
column.
(Fig. 2)

Smartphone Monitor Software Installation & Operation Manual
15
<Fig. 2>
c. It will appear free installation
instruction after selecting
“VacronViewer”. (Fig. 3)
<Fig. 3>
d. It will start downloading after
selecting “Accept and
Download”. (Fig. 4)
<Fig. 4>

Smartphone Monitor Software Installation & Operation Manual
16
e. It will appear ”VacronViewer”
sign after completion of
download process. (Fig. 5)
<Fig. 5>
2. Operation Procedure
a. It will start executing function
after selecting “VacronViewer”.
(Fig. 6)
Smartphone Monitor Software Installation & Operation Manual
17
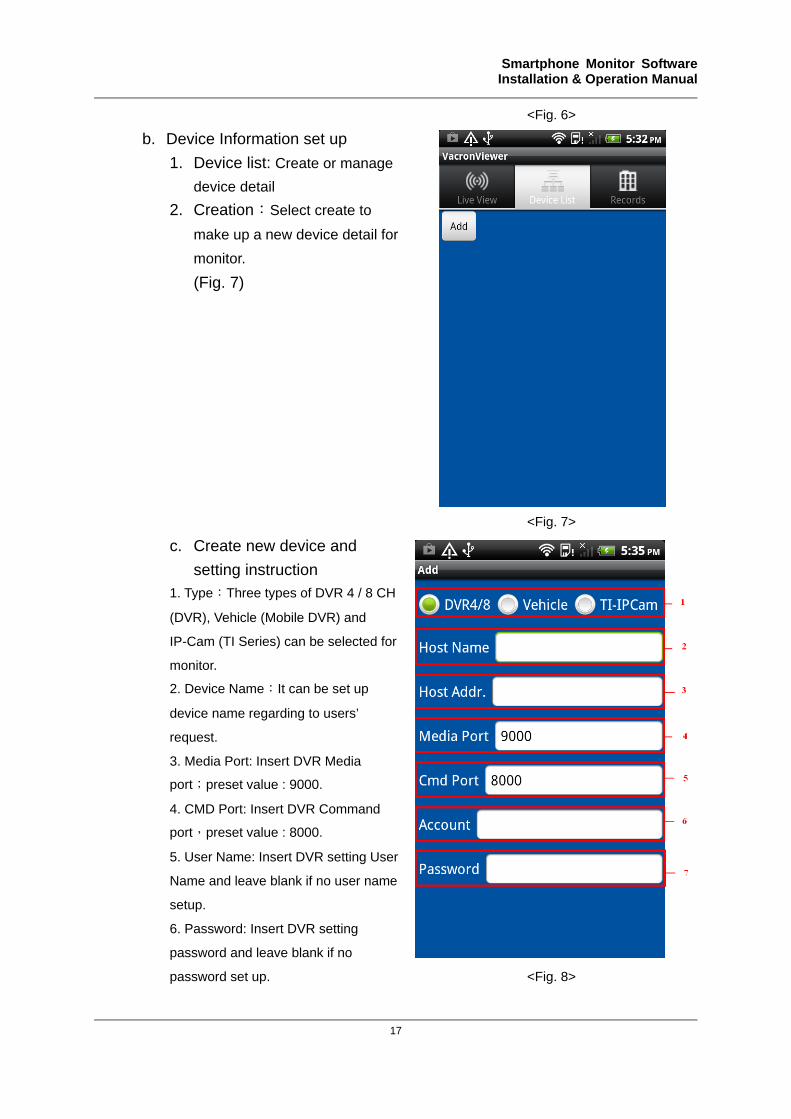
<Fig. 6>
b. Device Information set up
1. Device list: Create or manage
device detail
2. Creation:Select create to
make up a new device detail for
monitor.
(Fig. 7)
<Fig. 7>
c. Create new device and
setting instruction
1. Type:Three types of DVR 4 / 8 CH
(DVR), Vehicle (Mobile DVR) and
IP-Cam (TI Series) can be selected for
monitor.
2. Device Name:It can be set up
device name regarding to users’
request.
3. Media Port: Insert DVR Media
port;preset value : 9000.
4. CMD Port: Insert DVR Command
port,preset value : 8000.
5. User Name: Insert DVR setting User
Name and leave blank if no user name
setup.
6. Password: Insert DVR setting
password and leave blank if no
password set up. <Fig. 8>

Smartphone Monitor Software Installation & Operation Manual
18
d. Create Vehicle(MOBILE DVR)
device Instruction:
1. Device Name: It can be set up device
name regarding to users’ request.
2. Device location: Insert “3G Server IP” or
“Domain Name”
(Example: 3G Server Domain Name
taipei3g.mobilekore.com).
3. Media Port: Insert Vehicle Media Port;
preset value: 24680.
4. CMD Port: Insert Vehicle command port ;
preset value: 24681.
5. User Name: Insert 3G Server setting
User Name (Example: Demo bus).
6. Password: Insert 3G Server setting
password (Example: Demo 123456).
7. Bus code: Insert Mobile DVR setting
code.
<Fig. 9>
The creation of device is done after all parameters set up and select “Back to
menu” function on the cell phone. e. Create IP Cam(TI Serious)
device Instruction: 1. Device Name: It can be set up device name regarding to users’ request. 2. Device location: Insert “IP-Cam IP” or “Domain Name” 3. Media Port: Insert IP-Cam Media Port ; preset value:80。 4. CMD Port: Insert IP-Cam command port; preset value: 80. 5. User Name: Insert IP-Cam setting User Name; preset value: admin. 6. Password: Insert IP-Cam setting password;Preset value: 9999. The creation of device is done after all parameters set up and select “Back to menu” function on the cell phone.
<Fig. 10>
ipcam
192.168.0.201
admin
‧‧‧‧

Smartphone Monitor Software Installation & Operation Manual
19
f. It can be edited from the original
device setting values when
select “red circle” sign. (Fig.11)
<Fig. 11>
g. The creation of device is done
after all parameters set up and
select “Back to menu” function
on the cell phone.
<Fig. 12>

Smartphone Monitor Software Installation & Operation Manual
20
h. It will appear after ticking on (Fig.13) and users can select whether delete (Fig.14) the device setting.
<Fig.13>
<Fig.14>
i. -It will have channel selection for users when “CHANNEL ALL(red circle)” is
selected. (Fig.15)
-Users can select “ALL channel”、”Quad screen(1,2,3,4)”、”Quad
screen(5,6,7,8)”、”Individual channel”. (Fig.16)
-Once”Quad screen” is set up, users can monitor”Quad by Quad screen” by sliding
cell phone screen.
-Once”Individual channel” is set up, users can monitor”One by One channel” by
sliding cell phone screen.

Smartphone Monitor Software Installation & Operation Manual
21
<Fig.15>
<Fig.16>
j. Reconnection: Connection will
re-connect when
“Reconnection” is chosen. (Fig.
17)
<Fig.17>

Smartphone Monitor Software Installation & Operation Manual
22
k. Screen Capture: Users can
capture screen by selecting the
individual channel and it will
appear green circle around the
channel. Double click on one
channel in the all channel
screen, it will change to
individual channel and it can
capture the screen when
“Capture” is selected. It will
change to all channel status
after double click on the
screen. <Fig.18>
<Fig.18>
l. -Click on the individual channel, it will appear green circle on the channel and
it will start recording when “RECORDING” is chosen. (Fig.19)
-Double click on the individual screen; it will change to all channel status. (Fig.20)
<Fig.19>
<Fig.20>

Smartphone Monitor Software Installation & Operation Manual
23
m. PTZ: It will appear PTZ control panel when “PTZ” is selected and it shows PTZ
function process when the channel is around green light.
P.S. PTZ setting should be done in advance in DVR side before using this function
in Vacronviewer. (Fig.21 & 22)
<Fig.21>
<Fig.22>
<Fig.23>

Smartphone Monitor Software Installation & Operation Manual
24
PTZ Function:
1. :Control PTZ direction.
2. :PTZ will start auto-patrol in 360° rotation.
3. :It needs to set up the PTZ preset points in DVR side and when
select “Preset 1”, it will appear preset list for chosen in the screen
appearance. PTZ will go for the preset point that is chosen in the “Preset
point”. (Fig.23)
4. :Zoom in or out when or is selected.
5. :Focal length can be adjusted when or is
selected.
6. :Aperture can be adjusted when or is
selected.
7. :Back to “Control Panel” page. (Fig.21)

Smartphone Monitor Software Installation & Operation Manual
25
n. :Users can check in the
stored capture picture or recording
data when “Store Record” is
selected. (Fig. 24)
<Fig.24>
o. It will appear after ticking on and users can select whether
delete records. (Fig. 25 & 26)
<Fig.25>
<Fig.26>

Smartphone Monitor Software Installation & Operation Manual
26
p. It will show up capture picture. (Fig.27 & 28)
<Fig.27>
<Fig.28>
q. It will appear and start playing the recording data. (Fig.29 & 30)
<Fig.29>
<Fig.30>

Smartphone Monitor Software Installation & Operation Manual
27
r. :It will show out Vacronviewer version type when it is selected.(Figure. 31
&32)
<Fig.31>
<Fig.32>
s. :It will appear the exit confirmation when it is selected. (Fig. 33 & 34).
<Fig.33>
<Fig.34>

Smartphone Monitor Software Installation & Operation Manual
28
C. BlackBerry VacronViewer
1. Installation Procedure a. Select ”BlackBerry App World”.
(Fig.1)
<Fig.1>
b. Insert ”vacron” in the search
column. (Fig.2)
<Fig.2>

Smartphone Monitor Software Installation & Operation Manual
29
c. It will appear “Download”
instruction. (Fig.3)
<Fig.3>
d. It will start installing after
“Download” is selected. (Fig.4)
<Fig.4>
e. It will appear the Vacronviwer sign
on the menu after installation
process. (Fig.5)
<Fig.5>

Smartphone Monitor Software Installation & Operation Manual
30
2. Operation Procedure a. It will execute ”VacronViewer”
function after selecting on it.
(Fig.6)
<Fig.6>
b. It will appear the device setting screen after selecting “Vacronviewer”. (Fig.7)
1.Host:Insert DVR “IP” or “Domain Name”. 2.Port:Insert the DVR media port and the preset setting : 9000。
3.Account:Insert the DVR setting user name. 4.Password:Insert the DVR setting password. 5.Connect:Access to monitoring page. 6.Exit:Leave APP function.
<Fig.7>
c. Users can select channel for
monitor (from CH1 to CH 8).
(Fig.8)
<Fig.8>