Smart Search - Square 9 · Square 9 Softworks Inc. · 127 Church ... [email protected] ....
40
Square 9 Softworks Inc. · 127 Church Street · New Haven, CT 06510 (+1) 203-789-0889 email: [email protected] SmartSearch Server and Client Installation Guide v4.4 127 Church Street, New Haven, CT 06510 O: (203) 789-0889 | E: [email protected] www.square-9.com
-
Upload
truongkhanh -
Category
Documents
-
view
219 -
download
1
Transcript of Smart Search - Square 9 · Square 9 Softworks Inc. · 127 Church ... [email protected] ....

Square 9 Softworks Inc. · 127 Church Street · New Haven, CT 06510 (+1) 203-789-0889 email: [email protected]
SmartSearch Server and Client Installation Guide v4.4
127 Church Street, New Haven, CT 06510 O: (203) 789-0889 | E: [email protected] www.square-9.com


Square 9 Softworks Inc. · 127 Church Street · New Haven, CT 06510 (+1) 203-789-0889 email: [email protected]
Square 9 SmartSearch Server and Client Installation Guide Version 4.4 Copyrights, Legal Notices, Trademarks, and Servicemarks © Copyright 2016 Square 9® Softworks – All rights reserved. No part of this work may be reproduced or transmitted in any form or by any means whatsoever, without written permission of Square 9 Softworks unless such copying is expressly permitted by Federal copyright law. For information regarding permissions, contact: Square 9 Softworks Inc., 127 Church Street, New Haven, CT 06510, USA, [email protected]. July, 2016 edition Publication subject to change without notice, Square 9 Softworks assumes no liability for any damages incurred directly or indirectly from errors, omissions, or discrepancies between the actual software you install and/or the contents of this publication or any other accompanying publication. GlobalSearch, GlobalCapture, and GlobalAction are registered trademarks of Square 9 Softworks. All other products and devices listed in this document are trademarks or registered trademarks of their respective companies and are hereby acknowledged. Microsoft, Windows, Server 2008, Server 2012, SQL 2012 Express, Exchange, and SharePoint are trademarks and service marks of Microsoft, Inc., registered in the United States and other countries, and are the property of Microsoft, Inc. Flexera and InstallShield are trademarks and service marks of Flexera Software, LLC, registered in the United States and other countries, and are the property of Flexera Software, LLC.


SmartSearch Client and Server Installation Guide Table of Contents i
Table of Contents
Server Prerequisite Configuration .................................................................................................................. 5
Windows 7/8/8.1/10 Pro Prerequisites Configuration.............................................................................................. 5 Windows Server 2008/2008 R2/2012/2012 R2 Prerequisites Configuration .......................................................... 6
Server Installation .......................................................................................................................................... 11
SmartSearch Media Extraction .................................................................................................................................. 11 SmartSearch Installation ............................................................................................................................................ 11
Installation Wizard ............................................................................................................................................................................................. 11
License Agreement ............................................................................................................................................................................................ 12
Installation Type .................................................................................................................................................................................................. 13
Authentication Configuration ........................................................................................................................................................................ 13
Setup Type ............................................................................................................................................................................................................ 14
Database Type ..................................................................................................................................................................................................... 16
Web Service Location ....................................................................................................................................................................................... 18
SmartSearch Installation .................................................................................................................................................................................. 19
Additional GlobalCapture Engine Instances ............................................................................................................. 24
Client Installation ........................................................................................................................................... 27
Installation Wizard ..................................................................................................................................................... 27 License Agreement ..................................................................................................................................................... 28 Customer Information ............................................................................................................................................... 29 Custom Setup.............................................................................................................................................................. 29 Install SmartSearch Client .......................................................................................................................................... 30 SmartSearch ................................................................................................................................................................ 31
Post-Installation Requirements .................................................................................................................... 33
SmartSearch Server Registration .............................................................................................................................. 33 Register from Desktop Client ........................................................................................................................................................................ 33
Register from Web Client ................................................................................................................................................................................ 34
Common Server Configurations ................................................................................................................... 35
Services and Database on a Single Server ................................................................................................................ 35 SmartSearch with a Separate SQL Server ................................................................................................................. 35 SmartSearch with Separate Network File Storage and Database Servers ............................................................. 35 SmartSearch with Multiple Application Servers ...................................................................................................... 36


SmartSearch Client and Server Installation Guide How to Use this Guide iii
How to Use This Guide
Purpose
The SmartSearch® Client and Server Installation Guide provides instructions for installing your SmartSearch application. It outlines recommendations for the average deployment scenario. Your needs may vary depending on number of users, capture volume, workflows and capture requirements. This guide will help perform the following tasks:
• Identify prerequisites for installing SmartSearch • Install the Global Suite of Products core applications SmartSearch and GlobalSearch.
Audience
SmartSearch/GlobalSearch administrators should read this guide to understand how to do server and client installations.
Organization
This guide is organized into four chapters as follows:
• Chapter 1, Server Prerequisite Configuration, an explanation of the prerequisites before installing on servers.
• Chapter 2, Server Installation, instructions for installing SmartSearch on servers. • Chapter 3, Client Installation, instructions for installing SmartSearch on client machines. • Chapter 4, Post-Installation Requirements, instructions on registering your application.
For software requirements, please refer to the Square 9 website.
Conventions Used in this Guide
Icons
Name Icon Description
Behind the Scenes Highlights technical information useful to administrators and installers
Business Case Calls attention to specific examples which demonstrate how features can be used to address business needs
CAUTION Highlights important information to know to avoid situations that could potentially cause a loss of data or configuration, or could impact performance, functionality, or successful implementation
Example Highlights examples of settings for typical business uses
Note Highlights information of interest or important information needed to successfully accomplish a task or understand a procedure
Tip Highlights techniques, shortcuts, or productivity tips
Troubleshooting Highlights information or references troubleshooting resources that might prove helpful in solving a problem

iv How to Use this Guide SmartSearch Client and Server Installation Guide
Typographic Conventions
Convention Description
Bold Highlights interface items such as menus, dialog boxes, settings, and options and highlights text that must be entered exactly as shown
Italics Emphasizes text or indicates a placeholder variable which the user should replace with a specific word or symbol
Underlined Blue Points out URL links to external web pages or documents
Fixed Width Font Used for filenames, Windows folder paths, URLs, code samples, and system text
SMALL CAPITAL LETTERS Indicates keyboard keys, such as CTRL+C, ENTER, DELETE, or TAB
Writing Conventions
Convention Description
<Username> Angle brackets enclosing a word or phrase in italics indicates that information must be entered specific to the installation, configuration, or system. For example, <Username> means to enter a specific username in the indicated field
> Indicates the need to select an item from a menu. For example, File > Save
Initial Caps Indicates the item referenced is particular to SmartSearch or a Square 9 product or feature. For example, the Index Fields selected when creating an Archive
• Bullet A dot-shaped bullet indicates an unordered list, which in a procedure indicates either a procedure which is only one step long or a step or steps which may or may not need to be taken and in no particular order.
Bullet An arrowhead bullet indicates information closely related to a step in a procedure.
Help and Support
Support Other Resources Phone: 203-890-0889, option 2 Forums: forums.square-9.com Email: [email protected] Square 9 classes: [email protected]

SmartSearch Client and Server Installation Guide Server Installation 5
Server Prerequisite Configuration SmartSearch is a next-generation document management software that runs on the Microsoft® .NET platform. It is fully supported in both virtual or physical environments and runs on Windows Professional and Server Operating systems. SmartSearch uses Microsoft SQL Server® for its database backend and IIS (Internet Information Services) to communicate to its clients.
Regarding Updating SmartSearch If you plan on upgrading SmartSearch from a version previous to 4.2, you must be on version 4.1.1 before upgrading. For questions regarding the upgrade process for SmartSearch, please reference the SmartSearch Upgrade Guide. Documentation regarding SmartSearch, which can be found on our forums (http://forums.square-9.com).
Prior to installing SmartSearch, you will need to install both Microsoft Internet Information Server (IIS) and Message Queuing on your system.
Windows 7/8/8.1/10 Pro Prerequisites Configuration To install IIS and Message Queueing on a compatible Windows operating system, you will need to follow the steps below:
1. To configure IIS and Messaging Queueing on a compatible Windows operating system, open the Control Panel. You may be prompted to insert the Windows Installation CD to install these features.
2. Select Programs. 3. In Programs, in the Programs and Features group, select Turn Windows Features on or off. 4. In the Windows Features window, enable the following system prerequisites:
• Microsoft .NET Framework (3.5 and higher). Microsoft .NET 4.5.2 or higher is required to install SmartSearch v4.4. Windows 10 should
already have .NET 4.6 installed; there is no need to install .NET 4.5.2 in that case. • In Internet Information Services > World Wide Web Services:
• Expand Application Development Features and enable the following: o .NET Extensibility o ASP.NET
• Expand Common HTTP Features and enable the following: o Default Document o Directory Browsing o Static Content
• Expand Security and enable the following o Basic Authentication o Windows Authentication
5. To begin installing or enabling the prerequisites, click OK. This may require you to reboot the computer to complete the process.

6 Server Installation SmartSearch Client and Server Installation Guide
Windows Server 2008/2008 R2/2012/2012 R2 Prerequisites Configuration
1. To enable IIS and Message Queuing on a compatible Windows server operating system, open the Control Panel.
2. Select Programs. 3. In Programs, in the Programs and Features group, select Turn Windows Features on or off. Once selected, Server Manager will launch, then after a moment, Add Windows Features will
launch.
Server Manager
4. If the Add Roles and Features Wizard doesn’t appear, click Manage. 5. Click Add Roles and Features.
Server Manager Mange Menu
6. When the Add Roles and Features Wizard opens, click Next.

SmartSearch Client and Server Installation Guide Server Installation 7
Add Roles and Features
7. In Installation Type, select Role-based or feature-based Installation in Installation Type to
configuring a single server by adding roles or features to it.
Role-Based or Feature-Based Installation
8. In Server Selection, select the server (this should be the local machine).

8 Server Installation SmartSearch Client and Server Installation Guide
Server Selection
9. Click Next. 10. In Server Roles, select Web Server (IIS). 11. Once that is selected there is a chance that a window will open with a message about installing other
required features. Click OK to return to the Installation Wizard.
Server Roles
12. With Web Server (IIS) selected, click Next.
Web Server IIS

SmartSearch Client and Server Installation Guide Server Installation 9
13. If they are not already selected, In Features, select the following features: • .NET Framework (3.5 and higher) • Message Queueing Triggers • If you have selected a checkbox and another window appears, select Add Features.
14. Click Next.
Add Features
15. In Role Services, install the IIS Role Services and install the following: • Expand Common HTTP Features and enable the following:
• Default Document • Directory Browsing • Static Content
• Expand Security and enable the following: • Basic Authentication • Windows Authentication
• Expand Application Development and enable the following: • .NET Extensibility (3.5 and higher) • ASP.NET (3.5 and higher)

10 Server Installation SmartSearch Client and Server Installation Guide
IIS Role Services
16. Once the Services are selected, click Next. 17. In Confirmation, make sure that all the SmartSearch prerequisites have been selected, and then
click Install.
Confirmation of Installation

SmartSearch Client and Server Installation Guide Server Installation 11
Server Installation SmartSearch is distributed through download links. These links can be obtained from the Square 9 Softworks Fulfillment department by contacting them at:
Phone – 203.789.0889 Option 1 Email – [email protected]
Once the link is sent, it is valid for seven days. Download the self-extracting installation media to a folder of your choice. Prior to the installation of SmartSearch, the logged in account that will perform the installation must have the correct network permissions. • If you’re installing onto a Domain, you will need to ensure that the user you are logged into the system
as has the ability to create users on the Active Directory and to create databases within SQL Server. It is recommended that you use a “Domain Admin” during the initial install.
• If you’re doing a local installation, you must be logged into the system as an Administrator.
SmartSearch Media Extraction 1. Once the installation media has been downloaded, double-click on it to run the self-extractor. 2. In the SmartSearch Self-Extractor window, select the location you want the files to go in Select
extraction path. 3. Click OK to proceed with the extraction. This may take some time. If the extraction errors out, it is possible that the download has been
corrupted. If so, it will need to be downloaded again. 4. Once it has been extracted, proceed to the SmartSearch installation.
SmartSearch Installation
Installation Wizard 1. To start the Installation Wizard for SmartSearch, from your installation media, navigate to the AIO
directory, expand this directory, right-click on setup.exe and select Run as Administrator. It’s possible that the C++ Redistributables will need to be installed before running the
Installation Wizard. If you are missing any prerequisites, an error message will appear listing the missing items.
2. To install any listed missing elements, click Install. 3. If you do not receive this window, continue to the next step.

12 Server Installation SmartSearch Client and Server Installation Guide
(C++ Redistributable Package)
4. Click Next to start the SmartSearch installation process using the Installation Wizard. There may be a pause for installation.
SmartSearch Installation Wizard
License Agreement 1. Click Read License Agreement to read the agreement. 2. Click I accept the terms in the license agreement to accept the terms. 3. Click Next.
License Agreement

SmartSearch Client and Server Installation Guide Server Installation 13
Installation Type 1. In Installation Type, choose the type of installation:
• Sales Demo – Configures the demonstration installation for machines that will be mobile. This option installs a SmartSearch demonstration, assuming that your IP address will change, and configuration files will be configured to reference your machine as a localhost.
• Server Demo – Configures the demonstration installation to use your server’s static IP address or name.
• Full Product – A Full Product installation requires an ssFeatures.lic file and a serial number for the product, sent from Square 9 Fulfillment.
Installation Type
2. Click Next. 3. If the Full Product option was chosen, then the Change Current Destination Folder window
appears. a. Enter the destination folder:
• Browse to the folder where SmartSearch will be installed. • Type in the path to where SmartSearch will be installed.
b. Click Next.
Authentication Configuration 1. In Authentication Configuration, in the Please select Client Authentication Type group, select
the client authentication type: • Single Sign On – Use to allow automatic sign on into SmartSearch. When users launch
SmartSearch it will use their Windows Active Directory or Square 9 User credentials to log in. • Manual – When selected, users launch SmartSearch a window will appear, prompting them to
log in using their credentials to sign into SmartSearch. The information that is passed here will be the users’ Windows or Square 9 User credentials.
2. In the Please select Authentication Server group, select either Active Directory or Local Server. • Active Directory – Enable to indicate SmartSearch is to be installed using Active Directory users
and groups. • Local Server – Enable to indicate SmartSearch is to be installed using Workgroup users and
groups (users and groups that are local to the server).

14 Server Installation SmartSearch Client and Server Installation Guide
3. Enter a password for the ssAdministrator account in the Enter SmartSearch Admin Password text box and confirm the password by typing it again in the Confirm text box. This password must meet your machine’s password guidelines. It is case sensitive.
4. To using IP in the configuration files, enable Use IP in configuration files. Used to improve performance, this option requires a static IP address.
Authentication Configuration
Tip: Meet System Requirements for Passwords. The password must meet the system requirements for the operating system on which the installation is being performed. The Installation Wizard will let you enter a non-compliant password, but SmartSearch services will not run properly if the password does not meet your system requirements. Tip: Change ssAdministrator Password. The ssAdministrator password can be changed at a later point, if you want. If you do so:
• It must comply with the password requirements for your machine. • The password must be updated in three locations: IIS, the Application Pool, and the Service
Console.
Setup Type In Setup Type, choose either the Complete or the Custom setup type.
Complete Setup To perform a complete installation, with all the default settings and file paths, choose Complete. This will include the installation of demonstration Inboxes and the demonstration databases.
1. In Setup Type, choose Complete. 2. Click Next. The Installation Wizard will proceed to the Ready to Install window before you start
the SmartSearch installation. Skip to the “SmartSearch Installation” section below.

SmartSearch Client and Server Installation Guide Server Installation 15
Custom Setup To customize the installation, such as installing extra components, choosing the SQL Server instance to install to, or setting the location SmartSearch will be installed onto, choose Custom. Note that optional features can be installed, but will not function without the proper license.
1. In Setup Type, choose Custom. 2. Click Next. In Custom Setup there is the option to change the locations of where SmartSearch, the Client
Installation folder, Archives and inboxes will be installed.
Setup Type
3. Scroll through the list and select the desired options. All options that are purchased, thus available for installation, are enabled by default to be
installed. You can elect to not install features. When you click on a feature in the list you will see a description and the amount of hard drive
space required for that feature. 4. To remove a feature from installation, in Custom Setup, click the drop-down to the left of any
feature to remove and select This feature will not be available.
Custom Setup Configuration
5. To change the installation location for the GetSmart directory from the default of C:\GetSmart\: a. Click Change.
16 Server Installation SmartSearch Client and Server Installation Guide
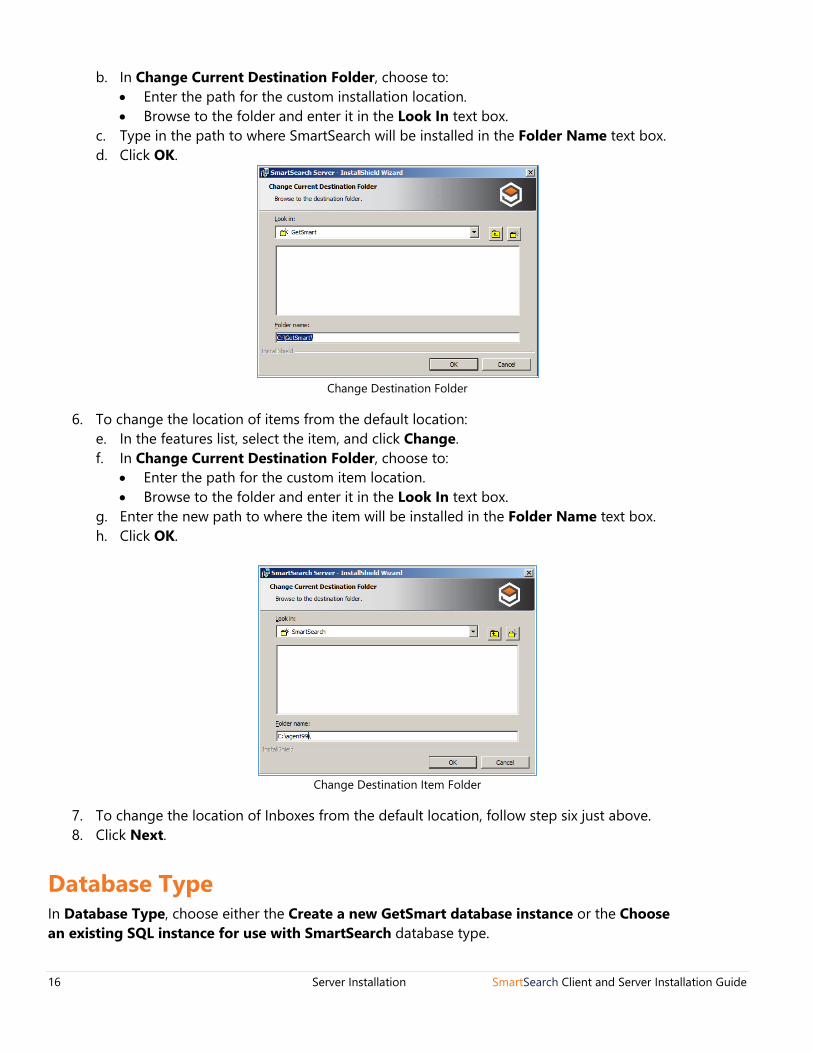
b. In Change Current Destination Folder, choose to: • Enter the path for the custom installation location. • Browse to the folder and enter it in the Look In text box.
c. Type in the path to where SmartSearch will be installed in the Folder Name text box. d. Click OK.
Change Destination Folder
6. To change the location of items from the default location: e. In the features list, select the item, and click Change. f. In Change Current Destination Folder, choose to:
• Enter the path for the custom item location. • Browse to the folder and enter it in the Look In text box.
g. Enter the new path to where the item will be installed in the Folder Name text box. h. Click OK.
Change Destination Item Folder
7. To change the location of Inboxes from the default location, follow step six just above. 8. Click Next.
Database Type In Database Type, choose either the Create a new GetSmart database instance or the Choose an existing SQL instance for use with SmartSearch database type.

SmartSearch Client and Server Installation Guide Server Installation 17
Database Type
Create a New Database Instance By default, SmartSearch installs with Microsoft SQL 2012 Express® and creates a database called “GetSmart.”
1. In Database Type, select Create a new GetSmart database instance. 2. Select Create a new GetSmart database instance. 3. Click Next. 4. If you wish indicate an alternate installation location for Microsoft SQL Server 2012 Express, in
Database Location, click Change. 5. If updates to SQL Server are desired, enable Allow SQL to install updates after installion. 6. Click Next.
(Database Location)
Select an Existing Database Instance You can use SmartSearch with an existing SQL Server or SQL Server Express database instance (SQL Server 2008 R2 or above).
1. In Database Type, select Choose an existing SQL instance for use with SmartSearch. 2. Select Choose an existing SQL instance for use with SmartSearch.

18 Server Installation SmartSearch Client and Server Installation Guide
3. Click Next. 4. In Database Server, in Database server that you are installing to, click the expansion arrow to and
select from a list of the SQL Server instances available to you or click the Browse button and browse to a SQL Server instance.
5. Choose login credentials in the Connect Using section: • Select Windows Authentication credentials of current user to use the login credentials of the
currently logged in user to create databases in the specified SQL instance. • Select Server authentication using the Login ID and password below to enter the System
Administrator (SA) user credentials. 6. Click Next to continue the installation.
Select Database Server and Authentication Method
Web Service Location 1. To use the default web services location and the default website port and continue the installation, in
Web Service Location click Next. 2. If you need to change the installation location in which web services will be installed, in Web Service
Location: a. Click Change. b. In Change Current Destination Folder, enter the new location path in the text box. c. Click OK.
3. The website port defaults to Port 80. To change the port that SmartSearch will be installed to, enter a port number in the Enter your desired web port text box.
4. Click Next.
Note: By default SmartSearch is installed onto port 80. SmartSearch must be the only application running on a specified port. The availability of the specified port is not validated by the installer; you must ensure the port’s availability prior to beginning the installation.

SmartSearch Client and Server Installation Guide Server Installation 19
Web Service Location
SmartSearch Installation Once preparation is done, you are ready to install SmartSearch. The SmartSearch installation window will pause while first GlobalCapture Server, then the GlobalCapture Engine installs, and then it finishes the installation process.
1. To install SmartSearch, in Ready to Install the Program, click Install. There will be a pause while the installation is processing.
2. If necessary, click Back to return to previous dialog boxes and make adjustments to the installation.
Begin SmartSearch Installation
GlobalCapture Server Installation Move the paused Installing SmartSearch Server window aside to fully view Welcome to the InstallShield Wizard for GlobalCapture Server.
1. From your installation media, navigate to the GCW directory, expand this directory, right-click on setup.exe and select Run as Administrator.
2. Click Next to start the GlobalCapture installation process using the Installation Wizard. There will be a pause while the installation is processing.

20 Server Installation SmartSearch Client and Server Installation Guide
GlobalCapture Server Installation Wizard
GlobalCapture Server Customer Information 1. In the Customer Information window, enter a name in the User Name text box. 2. Enter a name in the Organization text box. 3. Enter your serial number provided by Square 9 in the Serial Number text box. 4. Click Next. 5. If prompted with an error message, click OK or Yes and proceed with corrections. If no serial number is entered, a reminder message will appear. Click OK to proceed.
Customer Information
GlobalCapture Server Installation 1. Once preparation is done, in Ready to Install the Program, click Install to install GlobalCapture. There will be a pause while the installation is processing.
2. If necessary, click Back to return to previous dialog boxes and make adjustments to the installation.

SmartSearch Client and Server Installation Guide Server Installation 21
Begin GlobalCapture Server Installation
3. In InstallShield Wizard Completed, click Finish. a. If you prefer, enable the Show the Windows Installer log checkbox to see actions and times
related to the GlobalCapture installation and then click Finish. b. To keep the log for future reference:
1. In Notepad, select File > Save As. 2. If you prefer, select a different filename and/or storage location. 3. Click Save. 4. Close Notepad when done reviewing the log file.
4. In GlobalCapture Installer Information, choose one of the following: • At the prompt, click Yes to reboot the server, so that GlobalCapture is operational. • Or, click No if you will manually reboot later. There will be a pause while the installation is processing.
GlobalCapture Server Installation Completed
GlobalCapture Engine Installation When GlobalCapture Server is done installing, the GlobalCapture Engine for GlobalCapture installation begins. The GlobalCapture Engine installation process is very similar to the GlobalCapture Server process. If the GlobalCapture Engine InstallShield Wizard appears behind the GlobalCapture Server installer, drag it into view.
1. In the Welcome to the InstallShield Wizard for GlobalCapture Engine window, click Next. There will be a pause while the installation is processing.

22 Server Installation SmartSearch Client and Server Installation Guide
GlobalCapture Engine Installation Wizard
GlobalCapture Engine Customer Information
1. In Customer Information, enter a name in the User Name text box. 2. Enter name in the organization in the Organization text box. 3. Enter your license number provided by Square 9 in the Serial Number text box. 4. Click Next. 5. If no serial number is entered, a reminder message will appear. Click OK to proceed.
GlobalCapture Engine Customer Information
GlobalCapture Engine Installation
1. Once preparation is done, in Ready to Install the Program, click Install to install the GlobalCapture Engine. There will be a pause while the installation is processing.
2. If necessary, click Back to return to previous dialog boxes and make adjustments to the installation.

SmartSearch Client and Server Installation Guide Server Installation 23
Begin GlobalCapture Engine Installation
3. In InstallShield Wizard Completed, click Finish. a. If you prefer, enable the Show the Windows Installer log checkbox to see actions and times
related to the installation and then click Finish. b. To keep the log for future reference:
i. In Notepad, select File > Save As. ii. If you prefer, select a different filename and/or storage location. iii. Click Save. iv. Close Notepad when done reviewing the log file. You are returned to the GlobalCapture Engine installer.
4. In Capture Engine Installer Information, choose one of the following: • At the prompt, click Yes to reboot the server, so that the GlobalCapture Engine is operational. • Or, click No if you will manually reboot later.
GlobalCapture Engine Installation Completed
Complete SmartSearch Installation Once the GlobalCapture Server and GlobalCapture Engine installations are finished, the SmartSearch installation will finish.
1. In the SmartSearch Wizard Completed window, click Finish.

24 Server Installation SmartSearch Client and Server Installation Guide
SmartSearch Installation Completed
2. At the prompt, reboot the system. A reboot must be done before SmartSearch can be launched and run properly. Once the system has been restarted SmartSearch will start automatically. When launching
SmartSearch v4.4 for the first time, you will be prompted to log into SmartSearch. 3. Log into SmartSearch. After successfully logging into SmartSearch, the application will open.
With the SmartSearch with GlobalCapture installation complete, the SmartSearch desktop client and GlobalSearch shortcuts will appear on your Windows desktop.
Desktop Shortcuts
Additional GlobalCapture Engine Instances You can stand up to seven additional GlobalCapture Engine instances for GlobalCapture per machine which is running GlobalCapture.
1. Return to the location of your installation media, navigate to the GlobalCaptureEngineStandaloneInstaller directory, expand this directory, right-click on setup.exe and select Run as Administrator.
2. Select Install a new instance and click Next to start the next GlobalCapture Engine installation process. There will be a pause while the installation is processing.
Install a New GlobalCapture Engine Instance

SmartSearch Client and Server Installation Guide Server Installation 25
The Installation Wizard will appear. Follow the instructions in the “GlobalCapture Engine Installation” section above for the next GlobalCapture Engine.
3. To begin the installation, in Welcome to the InstallShield Wizard for GlobalCapture Engine 2, click Next to proceed to the next window. There will be a pause while the installation is processing.
4. In Customer Information: a. Enter a name in the User Name text box. b. Enter name in the organization in the Organization text box. c. Enter your license number provided by Square 9 in the Serial Number text box. d. Click Next to continue the installation. If no serial number is entered, a reminder message will appear. Click OK to proceed.
5. In Database Server: e. In Database server that you are installing to, click the expansion arrow to and select from a list
of the SQL Server instances available to you or click the Browse button and browse to a SQL Server instance.
f. Choose login credentials in the Connect Using section: • Select Windows Authentication credentials of current user to use the login credentials of
the currently logged in user to create databases in the specified SQL instance. • Select Server authentication using the Login ID and password below to enter the System
Administrator (SA) user credentials. g. Click Next to continue.
6. Once preparation is done, in Ready to Install the Program, click Install to install the GlobalCapture Engine. There will be a pause while the installation is processing.
7. In InstallShield Wizard Completed, click Finish. a. If you prefer, enable the Show the Windows Installer log checkbox to see actions and times
related to the installation and then click Finish. b. To keep the log for future reference:
i. In Notepad, select File > Save As. ii. If you prefer, select a different filename and/or storage location. iii. Click Save. iv. Close Notepad when done reviewing the log file. You are returned to the GlobalCapture Engine installer.
8. In GlobalCapture Installer Information, choose one of the following: • At the prompt, click Yes to reboot the server, so that GlobalCapture is operational. • Or, click No if you will manually reboot later There will be a pause while the installation is processing.
Once installation is complete, you will see the additional Engines listed in the GlobalCapture License Management interface.


SmartSearch Client and Server Installation Guide Client Installation 27
Client Installation When a server Demo or Full Product is installed, it will create a SmartSearch Client Installation folder. Use this folder to perform the installation of clients. This folder can be shared out from the server to everyone, then run over the network.
CAUTION: Do not use the SmartSearch Client Installation folder that is located in the SSMedia folder. The directory in ssMedia is the source of the directory that ends up on the application server, but the files that are written to the directory on the server are updated with install-specific information.
It is recommended that you share out the “SmartSearch Client Installation” folder, then navigate to that folder using a UNC path. The following steps will show you the location of this folder and the steps of how to install it from the client. By default, the “SmartSearch Client Installation” folder is located at the root of C:\.
Note: You can only perform the client installation once the server installation has been done.
SmartSearch Client Installation Folder
Installation Wizard 1. To install, you must be on the client that SmartSearch will be installed onto. On the client, navigate
to the client installation folder.

28 Client Installation SmartSearch Client and Server Installation Guide
(SmartSearch Client Installation for UNC Path)
2. To start the Installation Wizard for the SmartSearch client, in the SmartSearch Client Installation folder, select setup.exe.
3. Click Next.
SSClient Installation Wizard
License Agreement 1. Click Read License Agreement to read the agreement. 2. Click I accept the terms in the license agreement to accept the terms. 3. Click Next.

SmartSearch Client and Server Installation Guide Client Installation 29
License Agreement
Customer Information 1. In the Customer Information window, in the User Name text box, enter the name of the
SmartSearch client end user. 2. Enter a name in the Organization text box. 3. Select from the two Install this application for choices:
• Click Anyone who uses this computer to install the client for all users. • Click Only for me to install the client only for a single end user.
4. Click Next.
Customer Information
Custom Setup To customize the installation, such as installing extra components, choose Custom. Note that optional features can be installed, but will not function without the proper license.
1. In Setup Type, choose Custom. 2. Click Next. 3. In Custom Setup, select one or more of the options to install:

30 Client Installation SmartSearch Client and Server Installation Guide
• Choose ImageXChange to install Image XChange. • Select FileXChange to install File XChange. When you click on a feature in the list you will see a description and the amount of hard drive
space required for that feature.
Tip: Options Can Be Added Later. These options can be installed after the initial installation. From the workstation, again run \SmartSearch Client Installation\Setup.exe located on the app server.
4. To remove a feature from installation, in Custom Setup, click the drop-down to the left of any
feature to remove and select This feature will not be available. 5. To change the installation location of a listed feature from the default:
a. Click the name of any feature then click Change. b. In the Install to text box, choose to: • Enter the path for the custom installation location. • Browse to the folder and enter it in the Look In text box. c. Type in the path to where the client application will be installed in the Folder Name text box. d. Click OK.
6. Click Next.
Custom Setup Configuration
Install SmartSearch Client Once preparation is done, you are ready to install SmartSearch.
1. To install the SmartSearch client, click Install. There will be a pause while the installation is processing.
2. If necessary, click Back to return to previous dialog boxes and make adjustments to the installation.

SmartSearch Client and Server Installation Guide Client Installation 31
Begin Client Installation
3. Once the installation is finished, in the SmartSearch Wizard Completed window, click Finish.
SmartSearch Client Installation Completed
SmartSearch • After successfully installing the client, a shortcut is added to the desktop and to the Start menu.
Double-click on the shortcut icon to launch SmartSearch.


SmartSearch Client and Server Installation Guide Post-Installation Requirements 33
Post-Installation Requirements Once SmartSearch is installed you will need to register the product. Fulfillment has sent an email with a link to the media, an ssFeatures.lic file, and also a serial number. Use that serial number to register the copy of SmartSearch. If you do not register SmartSearch, some features may be limited with the system and there is a maximum amount of documents that can be stored into SmartSearch.
SmartSearch Server Registration
Register from Desktop Client 1. To register in the desktop client, click the applications control menu (Square 9 logo) button. 2. Click Register.
SmartSearch Registration
3. In the Registration window enter the Customer Serial Number in the text box. 4. In the Web Registration group, click Register.
Serial Number Registration
If receiving errors after clicking Register, contact the Square 9 Support Department. 5. If needed, in the Manual Registration group, enter the number provide by Square 9 into the
Registration Number text boxes. 6. Click Close.

34 Post-Installation Requirements SmartSearch Client and Server Installation Guide
Register from Web Client 1. To register in the web client, in the Administration menu, select Administration. 2. In the vertical Administration menu, select System. 3. Click the Expand (down arrow) icon on the Registration bar.
Registration
4. To register online, enter the required registration serial number in the Serial Number text box. 5. If you did not have an internet connection to perform the web registration or if requested by
Support, click Manual Registration and enter the number provided by Square 9. 6. To see a list of the Square 9 features enabled by your license, click Features. 7. Click the Close Features (X) icon to hide the Features list. 8. Click View License Agreement to go to the End User License Agreement (EULA) page on the
square-9.com website to review the license agreement. 9. Click Activate.

SmartSearch Client and Server Installation Guide Common Server Configurations 35
Common Server Configurations Square 9’s modular approach allows you to have the products installed on completely separate servers, the same server (hardware resources permitting) or the same product installed across multiple servers (for example having two SmartSearch servers to handle user load). Below are some examples of common server configurations.
Services and Database on a Single Server SmartSearch can be installed on a single server, storing images, and hosting its database on the same machine. This is suitable in small to medium environments.
SmartSearch with a Separate SQL Server In environments where a SQL server is available or demand requires it, the SmartSearch database and the SQL Server database can be installed on separate servers.
SmartSearch with Separate Network File Storage and Database Servers In more enterprise level environments, SQL, file storage and application operations may be separated entirely. Images can be stored on a separate file server, such as a NAS, SAN or any other addressable storage and database operations are performed on a dedicated or shared SQL server.

36 Example Server Configurations SmartSearch Client and Server Installation Guide
SmartSearch with Multiple Application Servers In high volume environments, it may be necessary to spread SmartSearch across multiple application servers. As such, use of a load balancer can handle traffic distribution, utilizing separate servers for image storage and database operations. You can create a more highly available environment when databases are stored on clustered SQL instances or images across redundant file storage.
Behind the Scenes: Because KeyFree Indexing in SmartSearch is a server-based activity, in high volume situations or those requiring a large number of simultaneous KeyFree users, performance can be enhanced with additional server processors, load-balancing, or the addition of dedicated KeyFree Indexing hosting. Please contact your Regional Sales Director for more detail on these options. KeyFree Indexing creates a temporary version of the document, runs an OCR engine, and collects data for Index Fields. Depending upon the systems set up and internet connection, In SmartSearch this can average approximately 12 seconds per document (approximately 20 minutes per 100 documents).