SMART Notebook: Basics and Application · use them in Word, Excel, or PowerPoint. Choose Open to...
32
SMART Notebook: Basics and Application
Transcript of SMART Notebook: Basics and Application · use them in Word, Excel, or PowerPoint. Choose Open to...

SMART Notebook:
Basics and Application

2
Table of Contents TESS Connection ........................................................................................................................................... 3
Version Number ............................................................................................................................................ 3
Tour of the Window ...................................................................................................................................... 5
The Main Toolbar ...................................................................................................................................... 5
The Sidebar ................................................................................................................................................. 18
Page Sorter .................................................................................................................................................. 19
The Gallery .................................................................................................................................................. 23
Searching ................................................................................................................................................. 23
My Content ............................................................................................................................................. 24
SMART Exchange ..................................................................................................................................... 26
SMART Techniques ..................................................................................................................................... 28
Drag to Sort ............................................................................................................................................. 28
Eraser Magic ............................................................................................................................................ 30
The Magical Magnifying Glass................................................................................................................. 31

3
TESS Connection Use of SMART boards and slates connects to TESS component 2a, create an environment of respect and rapport, component 2b, establish a culture for learning, component 2c, manage classroom procedures, component 3a, communicate with students, 3b, use questioning and discussion techniques, 3c, engage students in learning, and 3d, use assessment in instruction. Examples:
Use your SMART board or slate to:
take roll and collect lunch information by having students place themselves in the appropriate group
allow students (with the slate) to complete an activity from their seats
question students to check for understanding
take a class poll
communicate the day’s plans/activities to students
act as a center
These are just a few ways in which you can use SMART boards and slates. In addition, use of SMART
boards and slates connects to multiple components in TESS domain 1 and domain 4.
Version Number The main objective of this course is to familiarize you with the software on which SMART boards and
slates run. The software is called SMART Notebook. We are using version 11.4. To see what version you
are running, click HelpAbout SMART Notebook:
When the window opens, click the Technical Support tab at the top:

4
If, as in this example, your version is not 11.4, click Start and type Software Center.
Open Software Center and scroll down to SMART 11.4:
Check the box by it and click Install. This process can take 15 to 20 minutes so plan time accordingly.
When it has finished, you may be prompted to reboot your computer:

5
Reopen SMART Notebook and check the version number. It should be 11.4:
If not, please complete a Spiceworks ticket.
Tour of the Window In this section we will explore the different buttons and cover their operation. Later sections will cover
application of the buttons.
The Main Toolbar
This is the Main toolbar used in SMART Notebook. In this section we will explore the various buttons
found here.

6
The first two buttons are used for navigation. A SMART Document consists of several Pages. The
Document can be saved to use again and again. Undo and Redo are used here the same way you would
use them in Word, Excel, or PowerPoint. Choose Open to save a SMART file that you have already
created and use the Save icon to save the current file.
Unlike other programs, if you open from within the program, you can only open one Notebook file at a
time. Therefore, it is recommended that you save often.
The next button is the Views button. The first option is full screen.
Full Screen allows you to maximize your space. All toolbars and the taskbar are hidden. Only a small
toolbar remains:
You can also switch back to normal view by clicking the monitor button or by pressing ESC on your
keyboard.
The next option is Transparent Background.
Previous Page
Next Page
Open
Save
New Page Delete Page
Undo Redo

7
The purpose of this view is to allow you to use your SMART tools on a web page or other document
outside of SMART notebook.
The entire SMART window seems to disappear with only a toolbar showing:
Click the double-headed arrow at the end of this toolbar to open the expanded version:
Click the Transparent Screen button again to return to normal view.
The next option is Dual Page Display.
The purpose of dual page display is to allow you to see two pages simultaneously. Perhaps you have one
page of directions and another page that contains an example:

8
Click the Split Screen button again to return to normal view.
Other buttons in this menu include Entire Page and Page Width. Entire Page zooms out to show
everything while Page Width zooms in.
The Paste button is the same as in other programs. The Delete button is used to delete objects. You first
must select the object. You can select several objects at once by marqueeing them. To marquee, move
your mouse to an outside corner of the area. Then click and drag your mouse across the area that
contains the objects. The objects will become selected:
Paste
Delete Screen shade
Insert Table
Launch SMART Exchange
Screen
shot Measurement tools
Doc Camera

9
Once the objects have been selected, click the Delete key to delete them.
Screen Shot
The screen button lets you capture the entire page, or part of it, and save it as an image. In this way, you
can document student work.
It is recommended that you leave the Capture to new page box checked. Otherwise, the picture will be
laid on top of the current page.
The first button allows you to click and drag over a region. The second lets you choose a window to
capture:

10
The third button captures the entire display. If you have more than one active display, you are asked to
choose one:
The last option lets you drag over a specific region:

11
Shade
The Shade can be placed over a page so that you can reveal its contents a little at a time:
The dimples at the top, sides, and bottom provide locations that can be moved to reveal more of the
page:
To remove a shade, click the red button with X in the top left of the shade.

12
Tables
Use the table button to insert a table. In this example, I have inserted a 4 x 2 table:
Enter text into the table. If you want the text to be centered, it’s easier to click the center button when
the table is selected now.
As you enter text into the table, it is automatically centered:
Use this same method to set the default font and color for the table.
To add a new row, first select the entire bottom row:

13
Right-click anywhere and a shortcut menu appears:
Choose Insert Row. A new row is inserted:

14
Once the table has been inserted and completed, shades can be used on each cell. Select the table
(marquee if necessary), click the drop down and choose Add Table Shade:
Shades are placed over all the cells:
Click once on a shade to remove it:
Click on the gray triangle at the top left of the cell to replace one. To remove all the shades, select the
table, click the drop down, and click Remove Table Shade:

15
Measurement Tools
The measurement tools include a ruler and a protractor, tools students may see on the PARCC
assessment:
They do not operate exactly the same as those on the PARCC assessment but they are similar. Both can
be edited. Click and drag on the right edge of the ruler to change its length:
16
On either, click and drag in the darkest area to move it or click and drag in the light area to rotate:
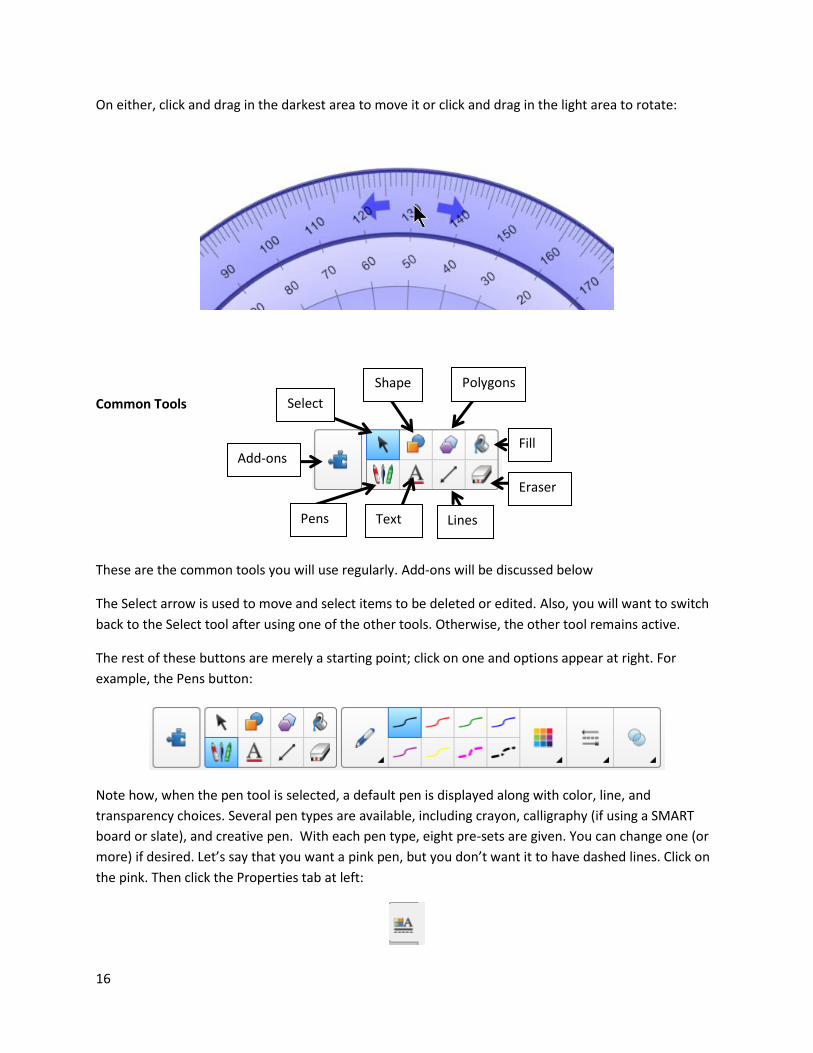
Common Tools
These are the common tools you will use regularly. Add-ons will be discussed below
The Select arrow is used to move and select items to be deleted or edited. Also, you will want to switch
back to the Select tool after using one of the other tools. Otherwise, the other tool remains active.
The rest of these buttons are merely a starting point; click on one and options appear at right. For
example, the Pens button:
Note how, when the pen tool is selected, a default pen is displayed along with color, line, and
transparency choices. Several pen types are available, including crayon, calligraphy (if using a SMART
board or slate), and creative pen. With each pen type, eight pre-sets are given. You can change one (or
more) if desired. Let’s say that you want a pink pen, but you don’t want it to have dashed lines. Click on
the pink. Then click the Properties tab at left:
Add-ons
Select
Shape
s
Polygons
Fill
Pens Text Lines
Eraser

17
This opens the Properties sheet for the chosen pen:
At the top, make sure Line Style is selected. Here you can choose the color. Use the eye dropper to copy an existing color. Click the eye dropper, click on the color you want to copy.
The next section lets you set the thickness and style of the line, and to add arrow heads if you prefer:
At the bottom of the page, click Save Tool Properties if you want this change to be permanent.
Shapes
Each shape has a property sheet as well. In the Fill Effects, however, you can change the color inside the
shape as well:

18
You can also use the Fill button to color the inside of a shape.
The Sidebar
Next Page
Previous Page
New Page
Delete Page
Auto-hide
These buttons, except Auto-hide, are all on the normal toolbar as well and have the same function
described above.
The Auto-hide button hides the sidebar and gives you more room on each page. To reopen the sidebar,
click on any tab.

19
Pages
Gallery
Attachments
Properties
Add-Ons
Sidebar toggle
The tabs give quick access to the page sorter, gallery, attachments, property window, and Add-ons.
The sidebar toggle allows you to move the sidebar to the other side of the board.
Page Sorter
The page sorter allows you to see the different pages of a file:

20
You can rename an individual page. Double-click the time date stamp and a text box opens:
You can also click the drop-down and choose Rename Page:

21
You may notice there is a group heading: Group 1. Groups have two main purposes: for use with SMART
Response and to organize a large Notebook file. In this example, we are going to show how to use Group
Names to organize a large file. Click the dropdown by the words Group 1 and you will see the option to
edit groups:
You are taken to the thumbnail view of your file:
Click the Add New Group button at top right:
A new group is added and is ready to be named:

22
Create four groups. You can name them whatever you like. For this example I have named them Math,
History, Science, and ELA:
Now drag pages into the groups. Do this until all pages are in one of the groups:
To exit this view, click the red X at top right:
Back in the Page Sorter tab you will see the groups listed:

23
Click one and you are taken to that group.
The Gallery The Gallery is a collection of clip art, backgrounds, multimedia content, .notebook files and pages that you can insert into an existing file. It is like ClipArt in PowerPoint. To access the Gallery, click the Gallery tab.
The Gallery is divided into sections. The first of these is called My Content. This is a place you can store your own pictures, files, media, etc. Gallery Essentials is an assortment of images and other files arranged by subject. Lesson Activity has a few examples of the activity builder.
Searching
To find a particular item, type the terms in the search window and click the magnifying glass. Your
results will appear at the bottom of the gallery:

24
Related Folders will show all the folders that contain an item that matches your search. Pictures are just
that while Interactive and Multimedia contains flash files and videos. Notebook files and pages have
background images or activities.
Expand one of these by clicking the arrow to the left. Choose an item and click its arrow to see options:
Notice that you have the option to Add to My Content. This allows you to easily find items you use
often.
The Gallery is discussed more thoroughly in the Application section later.
My Content
It is easy to add your own pictures into a SMART Notebook file. You can simply drag the picture onto the
page. Once the picture has been placed, drag it onto the My Content folder to add it. Another way to
add files to My Content is by clicking the arrow next to the My Content folder.

25
Click Add to My Content…
You can now navigate to the file to add it.
You can also add folders to My Content to keep your files organized. Click the arrow by My Content and choose New Folder. A New Folder appears with a window highlighted. Give the folder a name. You can now drag items into this folder or upload them using the Add to My Content feature.

26
SMART Exchange
SMART Exchange is a web site where you can download and upload SMART files and join in on forums.
You can search for lessons by grade, subject, or standard. Click the SMART Exchange button to go to the
website.
You can search or click Standards-Aligned to see lessons by standard. Under Standards, choose Arkansas
Curriculum Framework, Arkansas Early Childhood, or Arkansas Goals (9th and 12th grade Oral
Communications).
Then choose your Grade and Subject and click View.
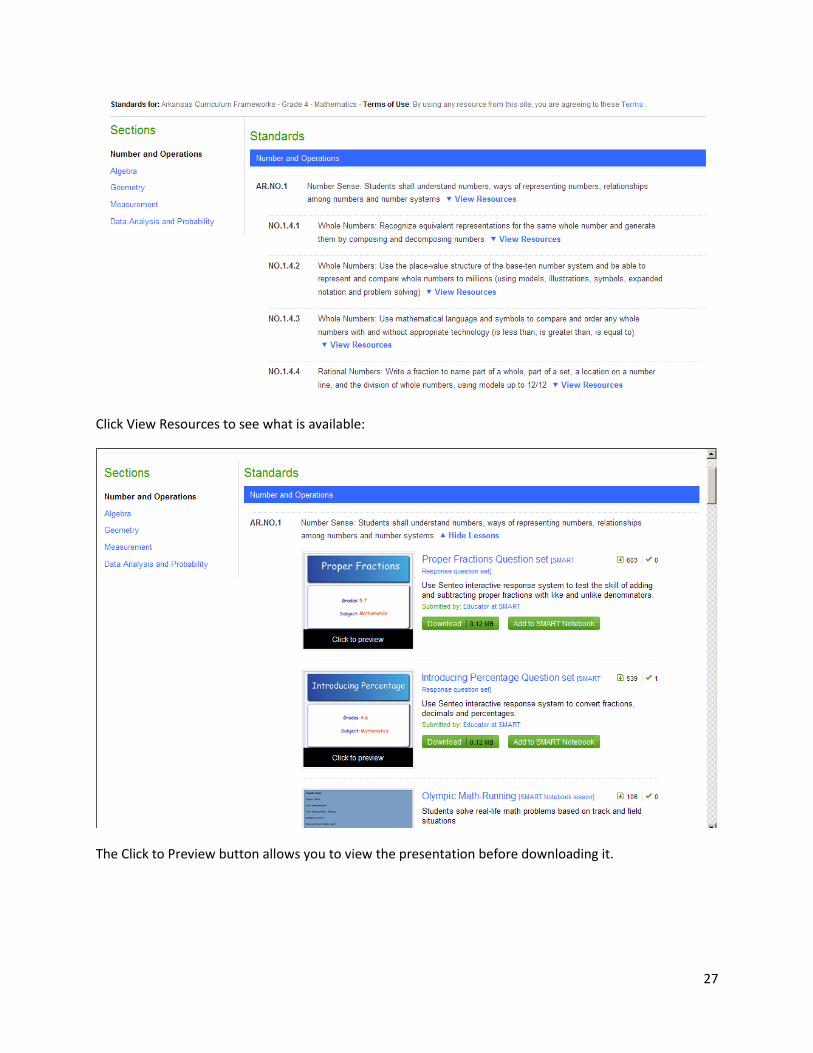
The list of standards appears. If the standard has a SMART notebook file, you will see the words View
Resources.
27
Click View Resources to see what is available:
The Click to Preview button allows you to view the presentation before downloading it.

28
Be Aware that some SMART Presentations, such as the one pictured here, are made to work with
SMART Response systems.
SMART Techniques Now that you know the basics of your SMART board, we can put it to good use with a few simple
techniques.
Drag to Sort The most common technique used on the SMART board is drag to sort. Consider the following scenario:
You are teaching your students the prime and composite numbers. Once you have taught the concept,
students can demonstrate their knowledge using a SMART board. Here is one way to set it up:
Two tools were used here. The text tool was used to create the words and numbers. Also, the headings
“Prime” and “Composite” were locked so that students do not drag them by accident. To do this, select
the word:

29
Click the dropdown and choose LockLock in Place:
Now students can drag the numbers under the correct heading. This technique can be used to sort
anything. Here is another example from math:
Here is an example from Literacy:

30
This example should spark a lot of discussion in that every word listed here can arguably be either a
noun or a verb.
Eraser Magic
In this technique, you create a question and answer and hide the answer. Then use the eraser to reveal
the answer. For example, consider this:
Now when we erase:
How to do it:
Choose a solid color for your background. White will work just as well.
Type your question. The color of the text should be in high contrast to the background.
Type your answer. The color of the text can be any color but should also be in contrast to the
background.
Pick up a pen tool. Change the properties so that the pen color matches the background color.
You may also want to change the thickness to the thickest.
Scribble over the answer. The answer is now hidden.
Save your document. When you erase, the answer appears.

31
The Magical Magnifying Glass
In this technique, a picture is used to reveal answers:
The trick here is that the circles match the background color. The magnifying glass can be any picture
that is a contrasting color. Then the picture is Sent to the Back so that when it is moved over the
sentence, the circles appear.
Step by step:
Type your sentence with directions.
Draw the circles (or boxes or arrows or whatever the answer will be).
Insert an image. Make sure the color contrasts with the text and background colors.
Click the arrow next to the image and choose Send to Back.
You will probably want to LOCK the text before using this technique. Otherwise, students may
accidentally move the text rather than the magnifying glass. Remember, any image will work:

32
Here, I drew a square for the answer then used a black circle for the reveal.