Small Robot Drive Trains - idc-online.com · Small Robot Drive Trains Posted on February 28, 2008,...
17
Small Robot Drive Trains Posted on February 28, 2008, by Ibrahim KAMAL, in Robotics , tagged This Tutorial Aims to introduce to beginner the different techniques used to build the chassis and drive trains of relatively small robots. What I mean by small robots, is the category of light weight robots where aspects like aerodynamics and vibration damping are not taken in account . Most of the fundamental theory remain the same for all sizes of robots, Theory such as robot stability, traction and steering techniques. However, This tutorial is dedicated to the construction of relatively small robots, explaining how to the implement your designs using material and equipment at the reach of any average level hobbyist. Traction and steering mechanisms There are many types of mechanisms that have been developed to move a robot from a place to another, more than you could imagine, however, we will only study some of those techniques which are the most adequate to relatively small robots: Differential Drive system figure 1.A This is the most common locomotion scheme in the world of robotics. It‟s easy to build, easy to control and can permit the robot to move in all required directions. In that system, two motors are connected, one to each of the two drive wheels at the right and at the left of the robot‟s base. Those two motors are responsible of driving the robot back and forth as well as steering in any required direction. This system can even allow a robot to pivot in its place.
Transcript of Small Robot Drive Trains - idc-online.com · Small Robot Drive Trains Posted on February 28, 2008,...

Small Robot Drive Trains
Posted on February 28, 2008, by Ibrahim KAMAL, in Robotics, tagged
This Tutorial Aims to introduce to beginner the different techniques used to build the chassis and drive
trains of relatively small robots. What I mean by small robots, is the category of light weight robots
where aspects like aerodynamics and vibration damping are not taken in account.
Most of the fundamental theory remain the same for all sizes of robots, Theory such as robot stability,
traction and steering techniques. However, This tutorial is dedicated to the construction of relatively small
robots, explaining how to the implement your designs using material and equipment at the reach of any
average level hobbyist.
Traction and steering mechanisms There are many types of mechanisms that have been developed to move a robot from a place to another,
more than you could imagine, however, we will only study some of those techniques which are the most
adequate to relatively small robots:
Differential Drive system
figure 1.A
This is the most common locomotion scheme in the world of robotics. It‟s easy to build, easy to control
and can permit the robot to move in all required directions. In that system, two motors are connected, one
to each of the two drive wheels at the right and at the left of the robot‟s base. Those two motors are
responsible of driving the robot back and forth as well as steering in any required direction. This system
can even allow a robot to pivot in its place.

The word “differential” comes from the fact that this system relies on the velocity difference between the
two wheels to drive the robot in the required path and make it move in any required curve.
Figure 1.A shows in a simplified way the principle of operation of differential drive. When the left and right
motors are turning at the same speed, the robot moves forward or backward in a straight line. In order to
turn right for example, the right motor is slowed down and the whole robot steers to the right. The bigger
the difference of speed between the two wheels, the tighter will be the steering curve.
As you can also notice in the figure 1.A, this system needs one or more caster wheels (also called free-
wheels) to support the rest of the chassis while freely following the movement of the robot engaged by the
two main drive wheels. Some robots use two caster wheels, adjacent to the drive wheels for better
stability, but again, in the category of small robots, one caster wheel can be enough.
figure 1.B
Many roboticists even replace this single freewheel with a piece of bent metal or any other low friction
surface to act as skid that slips on the ground under the action of the driving wheels.
Figure 1.B shows the chassis of one of our line follower robots where skids are used along with the drive
wheels to support it in a horizontal position. This technique becomes interesting when used for lightweight
robots, where caster wheels can cause even more friction than the skids, and add additional and
unnecessary weight to the robot.
You can also notice in the figure 1.B that the rear skid is not touching the ground, and thus is not a
primary skid, but rather a secondary one just in case the robot pivots around the drive wheels to the back
during a sudden acceleration for example.

Four wheel differential drive system
figure 1.C
Another variation of the differential drive system, is the four wheel differential drive system, which
resembles the drive trains of tanks and bulldozers.
As figure 1.c shows, it consists of only two motors and four wheels. Each pair of wheels are mechanically
connected together, usually by the mean of a belt forcing them to move together, driven by a single
motor.
The behavior of this drive train is similar to the previous differential drive system; If the the two motors
turn at the same speed, the robot moves forward or backward, if there is a difference between the speed
of the two motors, the robot will steer in the direction of the slower motor.
This drive system implicates a great deal of friction, specially during steering, and thus, to overcome
this friction, it requires relatively powerful motors, as compared to the previous differential drive scheme.
The advantage of this system is that it is very easy to build and is most suitable for running on low friction
and dusty surfaces where other drive systems would suffer.
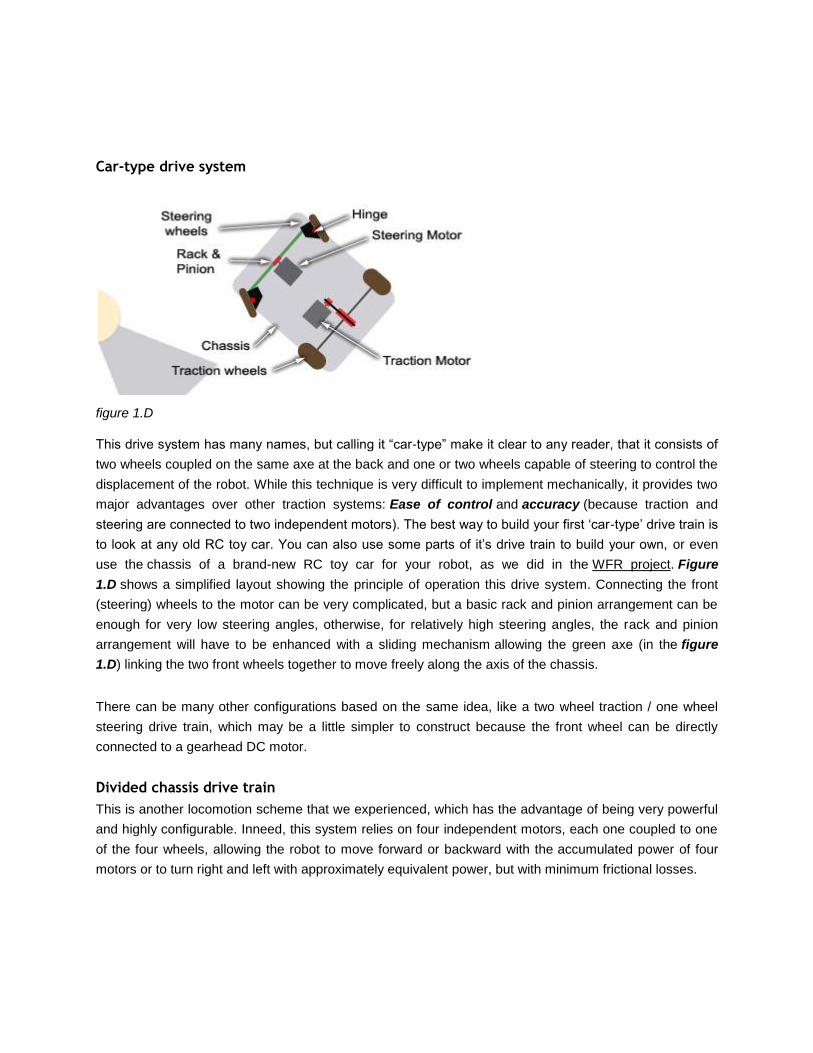
Car-type drive system
figure 1.D
This drive system has many names, but calling it “car-type” make it clear to any reader, that it consists of
two wheels coupled on the same axe at the back and one or two wheels capable of steering to control the
displacement of the robot. While this technique is very difficult to implement mechanically, it provides two
major advantages over other traction systems: Ease of control and accuracy (because traction and
steering are connected to two independent motors). The best way to build your first „car-type‟ drive train is
to look at any old RC toy car. You can also use some parts of it‟s drive train to build your own, or even
use the chassis of a brand-new RC toy car for your robot, as we did in the WFR project. Figure
1.D shows a simplified layout showing the principle of operation this drive system. Connecting the front
(steering) wheels to the motor can be very complicated, but a basic rack and pinion arrangement can be
enough for very low steering angles, otherwise, for relatively high steering angles, the rack and pinion
arrangement will have to be enhanced with a sliding mechanism allowing the green axe (in the figure
1.D) linking the two front wheels together to move freely along the axis of the chassis.
There can be many other configurations based on the same idea, like a two wheel traction / one wheel
steering drive train, which may be a little simpler to construct because the front wheel can be directly
connected to a gearhead DC motor.
Divided chassis drive train
This is another locomotion scheme that we experienced, which has the advantage of being very powerful
and highly configurable. Inneed, this system relies on four independent motors, each one coupled to one
of the four wheels, allowing the robot to move forward or backward with the accumulated power of four
motors or to turn right and left with approximately equivalent power, but with minimum frictional losses.
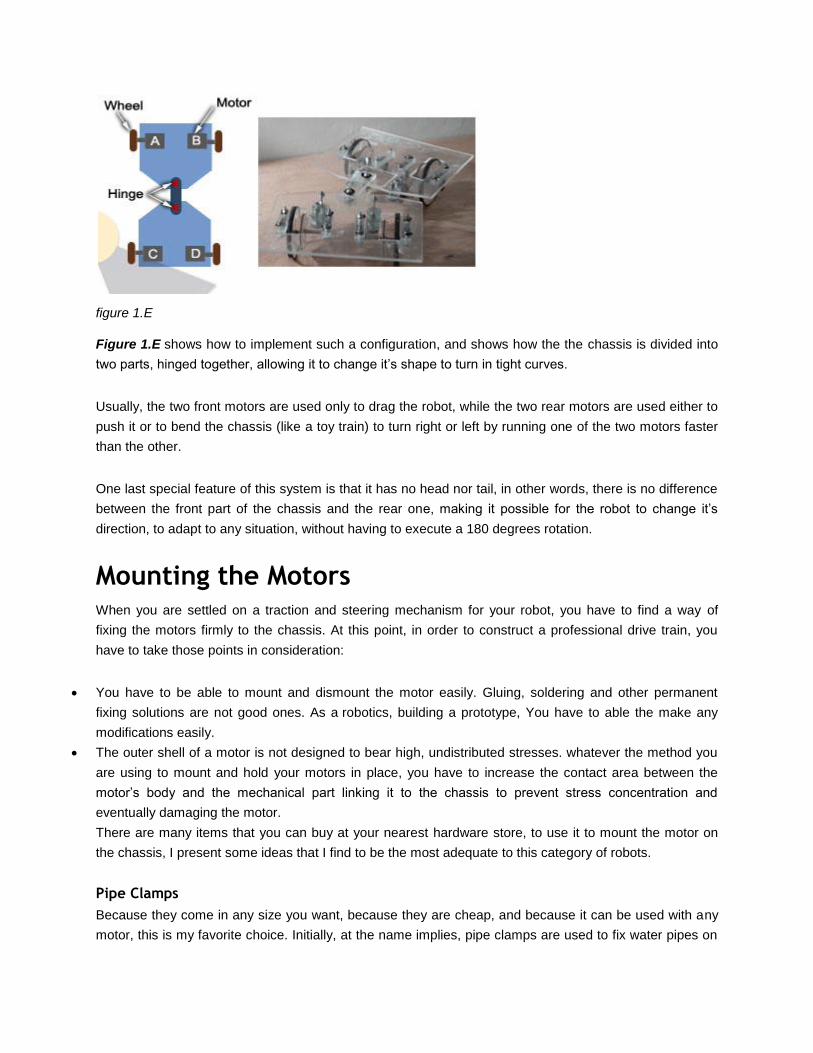
figure 1.E
Figure 1.E shows how to implement such a configuration, and shows how the the chassis is divided into
two parts, hinged together, allowing it to change it‟s shape to turn in tight curves.
Usually, the two front motors are used only to drag the robot, while the two rear motors are used either to
push it or to bend the chassis (like a toy train) to turn right or left by running one of the two motors faster
than the other.
One last special feature of this system is that it has no head nor tail, in other words, there is no difference
between the front part of the chassis and the rear one, making it possible for the robot to change it‟s
direction, to adapt to any situation, without having to execute a 180 degrees rotation.
Mounting the Motors When you are settled on a traction and steering mechanism for your robot, you have to find a way of
fixing the motors firmly to the chassis. At this point, in order to construct a professional drive train, you
have to take those points in consideration:
You have to be able to mount and dismount the motor easily. Gluing, soldering and other permanent
fixing solutions are not good ones. As a robotics, building a prototype, You have to able the make any
modifications easily.
The outer shell of a motor is not designed to bear high, undistributed stresses. whatever the method you
are using to mount and hold your motors in place, you have to increase the contact area between the
motor‟s body and the mechanical part linking it to the chassis to prevent stress concentration and
eventually damaging the motor.
There are many items that you can buy at your nearest hardware store, to use it to mount the motor on
the chassis, I present some ideas that I find to be the most adequate to this category of robots.
Pipe Clamps
Because they come in any size you want, because they are cheap, and because it can be used with any
motor, this is my favorite choice. Initially, at the name implies, pipe clamps are used to fix water pipes on

walls. Due to the resemblance of size and shape between the outer shell of a standard DC motor and
water pipes, those clamps are very adequate to the job of holding motors firmly in place, while distributing
any eventual stress along the whole contact surface.
figure 2.A
Figure 2.A shows a standard pipe clamp, where the right bolt was replaced with a longer 4 mm screw, to
be used later to fix the motor-clamp assembly to the chassis. Note that there are many varieties of pipe
clamps, so it‟s up to you to pay a visit to your hardware store and find the one that would be the most
suitable according to your design. Most Pipe clamps come with a nut welded to it, allowing easier fixation
to any adjacent plan (that plan can be a wall as it can be the chassis of your robot).
figure 2.B
Figure 2.B shows how a motor fits in that pipe clamp. Adding small parts of rubber between the surfaces
of the motor and the clamp can be a good idea, as it will absorb any eventual vibration, and protect the
motor‟s body.
figure 2.C
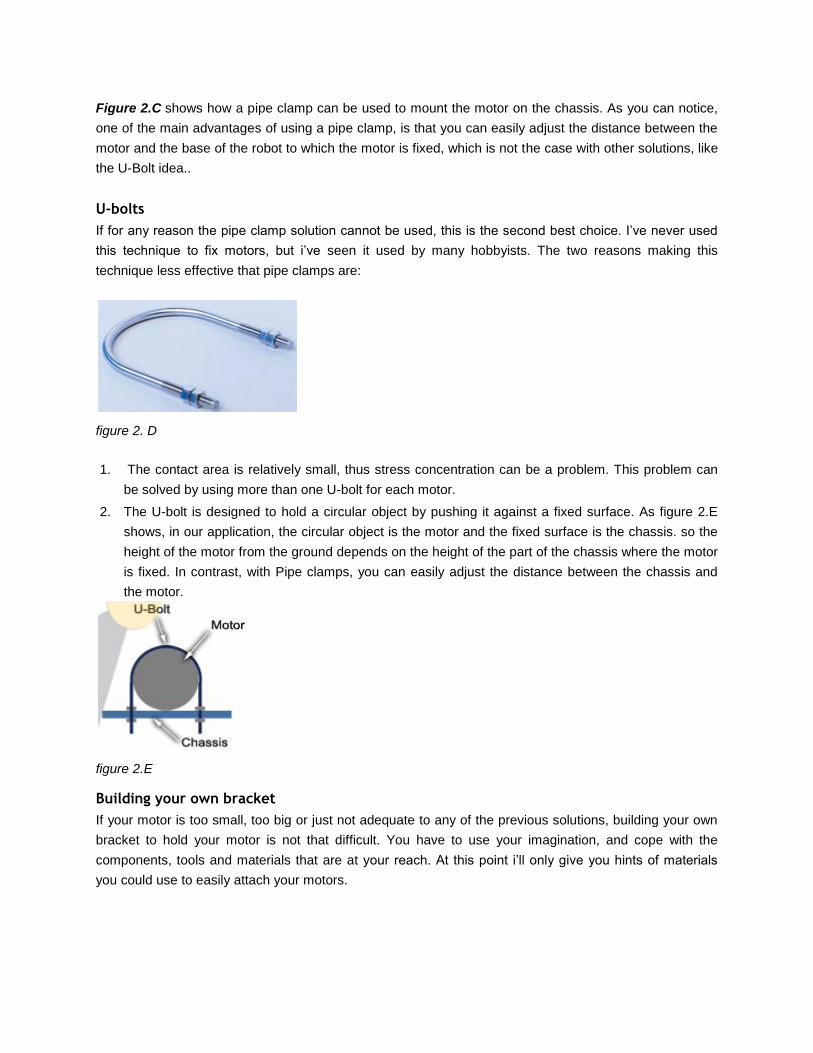
Figure 2.C shows how a pipe clamp can be used to mount the motor on the chassis. As you can notice,
one of the main advantages of using a pipe clamp, is that you can easily adjust the distance between the
motor and the base of the robot to which the motor is fixed, which is not the case with other solutions, like
the U-Bolt idea..
U-bolts
If for any reason the pipe clamp solution cannot be used, this is the second best choice. I‟ve never used
this technique to fix motors, but i‟ve seen it used by many hobbyists. The two reasons making this
technique less effective that pipe clamps are:
figure 2. D
1. The contact area is relatively small, thus stress concentration can be a problem. This problem can
be solved by using more than one U-bolt for each motor.
2. The U-bolt is designed to hold a circular object by pushing it against a fixed surface. As figure 2.E
shows, in our application, the circular object is the motor and the fixed surface is the chassis. so the
height of the motor from the ground depends on the height of the part of the chassis where the motor
is fixed. In contrast, with Pipe clamps, you can easily adjust the distance between the chassis and
the motor.
figure 2.E
Building your own bracket
If your motor is too small, too big or just not adequate to any of the previous solutions, building your own
bracket to hold your motor is not that difficult. You have to use your imagination, and cope with the
components, tools and materials that are at your reach. At this point i‟ll only give you hints of materials
you could use to easily attach your motors.

figure 2.F
A rubber band (figure 2.F) can hold your motor in place exactly like a U-Bolt, while giving it some
elasticity to absorb shocks and vibrations. You can obtain really strong rubber belts from old cassette
players.
figure 2.G
Thick copper wire can also be used instead of the U-bolt, although it has the major disadvantage of being
a permanent solution, any modification will be destructive and new wires will have to be installed. Figure
2.G shows actual pictures of DC motors that‟s I‟ve mounted on one of my first robots.
figure 2.H
Plastic strap fastener, is still a permanent solution, but has the advantage of providing a strong
attachment, while being easily introduced and fastened in small places where it would be harder to install
copper wires or rubber bands.
Metal sheets forming is the best alternative to U-Bolts and pipe clamps if you have the tools, skill, and
material to do the job. Then you can form the exact required shape to firmly hold your motor in place. I
personally recommend Aluminum as a working material. It‟s corrosion resistance, it‟s light weight and it‟s
mach-inability, make it a perfect match for small robots.
Transmitting power to the wheels There are many way of transmitting the power from the motor‟s shaft to the wheels, but in any case,
friction is your biggest enemy. The frictional losses increase when the weight of the robot increases,
specially if you‟re not using any ball bearings to support the shaft, which is usually the case in small
robots. I am going to categorize the various techniques used for power transmission into two main
categories: Direct transmission and Un direct transmission.
Direct transmission
figure 3.A
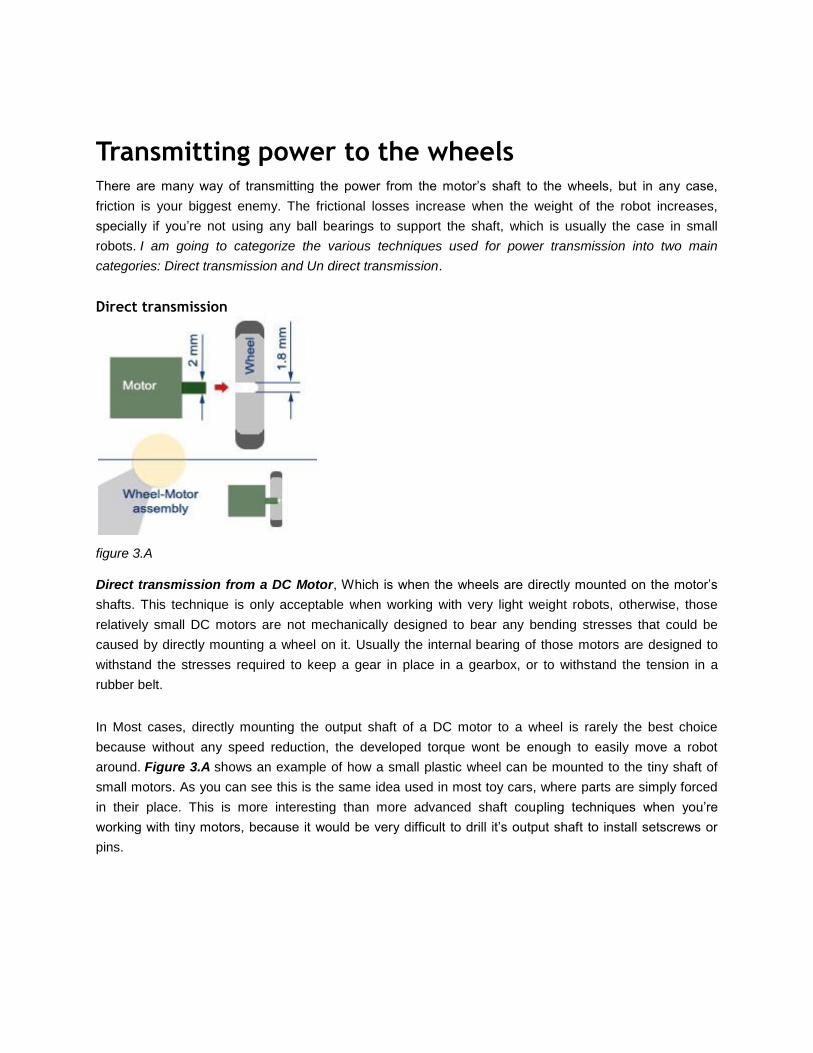
Direct transmission from a DC Motor, Which is when the wheels are directly mounted on the motor‟s
shafts. This technique is only acceptable when working with very light weight robots, otherwise, those
relatively small DC motors are not mechanically designed to bear any bending stresses that could be
caused by directly mounting a wheel on it. Usually the internal bearing of those motors are designed to
withstand the stresses required to keep a gear in place in a gearbox, or to withstand the tension in a
rubber belt.
In Most cases, directly mounting the output shaft of a DC motor to a wheel is rarely the best choice
because without any speed reduction, the developed torque wont be enough to easily move a robot
around. Figure 3.A shows an example of how a small plastic wheel can be mounted to the tiny shaft of
small motors. As you can see this is the same idea used in most toy cars, where parts are simply forced
in their place. This is more interesting than more advanced shaft coupling techniques when you‟re
working with tiny motors, because it would be very difficult to drill it‟s output shaft to install setscrews or
pins.

figure 3.B
Direct transmission from a gear-head DC motor is the most common method used by robotics,
specially for the category of robot we are talking about. That‟s because the output-shaft from the gearbox
of a gearhead motor are designed withstand higher stresses than the output shaft of the motor itself and
has a very suitable output characteristics (low RPM and high toque). That can be noticed from the shape
of the output shaft of a gear-head DC motor in the figures 3.B and 3.C, which is not fully circular to be
able to firmly secure it to a shaft coupling or to a wheel in our case.
There are many ways to fix a wheel to the output shaft of a gearhead DC motor, one of the simplest ways
is to drill a hole in the body of the wheel, of the exact diameter of the screw to be used. Forcing the screw
in the drilled material for the first time will form a helix mating the thread of your screw, allowing you to
fasted the shaft in its place by simply driving the screw.
If the wheel you are using doesn‟t have an extended shaft as shown in figure 3.A, you will have to find
another mean of fastening the motor‟s shaft to the wheel, but virtually any wheel you will find is designed
to be mounted on a shaft, so using your imagination, you‟ll end up finding a solution to that problem,
depending on the shape and size of the wheel.
figure 3.C
Undirect transmission
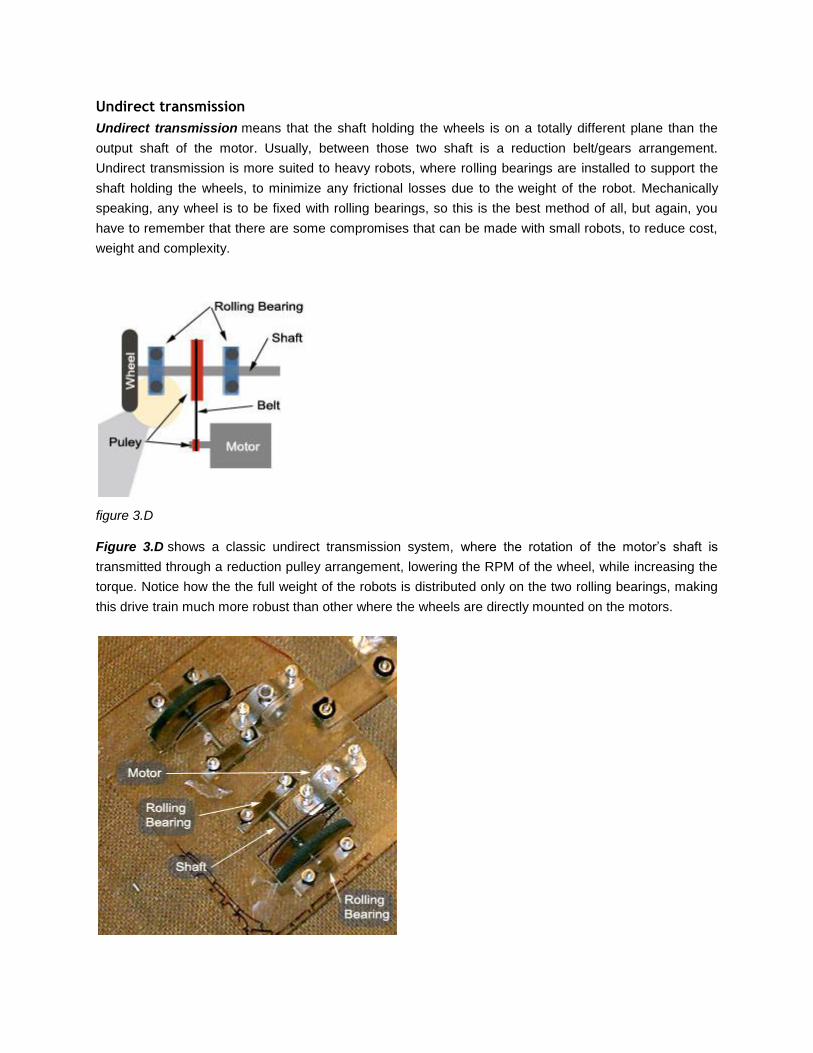
Undirect transmission means that the shaft holding the wheels is on a totally different plane than the
output shaft of the motor. Usually, between those two shaft is a reduction belt/gears arrangement.
Undirect transmission is more suited to heavy robots, where rolling bearings are installed to support the
shaft holding the wheels, to minimize any frictional losses due to the weight of the robot. Mechanically
speaking, any wheel is to be fixed with rolling bearings, so this is the best method of all, but again, you
have to remember that there are some compromises that can be made with small robots, to reduce cost,
weight and complexity.
figure 3.D
Figure 3.D shows a classic undirect transmission system, where the rotation of the motor‟s shaft is
transmitted through a reduction pulley arrangement, lowering the RPM of the wheel, while increasing the
torque. Notice how the the full weight of the robots is distributed only on the two rolling bearings, making
this drive train much more robust than other where the wheels are directly mounted on the motors.

figure 3.E
Figure 3.E and 3.F shows a practical implementation of this technique on one of our early robots, where
each wheel is mounted to a 6mm steel shaft, supported at both ends with rolling bearings. There is no
obligation to put the rolling bearing at both sides of the wheel (the two rolling bearing can be placed at the
same side of the wheel as in figure 3.D) but you have to put two of them, each one as distant from the
other as possible, to reduce shear stresses on the rolling bearings. (Rolling bearings are designed to
withstand very high radial stresses). While you‟re looking at the pictures, you can notice how the motors
are mounted with pipe clamps as explained before.
figure 3.F
Diameter of the wheels, speed and torque With a constant output RPM from a motor, The diameter of the wheel is the last criteria that can affect the
the balance between the torque of the robot and it‟s linear velocity.
Consider the wheel in figure 4, having a radius r turning with a constant angular velocity (RPM) ω, P a
point on the circumference of the wheel, T the torque developed from the motor acting on the ground
plane and F the reaction force of the ground on the wheel.

figure 4
Let Tf be the torque developed by the ground as reaction to the wheel‟s movement. This is the torque
resisting the robot‟s movement. For the robot to move from rest (or to accelerate), T must be bigger
than Tf.
The toque Tf = F.r …….(1)
Also note the that the linear velocity of the robot equals the linear velocity of any given point on the outer
circumference of the wheel,
Then the velocity V = w.r …….(2)
From the relations (1) and (2), you can easily deduce that increasing the radius of the wheel will increase
the velocity of the robot, but also increase the resisting torque that the robot have to overcome. Thus,
varying the radius of the wheel, you can make a compromise between linear velocity and torque of the
robot.
Mass distribution, Moment of Inertia and robot
stability One of the most important phenomenon that can affect the behavior of moving robots is the moment of
inertia. The moment of inertia, which is different for each shape, size, weight and trajectory of a moving
rigid body, is the ability of that rigid body to resist a change in its velocity. The force developed by
the moment of inertia appears at the center of gravity of the body, and acts as a mechanical moment
around the pivot point of the robot (usually a wheel) in the a direction opposing the change of velocity.
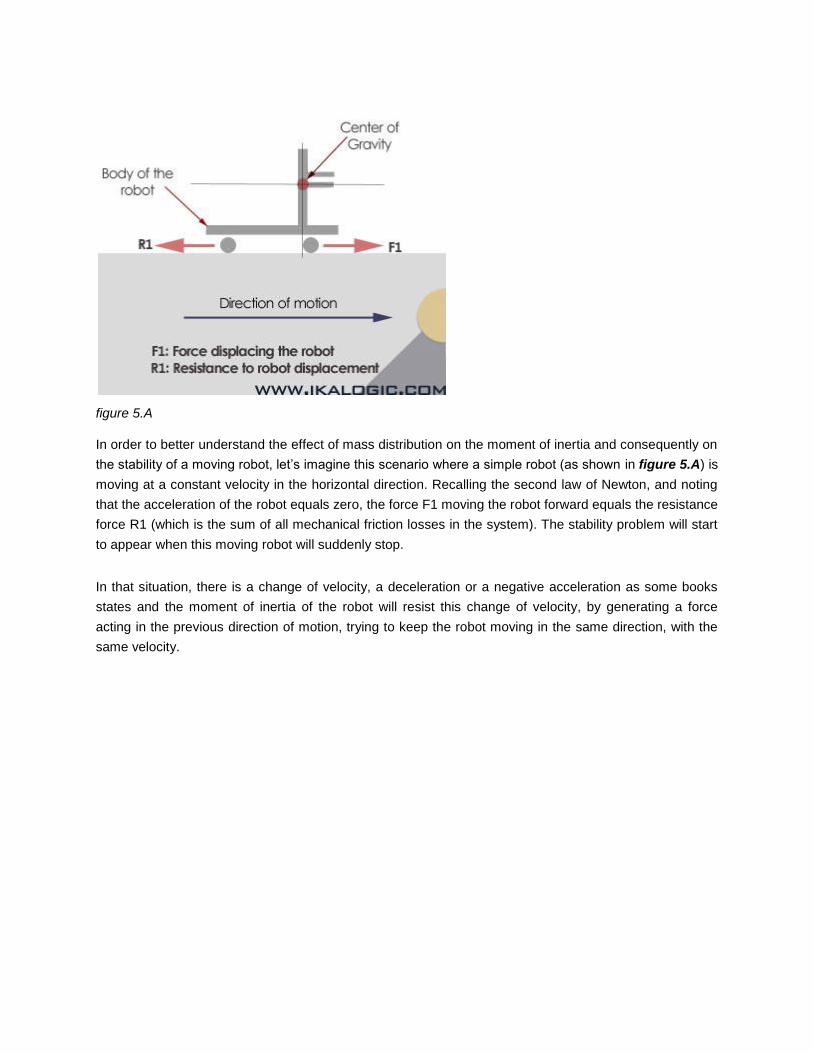
figure 5.A
In order to better understand the effect of mass distribution on the moment of inertia and consequently on
the stability of a moving robot, let‟s imagine this scenario where a simple robot (as shown in figure 5.A) is
moving at a constant velocity in the horizontal direction. Recalling the second law of Newton, and noting
that the acceleration of the robot equals zero, the force F1 moving the robot forward equals the resistance
force R1 (which is the sum of all mechanical friction losses in the system). The stability problem will start
to appear when this moving robot will suddenly stop.
In that situation, there is a change of velocity, a deceleration or a negative acceleration as some books
states and the moment of inertia of the robot will resist this change of velocity, by generating a force
acting in the previous direction of motion, trying to keep the robot moving in the same direction, with the
same velocity.

figure 5.B
In figure 5.B, the effect of the moment of inertia is somehow exaggerated to clearly show the unstability
that can be caused by this problem. To solve this problem, and design robots that have very low inertia,
you have to understand those two main factors that affect the inertia of a body:
A. The position of center of gravity has to be as near as possible from the ground or from the eventual
pivot point (which are the wheels in case of our example robot). This is verified by the mathematical
relation that state that:
I = m.(r^2)
Where I is the moment of inertia, m the mass of the body, r the distance between the center of mass
of the body and the pivot point.
To change the position of the center of mass of your robot, you have to lower the position of the
heavy parts of the robots like the batteries and the motors.
You also have to design the chassis to be as near as possible from the ground (as shown in figure
5.C). If all that is not enough, or if the chassis simply isn‟t heavy enough, it‟s common practice to add
additional weights as near as possible from the ground with the sole purpose of lowering the overall
center of mass of the robot.
B. The torque developed by the moment of inertial depends on the rate of change of velocity (the
acceleration). You can greatly decrease the effect of inertia by controlling the acceleration and
deceleration of your robot, through ingenious speed control algorithms.

figure 5.C
Finding motors and building material The easiest way to acquire all the material and equipment you need to build a robot, is to buy it! But that‟s
not the cheapest way, and sometimes you won‟t find all what you need in the stores. That‟s why – if you
plan to dig your way in the field of robotics – you should start collecting all kind of devices from which you
can scavenge all kind and sizes of DC motor, mechanical parts, gears, pulleys, etc.
From my experience, I tried to classify the kind of devices from which you could extract useful items, at
least, this is what I do with those devices before throwing them away.
Old cassette players and walkmans: Small Motors, pulleys, belts, gears.
Old Floppy disk and CD-ROM drives: Very small motors, worm gear, sliding mechanism, gears, limit
switches.
Old Photocopier machines, printers and scanners: quality Gearhead DC motors, sliding mechanisms,
rubber wheels, gears.
As for the chassis, it can be built with a multitude of materials. My preferred material is Copper boards
(made for PCBs) as you can solder many metals to it like screws and nuts, you can also design the main
board of the robot on the same board to reduce size, weight and cost.
My second best choice is the Fiberglass. It can be easily formed with a a cutter, can be easily drilled, can
sustain high stresses, and looks very neat an professional.
Another good choice for building the chassis of the robot is the 3mm Medium Density fibers (MDF wood)
which has the advantage of being very cheap, and can be very easily cut, drilled and grinded to any
shape you want. The only disadvantage of this material is that it can easily deteriorate with water or even
too high humidity.

Those were the material I found to be more suitable for this category of robots.
Source: http://www.ikalogic.com/small-robot-drive-trains/