SLIM JIM ASSEMBLY - WamBam Fence
21
WWW.WAMBAMFENCE.COM 1 ASSEMBLY INSTRUCTIONS AF14001 AF14001 ASSEMBLY INSTRUCTIONS 60 MIN Approximate assembly me Want to see a video on how to assemble this product? Scan the QR code SLIM JIM ALUMINUM FENCE WWW.WAMBAMFENCE.COM VER. 062221
Transcript of SLIM JIM ASSEMBLY - WamBam Fence

WWW.WAMBAMFENCE.COM 1
ASSEMBLY INSTRUCTIONS AF14001
AF14001
ASSEMBLY INSTRUCTIONS
60 MINApproximate assembly time
Want to see a video on how to assemble this product?
Scan the QR code
SLIM JIMALUMINUM FENCE
WWW.WAMBAMFENCE.COM VER. 062221

WWW.WAMBAMFENCE.COM2
ASSEMBLY INSTRUCTIONSAF14001
k Check the inside of the larger pieces in your box for other materials packed inside.
k When assembling components, place on a non-abrasive surface (i.e. shipping box) to avoid scratching.
k We recommend an area approximately 5’x 8’ for unobstructed assembling.
k You should not need to use excessive force when assembling components.
VISIT OUR WEBSITE FIRST, SO WE CAN HELP YOU RIGHT AWAY!Although great care has been taken to ensure proper packaging and handling of this product, occasionally problems occur. If you discover any missing, damaged, or defective parts, please visit our website to order replacement parts. If you experience any further trouble with your product, please contact our customer care department.
parts.nychbrands.com [email protected] 704-892-5222 / 877-778-5733
Customer service agents are available to take calls weekdays from 9am-5pm EST. If you call outside of business hours, please leave a voicemail.
To help you quickly and accurately, please have reference item number AF14001 and the specific part name which can be found on page 10. It is helpful if you can provide the batch lot which is a stamped number inside the box.
Please give us a call at 704-892-5222 / 877-778-5733.If you are having problems with the assembly or installation of this product, we are happy to assist you with the process.
If for some reason you need to return this product, please allow us to help resolve your issues first. If you still decide to return the product, you will need to initiate the return from the company you originally purchased from.
GENERAL INFORMATION
MISSING OR DAMAGED PARTS?
NEED ASSEMBLY HELP?
NEED TO RETURN?
IMPORTANT

WWW.WAMBAMFENCE.COM 3
ASSEMBLY INSTRUCTIONS AF14001
MEET CLEVER JOE
WE KNOW YOU HATE READING INSTRUCTIONS.
They call him Clever Joe because over the past few de-cades or so, he worked on inventing, re-inventing and per-fecting the world of digless fence. He personally installed hundreds of fences the WamBam way, and he knows how well it works.
Joe’s job is to help you perform the task of installing an attractive, professional looking WamBam Fence. Much like snowflakes and fingerprints, your property is one-of-a-kind and there are many scenarios you could encounter during your fence installation. That’s why our team at WamBam is available to help you. Please feel free to call us - we’d love to help you out.
To read more about his story, go to wambamfence.com
We do too!
But please, make an exception for this project. We want you to have the best possible expe-rience installing your WamBam Fence and reading the instructions will ensure this. Trust us, you’ll be glad you did!
So next time you’re headed to the john, loo, WC, or bathroom, swap out the newspaper for this guide and start reading. There’s a lot of great information in here, and we’ve tried to make it interesting. And relax, it’s mostly pictures.
Having said that, we want to stress that this is a guide. Unfortunately, because everyone’s property is different, we can’t provide a concrete step A, B and C. This guide will help you in almost all situations, though, and remember, we’re just a phone call away! For obstacles and challenges you might encounter, see our “Murphy’s Vinyl Fence Laws” guide on our website for information on how to navigate potentially sticky situations.

WWW.WAMBAMFENCE.COM4
ASSEMBLY INSTRUCTIONSAF14001
REALITY CHECKROME WASN’T BUILT IN A DAY, AND YOUR FENCE PROBABLY WON’T BE EITHER.
Time is your friend when installing your WamBam Fence. So chill out. Relax. Do a yoga pose. Take plenty of breaks.
As we all know, time flies when you’re having fun, so expect to spend more than just an afternoon on this project. If you expect to be able to WamBam your fence out in an hour, you’re mistaken. Yeah, we know your dog and kids are running loose and your neighbor is driving you nuts, but if you take your time, your project will be more successful. Besides, you’re going to be spending less time you would have if you had chosen to dig holes, mix cement, and go the old way... so be happy. Time is still on your side.
PAY ATTENTION TO SLOPES!
Even if your yard does not resemble a black diamond ski run, you have to think about the slope of your fence line. Is there any? There almost always is, and you need to pay special attention to this in the planning and purchasing stages of your fence. Otherwise, the posts you order might be too short.
Please refer to our “Murphy’s Vinyl Fence Laws” for more in-depth information.
PRACTICE MAKES PERFECT
Remember swinging the baseball bat as a kid, or shooting hoops for the first time? It took a bit to get the feel of it. The first few pipes you install into the ground might be a bit challenging at first, but it will get easier as you get the hang of it. Before you know it, you’ll be WamBam-ing your pipes into the ground so quickly your neighbors won’t know what happened.
For installation videos and more information, visit www.wambamfence.com

WWW.WAMBAMFENCE.COM 5
ASSEMBLY INSTRUCTIONS AF14001
JUST A COUPLE MORE THINGSOTHER STUFF YOU NEED TO KNOW
AND FINALLY...
Believe Joe, after the past few decades of installing countless fences the WamBam way, the success of your installation is going to depend on three things:
1. Site conditions(And your creativity to work around unforseen obstacles as they come up, because they are gonna come up!)
2. Your personal skill level 3. Complexity of the project
Remember, you are not alone. We love helping make our customer’s lives easier and more fun! Call us. We would consider it an honor to help..
k Draw a sketch layout of the proposed fence lines and logically look it over. If it doesn’t make sense on paper, chances are it won’t make sense in your yard.
k Ask for some help. There’s a good chance you have a handy neighbor or a family member that can help your project go more smoothly. An extra set of hands can make all the difference!
k Before you begin, make sure you have all the necessary materials, tools and equipment listed in the checklist found on page 7.

WWW.WAMBAMFENCE.COM6
ASSEMBLY INSTRUCTIONSAF14001
AVOID THESE PITFALLS!
HAVE YOU CONTACTED YOUR LOCAL UTILITIES?
HAVE YOU CHECKED YOUR LOCAL ZONING LAWS?
ARE YOU ABSOLUTELY SURE WHERE YOUR PROPERTY
LINE IS?
HAVE YOU TALKED TO YOUR NEIGHBORS?
IMPORTANT!UNSTABLE GROUND OR
ROCK?
1
2
3
4
5
You must call your local utilities before you start installing your fence to avoid puncturing any unseen underground utilities, especially electrical or gas lines. Fortunately, this is made easy for you.
Local zoning laws and Home Owners Associations may regulate the height, style, and placement of your fence. Some locations may even require a permit.
Ensure the installation of your fence is within your property line limits.
Your fence will become part of their yard too, and you'll have an easier time building it if you can have access from both sides. Besides, you may get lucky if they decide to share the cost with you.
If you encounter rock or unstable ground, you can concrete the pipe into place either during installation or afterwards.
k Simply call 811 in the US or visit www.call811.com. k In Canada, visit www.transcanada.com/contactus.html
for a list of phone numbers by province.

WWW.WAMBAMFENCE.COM 7
ASSEMBLY INSTRUCTIONS AF14001
TOOLS AND MATERIALS YOU’LL NEEDSafety Glasses 1ft. Torpedo Level
4ft. Level(optional String Line Level)
WamBam Pipe Pounder (Purchase or rent a similar product from Home Depot, Lowe’s or an equipment rental store.)
2in. x 2in. x 6in. Inch Wood “Spacer” Block (2 for each panel)
Cordless Drill (preferably with a high-torque setting)
5/16in. Hex Shank Driver for Cordless Drill (for hex head screws)
Shovel (optional)
Any Power Or Hand Saw With A Fine-Toothed Blade
String Line Stakes
Spool of String
Tape Measure
Earplugs
Gas Powered Post Pounder (rental available through us or some local equipment companies)
Air Driven Pipe Pounder & Small Air Compressor (must deliver at least 2.5 cu. ft. of air at 70-80 PSI. Available at your local equipment rental company.)
OPTIONAL
Recommended for projects that require the installation of 30 or more anchors, or if you have incredibly dry or hard soil.

WWW.WAMBAMFENCE.COM8
ASSEMBLY INSTRUCTIONSAF14001
MURPHY’S VINYL FENCE LAWSLET’S PRETEND (JUST FOR A MOMENT) THAT YOU LIVE IN A PERFECT WORLD.
To get started, we are going to walk you through how you would install the fence illustrated below.
This is the perfect scenario with no curve balls. The ground is level, your fence sections all work out evenly, the birds are chirping, and the sky is blue.
Now back to reality. Your situation is almost guaranteed not to be like this. That’s why we created “Murphy’s Vinyl Fence Laws”. This is a guide that outlines some of the different obstacles you could run into while installing your fence and how to overcome them. You can locate this information at: https://wambamfence.com/knowledgebase/tag/murphys-fence-laws

WWW.WAMBAMFENCE.COM 9
ASSEMBLY INSTRUCTIONS AF14001
DETAILED PRODUCT DIMENSIONS AND SPECIFICATIONS
48in.
51.4in.
82in.
3.97in.
Ground
4.59in. (o.c.)
2in.
84in.
(o.c.)
42in.
36in.
1.06in.
1.00in.
.65in.
.07in.
WamBam Anchor
36in.
Ground
String Line
This fence can be trimmed down both in width and height to accommodate custom applications.
Top and Middle Rails.
WamBamPipe Anchor

WWW.WAMBAMFENCE.COM10
ASSEMBLY INSTRUCTIONSAF14001
STEP 1: LAY OUT MATERIALS
A
C
E
D
B
Top Rail (1) 1” x 1” x 81¾”
⅝” Self-Drilling Stainless Steel Screw (34)
Bottom Rail (1) 1” x 1” x 81¾”
Picket (17) ⅝” x ⅝” x 47½”
1. Rail Bracket (4)2. Nut and Bolt (4)3. #8 5/8” Self-Drilling Screw (4)

WWW.WAMBAMFENCE.COM 11
ASSEMBLY INSTRUCTIONS AF14001
STEP 2: LOCATE AND INSTALL FIRST PIPE ANCHOR
STEP 2.1
Use a post pounder to stabilize the pipe anchor in the anchor positioner, then pound the pipe anchor into the ground.
Note: If obstructions exist beneath the ground, please refer to our ‘Murphy’s Vinyl Fence Laws’ guide for further clarification.
Note: Make sure your anchor positioner is level with the ground and not sloped at an angle.
Slide the leveling donut over the pipe anchor.
2”
STEP 2.2
STEP 2.3
Identify the location for the first pipe anchor positioner. Keep the edge of the anchor posi-tioner 2” away from any vertical surface to leave room for the post. If you are using Cap’n Jack post caps, please place the positioner 4” away instead of 2” to allow space for the post cap.
WWW.WAMBAMFENCE.COM12
ASSEMBLY INSTRUCTIONSAF14001
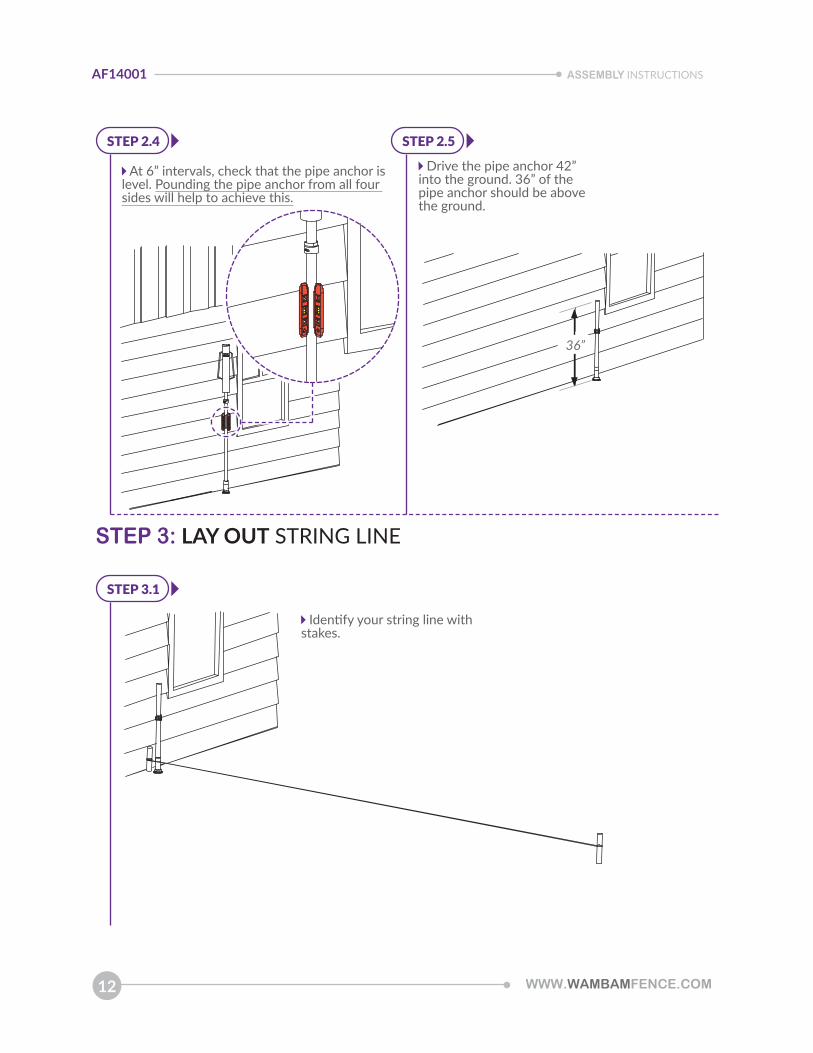
STEP 2.4
STEP 3.1
STEP 2.5
At 6” intervals, check that the pipe anchor is level. Pounding the pipe anchor from all four sides will help to achieve this.
Drive the pipe anchor 42” into the ground. 36” of the pipe anchor should be above the ground.
Identify your string line with stakes.
36”
STEP 3: LAY OUT STRING LINE

WWW.WAMBAMFENCE.COM 13
ASSEMBLY INSTRUCTIONS AF14001
STEP 4.1 Lay out one of the rails
along the string line.
Align the next anchor positioner with the string line and the end of the rail. Repeat this step for all of your anchor positioners.
Drive the rest of the pipe anchors into the ground using the anchor positioners and a post pounder.
Right angle string line application.
Note: Use the same fence rail as a spacer for ease of use and to avoid potential scratching on all of the rails.
Note: Lay out all of the anchor positioners from start to finish before installing the pipe anchors. This will help to identify obstacles and allow you to adjust as needed.
Top View Side View
3’
5’
4’
STEP 4: INSTALL PIPE ANCHORS
STEP 4.2
STEP 4.3
Rail
Rail
Rail

WWW.WAMBAMFENCE.COM14
ASSEMBLY INSTRUCTIONSAF14001
STEP 5: REMOVE SOIL AND SECURE ANCHOR POSITIONERS
STEP 5.1 (OPTIONAL)
Adjust your string line to the string line marking on the anchor positioner.
Drive (1) #8 5/8” self-drilling tek screw, included in the post box, through the anchor positioner into the pipe anchor.
Note: The anchor positioner is designed to adjust both up and down on the pipe anchor to help you determine the final elevation of the post.
Note: The hex head tek screws are packaged with the anchor positioner. You may need to pre-drill before installing the tek screw. Use a 1/8” drill bit.
STEP 5.2 STEP 5.3
3”
If you want your finished fence post to appear buried in the ground, remove about 3” of soil from underneath the anchor positioner.

WWW.WAMBAMFENCE.COM 15
ASSEMBLY INSTRUCTIONS AF14001
EXTREME FROST WARNING
The only fence that’s fun to install.
Ground
1 in.
3 in.
The only fence that’s fun to install.
Leave a 3” Air Cavity Below the Bottom Ring
If you live in the northern U.S or Canada, please leave a minimum 3” air cavity below the bottom plate of the anchor positioner as illustrated above. This will allow for the ground to heave without heaving the pipe.

WWW.WAMBAMFENCE.COM16
ASSEMBLY INSTRUCTIONSAF14001
STEP 7: INSTALL POSTS
STEP 7.1 Slide a post over the first pipe
anchor. The post will rest on the edge of the anchor positioner.
STEP 6: POSITION AND SECURE LEVELING DONUTS
STEP 6.1
Note: The level should sit on the bottom of the anchor positioner.
Note: The donut can be adjusted to compensate for a slightly crooked pipe anchor. Slide the donut either left or right to create a level plane between the anchor positioner and the donut.
Lift the leveling donut to within 1” of the top of the pipe anchor. Adjust the leveling donut as necessary until it is level with the anchor positioner. The leveling donuts should be aligned with the others in the fence line. This can be accomplished by using the string line. Fasten the donut to the pipe anchor using (2) #8 5/8” self-drilling tek screws included in the donut packaging.
WWW.WAMBAMFENCE.COM 17
ASSEMBLY INSTRUCTIONS AF14001
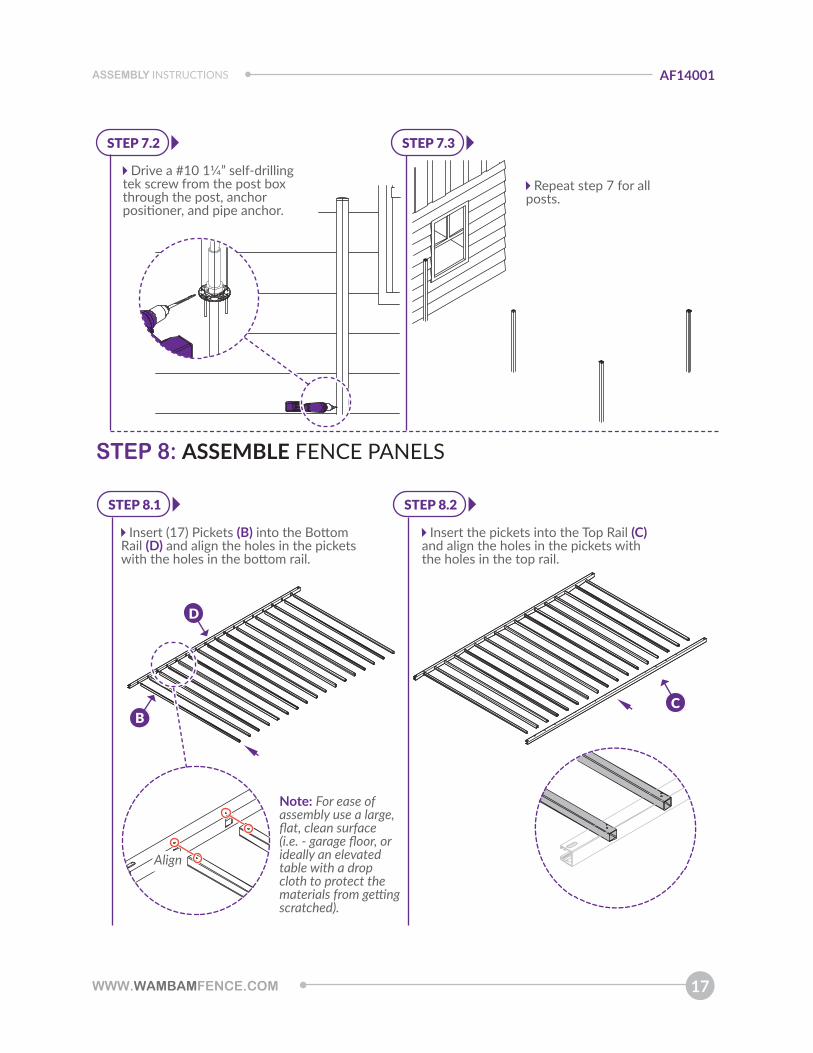
STEP 7.2 STEP 7.3
STEP 8: ASSEMBLE FENCE PANELS
STEP 8.1 STEP 8.2
Insert (17) Pickets (B) into the Bottom Rail (D) and align the holes in the pickets with the holes in the bottom rail.
Insert the pickets into the Top Rail (C)and align the holes in the pickets with the holes in the top rail.
Note: For ease of assembly use a large, flat, clean surface (i.e. - garage floor, or ideally an elevated table with a drop cloth to protect the materials from getting scratched).
D
CB
Repeat step 7 for all posts.
Drive a #10 11/4” self-drilling tek screw from the post box through the post, anchor positioner, and pipe anchor.
Align

WWW.WAMBAMFENCE.COM18
ASSEMBLY INSTRUCTIONSAF14001
STEP 8.3
Fasten the pickets to the rails with (34) ⅝” Self Drilling Stainless Steel Screws (E). Adjust the torque setting to release at the point when the head of the screw is flush with the rail. If you force the screws, you will strip them.
E
STEP 9: INSTALL RAIL BRACKET
STEP 9.1 STEP 9.2
Using the Rail Bracket (A), measure about 2” off the ground. Pre-drill a ⅛” hole into the proper side of the post, through the post itself, and into the pipe anchor inside.
Attach the rail bracket with a 5/8” self-drilling stainless steel screw. If you force the screws, you will strip them.
A
2”

WWW.WAMBAMFENCE.COM 19
ASSEMBLY INSTRUCTIONS AF14001
STEP 10: ATTACH PANELS TO POSTS
STEP 9.3
Install the top rail bracket. The distance between the bottom of the bottom bracket and the bottom of the top bracket should be 47⅛”. Repeat with (2) rail brackets on the opposite post.
Slide the fence panel in between the rail brackets.
Fasten the fence panel with the bolts and nuts that are packaged with the rail brackets.
47⅛”
STEP 10.1 STEP 10.2
Note: The posts can be trimmed down if necessary.

WWW.WAMBAMFENCE.COM20
ASSEMBLY INSTRUCTIONSAF14001
STEP 10.3
Continue to assemble, level, and attach the remaining fence panels as shown.
Congratulations! You did it! Go grab a beverage of your choice, admire your handiwork, and show us what you got by entering our annual photo contest!

WWW.WAMBAMFENCE.COM 21
ASSEMBLY INSTRUCTIONS AF14001
WWW.WAMBAMFENCE.COM
704-892-5222 877-778-5733
6935 Reames Rd. Ste. K. Charlotte, NC 28216