SLEEVE AND PITCH INSTRUCTION BOOKLET · • Check pitch at the sleeve using a digital level or...
8
CONCEPT2.COM Page 1 0517 SLEEVE AND PITCH INSTRUCTION BOOKLET Contents Section I: Replacing White, Green or Black Sleeves with Low Wear 12cm Green Sleeves Refer to this section if your oars currently have original white, green or black sleeves, and you are replacing your sleeves with Low Wear 12cm green sleeves. Section II: Replacing White Wear Plate Sleeves with White Wear Plate Sleeves Refer to this section if your oars currently have white sleeves with wear plates, and you are replacing your sleeves with white wear plate sleeves. Note: The most accurate way to check the pitch of your oars is with the Pitch Check available from Concept2. If you do not have the Pitch Check, the following instructions will enable you to check the pitch of your oars. Section III: Pitching Original Smoothie1 and Fat Blades Refer to this section if you need to check the pitch of your original Smoothie1 or Fat blades. Section IV: Pitching Macon, Big Blade, Smoothie2 and Fat2 Blades Refer to this section if you need to check the pitch of your Macon, Big Blade, Smoothie2 and Fat2 Blades.
Transcript of SLEEVE AND PITCH INSTRUCTION BOOKLET · • Check pitch at the sleeve using a digital level or...

CONCEPT2.COM Page 1 0517
SLEEVE AND PITCH INSTRUCTION BOOKLET
Contents
Section I: Replacing White, Green or Black Sleeves with Low Wear 12cm Green Sleeves
Refer to this section if your oars currently have original white, green or black sleeves, and you are replacing your sleeves with Low Wear 12cm green sleeves.
Section II: Replacing White Wear Plate Sleeves with White Wear Plate Sleeves
Refer to this section if your oars currently have white sleeves with wear plates, and you are replacing your sleeves with white wear plate sleeves.
Note: The most accurate way to check the pitch of your oars is with the Pitch Check available from Concept2. If you do not have the Pitch Check, the following instructions will enable you to check the pitch of your oars.
Section III: Pitching Original Smoothie1 and Fat Blades
Refer to this section if you need to check the pitch of your original Smoothie1 or Fat blades.
Section IV: Pitching Macon, Big Blade, Smoothie2 and Fat2 Blades
Refer to this section if you need to check the pitch of your Macon, Big Blade, Smoothie2 and Fat2 Blades.

CONCEPT2.COMPage 2 0517
SECTION I: REPLACING WHITE, GREEN OR BLACK SLEEVES WITH LOW WEAR 12 CM GREEN SLEEVES PAGE 1 OF 2
Materials Needed
• #1 Phillips screwdriver• 5/64” or 2 mm drill bit• Flat screwdriver• Chisel or knife• Sandpaper or scraper• Two-part urethane (available from Concept2) • C2 Pitch Check Assembly or rack for checking oar pitch• Level
Procedure Overview • Note existing inboard and plan for any
changes in inboard range if desired
• Remove collar and existing sleeve
• Prepare shaft
• Install new sleeve
• Set to desired pitch
Procedure
1. Remove the collar.
2. If your sleeve has a set screw installed in the recessed hole on the measuring guide, remove it.
3. a. Remove the six screws holding the sleeve parts together.
b. Using flat screwdriver, pry old sleeve parts off oar, being careful not to damage the shaft. Note: For some sleeves, it will be necessary to use heat to remove them from oar shafts. If this step is necessary, view the “how to” video for sleeve replacement at concept2.com/service/oars or call Customer Service for assistance.
4. Remove all old adhesive from the shaft, using a heat gun to warm the glue, if necessary. You may need to use a chisel or knife to remove the adhesive from the shaft. Take care when scraping not to damage the shaft.
5. Oar length measurement: (adjustable handles only)
a. Set the oar to the shortest range by adjusting the grip in or out accordingly.
b. Using a metric tape centered at the end of the blade and centered over the oar shaft, measure the length to the end of the outside grip.
c. Adjust grip to shortest length of range (i.e. 284-289 = 284mm).
d. Recheck measurements.
6. a. Remove the six screws from the new sleeve and disassemble the two halves of the sleeve. Reassemble the two sleeve halves near the blade end of the oar shaft where the sleeve is a loose fit. Take care not to strip the six screws by overtightening them.
b. Slide the sleeve up the shaft to its functional position on the oar, noting that the tapered end of the sleeve is the outboard end.
7. Note the “P” and “S” letters on the tapered end of the sleeve. When pitching a port oar, position the sleeve so that the “P” is in line with the back of the blade. When pitching a starboard oar, position the sleeve so that the “S” is in line with the back of the blade.
continued on page 3
Low Wear Green Sleeve
Note: You will notice the new Low Wear Sleeve is 2 cm shorter.
Original Black Sleeve
Original Green Sleeve
CONCEPT2.COM Page 3 0517
Procedure continued
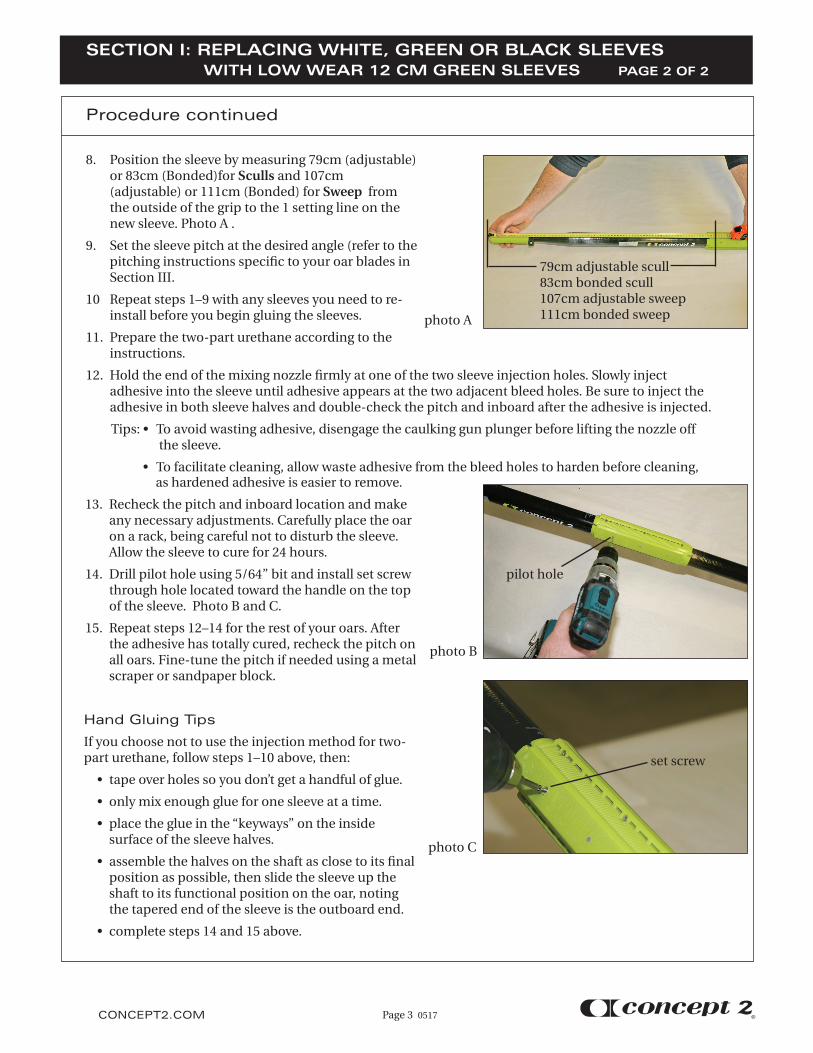
8. Position the sleeve by measuring 79cm (adjustable) or 83cm (Bonded)for Sculls and 107cm (adjustable) or 111cm (Bonded) for Sweep from the outside of the grip to the 1 setting line on the new sleeve. Photo A .
9. Set the sleeve pitch at the desired angle (refer to the pitching instructions specific to your oar blades in Section III.
10 Repeat steps 1–9 with any sleeves you need to re-install before you begin gluing the sleeves.
11. Prepare the two-part urethane according to the instructions.
12. Hold the end of the mixing nozzle firmly at one of the two sleeve injection holes. Slowly inject adhesive into the sleeve until adhesive appears at the two adjacent bleed holes. Be sure to inject the adhesive in both sleeve halves and double-check the pitch and inboard after the adhesive is injected.
Tips: • To avoid wasting adhesive, disengage the caulking gun plunger before lifting the nozzle off the sleeve.
• To facilitate cleaning, allow waste adhesive from the bleed holes to harden before cleaning,
SECTION I: REPLACING WHITE, GREEN OR BLACK SLEEVES WITH LOW WEAR 12 CM GREEN SLEEVES PAGE 2 OF 2
as hardened adhesive is easier to remove.
13. Recheck the pitch and inboard location and make any necessary adjustments. Carefully place the oar on a rack, being careful not to disturb the sleeve. Allow the sleeve to cure for 24 hours.
14. Drill pilot hole using 5/64” bit and install set screw through hole located toward the handle on the top of the sleeve. Photo B and C.
15. Repeat steps 12–14 for the rest of your oars. After the adhesive has totally cured, recheck the pitch on all oars. Fine-tune the pitch if needed using a metal scraper or sandpaper block.
Hand Gluing Tips
If you choose not to use the injection method for two-part urethane, follow steps 1–10 above, then:
• tape over holes so you don’t get a handful of glue.
• only mix enough glue for one sleeve at a time.
• place the glue in the “keyways” on the inside surface of the sleeve halves.
• assemble the halves on the shaft as close to its final position as possible, then slide the sleeve up the shaft to its functional position on the oar, noting the tapered end of the sleeve is the outboard end.
• complete steps 14 and 15 above.
photo B
photo A
photo C
79cm adjustable scull 83cm bonded scull 107cm adjustable sweep 111cm bonded sweep
pilot hole
set screw

CONCEPT2.COMPage 4 0517
SECTION II: REPLACING WHITE WEAR PLATE SLEEVES WITH WHITE WEAR PLATE SLEEVES PAGE 1 OF 2
Materials Needed
• Masking tape• Two-part glue• Screwdriver• Scraper• C2 Pitch Check Assembly or other rack for
checking oar pitch• Level• Drill and 5/64 drill bit
Procedure Overview • Mark existing inboard
• Remove collar and existing sleeve
• Prepare shaft
• Install new sleeve
• Repitch oar if necessary
photo A
Procedure
1. At the inboard (handle) side of the sleeve, wrap a piece of tape around the shaft to mark the current sleeve location. See photo A.
2. Remove the collar:
a. Pry off the old wear plate or slide it until it is free of the sleeve. See photo B.
b. If there is a set screw in the side of the sleeve, remove it, and save it for later use.
c. Peel off the large sleeve piece by working a screwdriver between the shaft and the sleeve, being careful not to damage the shaft. To facilitate this process, use a heat gun to warm the sleeve and glue under it.
3. Using a chisel or scraper, remove all the old adhesive from the shaft. To facilitate this process, use a heat gun to warm the glue.
4. Install new sleeve. If you are using injectable glue, proceed to step a in the following instruction. Otherwise, proceed to the Hand Mix Method section on page 7:
Injectable Glue Method
a. Place larger part of sleeve around the shaft. Starting from the blade end, slide the wear plate on until it “clicks” into place. Tip: It can be easier to assemble the sleeve on the shaft closer to the blade instead of closer to the final location, as the shaft is smaller in diameter closer to the blade.
b. Slide the sleeve into place next to the tape, and turn it so the wear plate is aligned with the back of the blade.
c. Assemble the glue and gun following the glue instructions.
d. Hold the end of the mixing nozzle firmly at one of the two sleeve injection holes. See photo C. Slowly inject adhesive into sleeve until adhesive appears at the adjacent bleed hole. Be sure to inject adhesive into both sleeve halves.
photo B
photo C

CONCEPT2.COM Page 5 0517
photo D
photo E
Tip 1: To avoid wasting adhesive, disengage the caulking gun plunger before lifting the nozzle off the sleeve.
Tip 2: To facilitate cleaning, allow waste adhesive from the bleed holes to harden before cleaning, as hardened adhesive is easier to remove.
Proceed to Step 5.
Hand Mix Method
• Note: The glue in the two tubes of C2 Part Number 633 (2-part Urethane Adhesive) will glue four scull sleeves or three sweep sleeves.
a. On a mixing surface, squeeze out equal amounts of glue and mix well with the supplied stick.
b. Apply glue along the middle of each half of the sleeve. See photo D.
c. Place the sleeve over the shaft so that it is aligned with the tape and with the wear plate side towards the back of the blade.
d. Slide the wear plate on until it “clicks” into place.
Proceed to step 5.
5. Check the inboard location and correct if necessary.
Procedure continued
6. Check the oar pitch (refer to the pitching instructions specific to your oar blades in Sections IV and V). Correct the pitch if necessary.
7. Carefully place the oar on a rack, being careful not to disturb the sleeve. Estimated cure time is 24 hours.
8. After 24 hours, scrape off any excess glue.
9. Using the drill and 5/64 bit, drill a pilot hole through the sleeve and oar shaft in the dimple provided in the sleeve. See photo E.
10. Install the screw in the hole and snug it up.
11. Install the collars.
Note: If you are replacing many white sleeves, or if you are having difficulty with the procedure, please contact Concept2 at 1.800.245.5676.
SECTION II: REPLACING WHITE WEAR PLATE SLEEVES WITH WHITE WEAR PLATE SLEEVES PAGE 2 OF 2

CONCEPT2.COMPage 6 0517
SECTION III: PITCHING ORIGINAL SMOOTHIE1 AND FAT BLADES PAGE 1 OF 2
Materials Needed
• Digital level or pitch meter• Level surface• Square-sided level or level block of wood
Procedure Overview • Set up the level block for the blade.
• Check pitch at the sleeve using a digital level or pitch meter
Procedure
1. When measuring the pitch on a Smoothie or “Fat” Smoothie Vortex blade, do not include the curved portion at the top edge of the blade.
2. Ensure the oar shaft is level.
There are a number of methods used to check the pitch on oars and sculls. The easiest way to measure pitch on Concept2 products is to use the Pitch Check available from Concept2. If you do not have a Pitch Check, the following instructions reflect the methods used at Concept2 to check and set pitch. If you want to check the pitch on your oars, we recommend that you use these same methods, as other methods may give you different results.
Note: Be sure to use the appropriate method for the type of blade you have.
End support
Sweep - 7 inches (18 cm) Scull - 6 inches (15.3cm)
3 inches(7.62cm)
Square sided level or a leveled block of wood
Pitch meter
IMPORTANT!! Note that this edge is parallel to the tip of the blade and must be level.
TOP VIEW
SIDE VIEW
continued on next page
(All blades made from the older 1996–2006 Smoothie1 mold) with or without Vortex Edge

CONCEPT2.COM Page 7 0517
2. Our standard procedure was to ship Smoothie1 blades with the pitch set so the oar could be put into rigging that was set for a Big Blade, with no adjustment required.
The Smoothie1 performs best with the flat surface of the blade pitched at 2 degrees during the drive. Thus, if you use the Smoothie1 in an oarlock pitched at 5 degrees, the result at the blade face will be the desired 2 degree pitch.
5° - 3° = 2° net pitch at blade face.
3. Set the sleeve at 2° relative to the flat blade surface as shown in diagram at right.
Procedure continued
5°
2°
blade face
3°
3 degrees3 degrees
3°
Starboard Oar Port Oar
Pitch meter (A digital level may also be used.)
SECTION III: PITCHING ORIGINAL SMOOTHIE1 AND FAT BLADES PAGE 2 OF 2

CONCEPT2.COMPage 8 0517
SECTION IV: PITCHING MACON, BIG BLADE, SMOOTHIE2 AND FAT2 BLADES
Materials Needed
• Level• Level surface• Square-sided level or level block of wood
Procedure Overview • Set up the level block for the blade.
• Check pitch at the sleeve using the level
Procedure
1. Clamp a piece of wood or steel to one end of a bench or other stable structure. This block should have an even top surface and must be at least as long as your blade is wide.
2. Using a bubble level and shims, level the block and secure it to the bench.
3. Position a support block (“V” blocks are helpful here) to hold the handle end of the oar off the bench.
4. Place the blade of the oar face side down on the block, with the short side corner of the blade extending 1 inch beyond the edge of level block.
Note: The centerline of the oar must be perpendicular to the level block.
5. Position your level on the wear surface of the sleeve. If the surface is level, then the oar has zero pitch. If the surface is not level, then raise one edge of the level until it shows level. This will show you how much sleeve material will have to be removed to correct the pitch to zero.
You may fine tune the pitch as much as one-half (0.5) degree by filing or scraping down the wear surface.
6. Use an adjustable pitch level for checking oars with a designated pitch other than zero.
There are a number of methods used to check the pitch on oars and sculls. The easiest way to measure pitch on Concept2 products is to use the Pitch Check available from Concept2. If you do not have a Pitch Check, the following instructions reflect the methods used at Concept2 to check and set pitch. If you want to check the pitch on your oars, we recommend that you use these same methods, as other methods may give you different results.
Note: Be sure you use the appropriate method for the type of blade you have.
(All blades made from the older 2007 Smoothie2 mold and 1987 traditional hatchet blade mold) with or without Vortex Edge
Centerline90°
1”
SIDE VIEW Level
Level blockTable
Support block
Check pitch on this surface
Shaft should be level for pitching.
Note: This corner of blade extends 1” beyond the edge of level block.