Sketching garments for virtual characters Workshop on Sketch-Based Interfaces and Modeling (2004)...
8
EUROGRAPHICS Workshop on Sketch-Based Interfaces and Modeling (2004) John F. Hughes and Joaquim A. Jorge (Guest Editors) Sketching garments for virtual characters Emmanuel Turquin 1 , Marie-Paule Cani 1 and John F. Hughes 2 1 Laboratoire GRAVIR (CNRS, INP Grenoble, INRIA, UJF) 2 Brown University Figure 1: Three examples of garments of various styles, respectively generated from the sketch on their left using our approach. Abstract We present a method for simply and interactively creating basic garments for dressing virtual characters in ap- plications like video games. The user draws an outline of the front or back of the garment, and the system makes reasonable geometric inferences about the overall shape of the garment (ignoring constraints arising from physics and from the material of the garment). Thus both the garment’s shape and the way the character is wearing it are determined at once. We use the distance from the 2D garment silhouette to the character model to infer the vari- ations of the distance between the remainder of the garment and the character in 3D. The garment surface is generated from the silhouette and border lines and this varying distance information, thanks to a data-structure that stores the distance field to the character’s body. This method is integrated in an interactive system in which the user sketches the garment over the 3D model of the character. Our results show that the system can be used to create both standard clothes (skirts, shirts) and other garments that may be worn in a variety of ways (scarves, panchos). Key words; Sketch-based interfaces, virtual garment, shape modeling. Categories and Subject Descriptors (according to ACM CCS): I.3.5 [Computational Geometry and Object Modeling]: Modeling packages I.3.6 [Methodology and Techniques]: Interaction techniques 1. Introduction Nowadays, 3D virtual characters are everywhere: in video games, feature films, TV shows... Obviously, these charac- ters need clothing: when we encounter a person, we instantly notice his or her clothes, and feel that these tell us some- thing about the person. Thus clothing on virtual characters provides a way to easily advance the story being told to the viewer. The range of approaches used for clothing virtual char- acters is large: for incidental characters, the clothing may be no more than a texture map. For lead characters in feature films, full-fledged physical simulation of detailed cloth mod- c The Eurographics Association 2004.
Transcript of Sketching garments for virtual characters Workshop on Sketch-Based Interfaces and Modeling (2004)...
EUROGRAPHICS Workshop on Sketch-Based Interfaces and Modeling (2004)John F. Hughes and Joaquim A. Jorge (Guest Editors)
Sketching garments for virtual characters
Emmanuel Turquin1, Marie-Paule Cani1 and John F. Hughes2
1 Laboratoire GRAVIR (CNRS, INP Grenoble, INRIA, UJF)2 Brown University
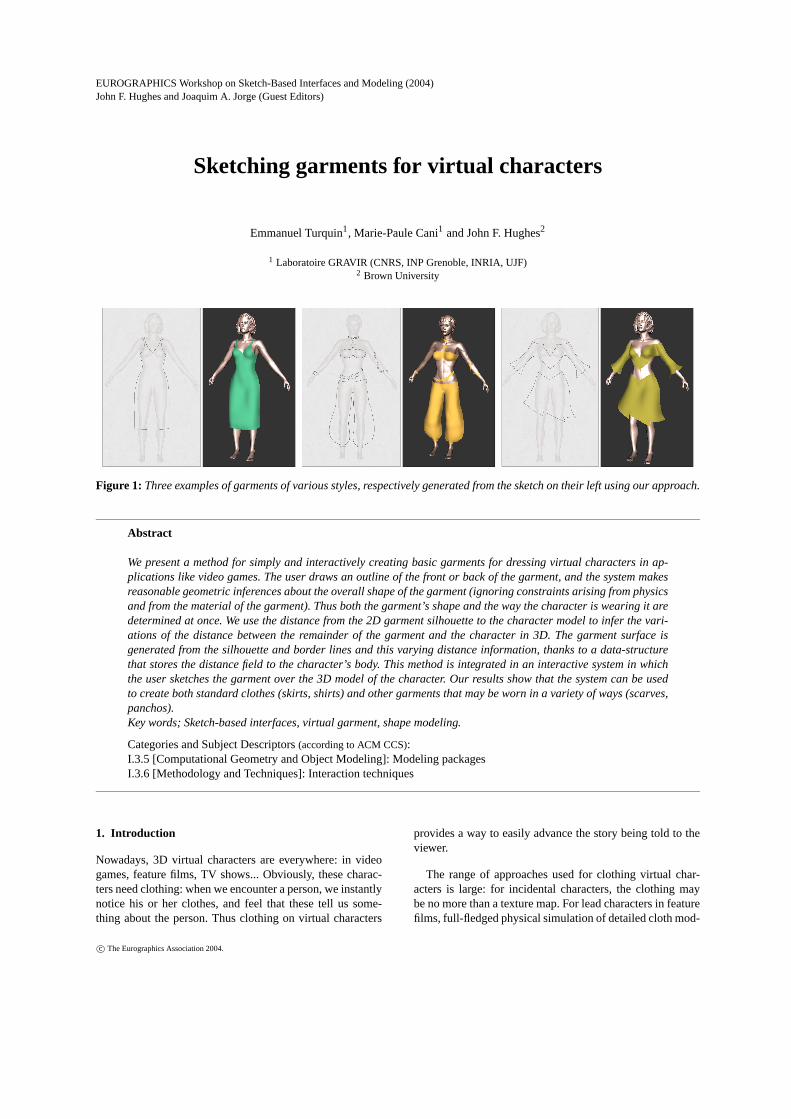
Figure 1: Three examples of garments of various styles, respectively generatedfrom the sketch on their left using our approach.
Abstract
We present a method for simply and interactively creating basic garments fordressing virtual characters in ap-plications like video games. The user draws an outline of the front or back of the garment, and the system makesreasonable geometric inferences about the overall shape of the garment (ignoring constraints arising from physicsand from the material of the garment). Thus both the garment’s shape andthe way the character is wearing it aredetermined at once. We use the distance from the 2D garment silhouette to thecharacter model to infer the vari-ations of the distance between the remainder of the garment and the character in 3D. The garment surface isgenerated from the silhouette and border lines and this varying distance information, thanks to a data-structurethat stores the distance field to the character’s body. This method is integrated in an interactive system in whichthe user sketches the garment over the 3D model of the character. Ourresults show that the system can be usedto create both standard clothes (skirts, shirts) and other garments that may be worn in a variety of ways (scarves,panchos).Key words; Sketch-based interfaces, virtual garment, shape modeling.
Categories and Subject Descriptors(according to ACM CCS):I.3.5 [Computational Geometry and Object Modeling]: Modeling packagesI.3.6 [Methodology and Techniques]: Interaction techniques
1. Introduction
Nowadays, 3D virtual characters are everywhere: in videogames, feature films, TV shows... Obviously, these charac-ters need clothing: when we encounter a person, we instantlynotice his or her clothes, and feel that these tell us some-thing about the person. Thus clothing on virtual characters
provides a way to easily advance the story being told to theviewer.
The range of approaches used for clothing virtual char-acters is large: for incidental characters, the clothing maybe no more than a texture map. For lead characters in featurefilms, full-fledged physical simulation of detailed cloth mod-
c© The Eurographics Association 2004.
E. Turquin & M.-P. Cani & J. F. Hughes / Sketching garments forvirtual characters
els may be used. And in the midrange, simple skinning tech-niques, combined with texture mapping, are common, pro-viding some deformation of clothing as the character moves,but no physical realism. There are three problems one canassociate with clothing virtual characters: the design of theclothes (tailoring), placing them on the character (dressing),and making them look physically correct (typically throughsimulation).
The process of tailoring, for human beings, involveschoosing cloth and fitting it to the body, often making ad-justments in the patterns of the cloth to adapt it to the par-ticular person’s form, and then sewing it. For virtual charac-ters, clothing often has no "patterns" from which it is sewn,instead being represented by a simple polygon mesh that’sconstructed to fit the body. It’s currently tedious to constructsuch meshes even without the issues of patterns and stitch-ing. It’s sometimes done by directly incorporating the clothmesh into a character’s geometric model, so that the charac-ter doesn’t actually havelegs, for instance, but justpants. Inthis case physical simulation is no longer a possibility, andwhen a character needs new clothes, it must be largely re-modeled. An alternative approach involves drawing patternpieces for a garment and positioning them over the nakedform of the character, defining stitching constraints, etc. Thiscan be tedious, especially when the character is not impor-tant enough to merit this level of effort; it also requires anunderstanding of how cloth fits over forms, although the ac-tual pattern-and-stitching information may not be relevantafter the tailoring is completed (except in the rare case wherethe physical properties of the cloth — was it cut on the bias?Does the cloth resist folding along one axis? — are later usedin a full-fledged physical simulation).
Our approach combines tailoring and dressing into a sin-gle step to create a mesh that’s suitable for later simulationor skinning approaches. The idea is to make it easy to gen-erate simple garments that are adapted to an existing model.We believe that most people know better how to draw gar-ments than the patterns which are needed to sew them. Theaim of this work is thus to explore the use of a sketch-basedinterface for quickly constructing 3D virtual garments over acharacter model. This paper describes simple solutions to theproblems ofshape generationandplacementof the clothing.The resulting system is so easy to use that it takes only min-utes to create a simple garment.
1.1. Related work
Current interactive systems [HM90, WMTT93, BGR02] fordesigning garments and dressing virtual actors with themcan be quite tedious: typically the user must draw each pat-tern piece on a planar virtual cloth, specify the edges to bestitched together, position the pieces around the virtual actor,and then finally run a simulation to obtain a convincing restshape for the garment around the character model.
Sketch-based modeling systems such as
[ZHH96, EyHBE97, IMT99, FBSS04] have becamepopular for interactively generating 3D geometry fromsketches. Most of them only generate solid objects, asopposed to such surfaces as garments.
Two works have combined the idea of sketching with thegoal of designing clothes: Bourguignon [BCD01] provided a3D sketching method and used it to design garments over vir-tual actors. The sketch could be viewed from arbitrary view-ing angles, but no 3D surface was reconstructed for the gar-ment. Igarashi [IH02] described a sketch-based method forpositioning garment patterns over a 3D body, but the usercould not use the system for directly sketching the desiredgarment and still must know which pattern shapes will re-sult in the garment he desires. That is to say, they addressedthedressingproblem through sketching, but not thetailoringproblem.
1.2. Overview
This paper presents a method for reconstructing the 3D ge-ometry and placement of garments from a 2D sketch. Asin [BCD01], the user sketches the garment directly on the3D virtual actor body model. However, our method outputsa full 3D geometry for the garment, using the distance fromthe 2D garment silhouette to the character body model to in-fer the variations of the distance between the garment andthe character in 3D.
More precisely, the reconstruction is performed in 3 steps:the lines of the 2D drawing are first automatically classifiedeither assilhouettes(lines that do not cross the body) or asborder lines(lines that do cross the body). A distance-to-the-body value is computed for each point of a silhouette seg-ment and these distances are then used to determine desiredpoint-to-body distances for the border lines. This distanceinformation is then propagated in 2D to find desired point-to-body distances, which are then in turn used to determinethe 3D position of the garment.
2. Sketch-based interface
2.1. Typical user interaction
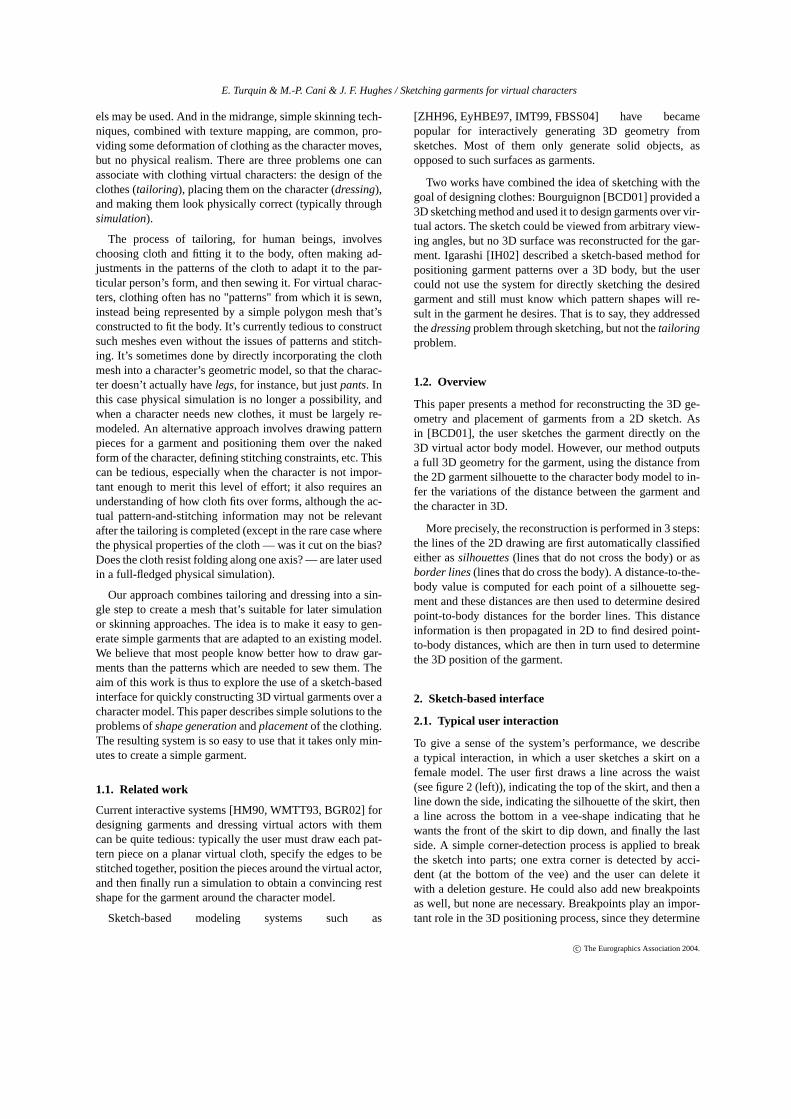
To give a sense of the system’s performance, we describea typical interaction, in which a user sketches a skirt on afemale model. The user first draws a line across the waist(see figure 2 (left)), indicating the top of the skirt, and then aline down the side, indicating the silhouette of the skirt, thena line across the bottom in a vee-shape indicating that hewants the front of the skirt to dip down, and finally the lastside. A simple corner-detection process is applied to breakthe sketch into parts; one extra corner is detected by acci-dent (at the bottom of the vee) and the user can delete itwith a deletion gesture. He could also add new breakpointsas well, but none are necessary. Breakpoints play an impor-tant role in the 3D positioning process, since they determine
c© The Eurographics Association 2004.
E. Turquin & M.-P. Cani & J. F. Hughes / Sketching garments forvirtual characters
Figure 2: (left) The user has drawn a few lines to indicatethe shape of the skirt; the corner-detector has detected abreakpoint that the user does not want. The user will make adeletion gesture (a curve in the shape of anα enclosing themistaken point) to delete it.(middle) The user has deletedthe breakpoint, and the lines have been classified: thesil-houettesare in red and thebordersin yellow. (right) Thesurface inferred by the system once the user has required areconstruction.
Figure 3: (left) The user drew the outline of the skirt with-out sharp corners at the bottom, and the corner-detectorfailed to put breakpoints there. The user therefore makesgestures (overdrawn in green here) to indicate the need fornew breakpoints.(middle) The new breakpoints have beeninserted.(right) The skirt is reconstructed.
the global 3D position of the cloth with respect to the body.The way they are used is detailed in Section 4.3. The twolines on the sides are classified as silhouettes, and the othersare classified as border lines, as shown in the figure.
Now the user asks to see the garment inferred by the sys-tem; a surface matching the drawn constraints, but adaptedto the shape of the underlying form (look near the waistine,for instance) appears almost instantly (see figure 2 (right)).
Sometimes, as in figure 3, the breakpoint-inference failsto detect all the points the user wants; in this case she or hecan make a gesture to add new breakpoints.
In the current state of our system, only the front of the gar-ment is generated; the back would have to be generated in asecond pass, possibly through a simple mirror image of thesilhouette strokes and user-applied modification of the bor-der strokes. There’s no texture on the surface, no indicationof how a surface of this form could be constructed from flatcloth, no method for indicating that the front and back shouldbe joined. Thus the current interface concentrates simply onthe way that shape and placement can be inferred from sim-ple strokes, not on the entire tailoring and dressing process.
2.2. Gestural interface components
The user’s marks are interpreted as gestures, with the de-fault being the construction of silhouette and border linesegments. Other gestures add breakpoints for the classifi-cation process, delete breakpoints, delete a segment or an
(a)
(b)
(c)
(d)
(e)
(f)
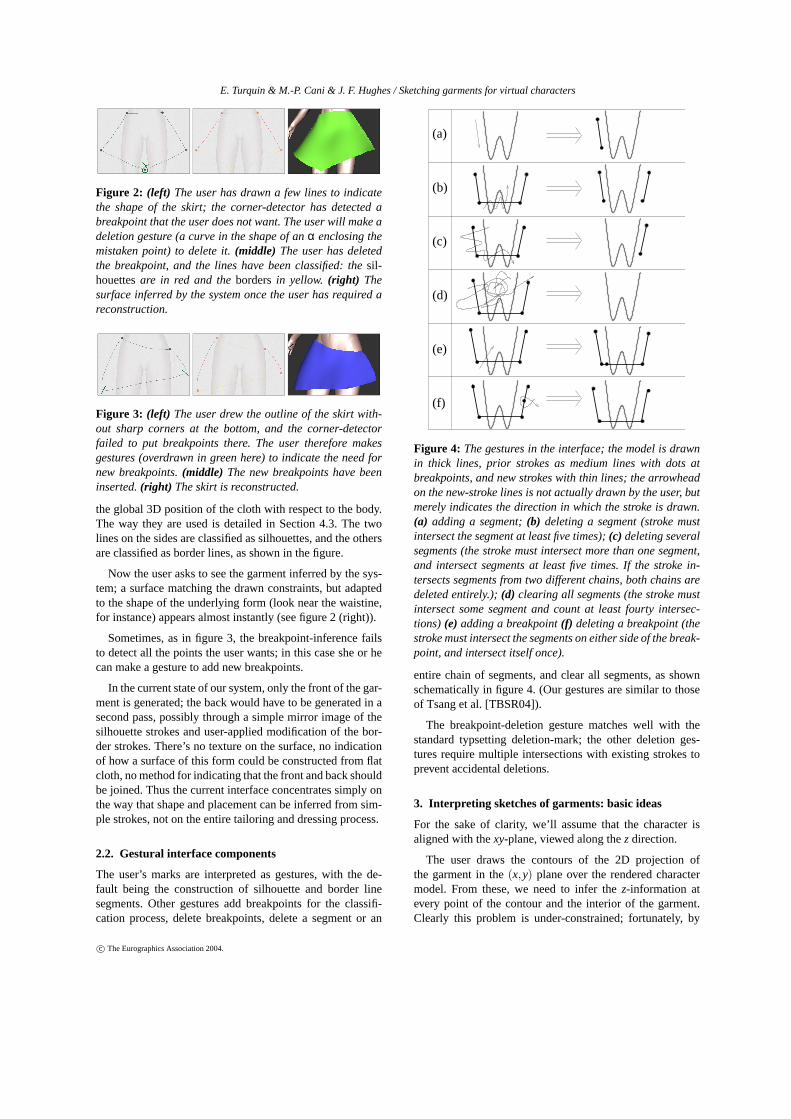
Figure 4: The gestures in the interface; the model is drawnin thick lines, prior strokes as medium lines with dots atbreakpoints, and new strokes with thin lines; the arrowheadon the new-stroke lines is not actually drawn by the user, butmerely indicates the direction in which the stroke is drawn.(a) adding a segment;(b) deleting a segment (stroke mustintersect the segment at least five times);(c) deleting severalsegments (the stroke must intersect more than one segment,and intersect segments at least five times. If the stroke in-tersects segments from two different chains, both chains aredeleted entirely.);(d) clearing all segments (the stroke mustintersect some segment and count at least fourty intersec-tions) (e) adding a breakpoint(f) deleting a breakpoint (thestroke must intersect the segments on either side of the break-point, and intersect itself once).
entire chain of segments, and clear all segments, as shownschematically in figure 4. (Our gestures are similar to thoseof Tsang et al. [TBSR04]).
The breakpoint-deletion gesture matches well with thestandard typsetting deletion-mark; the other deletion ges-tures require multiple intersections with existing strokes toprevent accidental deletions.
3. Interpreting sketches of garments: basic ideas
For the sake of clarity, we’ll assume that the character isaligned with thexy-plane, viewed along thez direction.
The user draws the contours of the 2D projection ofthe garment in the(x,y) plane over the rendered charactermodel. From these, we need to infer thez-information atevery point of the contour and the interior of the garment.Clearly this problem is under-constrained; fortunately, by
c© The Eurographics Association 2004.
E. Turquin & M.-P. Cani & J. F. Hughes / Sketching garments forvirtual characters
considering the special nature of clothing, we can gener-ate a plausible guess of the user’s intentions. In particular,silhouettes of clothing not only indicate points where thetangent plane to the cloth contain the view direction; theyusually occur as the clothing passes around the body, so wecan estimate thez-depth of a silhouette edge as being thez-depth of the nearest point on the body (or, for a body placedfairly symmetrically about thexy-plane, simply usez= 0 asa quicker estimate). Moreover, the distance from a silhouetteto the body helps us to infer the distance elsewhere, since acloth which tightly fits the body in the(x,y) plane will alsotend to fit it in thez direction, while a loose cloth will tendto float everywhere.
3.1. Overview of the algorithm
Our algorithm, whose different steps will be detailed in thefollowing sections, develops as follows:
1. Process the 2D sketch of the garment:
• Find high-curvature points (breakpoints) that split thecontours into segments;
• Let user add and/or delete breakpoints.• Classify segments of curve between breakpoints into
border lines(which cross the character’s body) orsil-houette lines.
2. Infer the 3D position of silhouette and border lines:
• For each breakpoint that does not lie over body, finddistance to body,d, and set the point’s depth,z, to thedepth of the closest point on the body.
• For each silhouette line, interpolatez linearly overthe interior of the line, and use interpolatedz-valuesto computed-values (distance to the body in the 3Dspace) over the interior of the line.
• For each border line, interpolated over interior lin-early to establish a desired distance to the model andset azvalue for each point on the line;
3. Generate the interior shape of the garment:
• Create a mesh consisting of points within the 2D sim-ple closed curve that the user has drawn, sampled ona rectangular grid in the(x,y) plane.
• Extend the values ofd, which are known on theboundary of this grid, over the interior.
• For each interior grid point(x,y), determine the valueof z for which the distance from(x,y,z) to the body isthe associated value ofd.
• Adjust this tentative assignment ofz values to takeinto account the surface tension of the garment be-tween two limbs of the character.
• Tesselate the grid with triangles, clipped to the bound-ary curves, and render the triangles.
3.2. Pre-computing a distance field
To accelerate steps 2 and 3 of the algorithm above, a dis-tance field to the character’s model is pre-computed whenthe model is loaded: for each point of a 3D grid aroundthe model, we determine and store the distance to the near-est point of the model, using the octree-based algorithmin [JS01].
The distance field will be used each time we need to findthezcoordinate to assign to a pointp(x0,y0) so that it lies ata given distance from the model. This can easily be done bystepping along the rayR(z) = (x0,y0,z) and stopping whenthe adequate distance value is reached (we interpolate tri-linearly to estimate distances for non-grid points). When thiscomputation is performed during a sweeping procedure, thestepping starts at thez value already found at a neighbour-ing pixel, which ensures the spatial coherence of the resultand efficiency. Else, the process starts near the near plane ofour rectangular frustum, in which the distance field has beencomputed.
The quality of the results depends directly on the resolu-tion of the 3D grid storing the distance field, as does compu-tation time. The size of the 3D grid is user-configurable, butwe have generally used a 32×32×32 grid.
4. Processing of contour lines
4.1. 2D processing
First, one must classify the parts of the user’s sketch. As theuser sketches, a new line that starts or ends near (within a fewpixels of) an endpoint of an already-sketched line is assumedto connect to it. When the sketch is complete (i.e., forms asimple closed curve in the plane), we classify the parts:
• First the sketched lines are broken into segments by de-tecting points of high (2D) curvature (breakpoints) (this isactually done on-the-fly, as the user draws the strokes).
• Each segment is classified as a silhouette or border line:border lines are ones whose projection meets the projec-tion of the body in thexy-plane, silhouettes are the others.The mask of the body’s projection is pre-computed andstored in a buffer called thebody mask, in order to makethis classification efficient.
• The resulting segmentation is visible to the user, whomay choose if necessary to add or delete breakpoints indi-cating segment boundaries, after which segments are re-classified.
4.2. Distance andz-value at breakpoints
Breakpoints that are located over the body model (which istested using the body mask) are used to indicate regions ofthe cloth that fit very tightly to the body. They are thus as-signed a zero distance to the model, and theirz value is setto the body’szat this specific(x,y) location.
c© The Eurographics Association 2004.

E. Turquin & M.-P. Cani & J. F. Hughes / Sketching garments forvirtual characters
To assign a distance valued to a breakpoint that does notlie over the body, we step along the ray from the eye inthe direction of the breakpoint’s projection into thexy-plane,checking distance values in the distance field data structureas we go, and find thez-value at which this distance is min-imized. We assign to the breakpoint the discoveredz anddvalues, thus positioning the breakpoint in 3D.
4.3. Line positioning in 3D
Our aim is to use the 3D position of the breakpoints we justcomputed to roughly position the garment in 3D, while thegarment’s shape will mostly be inferred from distances tothe body along the sketch silhouettes.
To position the silhouette lines in 3D, we interpolatezlinearly along the edge between the two breakpoints at theextremities of the silhouette. We then set thed-values forinterior points of the silhouette to those stored in the pre-computed distance field. (We could instead interpolateddirectly, and compute associatedz-values, but if the bodycurves away from the silhouette curve, there may be nozvalue for which the interpolatedd-value is the distance tothe body; alternatively, we could computed directly for eachinterior point and then assign thez-value of the closest bodypoint, as we did with the breakpoints, but in practice thisleads to wiggly lines because of the coarse grid on which wepre-compute the approximate distance-to-body.)
Having established the values ofz andd along silhouetteedges, we need to extend this assignment to the border lines.We do this in the simplest possible way: we assignd linearlyalong each border line. Thus, for example, in the skirt shownabove, thed-values at the two ends of the waistline are bothsmall, so thed-value for the entire waistline will be small,while thed-values for the ends of the hemline are quite large,so the values along the remainder of the hemline will be largetoo.
5. 3D Reconstruction of the garment’s surface
5.1. Using distance to guess surface position
As for the contour lines, the interpolation of distances to thebody will be our main clue for inferring the 3D position ofthe interior of the garment. The first process thus consistsinto propagating distance values inside the garment. This isdone in the following way:
The 2D closed contour lines of the garment are used togenerate a(x,y) buffer (sized to the bounding box of thesketch) in which each pixel is assigned one of the values‘in’, ‘out’ or ‘border’, according to its position with respectto the contour. A border pixel is one for which some contourline intersects either the vertical or horizontal segment oflength one passing through the pixel-center (see figure 5);other pixels are inside or outside, which we determine using
B
B
B
B
BB
I
I
I
II
I
I
I
IIII
O O O O
OOOO
O O O
O
Figure 5: Each grid point represents a small square (solidlines). If a contour (heavy line) meets a small vertical or hor-izontal line through the pixel center (dashed lines), the pixelis classified as a boundary; boundary pixels are marked witha “B” in this figure. Others are classified as inside (“I”) oroutside (“O”) by winding number.
a propagation of ‘out’ values from the outer limits of thebuffer.
The distance values already computed along the silhou-ette and border lines are assigned to the border pixels. Thedistances for the ‘in’ pixels are initialized to the mean valueof distances along the contour.
Then, distance information is propagated inside the bufferby applying several iterations of a standard smoothing fil-ter, which successively recomputes each value as an evenlyweighted sum (with coefficients summing to 1) of its currentvalue and those of its “in” or “boundary” orthogonal or di-agonal neighbours (see figure 6). The iterations stop whenthe maximum difference between values obtained after twosuccessive iterations is under a threshold, or if a maximumnumber of steps has been reached. Convergence generallyseems to be rapid, but we have not proven convergence ofthe method in general.
We then sweep in the 2D grid for computingz values atthe inner pixels: as explained in section 3.2, thez value iscomputed by stepping along a ray in thez direction, startingat thez value we already assigned for a neighbouring point,and taking thez the closest to the desired distance value, asstored in the pre-computed distance field.
5.2. Mimicking the cloth’s tension
The previous computation gives a first guess of the garment’s3D position, but still results in artefacts in regions locatedbetween two limbs of the character: due to surface tension,a cloth should not tightly fit the limbs in the in-between re-gion (as in figure 7 (top)), but rather smoothly interpolate thelimb’s largesz value, due to its surface tension.
To achieve this, we first erode the 2D body mask (alreadymentioned in section 4.1) of a proportion that increases with
c© The Eurographics Association 2004.
E. Turquin & M.-P. Cani & J. F. Hughes / Sketching garments forvirtual characters
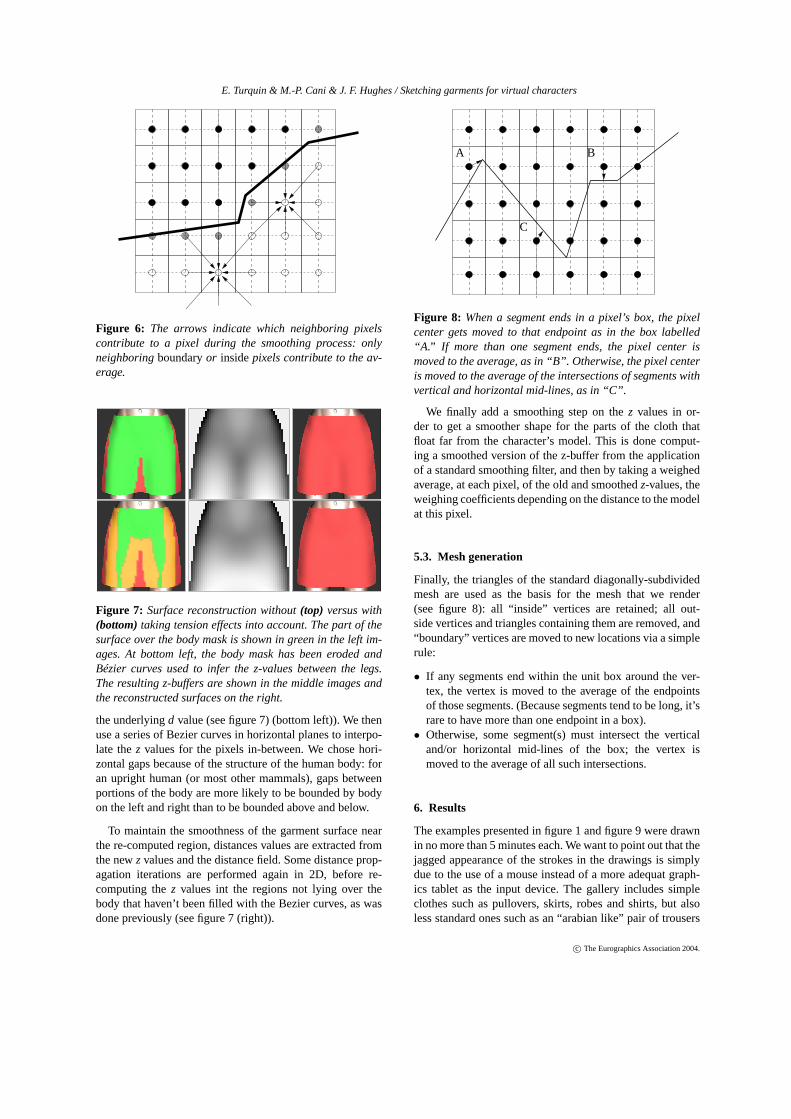
Figure 6: The arrows indicate which neighboring pixelscontribute to a pixel during the smoothing process: onlyneighboringboundaryor insidepixels contribute to the av-erage.
Figure 7: Surface reconstruction without(top) versus with(bottom) taking tension effects into account. The part of thesurface over the body mask is shown in green in the left im-ages. At bottom left, the body mask has been eroded andBézier curves used to infer the z-values between the legs.The resulting z-buffers are shown in the middle images andthe reconstructed surfaces on the right.
the underlyingd value (see figure 7) (bottom left)). We thenuse a series of Bezier curves in horizontal planes to interpo-late thez values for the pixels in-between. We chose hori-zontal gaps because of the structure of the human body: foran upright human (or most other mammals), gaps betweenportions of the body are more likely to be bounded by bodyon the left and right than to be bounded above and below.
To maintain the smoothness of the garment surface nearthe re-computed region, distances values are extracted fromthe newz values and the distance field. Some distance prop-agation iterations are performed again in 2D, before re-computing thez values int the regions not lying over thebody that haven’t been filled with the Bezier curves, as wasdone previously (see figure 7 (right)).
A B
C
Figure 8: When a segment ends in a pixel’s box, the pixelcenter gets moved to that endpoint as in the box labelled“A.” If more than one segment ends, the pixel center ismoved to the average, as in “B”. Otherwise, the pixel centeris moved to the average of the intersections of segments withvertical and horizontal mid-lines, as in “C”.
We finally add a smoothing step on thez values in or-der to get a smoother shape for the parts of the cloth thatfloat far from the character’s model. This is done comput-ing a smoothed version of the z-buffer from the applicationof a standard smoothing filter, and then by taking a weighedaverage, at each pixel, of the old and smoothedz-values, theweighing coefficients depending on the distance to the modelat this pixel.
5.3. Mesh generation
Finally, the triangles of the standard diagonally-subdividedmesh are used as the basis for the mesh that we render(see figure 8): all “inside” vertices are retained; all out-side vertices and triangles containing them are removed, and“boundary” vertices are moved to new locations via a simplerule:
• If any segments end within the unit box around the ver-tex, the vertex is moved to the average of the endpointsof those segments. (Because segments tend to be long, it’srare to have more than one endpoint in a box).
• Otherwise, some segment(s) must intersect the verticaland/or horizontal mid-lines of the box; the vertex ismoved to the average of all such intersections.
6. Results
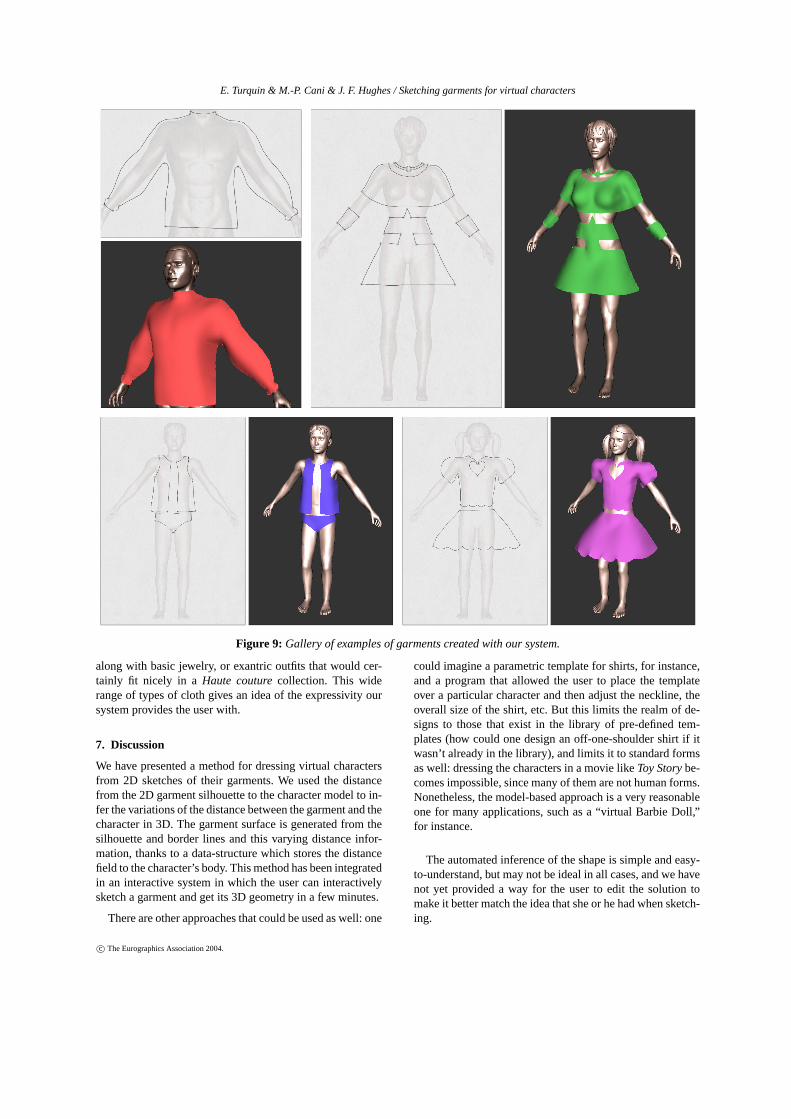
The examples presented in figure 1 and figure 9 were drawnin no more than 5 minutes each. We want to point out that thejagged appearance of the strokes in the drawings is simplydue to the use of a mouse instead of a more adequat graph-ics tablet as the input device. The gallery includes simpleclothes such as pullovers, skirts, robes and shirts, but alsoless standard ones such as an “arabian like” pair of trousers
c© The Eurographics Association 2004.
E. Turquin & M.-P. Cani & J. F. Hughes / Sketching garments forvirtual characters
Figure 9: Gallery of examples of garments created with our system.
along with basic jewelry, or exantric outfits that would cer-tainly fit nicely in a Haute couturecollection. This widerange of types of cloth gives an idea of the expressivity oursystem provides the user with.
7. Discussion
We have presented a method for dressing virtual charactersfrom 2D sketches of their garments. We used the distancefrom the 2D garment silhouette to the character model to in-fer the variations of the distance between the garment and thecharacter in 3D. The garment surface is generated from thesilhouette and border lines and this varying distance infor-mation, thanks to a data-structure which stores the distancefield to the character’s body. This method has been integratedin an interactive system in which the user can interactivelysketch a garment and get its 3D geometry in a few minutes.
There are other approaches that could be used as well: one
could imagine a parametric template for shirts, for instance,and a program that allowed the user to place the templateover a particular character and then adjust the neckline, theoverall size of the shirt, etc. But this limits the realm of de-signs to those that exist in the library of pre-defined tem-plates (how could one design an off-one-shoulder shirt if itwasn’t already in the library), and limits it to standard formsas well: dressing the characters in a movie likeToy Storybe-comes impossible, since many of them are not human forms.Nonetheless, the model-based approach is a very reasonableone for many applications, such as a “virtual Barbie Doll,”for instance.
The automated inference of the shape is simple and easy-to-understand, but may not be ideal in all cases, and we havenot yet provided a way for the user to edit the solution tomake it better match the idea that she or he had when sketch-ing.
c© The Eurographics Association 2004.
E. Turquin & M.-P. Cani & J. F. Hughes / Sketching garments forvirtual characters
8. Future work
To infer the shape of a full garment, we could use symmetryconstraints around each limb to infer silhouettes for the in-visible parts, and ask the user to sketch the border lines forthe back view, for instance.
We’d also like to allow the user to draw folds, and takethem into account when reconstructing the 3D geometry, sothat even for a closely-fitting garment, there can be extra ma-terial, as in a pleated skirt.
Most cloth is only slightly deformable, so the garmentwe sketch should be locally developable into a plane every-where. We did not take this kind of constraint into account inour model, but this would be an interesting basis for futurework, including the automatic inference of darts and gussetsas in [MHS99].
Finally, we have sketched clothing as though it were sim-ply a stiff polygonal material unaffected by gravity. Wewould like to allow the user to draw clothing, indicate some-thing about the stiffness of the material, and see how thatmaterial would drape over the body. The difference betweensilk (almost no stiffness), canvas (stiff), and tulle (very stiff)can generate very different draping behaviors. In the muchlonger term, we’d like to incorporate a simulator that cansimulate the difference between bias-cut cloth and straight-grain, the former being far more “clingy” than the latter.
References
[BCD01] BOURGUIGNOND., CANI M.-P., DRETTAKIS
G.: Drawing for illustration and annotation in3D. Computer Graphics Forum 20, 3 (2001).ISSN 1067-7055.
[BGR02] BONTE T., GALIMBERTI A., RIZZI C.: A3D graphic environment for garments design.Kluwer Academic Publishers, 2002, pp. 137–150.
[EyHBE97] EGGLI L., YAO HSU C., BRUDERLIN B. D.,ELBER G.: Inferring 3d models from freehandsketches and constraints.Computer-Aided De-sign 29, 2 (1997), 101–112.
[FBSS04] FLEISCH T., BRUNETTI G., SANTOS P.,STORK A.: Stroke-input methods for immer-sive styling environments. InProceedings ofthe 2004 International Conference on ShapeModeling and Applications, June 7–9, Genova,Italy (2004), pp. 275–283.
[HM90] H INDS B., MCCARTNEY J.: Interactive gar-ment design.The Visual Computer 6(1990),53–61.
[IH02] I GARASHI T., HUGHES J. F.: Clothing ma-nipulation. InProceedings of the 15th annual
ACM symposium on User interface softwareand technology(2002), ACM Press, pp. 91–100.
[IMT99] I GARASHI T., MATSUOKA S., TANAKA H.:Teddy: a sketching interface for 3d freeformdesign. InProceedings of the 26th annualconference on Computer graphics and inter-active techniques(1999), ACM Press/Addison-Wesley Publishing Co., pp. 409–416.
[JS01] JONESM. W., SATHERLEY R.: Using distancefields for object representation and rendering.In Proceedings of the19th Ann. Conf. of Euro-graphics (UK Chapter)(2001), pp. 91–100.
[MHS99] MCCARTNEY J., HINDS B. K., SEOW B. L.:The flattening of triangulated surfaces incorpo-rating darts and gussets.Computer Aided De-sign 31, 4 (1999), 249–260.
[TBSR04] TSANG S., BALAKRISHNAN R., SINGH K.,RANJAN A.: A suggestive interface for imageguided 3d sketching. InProceedings of CHI2004, April 24–29, Vienna, Austria(2004),pp. 591–598.
[WMTT93] WERNER H. M., MAGNENAT-THALMANN
N., THALMANN D.: User interface for fash-ion design. In Proceedings of the IFIPTC5/WG5.2/WG5.10 CSI International Con-ference on Computer Graphics(1993), North-Holland, pp. 197–204.
[ZHH96] ZELEZNIK R. C., HERNDON K., HUGHES
J. F.: Sketch: An interface for sketching 3dscenes. InComputer Graphics Proceedings,SIGGRAPH’96(New Orleans, Louisiana, Au-gust 1996), Annual Conference Series, ACM.
c© The Eurographics Association 2004.