SKAL RTS A MINISTRATOR’S GUI
24
DESKALERTS ADMINISTRATOR’S GUIDE © 2017 www.deskalerts.com Reproduction of this guide in whole or in part, by any means whatsoever, is prohibited without the prior written consent of the publisher. 901 N. Pitt Street, Suite 325 Alexandria, VA 22314
Transcript of SKAL RTS A MINISTRATOR’S GUI
DESKALERTS ADMINISTRATOR’S GUIDE
© 2017
www.deskalerts.com
Reproduction of this guide in whole or in part, by any means whatsoever, is prohibited without the prior written consent of the publisher.
901 N. Pitt Street, Suite 325 Alexandria, VA 22314

2
Contents 1 Pre-Requirements for installing DeskAlerts .................................................................................................................................................................................. 3
1.2 Hardware requirements ................................................................................................................................................................................................................ 3
1.2.1 Application Server requirements ..................................................................................................................................................................................... 3
1.2.2 Database Server requirements ......................................................................................................................................................................................... 3
1.2.3 Workstation requirements ................................................................................................................................................................................................. 3
1.3 Software requirements ................................................................................................................................................................................................................. 4
1.3.1 Application server requirements ..................................................................................................................................................................................... 4
1.3.2 Database server requirements ......................................................................................................................................................................................... 4
1.3.3 Workstation requirements ................................................................................................................................................................................................. 4
2 Installing DeskAlerts server application .......................................................................................................................................................................................... 4
2.1 Pre-installation steps ..................................................................................................................................................................................................................... 4
2.1.1 Setting up IIS connection to database with Windows authentication ............................................................................................................ 4
2.1.2 Installing the IIS features .................................................................................................................................................................................................... 6
2.1.3 Registering the ASP.NET 4.5 (Windows Server 2008 only) ................................................................................................................................... 6
2.1.4 Verify the specific modules requirements ................................................................................................................................................................... 6
2.2 Running the installer package ................................................................................................................................................................................................... 7
3 Building and installing DeskAlerts Clients ..................................................................................................................................................................................... 9
4 Active Directory synchronization .....................................................................................................................................................................................................12
5 Managing non-domain users and workstations .......................................................................................................................................................................13
5.1 Creating and managing custom groups .............................................................................................................................................................................14
6 Managing IP ranges ..............................................................................................................................................................................................................................14
7 Managing Content publishers and access rights ......................................................................................................................................................................15
7.1 Creating Policies ............................................................................................................................................................................................................................15
7.2 Creating Publishers ......................................................................................................................................................................................................................17
7.3 Setting up a single sign on publisher logon......................................................................................................................................................................17
8 Settings .......................................................................................................................................................................................................................................................17
8.1 Common system settings ..........................................................................................................................................................................................................17
8.1.1 System configuration .........................................................................................................................................................................................................17
8.1.2 Default settings .....................................................................................................................................................................................................................21
8.2 Profile settings ................................................................................................................................................................................................................................21
9 License limit and system lockdown ................................................................................................................................................................................................22
10 Approval workflow configurations ...............................................................................................................................................................................................22
11 Creating Emergency alerts shortcuts ...........................................................................................................................................................................................24
12 Where to get more documentation .............................................................................................................................................................................................24

3
1 Pre-Requirements for installing DeskAlerts DeskAlerts solution consists of two main parts – server web application (hosted on Windows-based
Application server running IIS) and client application, installed locally on message recipients’ machines.
Server application stores its data in MSSQL database, which may be hosted on the same server as the
application itself, or on a different database server somewhere.
Listed below are the hardware and software requirements for Application server, Database server and client
workstation.
Note: DeskAlerts server doesn’t require a dedicated IIS or database server, and can share any of these with
other applications.
1.2 Hardware requirements Each server must meet a minimal hardware requirement, depending on the message audience size:
1.2.1 Application Server requirements
Number of
users
1-600 600-2000 2000-10000 10000-20000+*
CPU speed 2GHz (1 core or higher) 3GHz (2 core or
higher)
3GHz (4 core or
higher)
3GHz or higher (8
core or higher)
RAM volume 1GB 2GB or higher 4GB or higher 8GB or higher
Hard disk
space
200 MB for installation
files + 1-2GB for log files
200 MB for
installation files +
2-4GB for log files
200 MB for
installation files +
4-8GB for log files
200 MB for
installation files +
8-20 GB for logs
Client poll
frequency
60 seconds 60 seconds 60-120 seconds 120-300 seconds
1.2.2 Database Server requirements
Number of
users
1-600 600-2000 2000-10000 10000-20000+*
CPU speed 1GHz 3GHz or higher 3GHz or higher 3GHz or higher
RAM volume 1GB, 2GB recommended 2GB min, 4GB
recommeded
4GB min, 6GB
recommended
6GB min, 8GB
recommended
Hard disk
space
1-5 GB 5-10 GB 10-20 GB 20-50 GB
Hard disk
speed
7200 RPM 7200 RPM 10000 RPM 10000 RPM
*- with more than 20000 users you will need to consider further decreasing polling frequency of client
applications or clustering your DA servers.
1.2.3 Workstation requirements
Client application is very lightweight and mostly consumes resources to display a message when it received,
consuming about as much as an extra tab in your web browser
256MB RAM
10MB free hard drive space

4
1.3 Software requirements 1.3.1 Application server requirements
• Windows Server 2008/2012/2016 (R2 editions are supported)
• Microsoft IIS 7.5 or higher (ASP features must be installed for back compatibility)
• Microsoft .NET Framework 4.5 or higher
Note: installing the application on Windows Server 2008 will require some additional steps to be taken – see
Pre-installation steps section.
1.3.2 Database server requirements
Microsoft SQL Server 2008 or newer – Express, Standard or Enterprise edition. SQL Server management
studio should be installed to set database permissions and user access level.
Note: MSSQL Server Express edition is only suitable for fairly small audiences (below 800 end users). If
you’re going to target bigger numbers of employees with alerts – consider using Standard or Enterprise
edition.
1.3.3 Workstation requirements
Windows 7(SP1)/8.1/10 with IE 11 installed
Or
OSX version 10.7.4 (Lion) or later
2 Installing DeskAlerts server application Basic installation and configuration of DeskAlerts server usually takes a few hours – the time depends on the
specific environment configuration (proxies, firewalls, Active Directory policies)
2.1 Pre-installation steps Prior to running the DeskAlerts Server installation package, the following steps must be taken:
- The user for database creation and connectivity should exist and authentication must be set up for
Windows accounts.
- Necessary IIS features must be installed in accordance with the list
Software can connect to the database instance using a built-in Windows authentication (using a domain
account), or using SQL Server authentication, if the MSSQL instance is running in mixed authentication
mode.
If you are going to use Windows authentication, follow the instructions in the 2.1.1
2.1.1 Setting up IIS connection to database with Windows authentication
1. Make sure that the account you’re going to use has sufficient rights to create databases or create a blank
database for DeskAlerts application manually using the account that can do that. After the installation, the
account used to connect to database will need to be granted db_owner role for the database.
2. Make sure this account’s password is set to never expire, so no reconfiguration will be needed after

5
3. Open the IIS Manager on Application server and navigate to Authentication feature for the site running
DeskAlerts:
4. Edit the Anonymous authentication settings and set them to use “Application pool identity”.
5. Go to the Application pools and select the application pool that will be running DeskAlerts application.
Go to “Advanced Settings”:

6
6. In the advanced settings, find the “Identity” field and set it to “Custom account”, specifying your AD
username credentials
2.1.2 Installing the IIS features
Before running the installation, make sure that all necessary features of IIS are installed. To do this, open
Server Manager and enter the “Add Roles and Features” wizard.
The options highlighted on the screenshot below are required for any installation of DeskAlerts server:
2.1.3 Registering the ASP.NET 4.5 (Windows Server 2008 only)
In Windows Server 2008 and 2008R2, the .NET Framework v4.5 is not preinstalled by default and ASP.NET
4.5 cannot be added via server manager.
You will need to:
- Get the .NET Framework v4.5 installer from Microsoft and install it manually
- Register the ASP.NET 4.5 component using the elevated command prompt with the “aspnet_regiis -i”
command, as described here.
2.1.4 Verify the specific modules requirements
Some of the DeskAlerts solution modules may have additional requirements, please check the table below
and verify if you may be missing something for one of the purchased modules:

7
Module Requirements
SMS Module SMS gateway you’ll be using should be accessible from DA server via the TCP
port used by it – some firewall configuration may be required
Screensaver Module Employees’ screensavers must not be managed by Group Policy (it will override
any DeskAlerts changes)
Wallpaper Module Employees’ wallpapers must not be managed by Group Policy (it will override
any DeskAlerts changes)
RSS Module The RSS feeds used need to be accessible from the Application server, since the
RSS reader is the part of server application
Active Directory
module
The AD domain controller should be accessible for LDAP requests via port 389
or 636 if LDAPS is used
Mobile alerts module Push notification services of Apple and Google must be accessible via ports
2195 and 443 respectively
2.2 Running the installer package The package you received from DeskAlerts contains the installation package for DA server and the
DeskAlerts client builder. The server installer executable is named DeskAlerts.Server.vx.x.x.x.exe, where
x.x.x.x is a version number. To start the installation, copy the file to Application server and launch it as
Administrator.
As first two steps, you will be presented with the EULA and the form to enter your trial key if you’re
installing a trial version. If you don’t have a trial key yet, the user interface also contains instructions on
retrieving it.

8
Then, the installer package will automatically check the pre-requirements. If you see any red signs on that
step, please re-check the steps described in 2.1.
Next two steps after requirements verification prompt you to enter the IIS options and database connection
parameters. The IIS options include the DeskAlerts installation path (actual directory where the software will
be installed) and DeskAlerts URL (the link the publishers and client applications will use to access the server
dashboard). To avoid firewall and DNS-related issues, it usually a good idea to check whether the server
name automatically supplied here is accessible from one of the potential employee workstations.
The SQL server settings step will also perform a validation of all information entered. If you encounter errors
– check “Help” section in the installer window for hints.
If you are performing a server update (database already exists), you will be prompted whether you need to
update the data in existing database, or drop it and create a new one. Click “Yes” to keep all existing data,
including messages history, user information etc.
Next steps allow you to select the modules to install. Some of these modules also have installer steps for
additional configuration, but the module configuration can also be performed later, from the web UI.
After clicking through module configuration steps (if any of these were necessary), you will be presented
with the final step – click “Install” to launch the installation process. Depending on your server performance
and existing database size, the process might take up to 10-20 minutes.

9
If any errors occur during the installation, you will be presented with the installation log. Please save this file
and send it to DeskAlerts support using [email protected]
If the installation completes successfully, you will be presented with a corresponding notification. If this is a
first installation on a clean database, you can use the default “admin” user with the “admin” password to log
in the product dashboard.
This completes the DeskAlerts server installation, if it is the first one – next step is to build the client
applications and perform an AD synchronization (if you’re using AD domain integration) to make the
software functional enough to send first test messages.
3 Building and installing DeskAlerts Clients DeskAlerts package contains a client application builder for Windows workstations, that enables you to
configure some options and choose which features will be available to the end users. You can also build
several versions of client applications with distinctive features available and deliver them to different
audiences (e.g. allow upper management to use “do not disturb” mode, while leaving this option off for
everyone else).
The client builder files are contained in archive named DeskAlerts.Client.vx.x.x.x.zip and must be
extracted before use.
Running the builder on the Application server running DeskAlerts is recommended, because this way
builder will store your choices for future use.

10
Run the file named ClientInstallation.exe to begin.
On the first step, put in your DeskAlerts URL (same as the one used during the server installation):
The builder will check if DeskAlerts server exists at this URL before proceeding.
Next step allows you to select platform settings – to choose which modules this client application should
integrate with. It also contains an option to build MSI installer, which is a default choice for most
deployments.

11
The next step, Installation options, allows you to select a few more options related to the client presence in
the end user’s system. It also allows you to specify some URL that will be opened after the installation if you
want to provide employees with some instructions or informational message about their DeskAlerts client.
Next step allows you to configure client interface options – affecting the features employee can use. Usually,
the “exit” and “uninstall” options are disabled, as well as “unobtrusive mode” – to prevent the users from
closing the app and missing the messages.

12
After you build the client application installers, click on “Close” and the folder containing the installation
files will open automatically.
The MSI file (if you built it) is fully compatible with GPO and SCCM deployment. It can be deployed silently
using the /quiet or /qn parameter of the msiexec.exe utility.
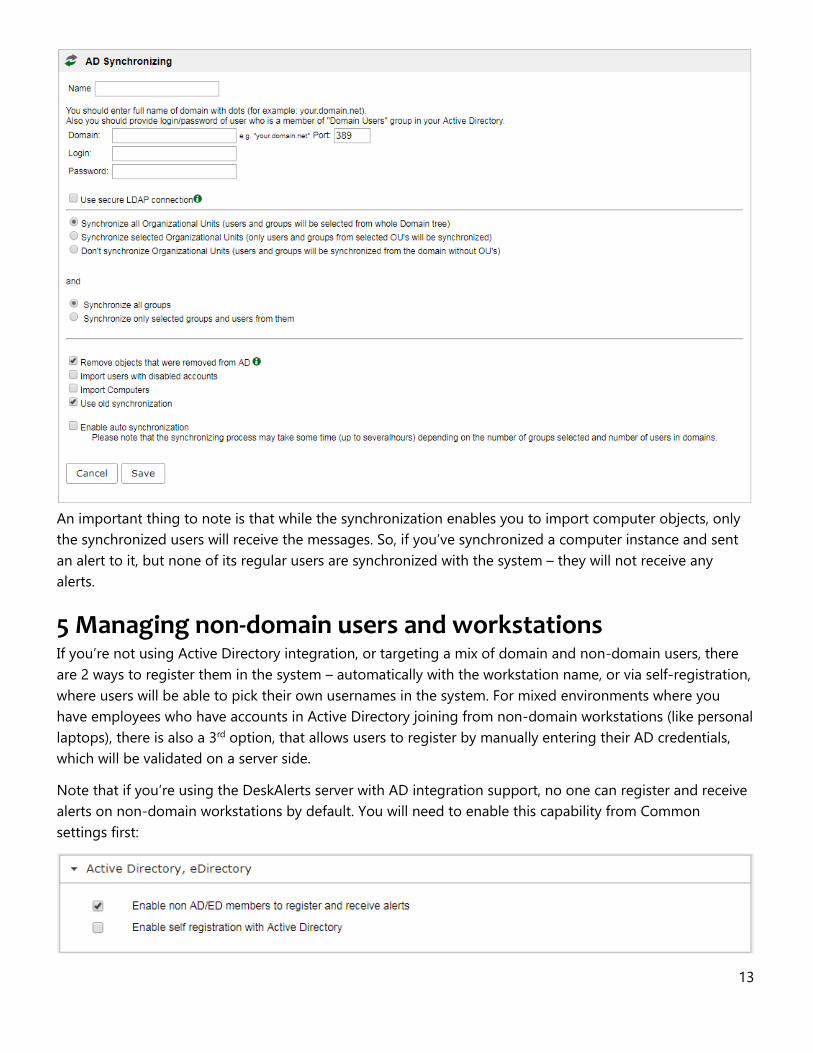
4 Active Directory synchronization The Active Directory synchronization is a key part of AD integration implemented in DeskAlerts solution. It
allows you to pull in the information from your domain tree or subtree to use it for message targeting
purposes.
The synchronization task:
- Retrieves the users and computer objects from the domain to be used for alerts targeting
- Retrieves the object containers, such as groups and organizational units to simplify the targeting to
large audiences
- Can be set to run on a schedule with no human interaction
- Can be configured to synchronize the whole domain tree, or only a part of it
- Can be tuned to only synchronize a selected list of groups instead of all groups in a selected subtree
- Can be set to automatically ignore the users with disabled accounts
Note that we do not import the employee passwords, or any personal information not required to target a
message. The only user attributes being retrieved are username, display name, group membership, phone
(for SMS targeting) and email address (for email notifications). The synchronization doesn’t write any data
back to the domain and is a read-only mechanism.
Usually, synchronizations are launched automatically on a schedule, but they can also be launched manually
from the Synchronizations list:
To create a synchronization, go to Active Directory -> Synchronizations menu item and click on “add new
synchronization” button, as seen above.
Supply all required fields, narrow down the synchronization scope and create a schedule for it to follow
automatically, then save it under an easily recognizable name.
The user credentials you use here can belong to any domain member without any admin rights, but it is
recommended to use a service account here, to the password won’t expire.
13
An important thing to note is that while the synchronization enables you to import computer objects, only
the synchronized users will receive the messages. So, if you’ve synchronized a computer instance and sent
an alert to it, but none of its regular users are synchronized with the system – they will not receive any
alerts.
5 Managing non-domain users and workstations If you’re not using Active Directory integration, or targeting a mix of domain and non-domain users, there
are 2 ways to register them in the system – automatically with the workstation name, or via self-registration,
where users will be able to pick their own usernames in the system. For mixed environments where you
have employees who have accounts in Active Directory joining from non-domain workstations (like personal
laptops), there is also a 3rd option, that allows users to register by manually entering their AD credentials,
which will be validated on a server side.
Note that if you’re using the DeskAlerts server with AD integration support, no one can register and receive
alerts on non-domain workstations by default. You will need to enable this capability from Common
settings first:

14
Checking only the first box here will allow anybody to register in the system as the messages recipient.
Checking the second one as well will force the end users to supply valid AD credentials for registration.
5.1 Creating and managing custom groups To simplify the messages targeting, you can create custom groups of users. The number of groups is
unlimited, and each user can belong to more than one group.
To manage the groups, go to either Active Directory -> Organization page (if your package includes AD
integration), or Groups page (if it doesn’t).
The groups can be nested inside each other. Click on the numbers in the table to display a list of group
members.
6 Managing IP ranges Another option of content targeting aside from broadcasting and selecting the specific users is to target IP
ranges. You can add and manage them from “IP Groups” page. Each groups can contain several ranges and
single IP addresses. Currently, only IPv4 addresses are supported, but the IPv6 adaptation of this feature is
being developed.
15
7 Managing Content publishers and access rights Content publishers’ tasks include composing and sending various types of content, as well as gathering
reports and managing the user audiences if given the necessary rights.
The scope of a Publisher access is defined by the Policy he has assigned.
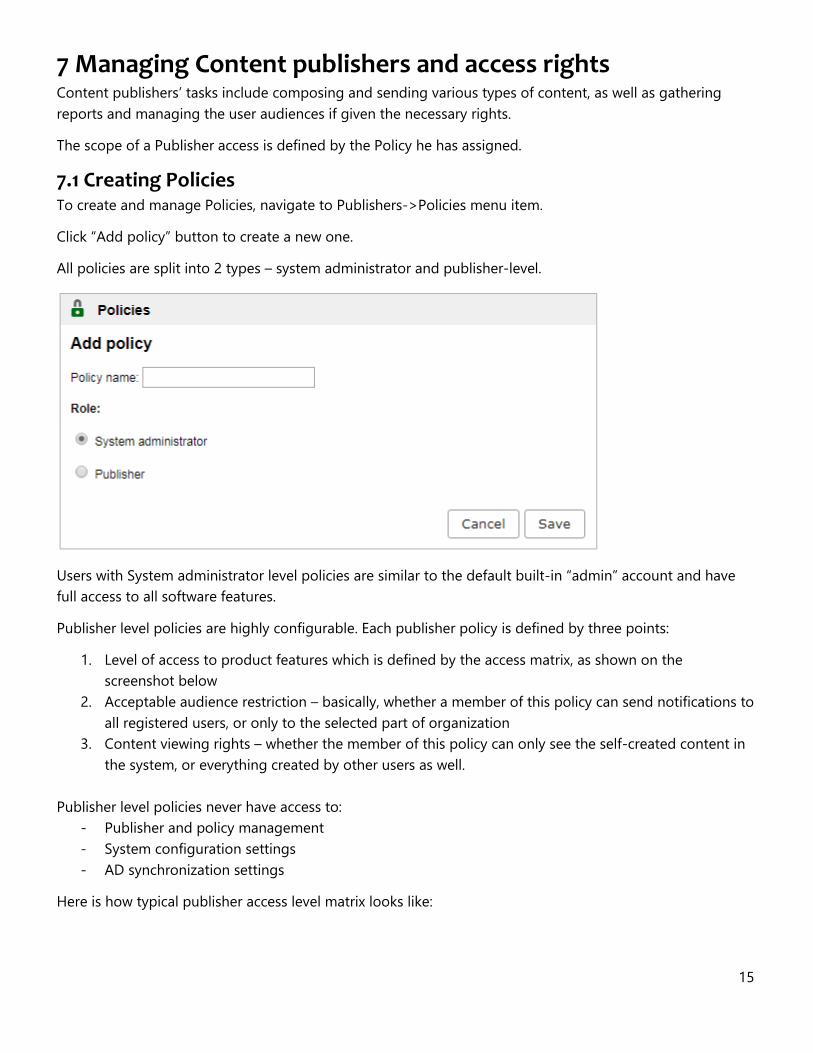
7.1 Creating Policies To create and manage Policies, navigate to Publishers->Policies menu item.
Click “Add policy” button to create a new one.
All policies are split into 2 types – system administrator and publisher-level.
Users with System administrator level policies are similar to the default built-in “admin” account and have
full access to all software features.
Publisher level policies are highly configurable. Each publisher policy is defined by three points:
1. Level of access to product features which is defined by the access matrix, as shown on the
screenshot below
2. Acceptable audience restriction – basically, whether a member of this policy can send notifications to
all registered users, or only to the selected part of organization
3. Content viewing rights – whether the member of this policy can only see the self-created content in
the system, or everything created by other users as well.
Publisher level policies never have access to:
- Publisher and policy management
- System configuration settings
- AD synchronization settings
Here is how typical publisher access level matrix looks like:

16
This policy example grants the person rights to create and send desktop alerts, possibly using message
templates created by other people, and view the delivery reports. All user/group management, as well as
different kinds of content are off limits for publishers who will have this policy assigned.
When the policy is created, you can view its members from the Policies page:

17
7.2 Creating Publishers To create a new publisher accounts, go to Publishers -> Publishers List page and use “Add Publisher”
button. For each publisher, you will need to specify the login, password and the policy. Number of
publishers is limited by your license.
7.3 Setting up a single sign on publisher logon DeskAlerts system can be configured so the publishers will be able to log in using their current Active
Directory credentials. This requires additional configuration, described in the SSO configuration manual that
can be downloaded from the Knowledge Base: https://deskalertssupport.zendesk.com/hc/en-
us/articles/115002274649-DeskAlerts-SSO-Guide
8 Settings Most of DeskAlerts configuration is done from the publisher dashboard when logged in the system
administrator-level account. To enter the Settings section, click on the gear icon next to Logout button.
8.1 Common system settings The Common settings section is available only to system administrators and affects various sides of the
software performance.
By default, the Common settings page is split to two tabs (more can appear in customized packages) –
System configuration and Default settings
8.1.1 System configuration
System configuration settings affect the solution performance for all its current users. All options in this
section are split into subsections in accordance with the area they are affecting.
Console interface settings affect some parts of user interface and messages workflow. The special thing
about these options is that after saving your changes, you need to manually refresh the page.

18
Enable Help option turns the right-side help on or off for all users. This section contains hints relevant to
every page of the product and can be useful for newer product users. If enabled (and it is by default), the
help section can be expanded/collapsed at any time by clicking the button in the page header. The
DeskAlerts dashboard also remembers whether you had the help opened last time you logged in or not and
follows this preference.
Allow user to rearrange menu sections by dragging them – if this option is turned on (it is by default),
the users can drag-and-drop menu items to make the ones they’re using more often easily accessible – their
choice is saved and used for further sessions, even if they are logging in from a different machine or
browser.
Enable content approving option activates the advanced approval workflow for messages, which is
described in the separate unit of this manual.
Enable alert title styling allows publishers to use HTML in the message title – changing its color, size, font-
family and so on.
Show skin selection dialog before alert creation option makes and additional dialog pop up on the alert
creation page, asking the publisher to select the message skin. If the option is disabled – they can still
change the skin by manually clicking on the skin selection control
Show message type selection dialog before alert/survey creation option makes and additional dialog
pop up during the alert creation page, asking the user whether they need to create a pop-up alert, a
19
scrolling ticker message, or an RSVP (considering the modules are installed). If the option is turned off – the
user still can change the message type by selecting a different tab.
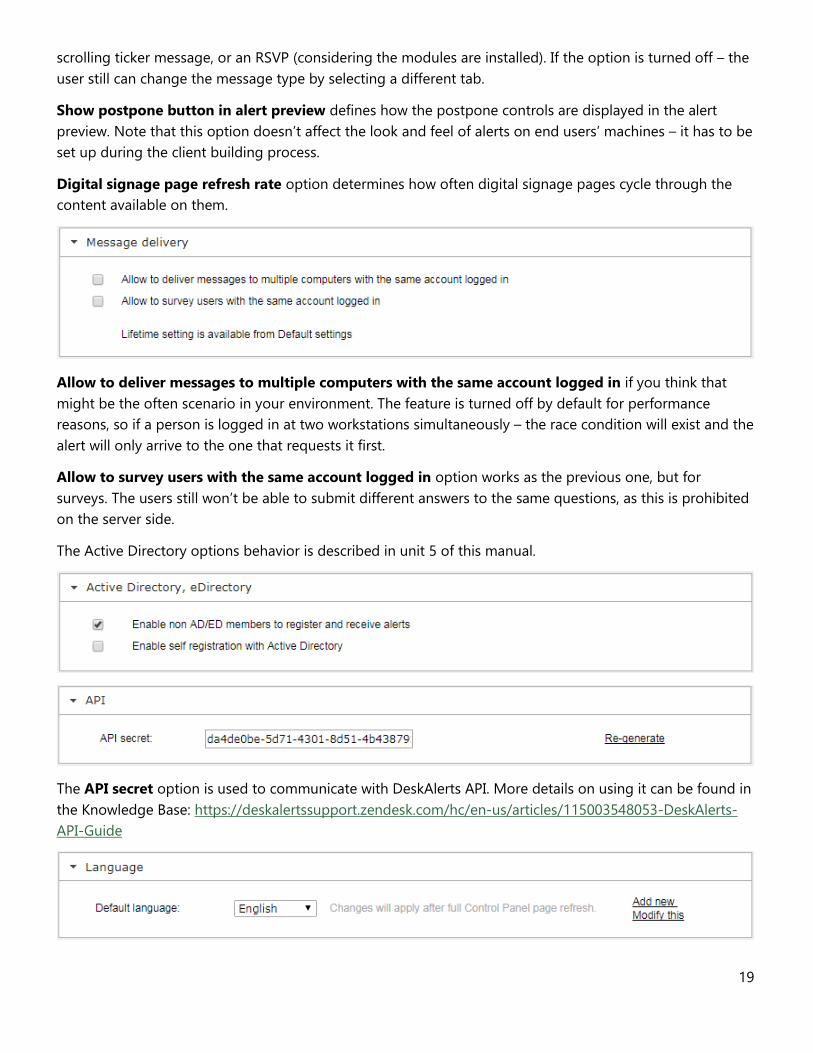
Show postpone button in alert preview defines how the postpone controls are displayed in the alert
preview. Note that this option doesn’t affect the look and feel of alerts on end users’ machines – it has to be
set up during the client building process.
Digital signage page refresh rate option determines how often digital signage pages cycle through the
content available on them.
Allow to deliver messages to multiple computers with the same account logged in if you think that
might be the often scenario in your environment. The feature is turned off by default for performance
reasons, so if a person is logged in at two workstations simultaneously – the race condition will exist and the
alert will only arrive to the one that requests it first.
Allow to survey users with the same account logged in option works as the previous one, but for
surveys. The users still won’t be able to submit different answers to the same questions, as this is prohibited
on the server side.
The Active Directory options behavior is described in unit 5 of this manual.
The API secret option is used to communicate with DeskAlerts API. More details on using it can be found in
the Knowledge Base: https://deskalertssupport.zendesk.com/hc/en-us/articles/115003548053-DeskAlerts-
API-Guide

20
The language options let you choose the default system language – meaning that it will be used for the
login page and all freshly created publisher accounts. Note that each publisher still can choose their
preferred language in the Profile settings once they are logged in.
The language settings page also lets you create your own translations for DA interface using “Add new”
control:
To create a new translation, you will need to specify a language name and ISO 639-1 compliant language
code, as well as provide translations for all user interface terms in the solution (the English versions will be
used for reference). You don’t have to do it all at once – you can save the progress at any time and continue
later.
Date and time settings determine how the date/time are displayed in the publisher UI, as well as allow you
to set up the session timeout value:

21
The SMTP settings need to be set up in order to use the Email notifications channel:
The SMS settings are used to connect to the SMS gateway API:
If you’re having troubles with the last one – reach out to [email protected], providing the
documentation about your SMS Gateway Provider.
8.1.2 Default settings
Default settings control the default options that will be selected for desktop alerts and some other content
types when publishers try to create new ones.
Each option here is similar to the alert option you can see on the creation page.
8.2 Profile settings Profile settings are available for both admins and publishers, since they only affect the user interface of a
specific user of a dashboard.
The options here include:
- Username change (as long as the new one is not taken)
- Password change
- Email or phone change
- Preferred language of the user interface (can differ from the system default)

22
- Start page – Dashboard by default, but can be set to any page present in the left-side menu
Note that you may need to log out and log back in again to apply some changes.
9 License limit and system lockdown On the top part of left-side menu, you can see a license counter:
The bar shows the currently used user licenses (1) and the license limit (3000). Note that only the Active
users are calculated towards the utilized licenses count. The user is considered to be Active only if he has
received some Email/SMS from DeskAlerts in the past 24 hours, or had his desktop/mobile client online
during the same timeframe. That means that if the user leaves the company or his user account is removed
from the system, in 24 hours the license he did occupy will be released.
If you go over the license limit, the system will enter a lockdown state, disabling all messaging capabilities,
so monitor the license burndown carefully and contact [email protected] immediately if you see a
“license limit is exceeded” warning in the menu.
10 Approval workflow configurations Sometimes, you may need more control over what is being sent to your workforce. Once way to achieve this
is to only allow the publishers to send messages using pre-defined templates, the other one is to set up an
approval workflow.

23
To enable the approval feature, turn it on in the Common Settings -> System Configuration -> Console
Interface section.
Once enabled, the access level matrix in Policy creation mechanism will gain a new column named
“approval”:
Only system administrators and publishers with the “Approval” right checked for some type of content will
be able to send it straight to the end users. People with the “send” rights not possessing the “approval”
right as well will instead “Submit it for approval”.
When message is submitted for approval, all publishers with approval rights are being notified that there’s
some unapproved content and can act on it in a few ways:
- They can review the message content and audience, then click “Approve” to confirm its validity and
send it to the intended recipients
- They can edit the message and send it out with the adjustments
- They can reject the message specifying the reason for rejection – in this case, the original message
creator will get a notification and will have a chance to correct the mistakes or delete the alert
- They can delete the created content entry completely

24
Such workflow ensures that the content is being reviewed by qualified personnel before being delivered to
the end users.
11 Creating Emergency alerts shortcuts The Emergency alerts module is designed to speed up delivery of urgent messages – which is achieved by
creating the messages in advance with the pre-defined content and audience and sending them out later in
one click. One of the ways to speed up the process even more is creating desktop shortcuts for the
publishers – the message will be sent out just by double-clicking a desktop shortcut.
Since the desktop shortcuts do not feature any authentication, the sender of a message will not be
identified, so consider the risks of using this feature.
To create a shortcut for already composed Emergency alert, go to Emergency Alerts -> Create Shortcut
menu. Click on a desired emergency alert tile and use “Create shortcut” button.
The server will generate two files – an executable and the .bat file. The executable is a portable alert sending
utility, while the other one is the shortcut itself – these should be placed in the same directory in order for
the sending to work. Note also that the name of the sending utility (DeskAlertsAPI.exe) must not be
changed, while the filename of a shortcut can be changed to whatever suits you best.
Once both files are generated, use SCCM or similar utility to place the files on a desktop of the employees
you trust to trigger the emergency alert messages.
12 Where to get more documentation If you encounter any issues with the setup and want to do some troubleshooting yourself before reaching
out to [email protected] – check our knowledge base at
https://deskalertssupport.zendesk.com/hc/en-us
The FAQ and Troubleshooting sections might answer your questions and contain useful tips and tricks.
The Documents section contains downloadable instructions on some specific setup scenarios, like:
- Single sign on configuration
- API integration with 3rd party systems like monitoring and automation tools
- Deployment on a load balanced configuration with more than one application server
- Setting up the software to work over HTTPS
It also contains a copy of deployment guide, some guidelines regarding the skin customization service and
the network diagram of a typical DeskAlerts installation.