
Six Paths to -...
9
1 Subscribe Now! Here’s how to arrange images in rows and columns without taking out a calculator. Some designers use structured grid systems with guides on Master Pages to influence their layout decisions. Others rarely use formal grid systems at all. But all designers have the occasional need to arrange images in rows and columns, and for that, you need a grid. But how can you create a quick grid without resorting to subtraction and long division? The following is all the grid-related wisdom and lore I’ve learned in my InDesign page layout life. (For articles about how to use classical grid systems in your layouts, see InDesign Magazine issues 14 and 35). By Keith Gilbert Six Paths to Gridded Bliss MAGAZINE 37 August | September 2010 EXCERPT
Transcript of Six Paths to -...
1Subscribe Now!
Here’s how to arrange images in rows and columns without taking out a calculator.
Some designers use structured grid systems with guides on Master Pages to influence their layout decisions. Others rarely use formal grid systems at all. But all designers have the occasional need to arrange images in rows and columns, and for that, you need a grid. But how can you create a quick grid without resorting to subtraction and long division?
The following is all the grid-related wisdom and lore I’ve learned in my InDesign page layout life. (For articles about how to use classical grid systems in your layouts, see InDesign Magazine issues 14 and 35).
By Keith Gilbert Six Paths toGridded Bliss
M A G A Z I N E 37 August | September 2010 EXCERPT

2Subscribe Now!
Step and RepeatWhen you need an evenly spaced set of guides, lines, or boxes, and you know the exact distance you want between them, Step and Repeat is the quick path to take.
Using Step and Repeat is simple. Just select a guide, line, or frame and choose Edit > Step and Repeat. Select the Preview option, and then enter how many copies of the object you want and exactly how far apart they should be spaced (Figure 1).
To step and repeat an object entirely from the keyboard, press Command-Shift-M (Mac) or Control-Shift-M (Windows) to create a copy that’s offset a specified amount. Then press Command-Option-4 (Mac) or Control-Alt-4 (Windows) to create duplicates of the object.
InDesign CS5 has an improved Step and Repeat dialog box. In addition to a standard step and repeat, this dialog box lets you create copies of the object in both the horizontal and vertical directions simultaneously (Figure 2).
Figure 1: The Step and Repeat dialog box in InDesign CS3–CS4
Figure 2: The InDesign CS5 Step and Repeat dialog box lets you do a standard step and repeat (left) or a “gridified” step and repeat (right).
M A G A Z I N E 37 August | September 2010 EXCERPT
3Subscribe Now!
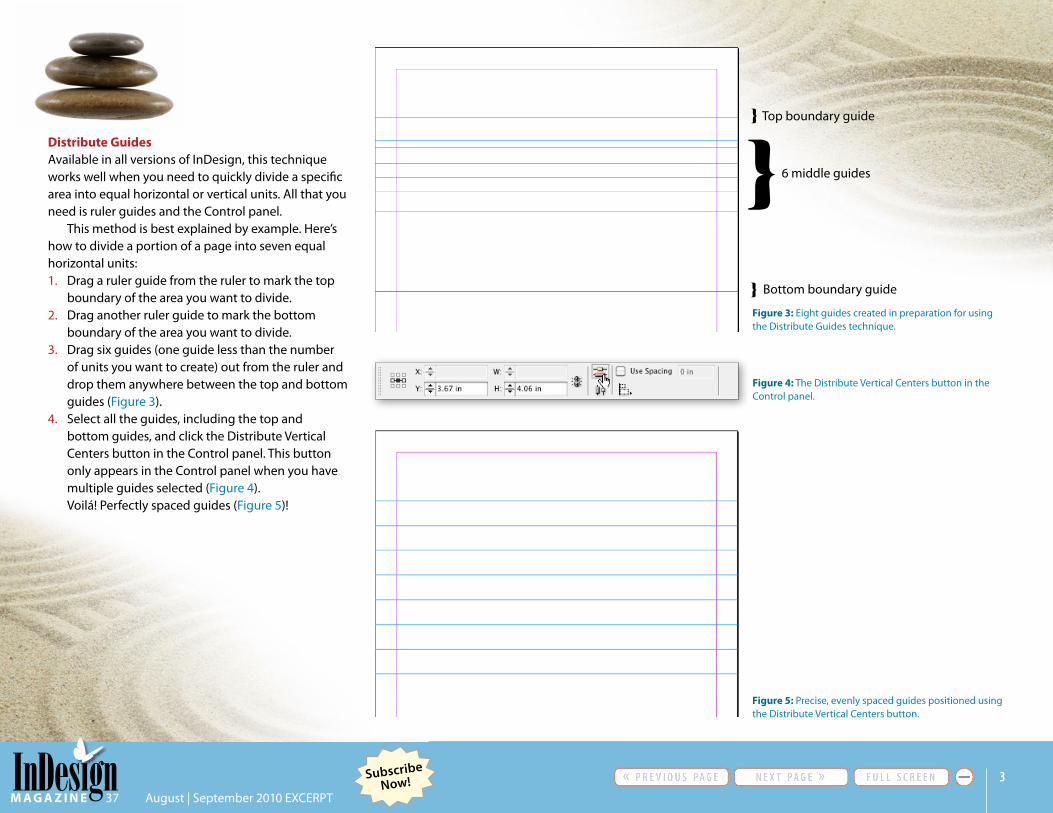
Distribute GuidesAvailable in all versions of InDesign, this technique works well when you need to quickly divide a specific area into equal horizontal or vertical units. All that you need is ruler guides and the Control panel.
This method is best explained by example. Here’s how to divide a portion of a page into seven equal horizontal units:1. Drag a ruler guide from the ruler to mark the top
boundary of the area you want to divide.2. Drag another ruler guide to mark the bottom
boundary of the area you want to divide.3. Drag six guides (one guide less than the number
of units you want to create) out from the ruler and drop them anywhere between the top and bottom guides (Figure 3).
4. Select all the guides, including the top and bottom guides, and click the Distribute Vertical Centers button in the Control panel. This button only appears in the Control panel when you have multiple guides selected (Figure 4).Voilá! Perfectly spaced guides (Figure 5)!
Figure 3: Eight guides created in preparation for using the Distribute Guides technique.
Figure 4: The Distribute Vertical Centers button in the Control panel.
Figure 5: Precise, evenly spaced guides positioned using the Distribute Vertical Centers button.
Top boundary guide
Bottom boundary guide
6 middle guides{{
{
M A G A Z I N E 37 August | September 2010 EXCERPT
4Subscribe Now!
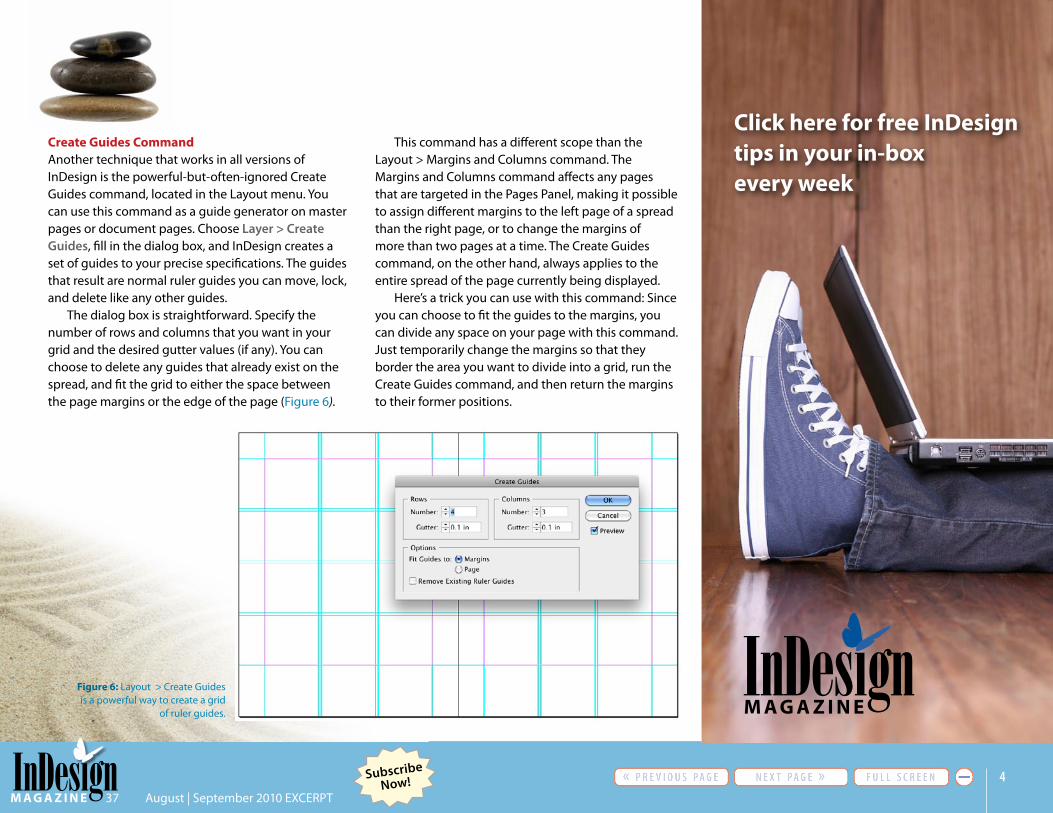
Create Guides CommandAnother technique that works in all versions of InDesign is the powerful-but-often-ignored Create Guides command, located in the Layout menu. You can use this command as a guide generator on master pages or document pages. Choose Layer > Create Guides, fill in the dialog box, and InDesign creates a set of guides to your precise specifications. The guides that result are normal ruler guides you can move, lock, and delete like any other guides.
The dialog box is straightforward. Specify the number of rows and columns that you want in your grid and the desired gutter values (if any). You can choose to delete any guides that already exist on the spread, and fit the grid to either the space between the page margins or the edge of the page (Figure 6).
Figure 6: Layout > Create Guides is a powerful way to create a grid
of ruler guides.
This command has a different scope than the Layout > Margins and Columns command. The Margins and Columns command affects any pages that are targeted in the Pages Panel, making it possible to assign different margins to the left page of a spread than the right page, or to change the margins of more than two pages at a time. The Create Guides command, on the other hand, always applies to the entire spread of the page currently being displayed.
Here’s a trick you can use with this command: Since you can choose to fit the guides to the margins, you can divide any space on your page with this command. Just temporarily change the margins so that they border the area you want to divide into a grid, run the Create Guides command, and then return the margins to their former positions.
Click here for free InDesign tips in your in-box every week
M A G A Z I N E 37 August | September 2010 EXCERPT

5Subscribe Now!
Make Grid/Add Guides scriptsTwo scripts included with InDesign CS3 through CS5—MakeGrid and AddGuides—are really useful for creating grids. Start by opening your Scripts panel (that’s Window > Automation > Scripts in CS3 and CS4, and Window > Utilities > Scripts in CS5). Then open the Application > Samples > JavaScript folder to locate the scripts (Figure 7).
The MakeGrid script will quickly divide a frame into as many sub-frames as you specify. To do so, take the following steps:1. Select one or more frames.2. Double-click on the MakeGrid script in the
Scripts panel.3. Fill in the number of rows and columns that you
want to divide the frame into, as well as the desired gutter (space between rows and columns). See Figure 8.
4. Click the OK button (Figure 9).Try the MakeGrid script on oval and polygon frames
or straight or curved lines for some interesting effects.
Figure 7: The Scripts panel contains two useful scripts for creating grids: MakeGrid and AddGuides.
Figure 8: The MakeGrid script will divide a frame into multiple sub-frames, based on the number of rows and columns that you specify.
Figure 9: The result of running the MakeGrid script on a large rectangle (left) and then again on three of the smaller frames (right).
M A G A Z I N E 37 August | September 2010 EXCERPT

6Subscribe Now!
The AddGuides script will automatically add ruler guides to the boundaries of selected objects. This is an easy way to add a grid of guides after you’ve created a grid of frames with the MakeGrid script. To use the AddGuides script, do the following:1. Select one or more objects.2. Double-click AddGuides in the Scripts panel.3. Fill in the dialog box as desired. I usually fill it in as
shown in Figure 10. The “Guides Based On” option only applies if the selected frames have strokes. If so, then Geometric Bounds ignores the stroke weight when placing the guides, while Visible Bounds places the guides on the outer edges of the strokes.
4. Click the OK button. The script creates a new layer named “Guides” and places guides on that layer around each selected object (Figure 11).
Figure 10. The AddGuides script is a fast way to add ruler guides around selected objects.
Figure 11: The result of running the AddGuides script on a grid of twelve frames.
M A G A Z I N E 37 August | September 2010 EXCERPT

7Subscribe Now!
Gridified Frame CreationInDesign CS5 has a fantastic new way to quickly create grids of objects. While you’re drawing a rectangle, ellipse, polygon or line, you can simply tap the up, down, left or right arrow keys on the keyboard to create or remove rows or columns of the object being drawn. See Figure 12.
To adjust the spacing between the objects while drawing, add the command key (Mac) or control key (Windows) while tapping the arrow keys.
Gridified PlaceInDesign CS4 and CS5 both let you create a grid of images as they are placed. Here’s how:1. Choose File > Place, select multiple images to
place, and click the Open button.2. [CS4] Hold down Command-Shift (Mac) or Control-
Shift (Windows) and drag out a rectangle. You will see a grid of frames appear. Don’t release the mouse button, but you can now release the Command/Control-Shift keys.
Now, while continuing to hold down the mouse button, you can adjust the number of rows and columns using the arrow keys on the keyboard. The up/down arrows increase/decrease the number of rows in the grid, and the right/left arrows increase/decrease the number of columns in the grid. Again, while continuing to hold the mouse button you can adjust the space between the rows and columns using Shift+the cursor keys on the keyboard. Shift + the up/down arrows increases/decreases the vertical space between rows, and Shift + the right/left arrows increases/decreases the horizontal space between columns.
Figure 12: In InDesign CS5, tapping the up, down, left or right cursor keys on the keyboard while dragging a rectangle will create a grid of rectangles.
M A G A Z I N E 37 August | September 2010 EXCERPT

8Subscribe Now!
3. [CS5] Drag out a rectangle, and then, without releasing the mouse, tap the up, down, left or right arrow keys on the keyboard, to create or remove rows or columns in the grid. To adjust the spacing between the objects, add the Command key (Mac) or Control key (Windows) while tapping the arrow keys.
4. When you release the mouse button, a precise grid of frames will be created, with an image placed in each frame (Figure 13).
Now you know all that I know about creating grids quickly. The next time you need a grid, you can choose the shortest path to complete this layout challenge.
Keith Gilbert is an independent consultant and educator in the design industry, with clients such as Apple, Adobe, Best Buy, Cargill, General Mills, Lands’ End, Medtronic, Target, and the United Nations. He is an Adobe Certified Instructor in InDesign, InCopy, Illustrator, Photoshop and Acrobat. Read his Tips & Techniques Blog at blog.gilbertconsulting.com.
Figure 13: Using the “Gridified Place” feature of InDesign CS4–CS5 to create a grid of imported images (above).
M A G A Z I N E 37 August | September 2010 EXCERPT

Two Cool OffersEnjoy two excellent subscription discounts: $20 off a one-year subscription (coupon code FRIEND), or $15 off a two-year subscription (coupon code FRIEND2). These goodies can be yours at www.indesignmag.com/purchase.php.


![MULTI-FIND/CHANGE · [Drive]:\Program Files\Adobe\Adobe InCopy [CS4/CS5/CS5.5]\Scripts User Preferences “Scripts” Folder Only the current user on the workstation where you are](https://static.fdocuments.us/doc/165x107/5eae387dab6b4860222029b1/multi-findchange-driveprogram-filesadobeadobe-incopy-cs4cs5cs55scripts.jpg)