Sirius Manual
150
32 OHM 32 OHM NATURAL DRUMS BASS- SOUNDS DIRTY NATURAL DIRTY BASS ELECTRONIC DRUMS PAD- SOUNDS 909-TYPE PLUCKED SOUNDS 808-TYPE LEVEL BD SNARE HIHAT PERC. SYNTH 1 SYNTH 2 SYNTH 3 MOD.-WHEEL ASSIGN PART SELECT SOUND SELECT MODULATION WHEEL PITCH BEND TRACK-MUTING PATTERN SELECT SONG SELECT PART MUTE PART/SEQ. TO MIDI PANORAMA FX1/FX2 1 2 SNARE HIHAT DETUNE FILTER- OVERDRIVE Q-FACTOR VCF-EG MACRO VCA-EG MACRO MOD.- DEPTH MOD.- RATE SPECIAL-LOOP TRACK-FADER OVERBLAST MOD.- MACRO WAVE- MACRO GLIDE LPF 24 dB RELEASE 0 32 64 96 127 LPF 12 dB HPF 12 dB PAGE/BANK MASTER VOLUME MICROPHONE CONNECTOR VALUE TEMPO RECALL EXIT EDIT WRITE SHIFT KEY-TRACKING OCTAVE-UP OCTAVE-DOWN VCF-DYN. VCA-DYN. RANDOM-SOUND PRESS BUTTON FOR SOUND-CREATION TAP- TEMPO DEMO SYNC. EXTERN AUDIO SYNC CUTOFF ENV.-MOD VCA LEVEL PERCUSSION PATTERN BREAK SPECIAL LOOP TRACKS SYNTH 1 SYNTH 2 SYNTH 3 VOCODER HOLD BUTTON AND SELECT PART ANALYSE CARRIER CARRIER-EXT. MICRO. HOLD TO SELECT REW ARPEG. ON/OFF START SONG-STEP STOP FWD PHONES KICK/BD 3 4 5 6 7 8 9 10 11 12 13 14 15 16 SOLO- SOUNDS DRUM-SFX EFFECT- SOUNDS SIRIUS SIRIUS by QUASIMIDI CATEGORIES MIXER 11 CHANNEL VOCODER SEQUENCER MODULATOR OSCILLATORS RESONANCE-FILTER AMPLIFIER EG-MACROS PHONETISCHER SPEKTRAL TRANSFORMATOR RECORD SIRIUS Operating Instructions QUASIMIDI
-
Upload
jose-manuel-gil-lopez -
Category
Documents
-
view
71 -
download
3
Transcript of Sirius Manual

32 OHM32 OHM
NATURALDRUMS
BASS-SOUNDS
DIRTYNATURAL
DIRTYBASS
ELECTRONICDRUMS
PAD-SOUNDS
909-TYPEPLUCKEDSOUNDS
808-TYPE
LEVEL
BD SNARE HIHAT PERC. SYNTH 1 SYNTH 2 SYNTH 3
MOD.-WHEELASSIGN
PARTSELECT
SOUNDSELECT
MODULATIONWHEEL
PITCHBEND
TRACK-MUTING
PATTERNSELECT
SONGSELECT
PARTMUTE
PART/SEQ.TO MIDI
PANORAMA FX1/FX2
1 2
SNARE HIHAT
DETUNE FILTER-OVERDRIVE
Q-FACTOR VCF-EGMACRO
VCA-EGMACRO
MOD.-DEPTH
MOD.-RATE
SPECIAL-LOOPTRACK-FADER
OVERBLAST
MOD.-MACRO
WAVE-MACRO
GLIDELPF 24 dB RELEASE
0
32
64
96
127
LPF 12 dB
HPF 12 dB
PAGE/BANK
MASTERVOLUME
MICROPHONECONNECTOR
VALUETEMPO
RECALL EXIT
EDIT WRITE
SHIFT
KEY-TRACKINGOCTAVE-UPOCTAVE-DOWN VCF-DYN. VCA-DYN. RANDOM-SOUND
PRESS BUTTONFOR SOUND-CREATION
TAP-TEMPO
DEMO
SYNC.EXTERN
AUDIOSYNC
CUTOFF ENV.-MOD VCALEVEL
PERCUSSION
PATTERN BREAK SPECIAL LOOP TRACKS
SYNTH 1 SYNTH 2 SYNTH 3 VOCODER
HOLD BUTTON ANDSELECT PART
ANALYSE CARRIER CARRIER-EXT. MICRO.
HOLDTO
SELECTREW
ARPEG.ON/OFF
START
SONG-STEP
STOP
FWD
PHONES
KICK/BD
3 4 5 6 7 8 9 10 11 12 13 14 15 16
SOLO-SOUNDS
DRUM-SFXEFFECT-SOUNDS
SIRIUS
SIRIUS
by QUASIMIDI
CATEGORIES
MIXER 11 CHANNEL VOCODER SEQUENCER
MODULATOR OSCILLATORS RESONANCE-FILTER AMPLIFIER EG-MACROS PHONETISCHER SPEKTRAL TRANSFORMATOR
RECORD
SIRIUSOperating Instructions
QUASIMIDI

Important Safety instructions
Unpacking and Connecting . . . . . . . . .
Getting started
The Synthesizer
The Percussion-Sets
The Write-Menu
The Sequencer
. . . . . . . . 4
Introduction . . . . . . . . . . . . . . . . . . . 7
8
. . . . . . . . . . . . . . . . 12
. . . . . . . . . . . . . . . 22
. . . . . . . . . . . . . 31
. . . . . . . . . . . . . . . . 34
. . . . . . . . . . . . . . . . 40
What is in the box . . . . . . . . . . . . . . . . 8Unpacking . . . . . . . . . . . . . . . . . . . . 8Connecting the power supply . . . . . . . . . . 8Connecting the goose neck microphone . . . . . 9Connecting the Sirius to a stereo system . . . . . 9Connecting the Sirius to a mixing desk . . . . . 10Connecting the Sirius to an amplifier . . . . . . 10Operating the Sirius with headphones. . . . . . 10
Initialise and Calibrate . . . . . . . . . . . . . 12Listening to Demo-Songs . . . . . . . . . . . . 12A round trip on the front panel of your Sirius . . 14Playing the Sounds of the Sirius . . . . . . . . . 20How do I listen to the pre-programmedpatterns of the Sirius . . . . . . . . . . . . . . 21
Creating Sounds. . . . . . . . . . . . . . . . . 22The Oscillator-Section. . . . . . . . . . . . . . 22The Filter-Section . . . . . . . . . . . . . . . . 24The Amplifier-Section . . . . . . . . . . . . . . 26The Modulator-Section . . . . . . . . . . . . . 27Pitch-Wheel and Hold-Pedal . . . . . . . . . . 28Random-Sound . . . . . . . . . . . . . . . . . 28Storing the Sound . . . . . . . . . . . . . . . . 29Recall and Compare-Sound . . . . . . . . . . . 29Overview of the Sound-Parameters . . . . . . . 30
Overview of the Sound and Setup Parameters. . 32
Storing/Saving . . . . . . . . . . . . . . . . . . 34The Quick-Save Function . . . . . . . . . . . . 35Save Patterns . . . . . . . . . . . . . . . . . . 35Save Songs . . . . . . . . . . . . . . . . . . . 36Save Arpeggio-Motions . . . . . . . . . . . . . 36Initialise Sounds . . . . . . . . . . . . . . . . . 37Initialise Patterns . . . . . . . . . . . . . . . . 37Initialise Songs . . . . . . . . . . . . . . . . . 37Copying Motifs . . . . . . . . . . . . . . . . . 38Momentary Dump . . . . . . . . . . . . . . . 38Sound-Dump . . . . . . . . . . . . . . . . . . 38Song-Dump . . . . . . . . . . . . . . . . . . . 38All-Dump . . . . . . . . . . . . . . . . . . . . 38
What is a Sequencer and how does it work? . . 40
Patterns, bars and Motifs . . . . . . . . . . . . 41What is being saved in a Pattern? . . . . . . . . 42
The Memory(Storage) Display . . . . . . . . . . 47Recording drum-motifs with the drumgrid. . . . 48The Step Sequencer for the Synthesizer-Parts . . 50The Mixer-Settings . . . . . . . . . . . . . . . 52Allocating the Sequencer Tracks . . . . . . . . . 53Saving a Pattern . . . . . . . . . . . . . . . . . 54Patterns in a Live-Performance . . . . . . . . . 54The Number-Keys or ‘Pads’ . . . . . . . . . . . 55The favourite Patterns . . . . . . . . . . . . . . 55The Breaks . . . . . . . . . . . . . . . . . . . 55The Special-Loop-Tracks. . . . . . . . . . . . . 55Mute und Transpose Tracks . . . . . . . . . . . 56A Song develops . . . . . . . . . . . . . . . . 57To Store a Song . . . . . . . . . . . . . . . . . 58Playing a Song . . . . . . . . . . . . . . . . . 59
The Selection of manufacturedarpeggio-types . . . . . . . . . . . . . . . . . 60The Arpeggiator-Freeze-Function . . . . . . . . 61Programming the Arpeggiator . . . . . . . . . . 61How to use the Gater und the Chord Trigger? . . 64Saving the Arpeggiator-Settings . . . . . . . . . 65Free-programmable-arpeggiator-pattern . . . . . 65How to record the arpeggiator intothe intern sequencer . . . . . . . . . . . . . . 68
How does the Beat-Recognition-System work . . 70Operating the Beat-Recognition-System. . . . . 70Connection to a Mixing Desk . . . . . . . . . . 71For difficult cases: The Beat-Offset . . . . . . . 73External Synchronization of additional units . . . 73
How to direct the Parts of the Siriusto the two Effect processors? . . . . . . . . . . 74The Effect processors of the Sirius . . . . . . . . 74The Effect processor FX1 . . . . . . . . . . . . 74The Effect processor FX2 . . . . . . . . . . . . 75
Vocoder-Basics . . . . . . . . . . . . . . . . . 78How does the Vocoder work? . . . . . . . . . . 78Features of the Sirius-Vocoder . . . . . . . . . . 78Starting immediately? . . . . . . . . . . . . . . 79
The Song and its Steps . . . . . . . . . . . . . 42Recording and Editing Motifs . . . . . . . . . . 42Random Motifs . . . . . . . . . . . . . . . . . 43Moving or Deleting User Memory Spaces . . . . 44Realtime Recording . . . . . . . . . . . . . . . 45Overdub Recording . . . . . . . . . . . . . . . 46The Groove-Factor . . . . . . . . . . . . . . . 47Quantisation . . . . . . . . . . . . . . . . . . 47
The Arpeggiator
The Beat-Recognition-System
The Effects
The Sirius-Vocoder
. . . . . . . . . . . . . . . 60
. . . . . . . . 70
. . . . . . . . . . . . . . . . . . 74
. . . . . . . . . . . . . . 78
Contents
2

3
Basic functions of the Vocoder . . . . . . . . . 82Turning the Vocoder On and Off . . . . . . . . 82Setting the volume of the Vocoder-sound . . . . 82How can I select the different Basic programs? . 82How can I select Analyze-signals and Carrier? . . 84Using other external sound sourcesfor the Vocoder . . . . . . . . . . . . . . . . . 86Changing the level of the individualVocoder tracks . . . . . . . . . . . . . . . . . 87How does the Filter Bank work?. . . . . . . . . 88How can I set Effects and Pan? . . . . . . . . . 89The Vocoder Menu . . . . . . . . . . . . . . . 90Where are the Vocoder settings stored? . . . . . 92Configuration Diagram of the Vocoder . . . . . 93
Master-Transpose . . . . . . . . . . . . . . . . 94Master-Tune . . . . . . . . . . . . . . . . . . . 94MIDI-Master-Channel . . . . . . . . . . . . . . 94Local-Off . . . . . . . . . . . . . . . . . . . . 95MIDI-Synchronization. . . . . . . . . . . . . . 96Send- and Receive Functions . . . . . . . . . . 96SysEx-Speed. . . . . . . . . . . . . . . . . . . 98Poti-Snap . . . . . . . . . . . . . . . . . . . . 98Poti-Info. . . . . . . . . . . . . . . . . . . . . 98Track-Mute . . . . . . . . . . . . . . . . . . . 99Beat-Input . . . . . . . . . . . . . . . . . . . 99
MIDI? What on earth that? . . . . . . . . . 100Connecting MIDI-Gear . . . . . . . . . . . . 100Examples of MIDI-Connections to the Sirius . . 101Sirius and Computer . . . . . . . . . . . . . . 103MIDI-Problems and Solutions . . . . . . . . . 107Changing Sound banks and Sound programswith MIDI . . . . . . . . . . . . . . . . . . . 108Data-Dumping-Storing your Data! . . . . . . . 110How to Data-Dump . . . . . . . . . . . . . . 110How does the Data-Dump get back to theSirius? . . . . . . . . . . . . . . . . . . . . . 112
Synchronisation of the Sirius to Cubase . . . . 113Recording Sirius-Pattern and -Songs into anexternal Sequencer . . . . . . . . . . . . . . 116
What is stored and where it is stored? . . . . . 118
The System Menu
The Sirius and MIDI
The Sirius and Cubase
Saving and storing
. . . . . . . . . . . . . . . 94
. . . . . . . . . . . . . 100
. . . . . . . . . . . 113
. . . . . . . . . . . . . 118
is
Appendix . . . . . . . . . . . . . . . . . . 120List of Wave-Macros . . . . . . . . . . . . . . 120List of Percussion Instruments . . . . . . . . . 121List of Drum Sounds . . . . . . . . . . . . . . 122List of Synth-Sounds . . . . . . . . . . . . . . 124List of MIDI-Controllers . . . . . . . . . . . . 126The System Exclusive Data formats of the Sirius 127Sirius MIDI-Implementation chart . . . . . . . 133Diagramatic Overview of the Edit Menus . . . 134
Problems and answers . . . . . . . . . . . . . 138Hotline . . . . . . . . . . . . . . . . . . . . 139Initializing of the Sirius and calibration of thecontrollers . . . . . . . . . . . . . . . . . . . 140INDEX . . . . . . . . . . . . . . . . . . . . . 141Warranty definitions . . . . . . . . . . . . . . 149Technical Data . . . . . . . . . . . . . . . . . 150
Button combinations. . . . . . . . . . . . . . 136Special Functions and short selection . . . . . 137
Contents
QUASIMIDI Musikelektronik GmbHBahnhofstr. 4435282 RauschenbergTel: 06425/93000Fax: 06425/930093

2
The lightning flash with arrowhead symbol, within anequilateral triangle, is intended to alert the user to pres-ence of uninsulated "dangerous voltage" within the prod-uct's enclosure that may be of suf ficient magnitude toconstitute a risk of electric shock to persons.
The exclamation point within an equilateral triangle isintended to alert the user to the presence of importantoperating and maintanance (servicing) instructions in theliterature accompanying the product.
INSTRUCTIONS PER TAINING TO A RISK OF FIRE, ELECTRIC SHOCK, OR INJURY TO PERSONS
SAVE THESE INSTRUCTIONS
The CE-Sign on our products declares that our electr ical devices are in conf ormity with the EN 55014 andEN 50082-1(in accordance with 89/336 EMC- and EEC dir ective). The manuf acturer also declares theconformity of above mentioned product with the actual required safety standards.
IMPORTANT SAFETY INSTRUCTIONSWARNING - When using electr ic products , basic precautions should alw ays be followed, including the f ollowing:
1.2.
3.
4.
5.
6.
7.8.
Read all the intructions before using the product.Do not use this product near water - for example, near abathtub, washbowl, kitchen sink, in a wet basement, ornear a swimming pool, or the like.This product should be used only with a cart or stand thatis recommended by the manufacturer .This product, either alone or in combination with anamplifier and headphones or speakers, may be capable ofproducing sound levels that could cause permanent hearingloss. Do not operate for long period of time at a highvolume level or at a level that is uncomfortable. If youexperience any hearing loss or ringing in the ears, youshould consult an audiologist.The product should be located so that its location or positiondoes not interfere with its proper ventilation.The product should be located away from heat sourcessuch as radiators, heat registers, or other products thatproduce heat.Avoid using the product where it may be af fected by dust.The product should be connected to a power-supply of thetype described in the operating instructions or as markedon the product.
9.
10.11.12.
13.
14.
The power-supply cord of the product should be unpluggedfrom the outlet when left unused for a long period of time.Do not tread on the power -supply cord.Do not pull the cord but hold the plug when unplugging.When setting up with any other instruments, the procedureshould be followed in accordance with instruction manual.Care should be taken so that objects do not fall and liquidsare not spilled into the enclosure through openings.The product should be serviced by qualified servicepersonnel when:A.
B.
C.D.
E.
The power-supply cord or the plug has been damaged;orObjects have fallen, or liquid has been spilled into theproduct; orThe product has been exposed to rain; orThe product does not appear to operate normally orexhibits a marked change in performance; orThe product has been dropped, or the enclosuredammaged.
15. Do not attempt to service the product beyond that describedin the user -maintanance instructions. All other servicingshould be referred to qualified personnel.

Important Notes
In addition to the "IMPORTANT SAFETY INSTRUCTIONS" on the previouspage please note the following:
Connecting to the Mains:
Installation:
Maintenance:
Repairs and Data:
-
-
-
-
-
-
-
-
-
Do not connect the unit to a socket which is already feeding other units that can cause interference (forinstance electric motors, light controls, fridges etc.)
The heat generated by the mains adapter is completely normal.
Whenever you intend to connect the Sirius to other units, first turn off all units. This will prevent possiblemalfunctions and damage to speakers and other equipment.
Using the unit close to heavy power sources (or other units containing larger mains transformers) cancause "humming" or other electrical interference.
The unit might cause disturbances to television and radio. Do not set up your unit near any of these re-ceivers.
Do not expose the unit to extreme temperatures (like for instance direct sun light in a closed vehicle orextreme frost in winter). The unit could be damaged or the varnish on the casing might disintegrate.
To clean the unit wipe it with a soft, dry or damp cloth. To remove persistent stains you can use a dampcloth and a neutral cleaning agent. Wipe the unit dry afterwards.
Never use Petrol, Thinner, Alcohol or similar cleaning agents to clean your unit. These can dissolve themarkings and varnish and might deface the casing.
Please remember that you might lose the memory of your unit when you send it in for repair. Importantinformation should therefore be stored on a different MIDI-unit (for instance Sequencer). Although ev-ery care is taken when repairing your unit it can happen, especially when work to the storage/memoryor affiliated groups is necessary, that information is lost. Please note that it is not possible for us to restorelost data.
See page 110
5

Important Notes
Storage Protection:
Additional precautions:
-
-
-
-
-
-
-
The memory of the unit is secured with a Lithium battery (CR 2025). The storage contents will remaineven when the unit is switched off. Depending on how it is treated, the battery will last for severalyears. Should you have to exchange it, please contact our Service-Department. Please make sure thatthe old batteries are disposed of properly. Batteries of all kinds do not belong in the domestic trash, asthey contain dangerous heavy metals.
Please consider that the storage contents can also be irrevocably lost through mal-function or improperuse. Important data should therefore be stored regularly on another MIDI-unit (for instance a se-quencer)
For these cases we point out that it is not possible to restore lost data.
Treat the keys and dials as well as the connection sockets with care - improper use can lead to mal-functions.
Never press or hit the buttons or the display hard.
Whenever you are connecting or unconnecting cables, always pull the plug itself, do not pull the cable.This will avoid short-circuits and cable damage.
Should you wish to transport the unit, it is best to use the original carton (including the polystyrene in-lays)
The CE-Sign on our products declares that our electrical devices are in conformity with theEN 55014 and EN 50082-1 (in accordance with 89/336 EMC- and EEC directive). Themanufacturer also declares the conformity of above mentioned product with the actualrequired safety standards.
See page 110
6
7
Introduction
Introduction:
Caution:
Dear Sirius-owner,
With the Sirius you have acquired a very user-friendly synthesizer. In the past, you had to spend alot of money on many different types of equipment before you could create and record an entire mu-sical composition. This is a fact which we paid a lot of attention to when designing the Sirius. To thisend, we have combined several exciting machines into one all-purpose unit.In the Sirius you will find everything you need to write and record your own music: a sequencer, adrum computer, 3 polyphonic synthesizers,an arpeggiator, a vocoder, a beat-recognition system and even two effects units. The Sirius is there-fore a complete and compact studio for very little expense.It does not matter whether you are a newcomer or have advanced knowledge of such musical instru-ments. The unit has been designed with user-friendliness as a priority, enabling everyone to reachtheir desired musical goals fast! The flexibility of the Sirius guarantees endless pleasure and surprises.Be it the versatile connection possibilities of the integrated vocoder or the brilliant real time possibili-ties of the filter and arpeggiator stages, the Sirius will definitely inspire the creative and experimentalsound designing side in everyone who uses it. The Sirius is programmed for endless fun!
You will soon realise that the Sirius, with its many useful functions and simplicity of operation, is theperfect partner in your day to day musical life. Naturally we have devoted a lot of thought to live per-formance as well, and have equipped the Sirius with numerous possibilities for real time operationand management. Your audience will be thrilled.
In order to get to know your Sirius as fast as possible you should work through this manual step bystep and try out the individual functions directly on the machine (learning by doing). Not only willthis save you a dry and dusty week of reading, it will also guarantee that you miss none of the excit-ing functions available to you.
But enough talk!Everyone here in the Quasimidi Team wishes you lots of fun working with your new synthesizer.
The use of the Sirius preset motifs and patterns for your own music production is granted only toQuasimidi Sirius owners.
The commercial distribution of Sirius preset-sound and preset-pattern samples on Sampling-CD,Internet, Disc or any other media without permission of the Quasimidi-Musikelektronik GmbH isstrictly prohibited.
We would like to thank Stefan Skaliks for the friendly support on the Beta-Test.
Copyright © 1998 QUASIMIDI-Musikelektronik GmbH
!
Tip
!
This symbol points out the numerous tips youwill find in this manual.
Text marked with this symbol should be paidparticular attention to.

Unpacking and connecting
What is in the box
Unpacking:
Connecting the mains adapter:
What else do you need to get going?
The box in which the Sirius is delivered contains the following parts:
- the Sirius- the external mains adapter- this manual- a guarantee registration form- 1 goose neck microphone- 2 jack-jack audio cables- 2 jack-phono(RCA) adapters
Do not use a knife or any other sharp metal object when removing the Sirius from its pack-ing.
The Sirius is secured in the packing with polystyrene moulded inlays. Take the Sirius together withthese polystyrene moulded inlays out of the box and put it on an even surface. Caution - the mainsadapter is packed in a small cardboard box located in a hollowed-out section in the side of one ofthe polystyrene inlays. After you have removed the mains adapter you can then carefully take off thepolystyrene inlays and take the Sirius out of the plastic bag. Now you can install the Sirius in its fu-ture place of work.
The box in which the Sirius is delivered is ideal for transportation. Should you wish totransport the Sirius, you won´t have any packing problems. In the unlikely event of a repair, theSirius should be sent to Quasimidi in its original packaging. Should Quasimidi receive a unit for re-pair without the original packaging, QUASIMIDI will return the repaired unit in replacement packag-ing at the owner's expense, as only this packaging can guarantee safe transport. Transport damagesdue to improper packaging will not be compensated by QUASIMIDI.
Remove the mains adapter from the box. Plug the big plug into the mains socket. Plug the small plugat the other end of the cable into the power supply socket, protruding slightly from the rear panel ofthe Sirius and located immediately next to theon/off switch. It is marked as follows:
10,5V DC, 1,5 A
Please use the original mains adapterprovided only for running your Sirius. Only thisadapter guarantees both perfect functioningand damage protection of the Sirius.
In order to hear the Sirius you will need an amplifier. Several appliances can be used: Stereo Sys-tems with auxiliary inputs, Mixers connected to an Amplification system, Instrument Amplifiers orsimply Headphones. The respective cables are included with the Sirius. The enclosed jack-jack ca-bles can be used with the usual mixers or instrument amplifiers. The jack-phono(RCA) adapters allowa problem-free connection to a stereo system (provided it has auxiliary inputs such as CD, AUX, DATetc.) or to any other DJ-Mixer.
Caution:
?
Caution:
Important:
!
!
!
!
8
external mains adapter

Unpacking and connecting
The Rear Panel
Connecting the goose neck microphone:
How do I connect the Sirius?
1.) Connecting the Sirius to a stereo system:
First plug the enclosed goose neck microphone into the XLR input which is located at the top right ofthe front panel of the Sirius.
On the back of the Sirius you will find two 6,3mm (1/4") jack sockets, the stereo output pair. Thesesockets are marked audio-left and audio-right. The amplifier, stereo system or mixing desk will beconnected to these outputs. You will need a mixing desk if you wish to run other instruments apartfrom the Sirius through the amplifier or stereo system. The 5-pin din sockets which you will also findon the rear panel are for the transmission of MIDI information and do not output any audio signal(sound). A more detailed explanation of the MIDI-connections can be found in the chapter called:"The Sirius and MIDI".
The following is a detailed description of how to connect the Sirius to the three types of audio equip-ment we have already mentioned. A detailed connection plan can also be found on the page afternext (Page 11):
First turn off your stereo system and the Sirius. You will need the two enclosed jack-jack cables andthe two jack-phono(RCA) adapters to make this connection. Not all of the auxiliary inputs at the rearof your stereo amplifier are suitable for connecting the Sirius. Choose one of the following possibili-ties:
1.) AUX or Auxiliary2.) LINE3.) CD4.) DAT5.) TAPE IN or TAPE PLAY
Totally unsuitable for the connection of the Sirius is the PHONO input of your stereo amplifier, asthis input has a pre-amp and is constructed for your record player. This input would distort the soundof the Sirius.Put the two jack cables in the AUDIO-LEFT/RIGHT socket of the Sirius. Connect the jack-phono(RCA) adapters to the other end of the cables. Now you can connect the cables to the stereoamplifier.Turn the volume dial of the stereo and the MASTER-VOLUME dial of your Sirius to minimum. Nowfirst switch on the Sirius and then the stereo system. Turn the input selector on your stereo amplifierto the input you chose when connecting the Sirius. Now turn the MASTER VOLUME dial of theSirius to Maximum. Press the START-Key of the Sirius (located in the SEQUENCER section on thefront panel) to start a sequence. Carefully turn up the volume of your stereo system to the desiredlevel. In order to avoid damage to your speakers due to the deep bass frequencies the Sirius is ableto create you might have to lower the bass level on your stereo amplifier.
2POWERON / OFFMIDI-INAUDIO-LEFTCARRIER-IN ANALYSE-IN GAIN MIDI-OUTAUDIO-RIGHT MIDI-THRUFOOTSWITCH
10,5V DC / 1,5 A
to amp or mixer
alternative inputsfor the Beat-Recognition-System
Footswitchconnection
Carrier-inputfor the Vocoder
Analyse-inputfor the Vocoderwith a Gain-knob
copyof the
MIDI-IN MIDI-keyboardor computer power
supply
See page 100
9

10
Unpacking and connecting
2.) Connecting the Sirius to a mixing desk:
3.) Connecting the Sirius to an amplifier:
4.) Operating the Sirius with headphones:
If you are connecting the Sirius to a mixing desk you must use the LINE INPUTS. The microphone in-puts of most mixing desks are unsuitable for connection to the Sirius - the high output level willcause distortion. Most microphone inputs are also equipped with XLR sockets which are only veryrarely used for connecting instruments. (By the way, the microphone input on the front panel of theSirius is a XLR socket.)
Before you attempt to make any audio connections turn all your equipment off. Then connect thetwo audio outputs of the Sirius (AUDIO-LEFT/RIGHT, located on the rear panel) to two of the inputson the mixing desk. Turn the MASTER-VOLUME control of the Sirius to maximum and the GAIN-CONTROL (sometimes referred to as "INPUT SENSITIVITY") of the mixing desk to MINIMUM. TheTONE CONTROL (or "EQUALISATION") of the mixing desk should be in the same position on bothchannels. You are best-off choosing a neutral setting for the tone control / equalisation (if possible,the tone control or equalisation should be switched out) so that the sound of the Sirius will not bechanged.The pan control of the two channels should be set to the exact opposite of each other:left channel -> hard left, right channel -> hard right) in order to hear true stereo. Should your mix-ing desk have stereo inputs, these settings are already made.Slide the stereo mix faders of the mixing desk back to MINIMUM.
Now turn on first the Sirius and then the mixing desk. Press both the demo Keys of the Sirius at thesame time (located below the large round VALUE/TEMPO-dial on the right of the front panel) andchose a demo song using one of the Number-Keys marked 1-16, which you will find directly abovethe Keyboard.
Set the Gain control of the mixing desk so that the level showing on the channels' individual level me-ters is below the peak level (if the meters are "in the red", the level is too high and distortion will oc-cur!). If your mixing desk does not have individual level meters for each channel, turn up the stereomix faders (master level faders) of the desk so you are able to hear any distortion which may be oc-curring and turn down the GAIN control accordingly. Instead of a gain control some desks only give achoice between LINE and MIC sensitivity. In this case turn the input selector to LINE. Should eventhe smallest gain setting of the mixing desk result in distortion, turn down both the MASTER-VOLUME and OVERBLAST controls on the Sirius respectively. Generally you should always choosethe highest possible setting of your sound source (in this case the Sirius) and turn down the mixingdesk accordingly to achieve the optimum sound to noise ratio. Once the mixing desk been cali-brated to the Sirius you can set the stereo mix faders of your mixing desk to your preferred setting.
Should you wish to connect your Sirius to an instrument or Keyboard amplifier you should firstly turnall the equipment off. Then connect the Sirius' audio outputs (AUDIO-LEFT/RIGHT, located on therear panel) to the audio inputs of your amplifier.Turn the volume control and, if there is one, gain control on your amplifier to minium and the MAIN-VOLUME control on the Sirius to maximum. Switch on the Sirius first and then the amplifier.On the Sirius press both demo Keys simultaneously (they are located on the right of the front paneldirectly below the large round VALUE/TEMPO- dial) and choose a demo song from the Number-Keys 1-16, which you will find directly above the Keyboard. Carefully adjust the gain control of theamplifier to just below the level where distortion occurs. Then adjust the overall volume of the am-plifier to the desired setting.
The Sirius has a headphone output on the far right of the front panel.
Should you use headphones please note that extensive blasting of your eardrums can resultin permanent damage to your hearing.In this case it is necessary to see a doctor.
The headphones should have an impedance of at least 32 ohm.
Caution:!
11
Unpacking and connecting
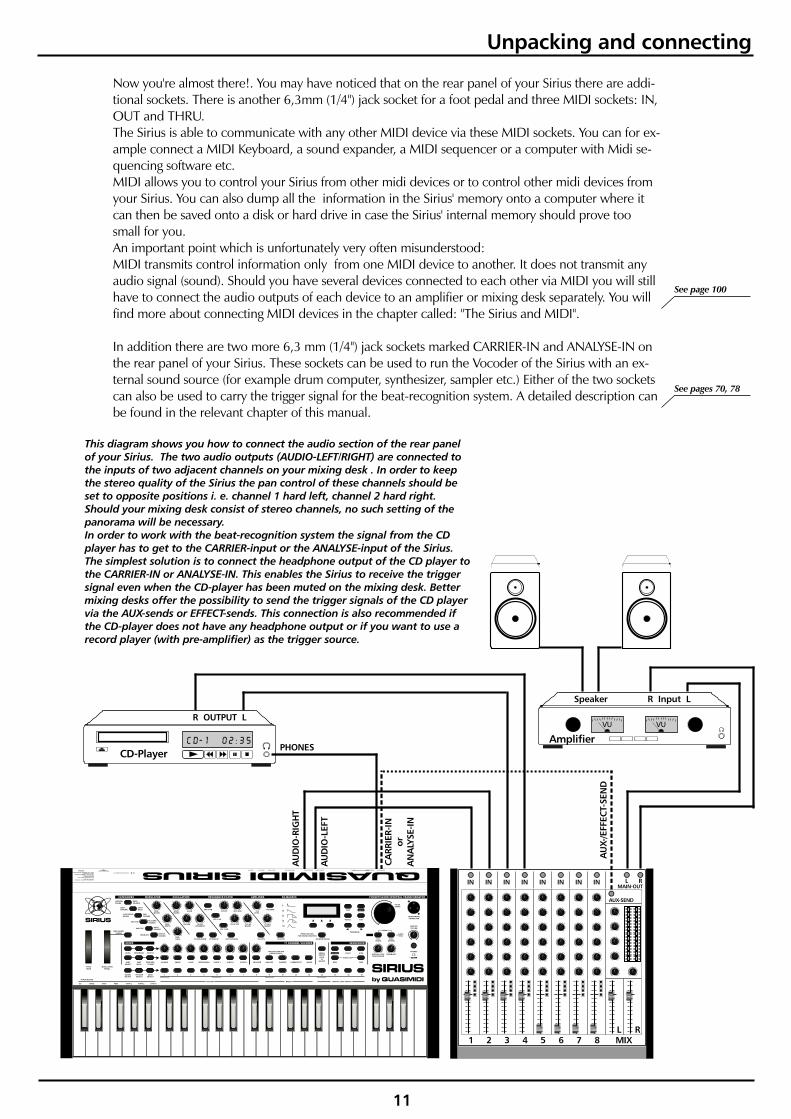
Now you're almost there!. You may have noticed that on the rear panel of your Sirius there are addi-tional sockets. There is another 6,3mm (1/4") jack socket for a foot pedal and three MIDI sockets: IN,OUT and THRU.The Sirius is able to communicate with any other MIDI device via these MIDI sockets. You can for ex-ample connect a MIDI Keyboard, a sound expander, a MIDI sequencer or a computer with Midi se-quencing software etc.MIDI allows you to control your Sirius from other midi devices or to control other midi devices fromyour Sirius. You can also dump all the information in the Sirius' memory onto a computer where itcan then be saved onto a disk or hard drive in case the Sirius' internal memory should prove toosmall for you.An important point which is unfortunately very often misunderstood:MIDI transmits control information only from one MIDI device to another. It does not transmit anyaudio signal (sound). Should you have several devices connected to each other via MIDI you will stillhave to connect the audio outputs of each device to an amplifier or mixing desk separately. You willfind more about connecting MIDI devices in the chapter called: "The Sirius and MIDI".
In addition there are two more 6,3 mm (1/4") jack sockets marked CARRIER-IN and ANALYSE-IN onthe rear panel of your Sirius. These sockets can be used to run the Vocoder of the Sirius with an ex-ternal sound source (for example drum computer, synthesizer, sampler etc.) Either of the two socketscan also be used to carry the trigger signal for the beat-recognition system. A detailed description canbe found in the relevant chapter of this manual.
This diagram shows you how to connect the audio section of the rear panelof your Sirius. The two audio outputs (AUDIO-LEFT/RIGHT) are connected tothe inputs of two adjacent channels on your mixing desk . In order to keepthe stereo quality of the Sirius the pan control of these channels should beset to opposite positions i. e. channel 1 hard left, channel 2 hard right.Should your mixing desk consist of stereo channels, no such setting of thepanorama will be necessary.In order to work with the beat-recognition system the signal from the CDplayer has to get to the CARRIER-input or the ANALYSE-input of the Sirius.The simplest solution is to connect the headphone output of the CD player tothe CARRIER-IN or ANALYSE-IN. This enables the Sirius to receive the triggersignal even when the CD-player has been muted on the mixing desk. Bettermixing desks offer the possibility to send the trigger signals of the CD playervia the AUX-sends or EFFECT-sends. This connection is also recommended ifthe CD-player does not have any headphone output or if you want to use arecord player (with pre-amplifier) as the trigger source.
IN IN IN IN IN IN IN IN L R
AUX-SEND
MAIN-OUT
1 2 3 4 5 6 7 8L RMIX
CD-1 02:35CD-Player
AU
DIO
-RIG
HT
AU
DIO
-LEF
T
CA
RRIE
R-IN
orA
NA
L YSE
-IN
AU
X -/E
FFEC
T -SE
ND
PHONES
R OUTPUT L
Amplifier
R Input LSpeaker
VU VU
32 OHM32 OHM
NATURALDRUMS
BASS-SOUNDS
DIRTYNATURAL
DIRTYBASS
ELECTRONICDRUMS
PAD-SOUNDS
909-TYPEPLUCKEDSOUNDS
808-TYPE
LEVEL
BD SNARE HIHAT PERC. SYNTH 1 SYNTH 2 SYNTH 3
MOD.-WHEELASSIGN
PARTSELECT
SOUNDSELECT
MODULATIONWHEEL
PITCHBEND
TRACK-MUTING
PATTERNSELECT
SONGSELECT
PARTMUTE
PART/SEQ.TO MIDI
PANORAMA FX1/FX2
1 2
SNARE HIHAT
DETUNE FILTER-OVERDRIVE
Q-FACTOR VCF-EGMACRO
VCA-EGMACRO
MOD.-DEPTH
MOD.-RATE
SPECIAL-LOOPTRACK-FADER
OVERBLAST
MOD.-MACRO
WAVE-MACRO
GLIDELPF 24 dB RELEASE
0
32
64
96
127
LPF 12 dB
HPF 12 dB
PAGE/BANK
MASTERVOLUME
MICROPHONECONNECTOR
VALUETEMPO
RECALL EXIT
EDIT WRITE
SHIFT
KEY-TRACKINGOCTAVE-UPOCTAVE-DOWN VCF-DYN. VCA-DYN. RANDOM-SOUND
PRESS BUTTONFOR SOUND-CREATION
TAP-TEMPO
DEMO
SYNC.EXTERN
AUDIOSYNC
CUTOFF ENV.-MOD VCALEVEL
PERCUSSION
PATTERN BREAK SPECIAL LOOP TRACKS
SYNTH 1 SYNTH 2 SYNTH 3 VOCODER
HOLD BUTTON ANDSELECT PART
ANALYSE CARRIER CARRIER-EXT. MICRO.
HOLDTO
SELECTREW
ARPEG.ON/OFF
START
SONG-STEP
STOP
FWD
PHONES
KICK/BD
3 4 5 6 7 8 9 10 11 12 13 14 15 16
SOLO-SOUNDS
DRUM-SFXEFFECT-SOUNDS
SIRIUS
SIRIUS
by QUASIMIDI
CATEGORIES
MIXER 11 CHANNEL VOCODER SEQUENCER
MODULATOR OSCILLATORS RESONANCE-FILTER AMPLIFIER EG-MACROS PHONETISCHER SPEKTRAL TRANSFORMATOR
RECORD
See page 100
See pages 70, 78

12
Getting started
Initialise and Calibrate:
Listening to Demo-Songs:
Now that you have connected your Sirius properly you are probably itching to hear it. Before youswitch it on for the first time you should however initialise it and calibrate the performance aids forsafety reasons. The memory of the Sirius will be deleted and all parameters will revert to their origi-nal settings.(In future you will only have two reasons to initialise your Sirius: 1. When the Sirius Service Depart-ment tells you to do so or, 2. If you want to reset the Sirius to its original factory settings.)
When you turn on the Sirius for the first time you should hold down the WRITE-Key and turn on thePOWER ON/OFF switch on the rear panel.The following message will appear on the display:
Now press the left-hand Key under the display (F1-Key) to confirm, and your Sirius will be initialised.This procedure is shown on the display by a status bar. Once the initialisation is complete the Sirius willask you to calibrate the pitch-bend and the modulation wheels. The display shows the following:
Now turn the modulation wheel down all the way and hold the pitch-bend wheel at its lowest position.Press the left Key under the display (F1-Key). The following message appears:
Repeat this procedure by bringing the wheels to their highest position. Again confirm with the F1-Key.This will bring you to a test menu. Here you can test if the calibration was successful.
When the pitch-bender is released it should show 64, its top setting 127, the lowest 0. The modulationwheel should show 0 in its lowest position ( at the bottom) and 127 in its highest position ( at the top). Con-firm once again by pressing the left-hand Key below the display (F1 Key). The Sirius is ready to go.
NB: Should the calibration not show the desired result you can repeat the procedure by pressing theright-hand Key under the display (F3-Key)
In order to sweeten the reading of this manual we have given the Sirius 16 Demo-Songs. 40 minutesof music of different musical styles await you to give you a small insight into the sound possibilities ofthe Sirius. All demo songs were exclusively programmed with the internal functions of the Sirius.Why not listen to the pieces while you are studying the manual?
To hear the songs the Sirius has to be switched to demo-mode. Press both keys named DEMO belowthe VALUE/TEMPO-dial control.
Initialize All?[ok] [cancel]
Set Wheels-> min[OK] [cancel]
Set Wheels-> MAX[OK]
Wheels-Test: 64[OK] [retry]
TAP-TEMPO
DEMO
SYNC.EXTERN

13
Getting started
After pressing the two Keys the normal display of the Sirius says good bye with an elegant wave anddisappears to the right. The display now shows that the Sirius is in demo mode:
Now you only need to listen. The 16 Demo -Songs are played one after the other. After the last songit will start again from the beginning. You can also choose the demo songs separately. Press any ofthe Number-Keys 1-16 located directly above the Keyboard. To make it easier to choose, here is ashort description of each demo-song:
A driving song with clear Drum & Bass and jungle elements.
An unusual name for this sparse groove. Please note that the rhythmic synth line isbubbling directly from the vocoder.
This song takes you directly to the disco. With the Sirius your songs should findtheir way into the charts too.
A Song proving that QUASIMIDI-instruments do not only produce "Techno". Thisdemo song has already thrilled the American audience at the NAMM-SHOW ‘98in Los Angeles and increased demand for the Sirius in the US!
House-heavy track with a strong stress on the Off-Beat and interesting filtersweeps.
Kraftwerk did not have the advantage of owning a Sirius 20 years ago. Now theydo!!
Not really from this world. Although only at a modest pace of under 130 BPM thisGoa-number with house influence will push your legs to the limit. Pay attention tothe clever use of the vocoder.
And because it was so fabulous, another bit of Kraftwerk.
This demo-song's name speaks for itself. Boxed up break-beats, off the wall synthsand a lot of effects give it an essential drive.
A demo for the nostalgic people amongst the synthesizer brotherhood. In the pastthis was known as "The Berlin School".
Commercial dance number. Here there is only a vocal line missing to bring it tochart success. Be our guest - do one yourself!
Modern, synthetic sound structures with a light ambient-touch.
Driving but still melodic Dancefloor-demo with a memorable refrain.
Another Dance-demo processed by the vocoder.
Several parts of an experimental electronic session with trance elements and somePhatt-beats.
A trip round the current club scene: a bit of trance, some house, some acid andthe techno soup bubbling away...
To exit the demo-mode press the EXIT-Key on the top right of the display.
1.) Saturn:
2.) VOC Grov:
3.) Danceflr:
4.) Hip&Funk:
5.) Tricky:
6.) Elektro1:
7.) AlienJam:
8.) Elektro2:
9.) Prodigy:
10.) Oldschol:
11.) DanceNow:
12.) Atmosphe:
13.) Tetsuo:
14.) VocodeX:
15.) SpaceAce:
16.) Motivate:
*** DEMO ***1: Saturn

14
Getting started
A round trip of the front panel of your Sirius:The individual control panels on the front panel of the Sirius are clearly divided. The following dia-gram gives you an overview of the most important functions of the Sirius.
The elements and sections in detail:
The Keyboard:
As the diagram above is only a rough guide we would like to briefly introduce the individual ele-ments and sections separately . A detailed description of the grouped functions like the Vocoder, theSequencer or the Synthesizer can be found in the relevant chapters in this manual.
The Keyboard is mainly used to play notes on the synthesizer. You also have the possibility to muteindividual tracks and to transpose a whole pattern (changing the overall musical Key of the pattern).These functions are available on the first two octaves of the Keyboard.
Mute Transpose
32 OHM32 OHM
NATURALDRUMS
BASS-SOUNDS
DIRTYNATURAL
DIRTYBASS
ELECTRONICDRUMS
PAD-SOUNDS
909-TYPEPLUCKEDSOUNDS
808-TYPE
LEVEL
BD SNARE HIHAT PERC. SYNTH 1 SYNTH 2 SYNTH 3
MOD.-WHEELASSIGN
PARTSELECT
SOUNDSELECT
MODULATIONWHEEL
PITCHBEND
TRACK-MUTING
PATTERNSELECT
SONGSELECT
PARTMUTE
PART/SEQ.TO MIDI
PANORAMA FX1/FX2
1 2
SNARE HIHAT
DETUNE FILTER-OVERDRIVE
Q-FACTOR VCF-EGMACRO
VCA-EGMACRO
MOD.-DEPTH
MOD.-RATE
SPECIAL-LOOPTRACK-FADER
OVERBLAST
MOD.-MACRO
WAVE-MACRO
GLIDELPF 24 dB RELEASE
0
32
64
96
127
LPF 12 dB
HPF 12 dB
PAGE/BANK
MASTERVOLUME
MICROPHONECONNECTOR
VALUETEMPO
RECALL EXIT
EDIT WRITE
SHIFT
KEY-TRACKINGOCTAVE-UPOCTAVE-DOWN VCF-DYN. VCA-DYN. RANDOM-SOUND
PRESS BUTTONFOR SOUND-CREATION
TAP-TEMPO
DEMO
SYNC.EXTERN
AUDIOSYNC
CUTOFF ENV.-MOD VCALEVEL
PERCUSSION
PATTERN BREAK SPECIAL LOOP TRACKS
SYNTH 1 SYNTH 2 SYNTH 3 VOCODER
HOLD BUTTON ANDSELECT PART
ANALYSE CARRIER CARRIER-EXT. MICRO.
HOLDTO
SELECTREW
ARPEG.ON/OFF
START
SONG-STEP
STOP
FWD
PHONES
KICK/BD
3 4 5 6 7 8 9 10 11 12 13 14 15 16
SOLO-SOUNDS
DRUM-SFXEFFECT-SOUNDS
SIRIUS
SIRIUS
by QUASIMIDI
CATEGORIES
MIXER 11 CHANNEL VOCODER SEQUENCER
MODULATOR OSCILLATORS RESONANCE-FILTER AMPLIFIER EG-MACROS PHONETISCHER SPEKTRAL TRANSFORMATOR
RECORD
DETUNE FILTER-OVERDRIVE
Q-FACTOR VCF-EGMACRO
VCA-EGMACRO
MOD.-DEPTH
MOD.-RATE
MOD.-MACRO
WAVE-MACRO
GLIDELPF 24 dB RELEASE
0
32
64
96
127
LPF 12 dB
HPF 12 dB
KEY-TRACKINGOCTAVE-UPOCTAVE-DOWN VCF-DYN. VCA-DYN.
FOR SOUND-CREA
CUTOFF ENV.-MOD VCALEVEL
LEVEL
PARTSELECT
PARTMUTE
PART/SEQ.TO MIDI
PANORAMA FX1/FX2
SNARE HIHAT PERCUSSION SYNTH 1 SYNTH 2 SYNTH 3 VOCODERKICK/BD
MIXER
SOUNDSELECT
PATTERNSELECT
SONGSELECT
1 2 3 4 5 6 7 8 9 10 11 12 13 14 15 16
HOLD BUTTON ANDSELECT PART
ANALYSE CARRIER CARRIER-EXT. MICRO.
11 CHANNEL VOCODER
PAGE/BANK
RECALL EXIT
EDIT WRITE
PRESS BUTTONFOR SOUND-CREATION
REW
START
SONG-STEP
STOP
FWD
SEQUENCER
RECORD
32 OHM32 OHM
SPECIAL-LOOPTRACK-FADER
OVERBLAST
VOLUME
SHIFT
TAP-TEMPO
DEMO
SYNC.EXTERN
AUDIOSYNC
PHONES
Synthesizer-Section
Edit section with display
Socket for foot switch VALUE /TEMPO-dial
Microphone input
Master-Section
Sequencer-Panel
Vocoder-Section
Keyboard Number-Keys
Mixer-Section
Modulation wheel
Pitch-Bend Wheel
Sound type / categories
NATURALUMS
BASS-SOUNDS
DIRTYTURAL
DIRTYBASS
ELECTRONIC PAD-SOUNDS
909-TYPEPLUCKEDSOUNDS
808-TYPESOLO-SOUNDS
UM-SFXEFFECT-SOUNDS
BD SNARE HIHAT PERC. SYNTH 1 SYNTH 2 SYNTH 3
TRACK-MUTING

15
Getting started
The Edit Panel and Display Panel:The Display Panel is for communication with the Sirius. It contains the display and the Keys whichenable you to move around the display's menus.
The three Keys below the display will now be referred to in this manual as the F1, F2 and F3 Keys.Depending on which menu has been chosen, these Keys perform different functions. If there is noedit or write menu shown on the display, the F2-Key activates the RANDOMIZE-mode which createsnew sounds with an intelligent random-algorithm.
The EDIT-Key opens the edit menu of the Sirius. The WRITE-Key opens the WRITE -menu of theSirius in which all memory and Init functions can be found. The RECALL-Key recalls the original ver-sion of an edited sound. The EXIT-Key quits the edit menu you were just working in. ThePAGE/BANK-Keys allow you to scroll through the pages in the edit menu. In addition you can chosefrom the Sound libraries of the Sirius with these Keys when you're not working in any of the editmenus.
The VALUE/TEMPO-dial:
The Master-Section:
The VALUE/TEMPO-dial is a so called infinite dial control. With this con-trol the values in the edit menus are changed. It is also used to changethe tempo of the sequencer.
The master section holds functions which affect the Sirius as a whole.
The most important function is without doubt the MASTER-VOLUME control which adjusts the over-all volume (output level) of the Sirius. Below this control you will find the headphone socket. Theheadphone volume is also adjusted with the MASTER-VOLUME-control.
VALUETEMPO
MASTERVOLUME
32 OHM32 OHM
OVERBLAST
SHIFT
TAP-TEMPO
DEMO
SYNC.EXTERN
AUDIOSYNC
PHONES
SPECIAL-LOOPTRACK-FADER
F1-Key
F2-Key
F3-KeyPAGE/BANK
RECALL EXIT
EDIT WRITE
PRESS BUTTONFOR SOUND-CREATION
RANDOM-SOUND
S I R I U Sby QUASIMIDI

16
Getting started
The control marked SPECIAL-LOOP TRACK-FADER allows you to adjust the volume of the special-loop tracks. When the Sirius is in Record mode you can adjust the volume of the metronome withthis control.The OVERBLAST-control is located right next to it. It allows you to lift up the high (treble) and low(bass) ends of the Sirius sounds. You could probably compare this function to the 'loudness' controlon most stereo systems. Above these two controls there are two Keys, both of which can performseveral functions.The SHIFT/TAP-TEMPO KEY serves first of all as a shift-Key. If you press it down you can performfunctions which do not have their own designated Key by using the other Sirius Keys . A list of thesefunctions can be found in the appendix of this manual. The TAP-TEMPO KEY allows you to adjustthe tempo or pace of the sequencer by tapping it four times at the desired tempo.With the SYNC-EXTERN KEY you can select whether the Sirius is to be synchronised to an externalMIDI device or to an audio signal. When the Key is constantly lit the Sirius is waiting to be synchro-nised to an external MIDI device. When the Key is blinking you have activated the BEAT-RECOGNI-TION-SYSTEM and you can synchronise the Sirius to an audio signal.When you press both Keys at the same time, the DEMO-mode of the Sirius will be activated. Thismode allows you to listen to the Demo-songs of the Sirius. In order to quit the demo-mode press theEXIT-Key to the right of the display.
The Sequencer panel controls the main functions for the sequencer. This panel will remind you of acassette deck and basically gives you the same functions: RECORD, START, STOP, REW and FWD.
This section lets you select specific sounds from the sound categories provided. The original soundsof the Sirius are already divided into specific categories of Sirius factory sounds. If, for example, youwould like to play wide sounds (Pads), simply press the PAD-SOUNDS Key. On the left of the Keysyou will find sound categories for your drum tracks (Parts 1-4), on the right you will find the soundcategories for the synthesizer tracks (Parts 5-7). Inside each of these sound categories there is a li-brary of 16 sounds which you can choose using the number Keys 1-16 directly above the Keyboard.As the Sirius offers several sound banks, each of these categories is available several times. ThePAGE/BANK-Keys in the edit section allow you to move from one bank of sounds to another.
The Sequencer Panel:
Choosing your sound from the Categories Section:
REW
START
SONG-STEP
STOP
FWD
SEQUENCER
RECORD
NATURALDRUMS
BASS-SOUNDS
DIRTYNATURAL
DIRTYBASS
ELECTRONICDRUMS
PAD-SOUNDS
909-TYPEPLUCKEDSOUNDS
808-TYPESOLO-SOUNDS
DRUM-SFXEFFECT-SOUNDS
CATEGORIES
See page 136

17
Getting started
The Number Keys:
The Mixer Panel:
The Synthesizer Section:
The Number-Keys 1-16 directly above the Keyboard allow you to perform a number of differenttasks. The most important feature here is the ability to choose whether you want sounds, patterns orsongs. This choice is made by pressing one of the three selection Keys on the far left hand side. Theselection you have made is indicated by the lit Key.
You also need to use these Keys to enter notes in the Drumgrid Record-mode,the Step Record-mode and the Arpeggiator, or to fly in breaks and special -loop-tracks.
This section is not only built like a mixing desk but also works like one! Apart from the selectionblock for the Part-Keys and Number-Keys, the mixer consists of seven dials above each Part-Key, eachdial with its respective Part-Key works as a pair. Each part (track) of the Sirius is controlled by one ofthese pairs. The dial controls allow you to set the volume, the pan position as well as the value forthe FX-sends of a Part (track).The row of Keys allows you to select the separate Parts of the Sirius in order to, for example, playthem on the Keyboard or to edit them. The Part-Keys also allow you to select individual parts/tracksor to pass them on to an external MIDI device.
The synthesizer-section is the heart of the Sirius. Here all the important sound creating elements areavailable to you. The section is built just like a classic analogue synth. From left to right you will findthe modulator (LFO), the oscillators, the filter (VCF) as well as the amplifier (VCA). The diagrams onthe right-hand side of the synthesizer section illustrate the behaviour of the Envelope Generator mac-ros for VCF and VCA.
SOUNDSELECT
PATTERNSELECT
SONGSELECT
1 2
PATTERN BREAK
VELOCITY
SPECIAL LOOP TRACKS
GATE-TIME
3 4 5 6 7 8 9 10 11 12 13 14 15 16
With these three Keys youdecide what you want tochoose using the numberKeys.
With these Keys youselect the functions whichare to be performed bythe mixer section
LEVEL
PARTSELECT
PARTMUTE
PART/SEQ.TO MIDI
PANORAMA FX1/FX2
SNARE HIHAT PERCUSSION SYNTH 1 SYNTH 2 SYNTH 3KICK/BD
MIXER
MOD.-DEPTH
DETUNE FILTER-OVERDRIVE
Q-FACTOR VCF-EGMACRO
VCA-EGMACRO
MOD.-MACRO
WAVE-MACRO
GLIDELPF 24 dB RELEASE
0
32
64
96
127
LPF 12 dB
HPF 12 dB
CUTOFF ENV.-MOD VCALEVEL
MODULATOR OSCILLATORS RESONANCE-FILTER AMPLIFIER EG-MACROS
MOD.-RATE KEY-TRACKINGOCTAVE-UPOCTAVE-DOWN VCF-DYN. VCA-DYN.

18
Getting started
The Vocoder section:This section controls the main functions of the Vocoder which are the switching on and off of theVocoder, selecting Vocoder presets, adjusting the volume as well as the routing of ANALYSE andCARRIER signals. The Vocoder section works closely with the mixer section. To adjust the separate fil-ter frequencies of the vocoder, for example, you would use the controls of the mixer while holdingdown the VOCODER-Key. With the row of Keys on the mixer, the separate tracks of the Sirius can berouted to the ANALYSE or CARRIER signal. You select the 16 vocoder presets using the Number-Keys1-16 while holding down the VOCODER-Key.
The Microphone connector:
The Footswitch Socket:
This socket is for connecting the goose neck microphone. The microphone is auto-matically activated when you select one of the 16 vocoder-presets. Please note thatthe microphone socket is immediately de-activated as soon as you connect a cableto the ANALYSE-IN socket on the rear panel of the Sirius.
Although this socket is not located on the front panel of the Sirius we would like to briefly go into itat this point.The reason for this is that a footswitch is a so called 'performance aid' with which the sound of theSirius can be influenced in real time. Other performance aids are the modulation wheel and thepitch bender.
This socket requires a footswitch with an on/off switch. The footswitch should be connected prior topowering up the Sirius. When the Sirius is turned on it will automatically recognise the polarisation ofthe footswitch. Pedals which send continuous information (for example volume pedals) are not suit-able for connection to this socket.
Once you have found the right footswitch you can try the following:hold down a PAD on the Keyboard and step on the footswitch. If you now let go of the note you areholding down on the Keyboard, the sound will keep on playing until you release the pedal. This iscalled a Sustain-footswitch.
The second function of the footswitch enables you to transpose arpeggios. When you step on thefootswitch while the Arpeggiator is running and stay put, the Arpeggio will continue to play out nor-mally. When you now press any note on the Sirius Keyboard the pitch of the whole Arpeggio willchange.
VOCODER
HOLD BUTTON ANDSELECT PART
ANALYSE CARRIER CARRIER-EXT. MICRO.
11 CHANNEL VOCODER
MICROPHONECONNECTOR
FOOTSWITCH

19
Getting started
The two wheels on the left of the front panel of the Sirius are often referred to as performance aids.They allow you to change the sound while playing, particularly useful in a live situation. Each wheelhas its own functions.
The Pitch-Bend Wheel, also known as the Pitch-Bender, allows you to change the pitch while youare playing. If you release the wheel it automatically returns to its central position. If you move itdownwards the pitch of the sound will get lower. If you move it upwards it will become higher. Eachsound of the Sirius can be allocated an individual pitch-bend setting.
The Modulation Wheel allows you, as the name says, to modulate sound. In synthesizer languagemodulation means the generating of a continuous change of the sound characteristics while playing.This could be for example the generating of vibratos or the opening of a filter. A lot of synthesizersonly allow you to control one parameter with each wheel. Not so with the Sirius. You can allocate upto five sound parameters of the Synthesizer section to the modulation wheel simultaneously. This en-ables you to create very complex and interesting soundscapes and layers.
The MOD-WHEEL ASSIGN-Key has several important functions. If you have assigned one or moresound parameters from the synthesizer section to the modulation wheel in order to process your cho-sen sound, this Key will be lit. This Key also allows you to delete a MOD-WHEEL ASSIGN or toprogramme a new one. You can do this by holding the key down. The display will show the followingmessage:
If you now press the Key F1 below the display the current settings of the modulation wheel will bedeleted. Once you release the Key the MOD-WHEEL-ASSIGN message on the display disappears.The Modulaton Wheel is now ready for re-programming. The assigning of parameters is very simple:Hold down the MOD-WHEEL-ASSIGN -key and turn the dial of the parameter which is to be as-signed to the modulation wheel. The display shows a change in value. This value shows the positiveand negative deviation of the parameter relative to the value stored in the sound. This deviation cannow be performed by the Modulation wheel. You can repeat this until you have assigned five differ-ent parameters to the Modulation Wheel. Should you want to assign one of the MACRO-controls tothe modulation wheel please note that you are then assigning several parameters at one time. For ex-ample the two EG-MACRO-Keys control 4 parameters each.
Apart from the parameters from the syntehesizer section the parameters from the Mixer section canalso be assigned to the Modulation Wheel. The procedure is the same. You can yield particularlygood results if for example you assign FX-sends when you have chosen a delay as an effect. Check itout!
The Pitch-Bend Wheel:
The Modulation Wheel:
How to programme the Modulation Wheel:
Mod-Wheel-Assign[Clear]
Experts tip:
Pitch-Bend Wheel
Modulation Wheel
Programming Key for theModulation wheel
PITCHBEND
MODULATIONWHEEL
MOD.-WHEELASSIGN
Tip

20
Playing the Sounds of the Sirius:
The sound categories:
The sound banks and libraries:
Playing Drum-Sounds:
By now you must be starving to hear the sounds of the Sirius. Once you have left the demo-mode bypressing the EXIT-Key you will see the following on the display:
This means the following: 'A' indicates the bank from which the sound comes - '71' indicates thenumber of the sound within that bank. After the colon comes the sound name, in this case"SyncSynt".
On the right of the display you see a number, in this case "160" which is indicating the current speedor tempo of the internal sequencer. In the lower part of the display you see the word "STOPPED"which means that at present the sequencer is not running.
The seven bars to the right symbolise the separate Parts(tracks) of the Sirius. If you now play the Key-board you will hear the sound shown on the display. The fifth bar of the part-display will show a levelreading. This is basically indicating that part 5 (SYNTH-1) is active. You will notice that the Part-key inthe mixer-section is also lit up, verifying the display's information.
Now let's look at the CATEGORIES section which allows you to choose the sound categories. You willnote that the CATEGORIES-Key named "SOLO-SOUNDS" is lit up. We have deliberately divided thesounds into these different categories because it makes the selection of particular sounds so mucheasier. The drum-sound categories (parts 1-4) are on the left of the CATEGORIES-Keys in orangeprint. The synthesizer-sound categories (parts 5-7) are printed in white on the right. With the help ofthe number Keys 1-16 directly above the keyboard you can choose one of 16 sounds from the se-lected sound category. You can immediately play it on the keyboard. The display will directly showyou sound name, storage bank and library number.
The synthesizer-sounds are spread over three fixed ROM banks (A, B and C) and a USER-bank. Afterlistening to all categories and sounds on bank "A" you will have to change to the next bank. You cando this two ways: Use either the PAGE/BANK-Key in the edit section or press the Categories-Key youhave selected one more time. Every time you press the Categories-Key you change banks.
In order to play any drum-sounds you have to select the Drum-Part you want to listen to first. You se-lect the parts with the Part-Keys (1-4) in the mixer section. You will find these Keys directly below thefirst four Mixer-section dials. Make sure that these Keys are selected by checking if the PART-SELECTKey on the left of the mixer is lit. If not, press it down. Now choose the part for which you want tohear the sounds. You select the different sounds exactly like you selected the synthesizer sounds. Butnote that there is only one ROM and one USER bank for each drum-part.
There are 96 different ROM-sounds available in every drum-part (kick, snare, hihat and percussion).This equals 384 drum sounds all together.
The synthesizer -Parts consists of 3 banks with 96 sounds each, 288 synthesizer-sounds in total. All inall the Sirius has 672 factory sounds ready for you to use.In addition the Sirius offers you 480 User-storage spaces for sounds programmed by yourself. Thereare 96 storage spaces each for the kick, snare, hihat, percussion and synth parts .
A71:SyncSynt 160(STOPPED)_______
Getting started
The fixed storage space for the factory-sounds of the Sirius is called ROM (Read Only Memory). Itcan not be deleted or overwritten. The USER-storage space for your own programmed sounds iscalled RAM (Random Access Memory).

21
How do I listen to the pre-programmed patterns of the Sirius?There are 142 factory-programmed patterns in the Sirius, the ROM-patterns.These patterns cannot be deleted or overwritten and serve as a basic stock of new grooves andUSER-patterns. You can combine them randomly to form new songs.
You can also use the separate motifs of these ROM patterns to create new ones. These patterns alsogive you an excellent overview of the musical and stylistic versatility of the Sirius. In order to listen tothe patterns systematically proceed as follows:
Press the EDIT-Key next to the display. With the PAGE/BANK-Key you choose page 2 of the menu.Now select the Edit-pattern menu by pressing the F1 Key.
Press the F1 Key once again to access the menu for the ROM- and USER patterns.
Here you can choose which pattern-type you want to listen to. If you haven«t created any patternsyourself yet, the USER-pattern section will be empty. Use the F1-Key to select the area of the ROM-pattern:
Once you have selected this page on the menu the sequencer of the Sirius will start up. Now youcan scroll through the 142 factory-programmed patterns using the VALUE/TEMPO-dial.
Once you have selected a pattern which you want to have a closer look at, press the F2 Key (OK) toget to the EDIT-PATTERN menu. Now you can look at single tracks closely, store new motifs or putother ROM or USER-motifs into the pattern.
Select Edit <2>[Pattern] [Mix]
Select Pattern[Rom] [User]
Load ROM-PatternPattern:055 [ok]
Getting started
See page 42

The Synthesizer
22
The Synthesizer
Creating sounds:
The Oscillator-Section:
We showed you how to access the factory sounds in the section "Playing the sounds of the Sirius".Now we will show you how to create your own sound with the synth parts 1,2 & 3 (Part-Keys 5-7 onthe mixer section). This procedure also applies to the drum parts (Part-Keys 1-4 on the mixer section)- even drum-parts are given a complete synthesizer!
We are sure that by now you have already started following your basic instincts: turning controls,pressing knobs in the synthesizer section, hitting the Randomizer.... Thanks to the macro-controlsand the simple design of the Sirius' front panel, the "learning by doing" or "hands-on" approach willbe easy and fun.The Sirius is actually offering you many more possibilities for fine editing and sound design than thefront panel immediately suggests. Let’s use the SYNTH 1 part as an example. Press the PART SELECTKey followed by the SYNTH 1 part Key:
In order to edit this sound within the Edit-section, press the EDIT-Key and select menu page 1 withthe PAGE/BANK-Key:
First we will look at the parameters available in the oscillator section:
Hit F1 thereby selecting the Edit-sound menu.
On this page you can choose one of 125 oscillator models. "22" indicates the number which is fol-lowed by the name of the oscillator model. The setting can be changed with the VALUE/TEMPO-dialas well as with the WAVE MACRO- control.
Select Edit |1>[Sound] [Arpeg.]
Edit Synt1-Sound|1> 22: S_Saw
LEVEL
PARTSELECT
SOUNDSELECT
PATTERNSELECT
SONGSELECT
PARTMUTE
PART/SEQ.TO MIDI
PANORAMA FX1/FX2
1 2
SNARE HIHAT PERCUSSION SYNTH 1 SYNTH 2 SYNTH 3KICK/BD
3 4 5 6 7
MIXER
DETUNE FILTER-OVERDRIVE
WAVE-MACRO
GLIDE
OSCILLATORS
OCTAVE-UPOCTAVE-DOWN
`

Edit Synt1-Sound<2> Octave: 8
Edit Synt1-Sound<3> Detune: 0.38
Edit Synt1-Sound<4> Glide: 127
Edit Synt1-Sound<5> Monophon: ON
Edit Synt1-Sound<6> EGP-Mod: +24
Edit Synt1-Sound<8> EGP-Dec: 113
`
Press the right-hand PAGE-Key once more. This brings you to page 2 of the menu. The parameter onmenu page 2 allows you to set the octave range of the sound. Four different basic ranges are at yourdisposal. '8' means the pitch of the sound remains the same. '4' is one octave higher. '16' is one oc-tave lower, etc.. Changes are made with the VALUE/TEMPO-dial or the Keys OCTAVE-UP and OC-TAVE-DOWN in the oscillator section.
Pressing the right-hand PAGE-Key once more will bring you to page 3 of the edit menu, the detunepage. Here you can individually detune the oscillators of the Sirius. The intensity of the de-tuning ofthe oscillators can vary from a fraction of a tone to a pitch difference of 24 semi tones (2 octaves).You can either use the DETUNE control in the oscillator section or the VALUE/TEMPO-dial.
On page 4, the Sirius offers you the possibility of polyphonic portamento. In the oscillator section theglide-value (or "portamento-time") can be set with the GLIDE-control, values ranging from 0 to 127.When you play a chord or note in the lowest octave of the Keyboard followed by a chord or note inthe highest octave you can clearly hear how the pitch glides smoothly "to the top".
On page 5 of the menu you can determine if this Part in the Sirius should be played polyphonicallyor monophonically.Polyphonic is the term used for a sound which can be played with many notes simultaneously, suit-able for playing chords - monophonic is a sound which can only be played one note at a time.Some parts benefit greatly from being in the monophonic mode.Turn the parameter to the ON-position. Hold one note down in the highest octave of the keyboardand play a tune in a lower octave. When you release each note of the tune being played, the highnote which you are holding down will play out.
Page six brings you to the Pitch Envelope Generator. This determines how the pitch of the originalwaveform (sound) will be changed over time.
A negative value will make the pitch rise up to the note you have pressed. Positive values will havethe opposite effect. Try it and hear for yourself! The values range from -63 -> +63 and are changedusing the VALUE/TEMPO-dial. This parameter is particularly useful for creating siren sounds, or togive the glissando characteristic of, for example, a brass section surging into the opening phrase of'The Stripper'!On pages 7 and 8 you can time the attack and the decay phases of the pitch envelope. A long attackmeans a slow gliding / sliding of the pitch up or down. The decay-phase begins as soon as the origi-nal pitch is reached.
The Pitch-Envelope Generator (EGP):
The Synthesizer
23
OCTAVE-UPOCTAVE-DOWN

The Synthesizer
24
The last parameter of the oscillator section is the VCF-drive. It produces an overload of the filter stagewhich leads to those wonderfully distorted and aggressive overdrive-sounds. Each filter in the parts ofthe Sirius therefore has its own distortion unit - very useful for, for instance, acid bass lines, aggressivesolo sounds etc.
For each of the 7 parts the Sirius has its own multi-mode-filter with controllable cut-off frequenciesand resonance (On the Sirius referred to as Q-factor). The cut-off frequency can be manipulated in anumber of ways. You can do this for instance with the separate envelope waveform generator whichgenerates sound changes automatically. You can also at any time "tune" the cutoff-frequency in realtime with the CUTOFF-control or assign it to the modulation wheel. Like all sound parameters the fil-ter can also be controlled from an external Midi device.The first three Keys in the filter section allow you to select one of the filter types. A low pass filter(LPF) will only allow the frequencies below the cutoff-frequency to pass through. A high pass filter(HPF) works the other way round. The frequency curve of the filter is given in dB/octave and de-scribes how strongly the frequencies are faded in and out before and after the cutoff-point. The 12dB filter is a milder curve than the steep 24 dB filter and therefore sounds a bit softer. The Key trackoption is explained later.
Now choose a filter type with the Keys on the front-panel or use the VALUE/TEMPO-dial.
Edit Synt1-Sound<9> VCFDrive: 27
Edit Synt1-Sound<10> VCFTyp:LP24
The Filter-Section:
Q-FACTOR VCF-EGMACRO
LPF 24 dB
LPF 12 dB
HPF 12 dB
CUTOFF ENV.-MOD
RESONANCE-FILTER
KEY-TRACKING VCF-DYN.
f
dBFilter withoutresonance
CUTOFF-FREQ.
dB
f
Q-Factor
Sirius-Filterwith resonance
CUTOFF-FREQ.

0
32
64
96
127
On the next page of the menu you can set the cut-off frequency:
and then the filter bandwidth and resonance (Q-factor):
The resonance is a factor producing an over-loading of the level of the cut-off frequency. When theresonance-values are high, such over-loading causes the filter to feed back and so generate new har-monics. The result is typically a "whistle" or "squeak" in the sound, providing it with a more cuttingedge. Filters without resonance are therefore not as flexible as the Sirius-filters.
On page 13 of the menu you can set the Key-tracking. You can activate it at any time with the KEY-TRACKING-Key on the front panel. The Key-tracking allows you to control the cut-off frequency bythe pitch you are playing on the Keyboard. You can for instance create sounds which become morebrilliant the further up the Keyboard you move. Positive values become more brilliant, negative val-ues more dull.
Check it out and let your ears and taste decide.
On page 14 of the menu you will find the parameter called VCF-dynamic. The VCF-dynamic allowsyou to determine how the filter can be controlled through Touch-sensitivity. When for instance youenter +63 the sound will turn more brilliant the harder you hit the Keyboard. -63 obviously pro-duces the opposite effect. You can activate this function with the VCF-DYN- Key on the front panel.
How much the envelope generator influences the filter is controlled on page 15 of the edit menu via theparameter called Envelope Modulation:
Now we come to the parameters of the waveform envelope. They can be set in two different ways.You either choose page 16-19 to enter values for attack, decay, sustain and release or you use theVCF-EG-MACRO control. There you will find 127 different waveform envelopes to control the na-ture of the sound (waveform). The front panel of the Sirius has diagrams showing the order in whichthe various waveform envelopes are placed.
Edit Synt1-Sound<11> Cutoff: 0
Edit Synt1-Sound<12> Qfactor: 92
Edit Synt1-Sound<13> KeyTrck:+63
Edit Synt1-Sound<14> VCF-Dyn:+63
Edit Synt1-Sound<15> Env-Mod:+19
The Synthesizer
25

The Synthesizer
26
Please note that the EG-MACROS for both filter and amplifier sections are not identical but areplaced in order using specific criteria.
You can of course fine edit the opened macro in its single parameters:Attack:
Decay:
Sustain:
Release:
This section regulates the behaviour of the volume of the sound. The first parameter sets the level:
This is the volume information which is stored for this sound. It has nothing to do with the level set-tings of the mix section.
You can also control the volume with Touch-sensitivity.
If you strike a note on the keyboard hard the sound will be louder than for a soft strike. You can acti-vate and de-activate the Touch-sensitivity at any time using the VCA-DYN-Key on the front panel.
The following menu pages allow you to set the parameters of the VCA Envelope Generator (EGA).These processes are explained below:
Edit Synt1-Sound<16> EGF-Att: 64
Edit Synt1-Sound<17> EGF-Dec: 64
Edit Synt1-Sound<18> EGF-Sus:115
Edit Synt1-Sound<19> EGF-Rel: 64
Edit Synt1-Sound<20> VCA-Lev: 88
Edit Synt1-Sound<21> VCA-Dyn: ON
The Amplifier-Section:
A
Note duration
AMP
TIME
ENVELOPE :
D S R
0
32
64
96
127VCA-EGMACRO
RELEASEVCA
LEVEL
AMPLIFIER EG-MACROS
VCA-DYN.
.

When you hold down a note on the Sirius Keyboard you automatically start the envelope generator.During the ATTACK time the sound will increase until it has reached its maximum level. After thatthe DECAY time sets in, and the volume of the sound decreases until it reaches the adjustable SUS-TAIN-level. This level remains until you release the note, when the sound can either stop immedi-ately or fade out. The duration of the fade-out is determined by the RELEASE time.
The VCA-EG-MACRO-control gives you access to the 127 pre-programmed envelopes. The amplifiersection also has a RELEASE-Key which automatically applies a release-time with a length value of 64for these VCA envelopes.
Attack:
Decay:
Sustain:
Release:
The modulator section allows you to set the type, intensity, frequency and destination of the modula-tor. Every Part of the Sirius contains a low frequency oscillator (LFO) with which you can programmeautomatic pitch changes (vibrato), sound colour changes (filtersweeps) and volume changes (trem-olo). You can also synchronise the LFO to a MIDI-clock.
This page determines the waveform used by the LFO. The following waveforms are available to you:Sinus (SIN), Sawtooth (SWU), Inverted sawtooth (SWD), Square (SQR), Triangle (TRL) and Random(RND).On the following page you can set the frequency of the LFO. The higher the value, the faster the rateof modulation. If you turn the VALUE/TEMPO-dial or the MOD-RATE-control almost all the way tothe right you can choose the resolution of the modulator when the LFO-frequency is synchronised toa MIDI-clock (1/4 note. 1/8 note etc.).
Edit Synt1-Sound<22> EGA-Att: 0
Edit Synt1-Sound<23> EGA-Dec: 64
Edit Synt1-Sound<24> EGA-Sus: 91
Edit Synt1-Sound<25> EGA-Rel: 64
Edit Synt1-Sound<26> LFOWave:SIN
Edit Synt1-Sound<27> LFORate:1/16
The Modulator-Section:
The Synthesizer
27
MOD.-DEPTH
MOD.-MACRO
MODULATOR
MOD.-RATE

The Synthesizer
28
Page 28 enables you to set the modulation intensity/depth:
The following menu pages contain the modulator destinations, i.e. which part of the synthesizer sec-tion you wish to modulate:
Here you can adjust how strongly you want the LFO to influence the pitch change of the oscillator.This modulation can be used for siren effects and vibratos.
The next page allows you to set modulations of the cutoff-frequency of the filter for creating, for in-stance, filtersweeps:
On page 31 you set the modulation of the amplifier section, i.e the volume:
The macro control in the modulation section allows you to access the pre-sets which combine thevarious waveforms with the destinations of the modulator. You will also find a macro to modulate thewaveform Pitch Envelope. In this macro the MOD-RATE-control regulates the velocity and theMOD-DEPTH controls the intensity of the Pitch Envelope.
On the last two pages of the menu you can determine the influence of performance-aids on thesound.
Here you determine how much the pitch will change when the pitch wheel is at its maximum or min-imum. Value readings are in semitones, i.e. 1=1 semitone, 24=24 semitones or 2 octaves, which isthe maximum available pitch change up or down.
The last page of the sound edit menu determines whether a connected foot pedal/switch will controlthe sustain of the sound you are playing. It basically activates or de-activates the footswitch.
Those of you who like surprises will love the Sirius. Simply press the RANDOM-SOUND-Key belowthe display, and, based on special algorithms, the Sirius will generate a totally new sound. You canthen, of course, edit this sound.
Edit Synt1-Sound<28> LFODpth: 10
Edit Synt1-Sound<29> LFO>VCO: 0
Edit Synt1-Sound<30> LFO>VCF: 45
Edit Synt1-Sound<31> LFO>VCA: 2
Edit Synt1-Sound<32> PitSens: 24
Edit Synt1-Sound<33| Holdped: ON
Pitch-Wheel and Hold-Pedal:
Random Sound:Tip
-

PRESS BUTTONFOR SOUND-CREATION
RANDOM-SOUND
Storing the Sound:
The Quick-Save Function to save/store your Sound:
Recall and Compare Sound:
Once you have edited your custom made sound you can store it on one of the 96 USER-sound mem-ory spaces. This also allows you to access the sound via MIDI with an external Midi device using itsmemory number. If you want to assign a sound to one of the 7 Parts (tracks) in the Sirius, you muststore the sound while the sequencer is active. Just press the WRITE-Key and confirm with [ok]. Nowname it, press [ok] and choose a storage space. Press [ok] once more. Done!
If you want to store your sound even faster press one of the 16 Number-keys and hold it down untilthe following message appears on the display:
As the number-Key is held, the storage space is displayed - a status bar indicates the progress of thesaving process. In this example the sound was stored in User-space 35.
The parameters in the edit menu work in the same or very similar ways for the other 6 Parts (kick,snare, hihat, percussion, Synth-2 and Synth-3) as they do for the Synth-1Part.
You can at any time compare your edited sound to the original. Just press the RECALL-Key. The dis-play will show the following:
You can exit the compare mode by either pressing the EXIT-Key or byre-pressing the RECALL-Key. Should you have accidentally changed the sound, thereby losing theone you had created, you can recall it with the RECALL-Key.
Save Sound to 35ok!
**COMPARE**
On the next page you will find an overview of all the sound parameters of the Sirius.
The Synthesizer
29
Tip
Save Sound to 35ok!
See page 108

The Synthesizer
30
The paramters marked with a * can also be influencedby control-dials or keys on the front panel.
Overview of the Sound-Parameters: Kick, Snare, Hihat, Synth-1, Synth-2, Synth-3:(An overview of the parameters of the Percussion-Part you can find on page 32)
|1> Wave-Macro*Octave: )
Tune*Glide: )Monophon: )
Pitch-Envelope-Modulation*
not selectable<2><3><4><5><6><7><8><9><10>
<11><12><13><14><15><16><17><18><19><20><22><23><24><25><26><27><28><29>
<30>
<31>
(
(
(
(
Pitch-Envelope Attack*Pitch-Envelope Decay*VCF-Overdrive*VCF-Typ:
*Cutoff-Frequency*Q-Factor*Key-Tracking: )
VCF-Dynamic-Modulation*VCF-Envelope-Modulation*VCF-Envelope Attack*VCF-Envelope Decay*VCF-Envelope Sustain*VCF-Envelope Release*VCA-Level*VCA-Envelope Attack*VCA-Envelope-Decay*VCA-Envelope Sustain*VCA-Envelope Release*LFO-Wave*LFO-Rate: *LFO-Depth*VCO (Pitch)-Modulationfrom LFO*VCF (Filter)-Modulationfrom LFO*VCA (Amplitude)-Modulationfrom LFO*
not selectablenot selectable
not selectable
24 dB-Lowpass,12 dB-Lowpass, 12 dB-Highpass
can be synchronised
|1> *Octave*
une*Glide*MonophonPitch-Envelope-Modulation*
Wave-Macro<2><3><4><5><6><7><8><9><10>
<11><12><13><14><15><16><17><18><19><20><22><23><24><25><26><27><28><29>
<30>
<31>
<32><33|
Det
Pitch-Envelope Attack*Pitch-Envelope Decay*VCF-Overdrive*VCF-Typ:
*Cutoff-Frequency*Q-Factor*VCF-Key-Tracking*VCF-Dynamic-Modulation*VCF-Envelope-Modulation*VCF-Envelope Attack*VCF-Envelope Decay*VCF-Envelope Sustain*VCF-Envelope Release*VCA-Level*VCA-Envelope Attack*VCA-Envelope-Decay*VCA-Envelope Sustain*VCA-Envelope Release*LFO-Wave*LFO-Rate: *LFO-Depth*VCO (Pitch)-ModulationFrom LFO*VCF (Filter)-Modulationfrom LFO*VCA (Amplitude)-Modulationfrom LFO*Pitch-Bend RangeHoldpedal
24 dB-Lowpass,12 dB-Lowpass, 12 dB-Highpass
can be synchronised
OSC
ILLA
TORS
OSC
ILLA
TORS
OSC
ILLA
TORS
OSC
ILLA
TORS
OSC
ILLA
TORS
OSC
ILLA
TORS
RESO
NA
NC
E-FI
L TER
RESO
NA
NC
E-FI
L TER
RESO
NA
NC
E-FI
L TER
RESO
NA
NC
E-FI
L TER
RESO
NA
NC
E-FI
L TER
RESO
NA
NC
E-FI
L TER
AM
PLIF
IER
AM
PLIF
IER
AM
PLIF
IER
AM
PLIF
IER
AM
PLIF
IER
AM
PLIF
IER
LFO
LFO
LFO
LFO
LFO
LFO
KICK/BD
SYNTH 1 SYNTH 2 SYNTH 3
SNARE-Drum HIHAT
Edit Sound

The Percussion Sets
31
The Percussion SetsCompared with the other Sirius sections, the PERCUSSION Part has a special status.
This part takes up to twelve instruments simultaneously (called a percussion set). A percussion setplays in 12 voice polyphony (i.e. you can play all 12 instruments in the set simultaneously). This fea-ture means you can double up the bass drum of the KICK-track, add a second HIHAT and let a ten-man conga band do the drumming!Your own customised percussion sets are automatically stored in one of the 20 User storage spaceswhich are available.On the one hand, you can work on the whole set the same way with the different sound parametersas you do with single sounds (waveforms). You have the same possibilities to change your sound withthe SOUND-menu or in real time via the dials and Keys of the Sirius. Any parameter changes madein the sound EDIT-menu will effect all the instruments in the percussion set at the same time. Whenthe PERCUSSION-part-Key is active the WAVE-MACRO-control allows you to jump between the 20percussion sets in the memory.
On the other hand you can edit each single instrument of a set separately in the EDIT-menu - the fol-lowing parameters are available in this mode: basic waveform, tune, level, pan, FX1 send and FX2send. The structure of the complete percussion set is explained by the diagram on the followingpage. Your efforts will pay off - composing your own 12 voice percussion sets from a number of basicwaveforms enables you to create some very complex grooves.
The SOUND-parameters which affect the whole percussion set are more or less the same as thoseavailable for the other 6 parts. Let us go directly to the parameters available in the EDIT-menu for theediting of the single instruments of a percussion set. You will find those in the SET-menu of the EDIT-menu.First select the percussion set you wish to edit:Press the PART-SELECT-Key on the mixer panel and then press the PERCUSSION -PART-Key. Nowpress the EDIT Key, and select menu page 1 by pressing the right hand PAGE/BANK-key. The follow-ing is displayed:
Contrary to the other sections you can see here that apart from the whole percussion sound you canalso edit the set's different instruments. In the SET-menu you will always be working on the percus-sion set you have chosen in the SOUND-menu. In order to edit any of the other 20 percussion setsjust turn the WAVE-MACRO-control (you can also select the set while on page 1 of the SOUND-menu by using the CATEGORIES-keys in combination with the Number-Keys).Now open the PERCUSSION-SET EDIT-menu by pressing the F2 Key under the display.
The percussion sets do not need to be stored with the WRITE function: every change youmake to one of the 20 sets will automatically be stored. (The command "STORE PERC.?" in theWRITE-menu stores only parameters affecting the sounds in the percussion set).Unlike the other Parts, changes can not be undone by using the RECALL-Key - so think hard beforeyou edit a percussion set!!
Important:
See pages 22 and32
Select Edit |1>[Snd][Set][Arp.]
F2

The Percussion Sets
32
Choosing instruments:
The Menu Pages:
When you are in the SET-menu you can determine with the keys of the Sirius keyboard which of the12 different percussion instruments you want to edit. Apart from an overall view of the percussionsection, the above diagram also shows you the order of the instruments on the keyboard. Just pressone key briefly and the relevant instrument is selected for editing and appears in the display.The letter on the top right of the display shows you which key and therefore which instrument youhave chosen to edit.
On page one of the menu you can select the basic sound (waveform) for the instrument.For the above example we have basic waveform 22 "808HiTom" selected. Turn the VALUE/TEMPO-dial and 256 different basic waveforms are available to you ranging from different drum instrumentsto exotic percussion and electronic effects.
Edit Set 1 - C|1> 22:808HiTom
Menu page 1: (basic waveform)
HA#AG#GF#D#C#
Parameters with an asterix (*)can also be influencedby controls or Keys on the front panel.
Overview of the SOUND and SETUP parameters: PercussionO
SCIL
LATO
RSRE
SON
AN
CE-
FIL T
ERA
MPL
IFIE
RLF
O
PERCUSSION
Edit Perc-Sound
Edit Set (1-20) - Note:
|1>Octave: )Tune: )Glide:
MonophonPitch-Envelope-Modulation*
not selectablePERCUSSION-SET 1-20
<2><3><4><5><6><7><8><9><10>
<11><12><13><14><15><16><17><18><19><20><22><23><24><25><26><27><28><29>
<30>
<31>
(
((( )
Pitch-Envelope Attack*Pitch-Envelope Decay*VCF-Overdrive*VCF-Typ:
*Cutoff-Frequenz*Q-Factor*Key-Tracking: )
VCF-Dynamic-Modulation*VCF-Envelope-Modulation*VCF-Envelope Attack*VCF-Envelope Decay*VCF-Envelope Sustain*VCF-Envelope Release*VCA-Level*VCA-Envelope Attack*VCA-Envelope-Decay*VCA-Envelope Sustain*VCA-Envelope Release*LFO-Wave*LFO-Rate: *LFO-Depth*VCO (Pitch)-Modulationfrom LFO*VCF (Filter)-Modulationfrom LFO*VCA (Amplitude)-Modulationfrom LFO*
not selectablenot selectable
not selectable
24 dB-Lowpass,12 dB-Lowpass, 12 dB-Highpass
can be synchronised
|1> Waveform
PanFX1SendFX2Send
<2><3><4><5><6|
TuneLevel
Inst
rum
ent
C
Inst
rum
ent
H
Inst
rum
ent
C#
Inst
rum
ent
D#
Inst
rum
ent
F#
Inst
rum
ent
G#
Inst
rum
ent
A#
Inst
rum
ent
D
Inst
rum
ent
E
Inst
rum
ent
F
Inst
rum
ent
G
Inst
rum
ent
AChoose the drum-instruments you want to edit with the Keyboard (the allocationof instruments to the keys on the keyboard, as shown in the diagram, is identicalfor all four octaves of the keyboard).
C D E F
Every percussion set consists of 12 percussion instruments and is playablein 12 voice polyphony. The instruments can be edited separately.

The Percussion Sets
33
Menu page 2: (Tune)
Menu page 3: (Level)
Menu page 4: (Panorama)
Menu page 5 and 6: (FX1-send and FX2-send)
Important:
With the tune parameter you can tune the instrument to a higher or lower pitch (in half-tone steps).
On menu page 3 you determine the output level (volume) of the instrument. Here you can regulatethe relative output levels of the instruments in one percussion set.
Here you can determine where the instrument will sit within the stereo picture. (NB: It is standardpractise for bass drums and snares to have a central position in the stereo picture, indicated by >C<on the display).
These parameters control the effect sends of the instruments to the first and the second Sirius effectsunits.
The effect of the settings in the Edit-SET-menu are also dependant on the settings you have chosen inthe MIX-menu or selected with the dials on the MIXER section of the Sirius for the overall percussionPart. The parameters of the MIX-menu are superior. In SET however they take care of the fine-tuningof the parameter for each instrument.Some examples: If the percussion sound is panned to the very right on the Mixer section, you willnot be able to pan the single instruments to the left in the Edit-SET-menu.If you want to allocate individual effects settings to each of the 12 instruments in the percussion set,the equivalent FX send dial in the MIX menu must at least be partially open. You can allocate differ-ent volumes to the instruments, the highest volume will however never exceed the value set in theMIXER-section.
Edit Set 1 - C<2> Tune: -2
Edit Set 1 - C<3> Level: 127
Edit Set 1 - C<4> Pan: >C<
Edit Set 1 - C<5> Fx1Send: 0
Edit Set 1 - C<6| Fx2Send: 90
!

The Write-Menu:
Storing/Saving:
The WRITE-Key located next to the VALUE/TEMPO-dial opens the WRITE-menu. This menu con-tains all the functions relevant to storing, initialising and data-dumping.In the following pages we will look at the functions of this menu more closely.First press the WRITE-Key to open the menu.
Here you will find the store-function for home-created (customised) sounds to store on one of theUser storage spaces. For the 7 parts of the Sirius you have the following number of sound storagespaces available:
A saved sound contains all sound parameters as well as any modulation-wheel allocations. The set-tings for the arpeggiator are also stored along with any of the Synth-Parts (Parts 5-7). The arpeggiatoris not stored along with Parts 1-4, i.e the drum parts.
If you want to store a sound press the F1 Key. The following sub-menu will open.
Here you can name the sound you wish to store. You can use either the VALUE/TEMPO-dial or thekeys of the keyboard to enter letters, numbers and signs. With the PAGE/BANK-keys you can jump tothe previous or to the next letter.
Menu page 1 (storing sound)
96 own Kick/BD-sounds96 own Snare-sounds96 own Hihat Sounds96 own Percussion-Sounds96 own Synth-1, Synth-2 and Synth-3 Sounds
|1> Store Synt1?[ok]
Name: HouseOg2[ok] [cancel]
The Write-Menu
34
WRITE
aA
bB
cC
dD
eE
fF
gG
hH
iI
jJ
kK
lL
mM
nN
oO
pP
rR
sS
tT
uU
vV
wW
xX
yY
zZ
{[
| }]
Space $ & / ! ? - + * 0 1 2 3 4 5 6 7 8 9
This diagram shows you which keys to use for letters, numbersand signs when naming your sound, pattern or song.
Once you have completed entering the name press the F1 Key under the display to access to the fol-lowing menu:
Here you select the storage space where you want to store your sound. You select it in the same wayas you selected the sound. Use the CATEGORIES-keys and the Number-keys 1-16.You can also select the sound storage space with the VALUE/TEMPO-dial. On the last two pages ofthe menu you have the option to cancel the storage by pressing the F3-Key (cancel).
When storing a sound you should always use a sound category which corresponds to the type ofsound you are storing. In this way you will avoid an arduous search should you want to find thesound again. This is why it is better to determine the storage space using the CATEGORIES Keys incombination with the Number Keys 1-16.
In order to find out which sound you would be overwriting you can listen to it again. If you do notwant to overwrite it you merely select another storage space. Press the RECALL-Key to the right ofthe display and the following message will appear on the display:
If you now play the Keyboard you will hear the sound you would be overwriting on the selected stor-age space. By pressing the EXIT-Key you will get back to the menu where you can select the storagespace. You can repeat this procedure until you have found a storage space for your sound, then pressthe ok Key (F1). The sound is now stored and can not be lost unless you decide to overwrite it withanother sound.
There is a further function available to you which will help to speed up your work with the Sirius:The Quick-Save-Function. It is recommended for instance if you have slightly modified a factory-sound to your liking and you quickly want to store it in the same storage space.Just press one of the 16 number Keys and hold it down for 3-4 seconds. A status bar showing the stor-age progress will appear in the display. Once the storage has been completed, an ok-message will ap-pear on the display. Should you release the Number-key before the status bar has completed its jour-ney, the storage process is automatically aborted.
This function allows you to save the pattern you are currently editing. A pattern stores the number ofused motifs, the used sound numbers, the settings for groove, volume, pan and FX sends as well asany current VOCODER routings. The latter is important for a problem-free use of the VOCODER in alive situation. In every user-pattern you can freely allocate the ANALYSE and CARRIER parts whichare to influence the VOCODER.
to U54(ModSequa)[ok] [cancel]
** COMPARE **
<2> Store Patt. ?[Ok]
Experts-tip:
Menu page 2 (storage of patterns)
The Quick-Save Function:
The Write-Menu
35
Tip

The Write-Menu
36
If you want to store a pattern, press the F1-Key.The following sub-menu will open:
You have 100 storage spaces available to save a pattern. Choose the desired storage space with theVALUE/TEMPO-dial and confirm with F1. If you press the F3-Key you will cancel the storage proce-dure.
On this menu page you can store the selected and edited song. You have 16 song-storage spacesavailable. A song stores the numbers of used patterns, the allocation of the 16 Number-keys with thepatterns, breaks and special-loop-tracks, the tempo of the song, the sequence of the song , the set-tings for the effects programmes and the settings for the vocoder.
Press F1 to start saving. The following menu page will open. Here you can name your song individu-ally.
As with the sound name, you enter the song name with the VALUE/TEMPO-dial or the Keyboard. Tochange to the next letter use the PAGE/BANK-Key. If you want to enter the name press the F1-Key toconfirm.
On this page you can select one of the 16 song storage spaces with the VALUE/TEMPO-dial. Onceyou have confirmed this function with the F1-Key your song is safely stored. On the last two pages ofthe menu you have the option to cancel the storage procedure by pressing the F3-Key.
This page allows you to store your home-created or customised arpeggio-motions. You have 9 stor-age spaces available.
When confirmed with F1 the following sub-menu will open:
Here you can select one of the 9 storage spaces for arpeggio motions with the VALUE/TEMPO-dial.Once you have done this you can complete the storage procedure with the F1 Key below the dis-play. To cancel the storage procedure press the F3-Key.
to Pattern P43[ok] [cancel]
<3> Store Song?[ok]
Name: OldSchol[ok] [cancel]
to 10 (OldSchol)[ok] [cancel]
<4> Store Arpg.?[ok]
to Motion MOT2[ok] [cancel]
Menu page 3 (storing of songs)
Menu page 4 (storing arpeggio-motions)
W

The Write-Menu
37
Initialise:With the following INIT-functions you can literally "hide" sounds, patterns and songs. This is very prac-tical if you want to return to the Sirius' original factory settings in order to program or edit a sound.
Please note that sounds, patterns or complete songs will not automatically be deleted once they areinitialised. The original data will only be lost once you have stored the initialised sound, pattern orsong onto the same storage space. If you save your initialised data onto a different storage space, theoriginal data will remain unchanged in its original storage space.
Once you have started this function by pressing the F1 Key the selected part of the Sirius will be in-itialised. This means that all sound parameters like for instance filters, LFO, waveform envelopes areset to their neutral position.This is very convenient when you want to programme a sound from scratch. Of course this also ap-plies to the drum Parts 1-4. While you are in this menu page you can select any other of the soundsor drum-parts using the Part-keys, CATEGORIES-keys and Number-keys and then initialise them.
Here you can initialise the selected pattern. This means the tracks as well as the setting of the mixersection are being set to neutral. Following the initialisation you will be working with an empty pat-tern.
This function allows you to initialise the selected song.
Initialising a song in a way 'hides' the sequence of the song, the allocation of Number-keys and allsong-relevant parameters. If you have initialised a song you still want to use, it matters not one whit.You will only permanently erase it once you have stored the empty initialised song in the same User-storage space.
Important:
Menu page 5 (initialise sounds)
Menu page 6 (initialise patterns)
Menu page 7 (Initialise songs)
<5> Init Synth1?[ok]
<6> Init Patt.?[ok]
<7> Init Song?[ok]

The Write-Menu
38
Copying:
Data-Dumping
Menu page 8 (copy motifs)
Menu page 9 (Momento Dump)
Menu page 10 (Sound Dump)
Menu page 11 (Song Dump)
Menu page 12 (All-Dump)
With this function you can copy user-motifs to another Part or another User motif storage space. Youcan copy, for example, a motif located on the Synth-1 Part in the same pattern to one of the otherParts without having to replay it.
Press the F1-Key and the copy function will be activated.
In this sub-menu you can select a Part (track) with the Part-keys for which you want to copy a motif.With the VALUE/TEMPO-dial you can select the motif to be copied. While selecting the motif to becopied you should leave the sequencer on so you can listen to the each motif being played. Onceyou have selected the part and motif press the F1 Key to confirm.
Select the part and motif storage space onto which you want to copy the motif you have chosen onthe previous menu page. An asterisk (*) before the motif number signifies that the storage space isnot taken up yet. Here you can also listen to the selected motif that you want to overwrite by run-ning the sequencer. Press the F1-Key to execute the copy command. F3 allows you to cancel it.
The Sirius offers you 4 different ways of dumping data. At this point we will only be giving you a briefoverview of the dumping functions. A more detailed description can be found in the chapter called"The Sirius and MIDI".
The momento-dump sends all presently set parameters of the Sirius, even those that have not beenstored yet. They are: the sound setting, all system parameters from the system-menu, all common pa-rameters (pad allocation, sequencer-tempo, groove settings, effects settings, vocoder settings, arpeg-gio settings) and finally Mix settings. You could call the momento dump a 'snapshot' of the current set-tings or status of the unit.
The sound dump sends all 480 sounds of the Sirius stored in the User bank, the settings of the per-cussion-sets and the arpeggiator-settings.
The song-dump sends all stored user-motifs, user patterns P0-P99, the mix parameters and songs. Afinished saved song contains the sequence of the song, the sequence-tempo, the groove settings, theeffects settings o f FX1 and FX2, the vocoder-settings and the arpeggiator settings.
When you select all-dump, a sound-dump and a song-dump are being sent immediately one afterthe other.
<8> Copy Motif?[ok]
Copy Synt2 Mtf 1[ok] [cancel]
to Synt2 Motif 1[ok] [cancel]
See page 110

Notes
39

The Sequencer
40
The Sequencer of the Sirius
The Sirius has a pattern-sequencer with 7 Parts or tracks.
The sequencer allows you to play little music pieces, called 'motifs', in various ways, which can thenbe put together to form a complete song.
The sequencer does not record the sound of the instrument which is being recorded, as does a taperecorder. It is more like a trigger: In record mode the sequencer memorizes which note or key is be-ing played, the strength with which the note or key is hit (known as 'VELOCITY'), the length of timewhich the note is held down for and the point at which the note is released.
It also memorizes the movements you make on the dials and wheels of the Sirius, such as the PitchBender or the EG-MACROS. When you replay your 'recording' the sequencer will play back thesame keys you pressed during the time of the recording. In a way, the sequencer invisibly repeatsyour performance in every tiny detail.
You can also record MIDI-information ( for notes and controllers) which comes into the Sirius froman external Midi device via the MIDI-in socket. In the appendix of this manual you will find a tableshowing you which information the sequencer is able to record from an external device.
The recorded songs stay stored even after you switch off the Sirius. The Sirius has a smallbattery supplying the storage block with power - this will have to be replaced after some years. Infor-mation on the battery and storage protection can be found in the chapter "Important Notes" at the be-ginning of this manual.
The sequencer in the Sirius is a 7-track-sequencer:This means up to 7 different tunes (motifs) can be played simultaneously. Every part of the Sirius(bass-drum, snare-drum, hihat, percussion set, synth-1, snyth-2, synth-3) is given its own track. Don'tforget, the percussion track can play 12 different instruments at once (effectively giving you a maxi-mum of 18 instruments playing at the same time).
What is a Sequencer?
What does the sequencer record?
How is the sequencer configured?
Important:
BASS-DRUM-Part Kick-Track
SNARE-Part Snare-Track
HI-HAT-Part Hihat-Track
PERCUSSION-SET-Part Perc-Track
SYNTH-1-Part Synt1-Track
SYNTH-2-Part Synt2-Track
SYNTH-3-Part Synt3-Track
PATTERNPERCUSSION-Instrument 1
PERCUSSION-Instrument 2
PERCUSSION-Instrument 3
PERCUSSION-Instrument 4
PERCUSSION-Instrument 5
PERCUSSION-Instrument 6
PERCUSSION-Instrument 7
PERCUSSION-Instrument 8
PERCUSSION-Instrument 9
PERCUSSION-Instrument 10
PERCUSSION-Instrument 11
PERCUSSION-Instrument 12Perc
ussi
on-S
et :
See page 126
!

This principle has the advantage that you can delete or edit any track without jeopardizing any of theother (non-selected) tracks. Given the fact that even for the drums you have several tracks availableyou can easily change the sounds for single drum instruments such as bass-drum, snare or hihat.This you can not do with, for instance, a drum-loop in a sampler. Like this you can record one trackafter the other and play them back all at the same time. Even for the non-professionals it is very easyto play rhythmic, complex drum patterns. Whilst replaying you may adjust the volume, pan and ef-fects separately for each track. Use the front panel controls of the Sirius MIXER.
So you can see that you are able to modify your musical creation at any time.
Having the use of seven adjacent tracks is in itself very practical - but there's more!Be honest: How would you fancy trying to play the bass-drum from the beginning to the end of aneight minute long track? Or, after a 5 minute-long performance, you make a mistake and have tostart the whole thing again from the top!More practical would be if you could play only a very few bars and then have them repeated severaltimes. Most of the time a song consists of small repeated sections - so the sequencer of the Siriusgives you the option to separate your musical ideas into these small sections.And so we come to the MOTIF.
In the Sirius a motif is a musical theme lying on a single sequencer track and is between one andmax. 8 bars long. For instance you can put a one bar motif on the bass-drum-track (kick-track) and a4-bar motif on the snare track and so on.
You can store the motifs of the 7 separate sequencer tracks together with other settings as a 'pattern'.
Patterns, bars and motifs:
What is a Motif?
What is a pattern?
The Sequencer
41
LEVEL
PARTSELECT
SOUNDSELECT
PATTERNSELECT
SONGSELECT
PARTMUTE
PART/SEQ.TO MIDI
PANORAMA FX1/FX2
1 2
SNARE HIHAT PERCUSSION SYNTH 1 SYNTH 2 SYNTH 3KICK/BD
3 4 5 6 7
MIXER
Kick-Track:
Snare-Track:
Hihat-Track:
Perc-Track:
Synt1-Track:
Synt2-Track:
Synt3-Track:
Kick-Motif
Snare-Motif Snare-Motif
HihatMot HihatMot HihatMot HihatMot HihatMot HihatMot HihatMotHihatMot HihatMotHihatMot
Perc-Motif Perc-Motif
Synt1-Motif Synt1-MotifSynt1-Motif Synt1-Motif
Synt2-Motif Synt2-Motif
Synt3-Motif Synt3-Motif

The Sequencer
42
What is being saved in a pattern?
The Song and its Steps:
Recording and Editing Motifs:
You might already have noticed that the Sirius contains a total number of 242 pattern storage spaces.142 ROM (factory) patterns are permanently installed and can not be deleted by mistake. You can,however, copy a single or several motifs into a freely editable User-pattern-storage space. User-Pattern-storage spaces can be deleted and edited.
In each of the 100 User-Pattern-storage spaces of the Sirius the motif allocations of the seven tracksare filed with their respective Sound number. You also store the so-called mix settings with the pat-tern. Apart from the volume settings of the 7 motifs the mix-settings contain the motif«s pan (left, cen-tre or right) and the effects-send settings of the two effects processors FX-1 and FX-2 for each of thetracks. The internal vocoder routing is also stored with the pattern. This is very important for a prob-lem-free live performance of the vocoder as you can freely assign the ANALYSE- and CARRIER-parts.
It goes without saying that you have the option to compose complete songs and store up to 16 ofthem in Sirius' memory block. One song can be made up from up to 100 'steps', called Song-steps.For every Song-step you define which pattern is to be heard in the step and how long it is to last (amax. of 64 bars per step is possible). The overall length of the song must not consist of more than600 bars which would equal 20 minutes per song at a speed of 120 BPM. In a Song-step you canalso determine which tracks are to be muted.You can also dictate the transposing (varying of the pitch in fixed increments: +/- 12 half tones) ofthe three Synth motifs. The following settings of the complete song with its steps are stored:the settings of the effects-processor, the tempo settings, the vocoder settings except for the internalvocoder routing. Also stored are the allocations for the 16 pads available in a song: your 8 favouritepatterns on the pads 1-8, the 4 breaks patterns and 4 special loop-motifs on pads 9-16.
Before you start recording a motif you should closely look at an already existing pattern with its mo-tifs.Press the EDIT-Key then the right-hand PAGE/BANK-Key. Now select the Edit-pattern main menu bypressing the F1-Key under the display. The display shows the following contents:
Editing the motifs in the pattern:
Select Pattern[Rom] [User]
The contents of one Pattern-Storage-SpacePattern-Parameter Mix-Parameter Vocoder-Routing
Motif
Motif
Motif
Motif
Motif
Motif
Motif
Track 1
Track 2
Track 3
Track 4
Track 5
Track 6
Track 7
Sound N°
Sound N°
Sound N°
Sound N°
Sound N°
Sound N°
Sound N°
Level
Level
Level
Level
Level
Level
Level
Panorama
Panorama
Panorama
Panorama
Panorama
Panorama
Panorama
FX1-Send
FX1-Send
FX1-Send
FX1-Send
FX1-Send
FX1-Send
FX1-Send
FX2-Send
FX2-Send
FX2-Send
FX2-Send
FX2-Send
FX2-Send
FX2-Send
Analyse On/Off
Analyse On/Off
Analyse On/Off
Analyse On/Off
Analyse On/Off
Analyse On/Off
Analyse On/Off
Carrier On/Off
Carrier On/Off
Carrier On/Off
Carrier On/Off
Carrier On/Off
Carrier On/Off
Carrier On/Off
GrooveFactor

Select USER and choose User-pattern 09 with the VALUE/TEMPO-dial. Confirm with F1 [ok] andstart the sequencer with the START-Key.
Press the PART-SELECT-key and select another Part (track) of the pattern. At the top right-hand cornerof the display you can always see which Part (track) you have just selected, (In this example it is theSynth-1 Part).A very practical aspect for you to consider is this: When you have activated the PART-MUTE-Key inthe mixer section the PART-Keys will show the muted tracks instead of the ones selected in the dis-play.
If you turn the VALUE/TEMPO-dial on this menu page you are selecting a different motif for your cho-sen track. There are 142 ROM motifs per track (non-deletable factory motifs) and 100 User-motifsavailable.
You recognise used User-motifs by the "-" before the number and the "*" for the un-used or empty ones.
If you use the function Keys F1-F3 you can execute the following shortcuts:
Display showing USR -> press F3: USR No. jumps to USR*00
Display showing USR -> press F2 or F1: motif jumps to ROM area with same No. (I.e. Displayshows USR*46 - hit F1 or F2 - display jumps to ROM-46)
Display showing ROM-00 to ROM-99 -> press F3: motif jumps to "no" (empty motif)
Display showing ROM-100 to ROM 142 -> press F3: motif jumps to ROM-100
Display showing ROM-100 to ROM 142 -> press F1: motif number jumps back 100 ROM numbers.
You will notice that when you change the motif, only the tune or arrangement changes, not thesounds playing the tune or arrangement. This is because each of the sounds allocated to the sevenParts (tracks) have not been altered.By holding down the PART-SELECT-Key you can scroll through the Parts (tracks) using the PART-Keys.You can also allocate different motif numbers to these Parts using the VALUE/TEMPO-dial.
Motif-Random-Selection:Hold down the SHIFT-Key and press one of the 7 PART-Keys. The random generator sort of throwsthe dice and produces a new sound and a different motif for the selected part. The Sirius does notwrite a new motif but picks out one of the many stored ROM patterns at random. The random motifis called up with the respective sound. Should you not be able to hear anything, the Sirius has proba-bly chosen a pattern in which not all of the 7 tracks are used.
By the way, this function is also available in the normal JAM mode, independent of the Edit-menu.
Select PatternPattern:P09 [ok]
Edit P09 T:Synt1|1> Motif:ROM-55
Expert's advice:
Expert's advice:
Expert's advice:Random-Motifs:
The Sequencer
43
Selected TrackSelected Pattern
Selected Motif
Tip
Tip

The Sequencer
44
Time to RECORD!
Moving or Deleting User Memory Spaces:
Deleting all motifs in a pattern simultaneously:
Following the dial twiddling and dice throwing we come to the most exciting part of the Edit-motifmenu: the recording and editing of your own ideas.Depending on the part you have selected with your 7 part-Keys (from kick to synth-3) the Sirius has 3different recording modes available:
1. Realtime recording - works on all 7 Parts (tracks)2. Step-recording - works on Parts (tracks) synth-1 to synth-33. Drumgrid-recording (for drum-Parts (tracks) kick, snare, hihat and percussion).
The Record mode you select depends entirely on personal taste. Each type of recording has its ownparticular advantages and uses.
Before you start recording new things you need to select an empty User motif or even a completelyempty user pattern. As you know, you recognise an empty motif by the "*" sign before the motif num-ber in the track display. If you are in the JAM mode empty tracks are also signified with an asterisk.In the following example, all 7 parts (tracks) of the selected pattern are still empty:
Press the EDIT-key. Use the right hand PAGE/BANK-key to access page 2 of the Edit-menu. Hit the F1key (Pattern). You will now see the following display:
Press the F3-key and select the user area. With the VALUE/TEMPO-dial select a pattern you wish todelete (initialise). The display will show for instance:
After confirming (ok) with the F3-key, select and edit the desired parameters. The pattern is automat-ically stored in the Sirius' RAM (temporary memory) block (the original user-pattern will still remainuntouched in its original User-storage bank).
Now press the Write-key and use the PAGE/BANK-keys to select page 6:
Confirm with key F1 and then press the EDIT-key to get back to the Edit-pattern menu.
As you can see now the motif information for all 7 tracks is deleted. The Sound data remains thesame. Please note the following: When you leave the edit-menu by pressing the EXIT key the patternis still not stored and will revert to the original untouched pattern when you call it up again. So don’tforget to save it!!
B13:TranceBS 160(P00) +0 *******
Select Pattern[Rom] [User]
Select PatternPattern:P09 [ok]
Edit P09 T:Synt1|1> Motif:ROM-55
<6> Init Pattern?[ok]
Edit P09 T:Synt1|1> Motif: no

Deleting one motif only:
Procedure:
If you want to delete only one motif from one track select page 3 of the Edit-pattern-menu and thenpress the F2-key.
Now the motif is empty because the values of the notes have been deleted. With the VALUE/TEMPO-dial you can enter a new motif length between 1 and 8 bars in the display . Should the mo-tif also contain Wheel control information from the performance aids, this will also be deleted withthe clear-function.
It does not matter where in the menu you are, simply press one of the other Part-keys and you will select that part within the current menu.
After you have deleted the motif you will see the following on menu page 1:
Again the "*" stands for an empty motif into which you can now record something new. You can ofcourse only record onto a User motif-storage space as the ROM storage can only be read and notover-written.
The Realtime record-mode records everything in real time, i.e. what you are playing whilst inRealtime record-mode. You will at this point be playing along to the beat of the metronome.
First you should switch the metronome to ON on page 5 of the Edit-pattern menu:
If you haven't already done so, select a User-pattern in the Edit-pattern menu and then a free motif(Menu-page 1) - example:
Now you have two methods to choose from in order to start your recording. You either simply pressthe RECORD-key in the sequencer section:
Or go to menu page 6. You will see the following display:
Edit P09 T:Synt1|3> [clear]
Edit P09 T:Synt1|1> Motif:USR*00
Edit P09 T:Synt1<5> Metronom: ON
Edit P09 T:Synt1|1> Motif:USR*00
Edit P09 T:Synt1<6> [record]:NEW
Expert's advice:
Realtime Recording:
The Sequencer
45
REW
START
SONG-STEP
STOP
FWD
SEQUENCER
RECORD
Tip

The Sequencer
46
You haven't started recording yet, but when you press the RECORD-key once more or the F2 key un-der the display you will hear a one bar count-in (pre-count) from the metronome.
You can adjust the volume of the metronome with the SPECIAL-LOOP-TRACK-FADER.
While the metronome is "ticking" away you will have one bar (4 beats) to tune into the beat. Thenthe recording will start and you can play your tune. By the way, your metronome will run with youuntil it has reached the motif end that you determined (1-8 bars). While you are recording you willsee the present recording position in the motif: At the bottom left you see the bar number, after thecolon is the current quarter note of the bar:
If the selected motif is for instance only 2 bars long you will automatically jump back to the begin-ning when the recording has stopped. Your 2 bar motif is now going to be repeated again and again(looped). During these repetitions you can not carry on recording. Your theme is only being re-played. The display will show the same as before.
You have probably already wondered what the word NEW on this menu page means. NEW showsthat if you re-record a motif the existing contents will be overwritten (deleted). Press the F3-key orturn the VALUE/TEMPO-dial and you can select another option.
Here DUB means overdub mode. You add a new recording to the already existing theme in the mo-tif. If for instance you played a note or a chord on the 1st beat of each bar and you then want some-thing else to happen on the second beat you can do this in DUB mode. Adding things will not deletewhat you have already recorded, or "set".
After recording the melody you can start another overdub-recording and "tune" the dials of the synth-section. Record for instance the movement of the cut-off control or volume control via VCA-level.You obtain another interesting effect by turning the de-tune control during a normal 16th HiHat-motif.
You should definitely try this out because like this you can achieve incredibly dynamic grooves,which you can normally only play with four or more hands.If you should notice immediately after the overdub recording that you don't like it you can cancel thelast action: use the PAGE/BANK-key to change to menu page 8:
The F3-key allows you to jump between the current recording and the recording before that (undoand redo). Be careful: you can only do this in the overdub recording mode while the sequencer isstill running. As soon as you stop the sequencer the undo function is not available to you anymore. Ifyou want to delete all the recorded dial movements of a motif at once just press the F2-key DELCmeans: delete controller.
Expert's advice:
Edit P09 T:Synt11:3 Record!
Edit P09 T:Synt1<6> [record]:NEW
Edit P09 T:Synt1<6> [record]:DUB
Edit P09 T:Synt1<8> [delc][undo]
Overdub-Recording:
!

After the recording:Following the recording of your motif the edit pattern menu offers you a number of parameters withwhich you can edit and perfect the recordings.
On page 2 of your menu you can add a groove-factor to your recording. This will basically re-position the notes you have played using specific musical criteria and gives your melody or yourrhythm more 'swing'. You can adjust the groove-factor in per-cent with the VALUE/TEMPO-dial.
Using the groove factor causes your rhythm to "shuffle" or "swing" giving you the impression that areal drummer is playing. This function is particularly effective for House, HipHop and Funk styles.If you favour a more machine-orientated groove you can copy the behaviour of the old cult-drumcomputers from the early days of electronic music particularly well. Due to slow processors, timingvariations were typical and were integral to the special character of those machines.
After you finished your recording you might notice that for instance the bass drum is not exactly onthe beat or that the timing of your recording is less than accurate. For such cases the sequencer ofthe Sirius has a function which can pull the separate notes into place on a given grid. How fine thisgrid is to be set can be determined on page 7 of the menu.
16 means here for example that your played notes will all be moved to the closest 16th of a bar. TheVALUE/TEMPO-dial allows you to set the quantisation from an 8th to a 32nd of a bar. You can evenquantize to triplet bar measures such as 12ths and 24ths. Totally inaccurate recordings can of coursenot be saved through quantization. So a certain accuracy is required when recording in realtime.
The F2 key starts the quantisation, it will also work while replaying the sequencer. You can also applythe undo function from menu page 8 should you have made a mistake.
On page 9 of the Edit-pattern menu you will find the information showing how much memory is stillavailable for recording further motifs.
The Groove Factor:
Quantisation:
The storage display:
Edit P09 T:synt1<2> Groove: 37%
Edit P09 T:synt1<7> [quant]:16
Edit P09 T:synt1<9| Mem: 99%free
The Sequencer
47
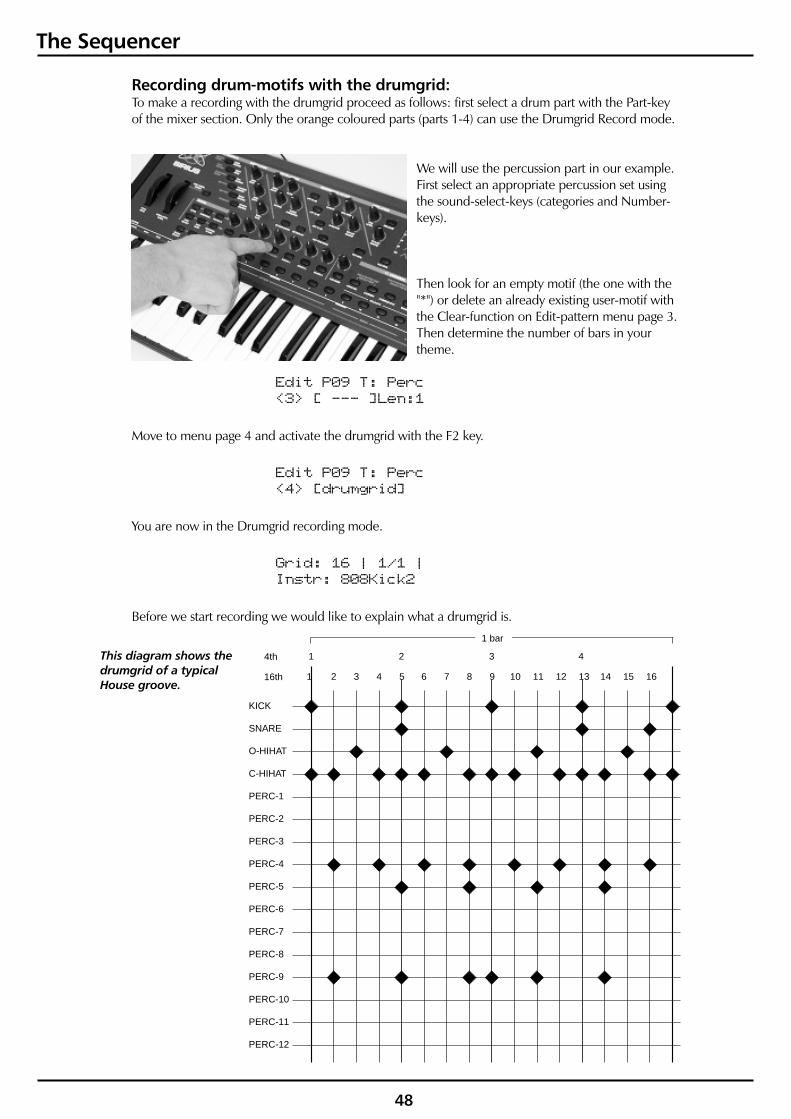
The Sequencer
48
Recording drum-motifs with the drumgrid:To make a recording with the drumgrid proceed as follows: first select a drum part with the Part-keyof the mixer section. Only the orange coloured parts (parts 1-4) can use the Drumgrid Record mode.
We will use the percussion part in our example.First select an appropriate percussion set usingthe sound-select-keys (categories and Number-keys).
Then look for an empty motif (the one with the"*") or delete an already existing user-motif withthe Clear-function on Edit-pattern menu page 3.Then determine the number of bars in yourtheme.
Move to menu page 4 and activate the drumgrid with the F2 key.
You are now in the Drumgrid recording mode.
Before we start recording we would like to explain what a drumgrid is.
Edit P09 T: Perc<3> [ --- ]Len:1
Edit P09 T: Perc<4> [drumgrid]
Grid: 16 | 1/1 |Instr: 808Kick2
KICK
16th
4th
1
1
2 3 4 5
2
6 7 8 9
3
10 11 12 13
4
14 15 16
SNARE
O-HIHAT
C-HIHAT
PERC-1
PERC-2
PERC-3
PERC-4
PERC-5
PERC-6
PERC-7
PERC-8
PERC-9
PERC-10
PERC-11
PERC-12
1 bar
This diagram shows thedrumgrid of a typicalHouse groove.

A two bar theme is split into two bars each with 16 equally long sections. This forms a fixed grid inwhich only 16th notes can be inserted. In Techno and Dance sections you very often hear continu-ous hihat-lines consisting of 16th notes. By putting all the drum instruments onto this grid you get agood impression of the timing of a drum instrument. You can also verify how many drum instrumentsare placed in the same position in the bar. The 16 divisions of the Sirius' drumgrid are represented bythe number keys 1-16 above the keyboard.
The keys 1-16 are a bar with 16 X 16th notes. The markings (bold white lines) under the 1, the 5, the9 and the 13 on the front panel show the position of each 'on' beat.
First press the START-key of the sequencer and set the volume of the metronome with the special-loop-track fader. You should now choose a percussion set which you want to record your theme in.By tapping a key on the keyboard you activate the respective instrument. The name of the instru-ment will immediately turn up in the second line of the display.
Now you can start entering the notes. The keys 1 to 16 represent one bar, containing 4 beats whichare divided into 16 notes (4 notes per beat or 4 'semiquavers' totalling 16 semiquavers to the bar). Soyou are working in a resolution of 16.
Now press some of those 16 number keys and listen to the result. You will recognize a recorded or'SET' note because the corresponding key will be permanently lit. To remove a note you hit the corre-sponding key a second time. You should try setting and removing notes intensively. After a shortwhile you will notice which grid points in the bar are the important ones.(NB: Number keys 1,5,9and 13 are the most important. Placing a bass drum on each of these grid points gives you the classicHouse/Dance 'Four On The Floor' bassdrum)
The drumgrid also allows you to select different volume settings for each note. You have four differ-ent volume settings available. To select these, hold down the SHIFT-key. Now one of the keys 9 to 12will be lit. On these 4 keys you have the volume settings, also called velocity (notice the word'Velocity' is printed in white above these 4 number-keys!). Key 9 is the most quiet setting, key 12 theloudest one.
The volumes for these 4 number-keys can be programmed in the PAD-menu de-scribed on pages 33-36.
So while you are holding down the SHIFT-key you can select one of the four programmable settingswith number-keys 9-12.
The change of velocity will only effect notes which are set after the change has been made. If youwant the new velocity to reflect in an already set note you have to delete this note first and then re-set it.
If your motif exceeds the selected bar length, the PAGE/BANK keys allow you to jump between thebars. Like this you can edit each bar on its own. The number of bars is displayed on the top right.
Starting the Recording
Expert's advice:
Grid: 16 | 1/4 >Instr: 808Kick2
The Sequencer
49
1 2
PATTERN BREAK
VELOCITY
SPECIAL LOOP TRACKS
GATE-TIME
3 4 5 6 7 8 9 10 11 12 13 14 15 16
Tip

The Sequencer
50
Another useful feature of the drumgrid is that you can set another resolution of the notes while en-tering them. Hold down the SHIFT-key and select the desired resolution with the PAGE/BANK-key.
The following resolutions are available:
8th of a note: lowest resolution. The bar only goes up to Number-key 8.
12th of a note: This resolution is also called a triplet. This means that a bar is divided into12 steps.
16th of a note This is the standard setting when opening the drumgrid. The bar is dividedinto 16 steps.
24th of a note This is another form of triplets. The bar now contains 24 steps.
32nd of a note This is the highest resolution. A bar contains 32 steps. In this resolution thekeys 1 to 16 only represent half a beat.
It is best to experience the different note resolutions by trying them out. For a bass drum a low reso-lution will certainly be sufficient. For snare-rolls or driving hihats a resolution of 32 would be appro-priate.
Triplets can be combined with any other resolution in the same motif, i.e you can have a resolutionof 8 for the bass drum and at the same time a resolution of 24 for the hihat.
Once you have completed the beat for one instrument in the percussion set just press another keyon the keyboard to get to the next instrument of the selected percussion set. Once you have finishedrecording all the necessary instruments of the percussion set you exit the drumgrid by pressing theEXIT-key. Now you can select another track with the Part-keys.In the HIHAT-section there is an option available you should take notice of:The drumgrid in the HIHAT section gives you the choice between closed HIHAT (closed HH) andopen HIHAT (open HH). Turn the VALUE/TEMPO-dial to choose between these two options. Thechange will be displayed.
After completing your drumgrid recording using the EXIT-key, select (if you haven't alreadydone so), your desired drum and bass sounds. Press the WRITE-key to store the pattern including thesound number for each track in the WRITE-menu.
What the drumgrid is for drum and percussion parts the step-sequencer is for the synthesizer parts.When you are on page 4 of the Edit-pattern-menu and you have selected the synth-1track with therespective Part-key the following will read on the display:
The step sequencer of the Sirius functions much the same way as the old analogue units which cameout in the early Eighties. As it was with these antique units, experimenting with the step-sequencer ofthe Sirius will keep on surprising you.Your motto when using the step sequencer should therefore be joy in experimentation. Don't neces-sarily try to understand exactly what you are doing at the time.Just let yourself be surprised by the results. For predictable melodies you still have the Realtime re-cording mode.
Caution:
The Step Sequencer for the Synthesiser-Parts:
Edit P09 T:Synt1<4> [stepRecord]
!
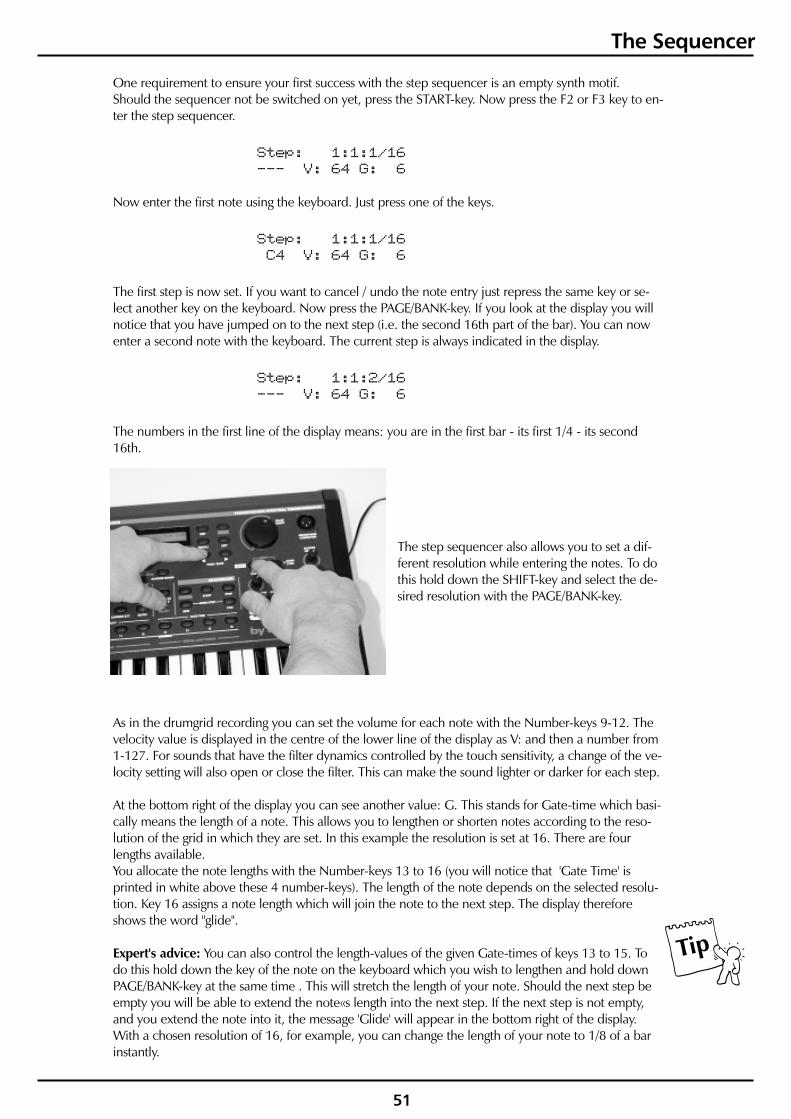
One requirement to ensure your first success with the step sequencer is an empty synth motif.Should the sequencer not be switched on yet, press the START-key. Now press the F2 or F3 key to en-ter the step sequencer.
Now enter the first note using the keyboard. Just press one of the keys.
The first step is now set. If you want to cancel / undo the note entry just repress the same key or se-lect another key on the keyboard. Now press the PAGE/BANK-key. If you look at the display you willnotice that you have jumped on to the next step (i.e. the second 16th part of the bar). You can nowenter a second note with the keyboard. The current step is always indicated in the display.
The numbers in the first line of the display means: you are in the first bar - its first 1/4 - its second16th.
The step sequencer also allows you to set a dif-ferent resolution while entering the notes. To dothis hold down the SHIFT-key and select the de-sired resolution with the PAGE/BANK-key.
As in the drumgrid recording you can set the volume for each note with the Number-keys 9-12. Thevelocity value is displayed in the centre of the lower line of the display as V: and then a number from1-127. For sounds that have the filter dynamics controlled by the touch sensitivity, a change of the ve-locity setting will also open or close the filter. This can make the sound lighter or darker for each step.
At the bottom right of the display you can see another value: G. This stands for Gate-time which basi-cally means the length of a note. This allows you to lengthen or shorten notes according to the reso-lution of the grid in which they are set. In this example the resolution is set at 16. There are fourlengths available.You allocate the note lengths with the Number-keys 13 to 16 (you will notice that 'Gate Time' isprinted in white above these 4 number-keys). The length of the note depends on the selected resolu-tion. Key 16 assigns a note length which will join the note to the next step. The display thereforeshows the word "glide".
You can also control the length-values of the given Gate-times of keys 13 to 15. Todo this hold down the key of the note on the keyboard which you wish to lengthen and hold downPAGE/BANK-key at the same time . This will stretch the length of your note. Should the next step beempty you will be able to extend the note«s length into the next step. If the next step is not empty,and you extend the note into it, the message 'Glide' will appear in the bottom right of the display.With a chosen resolution of 16, for example, you can change the length of your note to 1/8 of a barinstantly.
Step: 1:1:1/16--- V: 64 G: 6
Step: 1:1:1/16C4 V: 64 G: 6
Step: 1:1:2/16--- V: 64 G: 6
Expert's advice:
The Sequencer
51
Tip

The Sequencer
52
Play around with the step sequencer and try out its different step-parameters. As already explainedthe results are not always predictable. But is this not part of the attraction of electronic music? Onceyou have worked out your own system with the step sequencer you wont want to miss it anymore.
Expert’s advice: You can at any time quantize or add a groove factor to your new motif. It does notmake any difference whether you have recorded your motif in the Realtime, Drumgrid or StepRecord mode.
Before you now save your pattern you should get to know the MIXER-section, as the mix parametersare also stored along with the pattern.
The Mixer Settings:
Diagram of Mix section functions:
FX1-SEND
PANSeqTo.:Wave-Macro
SeqTo.:Wave-Macro
SeqTo.:Wave-Macro
SeqTo.:Wave-Macro
SeqTo.:Wave-Macro
SeqTo.:Wave-Macro
SeqTo.:Wave-Macro
PAN
PAN
PAN
PAN
PAN
PAN
MIX-LEVEL
MIX-LEVEL
MIX-LEVEL
LeftAudio-Out
RightAudio-Out
Stereo-Output
Right RightRightLeft Left Left
Right
Left
Right
Left
Right
Left
Right
Left
Right
Left
Right
Left
Right
Left
MIX-LEVEL
MIX-LEVEL
MIX-LEVEL
MIX-LEVEL
FX1-SEND
FX1-SEND
FX1-SEND
FX1-SEND
FX1-SEND
FX1-SEND
FX2-SEND
FX2-SEND
FX2-SEND
FX2-SEND
FX2-SEND
FX2-SEND
FX2-SEND
FX-2 FX-1
KICK/BD
SNARE
HIHAT
PERC.
SYNTH 1
SYNTH 2
SYNTH 3
OVERBLAST
Tip
-

Press the EDIT-key followed by the right-hand PAGE/BANK-key to access the Edit-mix menu.
Press the F3 key and you will go to Edit-mix menu page 1.
This menu allows you to command each Part (track) of the sequencer to either drive the respectivepart of the Sirius (here the synth-1 Part) or to send out MIDI information only - or both. You can setthis parameter with the VALUE/TEMPO-dial. Watch the LED display in the part keys when turningthe VALUE/TEMPO-dial. You can also select between Intern and MIDI with the Part-keys of the mixerpanel directly. You have to make sure that you have pressed the PART/SEQ TO MIDI-key.
Select Edit <2>[Pattern] [Mix]
Edit Mix T:Synt1|1> SeqTo:Intern
The Sequencer
53
Edit Mix|1> SeqTo:
MIDI-Out
SNAREINTERN
MIDI
BOTH (intern+MIDI) PART/SEQ.TO MIDI
=
SYNTH 1INTERN
MIDI
BOTH (intern+MIDI) PART/SEQ.TO MIDI
=
KICK/BDINTERN
MIDI
BOTH (intern+MIDI) PART/SEQ.TO MIDI
=
HIHATINTERN
MIDI
BOTH (intern+MIDI) PART/SEQ.TO MIDI
=
PERCINTERN
MIDI
BOTH (intern+MIDI) PART/SEQ.TO MIDI
=
SYNTH 2INTERN
MIDI
BOTH (intern+MIDI) PART/SEQ.TO MIDI
=
SYNTH 3INTERN
MIDI
BOTH (intern+MIDI) PART/SEQ.TO MIDI
=
S E
Q U
E N
C E
REdit System/Midi
<4> Local: ON
Key on the userpanel will display:
Allocating the Sequencer Tracks
This diagram shows the allocation of thesequencer tracks to the internal Partsand/or the MIDI-out. For this you must beswitched to “Local: ON” in the systemmenu. “Local: OFF” means that all se-quencer tracks are exclusively sent to theMIDI-out (all PART/SEQ TO MIDI-keys are lit)
The setting can be selected in the Edit mix-menu onlyThe setting can also be activated by the PART/SEQ TOMIDI-key on the front panel.
BOTHMIDI
Caution: The allocation of the sequencer(Internal, MIDI or Both) is not stored foreach pattern individually but is valid for allpatterns together. This allocation will re-main in the memory of the Sirius until younext change it, even if you have turned theSirius off. You should therefore first checkout this setting should you not be able tohear anything from the sequencer. The like-lihood is that the tracks are routed to theMIDI-out only.
!

The Sequencer
54
On menu page 2 you see which sound number has been allocated to which part:
When you switch between parts with the PART-SELECT-keys you will soon see which sounds are as-signed to which particular Part (track). Changing these sounds alone can immediately result in a newmusical ideas!On the following menu pages 3 to 6 you can determine the volume of the track in the pattern, thestereo-pan position (more to the right or left, centred or random(RND), as well as which Parts youare sending to the effects processors FX-1 and FX-2.
The parameters on menu pages 2 - 6 are stored with each pattern individually.
Once you have finished your pattern you can save it. Before you can do this you have to exit thedrumgrid or step-sequencer by pressing the EXIT-key.Now go to the Write menu by pressing the WRITE-key. Select page 2 of the Write-menu with thePAGE/BANK-keys. This is what it looks like:
Press F1 [ok] to save. The display shows this:
On this page you can select a User-memory space for your pattern. You do this with the EDITVALUE/TEMPO-dial. F3 [cancel] allows you to abort. The pattern will not be saved. When you haveentered your memory space press F1 [ok]. The pattern will now be stored in the selected User-memory space. Press the EXIT-key to quit the WRITE-menu.
Remember that in the pattern you only store the sound number for each of the 7 Parts. If you havecreated a new sound for one of the Parts during the editing of the pattern you should save this newsound (prior to saving the pattern) under a new sound number, i.e in a different User-memory space.
The sequencer of the Sirius can not only record and replay patterns but can do a lot more things youmight have missed in other sequencing devices. Particularly with the live performer in mind, theSirius offers you the chance to get in on the action. You can be flexible for your audience.
The tempo in which you record and replay can either be set using the VALUE/TEMPO-dial or can betapped in using the TapTempo-key. Try tapping the TAP-key rhythmically several times. You will no-tice that the tempo will adjust to your tapping rhythm.When you are in the top menu level of sound-select, pattern-select or song-select, the tempo is dis-played on the top right of the display. To get to this level hit the EXIT-key repeatedly until the displaystops changing.You have a further possibility to change the tempo - the Beat-Recognition-System of the Sirius.
The individual tempos of the songs are stored with the song data in each of the 16 avail-able song-memory banks.
Edit Mix T:Synt1<2> A15:WaveBass
<2> Store Patt.?[ok]
to Pattern P09[ok] [cancel]
Saving a Pattern:
Patterns in a Live-Performance:
Expert's advice:
Important:
The Tempo:
See page 70
!
Tip
Y

The Number-Keys or 'Pads':In this section we call the 16 Number-keys above the keyboard 'pads'.You can assign different functions to the pads which later can be called up at any time during a livegig.
The Number-keys 1-8 can store 8 patterns per song. These patterns do not necessarily have to be inthe song. It can be any pattern from any of the 100 user-patterns available. In the Edit-menu you willfind the menu to assign the pads. When you change to page 5 with the PAGE/BANK-keys, and con-firm with the F1-key, you will see the following display:
Turning the VALUE/TEMPO-dial allows you to select any user-pattern you want to allocate to Num-ber-key 1. Proceed the same way with the other Number-keys using menu pages 2 to 8.To play the pattern just press the Number-keys 1-8 and you will immediately start your favourite pat-tern. It will play/run until you press the STOP-key or any other Number-key. All 8 patterns will start inthe tempo stored in the song memory containing those 8 pattern numbers. You can change thetempo at any time with the VALUE/TEMPO-dial or the TAP-TEMPO-key. You regain the originaltempo by pressing the song-select key- and then selecting or entering the equivalent song numberwith one of the 16 Number-keys.
On menu pages 9 to 16 you can assign breaks. Again you are dealing with User-patterns which willnot loop endlessly but have a programmable length.The number of bars for the breaks can be set from 1 to 8 bars. After this length the previously usedpattern will automatically be recalled. With breaks like that you can bring a lot of entertaining changeand tension into a live session.
Make sure the contents of your breaks are thematically not too far apart from thepreviously played pattern.
On menu pages 17 to 32 you can set the function of the special-loop-tracks. Special loop tracks aresingle motifs which, when flown in, will replace the current motif in the pattern. While pressing oneof the keys 13 to 16 these motifs will replace the original motifs. You can choose from the first 99ROM and the 99 user motifs. You can also select other sound numbers for these loop motifs.
The volume of the special loop tracks can be adjusted with the SPECIAL -LOOP-TRACK-FADER.
An example (for this example we are using Pad 13):Go to menu page 17. Here you have 4 different menu pages for pad number 13 available:
The favourite patterns:
The Breaks:
The Special-Loop-Tracks
Edit Pad1 Assign|1> Pattern:P09
Expert's advice:
The Sequencer
55
Tip
SPECIAL-LOOPTRACK-FADER

The Sequencer
56
Press Number-key 13. The display will show the following:
On this page you can select the Part i.e. track to which the special-loop-track motif should be as-signed. To do this turn the VALUE/TEMPO-dial. The right PAGE/BANK-key will take you to the nextpage.
Turn the VALUE/TEMPO-dial to select the motif bank. You can choose between ROM and USER. Theright PAGE/BANK-key will take you to the next page.
Turn the VALUE/TEMPO-dial to select the motif number. The right PAGE/BANK -key will take you tothe next page.
On this page you set the Sound with which you want the speical-loop-track motif to play. Again turnthe VALUE/TEMPO-dial.Proceed the same way with the other Pads. Only the numbering of the menu pages will differ fromthose in our example. Now that you have programmed the special loop track keys, you can storethem for each song. In each of your 16 User song-storage spaces you have 4 individual loops avail-able.
Before you can try the possibilities we have already mentioned, you will have to set another param-eter in the SYSTEM -menu. Go to the Edit-menu and select the SYSTEM-menu.
On page 15 of the System-menu set the track-mute-parameter to the ON-position:
The keyboard of your Sirius was given another two functions.Apart from the Mute Part-keys you can now very comfortably mute and re-activate the single tracks
Edit Pad13 Assign<17> Track:Synt3
Edit Pad13 Assign<18> MotBnk: ROM
Edit Pad13 Assign<19> Motif: 94
Edit Pad13 Assign<20> Sound: U96
Select Edit <5|[Pads] [System]
Edit System/Midi<15> TrkMute: ON
Mute and Transpose Tracks:
Transpose
BD SNARE HIHAT PERC. SYNTH 1 SYNTH 2 SYNTH 3
TRACK-MUTING
Mute

The Sequencer
57
The second octave of the keyboard can be used to transpose the Synth-1-3 Parts in realtime whilethe pattern is playing. Why not just try this function. You will be amazed how many ideas for com-plete songs will open up to you.
With the patterns created by you you can arrange a complete song with up tp 100 separate stepscalled Song-steps.
The individual pieces of a song are called Steps. A Step relates to an individual pattern with a pre-determined length. You can also set a transposition for the three Synth-Parts within each Step. In addi-tion you can choose whether a Part (track) should be audible or mute. To open the Edit-song menu,press the EDIT-key. With the PAGE/BANK-keys choose page 4. The display shows the following:
Press the F3-key [song] to open the Edit-song menu:
This is the first page of the Edit-song menu. In all the pages, the top line shows you the current posi-tion of the song.
1. Edit S1: This means that you are just in the first Song-step.
2. Bar: 1: This display indicates the actual position of your song in bar-counts.
In both instances, the bottom display line contains a parameter you are allowed to change. On page1 you select the pattern. You can choose from 100 user-patterns. If you want to load up a ROM-pattern copy it onto a User-pattern storage space first.
Now press the right PAGE/BANK-key. You will see page 2 on the display:
On this page you set the number of tones you want one of the three synth-motifs to move up ordown (called transposition).
On this page you can determine how long the pattern should last, i.e. how many bars it contains.You can select between 1 and 64 bars.
This page offers you two functions: insert [ins] and delete [del]. Pressing the F2-key [ins] allows you toinsert a Step. Your selected Step will be copied and positioned as the next step in the song. All the fol-lowing steps move along one position (shuffle).
You can not insert when you are in the last step of a song.
A Song develops:
What is a Song-Step?
Select Edit <4>[Vocoder] [Song]
Edit S1 Bar: 1|1> Pattern: P09
Edit S1 Bar: 1<2> Transp: +0
Edit S1 Bar: 1<3> Bars: 4
Edit S1 Bar: 1<4> [ins] [del]
Caution:!

The Sequencer
58
When you press the F3-key [del] the selected step will be deleted. All the following steps shuffleback.
Page 5 of the Edit-song menu contains a copy function. The display shows the following:
When you press the F2-key the selected step will be copied. The step you want to replace with thecopied Step is selected using the VALUE/TEMPO-dial.To mute single instrument sections in a step press the MUTE-key accordingly. If the key is lit up, thesection is muted.Once you have edited a step to your satisfaction press the FWD-key in the Sequencer section to getto the next step. The REW-key takes you back one step.
Once you have finished your song you can store it. You do this in the Write-menu. Press the WRITE-key. Select page 3 of the Write-menu with the PAGE/BANK-keys. It looks like this:
Press [ok] to store. You will see the following in the display:
This page allows you to name your song. Turn the VALUE/TEMPO-dial to change the letters. Thenext letter you will get to with the right PAGE/BANK-key. You can also use the keyboard to nameyour song. The following diagram shows you where to find the letters, numbers and signs on the'Sirius' keyboard
You can abort all this with the F3 key [cancel]. The song will then not be stored. Once you have en-tered the name press the F1 key [ok]. The following confirmation will appear in the display:
You have to confirm once again if the selected User-memory space is definitely to be overwrittenwith your new song. The VALUE/TEMPO-dial allows you to select a different User-memory space.When you press [ok] the song will be stored. [cancel] allows you to abort the procedure. The songwill then not be stored.Press the EXIT-key once you have finished and want to leave the Write-menu.
Edit S1 Bar: 1<5| [copy]to:S1
<3> Store Song?[ok]
Name: Untitled[ok] [cancel]
to 1 (Untitled)[ok] [cancel]
To store a Song:
aA
bB
cC
dD
eE
fF
gG
hH
iI
jJ
kK
lL
mM
nN
oO
pP
rR
sS
tT
uU
vV
wW
xX
yY
zZ
{[
| }]
Space $ & / ! ? - + * 0 1 2 3 4 5 6 7 8 9
T

The Sequencer
59
Playing a song:To play a song press the SONG-SELECT-key and select the song using one of the Number-keys 1-16.Press the START-key to start your song. One song-step will be played after the other.
If during play you press the start key once again the LED will blink in the START-key and indicatesthat the actual song-step has been frozen. This step will now be repeated until you repress theSTART-key. This is very practical in a live gig to attend to the audience; you can peacefully fine tuneyour performance by wildly twiddling with the filter etc.
You also have the possibility to jump complete song-steps either way. Use the FWD-(Forward) andthe RWD-(rewind) key.
REW
START
SONG-STEP
STOP
FWD
SEQUENCER
RECORD
The Sequencer section onthe front panel gives you allthe functions needed toplay a song.

The Arpeggiator
60
The Arpeggiator
The selection of manufactured arpeggio-types
The arpeggiator is the most used feature to create exciting sequence-figures and also unusualmelodies. Basically the arpeggiator is separated into two different units. The first unit is more or lessthe same in every arpeggiator type. As soon as you play one or more keys these notes will becollected from the first part of the arpeggiator-unit, meaning they will be already saved in a kind of„in-between memory”. As soon as other keys will be played, this "Pool for notes” will be filled with
new notes. The second unit replays these„collected notes”. The special thing with thissecond unit is the order and rhythmic thesenotes will be played back with. The simplestcase for instance will be that the notes of aplayed chord won’ be played back all at oncebut all the single notes that are part of this chordwill be given back one after the other. Especiallyin this second unit there are the greatest differ-ences if you compare several arpeggiator-types.While very plain arpeggiators are playing backthese kind of notes in a „settled” follow up,there are more complex arpeggiators like theSIRIUS where you are able to „edit” the varietyof change-possibilities and the rhythmic that is
given. In the opposite to the most common arpeggiator-types, the SIRIUS is also able to create poly-phonic note-pattern. There are even more special features like for instance the chord-trigger-modeand the gater-function. All the different functions we will explain as follows.
:Basically you can use the Sirius arpeggiator on different tracks - by using the percussion-track evennew rhythm-figures are possible. To get an idea how the arpeggiator is working please go ahead andtry by following these steps:
1) Use that part, the arpeggiator should play on.
2) Use a sound that fits on fast melodies and bass-lines.
3) Turn on the arpeggiator by using the ARPEG.-ON/OFF-button. (If this button flashesalready by choosing the tone, you (discovered) selected a sound that has beensaved with an activated arpeggiator.
If you are playing the keys on your Keyboard now you can hear the typical arpeggiator-lines.
Some basic settings you can select withoutediting the arpeggiator. For this case youhold down the ARPEG.-ON/OFF-buttonand choose one of the select-buttonsranging from 1-16. In this way you get afirst impression on the possibilities of thearpeggiator. Got nosy?Then we can go on with the otherpossibilities the arpeggiator has.
Trying out the Sirius arpeggiator
.

The Arpeggiator
61
Tip
Especially for LIVE-Performance - The arpeggiator-freeze-function
Programming the arpeggiator
Expert-tip
:
A favorite function, that in the first place has been realized in our Synthesizer QUASAR, is the socalled arpeggiator-freeze-function. This function allows transposing, meaning the movement of thesound-level (high/low) of an arpeggiator-pattern on the keyboard of the Sirius. The word „freeze”says it: the Sirius „freezes” the actually played pattern. As soon as it is „frozen”, the notes youactually play won’t be added to the pattern but are influencing the transposing.
You can call on this function by using a pedal (a perfect pedal for this function can be purchasedwith our „starter-kit”. Besides the pedal our starter-kid has even more beneficial tools on the Sirius).To try out the function connect the pedal while the Sirius is „off-line” to the special pedal-input onthe backside of the Sirius. Then you can turn on the Sirius again.
Choose a sound you like and that already uses the arpeggiator and just play some keys on thekeyboard. If you step on the pedal now you can easily transpose the arpeggio-pattern on thekeyboard. As soon as you release the pedal you can play some new notes into the arpeggiator.
.
For the next step we have a look at the different parameters of the arpeggiator. To do so you don’thave to stop the arpeggiator but can proceed all the different changes while it is still running.All the settings you will get to know now, the Sirius will store together with the sound-parameters,meaning that every tone is also saving Information through the arpeggiator. With a change of thesound also the arpeggiator will be completely changed.
: If you are very happy about a well done arpeggiator-pattern and want to hear it withanother stored sound you just need to change the sound in the MIX-menu of the Sirius. In this caseonly the tone changes and the arpeggio-settings stay the same.
To get into the edit-menu of the arpeggiator, press the EDIT-button.You will see the following display-announcement:
By using the F3-button under the display you can select the arpeggiator - menu.After pressing this button you get into the menu for editing the arpeggiator.With the following menu-points the changes of the parameters are done with Value/Tempo Wheel.
Select edit I 1>[Sound] [Arpeg.]

The Arpeggiator
62
Menu-page 1: Arpeggiator - mode selection
Menu-page 3: Hold-function
Menu-page 4: Dynamic
Menu-page 5: Resolution
Edit ArpeggiatorI 1 > mode. ARPEG
Edit Arpeggiator<3> Hold: ON
Edit Arpeggiator<4>Dynamic:OFF
Edit Arpeggiator<5> Resolutn:16
Here you can select the basic-functions of the arpeggiator. Besides the arpeggiator here you will alsofind the functions „GATER” and „CHORD-TRIGGER”. We will take a look at these functions later.Please don’t change anything on this page, yet.Since menu-page 2 is only dealing with these two functions we will go directly to menu-page 3. Todo so please use your PAGE/BANK-button.
In the position „Hold:OFF” the arpeggiator plays only as long as you hold down the keys on thekeyboard. As soon as you release one or all the keys the selected notes won’t be played any longer.The „Hold: ON”-mode is totally different. Here the arpeggiator plays the notes until you actually stop thearpeggiator. If you hold down only one key you can fill the „note-pool” with every following key youplay. The others automatically play on even you just activate them with a tap on. You can select up to 16notes. Only when you release all the keys and afterwards play some new notes the „note-pool” will becleared and refilled with your new notes.This mode is especially important when the arpeggio-pattern should content more notes than youactually could play with one tap on or if you need both hands for editing.
Here you can set the touch sensitivity on the keys of your keyboard and decide if it will have influence onthe arpeggio-sequence. If this function is put on „OFF” the notes of the running sequence will alwaysplay with full dynamic (loud). In the „ON”-position the notes will be played with the different touchsensitivities. (with free-programmed arpeggio-pattern=>Mot 1-9 this parameter won’t have anyinfluence because in free-programmed motions you can also select the dynamic-values).
With this parameter you set the note-value a single step of the arpeggiator has. In the position „16” thearpeggiator plays up to 16 notes in one beat. You can also use this parameter to run the arpeggiator withthe double or half amount of sequence-tempo.

Menu-page 6: Gate-time (note-length)
Menu-page 7: Motion
This parameter decides if a note is played with staccato (=0, very short) or legato (=127, connected tonext note). You can change this parameter in 128 steps.
The motion-parameter gives you the replay-direction of the stored notes. You can select from thefollowing settings:
Edit Arpeggiator<6> Gate: 64
Edit Arpeggiator<7> Motion: UP
The Arpeggiator
63
Motion -Replay Direction Function
UP
DOWN
UPDW - up and down
RND - random
ASGN - assign
RVSD - reversed assigned
ASG2 - forward andreversed assign
MOT1 bis MOT9
Here the notes of the chord will be played from the lowest to thehighest.
Here the notes of the chord will be played from the highest to thelowest.
Here the played chord will be repeatedly played up and down andback again
With „random” the notes of the chord will be played by purechance, without a special order.
Here the notes of a sequence are played in the order they areplayed on the keyboard. With the similar activated „Hold”Function and by leaving out a key, you can easily put in completemelodies. You just leave out the first note of the melody and thefollowing you just shortly tap on.
Basically works the same way as the ASGN. Here the notes arereplayed in reverse order.
Has the same function as ASGN and RVSD. Here the notes willbe played in the order they have been played in and then theother way around.
With these pattern you got free programmable replay-orders thatalso could be polyphonic. The MOT1 to MOT9 are manufacturedpattern. Of course you can change these pattern any time on yourbehalf.

Menu-page 8: Octaves
Menu-page 9: Double-notes
Menu-page 10: Length-Fit
Expert-tip:
Edit Arpeggiator<8> Octaves: 2
Edit Arpeggiator<9>DblNote: ON
Edit Arpeggiator<10I LngFit: OFF
Edit ArpeggiatorI1> Mode: ARPEG
Here you can select how many octaves the arpeggio-pattern should go through while playing. In theposition „Octaves: 1” the notes will be only replayed in the original-soundlevel. In the position „Octaves:2” at first the notes will be replayed in the original-soundlevel and then one octave higher. At themaximum position „Octaves:4” the pattern will be transposed in a range of 4 octaves.
In the position „DblNote: ON” all the notes will be played twice instead of once. (On the freeprogrammable arpeggio-samples => Mot 1-9 this parameter has no influence because in the freeprogrammable Motions the repeating of different notes will be individually set for every step.)
The parameter „Length-Fit” forces the sequence of the arpeggio-pattern to be suitable to a 4/4 beat.Even you start with 5 or only 3 notes the arpeggiator always starts at the beginning of the beat with the firstnote.
Don’t hesitate to experiment with the above mentioned functions while the arpeggiator isrunning. In this way you can hear and see the results immediately.
Let us now get back to the arpeggiator-mode on menu-page 1 of the arpeggiator. Since we learnedalready how to work with the arpeggiator-setting, now we go to the Gater and chord-trigger-functions.First of all please go to menu-page 1 of the arpeggiator - edit - menus.
This operating mode takes apart a single Sound or a chord. Modulations like LFO or En-velope Generators (Envelope Pitches) that are on the sound will be preserved. The rhythmof this „taking apart” (chopping up) either oscillates free or is given by one of the internsequence-tracks. In this way the chopped pads of common Dance, Trance and Techno-music are produced. For this kind of sound-material always use Sounds with high sustain-value in the VCA- Envelope Generator, so the tone can be delayed. With short and fastoscillating sounds the tone already faded before the Gater-effect could take place.
How to use the Gater and the Chord-Trigger ?
GATER:
The Arpeggiator
64
Tip
-

CHORD:
Saving the Arpeggiator - Settings:
Free-programmable-arpeggiator-pattern:
With the chord-trigger the chords won’t be taken apart but rhythmical touched.If you for instance play a good old chord of the 70’s the arpeggiator will strikethis chord over and over again. For this function please use a sound with a fastattack time and a reduced release-time in the VCA-Envelope Generator so theproduced effect will be absolutely clear.
By using the Value/Tempo-wheel you can select the GATER or the CHORD-Trigger functions. Thefollowing settings work for both functions the in same way:
Turn on the arpeggiator and play a chord on the keyboard. If the sequencer is stopped now you can hearthe above mentioned effect with a given rhythm in the chosen tempo. Now please select page 2 of thearpeggiator-menu:
If the given rhythm-pattern is to boring for you just choose any sequence-pattern on this menu-page toget your favorite rhythm. In order to do so you need to select a pattern where at least has one track has amotif on. This shouldn’t be a problem with the more than 100 ROM-pattern of the Sirius. If you now startthe SIRIUS and play a chord you should be able to hear the influence of the rhythm track on the chordyou play.
All the discussed parameter of the arpeggiator will be stored for every different sound. Meaning, if youwant to keep a setting you also need to store a sound. In order to do so, please select in the Write-menuthe menu-page 1 „Store Synth 1?”.
As soon as you select one of the free-programmable arpeggiator-pattern 1-9 (Edit-menu Motion: Mot 1-Mot9) as replay-direction the arpeggiator-menu will get additional menu-pages. Before you go intoprogramming we will give you an idea of how it works:the free-programmable motions separate a complete arpeggiator -pattern into 2-32 steps. The note-value of one step corresponds exactly with the punched in resolution-value. Is it on 16 the arpeggiatorplays back 16th notes (semiquavers). If you punch in 16 steps as a pattern-length the length of the wholebeat corresponds to the length of the whole pattern. For each of these steps you can decide as follows:
1.) Which of the maximum 8 notes of the note-pool should be released on the selectedstep-number. Here maximum 8 notes at the time could be punched in.
2.) What should be the velocity these notes should be played with.
3.) What should be the GATE-time these notes should be played with.
4.) Should this step be pulled up or delayed? This possibility works for programming especiallygroovy arpeggiator pattern.
Edit Arpeggiator<2> Trig: Kick
The Arpeggiator
65
Siehe Seite 29, 34“Abspeichern vonSounds”

The following Graphic explains the construction the free programmable Arpeggio-pattern:
Programming your own arpeggiator - pattern:
If you already selected the free-programmable pattern (Mot 1-9) you can start the programming. First ofall choose menu-page 11 to punch in the length of the pattern:
Here you can punch in values ranging from 2 - 32. Depending on how many steps you released with theMotion-Loop-Parameter, at menu-page 12 you can select the single steps one by one. As with all theother parameter for this action you use the PAGE/BANK-button.In order to edit the first step, please select menu-page 12:
Most of the parameters are on the numbered-buttons 1-16 on the SIRIUS.
Edit Arpeggiator<11> MotLoop: 8
Edit Arpeggiator<12>Step01:+O%
The Arpeggiator
66
Note 1
Note 2
Note 3
Note 4
Note 5
Note 6
Note 7
Note 8
Velocity 1
Velocity 2
Velocity 3
Velocity 4
Gate 1
Gate 2
Gate 3
Gate 4
STEP 1 STEP 2 STEP 3 STEP 4 STEP 32
TIME REPEATStart
0% -50% +50%postponing STEPS

How to punch in the notes of the selected step:
How to select the Velocity of the chosen step:
CAUTION: You can hear the change of the Velocity-value through these numbered buttons onlyif on the selected sound the parameter VCA-DYN or VCF-DYN is turned on.
How to punch in the length of a tone on the selected step
How to punch in the movement of a selected step:
How to store a User-arpeggio:
With the numbered-buttons 1-8 you can activate single notes for this step or you can switch themoff. „1” means the lowest on the keyboard played note will be replayed. If you activate thenumbered - buttons „1” and „2”, the lowest and then the directly following note will be played.Because you can select from maximum 8 numbered-buttons, chords with up to 8 notes are possiblefor each step. Of course you also can decide on deactivating all of the 8 numbered buttons. This ofcourse will mean a break in your pattern.
Through the numbered buttons 9-12 you can select the velocity for each step. Of course only one ofthe buttons ranging from 9-12 is possible to use. The velocity will effect all the activated note-numbers equally.
:
Using the numbered buttons 13-16 you can adjust the length of the tone (GATE-time) within foursteps.
In addition every step can be moved forwards or backwards by up to 50% of the selected Resolution.With a setting of +50% and a Resolution of 16th notes the whole step will be delayed by one 32ndnote. Especially with extremely accurate settings these parameters will guarantee a very groovy note-release (Gate-release).
For each step this value is adjustable with the VALUE-wheel.
Now please choose the different steps one after the other out of the pattern and adjust them the wayyou want. Don’t hesitate to change the number of the played notes on the keyboard or just play awhole different chord. Often your arpeggiator-pattern will change drastically. You will also find out,that selecting only two used note-numbers also a polyphonic (for instance 8-notes) chord will onlyrelease (play) 2 different notes.
In order to be able to use your own created pattern in the future, you need to store it. the free-programmable arpeggio-pattern won’t be automatically stored by storing a sound. The sounds onlycall up the motion-numbers 1-9. To store the new arpeggio-pattern you need to choose menu-page4 of the write-menu. Press the Write-button and choose the menu-page 4 by using the PAGE/BANK-buttons.
Edit Arpeggiator<12> Step01: +50%
The Arpeggiator
67
!

With the F1-button you will start the storing-procedure. You will see a display-announcement forselecting a storage-space.
The storage-spaces 1-9 you can select with the Value-wheel. Pressing the F1-button you will storethe constructed pattern. The F3-button will cancel your storing-action.
Before you start using the following function you should go through the sequence-section of thismanual. In the following we put our main interest on realtime-record-function.
The sequencer of the Sirius doesn’t care if you are the artist playing virtuous notes into thesequencing program or if it is the arpeggiator. This means while real-time-recording you always canturn on the arpeggiator and record it into the sequencer. here it doesn’t matter if the arpeggiator is inthe Gater, Chord or normal mode. Everything will be recorded by the sequencer.Because the sequencer has direct access to the sounds of the Sirius (pass the arpeggiator) you won’thave to worry that your „transferred” arpeggio-pattern uses the arpeggiator directly again.
If you just found again a really great arpeggio-pattern but you don’t remember which notes youplayed for it, you can transfer this pattern without searching for the lost notes. Just let the arpeggiatorrun and select the wanted Motif-length in your sequencer-edit-menu. Than activate the realtime-record-function. While you hear the metronome your pattern is silence at first. But than it plays againin the wanted settings and will be transferred directly into your sequencer.
to Motion 5[ok] [cancel]
How to record the arpeggiator into the intern sequencer:
By the way:
The Arpeggiator
68
Tip

Notes
69

Beat-Recognition-System:Another extraordinary feature of the SIRIUS is its BEAT-RECONGITION-System. This function allowsyou to synchronise the Sirius to an external audio signal.You can use the BEAT-RECOGNITION-System to create a remix of a Vinyl-record or CD with thehelp of additional tracks of the SIRIUS. During a live-gig you can also, in the DJ-setup, fade-in theSIRIUS using the velocity of the last song.
The tempo of a song is expressed in bpm ( eats- er- inute). A value of 120 bpm, in the case of acontinuous quarter-note kick-drum, would mean that the kick-drum would beat 120 times a minute.The SIRIUS reacts with its-BEAT-RECOGNITION-system to the average frequency of a kick-drum. Itanalyses not only the quarter note in an audio track but works with a 16th grid. This way you canalso synchronise audio-tracks where not necessarily every quarter beat is covered with a kick-drum.The BEAT-RECOGINTION-SYSTEM is constantly searching for/receiving the incoming audio-signalwhich allows it to recognise the smallest tempo-changes and then adjust the tempo of the SIRIUS toit. If during a rhythm pause there is no kick-drum for a long period the Sirius will continue with thetempo it has calculated. In most cases the Sirius will continue even after a pause in the exact syn-chronous tempo.
In order to analyse the audio material, the source of the audio (eg. a CD player) will have to be con-nected to the Sirius. The included Goose-neck microphone is unsuitable for this purpose. In order tocontrol this system to the maximum use the Analyse or Carrier-input of the Sirius.
The following diagram shows you the connections for the control of the BEAT-RECOGNITON-system:
How does the BEAT-RECOGNITION-System work?
Operating the BEAT-RECOGNITION-system:
b p m
The Beat-Recognition-System
70
2IN IN IN IN IN IN IN IN L R
AUX-SEND
MAIN-OUT
1 2 3 4 5 6 7 8L RMIX
CD-1 02:35CD-Player
AU
DIO
-RIG
HT
AU
DIO
-LEF
T
CA
RRIE
R-IN
orA
NA
L YSE
-IN
AU
X -/E
FFEC
T -SE
ND
PHONES
R OUTPUT L
32 OHM32 OHM
NATURALDRUMS
BASS-SOUNDS
DIRTYNATURAL
DIRTYBASS
ELECTRONICDRUMS
PAD-SOUNDS
909-TYPEPLUCKEDSOUNDS
808-TYPE
LEVEL
BD SNARE HIHAT PERC. SYNTH 1 SYNTH 2 SYNTH 3
MOD.-WHEELASSIGN
PARTSELECT
SOUNDSELECT
MODULATIONWHEEL
PITCHBEND
TRACK-MUTING
PATTERNSELECT
SONGSELECT
PARTMUTE
PART/SEQ.TO MIDI
PANORAMA FX1/FX2
1 2
SNARE HIHAT
DETUNE FILTER-OVERDRIVE
Q-FACTOR VCF-EGMACRO
VCA-EGMACRO
MOD.-DEPTH
MOD.-RATE
SPECIAL-LOOPTRACK-FADER
OVERBLAST
MOD.-MACRO
WAVE-MACRO
GLIDELPF 24 dB RELEASE
0
32
64
96
127
LPF 12 dB
HPF 12 dB
PAGE/BANK
MASTERVOLUME
MICROPHONECONNECTOR
VALUETEMPO
RECALL EXIT
EDIT WRITE
SHIFT
KEY-TRACKINGOCTAVE-UPOCTAVE-DOWN VCF-DYN. VCA-DYN. RANDOM-SOUND
PRESS BUTTONFOR SOUND-CREATION
TAP-TEMPO
DEMO
SYNC.EXTERN
AUDIOSYNC
CUTOFF ENV.-MOD VCALEVEL
PERCUSSION
PATTERN BREAK SPECIAL LOOPTRACKS
SYNTH 1 SYNTH 2 SYNTH 3 VOCODER
HOLD BUTTON ANDSELECT PART
ANALYSE CARRIER CARRIER-EXT. MICRO.
HOLDTO
SELECTREW
ARPEG.ON/OFF
START
SONG-STEP
STOP
FWD
PHONES
KICK/BD
3 4 5 6 7 8 9 10 11 12 13 14 15 16
SOLO-SOUNDS
DRUM-SFXEFFECT-SOUNDS
SIRIUS
SIRIUS
by QUASIMIDI
CATEGORIES
MIXER 11 CHANNEL VOCODER SEQUENCER
MODULATOR OSCILLATORS RESONANCE-FILTER AMPLIFIER EG-MACROS PHONETISCHER SPEKTRAL TRANSFORMATOR
RECORD

A suitable sound source will be a CD-player, a tape-deck or an old drum-computer without MIDI orSync.-output. A record player can only be connected via a phono pre-amp. This is integrated in allHiFi-amplifiers and DJ-mixing desks. If you have a stereo system with a separate amplifier or pre-amp you can use the tape-output of the amplifier to connect a record player to the analyzer of theSirius. (In this case connect the amplifier output labelled "REC", "To Tape" or "Tape-Out" to the Sirius.You can then route the sound source using the record-select control of the amplifier). Because youwill want to hear both signals when using the BEAT-RECOGNITION-system - the signal of the syn-chronised Sirius and the one of the external audio material, we recommend the use of a mixing deskwith at least one Effects-send.
: Most DJ-mixing desks do not have an effects-send or AUX-send. These desks are on thewhole unsuitable. The existence of a cross-fader is often overpriced. You're probably better-off look-ing around for a normal mixing desk. If you want to use a record player you can connect your HiFi-outputs to the mixing desk or to separate record-player pre-amplifiers which you can get in your lo-cal radio store for around $ 50.
Expert´s tip
Connection to a Mixing Desk with at least one Aux-send:In the following example we will connect the Sirius, a CD-player and a mixing desk, in order to syn-chronise the Sirius to the CD-player and at the same time hear them through your amplifier system.First you should connect the main-output of the Sirius and the CD-player to the mixing desk asshown in the diagram. Use the Aux-send/FX-send of the mixing desk to send the signal of the CD-player to the Sirius. Open up this aux-send on the mixing desk for the CD-player only - close it forthe Sirius. Then connect the outputs of the FX/AUX-sends to the Carrier- or Analyse input of theSirius.
In order to tell the SIRIUS which input you want to use to analyse the music you have chosen, youmust first select the Beat-Input in the System-menu. You find the selection in the Edit-system-menuon menu page 16:
In this menu please set the input to which you have connected the audio source.
XAn stands for the ANALYSE-InputXCa stands for the CARRIER-Input
Now switch the SIRIUS to AUDIO SYNC. with the SYNC-EXTERN-key. A constant blinking will indi-cate the correct selection. Press PLAY on your CD-player. The status of the Beat-Recognition systemis displayed as a sign directly preceding the tempo-info.
Edit System/Midi<16| BeatInp:XAn
1: Saturn ?143(P09) +0 _______
Caution: If you use the ANALYSE-input of the SIRIUS, the VOCODER can not be used with themicrophone anymore.
The Beat-Recognition-System
71
!
Tip

A sequence of kick-drums will of course not tell the Sirius where it is in a bar.You may also want to synchronise music pieces with a more demanding groove than a pure Four-on-the-Flour pattern.You will have to tap the quarter beats of the music piece to start the Sirius with the TAP-key. With theinformation from both the tapping and the analysed kick-drum the Sirius will than calculate the ac-tual tempo. The 5th tap will then start the internal sequencer of the Sirius.
The SIRIUS will then need approx. 3 bars to lock to the beat. During this time the synchronisation isnot actually quite complete and will run 'wild'. For a live performance you should leave the tracks ofthe Sirius muted for this phase.Once you have reached a successful synchronisation the tempo display of the Sirius will only changefrom +-1beat per minute. This shows you that the system is constantly adjusting to the tempo. Yourlive-performance can begin.
Do not despair if the Audio-Sync will sometimes not work right away. It is like a DJ's skill in mix-ing records - it takes practise! The tapping in of the tempo requires some getting used-to. If asong is badly mixed it will unfortunately sometimes happen that the frequency of the kick-drumis not separated cleanly enough - the other instruments may then influence the system in a nega-tive way. Under these circumstances it may happen that the synchronisation fails.
The Beat-Recognition-System
72
Signs in the Display Meaning What to do
The Audio signal can not be usedto analyse the tempo:
1.) The input level of the signal istoo high to be correctly analysedby the SIRIUS
The Audio signal can not be usedto analyse the tempo:
1.) There is no kick drum in theAudio-track at present.
2.) The input level is too low.
The audio signal has identified abass-drum to analyse the tempo.The level its suitable for therecognition. The system isworking best when the dot in thedisplay is not lit permanently butflickers regularly. You can start tapping/entering.
No sign
1.) Wait for the kick-drum to start.2.) Adjust the level of the CD-player orthe Aux-send.
If you are using the Analyse-input ofthe Sirius, you can adjust the inputsensitivity via the Gain-control on theback panel.
1.) Adjust the level of the CD-player orthe Aux-Send.
If you are using the Analyse-input ofthe Sirius, you can adjust the inputsensitivity via the Gain-control on theback panel.
?
.
The following table shows you the signs and their meaning:
!

For difficult cases: The Beat Offset:
External synchronisation - synchronising additional units with the Audio-signal:
Readings in our Audio-laboratory have shown that some music pieces are synchronised perfectlywhen it comes to the tempo but that there is a audible deviation in complicated passages.For this purpose the Sirius has a Beat-Offset-Parameter. For external audio-synchronisaton this will becontrolled using the VALUE/TEMPO-dial. If you turn the VALUE/TEMPO-dial to the right or to the leftthe Sirius-Groove will be shifted slightly from the audio material, either delayed or advanced againstthe beat. This behaviour is also called Sync.Delay. The amount of change is shown in the display.
Positive values will make the Sirius play slightly earlier (advanced), negative will delay it slightly. Inthis way you will be able to sit in tight with these sections.
If the SIRIUS is running sync. to the beat of the Audio-signal the clock-signal generated can then beused to synchronise another synthesizer or sequencer to the SIRIUS using MIDI. You only have toconnect the MIDI-OUT-socket of the Sirius to the MIDI-IN-socket of the Midi-device you wish to syn-chronise. On page 11 of the Edit-system-menu , you can set the parameter TX-Clock to the "ON"-position. You will also have to put all sequencers or synthesizers to external synchronisation mode.
1: Saturn .43Beat-Offset: +2
The Beat-Recognition-System
73

How to direct the Parts of the Sirius to the two effects processors?
The Effects processors of the Sirius:
The Mixer-section offers you the possibility to direct the sound of a Part straight to one of the Sirius'effects processors. To the left of the mixer-section control panel you can see a key marked FX1/FX2.Press this key. It should now be lit. You can now individually set the Sound of each Part which is tobe sent to the effect processor FX1 using the mixer-controls. This is why this function is also calledFX-send. When you press the FX1/FX2-key a second time it will flash. The controls now refer to theeffect processor FX2. Now you can make the individual FX2 settings for each Part.
A further way to access the FX-sends can be found in the MIX menu of the currently selected part.This is how you get to the MIX-menu: Press the EDIT-key next to the display and immediately after-wards press the right-hand PAGE/BANK-key. You can now open the MIX-menu by pressing the F3-key. Go to menu-page 5 of the MIX-menu using the PAGE/BANK-keys. Page 5 contains the FX1-send,page 6 the FX2-send. In the display these pages look as follows:
This method is best suited to the final mix situation as you can also set all the other parameters rele-vant to each Part such as Pan, Sound, and Volume with greater accuracy.
The effects can also be assigned to the VOCODER-signal. This can either be done via the Mixer-section as you do with the Parts or you can set it in the Edit-vocoder menu.
The SIRIUS has two independently working effects processors. They are called FX1 and FX2. Each ofthese processors has different reverb, echo and modulation effects available. Every Sirius-part can beproportionally routed to the effects processors with the FX1/FX2-controls in the Mixer section. BothEffects-processors can be used simultaneously with one effects-programme each.The following listing shows you which effects programmes are available to you in the two effects pro-cessors and what they do.
Here you can reconstruct small rooms ranging from a rehearsal room to a lounge.
With a short reverb time this effect will sound as if you played your instrument through ametal tube. A long reverb time will suggest that you are in a big industrial hall.
Edit Mix T:Synt1
Edit Mix T:Synt2<6> Fx2Send: 127
<5> Fx1Send: 127
CAUTION: Should you notice in the Mix-menu that instead of FX-send values you have threedotted lines and that the VALUE-TEMPO-dial does not have any effect on determining these val-ues, you should make sure of the following:Is the currently selected Part set as an Analyse-or Carrier-signal for the Vocoder? If the settingof the effects is more important to you than the Vocoder, you can change the routing of thevocoder. First press the Analyse, then the Carrier-key in the vocoder-section. If one or morePart-keys are lit, these parts are allocated to the Vocoder. Just press all the lit parts to turn offthe keys. After that the display in the MIX menu will show the proper values again for each partyou have deactivated, and you can adjust them once more with the VALUE/TEMPO-dial.
Reverb effects:
Room:
Metallic:
The Effects Processor FX1:
The Effects
74
!

Chamber:
Hall:
Cathedrl:
Plate:
Level(0-127):
Time (0-127):
Echo Effects:
Delay:
PanDelay:
Level(0-127):
Time (0-127):
Feedback (0-127):
Chorus:
SlowChor:
FastChor:
SuperChr:
FeedbChr:
The Chamber-Reverb has the sound character of a large empty room.
The sound characteristics of this parameter are similar to those of a larger hall.
The longest Reverb-effect in this section. It recreates the reverb character of a church andis suitable for long echoing effects.
This is a simulation of one of the oldest reverb effects. Before the digital age, people used largethin metal plates to create reverbs. The reflection of the metal plate was picked up using a micro-phone or sound-enhancer and then mixed back in with the original sound.
The Reverb-effects have the following parameters:
Here the level sent into the effect can be set. The higher the level the morethe original sound is influenced, ie. the greater the amount of reverb on the sound.
This value determines the decay time. Imagine it as a way of enlarging orshrinking the 'room' you have placed your sound in. This extends or shortens the reverb onthe sound you are sending to this effect. (eg. A small room has a small decay time, whereasa cathedral will have a much longer decay time.)
A delay allows you to create a so called echo-effect, a bit like shouting into the Grand Can-yon, Grand Canyon, Grand Canyon.....! This will effect the whole stereo signal.
This delay makes the echo signal alternate equally from left to right.
The Echo Effects have the following Parameters available:
Here the level sent into the effect can be set. The higher the level the morethe original sound is influenced, ie. the greater the amount of echo on the sound.
Here you can set the delay time of the echo. The lower the value the fasterthe echo comes back. The maximum delay for the two Delay-effects of FX1 is 1119 ms(milliseconds).
This value allows you to set the number of echos. In a walled courtyardyou may have one echo 'slapping back' at you very quickly. In the Grand Canyon the echowould take much longer to come back, and may repeat many times.
The chorus doubles up the original signal and then sends the double back with a minimumtime-delay, making it sort of 'swirl'. This makes the sound wider, fuller and 'fatter'.
The Slow-Chorus works the same way as the chorus.
The delay in the Fast-Chorus is so intense that you will have a very strong swirling effect.
The Super chorus creates a strong swirling and phasing. The sound appears large and ex-tremely warm.
The Feedback-Chorus is a special effect influencing the sound in a dramatic way. Thefeedback to the input is so strong that you will get an almost metallic sound. This gives the sound acompletely new character, almost robotic.
The Effects processor FX2:
The Effects
75

The Effects
76
Flanger:
Level(0-127):
Time (0-127):
Feedback (0-127):
Rate (0-127):
Depth (0-127):
ShortDel:
PanDelay:
Level (0-127):
Time (0-127):
Feedback (0-127):
Expert´s tip:
Expert´s tip:
This effect allows you to create very spacy sounds. The flanger is based on the same princi-ple as the chorus but creates a stronger modulation. The flanger will sound particularly interesting onthe Hihat-track. Check it out with bass sounds too!!
These 'modulation' effects have the following parameters available:
Here the level sent into the effect can be set. The higher the level the morethe original sound is influenced, ie. the greater the amount of chorusing or flange on thesound.
Here you can set the time delay of the Chorused signal in relation to theOriginal signal.
The parameter Feedback routes back the effects signal to the effectsinput in controllable increments. This creates feedback causing a drastic sound change.
Here you can set the rate or speed of the modulation.
This parameter allows you to set the depth of the modulation.
Apart from the modulation effects already mentioned, FX2 also has 2 Echo-effects available.
This delay creates a very short echo.
This delay is like the PanDelay from section FX1.
The FX 2 echo-effects have the following parameters available:
Here the level sent into the effect can be set. The higher the level the morethe original sound is influenced, ie. the greater the amount of echo on the sound.
Here you can set the delay time of the echo. The lower the value the fasterthe echo comes back. The maximum delay for these two effects is 870 ms (milliseconds).
This value allows you to set the number of echoes.
The Reverb-, and Echo-effects in FX1 can best be explored with a Snare-sound or ashort percussive Synth-sound from the "Plucked-Sound" category. The modulation effects in FX2 arebest expressed in Pads or ambient sounds It is also very interesting to try out the different chorus-and flange effects on a Hihat or Percussion track.
If you work with the delays of both FX-sections simultaneously you will have the optionto mix these different delay-times which you have applied to the sounds. You can create very nice de-lay-grooves like this.
.
Tip
Tip
Notes
77
Notes
77
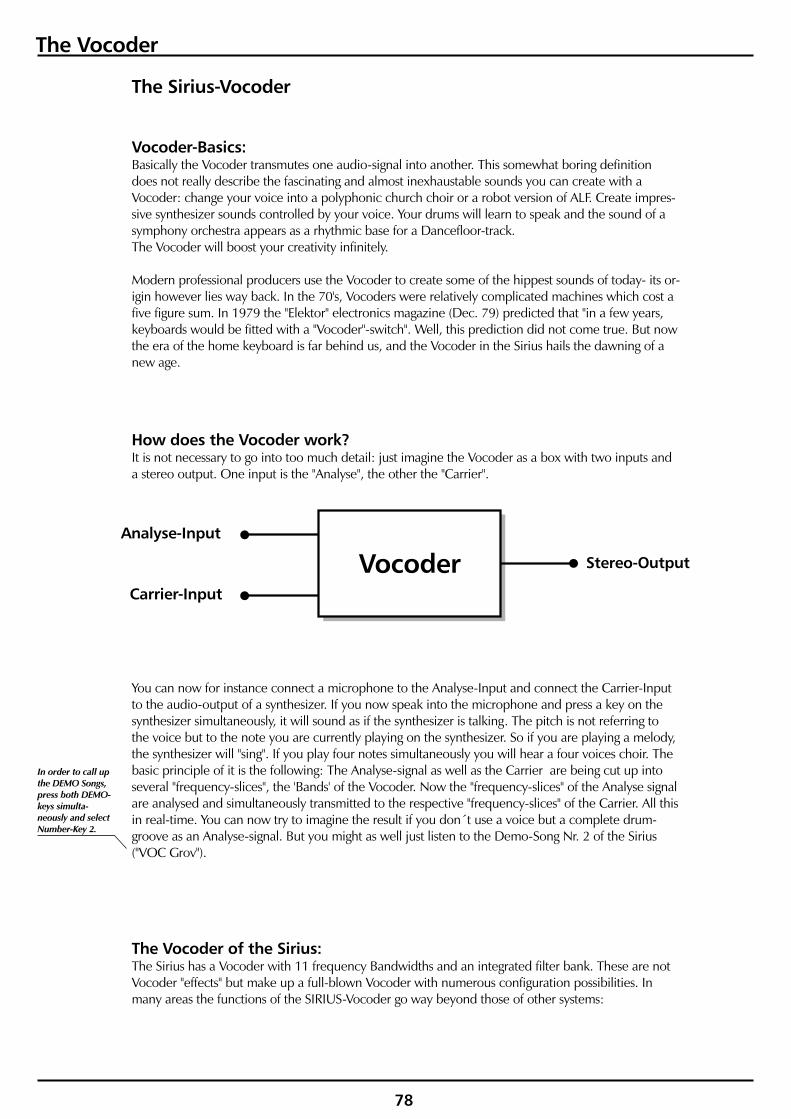
The Sirius-Vocoder
Vocoder-Basics:
How does the Vocoder work?
The Vocoder of the Sirius:
Basically the Vocoder transmutes one audio-signal into another. This somewhat boring definitiondoes not really describe the fascinating and almost inexhaustable sounds you can create with aVocoder: change your voice into a polyphonic church choir or a robot version of ALF. Create impres-sive synthesizer sounds controlled by your voice. Your drums will learn to speak and the sound of asymphony orchestra appears as a rhythmic base for a Dancefloor-track.The Vocoder will boost your creativity infinitely.
Modern professional producers use the Vocoder to create some of the hippest sounds of today- its or-igin however lies way back. In the 70's, Vocoders were relatively complicated machines which cost afive figure sum. In 1979 the "Elektor" electronics magazine (Dec. 79) predicted that "in a few years,keyboards would be fitted with a "Vocoder"-switch". Well, this prediction did not come true. But nowthe era of the home keyboard is far behind us, and the Vocoder in the Sirius hails the dawning of anew age.
It is not necessary to go into too much detail: just imagine the Vocoder as a box with two inputs anda stereo output. One input is the "Analyse", the other the "Carrier".
You can now for instance connect a microphone to the Analyse-Input and connect the Carrier-Inputto the audio-output of a synthesizer. If you now speak into the microphone and press a key on thesynthesizer simultaneously, it will sound as if the synthesizer is talking. The pitch is not referring tothe voice but to the note you are currently playing on the synthesizer. So if you are playing a melody,the synthesizer will "sing". If you play four notes simultaneously you will hear a four voices choir. Thebasic principle of it is the following: The Analyse-signal as well as the Carrier are being cut up intoseveral "frequency-slices", the 'Bands' of the Vocoder. Now the "frequency-slices" of the Analyse signalare analysed and simultaneously transmitted to the respective "frequency-slices" of the Carrier. All thisin real-time. You can now try to imagine the result if you don´t use a voice but a complete drum-groove as an Analyse-signal. But you might as well just listen to the Demo-Song Nr. 2 of the Sirius("VOC Grov").
The Sirius has a Vocoder with 11 frequency Bandwidths and an integrated filter bank. These are notVocoder "effects" but make up a full-blown Vocoder with numerous configuration possibilities. Inmany areas the functions of the SIRIUS-Vocoder go way beyond those of other systems:
The Vocoder
78
VocoderAnalyse-Input
Carrier-Input
Stereo-Output
In order to call upthe DEMO Songs,press both DEMO-keys simulta-neously and selectNumber-Key 2.
F

Features of the Sirius-Vocoder:
-The Drum and Synthesizer sounds of the Sirius are, with their infinite manipulation possibilities, theideal basic materials for creating unique vocoder sounds. You can use the Sirius immediately withoutneeding any additional equipment using its seven drum- and synth-Parts, which can be internallyrouted as Carrier and Analyse signals, as well as being able to use the Goose-neck microphone via itsintegrated pre-amplifier.
- The Sirius-Vocoder offers you 16 controllable Vocoder programmes each with completely differentsound characteristics. You basically have 16 different Vocoders.
- The option to feed and mix different sound sources into the Vocoder will leave you needing practi-cally nothing more. Apart from the internal Parts and the microphone signal you can connect other,external sound sources (for instance Drum-computer, Electric guitar, whole tracks from CDs...etc.) tothe Vocoder using the audio sockets at the rear of the Sirius. Several internal parts can simultaneouslybe used as Analyse and Carrier signals and can then be mixed with any external audio signal that theSirius is receiving.
- For all control signals the Sirius-Vocoder offers controllable Bypass functions. This means: You canfade in the original signal of the microphone (for example your voice) and mix it with the Vocoder -effectively a mixing desk with an integrated microphone. With the effects-units of the SIRIUS youcan then add a little reverb and delay.
- The integrated Filter-banks are able to perform the most delicate sound changes in the mix - or cancreate drastic effects which would be unthinkable with ordinary Equalisers which only effect thebass, psycho-acoustic effects, the weirdest LoFi-sounds etc.
- All Vocoder settings are storable. Although the attraction of a Vocoder is mainly due to the fact thatyou can repeatedly influence the sound using your voice, you can also alternate between vocodedRhythms and vocoded Pads within one song by switching the different Vocoder routings on and off.
-Despite all these Complex possibilities, the Vocoder is easy to handle: All the basic functions of thevocoder for both external sound sources and internal Parts, such as routing for example, can be oper-ated from the dials and keys on the front panel. You can also, of course, change settings in real timewhile the sequencer is running. A quiet whisper faded into a fat break beat? No problem. And all thiscan naturally be controlled via MIDI.
Before you try out the 11-Bandwidth-Vocoder with the microphone please note the following to en-sure optimum performance:
If you are using the Goose-neck microphone with the Vocoder and you are listening tothe Sirius through the speakers of an audio-unit such as a stereo system or instrument amplifier, thenacoustic feedback may occur.
This is particularly the case when- the distance between microphone and loud speaker is too little or the loud speakers are faced di-rectly towards the microphone head, or- the overall volume of the Sirius or the volume of the amplifier of your audio-system is set too high.
Feedback at high volume can damage your hearing. We therefore advise you to use the lowest possi-ble volume level when using a microphone or to work on headphones. For live-performances makesure that the microphone is not pointing in the direction of the PA-speakers!
Important:
Starting immediately?
The Vocoder
79
!

Presetting the Gain-Control:
Easy-Mode:
The Gain-control allows you to determine the input sensitivity of the built-in microphone pre-amplifier. The control is located on the right of the rear panel of the Sirius. Turn the Gain-control tothe middle setting (12 o´clock position).
If you have connected the Sirius to an audio-unit such as a stereo system or instrument amplifier,turn the volume control of your amplifier to minimum for the time being.
The Vocoder works with 16 basic programmes which can of course be changed if required. To get afirst impression these basic programmes can be tried first. The microphone is the analyse source inthis "Easy-Mode". A Carrier is automatically set you only have to speak into the microphone anddon´t have to press any keys on the keyboard.
You require some pre-settings for the Easy-Mode. Should you however have initialised your Sirius asdescribed at the beginning of this Manual and select a Song without Vocoder-settings (for exampleNr.1 "Saturn") you can leave out the following procedure. Skip on to "Selecting Basic Programmes".
1. The CARRIER-EXT.-key in the VOCODER-panel of the Sirius must be switched off.
2. No Part of the Sirius must be selected as Carrier. You will recognise that the CARRIER-key in theVocoder-panel is not lit. If the key is lit, you can change the setting as follows: When you hold downthe CARRIER-key, the Part-keys under the dials in the MIXER-panel will show you which Parts are se-lected as Carriers. A lit key indicates that this part is a Carrier for the Vocoder. While you still holddown the CARRIER-key turn off all lit keys below the dials one after the other. Now you have de-activated all internal Carrier signals.
To select the basic programme 1 "Robot Voc" (Robot-Vocals), first hold down the Vocoder-key in theMIXER-panel. The display will show:
Caution: Pre-settings for the Easy Mode:
Selecting Basic Programs:
The Vocoder
80
CARRIER-IN ANALYSE-IN GAIN
Gain-Control
32 OHM32 OHM
NATURALDRUMS
BASS-SOUNDS
DIRTYNATURAL
DIRTYBASS
ELECTRONICDRUMS
PAD-SOUNDS
909-TYPEPLUCKEDSOUNDS
808-TYPE
LEVEL
BD SNARE HIHAT PERC. SYNTH 1 SYNTH 2 SYNTH 3
MOD.-WHEELASSIGN
PARTSELECT
SOUNDSELECT
MODULATIONWHEEL
PITCHBEND
TRACK-MUTING
PATTERNSELECT
SONGSELECT
PARTMUTE
PART/SEQ.TO MIDI
PANORAMA FX1/FX2
1 2
SNARE HIHAT
DETUNE FILTER-OVERDRIVE
Q-FACTOR VCF-EGMACRO
VCA-EGMACRO
MOD.-DEPTH
MOD.-RATE
SPECIAL-LOOPTRACK-FADER
OVERBLAST
MOD.-MACRO
WAVE-MACRO
GLIDELPF 24 dB RELEASE
0
32
64
96
127
LPF 12 dB
HPF 12 dB
PAGE/BANK
MASTEROLUME
MICROPHONECONNECTOR
VALUETEMPO
RECALL EXIT
EDIT WRITE
SHIFT
KEY-TRACKINGOCTAVE-UPOCTAVE-DO VCF-DYN. VCA-DYN. RANDOM-SOUND
PRESS BUTTONFOR SOUND-CREATION
TAP-TEMPO
DEMO
SYNC.EXTERN
AUDIOSYNC
CUTOFF ENV.-MOD VCALEVEL
PERCUSSION
PATTERN BREAK SPECIAL LOOP TRACKS
SYNTH 1 SYNTH 2 SYNTH 3 VOCODER
HOLD BUTTON ANDSELECT PART
ANALYSE CARRIER CARRIER-EXT. MICRO.
HOLDTO
SELECTREW
ARPEG.ON/OFF
START
SONG-STEP
STOP
FWD
PHONES
KICK/BD
3 4 5 6 7 8 9 10 11 12 13 14 15 16
SOLO-SOUNDS
DRUM-SFXEFFECT-SOUNDS
SIRIUS
SIRIUS
by QUASIMIDI
CATEGORIES
MIXER 11 CHANNEL VOCODER SEQUENCER
MODULATOR OSCILLATORS RESONANCE-FILTER AMPLIFIER EG-MACROS PHONETISCHER SPEKTRAL TRANSFORMATOR
RECORD
Caution:The initialisationwill delete the en-tire ram memoryof the Sirius andall settings will re-vert to the originalfactory settings.
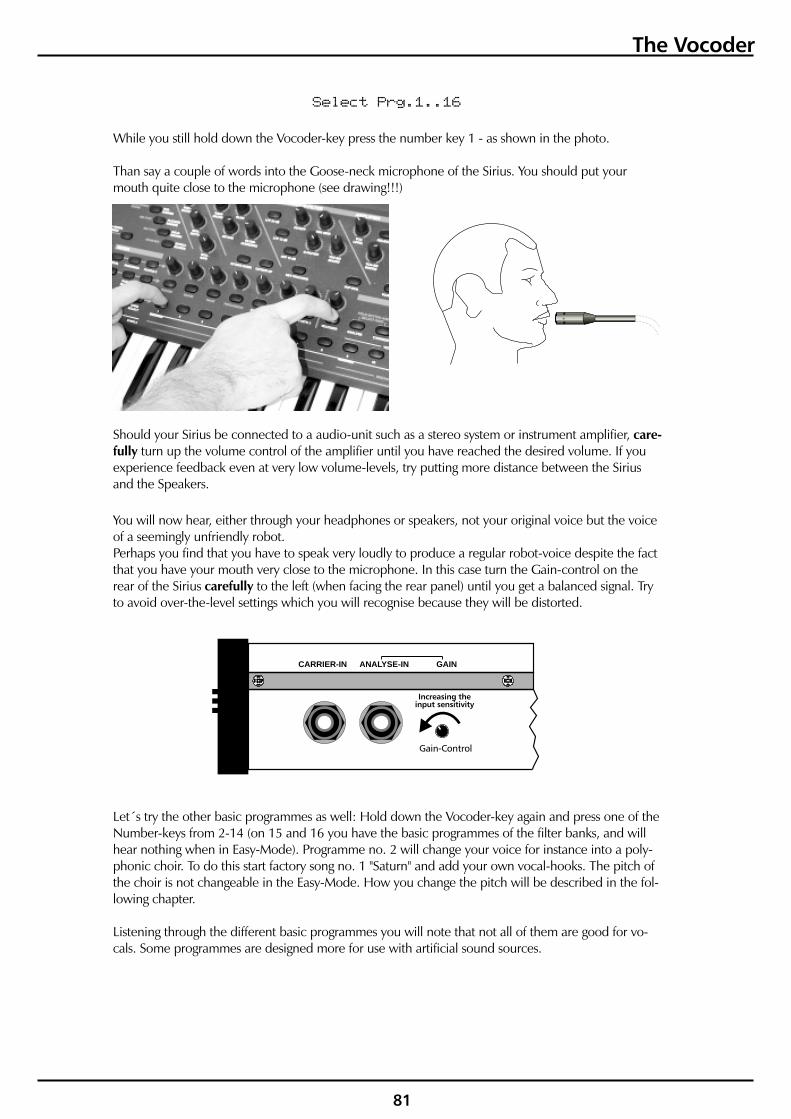
Select Prg.1..16
While you still hold down the Vocoder-key press the number key 1 - as shown in the photo.
Than say a couple of words into the Goose-neck microphone of the Sirius. You should put yourmouth quite close to the microphone (see drawing!!!)
Should your Sirius be connected to a audio-unit such as a stereo system or instrument amplifier,turn up the volume control of the amplifier until you have reached the desired volume. If you
experience feedback even at very low volume-levels, try putting more distance between the Siriusand the Speakers.
You will now hear, either through your headphones or speakers, not your original voice but the voiceof a seemingly unfriendly robot.Perhaps you find that you have to speak very loudly to produce a regular robot-voice despite the factthat you have your mouth very close to the microphone. In this case turn the Gain-control on therear of the Sirius to the left (when facing the rear panel) until you get a balanced signal. Tryto avoid over-the-level settings which you will recognise because they will be distorted.
Let´s try the other basic programmes as well: Hold down the Vocoder-key again and press one of theNumber-keys from 2-14 (on 15 and 16 you have the basic programmes of the filter banks, and willhear nothing when in Easy-Mode). Programme no. 2 will change your voice for instance into a poly-phonic choir. To do this start factory song no. 1 "Saturn" and add your own vocal-hooks. The pitch ofthe choir is not changeable in the Easy-Mode. How you change the pitch will be described in the fol-lowing chapter.
Listening through the different basic programmes you will note that not all of them are good for vo-cals. Some programmes are designed more for use with artificial sound sources.
care-fully
carefully
The Vocoder
81
CARRIER-IN ANALYSE-IN GAIN
Gain-Control
Increasing theinput sensitivity

Basic functions of the Vocoder:
Turning the Vocoder On and OFF:
Setting the volume of the Vocoder-sound:
How can I select the different Basic Programmes?
The Vocoder is turned on and off with the Vocoder-key located on the MIXER-panel.
The output-level of the Vocoder you can change in the usual way using the MIXER-panel of theSIRIUS. Switch on the LEVEL-key in the Mixer. Now you can set the volume with the VOCODER-dial.
The volume-changes are sent and received using MIDI information. You can automate thesechanges using an external sequencer.
When you turn on the Vocoder the automatic Carrier (Easy-Mode) is not activated if you have al-ready selected a Carrier. So when you change through the basic Programmes the selected Analyse-and Carrier-signals will remain routed to the Vocoder. When the percussion-track is vocoding astring sound from the Synth 1-part you can immediately check out how this will sound with differentVocoder-settings.Try this with the factory song No. 2 "Voc Grov" playing. You will notice that in different basicprogrammes different frequencies of the Grooves are stressed and single instruments are emphasisedor de-emphasised accordingly. Change between different basic settings of the Vocoder as follows:
First hold down the Vocoder-key on the MIXER-panel. The display shows:
While you still hold down the Vocoder-key you can switch between Vocoder-programs 1-16 usingthe Number-keys.
Tip:
Select Prg.1..16
The Vocoder
82
The setting of theVOCODER-key canbe stored in aSONG.
The setting of theVOCODER-keyscan be stored inthe SONG
LEVEL-Key
Tip
V

The following overview shows you all basic programmes of the 11 Bandwidth-Vocoder and gives youtips concerning these basic settings. Although we have said that some programmes are more suited tovocals and others more to artificial sounds, these tips should not be considered as hard and fast rules.The results depend a lot on what sound characteristics the audio-source has. So experimenting withthe different basic programmes and audio-sources is the order of the day! This is what makes theVocoder such an exciting tool: nothing says that you can not try the programme "InverseV" whenyour voice is being used to modulate a Synth bass.
The Vocoder's 16 basic programmes can amongst other characteristics be distinguished by their filter-type, the filter frequency and the decay-time for each of the 11 Vocoder-Bandwidth possibilities, or'Bands'. By the way QUASIMIDI will offer further Vocoder programmes in future.
After selecting a basic program we now feed different sounds into the Vocoder. You will soon be con-vinced that the SIRIUS Vocoder is much more than just a voice mutator.
The Vocoder
83
Basic Program Description
particularly suitable for vocals
Universal Vocoder
particularly suitable for drums
Very slow modulating Vocoder for pads
The Filterbanks
The Basic Programs:
1: RobotVoc
2: ChoirVoc3: StrngVoc
4: DuckVoc5: CrazyVoc
6: FXVoc7: BADVoc
8: ThinVoc9: CutVocod
10: InverseV11: HighQVoc
12: FrameVoc13: StereoV
14: SlowVoc
15: Filtbank16: BBoostFB
with bandwidth intereaction up to the high frequencies
treble-rich vocodersoft Vocoder with available cut off frequency filter
with high filter quality
with extreme stereo setting
emphasizing the low frequencies
Caution: The Filterbanks effect thechosen Carrier, theAnalyse-sourcesare being ignored.

How can I select Analyse-signals and Carrier?
Selecting Sirius-Parts as the Analyse-signal:
Selecting Sirius-Parts as Carrier:
You already know that the sound of the Analyse-signal is transmuted into that of the Carrier-signal.Four keys on the MIXER-panel decide which sources are to be fed into the Vocoder (Vocoder-Routing): ANALYSE, CARRIER, CARRIER-EXT. and MICRO. The lit key indicates that the respectivesources are fed into the Vocoder. A lit ANALYSE- or CARRIER-key means that at least one SIRIUS-partis selected as Analyse-signal or as Carrier-signal.You have probably sensed already: The Sirius-Vocoder allows you to select several Analyse & Carrier-signals simultaneously. But most of the time you will obtain a better sound result when only few partsare routed to the Vocoder. Like so often in music, less is more.
The Vocoder always requires sound sources on both inputs. When you have selected onlythe Carrier-signal or only the Analyse-signal whilst in sequencer mode, you will not hear anyVocoder-sound. This is also the case if Carrier and Analyse-signals are not being played out at thesame time.
In order to select one or more parts of the Sirius as the Analyse-signal, first hold down the ANALYSE-key of the VOCODER-panel. The lit keys under the dials will indicate which Parts have been selectedas Analyse-signals. While you still hold down the ANALYSE-key, turn on the key for the Part or Partswhich you wish to use as the Analyse-signal of the vocoder. That means you chose from KICK/BD,SNARE, HIHAT, PERCUSSION and SYNTH 1-3. If you press the Part key again whilst holding downthe ANALYSE-key, you turn off the Analyse-function for that Part.
To select one or more Parts of the SIRIUS as the Carrier-signal you must first hold down theCARRIER-key on the MIXER-panel. The lit keys under the dials will indicate which Parts have alreadybeen selected as Carrier-signals. While you still hold down the CARRIER-key, turn on the key for thePart you wish to use as Carrier of the Vocoder. That means you chose from KICK/BD, SNARE, HIHAT,PERCUSSION and SYNTH 1-3. If you press the Part key again whilst holding down the CARRIER-key,you turn off the Carrier-function for that Part.
Caution:
The Vocoder
84
A turned off Ana-lyse-function doesnot mean that thisPART is muted. ThePART is just notsent to the Vocoderanymore.
A turned off Car-rier-function doesnot mean that thisPART is muted. ThePART is just notsent to the Vocoderanymore.
!

Back to the Worksong Nr 2 "Voc Grov":When you press the ANALYSE-key the lit Part-keys tell you that the drum tracks of the Sirius are theAnalyse-signals of the Vocoder. When you hold the CARRIER-key you will see that the Synth-tracksare selected as the Carriers. With playing the sequencer try and switch off the Analyse- and Carrierfunction of each Part separately so that you can hear the original signal. This example of Vocoder-useis somewhat classic: The pads of the Synth-Parts are rhythmatised by the Percussion- and Drumsound, creating a rhythmic pad.
Maybe you have already tried this - the Sirius gives you the option to use a Part asthe Analyse-Signal and Carrier-signal simultaneously. Your imagination will decide how to use this op-tion!
To use the Goose-neck microphone of the Sirius as Analyse-Signal you merely have to switch-on theMICRO.-key on the Vocoder-panel. Press the key again and the Analyse-function of the microphoneis switched off.
If you use a microphone and an audio-unit such as a stereo system or instrument ampli-fier, please note the following to avoid feedback problems.
- allow sufficient distance between microphone and speakers- use the lowest possible volume-levels- during live-performance make sure the microphone is not pointed directly towards the PA-
speakers.
Before you switch on, set the Gain-control to the right of the rear panel of the Sirius to the middle set-ting (12 o´clock position). If you are using an audio-unit such as a stereo system or instrument ampli-fier, turn down the volume control of the amplifier to minimum. Then turn on the microphone withthe MICRO.-key as Analyse-source and carefully turn up the volume control while you speak into themicrophone. Bring your mouth as close to the microphone as possible. Should you still not be ableto get a regular Vocoder-sound, carefully turn the Gain-control on the rear panel to the left (when fac-ing the rear panel), until your signal is balanced. Try to avoid overloading.
The use of the human voice is particularly well suited to illustrating once more the way the Vocoderworks. First select a suitable Vocoder-basic programme, for instance Nr.2 "ChoirVoc". Turn the MI-CRO-key on and select a Synthesizer-sound as Carrier: For example use a soft string-sound. Play anote on the keyboard and at the same time speak into the microphone. Now play a melody. You willhear that you can control the pitch of your voice with the keyboard. If you press several keys at onceyou will suddenly sing with several voices.This principle can be used in a different way: You can have a choir singing your lead vocal.
Expert´s advice:
Selecting the Microphone as the Analyse-Signal:
Important:
The Vocoder
85
CARRIER-IN ANALYSE-IN GAIN
Gain-Control
Increasing theinput sensitivity
Caution: TheRouting of the inter-nal PARTS is storedwith the PATTERN.
Compare withchapter "Startimmediately" onpage 79.
Press SONG SELECT,Number-key 2 andPLAY!
!

Once you have experimented with the different Carriers you will notice that not all Carrier-soundsare suitable for use with the human voice. In order to obtain the best results, the sound of the Carriershould be similar to that of the human voice. Safe bets are the Sirius-waveforms SpectrAE, Mal-Choir,SuprStrg or VS_VOICE. With some waveforms you can create brilliant and original choirs, others aremore for monophonic playing. Here again: EXPERIMENT! Check out the possibilities. Generally theintelligibility of the voice decreases with increasing pitch because the low frequencies within thevoice are lost. The speech is generally better understood the lower down the Carrier-sound is playedon the keyboard.
: In the Edit-VOCODER menu you will find some more useful parameters which help you toavoid feedback and to increase vocal intelligibility. Here you can also mix in the original signal of themicrophone in order to use the SIRIUS as a mixing desk with built-in effects units (see page 92).
It can of course be very interesting to send sounds other than speech or singing through the micro-phone into the Vocoder. The Sirius offers the tempting option of also including your other audio-equipment in the Vocoder. So you also just bought a full Stand-Alone-Vocoder!
: The use of external sound sources is only recommended once you know the basic func-tions of the Vocoder really well.It does not matter whether it's a synthesizer, drum-computer like the RAVE-O-LUTION 309 or CD-player, tape player, mixing desk …simply connect the audio source to the relevant 6,3mm (1/2") jacksocket on the rear panel of the Sirius: A sound source that is to be used as the Carrier-signal shouldbe connected to the CARRIER-IN socket. A sound source that is to be used as the Analyse-signalshould be connected to the ANALYSE-IN. The following diagram shows an example of one such con-figuration.
Tip
Important
Using other external sound sources for the Vocoder:
The Vocoder
86
CA
RRIE
R-IN
AN
AL Y
SE-I
N
for example OUT3
Phono-preamp(DJ-mixing desk)
INSTRUMENT
TONE DECAY
LEVEL LEVEL LEVEL LEVEL CUTOFF
EXPANSION-SLOTSSEE BOTTOM-PLATE
SOUND
INSTRUMENT PERC.-SET
SOUND SOUND
EDIT
PAGE
PATTERN-PADS
FX-1:ROOM 1ROOM 2ROOM 3HALL 1HALL 2PLATEDELAYPAN-DELAY
FX-2:CHORUS 1CHORUS 2CHORUS 3CHORUS 4FEEDB. CHORUSFLANGERSHORT DELAYFEEDB. DELAY
FX-3:2-BAND PARAM.-EQUALIZER
OVERBLASTSPECIAL LOOP TRACKS
VELOCITY GATE-TIME
TAP
EDIT VALUE
SONG/PATTERN
PLAY STOP
F1 F2 F3
RECORDEXIT
SOUND
INSTRUMENT
ATTACK
LEVEL
SOUND
TUNE
POWERON / OFF
IN OUT-1OUT OUT-2
MIDI AUDIO
THRU FOOTSWITCH OUT-3 OUT-4 IN-1 IN-2
TUNE TUNE TONE WAVE ATTACK DECAY SUSTAIN MASTER-VOLUME
PHONES
32 OHM
DECAY
MUTE
SELECT SELECT SELECT SELECT SELECT
MUTE MUTE MUTE MUTE
DECAY DECAY ACCENT RESONANCE ENVMOD
VCA-GATE
WRITE
DUMP
STORE SOUND
GLIDE
ANALOG-EMULATION-SYNTHESIS BY QUASIMIDI
LOOP-FADE
OVERBLAST
1 92 104 126 148 163 115 137 15
SHIFT
TEMPO
A
AMP
dB
ENVELOPES (EG):
RESO.
SINUS
SQUARE
SAW-UP
SAW-DOWN
RANDOM
CUTOFF-FREQ.
D S tR
KICK OUTPUT
FX-ALGORITHMS
SNARE HIHAT PERCUSSION SET BASS - LEAD - SYNTHESIZER
RAVE-O-LUTION 309
TRANSPOSE:HOLD SHIFTAND PRESS BUTTON
LFO-WAVEFORM
Example: Drumloop from the 309as Analyse-signal modulates atrack from a record.
32 OHM32 OHM
NATURALDRUMS
BASS-SOUNDS
DIRTYNATURAL
DIRTYBASS
ELECTRONICDRUMS
PAD-SOUNDS
909-TYPEPLUCKEDSOUNDS
808-TYPE
LEVEL
BD SNARE HIHAT PERC. SYNTH 1 SYNTH 2 SYNTH 3
MOD.-WHEELASSIGN
PARTSELECT
SOUNDSELECT
MODULATIONWHEEL
PITCHBEND
TRACK-MUTING
PATTERNSELECT
SONGSELECT
PARTMUTE
PART/SEQ.TO MIDI
PANORAMA FX1/FX2
1 2
SNARE HIHAT
DETUNE FILTER-OVERDRIVE
Q-FACTOR VCF-EGMACRO
VCA-EGMACRO
MOD.-DEPTH
MOD.-RATE
SPECIAL-LOOPTRACK-FADER
OVERBLAST
MOD.-MACRO
WAVE-MACRO
GLIDELPF 24 dB RELEASE
0
32
64
96
127
LPF 12 dB
HPF 12 dB
PAGE/BANK
MASTERVOLUME
MICROPHONECONNECTOR
VALUETEMPO
RECALL EXIT
EDIT WRITE
SHIFT
KEY-TRACKINGOCTAVE-UPOCTAVE-DOWN VCF-DYN. VCA-DYN. RANDOM-SOUND
PRESS BUTTONFOR SOUND-CREATION
TAP-TEMPO
DEMO
SYNC.EXTERN
AUDIOSYNC
CUTOFF ENV.-MOD VCALEVEL
PERCUSSION
PATTERN BREAK SPECIAL LOOP TRACKS
SYNTH 1 SYNTH 2 SYNTH 3 VOCODER
HOLD BUTTON ANDSELECT PART
ANALYSE CARRIER CARRIER-EXT. MICRO.
HOLDTO
SELECTREW
ARPEG.ON/OFF
START
SONG-STEP
STOP
FWD
PHONES
KICK/BD
3 4 5 6 7 8 9 10 11 12 13 14 15 16
SOLO-SOUNDS
DRUM-SFXEFFECT-SOUNDS
SIRIUS
SIRIUS
by QUASIMIDI
CATEGORIES
MIXER 11 CHANNEL VOCODER SEQUENCER
MODULATOR OSCILLATORS RESONANCE-FILTER AMPLIFIER EG-MACROS PHONETISCHER SPEKTRAL TRANSFORMATOR
RECORD
You can also addeffects to yourVocoder-sound.Read page 89.
!
Tip

Important:
Tip:
The Gain-control on the back of the Sirius determines also the input sensitivity of theANALYSE-IN. If you connect other audio equipment to this socket you should first set the Gain-control to minimum.
You can switch the external Carrier-signal on and off with the CARRIER-EXT.key on the MIXER-panel.The external Analyse-signal is controlled with exactly the same key as the microphone-signal. Thismeans the MICRO.-key on the MIXER-panel also switches the external Analyse-signal on and off.
By the way - the Sirius-Vocoder allows you to mix internal Parts, microphone signals and external au-dio sources almost randomly - this is for the Analyse-signal as well as the Carrier-signal. One excep-tion: If you have connected an audio cable to the ANALYSE-IN-socket, the MICROPHONE CON-NECTOR on the front panel will be disabled.
Would you like to use your own favorite microphone? Instead of the Goose-neck microphone in-cluded with your Sirius, you can connect other dynamic microphones directly into the MICRO-PHONE CONNECTOR-socket (XLR-socket) of the Sirius. The ANALYSE-IN is also suitable to connecta microphone. If you want to use a condenser-microphone you will need an external phantom-power supply. Whatever Microphone you choose to use, make sure the Gain-control is sensibly ad-justed to avoid feedback.
You can use the change of volume of single Vocoder-tracks to create some interesting effects becauseyou can emphasize or de-emphasize each of the 11 frequency Bandwidth (Vocoder 'Bands') whichmake up your complete vocoded sound. Even more interesting is performing these changes in real-time while the sequencer section is active. You can create, for example, real-time morphing of Padsor sound atmospheres. These options are made available to you using the dials of the MIXER-panel:here you can, while your sequencer is running, set the volumes for the single Vocoder-Bands. On thedials you have Vocoder-Bands 2-9 which each represent one bandwidth, from the deepest bass tothe highest treble. Band-2 is the deepest bass, Band 9 the highest treble. (the other Bands are con-trollable only in the Edit-Vocoder menu - see page 91).
To set the Band-volume hold down the Vocoder-key and turn the control in the MIXER-panel at thesame time. The photo on the next page will make it clear to you.
Changing the level of the individual Vocoder tracks:
The Vocoder
87
CARRIER-IN ANALYSE-IN GAIN
Gain-Control
Increasing theinput-sensitivity
Set the Gain-Control to minimum first.To increase the level carefully turn itto the left.
SNARE HIHAT PERCUSSION SYNTH 1 SYNTH 2 SYNTH 3 VOCODERKICK/BD
BAND 2
Frequency increased
BAND 3 BAND 4 BAND 5 BAND 6 BAND 7 BAND 8 BAND 9
The settings for theCARRIER.EXT.- andthe MICRO-.keyscan be stored in aSONG.
You can store theBand-volumesettings in a SONG.
!
Tip
T

Tip:
Tip:
You can also control the Bands of the Vocoder with an external sequencer. All dial movementscan be recorded in the sequencer and then automated. This way you can for example create impres-sive automatic phasing effects with the Vocoder.
You will find the filterbank-programs on the Number-keys 15 and 16. When they are used the Sirius-Vocoder behaves like an equalizer with nine Bands. Because of the steepness of the filter you canmake both subtle sound changes obtain some very extreme effects- filter sweeps, which onlywork in the middle ranges, or impressive "formant-modulations". If you (and your neighbour) wish,you can also mercilessly overload the filter Bands. You will get the most wonderful LoFi-sounds -pumping bass drums, grinding HiHats, wicked 303-sounds.There is one pre-requisite for selecting the sound source: the filterbank will only effect the Partswhich are set as the Carrier-signals. The selected Analyse-signals will not be affected.As usual you can set the volumes of Bands 2-9 in the MIXER-panel. Hold down the Vocoder-key andturn the controls in the MIXER-panel at the same time. Use the picture at the top of this page as aguide. The location of the Bands you can see in the diagram below:
Let´s select basic programme no. 16 "BboostFB" (hold down Vocoder-key and press Number-key 16.Select a Synth-Part as Carrier and for this part choose a Synth-bass (for instance C03 "Acid Mod").The Part is now located at the entrance of the Filter bank. Now hold down the Vocoder-key andclose the dials 1-5 and 8 completely and open up dials 6 and 7. Also play with Cutoff-control and Q-factor: Aceeeeed!
Naturally the Band volumes of the filter bank are sent and received in MIDI so that you can con-trol the filter movements with an external sequencer.
How does the Filter Bank work?
and
The Vocoder
88
Controlling the Band volumes:Hold down the VOCODER-key andturn the dials in the MIXER panel.
SNARE HIHAT PERCUSSION SYNTH 1 SYNTH 2 SYNTH 3 VOCODERKICK/BD
BAND 2
Frequenz nimmt zu
BAND 3 BAND 4 BAND 5 BAND 6 BAND 7 BAND 8 BAND 9
Tip
Tip
-

How can I set Effects and Pan?As the icing on the cake you can refine your Vocoder-sound with the Sirius-Effects. Mix in rhythmicdelays to a speaking Groove in real-time or let your robot hold great speeches in a tiny bathroom.The procedure you already know from the description of the MIXER-panel. Above the FX1/FX2-keysof the Mixer you can select between two effects units of the Sirius. When the key is permanently lityou have selected FX1. When the key is blinking, FX2 is active. Now the dial of the Vocoder allowsyou to mix in the currently selected effect in real time.
The position of the Vocoder-sound in the stereo image ( ie. the pan setting) can be set as usual usingthe MIXER -panel. Turn on the PANORAMA-key of the Mixer. Now you can use the Vocoder dial toposition the Vocoder-sound further to the left or right of the stereo picture.
As you already know, the Sirius allows you to automate changes of the effects mix and pan-orama via MIDI using an external sequencer. Just turn the controls and the Sirius will output the nec-essary midi information through the MIDI-OUT.
Tip:
The Vocoder
89
Activate FX1 or FX2 with the Mixer andmix-in the desired effects part with theVOCODER-control.
Activate PANORAMA with the Mixerand determine the Stereo-positionof the Vocoder-sound with theVOCODER-control.
You can store theeffects mix and thepan settings in aSONG.
Tip

The Vocoder Menu:
Most Parameters of the Vocoder-menu can also be set using the dials and keys on the front panel ofthe Sirius. There are however some parameters which can only be set in the Edit-Vocoder menu. Themenu-pages of these restricted parameters are marked with a (*) in the following description of theEdit-Vocoder menu procedure.This is how to get to the Edit-Vocoder menu: Press the EDIT-key and select page 4 of the Edit-menuwith the right-hand PAGE/BANK-key. The following selection appears in the display:
Press the F1-key under the display to open the Edit-Vocoder-menu.
Here you can select the 16 different Vocoder types or programmes.
The types contain different bandwidth intereaction and different filter types for the Bands.
When you change between types the Band volume is also changed and you will revert tothe basic factory settings as described on page 83.
On page 2 you determine the output volume of the selected vocoder programme.
Here you can set the Panorama (the position of the Vocoder-sound in the stereo image).
This is really a balance function: As the single Vocoder-Bands can have different pan settings, theneach Band can take up its own place in the stereo image.
As the input signals of the Vocoder are being used as 'control' signals, their original sound is usuallynot sent to the main outputs and is therefore inaudible. The Bypass function on the next 4 menu-pages however allows you to mix the original sound back in from the Analyse and Carrier-soundsource. By the way, the original signals are also being sent through the effects-processors of the Sirius.
Menu-page 1: Vocoder Type
Important:
Menu-page 2: Level
Menu-page 3: Panorama
Menu-page 4*: Bypass for the internal Analyse-signal
Edit Vocoder|1> Typ:RobotVoc
Edit Vocoder<2> Level: 96
Edit Vocoder<3> Pan: L<61
The Vocoder
90
Select Edit <4>[Vocoder][Song]
F1
!

On page 4 you find the Bypass-function for the Analyse-Signals of the Sirius (ie. the internalParts of the Sirius which are being sent to the Vocoder). When for example you modulate a pad witha drumloop, you can mix in the original pad-sound with a controllable volume of 0-127.
The Carrier-bypass function enables you to mix the original sound of the Carrier-Parts of theSirius back in with the vocoded signal. When for example you modulate a pad with a drumloop, youcan mix in the original pad-sound with a controllable volume of 0-127.
With the Bypass function on menu page 6 you can mix-in the original sound of the microphone sig-nal and the external Analyse-signal with a controllable volume of 0-127.
When the Vocoder is inactive you can use the Sirius as a mixing desk which allows youto beef up your vocals or guitar solo using, for example, the reverb of a cathedral.
The Bypass function on menu-page 7 allows you to mix-in the original sounds of the external Carrier-signal with a controllable volume of 0-127.
These parameters control the Effect-sends of the Vocoder for the first and the second SIRIUS-Effectsunits.
The Lowpass is the lowest Band of the SIRIUS-Vocoder. Here you can specifically add bass to theParts of the Analyse-signal to, for example, emphasize the bass drum.
internal
Menu-page 5*: Bypass for the internal Carrier-signalinternal
Menu-page 6*: Bypass for the Microphone and external Analyse-signal
Expert´s-Tip:
Menu-page 7*: Bypass for the external Carrier-signal
Menu-page 8 and 9: Effect-send1 / Effect-send2
Menu-page 10*: Lowpass
Edit Vocoder<4> AnaBypass: 96
Edit Vocoder<5> CarBypass: 60
Edit Vocoder<6> MicBypass: 30
Edit Vocoder<7> ExtBypass: 0
Edit Vocoder<8> FX1Send: 80
Edit Vocoder<9> FX2Send: 10
Edit Vocoder<10> Lowpass: 0
Menu-page 11*: HighpassThe Highpass is the highest Band of the Sirius-Vocoder. Here you can specifically add to the trebleParts of the Analyse-signal.
The Vocoder
91
Tip

Tip: If you are using the microphone as Analyse-source you can emphasize (with Highpass) the sibi-lant qualities of the voice to increase the intelligibility ( ie. the T's and S's).
On the last 18 menu-pages you can set the volumes and the panorama settings of the other 9 fre-quency Bands. Yes it´s true: You can indeed select different pan-settings for every single Band! Useyour Vocoder as a psycho-acoustic-processor and distribute in a filterbank-programme the high fre-quencies of your mix over the total width of the stereo image.Here is an expample of the menu-page of the first Vocoder Band:
The Bypass-functions as well as the complete signaling of the SIRIUS-Vocoder is explained in the dia-gram on the following page.
The different basic settings of the Vocoder are stored in different storage areas. Whereas,for instance, the settings of the Bands are stored in the Song, the Vocoder-routing is stored in the Pat-tern. This makes sense because: it allows you during a song to change different allocations. For in-stance the Percussion track is modulating a pad at the beginning of the piece while this same Percus-sion becomes clattering metal plates at the end of the song. The different storage functions can be se-lected as usual with the WRITE-key to the right of the display. Select the desired storage area. The fol-lowing table shows you which setting of the Vocoder is stored to which area.
Edit Vocoder<11> Highpas:108
Edit Voc-Band 1<12> Level: 98
Edit Voc-Band 1<13> Pan: L<10
Menu-page 12-29*: Level/Panorama for the individual Bands(The volume for Bands 2-9 can also be controlled on the front panel)
Important:
Where are the Vocoder settings stored?
The Vocoder
92
Key Storage Level
Vocoder-LEVELVocoder-PANORAMAVocoder-FX1/FX2-SendSelection of Analyse and Carrier-PARTSinternalGoose-neck micro as Analyse ON/OFFexternal signal as ANALYSE ON/OFFexternal signal as Carrier ON/OFF
PANORAMA of the BandsLEVEL of the Bands
Analyse-BYPASS
Carrier-BYPASSMicrophone-BYPASSExternal Carrier-BYPASS
Vocoder-Setting
Vocoder ON/OFF VOCODER SONG
SONGSONGSONGPATTERNSONGSONGSONGSONGSONGSONGSONGSONGSONG
ANAYLSE/CARRIER
MICRO.MICRO.CARRIER-EXT.
You can store thecurrent settings ofall parameters ofthe Vocoder-menuin a SONG.
Tip
!

The Vocoder
93
Configuration Diagram of the VOCODER:
PAN
PAN
PAN
PAN
PAN
PAN
PAN
PAN
PAN
LEVEL
LEVEL
LEVEL
LEVEL
LEVEL
LEVEL
LEVEL
LEVEL
LEVEL
LEVEL
LEVEL
LEVEL
LEVEL
LEVEL
LEVEL
LeftAudio-Out
RightAudio-Out
Stereo-Output
FX1-SEND
FX2-SEND
FX-2 FX-1
Band 1
Band 2
Band 3
Band 4
Band 5
Band 6
Band 7
Band 8
Band 9
Highpass
LowpassANALYSE
MICROPHONE/ANALYSE-INsocket (optional)
PART 1-7
CARRIER
PART 1-7
CARRIER-INsocket
SOURCES:
CO
NTR
OL
SIG
NA
L
9 A
naly
se-B
and
s
ANALYSE Bypass
EXTERN Bypass
CARRIER Bypass
MICROPHONE Bypass
OVERBLAST

The System-Menu:
The System menu of the Sirius contains Parameters which allow you to change the basic settings onyour SIRIUS. The factory settings have the parameters set is such a way that the Sirius functions bestwhen acting as a stand-alone unit. A change of these Parameters may be necessary if you want to in-clude the Sirius in a larger MIDI-Setup or you want to customize it to your personal requirements.
Changes in the System-menu should only be made once you have read and understoodthe following section. The explanations of the separate menu pages will always contain a reference tothe factory settings. Should your Sirius sound different or behave in any way unusually after changingthese system parameters, you should revert to the original factory settings.
You will get to the System menu as follows: Press the EDIT-key and select page 5 of the Edit-menuwith the right PAGE/BANK-key. The following selection will appear in the display:
Press the F3 key under the display to open the System-menu.
The first two menu-pages allow you to change the overall tuning of the Sirius. On page 1 you findthe parameter called Master-Transpose.
This Parameter allows you to transpose the overall pitch of the Sirius by 6 semi-tones up or down.Live-keyboardists will particularly appreciate this option in a situation when for instance the Guitaristwants to play everything in E again. The factory setting is +0.
On page 2 of the System-menu you find the parameter Master-Tune.
Here you can fine tune the Sirius. If the value is set to +63 the Sirius will sound one semi-tonehigher than normal. If the value is set to -64 it will sound a semi-tone lower than normal. In mostcases you can ignore this parameter because the Sirius has the standard western tuning as a factorysetting. ( ie. A = 440 Hz). The factory setting is +0.
The next Menu-page requires a bit more care as the MIDI-channel-allocation of the Sirius is beingset.
The Parts of the Sirius have a fixed MIDI-channel allocation. For the factory setting (1) the Midi-channel allocation is as follows:
Caution:
Menu-page 1 (Master-Transpose):
Menu-page 2 (Master-Tune):
Menu-page 3 (MIDI-Master-Channel):
MIDI-Channel 1: KickMIDI- 2: SnareMIDI- 3: HihatMIDI- 4: PercussionMIDI- 5: Synth 1MIDI- 6: Synth 2MIDI- 7: Synth 3
Select Edit <5|(Pads) (System)
Edit System/Midi|1> M.Transp: +0
Edit System/Midi<2> M.Tune: +0
ChannelChannelChannelChannelChannelChannel
The System-Menu
94
!
In some cases it might be necessary to change this allocation to adapt to your MIDI-setup. This youcan do in the System-menu. On page 3 of this menu you find the Parameter "M.Channel". It allowsyou to set the Master-channel of the Sirius. In the above described factory setting it has the value 1. Ifyou set the value to 5 for instance the allocation of the MIDI-channels will change as follows:
The order of the Parts in relation to one another is fixed, due to the system configuration,and cannot be changed.
Another very important function can be found on page 4 of the system-menu: the Parameter LocalOn/Off. This parameter is often the solution for many problems that might occur when using theSirius with an external sequencer.
The factory settings of this parameter are set to ON - the only sensible setting all the time the Sirius isbeing used as a stand-alone unit.
If the Parameter is switched to OFF the following happens: The keyboard is separated from thesound sources within the Sirius. If you now press a key the MIDI-information "note-on" will not reachthe Synthesizer of the Sirius anymore. Instead this signal will immediately be sent to the MIDI-Outsocket of the Sirius. The Synthesizer is now able to receive MIDI-data only which gets to the unit viathe MIDI-In socket. The next thing would of course be to connect the MIDI-Out again with theMIDI-In. This task is in most studios dedicated to the sequencer software. The advantages of such asystem are clear: If for instance the Kick-Part (MIDI-channel 1) on the Sirius has been selected but inthe external sequencer the Synth1-Part (MIDI-channel 5) has been selected, only the Synth 1-Partwill play out when you play the keyboard. The setting Local-ON would in this instance also have theKick-Part playing.
What is true for the Keyboard of the Sirius is also true for the Internal- Sequencer. The Position LocalOFF will separate the Internal Sequencer form the internal sounds. This is always an advantage whena pattern or a song of the Sirius is to be recorded into an external sequencer. How you put this intopractice will be explained a little later with some examples. (see section " Recording Sirius-Patternsand Songs into an External Sequencer")
The diagram "The Local-Off Function of the Sirius" on the following page will show the above func-tion in detail.
MIDI-Channel 5: KickMIDI- 6: SnareMIDI- 7: HihatMIDI- 8: PercussionMIDI- 9: Synth 1MIDI- 10: Synth 2MIDI- 11: Synth 3
Edit System/Midi<3> M.Channel: 5
Edit System/Midi<4> Local: ON
Edit System/Midi<4> Local: OFF
ChannelChannelChannelChannelChannelChannel
Caution:
Menu-page 4 (Local-Off):
The System-Menu
95
!
See page 116
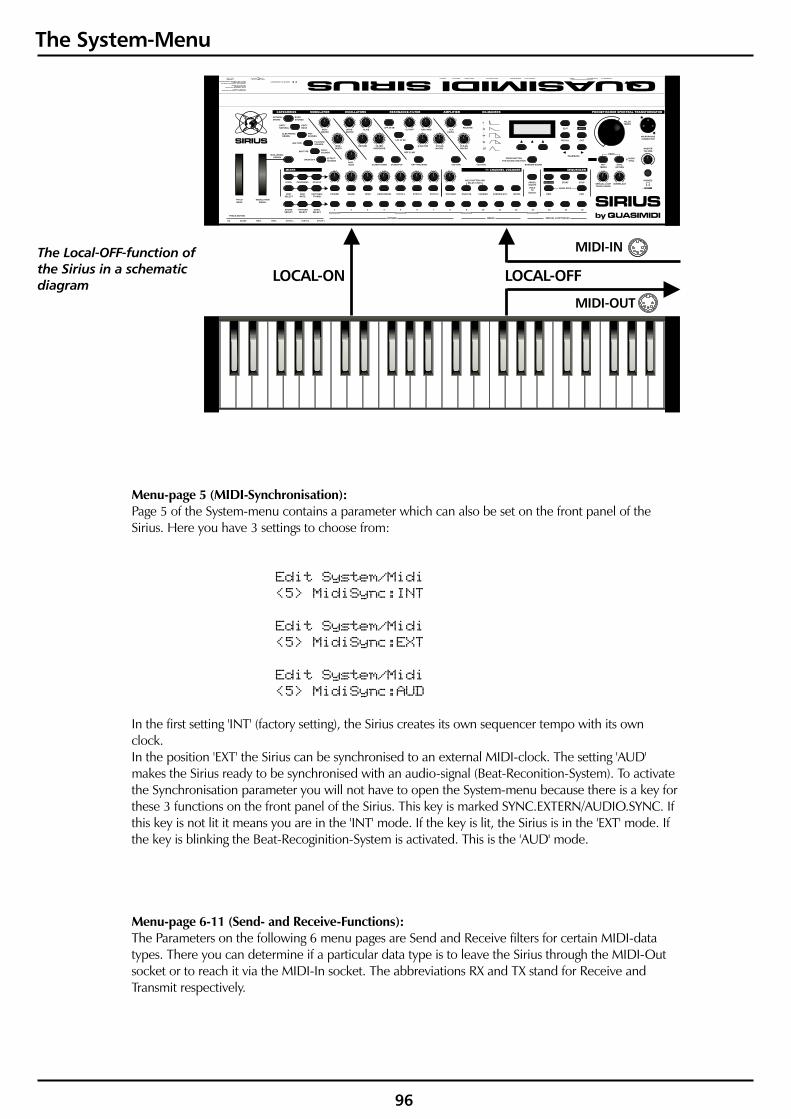
The System-Menu
96
Menu-page 5 (MIDI-Synchronisation):
Menu-page 6-11 (Send- and Receive-Functions):
Page 5 of the System-menu contains a parameter which can also be set on the front panel of theSirius. Here you have 3 settings to choose from:
In the first setting 'INT' (factory setting), the Sirius creates its own sequencer tempo with its ownclock.In the position 'EXT' the Sirius can be synchronised to an external MIDI-clock. The setting 'AUD'makes the Sirius ready to be synchronised with an audio-signal (Beat-Reconition-System). To activatethe Synchronisation parameter you will not have to open the System-menu because there is a key forthese 3 functions on the front panel of the Sirius. This key is marked SYNC.EXTERN/AUDIO.SYNC. Ifthis key is not lit it means you are in the 'INT' mode. If the key is lit, the Sirius is in the 'EXT' mode. Ifthe key is blinking the Beat-Recoginition-System is activated. This is the 'AUD' mode.
The Parameters on the following 6 menu pages are Send and Receive filters for certain MIDI-datatypes. There you can determine if a particular data type is to leave the Sirius through the MIDI-Outsocket or to reach it via the MIDI-In socket. The abbreviations RX and TX stand for Receive andTransmit respectively.
Edit System/Midi<5> MidiSync:INT
Edit System/Midi<5> MidiSync:EXT
Edit System/Midi<5> MidiSync:AUD
The Local-OFF-function ofthe Sirius in a schematicdiagram
32 OHM32 OHM
NATURALDRUMS
BASS-SOUNDS
DIRTYNATURAL
DIRTYBASS
ELECTRONICDRUMS
PAD-SOUNDS
909-TYPEPLUCKEDSOUNDS
808-TYPE
LEVEL
BD SNARE HIHAT PERC. SYNTH 1 SYNTH 2 SYNTH 3
MOD.-WHEELASSIGN
PARTSELECT
SOUNDSELECT
MODULATIONWHEEL
PITCHBEND
TRACK-MUTING
PATTERNSELECT
SONGSELECT
PARTMUTE
PART/SEQ.TO MIDI
PANORAMA FX1/FX2
1 2
SNARE HIHAT
DETUNE FILTER-OVERDRIVE
Q-FACTOR VCF-EGMACRO
VCA-EGMACRO
MOD.-DEPTH
MOD.-RATE
SPECIAL-LOOPTRACK-FADER
OVERBLAST
MOD.-MACRO
WAVE-MACRO
GLIDELPF 24 dB RELEASE
0
32
64
96
127
LPF 12 dB
HPF 12 dB
PAGE/BANK
MASTERVOLUME
MICROPHONECONNECTOR
VALUETEMPO
RECALL EXIT
EDIT WRITE
SHIFT
KEY-TRACKINGOCTAVE-UPOCTAVE-DOWN VCF-DYN. VCA-DYN. RANDOM-SOUND
PRESS BUTTONFOR SOUND-CREATION
TAP-TEMPO
DEMO
SYNC.EXTERN
AUDIOSYNC
CUTOFF ENV.-MOD VCALEVEL
PERCUSSION
PATTERN BREAK SPECIAL LOOP TRACKS
SYNTH 1 SYNTH 2 SYNTH 3 VOCODER
HOLD BUTTON ANDSELECT PART
ANALYSE CARRIER CARRIER-EXT. MICRO.
HOLDTO
SELECTREW
ARPEG.ON/OFF
START
SONG-STEP
STOP
FWD
PHONES
KICK/BD
3 4 5 6 7 8 9 10 11 12 13 14 15 16
SOLO-SOUNDS
DRUM-SFXEFFECT-SOUNDS
SIRIUS
SIRIUS
by QUASIMIDI
CATEGORIES
MIXER 11 CHANNEL VOCODER SEQUENCER
MODULATOR OSCILLATORS RESONANCE-FILTER AMPLIFIER EG-MACROS PHONETISCHER SPEKTRAL TRANSFORMATOR
RECORD
LOCAL-ON LOCAL-OFF
MIDI-IN
MIDI-OUT
The System-Menu
97
Menu-page 6 (Receive Program-Change):
Menu-page 7 (Receive Parameter):
Menu-page 8 (Receive Start):
Menu-page 9 (Transmit Program-Change):
Menu-page 10 (Transmit Parameter):
Menu-page 11 (Transmit Clock):
Edit System/Midi<6> RxPrgChg: ON
Edit System/Midi<7> RxParam: ON
Edit System/Midi<8> RxStart: ON
Edit System/Midi<9> TxPrgChg: ON
Edit System/Midi<10> TxParam: ON
Edit System/Midi<11> TxClock: ON
In the ON setting (factory-setting) the Sirius receives MIDI-programme- change commands and Bank-change commands from external MIDI-devices (for example a sequencer like Cubase or Logic). Inthe OFF setting these commands are ignored.
In the ON setting (factory setting) the Sirius receives sound parameter information in the form ofMIDI-controller commands from external MIDI-devices. In the OFF setting the controllers will be ig-nored.
In the ON setting (factory setting) the Sirius receives the start command of an external sequencerwhich is required for the synchronisation of all connected midi devices. (more details about Synchro-nisation can be found in the section "Synchronisation of the Sirius with Cubase"). The start commandwill be ignored in the OFF setting.
In the ON-setting (factory setting) the Sirius sends MIDI-programme- change commands and Bank-change commands to external MIDI-devices (for instance other Synthesizers or expanders as well asan external sequencer). No commands will be sent in the OFF setting.
In the ON-setting (factory setting) the Sirius will send sound parameters in the form of MIDI-controlcommands to external MIDI-devices. In the Off-setting the Control commands (for instance dial andwheel movements on the front panel of the Sirius) are not passed on to the MIDI-Out socket.
In the factory setting ON the Sirius will permanently send its internal MIDI-Clock information (evenwhen the internal sequencer is stopped). In rare cases this can be unwanted. You can stop sendingMIDI-Clock information by turning this parameter to the OFF-setting. More details on Synchronisa-tion can be found in the section "Synchronisation of the Sirius with Cubase".
See page 113
See page 113

Menu-page 12 (SysEx-Speed):
Menu-page 13 (Poti-Snap):
Menu-page 14 (Poti Info):
Edit System/Midi<12> SX-Spd:NORM
Edit System/Midi<13> PotSnap:OFF
A22:SawBass 130-> Cutoff: 100
Edit System/Midi<14> PotInfo: ON
This parameter allows you to set the speed at which system-exclusive data (Momentum, Sound, Songand All-Data Dumps) is sent from the Sirius. The factory setting should work with all common Se-quencing programmes and MIDI-interfaces. Apart from this setting it is also possible the speed up theTX of the data (position FAST) or to slow it down (position SLOW). To find the best TX speed it is ad-visable to try out all three options. If the setting FAST works with your MIDI-interface there is nothingagainst using it permanently - it will increase your work-speed enormously.
This parameter should only be changed by you when you have already had experience indata-Dumping different data types. More information on the different Data-Dump-types and how totransmit them you will find in the section "Data-Dumping" in the WRITE-menu section of this man-ual.
This parameter is about the behaviour of the dial controls on the front panel of the Sirius. Just experi-ment with the setting options of this parameter. These functions allow you to increase ease of opera-tion of the Sirius and to customise it to your special requirements. In the factory setting OFF, the con-trols on the front panel will behave as follows:As soon as you turn a dial the value corresponding to the control setting is called up. The resultantsound changes (for example when changing the Cutoff-frequency) can in some situations be un-wanted. We have therefore provided the new Pot-Snap function to the Sirius. It is activated in its ONsetting.Now the Pots will behave as in the following example: Let's assume the Cutoff-frequency of a soundhas the value 100. The Cutoff-control is however set to 20. Without Pot-Snap the cutoff frequencywould immediately take on the value 20 when you move the control. A clear jump would be audi-ble. With the activated Pot-Snap you can however move the control without hearing a jump. Onlywhen you exceed the value 100 will the sound start to change. In order for you to know which valueis set for the currently selected sound and in which direction the dial must be turned in order to findit is indicated in the display while turning the dial. For our example the display would look as fol-lows:
In this example the display shows you that you will have to turn the control to the right and that youwill only hear a change in sound once you have passed a Cutoff-value of 100.
This parameter lets you decide if you want to have the parameter and the relevant value displayed ornot when you turn a dial. The factory setting for this function is switched to ON. The OFF setting dis-ables this function.
Caution:
The System-Menu
98
!
See pages 38, 110

The System-Menu
99
Menu-page 15 (Track Mute):
Menu-page 16 (Beat Input):
Edit System/Midi<15> TrkMute: ON
Edit System/Midi<16| BeatInp:XCa
When you have come this far in the manual you will surely have noticed that the two lower octavesof the Sirius-keyboad allow you to mute and un-mute tracks as well as transpose them. The parame-ter on this page allows you to turn this function off. The factory setting makes this function active,and so the parameter is set to ON.
The parameter Beat-Input on this menu-page refers to the Beat-Recognition-System. Sirius' factorysetting is set in such a way that the Beat-Recognition-System is provided with audio-material via theCARRIER-IN socket (on the rear panel of the unit). Should the audio-signal your are feeding not havethe required level for the Beat-Recognition-System you can alternatively use the ANALYSE-IN socket.The Gain-control, coupled with the socket, allows you to increase the input-sensitivity of the Sirius.To activate the ANALYSE-IN-socket you have to switch the Beat-Input to Xan.
When you use the ANALYSE-IN-socket to access a sound from an external unit such as CDor Record Player, the microphone of the Sirius will be de-activated.
More about this subject can be found in the chapter describing the Beat-Recognition-System.
Caution:!
See page 70

The Sirius and MIDI:
If you already own an expanded MIDI-device setup and have made all the connections yourself,you can probably ignore this section. Those amongst you who wish to connect a MIDI-keyboard toyour computer for the first time should pay strict attention to the diagrams and explanations in thischapter.
First we want to clear some facts which always lead to misunderstandings. MIDI cablesonly transmit from one Midi device to another (eg. "note-on", "note length"or "note- off").
It therefore makesabsolutely no sense to connect a MIDI-cable to an audio-input or output of an amplifier or mixingdesk. Such connections are to be avoided at all costs because you may well damage your MIDI-device .
MIDI is an abbreviation and it means "Musical Instruments Digital Interface". MIDI is an internationalstandard used by most manufacturers of electronic musical instruments. This is why you can connectdevices made by different manufacturers using MIDI, allowing them to 'talk' to each other. A
allows MIDI-devices to communicate with each other and exchange data. The transmitteddata can for example contain information on the pitch, the length, the volume or the sound numberwhich a synthesiser is to play. A MIDI-interface can administrate up to 16 MIDI channels. They func-tion similarly to the channels of a radio or television. Data that is sent on a particular MIDI-channelcan also only be received by the same channel. In a MIDI system you can send and receive on allchannels simultaneously. The Sirius works on 7 MIDI-channels. It is therefore possible that the Siriuscan play 7 different sounds with different melodies and rhythms at the same time. We say the Siriushas a 7-part multimode.
1.) The MIDI-IN socket of one device is always connected to the MIDI-OUT socket of the other de-vice. The MIDI-OUT socket is the connection from which MIDI-data is sent from a device. TheMIDI-IN socket is the connection to which MIDI data is fed to a device. The MIDI-THRU-sockettakes in the arriving MIDI data and passes it on to the next device without changing it.
2.) When connecting your MIDI-devices you should make sure that you only use high-quality, properMIDI-cables. Similar cables from your Hi-fi store ( eg. tape recorder 'DIN' cables) are often not suit-able because they can be wired differently.
3) MIDI-cables should never be longer than 5 metres. Data transfer via MIDI is optimal through ca-bles up to this length. Longer MIDI-cables can cause problems.
Important:
It is impossible to transmit and hear a sound (audio-signal) via a MIDI-cable.
Midi control information
MIDI-interface
MIDI? What on earth that?
Connecting MIDI-Gear:
is
There are some rules regarding connecting MIDI-devices which you should pay strict attention to:
The Sirius and MIDI
100
3 Rules
!

The Sirius and MIDI
101
Examples of MIDI-Connections to the Sirius:In the following section you will find the most common MIDI-connections that are possible with theSirius.
In order to be able to hear the sound of all the instruments mentioned in the followingexamples, the audio-outputs of all devices must be connected to an amplifier or a mixing desk. Be-cause most amplifiers do not allow you to hear more than one sound source at one time, a mixingdesk is of course the better solution. The following diagram shows you how to connect the Sirius andother audio-equipment using a mixing desk and an amplifier. The CD-player in our example can ofcourse be replaced or supplemented by an expander, a sound card or another synthesizer.
Important:
This diagram shows you how to configure the audio connections of the Sirius. The two audio out-puts (OUT-LEFT/RIGHT) are connected with two parallel input channels on a mixing desk To main-tain the stereo integrity of the sounds of the Sirius, the pan controls of the mixing desk channelswhich you have used should be set to opposite positions, i.e. one hard-left and one hard-right. Ifyour mixing desk has dedicated stereo channels, no additional setting is required for the pan-orama.In order to be able to work with the Beat-Recognition-Sytsem the signal of the CD-player needsto get to the CARRIER-input of the Sirius. The simplest solution is to use the headphone output ofthe CD-player. In this way the Sirius can receive the trigger signal even when the CD-player ismuted on the mixing desk. Better mixing desks allow you to send the trigger signal of the CD-player via the AUX-Sends or EFFECT-sends to the Sirius. Such a connection is also required whenthe CD-player does not have a headphone output or you want to use for instance a record player(with pre-amp) as the Trigger source.
IN IN IN IN IN IN IN IN L R
AUX-SEND
MAIN-OUT
1 2 3 4 5 6 7 8L RMIX
CD-1 02:35CD-Player
AU
DIO
-RIG
HT
AU
DIO
-LEF
T
CA
RRIE
R-IN
orA
NA
L YSE
-IN
AU
X -/E
FFEC
T -SE
ND
PHONES
R OUTPUT L
Amplifier
R Input LSpeaker
VU VU
32 OHM32 OHM
NATURALDRUMS
BASS-SOUNDS
DIRTYNATURAL
DIRTYBASS
ELECTRONICDRUMS
PAD-SOUNDS
909-TYPEPLUCKEDSOUNDS
808-TYPE
LEVEL
BD SNARE HIHAT PERC. SYNTH 1 SYNTH 2 SYNTH 3
MOD.-WHEELASSIGN
PARTSELECT
SOUNDSELECT
MODULATIONWHEEL
PITCHBEND
TRACK-MUTING
PATTERNSELECT
SONGSELECT
PARTMUTE
PART/SEQ.TO MIDI
PANORAMA FX1/FX2
1 2
SNARE HIHAT
DETUNE FILTER-OVERDRIVE
Q-FACTOR VCF-EGMACRO
VCA-EGMACRO
MOD.-DEPTH
MOD.-RATE
SPECIAL-LOOPTRACK-FADER
OVERBLAST
MOD.-MACRO
WAVE-MACRO
GLIDELPF 24 dB RELEASE
0
32
64
96
127
LPF 12 dB
HPF 12 dB
PAGE/BANK
MASTERVOLUME
MICROPHONECONNECTOR
VALUETEMPO
RECALL EXIT
EDIT WRITE
SHIFT
KEY-TRACKINGOCTAVE-UPOCTAVE-DOWN VCF-DYN. VCA-DYN. RANDOM-SOUND
PRESS BUTTONFOR SOUND-CREATION
TAP-TEMPO
DEMO
SYNC.EXTERN
AUDIOSYNC
CUTOFF ENV.-MOD VCALEVEL
PERCUSSION
PATTERN BREAK SPECIAL LOOP TRACKS
SYNTH 1 SYNTH 2 SYNTH 3 VOCODER
HOLD BUTTON ANDSELECT PART
ANALYSE CARRIER CARRIER-EXT. MICRO.
HOLDTO
SELECTREW
ARPEG.ON/OFF
START
SONG-STEP
STOP
FWD
PHONES
KICK/BD
3 4 5 6 7 8 9 10 11 12 13 14 15 16
SOLO-SOUNDS
DRUM-SFXEFFECT-SOUNDS
SIRIUS
SIRIUS
by QUASIMIDI
CATEGORIES
MIXER 11 CHANNEL VOCODER SEQUENCER
MODULATOR OSCILLATORS RESONANCE-FILTER AMPLIFIER EG-MACROS PHONETISCHER SPEKTRAL TRANSFORMATOR
RECORD
Just to remind you, here is adiagram of how to configureyour audio connections!
!
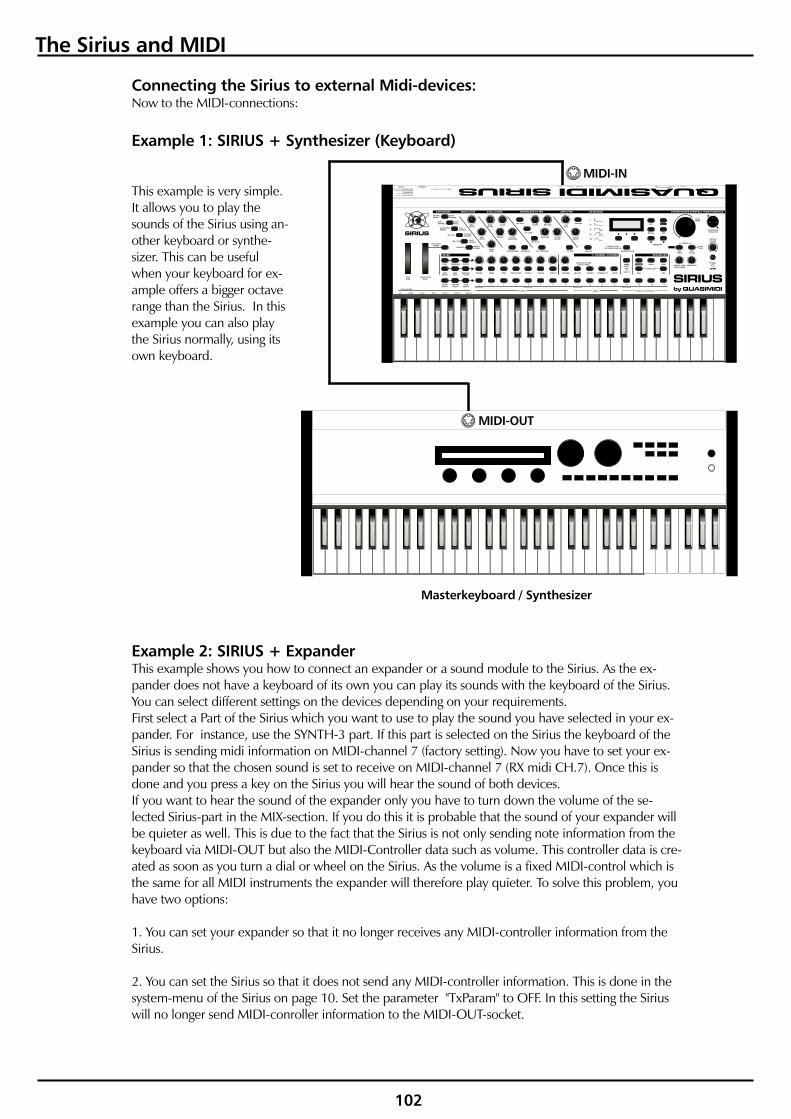
Connecting the Sirius to external Midi-devices:Now to the MIDI-connections:
Example 1: SIRIUS + Synthesizer (Keyboard)
Example 2: SIRIUS + Expander
This example is very simple.It allows you to play thesounds of the Sirius using an-other keyboard or synthe-sizer. This can be usefulwhen your keyboard for ex-ample offers a bigger octaverange than the Sirius. In thisexample you can also playthe Sirius normally, using itsown keyboard.
This example shows you how to connect an expander or a sound module to the Sirius. As the ex-pander does not have a keyboard of its own you can play its sounds with the keyboard of the Sirius.You can select different settings on the devices depending on your requirements.First select a Part of the Sirius which you want to use to play the sound you have selected in your ex-pander. For instance, use the SYNTH-3 part. If this part is selected on the Sirius the keyboard of theSirius is sending midi information on MIDI-channel 7 (factory setting). Now you have to set your ex-pander so that the chosen sound is set to receive on MIDI-channel 7 (RX midi CH.7). Once this isdone and you press a key on the Sirius you will hear the sound of both devices.If you want to hear the sound of the expander only you have to turn down the volume of the se-lected Sirius-part in the MIX-section. If you do this it is probable that the sound of your expander willbe quieter as well. This is due to the fact that the Sirius is not only sending note information from thekeyboard via MIDI-OUT but also the MIDI-Controller data such as volume. This controller data is cre-ated as soon as you turn a dial or wheel on the Sirius. As the volume is a fixed MIDI-control which isthe same for all MIDI instruments the expander will therefore play quieter. To solve this problem, youhave two options:
1. You can set your expander so that it no longer receives any MIDI-controller information from theSirius.
2. You can set the Sirius so that it does not send any MIDI-controller information. This is done in thesystem-menu of the Sirius on page 10. Set the parameter "TxParam" to OFF. In this setting the Siriuswill no longer send MIDI-conroller information to the MIDI-OUT-socket.
The Sirius and MIDI
102
MIDI-IN
Masterkeyboard / Synthesizer
MIDI-OUT
32 OHM32 OHM
NATURALDRUMS
BASS-SOUNDS
DIRTYNATURAL
DIRTYBASS
ELECTRONICDRUMS
PAD-SOUNDS
909-TYPEPLUCKEDSOUNDS
808-TYPE
LEVEL
BD SNARE HIHAT PERC. SYNTH 1 SYNTH 2 SYNTH 3
MOD.-WHEELASSIGN
PARTSELECT
SOUNDSELECT
MODULATIONWHEEL
PITCHBEND
TRACK-MUTING
PATTERNSELECT
SONGSELECT
PARTMUTE
PART/SEQ.TO MIDI
PANORAMA FX1/FX2
1 2
SNARE HIHAT
DETUNE FILTER-OVERDRIVE
Q-FACTOR VCF-EGMACRO
VCA-EGMACRO
MOD.-DEPTH
MOD.-RATE
SPECIAL-LOOPTRACK-FADER
OVERBLAST
MOD.-MACRO
WAVE-MACRO
GLIDELPF 24 dB RELEASE
0
32
64
96
127
LPF 12 dB
HPF 12 dB
PAGE/BANK
MASTERVOLUME
MICROPHONECONNECTOR
VALUETEMPO
RECALL EXIT
EDIT WRITE
SHIFT
KEY-TRACKINGOCTAVE-UPOCTAVE-DOWN VCF-DYN. VCA-DYN. RANDOM-SOUND
PRESS BUTTONFOR SOUND-CREATION
TAP-TEMPO
DEMO
SYNC.EXTERN
AUDIOSYNC
CUTOFF ENV.-MOD VCALEVEL
PERCUSSION
PATTERN BREAK SPECIAL LOOP TRACKS
SYNTH 1 SYNTH 2 SYNTH 3 VOCODER
HOLD BUTTON ANDSELECT PART
ANALYSE CARRIER CARRIER-EXT. MICRO.
HOLDTO
SELECTREW
ARPEG.ON/OFF
START
SONG-STEP
STOP
FWD
PHONES
KICK/BD
3 4 5 6 7 8 9 10 11 12 13 14 15 16
SOLO-SOUNDS
DRUM-SFXEFFECT-SOUNDS
SIRIUS
SIRIUS
by QUASIMIDI
CATEGORIES
MIXER 11 CHANNEL VOCODER SEQUENCER
MODULATOR OSCILLATORS RESONANCE-FILTER AMPLIFIER EG-MACROS PHONETISCHER SPEKTRAL TRANSFORMATOR
RECORD

The Sirius and MIDI
103
Should the midi TX of the sequencer track of the Sirius correspond to the Midi RX of the selectedpart of the external device, simply activate the "Part/Sequence to MIDI"-function of the Sirius for therelevant Part.Naturally this example will also work for a keyboard-synthesizer.
Despite the extensive possibilities of the Sirius-sequencer maybe you´d rather use your usual se-quencer software. Again the Sirius is well suited to this because its synthesizer can be addressed andcontrolled via MIDI. Because this subject is quite extensive we´ll have to go far afield to get to someparticularities resulting from a connection of Computer and MIDI. You will find a diagram for this ex-ample on the following page.
The basic requirement for this MIDI-connection is that your computer is equipped with a MIDI-interface. The ATARI ST has the MIDI-interface built in. PC and MAC need an additional interface,usually in the form of a card or an external Midi-interface unit connected to the printer or modem-port. Modern PC-s often have a sound card built in which includes a MIDI interface. In this case youwill need the MIDI connection cable that goes with the sound card (obtainable at your Computer-Specialist or the manufacturer of your sound card). Unfortunately it is important to note that theMIDI-interfaces of sound cards are not always terribly reliable. Should you plan on getting furtherMIDI-instruments later you should also consider the purchase of a "proper" MIDI interface. These de-vices often offer several MIDI-interfaces in one casing so that you are not restricted to 16 MIDI-channels anymore. There are interfaces with up to 128 MIDI-channels or 8 MIDI inputs and outputs(8 X 16 channels in, 8 X 16 channels out).
Example 3: SIRIUS + Computer
MIDI-Interfaces for the Computer:
This diagram shows youhow to connect an ex-pander, a sampler or anyother synthesizer with MIDIto the Sirius. This way youcan play the sounds of theconnected device with thekeyboard of the Sirius.
Expander / Sound module / Synthesizer
MIDI-IN
MIDI-OUT
32 OHM32 OHM
NATURALDRUMS
BASS-SOUNDS
DIRTYNATURAL
DIRTYBASS
ELECTRONICDRUMS
PAD-SOUNDS
909-TYPEPLUCKEDSOUNDS
808-TYPE
LEVEL
BD SNARE HIHAT PERC. SYNTH 1 SYNTH 2 SYNTH 3
MOD.-WHEELASSIGN
PARTSELECT
SOUNDSELECT
MODULATIONWHEEL
PITCHBEND
TRACK-MUTING
PATTERNSELECT
SONGSELECT
PARTMUTE
PART/SEQ.TO MIDI
PANORAMA FX1/FX2
1 2
SNARE HIHAT
DETUNE FILTER-OVERDRIVE
Q-FACTOR VCF-EGMACRO
VCA-EGMACRO
MOD.-DEPTH
MOD.-RATE
SPECIAL-LOOPTRACK-FADER
OVERBLAST
MOD.-MACRO
WAVE-MACRO
GLIDELPF 24 dB RELEASE
0
32
64
96
127
LPF 12 dB
HPF 12 dB
PAGE/BANK
MASTERVOLUME
MICROPHONECONNECTOR
VALUETEMPO
RECALL EXIT
EDIT WRITE
SHIFT
KEY-TRACKINGOCTAVE-UPOCTAVE-DOWN VCF-DYN. VCA-DYN. RANDOM-SOUND
PRESS BUTTONFOR SOUND-CREATION
TAP-TEMPO
DEMO
SYNC.EXTERN
AUDIOSYNC
CUTOFF ENV.-MOD VCALEVEL
PERCUSSION
PATTERN BREAK SPECIAL LOOP TRACKS
SYNTH 1 SYNTH 2 SYNTH 3 VOCODER
HOLD BUTTON ANDSELECT PART
ANALYSE CARRIER CARRIER-EXT. MICRO.
HOLDTO
SELECTREW
ARPEG.ON/OFF
START
SONG-STEP
STOP
FWD
PHONES
KICK/BD
3 4 5 6 7 8 9 10 11 12 13 14 15 16
SOLO-SOUNDS
DRUM-SFXEFFECT-SOUNDS
SIRIUS
SIRIUS
by QUASIMIDI
CATEGORIES
MIXER 11 CHANNEL VOCODER SEQUENCER
MODULATOR OSCILLATORS RESONANCE-FILTER AMPLIFIER EG-MACROS PHONETISCHER SPEKTRAL TRANSFORMATOR
RECORD

MIDI-Sequencing Software:If you don´t have it yet, you will of course need a suitable sequencer-software to run the Sirius witha computer-setup. Here the selection is enormous. There are however certain standards in the Mu-sic-scene. The most commonly used are the products of the companies Steinberg (Cubase) andEmagic (Logic). These programmes have the advantage that they work for all computer disk formats.If a friend for instance owns Cubase for the PC and you work with an ATARI, it is no problem toswap files with these computers. It is our experience that the Steinberg programme, Cubase, is themost widely used. This is why we have chosen this programme for our examples in this manual.Often you find sequencer-programmes included in the delivery of sound cards. These "freebies" areoften only slightly advanced demo-versions of more extensive programmes and are therefore re-stricted in their usability.
The original programmes Cubase and Logic have a copy-protection plug (dongle) or instal-lation key. Should you be using a version without a dongle it is probably a pirate copy. The use ofsuch a pirate copy is illegal. Very often these pirates are not fully functional and crash a lot. Do your-self and the software developers a favour and only use registered original software. This might at firstbe a little expensive but has the advantage that you will regularly be provided with Updates (whichfix errors and provide new functions) and you can make use of the Hot-line service of the manufac-turer when you have a question.
The MIDI-settings of a PC can, depending on the sound card, MIDI-interface and se-quencing software being used be in some respects very complicated. Please understand that we areunable to help you with problems concerning Sound cards and computers. If you do find problemshere, please consult the manufacturer of your sound card, your sequencing software or the dealerwho sold you the PC.
Warning:
The QUASIMIDI-Hotline will not give any support on software problems to users of pirate cop-ies.
Important:
The Sirius and MIDI
104
If you have connected the Sirius accordingto our diagram you will only need to do onething: Go to the system-menu of the Siriusand select page 4. Now set the parameter"Local" to OFF. More details about the pa-rameter Local-Off you can find in the de-scription of the System-menu earlier in thismanual.
PCAtari
Mac
MIDI-IN
MIDI-IN
MIDI-OUT
MIDI-OUT
Computerwith
Sequencer
32 OHM32 OHM
NATURALDRUMS
BASS-SOUNDS
DIRTYNATURAL
DIRTYBASS
ELECTRONICDRUMS
PAD-SOUNDS
909-TYPEPLUCKEDSOUNDS
808-TYPE
LEVEL
BD SNARE HIHAT PERC. SYNTH 1 SYNTH 2 SYNTH 3
MOD.-WHEELASSIGN
PARTSELECT
SOUNDSELECT
MODULATIONWHEEL
PITCHBEND
TRACK-MUTING
PATTERNSELECT
SONGSELECT
PARTMUTE
PART/SEQ.TO MIDI
PANORAMA FX1/FX2
1 2
SNARE HIHAT
DETUNE FILTER-OVERDRIVE
Q-FACTOR VCF-EGMACRO
VCA-EGMACRO
MOD.-DEPTH
MOD.-RATE
SPECIAL-LOOPTRACK-FADER
OVERBLAST
MOD.-MACRO
WAVE-MACRO
GLIDELPF 24 dB RELEASE
0
32
64
96
127
LPF 12 dB
HPF 12 dB
PAGE/BANK
MASTERVOLUME
MICROPHONECONNECTOR
VALUETEMPO
RECALL EXIT
EDIT WRITE
SHIFT
KEY-TRACKINGOCTAVE-UPOCTAVE-DOWN VCF-DYN. VCA-DYN. RANDOM-SOUND
PRESS BUTTONFOR SOUND-CREATION
TAP-TEMPO
DEMO
SYNC.EXTERN
AUDIOSYNC
CUTOFF ENV.-MOD VCALEVEL
PERCUSSION
PATTERN BREAK SPECIAL LOOPTRACKS
SYNTH 1 SYNTH 2 SYNTH 3 VOCODER
HOLD BUTTON ANDSELECT PART
ANALYSE CARRIER CARRIER-EXT. MICRO.
HOLDTO
SELECTREW
ARPEG.ON/OFF
START
SONG-STEP
STOP
FWD
PHONES
KICK/BD
3 4 5 6 7 8 9 10 11 12 13 14 15 16
SOLO-SOUNDS
DRUM-SFXEFFECT-SOUNDS
SIRIUS
SIRIUS
by QUASIMIDI
CATEGORIES
MIXER 11 CHANNEL VOCODER SEQUENCER
MODULATOR OSCILLATORS RESONANCE-FILTER AMPLIFIER EG-MACROS PHONETISCHER SPEKTRAL TRANSFORMATOR
RECORD
!
!

The Sirius and MIDI
105
Example 4: SIRIUS + Computer + ExpanderIn this example we are already dealing with a small MIDI-studio. This example expands on what wehave previously discussed and assumes that you have one MIDI-IN and one MIDI-OUT on your com-puter only.
In order for the computer to send data not only to the Sirius but also to the Expander you have toconnect it to the socket MIDI-THRU on the rear panel of the Sirius. The MIDI-THRU socket passeson all Midi-data received through the MIDI-IN socket to the expander without changing it. To avoiddoubled up sounds you should adjust your expander so that it will only receive on the MIDI-channels which are not already being used by the Sirius. The factory setting for those on the Siriusare MIDI-channels 1-7. Let´s assume that you have set your expander to the MIDI-channels 8 to 16.If you now want to play the sound of the expander, located on channel 8, and you are using the key-board of the Sirius, you will have to select a free track in your sequencer-programme and set it toMIDI-channel 8. Naturally the Sirius is in this example in Local-OFF mode.
If your expander also has a MIDI-THRU socket, you can connect another expander to this. Instead ofthe expander or sound module you may of course connect a sampler or another midi-synthesizer.
PCAtari
Mac
MIDI-IN
MIDI-IN
MIDI-OUT MIDI-THRU
Expander / Sound module
Computer with Sequencer-software
MIDI-OUT
MIDI-IN
32 OHM32 OHM
NATURALDRUMS
BASS-SOUNDS
DIRTYNATURAL
DIRTYBASS
ELECTRONICDRUMS
PAD-SOUNDS
909-TYPEPLUCKEDSOUNDS
808-TYPE
LEVEL
BD SNARE HIHAT PERC. SYNTH 1 SYNTH 2 SYNTH 3
MOD.-WHEELASSIGN
PARTSELECT
SOUNDSELECT
MODULATIONWHEEL
PITCHBEND
TRACK-MUTING
PATTERNSELECT
SONGSELECT
PARTMUTE
PART/SEQ.TO MIDI
PANORAMA FX1/FX2
1 2
SNARE HIHAT
DETUNE FILTER-OVERDRIVE
Q-FACTOR VCF-EGMACRO
VCA-EGMACRO
MOD.-DEPTH
MOD.-RATE
SPECIAL-LOOPTRACK-FADER
OVERBLAST
MOD.-MACRO
WAVE-MACRO
GLIDELPF 24 dB RELEASE
0
32
64
96
127
LPF 12 dB
HPF 12 dB
PAGE/BANK
MASTERVOLUME
MICROPHONECONNECTOR
VALUETEMPO
RECALL EXIT
EDIT WRITE
SHIFT
KEY-TRACKINGOCTAVE-UPOCTAVE-DOWN VCF-DYN. VCA-DYN. RANDOM-SOUND
PRESS BUTTONFOR SOUND-CREATION
TAP-TEMPO
DEMO
SYNC.EXTERN
AUDIOSYNC
CUTOFF ENV.-MOD VCALEVEL
PERCUSSION
PATTERN BREAK SPECIAL LOOP TRACKS
SYNTH 1 SYNTH 2 SYNTH 3 VOCODER
HOLD BUTTON ANDSELECT PART
ANALYSE CARRIER CARRIER-EXT. MICRO.
HOLDTO
SELECTREW
ARPEG.ON/OFF
START
SONG-STEP
STOP
FWD
PHONES
KICK/BD
3 4 5 6 7 8 9 10 11 12 13 14 15 16
SOLO-SOUNDS
DRUM-SFXEFFECT-SOUNDS
SIRIUS
SIRIUS
by QUASIMIDI
CATEGORIES
MIXER 11 CHANNEL VOCODER SEQUENCER
MODULATOR OSCILLATORS RESONANCE-FILTER AMPLIFIER EG-MACROS PHONETISCHER SPEKTRAL TRANSFORMATOR
RECORD

Example 5: SIRIUS as Expander + Synthesizer (Keyboard) + ComputerThis example corresponds more or less to the previous examples. The only difference is that now theSirius is taking on the part of an expander. Should your master-keyboard be a synthesizer you willonly pay attention to the fact that the MIDI-receive channels of the Sirius do not conflict with thoseof the synthesizer. The MIDI receive channels of the Sirius can be set in Edit-System menu page 3.
With this configuration you will unfortunately have to sacrifice some of the advantages of the Sirius.It is, for example, not possible to record the dial or wheel movements of the Sirius because theMIDI-OUT of the Sirius is not connected with the MIDI-IN of the computer. It is the same for thedata storage using MIDI-Data-Dump. If you absolutely depend on this connection-setup you willhave no choice but to change the connections before a data-Dump can be performed. In our exam-ple you would have to connect the MIDI-IN of the computer with the MIDI-OUT of the Sirius. (In alot of cases it is not advisable to change midi connections while the equipment is still powered up.)
This configuration is also open to expansion. If you want to connect a further Midi-device in addi-tion to the Sirius connect the MIDI-THRU of the Sirius to the MIDI-IN of the extra Midi-device.
The Sirius and MIDI
106
The Sirius can also be used as an expander in an already existing MIDI Setup.
PCAtari
Mac
MIDI-IN
MIDI-IN
Computer withSequencer-software
Masterkeyboard / Synthesizer
MIDI-OUT
MIDI-OUT MIDI-THRUMIDI-IN
32 OHM32 OHM
NATURALDRUMS
BASS-SOUNDS
DIRTYNATURAL
DIRTYBASS
ELECTRONICDRUMS
PAD-SOUNDS
909-TYPEPLUCKEDSOUNDS
808-TYPE
LEVEL
BD SNARE HIHAT PERC. SYNTH 1 SYNTH 2 SYNTH 3
MOD.-WHEELASSIGN
PARTSELECT
SOUNDSELECT
MODULATIONWHEEL
PITCHBEND
TRACK-MUTING
PATTERNSELECT
SONGSELECT
PARTMUTE
PART/SEQ.TO MIDI
PANORAMA FX1/FX2
1 2
SNARE HIHAT
DETUNE FILTER-OVERDRIVE
Q-FACTOR VCF-EGMACRO
VCA-EGMACRO
MOD.-DEPTH
MOD.-RATE
SPECIAL-LOOPTRACK-FADER
OVERBLAST
MOD.-MACRO
WAVE-MACRO
GLIDELPF 24 dB RELEASE
0
32
64
96
127
LPF 12 dB
HPF 12 dB
PAGE/BANK
MASTERVOLUME
MICROPHONECONNECTOR
VALUETEMPO
RECALL EXIT
EDIT WRITE
SHIFT
KEY-TRACKINGOCTAVE-UPOCTAVE-DOWN VCF-DYN. VCA-DYN. RANDOM-SOUND
PRESS BUTTONFOR SOUND-CREATION
TAP-TEMPO
DEMO
SYNC.EXTERN
AUDIOSYNC
CUTOFF ENV.-MOD VCALEVEL
PERCUSSION
PATTERN BREAK SPECIAL LOOPTRACKS
SYNTH 1 SYNTH 2 SYNTH 3 VOCODER
HOLD BUTTON ANDSELECT PART
ANALYSE CARRIER CARRIER-EXT. MICRO.
HOLDTO
SELECTREW
ARPEG.ON/OFF
START
SONG-STEP
STOP
FWD
PHONES
KICK/BD
3 4 5 6 7 8 9 10 11 12 13 14 15 16
SOLO-SOUNDS
DRUM-SFXEFFECT-SOUNDS
SIRIUS
SIRIUS
by QUASIMIDI
CATEGORIES
MIXER 11 CHANNEL VOCODER SEQUENCER
MODULATOR OSCILLATORS RESONANCE-FILTER AMPLIFIER EG-MACROS PHONETISCHER SPEKTRAL TRANSFORMATOR
RECORD

The Sirius and MIDI
107
MIDI - Problems and Solutions:
The Computer does not receive any MIDI-data:
The Computer does not send MIDI-data:
PC:
Incoming and outgoing MIDI-data is in most sequencer programmes indicated by a blinking dot or amoving bar. Cubase does it using two displays in the transport window.
If this shows you that MIDI-data is coming and going you can be sure that your connection is correctand the problem is somewhere in the software. When the keyboard of the Sirius is pressed and yoursequencer software does not receive any MIDI-data it is unlikely that the problem lies with the Sirius.First check your connections using our diagrams. Make sure the MIDI-OUT socket of the Sirius is in-deed connected to the MIDI-IN socket of the computer. If this is the case, the MIDI-cable could bedefective. Exchange it and re-try.Some sequencers have the option to turn the MIDI-inputs on and off separately. Check yourprogramme settings to this effect. If all of this has done nothing for you, you should check the settingsof your MIDI-interface and maybe get advice from the manufacturer of your interface or your soundcard.
Incoming and outgoing MIDI-data is in most sequencer programmes indicated by a blinking dot or amoving bar (see above). When you hit the Sirius-keyboard, the computer receives MIDI data butnothing is sent. If the MIDI-action indicator indicates outgoing data you should first check the con-nections using our diagrams. Make sure the MIDI-IN socket of the Sirius is really connected with theMIDI-OUT-socket of the computer. If this the case, the MIDI-cable could be faulty. Exchange it andrepeat the procedure. A lot of sequencer programmes have a so-called "MIDI-THRU" function whichyou can turn off. If this "MIDI-THRU" function is turned off the computer can receive MIDI-data butnot transmit it to the MIDI-OUT. You should check out this function if the MIDI-action indicator doesnot indicate any outgoing data.
When you play the keyboard you hear a different sound than the one you selected in the Sirius:Many sound cards have their own sound creator (for instance AWE32/64, Maxisound 64 etc.). If thesound card is duelly installed your sequencer software will give you the option to choose betweentwo different MIDI-outputs. If you have chosen the MIDI-output which relates to the sound creatorof the sound card, you will not be able to hear the Sirius anymore. In order to hear the Sirius you willhave to select the MIDI-output to which you have connected the Sirius.
is
The Transport window of Cubase
Here incoming MIDI-datais indicated
Here outgoing MIDI-datais indicated

Changing Sound banks and Sound programmes with MIDI:The sounds of the Sirius are systematically put in order in banks containing 96 sound programmeseach. For example: If you have composed a song on your sequencer software, and you want toswitch to a different sound within the song, you can switch these banks and programmes using MIDI.We will explain how this is done using Cubase as an example, as here there are one or two thingswhich need particular attention and care.
In our first example we want to select the synthesizer sound programme B48 of the Sirius for a com-plete Cubase track. In our case this is track no. 5 called "Synth-1". We assume that you have not yetcreated a Cubase-part, so settings apply to the complete track.
In this diagram pay particular attention to the trackinfo-box at the left of the display. If this box is miss-ing press the button in the bottom left corner of the Cubase-window. The trackinfo-box will then ap-pear. In our example only the windows "Bank" and "Prog" are important. In window "Bank" you enterthe value for the bank number of the Sirius. In window "Prog" enter the sound number.Now you will ask why you have to enter the value 256 for the B-Bank. This is a peculiarity of Cubasewhich in other sequencer programmes is dealt with a little more elegantly. There is however a certainsystem behind this which is explained in the table below. The values for the column in the Cubasedisplay must be entered into the window "Bank" of the trackinfo-box in order to select the relevantbanks of the Sirius.
Example 1:
SIRIUS-Synth CUBASE
User-Bank 0
A-Bank 128
B-Bank 256
C-Bank 384
The Sirius and MIDI
108
This is thetrack-info box
Here youenter theBank number
Here you enterthe Soundnumber
Here you canswitch theTrack info-boxon and off
To change the Synth-sound banks of theSirius with MIDI youhave to enter thefollowing values inCubase:

The Sirius and MIDI
109
Selecting the Drum sounds is a little easier as the Sirius has only two banks here.
Other sequencers allow you to sometimes change between banks with the values 0, 1, 2, 3. To dis-cover how this works with your software, please refer to you manual or simply try it out!
In this example we want to allocate the sound C87 of the Sirius to a single Cubase-Part. In Cubaseyou are able to assign a different sound to each Cubase-Part which allows you to select a new soundin the middle of a song.
In the diagram the Synth-1 Part is selected. It is "highlighted". As soon as a Part is selected thetrackinfo-box will turn into a partinfo-box. When you now enter new values into the windows of thisbox they will only apply to the selected Part. In this way you can select different sounds of the Siriusfor each Cubase-Part. NB: Information in the partinfo box is also copied when you copy a wholetrack.
SIRIUS-Drums CUBASE
User-Bank 0
A-Bank 128
Example 2:
To select the Drumsound Banks of theSirius with MIDIyou have to enterthe followingvalues in Cubase:
This is thePartinfo Box
Here youenter theBank-number
Here you enterthe Sound-number
Here you canswitch thePartinfo Box onand off

The Sirius and MIDI
110
Data-Dumping - Storing your Data!
How to Data-Dump:
Very, very important! As a safety measure you should regularly 'data-Dump' (data-save) the sounds,patterns and songs you created in the Sirius to an external sequencer or MIDI-file-player. You will doyourself and your carefully composed pieces a great favour. Even professionals in the heat of the mo-ment can delete or overwrite sounds, patterns and sometimes even whole songs! A Data-Dump isalso required when the memory of the Sirius is full and you want to store your work permanentlyonto an external device.
The Data-Dump-functions are located in the Write-menu of the Sirius from page 8 onwards. TheSirius offers four different forms of Data-Dump:
The Momentum-Data-Dump sends all currently set Parameters of the Sirius. Even the parametersthat are not stored yet. These are: the sound setting, bank and number; all system parameters fromthe System menu, common-parameters (pad-allocation, sequencer-tempo, groove-settings, effects-settings, Vocoder-settings, Arpeggiator-settings) and Mix settings. You could call the Momentum-Data-Dump a 'snapshot' of the current status of the device.
The Sound data-Dump stores the maximum no. of 480 Sirius sounds which have been stored in theUser-bank, the settings of the Percussion-sets and the Arpeggiator-motions.
The Song-data-Dump contains all stored User-motifs, User-patterns (P0-P99), Mix-parameters andsongs. A finished stored song contains the sequence of the song, the Sequencer-tempo, the Groove-settings, the effects settings of FX-1 and FX-2, the Vocoder-settings and the Arpeggiator-Settings.
When you select All-data-Dump, a Sound- and a Song-data-Dump will be sent immediately one af-ter the other.
In the following section we will explain to you step by step how you can Data-Dump Sirius data ontoa computer using Cubase. This procedure should be much the same for all good-quality sequencingsoftware, as the principle is the same.Should you not have any sequencer-software installed on your computer you might want to use aspecial Back-up programme. These programmes are mainly (as shareware and freeware) availablefree of charge. One of those programmes is for example “Dumpster” for the PC which you can getfrom our home page on the Internet.When performing a Data-Dump always make sure that the MIDI-Out socket of the Sirius is con-nected to the MIDI-IN socket of your computer or MIDI-inferface. Only then can the data of theSirius get to your computer.
1. Momentum-Data-Dump (Write-menu, page 9):
2. Sound-Data-Dump (Write-menu, page 10):
3. Song-data-Dump (Write-menu, page 11):
4. All-Data-Dump (Write-menu, page 12):
! !

The Sirius and MIDI
111
Basic settings for Data-Dumps to Cubase:First you should start a new Cubase-file. Create a new track and choose the setting "Any" or "OM" forthe channel. If your Cubase is set the way it is in our diagram, you are primed for Data-Dump.
A Data-Dump of the Sirius consists of so-called system-exclusive MIDI-data. It is therefore vital for anerror-free Data-Dump that Cubase is in a position to take on such data. You will have to click the en-try 'MIDI-filter' to be found in the Cubase-menu "Options". The following window will open:
Now click with your mouse into the circled in areaon the left-hand side. When the tick has disap-peared you can close the window again by clickingOK. Cubase is now ready to receive a Data-Dump.
Now press the WRITE-key of the Sirius to open the Write-menu. With the PAGE/BANK-keys selectthe type of data-Dump you wish to perform, eg. the Sound-Dump:
<9> Send Sounds?[Ok]
When you click onthis tick it willdisappear. TheSysEx data-filter isthen turned off.
Any

The Sirius and MIDI
112
Now start the recording in Cubase. Once the pre-count is finished and the recording starts in Cubasepress the F1 key under the Sirius-display [ok] to initiate the data-Dump. The display of the Sirius isnow showing that the data-Dump is being sent. An increasing bar informs you of the progress.
When the circled Cubase MIDI activity-indicator in the following diagram is constantly lit, the com-puter is receiving the data-Dump.
Once the data-Dump is complete, the display of the Sirius is briefly showing "ok!" and then jumpsback to the previous page. A further indication that the data-Dump is completed is the activity indi-cator in Cubase which will now be permanently off. Cubase now allows you to save this data-Dumponto the internal hard drive of your computer or onto a floppy disk.
Naturally you will at some point want to send the stored data-Dump(s) back to the Sirius. Fortunatelythis is much simpler than the recording. You need to have the MIDI-IN socket of the Sirius con-nected with the MIDI-OUT of your computer or MIDI-interface. Once you have done this, load thestored data-Dump from your hard drive or floppy into Cubase. All you have to do now is to start thereplay of Cubase. As soon as Cubase is running and sending the MIDI-data the Sirius is showing thefollowing message in the display:
That´s it! You will not have to set anything to receive a data-Dump on the Sirius. Just make sure thatyou are receiving on the same system channel you used for data-Dumping. Setting the system chan-nel is explained in the chapter about the System-menu of the Sirius.
Sending...
System-Exclusivemessage received
How does the Data-Dump get back to the Sirius?
When this indicator is lit yourcomputer is receiving MIDI-data.
Click on this button to start therecording in Cubase.
The transport window in Cubase
See page 94

The Sirius and Cubase
113
The Sirius and Cubase:
Synchronisation of the Sirius to Cubase:
The one question that is most frequently asked on our hotline refers to how our products work to-gether with a sequencer programme. Here we were able to notice that the Steinberg Cubaseprogramme (also recommended by us, by the way) is the most popular. We will therefore answer themost important questions using Cubase for reference. Procedure and relevant parameters can inmost cases be adapted for use in other sequencer programmes ( for example Logic or Cakewalk) be-cause the functions discussed are practically a pre-requisite for any self-respecting softwareprogramme.
At this point we would like to advise that shareware-sequencers and Light- and Demo-versions haveserious operational restrictions. It is possible that such programmes can not process SysEx-data (im-portant for MIDI-data-Dump), or cannot be synchronised to external devices or perhaps cannot storefiles.
We urgently advise you not to work with pirate copies of Cubase or Logic. First of all it is il-legal, and secondly these "Cracks" are totally unstable as both the Edit and Storage capabilities de-pend entirely on either a 'Dongle' or, usually in the case of Macintosh versions, an 'Authorisation Key'.You are better off investing in a licensed version of the software which will provide you with regularupdates and saves you from system errors and data loss just when the pressure is on.
From time to time it is necessary to synchronise the Sirius with another MIDI-device (for instance aComputer with Cubase or a drum computer). This means that the connected devices will be workingto one midi-clock and will therefore run at the same tempo. Another advantage of such Synchronisa-tion is that you can start and stop the devices simultaneously.
In order to set up a synchronisation you will first have to decide which device is to drive the beat, orin other words, which device's midi-clock is controlling all the other midi devices. This device willthen be the ' and passes on all its clock information to the device or devices you want to syn-chronise it to. These secondary devices are known as '. The Sirius can work as Slave or Master.Which setting is best for which situation is also explained in this chapter.
Cubase offers a generous choice of different synchronisation procedures which for a non-professionalcan be quite confusing. You have the options to synchronise your computer with tape machines,hard disc recorders, even video decks. Sometimes External Sync sources can be formats such asSMPTE, LTC, VITC, EBU or MIDI TIMECODE (MTC) and are often used to meticulously control anumber of devices simultaneously.
For our purpose (to synchronise the Sirius to Cubase) we have opted for the most simple Sync.-format: the MIDI-Clock. The MIDI-Clock consists of three important Parts: the "Start" command, the"Stop" command and the tempo of the clock itself. This clock is sending tempo information with agap of only one-96th of a note as a synchronisation signal to the Slave(s). The Slave(s) will thereforealways know exactly where the Master is within each bar of the pattern or song. Both devices arethen 'running in sync'.
To try out the following examples you must connect the MIDI-IN-socket of the Sirius to the MIDI-OUT-socket of the Computer and the MIDI-IN-socket of the Computer to the MIDI-OUT socket ofthe Sirius.Examples, diagrams and instructions regarding the MIDI-connection of the Sirius with a computerand other MIDI-devices can be found in the chapter called: "MIDI-connection-examples with theSirius"
Caution:
really
Master''Slaves
!
See page 102

The Sirius and Cubase
114
The Sirius as Slave:In order to make the Sirius a Slave you simply press the SYNC.EXTERN-key. The key should now belit and the following is shown in the display:
When you now press the PLAY-key of the Sirius you will notice that it will still start. Do not worry.This is to avoid the device being stopped by accidentally pressing the SYNC.EXTERN-key. But as longas the display shows "EXT" the Sirius is waiting for the start-command from Cubase's MIDI-clock. Toget Cubase to send its MIDI-clock, select the option "synchronise" from the Options-menu. The fol-lowing diagram shows you which settings you have to confirm in this menu.
Confirm the changes in this window with OK. When you now start Cubase the Sirius will also start.When you stop Cubase, the Sirius also stops. Because the Sirius understands the so-called 'Song-positon-pointer' you do not always have to start Cubase at the beginning of the song. The tempo isnow set in the transport window of Cubase because Cubase is the Master.This set-up is totally geared to synchronising a sequence of a song or a pattern in the Sirius to a Songcreated in Cubase.
Let´s now do it the other way round: Now we want the Sirius to be the Master and to start Cubase.You will have to switch the synchronisation of the Sirius back to internal (INT). To achieve this eitherpress the SYNC.EXTERN-key twice or start and stop the internal sequencer of the Sirius with theSTART- and STOP-keys. Also make sure that the Parameter TxClock on page 11 of the System-menuis set to "ON" (factory setting).
1: Untitled EXT(STOP) _______
The Sirius as Master:
In this example youcan ignore theParameters. Thesettings shown herecan however becopied over if yoursshould differ.
In this window youselect the MIDI-Out towhich you haveconnected your Sirius.
See page 96

115
The rest has to be set in Cubase. As in the previous example, open the window "synchronisation" inthe Options-menu. The required settings can be seen in the diagram below:
After entering the parameters click OK to close the window. To activate the settings you only have topress the sync-button in the transport window.
When you now press the PLAY-key on the Sirius, Cubase is automatically started as well. Try and turnthe TEMPO-dial of the Sirius or tap in a new tempo into the Sirius. You can now watch how thetempo indicator of Cubase is changing in sync with the display informaton of the Sirius. As soon asyou hit the STOP-key of the Sirius, Cubase will also stop.
The Sirius and Cubase
In this window youdefine that Cubase issynchronised to anexternal Midi-clock.
In this window you setthe MIDI-In to which theSirius is connected.
Tempo indicator
MIDI activity indicatorfor in- and outgoingMIDI-data
The transport window of Cubase
When the Sync-button is pressed, Cubase can receive andwork with the incoming synchronisation signal (Midi-clock).

The Sirius and Cubase
116
When Cubase is set as in the above illustration, you can start recording.
Recording Sirius-Pattern and -Songs into an external sequencer:To record patterns of the Sirius with Cubase it is first of all important that you synchronise both de-vices to each other. This is best done by selecting the Sirius as Master like we did in our previous ex-ample. Cubase is the Slave again. If the synchronisation works as in our previous example you willonly have to make one setting for the Sirius. Open page 4 of the System-edit-menu and set the Pa-rameter "Local" to "OFF". The menu-page should now look as follows:
In this mode, note and MIDI-controller information which the sequencer of the Sirius creates is notbeing sent directly to the internal synthesizer of the Sirius. The Data is now being sent directly to theMIDI-OUT-socket of the Sirius and into your computer and is being 'housed' within the computer.The data can then return to the Sirius through the MIDI-OUT socket of the Computer. So make surethat the MIDI-OUT-socket of the Computer is connected to the MIDI-IN-socket of the Sirius - other-wise you will not be able to hear anything.
The Cubase is receiving and sending MIDI data when you can see the MIDI activity indicator in thetransport window is active (Atari) or lit (PC and Mac).
If everything works you can start your recording. First create a Part which corresponds in length tothe pattern you want to record. For the MIDI-channel of this Part select the setting “All”, "Any" or"OM" (depending on your sequencer programme). When your settings look like the following inCubase, then you have done the right thing.
Edit System/Midi<4> Local: OFF
Any

117
Now click on the record-button in the transport window of Cubase. Of course Cubase won´t startyet - it is waiting for the start command from the Sirius. So now press the PLAY-key of the Sirius.Cubase will now record. To end the recording press the STOP-key of the Sirius.Should the recorded part go beyond the right locator (is longer than the desired pattern or songlength), just cut it off with the scissors from the toolbox at the desired point.
All the recorded tracks of the Sirius are now in one Part. To give every track its own part Cubase of-fers a practical function: Remix or demix. This function can be found in the structure-menu. To applythe function first select the Part (see background diagram) and click the function as displayed in theforeground diagram.
The Sirius and Cubase
The Cubase toolbox. You open itwith a click on the right-handmouse button.
The rubber deletes Parts
The scissors allow you to cut the Part
The glue-tube allows you to paste the Parts
The X mutes the Parts
Before the DemixTo demix open this menu
After the Demix
Any
Any
Saving and Storing
118
What is stored and where it is stored:
1.) The Sound storage places:
2.) Motif-Storage places:
3.) Arpeggiator-Motion-Storage places:
4.) Pattern-Storage places:
5.) Song-Storage places:
For a sound, all sound parameters as well as settings of the Arpeggiator, Gaters or Chord-Triggers arestored. The Arpeggio-Motions (customised polyphonic sequences included) are however stored inspecifically reserved storage places (see point 3 of this section). If you have used a self-created Arpeg-gio in your sound only the motion-number and the performance parameters like for instance the reso-lution, velocity etc. are stored there.For the Drum and Percussion-sounds the allocation of the Arpeggiator cannot be stored. The follow-ing storage spaces are available for your sounds.
The User-motif stores the MIDI-notes played into the Sequencer of the Sirius. User-motifs are auto-matically stored when you quit the drumgrids or the Realtime-Record and the Step-Record functionsof the Sirius and activate the next available User-motif storage space for the selected Part. A User-motif is also the place where realtime controller sequences, like for example a recorded performancewith the pitch-bend Wheel, are stored.For the User-motifs you have available.
Arpeggiator-motion mode stores all the patterns of the Arpeggiator which you have performed or pro-grammed are to be stored. This can also include polyphonic Arpeggios. In this mode you do not onlystore the rhythm but also the length of the Arpeggio-motion, the timing of the Steps, the Gate timeand the Velocity of each step. After editing the Arpeggio-motion, it can be stored using the Writemenu to one of the available.
In a User-pattern you store the Motif-allocation, the Storage space numbers of the sounds used in thepatterns, the Volume of the 7 Parts, the Panorama, the settings of the FX-sends as well as theVocoder-Routing and the set Groove-factor. In every User-pattern the Routings for the internal Ana-lyse- and Carrier-Parts can be freely allocated.To store your own User-pattern you have available.
In the SIRIUS, are available to you. For each song- step you can store one ofthe 100 different user-patterns, the length of the step, the settings of the Mutes for the 7 Parts andthe transposition of the Synth-Parts. In addition the following information is stored within a song: thesettings of the Effects-processors, the Tempo of the Song, the chosen function for each of the 16 num-ber-keys (pattern, breaks and special loop-tracks), the Vocoder-settings (volume and panorama posi-tion of the single Vocoder-Bands, Bypass-level Parts of the Low- and the Highpass-filter and the se-lected Vocoder preset).
96 for Kick/BD-Sounds96 for Snare-Sounds96 for Hihat-Sounds96 for Percussion-Sounds (consisting of complete Percussion-sets)96 for Synth-Sounds
100 storage places for each of the 7 Parts
9 Arpeggio-motion-storage places
100 User-Storage places
16 song-storage-places

Saving and Storing
119
6.) Basic Vocoder-programmes (Presets):
7.) Storage places for Percussion-Sets:
What are Vocoder-presets? As all the settings of the Vocoder (volume, panorama position of the sin-gle Bands, Bypass-level, Parts of the Low-and Highpass-filter and the basic programme selection) arestored in a song, this question is important. In one of the (Presets)you can change the frequency, tonal quality and decay-time for each Band. These Parameters haveto be set for Analyse and Carrier -signals separately. This can offer even more possibilities for experi-ments. Programming these functions is very complex and requires a certain amount of experiencewhen dealing with a Vocoder, namely a full understanding of System-Exclusive-data. A list of the sys-tem exclusive data formats of the Sirius can be found in the Annex of this Manual.
You may store your own Percussion sets in one of the 20 Percussion Set Storage places. Like with theVocoder-Presets you will overwrite one of the factory stored sounds. In a Percussion-set you store thesound, the Tuning, the volume, the panorama, the FX-send-settings as well as the allocation of thekeyboard keys to each Percussion-instrument. A Percussion set consists of 12 Sounds which can befreely spread over one octave. The saving of a Percussion-Set is performed automatically by theSIRIUS as soon as you quit the selected edit level.
16 basic Vocoder-programmes
Caution: When you programme the Vocoder you will always change the Vocoder Preset(programme) you have currently selected. You should therefore make sure that you do not de-lete or change anything you still need by mistake. The Vocoder Presets are, even after editing,not totally lost - they can be re-called by initialising.
Caution: During the programming you will always change the currently selected Percussion-set.You should therefore make sure that you don´t delete or change anything you still need by mis-take. The factory Percussion-sets are, however, not totally lost - they can be re-called by initialis-ing.
!
!

Snare-Wave-Macros
0 606Snar11 606Snar22 808Snar13 808Snar24 808Snar35 909Snar16 909Snar27 DrySnar18 DrySnar29 EfSnare110 EfSnare211 EfSnare312 EfSnare413 EfSnare514 FlSnare15 HipSnar16 IndSnar117 IndSnar218 LinSnar119 LinSnar220 LinSnar321 MS20Snar22 Noise123 Noise224 Noise325 PCMSnare26 PicSnare27 PitIndSn28 Pit606Sn29 RomSnar130 RomSnar231 Snare132 Snare233 Snare334 Snare435 UnivoxSn36 808Claps37 909Claps38 HandClap39 DirtyClp40 DirtClp241 LongClap
Hihat-Wave-Macros
Synth-Wave-Macros
0 606HiHat1 808HHat12 808HHat23 909HHat24 HiHats5 LinHHat16 LinHHat27 MS_20HH18 MS_20HH29 NatHihat10 NHiHat_111 NHiHat_212 UniVoxHH
0 V_Sine1 V_Triang2 V_TrianD3 S_Triang4 S_TrianM5 V_Trapez6 V_Rect_17 V_Rect_28 V_Pulse19 V_Pulse210 V_Pulse311 V_Pulse412 V_Pulse513 V_Pulse614 V_Pulse715 S_Rect16 S_Puls5017 S_Puls7018 V_Moog19 V_Form_120 V_Form_221 V_Form_322 S_Saw23 V_Saw_124 V_Saw_225 V_Saw_326 V_Saw_427 V_Sync128 V_Sync229 V_Sync3
30 V_Sync431 V_Sync532 V_Sync633 V_Sync734 Spectr_A35 Spectr_B36 Spectr_C37 Spectr_D38 Spectr_E39 Spectr_F40 Spectr_G41 Spectr_H42 Spectr_I43 Spectr_J44 Noise45 S_TriRec46 S_SawRec47 S_TriSaw48 SpectrAD49 SpectrAE50 SpectrAF51 SpectrAI52 SpectrBC53 SpectrBF54 SpectrBG55 SpectrBH56 SpectrBJ57 SpectrCI58 SpectrDE59 SpectrEH60 SpectrEJ61 SpectrFG62 SpectrFH63 SpectrFI64 SpectrFJ65 SpectrGH66 SpectrGI67 SpectrGJ68 SpectrHI69 SpectrHJ70 Sequenz171 Sequenz272 Sequenz373 Sequenz474 Wetbass175 Wetbass276 Sawtoot177 Sawtoot2
78 Sawtoot379 FatStack80 FatDirty81 HohnerSt82 SlowOrch83 MoogDeep84 DeepSine85 TB_Bass186 TB_Bass287 TB_Bass388 TB_VeloB89 Sync_190 Sync_291 Up_Sync92 MalChoir93 Mellotrn94 VS_Bell95 VS_Deep96 VS_Fat97 VS_Spect98 VS_Wave99 VS_VOICE100 Effect101 SpecStrg102 SuprStrg103 SeqPad_1104 SeqPad_2105 ChorStrg106 SuperFat107 FatVoice108 Saw_Orch109 Fat_Solo110 Effect_1111 Effect_2112 Effect_3113 Effect_4114 MZapBas1115 MZapBas2116 808TunBd117 NoiseSeq118 BellStrn119 SequFat1120 BasStrng121 SequFat2122 Wet_Fat123 Hohn_Wet124 PowrChrd
Kick-Wave-Macros
0 606Bass1 808DKick2 808Kick13 808Kick24 808Kick35 808LKick6 909Kick17 909Kick28 909Kick39 909Kick410 909Kick511 AmbientK12 AnaKick413 BD_Shot114 CallKck15 ClipKick16 D_Kick117 D_Kick218 D_Kick319 D_Kick420 D_Kick521 DepKick22 DistorBD23 DomKick124 DomKick225 DomKick326 HipKick27 KickMe28 KickShrt29 KicRev30 KlickKic31 KxiuKick32 LinnKick33 LngKick34 LongBD35 MasKick136 MasKick237 ModDyn238 ModKick139 ModKick240 MS_Kick41 PDistKk142 PDistKk243 PDistKk344 PDistKk445 PDistKk546 PDistKk647 RomKick148 RomKick249 RoomBDrm50 ShortBd51 ShrtKck152 ShrtKck253 UniVoxBD
List of Wave-Macros
120

Percussion-Intruments
0 12_Tom1 12_Tom_D2 14_Tom3 14_Tom_D4 16_Tom5 16_Tom_D6 606Bass7 606CloHH8 606Cymb9 606HiTom10 606HTom211 606LoTom12 606MeHat13 606OpnHH14 606Snare15 808CloHH16 808ClHH217 808Clap18 808Clave19 808Cymb20 808DKick21 808HiCon22 808HiTom23 808Kick124 808Kick225 808Kick326 808LKick27 808LoTom28 808MeTom29 808OpHH230 808Rimsh31 808Snar232 808Snar333 808Snare34 909Clap35 909CloHH36 909ClHH237 909Cras238 909Crash39 909HiTom40 909Kick141 909Kick242 909Kick343 909Kick444 909Kick545 909LoTom46 909MeTom47 909OpHH248 909Ride49 909Rimsh
List of Percussion-Instruments
121
50 909Snar151 909Snar252 Ambient53 Blecher154 Blecher255 CallKick56 Camera_157 Camera_258 Camera_359 Camera_460 ClipKick61 CloseHat62 Cng1Mute63 Cng1Palm64 Cng1Slap65 Cng2Mute66 Cng2Palm67 Cng3Ot68 Cng3Palm69 Cng3Slap70 CngMffl71 CngMute72 CngOpen73 CngOtOf74 CngOtOf275 CngOtOff76 CngPalm77 CngSlap78 CngSlOf79 CngSlphd80 CngTips81 D_Kick182 D_Kick283 D_Kick384 D_Kick485 D_Kick586 DeepShak87 DeepKick88 DirtClap89 DirtClp290 DirtHH91 DistorB92 DoomKick93 DomKick294 DomKick395 DrySnar196 DrySnar297 DstTomHi98 DstTomLo99 DstTomMi100 Effect1101 EfSnare1
102 EfSnare2103 EfSnare3104 EfSnare4105 EfSnare5106 ElHiTom107 ElLoTom108 F_Drum1109 F_Drum2110 F_Drum3111 F_Drum4112 F_Drum5113 F_Drum6114 F_Drum7115 F_Revs1116 FingSnip117 FipSnap118 FlngClp119 FlSnare120 Gap_Zip2121 HH1Closd122 HH1Open123 HH2Closd124 HH2Open125 HighStck126 HipKick127 HipSnare128 Huuhh129 IndSnare130 IndSnar2131 Ito_Hdmt132 Ito_Hdot133 Ito_Hds134 Ito_Ldm135 Ito_Ldot136 Ito_Lds137 Iya_Ahdo138 Iya_Ahds139 Iya_Hdm140 Iya_Hdot141 Iya_Hds142 Iya_Ldm143 Iya_Ldo144 Iya_Lds145 KickMe146 KickShrt147 KickRev148 KlickKic149 KxiuKick150 LFO151 LinCabas152 LinCrsh2153 LinnClHH
154 LinnClap155 LinnClp2156 LinnCong157 LinnCowb158 LinnCrsh159 LinnHHMC160 LinnHHSC161 LinnKCKF162 LinnOpHH163 LinnStck164 LinnTamb165 LinnTom1166 LinnTom2167 LinnOpHH168 LinSnar1169 LinSnar2170 LinSnar3171 LinTom1H172 LinTom1L173 LittlPer174 LongKick175 LngKick2176 LoopClap177 LoopShak178 LoopSnap179 Lopmatic180 Low_Zip1181 MasKick1182 MasKick2183 Metronom184 ModDyn2185 Modular1186 Modular2187 MoogZap1188 MoogZap2189 MS_20_HH190 MS_20_Sn191 MS_Kick1192 MTom193 NCHHFoot194 NClHH195 NormClap196 PDstKic1197 PDstKic2198 PDstKic3199 PDstKic4200 PDstKic5201 PDstKic6202 PCMSnare203 PicSnare204 PowrChrd205 Print_2
206 Ride207 Ride2208 RingPer1209 RingPer2210 RomKick2211 RomKick212 RomSnar1213 RomSnar2214 RoomBDrm215 Shorty_1216 Shorty_2217 Shorty_3218 ShrtBDrm219 ShrtKick220 ShrtKck2221 ShrtZip1222 Sirene223 Snare1224 Snare2225 Snare3226 Snare4227 Sp12Meta228 Sp12Tom1229 Sp12Tom2230 Sp12Tom3231 SpCrash232 Steam233 Ticker234 Tubus235 Udus1236 Udus2237 Udus3238 Udus4239 UniBDrm240 UniVoxCH241 UniVoxOH242 UnivSnar243 808Cowbl244 LittlePL245 LowZipLp246 RingPgLp247 RingPLp2248 Short1Lp249 Short2Lp250 Short3Lp251 ShrtZipL252 FDrum1Lp253 FDrum2Lp254 FDrum3Lp255 BlecherL

A59 Pump909A60 DancKickA61 DutchA62 DaftkickA63 ZannZ BDA64 House 1A65 Dist-808A66 808 Kic2A67 ReverbKkA68 808XFettA69 808 HighA70 Big 808A71 BigPitchA72 PitcherA73 Fluf808KA74 BumpiA75 808Kick1A76 PunchKicA77 Deep 808A78 Gummm808A79 Clean808A80 C.P. 808A81 PitchKicA82 ElektroKA83 ElekShotA84 SFX-KickA85 Big \A86 DirtySFXA87 PlusklasA88 DeepEnouA89 HerzShlgA90 Far NoizA91 AW-BrainA92 LavaseeA93 CascadeA94 BuckhardA95 Lift-OffA96 Calculat
A01 ShortyA02 HipSnareA03 ClearA04 Linn1A05 PCM Sna1A06 ShortSnrA07 ReverbA08 DeepTrasA09 HipHopSDA10 DrMnBsSdA11 NatSnareA12 MelloSndA13 16 TomsA14 Egon HalA15 Hi Snare
Snare-Sounds
A16 DB SnareA17 DirtyShtA18 ShortBigA19 NoiseSnrA20 NonameA21 MachineA22 HighSnarA23 LoFiSnarA24 NoFiSnarA25 HallsndA26 SniffSndA27 RachgSndA28 MouthSndA29 FatsA30 Delayed1A31 Delayed2A32 MetaleadA33 UnivoxA34 606 SnarA35 606Snar2A36 DryLowA37 MS 20SnaA38 NoiseSnrA39 PactroniA40 EventticA41 LinnResoA42 ElectroA43 SnipsnarA44 TickerA45 CliksnarA46 RollsnarA47 HypasnarA48 NoizclapA49 909 1A50 909 2A51 909 HighA52 909High2A53 BadTunedA54 FilterVLA55 Pitch EGA56 PitchEG2A57 MellwSndA58 HouseSndA59 DanceSndA60 909 SndA61 Carpt909A62 Short909A63 Reso 909A64 Velo 909A65 808 1A66 808 2A67 DeepTundA68 StoppedA69 808 3A70 808HipasA71 808Hips2A72 HighEndA73 808Snar1
A74 808Snar2A75 808Snar3A76 808Snar4A77 808VeloA78 808SnappA79 808BottmA80 808 HPA81 Scratch!A82 ModulateA83 NoiseModA84 QM-HighA85 Short@YYA86 EffectorA87 ReverseA88 NoSenseA89 DropjeBBA90 Dry DropA91 BloodA92 WindSnarA93 DjackaA94 1943A95 WirbelXTA96 Sweepeea
A01 NatHiHatA02 RockHihtA03 NHiHat-1A04 BlechA05 Highpas1A06 Highpas2A07 Highpas3A08 Highpas4A09 ButterHHA10 JazzHatA11 LuschigA12 TinHihatA13 LofihatA14 DynaLinnA15 8.8 monoA16 HAT monoA17 ModulateA18 ThorA19 ShortyA20 TakethisA21 Pitch EGA22 PitchEG2A23 PitchEG3A24 PitchEG4A25 WolligHHA26 AgressivA27 Mean HHA28 BlechHHA29 DirtechoA30 Highecho
Hihat-Sounds
Kick-Sounds
A01 HipKickA02 WetKickA03 StoppedA04 DeepKickA05 MediumA06 DirtyA07 AttackBDA08 BasketA09 StaubigA10 UltraDryA11 SuperDryA12 NormalKcA13 ClassicA14 FootkickA15 Big TomA16 RockickA17 Ultra!A18 Big KickA19 BigDirtyA20 MondoKicA21 BoomA22 Rat!A23 DeeperA24 ClipKickA25 MelloKckA26 Pump ItA27 NL-KickA28 The GridA29 TammBDA30 RaffkickA31 BlamkickA32 SlamkickA33 CallKickA34 PitchA35 LogikickA36 ToneKickA37 DindadaA38 ModularA39 SpecialA40 606KickA41 HardAttkA42 StaubA43 ZunchKicA44 FormantA45 SplattA46 HiLoA47 DiscusA48 GlidekikA49 909 1A50 909 2A51 909 3A52 909 4A53 909 5A54 Dirty909A55 Dirty 2A56 Mod 909A57 Knall:-)A58 HouseKic
List of Drum-Sounds
122

A31 GlitschA32 SlitschA33 UnivoxA34 DirtyA35 NaturaA36 ModulateA37 Modulat2A38 MS 20A39 MS 20PitA40 SiriusA41 DirtyHH1A42 MetalicA43 MesserHHA44 LongMSA45 ZippiA46 CrackleA47 NoizehatA48 LFO-HattA49 909 HatA50 909 HighA51 909CutEGA52 909**-**A53 HipHopA54 HigherA55 LFOA56 ResonancA57 909HP+A58 Short909A59 Norm-909A60 Worm-909A61 909itschA62 HAT LFO1A63 HAT LFO2A64 909 monoA65 808 1A66 808 2A67 Short808A68 ModulateA69 RoqueYA70 DJ"BestA71 TrickyA72 RemixA73 DanceHHA74 NaturellA75 808TicklA76 SwiftHHA77 CR-808A78 808 ??A79 Delay808A80 Bad 808A81 Modulat2A82 PitchChgA83 ShortTacA84 UnikatA85 Mad HHA86 PingPongA87 GogoA88 Q Wa Dis
A89 IndustA90 ModulSndA91 Aua-HHA92 God-HHA93 MaybeamA94 VinylhatA95 GongsA96 Bubbles
A01 FilterItA02 LatinA03 DanceA04 ShortSetA05 ResPercA06 Cut ThisA07 WavesA08 ShatterA09 Percus1A10 GroovSetA11 HouseSetA12 WierdPecA13 PowerTomA14 PowerA15 Good ForA16 ClapClapA17 DistortoA18 Distort2A19 LamburaA20 Attack1A21 Attack2A22 LoFi 1A23 LoFiPercA24 LoFi 2A25 MuffeligA26 Be FxedA27 SomeFunkA28 GrooveDTA29 MaharishA30 AboriginA31 PoonaA32 MahamonoA33 Linn SetA34 Linn 2A35 LinnShrtA36 TotalConA37 DeepNoisA38 X_TransfA39 Y_TransfA40 ZipZapA41 Electro2A42 Mega-PecA43 PerfectA44 MindburnA45 E-D-SA46 Pitching
Perc-Sounds
List of Drum-Sounds
123
A47 SwishiA48 SritshiA49 StandardA50 MfcA51 WestbamA52 BingoA53 ReverseA54 Short909A55 Short HPA56 CondensdA57 HopSet 1A58 GatePercA59 GroovSetA60 FatePercA61 Hifreq 9A62 Daft1SetA63 Lofi 909A64 Groov HPA65 808 SetA66 QuasarA67 Short808A68 NewKitsA69 PluckedA70 PitchedA71 LirasisA72 Sir^iusA73 DrmBass1A74 DanceSetA75 Tanz-SetA76 MAD-PercA77 Hifreq 8A78 Daft2SetA79 Lofi 808A80 Groov FxA81 ElectroA82 ModulA83 MoreFun!A84 SuperFX1A85 SuperFX2A86 SuperFX3A87 Animals?A88 Help!A89 EffektedA90 SatePercA91 TablatoiA92 StrangeA93 L-R-U-DA94 ARPEG-DRA95 Vari FX1A96 Vari Fx2

A58 PercularA59 BottomA60 SequenzCA61 Into SpaA62 AmbientTA63 ChorSeq!A64 <SynthiYA65 ArpeggioA66 TrancerA67 Goa !A68 Arpeggi2A69 Trancer3A70 HardSeq!A71 SyncSyntA72 SequenzAA73 Techno!A74 FilterS1A75 HighSeq2A76 UpperClsA77 Syncer2A78 OrgeltonA79 OrcSoloA80 PulsSoloA81 VocoderCA82 Filter^!A83 ZipperA84 TinyDirtA85 SwallowA86 FXPadA87 Psychos*A88 LushPad2A89 RhythmFXA90 AtmoA91 DreamsA92 AtomOrcA93 PsychoaA94 Pre�NatA95 Mello UpA96 Cult
B01 WetBassB02 TrancerB03 WetFiltrB04 ModuloBXB05 Mod BassB06 FatBoyB07 WetLongB08 PercBassB09 DiscoBasB10 DA HoolB11 SineBassB12 XenoBassB13 TranceBSB14 Filter!
Bank B
B15 WaveBassB16 StoppedB17 DownSwepB18 ForteB19 LuckyBasB20 SaverSexB21 303VeloB22 Detune!B23 MixBassB24 ShortBasB25 Synced!B26 JenY?B27 BitterfdB28 EraserB29 VoiceBasB30 IntroBasB31 Classic!B32 Classic2B33 VS SpectB34 Fat PadB35 LushSpecB36 HohnerB37 AntiSwepB38 HighSwepB39 BigSwepB40 StringsB41 SeqPadB42 TangramB43 PolySyntB44 FastStrgB45 HighSyntB46 Long PadB47 Mod Pad1B48 RisingB49 Edgar FB50 ClavinetB51 BellsB52 SequentB53 SoftSeq1B54 ModPluckB55 |P|C|B|B56 PercoChdB57 SpectralB58 PercuterB59 KraftwerB60 Sequenz1B61 InMotionB62 InMotio2B63 Sequenz1B64 AncientB65 LuckySolB66 Filt SolB67 FluteSolB68 SinSequB69 WestwoopB70 Eastbam2B71 Eastbam3
Synth-SoundsBank A
A01 WetBass2A02 SineBassA03 CoolBassA04 ModuloBXA05 Mod2BassA06 FatBoyA07 WetLongA08 Wet&BassA09 DiscoBasA10 *Atom*A11 PercSineA12 ResoBassA13 TranceBSA14 Filter!A15 WaveBassA16 DeepBassA17 DirtSyntA18 Dirt309A19 LuckyBasA20 SaverSexA21 303VeloA22 VeryDirtA23 MixOctA24 ShortBasA25 GuitarBsA26 S-FasterA27 FatDirtyA28 ZapBassA29 SawBassA30 PPG-BassA31 WetMoog!A32 StringBsA33 Shine OnA34 VS ChorA35 BrightPdA36 ShimmerA37 ChorA38 MellotrnA39 SentinelA40 TubularPA41 TecPadA42 SpectralA43 GateSyntA44 SwallowA45 OrchestrA46 Deep PadA47 Jet Pad1A48 Big PadA49 PicantA50 ClavonitA51 FloatingA52 QuintchdA53 ShortSeqA54 ModSequaA55 Block CA56 PercoA57 Spectacu
List of Synth-Sounds
124

C29 InstableC30 Bass ???C31 BasslineC32 309 BassC33 X-VoiceC34 KoyaaC35 StrangePC36 EnfrhmkiC37 Rel-Pad1C38 D.I.AugeC39 Deep-PadC40 StoffichC41 WunderPDC42 DunePad1C43 Feel It!C44 Juno-OrgC45 HistringC46 PortellaC47 DigistrxC48 DigichorC49 Psycorg2C50 TadavocC51 MellowsC52 MadseqC53 HouseOg1C54 HouseOg2C55 DigiDrmC56 ShibuyaC57 OrbitPnoC58 TrancerC59 WaterSynC60 PKS-50BsC61 SequBellC62 BanjojoC63 PsycorgC64 ClavityC65 SolojamC66 BigsoloC67 Hot FatC68 Wheel itC69 Cosmic BC70 TecnoSynC71 AngelVoxC72 TechSeqC73 OrbiBellC74 MindSoloC75 VCASoloC76 FSOLseqC77 QuintorC78 FlangeC79 ResoLeadC80 SynclineC81 FilterEGC82 GalacticC83 KotzrobbC84 CrazykorC85 SpaceChr
C86 LFO-PadC87 FSOLbellC88 UFO-FlyC89 LophoLFOC90 SpaceAmbC91 Fat-GuitC92 UFOworldC93 LFO NoizC94 Funky FXC95 LFOitschC96 GoaFix
B72 EastbamCB73 DA CoolB74 HighSeq1B75 SynSequB76 UpSyncB77 SyncerB78 FatSoloB79 OrcSoloB80 DirtySolB81 EffectorB82 Filter^!B83 ZipperB84 Organ 1B85 SwallowB86 FXPadB87 GuitarB88 LushPad2B89 RhythmFXB90 AtmoB91 DreamsB92 AtomOrcB93 ForceMaB94 Pre�NatB95 Mello UpB96 FuturSir
C01 Junky CPC02 GliderC03 Acid ModC04 D+BASSC05 PizzaBssC06 OffBeatC07 DeepHausC08 Funk-ManC09 FroggerC10 PhaseBasC11 MKS-50BsC12 UltraBasC13 Funky HKC14 202 BassC15 SlfobassC16 Mod'BassC17 SH-XC18 NovaBassC19 80s LeadC20 BoardC21 REBIRTH2C22 80s BassC23 Pad-BassC24 Bi-BassC25 Masse XC26 303likeC27 REBIRTHC28 WeichBas
Bank C
List of Synth-Sounds
125
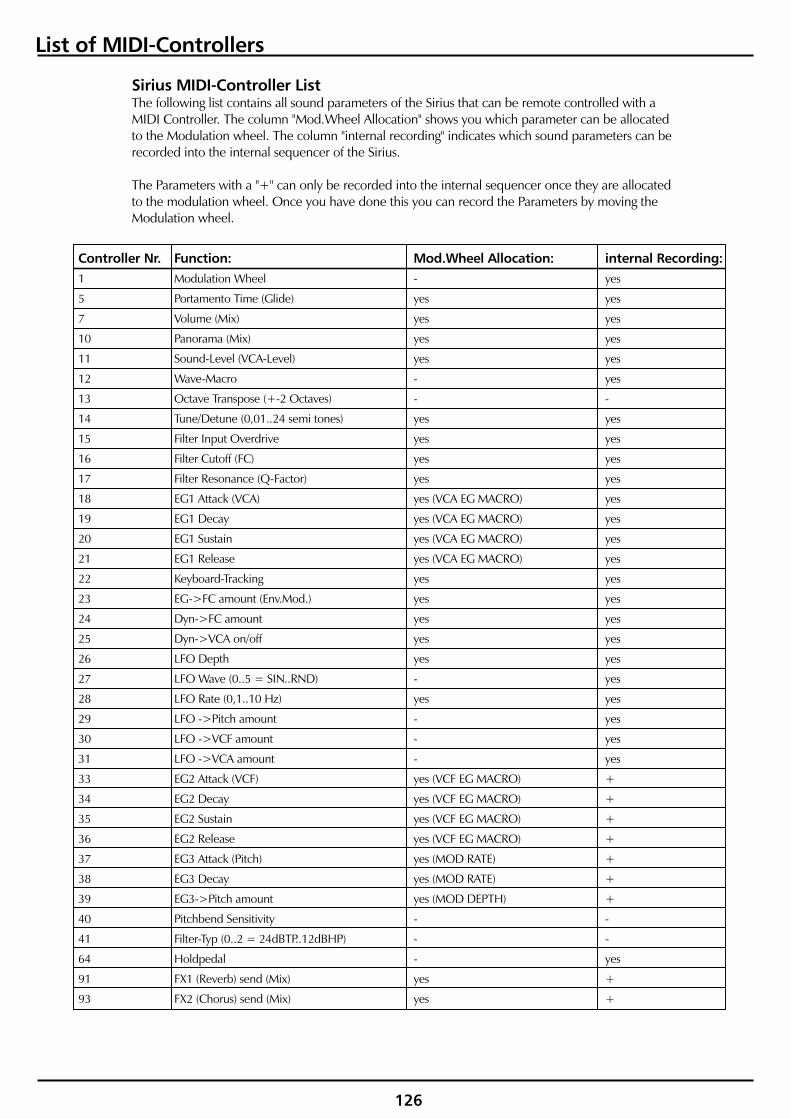
List of MIDI-Controllers
126
Sirius MIDI-Controller ListThe following list contains all sound parameters of the Sirius that can be remote controlled with aMIDI Controller. The column "Mod.Wheel Allocation" shows you which parameter can be allocatedto the Modulation wheel. The column "internal recording" indicates which sound parameters can berecorded into the internal sequencer of the Sirius.
The Parameters with a "+" can only be recorded into the internal sequencer once they are allocatedto the modulation wheel. Once you have done this you can record the Parameters by moving theModulation wheel.
Controller Nr. Function: Mod.Wheel Allocation: internal Recording:1 Modulation Wheel - yes
5 Portamento Time (Glide) yes yes
7 Volume (Mix) yes yes
10 Panorama (Mix) yes yes
11 Sound-Level (VCA-Level) yes yes
12 Wave-Macro - yes
13 Octave Transpose (+-2 Octaves) - -
14 Tune/Detune (0,01..24 semi tones) yes yes
15 Filter Input Overdrive yes yes
16 Filter Cutoff (FC) yes yes
17 Filter Resonance (Q-Factor) yes yes
18 EG1 Attack (VCA) yes (VCA EG MACRO) yes
19 EG1 Decay yes (VCA EG MACRO) yes
20 EG1 Sustain yes (VCA EG MACRO) yes
21 EG1 Release yes (VCA EG MACRO) yes
22 Keyboard-Tracking yes yes
23 EG->FC amount (Env.Mod.) yes yes
24 Dyn->FC amount yes yes
25 Dyn->VCA on/off yes yes
26 LFO Depth yes yes
27 LFO Wave (0..5 = SIN..RND) - yes
28 LFO Rate (0,1..10 Hz) yes yes
29 LFO ->Pitch amount - yes
30 LFO ->VCF amount - yes
31 LFO ->VCA amount - yes
33 EG2 Attack (VCF) yes (VCF EG MACRO) +
34 EG2 Decay yes (VCF EG MACRO) +
35 EG2 Sustain yes (VCF EG MACRO) +
36 EG2 Release yes (VCF EG MACRO) +
37 EG3 Attack (Pitch) yes (MOD RATE) +
38 EG3 Decay yes (MOD RATE) +
39 EG3->Pitch amount yes (MOD DEPTH) +
40 Pitchbend Sensitivity - -
41 Filter-Typ (0..2 = 24dBTP..12dBHP) - -
64 Holdpedal - yes
91 FX1 (Reverb) send (Mix) yes +
93 FX2 (Chorus) send (Mix) yes +
!

Sirius System-Exclusive Format
127
Caution: Only for Professionals and Programmers!!
The System-Exclusive Data formats of the Sirius:
SIRIUS System-Exclusive Format:
The following pages contain a list of the System-exclusive data formats of the Sirius. This list is for theadvanced MIDI-programmers. If you want to programme for instance a software editor, a mixer mapor an environment for the Sirius, the necessary information can be found here.
Request Data from device:
Dump Data to device:
Adress Map:
Byte No. Value Remarks0 F0 System Exclusive start command1 3F QUASIMIDI id number2 dv device number = System channel-13 27 SIRIUS id number4 52 Request data command5 ah adress high6 am adress mid7 al adress low8 dh data count high (2 bit)9 dm data count mid (7 bit)10 dl data count low (7 bit)11 F7 end of System Exclusive
Byte No. Value Remarks0 F0 System Exclusive start command1 3F QUASIMIDI id number2 dv device number = System channel-13 27 SIRIUS id number4 44 Dump data command5 ah adress high6 am adress mid7 al adress low8... dt data (7 bit)xx F7 end of System Exclusive
(third byte is Adress-Offset)00 00 00 system parameter01 00 00 temporary common parameter01 01 00 temporary sound/mix parameter (KICK)01 02 00 -"- (SNARE)01 03 00 -"- (HIHAT)01 04 00 -"- (PERC)01 05 00 -"- (SYNTH1)01 06 00 -"- (SYNTH2)01 07 00 -"- (SYNTH3)01 08 00 reserved...01 0F 00 -"-...01 7F 00 -"-
!

Sirius System-Exclusive Format
128
02 00 00 track mutes02 01 00 reserved...04 7F 00 -"-
05 00 00 kick sound 1 parameter05 01 00 -"- 2 -"-... ...05 5F 00 -"- 96 -"-
06 00 00 snare sound 1 parameter06 01 00 -"- 2 -"-... ...06 5F 00 -"- 96 -"-
07 00 00 hihat sound 1 parameter07 01 00 -"- 2 -"-... ...07 5F 00 -"- 96 -"-
08 00 00 perc sound 1 parameter08 01 00 -"- 2 -"-... ...08 5F 00 -"- 96 -"-
09 00 00 synth sound 1 parameter09 01 00 -"- 2 -"-... ...09 5F 00 -"- 96 -"-
0A 00 00 drumset 1 parameter (drum instr 1)0A 01 00 -"- (drum instr 2)... ...0A 0B 00 -"- (drum instr 12)0B 00 00 drumset 2 parameter (drum instr 1)... ...1D 0B 00 drumset 20 parameter (drum instr 12)
1E 00 00 reserved...32 7F 00 -"-
33 00 00 pattern 033 01 00 pattern 1... ...33 63 00 pattern 99
34 00 00 song 1 name34 01 00 song 1 common34 02 00 song 1 song event (step 1)34 03 00 -"- (step 2)... ...34 65 00 -"- (step 100)35 00 00 song 2 name… ...43 65 00 song 16 song event (step 100)
44 00 00 reserved...53 7F 00 -"-
0

Sirius System-Exclusive Format
129
54 00 00 vocoder 1 band 1 coefficients... ...54 00 08 -"- band 9... ...54 0A 00 -"- reserved54 0B 00 -"- type54 0B 01 -"- highpass54 0B 02 -"- lowpass54 0B 03 -"- band 1 default level... ...54 0B 0B -"- band 9 -"-54 0B 0C -"- band 1 default pan... ...54 0B 14 -"- band 9 -"-54 0B 15..1C -”- preset name55 00 00 vocoder 2 band 1 coefficients... ...63 0B 1C vocoder 16 preset name
64 00 00 arpeggiator motion 165 00 00 arpeggiator motion 2... ...6C 00 00 arpeggiator motion 9
6D 00 00 reserved...76 7F 00 -"-
77 00 00 user motif block 077 01 00 -"- 1... ...77 63 00 -"- 99
77 64 00 reserved...77 7F 00 -"-77 7F 7F command: clear all user motifs!
78 00 00 reserved...7F 7F 00 -"-
00 system channel 0..15 (1..16)01 local 0..1 (off,on)02 extern sync 0..2 (off,on,audio)03 program change input 0..1 (off,on)04 parameter control input 0..1 (off,on)05 program change out 0..1 (off,on)06 parameter control out 0..1 (off,on)07 midi clock out 0..1 (off,on)08 metronom 0..1 (off,on)09 master tune 0..64..127 (-100%..0..+100%)0A master transpose 58..64..70 (-6..0..+6)0B system excl. transmit speed 0..2 (slow,norm,fast)0C poti snap mode 0..1 (norm,snap)0D poti message 0..1 (off,on)0E receive external start 0..1 (off,on)0F beatdetector input select 0..1(ext carrier in, mic/analyse in)10 sequencer control(track muting) 0..1 (off,on)11 beatdetect offset 0..16..32 (-16..0..+16/768tel)
Address Offsets:
SYSTEM-Parameter:
Remark: vocoder data and user-motif blocks aresent in nibble mode (high nibble first)!

Sirius System-Exclusive Format
130
COMMON-Parameter:
00 speed 0..127 speed bit 1..7 (in BPM)01 groove bit 4..6: groove 0..7 (0%..100%)
bit 0: speed bit 002 keyboard transpose 0,12 (0,+1 Octave)03 current gate pad 0..304 current velocity pad 0..305 pad velocity 1 0..12706 pad velocity 2 0..12707 pad velocity 3 0..12708 pad velocity 4 0..12709 pad 1 pattern nb 0..99...14 pad 12 pattern nb 0..9915 pad 9 fill lenght 1..8...18 pad 12 fill lenght 1..819 pad 13 motif nb 0..99...1C pad 16 motif nb 0..991D pad 13 motif bank 0..2 (User..Rom)...20 pad 16 motif bank 0..2 (User..Rom)21 pad 13 track 0..6 (Kick..Synth3)...24 pad 16 track 0..6 (Kick..Synth3)25 pad 13 sound nb 0..95...28 pad 16 sound nb 0..95
29 fx1 typ 0..7 (room...pan-delay)2A fx1 level 0..1272B fx1 time 0..1272C fx1 feedback 0..127(only if fx1 typ = 6 or 7)
2D fx2 typ 0..7 (chorus...delay)2E fx2 level 0..1272F fx2 feedback 0..12730 fx2 delay 0..12731 fx2 rate 0..12732 fx2 depth 0..127
33 overblast eq1 gain 0..127(-12..+12dB)34 overblast eq1 freq 0..127(0..4.7kHz)35 overblast eq2 gain 0..127(-12..+12dB)36 overblast eq2 freq 0..127(0..18.7kHz)
37 vocoder type 0..15 (RobotVoc...BBoostFB)38 vocoder level 0..12739 vocoder pan 0..64..127(left..center..right)3A fx1 send 0..1273B fx2 send 0..1273C mic (analyse-in) bypass 0..1273D ext (carrier-in) bypass 0..1273E internal analyse bypass 0..1273F internal carrier bypass 0..12740 mic -> vocoder analyse 0..12741 ext -> vocoder carrier 0..12742 reserved43 vocoder on/off 0,1 (off,on)44 analyse highpass 0..12745 analyse lowpass 0..12746 vocoder band 1 level 0..127...4E vocoder band 9 level 0..1274F vocoder band 1 pan 0..64..127 (left..center..right)...57 vocoder band 9 pan 0..64..127 (left..center..right)

Sirius System-Exclusive Format
131
58 arpeggiator byte1 bit 5..6 mode 0..2 (arp,gater,chord)bit 3..4 octaves 0..3 (1..4)bit 2 arpeg.on/off0,1 (off,on)bit 0..1 resolution 1..3 (8,16,32)
59 arpeggiator byte2 bit 6 double 0,1 (off,on)bit 5 lenghtfit 0,1 (off,on)bit 4 hold 0,1 (off,on)bit 0..3 motion 0..15 (up,down...mot9)
5A arpeggiator byte3 bit 3..6 trig.track 0..15 (1..16)bit 2..1 reservedbit 0 dynamic 0,1 (off,on)
5B arpeggiator gate 0..127(127 = legato)
00..07 sound name08 trackmode bit 0..1 seq to 1..3 (INTERN, MIDI, BOTH)
bit 2 mono 0,1 (off,on)bit 3 reservedbit 4 holdpedal 0,1 (off,on)bit 5 analyse 0,1 (off,on)bit 6 carrier 0,1 (off,on)
09 bank nb 0..3 (user,rom A..C)0A sound nb 0..950B mix level 0..1270C pan 2..64..124 (rnd,left..center..right)0D fx1 send 0..1270E fx2 send 0..1270F wave macro nb 0..xx (depents on part)10 tune 0..3 (32"..4")(only on synth part)11 detune 0..103/104..127 (fine/coarse)12 glide time 0..127 (0 = portamento off)13 vca level 0..12714 filter overdrive 0..12715 filter typ 0..2 (24dB LP, 12dB LP, 12dB HP)16 cutoff frequency 0..12717 q-factor (resonance) 0..12718 vca eg attack 0..12719 vca eg decay 0..1271A vca eg sustain 0..1271B vca eg release 0..1271C vcf eg attack 0..1271D vcf eg decay 0..1271E vcf eg sustain 0..1271F vcf eg release 0..12720 vcf eg vcf amount 0..64..127 (-64..0..+63)21 dyn vcf amount 0..64..127 (-64..0..+63)22 key vcf amount 0..64..127 (-64..0..+63)23 pitch eg attack 0..12724 pitch eg decay 0..12725 pitch eg pitch amount 0..64..127 (-64..0..+63)26 lfo wave 0..4 (Sine,UpSaw,DownSaw,Rect,Rnd)27 lfo rate 0..120/121..127 (sync 1/16..4/1)28 lfo depth 0..12729 lfo pitch amount 0..1272A lfo vcf amount 0..1272B lfo vca amount 0..1272C pitchbend sensitivity 0..242D dynamic vca amount 0,1 (off,on)2E modulation wheel assign1 0..127 (bit 6 is depth bit 7)2F mod.wheel assign1 depth 0..12730 modulation wheel assign2 0..127 (bit 6 is depth bit 7)31 mod.wheel assign2 depth 0..12732 modulation wheel assign3 0..127 (bit 6 is depth bit 7)33 mod.wheel assign3 depth 0..12734 modulation wheel assign4 0..127 (bit 6 is depth bit 7)35 mod.wheel assign4 depth 0..127
PART-Parameter:

Sirius System-Exclusive Format
132
36 modulation wheel assign5 0..127 (bit 6 is depth bit 7)37 mod.wheel assign5 depth 0..12738 arpeggiator packed byte 1 (only on synth part)39 arpeggiator packed byte 2 (only on synth part)3A arpeggiator packed byte 3 (only on synth part)3B arpeggiator gate (only on synth part)
00 bank nb 0..101 instrument 0..12702 level 0..12703 pan 3..64..124 (left..center..right)04 fx1 send 0..12705 fx2 send 0..12706 pitch 0..12707 reserved
00 mode/bank bit 6 carrier on 0,1 (off,on)bit 5 analyse on 0,1 (off,on)bit 4 reservedbit 2..3 sound bank 0..3 (User,RomA..C)Bit 0..1 motif bank 0..2 (user..rom)
01 sound nb 0..9502 motif nb 0..9903 mix level 0..12704 pan 2,3..64..124 (rnd,left..center..right)05 fx1 send 0..12706 fx2 send 0..12707 groove bit 4..6: 0..7 (0..100%)
bit 0..3: reserved
00 bars no. 1..64 (0 = end of song)01 pattern nb 0..9902 transpose 0..12..24 (-12..0..+12)03 mutes 0..127 (1bit/track)
DRUM-Parameter:
TRACK-Parameter:
SONG-EVENT-Parameter:

Sirius MIDI-Implementation chart
133
Function
BasicChannel
ModeDefaultMessages
NoteNumber
36-96 36-9624-112
Velocity Note OnNote Off
Aftertouch KeysChannel
MSB (7 bit)LSB (1 bit)
SystemCommon
Song PositionSong SelectTune Request
SystemReal Time
ClockCommands
AuxMessages
120 All Sounds off121 Reset all Controller122 Local On/Off123 All Notes Off
Active Sens.System Reset
x = No0 = Yes* = Multi-Mode 3b: omni-off, poly. Mode 4: omni-off, mono.** = can be set to on/off in SYSTEM-Edit*** = Dump-Functions**** = See manual page with MIDI-Controller-List
xxxxx
000xx
0**0**
0**0**
0 (Audio-Sync)xx
0xx
0x
00
ControlChange
Program Change 0** 0**
System Exclusive 0*** 0***
0 Bank Change
1 - 41, 91, 93
64 Holdpedal
65 Portamento on/off
0**
0****
0
x
0**
0****
0
0
xx
Pitch Bend
xx
0x
0x
True Voice
3b*x
Mode 3b*Mode 3b, Mode 4 (M=1)*
DefaultChanged
1-71-16
1-71-16
Transmitted Recognized

Diagramatic Overview of the Edit Menus
134
SELE
CT-
EDIT
VO
CO
DER
-ED
ITSO
NG
-ED
ITPA
DS-
EDIT
SYST
EM-E
DIT
FX2-
EDIT
FX1-
EDIT
MIX
-ED
ITPA
TTER
N-E
DIT
ARP
EGG
IO-E
DIT
SOU
ND
-ED
IT
PAD
1 P a
tter
n A
ssig
n
PAD
2 P a
tter
n A
ssig
n
PAD
3 P a
tter
n A
ssig
n
PAD
4 P a
tter
n A
ssig
n
PAD
5 P a
tter
n A
ssig
n
PAD
6 P a
tter
n A
ssig
n
PAD
7 P a
tter
n A
ssig
n
PAD
8 P a
tter
n-A
ssig
n
PAD
9 Br
eak-
P att
ern
PAD
9 Br
eak-
Leng
th
PAD
10 B
reak
-Pat
tern
PAD
11 B
reak
-Pat
tern
PAD
12 B
reak
-Pat
tern
PAD
10 B
reak
-Len
gth
PAD
11 B
reak
-Len
gth
PAD
12 B
reak
-Len
gth
Brea
k-P A
DS
Mas
ter
T ran
spos
e
Mas
ter
T une
Mas
ter
Cha
nnel
Loca
l on/
off
MID
I Syn
c
Rx P
rogr
am C
hg.
Rx P
aram
eter
Rx S
tart
Tx P
rogr
am C
hg.
Tx P
aram
eter
Tx C
lock
SysE
x Sp
eed
Poti
Sna
p o
n/of
f
Poti
Info
on/
off
Trac
k M
ute
on/o
ff
Beat
Inp
ut
Wav
e 1-
125
Arp
eggi
o M
ode
Seq
uenc
e to
:In
tern
/MID
I/Bot
hEf
fect
Typ
eEf
fect
Typ
eVo
cod
er T
ype
Patt
ern
Num
ber
Oct
ave
32’-
4’Tr
igge
r
Mot
ifSo
und
num
ber
Leve
lLe
vel
Leve
lTr
ansp
ose
Det
une
Arp
. Hol
d o
n/of
f
Gro
ove
Leve
lTi
me
Tim
ePa
nora
ma
Bars
Glid
eD
ynam
ic o
n/of
f
Cle
ar M
otif
Mot
if le
ngth
Pano
ram
aFe
edb
ack
Feed
bac
kA
naly
se B
ypas
sin
sert
/del
ete
Mon
o on
/off
Reso
luti
on
Dru
mgr
idor
Step
reco
rd
FX-1
Sen
dRa
teC
arri
er B
ypas
sSt
ep c
opy
EGP -
Mod
Gat
e Ti
me
FX-2
Sen
dD
epth
Mic
Byp
ass
EGP -
Att
ack
Mot
ion
Met
rono
m
Exte
rnal
Byp
ass
EGP -
Dec
ayO
ctav
es 1
-4
Real
tim
e Re
cord
FX-1
Sen
d
VC
F D
rive
Dou
ble
Not
es
Qua
ntiz
e
FX-2
Sen
d
VC
F T y
pLe
ngth
Fit
Del
ete
Con
trol
Und
o
Low
pas
s
Cut
off
Mot
ion
Loop
Step
1 Ti
me
Step
32 T
ime
Mem
ory
Hig
hpas
s
Band
1 Le
vel
Band
1 P a
n
Band
9 Le
vel
Band
9 P a
n
Q F
acto
r
Key
T rac
king
VC
F D
ynam
ic
Enve
lop
e M
od
EGF
Att
ack
ROM
U
SER
ED
IT

Diagramatic Overview of the Edit Menus
135
PAD
13 T
rack
PAD
14 T
rack
PAD
15 T
rack
PAD
16 T
rack
PAD
9 V e
loci
ty
PAD
10 V
eloc
ity
PAD
11 V
eloc
ity
PAD
12 V
eloc
ity
PAD
13 M
otif
PAD
14 M
otif
PAD
15 M
otif
PAD
16 M
otif
PAD
13 M
otif
Ban
k
PAD
14 M
otif
Ban
k
PAD
15 M
otif
Ban
k
PAD
16 M
otif
Ban
k
PAD
13 S
ound
PAD
14 S
ound
PAD
15 S
ound
PAD
16 S
ound
Spec
ial L
oop
Tra
cks
Dru
mgr
id/S
tep
seq
uenc
erVe
loci
ty
EGF
Dec
ay
EGF
Sust
ain
EGF
Rele
ase
VC
A L
evel
VC
A D
ynam
ic
EGA
Att
ack
EGA
Dec
ay
EGA
Sus
tain
EGA
Rel
ease
LFO
Wav
e
LFO
Rat
e
LFO
Dep
th
LFO
>V
CO
LFO
>V
CF
LFO
>V
CA
Pitc
h Se
nsit
ive
Hol
dp
ed. o
n/of
f
The
P ara
met
ers
in t
he d
ot-f
ram
ed w
indo
ws
are
only
ava
ilab
le in
cer
tain
set
ting
s.
Key Combinations
136
Key- or dial combination
SHIFT & MOD-WHEEL ASSIGN
SHIFT & NUMBER-key 9-12
SHIFT & PART-key
ARPEGGIO ON/OFF &NUMBER-key 1-16
SHIFT & PAGE/BANK
ANALYSE & PART-keys
CARRIER & PART-keys
VOCODER ON/OFF &NUMBER-key 1-16
KEYBOARD-keys &PAGE/BANK
VOCODER ON/OFF &MIXER-dial
Edit level
Can not be executed duringRecord or Compare
Only in the Drumgrid
Not in the Drumgrid, duringMod.Wheel-Assign orCompare
Always
Always except the Drumgrid
Only with switched-onVOCODER
Only with switched-onVOCODER
Always
In the Step-edit of theSynthesizer section
Always
Function
Holds down the ASSIGN-key foryou. This gives you two hands toselect Parameters.
SHIFT + Number-key 9-12selects the Velocity for the noteswhich are about to be played.
Random Motif-selection for theselected Part.
Selecting the Arpeggiator-motions.
This key combination allows youto transpose the keyboard in allareas. This allows you to put outhigh notes via MIDI.
In the DRUMGRID you switchthe Grid-resolution using thesekeys.
You can select one or severalParts as Analyse-signal.
You can select one or severalParts as Carrier-signal.
Loading the 16 factoryprogrammes of the VOCODER.
This key combination allows youto adjust the length of thecurrently played note.
This allows you to select thefrequencies of the VOCODER-Bands.
Key combinations:As it is not possible to provide a key or dial for every single function of the Sirius, some functions areperformed by using combinations of dials and keys.The following table will give you an overview of these functions or 'shortcuts':
Special Functions
137
Special Functions and short selection:Many push buttons on the Sirius have other features next to their own task. They are used forexample, for faster selection or to switch to defined functions. The following table gives you anoverview:
Part Button hold pushed(independent from Partselect)
Recall Button(multiple functions)
PAGE/BANK-Button:
CATEGORIES-Buttons:
Number-Buttons 1-16
Number-Buttons 1-16
Number-Buttons 9-16
VALUE/TEMPO-wheel
VALUE/TEMPO-wheel
VALUE/TEMPO-wheel
KEYBOARD Keys
PAGE/BANK
PAGE/BANK
Edit level
Always
In write menu
In Sound SelectMode
Always
In Drum grid
In Arpeggiator Edit
Step-Edit of theSynthesizer sections
Arpeggiator Edit
Step-Record of theSynthesizer sections
In the Menus
WRITE-Menu
Drum grid and StepRecording
In the Menus
Function
As long as the Part Button stays pushed in asection, it can be edited with the control of theSynthesizer section.
When using this button in the write menu youcan hear the tone which will be overwritten whenyou save a sound. Otherwise its function is to"undo" when you have switched a sound bymistake: The sound can be reversed.
In the Sound Select Mode you can switchbetween the different sound banks with thesebuttons.
This button chooses the sound categories. If youare on the category that you want, push oncemore and the sound bank will change.
With these buttons you can put your notes intothe grid.In Arpeggio motion Edit (start menu page 12) youcan turn the chosen notes on or off with buttons1 to 8 (1=lowest and 8 highest). With buttons 9to 12 you can adjust the step velocity. Withbuttons 13 to 16 you can adjust the step length.
The buttons 9 to 12 adjust the velocity for thefollowing note inputs. The buttons 13 to 16 chosethe Gate time (step length) for the following noteinputs. The value is fixed and independent fromthe current resolution of the step grid.
With the VALUE/STEP-wheel you can shift thetime when a step is played referring to the“straight” beat. For example at a 8th grid and50% the step will be played a 16th note later.
The VALUE/TEMPO-wheel chooses the toneheight.
This wheel is used to change the values of theparameters.
You enter in the names of the sounds or the songswith the keys. They can also be entered with theVALUE/TEMPO-wheel.
Choosing of the different bars in drum grid, whenit is longer than a bar.
Change the Menu page.
Button Special Function

CORRECTION OF AN ERROR
After turning on there is nothing in the display:
There is no sound:
The sound is different to my adjustments:
There are no effects:
No MIDI data and Dumps can be transferred to an external instrument or Sequencer:
After transferring a dump the display shows "Memory overflow":
The Vocoder has no effect on the sound or my voice?
The synchronizing of external equipment or sequencers does not work:
The synchronizing of the Sirius with an external clock signal does not work:
It is not possible to synchronize the Sequencer of the Sirius with the Beat recognition:
As we know there unfortunately are everyday problems with Electronics musicians equipment.Naturally were are not faultless. But also we have found that a lot of problems are user error. Tomake your life a little easier and to reduce the load on the hot line we listed the most often reportedproblems. Of course you can find here an answer to all these problems.
1.) Is the power supply in the wall socket?2.) Is the plug correctly inserted into the Sirius?3.) Is the power supply getting warm? (This shows that the supply is working properly.)4.) If the problem stays the same call QUASIMIDI.
1.) Is the master volume control turned up?2.) Is the “local” function of the Sirius (System menu on page 4) turned on?3.) Are the audio outputs connected properly with the amplifier?4.) Do you have mixed up the audio outputs with the “Analyze” or “Carrier” outputs?5.) Is the amplifier adjusted correctly? The HiFi amplifiers have many different controls.6.) Test your headphones on the stereo to see if it works.7.) Is the volume of the parts that you want to be played turned up?
1.) Did you save the edited sound with the write function?
1.) Are the FX- sends of the effects you want to use turned up? Check the mixer control.2.) Do you have effects applied to the effect processors?
1.) Are the cables connected properly?2.) Did you select the corresponding section on PARTS/SEQ to MIDI to control an externalSynthesizer?3.) To transfer a Dump be sure that no “System-Exclusive” filter is chosen.
1.) The memory of the Sirius is full. Initialize the instrument and start the dump again.
1.) Is the Vocoder on?2.) Did you choose an Analyze and Carrier signal?3.) Are notes or sounds on the tracks you have chosen as Analyze or Carrier signals?4.) Is the microphone to change your voice plugged in and turned on?5.) Is the Gain adjusted to your voice level?
1.) Have you made sure that the "TX-CLOCK" Parameter in the System menu of the Sirius on menupage 11 is turned on?2.) Is the MIDI connection cable connected correctly to the external equipment?3.) Did you select external synchronization on the external sequencer or equipment? Read theirinstructions.
1.) Did you activate the "Sync. Extern" function of the Sirius?2.) Is the MIDI cable connected correctly?3.) Is the right MIDI output of the device selected for the clock signal and is the "Transmit clock”function active?
1.) Is the "Auto sync" of the Sirius activated?2.) Is the Audio output of the analyzing signal connected properly to the Sirius?
Problems and Answers
138

Problems and Answers
139
3.) Did you push the Tap button five times to give the Sirius the first beat?4.) Did you adjust the volume of the analyzing equipment, that you can see a "." in the display?
If you are still having problems and if you are a registered user of QUASIMIDI products you can callour free HOT LINE.
Our Hot line can be called at the following number:
Monday to Friday 4:30 pm to 5:30 pm MET 0049 6425 930035
Please make notes so that we can exactly pin point the problem. Try to think exactly in whichoperating task you noticed this problem. This will reduce your telephone costs and we will be able tohelp you fast and efficiently.If you are using external equipment, PC's or Software, please make sure that they are workingproperly and see that your MIDI equipment is correctly adjusted. Refer to the detailed chapters ”TheSirius and the MIDI” and “The Sirius and Cubase”. If you discover that the problem is caused byyour Computer, the Software or the MIDI interface, please contact the Service department of theManufacturer or read the pertaining manual. Especially if you have questions concerning Sequencerprograms, sound cards and Midi interfaces the manufacturer can give you better advice.
HOT LINE
Please do not forget to send away your Warranty and Registration form, included with thisoperating manual.

Initializing and Calibration
140
Initializing the Sirius and calibration of the controllers:
The initializing should only be done on advice of the Service department. Always remember thecomplete data will be lost.
Clearing the memory and calibrating the controllers.
Calibrating the controllers without losing data.
The initializing resets the Instrument to the time of delivery. At this time all saved User data (sounds,patterns and songs and all pertaining adjustments) are cancelled. The calibration of the controllers(modulation and pitch bend wheel) is used to adjust these operating devicesThere are two ways of initializing. First the pitch bend and modulation wheel can be adjusted(calibrated) without losing the memory. The second possibility is to completely clear the usermemory, resetting all internal parameters and also to re-calibrate the controllers.
To start the initializing you have to do the following:When the SIRIUS is turned off hold the WRITE button, then turn on the Sirius. The followingmessage is in the display
You can decide here if you want to clear memory or just calibrate the controller.
If you confirm (OK) a bar in the display will show how far the initializing has taken place.When this is finished, you will be asked to calibrate the controller. See the following instructions. Donot turn your instrument off and initialize again.
To calibrate the controllers without losing data, follow the directions: Push the button (F3) to initializewith (cancel). You are now in the calibration menus of the Sirius.
Turn the modulation wheel completely down and hold the pitch bend wheel in the down position.Confirm with the left button (F1) under the display. The following display will be shown:
Repeat the last setting by putting the wheels in the upper position and press the F-1 button.Afterwards you are in the Test menu. Here you can test if the calibration was correct.
The pitch bender should show 64 when untouched, 127 at the top and 0 at the bottom. Themodulation wheel should show 0 at the bottom and 127 at the top. If you do not have these valuesyou can repeat this once again.
Initialize All?(OK) (cancel)
SET WHEELS- > min(OK) (cancel)
Set wheels- > MAX(OK)
Wheels-Test: 64(OK) (retry)
.

INDEX
141
He who has the knowledge, is well informed!
Although this statement is not from Confucius, we would still like to use this Motto for this index.Here you will find the important overview of working around Synthesizers and Electronic music. Ifyou memorize this list, no one will be able to impress you with his knowledge in this area. Evenwhen you read technical magazines this list will help you understand the contents of articles muchbetter.
- An Analyze signal (i.e. microphone) is one of the two inputs of the
- An Arpeggiator dissolves played chords into single-tones and creates broken chords,which speed and play direction can be adjusted. Effects such as Gater and Chord trigger can also befound in the Arpeggiator Menu of the Sirius.
- The fade in of an instrument. The piano has a very short Attack (percussive), as the stringsound slowly fades in (slow attack).
Name for all devices which make sound audible and amplify music (Stereos,Amplifiers, PA).
Controller to choose from the different - banks. TheSirius has 4 different Banks with each 96 Synthesizer sounds and 2 Banks with each 96 drumsounds. The Program-change-command is not capable of calling all tones, as MIDI has only 128different programs which can be called with this command. Therefore the Bank-change-commandwill always be sent before the program change to call the chosen bank. Bank-change occupies thecontroller no. 0.
beats per minute. One hit equals a quarter note.
For example, if you adjust an instrument to bypass, the tones will be rerouted around theelectronic sound effect. A bypass parameter can be found in the Vocoder menu of the Sirius.
The Carrier signal is the second input of the For example, if you let yourvoice be analyzed by the Vocoder, you can change the pitch of your voice by using Pad sounds as acarrier.
The Chord Trigger chops the played chords, as though you would continuouslystrike the chords.
- Effect which gives an instrument a suspended and dimensional sound impression.
Analyze
Arpeggiator
Attack
Audio System -
Balance ->
Bank-change -
Bpm -
Bypass -
Carrier -
Chord Trigger -
Chorus
Panorama
MIDI - > Program-change
-->
->
-->
Vocoder
Envelope
- >
Vocoder.
Cutoff frequency - The frequencies above the cutoff frequency are depressed by the filter.
Decay - ->-> ->
Drum loop
-> -> ->->
-> -> ->
->
Envelope modulation (Env.-Mod)
Exit - ->
After the of the the Decay time sets in, and the volume,of the sound decreases until it reaches the adjustable -level.
When you hold down a note on the Sirius Keyboard you automatically start the envelopegenerator. During the time the volume, of the sound willincrease until it has reached its maximum level. After that the time sets in, and the volume,
of the sound decreases until it reaches the adjustable -level (not available in the pitch envelope). This level remains until you release the note and the fade-out of the sound is determined by the time (not available in the pitch envelope). Theparameters of the envelopes can be simply controlled with the EG-MACRO-knobs of the Sirius.
, or
- >
, or
, or
- >
This button is used to exit the chosen menus.( )
-> ->Envelope Cutofffrequency pitch
Loop
Cutoff frequency pitch
Cutoff frequency pitch
Envelope
Edit
AttackSustain
AttackDecay
Sustain
Release
Envelope -
Delay
Demo song -
Distortion - ->-> - >
Drum set.
Dump - >
Edit -
Effect processor -- > , - > - > .- > ->
Equalizer -
Expander -
Feed back -
- Effect to produce i.e. an echo.
The demo songs demonstrate the different sounds of the Sirius. By pushing the “Taptempo” and the “Sync. Ext.” buttons simultaneously you can start the 16 Demo songs.
The Sirius can produce distorted sounds with help of the , theand the
- With the Sirius you can construct your own 20 different Drum sets, each containing 12Drum, Percussion or effect sounds The drums can be found in the PERCUSSION-part ,when youturn the WAVE-MACRO control.
The Sirius has different edit-levels where you can adjust all functions of the Sirius. Some ofthese functions can not be reached on the front panel of the Sirius.
An effect processor is a device that changes the sound of the instrument. Typicaleffects are and The Sirius has two built in effect processors, thatare marked and , which generate different effects.
With an equalizer you can manipulate the frequencies of your mix.
An expander is a synthesizer without a keyboard.
To avoid feed back, the amplifiers should not be turned up to high when using themicrophone.
Filter overdriveCutoff frequency Q-Factor.
MIDI-Data-Dump
Reverb Delay ChorusFX-1 FX-2
F
142
INDEX

Filter -
Filter-overdrive -->
Filter sweep -- > .
Flanger - - > ,
Formant-Modulation -
Foot-pedal - - >
FX-1/FX-2 - - > , - >->
FX-Send -
Gain-Control -
Gater-
Glide ->
Groove -
Hall - >
ID-Number -
The filter is a part in the Synthesizer, which creates the largest sound changes. The Sirius hasthree types of filters, a 24db/oct - low pass, a 12 db/oct - low pass and a 12 db/oct - high pass. Lowpass filters depress the frequency area above the . High pass filters are exactlythe opposite. The terms “12db/oct” and “24db/oct” describe the rolloff characteristics of the filter. Afilter with 12db is softer than a filter with 24db. You can try it out on the Sirius. An importantparameter of the filters is the
With the filter overdrive in connection with andyou can create a distortion effect.
Filter sweep is a filter modulation. This can be accomplished by turning the Cutoff-knob on the Sirius or by modulating the filter with the or the
Extra type of where the delay time is modulated. Depending on the delay timeand the feedback adjustment the flanger creates a spacious and suspended sound.
Every sound exists as partial tones, which determines its character. TheFormant- Modulation creates a movement of the partial tones. This can be used for a suspension or adrastic change to the sounds.
The Sirius has a connection for a foot pedal. It has two functions. If theis active you can hold the Arpeggio and transpose it by using the keys. The foot pedal should behooked up before turning on the Sirius.
The provide the Sirius with andmodulations like .
This Parameter defines to which extent the sound is sent to the effect processors
This control is used to adjust the input sensitivity of the Analyze input (microphoneinput). On a mixer desk it is used to adjust the incoming signals. If the control is adjusted to high,distortion will occur.
A Gater effect causes rhythmic chopping of a sound, for example a pad sound.
With the groove function you can shift the beats of a running sequence to different extents.Through this the rhythm starts to swing.
When transferring , IDs are needed to distinguish betweenthe several connected instruments. There is an ID for the manufacturer and the model number andadditionally a special Sirius-ID (which is the same as the system-channel), so you can connect morethan one Sirius.
- > Cutoff- frequency
- > Resonance or the Q-factor.- >Cutoff frequency
Resonance
LFO ->Envelope
Delay
Arpeggiator
- > Effect processors Reverbs DelaysChorus/Flanger
Portamento
Reverb
-> System Exclusive data
You can compress the sound or make it moreaggressive.
The gater istriggered by another track.
(- >).
FX-1,FX-2
143
INDEX

INDEX
144
Initialization -
Keyboard-Combo -
LFO=Low Frequency Oscillator -
Loop -
MIDI=Musical Instrument Digital Interface -
MIDI-Controller -
MIDI-Data-Dump -
MIDI-In -
MIDI-Channel -
MIDI-Master-Channel -
MIDI-Merger -
MIDI-Multi-Mode -
MIDI-Omni-Mode -
MIDI-Out -
If you initialize, you delete all the data of the Sirius’ internal memory. All theparameters are set to “factory standard”.
Amplifier with built-in speakers.
A LFO offers various waveforms which can be used to modulatethe volume, or of a synthesizer.
a musical theme permanently repeated.
Enables the communication between electronicinstruments of different manufacturers. Only digital data concerning the played notes or theadjustments of an instrument are transferred, not the audible music itself. The data includes noteinformation, controller information and .Two MIDI-devices have to communicate on the same MIDI-Channels.
recognize more than one MIDI-channel at once. The Sirius can communicate on 7channels at once, so it can be seen as 7 independent synthesizers.For details see chapter “The Sirius and MIDI”.
Midi data used for changing or modulating the sound. For the Sirius, all soundparameters can be controlled via MIDI-Controllers.
A MIDI-Data-Dump is a transfer of synthesizer settings through the MIDIInterface. The transfer is done through
Connector for receiving MIDI data. Connect for example the MIDI-Output of your Siriusto the MIDI-In of your computer sequencer in order to transfer data into the sequencer from theSirius.
There are 16 Midi-Channels, so that you can address up to 16 instruments on onlyone Midi-Cable. In the , each instrument has it’s own andreacts only on notes and controllers on this channel. (additionally see
)
The MIDI-Master-Channel has two meanings. It is the whentransferring and it is the first of the 7 Sirius instrument channels.
A MIDI-Merger is able to mix two digital MIDI-Outputs for one MIDI-In.
A synthesizer with MIDI-Multi-Mode is independently able to react to morethan one at once. Meaning: A synthesizer with this feature acts like severalindependent instruments (Sirius: 7 channels=7 instruments).
In MIDI-Omni-Mode, the MIDI-Channel information is ignored. Only oneinstrument can be played through one MIDI-Cable. This can be found mainly with old synthesizers.
Connector for transmitting MIDI data. Connect it to a .
-> ->
->
pitch Cutoff frequency
system exclusive data
-> System-Exclusive data
-> MIDI-Polymode -> receive-channel->MIDI-Multi-Mode, -
>MIDI-Omni-Mode
->ID-Number->System-Exclusive data
->MIDI-Channel
->MIDI-In
MIDI-Multimode describesthe skill to

INDEX
145
MIDI-Polymode -
MIDI-Thru -
Mixer-
MOD-Depth -
MOD-Rate - ->
MOD-Wheel -
Mute -
Monophonic -- >
Oscillator - - >
Over blast -
PA Speakers - (
Phaser - W
Panorama -
Part
see
Connector which offers a copy of the MIDI-data coming to the Connecthere the MIDI-In of a second instrument which needs the same MIDI-data.
The Sirius has a built-in mixer that allows you to regulate for instance the volume and thepanorama-position of the different parts played.
With the MOD-Depth you adjust the strength with which the affects themodulation parameter.
The MOD-Rate adjusts the speed for modulation of the . A LFO-Sync can alsobe adjusted on the Sirius. The MOD-Rate goes by the momentary selected Sequencer speed of theSirius. Therefore you can adjust different LFO -speeds in proportion to the Sequencer speed.
besides the ->Pitch-Bend Wheel the most important tool to change the sound duringplaying. In the Sirius, sound parameters can be assigned to the MOD-Wheel.
Sound is turned off.
Single voice melodies are also described as “monophonic”. The opposite tomonophonic is .
The oscillator creates the in a Synthesizer. It is also responsible for theaudible sounds of the Synthesizer. The Sirius has two Oscillators for every Synthesizer-Part which canbe detuned. That way the sound gets wider.
A function of the Sirius, which gives a kind of loudness or Bass boost to all parts of theinternal sequencer. The sound will be thicker and bass will be brought out..
PA= Public address) PA speakers are loud speakers with a very high music power.They are mostly used by live appearances.
hen the same signal is mixed in with a deferred timing, you will get a Phaser effect, whichmeans a spacious, suspended sound.
The panorama value determines how far a sound is moved to the left or the right of thestereo image. The Sirius has the possibility to call up a Random panorama. With this the soundswitches between both speakers at random paces.
- A part is one of seven tracks in the Sirius in -Multimode. Every part of the Sirius actsas an own Synthesizer.
->MIDI-Channel
->MIDI-In.
LFO
polyphonic
Wave forms
- > MIDI
->
MOD Effects -
LFO
for example Chorus, Flanger, Phaser.

INDEX
146
Pitch -
Pitch-Bend -
Polyphonic
Portamento -
Potentiometer (Poti) -
Program-change -
Q-Factor - >
Release -->
Resonance -
Reverb -
ROM Sounds -
Routing -
Sequence -
Sequencer -->
Sub menu - - > , - > ,- > , ->
Sustain -
Sound height.
Sound height bending. With the pitch bend wheel you can bend your played note upor down, to give your playing more expression or to imitate natural instruments.
- An instrument which can play more than one note at once (chords etc.) is called“polyphonic”. The Sirius is 28 voiced polyphonic, you can play 28 voices at once.
Portamento is the smooth gliding from one tone height to the next.
A turning knob for changing the sound parameters, volume, etc.
MIDI-command to change the program and sounds of a MIDI-instrument. 128different programs can be called with Program-change.
The time for how long the sound is heard after the key on the keyboard is released. This isdetermined by the
The resonance is a parameter, that determines the behaviour of a filter. By theresonance the frequency area around the - Is raised. If the resonance is veryhigh, the filter can be enabled to self-oscillate.
Reverb is an effect algorithm in FX-1. Its used for the simulation of room capacity. TheSirius imitates a country church to a Cathedral and a rubber room to a wash room.
ROM sounds are permanently stored in the Sirius and can not be erased or lost.
We understand routing as a flexible switching of different signals sources. When you adjustthe parameter -> in the mixer , this part will be routed to an effect processor.
A continuous replay of notes is called a “sequence”.
Control unit for a synthesizer, which automatically plays back the played in orprogrammed
The different changeable areas like andare divided into several sub menus depending on the number of parameters. The
sub menus can be selected with the PAGE/BANK-buttons.
Sustain is described as the hold level for an
- >Bank-change
Resonance
Envelope.
> Cutoff frequency
FX send
Sequences.
FX-1 FX-2 Part Arpeggiator- >System edit
->envelope.

INDEX
147
System exclusive data - ->
Temporary memory -
Track mute -
Transposing -
Trigger -->
Tuning -
Turn on static -
VCA -
VCA-EG-MACRO ->
VCA Level -
VCF -> .
VCF-EG-MACRO - >e
VCO -
Velocity -
Vibrato -
System exclusive data are manufacture and product specific data.They transfer the sounds and system information between the same MIDI instruments or to and froma sequencer for the purpose of data recording. The transfer of this data is called MIDI data dump.
The temporary memory is a data buffer where the current changes are beingsaved. After a in performance operation they are lost. Through the MIDI datadump function in the Sirius, you can transfer and save the temporary memory.
By listening or arranging a sequencer song you would like to silent certain parts at timesto be able to concentrate on the other tracks. The Sirius has several Mute functions that you can alsouse in live action. The way to produce Techno excitement and breaks is purposely leaving in andtaking out single tracks and motives.
When the transposing mode is turned on, you can change the pitch of the playback inthe range of one octave. In the Sirius, you can find the transpose mode in the edit-system menu.Transposing during playback is called realtime transposing.
Trigger is an impulse which can be used to create a function. For example, when you pressa key on the Sirius, you trigger the of a sound
The tuning (tone frequency) defines the tone height of a sound. The higher the tonefrequency in cycles per second, the higher the tone.
When turning on an instrument, there can be a turn on static. Make sure that theamplifier is turned on last to avoid a scratching sound.
Voltage controlled Amplifier. The VCA is the internal amplifier of the synthesizers.
The parameter “VCA level” controls the volume of a Sirius sound.
Voltage controlled filter. The VCF is one of the most important sound features in thesynthesizer.-
Voltage controlled oscillator
The volume and the sound can be controlled with the strength of the key strike.
The modulation of the tone height of a instrument with a -
MIDI
- >program change
envelope
envelope
filter
nvelope
>LFO
.
VALUE/TEMPO-Dial - With the VALUE/TEMPO-Dial you can raise or lower the tempo of a song orthe value shown in the display. The dial has no end or starting point.
INDEX
148
Vocoder -
Vowel -
Waveform -
Write menu -
The Vocoder has two inputs “analyze” and “carrier”.
An example for a vocoder effect is a robot voice. This type ofvocoder usage can be heard in songs of the group Kraftwerk.
The letters a, e, i, o, u.
Collective name for oscillating forms like Sinus, Sawtooth, etc. Samples are also oftencalled waveforms. They are produced by the .
In the write menu you find save, copy and functions for theSirius.
The Analyze signal as well as theCarrier are being cut up into several "frequency-slices", the 'Bands' of the Vocoder. Now the"frequency-slices" of the Analyze signal are analyzed and simultaneously transmitted to the respective"frequency-slices" of the Carrier.
- >Oscillator
- >MIDI Data dump
WARRANTY REGISTRATION
Fill out the Registration card and send to the preprinted address on the front of the card.
How to Validate the Warranty:
To validate the Warranty, fill out the Warranty card and return it to Quasimidi within ten days fromthe date of purchase.
What is covered and what is not covered?
This Warranty covers all defects in material and workmanship for six (or twelve) months from thedate of original purchase. This Warranty does not cover damage to, or deterioration of the externalcabinet or internal circuitry resulting from accident, misuse, neglect, attempted unauthorized repairor failure to follow instructions in this owners manual.This Warranty does not cover units that have been modified or altered (except an authorizedQUASIMIDI modification which includes its own Warranty coverage).This Warranty does not cover damage that may occur during shipping. Software/Firmware are notsold as is and not covered by the Warranty.
How to obtain Warranty servicing:
Return your unit to an Authorized QUASIMIDI Service center. If you are unable to locate one, writeor call the QUASIMIDI Factory Service Department. We will either refer you to an AuthorizedService Center or issue a Return Authorization number for factory service. Units returned toQUASIMIDI for factory service must display the Return Authorization number on the outside of theshipping carton and on all related documents, or units will be returned freight collect. The ownermust pay all shipping costs to and from the factory.Shipment of the product to QUASIMIDI is the responsibility of the owner, and should be insured bythe owner for the full value of the product.
NO CLAIM FOR WARRANTY WILL BE HONORED WITHOUT PROOF OF PURCHASE
Limitations of implied Warranties and exclusion of certain damages. Any implied Warranties,including Warranties of usefulness for a particular purpose are limited in duration to the length of theWarranty.
QUASIMIDI’s liability for any defective product is limited to repair or replacement of the product.
QUASIMIDI shall not be liable under any circumstances for :1) Damages based upon inconvenience, loss of use of the unit, loss of time, interrupted operation orcommercial loss.2) Any other damages, whether incidental, consequential or otherwise, except damages which maynot be excluded under applicable law.
WARRANTY REGISTRATION
149

Technical Data
150
Technical Data of the QUASIMIDI Sirius:
What´s in the box:
Concept:
Sound Generation::
Polyphony:
Keyboard:
Fast-Edit Macros:
Random-SoundCreation:
Sound Storage:
Sequencer:
Vocoder:
Arpeggiator:
Effects:
User Controls:
Display:
Connections:
Power Source:
Dimensions:
Sirius, 1 x external mains adapter, 1 x Goose neck microphone, 2 x 6,3mm (1/4") jackcable, 2 x 1/4" jack to phono (RCA) adapters, this Manual, Warranty form.
Synthesizer with step and realtime sequencer, drum computer, vocoder with filter bank,beat recognition system, arpeggiator and 2 built-in independent effects processors.
DTE- Synthesis based on spectral waveforms, Subtractive synthesis with 2 Oscillators pervoice, 2 ADSRs (one VCA, one VCF), 1 pitch envelope, keyboard tracking, glide, marcoaccess for rapid sound creation. Filter: 24dB lowpass, 12db lowpass, 12db high pass.With resonance to self oscillation and overdrive.
28 voices, 7-channel multi mode.
49 keys, 4 octaves.
For filters, amplifier envelope, modulation routing, oscillator tuning and waveform sets.
At the touch of a button.
Instant storage in categories by single touch button. 672 ROM locations, 480 userstorage for new sounds RAM locations. 20 drum sets, 256 drum and percussioninstruments..
7 channels (kick, snare, hihat, percussion and 3 polyphonic synthesizer channels), 142ROM patterns, 100 RAM patterns, 16 songs. Drum programming (drum grid andrealtime). Step sequencer recording with 4 levels of accent and glide per step. Real timerecording for all tracks. Tempo 51-250 BPM. 8 stage groove quantize. Synchronizationwith MIDI clock and MIDI song position pointer. Synchronization with external audiosignals (i.e. Turn tables, CD players etc.) With intelligent beat recognition system.
11 channels (1 lowpass, 9 bands, 1 high pass), 16 programmable Vocoding presetsincluding i.e.: Standard, robotic, frequency shifted, cross modulated etc.
Fully programmable. 16 (partly polyphonic) presets of arpeggiation with automaticsynchronization. Gater and Chord Trigger functions. 9 storage locations for arpeggiomotions.
2 independent effect processors for reverb, delay, chorus etc. Over blast for globalsound contour.
22 real time controls, 1 Over blast, 1 microphone gain, 70 lighted touch switches, 2wheels ( 1 pitch-bend, 1 fully programmable and assignable modulation wheel), 1VALUE/TEMPO-dial.
2X16 character LCD display with back lighting.
4 x1/4 inch jacks (stereo out and 2 inputs), 1/4 inch jack for foot switch, 1 Midi in, 1Midi out, 1 Midi thru, balanced XLR for microphone.
External Power supply (included) 10.5 Volts DC, 1.5 Amps.
Width = 73.5 cm, Depth = 37.5 cm, Height = 11.5 cm.


