SIR C.R.REDDY COLLEGE OF ENGINEERING … Carpentry 1-5 ... These are general purpose chisels and are...
67
SIR C.R.REDDY COLLEGE OF ENGINEERING ELURU-534007 ENGINEERING WORKSHOP MANUAL I/IV B.TECH I & II SEMESTER Name Register Number Branch Section
Transcript of SIR C.R.REDDY COLLEGE OF ENGINEERING … Carpentry 1-5 ... These are general purpose chisels and are...

SIR C.R.REDDY COLLEGE OF ENGINEERING
ELURU-534007
ENGINEERING WORKSHOP MANUAL
I/IV B.TECH I & II SEMESTER
Name Register Number Branch Section

DEPARTMENT OF MECHANICAL ENGINEERING
CONTENTS
S.No. Name of the Experiment Page No.
Preface i
Acknowledgement ii
Lab Objectives & Guidelines to the students iii
University Syllabus iv
Index v
1 Carpentry 1-5
1.1 T – Lap Joint 6-8
1.2 Cross Lap Joint 9-11
2 Fitting 12-22
2.1 V- Fit 23-25
2.2 Square Fit 26-28
3 Black Smithy 29-32
3.1 Round rod to Square 33-35
3.2 S – Hook 36-37
4 House Wiring 38-44
4.1 Parallel/ Series connection of three bulbs 45-48
4.2 Stair case connection 49-51
5 Tin Smithy 52-55
5.1 Square box without lid 56-57
5.2 Open scoop 58-60

PREFACE
The engineers can create a new kind of civilization, based on technology, where art,
beauty and finer things of life are accepted as everyone’s due. Engineers, whatever be their
line of activity, must be proficient with all aspects of manufacturing. However, it should not
be forgotten that practice without theory is blind and the theory without practice is lame. A
person involved in acquiring manufacturing skills must have balanced knowledge of theory
as well as practice. Thus, workshop practice is a study and practices of the scientific
principles underlying the art of manufacture- an important subject when one considers that
it is the skill in manufacturing activity that makes a better standard of living.
This manual is written to meet the objectives of the training courses in “Engineering
Workshop Laboratory” for the first year students of Civil, Mechanical, Electrical and
Electronics Engineering, Electronics and Communication and Information Technology
branches. It imparts basic knowledge of various tools and their use in different sections of
manufacture such as fitting, carpentry, black smithy, tin smithy and house wiring.

Lab Objective
To impart hands-on practice on basic engineering trades and skills.
Recommended Equipment
1. Carpentry Tools
2. Fitting Tools
3. House Wiring Tools
4. Black Smithy Tools
5. Tin Smithy Tools
Guidelines to the Students
All staff and students who undertake work in the workshop and laboratories must take reasonable
care of their own health and safety and the health and safety of others by:
Taking action to avoid, eliminate or minimize hazards of which they are aware;
Complying with all occupational health and safety instructions, policies, and procedures
including departmental safety manuals;
Making proper use of all safety devices and personal protective equipment;
Complying with the instructions given by emergency response personnel such as building
wardens and first aiders;
Not willfully placing at risk the health and safety of any other person;
Seeking information or advice where necessary before carrying out new or unfamiliar work;
Maintaining dress standards appropriate for the work being done. Appropriate protective
clothing and footwear must be worn at all times;
Consuming or storing food and drink in designated areas. Food is strictly forbidden in the
workshop or any laboratory.

All lifting equipment, including chain blocks, pendant hoist controls, and abbey lifting frames
are to be used by technical staff only unless training and authorization has been approved.
Being familiar with emergency and evacuation procedures and the location of and if
appropriately trained, in the use of, emergency equipment;
Safe Conduct
Never adopt a casual attitude in the workshop and always be conscious of the potential
hazards.
Ensure that personal clothing is suitable to the workshop conditions, e.g. Safety
footwear with steel capping. Thongs or open footwear should not be worn in the workshop
area. Singlets, tank tops or similar clothing are not suitable for wearing in the workshop.
Always wear eye protection when using power operated hand or machine tools or while
performing physical tests that could lead to eye damage.
Use protective clothing and devices appropriate to the type of operation being carried out,
giving due consideration to the work being carried out in the vicinity.
Never run in the workshop or any laboratory.
Never indulge in reckless behavior in the workshop
Always exercise care when opening and closing doors and entering or leaving the workshop.
Do not carry out any work in isolation in the workshop; ensure that at least a second person
is within call.
Do not handle, store or consume food or drink in the workshop.
Do not store food or drink in a refrigerator, which is used to store workshop materials.
Do not smoke within any university building.
Regard all substances as hazardous unless there is definite information to the contrary.
Before any work is carried out in the workshop, permission must be obtained from the
Workshop Supervisor.

Never undertake any work unless the potential hazards of the operation are known as
precisely as possible, and the appropriate safety precautions are adopted. Any flame
producing activity is not to commence until the immediate area has been cleared of dusts.
Take additional care when carrying or moving any potentially hazardous material or
substance.
Keep all fire-escape routes completely clear at all times.

JAWAHARLAL NEHRU TECHNOLOGICAL UNIVERSITY KAKINADA I Year B.Tech. (Common to all Branches)
ENGINEERING WORKSHOP
No. of Credits: 2
Note: At least two exercises to be done from each trade.
Carpentry: 1. T – Lap Joint
2. Cross Lap Joint
3. Dovetail Joint
4. Mortise & Tenon Joint
Fitting: 1. V- Fit
2. Square Fit
3. Half round Fit
4. Dovetail Fit
Black Smithy: 1. Round rod to Square
2. S – Hook
3. Round rod to Flat ring
4. Round rod to square headed bolt
House Wiring: 1. Parallel/ Series connection of three bulbs
2. Stair case connection
3. Florescent Lamp fitting
4. Measurement of earth resistance
Tin Smithy: 1. Taper tray
2. Square box without lid
3. Open scoop
4. Funnel

Index
Academic Year 20 -20
Exp. No. Date of
Conduction Name of the Experiment Marks/ Grade
Signature of the
Faculty Incharge
1
2
3
4
5
6
7
8
9
10
11
12

Engineering Workshop Department of Mechanical Engineering
1
CARPENTRY
INTRODUCTION
Carpentry may be defined as the process of making wooden components. It starts
from a marketable form of wood and ends with a finished product. It deals with the building
work, furniture, cabinet making, etc. Joinery, i.e., preposition of joints is one of the import
operations in all wood works. It deals with the specific work of a carpenter like making
different types of joints to form a finished product. In this session, tools and works
associated with joinery are presented.
CARPENTRY TOOLS
The following tools are used for all wood working operations.
MARKING AND MEASURING TOOLS
Marking Gauge
It is a tool used to mark lines parallel to the edge of a wooden piece. It consists of a
square wooden stem with a sliding wooden stock on it. On the stem is filled a marking pin,
made of steel. The stock is set at any desired distance from the marking point and fixed in
position by a screw. It must be ensured that the marking pin projects through the stem,
about 3mm and the end are sharp enough to make a very fine line. A Mortise Gauge
consists of two pins. In this, it is possible to adjust the distance between the pins, to draw
two parallel lines on the stock.
Try square
It is used for marking and testing the squareness of planed surfaces. It consists of a
steel blade, fitted in a Cast Iron stock. It is also used for checking the planed surfaces for
flatness. Its size varies from 150 to 300mm, according to the length of the blade. It is less
accurate when compared to the try-square used in fitting shop.
Compass and Divider
Compass and divider are used for marking arcs and circles on the planed surfaces of
the wood.
PLANING TOOLS
In general, planes are used to produce flat surfaces on wood. The cutting blade used
in a plane is very similar to a chisel. The blade of a plane is fitted in a wood or metallic block
at an angle.

Engineering Workshop Department of Mechanical Engineering
2
Jack plane which is about 35cm long is used for general planning. A smooth plane
that is about 20 to 25cm long is used for smoothing the stock. Being short, it can follow even
the slight depressions in the stock, better than the jack place. Smoothing plane is used after
using the jack plane.
A rebate plane is used for making a rebate. A rebate is a recess along the edge of a
piece of wood which is generally used for positioning glass in frames and doors. A rough
plane is used to cut grooves, which are used to fix panels in a door.

Engineering Workshop Department of Mechanical Engineering
3
CUTTING TOOLS
Cross Cut (or) Hand Saw
It is used to cut across the grains of the stock. The teeth are so set that the saw kerf will
be wider than the blade thickness. This allows the blade to move freely in the cut, without
sticking.
Rip Saw
It is used for cutting the stock along the grain. The cutting edge of this saw makes a
steeper angle (about 60°), where as that of cross cut saw makes an angle of 45º with the
surface of the stock.
Tenon Saw

Engineering Workshop Department of Mechanical Engineering
4
It is used for cutting tenons and in fine cabinet work. The blade of this saw is very thin
and so it is stiffened with a thick back strip. Hence, this is sometimes called as backsaw.
Firmer Chisels
Chisels are used for cutting and shaping wood accurately. These are general purpose
chisels and are used either by hand pressure or by a mallet. The blade of a firmer chisel is flat
and specified by the width of the blade.
Dovetail Chisel
It has a blade with a beveled back, due to which it can enter sharp corners for finishing
them, as in dovetail joint.
Mortise Chisel
These are used for cutting mortises. The cross section of the mortise chisel is
proportioned to withstand heavy blows during mortising.

Engineering Workshop Department of Mechanical Engineering
5

Engineering Workshop Department of Mechanical Engineering
6
T – LAP JOINT
Expt.No: Date:
AIM: To make a T- Lap joint
MATERIAL REQUIRED: 150 x 48 x 44 mm country wood pieces - 2Nos
TOOLS REQUIRED:
1. Carpenter’s vice
2. Steel rule
3. Tenon saw
4. Try square
5. Hand saw or Cross cut saw
6. Marking gauge
7. Metal jack plane
8. Firmer chisel
9. Wooden mallet
SEQUENCE OF OPERATIONS:
1. The given wooden pieces are checked to ensure their correct size.
2. The piece is firmly clamped in the carpenter’s vice and any two adjacent faces are planned by the jack plane and the two faces are checked for squareness with the try square.
3. Marking gauge is set and lines are drawn to mark the thickness and width of the model.
4. The excess material is first chiseled out with firmer chisel and then planned to correct size.
5. The mating dimensions of the parts are then marked using scale and marking gauge.
6. Using the cross cut saw, the portions to be removed are cut in both the pieces, followed by chiseling and also the parts are separated by cross-cutting, using the tenon saw.
7. The ends of both the parts are chiseled to the exact lengths.

Engineering Workshop Department of Mechanical Engineering
7
8. A fine finishing is given to the parts, if required, so that proper fitting is obtained.
9. The parts are fitted to obtain a slightly tight joint.
PRECAUTIONS:
1. While fixing the job in the vice it should be fixed parallel to the jaws.
2. Uniform pressure should be applied while sawing
3. While cutting with saw, hold it be perpendicular to the job.
4. Chiseling is to be done carefully.
Fig.T- Lap Joint
RESULT: The T lap Joint is thus made by following the above sequence of operations.

Engineering Workshop Department of Mechanical Engineering
8
VIVA QUESTIONS
1. Name the commonly available shapes of timber in the market.
2. Classify wood used for construction purposes.
3. What is the difference between marking gauge and marking knife?
4. What is the difference between C-clamp and bar cramp?
5. What for a plane is used in a carpentry shop?
SIGNATURE OF THE FACULTY

Engineering Workshop Department of Mechanical Engineering
9
CROSS LAP JOINT
Expt.No: Date:
AIM: To make a Cross Lap Joint.
MATERIAL REQUIRED: 150 x 48 x 24 mm country wood - 2Nos
TOOLS REQUIRED:
1. Carpenters vice
2. Steel rule
3. Tenon saw
4. Try square
5. Hand saw or Cross cut saw
6. Marking gauge
7. Metal jack plane
8. Firmer chisel
9. Wooden mallet
SEQUENCE OF OPERATIONS:
1. The given wooden pieces are checked to ensure their correct size.
2. The piece is firmly clamped in the carpenter’s vice and any two adjacent faces are planned by the jack plane and the two faces are checked for squareness with the try square.
3. Marking gauge is set and lines are drawn to mark the thickness and width of a model respectively.
4. The excess material is first chiseled out with firmer chisel and then planned to correct size.
5. The mating dimensions of the parts are then marked using scale and marking gauge.
6. Using the cross cut saw, the portions to be removed are cut in both the pieces, followed by chiseling and also the parts are separated by cross-cutting, using the tenon saw.
7. The ends of both the parts are chiseled to the exact lengths.

Engineering Workshop Department of Mechanical Engineering
10
8. A fine finishing is given to the parts, if required so that, proper fitting is obtained.
9. The parts are fitted to obtain a slightly tight joint.
PRECAUTIONS:
1. While fixing the job in the vice it should be fixed parallel to the jaws.
2. Uniform pressure should be applied while sawing.
3. While cutting with a saw hold it perpendicular to the job.
4. Chiseling is to be done carefully.
Fig.Cross Lap Joint
RESULT: The Cross lap joint is thus made by following the above sequence of operations.

Engineering Workshop Department of Mechanical Engineering
11
VIVA QUESTIONS
1. Classify the planning tools.
2. Classify the chisels and their applications.
3. Name the tools used for pulling nails.
4. On what parameters does the strength of the joint depend?
5. Which processis used to removemoisture content in wood?
SIGNATURE OF THE FACULTY

FITTING
INTRODUCTION
Manufacturing processes are broadly classified into four categories:
1. Casting processes
2. Forming processes
3. Fabrication processes
4. Material removal processes.
In all these processes, components are produced with the help of either machines
or manual effort. The attention of the fitter is required at various stages of manufacture
starting from marking to assembling and testing the finished goods.
Machine tools are capable of producing work at a faster rate, but there are
occasions when components are processed at the bench. Sometimes it becomes
necessary to replace or repair a component which must fit accurately with another
component on reassembly. This involves a certain amount of hand fitting. The assembly of
machine tools, jigs, gauges, etc. involves certain amount of bench work. The accuracy of
work done depends upon the experience and skill of the fitter.
The term bench work refers to the production of components by hand on the
bench. Whereas fitting deals with the assembly of mating parts, through removal of metal,
to obtain the required fit.
Both the bench work and fitting requires the use of number of simple hand tools
and considerable manual effort. The operations in the above works consist of fitting,
chipping, scrapping, sawing driller tapping, etc.
FITTING TOOLS
WORK HOLDING TOOLS
Bench Vice
The bench vice is a work holding device. When the vice handle is turned in a
clockwise direction the sliding jaw forces the work against the fixed jaw. The greater the
pressure applied to the handle, the tighter is the work held. The jaws are made of
hardened steel. Serrations on the jaws ensure a good grip. Jaw caps made of soft material
such as Aluminium or GI is used to protect finished surfaces of the work gripped in the
vice.
The body of the vice is made of cast iron which is strong in compression but
fractures under shock and therefore should never be hammered.

V Block with Clamp
The V block is a rectangular or square block with a V groove on one or both sides,
opposite to each other. The angle of the ‘V’ is usually 90º. V block with a clamp is used to
hold cylindrical work securely, during layout of measurements or for measuring operation.
It is made of CI or hardened steel.
C Clamp
This is used to hold work against an angle plate or V block or any other surface,
when gripping is required. It is also known as C clamp.

MARKING AND MEASURING TOOLS
Surface plate
The surface plate is used for testing the flatness of the work piece. It also used for
marking out small works and is more precise than the marking table. The surface plate is
made of cast iron, hardened steel or granite stone. It is specified by length x width
xheight x grade. Now a days surface plates are made of special granite stones.
Angle plate
The angle plate is made of cast iron. It has two surfaces machined at right angles
to each other. Plates and components, which are to be marked out may be held against
the upright face of the angle plate to facilitate the marking or inspection.
Universal Scribing Block
This is used for scribing lines for layout work and checking parallel surfaces.
Try square
Try square is used for checking the squareness of many types of small works,
when extreme accuracy is not required. The blade of the try square is made of hardened
steel and the beam of cast iron or steel. The size of the try square is specified by the
length of the blade.
Combination Set
A combination set consists of a rule, square head, centre head and a protractor.
This may be used as a rule, a square, a depth gauge for marking angles. The rule is made
of tempered steel with grooves.
Scriber
A scriber is a slender steel rod, used to scribe or mark lines on metal work pieces.
Odd Leg Caliper
This is also called ‘Jenny Caliper’ or ‘Hermaphrodite’. This is used for marking
parallel lines from a finished edge and also for locating the centre of round bars. They are
specified by the height of the leg up to the hinge point.
Divider
This is used for marking circles, arcs, laying out perpendicular lines, bisecting lines,
etc.

Dot Punch
This is used to locate centre of holes and to provide a small centre mark for
divider point, etc. For this purpose, the punch is ground to a conical point having 60º
included angle.

Calipers
These are used with the help of steel rule to check inside and outside
measurements.
Vernier Calipers
These are used for measuring outside as well as inside dimensions accurately. It may
also be used as a depth gauge. In the figure, 19 main scale divisions are divided into 20
equal parts in the Vernier scale.
Hence least count of the Vernier
= 1 main scale division – 1 Vernier scale division
= 119/20=0.05 mm.
Vernier Height Gauge
The Vernier height gauge, clamped with a scriber, is used for layout work. An offset
scriber is used when it is required to take measurements from the surface on which the
gauge is standing. The accuracy and working principle of the gauge are the same as those of
the Vernier caliper.
Outside Micrometer
This is used for measuring external dimensions accurately. The figure shows a
micrometer of 0 to 25mm range with an accuracy of 0.01mm. These micrometers are
available in different ranges with interchangeable anvils.
Inside Micrometer
This is used to measure inside dimensions accurately. An inside micrometer of range
25 to 150mm with extension rods is shown in figure.

CUTTING TOOLS
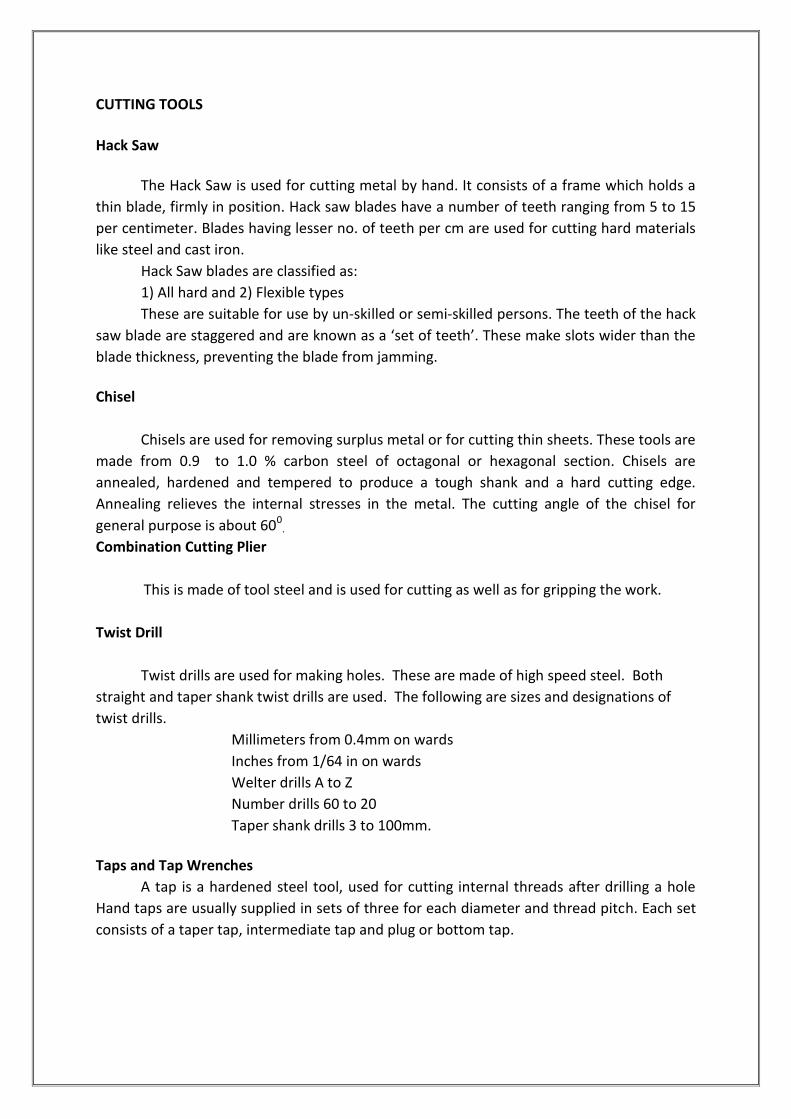
Hack Saw
The Hack Saw is used for cutting metal by hand. It consists of a frame which holds a
thin blade, firmly in position. Hack saw blades have a number of teeth ranging from 5 to 15
per centimeter. Blades having lesser no. of teeth per cm are used for cutting hard materials
like steel and cast iron.
Hack Saw blades are classified as:
1) All hard and 2) Flexible types
These are suitable for use by unskilled or semiskilled persons. The teeth of the hack
saw blade are staggered and are known as a ‘set of teeth’. These make slots wider than the
blade thickness, preventing the blade from jamming.
Chisel
Chisels are used for removing surplus metal or for cutting thin sheets. These tools are
made from 0.9 to 1.0 % carbon steel of octagonal or hexagonal section. Chisels are
annealed, hardened and tempered to produce a tough shank and a hard cutting edge.
Annealing relieves the internal stresses in the metal. The cutting angle of the chisel for
general purpose is about 600.
Combination Cutting Plier
This is made of tool steel and is used for cutting as well as for gripping the work.
Twist Drill
Twist drills are used for making holes. These are made of high speed steel. Both
straight and taper shank twist drills are used. The following are sizes and designations of
twist drills.
Millimeters from 0.4mm on wards
Inches from 1/64 in on wards
Welter drills A to Z
Number drills 60 to 20
Taper shank drills 3 to 100mm.
Taps and Tap Wrenches
A tap is a hardened steel tool, used for cutting internal threads after drilling a hole
Hand taps are usually supplied in sets of three for each diameter and thread pitch. Each set
consists of a taper tap, intermediate tap and plug or bottom tap.

Dies and Die Holders
Dies are cutting tools used for making external threads. Dies are made either solid or
split type. They are fixed in a die holder for holding and adjusting the die gap. They are
made of tool steel or high carbon steel.
The following are the stages in producing external threads.
1. Prepare the work with a chamfer at its end.
2. Select the correct size die.
3. Position the die in the die holder. Tighten the set screws so that the die is held firmly in
its place. In case of adjustable die, set the die to cut oversize threads first.
4. Fasten the work firmly in a vice.
5. Place the die over the chamfered end of the work and start cutting threads by turning
it clockwise while applying downward pressure. Apply cutting fluid while threading in
steel.
6. Turn back the die for the chips to break loose. Continue until threading is completed.
7. Check the threaded work to see if it fits the tapped hole or nut. If the fit is too tight
adjust the die for a straight deeper cut and complete the threading again.
Bench Drilling Machine
Holes are drilled for fastening parts with rivets or bolts for producing internal
threads. Bench drilling machine is the most versatile machine used in a fitting shop for the
purpose. Twist drills, made of tools for high speed steel are used with the drilling work.


FINISHING TOOLS
File
Filing is one of the methods of removing small amounts of material from the surface
of a metal part. A file is hardened steel tool, having slant parallel rows of cutting edges or
teeth on its surfaces. One end of the file is shaped to fit into a wooden handle. Figure shows
the parts of a hand file. The hand file is parallel in width and tapering slightly in thickness,
towards the top. It is provided with double cut teeth on the faces, single cut on one edge
and no teeth on the other edge, which is known as the safe edge.
Types of Files
Files are classified according to their shape, cutting teeth and pitch or grade of the
teeth. The figure shows the various types of files based on their shape.
MISCELLANEOUS TOOLS
Ball Peen Hammer
Hammers are named, depending on their shape and material and specified by their
weight. A ball peen hammer has a flat face which is used for general work and the ball end,
particularly used for riveting. They weigh from 200g to 1.5kg.
The hammer consists of a hardened and tempered steel head varying in mass from
0.1kg to about 1kg the flat striking surface is known as the face, and the opposite side is
called the peen.
Screw Driver
A screw driver is designed to turn screws. The blade is made of steel and is available
in different lengths and diameters. The grinding of the tip of the blade to the correct shape
is very important. Screw driver is specified by the length of the steel rod. A Phillips screw
driver is specially designed to fit the head of Phillips screws. The end of the blade is fluted
instead of flattened.
Spanner
A spanner or wrench is a tool for turning nuts and bolts. It is usually made of forged
steel. There are many kinds of spanners. They are named according to the shape and
application. The size of the spanner denotes the size of the bolt on which it can work.


V- FIT
Expt.No: Date:
AIM: To Make a V-Fit
MATERIAL REQUIRED: 4X48 X48 mm Mild Steel Flat - 2 Nos
TOOLS REQUIRED:
1. Bench vice 2. Steel rule 3. Try square 4. Ball-peen hammer 5. Jenny caliper 6. Dot punch 7. Centre punch 8. Set of files 9. Surface plate 10. Hacksaw with blade 11. Divider
SEQUENCE OF OPERATIONS:
1. Right angle filing 2. Marking 3. Punching 4. Hack-sawing 5. Finishing
WORKING STEPS:
1. The burrs in the pieces are removed and the dimensions are checked with steelrule. 2.The outer mating edges are filed, by rigidly fixing in the bench vice. The flatness of the edges is also checked by the try-square. 3. The edges of the two pieces are filed such that, they are at right angles to the edges and the widths are exactly 48mm each. 4. Chalk is then applied on the surfaces of the two pieces. 5. The given dimensions are marked on the two pieces, by using the Jenney caliper and spring divider 6. Using the dot punch, dots are punched along the above scribed lines. 7. Using the hack saw the unwanted portions are removed to the extent possible. 8. The cut edges are filed by using square and half round files.
9. The pieces are fitted together and the mating is checked for the correctness of the fit.
Anydefects noticed are rectified by filing with a smooth file.

SAFETY PRECAUTIONS:
1. While filing, set the work piece parallel to bench-vice. 2. While hack-sawing set the work piece perpendicular to bench vice. 3. Fix hacksaw blade in the forward direction. 4. Apply coolant while hack-sawing.
Fig. V Fit
RESULT: The required V Fitting is thus obtained.

VIVA QUESTIONS
1. Define the terms, ‘Bench work’ and ‘fitting’.
2. What for a C- clamp is used?
3. Define ‘Least count’ of a Vernier.
4. Classify hacksaw blades.
5. Name the material with which a vice body is normally made of.
SIGNATURE OF THE FACULTY

SQUARE FIT
Expt.No: Date:
AIM: To Make a square fit
MATERIAL REQUIRED: 4X48 X48 mm Mild Steel Flat - 2 Nos
TOOLS REQUIRED:
1. Bench vice
2. Steel rule
3. Try square
4. Ball peen hammer
5. Jenny caliper
6. Dot Punch
7. Centre punch
8. Set of files
9. Surface plate
10. Hacksaw with blade
11. Divider
SEQUENCE OF OPERATIONS:
1. Right angle filing 2. Marking 3. Punching 4. Hack sawing 5. Finishing
WORKING STEPS
1. The burrs in the pieces are removed and the dimensions are checked with steelrule.
2. The outer mating edges are filed, by rigidly fixing in the bench vice. The flatness of
the edges are also checked by the try-square.
3. The edges of the two pieces are filed such that, they are at right angle to the edges
and the widths are exactly 48mm each.
4. Chalk is then applied on the surfaces of the two pieces.
5. The given dimensions are marked on the two pieces, by using the Jenney caliper and
spring divider
6. Using the dot punch, dots are punched along the above scribed lines.
7. Using the hack saw the unwanted portions are removed to the extent possible.
8. The cut edges are filed by using square and half round files.

9. The pieces are fitted together and the mating is checked for the correctness of the
fit. Any defects noticed are rectified by filing with a smooth file.
SAFETY PRECAUTIONS: 1. While filing set the work piece parallel to bench-vice. 2. While hack-sawing set the work piece perpendicular to bench vice. 3. Fix the hacksaw blade in the forward direction. 4. Apply coolant while hack-sawing.
Fig.Square Fit
RESULT: The required square joint is thus obtained.

VIVA QUESTIONS:
1. Differentiate between all hard and flexible hacksaw blades.
2. Name the different types of hammers used in fitting work.
3. Differentiate between single cut and double cut files.
4. What is meant by pinning of files?
5. Differentiate between cross filing and draw filing.
SIGNATURE OF THE FACULTY

BLACK SMITHY
INTRODUCTION
Black smithy work consists of heating a metal stock till it acquires sufficient plasticity,
followed by hand forging involving hammering, bending, pressing, etc. till the desired shape
is attained. Hand gorging is the term used, when the process is carried out by hand tools.
The hand forging process is generally employed for relatively small components.
TOOLS
Forge or Hearth
A smith’s forge or hearth is used to heat the metal to be shaped. Hearths are used for
heating small jobs to be forged by hand. Gas, oil or coal firing may be used for the purpose.
The required air for the fire is supplied under pressure, by a blower through the tuyere in
the hearth. The blowers may either be hand operated or power driven. In the latter case,
the amount of air supply is controlled by valves near the forge. The hood collects gases of
combustion and sends out through a chimney.
Anvil
It provides the necessary support during forging by resisting the heavy blows
rendered to the job. It is also useful for operations such as bending, swaging, etc. Its body is
generally made of cast steel, wrought iron or mild steel, with a hardened top layer of about
20 to 25 mm thick. Figure show an anvil with various parts marked on it.
Beak is used for bending metal to round shapes. The square hardie hole is used to
hold square shank tools like, swages and fullers. The punching hole is used for bending small
rods and punching holes in the work. Anvils are made in sizes weighing from 25 to 250kg. An
anvil weighing about 75kg is suitable for general purpose.
Swage Block
A Swage block has a number of slots of different shapes and sizes along its four side
faces and through holes of different shapes and sizes, running from its top to bottom faces.
This is used as a support while forming (Swaging) different shapes and in punching holes. It
is generally made of cast iron or cast steel.

Hammer
Hammers of different types and weights are used in black smithy. The ball peen
hammer used for forging, weighs 0.5 to 1kg. The sledge hammer which is used for heavy
work has flat ends on either side and weighs 3 to 8 kg. The length of the handle of a
hammer increases with its weight.
Tongs
The metal to be forged must be held securely, while it is being shaped. A pair of tongs
of suitable size and shape must be used for the purpose. Figure shows the most commonly
used shapes in a black smithy shop. They are made of mild steel and the size varies from 40
cm to 60 cm in length and 6mm to 55mm opening.

FORGING OPERATIONS
The following are the basic operations that may be performed by hand forging.
Drawing
Drawing is the process of stretching the stock while reducing its cross section.
Forging the tapered end of a cold chisel is an example of drawing operation.
Upsetting
It is a process of increasing the area of cross section of a metal piece locally, with a
corresponding reduction in length.
Fullering
Fullers are used for necking down a piece of work, the reduction often serving as the
starting point for drawing. Fullers are made of high carbon steel in two parts, called the top
and bottom fullers. The bottom tools fit in the hardie hole of the anvil. Fuller size denotes
the width of the fuller edge.
Flattening
Flatters are the tools that are made with a perfectly, flat face of about 7.5 cm square.
These are used for finishing flat surfaces. A flatter of small size is known as set hammer and
is used for finishing near corners and in confined spaces.
Swaging
Swages, like fullers are also made of high carbon steel and are made in two parts
called top and bottom swages. These are used to reduce and finish to round or hexagonal
form. For this, the swages are made with half grooves of dimensions to suit the work.

Bending
Bending of bars, flats, etc. is done to produce different types of bent shapes such as
angles, ovals, circles, etc. Sharp bends as well as round bends may be made on the anvil, by
choosing the appropriate place on it for the purpose.
Twisting
It is also one form of bending. Sometimes, it is done to increase the rigidity of the
work piece. Small pieces may be twisted by heating and clamping a pair of tongs on each
end of the section to be twisted and applying a turning moment. Larger pieces may be
clamped in a leg vice and twisted with a pair of tongs or a monkey wrench. However, for
uniform twist, it must be noted that the complete twisting operation must be performed in
one heating.

ROUND ROD TO SQUARE
Expt.No: Date:
AIM:To make a 130mm length and 8 mm side square rod.
MATERIAL REQUIRED: Mild steel rod of ø10×106mm.
TOOLS REQUIRED:
1. Blacksmith furnace
2. Tongs
3. Anvil
4. Swage block
5. Sledge hammer
6. Flatters.
SEQUENCE OF OPERATIONS:
1. Heating
2. Hammering
3. Flattening
4.Squareness checking
5. Cooling
WORKING STEPS:
1. One half of the rod is heated to red hot condition in the smith’s forge, 2. Holding the rod with tongs and placed on the anvil face, the rod is then hammered 3. The rod is hammered such that round rod is converted in to square rod 4. Repeat the process until the required squareness and length is obtained
PRECAUTIONS:
1) Wear gloves when handling the hot metal.
2) Wear face shield when hammering the hot metal.

Fig. Round rod to Square
RESULT: Thus the required square rod is obtained from the round rod.

VIVA QUESTIONS
1. What is meant by smithy?
2. Differentiate between hand forging and machine forging.
3. Classify the tongs and what are their applications?
4. Differentiate between hot and cold chisels.
5. What are the advantages of forging?
SIGNATURE OF THE FACULTY

S – HOOK
Expt.No: Date:
AIM: To make a S- hook from the given round rod by hand forging operation
MATERIAL REQUIRED: MS round rod of length 220 mm and diameter 6 mm
TOOLS REQUIRED:
1. Smith's Forge
2. Pick-up tongs
3. Anvil
4. Swage block
5. Sledge hammer
6. Flatters
SEQUENCE OF OPERATIONS:
1. Heating
2. Stretching
3. Bending on the large diameter side
4. Bending on the smaller diameter side.
5. Finishing to the required shape and size
6. Cooling
PROCEDURE:
1. One end of the bar is heated to red hot condition in smith’s forge. 2. Using pick-up tongs, the rod is taken from the forge and held with half round tongs. The heated end is forged into pointed end. 3. One half of the rod towards the pointed end is heated in the forge to red hot condition and then bent into circular shape as shown. 4. The other end of the rod is then heated and forged intopointed end. 5. The straight portion of the rod is heated in the forge to red hot condition and then bent into circular shape as required. 6. Using the flatter, the S-hook made as above, is kept on the anvil and flattened so that the shape of the hook is proper.

PRECAUTIONS:
1) Wear gloves when handling the hot metal.
2) Wear face shield when hammering the hot metal
Fig. S-hook
RESULT: The required S-hook bend is thus obtained from the given round rod.
VIVA QUESTIONS:
1. What for swage block is used in a smithy shop?
2. Metals to be forged are heated below/above their melting temperature.
3. Sledge hammer is ……………………. than ball-peen hammer. (heavier/lighter)
4. Which part of the anvil is used to form rings?
5. What are the various stages of hand forging to get the desired shape?
SIGNATURE OF THE FACULTY

HOUSE WIRING
INTRODUCTION
Power is supplied to the domestic installations through, the phase and a neutral, forming a single phase AC 230V, two wire system. For industrial establishments, power is supplied through three-phase four-wire system to give 440V. Figure shows the power tapping for domestic and industrial purposes. The neutral is earthed at the sub-station of the supply.
As a safe practice all single-phase devices such as switches, fuses, etc. are connected to the live conductor. All electrical conductors and cables are color coded and must be correctly connected up. Electrical wiring is defined as a system of electrical conductors, components and apparatus for conveying electrical power from the source to the point of use. The wiring system must be designed to provide a constant voltage to the load.
Elements of House wiring:
1. Fuses and circuit breakers 2. Electrical switch
3. Plug
4. Socket outlet
5. Lamp holder
6. Ceiling rose
7. Main switch
8. Incandescent light


Wires and wire sizes: A wire is defined as a bare or insulated conductor consisting of one or several strands. An insulated wire consists of a conductor (Silver/Copper/Aluminum) with insulating material made of vulcanized Indian Rubber (VIR) or Poly Vinyl Chloride (PVC). Wire sizes are specified by the diameter of the wire, using a standard wire gauge (SWG), which also gives an idea of the current carrying capacity. The specification consists of both the number of strands and diameter of each wire in it. For Example, the specification 3/18 PVC consists of 3 strands of 18 gauge each. Various systems of wiring:
1. Cleat wiring 2. CTS / TRS wiring (Cap tyer sheathed/ Tough rubber sheathed wiring) 3. Wooden casing & capping wiring 4. Lead sheathed wiring 5. Conduit wiring 6. PVC casing & capping
Wiring methods: 1. Series circuit 2. Parallel circuit
Fundamentals of Electricity: Electricity: Electricity is a form of energy, which cannot be seen. But can be felt and effectslike magnetic effect, heating effect and chemical effect. Voltage: It is a pressure which makes the electricity to flow. The unit of measure is Volt. Thesymbol used is ‘V’. The instrument used to measure is Voltmeter Current: The free flow of electrons is called as current. The unit to measure current is ‘Ampere’. The symbol is ‘A’. The instrument used to measure the current is Ammeter. Resistance: It is opposition to current. The unit of resistance is ‘Ohm’. The symbol of ohm is Ω. The resistance is measured by Ohmmeter. Watt: It is the rate of doing work, when potential difference across the current is of Volt andcurrent flowing is ampere per second. The energy consumed is of Watt.
1000 Watts = 1 Unit 746 Watts = 1 HP
The following are the formulae for calculation. Voltage, V = IR Current, I = V / R Resistance, R = V2 /P Wattage, P = V I = V2/R
House Wiring Tools: Combination Pliers: Used for holding, twisting or cutting of wires Side cutting Pliers: Used for Cutting at narrow places or ordinary places for removing insulation Round Nose Pliers or Flat Nose Pliers: Used for holding, twisting or joining the wire at narrow places. Firmer Chisel: Used for chipping, scrapping and grooving the wood Cold chisel: Used for chipping, Boring and channeling in walls. Tenon saw or back saw: Used for cutting wooden boards, wooden blocks, etc. Hack saw: Used for cutting conduit GI pipes or mild steel.

Mallet: Used as a hammer and made of wood. Double blade electric knife: It has two blades, one for removing insulation of wires andanother for cleaning the wires. Soldering Iron: Used to solder small joint terminals. Poker: Used for making pilot holes for fixing wood screws. Line Tester: Used for testing the current. Royal Plug Tool: It is made of steel and is used for making holes in the stone wall or concretewall for fiber made Royal plugs Screw driver: Used for loosening, tightening and to keep the screws in position. Ball Peen Hammer: Used for fitting nails in the walls or wooden boards.


Instructions:
1. When closing the electric switch, always grasp the switch by the insulated handle. 2. Do not run too many electrical items from one point. 3. Use fuses and circuit breakers of proper capacity, so as to interrupt the
current before it becomes dangerous. 4. Disconnect the units to be repaired free from power supply and make sure that
they might not be energized while the repair work continues. 5. Do not pour water to put-off fires in electric wires and electric equipment. You will
be subjected to electric shock or you will be electrocuted. Use sand to put-off fires in electric items.
6. Whenever there is power failure, put-off the power supply to all equipment, in order to prevent spontaneous recovery.
7. Never remove a plug from an outlet by pulling cord. Always pull by holding the plug. 8. While testing always keep one hand in your pocket. If the hands are in contact with a
circuit, current will flow across your body and is more dangerous. 9. Electricity has no respect for ignorance. Do not apply voltage or turn-on any device
until it has been properly checked. 10. Check earth connection before switching on portable equipment.

PARALLEL/SERIES CONNECTION OF THREE BULBS
Expt. No: Date:
AIM: To make a parallel/series connection of three bulbs
APPARATUS REQUIRED:
S.No. Name of
apparatus Type Range Quantity
1 MCB Double pole 6A, 230V 1
2 Fuse Rewirable 0-5A 1
3 Lamp Incandescent 60,230V 3
4 Switch (1-way) (SPST)Bakelite 6A,230V 1
5 Gang box Bakelite Type -- 1
6 Lamp holder Battery Type 6A,230V 3
7 Conduit box PVC 1-way, 2-way ½
8 Conduit PVC ½ inch 1
9 L-Bend Solid bend(PVC) ½ inch 1
10 Saddle Iron ½ inch L.S
11 Connecting
wires PVC
Insulation wire 1/18 SWG L.S
12 Ceiling plate PVC -- 3
13 Tape Insulation -- L.S
TOOLS REQUIRED:
1. Screwdriver
2. Cutting pliers
3. Voltage tester
4. Wire cutter
5. Lamp holders

PROCEDURE:
1. Take (1-way) SPST and mount it on a gang box by wiring screws given for the switch.
2. Fit the pipes on the wooden board with the help of screws and saddles as shown in
linediagram.
3. Remove the insulation of wire in conduit.
4. Join and insert the wires in conduit.
5. Connect the phase to switch as shown in wiring diagram.
SERIES CONNECTIONS:
The wires from the second terminal of the switch are given to the terminal of the lamp
holder of lamp “L1” the other terminal at next lamp “L2”.The empty terminal at next
lamp “L2” the other terminal at next lamp “L3”.The empty terminal at next lamp “L3” is
given to the neutral wire directly from the supply of mains as shown in wiring diagram.
PARALLEL CONNECTION:
The wire from the second terminal of the switch is given to the terminal of lamp holder
of “L1” from the same terminal connect a wire to the any one of the terminal of lamp
“L2” from the same terminal connect a wire to the any one of the terminal of lamp
“L3” then take the neutral wire, directly from the supply mains is given to the other
terminal of the lamp L1, L2 and L3 as shown in figure.
PRECAUTIONS:
1. Keep the mains in OFF position.
2. Do not use a switch are fuse in neutral connector
3. Use black colour wire in neutral.
4. Loose connections should be avoided.
5. Keep insulation tape on the wire joints.
6. Do not connect phase and neutral together it may cause short circuits
8. Take care about electric supply.

Bulbs in Series
Bulbs in Parallel
Fig. Parallel/Series Connection of three bulbs
RESULT: Series/Parallel connection of three bulbs is made.

VIVA QUESTIONS
1. Name the safety devices used to protect the electric circuits from overload.
2. Name the various types of fuses.
3. Differentiate between a fuse and a circuit breaker.
4. Name the types of lamp holders available in the market.
5. What is difference between emergency and indicator lamp?
SIGNATURE OF THE FACULTY

STAIR CASE WIRING
Expt. No: Date:
AIM: To do stair case wiring (i.e. control of one lamp by two switches fixed at two different
places)
APPARATUS REQUIRED:
S.No. Name of
apparatus
Type Range Quantity
1 MCB Double pole 5A, 230V 1
2 Fuse Rewirable 0-5A 1
3 Switch (SPST)Bakelite 2A,230V 2
4 Lamp Incandescent 60W,230V 1
5 Gang box Bakelite -- 2
6 Lamp holder Battery 2A,230V 1
7 Conduit box PVC ½ inch LS
8 L-Bend PVC ½ inch 1
9 Conduit box PVC 2-way 2
10 Saddle Iron ½ inch LS
11 Screws Iron ½ inch LS
12 Connecting
wires
C-W 1/8 Swg LS
TOOLS REQUIRED:
1. Screwdriver
2. Cutting pliers
3. Tester
4. Wire cutter
5. Test lamp

PROCEDURE:
1. Mark the location of switch and bulb on the given wooden board.
2. Mark line for wiring on the wooden board.
3. The required length of PVC pipe can be fixed along the lines with help of clips.
4. The wires of required length and colours are chosen and the wiring is
being made through the PVC pipe.
5. The bulb holder and switches are fixed in the corresponding location.
6. Use the red colour wire for phase line to the bulb through two way switch.
7. Another point of the bulb is connected to the neutral line using black wire.
8. The red and black wire terminals are connected to main switch.
9. Give the supply to the circuit.
10. Make the bulb to glow by operating the switches as shown in circuit.
PRECAUTIONS:
1. Keep the machine in OFF position.
2. Connect the phase and neutral to the supply mails.
3. Use black colour wire in neutral.
4.Loose connections should be avoided.
5. Keep insulation tape on the wire joints.
6. Take care about electric supply

Fig. Stair Case Wiring
RESULT: Stair case wiring (i.e. control of one lamp by two switches fixed at two different
places) is done.
VIVA QUESTIONS
1. What for a lamp holder is used in an electric circuit?
2. Name the different forms of interior wiring.
3. What for a ceiling rose is used?
4. What for a circuit breaker is used.
5. Define the term earthing or grounding.
SIGNATURE OF THE FACULTY

TIN SMITHY
INTRODUCTION
Tin smithy deals with making of metal boxes, cans, funnels and ducts from flat sheet
metal. In this, the development is drawn on the sheet metal and it is cut and folded to form
the required shape of the object. For successful working in this trade, one should have a
thorough knowledge of development of surfaces.
TOOLS AND EQUIPMENT
Some of the tools used in fitting are also used in sheet metal work. Certain additional
tools used by sheet metal workers are described below.
Snip
Hand shears or snips are used to cut sheet metal. Although there are many types, the
sheet metal worker generally uses straight snip and curved snip. Straight snips have straight
blades and are used for cutting along the straight line and for trimming edges. Curved snip
have a curved blade and are used for cutting circles and irregular shapes.
Bench Shear
Sheet metal may be cut by shearing action. Fig 5.1 shows a bench shear. In this the
force is applied through a compound lever, making it possible to cut sheet metal up to 4 mm
thick. It can shear a mild steel rod up to 10 mm diameter.
Stake
Stakes are made of steel and are available in a variety of shapes and sizes. Its working
face is machined and polished to facilitate various operations as bending, seaming or
forming. The various types of stakes are shown in fig.5.2
Hand Tools
The common hand tools used in sheet metal work are steel rule, usually of 60cm
length, wire gauge, dot punch, trammel, scriber, ball peen hammer, cross peen hammer,
mallet, snips and soldering iron.
Trammel
Sheet metal lay out requires marking of arcs and circles. This may be done by using
the trammel, as shown. The length of the beam decides the maximum size of the arc that
can be scribed.

Fig: 5.1 Bench Shear
Fig: 5.2 stakes

Fig: 5.3 Standard wire gauge

Wire Gauge
The thickness of sheet metal is referred in numbers known as Standard Wire Gauge
(SWG). The gaps in the circumference of the gauge are used to check the gauge number as
shown in Fig 5.3. Some of the standard wire gauge numbers with corresponding thickness
are as follows:
S. No. SWG No Thickness mm
1 10 3.20
2 12 2.60
3 14 2.30
4 16 1.60
5 20 1.00
6 22 0.70
7 24 0.65
8 26 0.45
9 30 0.30
Snip
Snips are hand shears, varying in length from 200mm to 600mm, 200mm to 250mm
being the lengths commonly used. Figure shows straight and curved snip or bentsnip is for
trimming along in side curves.
Hammers
Light weight hammers and mallets are used in sheet metal.
Sheet Metal Screws
Sheet metal screws are used in sheet metal work to join and install duct work for
ventilation, air conditioning, etc. These screws are also known as self-tapping screws since
they cut their own threads. Sharp and blunt pointed screws are used generally to join light
material. The hole size should be equal to the root diameter of the screw.

SQUARE BOX WITHOUT LID
Expt.No: Date:
AIM: To make a square box without lid from the given sheet metal.
MATERIAL SUPPLIED: 30 gauge galvanized iron (GI) sheet. 120x120mm
TOOLS REQUIRED:
1. Steel rule
2. Mallet
3. Scriber
4. Divider
5. Protractor
6. Straight snip
SEQUENCE OF OPERATIONS:
1. Checking
2. Leveling
3. Marking
4. Cutting
5. Bending
6. Seaming
WORKING STEPS:
1. The size of the given sheet is checked with the steel rule.
2. The layout of the tray is marked on the given sheet.
3. The layout of the tray is cut by using the straight snip.
4. Single hemming is made on the four sides of the box.
5. The edges of the box can be riveted or soldered to ensure stability of the joints.
PRECAUTIONS:
1. Mark the dimensions correctly.
2. Cut the sheet correctly.
3. Remove the chips with brush.

Fig. Square Box
RESULT: Thus the desired square box is obtained from the given sheet metal.
VIVA QUESTIONS
1. Sheet metal layout is known as ……………………………of the surface of the object.
2. A sheet of steel, which is coated with molten zinc is known as………………………..
3. Describe the process of sheet metal work.
4. What are the articles that are normally made of sheet metal?
SIGNATURE OF THE FACULTY

OPEN SCOOP
Expt.No: Date:
AIM: To make a open scoop from the given sheet metal.
MATERIAL SUPPLIED: 30 gauge galvanized iron (GI) sheet 110 x 120mm
TOOLS REQUIRED:
1. Steel rule
2. Mallet
3. Scriber
4. Divider
5. Protractor
6. Straight snip
SEQUENCE OF OPERATIONS:
1. Checking
2. Leveling
3. Marking
4. Cutting
5. Bending
6. Seaming
PROCEDURE:
1. The size of the given sheet is checked with the steel rule.
2. The layout of the scoop is marked on the given sheet.
3. The layout of the scoop is cut by using the straight snip.
4. The corners of the scoop are hemmed.
5. The corners of the scoop can be riveted or soldered to ensure stability of the
joints.

PRECAUTIONS:
1. Mark the dimensions correctly
2. Cutting of the sheet should be done carefully.
3. Clean the chips with brush.
Fig. Open Scoop
RESULT: The desired open scoop is obtained.
VIVA QUESTIONS
1. What are stakes? Name the different types
2. What are the applications of straight and bent snips?
3. What is the purpose of zinc coating on a G.I sheet?
4. Differentiate between cross-peen hammer and mallet.
SIGNATURE OF THE FACULTY