SIP Servlets Server User Guide - The Guide to the SIP...
150
SIP Servlets Server User Guide The Guide to the SIP Servlets v1.1-Certified Server Douglas Silas <[email protected]> Jean Deruelle <jean.deruelle (at) gmail.com> Vladimir Ralev <vladimir.ralev (at) gmail.com> Ivelin Ivanov <ivelin.atanasoff.ivanov (at) gmail.com> Charles Roufay <charles.roufay (at) gmail.com> Jared Morgan <[email protected]>
Transcript of SIP Servlets Server User Guide - The Guide to the SIP...
SIP Servlets Server User Guide
The Guide to the SIP
Servlets v1.1-Certified Server
Douglas Silas <[email protected]>
Jean Deruelle <jean.deruelle (at) gmail.com>
Vladimir Ralev <vladimir.ralev (at) gmail.com>
Ivelin Ivanov <ivelin.atanasoff.ivanov (at) gmail.com>
Charles Roufay <charles.roufay (at) gmail.com>
Jared Morgan <[email protected]>

SIP Servlets Server User Guide: The Guide to the SIP Servlets
v1.1-Certified Serverby Douglas Silas, Jean Deruelle, Vladimir Ralev, Ivelin Ivanov, Charles Roufay, and Jared Morgan
Abstract
This user guide will help you get a better understanding of Mobicents SIP servlets and how the
container can be used in an enterprise context. The guide will cover how to how to quickly get
started with Mobicents SIP servlets either on top of JBoss or Apache Tomcat containers. There
are sample applications included for those who want to grasp how to build SIP applications. You
will also learn how to use advanced features like High Availability through Clustering and Failover.
Finally, monitoring and security will be explained.
iii
Preface ............................................................................................................................. vi
1. Document Conventions ......................................................................................... vi
1.1. Typographic Conventions ............................................................................ vi
1.2. Pull-quote Conventions ............................................................................. viii
1.3. Notes and Warnings ................................................................................. viii
1. Introduction ................................................................................................................. 1
1.1. Overview of Mobicents SIP Servlets within the Telecommunications Industry .......... 1
1.2. Overview of SIP Servlets Server .......................................................................... 1
2. SIP Servlets Server-Installing, Configuring and Running ............................................ 3
2.1. Getting Started with MSS for JBoss AS7 .............................................................. 3
2.1.1. Downloading and Starting MSS for JBoss AS7 .......................................... 3
2.1.2. Testing Click2Call with MSS for JBOSS AS7 ............................................. 6
2.1.3. Command Line Interface for MSS JBoss AS7 ............................................ 9
2.1.4. Accessing Management Console ............................................................. 13
2.2. Getting Started with MSS for Tomcat 7 .............................................................. 18
2.2.1. Testing Click2CallAsync with MSS for Tomcat 7 ....................................... 19
2.2.2. Tomcat for Windows ............................................................................... 25
2.3. Sip Connectors ................................................................................................. 27
2.3.1. Configuring SIP Connectors and Bindings ................................................ 27
2.3.2. Application Routing and Service Configuration ......................................... 30
2.3.3. SIP Servlets Server Logging ................................................................... 34
3. Application Router ..................................................................................................... 38
3.1. Default Application Router ................................................................................. 38
3.1.1. Role of the Application Router ................................................................ 38
3.1.2. Mobicents Default Application Router ...................................................... 38
3.1.3. Limitations of the Default Application Router ............................................ 43
3.2. DFC Application Router ..................................................................................... 44
3.2.1. Description of DFC Application Router ..................................................... 44
3.2.2. Installing the DFC Application Router ...................................................... 44
4. SIP Servlet Example Applications ............................................................................. 46
4.1. Operating the Example Applications ................................................................... 48
4.1.1. The Location Service .............................................................................. 48
4.1.2. The Diameter Event-Changing Service .................................................... 51
4.1.3. The Call-Blocking Service ....................................................................... 57
4.1.4. The Call-Forwarding Service ................................................................... 59
4.1.5. The Call-Controller Service ..................................................................... 62
4.1.6. Media IPBX ........................................................................................... 65
4.1.7. Tomcat Servlet Click2call Windows Setup ................................................ 66
5. Clustering and High Availability ................................................................................ 79
5.1. Understanding Mobicents High Availabilty .......................................................... 79
5.2. Load Balancer .................................................................................................. 80
5.2.1. SIP Load Balancer: Installing, Configuring and Running ............................ 81
5.2.2. IP Load Balancing .................................................................................. 92
5.2.3. SIP Load Balancing Basics ..................................................................... 93

SIP Servlets Server User Guide
iv
5.2.4. HTTP Load Balancing Basics .................................................................. 94
5.2.5. Pluggable balancer algorithms ................................................................ 94
5.2.6. Distributed load balancing ....................................................................... 95
5.2.7. Implementation of the Mobicents Load Balancer ....................................... 96
5.2.8. SIP Message Flow ................................................................................. 97
6. Enterprise Monitoring and Management .................................................................... 99
7. Security .................................................................................................................... 100
7.1. SIP Servlets Application Security ..................................................................... 100
7.2. TLS ................................................................................................................ 103
7.2.1. Quick Start ........................................................................................... 103
7.2.2. Production Setup .................................................................................. 108
8. Advanced Features of the SIP Servlets Server ........................................................ 110
8.1. Media Support ................................................................................................ 110
8.1.1. JSR 309: Media Server Control API ...................................................... 110
8.2. Concurrency and Congestion Control ............................................................... 110
8.3. STUN Support ................................................................................................ 116
8.4. Mobicents vendor-specific Extensions to JSR 289 ............................................. 117
8.5. CDI Telco Framework ..................................................................................... 118
8.6. Diameter Support ............................................................................................ 118
8.7. SIP and IMS Extensions .................................................................................. 119
8.8. SIP Servlets - JAIN SLEE Interoperability ......................................................... 122
8.9. Eclipse IDE Tools ........................................................................................... 124
8.9.1. Pre-Install requirements ........................................................................ 125
8.9.2. Installation ............................................................................................ 125
8.9.3. SIP Servlets Core Plug-in ..................................................................... 125
8.9.4. SIP Phone Plug-in ................................................................................ 125
9. Best Practices .......................................................................................................... 126
9.1. Mobicents SIP Servlets Performance Tips ........................................................ 126
9.1.1. Tuning JBoss ....................................................................................... 126
9.1.2. Tuning Mobicents SIP Servlets .............................................................. 126
9.1.3. Tuning The JAIN SIP Stack .................................................................. 126
9.1.4. Tuning The JVM .................................................................................. 128
9.1.5. Tuning The Operating System ............................................................... 129
9.2. NAT Traversal ................................................................................................ 130
9.2.1. STUN .................................................................................................. 130
9.2.2. TURN .................................................................................................. 130
9.2.3. ICE ...................................................................................................... 131
9.2.4. Other Approaches ................................................................................ 131
10. Apendix .................................................................................................................. 132
10.1. Java Development Kit (JDK): Installing, Configuring and Running ..................... 132
10.1.1. JRE versus JDK - 32-Bit versus 64-Bit ................................................. 132
10.1.2. Downloading JDK ............................................................................... 132
10.1.3. Installing JDK on Windows .................................................................. 133
10.1.4. Setting Linux JAVA_HOME Environment Variables ............................... 134

SIP Servlets Server User Guide
v
10.1.5. Setting the Correct Java Version ......................................................... 134
10.1.6. Setting JAVA_HOME Environment Variables on Windows ..................... 135
10.1.7. Uninstalling JDK on Linux and Windows .............................................. 135
10.1.8. Setting the JBOSS_HOME Environment Variable ................................. 135
10.1.9. Setting CATALINA_HOME on Linux and Windows ................................ 138
11. JSR 289 Errata ....................................................................................................... 140
11.1. Mobicents SIP Servlets Deviations from JSR 289 ............................................ 140
A. Revision History ........................................................................................................ 141
vi
Preface
1. Document Conventions
This manual uses several conventions to highlight certain words and phrases and draw attention
to specific pieces of information.
In PDF and paper editions, this manual uses typefaces drawn from the Liberation Fonts [https://
fedorahosted.org/liberation-fonts/] set. The Liberation Fonts set is also used in HTML editions if
the set is installed on your system. If not, alternative but equivalent typefaces are displayed. Note:
Red Hat Enterprise Linux 5 and later includes the Liberation Fonts set by default.
1.1. Typographic Conventions
Four typographic conventions are used to call attention to specific words and phrases. These
conventions, and the circumstances they apply to, are as follows.
Mono-spaced Bold
Used to highlight system input, including shell commands, file names and paths. Also used to
highlight key caps and key-combinations. For example:
To see the contents of the file my_next_bestselling_novel in your current
working directory, enter the cat my_next_bestselling_novel command at the
shell prompt and press Enter to execute the command.
The above includes a file name, a shell command and a key cap, all presented in Mono-spaced
Bold and all distinguishable thanks to context.
Key-combinations can be distinguished from key caps by the hyphen connecting each part of a
key-combination. For example:
Press Enter to execute the command.
Press Ctrl+Alt+F1 to switch to the first virtual terminal. Press Ctrl+Alt+F7 to
return to your X-Windows session.
The first sentence highlights the particular key cap to press. The second highlights two sets of
three key caps, each set pressed simultaneously.
If source code is discussed, class names, methods, functions, variable names and returned values
mentioned within a paragraph will be presented as above, in Mono-spaced Bold. For example:
File-related classes include filesystem for file systems, file for files, and dir
for directories. Each class has its own associated set of permissions.
Proportional Bold
Preface
vii
This denotes words or phrases encountered on a system, including application names; dialogue
box text; labelled buttons; check-box and radio button labels; menu titles and sub-menu titles.
For example:
Choose System > Preferences > Mouse from the main menu bar to launch Mouse
Preferences. In the Buttons tab, click the Left-handed mouse check box and click
Close to switch the primary mouse button from the left to the right (making the
mouse suitable for use in the left hand).
To insert a special character into a gedit file, choose Applications > Accessories >
Character Map from the main menu bar. Next, choose Search > Find… from the
Character Map menu bar, type the name of the character in the Search field and
click Next. The character you sought will be highlighted in the Character Table.
Double-click this highlighted character to place it in the Text to copy field and
then click the Copy button. Now switch back to your document and choose Edit
> Paste from the gedit menu bar.
The above text includes application names; system-wide menu names and items; application-
specific menu names; and buttons and text found within a GUI interface, all presented in
Proportional Bold and all distinguishable by context.
Note the > shorthand used to indicate traversal through a menu and its sub-menus. This is to
avoid the difficult-to-follow 'Select Mouse from the Preferences sub-menu in the System menu of
the main menu bar' approach.
Mono-spaced Bold Italic or Proportional Bold Italic
Whether Mono-spaced Bold or Proportional Bold, the addition of Italics indicates replaceable or
variable text. Italics denotes text you do not input literally or displayed text that changes depending
on circumstance. For example:
To connect to a remote machine using ssh, type ssh [email protected]
at a shell prompt. If the remote machine is example.com and your username on
that machine is john, type ssh [email protected].
The mount -o remount file-system command remounts the named file system.
For example, to remount the /home file system, the command is mount -o
remount /home.
To see the version of a currently installed package, use the rpm -q package
command. It will return a result as follows: package-version-release.
Note the words in bold italics above — username, domain.name, file-system, package, version
and release. Each word is a placeholder, either for text you enter when issuing a command or
for text displayed by the system.
Aside from standard usage for presenting the title of a work, italics denotes the first use of a new
and important term. For example:

Preface
viii
When the Apache HTTP Server accepts requests, it dispatches child processes
or threads to handle them. This group of child processes or threads is known as
a server-pool. Under Apache HTTP Server 2.0, the responsibility for creating and
maintaining these server-pools has been abstracted to a group of modules called
Multi-Processing Modules (MPMs). Unlike other modules, only one module from
the MPM group can be loaded by the Apache HTTP Server.
1.2. Pull-quote Conventions
Two, commonly multi-line, data types are set off visually from the surrounding text.
Output sent to a terminal is set in Mono-spaced Roman and presented thus:
books Desktop documentation drafts mss photos stuff svn
books_tests Desktop1 downloads images notes scripts svgs
Source-code listings are also set in Mono-spaced Roman but are presented and highlighted as
follows:
package org.jboss.book.jca.ex1;
import javax.naming.InitialContext;
public class ExClient
{
public static void main(String args[])
throws Exception
{
InitialContext iniCtx = new InitialContext();
Object ref = iniCtx.lookup("EchoBean");
EchoHome home = (EchoHome) ref;
Echo echo = home.create();
System.out.println("Created Echo");
System.out.println("Echo.echo('Hello') = " + echo.echo("Hello"));
}
}
1.3. Notes and Warnings
Finally, we use three visual styles to draw attention to information that might otherwise be
overlooked.

Preface
ix
Note
A note is a tip or shortcut or alternative approach to the task at hand. Ignoring a
note should have no negative consequences, but you might miss out on a trick that
makes your life easier.
Important
Important boxes detail things that are easily missed: configuration changes that
only apply to the current session, or services that need restarting before an update
will apply. Ignoring Important boxes won't cause data loss but may cause irritation
and frustration.
Warning
A Warning should not be ignored. Ignoring warnings will most likely cause data
loss.

1
Chapter 1. Introduction
1.1. Overview of Mobicents SIP Servlets within the
Telecommunications Industry
The Mobicents Communication Platform [http://www.mobicents.org/] is the best architecture to
create, deploy and manage services and applications integrating voice, video and data across a
range of IP and legacy communications networks. It drives convergence with the following key
enablers:
Figure 1.1. Mobicents Architecture Overview
1.2. Overview of SIP Servlets Server
Mobicents SIP Servlets is a modern communications middleware platform. Mobicents SIP Servlets
facilitates the shift towards Cloud Communications by enabling deployment and autoscaling of
real time SIP Servlets apps across all major IaaS (Infrastructure as a Service) providers and also
brings realtime communications (voice and video) to your Browser using HTML5 WebRTC [http://
www.webrtc.org/] and SIP Over WebSockets !
The Mobicents HTML5 WebRTC Client [ http://code.google.com/p/sipservlets/wiki/
HTML5WebRTCVideoApplication]allows you to make video calls from and to any Web Browser

Introduction
2
supporting WebRTC [http://www.webrtc.org/] , (only Google Chrome supports it so far but all
major browsers should support it in the next 6 months) as well as SIP Endpoints.
Mobicents SIP Servlets enables turnkey SaaS offerings such as RestComm [http://
www.restcomm.org/].
Mobicents SIP Servlets implements the latest SIP Servlet v1.1 (JSR 289) standard. It can be
plugged into any Application Server container (currently 7.X and JBoss 7.X) and also offers High
Availability and Failover.
Mobicents SIP Servlets is lead by TeleStax, Inc [http://www.telestax.com/]. and developed
collaboratively by a community of individual and enterprise contributors.
Figure 1.2. Mobicents WebRTC SIP Stack
3
Chapter 2. SIP Servlets Server-
Installing, Configuring and Running
2.1. Getting Started with MSS for JBoss AS7
Features not yet available on MSS for JBoss AS7
* SIP Clustering and Failover
* SNMP
* Jopr Monitoring
Some of the features mentioned above will likely be added in the future. As of the time of this
writing, they are not available. Even though Jopr monitoring is not available, there is a Command
Line Interface (CLI), which will be discussed further down. As the features become available, this
guide will be updated to reflect the changes.
2.1.1. Downloading and Starting MSS for JBoss AS7
If you have been working with JBoss for some time, you will quickly notice that the JBoss AS7
iteration has gone through a lot of changes. This guide will help you understand how you can
quickly get started with JBoss AS7 within the MSS framework.
You can go to the link below to download the latest MSS for JBoss AS7: Download Latest Version
of MSS for JBoss AS7 [ https://code.google.com/p/sipservlets/wiki/Downloads?tm=2]
You will need to extract the content of the file into a directory on your local system. The root
directory of the MSS for JBoss AS7 that you downloaded will be referred to in this guide as
$JBOSS_HOME.
If this is your first time working with MSS for JBoss, you will need to make sure you have Java Run
Time or JDK installed on your computer. You will also need to have the environment variables
set. See the links below to learn how to get JRE or JDK setup on your system.
Installing and Configuring JDK
Section 10.1, “Java Development Kit (JDK): Installing, Configuring and Running”
Setting Environment Variables
Section 10.1.8, “Setting the JBOSS_HOME Environment Variable”
Starting MSS for JBoss AS7 . To start the server do the following:

SIP Servlets Server-Installing,
Configuring and Running
4
$JBOSS_HOME/bin/standalone.sh
During the startup process, you will notice that the final part of the log output will be similar
to the truncated output below. Notice that the Admin Console interface can be accessed at
http://172.0.0.1:9990. This will be explained later.
14:28:43,972 INFO [org.jboss.as] (Controller Boot Thread) JBAS015951: Admin
console listening on http://127.0.0.1:9990
14:28:43,974 INFO [org.jboss.as] (Controller Boot Thread) JBAS015874: JBoss
AS 7.1.2.Final "Steropes"
started in 22148ms - Started 222 of 306 services (83 services are passive or
on-demand)
You will notice that the startup is very fast. The reason for this is that JBoss was rewritten from
the ground up for speed with services being started concurrently and non critical services remain
passive until first use. This provides better system resource management. With the simple startup
above, you will be able to enter the default web interface of the application server by going to this
url http://127.0.0.1:8080. The result will show a screenshot similar to the one below.

SIP Servlets Server-Installing,
Configuring and Running
5
Figure 2.1. JBoss Application Server 7 Welcome Page
With the standard startup script, you will not have access to any SIP functionalities. This is because
of the modular approach implemented in JBoss AS7. There is a configuration file that needs to be
used to activate additional functionalities like SIP and High Availability.
In order to start the MSS for JBoss AS7 with SIP functionalities, you need to append the startup
script with the SIP configuration file. The configuration files are located in the $JBOSS_HOME/
standalone/configuration directory. You can see the content of the directory below
application-roles.properties mgmt-users.properties standalone-ha.xml
application-users.properties mss-sip-stack.properties standalone-sip.xml
dars standalone-full-ha.xml standalone.xml
logging.properties standalone-full.xml
standalone_xml_history

SIP Servlets Server-Installing,
Configuring and Running
6
Starting MSS for JBoss AS7 with SIP.
If you want to start MSS with SIP services activated, you need to go to the $JBOSS_HOME/bin
directory. Type the following command:
./standalone.sh -c standalone-sip.xml
You will see a message similar to the one below once the server is successfully started.
20:43:21,487 INFO [org.jboss.as.server] (ServerService Thread Pool -- 37)
JBAS018559: Deployed "click2call.war"
20:43:21,489 INFO [org.jboss.as.server] (ServerService Thread Pool -- 37)
JBAS018559: Deployed "sip-servlets-management.war"
20:43:21,647 INFO [org.jboss.as] (Controller Boot Thread) JBAS015951: Admin
console listening on http://127.0.0.1:9990
20:43:21,648 INFO [org.jboss.as] (Controller Boot Thread) JBAS015874: JBoss
AS 7.1.2.Final "Steropes" started in 26560ms - Started 232 of 321 services
(88 services are passive or on-demand)
The click2call SIP sample application bundled with MSS will become available at this url
http://127.0.0.1:8080/click2call. You can configure multiple SIP softphones to use the sample
application. See the section below for how to configure and test the SIP sample application.
2.1.2. Testing Click2Call with MSS for JBOSS AS7
Once the server is started as stated in the previous section, you can configure multiple instances
of any SIP softphone you prefer. In this example, Linphone will be used.
(configuring two instances of Linphone)
start Linphone
go to the Options menu
On the Network Settings tab,
SIP (UDP) port to 5061. (leave the rest as default)
On the Manage SIP Accounts tab,
click the add button
Your SIP identity: = sip:[email protected]:5080
SIP Proxy address: = sip 127.0.0.1:5080
Leave the rest of the settings as default.
Configuring Linphone (on the second shell)

SIP Servlets Server-Installing,
Configuring and Running
7
go to the Options menu
On the Network Settings tab,
SIP (UDP) port to 5062. (leave the rest as default)
On the Manage SIP Accounts tab,
click the add button
Your SIP identity: = sip:[email protected]:5080
SIP Proxy address: = sip 127.0.0.1:5080
Leave the rest of the settings as default.
A correctly configured Linphone will look like the screenshot below.

SIP Servlets Server-Installing,
Configuring and Running
8
Figure 2.2. Successfully Configured Linphone

SIP Servlets Server-Installing,
Configuring and Running
9
Once the phones are successfully registered with the MSS for JBoss AS7 server, you can check
the result in the sample SIP application at this url, http://127.0.0.1:8080/click2call
Figure 2.3. Click2call SIP Registered Softphones
You can make calls from the sample click2call application and see the logs in the shell terminal
you used to start the MSS for JBoss AS7 server.
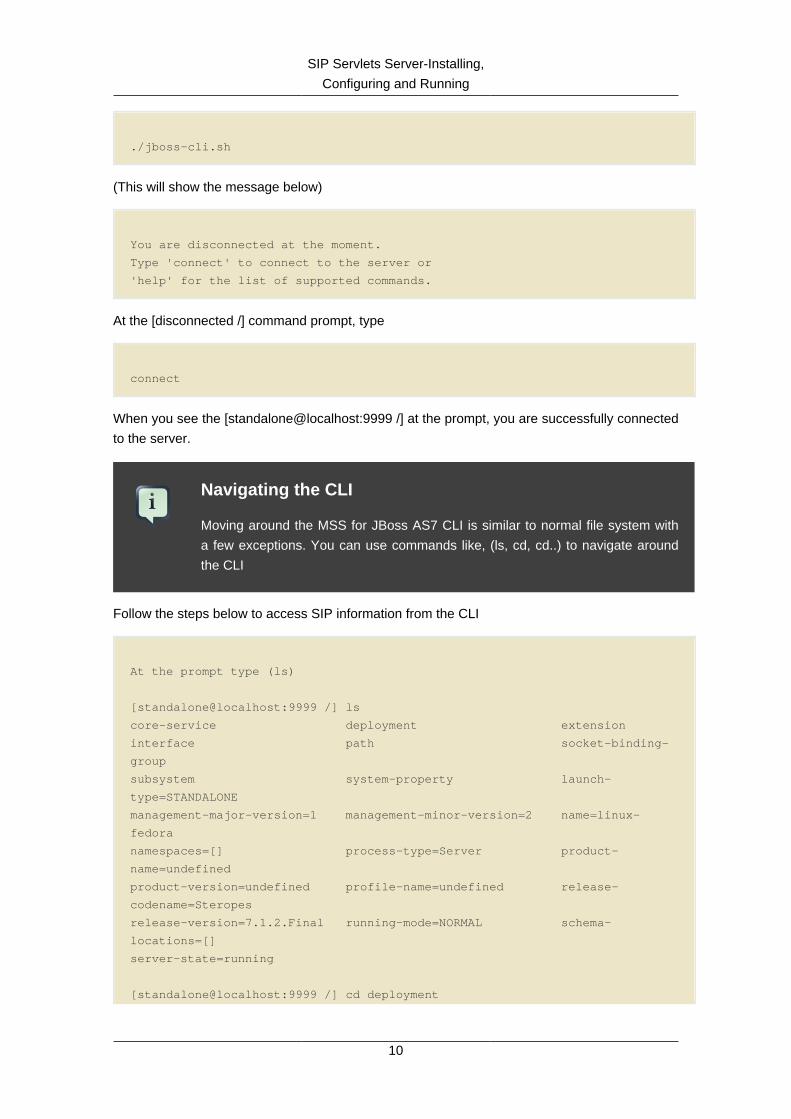
2.1.3. Command Line Interface for MSS JBoss AS7
Part of the task of any administrator who has to manage a JBoss server will be to monitor services
offered to clients. There is a command line interface bundled with JBoss AS7 which can be
accessed by going to the $JBOSS_HOME/bin directory.
You need to make sure that the JBoss server is running on your system and listening on port
9999. The section below will work you through steps to familiarize yourself with the CLI.
There are so many features available with the MSS for JBoss AS7 CLI. The example below
will concentrate on getting data from the SIP you started using the ./standalone.sh -c
standalone-sip.xml script.
In the $JBOSS_HOME/bin directory, type
SIP Servlets Server-Installing,
Configuring and Running
10
./jboss-cli.sh
(This will show the message below)
You are disconnected at the moment.
Type 'connect' to connect to the server or
'help' for the list of supported commands.
At the [disconnected /] command prompt, type
connect
When you see the [standalone@localhost:9999 /] at the prompt, you are successfully connected
to the server.
Navigating the CLI
Moving around the MSS for JBoss AS7 CLI is similar to normal file system with
a few exceptions. You can use commands like, (ls, cd, cd..) to navigate around
the CLI
Follow the steps below to access SIP information from the CLI
At the prompt type (ls)
[standalone@localhost:9999 /] ls
core-service deployment extension
interface path socket-binding-
group
subsystem system-property launch-
type=STANDALONE
management-major-version=1 management-minor-version=2 name=linux-
fedora
namespaces=[] process-type=Server product-
name=undefined
product-version=undefined profile-name=undefined release-
codename=Steropes
release-version=7.1.2.Final running-mode=NORMAL schema-
locations=[]
server-state=running
[standalone@localhost:9999 /] cd deployment

SIP Servlets Server-Installing,
Configuring and Running
11
[standalone@localhost:9999 deployment] ls
click2call.war sip-servlets-management.war
[standalone@localhost:9999 deployment] cd click2call.war
[standalone@localhost:9999 deployment=click2call.war] ls
subdeployment
subsystem
content=[{"path" => "deployments/click2call.war","relative-to" =>
"jboss.server.base.dir","archive" => true}]
enabled=true
name=click2call.war
persistent=false
runtime-name=click2call.war
status=OK
[standalone@localhost:9999 deployment=click2call.war] cd subsystem
[standalone@localhost:9999 subsystem] ls
sip web
[standalone@localhost:9999 subsystem] cd sip
[standalone@localhost:9999 subsystem=sip] ls
servlet
active-sip-application-sessions=7
active-sip-sessions=8
app-name=org.mobicents.servlet.sip.example.SimpleApplication
expired-sip-application-sessions=25
expired-sip-sessions=26
max-active-sip-sessions=-1
rejected-sip-application-sessions=0
rejected-sip-sessions=0
sip-application-session-avg-alive-time=180
sip-application-session-max-alive-time=230
sip-application-sessions-created=32
sip-application-sessions-per-sec=0.0
sip-session-avg-alive-time=162
sip-session-max-alive-time=180
sip-sessions-created=34
sip-sessions-per-sec=0.0
SIP Servlets Server-Installing,
Configuring and Running
12
No SIP data on the CLI
The data from the SIP subsystem are only available if you have the click2call
sample application running and your softphones are connected to the server.
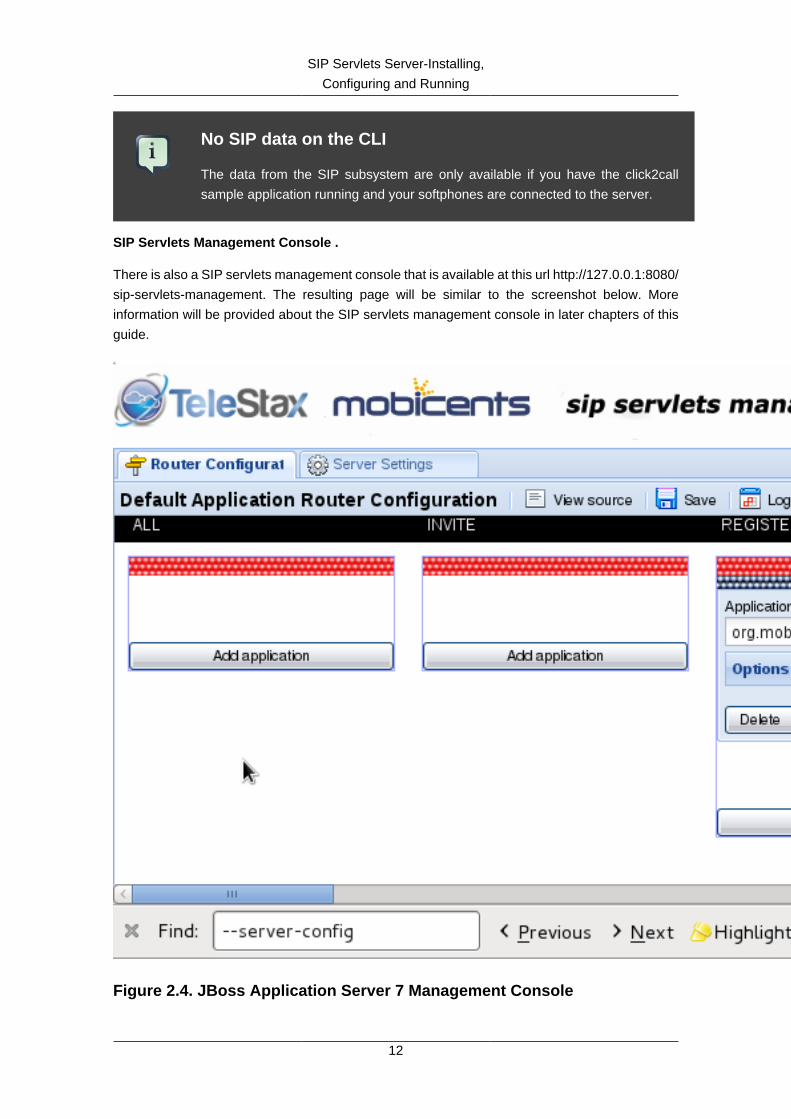
SIP Servlets Management Console .
There is also a SIP servlets management console that is available at this url http://127.0.0.1:8080/
sip-servlets-management. The resulting page will be similar to the screenshot below. More
information will be provided about the SIP servlets management console in later chapters of this
guide.
Figure 2.4. JBoss Application Server 7 Management Console

SIP Servlets Server-Installing,
Configuring and Running
13
2.1.4. Accessing Management Console
MSS for JBoss AS7 provides a management console that can be useful for accessing
vital information about your server. In the welcome page that appears when you access
http://127.0.0.1:8080, there is a link that points to the Administration Console.
If you don't have a user account for the management console, you will see a screenshot like the
one below. It contains instructions about how to create a user account.

SIP Servlets Server-Installing,
Configuring and Running
14
Figure 2.5. Administration Console Error Page

SIP Servlets Server-Installing,
Configuring and Running
15
Creating a User Account.
Go to the $JBoss_HOME/bin directory and run the ./add-user.sh script. You can follow the
interactive user mode to create an account for the Administration Console.
Once the user account has been created, you can access the Administration Console at this
address http://127.0.0.1:9990/console/
The screenshot below shows you what the Administration Console looks like.

SIP Servlets Server-Installing,
Configuring and Running
16
Figure 2.6. Administration Console

SIP Servlets Server-Installing,
Configuring and Running
17
Deleting Administration Console User Account
Deleting the user account isn't very intuitive. In the event that you will need to
remove an account and create another one, you can remove the account from the
mgmt-users.properties file. It is located in the $MSS_JBoss_HOME/standalone/
configuration directory. If you are running in the domain mode, you will need to
check the corresponding configuration directory.
2.1.4.1. Installing the MSS for JBoss Binary Distribution on
Windows™
For this procedure, it is assumed that the downloaded archive is saved in the My Downloads folder.
1. Create a directory in My Downloads to extract the zip file's contents into. For ease of
identification, it is recommended that the version number of the binary is included in the folder
name. For example, MSS-jboss-<version>.
2. Extract the contents of the archive, specifying the destination folder as the one created in the
previous step. You can either use Winzip or the opensource tool called 7-Zip to extract the
content of the donwloaded MSS for JBoss AS7 file
3. It is recommended that the folder holding the MSS for JBoss files (in this example, the folder
named mss-jboss-<version>) is moved to a user-defined location for storing executable
programs. For example, the Program Files folder.
Procedure 2.1. Running MSS for JBoss on Windows™
There are several ways to start MSS for JBoss on Windows. All of the following methods
accomplish the same task.
1. Using Windows Explorer, navigate to the bin subdirectory in the installation directory.
2. The preferred way to start MSS for JBoss from the Command Prompt. The command line
interface displays details of the startup process, including any problems encountered during
the startup process.
Open the Command Prompt via the Start menu and navigate to the correct folder:
C:\Users\<user>My Downloads> cd "mss-jboss-<version>"
3. Start the JBoss Application Server by executing one of the following files:
• run.bat batch file:
C:\Users\<user>My Downloads\mss-jboss-<version>>bin\run.bat

SIP Servlets Server-Installing,
Configuring and Running
18
• run.jar executable Java archive:
C:\Users\<user>My Downloads\mss-jboss-<version>>java -jar bin\run.jar
2.2. Getting Started with MSS for Tomcat 7
You can download the latest MSS for Tomcat 7 Download Latest Version of MSS for Tomcat 7 [
https://code.google.com/p/sipservlets/wiki/Downloads?tm=2]
The content of the downloaded file can be extracted to any location you prefer on your computer.
The root directory to which the content of the download is extracted will be referred to as
$CATALINA_HOME.
The content of the $CATALINA_HOME/bin is similar to the output below.
bootstrap.jar cpappend.bat startup.bat
catalina.bat daemon.sh startup.sh
catalina.sh digest.bat tomcat-juli.jar
catalina-tasks.xml digest.sh tomcat-native.tar.gz
commons-daemon.jar setclasspath.bat tool-wrapper.bat
commons-daemon-native.tar.gz setclasspath.sh tool-wrapper.sh
configtest.bat shutdown.bat version.bat
configtest.sh shutdown.sh version.sh
You can start MSS for Tomcat 7 by going to $CATALINA_HOME/bin directory and typing the
following:
sudo ./catalina.sh run
The startup process is slightly different from MSS for JBoss AS7. If you see an output like the one
below, you know that Tomcat is correctly started. This is a truncated log from the startup process.
2012-08-21 22:23:41,025 INFO [SipApplicationDispatcherImpl] (main)
SipApplicationDispatcher Started
2012-08-21 22:23:41,025 INFO [SipStandardService] (main) SIP Standard
Service Started.
Aug 21, 2012 10:23:41 PM org.apache.catalina.startup.Catalina start
INFO: Server startup in 3608 ms

SIP Servlets Server-Installing,
Configuring and Running
19
If you get an error message about environment variables or Java, make sure you have the
CATALINA environment variables set.
Setting Environment Variables - JAVA and CATALINA
Section 10.1.9, “Setting CATALINA_HOME on Linux and Windows”
2.2.1. Testing Click2CallAsync with MSS for Tomcat 7
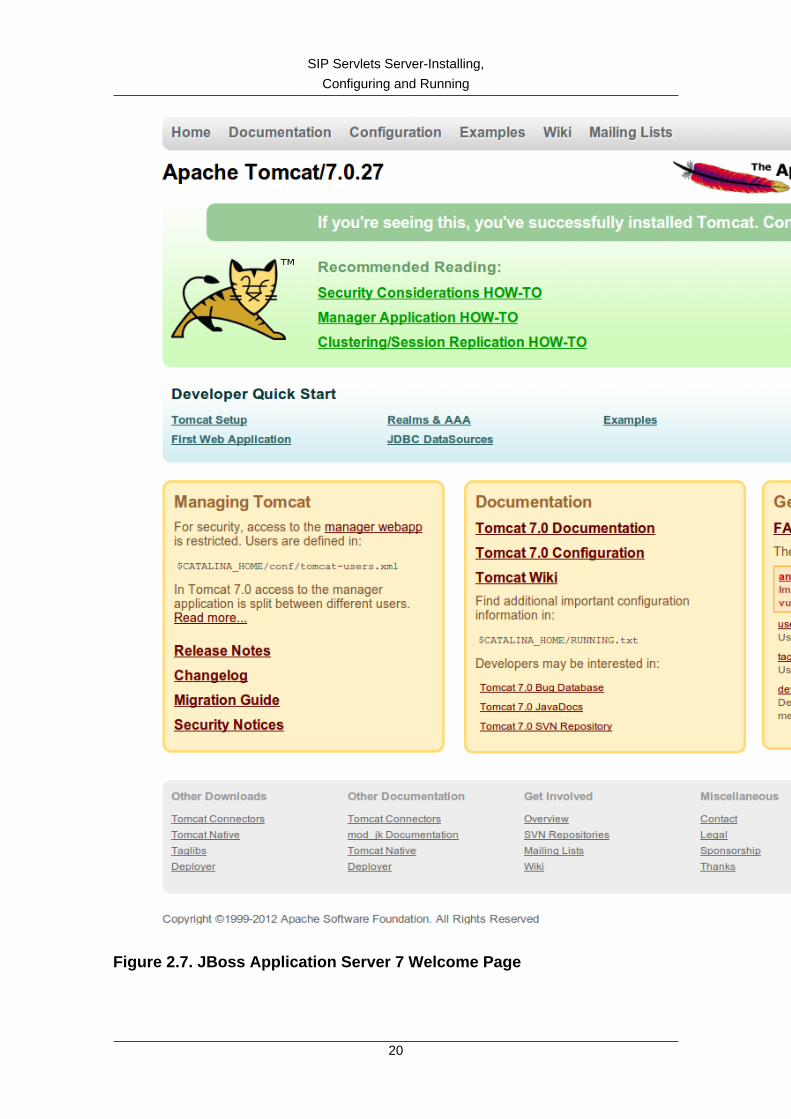
If MSS for Tomcat 7 is started and running, you should be able to use your web browser to access
the welcome page at this url http://127.0.0.1:8080/ This will show you a screenshot similar to the
one below.
SIP Servlets Server-Installing,
Configuring and Running
20
Figure 2.7. JBoss Application Server 7 Welcome Page

SIP Servlets Server-Installing,
Configuring and Running
21
Deploying your application once the server is running is simple. You need to copy your .War files
to the $CATALINA_HOME/webapps directory.
There is a pre-installed sample SIP application that you can use to test your MSS Tomcat 7
configuration. The application is also located in the $CATALINA_HOME/webapps directory
Start your web browser and go to the link, http://127.0.0.1:8080/Click2CallAsync/
Sample Application Name
Note that the application name is case-sensitive and will not work if you try to
access it as http://127.0.0.1:8080/click2callasync/
The sample SIP application page will be similar to the screenshot below.

SIP Servlets Server-Installing,
Configuring and Running
22
Figure 2.8. SIP Sample Click2CallAsync Application
In order to use the application, you can download a softphone and start multiple instances of
the phone on a single server. In this guide, the softphone that will be used is Linphone. The
configuration is as follows:

SIP Servlets Server-Installing,
Configuring and Running
23
Multiple Instances of Linphone
On some Linux systems, you might need to use a different user profile in order to
start a second instance of Linphone. Ex. sudo linphone
(configuring two instances of Linphone)
start Linphone
go to the Options menu
On the Network Settings tab,
SIP (UDP) port to 5061. (leave the rest as default)
On the Manage SIP Accounts tab,
click the add button
Your SIP identity: = sip:[email protected]:5080
SIP Proxy address: = sip 127.0.0.1:5080
Leave the rest of the settings as default.
Configuring Linphone (on the second shell)
go to the Options menu
On the Network Settings tab,
SIP (UDP) port to 5062. (leave the rest as default)
On the Manage SIP Accounts tab,
click the add button
Your SIP identity: = sip:[email protected]:5080
SIP Proxy address: = sip 127.0.0.1:5080
Leave the rest of the settings as default.
Once the softphones are configured and are successfully registered with the MSS for Tomcat
7 server, you will see a screenshot like the one below in the web browser at this url
http://127.0.0.1:8080/Click2CallAsync/

SIP Servlets Server-Installing,
Configuring and Running
24
Figure 2.9. SIP Click2CallAsync with Registers Clients
You can make calls using the application and the softphones you configured will start ringing.
It is important to start MSS for Tomcat 7 in a terminal using the (./catalina.sh run) script. It will
help with troubleshooting SIP calls. The logs you see on the terminal will let you know when a
softphone registers with the Tomcat server and you will also be able to see the status of call setup
and shutdown.
Stopping MSS for Tomcat 7 .
The best way to stop a server is using the CTRL-D on the terminal in which the server was started.
If you started the MSS for Tomcat 7 server using the $CATALINA_HOME/bin/startup.sh, you can
stop the server using $CATALINA_HOME/bin/shutdown.sh
SIP Servlets Server-Installing,
Configuring and Running
25
2.2.2. Tomcat for Windows
2.2.2.1. Installing the MSS for Tomcat 7 Binary Distribution on
Windows
1. For this example, we'll assume that you downloaded the binary distribution zip file to the My
Downloads folder. First, using Windows Explorer, create a subdirectory in My Downloads to
extract the zip file's contents into. When you name this folder, it is good practice to include the
version number; if you do so, remember to correctly match it with the version of the MSS for
Tomcat binary distribution you downloaded. In these instructions, we will refer to this folder
as mss-tomcat-<version>.
2. Double-click the downloaded zip file, selecting as the destination folder the one you just
created to hold the zip file's contents.
• Alternatively, it is also possible to use Java's jar -xvf command to extract the binary
distribution files from the zip archive. To use this method instead, first move the
downloaded zip file from My Downloads to the folder that you just created to hold the
SIP Servlets Server files.
• Then, open the Windows Command Prompt and navigate to the folder holding the archive
using the cd command.
Opening the Command Prompt from Windows
Explorer
If you are using Windows Vista®, you can open the Command Prompt
directly from Explorer. Hold down the Shift key and right-click on either a
folder, the desktop, or inside a folder. This will cause an Open Command
Window Here context menu item to appear, which can be used to open
the Command Prompt with the current working directory set to either the
folder you opened, or opened it from.
• Finally, use the jar -xvf command to extract the archive contents into the current folder.
C:\Users\Me\My Downloads\mss-tomcat-<version>>jar -xvf
"mss-1.6.0.FINAL-apache-tomcat-6.0.20-1007051527.zip"
3. At this point, you may want to move the folder holding the MSS for Tomcat binary files (in
this example, the folder named mss-tomcat-<version>) to another location. This step is
not strictly necessary, but it is probably a good idea to move the installation folder from My
Downloads to a user-defined location for storing runnable programs. Any location will suffice,
however.

SIP Servlets Server-Installing,
Configuring and Running
26
4. You may want to delete the zip file after extracting its contents in order to free disk space:
C:\Users\Me\My Downloads\mss-tomcat-<version>>delete "mss-1.6.0.FINAL-
apache-tomcat-6.0.20-1007051527.zip"
2.2.2.2. Configuring
Configuring MSS for Tomcat consists in setting the CATALINA_HOME environment variable
and then, optionally, customizing your MSS for Tomcat container by adding SIP Connectors,
configuring the application router, and configuring logging. See Section 2.3, “ Sip Connectors ” to
learn what and how to configure MSS for Tomcat.
Alternatively, you can simply run your MSS for Tomcat container now and return to this section
to configure it later.
2.2.2.3. Running
Once installed, you can run the Tomcat Servlet Container by executing the one of the startup
scripts in the bin directory (on Linux or Windows), or by double-clicking the run.bat executable
batch file in that same directory (on Windows only). However, we suggest always starting Tomcat
using the terminal or Command Prompt because you are then able to read—and act upon—
any startup messages, and possibly debug any problems that may arise. In the Linux terminal or
Command Prompt, you will be able to tell that the container started successfully if the last line of
output is similar to the following:
Using CATALINA_BASE: /home/user/temp/apps/sip_servlets_server/
Using CATALINA_HOME: /home/user/temp/apps/sip_servlets_server/
Using CATALINA_TMPDIR: /home/user/temp/apps/sip_servlets_server/temp
Using JRE_HOME: /etc/java-config-2/current-system-vm
Detailed instructions are given below, arranged by platform.
Procedure 2.2. Running MSS for Tomcat on Windows
1. There are several different ways to start the Tomcat Servlet Container on Windows. All of the
following methods accomplish the same task.
Using Windows Explorer, change your folder to the one in which you unzipped the
downloaded zip file, and then to the bin subdirectory.
2. Although not the preferred way (see below), it is possible to start the Tomcat Servlet Container
by double-clicking on the startup.bat executable batch file.
• As mentioned above, the best way to start the Tomcat Servlet Container is by using the
Command Prompt. Doing it this way will allow you to view all of the server startup details,
which will enable you to easily determine whether any problems were encountered

SIP Servlets Server-Installing,
Configuring and Running
27
during the startup process. You can open the Command Prompt directly from the
<topmost_directory>\bin folder in Windows Explorer, or you can open the Command
Prompt via the Start menu and navigate to the correct folder:
C:\Users\Me\My Downloads> cd "mss-tomcat-<version>"
• Start the Tomcat Servlet Container by running the executable startup.bat batch file:
C:\Users\Me\My Downloads\mss-tomcat-<version>>bin\startup.bat
2.2.2.4. Stopping
Detailed instructions for stopping the Tomcat Servlet Container are given below, arranged by
platform. Note that if you properly stop the server, you will see the following three lines as the last
output in the Linux terminal or Command Prompt (both running and stopping the Tomcat Servlet
Container produces the same output):
Using CATALINA_BASE: /home/user/temp/apps/sip_servlets_server
Using CATALINA_HOME: /home/user/temp/apps/sip_servlets_server
Using CATALINA_TMPDIR: /home/user/temp/apps/sip_servlets_server/temp
Using JRE_HOME: /etc/java-config-2/current-system-vm
Procedure 2.3. Stopping MSS for Tomcat on Windows
• Stopping the Tomcat Servlet Container on Windows consists in executing the shutdown.bat
executable batch script in the bin subdirectory of the SIP Servlets-customized Tomcat binary
distribution:
C:\Users\Me\My Downloads\mss-tomcat-<version>>bin\shutdown.bat
2.3. Sip Connectors
Mobicents comes with default settings that are designed to get your system up and running without
the need to know about all the detailed configurations. That said, there are situations in which you
might like to fine-tune your setttings to adapt it to your needs. That is what the following section
will help you achieve. You will get a better understand of SIP connectors and how to make them
work for you.
2.3.1. Configuring SIP Connectors and Bindings
There are two important configuration files that you might need to modifying depending on your
system needs. The standalone-sip.xml file in MSS for JBoss AS7 and the server.xml file in MSS
for Tomcat. The extracts below will give you a snapshot of default configurations.

SIP Servlets Server-Installing,
Configuring and Running
28
For JBoss.
Changing the ports and other configuration for the SIP connector can be done in the standalone-
sip.xml file. Below is an extract.
Example 2.1. Adding a SIP Connector to $JBOSS_HOME/standalone/
configuration/standalone-sip.xml
<socket-binding-group name="standard-sockets" default-interface="public" port-
offset="${jboss.socket.binding.port-offset:0}">
<socket-binding name="management-native" interface="management"
port="${jboss.management.native.port:9999}"/>
<socket-binding name="management-http" interface="management"
port="${jboss.management.http.port:9990}"/>
<socket-binding name="management-https" interface="management"
port="${jboss.management.https.port:9443}"/>
<socket-binding name="ajp" port="8009"/>
<socket-binding name="http" port="8080"/>
<socket-binding name="https" port="8443"/>
<socket-binding name="sip-udp" port="5080"/>
<socket-binding name="sip-tcp" port="5080"/>
<socket-binding name="sip-tls" port="5081"/>
<socket-binding name="osgi-http" interface="management" port="8090"/>
<socket-binding name="remoting" port="4447"/>
<socket-binding name="txn-recovery-environment" port="4712"/>
<socket-binding name="txn-status-manager" port="4713"/>
<outbound-socket-binding name="mail-smtp">
<remote-destination host="localhost" port="25"/>
</outbound-socket-binding>
</socket-binding-group>
For Tomcat.
Changing the ports and other configuration for the SIP connector can be done in the server.xml
file. Below is an extract.
Example 2.2. Adding a SIP Connector to $CATALINA_HOME/conf/
server.xml
<Connector port="5080"
ipAddress="127.0.0.1"
protocol="org.mobicents.servlet.sip.startup.SipProtocolHandler"
signalingTransport="udp"
useStun="false"
stunServerAddress="stun01.sipphone.com"
stunServerPort="3478"
staticServerAddress="122.122.122.122"

SIP Servlets Server-Installing,
Configuring and Running
29
staticServerPort="44"
useStaticAddress="true"
httpFollowsSip="false"/>
SIP <connector> Attributes
port
The port number on which the container will be able to receive SIP messages.
ipAddress
The IP address at which the container will be able to receive SIP messages. The container
can be configured to listen to all available IP addresses by setting ipAddress to 0.0.0.0
<sipPathName>.
protocol
Specifies the connector is a SIP Connector and not an HTTP Connector. There is no need
to change this property.
signalingTransport
Specifies the transport on which the container will be able to receive SIP messages. For
example, "udp".
useStun
Enables Session Traversal Utilities for NAT (STUN) support for this Connector. The attribute
defaults to "false". If set to "true", ensure that the ipAddress attribute is not set to 127.0.0.1.
Refer to Section 8.3, “STUN Support” for more information about STUN.
stunServerAddress
Specifies the STUN server address used to discover the public IP address of the SIP
Connector. This attribute is only required if the useStun attribute is set to "true". Refer to
Section 8.3, “STUN Support” for more information about STUN and public STUN servers.
stunServerPort
Specifies the STUN server port of the STUN server used in the stunServerAddress attribute.
You should rarely need to change this attribute; also, it is only needed if the useStun attribute
is set to "true". Refer to Section 8.3, “STUN Support” for more information about STUN.
useStaticAddress
Specifies whether the settings in staticServerAddress and staticServerPort are activated. The
default value is "false" (deactivated).
staticServerAddress
Specifies what load-balancer server address is inserted in Contact/Via headers for server-
created requests. This parameter is useful for cluster configurations where requests should
be bound to a load-balancer address, rather than a specific node address.

SIP Servlets Server-Installing,
Configuring and Running
30
staticServerPort
Specifies the port of the load-balancer specified in staticServerAddress. This parameter is
useful in cluster configurations where requests should be bound to a load-balancer address
rather than a specific node address.
httpFollowsSip
Makes the application server aware of how the SIP Load Balancers assign request affinity,
and stores this information in the application session.
When the HTTP Load Balancer sends HTTP requests that are not associated with the
application session, the application server will force the HTTP request to be repeated until it
lands on the correct node.
Note
A comprehensive list of implementing classes for the SIP Stack is available from
the Class SipStackImpl page on nist.gov [http://ci.jboss.org/jenkins/job/jain-sip/
lastSuccessfulBuild/artifact/javadoc/javax/sip/SipStack.html].
2.3.2. Application Routing and Service Configuration
The application router is called by the container to select a SIP Servlet application to service an
initial request. It embodies the logic used to choose which applications to invoke. An application
router is required for a container to function, but it is a separate logical entity from the container.
The application router is responsible for application selection and must not implement application
logic. For example, the application router cannot modify a request or send a response.
For more information about the application router, refer to the following sections of the JSR 289
specification [http://jcp.org/en/jsr/detail?id=289]: Application Router Packaging and Deployment,
Application Selection Process, and Appendix C.
See the example chapters for more information about the Application Router
Configuration for SIP MSS for JBoss AS7
Section 4.1, “Operating the Example Applications”
In order to configure the application router for Tomcat, you should edit the Service element in
the container's server.xml configuration file
Example 2.3. Configuring the Service Element in the Container's server.xml

SIP Servlets Server-Installing,
Configuring and Running
31
<Service name="Sip-Servlets"
className="org.mobicents.servlet.sip.startup.SipStandardService"
sipApplicationDispatcherClassName="org.mobicents.servlet.sip.core.SipApplicationDispatcherImpl"
usePrettyEncoding="false"
additionalParameterableHeaders="Header1,Header2"
bypassResponseExecutor="false"
bypassRequestExecutor="false"
baseTimerInterval="500"
t2Interval="4000"
t4Interval="5000"
timerDInterval="32000"
dispatcherThreadPoolSize="4"
darConfigurationFileLocation="file:///home/user/workspaces/sip-servlets/
sip-servlets-examples/reinvite-demo/reinvite-dar.properties"
sipStackPropertiesFile="conf/mss-sip-stack.properties"
dialogPendingRequestChecking="false"
canceledTimerTasksPurgePeriod="1">
For MSS for JBoss AS7 this is located in standalone-sip.xml file :
Example 2.4. Configuring the Mobicents SubSystem Element in the
Container's standalone.xml
<subsystem xmlns="urn:org.mobicents:sip-servlets-as7:1.0" application-router="dars/
mobicents-dar.properties" stack-properties="mss-sip-stack.properties" path-name="gov.nist" app-
dispatcher-class="org.mobicents.servlet.sip.core.SipApplicationDispatcherImpl" concurrency-
control-mode="SipApplicationSession" congestion-control-interval="-1">
<connector name="sip-udp" protocol="SIP/2.0" scheme="sip" socket-binding="sip-udp"/>
<connector name="sip-tcp" protocol="SIP/2.0" scheme="sip" socket-binding="sip-tcp"/>
<connector name="sip-tls" protocol="SIP/2.0" scheme="sip" socket-binding="sip-tls"/>
</subsystem>
SIP Service element attributes
className
This attribute specifies that the servlet container is a converged (i.e. SIP + HTTP) servlet
container.
sipApplicationDispatcherClassName
This attribute specifies the class name of the
org.mobicents.servlet.sip.core.SipApplicationDispatcher implementation to use.
The routing algorithm and application selection process is performed in that class.
darConfigurationFileLocation
The default application router file location. This is used by the default application router to
determine the application selection logic. Refer to Appendix C of the JSR 289 specification
for more details.

SIP Servlets Server-Installing,
Configuring and Running
32
sipStackPropertiesFile
Specifies the location of the file containing key value pairs corresponding to the SIP Stack
configuration properties. This attribute is used to further tune the JAIN SIP Stack. If this
property is omitted, the following default values are assumed:
• gov.nist.javax.sip.LOG_MESSAGE_CONTENT=true
• gov.nist.javax.sip.TRACE_LEVEL=32
• gov.nist.javax.sip.DEBUG_LOG=logs/mss-jsip-debuglog.txt
• gov.nist.javax.sip.SERVER_LOG=logs/mss-jsip-messages.xml
• javax.sip.STACK_NAME=Mobicents-SIP-Servlets
• javax.sip.AUTOMATIC_DIALOG_SUPPORT=off
• gov.nist.javax.sip.DELIVER_UNSOLICITED_NOTIFY=true
• gov.nist.javax.sip.THREAD_POOL_SIZE=64
• gov.nist.javax.sip.REENTRANT_LISTENER=true
• gov.nist.javax.sip.MAX_FORK_TIME_SECONDS=0. Dialog forking is not enabled by
default as it has an impact on memory. If set to a value greater than 0, Dialog Forking will
be enabled on Mobicents Sip Servlets.
• gov.nist.javax.sip.AUTOMATIC_DIALOG_ERROR_HANDLING=false. Merged requests
Loop Detection is turned off by default
SIP Servlets also adds its own properties to allow for even more configuration and flexibility:
• If the property org.mobicents.servlet.sip.SERVER_HEADER is set, a server header will
be added to all SIP Responses leaving the container.
• If the property org.mobicents.servlet.sip.USER_AGENT_HEADER is set, a server header
will be added to all SIP Requests leaving the container.
usePrettyEncoding
Allows Via, Route, and RecordRoute header field information to be split into multiple lines,
rather than each header field being separating with a comma. The attribute defaults to "true".
Leaving this attribute at the default setting may assist in debugging non-RFC3261 compliant
SIP servers.
additionalParameterableHeaders
Comma separated list of header names that are treated as parameterable by the container.
The specified headers are classed as valid, in addition to the standard parameterable headers
defined in the Sip Servlets 1.1 Specification.
Setting and getting parameters is allowed for both the standard and the additional parameters.
Parameters that are not specified in additionalParameterableHeaders will result in a
ServletParseException error.

SIP Servlets Server-Installing,
Configuring and Running
33
bypassRequestExecutor/bypassResponseExecutor
If set to false, the SIP Servlets server uses a ThreadPoolExecutor linked to a
LinkedBlockingQueue to dispatch the request/response threads. The container can then
handle two different responses (for example a 180 Ringing and a 200 OK) concurrently.
However, a race condition can occur where the second response overtakes the first one (200
OK dispatched to the application before the 180 Ringing) on UDP.
These flags are set to true by defauilt, Jain sip serializing is used per transaction to ensure
such race conditions don't occur in Mobicents Sip Servlets even though they can still happen
on UDP at jain sip level.
baseTimerInterval
Specifies the T1 Base Timer Interval, which allows the SIP Servlets container to adjust its
timers depending on network conditions. The default interval is 500 (milliseconds).
For more information about available timers, refer to the RFC326 "Table of Timer
Values"1 [http://tools.ietf.org/html/rfc3261#appendix-A], and the document contained in the
3GPP-IMS TS 24.229 v9.1.0 specification ZIP archive [http://www.3gpp.org/ftp/Specs/html-
info/24229.htm].
All of the timers present in the tables depend on T1, T2, T4, and Timer D.
t2Interval
Specifies the T2 Interval, which allows the SIP Servlets container to adjust its timers depending
on network conditions. The default interval is 4000 (milliseconds).
For more information about available timers, refer to the RFC326 "Table of Timer
Values"1 [http://tools.ietf.org/html/rfc3261#appendix-A], and the document contained in the
3GPP-IMS TS 24.229 v9.1.0 specification ZIP archive [http://www.3gpp.org/ftp/Specs/html-
info/24229.htm].
All of the timers present in the tables depend on T1, T2, T4, and Timer D.
t4Interval
Specifies the T4 Interval, which allows the SIP Servlets container to adjust its timers depending
on network conditions. The default interval is 5000 (milliseconds).
For more information about available timers, refer to the RFC326 "Table of Timer
Values"1 [http://tools.ietf.org/html/rfc3261#appendix-A], and the document contained in the
3GPP-IMS TS 24.229 v9.1.0 specification ZIP archive [http://www.3gpp.org/ftp/Specs/html-
info/24229.htm].
All of the timers present in the tables depend on T1, T2, T4, and Timer D.
timerDInterval
Specifies the Timer D Interval, which allows the SIP Servlets container to adjust its timers
depending on network conditions. The default interval is 32000 (milliseconds).
For more information about available timers, refer to the RFC326 "Table of Timer
Values"1 [http://tools.ietf.org/html/rfc3261#appendix-A], and the document contained in the

SIP Servlets Server-Installing,
Configuring and Running
34
3GPP-IMS TS 24.229 v9.1.0 specification ZIP archive [http://www.3gpp.org/ftp/Specs/html-
info/24229.htm].
All of the timers present in the tables depend on T1, T2, T4, and Timer D.
dispatcherThreadPoolSize
The number of threads used for processing SIP messages inside the Sip Servlets container
by the dispatcher. The default value is 4.
dialogPendingRequestChecking
This property enables and disables error checking when SIP transactions overlap. If within
a single dialog an INVITE request arrives while there is antoher transaction proceeding, the
container will send a 491 error response. The default value is false.
dnsServerLocatorClass
Specifies the org.mobicents.ext.javax.sip.dns.DNSServerLocator implementation
class that will be used by the container to perform DNS lookups compliant with RFC
3263 : Locating SIP Servers and E.164 NUmber Mapping. The default class used by
the container is org.mobicents.ext.javax.sip.dns.DefaultDNSServerLocator, but any
class implementing the org.mobicents.ext.javax.sip.dns.DNSServerLocator interface.
To disable DNS lookups, this attribute should be left empty.
addressResolverClass
Specifies the gov.nist.core.net.AddressResolver implementation class that will be used
by the container to perform DNS lookups. The default class used by the container is
org.mobicents.servlet.sip.core.DNSAddressResolver, but any class implementing the
gov.nist.core.net.AddressResolver NIST SIP Stack interface and having a constructor
with a org.mobicents.servlet.sip.core.SipApplicationDispatcher parameter can be
used. To disable DNS lookups, this attribute should be left empty.
This attribute has been deprecated in favor of dnsServerLocatorClass attribute which
provides better compliance with RFC 3263 : Location SIP Servers and ENUM support
canceledTimerTasksPurgePeriod
Defines a period to due a purge in the container timer schedulers. The purge may prevent
excessive memory usage for apps that cancel most of the timers it sets.
2.3.3. SIP Servlets Server Logging
Logging is an important part of working with Mobicents. There are a few files that you need to be
familiar with in order to successfully troubleshoot and adapt MSS server monitoring and logging
to your environment.
Logging Files for MSS for JBoss AS7.
$JBOSS/standalone/configuration/logging.properties
$JBOSS/standalone/configuration/mss-sip-stack.properties
SIP Servlets Server-Installing,
Configuring and Running
35
$JBOSS/standalone/configuration/standalone-sip.xml
Example 2.5. Setting the log file name in $JBOSS/standalone/configuration/
standalone-sip.xml
</formatter>
<file relative-to="jboss.server.log.dir" path="server.log"/>
<suffix value=".yyyy-MM-dd"/>
<append value="true"/>
The configuration above produces SIP logs that can be found in the $JBOSS_HOME/standalone/
log directory. Below is an extract of the log files.
server.log.2012-08-14 server.log.2012-08-24
server.log server.log.2012-08-16 server.log.2012-08-25
server.log.2012-08-07 server.log.2012-08-21 server.log.2012-08-26
server.log.2012-08-13 server.log.2012-08-22
Logging Files for MSS for Tomcat .
If you are working with Tomcat, the log configuration files are located in the $CATALINA_HOME/
conf/ directory. The log4j configuration file is located in $CATALINA_HOME/lib/ directory
$CATALINA_HOME/conf/logging.properties
$CATALINA_HOME/conf/mss-sip-stack.properties
$CATALINA_HOME/conf/server.xml
$CATALINA_HOME/lib/log4j.xml
Truncated Sample Configuration from Server.xml .
Example 2.6. Setting the log file name $CATALINA_HOME/conf/server.xml
<Valve className="org.apache.catalina.valves.AccessLogValve" directory="logs"
prefix="localhost_access_log." suffix=".txt"
pattern="%h %l %u %t "%r" %s %b" resolveHosts="false"/>
SIP Servlets Server-Installing,
Configuring and Running
36
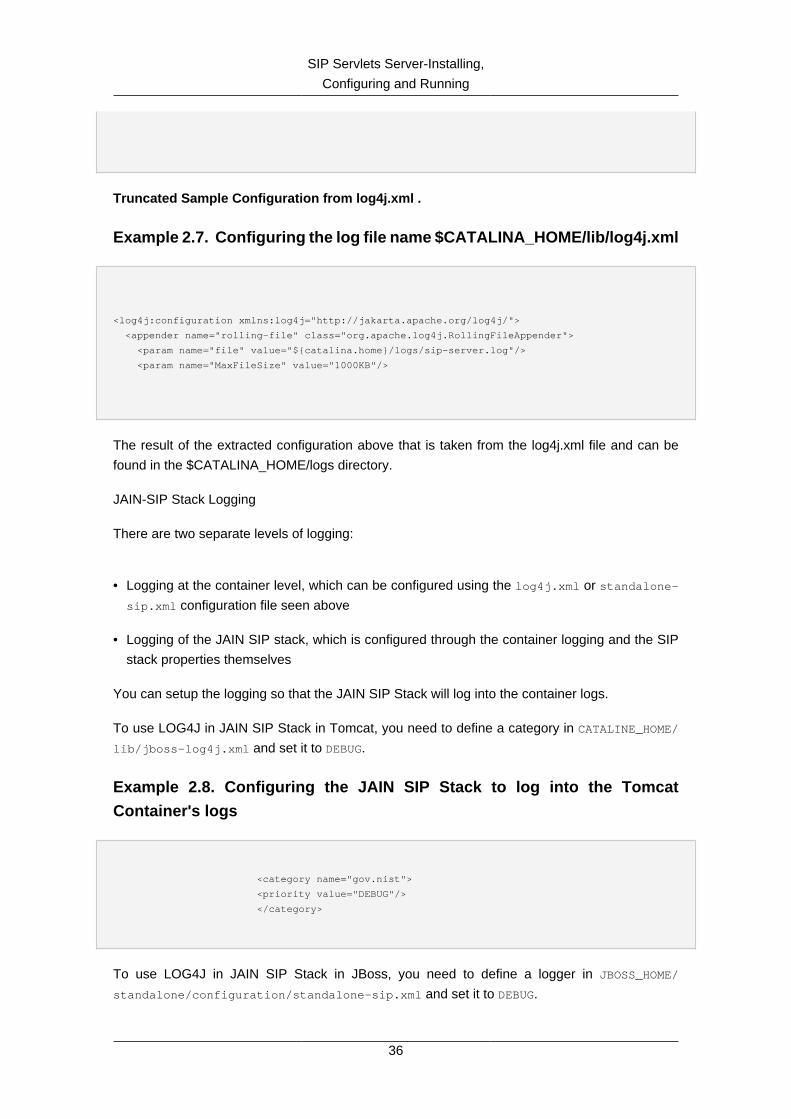
Truncated Sample Configuration from log4j.xml .
Example 2.7. Configuring the log file name $CATALINA_HOME/lib/log4j.xml
<log4j:configuration xmlns:log4j="http://jakarta.apache.org/log4j/">
<appender name="rolling-file" class="org.apache.log4j.RollingFileAppender">
<param name="file" value="${catalina.home}/logs/sip-server.log"/>
<param name="MaxFileSize" value="1000KB"/>
The result of the extracted configuration above that is taken from the log4j.xml file and can be
found in the $CATALINA_HOME/logs directory.
JAIN-SIP Stack Logging
There are two separate levels of logging:
• Logging at the container level, which can be configured using the log4j.xml or standalone-
sip.xml configuration file seen above
• Logging of the JAIN SIP stack, which is configured through the container logging and the SIP
stack properties themselves
You can setup the logging so that the JAIN SIP Stack will log into the container logs.
To use LOG4J in JAIN SIP Stack in Tomcat, you need to define a category in CATALINE_HOME/
lib/jboss-log4j.xml and set it to DEBUG.
Example 2.8. Configuring the JAIN SIP Stack to log into the Tomcat
Container's logs
<category name="gov.nist">
<priority value="DEBUG"/>
</category>
To use LOG4J in JAIN SIP Stack in JBoss, you need to define a logger in JBOSS_HOME/
standalone/configuration/standalone-sip.xml and set it to DEBUG.

SIP Servlets Server-Installing,
Configuring and Running
37
Example 2.9. Configuring the JAIN SIP Stack to log into the JBoss
Container's logs
<logger category="gov.nist">
<level name="DEBUG"/>
</logger>
For this category to be used in MSS, you need to specify it in JBOSS_HOME/
standalone/configuration/mss-sip-stack.properties or CATALINE_HOME/conf/mss-sip-
stack.properties, add the gov.nist.javax.sip.LOG4J_LOGGER_NAME=gov.nist property,
and set the gov.nist.javax.sip.TRACE_LEVEL=LOG4J property.
38
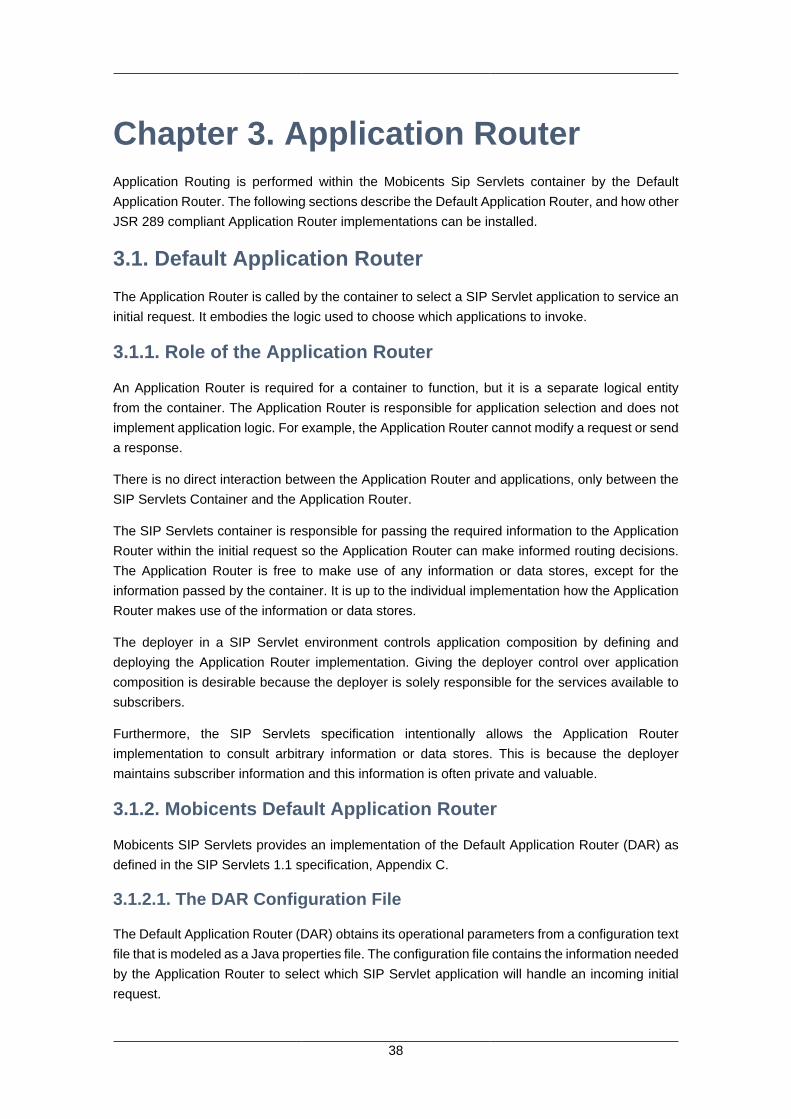
Chapter 3. Application RouterApplication Routing is performed within the Mobicents Sip Servlets container by the Default
Application Router. The following sections describe the Default Application Router, and how other
JSR 289 compliant Application Router implementations can be installed.
3.1. Default Application Router
The Application Router is called by the container to select a SIP Servlet application to service an
initial request. It embodies the logic used to choose which applications to invoke.
3.1.1. Role of the Application Router
An Application Router is required for a container to function, but it is a separate logical entity
from the container. The Application Router is responsible for application selection and does not
implement application logic. For example, the Application Router cannot modify a request or send
a response.
There is no direct interaction between the Application Router and applications, only between the
SIP Servlets Container and the Application Router.
The SIP Servlets container is responsible for passing the required information to the Application
Router within the initial request so the Application Router can make informed routing decisions.
The Application Router is free to make use of any information or data stores, except for the
information passed by the container. It is up to the individual implementation how the Application
Router makes use of the information or data stores.
The deployer in a SIP Servlet environment controls application composition by defining and
deploying the Application Router implementation. Giving the deployer control over application
composition is desirable because the deployer is solely responsible for the services available to
subscribers.
Furthermore, the SIP Servlets specification intentionally allows the Application Router
implementation to consult arbitrary information or data stores. This is because the deployer
maintains subscriber information and this information is often private and valuable.
3.1.2. Mobicents Default Application Router
Mobicents SIP Servlets provides an implementation of the Default Application Router (DAR) as
defined in the SIP Servlets 1.1 specification, Appendix C.
3.1.2.1. The DAR Configuration File
The Default Application Router (DAR) obtains its operational parameters from a configuration text
file that is modeled as a Java properties file. The configuration file contains the information needed
by the Application Router to select which SIP Servlet application will handle an incoming initial
request.

Application Router
39
In the case of Mobicents SIP Servlets, it is also possible to configure the DAR through
the server.xml configuration file (see Example 2.3, “Configuring the Service Element in the
Container's server.xml” and ???).
The properties file has the following characteristics and requirements:
• It must be made available to the DAR.
• It must allow the contents and file structure to be accessible from a hierarchical URI supplied
as a system property javax.servlet.sip.ar.dar.configuration.
• It is first read by the container when it loads up and is refreshed each time an application is
deployed and undeployed.
• It has a simple format in which the name of the property is the SIP method and the value is a
comma-separated string value for the SipApplicationRouterInfo object.
INVITE: (sip-router-info-1), (sip-router-info-2)..
SUBSCRIBE: (sip-router-info-3), (sip-router-info-4)..
ALL: (sip-router-info-5), (sip-router-info-6)..
Mobicents SIP Servlets defines a new keyword called ALL. The keyword allows mapping
between the sip-router-info data, and all methods supported by the container (for example,
INVITE, REGISTER, SUBSCRIBE). This mapping can save time when configuring an
application that listens to all incoming methods.
Note
If ALL, and a specific method are defined in the DAR file, the specific method takes
precedence over ALL. When the specific method no longer has applications to
serve, ALL is enabled again.
The sip-router-info data specified in the properties file is a string value version of the
SipApplicationRouterInfo object. It consists of the following information:
• The name of the application as known to the container. The application name can be obtained
from the <app-name> element of the sip.xml deployment descriptor of the application, or the
@SipApplication annotation.
• The identity of the subscriber that the DAR returns. The DAR can return any header in the SIP
request using the DAR directive DAR:SIP_HEADER. For example, DAR:From would return the SIP
URI in the From header. The DAR can alternatively return any string from the SIP request.
• The routing region, which consists of one of the following strings: ORIGINATING, TERMINATING
or NEUTRAL. This information is not currently used by the DAR to make routing decisions.

Application Router
40
• A SIP URI indicating the route as returned by the Application Router, which can be used to route
the request externally. The value may be an empty string.
• A route modifier, which consists of one of the following strings: ROUTE, ROUTE_BACK or NO_ROUTE.
The route modifier is used in conjunction with the route information to route a request externally.
• A string representing the order in which applications must be invoked (starts at 0). The string is
removed later on in the routing process, and substituted with the order positions of sip-router-
info data.
• An optional string that contains Mobicents-specific parameters. Currently, only the DIRECTION
and REGEX parameters are supported.
Note
The field can contain unsupported key=value properties that may be supported
in future releases. The unsupported properties will be ignored during parsing,
until support for the attributes is provided.
The syntax is demonstrated in Example 3.1, “DIRECTION Example”.
• The DIRECTION parameter specifies whether an application serves external(INBOUND)
requests or initiates (OUTBOUND) requests.
If an application is marked DIRECTION=INBOUND, it will not be called for requests initiated by
applications behaving as UAC. To mark an application as UAC, specify DIRECTION=INBOUND
in the optional parameters in the DAR.
Applications that do not exist in the DAR list for the container are assumed to be OUTBOUND.
Because undefined applications are incapable of serving external requests, they must have
self-initiated the request. The Sip Servlets Management Console can be used to specify the
DIRECTION parameter.
• The REGEX parameter specifies a regular expression to be matched against the initial request
passed to the Application Router.
If the regular expression matches a part of the initial request, the application is called. If it
does not, it is skipped.
For example, in the following sip-router-info data:
INVITE - ("org.mobicents.servlet.sip.testsuite.SimpleApplication",
"DAR:From", "ORIGINATING", "", "NO_ROUTE", "0",
"REGEX=From:.*sip:.*@sip-servlets\.com")
- only incoming initial requests with a From Header with a SIP URI that belongs to the sip-
servlets.com domain will be passed to the SimpleApplication.

Application Router
41
Example 3.1. DIRECTION Example
In this example, two applications are declared for the INVITE request. The
LocationServiceApplication is called for requests coming from outside the container, but it
will not be called for the requests initiated by the UAC application Click2DialApplication.
INVITE: ("org.mobicents.servlet.sip.testsuite.Click2DialApplication",
"DAR:From",
"ORIGINATING", "", "NO_ROUTE", "0", "DIRECTION=OUTBOUND"), \
("org.mobicents.servlet.sip.testsuite.LocationServiceApplication", "DAR
\:From",
"ORIGINATING", "", "NO_ROUTE", "0", "DIRECTION=INBOUND")
This type of configuration is useful in cases where different application must be responsible for
both requests initiated by the container, and external requests received by the container.
Example 3.2. ORIGINATING/TERMINATING DAR Example
In this example, the DAR is configured to invoke two applications on receipt of an INVITE request;
one each in the originating and the terminating halves. The applications are identified by their
application deployment descriptor names.
INVITE: ("OriginatingCallWaiting", "DAR:From", "ORIGINATING", "",
"NO_ROUTE", "0"), ("CallForwarding", "DAR:To", "TERMINATING",
"","NO_ROUTE", "1")
For this example, the returned subscriber identity is the URI from each application's From and
To headers respectively. The DAR does not return any route to the container, and maintains the
invocation state in the stateInfo as the index of the last application in the list.
3.1.2.2. Routing of SIP Messages to Applications
3.1.2.2.1. Initial Requests and Application Selection Process
Initial Requests are those that can essentially be dialog creating (such as, INVITE, SUBSCRIBE
and NOTIFY), and not part of an already existing dialog.
Initial requests are routed to applications deployed in the container according to the SIP Servlets
1.1 specification, Section 15.4.1 Procedure for Routing an Initial Request.
Note
There are some other corner cases that apply to initial requests. Refer to Appendix
B, Definition of an Initial Request in the SIP Servlets 1.1 specification.
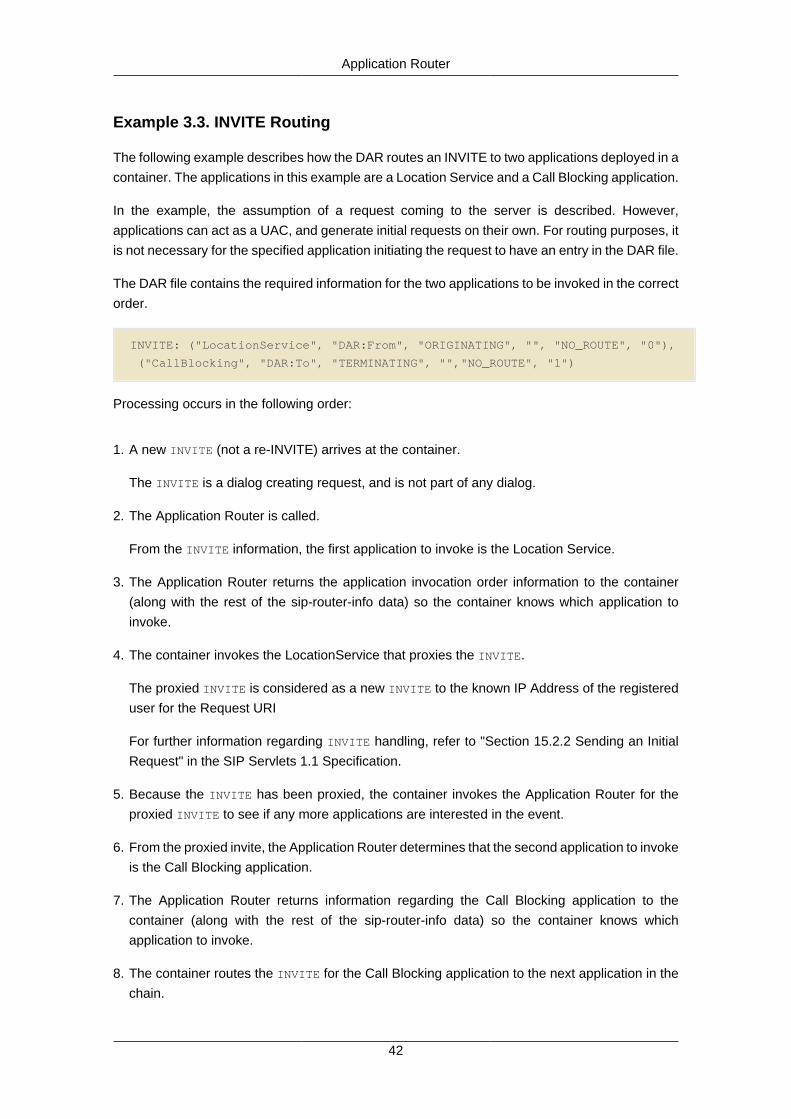
Application Router
42
Example 3.3. INVITE Routing
The following example describes how the DAR routes an INVITE to two applications deployed in a
container. The applications in this example are a Location Service and a Call Blocking application.
In the example, the assumption of a request coming to the server is described. However,
applications can act as a UAC, and generate initial requests on their own. For routing purposes, it
is not necessary for the specified application initiating the request to have an entry in the DAR file.
The DAR file contains the required information for the two applications to be invoked in the correct
order.
INVITE: ("LocationService", "DAR:From", "ORIGINATING", "", "NO_ROUTE", "0"),
("CallBlocking", "DAR:To", "TERMINATING", "","NO_ROUTE", "1")
Processing occurs in the following order:
1. A new INVITE (not a re-INVITE) arrives at the container.
The INVITE is a dialog creating request, and is not part of any dialog.
2. The Application Router is called.
From the INVITE information, the first application to invoke is the Location Service.
3. The Application Router returns the application invocation order information to the container
(along with the rest of the sip-router-info data) so the container knows which application to
invoke.
4. The container invokes the LocationService that proxies the INVITE.
The proxied INVITE is considered as a new INVITE to the known IP Address of the registered
user for the Request URI
For further information regarding INVITE handling, refer to "Section 15.2.2 Sending an Initial
Request" in the SIP Servlets 1.1 Specification.
5. Because the INVITE has been proxied, the container invokes the Application Router for the
proxied INVITE to see if any more applications are interested in the event.
6. From the proxied invite, the Application Router determines that the second application to invoke
is the Call Blocking application.
7. The Application Router returns information regarding the Call Blocking application to the
container (along with the rest of the sip-router-info data) so the container knows which
application to invoke.
8. The container routes the INVITE for the Call Blocking application to the next application in the
chain.

Application Router
43
9. The Call Blocking application determines that the user that initiated the call is black listed. The
application rejects the call with a "Forbidden" response.
10.Because the Call Blocking application acts as a UAS, the Application Selection Process is
stopped for the original INVITE.
The path the INVITE has taken (that is, LocationService to CallBlocking) is called the application
path. The routing of the responses will now occur as explained in the next section.
3.1.2.2.2. Response Routing
Responses always follow the reverse of the path taken by the corresponding request. In our case,
the Forbidden response will first go back to the LocationService, and then back to the caller. This
is true for responses to both initial and subsequent requests. The application path is a logical
concept and as such may or may not be explicitly represented within containers.
Another possible outcome could have been that the Call Blocking application, instead of sending
a Forbidden response, allowed the call and proxied the INVITE to the same Request URI chosen
by the Location Service. Then when the callee sends back the 200 OK Response, this response
goes back the same way through the application path (so in the present case Call Blocking, then
Location Service, then back to the caller).
Note
The Call Blocking application cannot just do nothing with the request and expect
the container to route the request in its place (either to a next application in chain if
another one is present or to the outside world if none is present). The Application
has to do something with request (either proxy it or act as a UAS).
3.1.2.2.3. Subsequent Requests
Subsequent requests are all requests that are not Initial.
The second scenario, where the Call Blocking application allowed the call, will be used in this
section to showcase subsequent requests. The caller has received the 200 OK response back.
Now, according to the SIP specification (RFC 3261), it sends an ACK. The ACK arrives at the
container, and is not a dialog creating request and is already part of an ongoing dialog (early
dialog) so the request is detected as a Subsequent request and will follow the application path
created by the initial request. The ACK will go through Location Service, Call Blocking, and finally
to the callee.
3.1.3. Limitations of the Default Application Router
The DAR is a minimalist Application Router implementation that is part of the reference
implementation. While it could be used instead of a production Application Router, it offers no
processing logic except for the declaration of the application order.
Application Router
44
In real world deployments, the Application Router plays an extremely important role in application
orchestration and composition. It is likely that the Application Router would make use of complex
rules and diverse data repositories in future implementations.
3.2. DFC Application Router
3.2.1. Description of DFC Application Router
Instead of using the Mobicents Default Application Router, any SIP Servlets 1.1 compliant
Application Router can be used, including the eCharts DFC Application Router [http://echarts.org/
EChartsSipServletManual/sip-echartsse4.html#x6-140004.1].
3.2.2. Installing the DFC Application Router
Detailed instructions are available from the eCharts website [http://echarts.org/Blog/Running-
E4SS-apps-on-Mobicents-SIP-Servlets.html]. The following procedure describe how to install the
eCharts DFC Application Router (DFCAR) on a variety of SIP Servlet Server platforms.
Procedure 3.1. Installing DFCAR on Tomcat
1. Deploy the DFCAR
Drop the dfcar.jar from the ECharts distribution package in the TOMCAT_HOME/lib directory.
2. Remove the DAR
Remove the Mobicents Default Application Router located in TOMCAT_HOME/lib/sip-
servlets-application-router-*.jar.
Please see the following link to learn how to deploy jar files in MSS for JBoss AS7.
Procedure 3.2. Installing DFCAR on JBoss AS7
1. Deploy the DFCAR
Create a directory under JBOSS_HOME/modules/org/echarts/
Drop the dfcar.jar from the ECharts distribution package in the JBOSS_HOME/modules/
org/echarts/ directory.
Create a module.xml file under the same directory with the following contents
<module xmlns="urn:jboss:module:1.1" name="org.echarts">
<resources>

Application Router
45
<resource-root path="dfcar.jar"/>
</resources>
<dependencies>
<module name="org.apache.log4j"/>
<module name="org.mobicents.javax.servlet.sip"/>
</dependencies>
</module>
2. Remove the DAR
Remove the Mobicents Default Application Router located in JBOSS_HOME/modules/org/
mobicents/dar.
3. Use the DFC DAR
In JBOSS_HOME/modules/org/jboss/as/web/main/module.xml, replace the following line
<module name="org.mobicents.dar" export="true"/>
by this one
<module name="org.echarts" export="true"/>

46
Chapter 4. SIP Servlet Example
ApplicationsThe SIP Servlet Server has a selection of examples that demonstrate particular capabilities of the
server. Table 4.1, “Available Examples” lists the available examples, their location, and a brief
description about the functionality each example demonstrates. The examples can also provide
a useful starting point for developing SIP Applications, therefore it is encouraged to experiment
and adapt the base examples. Each example is available in both binary and source formats.
Table 4.1. Available Examples
Example Description
Section 4.1.3, “The Call-Blocking Service” Demonstrates how to block calls by specifying
that the INVITE SIP Extension checks the
From address to see if it is specified in
the block list. If the blocked SIP address
matches, the Call Blocking application send a
FORBIDDEN response.
Section 4.1.4, “The Call-Forwarding Service” Demonstrates how to forward calls by
specifying that the INVITE SIP Extension
checks the To address to see if it is specified
in the forward list. If the SIP address matches,
the application acts as a back-to-back user
agent (B2BUA).
Section 4.1.5, “The Call-Controller Service” Call Blocking and Call Forwarding are merged
to create a new service.
Speed Dial [https://code.google.com/p/
sipservlets/wiki/SpeedDial]
Demonstrates how to implement speed
dialing for SIP addresses. The demonstration
uses a static list of speed dial numbers.
The numbers are translated into a complete
address based on prior configuration. The SIP
addresses are proxied without record-routing,
or supervised mode.
Section 4.1.1, “The Location Service” Demonstrates a location service that performs
a lookup based on the request URI, into a
hard-coded list of addresses. The request is
proxied to the set of destination addresses
associated with that URI.
Composed Speed Dial and Location
[https://code.google.com/p/sipservlets/wiki/
SpeedDialLocationService]
Speed Dial and Location are merged to
create a new service. Speed Dial proxies the
speed dial number to a SIP address, then

SIP Servlet Example
Applications
47
Example Description
Location Service proxies the call to the actual
location of the call recipient.
Click to Call [concept-chapter-SS_click2call] Demonstrates how SIP Servlets can be used
along with HTTP servlets as a converged
application to place calls from a web portal.
The example is a modified version of the click
to dial example from the Sailfin project, but
has been reworked to comply with JSR 289.
Chat Server [https://code.google.com/p/
sipservlets/wiki/ChatServer]
Demonstrates MESSAGE SIP Extension
support. This example is based on the
chatroom server demonstration from the BEA
dev2dev project, and has been modified to
meet JSR 289 requirements.
Media JSR 309 Example [https://
code.google.com/p/sipservlets/wiki/
MediaDemo]
Demonstrates how the Sip Servlets
Application Developers can leverage the
JSR-309 API, which provides to application
developers multimedia capabilities with
a generic media server (MS) abstraction
interface. This example is only compatible
with JBoss AS5. The solution is know to work
with Twinkle and linphone SIP soft-phones.
Shopping [https://code.google.com/p/
sipservlets/wiki/ShoppingDemo]
Demonstrates integration with Seam and
Java Enterprise Edition (JEE), and JSR 309
Media integration with text to speech (TTS)
and dual-tone multi-frequency (DTMF) tones.
The demonstration builds on the Converged
Demo example, and adds support for the SIP
Servlets v1.1 specification.
Section 4.1.2, “The Diameter Event-Changing
Service”
Demonstrates how the Diameter Event
Charging, and the Location service, can be
used to perform fixed-rated charging of calls
(event charging). When a call is initiated, a
debit of ten euros is applied to the A Party
account. If the call is rejected by the B Party,
or A Party hangs up before B Party can
answer the call, the ten euro charge is
credited to the A Party account.
Diameter Sh OpenIMS Integration [https://
code.google.com/p/sipservlets/wiki/
DiameterSh]
Demonstrates the integration between
Mobicents and OpenIMS, using the Diameter
Sh interface to receive profile updates and
SIP.
SIP Servlet Example
Applications
48
Example Description
Diameter Ro/Rf IIntegration [https://
code.google.com/p/sipservlets/wiki/
DiameterRoRf]
A Diameter Ro/Rf service that performs online
call charging.
Conference [https://code.google.com/p/
sipservlets/wiki/ConferenceDemo]
Demonstrates the capabilities of the Media
Server, such as endpoint composition and
conferencing, as well as proving that SIP
Servlets are capable of working seamlessly
with any third-party web framework, without
repackaging or modifying the deployment
descriptors. The demonstration uses Google's
GWT Ajax framework with server-push
updates to provide a desktop-like user
interface experience and JSR 309 for Media
Control.
Alerting Application [https://code.google.com/
p/sipservlets/wiki/AlertingApplication]
This application was developed so that the
JBoss RHQ/Jopr Enterprise Management
Solution would be able to notify system
administrators when a monitoring alert is fired
by Jopr/RHQ.
SIP Presence Client Application [https://
code.google.com/p/sipservlets/wiki/
PresenceClientExample]
A Call Blocking application interoperating
with the PLATFORM_NAME; SIP Presence
Service (Technology Preview) to fetch the
blocked contacts through XCAP.
4.1. Operating the Example Applications
Important Information
Before trying out the examples in this section, you must have installed, configured
and have MSS for JBoss or MSS for Tomcat AS7 running on your system.
See the chapters below for detailed instructions.
Section 2.1, “Getting Started with MSS for JBoss AS7 ”
Section 2.2, “Getting Started with MSS for Tomcat 7 ”
4.1.1. The Location Service
The Mobicents Location Service contains a list of mappings of request URIs to destination
addresses. When the Location Service receives a request, it performs a lookup on that mapping

SIP Servlet Example
Applications
49
and proxies the request simultaneously to the destination address (or addresses) associated with
that URI.
The Location Service Mappings Cannot Currently Be
Configured
The Location Service currently performs a lookup on a hard-coded list of
addresses. This model is evolving toward the eventual use of a database.
Regardless of whether you are using the JBoss Application Server or the Tomcat Servlet Container
as the Servlets Server, the application, container and Location Service perform the following steps:
• A user—let us call her Alice—makes a call to sip:[email protected]. The INVITE
is received by the servlet container, which then starts the Location Service.
• The Location Service, using non-SIP means, determines that the callee (i.e. the receiver) is
registered at two locations, identified by the two SIP URIs, sip:[email protected]:5090
and sip:[email protected]:6090.
• The Location Service proxies to those two destinations in parallel, without record-routing, and
without making use of supervised mode.
• One of the destinations returns a 200 OK status code; the second proxy is then canceled.
• The 200 OK is forwarded to Alice, and call setup is completed as usual.
Here is the current list of hard-coded contacts and their location URIs:
• sip:[email protected]:5090
• sip:[email protected]:6090
Downloading. The Location Service is comprised of two archive files, a Web
Archive (WAR) and a Default Application Router (DAR) configuration file, which
you need to add to your installed SIP Servlets Server. For more information
about WAR files, refer to the JBoss Application Server Administration and
Development Guide [http://www.jboss.org/file-access/default/members/jbossas/freezone/docs/
Server_Configuration_Guide/beta422/html/index.html]. For more information about DAR files,
refer to the JSR 289 spec, Appendix C [http://jcp.org/en/jsr/detail?id=289].
Download the Location Service's WAR file from here: https://oss.sonatype.org/content/groups/
public/org/mobicents/servlet/sip/examples/location-service/3.0.0-SNAPSHOT/location-
service-3.0.0-SNAPSHOT.war.

SIP Servlet Example
Applications
50
Download the Location Service's DAR file from here: https://sipservlets.googlecode.com/git/sip-
servlets-examples/location-service/locationservice-dar.properties.
Installing. Both the location-service-3.0.0-SNAPSHOT.war WAR file and the
locationservice-dar.properties DAR file that you downloaded should be placed into different
directories in your SIP Servlet Server installation hierarchy. Which directory depends on whether
you are using the Location Service with MSS for JBoss or with MSS for Tomcat:
MSS for JBoss AS7
Place location-service-3.0.0-SNAPSHOT.war into the $JBOSS_HOME/standalone/
deployments/ directory, and locationservice-dar.properties into the $JBOSS_HOME/
standalone/configuration/dars/ directory.
MSS for Tomcat AS7
Place location-service-3.0.0-SNAPSHOT.war into the $CATALINA_HOME/webapps/
directory, and locationservice-dar.properties into the $CATALINA_HOME/conf/dars/
directory.
Configuration.
MSS for JBoss
Example 4.1. Editing MSS for JBoss's standalone-sip.xml for the
Location Service
In the $JBOSS_HOME/standalone/configuration/standalone-sip.xml file
search for the line
<subsystem xmlns="urn:org.mobicents:sip-servlets-as7:1.0"
application-router="dars/mobicents-dar.properties"
and replace it with the line below
<subsystem xmlns="urn:org.mobicents:sip-servlets-as7:1.0"
application-router="dars/locationservice-dar.properties"
MSS for Tomcat
Open the $CATALINA_HOME/conf/server.xml configuration file and find the Service
element. Add an attribute to it called darConfigurationFileLocation, and set it to conf/
dars/locationservice-dar.properties:
Example 4.2. Editing MSS for Tomcat's server.xml for the Location
Service
<Service

SIP Servlet Example
Applications
51
name="Sip-Servlets"
className="org.mobicents.servlet.sip.startup.SipStandardService"
sipApplicationDispatcherClassName="org.mobicents.servlet.sip.core.SipApplicationDispatcherImpl"
darConfigurationFileLocation="conf/dars/locationservice-dar.properties"
sipStackPropertiesFile="conf/mss-sip-stack.properties">
Make sure that the configuration file only contains one darConfigurationFileLocation
attribute: your new one.
Running. Once the WAR and DAR files have been placed in the right directories, and the JBoss
Application Server or Tomcat Servlet Container knows where to find them (which you specified
in the standalone-sip.xml and server.xml file), then you should go ahead and run the SIP
Servlets Server.
Testing. The following procedure shows how to test the Location Service.
Procedure 4.1.
1. Start two SIP soft-phones. The first phone should be set up as sip:receiver@sip-
servlets.com at the IP address 127.0.0.1 on port 5090. The second phone can be set up
in any way you like. Note that the SIP phones do not have to be registered.
2. Using the second phone, make a call to sip:[email protected]. If the Location
Service has been set up correctly and is running, the first phone—as the receiver or callee
—should now be ringing.
4.1.2. The Diameter Event-Changing Service
The Diameter Event-Changing Service is based on the Location Service, which performs call-
charging at a fixed rate. Upon the initiation of a call, a debit of €10.00 occurs. In the cases of
a call being rejected or the caller disconnecting (hanging up) before an answer is received, the
caller's account is refunded.
Note that an MSS for JBoss installation is required to run this example; it will not work with MSS
for Tomcat.
Provided here is a step-by-step description of the procedure as performed by the application and
container:
Procedure 4.2. Diameter Event-Changing Service Step-By-Step
1. A user, Alice, makes a call to sip:[email protected]. The INVITE is received by
the servlet container, which sends a request to debit Alice's account to the Charging Server.
The servlet container then invokes the location service.

SIP Servlet Example
Applications
52
2. The Location Service determines, without using the SIP protocol itself, where the callee—or
receiver—is registered. The callee may be registered at two locations identified by two SIP
URIs: sip:[email protected]:5090 and sip:[email protected]:6090.
3. The Location Service proxies to those two destinations simultaneously, without record-routing
and without using the supervised mode.
4. One of the destinations returns 200 (OK), and so the container cancels the other.
5. The 200 (OK) is forwarded upstream to Alice, and the call setup is carried out as usual.
6. If none of the registered destinations accepts the call, a Diameter Accounting-Request for
refund is sent to the Diameter Charging Server in order to debit the already-credited €10.00
4.1.2.1. Diameter Event-Changing Service: Installing, Configuring
and Running
Preparing your MSS for JBoss server to run the Diameter Event-Changing example requires
downloading a WAR archive, a DAR archive, the Ericsson Charging Emulator, setting an
attribute in JBoss's standalone-sip.xml configuration file, and then running JBoss AS. Detailed
instructions in the section below.
Pre-Install Requirements and Prerequisites. The following requirements must be met before
installation can begin.
Software Prerequisites
One MSS for JBoss Installation
Before proceeding, you should follow the instructions for installing, configuring, running and
testing MSS for JBoss from the binary distribution.
Downloading. The following procedure describes how to download the required files.
1. First, download the latest Web Application Archive (WAR) file corresponding to this
example, the current version of which is named diameter-event-charging-*.war,
from https://oss.sonatype.org/content/groups/public/org/mobicents/servlet/sip/examples/
diameter-event-charging/3.0.0-SNAPSHOT/diameter-event-charging-3.0.0-
SNAPSHOT.war.
2. Secondly, download the corresponding Disk Archive (DAR) configuration file
here: https://sipservlets.googlecode.com/git/sip-servlets-examples/diameter-event-charging/
diametereventcharging-dar.properties.
3. Finally, you will need to download the Ericsson Charging Emulator, version 1.0, from http://
mobicents.googlecode.com/files/ChargingSDK-1_0_D31E.zip.

SIP Servlet Example
Applications
53
Installing. The following procedure describes how to install the downloaded files.
1. Place the diameter-event-charging-3.0.0-SNAPSHOT.war WAR archive into the
$JBOSS_HOME/standalone/deployments/ directory.
2. Place the diametereventcharging-dar.properties DAR file in your $JBOSS_HOME/
standalone/configuration/dars/ directory.
3. Finally, open the terminal, move into the directory to which you downloaded the Ericsson
Charging SDK (for the sake of this example, we will call this directory charging_sdk), and
then unzip the downloaded zip file (you can use Java's jar -xvf command for this:
~]$ cd charging_sdk
charging_sdk]$ jar -xvf ChargingSDK-1_0_D31E.zip
Alternatively, you can use Linux's unzip command to do the dirty work:
charging_sdk]$ unzip ChargingSDK-1_0_D31E.zip
Configuration.
MSS for JBoss
Example 4.3. Editing the standalone-sip.xml for the Diameter Event-
Changer Service
In the $JBOSS_HOME/standalone/configuration/standalone-sip.xml
make sure the application router is pointing the mobicents-dar.properties
file as follows.
<subsystem xmlns="urn:org.mobicents:sip-servlets-as7:1.0"
application-router="dars/mobicents-dar.properties"
Running. The following procedure describes how to run the Diameter Event-Changing Service.
Procedure 4.3. Diameter Event-Changing Service
• Then, run the Ericsson Charging Emulator. Open a terminal, change the working directory to
the location of the unzipped Charging Emulator files (in ChargingSDK-1_0_D31E or a similarly-
named directory), and run it with the java -jar PPSDiamEmul.jar command:

SIP Servlet Example
Applications
54
~]$ java -jar PPSDiamEmul.jar
Using. Using the Event-Changing service means, firstly, inserting some parameters into the
Charging Emulator, and then, by using two SIP (soft)phones, calling one with the other. The
following sequential instructions show you how.
SIP (Soft)Phone? Which?
The Mobicents team recommends one of the following SIP phones, and has found
that they work well: the 3CX Phone, the SJ Phone or the WengoPhone.
Procedure 4.4. Using the Diameter Event-Changing Service
1. Configure the Ericsson SDK Charging Emulator
Once you have started the Charging Emulator, you should configure it exactly as portrayed
in Figure 4.1, “Configuring the Charging Emulator”.

SIP Servlet Example
Applications
55
Figure 4.1. Configuring the Charging Emulator
1. Set the Peer ID to: aaa://127.0.0.1:21812
2. Set the Realm to: mobicents.org

SIP Servlet Example
Applications
56
3. Set the Host IP to: 127.0.0.1
2. Start two SIP (soft)phones. You should set the first phone up with the following parameters:
sip:receiver@sip-servlets on IP address 127.0.0.1 on port 5090. The other phone can
be set up any way you like.
3. Before making a call, open the Config → Options dialog window, as shown in the image.
Figure 4.2. Configuring Accounts in the Charging Emulator
In the Account Configuration window of the Charging Emulator, you can see the user's
balances. Select a user to watch the balance. You can also stretch the window lengthwise
to view the user's transaction history.
4. Time to call! From the second, “any-configuration” phone, make a call to sip:receiver@sip-
servlets.com. Upon doing so, the other phone should ring or signal that it is being contacted .
5. You should be able to see a request—immediately following the invite and before the other
party (i.e. you) accepts or rejects the call—sent to the Charging Emulator. That is when the
debit of the user's account is made. In the case that the call is rejected, or the caller gives
up, a second, new Diameter request is sent to refund the initial amount charged by the call.

SIP Servlet Example
Applications
57
On the other hand, if the call is accepted, nothing else related to Diameter happens, and no
second request takes place.
Please note that this is not the correct way to do charging, as Diameter provides other means,
such as unit reservation. However, for the purpose of a demonstration it is sufficient to show
the debit and follow-up credit working. Also, this is a fixed-price call, regardless of the duration.
Charging can, of course, be configured so that it is time-based.
4.1.3. The Call-Blocking Service
The Mobicents Call-Blocking Service, upon receiving an INVITE request, checks to see whether
the sender's address is a blocked contact. If so, it returns a FORBIDDEN reply; otherwise, call setup
proceeds as normal.
Blocked Contacts Cannot Currently Be Configured
Blocked contacts are currently hard-coded addresses. This model is evolving
towards the eventual use of a database.
Here is the current hard-coded list of blocked contacts:
• sip:[email protected]
• sip:[email protected]
4.1.3.1. The Call-Blocking Service: Installing, Configuring and
Running
Software Prerequisites
Either an MSS for JBoss or an MSS for Tomcat Installation
The Call-Blocking Service requires either an MSS for JBoss or an MSS for Tomcat binary
installation.
You can find detailed instructions on installing MSS for JBoss here: Section 2.1, “Getting
Started with MSS for JBoss AS7 ”.
You can find detailed instructions on installing MSS for Tomcat here: Section 2.2.2, “Tomcat
for Windows ”.
Downloading. The Call-Blocking Service is comprised of two archive files, a
Web Archive (WAR) and a Default Application Router (DAR) configuration file,
which you need to add to your installed SIP Servlets Server. For more
information about WAR files, refer to the JBoss Application Server Administration and
Development Guide [http://www.jboss.org/file-access/default/members/jbossas/freezone/docs/

SIP Servlet Example
Applications
58
Server_Configuration_Guide/beta422/html/index.html]. For more information about DAR files,
refer to the JSR 289 spec, Appendix C [http://jcp.org/en/jsr/detail?id=289].
Download the Call-Blocking Service's WAR file from here: https://oss.sonatype.org/content/
groups/public/org/mobicents/servlet/sip/examples/call-blocking/3.0.0-SNAPSHOT/call-
blocking-3.0.0-SNAPSHOT.war.
Download the Call-Blocking Service's DAR file from here: https://sipservlets.googlecode.com/git/
sip-servlets-examples/call-blocking/call-blocking-servlet-dar.properties.
Installing. Both the call-blocking-3.0.0-SNAPSHOT.war WAR file and the call-blocking-
servlet-dar.properties DAR file that you downloaded should be placed into different
directories in your SIP Servlet Server installation hierarchy. Which directory depends on whether
you are using the Call-Blocking Service with MSS for JBoss or with MSS for Tomcat:
MSS for JBoss
Place call-blocking-3.0.0-SNAPSHOT.war into the $JBOSS_HOME/standalone/
deployments/ directory, and call-blocking-servlet-dar.properties into the
$JBOSS_HOME/standalone/configuration/dars/ directory.
MSS for Tomcat
Place call-blocking-servlet-dar.properties into the $CATALINA_HOME/webapps/
directory, and call-blocking-servlet-dar.properties into the $CATALINA_HOME/conf/
dars/ directory.
Configuring.
MSS for JBoss
Example 4.4. Editing the standalone-sip.xml file for Call Blocking
In the $JBOSS_HOME/standalone/configuration/standalone-sip.xml search for
the line below
<subsystem xmlns="urn:org.mobicents:sip-servlets-as7:1.0"
application-router="dars/mobicents-dar.properties"
change it to the following
<subsystem xmlns="urn:org.mobicents:sip-servlets-as7:1.0"
application-router="dars/call-blocking-servlet-dar.properties"
MSS for Tomcat
Open the $CATALINA_HOME/conf/server.xml configuration file and find the Service
element. Add an attribute to it called darConfigurationFileLocation, and set it to conf/
dars/call-blocking-servlet-dar.properties:

SIP Servlet Example
Applications
59
Example 4.5. Editing MSS for Tomcat's server.xml for the Call-Blocking
Service
<Service
name="Sip-Servlets"
className="org.mobicents.servlet.sip.startup.SipStandardService"
sipApplicationDispatcherClassName="org.mobicents.servlet.sip.core.SipApplicationDispatcherImpl"
darConfigurationFileLocation="conf/dars/call-blocking-servlet-dar.properties"
sipStackPropertiesFile="conf/mss-sip-stack.properties">
Make sure that the configuration file only contains one darConfigurationFileLocation
attribute: your new one.
Running. Once the WAR and DAR files have been placed in the right directories, and the JBoss
Application Server or Tomcat Servlet Container knows where to find them (which you specified
in a server.xml and the standalone-sip.xml files), then you should go ahead and run the SIP
Servlets Server.
Testing. The following procedure shows how to test the Call-Blocking Service.
Procedure 4.5. Testing the Call Blocking Service
1. Start a SIP softphone of your choice. The account name should be blocked-sender.
The From Header should list one of the following addresses: sip:blocked-sender@sip-
servlets.com or sip:[email protected]. The SIP softphone does not need to be
registered.
2. Make a call to any address, and you should receive a FORBIDDEN response.
4.1.4. The Call-Forwarding Service
The Mobicents Call-Forwarding Service, upon receiving an INVITE request, checks to see whether
the sender's address is among those in a list of addresses which need to be forwarded. If so,
then the Call-Forwarding Service acts as a Back-to-Back User Agent (B2BUA), and creates a new
call leg to the destination. When the response is received from the new call leg, it sends it an
acknowledgment (ACK) and then responds to the original caller. If, on the other hand, the server
does not receive an ACK, then it tears down the new call leg with a BYE. Once the BYE is received,
then it answers OK directly and sends the BYE to the new call leg.
Contacts to Forward Cannot Currently Be Configured
Contacts to forward are currently hard-coded addresses. This model is evolving
toward the eventual use of a database.
Here is the current hard-coded list of contacts to forward:

SIP Servlet Example
Applications
60
• sip:[email protected]
• sip:[email protected]
4.1.4.1. The Call-Forwarding Service: Installing, Configuring and
Running
Pre-Install Requirements and Prerequisites. The following requirements must be met before
installation can begin.
Downloading. The Call-Forwarding Service is comprised of two archive files, a Web Archive
(WAR) and a Data Archive (DAR), which you need to add to your installed SIP Servlets Server. For
more information about WAR and DAR files, refer to the JBoss Application Server Administration
and Development Guide [http://www.jboss.org/file-access/default/members/jbossas/freezone/
docs/Server_Configuration_Guide/beta422/html/index.html].
Download the Call-Forwarding Service's WAR file from here: https://oss.sonatype.org/content/
groups/public/org/mobicents/servlet/sip/examples/call-forwarding/3.0.0-SNAPSHOT/call-
forwarding-3.0.0-SNAPSHOT.war.
Download the Call-Forwarding Service's DAR file from here: https://sipservlets.googlecode.com/
git/sip-servlets-examples/call-forwarding/call-forwarding-b2bua-servlet-dar.properties.
Installing. Both the call-forwarding-3.0.0-SNAPSHOT.war WAR file and the call-
forwarding-servlet-dar.properties DAR file that you downloaded should be placed into
different directories in your SIP Servlet Server installation hierarchy. Which directory depends on
whether you are using the Call-Forwarding Service with MSS for JBoss or with MSS for Tomcat:
MSS for JBoss
Place call-forwarding-3.0.0-SNAPSHOT.war into the $JBOSS_HOME/standalone/
deployments/ directory, and call-forwarding-servlet-dar.properties into the
$JBOSS_HOME/standalone/configuration/dars/ directory.
MSS for Tomcat
Place call-forwarding-3.0.0-SNAPSHOT.war into the $CATALINA_HOME/webapps/
directory, and call-forwarding-servlet-dar.properties into the $CATALINA_HOME/
conf/dars/ directory.
Configuring.
MSS for JBoss
Example 4.6. Editing MSS for JBoss's standalone-sip.xml for the Call-
Forwarding Service

SIP Servlet Example
Applications
61
In the $JBOSS_HOME/standalone/configuration/standalone-sip.xml search for
the line below
<subsystem xmlns="urn:org.mobicents:sip-servlets-as7:1.0"
application-router="dars/mobicents-dar.properties"
change it to the following
<subsystem xmlns="urn:org.mobicents:sip-servlets-as7:1.0"
application-router="dars/call-forwarding-b2bua-servlet-dar.properties"
MSS for Tomcat
Open the $CATALINA_HOME/conf/server.xml configuration file and find the Service
element. Add an attribute to it called darConfigurationFileLocation, and set it to conf/
dars/call-forwarding-b2bua-servlet-dar.properties:
Example 4.7. Editing MSS for Tomcat's server.xml for the Call-
Forwarding Service
<Service
name="Sip-Servlets"
className="org.mobicents.servlet.sip.startup.SipStandardService"
sipApplicationDispatcherClassName="org.mobicents.servlet.sip.core.SipApplicationDispatcherImpl"
darConfigurationFileLocation="conf/dars/call-forwarding-b2bua-servlet-dar.properties"
sipStackPropertiesFile="conf/mss-sip-stack.properties">
Make sure that the configuration file only contains one darConfigurationFileLocation
attribute: your new one.
Running. Once the WAR and DAR files have been placed in the right directories, and the JBoss
Application Server or Tomcat Servlet Container knows where to find them (which you specified
in a standalone-sip.xml and server.xml files), then you should go ahead and run the SIP
Servlets Server.
Testing. The following procedure shows how to test the Call-Forwarding Service.
Procedure 4.6.
1. Start two SIP soft-phones of your choice. Set the account settings of the first SIP softphone to:
• Account name: forward-receiver
• IP address: 127.0.0.1
• Port: 5090

SIP Servlet Example
Applications
62
Neither of the SIP soft-phones needs to be registered.
2. From the second phone, make a call to sip:[email protected]. The first phone,
"forward-receiver", should now be ringing.
4.1.5. The Call-Controller Service
The Call-Controller service is a composition of two other services: Call-Blocking and Call-
Forwarding. Essentially, it performs the services of both call-forwarding and call-blocking.
• To learn about how the Call-Blocking service works, refer to Section 4.1.3, “The Call-Blocking
Service”.
• To learn about how the Call-Forwarding service works, refer to Section 4.1.4, “The Call-
Forwarding Service”.
Blocked Contacts and Contacts to Forward Cannot
Currently Be Configured
Both the list of blocked contacts and the list of contacts to forward are currently
both hard-coded. However, both of those models are evolving toward the eventual
use of databases.
4.1.5.1. The Call-Controller Service: Installing, Configuring and
Running
The Call-Controller service requires the two WAR files for the Call-Blocking and Call-Forwarding
services to be placed in the correct directory inside your Mobicents SIP Servlets Server binary
installation. However, the Call-Controller service does not require their corresponding DAR files:
you need only to download and install a DAR file customized for the Call-Controller service. The
instructions below show you how to do precisely this; there is no need, therefore, to first install
either the Call-Blocking or the Call-Forwarding services, though it is helpful to at least be familiar
with them.
Pre-Install Requirements and Prerequisites. The following requirements must be met before
installation can begin.
Downloading. The Call-Controller Service is comprised of two WAR files, one for the Call-
Forwarding service and one for Call-Blocking, and a customized Call-Controller DAR file. You
do not need to install the DAR files for the Call-Forwarding or the Call-Blocking services. For
more information about WAR files, refer to the JBoss Application Server Administration and
Development Guide [http://www.jboss.org/file-access/default/members/jbossas/freezone/docs/
Server_Configuration_Guide/beta422/html/index.html]. For more information about DAR files,
refer to the JSR 289 spec, Appendix C [http://jcp.org/en/jsr/detail?id=289]

SIP Servlet Example
Applications
63
Download the Call-Blocking Service's WAR file from here: https://oss.sonatype.org/content/
groups/public/org/mobicents/servlet/sip/examples/call-blocking/3.0.0-SNAPSHOT/call-
blocking-3.0.0-SNAPSHOT.war.
Download the Call-Forwarding Service's WAR file from here: https://oss.sonatype.org/content/
groups/public/org/mobicents/servlet/sip/examples/call-forwarding/3.0.0-SNAPSHOT/call-
forwarding-3.0.0-SNAPSHOT.war.
Download the Call-Controller Service's DAR file from here: https://sipservlets.googlecode.com/
git/sip-servlets-examples/call-blocking/call-controller-servlet-dar.properties.
Installing. The call-blocking-3.0.0-SNAPSHOT.war, call-forwarding-3.0.0-
SNAPSHOT.war and call-controller-servlet-dar.properties archive files that you
downloaded should be placed into different directories in your SIP Servlet Server installation
hierarchy. Which directory depends on whether you are using the Call-Controller Service with
MSS for JBoss or with MSS for Tomcat:
MSS for JBoss
Place call-blocking-3.0.0-SNAPSHOT.war and call-forwarding-3.0.0-SNAPSHOT.war
into the $JBOSS_HOME/standalone/deployments/ directory, and call-controller-
servlet-dar.properties into the $JBOSS_HOME/standalone/configuration/dars/
directory.
MSS for Tomcat
Place call-blocking-3.0.0-SNAPSHOT.war and call-forwarding-3.0.0-SNAPSHOT.war
into the $CATALINA_HOME/webapps/ directory, and call-controller-servlet-
dar.properties into the $CATALINA_HOME/conf/dars/ directory.
Configuring.
MSS for JBoss
Example 4.8. Editing MSS for JBoss's standalone-sip.xml for the Call-
Controller Service
In the $JBOSS_HOME/standalone/configuration/standalone-sip.xml search for
the line below
<subsystem xmlns="urn:org.mobicents:sip-servlets-as7:1.0"
application-router="dars/mobicents-dar.properties"
change it to the following
<subsystem xmlns="urn:org.mobicents:sip-servlets-as7:1.0"
application-router="dars/call-controller-servlet-dar.properties"

SIP Servlet Example
Applications
64
Make sure that the configuration file only contains one darConfigurationFileLocation
attribute: your new one.
MSS for Tomcat
Open the $CATALINA_HOME/conf/server.xml configuration file and find the Service
element. Add an attribute to it called darConfigurationFileLocation, and set it to conf/
dars/call-controller-servlet-dar.properties :
Example 4.9. Editing MSS for Tomcat's server.xml for the Call-Controller
Service
<Service
name="Sip-Servlets"
className="org.mobicents.servlet.sip.startup.SipStandardService"
sipApplicationDispatcherClassName="org.mobicents.servlet.sip.core.SipApplicationDispatcherImpl"
darConfigurationFileLocation="conf/dars/call-controller-servlet-dar.properties "
sipStackPropertiesFile="conf/mss-sip-stack.properties">
Make sure that the configuration file only contains one darConfigurationFileLocation
attribute: your new one.
Running. Once the WAR and DAR files have been placed in the right directories, and the JBoss
Application Server or Tomcat Servlet Container knows where to find them (which you specified in
a server.xml file), then you should go ahead and run the SIP Servlets Server.
Testing. Two use-cases can be distinguished for the Call-Controller service: one in which a call
is blocked, and another in which a call is forwarded. Therefore, we have two cases for which we
can test the Call-Controller.
Procedure 4.7. Blocking a Call with Call-Controller
1. Start two SIP soft-phones of your choice. Set the account settings of the SIP soft-phones to:
Relevant First Softphone Settings
• Account name: forward-receiver
• IP address: 127.0.0.1
• Port: 5090
Relevant Second Softphone Settings
• Account name: blocked-sender
Neither of the SIP soft-phones needs to be registered.
SIP Servlet Example
Applications
65
2. From the second phone, blocked-sender, make a call to sip:receiver@sip-
servlets.com. You should receive a FORBIDDEN response.
Procedure 4.8. Forwarding a Call with Call-Controller
1. Start two SIP soft-phones of your choice. Set the account settings of the SIP soft-phones to:
Relevant First Softphone Settings
• Account name: forward-receiver
• IP address: 127.0.0.1
• Port: 5090
Relevant Second Softphone Settings
• Account name: forward-sender
Neither of the SIP soft-phones needs to be registered.
2. From the second softphone, forward-sender, make a call to sip:receiver@sip-
servlets.com. The first phone, forward-receiver, should now be ringing.
Note
Chapter 4, SIP Servlet Example Applications provides more information about
other service examples available.
4.1.6. Media IPBX
The Media IPBX provides an extensible and customizable SIP PBX solution, based on the Seam
Telco Framework (STF). While the PBX is currently provided as a capability demonstration, the
ultimate goal is to transition Media IPBX into a fully-fledged SIP PBX solution.
Media IPBX terminates all calls to Mobicents Media Server conference endpoints, which provides
flexibility in manipulating established calls including server-side conferencing and ring-back tones.
The PBX can also be implemented as a Session Border Controller.
Note
Media IPBX is compatible with Mobicents SIP Servlets with JBoss AS 4.2.3.
Versions prior to this release do not support Media IPBX.

SIP Servlet Example
Applications
66
Media IPBX provides the following major features:
• User authentication.
• SIP phone registration.
• System configuration.
• Individual user views.
• Call monitoring and management.
• Multiple SIP phone instances per user.
• Status-based SIP phone assignment for incoming calls.
• Public Switched Telephone Network (PSTN) support, including administrative functions.
• Support for SIP REGISTER requests to automatically add phones by matching the username,
or username and hostname (in 'strict mode' only).
• Optionally specify local or online sources for announcements and ringback tones.
• Session Border Controller capability.
• Full conferencing support, including:
• Privacy functions, including mute and closed-calls.
• Call status announcement.
• Ringback tones when waiting for other participants to join the conference.
• Joining incoming calls to a conference.
• Parking calls and isolating a single speaker using dual-tone multi-frequency (DTMF) tones.
This feature is currently experimental.
Many of the features in Media IPBX are presented to the user as hints on the GUI portal pages.
It is recommended that you install Media IPBX and experiment with the demonstration to gain an
understanding of how the solution works.
For information about installing and running Media IPBX, including binary and source code
locations, visit the Media IPBX homepage [http://www.mobicents.org/mss-ipbx.html].
4.1.7. Tomcat Servlet Click2call Windows Setup
Mobicents SIP Servlets Server can be run on a JBoss Application Server or on the Tomcat Servlet
Container. Here is how to install and configure both JBoss a Microsoft Windows based system.

SIP Servlet Example
Applications
67
Tomcat Servlet running on Microsoft Windows The Mobicents Platform is based on Java, so
you need to make sure you have both the Java Runtime Environment (JRE) and, or the Java
Development Kit (JDK) installed on your Windows based system.
You can download the Java Runtime Environment here [http://www.java.com/en/].
<step> Do to the following to open the cmd window
menu > Start > Run > CMD
In the black CMD window type 'java -version' You should see something similar to the screenshot
below
Figure 4.3. Testing if Java is installed and running
</step>
If you are a developer, you can get the Java Development Kit here . It is recommended that
you install the latest version of JDK. You can opt for the JDK Java SE (Standard Edition) for test
purposes. Once you have downloaded JDK, you will see an executable like the one below in your
download folder.
<step> Double-click the .exe file and follow the menu to complete your installation.
Jdk-(version)-windows-i586.exe
Figure 4.4. JDK executable file
</step>
JAVA_Home enviroment variable. In order for applications to interact with your Java installation,
you need to specify the install location by setting the JAVA_HOME environment variable. Start
the 'cmd' without the quotes and press Enter

SIP Servlet Example
Applications
68
Start > Run > cmd
In the CMD window, type
Set JAVA_HOME=C:\Java\jdk1.7.0_02
Figure 4.5. Set environment variable
This will set the environment variable for your session. The C:\Java\jdk1.7.0_02 is the
root folder where your JDK files are installed. You can go to this Microsoft page [http://
support.microsoft.com/kb/931715] to see how set your environment variable and make it
permanent. If you want to make sure the JDK environment variable is set, type
c:\> Set
Installing Mobicents Tomcat on Windows. It is recommended that you install the latest Mobicents
Sip Servlets. You can download the Mobicents SIP Servlets for Tomcat here [https://
code.google.com/p/sipservlets/wiki/Downloads] Make sure you download the latest Tomcat and
not the JBoss.
Figure 4.6. Download Mobicents SIP Servlets for Tomcat

SIP Servlet Example
Applications
69
The downloaded file will appear similar to this screenshot below
Figure 4.7. Downloaded Tomcat File
The extracted file will look similar to this folder
Figure 4.8. Content of Tomcat Directory
Once you have extracted the content of the MSS Tomcat server zip file, you need to set the
CATALINA_HOME environment variable. Open the 'cmd' window
Start > run > cmd
In this example, the environment variable is set as follows:
set CATALINA_HOME=C:\tomcat\3.0.0-SNAPSHOT
Start the MSS Tomcat Server The \bin directory in the root of your Tomcat folder holds the
executables you need to work with the MSS server application. To start the server, you need to
execute the startup.bat file. First, start the cmd window as follows:
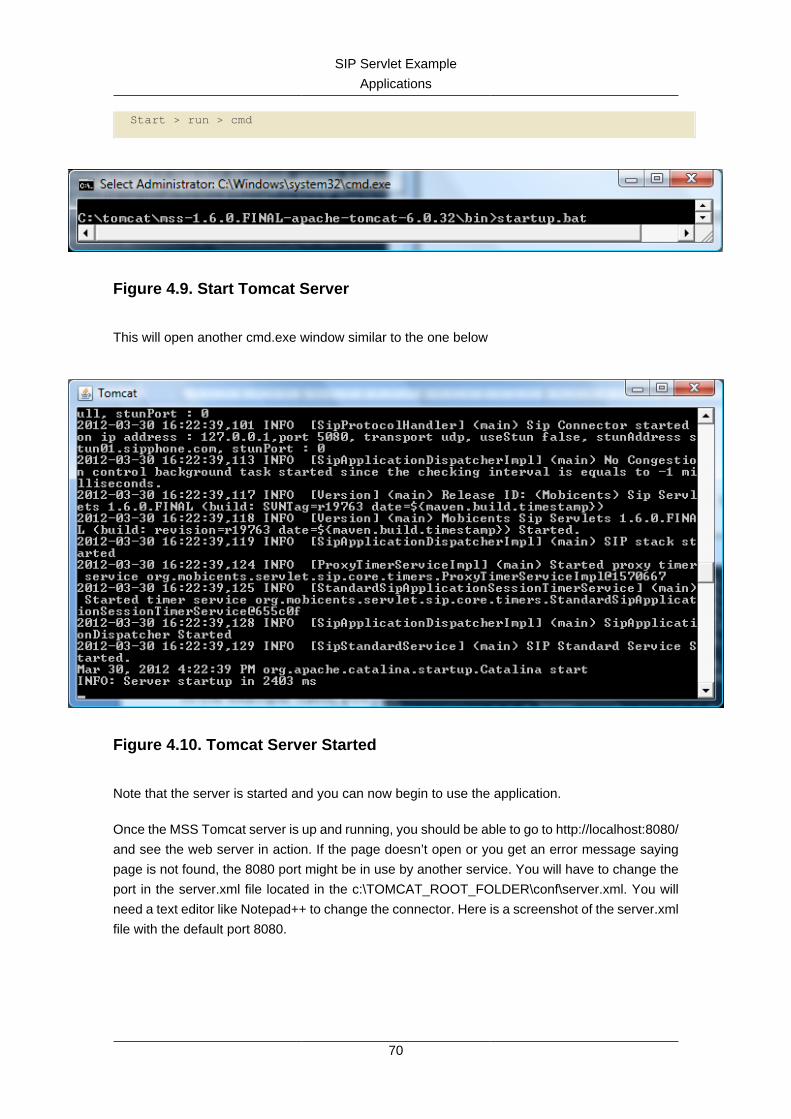
SIP Servlet Example
Applications
70
Start > run > cmd
Figure 4.9. Start Tomcat Server
This will open another cmd.exe window similar to the one below
Figure 4.10. Tomcat Server Started
Note that the server is started and you can now begin to use the application.
Once the MSS Tomcat server is up and running, you should be able to go to http://localhost:8080/
and see the web server in action. If the page doesn’t open or you get an error message saying
page is not found, the 8080 port might be in use by another service. You will have to change the
port in the server.xml file located in the c:\TOMCAT_ROOT_FOLDER\conf\server.xml. You will
need a text editor like Notepad++ to change the connector. Here is a screenshot of the server.xml
file with the default port 8080.

SIP Servlet Example
Applications
71
Figure 4.11. Tomcat Default Http Port
The port number must be higher than 1024. In the example below, the port number for the
connector has been change to 8040
Figure 4.12. Change Default Http Port to 8040
You can use your internet browser to see the result by going to http://localhost:8040 You
will see a page similar to the screenshot below

SIP Servlet Example
Applications
72
Figure 4.13. Localhost Homepage
In order to manage the Click2call sip servlet clients, you need to navigate to the http://
localhost:8040/click2call If you get an error message that says, page cannot be displayed,
you need to make sure the MSS Tomcat server is running by executing the startup.bat file in the
MSS_Tomcat_root_folder\bin\startup.bat Here is a screenshot of what the Click2call applet
will look like without any registered soft phone clients
Figure 4.14. Click2call Homepage
At the moment there are no registered users. That is because you need to get the softphone
clients to register with the Tomcat server you started above. You need to install a minimum of two
soft phones in order to be able to run the sip servlet Click2Call sample. In this example, we shall
be using 2 soft phones clients, WengoPhone and 3CXPhone. Download the latest version of the
soft phones, install and configure them like the screenshots below:

SIP Servlet Example
Applications
73
Figure 4.15. Wengo Softphone Configuration
You can use any username and password you desire. The MSS Tomcat server is listening for
calls on the 127.0.0.1:5080 port
Configuring the 3CXPhone After the installation is complete, you can start up the 3CXPhone, you
will see the screen below prompting you to create a profile. Click on the Create Profile Button.

SIP Servlet Example
Applications
74
Figure 4.16. 3CXphone Profile
In the Accounts window choose the 'New' button and configure as follows
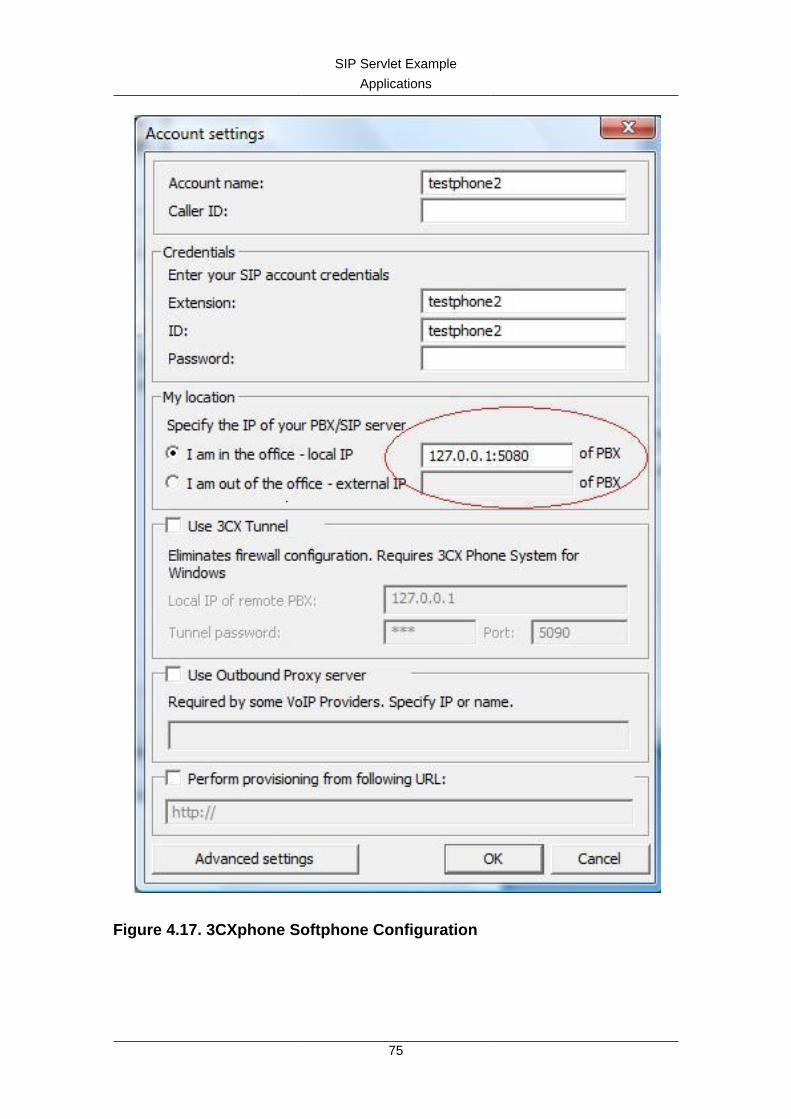
SIP Servlet Example
Applications
75
Figure 4.17. 3CXphone Softphone Configuration

SIP Servlet Example
Applications
76
Once the 2 soft phone clients are configured with the SIP details, you can go back to the http://
localhost:8040/click2call/index.jsp page and you will see the clients registered
with the server.
Figure 4.18. Registered Sip Clients
Before you can make calls, you will need to specify the contact details of the person you want to
call. It is just like entering the phone number. Because this is a SIP based setting, you will need
to enter the SIP address instead of the phone number.
Testing the Soft Phones on Click2Call In order to be able to make a call from one phone to the
other, you need to create a contact user. Because you will be using the SIP protocol, you will need
to type the contact details with the testphone1 SIP pointing to the

SIP Servlet Example
Applications
77
Figure 4.19. Wengo Phone Contact User Details
You need to do the same on the 3CXPhone contact. The phone contact number will be
sip:[email protected]:5080

SIP Servlet Example
Applications
78
Figure 4.20. 3CXPhone Contact User Details
Once you have both contact sip details configured, you can start to make calls and fully use the
Click2call application.

79
Chapter 5. Clustering and High
Availability
5.1. Understanding Mobicents High Availabilty
High Availability in MSS for JBoss AS7
Clustering and Failover features as described below are not yet implemented
in MSS for JBoss AS7. This guide will be updated when the feature becomes
available.
High Availability
Is a term used to describe software and hardware based strategies that are implemented to
ensure optimal performance and continuous system operation in case of failure. High availability
encompasses, clustering, failover and load balancing
Clustering
Is a technique used to ensure continuous service availability by having two or more servers
communicate with each other and share configuration and application data (replication) on fixed,
predetermined intervals. This produces two or more application servers with identical setup. There
is often a primary server within a clustered cloud from which data is replicated to the secondary.
The application servers within a clustered environment will use what is called a heartbeat to ensure
that all servers within are alive and functioning. In the case of failure, another server (secondary)
will take over the task of responding to client's requests without impacting user experience. In
some clustered ecosystem, load balancing is used as explained below.
Load Balancing
This is ultimately about performance. All request from clients are evenly distributed by the (load
balancer) to multiple application servers that are running similar configurations.This type of setup
often includes fault tolerance or failover. When one of the nodes, application server instance is
not available, all traffic will be directed to the remaining servers. This ensures continuity albeit
performance can degrade. Load balancing allows a single point of entry for multiple clients.
Failover
Failover is a way to provide continuous service to clients connecting to an application server in
case of system, software or hardware failure. Connections to an unresponsive server is directed
(failed over) to a backup server. This is often done within the scope of a clustered configuration
aided by a load balancer.

Clustering and High Availability
80
It is important to note that clustering is also a way to provide failover and enhance server
performance. The same can be said of load balancing. The idea behind all the above mentioned
techniques is to provide high availability to connecting clients connecting to applications running
on Mobicents. In a nutshell, high availability englobes all the above mentioned techniques.
5.2. Load Balancer
Figure 5.1. Star Cluster Topology.
The SIP Load Balancer is used to balance the load of SIP service requests and responses between
nodes in a SIP Servlets Server cluster. Both MSS for JBoss and MSS for Tomcat servers can be
used in conjunction with the SIP Load Balancer to increase the performance and availability of
SIP services and applications.
Clustering and High Availability
81
In terms of functionality, the SIP Load Balancer is a simple stateless proxy server that intelligently
forwards SIP session requests and responses between User Agents (UAs) on a Wide Area
Network (WAN), and SIP Servlets Server nodes, which are almost always located on a Local Area
Network (LAN). All SIP requests and responses pass through the SIP Load Balancer.
5.2.1. SIP Load Balancer: Installing, Configuring and Running
5.2.1.1. Pre-Install Requirements and Prerequisites
Software Prerequisites
A JAIN SIP HA-enabled application server such as Mobicents JAIN SLEE or Mobicents SIP
Servlets is required.
Running the SIP Load Balancer requires at least two instances of the application server as
cluster nodes nodes. Therefore, before configuring the SIP Load Balancer, we should make
sure we've installed a the SIP application server first. The Mobicents SIP load balancer will
work with a SIP Servlets-enabled JBoss Application Server or a JAIN SLEE application server
with SIP RA.
SIP Servlets containers based on Tomcat are also supported but the session replication is
not available there, thus mid-call failover will not work.
• To install a SIP Servlet-enabled JBoss Application Server, follow the instructions here: ???.
• To install a SIP Servlet-enabled Tomcat Servlet Container, follow these instructions:
Section 2.2.2, “Tomcat for Windows ”.
5.2.1.2. Downloading
The load balancer is located in the sip-balancer top-level directory of the MSS distribution. You
will find the following files in the directory:
SIP load balancer executable JAR file
This is the binary file with all dependencies
SIP load balancer Configuration Properties file
This is the properties files with various settings
5.2.1.3. Installing
The SIP load balancer executable JAR file can be extracted anywhere in the file system. It is
recommended that the file is placed in the directory containing other JAR executables, so it can
be easily located in the future.

Clustering and High Availability
82
5.2.1.4. Configuring
Configuring the SIP load balancer and the two SIP Servlets-enabled Server nodes is described
in Procedure 5.1, “Configuring the Mobicents SIP Load Balancer and SIP Server Nodes”.
Procedure 5.1. Configuring the Mobicents SIP Load Balancer and SIP Server
Nodes
1. Configure lb.properties Configuration Properties File
Configure the SIP Load Balancer's Configuration Properties file by substituting valid values
for your personal setup. Example 5.1, “Complete Sample lb.properties File” shows a sample
lb.properties file, with key element descriptions provided after the example. The lines
beginning with the pound sign are comments.
Example 5.1. Complete Sample lb.properties File
# Mobicents Load Balancer Settings
# For an overview of the Mobicents Load Balancer visit
# http://docs.google.com/present/view?id=dc5jp5vx_89cxdvtxcm
# The Load balancer will listen for both TCP and UDP connections
# The binding address of the load balancer. This also specifies the
# default value for both internalHost and externalHost if not specified separately.
host=127.0.0.1
# The binding address of the load balancer where clients should connect (if the host property
is not specified)
#externalHost=127.0.0.1
# The SIP port from where servers will receive messages
# delete if you want to use only one port for both inbound and outbound)
internalPort=5065
# The SIP port used where clients should connect
externalPort=5060
# The binding address of the load balancer where SIP application servers should connect
(if the host property is not specified)
#internalHost=127.0.0.1
# The RMI port used for heartbeat signals
rmiRegistryPort=2000
# The HTTP port for HTTP forwarding
# if you like to activate the integrated HTTP load balancer, this is the entry point
httpPort=2080
#If no nodes are active the LB can redirect the traffic to the unavailableHost specified
in this property,
#otherwise, it will return 503 Service Unavailable
#unavailableHost=google.com

Clustering and High Availability
83
# If you are using IP load balancer, put the IP address and port here
#externalIpLoadBalancerAddress=127.0.0.1
#externalIpLoadBalancerPort=111
# Requests initited from the App Servers can route to this address (if you are using 2 IP
load balancers for bidirectional SIP LB)
#internalIpLoadBalancerAddress=127.0.0.1
#internalIpLoadBalancerPort=111
# The addresses in the SIP LB Via headers can be either the real addresses or those specified
in the external and internal IP LB addresses
useIpLoadBalancerAddressInViaHeaders=false
# Designate extra IP addresses as serer nodes
#extraServerNodes=222.221.21.12:21,45.6.6.7:9003,33.5.6.7,33.9.9.2
# Call-ID affinity algortihm settings. This algorithm is the default. No need to uncomment it.
#algorithmClass=org.mobicents.tools.sip.balancer.CallIDAffinityBalancerAlgorithm
# This property specifies how much time to keep an association before being evitcted.
# It is needed to avoid memory leaks on dead calls. The time is in seconds.
#callIdAffinityMaxTimeInCache=500
#The following attribute specified the policy after failover. If set to true all calls
from the failed node
#will go to a new healthy node (all calls to the same node). If set to false the calls
will go to random new nodes.
#callIdAffinityGroupFailover=false
# Uncomment to enable the consistent hash based on Call-ID algorithm.
#algorithmClass=org.mobicents.tools.sip.balancer.HeaderConsistentHashBalancerAlgorithm
# This property is not required, it defaults to Call-ID if not set, cna be "from.user" or
"to.user" when you want the SIP URI username
#sipHeaderAffinityKey=Call-ID
#specify the GET HTTP parameter to be used as hash key
#httpAffinityKey=appsession
# Uncomment to enable the persistent consistent hash based on Call-ID algorithm.
#algorithmClass=org.mobicents.tools.sip.balancer.PersistentConsistentHashBalancerAlgorithm
# This property is not required, it defaults to Call-ID if not set
#sipHeaderAffinityKey=Call-ID
#specify the GET HTTP parameter to be used as hash key
#httpAffinityKey=appsession
#This is the JBoss Cache 3.1 configuration file (with jgroups), if not specified it will
use default
#persistentConsistentHashCacheConfiguration=/home/config.xml
# Call-ID affinity algortihm settings. This algorithm is the default. No need to uncomment it.
#algorithmClass=org.mobicents.tools.sip.balancer.CallIDAffinityBalancerAlgorithm
# This property specifies how much time to keep an association before being evitcted.
# It is needed to avoid memory leaks on dead calls. The time is in seconds.
#callIdAffinityMaxTimeInCache=500
# Uncomment to enable the consistent hash based on Call-ID algorithm.
#algorithmClass=org.mobicents.tools.sip.balancer.HeaderConsistentHashBalancerAlgorithm
# This property is not required, it defaults to Call-ID if not set, cna be "from.user" or
"to.user" when you want the SIP URI username
#sipHeaderAffinityKey=Call-ID
#specify the GET HTTP parameter to be used as hash key

Clustering and High Availability
84
#httpAffinityKey=appsession
# Uncomment to enable the persistent consistent hash based on Call-ID algorithm.
#algorithmClass=org.mobicents.tools.sip.balancer.PersistentConsistentHashBalancerAlgorithm
# This property is not required, it defaults to Call-ID if not set
#sipHeaderAffinityKey=Call-ID
#specify the GET HTTP parameter to be used as hash key
#httpAffinityKey=appsession
#This is the JBoss Cache 3.1 configuration file (with jgroups), if not specified it will
use default
#persistentConsistentHashCacheConfiguration=/home/config.xml
#If a node doesnt check in within that time (in ms), it is considered dead
nodeTimeout=5100
#The consistency of the above condition is checked every heartbeatInterval milliseconds
heartbeatInterval=150
#JSIP stack configuration.....
javax.sip.STACK_NAME = SipBalancerForwarder
javax.sip.AUTOMATIC_DIALOG_SUPPORT = off
# You need 16 for logging traces. 32 for debug + traces.
# Your code will limp at 32 but it is best for debugging.
gov.nist.javax.sip.TRACE_LEVEL = 0
// Specify if message contents should be logged.
gov.nist.javax.sip.LOG_MESSAGE_CONTENT=false
gov.nist.javax.sip.DEBUG_LOG = logs/sipbalancerforwarderdebug.txt
gov.nist.javax.sip.SERVER_LOG = logs/sipbalancerforwarder.xml
gov.nist.javax.sip.THREAD_POOL_SIZE = 64
gov.nist.javax.sip.REENTRANT_LISTENER = true
host
Local IP address, or interface, on which the SIP load balancer will listen for incoming
requests.
externalPort
Port on which the SIP load balancer listens for incoming requests from SIP User Agents.
internalPort
Port on which the SIP load balancer forwards incoming requests to available, and healthy,
SIP Server cluster nodes.
rmiRegistryPort
Port on which the SIP load balancer will establish the RMI heartbeat connection to the
application servers. When this connection fails or a disconnection instruction is received,
an application server node is removed and handling of requests continues without it by
redirecting the load to the lie nodes.

Clustering and High Availability
85
httpPort
Port on which the SIP load balancer will accept HTTP requests to be distributed across
the nodes.
internalTransport
Transport protocol for the internal SIP connections associated with the internal SIP port
of the load balancer. Possible choices are UDP, TCP and TLS.
externalTransport
Transport protocol for the external SIP connections associated with the external SIP port
of the load balancer. Possible choices are UDP, TCP and TLS. It must match the transport
of the internal port.
externalIpLoadBalancerAddress
Address of the IP load balancer (if any) used for incoming requests to be distributed in
the direction of the application server nodes. This address may be used by the SIP load
balancer to be put in SIP headers where the external address of the SIP load balancer
is needed.
externalIpLoadBalancerPort
The port of the external IP load balancer. Any messages arriving at this port should be
distributed across the external SIP ports of a set of SIP load balancers.
internalIpLoadBalancerAddresst
Address of the IP load balancer (if any) used for outgoing requests (requests initiated
from the servers) to be distributed in the direction of the clients. This address may be
used by the SIP load balancer to be put in SIP headers where the internal address of
the SIP load balancer is needed.
internalIpLoadBalancerPort
The port of the internal IP load balancer. Any messages arriving at this port should be
distributed across the internal SIP ports of a set of SIP load balancers.
extraServerNodes
Comma-separated list of hosts that are server nodes. You can put here alternative
names of the application servers here and they will be recognized. Names are important,
because they might be used for direction-analysis. Requests coming from these server
will go in the direction of the clients and will not be routed back to the cluster.
algorithmClass
The fully-qualified Java class name of the balancing algorithm to be used. There are
three algorithms to choose from and you can write your own to implement more complex
routing behaviour. Refer to the sample configuration file for details about the available
options for each algorithm. Each algorithm can have algorithm-specific properties for fine-
grained configuration.

Clustering and High Availability
86
nodeTimeout
In milliseonds. Default value is 5100. If a server node doesnt check in within this time (in
ms), it is considered dead.
heartbeatInterval
In milliseconds. Default value is 150 milliseonds. The hearbeat interval must be much
smaller than the interval specified in the JAIN SIP property on the server machines -
org.mobicents.ha.javax.sip.HEARTBEAT_INTERVAL
Note
The remaining keys and properties in the configuration properties file
can be used to tune the JAIN SIP stack, but are not specifically
required for load balancing. To assist with tuning, a comprehensive list
of implementing classes for the SIP Stack is available from the Interface
SIP Stack page on nist.gov [http://snad.ncsl.nist.gov/proj/iptel/jain-sip-1.2/
javadoc/javax/sip/SipStack.html]. For a comprehensive list of properties
associated with the SIP Stack implementation, refer to Class SipStackImpl
page on nist.gov [http://snad.ncsl.nist.gov/proj/iptel/jain-sip-1.2/javadoc/gov/
nist/javax/sip/SipStackImpl.html].
2. Configure logging
The SIP load balancer uses Log4J [http://logging.apache.org/log4j] as a logging mechanism.
You can configure it through the typical log4j xml configuration file and specify the path
as follows -DlogConfigFile=./log4j.xml. Please refer to Log4J documentation for more
information on how to configure the logging. A shortcut exists if you want to switch between
INFO/DEBUG/WARN logging levels. The JVM option -DlogLevel=DEBUG will allow you to
switch all loggig categories to the specified log level.
3. Configure the container configuration file
Ensure the following attributes are configured for the <service> element in server.xml for
Tomcat or in the mobicents subsystem element for JBoss AS7.
• The sipPathName attribute must contain the following value
org.mobicents.ha.balancing.only to indicate that the server will be using the
Mobicents JAIN SIP HA SIP Stack which is an extension of the JAIN SIP Stack offering
integration with the Mobicents Load Balancer and transparent replication.
4. Configure the mss-sip-stack.properties configuration file
• The org.mobicents.ha.javax.sip.cache.MobicentsSipCache.cacheName property
must contain the name of the cache that will be responsible for holding the replicated data
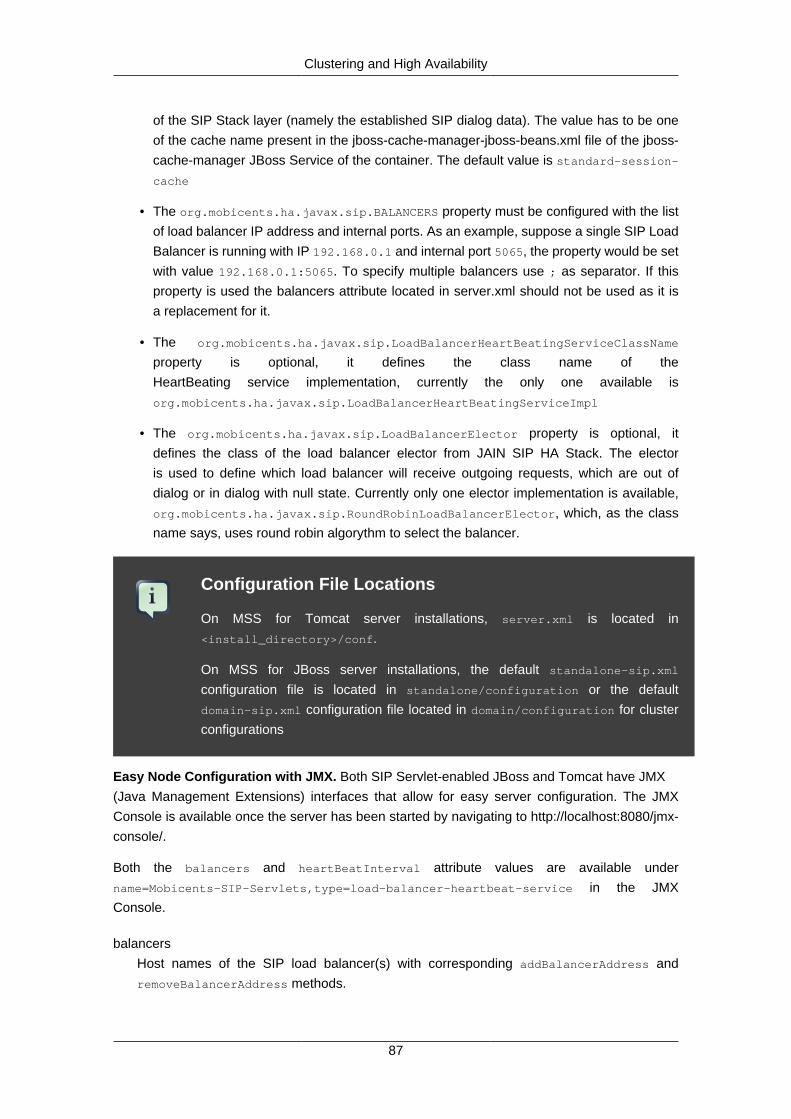
Clustering and High Availability
87
of the SIP Stack layer (namely the established SIP dialog data). The value has to be one
of the cache name present in the jboss-cache-manager-jboss-beans.xml file of the jboss-
cache-manager JBoss Service of the container. The default value is standard-session-
cache
• The org.mobicents.ha.javax.sip.BALANCERS property must be configured with the list
of load balancer IP address and internal ports. As an example, suppose a single SIP Load
Balancer is running with IP 192.168.0.1 and internal port 5065, the property would be set
with value 192.168.0.1:5065. To specify multiple balancers use ; as separator. If this
property is used the balancers attribute located in server.xml should not be used as it is
a replacement for it.
• The org.mobicents.ha.javax.sip.LoadBalancerHeartBeatingServiceClassName
property is optional, it defines the class name of the
HeartBeating service implementation, currently the only one available is
org.mobicents.ha.javax.sip.LoadBalancerHeartBeatingServiceImpl
• The org.mobicents.ha.javax.sip.LoadBalancerElector property is optional, it
defines the class of the load balancer elector from JAIN SIP HA Stack. The elector
is used to define which load balancer will receive outgoing requests, which are out of
dialog or in dialog with null state. Currently only one elector implementation is available,
org.mobicents.ha.javax.sip.RoundRobinLoadBalancerElector, which, as the class
name says, uses round robin algorythm to select the balancer.
Configuration File Locations
On MSS for Tomcat server installations, server.xml is located in
<install_directory>/conf.
On MSS for JBoss server installations, the default standalone-sip.xml
configuration file is located in standalone/configuration or the default
domain-sip.xml configuration file located in domain/configuration for cluster
configurations
Easy Node Configuration with JMX. Both SIP Servlet-enabled JBoss and Tomcat have JMX
(Java Management Extensions) interfaces that allow for easy server configuration. The JMX
Console is available once the server has been started by navigating to http://localhost:8080/jmx-
console/.
Both the balancers and heartBeatInterval attribute values are available under
name=Mobicents-SIP-Servlets,type=load-balancer-heartbeat-service in the JMX
Console.
balancers
Host names of the SIP load balancer(s) with corresponding addBalancerAddress and
removeBalancerAddress methods.

Clustering and High Availability
88
heartBeatInterval
Interval at which each heartbeat is sent to the SIP load balancer(s).
5.2.1.4.2. Converged Load Balancing
5.2.1.4.2.1. Apache HTTP Load Balancer
The MSS SIP Load Balancer can work in concert with HTTP load balancers such as mod_jk.
Whenever an HTTP session is bound to a particular node, an instruction is sent to the SIP Load
Balancer to direct the SIP calls from the same application session to the same node.
It is sufficient to configure mod_jk to work for HTTP in JBoss in order to enable cooperative load
balancing. MSS will read the configuration and will use it without any extra configuration. You can
read more about configuring mod_jk with JBoss in your JBoss Application Server documentation.
Alternatively you may disable this behaviour and make the HTTP load balancer follow the
decisions made by the SIP load balancer with the httpFollowsSip flag. This is achieved by
changing the jvmRoute part of the session ID cookie used internally by mod_jk.
5.2.1.4.2.1.1. The httpFollowsSip flag
The httpFollowsSip flag in the service configuration makes the application server aware of
how different mod_jk and SIP load balancers have assigned request affinity for each application
session. The application servers assign exactly one node to each Sip Servlets application session
and this node is the node where the last SIP request associated with the application session has
landed (decised by the SIP load balancer). Then the application server will actively update the
session ID cookie (the jvmRoute part) of any HTTP request that arrives at the wrong node. The
application server will do so with a specially composed HTTP redirect response or with a HTML
refresh hint. As a backup strategy, if the request is bound to seek non-existing node forever and
it will let the request be served by a new node. This avoids having a client stuck reloading the
same page over and over.
One problem with this flag is that if you have two or more SIP sessions associated with the
same application session and the load balancer has decided to send SIP requests to different
nodes, which might happend if you use Call-ID based affinity, then the application server will have
to change the jvmRoute very often for every SIP request resulting in significant overhead. It is
generally not adviced to enable this flag if you have more than 1 SIP session per application
session and the means to guarantee all SIP sessions from the application session will land on
the same node.
This is an example how to enable the option. It is disabled by default.
<Connector port="5080"
ipAddress = "${jboss.bind.address}"
...
httpFollowsSip="true" />

Clustering and High Availability
89
5.2.1.4.2.2. Integrated HTTP Load Balancer
To use the integrated HTTP Load Balancer, no extra configuration is needed. If a unique jvmRoute
is specified and enabled in each application server, it will behave exactly as the apache balancer.
If jvmRoute is not present, it will use the session ID as a hash value and attempt to create a sticky
session. The integrated balancer can be used together with the apache balancer at the same time.
In addition to the apache behavior, there is a consistent hash balancer algorithm that can be
enabled for both HTTP and SIP messages. For both HTTP and SIP messages, there is a
configurable affinity key, which is evaluated and hashed against each unassigned request. All
requests with the same hash value will always be routed to the same application server node. For
example, the SIP affinity key could be the callee user name and the HTTP affinity key could the
“appsession” HTTP GET parameter of the request. If the desired behaviour group these requests,
we can just make sure the affinity values (user name and GET parameter) are the same.
Figure 5.2. Ensuring SIP and HTTP requests are being grouped by common
affinity value.

Clustering and High Availability
90
5.2.1.5. Running
Procedure 5.2. Running the SIP Load Balancer and SIP Server Nodes
1. Start the SIP Load Balancer
Start the SIP load balancer, ensuring the Configuration Properties file (lb.properties in this
example) is specified. In the Linux terminal, or using the Windows Command Prompt, the SIP
Load Balancer is started by issuing a command similar to this one:
java -jar sip-balancer-jar-with-dependencies.jar lb-
configuration.properties
Executing the SIP load balancer produces output similar to the following example:
home]$ java -jar sip-balancer-jar-with-dependencies.jar lb-
configuration.properties
Oct 21, 2008 1:10:58 AM
org.mobicents.tools.sip.balancer.SIPBalancerForwarder start
INFO: Sip Balancer started on address 127.0.0.1, external port : 5060,
port : 5065
Oct 21, 2008 1:10:59 AM
org.mobicents.tools.sip.balancer.NodeRegisterImpl startServer
INFO: Node registry starting...
Oct 21, 2008 1:10:59 AM
org.mobicents.tools.sip.balancer.NodeRegisterImpl startServer
INFO: Node expiration task created
Oct 21, 2008 1:10:59 AM
org.mobicents.tools.sip.balancer.NodeRegisterImpl startServer
INFO: Node registry started
The output shows the IP address on which the SIP Load Balancer is listening, as well as the
external and internal listener ports.
2. Configure SIP Server Nodes
SIP Servlets Server nodes can run on the JBoss Application Server, or the Tomcat Servlet
Container. The SIP Servlets Server binary distributions define the type of SIP Servlets Server
nodes used, and should already be installed from Software Prerequisites.
The Tomcat's server.xml or JBoss's standalone-sip.xml file specifies the nodes used.
Because there is more then one client node specified, unique listener ports must be specified
for each node to monitor HTTP and/or SIP connections. Section 2.3.1, “Configuring SIP
Connectors and Bindings” describes the affected element in the configuration file.
3. Start Load Balancer Client Nodes
Start all SIP load balancer client nodes.

Clustering and High Availability
91
5.2.1.6. Testing
To test load balancing, the same application must be deployed manually on each node, and two
SIP Softphones must be installed.
Procedure 5.3. Testing Load Balancing
1. Deploy an Application
Ensure that for each node, the DAR file is the same.
Deploy the Location service manually on both nodes.
2. Start the "Sender" SIP softphone
Start a SIP softphone client with the SIP address of sip:sender@sip-servlets-com,
listening on port 5055. The outbound proxy must be specified as the sip-balancer
(http://127.0.0.1:5060)
3. Start the "Receiver" SIP softphone
Start a SIP softphone client with the SIP address of sip:receiver-failover@sip-
servlets-com, listening on port 5090.
4. Initiate two calls from "Sender" SIP softphone
Initiate one call from sip:sender@sip-servlets-com to sip:receiver-failover@sip-
servlets-com. Tear down the call once completed.
Initiate a second call using the same SIP address, and tear down the call once completed.
Notice that the call is handled by the second node.
5.2.1.7. Stopping
Assuming that you started the JBoss Application Server as a foreground process in the Linux
terminal, the easiest way to stop it is by pressing the Ctrl+C key combination in the same terminal
in which you started it.
This should produce similar output to the following:
^COct 21, 2008 1:11:57 AM
org.mobicents.tools.sip.balancer.SipBalancerShutdownHook run
INFO: Stopping the sip forwarder
5.2.1.8. Uninstalling
To uninstall the SIP load balancer, delete the JAR file you installed.

Clustering and High Availability
92
5.2.2. IP Load Balancing
5.2.2.1. IP Load Balancers
An IP load-balancer is a network appliance that distributes traffic to an application server (or actual
servers) using a load-balancing algorithm. IP load-balancing is often used when the other load-
balancers' capacity is exceeded and can not scale further without hardware upgrades.
Routing decisions are made based on OSI Layer 2, 3 or 4 data. This type of load balancer
only examines low-level TCP, UDP or ethernet packet structures including MAC addresses, IP
addresses, ports, and protocol types (TCP or UDP or other).
An IP load balancer never reads the payload of the TCP/IP packets and therefore never parses
SIP or HTTP (or any protocol above OSI Layer 4). Because an IP load balancing device is not SIP
or HTTP aware in any way, it is much more performant than mod_jk or the MSS SIP load-balancer.
5.2.2.2. Technical overview
In its simplest form, the IP load-balancer usually "owns" the public-facing IP address (known as a
VIP). The traffic is routed to actual servers in it's private network similar to NAT. It is also possible
to not change the IP address and just work on the MAC address by assuming that all actual
servers are configured to accept packets for the VIP address. The features offered by the IP load
balancer depend largely on the vendor.
Some examples of Linux-based software load balancers include Red Hat Cluster
Suite (RHCS) [http://www.redhat.com/cluster_suite/] and Linux Virtual Server (LVS) [http://
www.linuxvirtualserver.org/]. There are many hardware vendors as well.
One main drawback relating to IP load balancers is that they can not make routing decisions
based on SIP messages and (with some exceptions) they can not work cooperatively with HTTP
or other load balancers.
5.2.2.3. Configuring MSS Cluster for pure IP Load Balancing
Warning
Pure IP load balancing is not a recommented option. It is advised to use a
distributed load balancer instead. Proper operation with pure IP load balancing
depends on the ability of the IP load balancer to establish request affinity based
on IP addresses and ports.
First you need to remove the SIP load balancers from any configuration in MSS. In particular
the org.mobicents.ha.javax.sip.BALANCERS attribute in mss-sip-stack.properties. You
should remove the balancers attribute from the Service tag of jboss.web service. This simply
removes the default load balancer from the system and the traffic bypasses the SIP load-balancer.

Clustering and High Availability
93
Next you must configure MSS to put the IP load balancer IP address in the Via, Contact and
other system headers where the IP address of the server machine is required. This will ensure
that any responses or subsequent SIP requests follow the same path, but always hit the load
balancer instead of particular cluster node that may fail. To specify the IP load balancer address
in MSS your should edit this file on Tomcat CATALINA_HOME/conf/server.xml and specify
staticServerAddress such as:
<Connector port="5080"
ipAddress = "${jboss.bind.address}"
...
staticServerAddress="122.122.122.122" staticServerPort="44"
useStaticAddress="true"/>
and edit this file on JBoss JBOSS_HOME/standalone/configuration/standalone-sip.xml and
specify staticServerAddress such as:
<socket-binding name="sip-udp" port="5080"
...
staticServerAddress="122.122.122.122" staticServerPort="44"
useStaticAddress="true"/>
Note
Depending on your reliability requirements you can omit the configuration
described in this section and let the servers use their own IP address in the SIP
messages.
5.2.3. SIP Load Balancing Basics
All User Agents send SIP messages, such as INVITE and MESSAGE, to the same SIP URI (the IP
address and port number of the SIP Load Balancer on the WAN). The Load Balancer then parses,
alters, and forwards those messages to an available node in the cluster. If the message was sent
as a part of an existing SIP session, it will be forwarded to the cluster node which processed that
User Agent's original transaction request.
The SIP Server that receives the message acts upon it and sends a response back to the SIP
Load Balancer. The SIP Load Balancer reparses, alters and forwards the message back to the
original User Agent. This entire proxying and provisioning process is carried out independent of
the User Agent, which is only concerned with the SIP service or application it is using.
By using the Load Balancer, SIP traffic is balanced across a pool of available SIP Servers,
increasing the overall throughput of the SIP service or application running on either individual
nodes of the cluster. In the case of a MSS server with </distributed> capabilities, load balancing
advantages are applied across the entire cluster.

Clustering and High Availability
94
The SIP Load Balancer is also able to failover requests mid-call from unavailable nodes
to available ones, thus increasing the reliability of the SIP service or application. The Load
Balancer increases throughput and reliability by dynamically provisioning SIP service requests
and responses across responsive nodes in a cluster. This enables SIP applications to meet the
real-time demand for SIP services.
5.2.4. HTTP Load Balancing Basics
In addition to the SIP load balancing, there are several options for coordinated or cooperative load
balancing with other protocols such as HTTP.
Typically, a JBoss Application Server will use apache HTTP server with mod_jk, mod_proxy,
mod_cluster or similar extension installed as an HTTP load balancer. This apache-based load
balancer will parse incoming HTTP requests and will look for the session ID of those requests in
order to ensure all requests from the same session arrive at the same application server.
By default, this is done by examining the jsessionid HTTP cookie or GET parameter and
looking for the jvmRoute assigned to the session. The typical jsessionid value is of the form
<sessionId>.<jvmRoute>. The very first request for each new HTTP session does not have a
session ID assigned; the apache routes the request to a random application server node.
When the node responds it assigns a session ID and jvmRoute to the response of the request
in a HTTP cookie. This response goes back to the client through apache, which keeps track of
which node owns each jvmRoute. Once the very first request is served this way, the subsequent
requests from this session will carry the assigned cookie, and the apache load balancer will always
route the requests to the node, which advertised itself as the jvmRoute owner.
Instead of using apache, an integrated HTTP Load Balancer is also available. The SIP Load
Balancer has a HTTP port where you can direct all incoming HTTP requests. The integrated HTTP
load balancer behaves exactly like apache by default, but this behavior is extensible and can be
overridden completely with the pluggable balancer algorithms. The integrated HTTP load balancer
is much easier to configure and generally requires no effort, because it reuses most SIP settings
and assumes reasonable default values.
Unlike the native apache, the integrated HTTP Load Balancer is written completely in Java, thus a
performance penalty should be expected when using it. However, the integrated HTTP Balancer
has an advantage when related SIP and HTTP requests must stick to the same node.
5.2.5. Pluggable balancer algorithms
The SIP/HTTP Load Balancer exposes an interface to allow users to customize the routing
decision making for special purposes. By default there are three built-in algorithms. Only one
algorithm is active at any time and it is specified with the algorithmClass property in the
configuration file.
It is up to the algorithm how and whether to support distributed architecture or how to store the
information needed for session affinity. The algorithms will be called for every SIP and HTTP
request and other significant events to make more informed decisions.

Clustering and High Availability
95
Note
Users must be aware that by default requests explicitly addressed to a live server
node passing through the load balancer will be forwarded directly to the server
node. This allows for pre-specified routing use-cases, where the target node is
known by the SIP client through other means. If the target node is dead, then the
node selection algorithm is used to route the request to an available node.
The following is a list of the built-in algorithms:
org.mobicents.tools.sip.balancer.CallIDAffinityBalancerAlgorithm
This algorithm is not distributable. It selects nodes randomly to serve a give Call-ID extracted
from the requests and responses. It keeps a map with Call-ID -> nodeId associations
and this map is not shared with other load balancers which will cause them to make different
decisions. For HTTP it behaves like apache.
org.mobicents.tools.sip.balancer.HeaderConsistentHashBalancerAlgorithm
This algorithm is distributable and can be used in distributed load balancer configurations. It
extracts the hash value of specific headers from SIP and HTTP messages to decide which
application server node will handle the request. Information about the options in this algorithms
is available in the balancer configuration file comments.
org.mobicents.tools.sip.balancer.PersistentConsistentHashBalancerAlgorithm
This algorithm is distributable and is similar to the previous algorithm, but it attempts to keep
session affinity even when the cluster nodes are removed or added, which would normally
cause hash values to point to different nodes.
org.mobicents.tools.sip.balancer.ClusterSubdomainAffinityAlgorithm
This algorithm is not distributable, but supports grouping server nodes to act as a subcluster.
Any call of a node that belongs to a cluster group will be preferentially failed over to a node
from the same group. To configure a group you can just add the subclusterMap property
in the load balancer properties and listing the IP addresses of the nodes. The groups are
enclosed in parentheses and the IP addresses are separate by commas as follows:
subclusterMap=( 192.168.1.1, 192.168.1.2 ) ( 10.10.10.10, 20.20.20.20,
30.30.30.30)
The nodes specified in a group do not have to alive and nodes that are not specified are still
allowed to join the cluster. Otherwise the algorthim behaves exactly as the default Call-ID
affinity algorthim.
5.2.6. Distributed load balancing
When the capacity of a single load balancer is exceeded, multiple load balancers can be used.
With the help of an IP load balancer the traffic can be distributed between all SIP/HTTP load

Clustering and High Availability
96
balancers based on some IP rules or round-robin. With consistent hash and jvmRoute-based
balancer algorithms it doesn't matter which SIP/HTTP load balancer will process the request,
because they would all make the same decisions based on information in the requests (headers,
parameters or cookies) and the list of available nodes. With consistent hash algorithms there is
no state to be preserved in the SIP/HTTP balancers.
Figure 5.3. Example deployment: IP load balancers serving both directions
for incoming/outgoing requests in a cluster
5.2.7. Implementation of the Mobicents Load Balancer
Each individual Mobicents SIP Server in the cluster is responsible for contacting the SIP load
balancer and relaying its health status and regular "heartbeats".
From these health status reports and heartbeats, the SIP Load Balancer creates and maintains
a list of all available and healthy nodes in the cluster. The Load Balancer forwards SIP requests
between these cluster nodes, providing that the provisioning algorithm reports that each node is
healthy and is still sending heartbeats.
If an abnormality is detected, the SIP Load Balancer removes the unhealthy or unresponsive node
from the list of available nodes. In addition, mid-session and mid-call messages are failed over
to a healthy node.
The SIP Load Balancer first receives SIP requests from endpoints on a port that is specified in its
Configuration Properties configuration file. The SIP Load Balancer, using a round-robin algorithm,

Clustering and High Availability
97
then selects a node to which it forwards the SIP requests. The Load Balancer forwards all same-
session requests to the first node selected to initiate the session, providing that the node is healthy
and available.
5.2.8. SIP Message Flow
The SIP Load Balancer appends itself to the Via header of each request, so that returned
responses are sent to the SIP Balancer before they are sent to the originating endpoint.
The Load Balancer also adds itself to the path of subsequent requests by adding Record-Route
headers. It can subsequently handle mid-call failover by forwarding requests to a different node
in the cluster if the node that originally handled the request fails or becomes unavailable. The
SIP load balancer immediately fails over if it receives an unhealthy status, or irregular heartbeats
from a node.
In advanced configurations, it is possible to run more than one SIP Load Balancer. Simply edit
the balancers connection string in your SIP Server - the list is separated with semi-colon.
Figure 5.4, “Basic IP and Port Cluster Configuration” describes a basic IP and Port Cluster
Configuration. In the diagram, the SIP Load balancer is the server with the IP address of
192.168.1.1.

Clustering and High Availability
98
Figure 5.4. Basic IP and Port Cluster Configuration

99
Chapter 6. Enterprise Monitoring
and ManagementThere is two ways of monitoring Mobicents Sip Servlets :
• Through the industry standard Simple Network Management Protocol - SNMP
• Through Jopr is an enterprise management solution for JBoss middleware projects and other
application technologies. This pluggable project provides administration, monitoring, alerting,
operational control and configuration in an enterprise setting with fine-grained security and an
advanced extension model.
It provides support for monitoring base operating system information on six operating systems
as well as management of Apache, JBoss Application Server (JBoss AS) and other related
projects. See the Jopr website [http://www.jboss.org/jopr] or the Jopr embedded website [http://
www.jboss.org/embjopr] for more information.
SNMP and Monitoring for MSS for JBoss AS7
This feature is not yet implemented in MSS for JBoss AS7. This guide will be
updated when SNMP and other monitoring features become available. In the
meantime, see the chapter below for information about the CLI.
Section 2.2, “Getting Started with MSS for Tomcat 7 ”

100
Chapter 7. SecurityThe information present in SIP requests often contains sensitive user information. To protect user
information, SIP Security can be enabled on the server, and within the SIP application to mitigate
the risk of unauthorised access to the information.
There are essentially two levels of security that can be enabled on the server, the communication
between the server and other SIP entities and securing the application and its content.
7.1. SIP Servlets Application Security
Application security varies depending on the server type used. The following procedures describe
how to configure the JBoss AS7 and Tomcat servers to enable Security.
Procedure 7.1. Enable SIP Application Security in JBoss AS7
1. Add Security Policy to Server Configuraton
1. Open the configuration file located in $JBOSS_HOME/standalone/configuration/
standalone-sip.xml
2. Append a security domain to the under the <security-domains>:
<security-domain name="sip-servlets">
<authentication>
<login-module code="UsersRoles" flag="required">
<module-option name="usersProperties" value="${jboss.server.config.dir}/sip-
servlets-users.properties"/>
<module-option name="rolesProperties" value="${jboss.server.config.dir}/sip-
servlets-roles.properties"/>
<module-option name="hashAlgorithm" value="MD5"/>
<module-option name="hashEncoding" value="RFC2617"/>
<module-option name="hashUserPassword" value="false"/>
<module-option name="hashStorePassword" value="true"/>
<module-option name="passwordIsA1Hash" value="true"/>
<module-option name="storeDigestCallback"
value="org.jboss.security.auth.callback.RFC2617Digest"/>
</login-module>
</authentication>
</security-domain>
2. Create SIP Server User Properties File
1. Open a terminal and navigate to the $JBOSS_HOME/standalone/configuration directory:

Security
101
home]$ cd standalone/configuration
2. Create and open a sip-servlets-users.properties file and append the user lines to
the file:
# A sample users.properties file, this line creates user "admin" with
# password "admin" for "sip-servlets-realm"
admin=<A1_cryptographic_string>
3. To create <A1_cryptographic_string>, execute the following command in a terminal:
home]$ java -cp ../../modules/org/picketbox/main/picketbox-4.0.9.Final.jar
org.jboss.security.auth.callback.RFC2617Digest admin sip-servlets <password>
4. Copy the A1 hash, and paste it into the admin parameter in the previous step.
5. Save and close sip-servlets-users.properties.
3. Create the SIP Server Roles File
1. Create and open sip-servlets-roles.properties (using your preferred editor) and
append the following information to the file:
# A sample roles.properties file for use with some roles
# Each line in this file assigns roles to the users defined in
# sip-servlets-users.properties
admin=caller,role1,role2,..
4. Add the Security Domain to the SIP Application
1. Open the jboss-web.xml file for the SIP application to which security is required.
2. Add the <security-domain> element as a child of the <jboss-web> element:
<jboss-web>
<security-domain>sip-servlets</security-domain>
</jboss-web>

Security
102
5. Add Security Constraints to the SIP Application
1. Open the sip.xml file for the SIP application.
2. Add the <security-domain> element as a child of the <sip-app> element:
<security-constraint>
<display-name>REGISTER Method Security Constraint</display-name>
<resource-collection>
<resource-name>SimpleSipServlet</resource-name>
<description>Require authenticated REGSITER requests</description>
<servlet-name>SimpleSipServlet</servlet-name>
<sip-method>REGISTER</sip-method>
</resource-collection>
<auth-constraint>
<role-name>caller</role-name>
</auth-constraint>
</security-constraint>
<login-config>
<auth-method>DIGEST</auth-method>
<realm-name>sip-servlets</realm-name>
</login-config>
Procedure 7.2. Enable SIP Application Security in Tomcat Server
1. Activate the Memory Realm in Catalina:
1. Open a terminal and navigate to the /conf directory:
home]$ cd server/default/<tomcat_home>/conf/
2. Open server.xml and uncomment the following line:
<!--<Realm className="org.apache.catalina.realm.MemoryRealm"/>-->
2. Update SIP Server User Properties File
1. In the /conf directory, open tomcat-users.xml (using your preferred editor) and append
the following <user> child element:

Security
103
<user name="user" password="password" roles="caller"/>
3. Add Security Constraints to the SIP Application
1. Open the sip.xml file for the SIP application to which security is required.
2. Add the <security-domain> child element to the <jboss-web> element:
<security-constraint>
<display-name>REGISTER Method Security Constraint</display-name>
<resource-collection>
<resource-name>SimpleSipServlet</resource-name>
<description>Require authenticated REGISTER requests</description>
<servlet-name>SimpleSipServlet</servlet-name>
<sip-method>REGISTER</sip-method>
</resource-collection>
<auth-constraint>
<role-name>caller</role-name>
</auth-constraint>
</security-constraint>
<login-config>
<auth-method>DIGEST</auth-method>
<realm-name>sip-servlets-realm</realm-name>
</login-config>
7.2. TLS
In order to configure TLS you will have to obtain a public/private key, a X.509 certificate, add
those to the Java keystore and optionally add certificates from a known CA (certicate authority).
The entire process can be confusing but in order to get a basic setup for testing purposes up and
running with minimal effort, this section starts off with a simple quick start. However, for production
environment you need to obtain an officially signed certificate from a known CA and that process
is outlined in section Section 7.2.2, “Production Setup”.
7.2.1. Quick Start
This section shows how to create a self signed certificate, how to add that to the Java keystore and
how to configure the SIP Servlet Container to make use of this configuration. Note, this section
should only be used in a development environment and the main reason for this quickstart section
is to get you going right away as well as get you comfortable with generating keys and certificates
and adding them to the Java keystore.
Procedure 7.3. Server Side Authentication
At a high-level, we will execute the following three steps:

Security
104
1. Generate a public/private key pair and a self signed certificate and add those to the Java
keystore.
2. Configure the SIP Servlet Container to load our certificate from the keystore.
3. Test!
1. Generate certificate
Generating a new key-pair and a certificate can be done in a few different ways with a few
different tools but here we will just use the java keytool that comes with the JDK. Simple issue
the following command, which will generate a new public and private key, generate a self-
signed certificate and add it all to the Java keystore:
keytool -genkeypair -alias myserver -keyalg RSA -keysize 1024 -keypass secret -validity
365 -storetype jks -keystore myserver.jks -storepass secret -v -dname "CN=James Smith,
OU=Engineering, O=My Company, L=My City, S=My State, C=US"
-keystore specifies which keystore we should use/update. If the keystore doesn't exist, a new
one will be created for one. In the above example, we named the keystore myserver.jks
and it will be saved in the current directory
-keypass and -storepass should be chosen wisely since with bad passwords you won't
have much protection anyway. Also, normally you should never passwords on the command
prompt, it is too easy for other people to steal. If you leave these two options out, the keytool
command will ask you for it.
-keyalg specifies which algorithm to use when generating the keys and the keysize how long
those keys should be.
Note: the command -genkeypair is new in JDK 6 and was previously named -genkey. The
keytool in JDK 6 has some improvements over the previous versions so it is recommended
to use it instead.
See more about the Java keytool here: http://docs.oracle.com/javase/6/docs/technotes/tools/
solaris/keytool.html
2. Configure the SIP Servlet Container
The SIP Servlet Container relies on the JAIN SIP stack to support it with TLS capabilities.
As such, it is the JAIN SIP stack that we need to configure to have it read our certificate we
added to the key store. The various configuration options are described in the javadoc of the
SipStackImpl [http://ci.jboss.org/jenkins/job/jain-sip/lastSuccessfulBuild/artifact/javadoc/gov/
nist/javax/sip/SipStackImpl.html] class but for this quickstart, we will be using the following
ones:
• javax.net.ssl.keyStore – the filename and location of the keystore to use.

Security
105
• javax.net.ssl.keyStorePassword – the password to the keystore.
• gov.nist.javax.sip.TLS_CLIENT_AUTH_TYPE – which type of authentication we will
require of the client (for now, the client authentication type will be set to Disabled).
The configuration options are JVM parameters and you will have to add these to the command
line when you start the server:
./bin/run.sh -Djavax.net.ssl.keyStorePassword=mysecret -
Dgov.nist.javax.sip.TLS_CLIENT_AUTH_TYPE=Disabled -Djavax.net.ssl.keyStore=/path/to/your/
keystore/myserver.jks
Once the server is up, we are ready to verify that we can get a TLS connection using the
certificate we previously added in the first step.
Note: for this first part of the quickstart we will not require a certificate
from the client since this involves more configuration. This is controlled by the
gov.nist.javax.sip.TLS_CLIENT_AUTH_TYPE parameter.
3. Test!
To verify your setup there are a few different tools that you can use.
• openssl [http://www.openssl.org/] is an open source SSL toolkit and contains a generic
SSL/TLS test client
• SIPp [http://sipp.sourceforge.net/] – an open source SIP load testing tool that is capable of
using TLS. However, it requires some additional steps that we have not addressed in the
first parf of this quickstart so therefore we willl not be using SIPp.
• Using your favorite SIP client. Most SIP clients out there are capable of establishing a TLS
connection but you will have to consult its documentation of how to configure TLS.
Using openssl:
Assuming that your server is running on localhost and is listening for TLS on port 5081 the
command would be:
openssl s_client -host 127.0.0.1 -port 5081
If you are successful you should see an output from openssl displaying information about the
server certificate (which should be the one we generated in Step 1). If there are any issues
with the setup, openssl is pretty good about giving out information about what it thinks is
wrong.

Security
106
Tip: if you add the following JVM parameter as well you will get a lot of useful debug
information: -Djavax.net.debug=ssl
Procedure 7.4. Server Side Authentication
In the first part of this quickstart we generated a public and private key along with a self-signed
certificate and added them all into the Java keystore. The server was then configured to use this
information and when a client connected, our certificate was served up to the client. However,
normally, the client and the server would like to verify each others certificate to make sure they
both trust each other and if not, either of them will terminate the connection. In the first part of the
quickstart, the server did not require the client to present a certificate when connecting (remember
that we set the gov.nist.javax.sip.TLS_CLIENT_AUTH_TYPE to disabled) so let's do that now.
At a high-level, these are the tasks we need to execute:
1. Generate a public/private key pair for the client along with a certificate.
2. The server need to add the client certificate to its keystore as a trusted certificate.
3. Start the server with client authenticating enabled.
1. Generate Client Certificate
We will use the Java keytool for this step in the same we did for for the server side in the
previous quikstart. The command is exactly the same and the only difference is that we store
the information in a new keystore called myclient.jks.
keytool -genkeypair -alias myclient -keyalg RSA -keysize 1024 -keypass secret -validity
365 -storetype jks -keystore myclient.jks -storepass secret -v -dname "CN=John Doe,
OU=Engineering, O=Some Work, L=Some City, S=Some State, C=US"
We have now generated a new keystore containing the clients authentication information.
However, the server needs to import the client certificate into its trusted keystore so we need
to extract the certificate out of the client key store. This can also be done using the Java
keytool.
keytool -exportcert -alias myclient -file client.cert -keystore myclient.jks -storepass
secret -rfc
The certificate is saved in file 'client.cert' and we will use this file in the next step.
2. Re-configure the server
Simply change the gov.nist.javax.sip.TLS_CLIENT_AUTH_TYPE from 'Disabled' to
'Enabled' and start the server again.

Security
107
3. Test
We will once again use openssl to verify our setup but now that the client will be forced to
present a certificate as well, we do need the certificate's private key as well. The private key
is embedded into the keystore and was generated when we issued the 'kenkeypair' keytool-
command. Unfortunately, the keytool does not have an option for exporting the private key
so we will have to write a small java program to extract it for us. Luckily, it is not a lot of code:
import java.io.FileInputStream;
import java.security.Key;
import java.security.KeyStore;
import sun.misc.BASE64Encoder;
/**
* Code originally posted on Sun's developer forums but
* can now only be found at stackoverflow:
* http://stackoverflow.com/questions/150167/how-do-i-list-export-private-keys-from-a-
keystore
*/
public class DumpPrivateKey {
static public void main(String[] args)
throws Exception {
if(args.length < 3) {
throw new IllegalArgumentException("expected args: Keystore filename, Keystore
password, alias, <key password: default same than keystore");
}
final String keystoreName = args[0];
final String keystorePassword = args[1];
final String alias = args[2];
final String keyPassword = getKeyPassword(args,keystorePassword);
KeyStore ks = KeyStore.getInstance("jks");
ks.load(new FileInputStream(keystoreName), keystorePassword.toCharArray());
Key key = ks.getKey(alias, keyPassword.toCharArray());
String b64 = new BASE64Encoder().encode(key.getEncoded());
System.out.println("-----BEGIN PRIVATE KEY-----");
System.out.println(b64);
System.out.println("-----END PRIVATE KEY-----");
}
private static String getKeyPassword(final String[] args, final String
keystorePassword)
{
String keyPassword = keystorePassword; // default case
if(args.length == 4) {
keyPassword = args[3];
}
return keyPassword;
}
}
Copy and paste the above code into a file call DumpPrivateKey.java and then compile it:

Security
108
javac DumpPrivateKey.java
and then use it to extract the private key:
java DumpPrivateKey myclient.jks secret myclient > clientprivate.key
Now that we have the private key of the client we can use openssl to verify the setup again:
openssl s_client -host 127.0.0.1 -port 5081 -cert client.cert -certform PEM -key
clientprivate.key
If all goes well you should successfully establish a connection and openssl will dump
information about the certificate exchange.
7.2.2. Production Setup
In a production environment it is important that you run with an officially signed certificate from a
known CA. It is this certificate that you will load into your keystore and the process is very similar
to the one outlined in the quick start.
1. Generate a PKCS#12 Storage
Assuming that you already have a private key and a signed certificate from a known CA
you first have to wrap these two into a pkcs#12 storage (pkcs#12 is a file format for storing
X.509 public certificates along with the private key), and then load that into the Java keystore.
To create a pkcs#12 storage you can use the openssl pkcs12 [http://www.openssl.org/docs/
apps/pkcs12.html] command:
openssl pkcs12 -inkey myprivate.key -in mycertificate.pem -export -out mystorage.pkcs12 -
passout mysecret
where myprivate.key is the private key, mycertificate.pem is the X.509 certificate. The
password for the storage is 'mysecret' and the name of the storage file is mystorage.pkcs12.
2. Generate the Java Keystore
Once the pkcs#12 has been created, use the Java keytool to load the pkcs12 storage and
convert it into a java keystore.
keytool -importkeystore -srckeystore mystorage.pkcs12 -srcstoretype PKCS12 -destkeystore
myserver.jks -deststorepass mysecret -srcstorepass mysecret

Security
109
A few things to point out:
-srcstoretype is important and tells the Java keytool which format the key store that we are
importing is in. In the previous step, we generated a pkcs#12 store so in this example, the
store type must be PKCS12.
-srcstorepass is the password for the pkcs#12 storage and in the above example it is the
same as the destination key store (-deststorepass) but most likely they will be different.
3. Re-configure and Test
Now that we have a java keystore the server configuration is exactly the same as
described in the quick start, i.e., simply set the java properties javax.net.ssl.keyStore
to point to this key keystore file and then set the password through the property
javax.net.ssl.keyStorePassword. Once the server has been re-started you can use
openssl to verify the setup.

110
Chapter 8. Advanced Features of
the SIP Servlets ServerThe advanced features of SIP Servlets include Concurrency and Congestion Control, load
balancing with the Mobicents Load Balancer, and, exclusively for MSS for JBoss, clustering and
failover support.
8.1. Media Support
Mobicents SIP Servlets provides support for applications to set up calls through SIP by
implementing the SIP Servlets 1.1 Specification.
As most Telco services have the need for managing and controlling media (for example, to play
announcements, mix calls and recognize DTMF), Mobicents SIP Servlets allows applications to
control media through JSR 309.
8.1.1. JSR 309: Media Server Control API
This specification is a protocol agnostic API for Media Server Control. It provides a portable
interface to create media rich applications with IVR, Conferencing, Speech Recognition, and
similar features.
Mobicents Media Server provides an implementation of the JSR 309 specification [http://jcp.org/
en/jsr/detail?id=309] using the MGCP protocol, to allow any Media Server (located in the same
Virtual Machine or on a remote server) supporting MGCP to be controlled.
The following examples demonstrate its usage:
• Media Example [http://www.mobicents.org/mss-jsr309-demo.html] : a SIP Servlet application
showing how to use media capabilities (Media playback, Recording, Text to Speech with
FreeTTS and DTMF detection).
• Conference Demo [http://www.mobicents.org/conference-demo-jsr309.html] : a Conference
Media Server demo application built on GWT with server-push updates.
• Shopping Example [http://www.mobicents.org/shopping-demo-jsr309.html] : a Converged JEE
Application showing SEAM integration, JEE, Media integration with TTS and DTMF support.
8.2. Concurrency and Congestion Control
Concurrency and Congestion control refer to settings that define the way in which messages are
processed under heavy load. The way Mobicents SIP Servlets Server processes messages in a
production environment is crucial to ensure quality of service for customers.
Advanced Features of
the SIP Servlets Server
111
Concurrency control mode tuning affects the way in which the SIP Servlets Server processes
messages, whereas Congestion Control tuning affects the point at which the server begins
rejecting new requests. Both of these parameters can be set using the following methods:
• Through the SIP Servlets Management Console.
• Editing the server's server.xml or standalone-sip.xml configuration file.
• From the dispatcher MBean.
• From the Embedded Jopr integrated management platform.
Concurrency Control. The JSR 289 expert group does not specify how concurrency control
should be implemented.
Mobicents SIP Servlets for JBoss and Mobicents SIP Servlets for Tomcat have concurrency
control implemented as a configurable mode, which defines the way in which the SIP Servlets
Server processes messages.
It has to be noted that this concurrency control mechanism is not cluster aware and will work per
node only, it is not a cluster wide lock.
The following modes are provided, and cater for the particular setup required in an implementation:
None
All SIP messages are processed as soon as possible in a thread from the global thread pool.
When two messages belong to the same SipSession, they can be concurrently processed.
Ensure that SIP Messages that access shared resources (such as the session attribute)
concurrently are synchronized in a thread-safe manner.
Transaction
Bypass the SIP Servlets request/response executors, and utilize the JAIN SIP built-in
Transaction serialization to manage race conditions on the same transaction.
By default, the SIP Servlets server uses a ThreadPoolExecutor linked to a
LinkedBlockingQueue to dispatch the request/response threads. The container can thus
handles two different response (for example a 180 Ringing and a 200 OK) concurrently, a race
condition can occur where the second response overtakes the first one (200 OK dispatched
to the application before the 180 Ringing).
SipSession
SIP messages are processed as soon as possible except for messages originating from the
same SipSession. These messages are excluded from any simultaneous processing.
Messages from the same SipSession are processed sequentially, in the order they originally
arrived.
Two (or more) messages from different SipSession instances in the same
SipApplicationSession may be processed simultaneously. For this reason, ensure that

Advanced Features of
the SIP Servlets Server
112
SIP Messages that access shared resources (such as the session attribute) concurrently are
synchronized in a thread-safe manner.
Thread-safety is particularly important in Back-to-Back User Agent (B2BUA) cases, where
each communication leg of the B2BUA consists of a different SipSession in the same
SipApplicationSession.
SipApplicationSession
SIP messages are processed as soon as possible, with the guarantee that no two messages
from the same SipSession or from the same SipApplicationSession will ever be processed
simultaneously. Of all the available methods, this mode is the best choice for guaranteed
thread-safety.
If applications access shared resources in an unmanaged way (for example, by accessing a
SipSession attribute from an unmanaged thread, or from an Enterprise JavaBean) access
will not be synchronized.
Congestion Control. Mobicents Sip Servlets currently provides the following congestion
control mechanisms:
Changing Congestion Control Settings
All the settings and congifurations starting with gov.nist.javax.sip are located
in the $JBOSS-HOME/standalone/configuration/mss-sip-stack.properties file. The
section below will provide further details.
• Congestion control is largely application-specific and it is implemented in a pipeline. First
messages arrive in the JAIN SIP message queue where they will wait on the locks needed
before they can be processed. To avoid keeping too many messages in the queue and
potentially running out of memory, older messages are discarded without any error indication.
This prevents spam and flood DoS attacks to accumulate large backlog and render the
server unresponsive. It also guranatees flood recovery time of 20 seconds or less, in the
mean time retransmissions are already queuing so that normal SIP calls can continue
without dropping them. After the request has passed the first queue it enters the SIP
transaction layer where there is a customizable optional congestion control logic. There is one
packaged congestion control algorithm which can be enabled by setting the following property
gov.nist.javax.sip.SIP_MESSAGE_VALVE=gov.nist.javax.sip.stack.CongestionControlMessageValve.
For this algorithm you can set the limit value by the following property
gov.nist.javax.sip.MAX_SERVER_TRANSACTIONS=2000. You can also implement your own
algorithm and change the class name in gov.nist.javax.sip.SIP_MESSAGE_VALVE to activate
it.
There is also another optional legacy congestion control stage with another queue where
messages can be discarded based on dynamic parameters such as available JVM heap
memory or number of messages in the queue. This method will be deprecated and is not
Advanced Features of
the SIP Servlets Server
113
recommended. All SIP messages which cannot be processed immediately are put into a queue,
and wait for either a free thread or for the lock on their session to be released. The size of the
SIP message queue is a tunable parameter, which defaults to 1500.
• If the SIP Message queue becomes full, the container immediately begins rejecting new SIP
requests until the queue clears. This is achieved by using one of the following methods:
• Sending a 503 SIP error code to the originating application.
• Dropping incoming messages (according to the specified congestion control policy).
• If the container exceeds the configurable memory threshold (90% by default), new SIP requests
are rejected until the memory usage falls below the specified memory threshold. This is achieved
by using one of the following methods:
• Sending a 503 SIP error code to the originating application.
• Dropping incoming messages (according to the specified congestion control policy).
A background task gathers information about the current server congestion. The data collection
interval can be adjusted, and congestion control deactivated, by setting the interval to 0 or a
negative value.
The congestion control policy defines how an incoming message is handled when the server is
overloaded. The following parameters are configurable:
• DropMessage - drop any incoming message
• ErrorResponse - send a 503 - Service Unavailable response to any incoming request (Default).
Configuring the Concurrency and Congestion Control Settings. The concurrency and
congestion control settings can be configured through the SIP Servlets Management Console,
using the following methods:
• Through the SIP Servlets Management Console.
• Editing the server's server.xml or the standalone-sip.xml configuration file.
• From the dispatcher MBean.
• From the Embedded Jopr integrated management platform.
Tuning Parameters with the SIP Servlets Management Console
The easiest way to configure the SIP Message Queue Size and Concurrency Control Mode
tunable parameters is to open the SIP Servlets Management Console in your browser
(by going to http://localhost:8080/sip-servlets-management), making your changes, and then
clicking Apply.

Advanced Features of
the SIP Servlets Server
114
Figure 8.1. SIP Servlets Management Console Concurrency and
Congestion Control Tuning Parameters
Persistent Settings
Concurrency and congestion control settings altered through the SIP Servlets
Management Console are not saved to the server.xml on Tomcat, only on
JBoss AS7 through the standalone-sip.xmlconfiguration file.
To make settings persistent, append the settings to the server.xml file
directly.
Making your changes permanent in standalone-sip.xml or server.xml by manual editing
Alternatively, you can edit your server's standalone-sip.xml or server.xml configuration
file, which has the benefit of making your chosen settings changes permanent for Tomcat.
Instructions follow, grouped by the SIP Servlets Server you are running:
Procedure 8.1. Tuning Mobicents SIP Servlets for JBoss Server Settings
for Concurrency and Congestion Control
1. Open standalone-sip.xml File
Open the $JBOSS_HOME/standalone/configuration/standalone-sip.xml
configuration file in a text editor.

Advanced Features of
the SIP Servlets Server
115
2. Example 8.1. Extract from stanalone-sip.xml file with conccurency
configuration
<subsystem xmlns="urn:org.mobicents:sip-servlets-as7:1.0" application-router="dars/
mobicents-dar.properties" stack-properties="mss-sip-stack.properties" path-
name="gov.nist" app-dispatcher-
class="org.mobicents.servlet.sip.core.SipApplicationDispatcherImpl" concurrency-
control-mode="SipApplicationSession" congestion-control-interval="-1">
<connector name="sip-udp" protocol="SIP/2.0" scheme="sip" socket-binding="sip-
udp"/>
<connector name="sip-tcp" protocol="SIP/2.0" scheme="sip" socket-binding="sip-
tcp"/>
<connector name="sip-tls" protocol="SIP/2.0" scheme="sip" socket-binding="sip-
tls"/>
</subsystem>
Procedure 8.2. Tuning Mobicents SIP Servlets for Tomcat Server
Settings for Concurrency and Congestion Control
1. Open server.xml File
Open the $CATALINA_HOME/conf/server.xml configuration file in your text editor.
2. Add Parameters to <service> Element
Locate the <service> element, and add the concurrencyControlMode and/or
sipMessageQueueSize attributes.
Possible values for the concurrencyControlMode attribute include: None, SipSession or
SipApplicationSession. SipSession is the value of this attribute when it is not present
—and overridden—in server.xml.
3. Define the Correct Attribute Values
The following default values for the concurrency and congestion control parameters are
used regardless of whether the attributes are defined in the server.xml file:
• sipMessageQueueSize="1500"
• backToNormalSipMessageQueueSize="1300"
• congestionControlCheckingInterval="30000" (30 seconds, in milliseconds)

Advanced Features of
the SIP Servlets Server
116
• memoryThreshold="95" (in percentage)
• backToNormalMemoryThreshold="90" (in percentage)
• congestionControlPolicy="ErrorResponse"
Experimentation is required for these tuning parameters depending on the operating
system and server.
Tuning Parameters from the dispatcher MBean
Navigate to the dispatcher MBean from Mobicents SIP Servlets for JBoss's JMX console.
All changes performed at run time are effective immediately, but do not persist across reboots
for Tomcat, only on JBoss AS7. the server.xml must be appended with the settings in order
to make the configuration persistent.
When editing the dispatcher MBean from Mobicents SIP Servlets for JBoss's JMX
console, values allowed for the concurrency control mode are None, SipSession or
SipApplicationSession.
8.3. STUN Support
The Session Traversal Utilities for NAT (STUN) prococol is used in Network Address Translation
(NAT) traversal for real-time voice, video, messaging, and related interactive IP application
communications. This light-weight, client-server protocol allows applications passing through a
NAT to obtain the public IP address for the UDP connections the application uses to connect to
remote hosts.
STUN support is provided at the SIP connector level, using the STUN for Java [https://
stun4j.dev.java.net/] project. The STUN for Java project provides a Java implementation of the
STUN Protocol (RFC 3489), which allows each SIP connector to select whether it should use
STUN to discover a public IP address, and then use this address in the SIP messages sent through
the connector.
To make a SIP connector STUN-enabled, three attributes must be appended to the <connector>
child element in the server.xml or <socket-binding> child element in standalone-sip.xml file.
The properties are:
• useStun="true"
Enables STUN support for this connector. Ensure that the ipAddress attribute is not set to
127.0.0.1.
• stunServerAddress="<Public_STUN_Server>"
STUN server address used to discover the public IP address of this SIP Connector. See
Table 8.1, “Public STUN Servers”for a suggested list of public STUN servers.

Advanced Features of
the SIP Servlets Server
117
• stunServerPort="3478"
STUN server port of the STUN server used in the stunServerAddress attribute. Both TCP and
UDP protocols communicate with STUN servers using this port only.
Note
A complete list of available SIP connector attributes and their descriptions is
located in the Section 2.3.1, “Configuring SIP Connectors and Bindings” section
of this guide.
A number of public STUN servers are available, and can be specified in the stunServerAddress.
Depending on the router firmware used, the STUN reply packets' MAPPED_ADDRESS may be
changed to the router's WAN port. To alleviate this problem, certain public STUN servers provide
XOR_MAPPED_ADDRESS support. Table 8.1, “Public STUN Servers” provides a selection of
public STUN servers.
Table 8.1. Public STUN Servers
Server Address XOR Support DNS SRV Record
stun.ekiga.net Yes Yes
stun.fwdnet.net No Yes
stun.ideasip.com No Yes
stun01.sipphone.com Yes No
stun.softjoys.com No No
stun.voipbuster.com No No
stun.voxgratia.org No No
stun.xten.com Yes Yes
stunserver.org Yes Yes
Note
For more information about NAT traversal best practices, refer to Section 9.2, “NAT
Traversal”.
8.4. Mobicents vendor-specific Extensions to JSR 289
Mobicents provide Extensions for applications or external systems to interact with the Mobicents
SIP Servlets container as well as Extensions not defined in the specification in the JSR 289
specification that can prove useful and might be proposed for inclusion in a next release of the
SIP Servlets specification

Advanced Features of
the SIP Servlets Server
118
Javadoc for Mobicents JSR 289 Extensions [http://ci.jboss.org/jenkins/view/Mobicents/job/
MobicentsBooks/lastSuccessfulBuild/artifact/api-docs/jsr289/extensions/index.html]
8.5. CDI Telco Framework
CDI is the Java standard for dependency injection and contextual lifecycle management, led by
Gavin King for Red Hat, Inc. and is a Java Community Process(JCP) specification that integrates
cleanly with the Java EE platform. Any Java EE 6-compliant application server provides support
for JSR-299 (even the web profile). It seemed a natural fit create a new framework based on CDI
for the Telco world.
CDI-Telco-Framework (CTF) from Mobicents brings the power and productivity benefits of CDI
into the Mobicents Sip Servlets platform providing dependency injection and contextual lifecycle
management for converged HTTP/SIP applications. This new framework is intended to become
a replacement for our previous Seam Telco Framework.
CTF mission statement is to simplify SipServlets development by introducing a component based
programming model, ease of development by making available SIP utilities out of the box, and
finally providing dependency injection and contextual lifecycle management to the SipServlets.
Figure 8.2. CDI Telco Framework Extension
More information about the CTF can be found on the CDI Telco Framework Documentation [http://
docs.jboss.org/mobicents/frameworks/ctf/1.0.0.ALPHA1/user_guide/en-US/html_single/].
8.6. Diameter Support
The Diameter Protocol (RFC 3588 [http://www.ietf.org/rfc/rfc3588.txt]) is a computer networking
protocol for Authentication, Authorization, and Accounting (AAA). The Diameter version included
in Mobicents SIP Servlets currently support Base, Sh, Ro and Rf.

Advanced Features of
the SIP Servlets Server
119
For more information regarding Diameter support, refer to the Diameter Home Page [https://
code.google.com/p/jdiameter/]. For a list of Diameter examples, refer to Chapter 4, SIP Servlet
Example Applications.
8.7. SIP and IMS Extensions
SIP Extensions in the SIP Servlets Server are based on the Internet Engineering Task Force's
(IETF) Request for Comments (RFC) protocol recommendations. Table 8.2, “Supported SIP
Extensions” lists the supported RFCs for the SIP Servlets Server.
Table 8.2. Supported SIP Extensions
Extension RFC Number Description
DNS RFC 3263 [http://
www.ietf.org/rfc/rfc3263.txt]
SIP: Locating SIP Servers
ENUM RFC 2916 [http://
www.ietf.org/rfc/rfc2916.txt]
E.164 number and DNS
INFO RFC 2976 [http://
www.ietf.org/rfc/rfc2976.txt]
The SIP INFO Method
IPv6 RFC 2460 [http://
www.ietf.org/rfc/rfc2460.txt]
Internet Protocol, Version 6
(IPv6) Specification
JOIN RFC 3911 [http://
www.ietf.org/rfc/rfc3911.txt]
The SIP "Join" Header
MESSAGE RFC 3428 [http://
www.ietf.org/rfc/rfc3428.txt]
SIP Extension for Instant
Messaging
PATH RFC 3327 [http://
www.ietf.org/rfc/rfc3327.txt]
SIP Extension Header Field
for Registering Non-Adjacent
Contacts
PRACK RFC 3262 [http://
www.ietf.org/rfc/rfc3262.txt]
Reliability of Provisional
Responses in the SIP
PUBLISH RFC 3903 [http://
www.ietf.org/rfc/rfc3903.txt]
SIP Extension for Event State
Publication
REASON RFC 3326 [http://
www.ietf.org/rfc/rfc3326.txt]
The Reason Header Field for
the Session Initiation Protocol
(SIP)
REFER RFC 3515 [http://
www.ietf.org/rfc/rfc3515.txt]
The SIP Refer Method
REPLACES RFC 3891 [http://
www.ietf.org/rfc/rfc3891.txt]
The SIP "Replaces" Header
STUN RFC 3489 [http://
www.ietf.org/rfc/rfc3489.txt]
STUN - Simple Traversal
of User Datagram Protocol

Advanced Features of
the SIP Servlets Server
120
Extension RFC Number Description
(UDP) through Network
Address Translators (NATs)
SUBSCRIBE/NOTIFY RFC 3265 [http://
www.ietf.org/rfc/rfc3265.txt]
SIP-specific Event Notification
Symmetric Response
Routing
RFC 3581 [http://
www.ietf.org/rfc/rfc3581.txt]
An Extension to the Session
Initiation Protocol (SIP) for
Symmetric Response Routing
Multipart type RFC 4662 [http://
www.ietf.org/rfc/rfc4662.txt]
A Session Initiation Protocol
(SIP) Event Notification
To/From Header Modification RFC 4916 [http://
www.ietf.org/rfc/rfc4916.txt]
Connected Identity in the
Session Initiation Protocol
(SIP)
IMS Private Header (P-Header) Extensions are provided according to the recommendations of
the 3rd Generation Partnering Project (3GPP) [http://www.3gpp.org/] and the IETF. P-Header
extensions are primarily used to store information about the networks a call traverses, including
security or call charging details.
Table 8.3, “IMS P-Header Extensions” describes the list of supported P-Headers, including links
to the relevant ITEF memorandum where available.
Table 8.3. IMS P-Header Extensions
Extension Description
AuthorizationHeaderIMS Defines a new auth-param for the
Authorization header used in REGISTER
requests.
PAccessNetworkInfoHeader Contains information regarding the access
network the User Agent (UA) uses to connect
to the SIP Proxy. The information contained
in this header may be sensitive, such as the
cell ID, so it is important to secure all SIP
application that interface with this header.
PAssertedIdentityHeader [http://www.ietf.org/
rfc/rfc3324.txt]
Contains an identity resulting from an
authentication process, derived from a SIP
network intermediary. The identity may be
based on SIP Digest authentication.
PAssertedServiceHeader Contains information used by "trust domains",
according to Spec(T) specifications detailed in
RFC 3324 [http://www.ietf.org/rfc/rfc3324.txt].
PAssociatedURIHeader [http://www.ietf.org/
rfc/rfc3455.txt]
Contains a list of URIs that are allocated to
the user. The header is defined in the 200 OK

Advanced Features of
the SIP Servlets Server
121
Extension Description
response to a REGISTER request. It allows
the User Agent Client (UAC) to determine the
URIs the service provider has associated to
the user's address-of-record URI.
PathHeader [http://www.ietf.org/rfc/
rfc3327.txt]
SIP Extension header, with syntax similar to
the RecordRoute header. Used in conjunction
with SIP REGISTER requests and 200
class messages in response to REGISTER
responses.
PCalledPartyIDHeader Typically inserted en-route into an INVITE
request by the proxy, the header is populated
with the Request_URI received by the proxy
in the request. The header allows the User
Agent Server (UAS) to identify which address-
of-record the invitation was sent to, and can
be used to render distinctive audio-visual alert
notes based on the URI.
PChargingFunctionAddressesHeader Contains a list of one or more of the Charging
Collection Function (CCF) and the Event
Charging Function (ECF) addresses. The
CCF and ECF addresses may be passed
during the establishment of a dialog, or in a
standalone transaction.
PChargingVectorHeader Contains a unique charging identifier and
correlation information, which is used by
network operators to correctly charge for
routing events through their networks.
PMediaAuthorizationHeader [http://
www.ietf.org/rfc/rfc3313.txt]
Contains one or more session-specific media
authorization tokens, which are used for QoS
of the media streams.
PPreferredIdentityHeader [http://www.ietf.org/
rfc/rfc3325.txt]
Contains a SIP URI and an optional
display-name. For example, "James May"
<sip:[email protected]>. This header is
used by trusted proxy servers to identify the
user to other trusted proxies, and can be used
to select the correct SIP URI in the case of
multiple user identities.
PPreferredServiceHeader Used by the PAssertedService Header to
determine the preferred user service. Multiple
PPreferreedService headers may be present
in a single request.
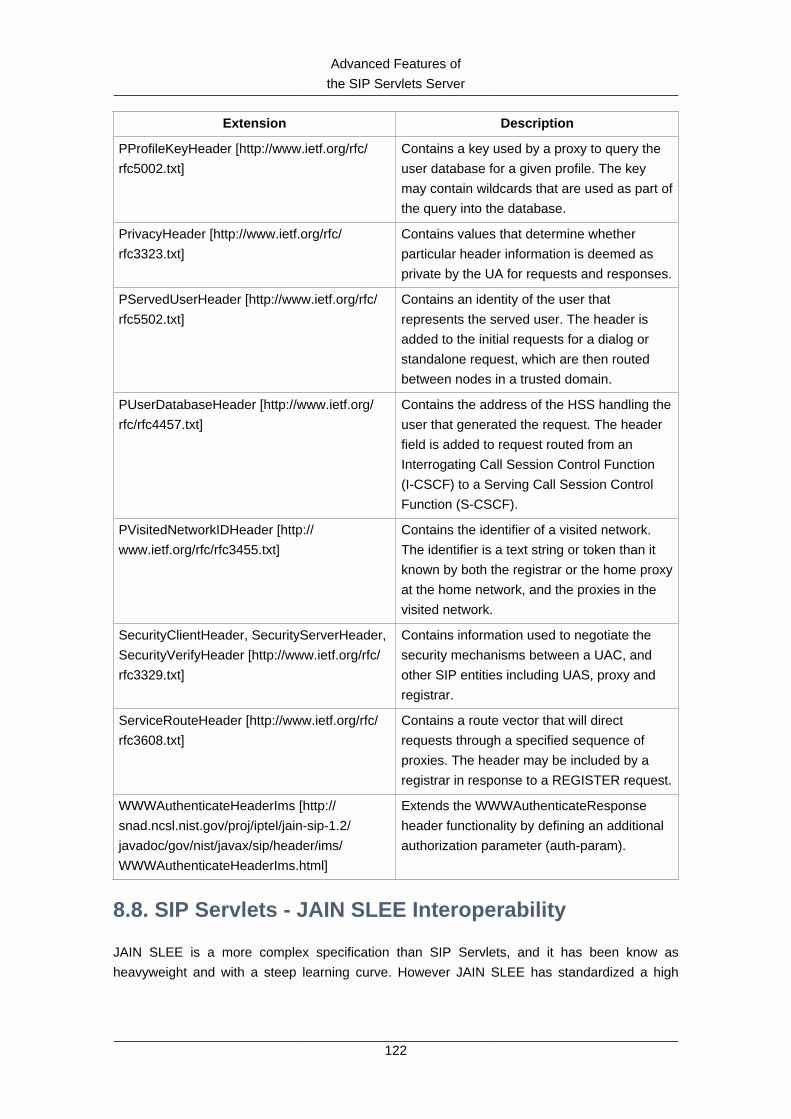
Advanced Features of
the SIP Servlets Server
122
Extension Description
PProfileKeyHeader [http://www.ietf.org/rfc/
rfc5002.txt]
Contains a key used by a proxy to query the
user database for a given profile. The key
may contain wildcards that are used as part of
the query into the database.
PrivacyHeader [http://www.ietf.org/rfc/
rfc3323.txt]
Contains values that determine whether
particular header information is deemed as
private by the UA for requests and responses.
PServedUserHeader [http://www.ietf.org/rfc/
rfc5502.txt]
Contains an identity of the user that
represents the served user. The header is
added to the initial requests for a dialog or
standalone request, which are then routed
between nodes in a trusted domain.
PUserDatabaseHeader [http://www.ietf.org/
rfc/rfc4457.txt]
Contains the address of the HSS handling the
user that generated the request. The header
field is added to request routed from an
Interrogating Call Session Control Function
(I-CSCF) to a Serving Call Session Control
Function (S-CSCF).
PVisitedNetworkIDHeader [http://
www.ietf.org/rfc/rfc3455.txt]
Contains the identifier of a visited network.
The identifier is a text string or token than it
known by both the registrar or the home proxy
at the home network, and the proxies in the
visited network.
SecurityClientHeader, SecurityServerHeader,
SecurityVerifyHeader [http://www.ietf.org/rfc/
rfc3329.txt]
Contains information used to negotiate the
security mechanisms between a UAC, and
other SIP entities including UAS, proxy and
registrar.
ServiceRouteHeader [http://www.ietf.org/rfc/
rfc3608.txt]
Contains a route vector that will direct
requests through a specified sequence of
proxies. The header may be included by a
registrar in response to a REGISTER request.
WWWAuthenticateHeaderIms [http://
snad.ncsl.nist.gov/proj/iptel/jain-sip-1.2/
javadoc/gov/nist/javax/sip/header/ims/
WWWAuthenticateHeaderIms.html]
Extends the WWWAuthenticateResponse
header functionality by defining an additional
authorization parameter (auth-param).
8.8. SIP Servlets - JAIN SLEE Interoperability
JAIN SLEE is a more complex specification than SIP Servlets, and it has been know as
heavyweight and with a steep learning curve. However JAIN SLEE has standardized a high

Advanced Features of
the SIP Servlets Server
123
performing event driven application server, an execution environment with a good concurrency
model and powerful protocol agnostic capabilities thus covering a variety of Telco protocols.
SIP Servlets on the other hand is much simpler and easier to get started with. Its focus is
on extending the HTTP Servlets and Java EE hosting environments with SIP capabilities. SIP
Servlets is more of a SIP programming framework, while JSLEE is a complete, self sufficient
application platform. The fact that SIP Servlets is focused on SIP and Java EE makes it a natural
fit to build JEE converged applications.
Table 8.4. SIP Servlets / JAIN SLEE Comparison Table
SIP Servlets JAIN SLEE
Application Architecture
Based on HTTP Servlets. Unit
of logic is the SIP Servlets
Component based, Object
Orientated architecture. Unit of
logic is the Service Building Block
Composition through Application Router Composition through parent-child relationship
Application State
Servlets are stateless SBBs may be stateful
Shared state stored in a session and visible
to all Servlets with access to the session
SBB state is transacted and a
property of the SBB itself. Shared
state may be stored in a separate
ActivityContext via a type safe interface
Concurrency Control
Application managed: use of Java monitors System Managed: isolation
of concurrent transactions
Facilities (Utilities for Applications)
Timer, Listeners Timer, Trace, Alarm, Statistics, Profiles.
Protocol Support
SIP, HTTP and Media (JSR 309) Protocol agnostic. Consistent event
model, regardless of protocol/resource
Availability Mechanisms
Container managed state (session
object) that can be replicated
Container managed state (SBB CMP, Facility,
ActivityContext) that can be replicated
No transaction context for
SIP message processing
Transaction context for event delivery
Non transacted state operations Container managed state
operations are transacted
Facilities are non transacted Facilities, timers, are transacted
Advanced Features of
the SIP Servlets Server
124
SIP Servlets JAIN SLEE
No defined failure model Well defined and understood
failure model via transactions
Management
No standard management
mechanisms defined
JMX Interface for managing
applications, life cycle, upgrades, ...
JSLEE and SIP Servlets target different audiences with different needs, but they can be
complementary in a number of real world cases.
SIP Servlets focuses on SIP and its integration with Java EE. It is also more of a SIP framework
within Java EE. JSLEE is an event driven application server with protocol agnostic architecture,
spanning any legacy or potential future protocols. SIP Servlets applications are generally simpler
to implement and accelerate time to market for Web and SIP deployment scenarios. JSLEE has
a steeper learning curve and covers a wider set of target deployment environments.
As JBoss is the only vendor to implement both specifications through Mobicents, this makes
it a natural fit to build converged and interoperable JSLEE/SIP Servlets applications that
are able to comply with standards in a portable manner. We built an application that
could leverage standards all the way without resorting to vendor proprietary extensions by
making SIP Servlets and JSLEE work together. Our "JSLEE and SIP-Servlets Interoperability
with Mobicents Communication Platform" paper [http://mobicents.googlecode.com/files/deruelle-
JSleeSipServletsInteroperability-final.pdf] describes our approach and the possible different
approaches we have identified to achieve the goal of interoperability between SIP Servlets and
JSLEE.
You can also use our JSLEE/SIP Servlets interoperability example [https://code.google.com/p/
sipservlets/source/browse/#git%2Fsip-servlets-examples%2Fjslee-sips-interop], showcasing our
approach.
8.9. Eclipse IDE Tools
The SIP Servlets Eclipse tools assist developers in creating JSR-289 applications with Mobicents.
You can use the Dynamic Web Project wizard for converged applications to get started with an
empty project, and then test your application with a real SIP Phone right from the IDE.
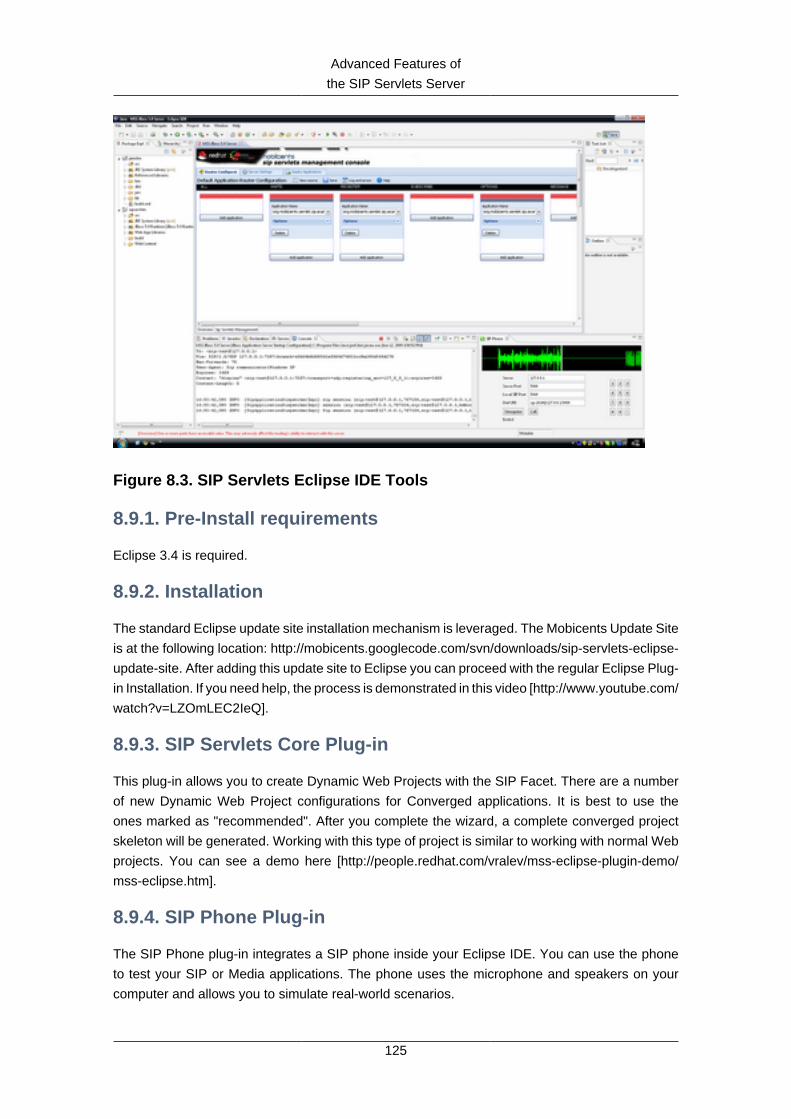
Advanced Features of
the SIP Servlets Server
125
Figure 8.3. SIP Servlets Eclipse IDE Tools
8.9.1. Pre-Install requirements
Eclipse 3.4 is required.
8.9.2. Installation
The standard Eclipse update site installation mechanism is leveraged. The Mobicents Update Site
is at the following location: http://mobicents.googlecode.com/svn/downloads/sip-servlets-eclipse-
update-site. After adding this update site to Eclipse you can proceed with the regular Eclipse Plug-
in Installation. If you need help, the process is demonstrated in this video [http://www.youtube.com/
watch?v=LZOmLEC2IeQ].
8.9.3. SIP Servlets Core Plug-in
This plug-in allows you to create Dynamic Web Projects with the SIP Facet. There are a number
of new Dynamic Web Project configurations for Converged applications. It is best to use the
ones marked as "recommended". After you complete the wizard, a complete converged project
skeleton will be generated. Working with this type of project is similar to working with normal Web
projects. You can see a demo here [http://people.redhat.com/vralev/mss-eclipse-plugin-demo/
mss-eclipse.htm].
8.9.4. SIP Phone Plug-in
The SIP Phone plug-in integrates a SIP phone inside your Eclipse IDE. You can use the phone
to test your SIP or Media applications. The phone uses the microphone and speakers on your
computer and allows you to simulate real-world scenarios.

126
Chapter 9. Best PracticesThis chapter discusses Best Practices related to Mobicents SIP Servlets usage in real world
deployments.
9.1. Mobicents SIP Servlets Performance Tips
Because the default profile of Mobicents SIP Servlets is targeted at a development environment,
some tuning is required to make the server performance suitable for a production environment.
A useful presentation from OKI Japan
9.1.1. Tuning JBoss
To ensure the server is finely tuned for a production envirionment, certain configuration
must be changed. Visit the JBoss Application Server Tuning [http://wiki.jboss.org/wiki/Wiki.jsp?
page=JBossASTuningSliming] wiki page to learn about optimization techniques.
While it is preferable to have a fast Application Server, most of the information doesn't apply to
Mobicents. In summary, the most important optimization technique is to remove logs, leaving only
what is required.
Check the log configuration file in the following location and review the information.
Section 2.3.3, “SIP Servlets Server Logging”
9.1.2. Tuning Mobicents SIP Servlets
• Congestion Control: It is recommended that this feature is enabled to avoid overload of
the server and that the sipMessageQueueSize and memoryThreshold parameters are tuned
according to Section 8.2, “Concurrency and Congestion Control”.
• Concurrency : Default Value: None. For better performance, it is recommended to leave this
value set to None.
9.1.3. Tuning The JAIN SIP Stack
The stack can be fine-tuned by altering the SIP stack properties, defined in the external properties
file specified by the sipStackPropertiesFile attribute as described in Section 2.3.1, “Configuring
SIP Connectors and Bindings”.
• gov.nist.javax.sip.THREAD_POOL_SIZE
Default value: 64
This thread pool is responsible for parsing SIP messages received from socket messages into
objects.
Best Practices
127
A smaller value will make the stack less responsive, since new messages have to wait in a
queue for free threads. In UDP, this can lead to more retransmissions.
Large thread pool sizes result in allocating resources that are otherwise not required.
• gov.nist.javax.sip.REENTRANT_LISTENER
Default value: true
This flag indicates whether the SIP stack listener is executed by a single thread, or concurrently
by the threads that parse the messages.
Mobicents SIP Servlets expects this flag to be set to true, therefore do not change the value.
• gov.nist.javax.sip.LOG_MESSAGE_CONTENT
Default value: true
Set the parameter to false to disable message logging.
• gov.nist.javax.sip.TRACE_LEVEL=0
Default value: 32.
Set the parameter to 0 to disable JAIN SIP stack logging.
• gov.nist.javax.sip.RECEIVE_UDP_BUFFER_SIZE=65536 and
gov.nist.javax.sip.SEND_UDP_BUFFER_SIZE=65536
Default value: 65536.
Those properties control the size of the UDP buffer used for SIP messages. Under load, if
the buffer capacity is overflown the messages are dropped causing retransmissions, further
increasing the load and causing even more retransmissions.
• gov.nist.javax.sip.MAX_MESSAGE_SIZE=10000
Default value: 10000.
This property controls the maximum size of content that can be read for a SIP Message on UDP.
The default is 65536. The average UDP message size is quite lower than this so reducing this
property will benefit memory usage since a byte buffer of this size is created for every message
received.
It also defines the maximum size of content that a TCP connection can read. Must be at least
4K. Default is "infinity" -- ie. no limit. This is to prevent DOS attacks launched by writing to a
TCP connection until the server chokes.
• gov.nist.javax.sip.TCP_POST_PARSING_THREAD_POOL_SIZE=30
Default value: 30.

Best Practices
128
Use 0 or do not set this option to disable it. When using TCP, your phones/clients usually
connect independently, creating their own TCP sockets. Sometimes however SIP devices are
allowed to tunnel multiple calls over a single socket. This can also be simulated with SIPP by
running "sipp -t t1".
In the stack, each TCP socket has it's own thread. When all calls are using the same socket
they all use a single thread, which leads to severe performance penalty, especially on multi-
core machines. This option instructs the SIP stack to use a thread pool and split the CPU load
between many threads. The number of the threads is specified in this parameter.
The processing is split immediately after the parsing of the message. It cannot be split before the
parsing because in TCP the SIP message size is in the Content-Length header of the message
and the access to the TCP network stream has to be synchronized.
Additionally, in TCP the message size can be larger. This causes most of the parsing for all calls
to occur in a single thread, which may have impact on the performance in trivial applications
using a single socket for all calls. In most applications it doesn't have performance impact. If the
phones/clients use separate TCP sockets for each call, this option doesn't have much impact,
except the slightly increased memory footprint caused by the thread pool. It is recommended to
disable this option in this case by setting it 0 or not setting it at all. You can simulate multi-socket
mode with "sipp -t t0". With this option also we avoid closing the TCP socket when something
fails, because we must keep processing other messages for other calls. Note: This option relies
on accurate Content-Length headers in the SIP messages. It cannot recover once a malformed
message is processed, because the stream iterator will not be aligned any more. Eventually
the connection will be closed.
The full list of JAIN SIP stack properties is available from the SIP Stack Properties Home Page
[http://snad.ncsl.nist.gov/proj/iptel/jain-sip-1.2/javadoc/javax/sip/SipStack.html] and the full list of
implementation specific properties are available from the SIP Stack Implementation Home Page
[http://snad.ncsl.nist.gov/proj/iptel/jain-sip-1.2/javadoc/gov/nist/javax/sip/SipStackImpl.html].
9.1.4. Tuning The JVM
The following tuning information applies to Sun JDK 1.6, however the information should also
apply to Sun JDK 1.5.
Note
For more information on tuning Mobicents SIP Servlets performance, refer to
the OKI Japan Presentation [http://www.slideshare.net/jean.deruelle/tuning-and-
development-with-sip-servlets-on-mobicents].
For more information on performance, refer to the Performance White Paper [http://
java.sun.com/performance/reference/whitepapers/6_performance.html].
Best Practices
129
To pass arguments to the JVM, change $JBOSS_HOME/bin/standalone.conf (Linux) or
$JBOSS_HOME/bin/standalone.bat (Windows).
• Garbage Collection
JVM ergonomics automatically attempt to select the best garbage collector. The default
behaviour is to select the throughput collector, however a disadvantage of the throughput
collector is that it can have long pauses times, which ultimately blocks JVM processing.
For low-load implementations, consider using the incremental, low-pause, garbage collector
(activated by specifying -XX:+UseConcMarkSweepGC -XX:+CMSIncrementalMode ). Many SIP
applications can benefit from this garbage collector type because it reduces the retransmission
amount.
For more information please read: Garbage Collector Tuning [http://java.sun.com/javase/
technologies/hotspot/gc/gc_tuning_6.html]
• Heap Size
Heap size is an important consideration for garbage collection. Having an unnecessarily large
heap can stop the JVM for seconds, to perform garbage collection.
Small heap sizes are not recommended either, because they put unnecessary pressure on the
garbage collection system.
9.1.5. Tuning The Operating System
The following tuning information is provided for Red Hat Enterprise Linux (RHEL) servers that
are running high-load configurations. The tuning information should also apply to other Linux
distributions.
After you have configured RHEL with the tuning information, you must restart the operating
system. You should see improvements in I/O response times. With SIP, the performance
improvement can be as high as 20%.
• Large Memory Pages
Setting large memory pages can reduce CPU utilization by up to 5%.
Ensure that the option -XX:+UseLargePages is passed and ensure that the following Java
HotSpot(TM) Server VM warning does not occur:
Failed to reserve shared memory (errno = 22)" when starting JBoss. It means that
the number of pages at OS level is still not enough.
To learn more about large memory pages, and how to configure them, refer to Java Support for
Large Memory Pages [http://java.sun.com/javase/technologies/hotspot/largememory.jsp] and
Andrig's Miller blog post [http://andrigoss.blogspot.com/2008/02/jvm-performance-tuning.html].
• Network buffers

Best Practices
130
You can increase the network buffers size by adding the following lines to your /etc/
sysctl.conf file:
• net.core.rmem_max = 16777216
• net.core.wmem_max = 16777216
• net.ipv4.tcp_rmem = 4096 87380 16777216
• net.ipv4.tcp_wmem = 4096 65536 16777216
• net.core.netdev_max_backlog = 300000
• Execute the following command to set the network interface address:
sudo ifconfig [eth0] txqueuelen 1000 #
Replace [eth0] with the correct name of the actual network interface you are setting up.
9.2. NAT Traversal
In a production environment, it is common to see SIP and Media data passing through different
kinds of Network Address Translation (NAT) to reach the required endpoints. Because NAT
Traversal is a complex topic, refer to the following information to help determine the most effective
method to handle NAT issues.
9.2.1. STUN
STUN (Session Traversal Utilities for NAT) is not generally considered a viable solution for
enterprises because STUN cannot be used with symmetric NATs.
Most enterprise-grade firewalls are symmetric, therefore STUN support must be provided in the
SIP Clients themselves.
Most of the proxy and media gateways installed by VoIP providers recognize the public IP address
the packets have originated from. When both SIP end points are behind a NAT, they can act as
gateways to clients behind NAT.
9.2.2. TURN
TURN (Traversal Using Relay NAT) is an IETF standard, which implements media relays for SIP
end-points. The standard overcomes the problems of clients behind symmetric NATs which cannot
rely on STUN to solve NAT traversal.
TURN connects clients behind a NAT to a single peer, providing the same protection offered by
symmetric NATs and firewalls. The TURN server acts as a relay; any data received is forwarded.
This type of implementation is not ideal. It assumes the clients have a trust relationship with a
TURN server, and a request session allocation based on shared credentials.

Best Practices
131
This can result in scalability issues, and requires changes in the SIP clients. It is also impossible
to determine when a direct, or TURN, connection is appropriate.
9.2.3. ICE
ICE (Interactive Connection Establishment) leverages both STUN and TURN to solve the NAT
traversal issues.
It allows devices to probe for multiple paths of communication, by attempting to use different port
numbers and STUN techniques. If ICE support is present in both devices, it is quite possible that
the devices can initiate and maintain communication end-to-end, without any intermediary media
relay.
Additionally, ICE can detect cases where direct communication is impossible and automatically
initiate fall-back to a media relay.
ICE is not currently in widespread use in SIP devices, because ICE capability must be embedded
within the SIP devices.
Depending on the negotiated connection, a reINVITE may be required during a session, which
adds more load to the SIP network and more latency to the call.
If the initiating ICE client attempts to call a non-ICE client, then the call setup-process will revert
to a conventional SIP call requiring NAT traversal to be solved by other means.
9.2.4. Other Approaches
While the above is a good solution to circumvent NAT issues. There might be cases where it is
not possible to use those solutions at all.
Other approaches include using proxy and media that can act as gateways, Session Border
Controllers, enhanced Firewall with Application Layer Gateway (ALG) and Tunnelling.
Here is more information on Session Border Controllers [http://groups.google.com/group/
mobicents-public/browse_thread/thread/5f1d6cbda9e8c302] and how they can resolve NAT
issues when above solutions are not possible

132
Chapter 10. Apendix10.1. Java Development Kit (JDK): Installing,
Configuring and Running
The Mobicents Platform is written in Java; therefore, before running any Mobicents server, you
must have a working Java Runtime Environment (JRE) or Java Development Kit (JDK) installed
on your system. In addition, the JRE or JDK you are using to run Mobicents must be version 5
or higher1.
10.1.1. JRE versus JDK - 32-Bit versus 64-Bit
Should I Install the JRE or JDK? Although you can run Mobicents servers using the Java
Runtime Environment, we assume that most users are developers interested in developing Java-
based, Mobicents-driven solutions. Therefore, in this guide we take the tact of showing how to
install the full Java Development Kit.
Should I Install the 32-Bit or the 64-Bit JDK, and Does It Matter? Briefly stated: if you are
running on a 64-Bit Linux or Windows platform, you should consider installing and running the 64-
bit JDK over the 32-bit one. Here are some heuristics for determining whether you would rather
run the 64-bit Java Virtual Machine (JVM) over its 32-bit cousin for your application:
• Wider datapath: the pipe between RAM and CPU is doubled, which improves the performance
of memory-bound applications when using a 64-bit JVM.
• 64-bit memory addressing gives virtually unlimited (1 exabyte) heap allocation. However large
heaps affect garbage collection.
• Applications that run with more than 1.5 GB of RAM (including free space for garbage collection
optimization) should utilize the 64-bit JVM.
• Applications that run on a 32-bit JVM and do not require more than minimal heap sizes will gain
nothing from a 64-bit JVM. Barring memory issues, 64-bit hardware with the same relative clock
speed and architecture is not likely to run Java applications faster than their 32-bit cousin.
Note that the following instructions detail how to download and install the 32-bit JDK, although the
steps are nearly identical for installing the 64-bit version.
10.1.2. Downloading JDK
You can download the Sun JDK 5.0 (Java 2 Development Kit) from Sun's website: http://
java.sun.com/javase/downloads/index_jdk5.jsp. Click on the Download link next to "JDK 5.0
1 At this point in time, it is possible to run most Mobicents servers, such as the JAIN SLEE Server, using a Java 6 JRE
or JDK. Be aware, however, that presently the XML Document Management Server does not run on Java 6. We suggest
checking the Mobicents web site, forums or discussion pages if you need to inquire about the status of running the XML
Document Management Server with Java 6.

Apendix
133
Update <x>" (where <x> is the latest minor version release number). On the next page, select
your language and platform (both architecture—whether 32- or 64-bit—and operating system),
read and agree to the Java Development Kit 5.0 License Agreement, and proceed to the
download page.
The Sun website will present two download alternatives to you: one is an RPM inside a self-
extracting file (for example, jdk-1_5_0_16-linux-i586-rpm.bin), and the other is merely a self-
extracting file (e.g. jdk-1_5_0_16-linux-i586.bin). If you are installing the JDK on Red Hat
Enterprise Linux, Fedora, or another RPM-based Linux system, we suggest that you download
the self-extracting file containing the RPM package, which will set up and use the SysV service
scripts in addition to installing the JDK. We also suggest installing the self-extracting RPM file if
you will be running Mobicents in a production environment.
Installing. The following procedures detail how to install the Java Development Kit on both
Linux and Windows.
Procedure 10.1. Installing the JDK on Linux
• Regardless of which file you downloaded, you can install it on Linux by simply making sure
the file is executable and then running it:
~]$ chmod +x "jdk-1_5_0_<minor_version>-linux-<architecture>-rpm.bin"
~]$ ./"jdk-1_5_0_<minor_version>-linux-<architecture>-rpm.bin"
Moving from Non-RPM Installer to SysV Service Scripts
If you download the non-RPM self-extracting file (and installed it), and you
are running on an RPM-based system, you can still set up the SysV service
scripts by downloading and installing one of the -compat packages from
the JPackage project. Remember to download the -compat package which
corresponds correctly to the minor release number of the JDK you installed.
The compat packages are available from ftp://jpackage.hmdc.harvard.edu/
JPackage/1.7/generic/RPMS.non-free/.
Important
You do not need to install a -compat package in addition to the JDK if you installed
the self-extracting RPM file! The -compat package merely performs the same SysV
service script set up that the RPM version of the JDK installer does.
10.1.3. Installing JDK on Windows
• Using Explorer, simply double-click the downloaded self-extracting installer and follow the
instructions to install the JDK.

Apendix
134
Configuring. Configuring your system for the JDK consists in two tasks: setting the JAVA_HOME
environment variable, and ensuring that the system is using the proper JDK (or JRE) using
the alternatives command. Setting JAVA_HOME usually overrides the values for java, javac and
java_sdk_1.5.0 in alternatives, but we will set them all just to be safe and consistent.
10.1.4. Setting Linux JAVA_HOME Environment Variables
Setting the JAVA_HOME Environment Variable on Generic Linux
After installing the JDK, you must ensure that the JAVA_HOME environment variable exists and
points to the location of your JDK installation.
Setting the JAVA_HOME Environment Variable on Linux. You can determine whether
JAVA_HOME is set on your system by echoing it on the command line:
~]$ echo $JAVA_HOME
If JAVA_HOME is not set already, then you must set its value to the location of the JDK installation
on your system. You can do this by adding two lines to your personal ~/.bashrc configuration
file. Open ~/.bashrc (or create it if it doesn't exist) and add a line similar to the following one
anywhere inside the file:
export JAVA_HOME="/usr/lib/jvm/jdk1.5.0_<version>"
You should also set this environment variable for any other users who will be running
Mobicents (any environment variables exported from ~/.bashrc files are local to that user).
10.1.5. Setting the Correct Java Version<varlistentry>Setting java, javac and java_sdk_1.5.0 Using the alternatives command
Selecting the Correct System JVM on Linux using alternatives . On systems with the
alternatives command, including Red Hat Enterprise Linux and Fedora, you can easily choose
which JDK (or JRE) installation you wish to use, as well as which java and javac executables
should be run when called.
As the root user, call /usr/sbin/alternatives with the --config java option to select between
JDKs and JREs installed on your system:
root@localhost ~]$ /usr/sbin/alternatives --config java
There are 3 programs which provide 'java'.
Selection Command
-----------------------------------------------
1 /usr/lib/jvm/jre-1.5.0-gcj/bin/java
2 /usr/lib/jvm/jre-1.6.0-sun/bin/java
*+ 3 /usr/lib/jvm/jre-1.5.0-sun/bin/java

Apendix
135
Enter to keep the current selection[+], or type selection number:
In our case, we want to use the Sun JDK, version 5, that we downloaded and installed, to run
the java executable. In the alternatives information printout above, a plus (+) next to a number
indicates the one currently being used. As per alternatives' instructions, pressing Enter will simply
keep the current JVM, or you can enter the number corresponding to the JVM you would prefer
to use.
Repeat the procedure above for the javac command and the java_sdk_1.5.0 environment
variable, as the root user:
~]$ /usr/sbin/alternatives --config javac
~]$ /usr/sbin/alternatives --config java_sdk_1.5.0
</varlistentry>
10.1.6. Setting JAVA_HOME Environment Variables on
Windows
Setting the JAVA_HOME Environment Variable on Windows
For information on how to set environment variables in Windows, refer to http://
support.microsoft.com/kb/931715.
10.1.7. Uninstalling JDK on Linux and Windows
Uninstalling. There is usually no reason (other than space concerns) to remove a particular
JDK from your system, given that you can switch between JDKs and JREs easily using
alternatives, and/or by setting JAVA_HOME.
Uninstalling the JDK on Linux. On RPM-based systems, you can uninstall the JDK using the
yum remove <jdk_rpm_name> command.
Uninstalling the JDK on Windows. On Windows systems, check the JDK entry in the Start
menu for an uninstall command, or use Add/Remove Programs.
10.1.8. Setting the JBOSS_HOME Environment Variable
The Mobicents Platform (Mobicents) is built on top of the JBoss Application Server (JBoss AS).
You do not need to set the JBOSS_HOME environment variable to run any of the Mobicents Platform
servers unless JBOSS_HOME is already set.
The best way to know for sure whether JBOSS_HOME was set previously or not is to perform a
simple check which may save you time and frustration.
Apendix
136
Checking to See If JBOSS_HOME is Set on Unix. At the command line, echo $JBOSS_HOME
to see if it is currently defined in your environment:
~]$ echo $JBOSS_HOME
The Mobicents Platform and most Mobicents servers are built on top of the JBoss Application
Server (JBoss AS). When the Mobicents Platform or Mobicents servers are built from source, then
JBOSS_HOME must be set, because the Mobicents files are installed into (or “over top of” if you
prefer) a clean JBoss AS installation, and the build process assumes that the location pointed to
by the JBOSS_HOME environment variable at the time of building is the JBoss AS installation into
which you want it to install the Mobicents files.
This guide does not detail building the Mobicents Platform or any Mobicents servers from source.
It is nevertheless useful to understand the role played by JBoss AS and JBOSS_HOME in the
Mobicents ecosystem.
The immediately-following section considers whether you need to set JBOSS_HOME at all and, if
so, when. The subsequent sections detail how to set JBOSS_HOME on Unix and Windows
Important
Even if you fall into the category below of not needing to set JBOSS_HOME, you may
want to for various reasons anyway. Also, even if you are instructed that you do
not need to set JBOSS_HOME, it is good practice nonetheless to check and make
sure that JBOSS_HOME actually isn't set or defined on your system for some reason.
This can save you both time and frustration.
You DO NOT NEED to set JBOSS_HOME if...
• ...you have installed the Mobicents Platform binary distribution.
• ...you have installed a Mobicents server binary distribution which bundles JBoss AS.
You MUST set JBOSS_HOME if...
• ...you are installing the Mobicents Platform or any of the Mobicents servers from source.
• ...you are installing the Mobicents Platform binary distribution, or one of the Mobicents server
binary distributions, which do not bundle JBoss AS.
Naturally, if you installed the Mobicents Platform or one of the Mobicents server binary
releases which do not bundle JBoss AS, yet requires it to run, then you should install JBoss
AS [http://docs.jboss.org/jbossas/docs/Installation_And_Getting_Started_Guide/5/html_single/
index.html] before setting JBOSS_HOME or proceeding with anything else.

Apendix
137
Setting the JBOSS_HOME Environment Variable on Unix. The JBOSS_HOME environment
variable must point to the directory which contains all of the files for the Mobicents Platform or
individual Mobicents server that you installed. As another hint, this topmost directory contains a
bin subdirectory.
Setting JBOSS_HOME in your personal ~/.bashrc startup script carries the advantage of retaining
effect over reboots. Each time you log in, the environment variable is sure to be set for you, as a
user. On Unix, it is possible to set JBOSS_HOME as a system-wide environment variable, by defining
it in /etc/bashrc, but this method is neither recommended nor detailed in these instructions.
Procedure 10.2. To Set JBOSS_HOME on Unix...
1. Open the ~/.bashrc startup script, which is a hidden file in your home directory, in a text
editor, and insert the following line on its own line while substituting for the actual install
location on your system:
export JBOSS_HOME="/home/<username>/<path>/<to>/<install_directory>"
2. Save and close the .bashrc startup script.
3. You should source the .bashrc script to force your change to take effect, so that JBOSS_HOME
becomes set for the current session2.
~]$ source ~/.bashrc
4. Finally, ensure that JBOSS_HOME is set in the current session, and actually points to the correct
location:
Note
The command line usage below is based upon a binary installation of the
Mobicents Platform. In this sample output, JBOSS_HOME has been set correctly
to the topmost_directory of the Mobicents installation. Note that if you are
installing one of the standalone Mobicents servers (with JBoss AS bundled!),
then JBOSS_HOME would point to the topmost_directory of your server
installation.
~]$ echo $JBOSS_HOME
/home/silas/mobicents-all-1.2.1.GA-jboss-4.2.3.GA/jboss/
Setting the JBOSS_HOME Environment Variable on Windows. The JBOSS_HOME
environment variable must point to the directory which contains all of the files for the Mobicents
2 Note that any other terminals which were opened prior to your having altered .bashrc will need to source ~/.bashrc
as well should they require access to JBOSS_HOME.

Apendix
138
Platform or individual Mobicents server that you installed. As another hint, this topmost directory
contains a bin subdirectory.
For information on how to set environment variables in recent versions of Windows, refer to http://
support.microsoft.com/kb/931715.
10.1.9. Setting CATALINA_HOME on Linux and Windows
Procedure 10.3. Setting the CATALINA_HOME Environment Variable on Linux
1. The CATALINA_HOME environment variable must point to the location of your Tomcat
installation. Any Mobicents server which runs on top of the Tomcat servlet container has a
topmost directory, i.e. the directory in which you unzipped the zip file to install the server,
and underneath that directory, a bin directory. CATALINA_HOME must be set to the topmost
directory of your Mobicents server installation.
Setting this variable in your personal ~/.bashrc file has the advantage that it will always be
set (for you, as a user) each time you log in or reboot the system. To do so, open ~/.bashrc in
a text editor (or create the file if it doesn't already exist) and insert the following line anywhere
in the file, taking care to substitute <sip_server> for the topmost directory of the Mobicents
server you installed:
export CATALINA_HOME="/home/<username>/<path>/<to>/<sip_server>"
Save and close .bashrc.
2. You can—and should—source your .bashrc file to make your change take effect (so that
CATALINA_HOME is set) for the current session:
~]$ source ~/.bashrc
3. Finally, make sure that CATALINA_HOME has been set correctly (that it leads to the right
directory), and has taken effect in the current session.
The following command will show the path to the directory pointed to by CATALINA_HOME:
~]$ echo $CATALINA_HOME
To be absolutely sure, change your directory to the one pointed to by CATALINA_HOME:
~]$ cd $CATALINA_HOME && pwd
Procedure 10.4. Setting the CATALINA_HOME Environment Variable on Windows
• The CATALINA_HOME environment variable must point to the location of your Tomcat
installation. Any Mobicents server which runs on top of the Tomcat servlet container has a

Apendix
139
topmost directory, i.e. the directory in which you unzipped the zip file to install the server,
and underneath that directory, a bin directory. CATALINA_HOME must be set to the topmost
directory of your Mobicents server installation.
If you are planning on running the Tomcat container as the Administrator, then you should, of
course, set the CATALINA_HOME environment variable as the administrator, and if you planning
to run Tomcat as a normal user, then set CATALINA_HOME as a user environment variable.
For information on how to set environment variables in Windows, refer to http://
support.microsoft.com/kb/931715.

140
Chapter 11. JSR 289 ErrataThis chapter discusses deviations from the JSR 289 specification by Mobicents SIP Servlets after
feedback on usage in real world deployments and from the community.
11.1. Mobicents SIP Servlets Deviations from JSR 289
• Correlation of Responses to Proxy Branches : It seems the javadoc for Speed
Dial [http://ci.jboss.org/jenkins/view/Mobicents/job/Mobicents-Books/lastSuccessfulBuild/
artifact/api-docs/jsr289/javadocs/javax/servlet/sip/
SipServlet.html#doResponse(javax.servlet.sip.SipServletResponse)] contains an error,
SipServlet.doBranchResponse() shouldn't be included as it contradicts the last sentence
from the spec 10.2.4.2 Correlating responses to proxy branches : "Note that if the
doBranchResponse() is not overridden then doResponse() method will be invoked only for
the best final response as before", If SipServlet.doBranchResponse() handling is done in
SipServlet.doResponse() and the servlet overrides SipServlet.doResponse() then it will receive
intermediate final responses as well as the best final response which is not the desired
behavior, so the doBranchResponse() handling is done in SipServlet.doService() method
allowing applications not overriding doResponse or doService to receive both intermediate final
responses on the doBranchResponse as well as the best final response on doResponse but
this fixes the issue of intermediate final responses being delivered to doResponse in case the
servlet overrides it.
• SipServletResponse typo : SipServletResponse.SC_TEMPORARLY_UNAVAILABLE should
be replaced by SC_TEMPORARILY_UNAVAILABLE.

141
Appendix A. Revision HistoryRevision History
Revision 4.0 Mon Jan 24 2011 TomWells<[email protected]>
Publican valid edition of community documentation.
Revision 3.0 Thu Jun 11 2009 JaredMorgan<[email protected]>
Second release of the "parameterized" documentation.
Revision 2.0 Fri Mar 06 2009 DouglasSilas<[email protected]>
First release of the "parameterized", and much-improved JBCP documentation.