SIMATIC HMI Activating and testing ASIA 4 - Siemens AG · 09/2014 . Printout of the Online Help ....
52
WinCC Installation Notes ___________________ ___________________ ___________________ ___________________ ___________________ ___________________ ___________________ ___________________ ___________________ SIMATIC HMI WinCC V7.3 SE incl. Update 1 WinCC Installation Notes Installation Manual Printout of the Online Help 09/2014 Printout of the Online Help Installation Guide 1 Scope of delivery 2 Licenses and Licensing 3 Activating and testing ASIA licenses 4 Installation Requirements 5 Installing WinCC 6 How to Perform an Uninstall 7 Upgrading WinCC 8 Notes about Running the Software 9
Transcript of SIMATIC HMI Activating and testing ASIA 4 - Siemens AG · 09/2014 . Printout of the Online Help ....
WinCC Installation Notes
___________________ ___________________ ___________________ ___________________ ___________________ ___________________ ___________________ ___________________ ___________________
SIMATIC HMI
WinCC V7.3 SE incl. Update 1 WinCC Installation Notes
Installation Manual
Printout of the Online Help
09/2014 Printout of the Online Help
Installation Guide 1
Scope of delivery 2
Licenses and Licensing 3
Activating and testing ASIA licenses
4
Installation Requirements 5
Installing WinCC 6
How to Perform an Uninstall 7
Upgrading WinCC 8
Notes about Running the Software
9
Legal information Warning notice system
This manual contains notices you have to observe in order to ensure your personal safety, as well as to prevent damage to property. The notices referring to your personal safety are highlighted in the manual by a safety alert symbol, notices referring only to property damage have no safety alert symbol. These notices shown below are graded according to the degree of danger.
DANGER indicates that death or severe personal injury will result if proper precautions are not taken.
WARNING indicates that death or severe personal injury may result if proper precautions are not taken.
CAUTION indicates that minor personal injury can result if proper precautions are not taken.
NOTICE indicates that property damage can result if proper precautions are not taken.
If more than one degree of danger is present, the warning notice representing the highest degree of danger will be used. A notice warning of injury to persons with a safety alert symbol may also include a warning relating to property damage.
Qualified Personnel The product/system described in this documentation may be operated only by personnel qualified for the specific task in accordance with the relevant documentation, in particular its warning notices and safety instructions. Qualified personnel are those who, based on their training and experience, are capable of identifying risks and avoiding potential hazards when working with these products/systems.
Proper use of Siemens products Note the following:
WARNING Siemens products may only be used for the applications described in the catalog and in the relevant technical documentation. If products and components from other manufacturers are used, these must be recommended or approved by Siemens. Proper transport, storage, installation, assembly, commissioning, operation and maintenance are required to ensure that the products operate safely and without any problems. The permissible ambient conditions must be complied with. The information in the relevant documentation must be observed.
Trademarks All names identified by ® are registered trademarks of Siemens AG. The remaining trademarks in this publication may be trademarks whose use by third parties for their own purposes could violate the rights of the owner.
Disclaimer of Liability We have reviewed the contents of this publication to ensure consistency with the hardware and software described. Since variance cannot be precluded entirely, we cannot guarantee full consistency. However, the information in this publication is reviewed regularly and any necessary corrections are included in subsequent editions.
Siemens AG Industry Sector Postfach 48 48 90026 NÜRNBERG GERMANY
Printout of the Online Help Ⓟ 09/2014 Subject to change
Copyright © Siemens AG 2014. All rights reserved
Table of contents
1 Installation Guide .................................................................................................................................... 5
2 Scope of delivery .................................................................................................................................... 7
3 Licenses and Licensing ........................................................................................................................... 9
4 Activating and testing ASIA licenses ...................................................................................................... 11
5 Installation Requirements ...................................................................................................................... 13
5.1 WinCC Installation Requirements ........................................................................................... 13
5.2 Hardware Requirements for the Installation ........................................................................... 15
5.3 Software Requirements for the Installation ............................................................................. 18
5.4 Notes on Data and System Security ....................................................................................... 23
5.5 Access rights in the operating system .................................................................................... 25 5.5.1 Defining Access Rights in the Operating System ................................................................... 25 5.5.2 Including users in the "SIMATIC HMI" user group .................................................................. 28 5.5.3 Including domain-global user group in the "SIMATIC HMI" user group ................................. 29 5.5.4 Release existing project for "SIMATIC HMI" user group ........................................................ 30
5.6 How to Adapt the Windows Security Policies ......................................................................... 31
6 Installing WinCC ................................................................................................................................... 33
6.1 Installing WinCC ..................................................................................................................... 33
6.2 How to Install MS Message Queuing ...................................................................................... 34
6.3 How to Install WinCC .............................................................................................................. 36
6.4 How to Install Supplementary Components Later .................................................................. 40
6.5 How to Install Supplementary Languages .............................................................................. 41
6.6 How to upgrade a standard client ........................................................................................... 42
7 How to Perform an Uninstall .................................................................................................................. 43
8 Upgrading WinCC ................................................................................................................................. 45
9 Notes about Running the Software ........................................................................................................ 49
Index..................................................................................................................................................... 51
WinCC Installation Notes Installation Manual, 09/2014, Printout of the Online Help 3

Table of contents
WinCC Installation Notes 4 Installation Manual, 09/2014, Printout of the Online Help

Installation Guide 1
Contents This documentation contains important information on the scope of delivery, as well as on the installation and operation of WinCC.
The information contained here takes precedence over the information contained in the manual and online help.
WinCC Installation Notes Installation Manual, 09/2014, Printout of the Online Help 5

Installation Guide
WinCC Installation Notes 6 Installation Manual, 09/2014, Printout of the Online Help

Scope of delivery 2
Components supplied WinCC V7.3 SE incl. Update 1 is available as a basic package, upgrade package and as a download package "OSD" (Online Software Delivery).
You will receive the following components: Components Basic / Upgrade / Download Package DVD WinCC V7.3 SE incl. Update 1: • WinCC V7.3 SE incl. Update 1 • WinCC/ WebNavigator V7.3 SE incl. Update 1 • WinCC/ DataMonitor V7.3 SE incl. Update 1 • WinCC/ Connectivity Pack V7.3 SE incl. Update 1 • WinCC/ Connectivity Station V7.3 SE incl. Update 1 • SQL Server 2008 R2 SP2 for WinCC V7.3 SE incl. Up-
date 1 • SIMATIC Logon V1.5 SP2 • Automation License Manager V5.3 SP1 • Simatic Net V7.1 SP6 • Simatic Net V12 • Simatic NCM PC V5.5 SP3 • AS-OS-Engineering V8.1 Update 1
X
Required licenses X Certificate of License X
1) Refer to the software requirements in the installation notes and release notes.
Note Print Installation Notes
The installation notes for the respective products are also provided as a PDF file.
You can find the installation notes and release notes on the WinCC DVD in the "Install_and_Release-Notes" directory.
You will need Adobe Acrobat Reader V5.0 or later. You can download Adobe Acrobat Reader free of charge at the following URL: • http://www.adobe.com/products/acrobat
WinCC Installation Notes Installation Manual, 09/2014, Printout of the Online Help 7

Scope of delivery
Communication drivers The following table lists the communication drivers included in the package. Communication drivers Additional license OPC No Allen Bradley - Ethernet IP No Mitsubishi Ethernet No Modbus TCP/ IP No PROFIBUS DP No PROFIBUS FMS No SIMATIC 505 TCPIP No SIMATIC S5 Ethernet Layer 4 No SIMATIC S5 Profibus FDL No SIMATIC S5 Programmers Port AS511 No SIMATIC S5 Serial 3964R No SIMATIC S7 Protocol Suite No SIMATIC S7-1200, S7-1500 No 1) SIMATIC TI Ethernet Layer 4 No SIMATIC TI Serial No SIMOTION No System Info No WinCC OPC UA server No 2) 1) The licensing for SIMATIC S7-1200, S7-1500 is based on the number of connections.
You can use up to two connections without an additional license. 2) You need a Connectivity Pack license for the WinCC OPC UA server.
WinCC Installation Notes 8 Installation Manual, 09/2014, Printout of the Online Help

Licenses and Licensing 3
Introduction The WinCC software is protected and can only be used in its full measure with a valid license. Each installed software and option used requires a valid license for unrestricted operation of WinCC. You will receive a storage medium with all necessary license keys for the installation of licenses. The licenses for optional packages must be ordered separately.
Licenses which are installed for use in WinCC are transferred from the storage medium to a local drive and are unregistered on the storage medium. The cumulation of more than one license per component subject to a license is possible only for archive licenses and for licenses of the WinCC/WebUX, WinCC/PerformanceMonitor and SIMATIC Information Server options. Other licenses cannot be cumulated.
Note
Furthermore, the licensee confirms that the software (SW) contains licensed software by Microsoft Corporation or its subsidiaries. Thereby, licensee agrees to be bound by the terms and conditions of the appended license agreement between Microsoft SQL Server and end user, and to fulfill same.
Notes On License Conditions Please observe the enclosed license conditions, which are also displayed during the installation. You need V7.3 licenses for WinCC V7.3 SE including Update 1.
The SIMATIC WinCC software is copy-protected against unlicensed use. Additional information on licenses and license types may be found under "Licensing" in the WinCC Information System.
Installed licenses are required to enable proper operation of WinCC. If WinCC is installed without licenses, the program will switch to demo mode at start-up.
Note
It is not allowed to run WinCC in process mode without a valid license.
Demo Mode If a license is missing for one or several components, WinCC will run in demo mode. WinCC also switches to demo mode when the maximum authorized number of process tags or archive tags is exceeded in a project.
In Demo mode, you can use the WinCC software fully for a maximum of one hour. After this period, the operation of WinCC violates the license agreements. After one hour, the WinCC Explorer and the editors will be closed. In runtime, the system will request the acquisition of a valid license. This dialog will appear every 10 minutes.
WinCC Installation Notes Installation Manual, 09/2014, Printout of the Online Help 9
Licenses and Licensing
You can upgrade a WinCC demo version to the full version. To do this, proceed as follows:
● Install the required licenses.
● Install the SQL Standard Server using the WinCC DVD.
Details on demo mode may be found in WinCC Information System under "Licensing".
Microsoft SQL Server 2008 R2 SP2 A license is necessary to use the Microsoft SQL Server database. This license is readily available in a licensed and proper installation of WinCC.
The licensed SQL server installed with WinCC may only be used in connection with WinCC.
Its use for other purposes requires an additional license. These include, e.g.:
● Use for internal databases
● Use in third-party applications
● Access of third-party applications to the WinCC database by means of SQL commands or other mechanisms
Uninstalling
After uninstalling WinCC, the "WinCC" SQL server instance must also be removed. Select "Control Panel" > "Software" and then select the "Microsoft SQL Server 2008" item for removal.
Installation of Licenses You may use the Automation License Manager for installation of licenses. Licenses may be installed during installation of WinCC or after the fact. You will find the Automation License Manager in the Windows start menu in the "Siemens Automation" program group. An after-the-fact installation of a license will take effect upon restart of your computer.
For the installation of licenses, the following requirements must be met:
● The storage medium containing the licenses must not be write protected.
● You can install the RC licenses on a license server for the configuration. You do not have to install the licenses on the local drive.
● Licenses may only be installed on a non-compressed drive.
Note
After uninstalling WinCC, the licenses remain installed on the system.
WinCC Installation Notes 10 Installation Manual, 09/2014, Printout of the Online Help
Activating and testing ASIA licenses 4
Introduction The license keys for WinCC Runtime and WinCC CS are supplied on the included license storage medium.
The licensed ASIA version is executable in parallel to the European version by switching to Unicode. The supplied hardware key (dongle) checks for the following conditions:
● The runtime language of the user interface (GUI)
● The languages in the text library
● The operating system
Note
It is not allowed to run WinCC in process mode without a valid license.
Installation of Licenses You may use the Automation License Manager for installation of licenses. Licenses may be installed during installation of WinCC or after the fact.
You will find the Automation License Manager in the Windows start menu in the "Siemens Automation" program group.
An after-the-fact installation of a license will take effect upon restart of your computer.
For the installation of licenses, the following requirements must be met:
● The storage medium containing the licenses must not be write protected.
● You can install the RC licenses on a license server for the configuration. You do not have to install the licenses on the local drive.
● Licenses may only be installed on a non-compressed drive.
Note
After uninstalling WinCC, the licenses remain installed on the system.
WinCC Installation Notes Installation Manual, 09/2014, Printout of the Online Help 11
Activating and testing ASIA licenses
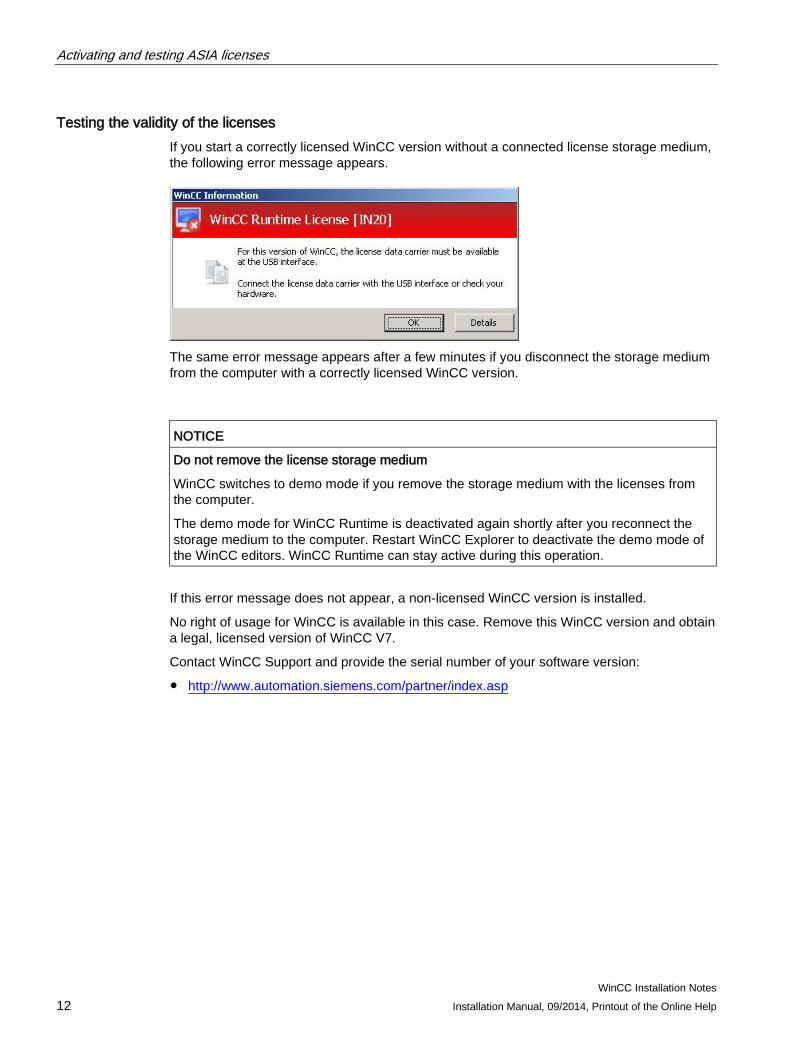
Testing the validity of the licenses If you start a correctly licensed WinCC version without a connected license storage medium, the following error message appears.
The same error message appears after a few minutes if you disconnect the storage medium from the computer with a correctly licensed WinCC version.
NOTICE
Do not remove the license storage medium
WinCC switches to demo mode if you remove the storage medium with the licenses from the computer.
The demo mode for WinCC Runtime is deactivated again shortly after you reconnect the storage medium to the computer. Restart WinCC Explorer to deactivate the demo mode of the WinCC editors. WinCC Runtime can stay active during this operation.
If this error message does not appear, a non-licensed WinCC version is installed.
No right of usage for WinCC is available in this case. Remove this WinCC version and obtain a legal, licensed version of WinCC V7.
Contact WinCC Support and provide the serial number of your software version:
● http://www.automation.siemens.com/partner/index.asp
WinCC Installation Notes 12 Installation Manual, 09/2014, Printout of the Online Help

Installation Requirements 5 5.1 WinCC Installation Requirements
Introduction You will need special hardware and software for the installation of WinCC. The requirements are described in the chapters "Hardware Requirements for Installation" and "Software Requirements for Installation".
Note Windows operating system: Avoid changes in system
Windows settings deviating from default can have an effect on operation of WinCC.
Observe this note particularly for the following changes:
- Change of processes and services in Control Panel.
- Changes in Windows Task Manager.
- Changes in Windows registry.
- Changes in Windows security policies.
The first check if certain conditions are met is already executed during the installation of WinCC. The following conditions are checked:
● Operating system
● User Rights
● Graphic Resolution
● Internet Explorer
● MS Message Queuing
● SQL Server
● Due Complete Restart (Cold Restart)
WinCC Installation Notes Installation Manual, 09/2014, Printout of the Online Help 13

Installation Requirements 5.1 WinCC Installation Requirements
Error Messages If one these conditions is not met, the WinCC installation will be aborted and an error message will be displayed. For details about the error messages displayed see the table below.
Error Message Explanation To execute installation properly, restart the computer
The software installed on your computer requires a restart. Before WinCC can be installed, the computer should be restarted once.
This application requires VGA or any higher resolution
Check the settings of the connected monitor and upgrade the graphic card, if necessary.
You do not have administrator rights. Log on as administrator.
Administrator rights are required for the installation. Please log in to Windows again as a user with administrator rights.
Setup has detected that unInstallShield is ac-tive. Please close unInstallShield and restart Setup.
Close unInstallShield. This message may also indicate that you are lacking administrator rights for this installation. In this case, log on to Windows again as user with administrator rights.
The Microsoft Message Queuing services are not installed.
Install the Microsoft Message Queuing services. To do this, you will need the Windows installation CD. You can find detailed information in the section "Installing Microsoft Message Queuing".
WinCC Installation Notes 14 Installation Manual, 09/2014, Printout of the Online Help
Installation Requirements 5.2 Hardware Requirements for the Installation
5.2 Hardware Requirements for the Installation
Introduction Certain hardware configuration conditions must be fulfilled for installation.
Hardware Requirements WinCC supports all common IBM/AT-compatible PC platforms.
To efficiently work with WinCC, select a system with the recommended specifications.
Note
Unless noted to the contrary, the same requirements as for servers are applicable to single-user systems.
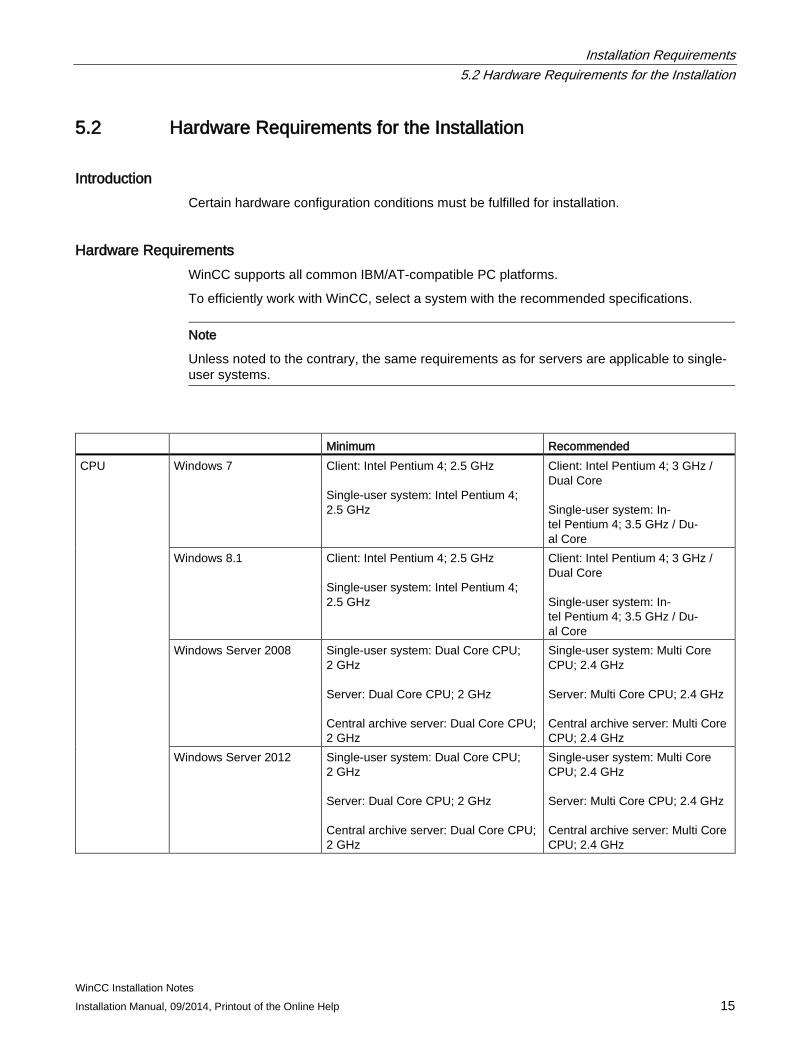
Minimum Recommended CPU Windows 7 Client: Intel Pentium 4; 2.5 GHz
Single-user system: Intel Pentium 4; 2.5 GHz
Client: Intel Pentium 4; 3 GHz / Dual Core Single-user system: In-tel Pentium 4; 3.5 GHz / Du-al Core
Windows 8.1 Client: Intel Pentium 4; 2.5 GHz Single-user system: Intel Pentium 4; 2.5 GHz
Client: Intel Pentium 4; 3 GHz / Dual Core Single-user system: In-tel Pentium 4; 3.5 GHz / Du-al Core
Windows Server 2008 Single-user system: Dual Core CPU; 2 GHz Server: Dual Core CPU; 2 GHz Central archive server: Dual Core CPU; 2 GHz
Single-user system: Multi Core CPU; 2.4 GHz Server: Multi Core CPU; 2.4 GHz Central archive server: Multi Core CPU; 2.4 GHz
Windows Server 2012 Single-user system: Dual Core CPU; 2 GHz Server: Dual Core CPU; 2 GHz Central archive server: Dual Core CPU; 2 GHz
Single-user system: Multi Core CPU; 2.4 GHz Server: Multi Core CPU; 2.4 GHz Central archive server: Multi Core CPU; 2.4 GHz
WinCC Installation Notes Installation Manual, 09/2014, Printout of the Online Help 15
Installation Requirements 5.2 Hardware Requirements for the Installation
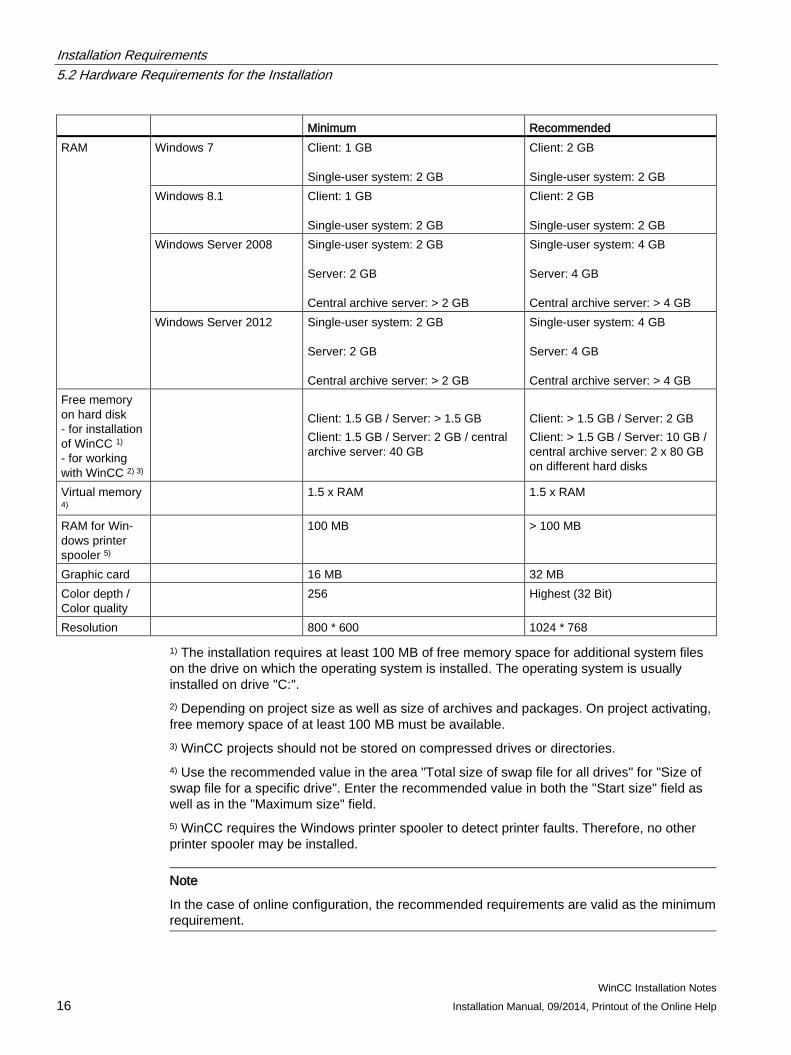
Minimum Recommended RAM Windows 7 Client: 1 GB
Single-user system: 2 GB
Client: 2 GB Single-user system: 2 GB
Windows 8.1 Client: 1 GB Single-user system: 2 GB
Client: 2 GB Single-user system: 2 GB
Windows Server 2008 Single-user system: 2 GB Server: 2 GB Central archive server: > 2 GB
Single-user system: 4 GB Server: 4 GB Central archive server: > 4 GB
Windows Server 2012 Single-user system: 2 GB Server: 2 GB Central archive server: > 2 GB
Single-user system: 4 GB Server: 4 GB Central archive server: > 4 GB
Free memory on hard disk - for installation of WinCC 1) - for working with WinCC 2) 3)
Client: 1.5 GB / Server: > 1.5 GB Client: 1.5 GB / Server: 2 GB / central archive server: 40 GB
Client: > 1.5 GB / Server: 2 GB Client: > 1.5 GB / Server: 10 GB / central archive server: 2 x 80 GB on different hard disks
Virtual memory 4)
1.5 x RAM 1.5 x RAM
RAM for Win-dows printer spooler 5)
100 MB > 100 MB
Graphic card 16 MB 32 MB Color depth / Color quality
256 Highest (32 Bit)
Resolution 800 * 600 1024 * 768
1) The installation requires at least 100 MB of free memory space for additional system files on the drive on which the operating system is installed. The operating system is usually installed on drive "C:". 2) Depending on project size as well as size of archives and packages. On project activating, free memory space of at least 100 MB must be available. 3) WinCC projects should not be stored on compressed drives or directories. 4) Use the recommended value in the area "Total size of swap file for all drives" for "Size of swap file for a specific drive". Enter the recommended value in both the "Start size" field as well as in the "Maximum size" field. 5) WinCC requires the Windows printer spooler to detect printer faults. Therefore, no other printer spooler may be installed.
Note
In the case of online configuration, the recommended requirements are valid as the minimum requirement.
WinCC Installation Notes 16 Installation Manual, 09/2014, Printout of the Online Help

Installation Requirements 5.2 Hardware Requirements for the Installation
Virtualization The following virtualization systems are tested:
● Microsoft Hyper-V 2012 R2
● VM Ware ESXi 5.5
Requirement
The performance data of the virtual computers must meet the minimum requirements for WinCC clients.
Go to the following URL for additional information about virtual environments with WinCC:
● Internet: FAQ Virtualization (http://support.automation.siemens.com/WW/view/en/49370459)
WinCC Installation Notes Installation Manual, 09/2014, Printout of the Online Help 17

Installation Requirements 5.3 Software Requirements for the Installation
5.3 Software Requirements for the Installation
Introduction For the installation, certain requirements concerning operating system and software configuration must be met.
Note
WinCC is enabled for operation within a domain or workgroup.
Note however that domain group policies and restrictions in the domains may prevent installation. In this case, remove the computer from the domain before installing Microsoft Message Queuing, Microsoft SQL Server and WinCC. Log on to the computer concerned locally with administrator rights. Carry out the installation. Following successful installation, the WinCC computer can be registered in the domain again. If the domain-group policies and domain restrictions do not impair the installation, the computer must not be removed from the domain during installation.
Note however that domain group policies and restrictions in the domain may also hinder operation. If these restrictions cannot be overcome, operate the WinCC computer in a work group. If necessary, contact the domain administrator.
Operating systems
Operating System Languages
WinCC is released for the following operating system languages only:
● German
● English
● French
● Italian
● Spanish
● Chinese (Simplified, PR China)
● Chinese (Traditional, Taiwan)
● Japanese
● Korean
● Multilingual operating system (MUI version)
Configurations
When using more than one server, all servers must be operated with a uniform operating system: Windows Server 2008 or 2012, each with the same Standard or Enterprise Edition.
WinCC Installation Notes 18 Installation Manual, 09/2014, Printout of the Online Help

Installation Requirements 5.3 Software Requirements for the Installation
Single-user systems and clients
WinCC runs on Windows 7 and Windows 8.1. Operating system Configuration Comments Windows 7 Professional Service Pack 1
Enterprise Service Pack 1 Ultimate Service Pack 1
Standard installation 32-bit and 64-bit
Windows 8.1 Professional Enterprise
Standard installation 32-bit and 64-bit
You can also run single-user systems and clients in WinCC multi-user systems on Windows Server 2008 / 2012.
WinCC Server
You can operate a WinCC server on Windows Server 2008 / 2012 Standard / Enterprise Edition or Windows Server 2008 R2.
WinCC server with up to three WinCC clients on Windows 7 or Windows 8.1
It is also possible to operate a WinCC Runtime server on Windows 7 if you are not running more than three clients. WinCC ServiceMode is not released for this configuration.
Operating system Configuration Comments Windows Server 2008 Standard Service Pack 2 32-bit Windows Server 2008 R2 Standard Service Pack 1 64-bit Windows Server 2012 R2 Standard 64-bit
Note
WinCC is not suitable for use on a Microsoft terminal server. You can use the Microsoft terminal server only in connection with the WinCC Web client. Note the installation instructions of the WinCC/WebNavigator.
Microsoft Message Queuing services WinCC requires Microsoft Message Queuing services. You can find detailed information in the section "Installing Microsoft Message Queuing".
Microsoft SQL Server 2008 WinCC requires the 32-bit version of Microsoft SQL Server 2008 R2 Service Pack 2. SQL Server is included automatically in the WinCC installation.
The necessary connectivity components are also installed with the Microsoft SQL Server.
The corresponding user rights must have been set up for accessing the SQL Server data. Observe the notes in the section "Defining access rights in the operating system".
WinCC Installation Notes Installation Manual, 09/2014, Printout of the Online Help 19

Installation Requirements 5.3 Software Requirements for the Installation
SQL server instance "WinCC"
During installation, a new "WinCC" SQL server instance is created with Microsoft SQL Serve containing the required settings.
This instance is always installed in English. The language in which existing SQL server instances have been installed has no effect on this. Existing instances are not affected by the Service Pack.
"WinCC" instance after removing WinCC
When WinCC is removed , the "WinCC" SQL server instance remains installed and must be removed manually for licensing reasons.
Do not change the Windows computer name
Do not change the Windows computer name after installing WinCC installation.
If you change the Windows computer name, you will need to remove and reinstall the SQL Server.
Microsoft .NET Framework under Windows 8.1 / Windows Server 2012 R2 Microsoft .NET Framework 3.5 and 4.5 must be installed for the Windows 8.1 and Windows Server 2012 R2 operating systems.
For this reason, make sure that the .Net Framework is installed before you install WinCC.
Operation with multiple network adapters When a server is used with several network adapters, read the notes in the WinCC Information System under "Configurations > Distributed Systems > Special features of communication using a server with several network adapters".
Process communication driver For the SIMATIC NET drivers, select the "SIMATIC NET PC Software" program during the WinCC installation.
WinCC Installation Notes 20 Installation Manual, 09/2014, Printout of the Online Help

Installation Requirements 5.3 Software Requirements for the Installation
Internet Explorer - requirements The following versions are released for WinCC:
● Microsoft Internet Explorer V9.0 (32-bit)
● Microsoft Internet Explorer V10.0 (32-bit)
● Microsoft Internet Explorer V11.0 (32-bit)
If you wish to fully use WinCC's HTML Help, you must permit the use of JavaScript under "Internet Options" in Internet Explorer.
Note
In Windows 7 and Windows Server 2008/2012, do not disable Internet Explorer.
Adapting security policies The operating system must permit the installation of unsigned drivers and files. Detailed information is available in the section "Adapting Security Policies under Windows".
Note
An update of the operating system is not permitted if WinCC is started. Start the computer again after updating the operating system.
Checking the "Path" environment variable Before starting WinCC, you should check the entries in the "Path" environment variable.
A few programs insert paths containing quotation marks in the environment variable. These paths can prevent WinCC from starting or limit its functionality. The paths with quotation marks can also interfere with the software of other manufacturers.
Open the "System properties" dialog in the Control Panel. Open the "Environment variables" dialog using the "Environment variables" button on the "Advanced" tab, and display the value of the "Path" system tag.
If the "Path" system tag contains paths with quotation marks, reorder the entries so that these paths are called last.
WinCC Installation Notes Installation Manual, 09/2014, Printout of the Online Help 21
Installation Requirements 5.3 Software Requirements for the Installation
Windows 7 and Windows Server 2008/2012: Microsoft Internet Information Service (IIS) If you are using the OPC-XML-DA server of WinCC, you must install the Microsoft Internet Information Service (IIS) before installation.
Under Windows Server 2008/2012, configure the settings in Server Manager using the "Webserver (IIS)" role in the associated role services.
Select the following settings:
● Web Management Tools:
– IIS Management Service
– IIS Management Console
– IIS Management Scripts and Tools
– IIS Metabase and IIS 6 configuration compatibility
– IIS 6 WMI Compatibility
● WWW Services > Common HTTP Features:
– Default Document
– Static Content
● WWW Services > Application Development Features:
– .NET Extensibility
– ASP
– ASP.NET
– ISAPI extensions
– ISAPI filters
● WWW Services > Security:
– Request Filtering
– Basic Authentication
– Windows Authentication
Note Always install Microsoft Internet Information Service (IIS) with ASP.NET and ASP
Always install ASP.NET and ASP when you install the Microsoft Internet Information Service (IIS). WinCC OPC XML DA Server: Firewall settings
The web service of the WinCC OPC XML DA server communicates over port: 80 (HTTP).
Make sure that the firewall rule "WWW services (HTTP)" is selected and activated for the required network areas.
WinCC Installation Notes 22 Installation Manual, 09/2014, Printout of the Online Help

Installation Requirements 5.4 Notes on Data and System Security
5.4 Notes on Data and System Security
Introduction System security when using WinCC can be increased by implementing simple measures.
Preventing Access to the Operating System Layer in Runtime If the Windows Selection dialog is opened in an activated WinCC project, access to the Windows operating system is possible using this function. A Windows Selection dialog is opened, for example, when data is imported or files are selected.
Protect the corresponding function by executing a Permission Check via the User Administrator to prevent unauthorized access to the operating system.
Preventing access to the Windows toolbar
You can use the computer properties to prevent the Windows taskbar from being displayed in Runtime. Open the "Parameters" tab in the "Computer properties" dialog and deactivate all the shortcut keys in the "Disable Keys" area.
In addition, deactivate the "Keep the taskbar on top of other windows" setting in Windows.
Disabling shortcut keys
If you would like to disable shortcut keys, you must adapt the group policies in the operating system management.
A detailed description of this can be found in the FAQ with entry ID "44027453" in the SIMATIC Customer Online Support:
● Internet: WinCC FAQ 44027453 (http://support.automation.siemens.com/WW/view/en/44027453)
WinCC Installation Notes Installation Manual, 09/2014, Printout of the Online Help 23

Installation Requirements 5.4 Notes on Data and System Security
Shortcut key <Ctrl+Esc>
If you disable the <Ctrl+Esc> shortcut key, the following shortcut keys are also disabled in Runtime: Shortcut key Function <Windows key+U> System utility program manager Press <Shift> five times Locking function Press <Shift right> for eight seconds Impact delay <Alt left+Shift left+Num> Keyboard mouse <Alt left+Shift left+Print> High contrast
Note
The functions can be configured using the Windows Control Panel.
If the functions are activated in the Windows Control Panel before activating WinCC Runtime, they are no longer locked in runtime.
Disabling shortcut keys
If you would like to disable shortcut keys, you must adapt the group policies in the operating system management.
A detailed description of this can be found in the FAQ with entry ID "44027453" in the SIMATIC Customer Online Support:
● Internet: WinCC FAQ 44027453 (http://support.automation.siemens.com/WW/view/en/44027453)
WinCC Installation Notes 24 Installation Manual, 09/2014, Printout of the Online Help

Installation Requirements 5.5 Access rights in the operating system
5.5 Access rights in the operating system
5.5.1 Defining Access Rights in the Operating System
Introduction To support you in protecting your system, WinCC offers a structured user management:
● Protect your system against unauthorized access.
● Assign each user the required rights.
In order to work with WinCC, certain folders can be enabled for access via the network. For security reasons, you should only assign access rights to these folders to authorized users. You manage access rights via the Windows Standard user groups and user groups created by WinCC.
Access rights specified in WinCC Following WinCC installation, WinCC automatically establishes the following local groups in Windows User and Group Administration:
● "SIMATIC HMI"
All users must be members of the "SIMATIC HMI" user group. These members may create local projects, and may process, start, and access these projects remotely. Access to the WinCC database is limited to the minimum rights necessary (read/write). By default, the user who carries out the WinCC installation and the local administrator are members of this group. Additional members must be added manually by an administrator.
● "SIMATIC HMI Viewer"
These members have read access only to configuration and runtime data in the WinCC database. This group is primarily used for accounts for Web publication services, e.g., IIS (Internet Information Services) account for operation of WinCC WebNavigator.
● Access to folder "<Installation Directory>/WinCC/aplib"
Following installation, the directory "Installation Directory/WinCC/aplib" named "SCRIPTFCT" is unlocked for the "SIMATIC HMI" user group. This directory contains central libraries for project script functions.
User Groups and User Rights The following overview contains the tasks of the different user groups with the access rights and instructions required to assign these access rights.
WinCC Installation Notes Installation Manual, 09/2014, Printout of the Online Help 25
Installation Requirements 5.5 Access rights in the operating system
WinCC Installation ● Task: WinCC Installation
● Role: Configuration engineer, Administrator
● Authorization: Windows Administrator rights
● Procedure:
Prior to installation, ensure that you have local administrator rights on the computer.
● Explanation:
You need local administrator rights to install WinCC.
Preparation for operation ● Task: Access to WinCC
● Role: Configuration engineer, Administrator
● Authorization: Power user rights, Administrator rights
● Procedure:
After installation, set up the administrative settings as administrator or power user.
● Explanation:
Power user rights are the minimum requirements for administrative settings, e.g. the authorization of file rights or printer driver settings.
To delete a WinCC project completely, you must have power user rights, at a minimum.
Local user rights when operating WinCC ● Task: Operator input in Runtime, configuration
● Role: WinCC user (operator, configuration engineer)
● Authorization:
- Windows group "User"
- User group "SIMATIC HMI"
● Procedure:
Add the user to the "SIMATIC HMI" user group and, at a minimum, to the Windows "User" user group.
● Explanation:
In order to operate WinCC or for remote access to a WinCC project on the client and server, the user must be a member of the "SIMATIC HMI" user group.
WinCC Installation Notes 26 Installation Manual, 09/2014, Printout of the Online Help

Installation Requirements 5.5 Access rights in the operating system
Access to distributed systems ● Task: Access to distributed systems
● Role: WinCC user (operator, configuration engineer)
● Authorization: Uniform user groups on all computers
● Procedure:
Enter the WinCC users on all computers in the same group.
Assign the same password to all the users.
● Explanation:
For access to distributed systems, the same user groups must be created on clients and servers.
Access rights for local projects ● Task: Access to projects which were created as follows:
- Manual copy
- Duplicate
- Retrieval
- Migration
● Role: WinCC user (operator, configuration engineer)
● Authorization: SIMATIC HMI, SIMATIC HMI Viewer
● Procedure:
Assign full access rights to the project folder for the "SIMATIC HMI" group.
To do so, open the project following its creation once as administrator or power user. Alternatively, you can specify access rights in the Windows Computer Management.
Even if you want to copy projects with the Project Duplicator you will need the appropriate authorizations. You will either have to grant access to the used folders or duplicate them as main user.
● Explanation:
When a local project is newly created, the members of user groups "SIMATIC HMI" and "SIMATIC HMI Viewer" automatically receive the necessary access rights to the project directory.
However, when projects are copied, logged, or migrated, the local authorizations are not transferred but must be reassigned.
WinCC Installation Notes Installation Manual, 09/2014, Printout of the Online Help 27
Installation Requirements 5.5 Access rights in the operating system
Access rights to system information ● Task: Access to system information via the WinCC channel "System Info"
● Role: Operator
● Authorization: System monitor user
● Procedure:
Into the Windows group "System monitor user", accept all users who require the following
system information of the WinCC channel "System Info":
– CPU load
– Status of the export file
● Explanation:
Users with Windows standard user rights do not have access to certain system information.
5.5.2 Including users in the "SIMATIC HMI" user group
Introduction Include those local users in the "SIMATIC HMI" group whose login permits access to WinCC. You must first create local users to do so. Users of a domain may be directly included in the user group "SIMATIC HMI".
Procedure 1. Open the workstation administration under Windows.
2. Select the entry "Local Users and Groups > Users" in the navigation window . All local users are displayed in the data window.
3. Open the "New User" dialog via the shortcut menu. Create a user account with the same login for each user who is to have access to WinCC.
4. Select the entry "Local Users and Groups > Groups" in the navigation window". All groups are displayed in the data window. Select the "SIMATIC HMI" group.
5. Using the pop-up menu, open the "Add Member" dialog and include those users as members of the "SIMATIC HMI" user group.
WinCC Installation Notes 28 Installation Manual, 09/2014, Printout of the Online Help

Installation Requirements 5.5 Access rights in the operating system
5.5.3 Including domain-global user group in the "SIMATIC HMI" user group
Introduction During operation of a domain, an additional domain-global user group may be created and included as a member of the "SIMATIC HMI" user group.
Requirements ● The domain administrator creates a domain-global user group.
● Within the domain, the domain administrator includes those users in the domain whose login permits access to WinCC.
Procedure 1. Open the workstation administration under Windows.
2. In the navigation window, select the "Local Users and Groups > Groups" entry. The data window displays all groups. Select the group "SIMATIC HMI".
3. Using the pop-up menu, open the "Add Member" dialog and include domain-global user group as members of the "SIMATIC HMI" user group.
WinCC Installation Notes Installation Manual, 09/2014, Printout of the Online Help 29
Installation Requirements 5.5 Access rights in the operating system
5.5.4 Release existing project for "SIMATIC HMI" user group
Introduction You must first remove the existing release of the project directory if the user group "SIMATIC HMI" has to access an existing user group. Then the project is released again while opening WinCC Explorer.
Procedure 1. Open the workstation administration under Windows.
2. In the navigation window, select the entry "Shared Folders > Shares". The data window displays all unlocked directories.
3. Select the respective project directory and remove the enable through the "Cancel Share" pop-up menu.
4. If you now open the project in WinCC, the project directory is automatically unlocked for the "SIMATIC HMI" user group, and all members of the user group are granted access to the project directory.
Note
The enable name of the directory unlocked by WinCC must not be modified.
WinCC Installation Notes 30 Installation Manual, 09/2014, Printout of the Online Help
Installation Requirements 5.6 How to Adapt the Windows Security Policies
5.6 How to Adapt the Windows Security Policies
Introduction Before you install WinCC, you must check the operating system settings:
● The system must permit the installation of unsigned drivers and files.
● In the case of Windows 7/Server 2008/Server 2008 R2, the use of the Windows function "Fast User Switching" is not permitted for WinCC.
Procedure for Windows 7 / Windows Server 2008 1. In the Windows Start menu, select "Programs > Accessories > Execute".
2. Enter "gpedit.msc" in the input box.
The "Local Group Policy Editor" dialog box opens.
3. In the left section of the window under "Policy for local computer", select "Computer Configuration > Administrative Templates > System > Device Installation > Device Installation Restrictions".
4. Check the settings of the security policies below:
– "Display a custom message when installation is prevented by policy (balloon text)"
– "Display a custom message when installation is prevented by policy (balloon title)"
"Not configured" must be set for the policy.
5. In the left section of the window under "Policy for local computer", select "Computer Configuration > Administrative Templates > System > Login".
6. Enable the option "Hide entry points for Fast User Switching".
After you have logged off, the "Fast User Switching" function is no longer available in the Windows Start menu.
WinCC Installation Notes Installation Manual, 09/2014, Printout of the Online Help 31

Installation Requirements 5.6 How to Adapt the Windows Security Policies
WinCC Installation Notes 32 Installation Manual, 09/2014, Printout of the Online Help
Installing WinCC 6 6.1 Installing WinCC
Introduction This section describes the installation of WinCC.
Install MS Message Queuing before you install WinCC.
Installation of a WinCC file server If a WinCC server is set up which is to be used for project data archiving only, only the WinCC file server needs to be installed. You can find more information in the WinCC Information System, in the section "Configurations > Fileserver".
Note Usage only with administrator rights
If you want to use the Fileserver, you need administrator rights. Fileserver installation requirements
WinCC V7 and WinCC Fileserver V7 cannot be installed at the same time on one computer.
Installation of WinCC Options The WinCC DVD contains the following options:
● WinCC/Connectivity Pack / Connectivity Station
● WinCC/DataMonitor
● WinCC/WebNavigator
● WinCC/WebUX
● SIMATIC Information Server
These options require their own licenses.
If you purchase a WinCC option at a later date, you will receive the necessary licenses on a license data carrier. An installation DVD is not supplied. Use the WinCC DVD for installation.
The "Process Historian Ready" component is also installed with WinCC. This component is a prerequisite for the use of the "SIMATIC Process Historian" archive system.
WinCC Installation Notes Installation Manual, 09/2014, Printout of the Online Help 33
Installing WinCC 6.2 How to Install MS Message Queuing
6.2 How to Install MS Message Queuing
Introduction WinCC implements the Message Queuing services from Microsoft. It is a component part of the operating system. MS Message Queuing is however not included in the standard Windows installation and must be installed separately if required.
The Windows installation CD is required to complete the installation.
Note
WinCC is enabled for operation within a domain or workgroup.
Note however that domain group policies and restrictions in the domains may prevent installation. In this case, remove the computer from the domain before installing Microsoft Message Queuing, Microsoft SQL Server 2008 and WinCC. Log on to the computer concerned locally with administrator rights. Carry out the installation. Following successful installation, the WinCC computer can be registered in the domain again. If the domain-group policies and domain restrictions do not impair the installation, the computer must not be removed from the domain during installation.
Note however that domain group policies and restrictions in the domain may also hinder operation. If these restrictions cannot be overcome, operate the WinCC computer in a work group.
If necessary, contact the domain administrator.
Procedure for Windows 7 1. In the operating system Start Menu, open "Control Panel > Programs and Functions".
2. Click the "Enable/Disable Functions" button on the left menu bar. The "Windows Function" dialog opens.
3. Select the "Microsoft Message Queue (MSMQ) Server" component.
4. Activate the "Microsoft Message Queue (MSMQ) Server Core" component.
5. Deactivate the subsidiary components.
6. Confirm with "OK".
WinCC Installation Notes 34 Installation Manual, 09/2014, Printout of the Online Help

Installing WinCC 6.2 How to Install MS Message Queuing
Procedure for Windows 8.1 1. Go to "Control Panel > Programs and Features".
2. Click the "Turn Windows features on or off" button on the left menu bar. The "Windows Features" dialog opens.
3. Select the "Microsoft Message Queue" component.
4. Activate the "Microsoft Message Queue Server Core" option.
5. Deactivate the subsidiary components.
6. Confirm with "OK".
Procedure for Windows Server 2008 1. Start the Server Manager.
2. Right-click on "Features" in the navigation area and select "Add features".
3. Activate the "Message Queuing" option, and under it also the "Message Queuing Services" and "Message Queuing Server" options.
4. Click "Install".
Procedure for Windows Server 2012 1. Start the Server Manager.
2. Click on "Add roles and features".
3. Click "Server selection" in the navigation area. Ensure that the current computer is selected.
4. Click "Features" in the navigation area.
5. Activate the "Message Queuing" option, and under it also the "Message Queuing Services" and "Message Queuing Server" options.
6. Click "Install".
WinCC Installation Notes Installation Manual, 09/2014, Printout of the Online Help 35

Installing WinCC 6.3 How to Install WinCC
6.3 How to Install WinCC
Introduction This section describes how to install and run WinCC.
The components already installed are displayed during setup. The following icons are used: Icon Meaning
Current version of program is installed.
Program is being updated.
Program setup conditions are not met. Click the symbol for more detailed information.
Program can be selected.
Program selected for installation.
Program cannot be selected (due to dependence on other programs).
Program selected for installation (cannot be deselected).
Scope of Installation During the installation of WinCC, you can choose between the following variants:
● Minimum (WinCC Runtime, WinCC CS, Basic Process Control, OPC-Server, SQL-Server)
● Typical (including SmartTools)
● Complete
● Expert mode (user-defined setup, i.e. you can enable or disable specific components)
● Client (installation for a client, with SQL-Express)
● Fileserver (WinCC Fileserver and SQL Server)
You can also install or remove components and languages at a later time. Read the sections "How to perform a supplementary installation" and "How to perform a supplementary installation of languages" for more on this.
The required drive space depends upon the installed components. An estimated value is shown in the status bar.
WinCC Installation Notes 36 Installation Manual, 09/2014, Printout of the Online Help

Installing WinCC 6.3 How to Install WinCC
Installation of WinCC Options
You can installed the desired options during the installation of WinCC itself.
The documentation for some of the options will be available only if the concerned option package is installed.
Automatic Migration when a WinCC Project of a Previous Version is Opened
When you open a project that was created with a version older than WinCC V7.3, the configuration data and Runtime data are automatically migrated. Convert the pictures and libraries with the Project Migrator or manually via the Graphics Designer.
You can find detailed information about migration in the WinCC Information System under "First Steps > Migration".
Requirements ● You need local administrator rights to install WinCC.
Information on user rights, which is necessary for the operation of WinCC, is located in section "Instructions for Security of Data and System".
● The Windows component "MS Message Queuing" services must have been installed.
● The security policies must be adapted under Windows.
● No manually created SQL server entity with the name "WinCC" may be installed.
● The storage medium with the licenses is still not to be connected with the installation computer.
● If you want to use the OPC-XML-DA-Server from WinCC, the Microsoft Internet Information Service (IIS) must be installed before installing the OPC-XML-DA-Server.
WinCC is released for the operating languages German, English, French, Italian and Spanish or multilingual operating systems. WinCC is also released for the operating system languages simplified Chinese (PR China), traditional Chinese (Taiwan), Japanese and Korean.
Note
An error message is output if you run WinCC Setup without having the administrator rights, or if other setup conditions are not met. For additional information pertaining to error messages, refer to "Prerequisites for the installation of WinCC".
WinCC Installation Notes Installation Manual, 09/2014, Printout of the Online Help 37

Installing WinCC 6.3 How to Install WinCC
Procedure 1. Start the WinCC product DVD.
The DVD starts automatically if Autorun is enabled in the operating system. If the Autorun function is not activated, start the program Setup.exe on the DVD.
2. Follow the on-screen instructions.
Read the License Agreement and the Open Source License Agreement.
3. Select the languages you want to install.
You may install other languages at a later time.
4. Select "Install" as the setup type. If an older WinCC version is found, you can also activate the "Update" setup type. With this setup type, it is not possible to select additional products to be installed.
5. Select the setup mode.
6. In Package installation , select the Program package "WinCC Installation".
If you also want to install WinCC options, select the corresponding program packages.
Select the scope of your installation in User-defined installation.
The components to be installed are highlighted in Setup.
Click on "Help" for a description of the displayed symbols. Click on "Readme" to open the Information System.
7. Read the license agreement for the Microsoft SQL Server.
8. The security settings that will be adapted for WinCC are displayed in the "System Settings" dialog prior to installation. The firewall is configured automatically. Confirm the changes to the system settings.
9. Start installation.
You can track the status of the installation in the displayed dialog. Select "Cancel" to cancel the installation of the current component.
10.You can transfer the product License Keys after having installed the components. To do so, click on "Transfer License Key". Select "Next" if you have already transferred the license keys or want to install them at a later time.
Note
Transferring the licenses
The license keys will not be transferred automatically. You will have to transfer missing license keys during or after installation with Automation License Manager .
11.Restart the computer to conclude the installation.
WinCC Installation Notes 38 Installation Manual, 09/2014, Printout of the Online Help
Installing WinCC 6.3 How to Install WinCC
New Entries in the Windows Start Menu WinCC setup has installed new folders in the "SIMATIC" program group.
The "SIMATIC" program group can be found in the Start menu of the operating system under "Start > Programs > Siemens Automation > SIMATIC".
In this folder, you can start WinCC Explorer ("SIMATIC > WinCC > WinCC Explorer") and open various tools for working with WinCC ("SIMATIC > WinCC > Tools").
You will find the documentation for WinCC in the WinCC Information System. The documentation for WinCC V7.3 is also valid for WinCC V7.3 SE incl. Update 1. Under "SIMATIC > WinCC > WinCC Information System", open the WinCC Information System in the language in which WinCC was installed. Documentation in all languages can be found under "Siemens Automation > Documentation".
Licenses can be managed using the Automation License Manager ("Programs > Siemens Automation > Automation License Manager").
You can use the Security Controller to view the adapted security settings ("Programs > Siemens Automation > Security Controller").
The dialog provides you with an overview of the SIMATIC software and components installed on your system: ("Programs > Siemens Automation > SIMATIC > Information > Inst. software").
WinCC Installation Notes Installation Manual, 09/2014, Printout of the Online Help 39
Installing WinCC 6.4 How to Install Supplementary Components Later
6.4 How to Install Supplementary Components Later
Introduction Once you have installed WinCC, you can then install further components or options at a later date.
Installation of WinCC Options The WinCC DVD contains the following WinCC Options:
● WinCC/Connectivity Pack / Connectivity Station
● WinCC/DataMonitor
● WinCC/WebNavigator
● WinCC/WebUX
● SIMATIC Information Server
These options require their own licenses.
If you purchase a WinCC option at a later date, you will receive the necessary licenses on a license data carrier. An installation DVD is not supplied.
Use the WinCC DVD for installation.
Procedure 1. Start the WinCC product DVD.
If the Autorun function is not activated, start the program Setup.exe on the DVD.
2. Specify whether you wish to install individual components or options. The already installed components will be displayed.
3. Follow the on-screen instructions.
Installation path of SmartTools Run the SmartTools setup from the following path on your WinCC DVD:
● "Instdata\Smarttools\Setup\Setup.exe"
WinCC Installation Notes 40 Installation Manual, 09/2014, Printout of the Online Help

Installing WinCC 6.5 How to Install Supplementary Languages
6.5 How to Install Supplementary Languages
Introduction Once you have installed WinCC, you can later install additional languages.
Procedure 1. Open the "Programs and Features" entry in the Control Panel.
2. Select "SIMATIC WinCC Runtime V7.3 SE incl. Update 1" and click the "Change" button.
The WinCC Setup program opens.
3. Select the desired languages.
4. When prompted, insert the WinCC product DVD in the DVD drive.
Once the start page of the DVD is opened via Autorun function, close the window with "Exit".
5. Follow the instructions on the screen.
6. If you have installed WinCC CS, select "SIMATIC WinCC Configuration V7.3 SE incl. Update 1" and click the "Change" button.
Repeat steps 3 to 5 for WinCC CS.
Repeat this procedure for any additionally installed components and options.
WinCC Installation Notes Installation Manual, 09/2014, Printout of the Online Help 41
Installing WinCC 6.6 How to upgrade a standard client
6.6 How to upgrade a standard client
Introduction A WinCC standard client only contains those WinCC components that are required for a client without a project of its own. This is why a WinCC standard client cannot be upgraded directly to a WinCC single-user system or WinCC client.
To upgrade, you first have to remove a WinCC standard client and install WinCC again.
Procedure 1. Remove WinCC:
Go to "Control Panel" in the operating system and then to "Programs and Functions" or "Programs and Features".
Select the entries beginning with "SIMATIC WinCC" and click the "Remove" button for each one.
Follow the on-screen instructions.
2. Start the WinCC DVD.
3. Select a desired program package and components.
Follow the on-screen instructions. You can find additional information under "How to install WinCC".
WinCC Installation Notes 42 Installation Manual, 09/2014, Printout of the Online Help
How to Perform an Uninstall 7
Introduction On your computer, you can remove WinCC completely or simply remove individual components. You cannot remove individual languages.
You can execute the removal via the WinCC product DVD or vial the control panel of the operating system.
How to remove via the WinCC product DVD 1. Start the WinCC product DVD.
The DVD starts automatically if Autorun is enabled in the operating system. If the Autorun function is not activated, start the program Setup.exe on the DVD.
2. Follow the on-screen instructions.
3. Select "Remove" as the setup type.
4. Select the components that you want to remove.
Use the Control Panel to uninstall ProAgent 1. Go to "Control Panel" in the operating system and then to "Programs and Functions" or
"Programs and Features".
All entries of the installed WinCC components start with the prefix "SIMATIC WinCC".
2. Select the desired entry and click "Remove".
This starts WinCC Setup.
3. Select the components that you want to remove.
Remove any WinCC options that may have been installed before you remove the WinCC version.
4. Follow the on-screen instructions.
Microsoft SQL Server 2008 Following the removal of WinCC, the "WinCC" SQL server entity must also be removed. Select "Control Panel" > "Software" and then select the "Microsoft SQL Server 2008" item for removal.
The use of the Microsoft SQL Server 2008 is only permitted when you have a valid license.
WinCC Installation Notes Installation Manual, 09/2014, Printout of the Online Help 43

How to Perform an Uninstall
Automation License Manager / MS Update When WinCC is removed, the following programs remain installed, as they may be needed by other SIMATIC products:
● Automation License Manager
● MS Update V1.0 SP1
If, after removing WinCC, you want to install an earlier version of WinCC, you will need to remove both of these programs. Open "Control Panel" > "Add/Remove Programs" and then select the corresponding item for removal.
Removal when the WebNavigator client is installed If you remove WinCC from a computer on which the WebNavigator client is installed, you must then reinstall the WebNavigator client.
Changing the settings in the Windows Event Viewer When WinCC is installed, the WinCC Setup program changes the settings of the Event Viewer.
● Maximum Log Size (System Log/User Log): 1024 KB (default setting: 512 KB)
● Log Continuation (System Log/User Log): "Overwrite events" (default setting: Overwrite events that are older than 7 days)
After removing WinCC, these settings are not reset. You can adapt these settings in the Windows Event Viewer yourself.
WinCC Installation Notes 44 Installation Manual, 09/2014, Printout of the Online Help

Upgrading WinCC 8
Introduction As of version WinCC V6.2 SP3, you can upgrade to WinCC V7.3 SE including Update 1 via an upgrade installation.
Proceed as described in "Upgrading an installation" section.
The procedure described also applies if you are upgrading from WinCC V7.3 to WinCC V7.3 SE including Update 1.
Note
Reboot the PC before beginning the update installation to WinCC V7.3 SE including Update 1.
Information on migrating projects When you open a project of a previous version in WinCC V7.3, you are prompted to migrate it. However, you may also use WinCC Project Migrator to migrate several WinCC projects in a single step.
You still have to make some project settings after migration.
For more information about the migration of projects see section "Migration".
Note WinCC user no longer needs to be a member of the "SQLServerMSSQLUser$<COMPUTER NAME>$WINCC" user group
When you migrate projects created prior to WinCC V7.2, you remove the WinCC users from this group.
In WinCC projects prior to V7.2, you will find the user group under the name "SQLServer2005MSSQLUser$<COMPUTER NAME>$WINCC".
Notes on licensing You need to upgrade licenses of WinCC prior to V7.3 to the current version.
You can update the licensing retroactively. Detailed information is available in the WinCC Information System under the topic "Licensing".
WinCC Installation Notes Installation Manual, 09/2014, Printout of the Online Help 45

Upgrading WinCC
Introduction If you currently have WinCC V6.2 SP3 installed on your system, you can perform an upgrade installation.
Before beginning an upgrade installation, the transfer of existing projects must be prepared.
The procedure described also applies if you are upgrading from WinCC V7.3 to WinCC V7.3 SE including Update 1.
Note
If modified standard functions (ANSI-C) are used, make backup copies of the functions prior to the upgrade installation. During the WinCC installation process, these functions are overwritten by the standard functions supplied.
Also pay attention to the notes in the WinCC Information System under "Migration".
Make a backup copy of your project before upgrading WinCC.
Requirement The hardware configuration on which WinCC V6.2 SP3 or higher has been installed is also sufficient for installing an upgrade to WinCC V7.3 SE including Update 1. However, there should be no significant increase in data volume because otherwise the performance will be affected. If it is expected that the data volume will increase, upgrade the hardware in good time.
Upgrade preparation Before performing an upgrade installation of WinCC, check the existing projects with regard to special characters used in the archive names, archive tag names, trend names, trend window names, column names and table window names. You will find a table with the permitted special characters in the section "Working with WinCC > Working with Projects > References".
It is possible that you must use Tag Logging in WinCC V6.2 SP3. or V7.0 to remove certain special characters from the names.
NOTICE
Transferring archives with impermissible special characters
When transferring archives, if they contain impermissible special characters, the Runtime archive may be lost.
WinCC Installation Notes 46 Installation Manual, 09/2014, Printout of the Online Help

Upgrading WinCC
Procedure 1. Prepare existing WinCC projects for migration.
Check the used names for impermissible special characters.
2. Install WinCC V7.3 SE including Update 1. Proceed as described in the section "How to install WinCC".
You need the storage medium that contains the licenses for WinCC V7.3. Upgraded licenses of previous WinCC versions will be lost.
3. Migrate your existing WinCC projects.
Note the corresponding "First Information > Migration" section in the WinCC Information System.
WinCC Installation Notes Installation Manual, 09/2014, Printout of the Online Help 47

Upgrading WinCC
WinCC Installation Notes 48 Installation Manual, 09/2014, Printout of the Online Help

Notes about Running the Software 9
Introduction In order to operate WinCC without problems at optimum performance, please follow the Notes on Operation under Windows.
More information is available in the following sections of the WinCC Information System:
● "Release Notes > Notes on operation"
● "Working with WinCC > Working with Projects > Making Settings for Runtime > Effect of External Applications at Runtime"
WinCC Installation Notes Installation Manual, 09/2014, Printout of the Online Help 49

Notes about Running the Software
WinCC Installation Notes 50 Installation Manual, 09/2014, Printout of the Online Help

Index
A Access right, 25, 28, 29, 30
C Client
Operating system, 18 Communication drivers, 7, 18 Component, 7, 36, 40, 40
Communication drivers, 7 Components supplied, 7
D Demo Mode, 9, 11 Domain, 18 Domain-global user group, 29 Domains, 18 Dongle, 11 Driver
Unsigned, 31
E Event display, 43 External Applications, 49
F File
Unsigned, 31 File sharing, 25 Folder, 25
Released folders, 25
H Hardware Requirement, 15
I Installation, 5, 33, 36
Adapting Security Policy, 31
Component, 36, 40, 40 Domain, 18 Notes on installed software, 36 PDF files, 7 Performing, 36, 46 Performing supplementary installation, 40, 40, 41, 42 Preparing the installation, 31 Removing, 43 Requirements, 13, 15, 18 Supplementary installation of a language, 41 Upgrading an installation, 46
Installation Guide, 5 Installation Notes, 5 Installed software, 36 Internet Explorer, 18
L Language
Performing supplementary installation, 41 License, 9, 11
Installation, 9, 11 Test, 11
License Agreement, 9 License check, 11 License data carrier, 11 License type, 9
M Microsoft Message Queuing, 34, 34
MSMQ Server, 34 Microsoft SQL Server 2008, 9, 43 MS Message Queuing, 34 MSMQ Server, 34
O Operating system, 18
Access rights, 25 Prevent access, 23
Operation, 49 Domain, 18
WinCC Installation Notes Installation Manual, 09/2014, Printout of the Online Help 51
Index
P PDF files, 7 Project
Include in user group, 30
R Removal, 43
Performing, 43 Requirement, 13
Hardware, 15 Operating system, 18 Software, 18
S Safety, 23, 25 Scope of delivery, 7 Security Controller, 36 Security policy, 31 Server
Operating system, 18 Share, 25 SIMATIC HMI, 25, 28, 29, 30
User group, 25 SIMATIC Manager
User Rights, 25 SIMATIC Security Controller, 36 Software, 18
Requirement, 18 Standard client, 42
Supplementary installation, 42 Start menu, 36 Storage device, 11 Supplementary installation, 40, 40, 41, 42
Languages, 41 Performing, 40, 40, 41, 42 Standard client, 42
T Toolbar, 23
U Unsigned driver, 31 Unsigned file, 31 Upgrade installation, 9, 11, 46
Performing, 46
User group, 25 Domain-global user group, 29 Include project, 30 SIMATIC HMI, 25, 28, 29, 30
User group SIMATIC HMI, 25, 28, 29, 30
V Virtualization, 17
W WinCC
Installation, 5, 13, 33 Installation requirements, 15, 18 Limit access, 25 Performing installation, 36 Performing supplementary installation, 40, 40, 41, 42 Preparing the installation, 31 Removing, 43 upgrade, 45 Upgrading an installation, 46 WinCC DVD, 7
WinCC DVD, 7 WinCC project
Include in user group, 30 WinCC V6.x, 45 Windows, 18, 25
Access rights, 25 Microsoft Message Queuing, 34 Operation under Windows, 49 Preparation the installation of WinCC, 31 Security policy, 31 Toolbar, 23 User Rights, 25
Windows 7, 18 Windows 8.1, 18 Windows event display, 43 Windows Server 2008, 18 Windows Server 2012, 18 Windows Start menu, 36
WinCC Installation Notes 52 Installation Manual, 09/2014, Printout of the Online Help