Silent Night Wall Hanging - Embroidery Library · Silent Night Wall Hanging To make chain loops to...
15
Silent Night Wall Hanging Silent Night Wall Hanging Celebrate the spirit of the Christmas season with a beautiful wall hanging. The elegant Silent Night designs portray the scenes of the holy family, three wise men, and shepherds, along with trumpeting angels watching from above. Make this glorious wall hanging at Christmastime for your home or church. Add chains, decorative trim and sparkling stars for a multi- dimensional effect. Read below for these free project instructions! Supplies Needed: **28 inch (expandable to 48 inches) curtain rod **1 1/2 yards print fabric (for front border pieces and back - we used lightweight canvas) **1/2 yard linen fabric (for embroidered panels) **1/4 yard cotton fabric (for dividing fabric pieces) file:///F|/Source/ELProjects/html/PR1638.html (1 of 15) [11/23/2010 2:51:12 PM] 1
Transcript of Silent Night Wall Hanging - Embroidery Library · Silent Night Wall Hanging To make chain loops to...

Silent Night Wall Hanging
Silent Night Wall Hanging
Celebrate the spirit of the Christmas season with a beautiful wall hanging. The elegant Silent Night designs portray the scenes of the holy family, three wise men, and shepherds, along with trumpeting angels watching from above. Make this glorious wall hanging at Christmastime for your home or church. Add chains, decorative trim and sparkling stars for a multi-dimensional effect. Read below for these free project instructions!
Supplies Needed:
**28 inch (expandable to 48 inches) curtain rod
**1 1/2 yards print fabric (for front border pieces and back - we used lightweight canvas)
**1/2 yard linen fabric (for embroidered panels)
**1/4 yard cotton fabric (for dividing fabric pieces)
file:///F|/Source/ELProjects/html/PR1638.html (1 of 15) [11/23/2010 2:51:12 PM]
1

Silent Night Wall Hanging
Supplies Continued: **Medium-weight cutaway stabilizer
**Temporary spray adhesive
**Air-erase pen (or other marking tool)
**Fabric glue
**1/2 inch wide ribbon
**32 inch length of medium sized chain (for chain loops)
**1 1/2 yards - 1/2 inch wide decorative trim
**1 yard decorative trim
**Nylon monofilament thread
**Masking tape
**Jewelry pliers or needle-nose pliers
**Jewelry charms (optional) Designs used: A Silent Night Design Pack - Large (5" x 7") These designs are also available in a smaller design pack: A Silent Night Design Pack - Small (4" x 4") Finished Size: 34 inches wide by 24 1/2 inches high
file:///F|/Source/ELProjects/html/PR1638.html (2 of 15) [11/23/2010 2:51:12 PM]
2

Silent Night Wall Hanging
To begin, we will prepare the fabric for the bottom row of embroidered center panels. Using an air-erase pen (or other marking tool), draw an 8 inch by 8 inch square on the linen fabric. Leave a few inches of excess fabric around the shape.
Mark the center of each side of the square by measuring and dividing by two. Then, draw lines to connect the marks. Where the lines meet is the exact center of the shape.
file:///F|/Source/ELProjects/html/PR1638.html (3 of 15) [11/23/2010 2:51:12 PM]
3
Silent Night Wall Hanging
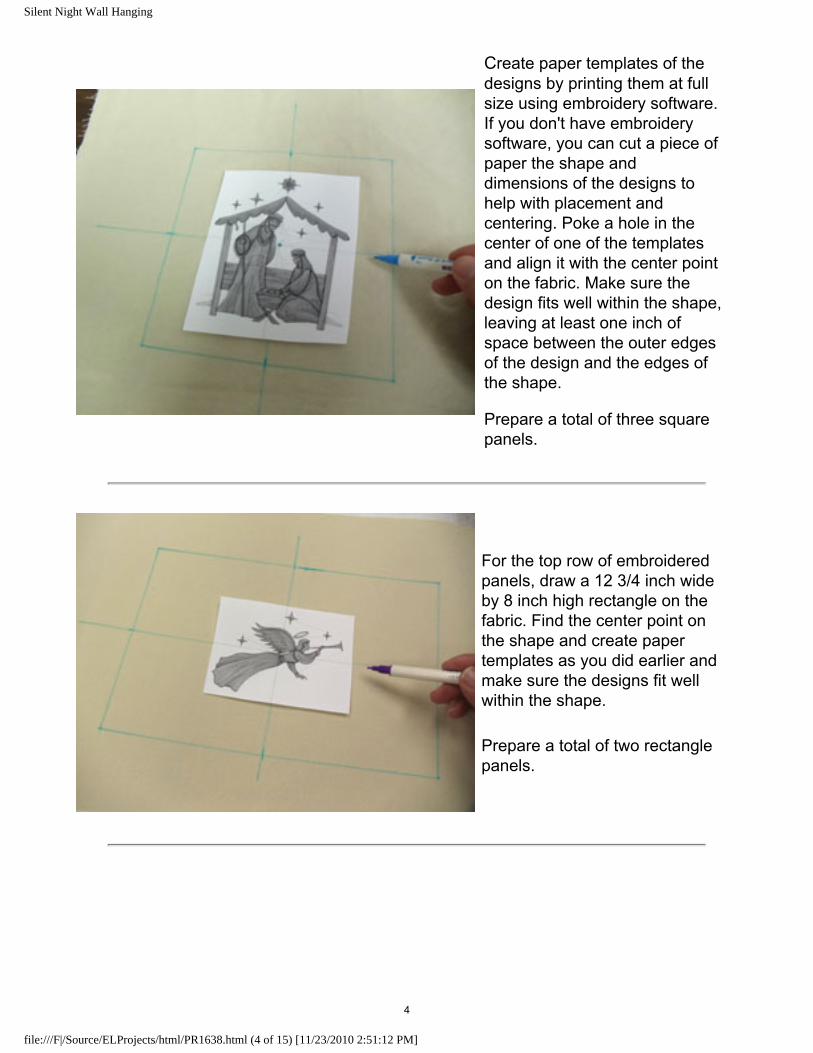
Create paper templates of the designs by printing them at full size using embroidery software. If you don't have embroidery software, you can cut a piece of paper the shape and dimensions of the designs to help with placement and centering. Poke a hole in the center of one of the templates and align it with the center point on the fabric. Make sure the design fits well within the shape, leaving at least one inch of space between the outer edges of the design and the edges of the shape. Prepare a total of three square panels.
For the top row of embroidered panels, draw a 12 3/4 inch wide by 8 inch high rectangle on the fabric. Find the center point on the shape and create paper templates as you did earlier and make sure the designs fit well within the shape.
Prepare a total of two rectangle panels.
file:///F|/Source/ELProjects/html/PR1638.html (4 of 15) [11/23/2010 2:51:12 PM]
4

Silent Night Wall Hanging
Remove the templates and spray a piece of medium-weight cutaway stabilizer with temporary adhesive and smooth the fabric on top. Hoop the fabric and stabilizer by aligning the marks on the hoop with the lines on the fabric. Attach the hoop to the machine and load the design. Move the hoop so that the needle is directly over the center point on the fabric. Embroider the design.
Repeat this process for all five panels.
When the design has finished, trim away the excess stabilizer on the back of the embroidery.
file:///F|/Source/ELProjects/html/PR1638.html (5 of 15) [11/23/2010 2:51:12 PM]
5

Silent Night Wall Hanging
Cut out each shape.
To prepare the dividing fabric pieces (the pieces in between the embroidered panels), cut three pieces of cotton fabric 2 1/2 inches wide by 8 inches high.
file:///F|/Source/ELProjects/html/PR1638.html (6 of 15) [11/23/2010 2:51:12 PM]
6

Silent Night Wall Hanging
Align two of the dividing fabric pieces on top of the embroidered left and center square panels (right sides together) along the right edge. Pin in place and sew a 1/4 inch seam along the pinned edges only.
Press the back seams open with an iron.
file:///F|/Source/ELProjects/html/PR1638.html (7 of 15) [11/23/2010 2:51:12 PM]
7
Silent Night Wall Hanging
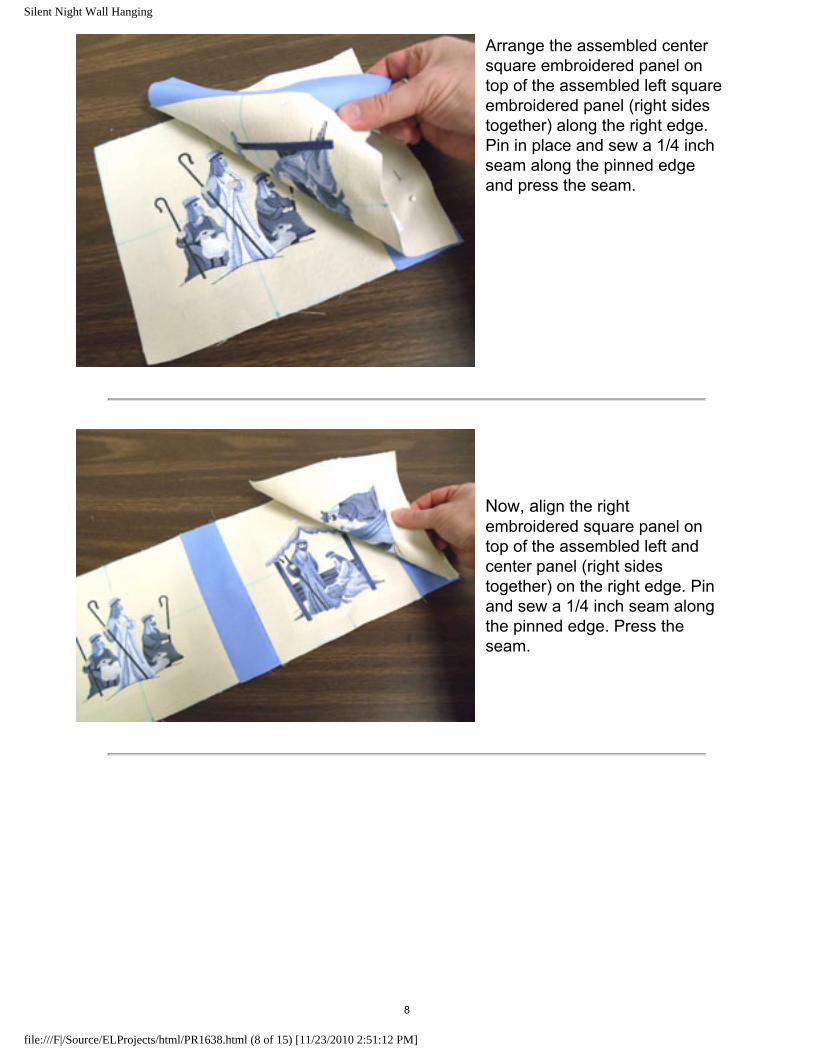
Arrange the assembled center square embroidered panel on top of the assembled left square embroidered panel (right sides together) along the right edge. Pin in place and sew a 1/4 inch seam along the pinned edge and press the seam.
Now, align the right embroidered square panel on top of the assembled left and center panel (right sides together) on the right edge. Pin and sew a 1/4 inch seam along the pinned edge. Press the seam.
file:///F|/Source/ELProjects/html/PR1638.html (8 of 15) [11/23/2010 2:51:12 PM]
8

Silent Night Wall Hanging
Line up the remaining dividing fabric piece on top of the left rectangle embroidered panel (right sides together) along the right side. Pin in place, sew a 1/4 inch seam along the pinned edge, and press.
Now, place the right rectangle embroidered panel on top of the assembled left rectangle embroidered panel (right sides together) along the right side. Pin and sew a 1/4 inch seam along the pinned edge, and press.
file:///F|/Source/ELProjects/html/PR1638.html (9 of 15) [11/23/2010 2:51:12 PM]
9

Silent Night Wall Hanging
Cut a piece of dividing fabric 27 inches wide by 2 1/2 inches high. Arrange the fabric along the top edge of the assembled square panels, right sides together. Pin and sew a 1/4 inch seam, and press.
Align the assembled rectangle panels on top of the assembled square panels (right sides together) along the top edge. Pin and sew a 1/4 inch seam, and press.
To add the decorative trim, using an air-erase pen (or other marking tool), draw lines along the center of each of the dividing fabric pieces by measuring the width of each piece and dividing by two. Then, cut a length of trim to cover each line. Spray the back of each piece of trim with adhesive and press it in place on the fabric. Using nylon monofilament thread, sew the trim in place by stitching along the center of the trim.
file:///F|/Source/ELProjects/html/PR1638.html (10 of 15) [11/23/2010 2:51:12 PM]
10

Silent Night Wall Hanging
For an extra festive touch, we added decorative cord to the rectangle panels. Use fabric glue to glue the cord in place.
To prepare the fabric for the front side borders, cut two pieces of the print fabric (we used lightweight canvas) 17 1/2 inches high by 4 1/2 inches wide. Align the side border fabric pieces along each side of the assembled center panel piece (right sides together). Pin and sew a 1/4 inch seam along the pinned edges, and press.
file:///F|/Source/ELProjects/html/PR1638.html (11 of 15) [11/23/2010 2:51:12 PM]
11

Silent Night Wall Hanging
To assemble the fabric for the front top and bottom border, cut two pieces of print fabric 35 inches wide by 4 1/2 inches high. Arrange the fabric pieces along the top and bottom edges of the center panel piece (right sides together). Pin and sew a 1/4 inch seam along the pinned edges, and press.
For the back fabric, lay the assembled front piece on top of the fabric, right sides together, pin, and cut out the shape so the back piece is the same size as the front piece.
file:///F|/Source/ELProjects/html/PR1638.html (12 of 15) [11/23/2010 2:51:12 PM]
12

Silent Night Wall Hanging
To make chain loops to hold the curtain rod, cut four - 3 1/2 inch strips of 1/2 inch wide ribbon. Then, using a pliers, separate out four - 8 inch lengths of chain. Create rings with the chains by linking the ends together. Thread a strip of ribbon through a link in the chain, spray one end of the ribbon with adhesive and bring the raw ends of the ribbon together. Repeat this process to create four chain loops.
To add the loops, measure and mark the center of the top edge of the back fabric. Then, divide that measurement in two and make a mark on each half of the fabric at the center point. Lay a chain loop at each mark and at each end of the fabric about one inch in from the corner. Extend the ribbon out past the top edge of the fabric about 1/4 inch and pin in place. Also, tape the chains in place so they will not be sewn over. Align the back fabric and assembled front fabric piece together, pin in place, and sew a 1/2 inch seam along edges of the fabric leaving about 10 inches open along the bottom edge.
file:///F|/Source/ELProjects/html/PR1638.html (13 of 15) [11/23/2010 2:51:12 PM]
13

Silent Night Wall Hanging
Turn the fabric right side out. Remove the pins and tape, and press the seams. Also, turn the fabric of the opening in 1/2 inch and top stitch a 1/4 inch seam around the entire outer edge of the fabric.
We added charms for a little extra sparkle. Glue them in place on the fabric where you would like them. Insert the curtain rod through the chain loops, and your wall hanging is complete!
file:///F|/Source/ELProjects/html/PR1638.html (14 of 15) [11/23/2010 2:51:12 PM]
14

Silent Night Wall Hanging
Click here for a printable version of these project instructions.
The collection of free project instructions featuring Nativity designs is growing and growing! Here are other projects that we've presented in the past, each with a different style and technique. Click on the images below to view the project instructions. Enjoy!
Peace on Earth Wall Hanging Nativity Wall Hanging
file:///F|/Source/ELProjects/html/PR1638.html (15 of 15) [11/23/2010 2:51:12 PM]
15