Sikaflex® Marine Handbook
32
C AULKING L EVELLING B EDDING P ROTECTING S EALING B ONDING G LAZING Sikaflex ® Marine Handbook Bonding and Sealing Systems
Transcript of Sikaflex® Marine Handbook

CA U L K I N G
LE V E L L I N G
BE D D I N G
PR O T E C T I N G
SE A L I N G
BO N D I N G
GL A Z I N GSikaflex® Marine Handbook
Bonding and Sealing Systems
Application Guide 19/1/05 2:37 PM Page 2
High-tech, High bond.
When the marine industry specifies a product, durability is highon its list of requirements. And for the boat owner, durability isan essential prerequisite for the smooth running of the vessel,the untroubled enjoyment of passengers and the sheer joy ofsailing. Whether at the wheel of a power boat or at the tiller of a sailing yacht: there’s nothing quite like that feeling of freedomwhen you’re out there on your own, facing the elements ... orthat feeling of total tranquillity with only the horizon ahead andblue skies above. Times like this make your boat a possessionto cherish, and a valuable asset that you’ll want to protectagainst the elements for many years to come.
Water leaks, in particular, can damage your prized possession,leaving unsightly marks along the hull and causing woodworkto rot and metal components to corrode. To avoid expensiverepair bills, watertight seals are absolutely essential.
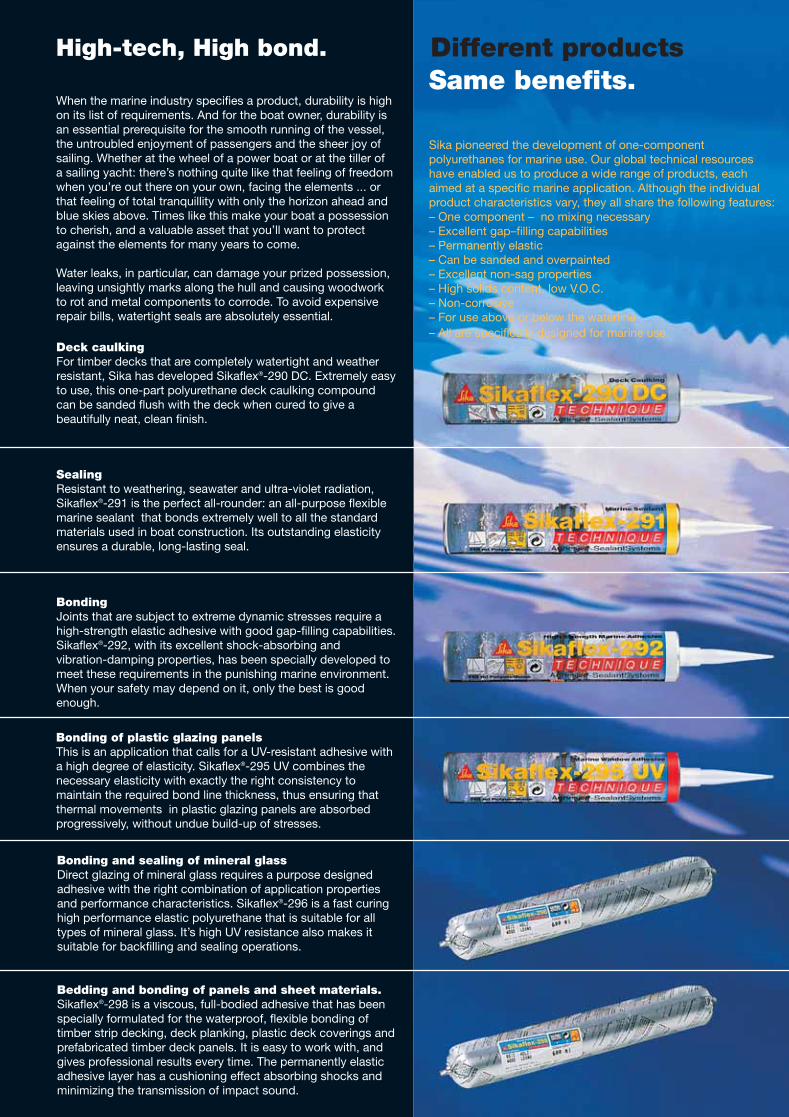
Deck caulkingFor timber decks that are completely watertight and weatherresistant, Sika has developed Sikaflex®-290 DC. Extremely easyto use, this one-part polyurethane deck caulking compound can be sanded flush with the deck when cured to give a beautifully neat, clean finish.
SealingResistant to weathering, seawater and ultra-violet radiation,Sikaflex®-291 is the perfect all-rounder: an all-purpose flexiblemarine sealant that bonds extremely well to all the standardmaterials used in boat construction. Its outstanding elasticityensures a durable, long-lasting seal.
BondingJoints that are subject to extreme dynamic stresses require ahigh-strength elastic adhesive with good gap-filling capabilities.Sikaflex®-292, with its excellent shock-absorbing and vibration-damping properties, has been specially developed tomeet these requirements in the punishing marine environment.When your safety may depend on it, only the best is goodenough.
Bonding of plastic glazing panelsThis is an application that calls for a UV-resistant adhesive witha high degree of elasticity. Sikaflex®-295 UV combines thenecessary elasticity with exactly the right consistency to maintain the required bond line thickness, thus ensuring that thermal movements in plastic glazing panels are absorbedprogressively, without undue build-up of stresses.
Bonding and sealing of mineral glassDirect glazing of mineral glass requires a purpose designedadhesive with the right combination of application propertiesand performance characteristics. Sikaflex®-296 is a fast curinghigh performance elastic polyurethane that is suitable for alltypes of mineral glass. It’s high UV resistance also makes itsuitable for backfilling and sealing operations.
Bedding and bonding of panels and sheet materials.Sikaflex®-298 is a viscous, full-bodied adhesive that has beenspecially formulated for the waterproof, flexible bonding of timber strip decking, deck planking, plastic deck coverings andprefabricated timber deck panels. It is easy to work with, andgives professional results every time. The permanently elasticadhesive layer has a cushioning effect absorbing shocks andminimizing the transmission of impact sound.
Same benefits.
Sika pioneered the development of one-componentpolyurethanes for marine use. Our global technical resourceshave enabled us to produce a wide range of products, each aimed at a specific marine application. Although the individualproduct characteristics vary, they all share the following features:– One component – no mixing necessary– Excellent gap–filling capabilities– Permanently elastic– Can be sanded and overpainted – Excellent non-sag properties– High solids content, low V.O.C.– Non-corrosive– For use above or below the waterline – All are specifically designed for marine use.
Different products
Application Guide 19/1/05 2:38 PM Page 28
I n t r o d u c t i o n
B o n d i n g a n d S e a l i n g b a s i c s
Wo r k i n g w i t h t e a k
I n s t r u c t i o n s f o r
B o n d i n g a n d C a u l k i n g Te a k D e c k s
B o n d i n g o f D e c k P a n e l s a n d F e a t u r e D e c k s
B o n d i n g A n t i - S l i p D e c k C o v e r i n g s
B o n d i n g o f A n t i - S l i p P l a t e s f o r E n g i n e R o o m s
B o n d i n g T i m b e r C o m p o n e n t s
B e d d i n g a n d S e a l i n g o f F i t t i n g s a n d H a r d w a r e
S e a l i n g o f H i g h - U V- R i s k A r e a s
B o n d i n g o f R u b R a i l s a n d F e n d e r s
K e e l - t o - H u l l J o i n t s a n d S e a l i n g
B o n d i n g a n d S e a l i n g O r g a n i c “ G l a s s ” ( P l a s t i c ) W i n d o w s
B o n d i n g a n d S e a l i n g M i n e r a l G l a s s W i n d o w s
B o n d i n g o f D e c o r a t i v e P a n e l s a n d Wo r k S u r f a c e s
N o t e s o n S u b s t r a t e s
S i k a M a r i n e P r o d u c t s Te c h n i c a l D a t a
C l e a n e r, P r i m e r a n d A d h e s i v e C o n s u m p t i o n Ta b l e
P r i m e r C h a r t f o r S i k a M a r i n e A p p l i c a t i o n
2
Contents
3
4
5-7
8
9
10
11
12
13
14
15
16/17
18/19
20
21/22
23
24
25/26
Application Guide 19/1/05 2:37 PM Page 1
Since the middle of the 17th
century, when the industrial
revolution started, to the present
day, the process of joining has
changed dramatically.
Nowadays the most advanced
technology in marine is based on
elastic adhesives.
Historically no technique in ship
building has evolved as strongly
over the centuries as the
technology of deck caulking.
In the early days, woollen or
cotton caulking yarn, in
combination with bituminous
materials, were employed.
Nowadays the use of elastomeric
materials are common worldwide,
especially as these elastic sealants
not only fill the joint but
additionally seal and bond similar
and dissimilar substrates
simultaneously.
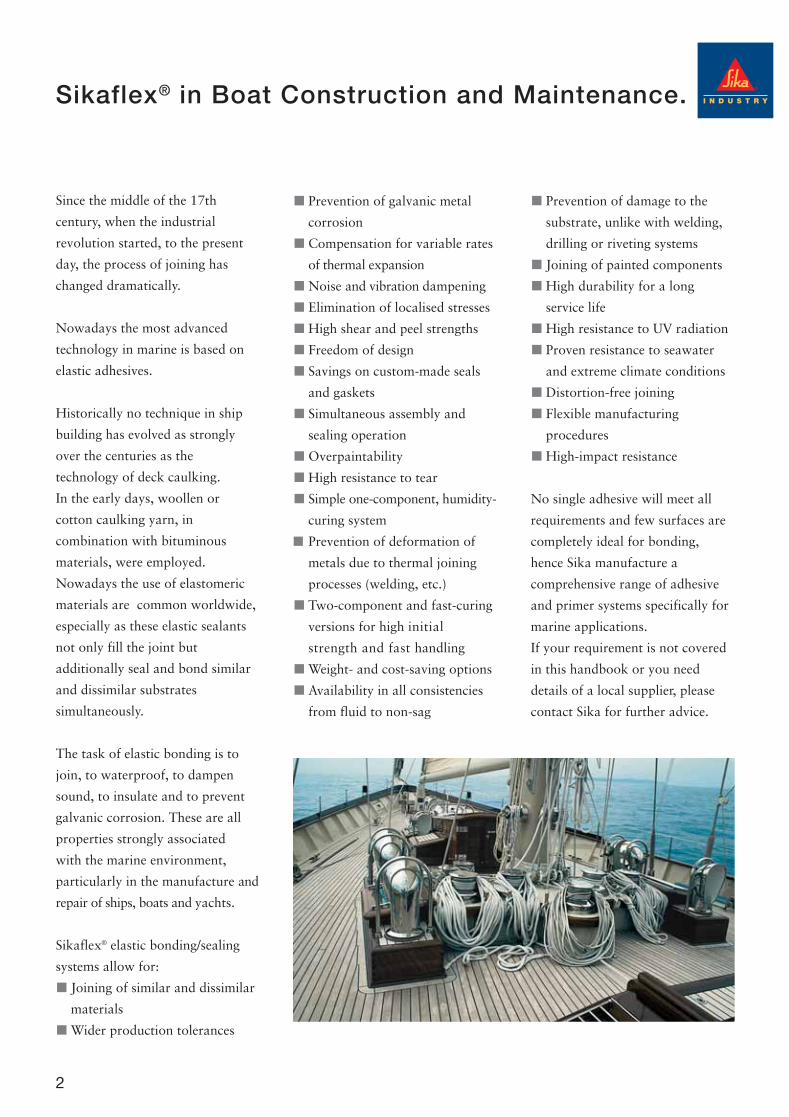
The task of elastic bonding is to
join, to waterproof, to dampen
sound, to insulate and to prevent
galvanic corrosion. These are all
properties strongly associated
with the marine environment,
particularly in the manufacture and
repair of ships, boats and yachts.
Sikaflex® elastic bonding/sealing
systems allow for:
Joining of similar and dissimilar
materials
Wider production tolerances
Prevention of galvanic metal
corrosion
Compensation for variable rates
of thermal expansion
Noise and vibration dampening
Elimination of localised stresses
High shear and peel strengths
Freedom of design
Savings on custom-made seals
and gaskets
Simultaneous assembly and
sealing operation
Overpaintability
High resistance to tear
Simple one-component, humidity-
curing system
■ Prevention of deformation of
metals due to thermal joining
processes (welding, etc.)
Two-component and fast-curing
versions for high initial
strength and fast handling
Weight- and cost-saving options
Availability in all consistencies
from fluid to non-sag
Prevention of damage to the
substrate, unlike with welding,
drilling or riveting systems
Joining of painted components
High durability for a long
service life
High resistance to UV radiation
Proven resistance to seawater
and extreme climate conditions
Distortion-free joining
Flexible manufacturing
procedures
High-impact resistance
No single adhesive will meet all
requirements and few surfaces are
completely ideal for bonding,
hence Sika manufacture a
comprehensive range of adhesive
and primer systems specifically for
marine applications.
If your requirement is not covered
in this handbook or you need
details of a local supplier, please
contact Sika for further advice.
Sikaflex® in Boat Construction and Maintenance.
2
Application Guide 19/1/05 2:37 PM Page 2
3
Sika’s adhesives and sealants are
working materials which show good
affinity for other surfaces. Their task
is to flow as a liquid onto and into
the contours of a surface and then
transform themselves into a solid,
by developing both a physical and a
chemical bond with the substrate.
Sika Marine Adhesive and Sealant
Systems can range from fluid liquids
to heavy thixotropic paste-like
systems, able to supply low-to-high-
strength values and cure to a highly
elastic or rigid bond. The ability of
the adhesive or sealant to “wet” a
surface is very critical in the
development of a proper bond;
solidification (curing) can take place
through a physical or a chemical
reaction or through both at the
same time. Experience has shown
that chemically reactive adhesives
like Sikaflex® have the highest
strength, durability and resistance
to water.
Preparation
Correct surface preparation is key to
successful bonding.
Where there are weak or
contaminated surfaces, extensive
preparation maybe needed to ensure
a perfect bond. Typical problems are
dust, dirt, grease, oil, rust, flaking
paint, etc.
The preparation selected will depend
on the type of substrate (metal,
plastic, paint, wood, etc.), the
operating conditions in service, the
degree of surface deterioration and
the practicalities of any particular
installation. See the ‘notes on
substrates’ in this manual or contact
Sika for details.
Mechanical Cleaning
Mechanical preparation, will be
required if, for example, corrosion is
apparent, weak surface layers
prevail, or surface degradation is
showing. The level of cleaning will
be determined by the type of surface
and the degree of deterioration.
Preparation techniques include the
use of abrasive nylon pads, abrasive
paper/fabric, wire brushing, abrasive
wheels, and wet or dry grit blasting.
Following mechanical treatment,
additional cleaning with solvents
may also be required.
Dedusting, Degreasing
If compressed air is used to remove
dust from surfaces, the air should be
filtered to remove traces of oil.
The use of vacuum cleaners is even
better for dust removal. All
nonporous surfaces must be cleaned
prior to Sikaflex® application.
Only Sika-recommended cleaning
materials should be used. Solvents,
such as White Spirits and alcohol
based, are not recommended as they
can hinder cure or subsequent
adhesion. Always use clean, lintfree
wipes, and change them frequently
to ensure that the contamination is
removed from and not redistributed
onto the surface.
Once clean, the substrates should
be left to completely dry before
proceeding to the next operation.
Note: Certain solvents, including
Sika Cleaner®-205, are not
recommended for use on absorbent
substrates as unevaporated solvents
can affect the curing mechanism of
Sikaflex®.
Priming
Priming is a means of transforming a
surface, either chemically, physically
or both, into an ideal condition for
successful bonding, thus ensuring
long-term performance. The simplest
form of priming is wiping the
prepared surface with a conditioner
(such as Sika Activator®) which
reacts with the surface providing
improved “wetting” characteristics
and more reactive sites.
Porous and rough surfaces require
a primer with “film-forming”
properties to re-profile the surface,
producing a denser, more even bond
line.
Primers must always be allowed to
dry thoroughly before application of
the Sikaflex® adhesive. If left too
long, primed areas must be reapplied
or reactivated. Minimum and
maximum drying times are given in
the primer chart in this guide.
Primed surfaces should be protected
from contamination by dust, dirt,
grease, vapours, moisture, etc., until
the bond is formed.
Bonding and Sealing Basics
Application Guide 19/1/05 2:37 PM Page 3

4
Working with Teak
Teak has been used for hundreds of
years as a decking material for
ships and boats because of its
anti-rot properties. Teak is a
beautiful material in its unfinished
state and, when caulked with
Sikaflex®, provides an elegant
solution for the anti-slip
properties required from a wet deck.
Teak, however, is not a uniform
material; oil, and resin-content,
as well as porosity, vary greatly
and the water content changes
depending on storage conditions,
duration, temperature and
humidity.
General Conditions
Proper working conditions are
essential for a successful result.
Optimal results are obtained
under constant or falling
temperature conditions of
between +5°C and +25°C.
Exposure to direct sunlight and
rain during the operation and
especially during bonding or
caulking needs to be avoided
under all circumstances.
Exposure to the elements during
and following each step of the
application procedure needs to
be prevented for at least 8 hours.
Good ventilation in a well-or-
ganised working area are
important factors for success.
The Quality of the Wood
Teak planks should show
vertical, standing year rings.
The core humidity content of the
wood should ideally not exceed
12%. Too high a level could
result in excessive shrinkage
leading to failure.
Ideally, the humidity content of the
timber should correspond to the
equivalent humidity expected in
service.
Teak Decks
It is imperative that the width of
the seams be directly related to the
width of the teak planks and to the
depth of the seam; guidelines are
listed below.
Should the joint dimensions
not conform with our
recommendations, please contact
Sika.
plank width seam width seam depth (mm) (in) (mm) (in) (mm) (in)
35 13/8 4 5/32 4 to 5 5/32 – 3/16
45 13/4 4 to 5 5/32 – 3/16 6 1/4
50 2 5 to 6 3/16 – 1/4 6 1/4
75 3 8 5/16 7 9/32
100 4 10 13/32 8 5/16
125 5 12 15/32 10 13/32
Application Guide 19/1/05 2:37 PM Page 4
5
Bonding Teak Decks
Preparation of Substrate
Glassfibre Reinforced Plastic (GRP) Decks
Heavily soiled surfaces should be
cleaned off first with a pure solvent
(Sika® Remover-208) to remove the
worst of the soiling.
Lightly abrade contact area with a
very fine sanding pad. Remove dust
with a vacuum cleaner.
Clean the substrate with Sika® Cleaner-
205, using a clean, lint-free rag or
paper towel. Change frequently!
Drying time: minimum 10 minutes,
maximum 2 hours
Apply a thin, continuous coat of Sika®
Primer-206 G+P or Sika® Primer-215,
using a clean brush or felt applicator.
Drying time: minimum 30 minutes,
maximum 24 hours
Timber Decks
Abrade contact area on hull with
sanding pad (80/100 grit) and remove
dust with a vacuum cleaner.
Apply a thin, continuous coat of Sika®
Primer-290 DC, using a clean brush or
felt applicator.
Drying time: minimum 60 minutes,
maximum 24 hours
Aluminium and Steel Decks
If the deck is already coated with a
primer but adhesion cannot be
assured or the primer is soluble in
Colma Cleaner, the primer must be
removed by gritblasting.
If adhesion can be assured, the
surface should be cleaned with an
appropriate aqueous cleaner and
subsequently washed.
Apply a continuous coat of two-
component Sika Icosit® EG 1 to the
surface using a clean brush or roller at
a consumption of 200 g/m2.
Drying time:
10ºC 48 h–14 days
20ºC 24 h–14 days
30ºC 14 h–14 days
205
290 DC
206 G+P/215
EG 1
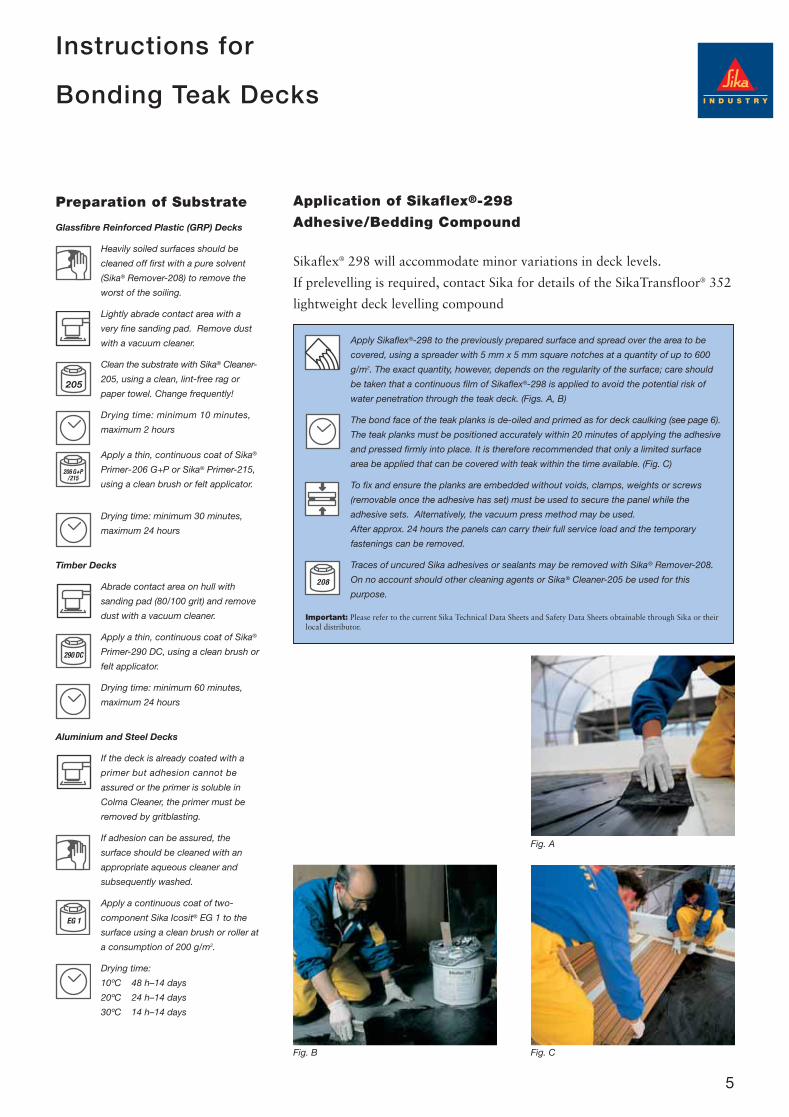
Application of Sikaflex®-298
Adhesive/Bedding Compound
Apply Sikaflex®-298 to the previously prepared surface and spread over the area to be
covered, using a spreader with 5 mm x 5 mm square notches at a quantity of up to 600
g/m2. The exact quantity, however, depends on the regularity of the surface; care should
be taken that a continuous film of Sikaflex®-298 is applied to avoid the potential risk of
water penetration through the teak deck. (Figs. A, B)
The bond face of the teak planks is de-oiled and primed as for deck caulking (see page 6).
The teak planks must be positioned accurately within 20 minutes of applying the adhesive
and pressed firmly into place. It is therefore recommended that only a limited surface
area be applied that can be covered with teak within the time available. (Fig. C)
To fix and ensure the planks are embedded without voids, clamps, weights or screws
(removable once the adhesive has set) must be used to secure the panel while the
adhesive sets. Alternatively, the vacuum press method may be used.
After approx. 24 hours the panels can carry their full service load and the temporary
fastenings can be removed.
Traces of uncured Sika adhesives or sealants may be removed with Sika® Remover-208.
On no account should other cleaning agents or Sika® Cleaner-205 be used for this
purpose.
Important: Please refer to the current Sika Technical Data Sheets and Safety Data Sheets obtainable through Sika or theirlocal distributor.
Fig. A
Fig. C
208
Fig. B
Sikaflex® 298 will accommodate minor variations in deck levels.
If prelevelling is required, contact Sika for details of the SikaTransfloor® 352
lightweight deck levelling compound
Instructions for
Application Guide 19/1/05 2:37 PM Page 5

6
Caulking Teak Decks
Before caulking the deck, ensure
the seam width and depth meets
the guidelines listed on page 4.
Preparation of Substrate
Seams
In order to achieve long-term adhesion
of Sikaflex®-290 DC to the sides of the
seams, a meticulous preparation of the
seams is required. All foreign material
must be removed and the seams must
be clean and dry prior to the applica-
tion of the primer. Best results are
obtained using a high-powered indus-
trial vacuum cleaner. Pneumatic
equipment should not be used unless
equipped with an oil separator as teak
readily absorbs oil. De-oiling of the
sides is recommended and is perform-
ed using a lint-free cloth wetted with
acetone or MEK (Methyl Ethyl Ketone).
The cloth must be replaced at regular
intervals to avoid re-soiling of the
surfaces. Allow 10 minutes to flash off.
Remember these solvents are
flammable, so take proper
precautions!
When recaulking older decks, existing
caulking should be removed and the
seams routed out to the required
dimensions.
Priming
Priming the planks is a vital step in
the process of caulking with
Sikaflex®-290 DC. Failure to
observe the priming procedure
might be detrimental to the final
quality of the seal and will impair
the longevity of the deck. Priming
may commence after thorough
cleaning and de-oiling of the
planks.
Apply a thin, continuous coat of Sika®
Primer-290 DC to the seam edges.
Sika® Primer-290 DC can be brush or
spray applied in one coat to the seam
sides. To ensure that no areas are
missed, move the brush back and
forth. Sika® Primer-290 DC is a film
former: The coating should therefore
look glossy, giving a “wet-look” even
when dry (Fig. A). Working
temperature 5–35°C, RH: 75% max.
Fig. A
Drying time: Protect the primed area
against dust and rain, and leave the
primer to dry for at least one hour
before starting the deck caulking
operation. The maximum allowable
time between priming and caulking is
no more than 24 hours. If this period
is exceeded, repriming is required.
Application of the Bond
Breaker Tape
Sikaflex®-290 DC caulking compound
is designed to absorb the lateral
movements of the teak planks as they
expand and contract with changes in
the weather, the environment or due
to variations in the humidity content
of the teak. To ensure proper
performance of the Sikaflex®, it is
imperative that adhesion to the
bottom of the seam section be
avoided at all cost. To ensure this, a
strip of release tape is applied to the
bottom of the seam after the primer
has dried. (Fig. B)
Fig. B
290 DC
Instructions for
Application Guide 19/1/05 2:37 PM Page 6

7
Caulking Teak Decks
Before any work commences ensurethe temperature of the wood does notexceed 25°C. In addition, the operating temperatureduring application should be constantor falling and ideally within the range of+5°C and +25°C.
Apply Sikaflex®-290 DC ensuring air isprevented from entering the seam byplacing the tip of the nozzle againstthe bottom and keeping the gun at anangle of 60°–90°. Always use a handgun or a piston-driven airgun.Continue to pull the nozzle along theseam so that the joint is filled behindthe nozzle always ensuring a constantmotion is maintained. (Figs. C,D)
After application of Sikaflex®-290 DCand before skinning occurs, tool theexcess material from the surface of thedeck using a slightly flexible spatula at45°. This ensures complete filling ofthe seam.
Protect the caulked joints from rainand direct sunlight for a period of atleast 8 hours. Do not use excessmaterial from the spatula for fillingseams.
Sikaflex®-290 DC is ready for sandingafter 7 days.
Important: Please refer to the current Sika Technical DataSheets and Safety Data Sheets obtainable through Sika ortheir local distributor.
The Sanding ProcessFollowing 7 days curing the deck is
ready for sanding. Prior to that, how-
ever, excess cured Sikaflex®-290 DC
should be removed with a sharp
chisel or knife.
This procedure will avoid excess pull
on the edges of the seams during the
subsequent sanding operation. For
effective sanding results use an
industrial sander. It is recommended
to begin with a medium (80)
progressing to a 120 grit or finer.
Suitable sanders are beltsanders, flat
plate sanders or elastically suspended
sanders. Sanding should be along the
direction of the seams.
The Finishing TouchAlthough we do not recommend
the application of a finish to the
exterior teak deck, many boat
owners prefer to apply a lacquer
finish to the deck after sanding.
Generally great care should be
taken as finishes contain solvents
or plasticisers which can adversely
affect the cured Sikaflex®-290 DC
or the drying of the lacquer.
The following criteria should
always be taken into consideration:
Never apply the lacquer finish to
uncured Sikaflex®-290 DC.
Waiting time of at least one month
before application of the finish is
recommended.
The compatibility of the lacquer
should be evaluated on a small
sample area of the teak deck before
application.
Rigid lacquers have a negative
effect on the elasticity of the joint
and may crack or cause loss of
adhesion of the Sikaflex®-290 DC
from the teak planks.
MaintenanceIt is important to wet and rinse
the deck regularly with fresh
water in order to prevent drying
out. In warm climates this
procedure should be carried out on
a daily basis. The occasional use of
a mild detergent (natural liquid
soap) diluted in water should be
kept to a minimum. Bleach and
aggressive chemical cleaners should
not be used.
Note Prefabricated teak decks often
consist of a multilayer construction,
e.g. they are made of wood onto
which a fine layer of teak is
bonded. The base wood might
consist of various wood qualities;
the pores in the “wood” are
different in structure and size,
therefore the caulking compound is
not always in a position to expel
the air pockets from the pores
during caulking. As a result small
bubbles within the joint may
surface during caulking. To avoid
the development of these “air”
bubbles, we recommend tooling
the joints using a smooth, slightly
flexible spatula at an angle of 45°,
expelling air from the pores and
allowing a perfect joint to develop
during cure.
Fig. D
Fig. C
Instructions for
Application ofSikaflex® - 290DC
Application Guide 19/1/05 2:37 PM Page 7
8
Bonding of Deck Panels and Feature Decks
Preparation of Substrate
Glass Reinforced Plastic (GRP) Decks
Heavily soiled surfaces should be
cleaned off first with a pure solvent
(Sika® Remover-208) to remove the
worst of the soiling.
Lightly abrade contact area with a
very fine sanding pad. Remove dust
with a vacuum cleaner.
Clean the substrate with Sika® Cleaner-
205, using a clean, lint-free rag or
paper towel. Change frequently!
Drying time: minimum 10 minutes,
maximum 2 hours
Apply a thin, continuous coat of Sika®
Primer-206 G+P or Sika® Primer-215,
using a clean brush or felt applicator.
Drying time: minimum 30 minutes,
maximum 24 hours
Timber Decks
Abrade contact area on hull with
sanding pad (80/100 grit) and remove
dust with a vacuum cleaner.
Apply a thin, continuous coat of Sika®
Primer-290 DC, using a clean brush or
felt applicator
Drying time: minimum 60 minutes,
maximum 24 hours
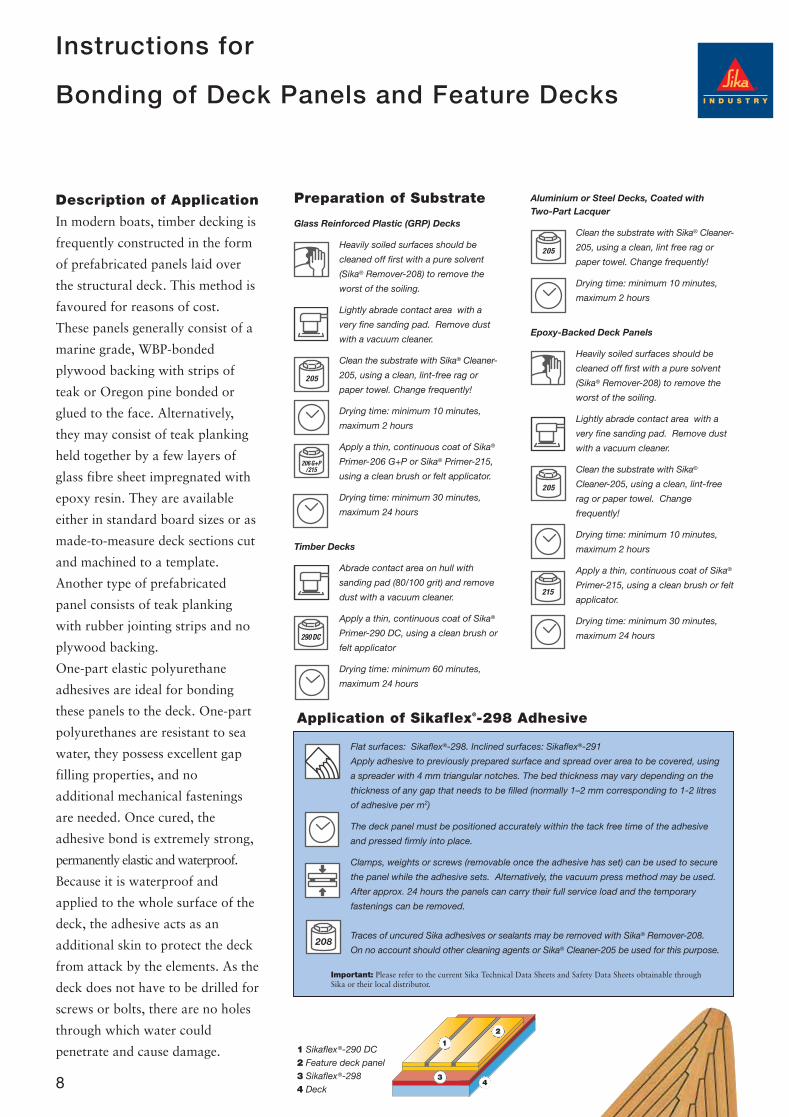
Description of Application
In modern boats, timber decking is
frequently constructed in the form
of prefabricated panels laid over
the structural deck. This method is
favoured for reasons of cost.
These panels generally consist of a
marine grade, WBP-bonded
plywood backing with strips of
teak or Oregon pine bonded or
glued to the face. Alternatively,
they may consist of teak planking
held together by a few layers of
glass fibre sheet impregnated with
epoxy resin. They are available
either in standard board sizes or as
made-to-measure deck sections cut
and machined to a template.
Another type of prefabricated
panel consists of teak planking
with rubber jointing strips and no
plywood backing.
One-part elastic polyurethane
adhesives are ideal for bonding
these panels to the deck. One-part
polyurethanes are resistant to sea
water, they possess excellent gap
filling properties, and no
additional mechanical fastenings
are needed. Once cured, the
adhesive bond is extremely strong,
permanently elastic and waterproof.
Because it is waterproof and
applied to the whole surface of the
deck, the adhesive acts as an
additional skin to protect the deck
from attack by the elements. As the
deck does not have to be drilled for
screws or bolts, there are no holes
through which water could
penetrate and cause damage. 1 Sikaflex®-290 DC2 Feature deck panel3 Sikaflex®-2984 Deck
43
2
Aluminium or Steel Decks, Coated with Two-Part Lacquer
Clean the substrate with Sika® Cleaner-
205, using a clean, lint free rag or
paper towel. Change frequently!
Drying time: minimum 10 minutes,
maximum 2 hours
Epoxy-Backed Deck Panels
Heavily soiled surfaces should be
cleaned off first with a pure solvent
(Sika® Remover-208) to remove the
worst of the soiling.
Lightly abrade contact area with a
very fine sanding pad. Remove dust
with a vacuum cleaner.
Clean the substrate with Sika®
Cleaner-205, using a clean, lint-free
rag or paper towel. Change
frequently!
Drying time: minimum 10 minutes,
maximum 2 hours
Apply a thin, continuous coat of Sika®
Primer-215, using a clean brush or felt
applicator.
Drying time: minimum 30 minutes,
maximum 24 hours
205
215
205
205
290 DC
1
206 G+P/215
Instructions for
Flat surfaces: Sikaflex®-298. Inclined surfaces: Sikaflex®-291
Apply adhesive to previously prepared surface and spread over area to be covered, using
a spreader with 4 mm triangular notches. The bed thickness may vary depending on the
thickness of any gap that needs to be filled (normally 1–2 mm corresponding to 1-2 litres
of adhesive per m2)
The deck panel must be positioned accurately within the tack free time of the adhesive
and pressed firmly into place.
Clamps, weights or screws (removable once the adhesive has set) can be used to secure
the panel while the adhesive sets. Alternatively, the vacuum press method may be used.
After approx. 24 hours the panels can carry their full service load and the temporary
fastenings can be removed.
Traces of uncured Sika adhesives or sealants may be removed with Sika® Remover-208.
On no account should other cleaning agents or Sika® Cleaner-205 be used for this purpose.208
Important: Please refer to the current Sika Technical Data Sheets and Safety Data Sheets obtainable throughSika or their local distributor.
Application of Sikaflex®-298 Adhesive
Application Guide 19/1/05 2:37 PM Page 8

9
Bonding Anti-Slip Deck Coverings
Description of Application
Deck coverings or mats of
synthetic resin composition
provide a safe, non-slip surface to
walk on as well as protecting the
deck against damage and leaks.
The use of a one-part polyurethane
adhesive maximises the
effectiveness of the covering
material, facilitates installation and
ensures a professional finish.
Proprietary deck coverings in
common use include:
T B S Anti-slide
Treadmaster Lay Tech
Polygrip Nautoflex
Norament
Marine Deck 2000
One-part polyurethane adhesives
give excellent results with these
products. Installation is simple and
straightforward, while the long
term performance characteristics of
the adhesive offer a number of
significant benefits.
Preparation of Substrate
and Deck Coverings
GRP Decks
Heavily soiled surfaces should be
cleaned off first with a pure solvent
(Sika® Remover-208) to remove the
worst of the soiling.
Lightly abrade contact area with a very
fine sanding pad (Scotch Brite M 600).
Remove dust with a vacuum cleaner.
Clean the substrate with Sika®
Cleaner-205, using a clean, lint-free
rag or paper towel. Change frequently!
Drying time: minimum 10 minutes,
maximum 2 hours
205
The covering material must be free
from release agents or other media
used in the production process. Use
MEK, Colma Cleaner, or other
appropriate solvents recommended
by the manufacturer. Perform a small
test to verify if the substrate is
affected by the solvent.
On non-porous coverings, the side
that is to be bonded should be
cleaned with Sika® Cleaner-205, using
a clean, lint-free rag or paper towel.
Change rag frequently!
Drying time: minimum 10 minutes,
maximum 2 hours
In the case of covering materials with
an open-pore structure or textured
weave finish, the only preparation
necessary is to ensure that the side to
be adhered to is completely dust-free.
Application of Sikaflex®-291/-298 Adhesive
Flat surfaces: Sikaflex®-298. Inclined surfaces: Sikaflex®-291
Apply adhesive to previously prepared surface and spread over area to be covered, using
a spreader with 2 mm triangular notches. The layer thickness should be 0.5–1 mm approx.
The covering material must be placed in position within 30 minutes of applying the
adhesive, so adhesive should be applied only to an area large enough to receive the next
section of covering.
When the covering has been placed in position it should be rolled down with a rubber
roller, working from the centre outwards to expel any trapped air and push any excess
adhesive out to the edges, where it can be removed. It is essential to ensure no trapped
air remains.
Note: If the covering material is laid under tension, the edges must be held or suitably
weighted.
Traces of uncured Sika adhesives or sealants may be removed with Sika® Remover-208.
On no account should other cleaning agents or Sika® Cleaner-205 be used for this purpose.
Timber Decks
Abrade contact area on hull with
sanding pad (80/100 grit) and remove
dust with a vacuum cleaner.
Apply a thin, continuous coat of Sika®
Primer-290 DC, using a clean brush or
felt applicator
Drying time: minimum 60 minutes,
maximum 24 hours
Aluminium Decks, Coated with Two-Part Lacquer
Clean the substrate with Sika®
Cleaner-205, using a clean, lint-free
rag or paper towel. Change
frequently!
Drying time: minimum 10 minutes,
maximum 2 hours
For the preparation of other
substrates, please refer to the
Primer Chart.
208
Note: Due to the many variations
of deck coverings, a test to check for
adhesion is always recommended.
205
290 DC
205
Instructions for
Important: Please refer to the current Sika Technical Data Sheets and Safety Data Sheets obtainable throughSika or their local distributor.
Application of Sikaflex®-291/-298 Adhesive
Deck Coverings
Application Guide 19/1/05 2:37 PM Page 9
10
Bonding of Anti-Slip Plates for Engine Rooms
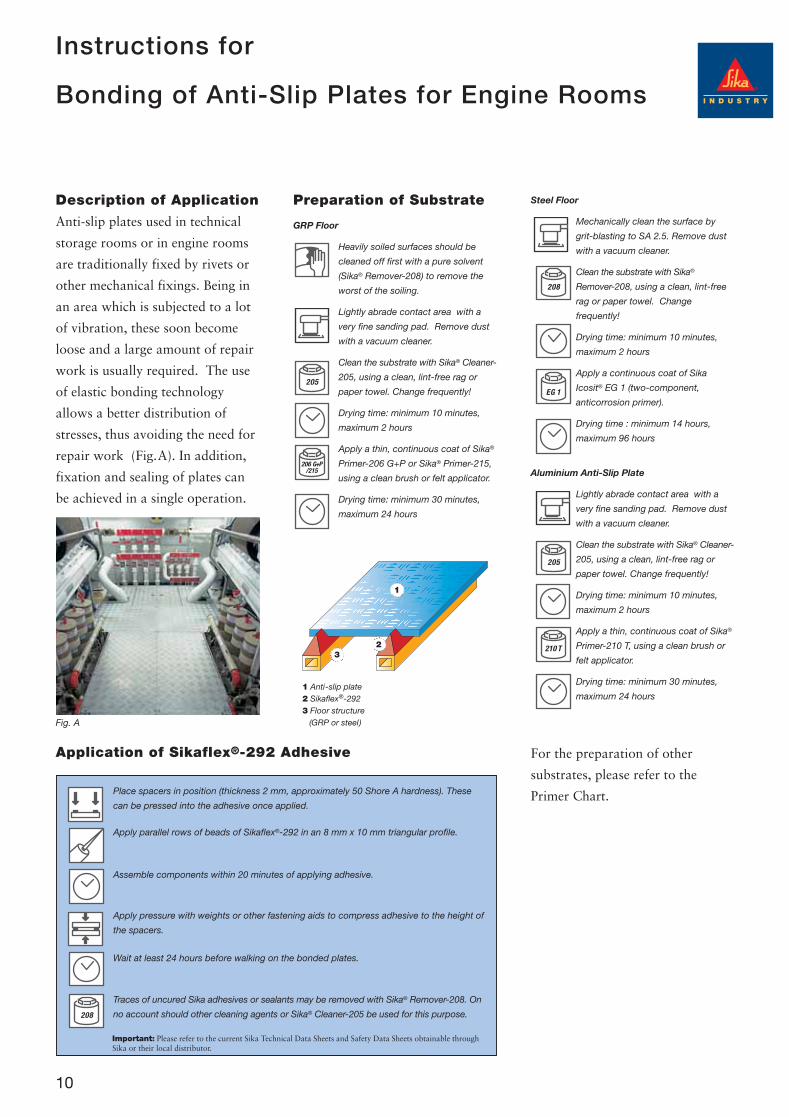
Description of Application
Anti-slip plates used in technical
storage rooms or in engine rooms
are traditionally fixed by rivets or
other mechanical fixings. Being in
an area which is subjected to a lot
of vibration, these soon become
loose and a large amount of repair
work is usually required. The use
of elastic bonding technology
allows a better distribution of
stresses, thus avoiding the need for
repair work (Fig.A). In addition,
fixation and sealing of plates can
be achieved in a single operation.
1 Anti-slip plate2 Sikaflex®-2923 Floor structure
(GRP or steel)
32
1
Application of Sikaflex®-292 Adhesive
Place spacers in position (thickness 2 mm, approximately 50 Shore A hardness). These
can be pressed into the adhesive once applied.
Apply parallel rows of beads of Sikaflex®-292 in an 8 mm x 10 mm triangular profile.
Assemble components within 20 minutes of applying adhesive.
Apply pressure with weights or other fastening aids to compress adhesive to the height of
the spacers.
Wait at least 24 hours before walking on the bonded plates.
Traces of uncured Sika adhesives or sealants may be removed with Sika® Remover-208. On
no account should other cleaning agents or Sika® Cleaner-205 be used for this purpose.
Fig. A
Preparation of Substrate
GRP Floor
Heavily soiled surfaces should be
cleaned off first with a pure solvent
(Sika® Remover-208) to remove the
worst of the soiling.
Lightly abrade contact area with a
very fine sanding pad. Remove dust
with a vacuum cleaner.
Clean the substrate with Sika® Cleaner-
205, using a clean, lint-free rag or
paper towel. Change frequently!
Drying time: minimum 10 minutes,
maximum 2 hours
Apply a thin, continuous coat of Sika®
Primer-206 G+P or Sika® Primer-215,
using a clean brush or felt applicator.
Drying time: minimum 30 minutes,
maximum 24 hours
Steel Floor
Mechanically clean the surface by
grit-blasting to SA 2.5. Remove dust
with a vacuum cleaner.
Clean the substrate with Sika®
Remover-208, using a clean, lint-free
rag or paper towel. Change
frequently!
Drying time: minimum 10 minutes,
maximum 2 hours
Apply a continuous coat of Sika
Icosit® EG 1 (two-component,
anticorrosion primer).
Drying time : minimum 14 hours,
maximum 96 hours
Aluminium Anti-Slip Plate
Lightly abrade contact area with a
very fine sanding pad. Remove dust
with a vacuum cleaner.
Clean the substrate with Sika® Cleaner-
205, using a clean, lint-free rag or
paper towel. Change frequently!
Drying time: minimum 10 minutes,
maximum 2 hours
Apply a thin, continuous coat of Sika®
Primer-210 T, using a clean brush or
felt applicator.
Drying time: minimum 30 minutes,
maximum 24 hours
For the preparation of other
substrates, please refer to the
Primer Chart.
205
205
210 T
208
208
206 G+P/215
EG 1
Instructions for
Important: Please refer to the current Sika Technical Data Sheets and Safety Data Sheets obtainable throughSika or their local distributor.
Application Guide 19/1/05 2:37 PM Page 10
Bonding Timber Components
11
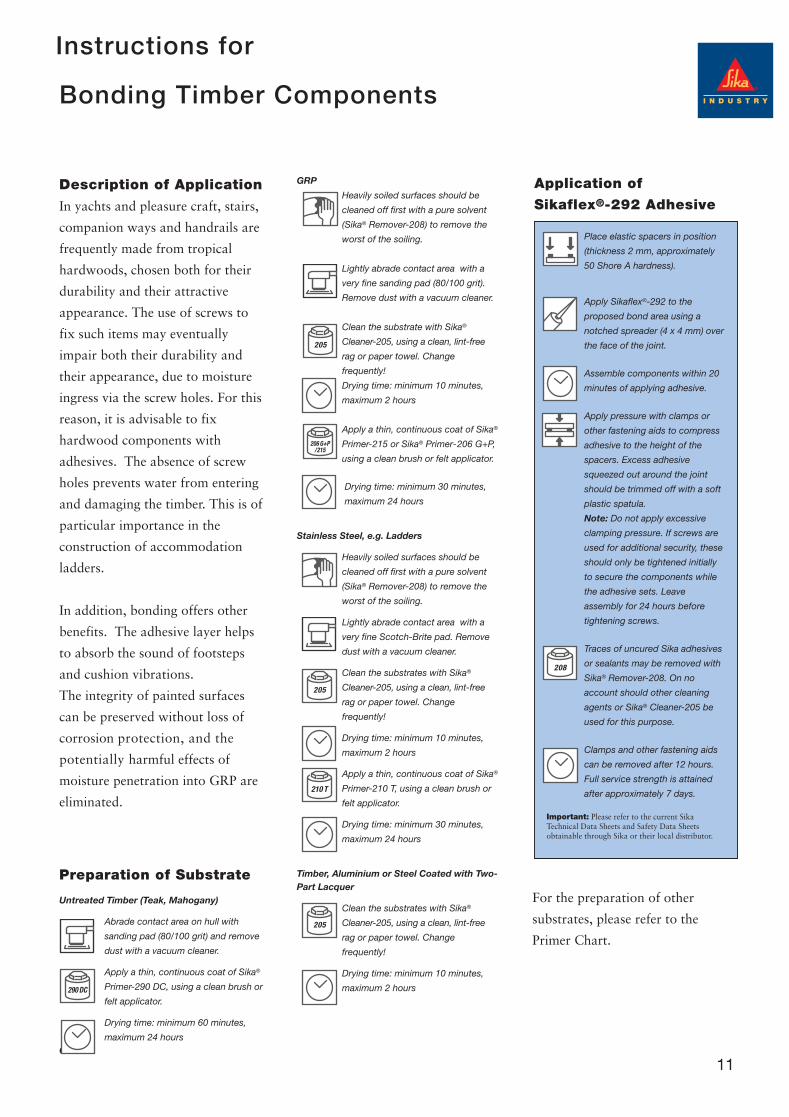
Application of
Sikaflex®-292 Adhesive
Place elastic spacers in position
(thickness 2 mm, approximately
50 Shore A hardness).
Apply Sikaflex®-292 to the
proposed bond area using a
notched spreader (4 x 4 mm) over
the face of the joint.
Assemble components within 20
minutes of applying adhesive.
Apply pressure with clamps or
other fastening aids to compress
adhesive to the height of the
spacers. Excess adhesive
squeezed out around the joint
should be trimmed off with a soft
plastic spatula.
Note: Do not apply excessive
clamping pressure. If screws are
used for additional security, these
should only be tightened initially
to secure the components while
the adhesive sets. Leave
assembly for 24 hours before
tightening screws.
Traces of uncured Sika adhesives
or sealants may be removed with
Sika® Remover-208. On no
account should other cleaning
agents or Sika® Cleaner-205 be
used for this purpose.
Clamps and other fastening aids
can be removed after 12 hours.
Full service strength is attained
after approximately 7 days.
Important: Please refer to the current SikaTechnical Data Sheets and Safety Data Sheetsobtainable through Sika or their local distributor.
208
GRP
Heavily soiled surfaces should be
cleaned off first with a pure solvent
(Sika® Remover-208) to remove the
worst of the soiling.
Lightly abrade contact area with a
very fine sanding pad (80/100 grit).
Remove dust with a vacuum cleaner.
Clean the substrate with Sika®
Cleaner-205, using a clean, lint-free
rag or paper towel. Change
frequently!
Drying time: minimum 10 minutes,
maximum 2 hours
Apply a thin, continuous coat of Sika®
Primer-215 or Sika® Primer-206 G+P,
using a clean brush or felt applicator.
Drying time: minimum 30 minutes,
maximum 24 hours
Stainless Steel, e.g. Ladders
Heavily soiled surfaces should be
cleaned off first with a pure solvent
(Sika® Remover-208) to remove the
worst of the soiling.
Lightly abrade contact area with a
very fine Scotch-Brite pad. Remove
dust with a vacuum cleaner.
Clean the substrates with Sika®
Cleaner-205, using a clean, lint-free
rag or paper towel. Change
frequently!
Drying time: minimum 10 minutes,
maximum 2 hours
Apply a thin, continuous coat of Sika®
Primer-210 T, using a clean brush or
felt applicator.
Drying time: minimum 30 minutes,
maximum 24 hours
Timber, Aluminium or Steel Coated with Two-Part Lacquer
Clean the substrates with Sika®
Cleaner-205, using a clean, lint-free
rag or paper towel. Change
frequently!
Drying time: minimum 10 minutes,
maximum 2 hours
Preparation of Substrate
Untreated Timber (Teak, Mahogany)
Abrade contact area on hull with
sanding pad (80/100 grit) and remove
dust with a vacuum cleaner.
Apply a thin, continuous coat of Sika®
Primer-290 DC, using a clean brush or
felt applicator.
Drying time: minimum 60 minutes,
maximum 24 hoursGRP
Description of Application
In yachts and pleasure craft, stairs,
companion ways and handrails are
frequently made from tropical
hardwoods, chosen both for their
durability and their attractive
appearance. The use of screws to
fix such items may eventually
impair both their durability and
their appearance, due to moisture
ingress via the screw holes. For this
reason, it is advisable to fix
hardwood components with
adhesives. The absence of screw
holes prevents water from entering
and damaging the timber. This is of
particular importance in the
construction of accommodation
ladders.
In addition, bonding offers other
benefits. The adhesive layer helps
to absorb the sound of footsteps
and cushion vibrations.
The integrity of painted surfaces
can be preserved without loss of
corrosion protection, and the
potentially harmful effects of
moisture penetration into GRP are
eliminated.
205
210 T
205
205
290 DC
206 G+P/215
Instructions for
For the preparation of other
substrates, please refer to the
Primer Chart.
Application Guide 19/1/05 2:37 PM Page 11

12
Bedding and Sealing of Fittings and Hardware
Description of Application
All kinds of deck fittings and
hardware need to be securely fixed
and totally watertight. Some of
these fittings are also subjected, on
occasion, to very high forces and
torsional stresses.
Poorly sealed joints can eventually
result in serious damage such as
metal corrosion, osmosis and
water leaks causing damage to
interior furnishings and fittings.
Bedding and Sealing
Fittings Subject to High
Mechanical Stresses
Deck fittings such as chain plates,
winches and guide rollers have to
absorb very high dynamic stresses.
A high-performance product, such
as Sikaflex®-292, should be used in
conjunction with additional
mechanical fixation for this
purpose.
Bedding and Sealing
Fittings Subject to
Minimal Mechanical
Stresses
Deck fittings such as ventilators,
cover strips, etc. need to be sealed
against entry of water, but they
are not subject to high tensile
stresses. Such fittings can be
effectively bedded and sealed with
Sikaflex®-291.
Important Note:
It is vital to ensure that the
adhesive is not simply squeezed out
again when the fixing screws are
pulled up tight. To prevent this
happening, shims approx. 1 mm
thick should be threaded over the
screws on the underside of the
fitting to act as spacers. The screw
holes themselves should also be
filled with sealant prior to fixing.
Spacing the fitting off the deck by
2–3 mm also facilitates its removal
at a later date, when a cutting wire
or knife blade can be inserted
between the base of the fitting and
the deck.
Apply a thin, continuous coat of Sika®
Primer-210 T, using a clean brush or
felt applicator.
Drying time: minimum 30 minutes,
maximum 24 hours
Aluminium Fittings
Lightly abrade contact area with a
very fine sanding pad (Scotch-Brite M
600).
Clean the substrate with Sika®
Cleaner-205, using a clean, lint-free
rag or paper towel. Change rag
frequently!
Drying time: minimum 10 minutes,
maximum 2 hours
Apply a thin, continuous coat of Sika®
Primer-210 T, using a clean brush or
felt applicator.
Drying time: minimum 30 minutes,
maximum 24 hours
For the preparation of other
substrates, please refer to the
Primer Chart.
Preparation of Substrate
Timber Decks
Abrade contact area on hull with
sanding pad (80/100 grit) and remove
dust with a vacuum cleaner.
Apply a thin continuous coat of Sika®
Primer-290 DC, using a clean brush or
felt applicator
Drying time: minimum 60 minutes,
maximum 24 hours
Aluminium Decks (Painted)
Clean the substrate with Sika®
Cleaner-205, using a clean, lint-free
rag or paper towel. Change
frequently!
Drying time: minimum 10 minutes,
maximum 2 hours
290 DC
205
205
210 T
205
210 T
Bronze, Brass or Stainless Steel Fittings
Clean the substrate with Sika® Cleaner-
205, using a clean, lint-free rag or
paper towel. Change frequently!
Drying time: minimum 10 minutes,
maximum 2 hours
Application of Sikaflex®-291/292 Adhesive
Sikaflex®-291or 292 should be applied to the deck and the fixing screw holes in a bead of
the required thickness. The fitting is then pressed into position.
The fixing screws should be tightened sufficiently to pull the fitting down on the spacers,
but no more. Use a plastic spatula to remove excess sealant squeezed out around the
edges. After 24 hours tighten the screws.
Traces of uncured Sika adhesives or sealants may be removed with Sika® Remover-208.
On no account should other cleaning agents or Sika® Cleaner-205 be used for this
purpose.Important: Please refer to the current Sika Technical Data Sheets and Safety Data Sheets obtainable through Sika or theirlocal distributor..
208
Instructions for
Application Guide 19/1/05 2:37 PM Page 12
13
Sealing of High-UV-Risk Areas
Description of Application
On modern ships, yachts and motor
boats the joints between different
materials must be sealed to protect
against water ingress, corrosion, etc.
In addition, they must also supply
an aesthetic finish to the joint.
High-performance sealant joints can
be made with conventional
one-component, polyurethane-based
systems, which, due to their
excellent adhesion to various
substrates, allow permanent
elasticity and resistance against
water ingress and corrosion.
Conventional polyurethane sealants,
however, exhibit some sensitivity to
UV radiation. After very prolonged
periods of exposure the joint surface
may exhibit slight degradation. This
does not detract from the sealing
properties, as it is only a surface
effect. If a durable surface aspect is
required, the use of a specifically
formulated, UV-resistant
polyurethane should be considered.
Most ships and particularly luxury
yachts and vessels require a large
number of such joints and hence
require the use of a high-durability
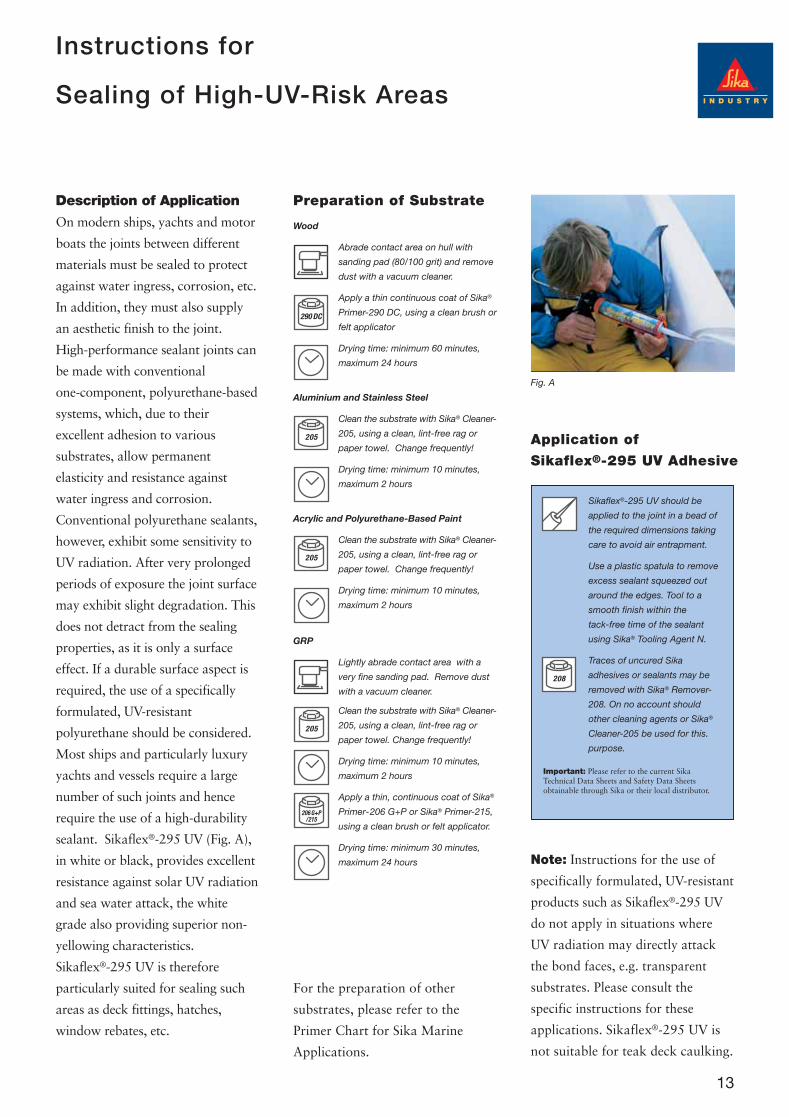
sealant. Sikaflex®-295 UV (Fig. A),
in white or black, provides excellent
resistance against solar UV radiation
and sea water attack, the white
grade also providing superior non-
yellowing characteristics.
Sikaflex®-295 UV is therefore
particularly suited for sealing such
areas as deck fittings, hatches,
window rebates, etc.
Instructions for
Performing UV-Resistant
Sealing Applications
Preparation of Substrate
Wood
Abrade contact area on hull with
sanding pad (80/100 grit) and remove
dust with a vacuum cleaner.
Apply a thin continuous coat of Sika®
Primer-290 DC, using a clean brush or
felt applicator
Drying time: minimum 60 minutes,
maximum 24 hours
Aluminium and Stainless Steel
Clean the substrate with Sika® Cleaner-
205, using a clean, lint-free rag or
paper towel. Change frequently!
Drying time: minimum 10 minutes,
maximum 2 hours
Acrylic and Polyurethane-Based Paint
Clean the substrate with Sika® Cleaner-
205, using a clean, lint-free rag or
paper towel. Change frequently!
Drying time: minimum 10 minutes,
maximum 2 hours
GRP
Lightly abrade contact area with a
very fine sanding pad. Remove dust
with a vacuum cleaner.
Clean the substrate with Sika® Cleaner-
205, using a clean, lint-free rag or
paper towel. Change frequently!
Drying time: minimum 10 minutes,
maximum 2 hours
Apply a thin, continuous coat of Sika®
Primer-206 G+P or Sika® Primer-215,
using a clean brush or felt applicator.
Drying time: minimum 30 minutes,
maximum 24 hours
For the preparation of other
substrates, please refer to the
Primer Chart for Sika Marine
Applications.
Application of
Sikaflex®-295 UV Adhesive
Sikaflex®-295 UV should be
applied to the joint in a bead of
the required dimensions taking
care to avoid air entrapment.
Use a plastic spatula to remove
excess sealant squeezed out
around the edges. Tool to a
smooth finish within the
tack-free time of the sealant
using Sika® Tooling Agent N.
Traces of uncured Sika
adhesives or sealants may be
removed with Sika® Remover-
208. On no account should
other cleaning agents or Sika®
Cleaner-205 be used for this.
purpose.
Important: Please refer to the current SikaTechnical Data Sheets and Safety Data Sheetsobtainable through Sika or their local distributor.
Note: Instructions for the use of
specifically formulated, UV-resistant
products such as Sikaflex®-295 UV
do not apply in situations where
UV radiation may directly attack
the bond faces, e.g. transparent
substrates. Please consult the
specific instructions for these
applications. Sikaflex®-295 UV is
not suitable for teak deck caulking.
Fig. A
290 DC
205
205
205
208
206 G+P/215
Instructions for
Application Guide 19/1/05 2:37 PM Page 13

14
Bonding of Rub Rails and Fenders
Description of Application
Rub rails and fenders are designed
to protect the hull of a ship or boat
against damage. They act as a
bumper to absorb impacts and
scrapes, and the more elastic they
are, the more effectively they can
perform this function.
Their elastic behaviour varies
according to the type of material
used. The shock-absorbing
performance of the rub rail is
significantly improved by the use
of an elastic adhesive joint. This
affords maximum protection to the
hull.
Rub rails of conventional timber,
PVC or polyurethane construction
can be securely bonded to marine
hulls using Sikaflex®-292. The
resulting elastic joint helps to
absorb most of the shear and
tensile stresses to which rub rails
are subjected when a vessel is
docking or casting off.
In the case of rub rails secured
with screws, a similar effect can be
obtained by backfilling the rail
profile with Sikaflex®-291, a highly
elastic polyurethane sealant. As
well as absorbing torsional
stresses, this also seals the screw
holes and prevents the ingress of
water or dirt behind the rub rail.
Timber Rub Rails
Abrade contact area on hull with
sanding pad (80/100 grit) and remove
dust with a vacuum cleaner.
Apply a thin, continuous coat of Sika®
Primer-290 DC, using a clean brush or
felt applicator
Drying time: minimum 60 minutes,
maximum 24 hours.
Moulded PVC or Polyurethane Rub Rails
The bond face of the rub rails must be
free from mould release agents or
other chemical contaminants. All
traces of such substances must be
removed prior to proceeding.
Abrade the bond face of the rub rail
with coarse sand paper (60/80grit) to
key the surface.
Clean the substrate with Sika®
Cleaner-205, using a clean, lint-free
rag or paper towel. Change rag
frequently!
Drying time: minimum 10 minutes,
maximum 2 hours
Instructions for Bonding
Rub Rails to Hull
Preparation of Substrate
GRP Hulls
Heavily soiled surfaces should be
cleaned off first with a pure solvent
(Sika® Remover-208) to remove the
worst of the soiling.
Lightly abrade contact area with a
very fine sanding pad. Remove dust
with a vacuum cleaner.
Clean the substrate with Sika®
Cleaner-205, using a clean, lint-free
rag or paper towel. Change
frequently!
Drying time: minimum 10 minutes,
maximum 2 hours
Apply a thin, continuous coat of
Sika® Primer-206 G+P or Sika®
Primer-215, using a clean brush or
felt applicator.
Drying time: minimum 30 minutes,
maximum 24 hours
Finished Painted Hulls of Aluminium orSteel, Coated with Two-part Lacquer
Clean the substrate with Sika®
Cleaner-205, using a clean, lint-free
rag or paper towel. Change
frequently!
Drying time: minimum 10 minutes,
maximum 2 hours
205
290 DC
205
206 G+P/215
205
Instructions For
Application of Sikaflex®-292/291 Adhesive/Sealant
Place elastic spacers in position (thickness 2 mm, approximately 50 Shore A hardness).
Apply Sikaflex®-292 (or Sikaflex®-291 if rub rails are to be secured using additional
mechanical fixation) in an 8 mm x 10 mm triangular bead to the proposed bond area.
Assemble components within 20 minutes of applying adhesive.
Press the rub rail into place, either directly onto the face of the hull or fitted over the core
profile. Use clamps, etc. to hold the rub rail in position while the adhesive sets. If the rub
rail is to be secured with mechanical fixings, any holes should also be filled with adhesive.
Clamps and other fastening aids can be removed after 24 hours.
Full service strength is attained after approximately 7 days.
Traces of uncured Sika adhesives or sealants may be removed with Sika® Remover-208. On
no account should other cleaning agents or Sika® Cleaner-205 be used for this purpose.
Important: Please refer to the current Sika Technical Data Sheets and Safety Data Sheets obtainable through Sika or theirlocal distributor.
208
Because of the variable composition of rub
rails, an adhesivon test is advised prior to
installation.
Application Guide 19/1/05 2:37 PM Page 14
15
Preparation of Substrate
Aluminium Hulls
Heavily soiled surfaces should be
cleaned off first with a pure solvent
(Sika® Remover-208) to remove the
worst of the soiling.
Lightly abrade contact area with a
very fine sanding pad. Remove dust
with a vacuum cleaner.
Clean the substrate with Sika®
Cleaner-205, using a clean, lint-free
rag or paper towel. Change rag
frequently!
Drying time: minimum 10 minutes,
maximum 2 hours
Apply a thin, continuous coat of Sika®
Primer-210 T, using a clean brush or
felt applicator.
Drying time: minimum 30 minutes,
maximum 24 hours
GRP Hulls
Heavily soiled surfaces should be
cleaned off first with a pure solvent
(Sika® Remover-208) to remove the
worst of the soiling.
Lightly abrade contact area with a
very fine sanding pad. Remove dust
with a vacuum cleaner.
Clean the substrate with Sika®
Cleaner-205, using a clean, lint-free
Keel-to-Hull Joints and Sealing
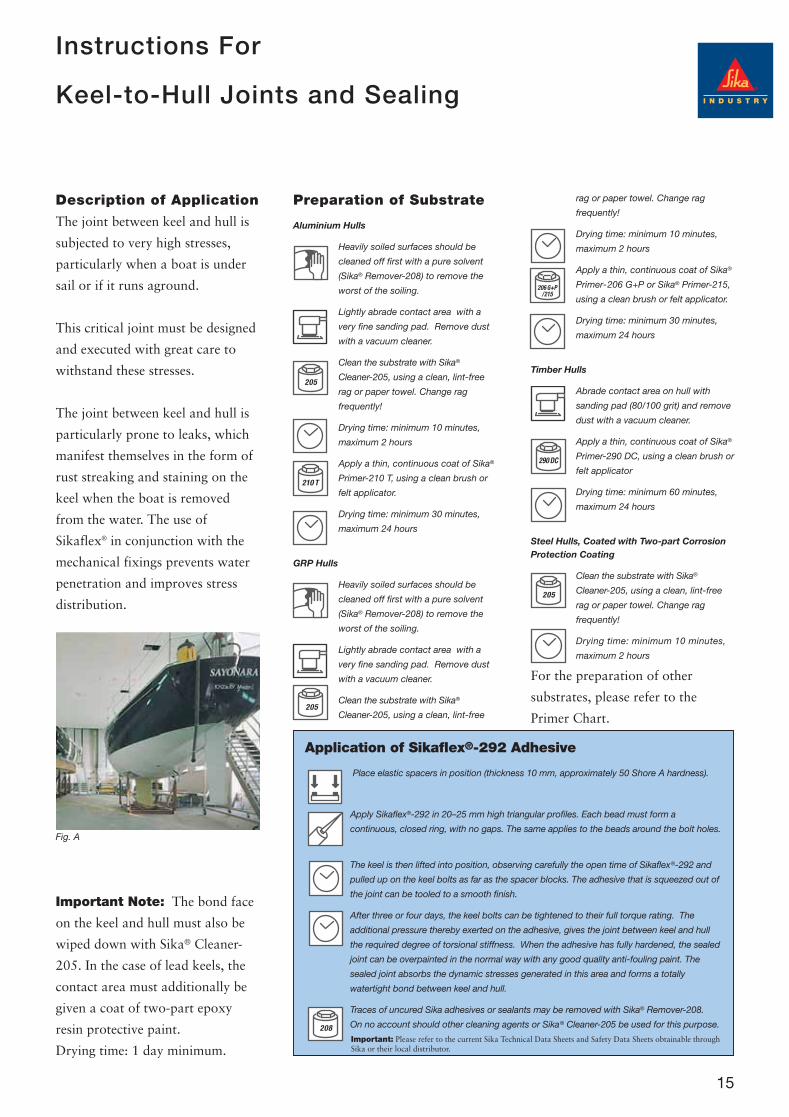
Description of Application
The joint between keel and hull is
subjected to very high stresses,
particularly when a boat is under
sail or if it runs aground.
This critical joint must be designed
and executed with great care to
withstand these stresses.
The joint between keel and hull is
particularly prone to leaks, which
manifest themselves in the form of
rust streaking and staining on the
keel when the boat is removed
from the water. The use of
Sikaflex® in conjunction with the
mechanical fixings prevents water
penetration and improves stress
distribution.
rag or paper towel. Change rag
frequently!
Drying time: minimum 10 minutes,
maximum 2 hours
Apply a thin, continuous coat of Sika®
Primer-206 G+P or Sika® Primer-215,
using a clean brush or felt applicator.
Drying time: minimum 30 minutes,
maximum 24 hours
Timber Hulls
Abrade contact area on hull with
sanding pad (80/100 grit) and remove
dust with a vacuum cleaner.
Apply a thin, continuous coat of Sika®
Primer-290 DC, using a clean brush or
felt applicator
Drying time: minimum 60 minutes,
maximum 24 hours
Steel Hulls, Coated with Two-part CorrosionProtection Coating
Clean the substrate with Sika®
Cleaner-205, using a clean, lint-free
rag or paper towel. Change rag
frequently!
Drying time: minimum 10 minutes,
maximum 2 hours
For the preparation of other
substrates, please refer to the
Primer Chart.
Fig. A
210 T
205
205
290 DC
205
206 G+P/215
Important Note: The bond face
on the keel and hull must also be
wiped down with Sika® Cleaner-
205. In the case of lead keels, the
contact area must additionally be
given a coat of two-part epoxy
resin protective paint.
Drying time: 1 day minimum.
Application of Sikaflex®-292 Adhesive
Place elastic spacers in position (thickness 10 mm, approximately 50 Shore A hardness).
Apply Sikaflex®-292 in 20–25 mm high triangular profiles. Each bead must form a
continuous, closed ring, with no gaps. The same applies to the beads around the bolt holes.
The keel is then lifted into position, observing carefully the open time of Sikaflex®-292 and
pulled up on the keel bolts as far as the spacer blocks. The adhesive that is squeezed out of
the joint can be tooled to a smooth finish.
After three or four days, the keel bolts can be tightened to their full torque rating. The
additional pressure thereby exerted on the adhesive, gives the joint between keel and hull
the required degree of torsional stiffness. When the adhesive has fully hardened, the sealed
joint can be overpainted in the normal way with any good quality anti-fouling paint. The
sealed joint absorbs the dynamic stresses generated in this area and forms a totally
watertight bond between keel and hull.
Traces of uncured Sika adhesives or sealants may be removed with Sika® Remover-208.
On no account should other cleaning agents or Sika® Cleaner-205 be used for this purpose.208
Instructions For
Important: Please refer to the current Sika Technical Data Sheets and Safety Data Sheets obtainable throughSika or their local distributor.
Application Guide 19/1/05 2:37 PM Page 15

16
Bonding and Sealing “Organic Glass” (Plastic)Windows
Description of Application
Most of the plastic glazing
materials used in boat building are
either clear acrylic sheet (PMMA),
widely marketed under trade
names such as “Perspex” and
“Plexiglas” (the latter
manufactured by Röhm and Haas),
or polycarbonate (PC), marketed
by Röhm and Haas as
“Makrolon” and by General
Electric as “Lexan”.
All plastic glazing products possess
certain characteristics that must be
clearly understood before these
products are installed or bonded
with adhesives. In general,
incorrectly installed plastic glazing
panels are prone to stress cracking,
which may be aggravated by the
use of certain adhesives.
Plastic glazing products have a
higher coefficient of thermal
expansion than conventional glass.
Therefore, when designing glazing
installations, an expansion gap of
at least 5 mm (see edge sealing
page 17) all round must be
incorporated between the window
rebate and the plastic glazing panel
to accommodate thermal
movement. Similarly, any clearance
holes for fixing screws must be
drilled oversize, i.e. larger than the
actual diameter of the screw shank.
To minimise the risk of stress
cracking, flat sheets of plastic
glazing material should be installed
completely flat; they should not be
forced to take up a curvature by
the use of mechanical fastenings.
When the design calls for curved
glazing panels, these should be
prefabricated to order and properly
tempered by a specialist supplier to
ensure a stress-free installation.
As many varieties of organic glass
exist it is recommended to ensure
that the specific grade selected is
suitable for use with
Sikaflex®-295 UV. For further
details contact Sika.
1 Flange 2 Window 3 Sikaflex®-295 UV 4 Sikaflex®-295 UV 5 Sika® UV Shielding Tape
3
2
5
1
4
Largest dimension of the window (m)
min
imal
ad
hesi
ve t
hick
ness
,t (m
m)
0 0,5 1 1,5 2
24
68
10
too small
ok
Preparation of Substrate
GRP Frame
Lightly abrade contact area with avery fine sanding pad. Remove dustwith a vacuum cleaner.
Clean the substrate with Sika® Cleaner-205, using a clean, lint-free rag orpaper towel. Change frequently!
Drying time: minimum 10 minutes,maximum 2 hours
Apply a thin, continuous coat of Sika®
Primer-206 G+P or Sika® Primer-215,using a clean brush or felt applicator.
Drying time: minimum 30 minutes,maximum 24 hours
Anodised Aluminium Frame
Lightly abrade surface with ScotchBrite M 600, clean with Sika® Cleaner-205, using a clean, lint-free rag orpaper towel. Change frequently!
Drying time: minimum 10 minutes,maximum 2 hours
Apply a thin, continuous coat of Sika®
Primer-210 T, using a clean brush orfelt applicator.
Drying time: minimum 30 minutes,maximum 24 hours
PMMA / PC Glazing PanelsMask off perimeter bond area withmasking tape. Abrade bond area withabrasive paper or Scotch-Brite.
Clean the substrate with Sika® Cleaner-205, using a clean, lint-free rag orpaper towel. Change frequently!
Drying time: minimum 10 minutes,maximum 2 hours
Apply a continuous coat of Sika®
Primer-209, using a clean brush or feltapplicator.
Drying time: minimum 30 minutes,maximum 24 hours
Timber or Aluminium Frame Coated with Two-Part Lacquer
Clean the substrate with Sika® Cleaner-205, using a clean, lint-free rag orpaper towel. Change frequently!
Drying time: minimum 10 minutes,maximum 2 hours
Refer to Sika® primer chart for other substrates.
205
205
205
205
210 T
209
206 G+P/215
Instructions for
t
Application Guide 19/1/05 2:37 PM Page 16

17
Application of Sikaflex®-295 UV Adhesive
Place spacers in position. Depending on the size of the glazing panel, the thickness of the
spacer should be chosen accordingly; approximately 30 Shore A hardness (see diagram
page16).
Apply Sikaflex®-295 UV to the frame rebate or glazing panel using a triangular nozzle of
bead width 10 mm minimum.
Assemble components within 20 minutes of applying adhesive.
To prevent slip down of vertical glazing panels, additional spacers (wood or plastic) must
be placed in the lower rebate during installation. After curing, these must be removed.
The rebate gap must be a minimum of 5 mm (see diagram below).
Clamps and other fastening aids can be removed after 24 hours. After this time, the
expansion gap between glazing panel and rebate can be filled and sealed with Sikaflex®-
295 UV. This should be done only when the glazing adhesive has reached full cure. This
sealant joint can be tooled to a smooth finish using Sika® Tooling Agent N. This must be
carried out before skinning of the sealant.
Traces of uncured Sika adhesives or sealants may be removed with Sika® Remover-208.
On no account should other cleaning agents or Sika® Cleaner-205 be used for this
purpose.
Apply cover strip or Sika® UV Shielding Tape to cover the bondline in accordance with
Sika recommendation.
208
Protection of the Bond
As with conventional glass, plastic
glazing panels generally do not
protect the adhesive face from
damage by UV radiation.
Therefore, the bond face must be
protected from direct sunlight via
one of the methods recommended.
External cover strip of
appropriate dimensions
Sika® UV Shielding Tape of
appropriate dimensions
Edge Sealing of Window
Commonly, the edge of the
window will be cosmetically
finished with Sikaflex® materials.
The preparation of the surfaces
must be identical to that used for
bonding. Edge sealing both ensures
the prevention of standing water
on or near the bond and helps
cosmetically finish the window.
For plastic window panels
Sikaflex®-295 UV must be used in
accordance with the diagram.
O = Overlap
3
21
1 UV protection2 Sikaflex®-295 UV3 Window
Largest window dimension (m)
Min
imal
join
t w
idth
(mm
)
0 1 2 3
48
1216
ok
too small
Minimum Recommendations for UV Protection of the Bond
√O=d 1(n12 –1)2
n12 = Refraction indexfor window glass
d
Sika RuleO = 2 x dExample: if d=8mm, the overlapshould be at least 16mm.
d=Thickness ofthe window
Fig. C
Fig. B
Important: Please refer to the current Sika Technical Data Sheets and Safety Data Sheets obtainable throughSika or their local distributor.
Bonding and Sealing “Organic Glass” (Plastic)Windows
Instructions for
Application Guide 19/1/05 2:37 PM Page 17

18
Description of ApplicationThe direct glazing of mineral glass
(toughened security glass) into
frames or directly into the hull or
deck, requires a full understanding
of all the important principles
involved.
It is essential that the glass meet all
the demands and standards
required for the intended
application. For insulation glass,
total bonding consistency must be
ensured through the complete use
of Sikaflex® adhesives for all the
installation, i.e. no silicones.
The polyurethane adhesive bond
face must also be protected against
UV radiation. This may be
achieved by several means:
Using a black, ceramic coated
border with a light transmission of
less than 0.01% (measured with
Gretag D 200 visible range). Or by
using an overlapping trim (plastic
or metal) with a width twice that
of the glass thickness.
For glass without a black, ceramic
coated border or without the
overlapping trim, Sika® UV
Shielding Tape should be used for
proper protection of the bondline.
Bonding and Sealing Mineral Glass Windows
Note: Local and international
rules for maritime construction
and appropriate legislation must
always be observed.
1 Mineral glass2 Ceramic coating3 Sikaflex®-2964 Flange
1 Mineral glass2 Ceramic coating3 Sikaflex®-2964 Flange5 Edge Protection
3
21
4
3
2
4
1
5
Largest window dimension (m)
Min
imal
join
t w
idth
(mm
)
0 1 2 3
48
1216
ok
too small
Largest dimension of the glass (m)
Min
imal
ad
hesi
ve t
hick
ness
,t (m
m)
0 1 2 3
46
810
ok
too small
Glass Window Dimensioning Joint width
Glass Window Dimensioning Adhesive thickness,t
Joint width
adhesive thickness,t
Joint widthWidth of the adhesive12mm to 20mm
alumimium
Steel
Dimensioning of Adhesive
and Sealant
The dimensioning of the adhesive
and joint geometry must be carried
out in accordance with Sika’s
basic rules of calculation. If deck
movement is negligible the
following dimensions are
recommended.
Instructions for
Application Guide 19/1/05 2:37 PM Page 18

19
O = Overlap
3
21
1 UV protection2 Sikaflex®-2963 Window
Minimum Recommendations for UV Protection of the Bond
√O=d 1(n12 –1)2
n12 = Refraction indexfor window glass
O=d x 0,9
d
Sika RuleO = 2 x dExample: if d=8mm, the overlapshould be at least 16mm.
d=Thickness ofthe window
Application of Sikaflex®-296 Adhesive
Place spacers in position. The thickness of the spacer should be a minimum of 5 mm
approximately 30 Shore A hardness (according to diagram).
Apply Sikaflex®-296 to the frame rebate or glazing panel using a triangular nozzle of bead
width 10 mm minimum.
Assemble components within 20 minutes of applying adhesive.
To prevent slip down of vertical glazing panels, additional spacers (wood or plastic) must
be placed in the lower rebate during installation. After curing, hard spacers must be
removed. The rebate gap must be a minimum of 5 mm.
Clamps and other fastening aids can be removed after 24 hours. After this time, the
expansion gap between glazing panel and rebate can be filled and sealed with Sikaflex®-
296. This should be done only when the glazing adhesive has reached full cure. This
sealant joint is tooled to a smooth finish using Sika® Tooling Agent N. This must be
carried out before skinning of the sealant.
Traces of uncured Sika adhesives or sealants may be removed with Sika® Remover-208.
On no account should other cleaning agents or Sika® Cleaner-205 be used for this
purpose.
Service of the vessel can be resumed after one week.
208
Protection of the BondlineConventional glass without a
ceramic frit does not protect the
adhesive face from damage by UV
radiation. Therefore, the bond face
must be protected from direct
sunlight via one of the materials
recommended below.
External cover strip of
appropriate dimensions
Sika® UV Shielding Tape of
appropriate dimensions
Preparation of Substrate
Glass (additional UV shielding required)
Clean the substrate with Sika®
Activator, using a clean, lint-free rag
or paper towel. Change frequently!
Drying time: minimum 10 minutes,
maximum 2 hours
Black, Ceramic Glass Border(transmission <0.01%)
Clean the substrates with Sika®
Activator, using a clean, lint-free rag
or paper towel. Change frequently!
Drying time: minimum 10 minutes,
maximum 2 hours
For the preparation of the frame,please refer to the Primer Chart.
SA
SA
Bonding and Sealing Mineral Glass Windows
Instructions for
Important: Please refer to the current Sika Technical Data Sheets and Safety Data Sheets obtainable throughSika or their local distributor.
Application Guide 19/1/05 2:37 PM Page 19
20
Bonding of Decorative Panels and Work Surfaces
Application of Sikaflex® Adhesives
Place spacers in position (thickness typically 3 mm,: approximately 50 Shore A hardness).
Apply parallel beads of Sikaflex®-292 at 600 mm centres in an 8 mm x 10 mm triangular
bead.
Assemble components within 20 minutes of applying adhesive.
Panels, if required, may be held in place during cure by clamps, support brackets, or by
the use of SikaTack®-Panel Tape.
Clamps and other fastening aids can be removed after 24 hours.
Full service strength is attained after approximately 7 days.
Traces of uncured Sika adhesives or sealants may be removed with Sika® Remover-208.
On no account should other cleaning agents or Sika® Cleaner-205 be used for this
purpose.
Vertical Panels
Flat surfaces: Sikaflex®-298. Inclined surfaces: Sikaflex®-291
Apply adhesive to previously prepared surface and spread over area to be covered, using
a spreader with 4 mm triangular notches. The bed thickness may vary depending on the
thickness of any gap that needs to be filled (normally 1–2 mm)
The panel must be positioned accurately within the tack free time of the adhesive and
pressed firmly into place to avoid air-entrapment.
Clamps, weights or screws (removable once the adhesive has set) can be used to secure
the panel while the adhesive sets. Alternatively, the vacuum press method may be used.
After approx. 24 hours the panels can carry their full service load and the temporary
fastenings can be removed. In case vapour-tight substrates are employed, spray a fine
mist (ca. 10 g/m2) onto the Sikaflex®-298 surface to ensure fast curing.
Horizontal Panels
208
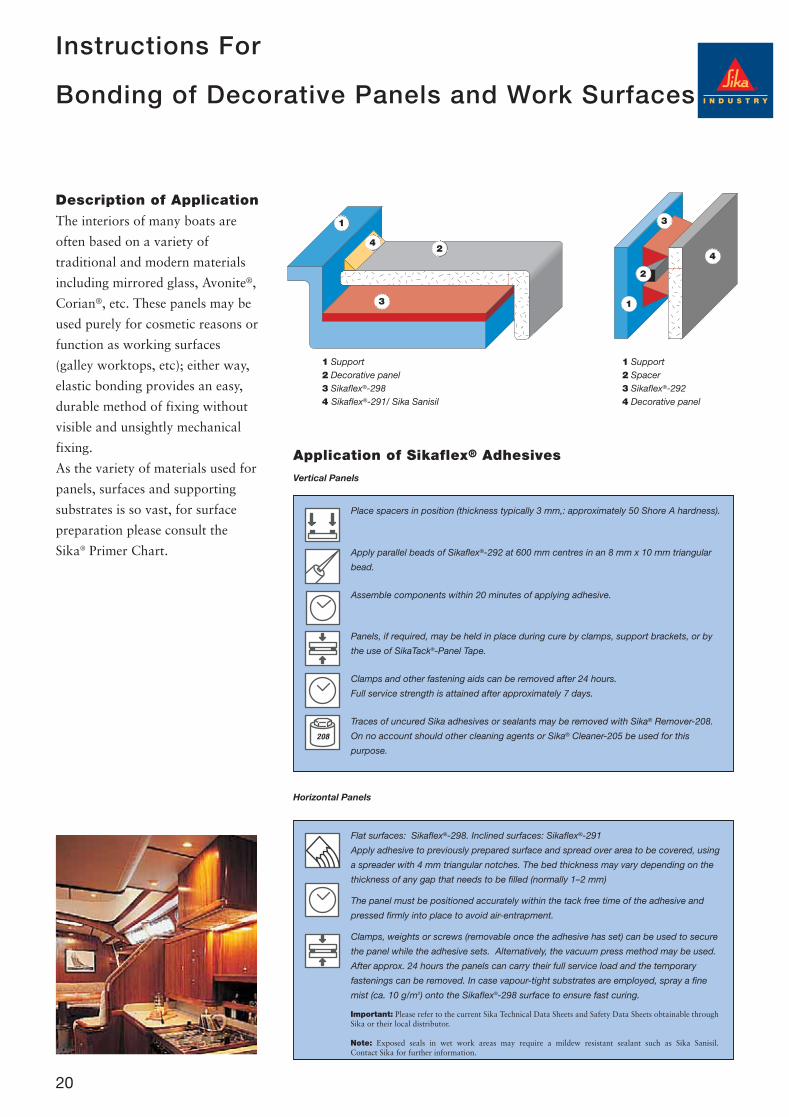
1 Support2 Decorative panel3 Sikaflex®-2984 Sikaflex®-291/ Sika Sanisil
1 Support2 Spacer3 Sikaflex®-2924 Decorative panel
3
24
1
4
3
1
2
Description of ApplicationThe interiors of many boats are
often based on a variety of
traditional and modern materials
including mirrored glass, Avonite®,
Corian®, etc. These panels may be
used purely for cosmetic reasons or
function as working surfaces
(galley worktops, etc); either way,
elastic bonding provides an easy,
durable method of fixing without
visible and unsightly mechanical
fixing.
As the variety of materials used for
panels, surfaces and supporting
substrates is so vast, for surface
preparation please consult the
Sika® Primer Chart.
Instructions For
Important: Please refer to the current Sika Technical Data Sheets and Safety Data Sheets obtainable throughSika or their local distributor.
Note: Exposed seals in wet work areas may require a mildew resistant sealant such as Sika Sanisil.Contact Sika for further information.
Application Guide 19/1/05 2:37 PM Page 20

21
GeneralSubstrates should be free from
dust, dirt, oil, grease and any
contaminants. Any dirty, corroded
or degraded areas of the joint must
be cleaned.
PaintabilityMost of the common paints
(except alkyd-based paints) can be
used on top of Sikaflex® products.
The best results are obtained when
the adhesive/sealant is fully cured.
It is, however, recommended that
the compatibility is checked by
pretesting if early painting is
required or in critical applications.
Please note that rigid paint systems
prevent joint movement, which
may lead to cracking of the paint
and defects in the seal.
Coated Surfaces, Paints and VarnishesPretesting of adhesion is a
prerequisite on coated surfaces. As
a guide, reactive systems which are
cross-linked thermally (powder
coatings) or by polyaddition
reaction (epoxy or PUR coatings)
can be bonded with Sikaflex®
products. Alkyd resin-based
paints/varnishes which dry by
oxidation are less suitable.
Polyvinylbutyral, epoxy resin ester
systems and other non-reactive
air-drying one-component paints
are lower in final strength and are
generally compatible, physically,
with our sealants; however,
depending on stresses, may or may
not be strong enough for use with
our adhesives. Please note that
paint additives which act on the
surface of the paint or varnish,
such as coalescing agents, silicones,
anti-foams, etc. can effect the
adhesion of the adhesive/sealant to
the paint and should be removed
from the surface.
Glass and Other Transparent SubstratesIf a transparent substrate is used
where the bond is exposed to
direct sunlight through the
transparent layer, additional
protection against UV radiation is
required.
This could be:
■ a mechanical protection like a
trim or metallic profile,
■ a ceramic screen-printed
peripheric edge (onto mineral
glass) providing a sufficient
barrier against UV radiation, or
■ a black or white coloured film
such as Sika® UV Shielding
Tape.
Under all circumstances the overlap
of any of the aforementioned
variants should be taken into
consideration because of refractional
effects.
If in doubt it is recommended toconsult with Sika.
Glassfibre ReinforcedPlastic (GRP)
Generally, GRP’s represent a
thermosetting plastic of unsaturated
polyester resin (UP), an epoxy
resin (EP) or a polyurethane resin
(PUR). Sometimes freshly
produced UP-GRP parts may still
contain residual styrene monomer,
and, since the chemical reaction is
not completed, subsequently show
post-shrinkage. Only postcured or
aged GRP parts should be bonded.
The smooth side (gel-coated side)
of the GRP part may contain
mould release agents. These impair
the subsequent bonding
capabilities to the surface and
should be removed. The rough side
of the GRP panels generally
Notes on Substrates
Application Guide 19/1/05 2:37 PM Page 21
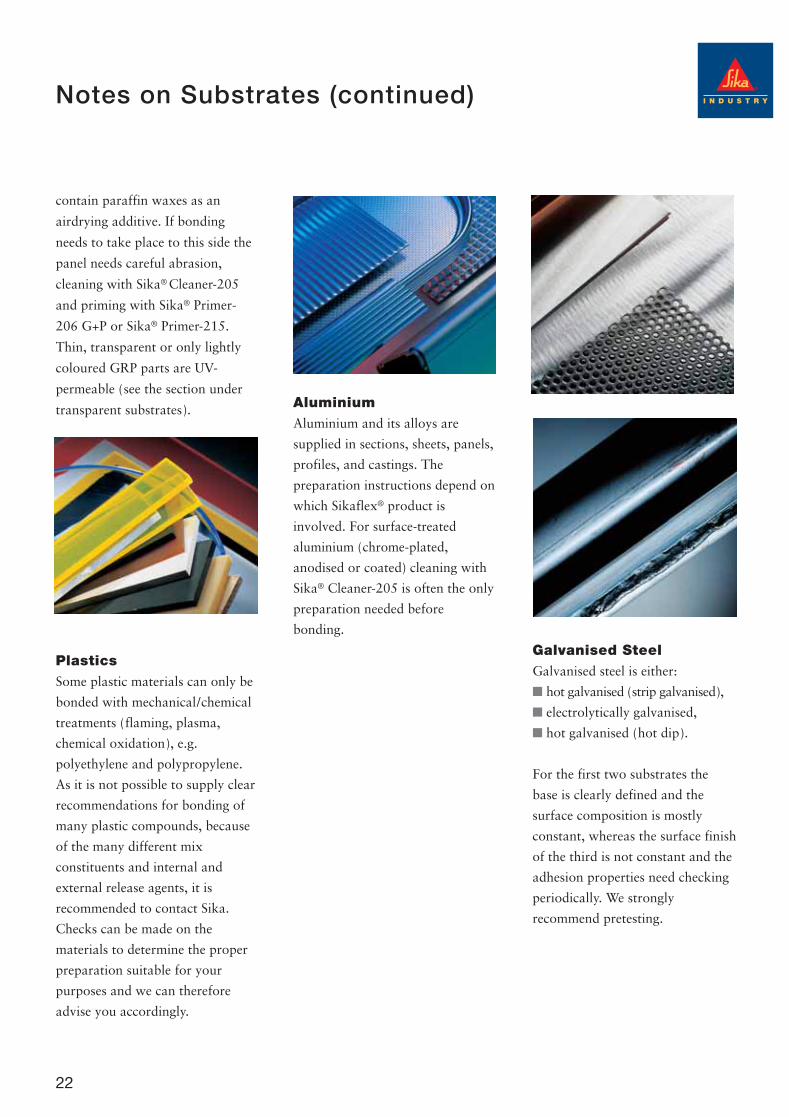
22
Notes on Substrates (continued)
contain paraffin waxes as an
airdrying additive. If bonding
needs to take place to this side the
panel needs careful abrasion,
cleaning with Sika® Cleaner-205
and priming with Sika® Primer-
206 G+P or Sika® Primer-215.
Thin, transparent or only lightly
coloured GRP parts are UV-
permeable (see the section under
transparent substrates).
PlasticsSome plastic materials can only be
bonded with mechanical/chemical
treatments (flaming, plasma,
chemical oxidation), e.g.
polyethylene and polypropylene.
As it is not possible to supply clear
recommendations for bonding of
many plastic compounds, because
of the many different mix
constituents and internal and
external release agents, it is
recommended to contact Sika.
Checks can be made on the
materials to determine the proper
preparation suitable for your
purposes and we can therefore
advise you accordingly.
AluminiumAluminium and its alloys are
supplied in sections, sheets, panels,
profiles, and castings. The
preparation instructions depend on
which Sikaflex® product is
involved. For surface-treated
aluminium (chrome-plated,
anodised or coated) cleaning with
Sika® Cleaner-205 is often the only
preparation needed before
bonding.
Galvanised SteelGalvanised steel is either:
■ hot galvanised (strip galvanised),
■ electrolytically galvanised,
■ hot galvanised (hot dip).
For the first two substrates the
base is clearly defined and the
surface composition is mostly
constant, whereas the surface finish
of the third is not constant and the
adhesion properties need checking
periodically. We strongly
recommend pretesting.
Application Guide 19/1/05 2:38 PM Page 22

Pro
duct
Sik
afl
ex®
-290 D
CSik
afl
ex®
-291
Sik
afl
ex®
-292 Sik
afl
ex®
-295 U
VSik
afl
ex®
-296
Sik
afl
ex®
-298
Sik
afl
ex®
-852FR
Des
crip
tion
Dec
k ca
ulki
ng
Mar
ine
seal
ing
Stro
ng e
last
ic
Fast
-cur
ing
Hig
h st
reng
th
Spre
adab
le a
dhes
ive
Seal
ing
and
com
poun
dco
mpo
und
adhe
sive
for
di
rect
-gla
zing
di
rect
gla
zing
for
mar
ine
adhe
sive
sys
tem
mar
ine
appl
icat
ions
adhe
sive
ad
hesi
veap
plic
atio
ns
Use
sSe
alin
g jo
ints
G
ener
al p
urpo
se
Stru
ctur
al
Bon
ding
of
orga
nic
Bon
ding
min
eral
B
ondi
ng o
f de
cks
Seal
ing/
bond
ing
in t
imbe
r de
ck
seal
ing
and
bond
ing
bond
ing
glas
s. U
V r
esis
tant
gl
ass
pane
ls a
nd
whe
re F
lam
e pl
anki
ngse
alin
gsh
eets
reta
rdan
cy is
requ
ired
Che
mic
al b
ase
1-pa
rt
1-pa
rt
1-pa
rt1-
part
1-
part
1-
part
1-
part
po
lyur
etha
nepo
lyur
etha
nepo
lyur
etha
nepo
lyur
etha
nepo
lyur
etha
nepo
lyur
etha
nepo
lyur
etha
ne
Stab
ility
Thi
xotr
opic
G
ood
Ver
y go
odG
ood
Ver
y go
od, w
ith
Flui
dG
ood
(non
sag
rati
ng)
no t
ende
ncy
to
sag
or s
lum
p
Tack
fre
e ti
me
60 m
inut
es
60 m
inut
es
40 m
inut
es
50 m
inut
es
45 m
inut
es
60 m
inut
es
60-9
0 m
inut
es
23°C
, 50%
R.H
.ap
prox
.ap
prox
.ap
prox
.ap
prox
.ap
prox
.ap
prox
.
Rat
e of
cur
e3
mm
per
24
hrs.
3
mm
per
24
hrs.
4
mm
per
24
hrs.
3
mm
per
24
hrs.
>3.5
mm
per
24
hrs.
3 m
m p
er 2
4 hr
s.3
mm
per
24
hrs.
Shor
e A
har
dnes
s 35
app
rox.
40 a
ppro
x.55
app
rox.
35 a
ppro
x.45
app
rox.
35 a
ppro
x.50
app
rox.
(DIN
535
05) a
t 23°
C
Elo
ngat
ion
at
> 25
0%>
400%
>300
%>
500%
> 45
0%>
600%
> 30
0%br
eak
(DIN
535
04)
Tens
ile s
tren
gth
1,3
N/m
m2
1,8
N/m
m2
4 N
/mm
23
N/m
m2
> 6,
5 N
/mm
21
N/m
m2
2,5
N/m
m2
(DIN
535
04)
appr
ox.
appr
ox.
appr
ox.
appr
ox.
appr
ox.
appr
ox.
appr
ox.
App
licat
ion
+5°C
to
+25°
C+1
0°C
to
+35°
C+1
0°C
to
+35°
C+1
0°C
to
+35°
C+1
0°C
to
+35°
C+1
0°C
to
+35°
C+1
0°C
to
+35°
Cte
mpe
ratu
re r
ange
Serv
ice
– 40
°C t
o +9
0°C
– 40
°C t
o +9
0°C
–
40°C
to
+90°
C
– 40
°C t
o +9
0°C
–
40°C
to
+90°
C
–50
°C t
o +8
0°C
–
40°C
to
+90°
C
tem
pera
ture
rang
e12
0°C
(sho
rt ex
posu
re)
120°
C (s
hort
expo
sure
)14
0°C
(sho
rt ex
posu
re)
120°
C (s
hort
expo
sure
)10
0°C
(sho
rt ex
posu
re)
120°
C(sh
ort e
xpos
ure)
23
Sik
afl
ex
®M
ari
ne
Ad
he
sive
s a
nd
Se
ala
nts
Impo
rtan
t: P
leas
e re
fer
also
to
the
curr
ent
Sika
Tech
nica
l Dat
a Sh
eets
and
Saf
ety
Dat
a Sh
eets
obta
inab
le t
hrou
gh S
ika
or t
heir
loca
l Dis
trib
utor
Application Guide 19/1/05 2:38 PM Page 23

24
Cleaner, Primer and Adhesive Consumption Table
Sikaflex®-290 DC Coverage per unitJoint dimension (lineal metres)
310ml 600ml
5 x 5mm 12 248 x 5mm 8 15
10 x 5mm 6 1210 x 7.5mm 4 8
Thickness of Quantity CoverageSikaflex®-298 in mm required in l/m2 600ml unit/m2
2 2 34 4 6
Product Packaging Unit Quantity per m2 Coverage/ Length of primedin ml required in ml Unit in m2 surface 30mm
wide in metres
Sika®Activator
Sika®Cleaner-205
Sika®Primer-206 G+P
Sika®Primer-209
Sika®Primer-210 T
Sika®Primer-215
Sika®Primer-290 DC
Sika®Primer-204 N
250
2501000
30250
250
2501000
2501000
30250
1000
250
6.25
6.2525.00
0.201.60
1.60
1.606.60
1.606.60
0.201.606.60
1.60
6.25
6.2525.00
650
50
50200
50200
650
200
50
40
40
150
150
150
150
150
150
Contact Sika® for details on Sika® Primer-204 EP and Icosit® EG.
Application Guide 19/1/05 2:38 PM Page 24

25
Pri
me
r C
ha
rt f
or
Sik
a M
ari
ne
Ap
pli
ca
tio
ns
(se
e p
ag
e 2
6 f
or
ke
y to
ab
bre
via
tio
ns)
Seala
nt
&
Alu
min
ium
Alu
min
ium
Anodis
ed
Ste
el St3
7Sta
inle
ss S
teel
Hot
dip
ped
Adhesi
ve(A
lMg3)
(AlM
gSi)
Alu
min
ium
galv
anis
ed
steel
Sika
flex
®-2
9120
520
520
520
5>20
4EP
205
205>
206G
P
Sika
flex
®-2
92SB
>205
>210
TSB
>205
>210
T20
5>21
0TSB
>208
>204
EP
SB>2
05>2
06G
PSB
>205
>210
TSB
>205
>206
GP
SB>2
05>2
06G
PSB
>205
>206
GP
SB>2
05>2
04N
SB>2
05>2
04E
PSB
>205
>204
NSB
>205
>204
NSB
>205
>206
GP
SB>2
05>2
04N
Sika
flex
®-2
96SB
>SA
>210
TSB
>SA
>210
TSA
>206
GP
SB>2
05>2
06G
PSB
>SA
>206
GP
SB>S
A>2
06G
PSB
>SA
>206
GP
SB>S
A>2
06G
P20
5>20
6GP
SB>2
08>2
04E
PSB
>205
>206
GP
SB>2
05>2
06G
P
Sika
flex
®-2
95U
VSB
>205
>210
TSB
>205
>210
T20
5>21
0TSB
>208
>204
EP
SB>2
05>2
06G
PSB
>205
>210
TSB
>205
>206
GP
SB>2
05>2
06G
P20
5>20
6GP
SB>2
05>2
06G
PSB
>205
>210
TSB
>205
>206
GP
Sika
flex
®-8
52FR
208>
204E
P20
8>20
4EP
208>
204E
P20
8>20
4EP
208>
204E
P20
8>20
4EP
Sika
flex
®-2
98E
G1
EG
120
5E
G1
205
EG
1
Seala
nt
&
Ele
ctr
oG
lass
Rein
forc
ed
AB
SG
lass
Cera
mic
Acry
lic P
UW
ood
Adhesi
veG
alv
anis
ed
Poly
est
er
Fri
tted G
lass
Pain
tsSte
el
Sika
flex
®-2
9120
5>20
6GP
S80>
205>
206G
P20
5>21
5SA
SA20
529
0DC
Pri
mer
S80>
205>
215
205>
209
SA>2
06G
PSA
>206
GP
208
Sika
flex
®-2
92SB
>205
>210
TSB
>205
>206
GP
SB>2
05>2
15N
.AN
.A.
208>
209
290D
C P
rim
erSB
>205
>204
EP
SB>2
05>2
15SB
>205
>204
N
Sika
flex
®-2
96SB
>SA
>206
GP
SB>2
05>2
15SB
>205
>215
SASA
SA29
0DC
Pri
mer
SB>2
05>2
06G
PSB
>205
>206
GP
Sika
flex
®-2
95U
VSB
>205
>210
TSB
>205
>215
SB>2
05>2
15N
.A.
N.A
.20
8>20
929
0DC
Pri
mer
SB>2
05>2
06G
PSB
>205
>206
GP
Sika
flex
®-8
52FR
208>
204E
PS8
0>20
4EP
205>
215
N.A
.N
.A.
TS
N.A
.
Sika
flex
®-2
98E
G1
S80>
205
N.A
.N
.A.
N.A
.20
529
0DC
Pri
mer
Impo
rtan
t: P
leas
e re
fer
also
to
the
curr
ent
Sika
Tech
nica
l Dat
a Sh
eets
and
Saf
ety
Dat
a Sh
eets
obta
inab
le t
hrou
gh S
ika
or t
heir
loca
l dis
trib
utor
.
Application Guide 19/1/05 2:38 PM Page 25

26
Pri
me
r C
ha
rt f
or
Sik
a M
ari
ne
Ap
pli
ca
tio
ns
(ke
y)
Abbre
viati
on
Pro
duct/
Exp
lanati
on
Com
po-
Consu
mpti
on
Dry
ing T
ime (23/5
0%
)C
olo
ur
Codin
g (C
ap)
nents
204N
Sika
®Pr
imer
-204
NI
Part
0.1–
0.15
kg/
m2
60 m
in. t
o 24
hou
rsL
ight
Blu
e
205
Sika
®C
lean
er-2
05I
Part
0.04
kg/
m2
10 m
in. t
o 2
hour
sY
ello
w
206G
PSi
ka®
Prim
er-2
06 G
+PI
Part
0.1–
0.15
kg/
m2
30 m
in. t
o 24
hou
rsB
lack
208
Sika
®R
emov
er-2
08I
Part
0.04
kg/
m2
30 m
in. t
o 24
hou
rsR
ed
209
Sika
®Pr
imer
-209
I Pa
rt0.
15–0
.2 k
g/m
230
min
. to
24 h
ours
Gre
en
210T
Sika
®Pr
imer
-210
TI
Part
0.15
–0.2
kg/
m2
30 m
in. t
o 24
hou
rsG
rey
290D
CSi
ka®
Prim
er-2
90 D
CI
Part
0.15
–0.2
kg/
m2
60 m
in. t
o 24
hou
rsR
oyal
Blu
e
SASi
ka®
Act
ivat
orI
Part
0.04
kg/
m2
10 m
in. t
o 24
hou
rsO
rang
e
204E
PSi
ka®
Prim
er-2
04 E
P2
Part
0.8
kg/m
224
hou
rs t
o 14
day
sN
one
215
Sika
®Pr
imer
-215
I Pa
rt0.
15–0
.2 k
g/m
230
min
. to
24 h
ours
Dar
k B
lue
EG
1Ic
osit
®E
G1
Prim
er2
Part
0.2
kg/m
212
hou
rs t
o 16
hou
rsN
one
SBSc
otch
-Bri
te M
600
TS
C
onsu
lt T
echn
ical
Ser
vice
S80
Sand
pap
er (
80 g
rit)
N.A
.no
t ap
plic
able
>ne
xt s
tep
Impo
rtan
t: P
leas
e re
fer
also
to
the
curr
ent
Sika
Tech
nica
l Dat
a Sh
eets
and
Saf
ety
Dat
a Sh
eets
obta
inab
le t
hrou
gh S
ika
or t
heir
loca
l dis
trib
utor
.
Application Guide 19/1/05 2:38 PM Page 26

27
Notes
Application Guide 19/1/05 2:38 PM Page 30

28
Notes
Application Guide 19/1/05 2:38 PM Page 31

Bonding technology with global experience
Leading manufacturers in themarine industry were quick toappreciate the unique properties andquality of our innovative marineproducts years ago – and have beenusing them worldwide ever since.
Sika pioneered the developmentof a variety of one-componentpolyurethanes for marine use. They all share certain characteristicsincluding excellent gap-fillingcapability and permanent elasticity.They are also sandable, non-corrosive and can be overpainted.
From the smallest boats to thelargest ships, Sika provides thewatertight solution.
Worldwide Sika bondsthe finest craft
Application Guide 19/1/05 2:38 PM Page 29

Cer
tifie
d
Management
System
ISO 14001
Cer
tified Quality System
ISO
9001/ EN 29001
Sika Ireland LimitedUnit 3 Ballymun Industrial Estate,
Dublin 11, IrelandTel: (01) 8620709 Fax: (01) 8620707
e-mail: [email protected]
Sika LimitedWatchmead, Welwyn Garden City,
Hertfordshire AL7 1BQTel: 01707 394444 Fax: 01707 329129
e-mail: [email protected]
Website: www.sika.co.uk4.
03.W
P.2K
Application Guide 19/1/05 2:37 PM Page 1