SIGSAUER TRANSITION TRAINING - National … 12 RDS (15) yard line - 3 RDS 7 sec. right standing...
123
! < , SIGSAUER P226/9mm TRANSITION TRAINING J 'c r ¥ , <, j f " , , , , \ i, .' If you have issues viewing or accessing this file contact us at NCJRS.gov.
Transcript of SIGSAUER TRANSITION TRAINING - National … 12 RDS (15) yard line - 3 RDS 7 sec. right standing...

! < ,
SIGSAUER P226/9mm ~ TRANSITION TRAINING J ~~ 'c ~ r ¥ ~ , <,
j
f " ,
, , ,
\ i, .'
If you have issues viewing or accessing this file contact us at NCJRS.gov.

-- ,> -
SIG SAUER P226/9m.m TRANSITION TRAINING

U.S. Department of Justice National Institute of Justice
148828
This document has been reproduced exactly as received from the person or organization originating It. Points of view oroplnlons stated in this document are those of the authors and do not necessarily represent the official position or policies of the National Institute of Justice.
Permission to reproduce this copyrighted material has been
gr¥~iihessee Valley Authority
to the National Criminal Justice Reference Service (NCJRS).
Further reproduction outside of the NCJRS system requires permission of the copyright owner.
1 1 1 1 1 1 1

e e e FIREARMS QUALIFICATION FORM
9mm SIG SAUER
STAGE STAGE STAGE STAGE FAGE .ST.AGE STA .. GE STAGE . \ ... ,., ..... .... . ... ' I
DISTANCE AND TIME .. ' . ",-S!" ' : . ROUNDS lA IB 2A 2B, ,A 4A, 4B, \1' ,01'" A LS, I
Name Date Time Time Time Time Time Time Time p~~~~:es I 0 .1 2 I 3 I 4 I 5 I ~RE I ~
NOTE: Transtar II targets will be used.
70% is i'Cquired to qualify.
Instructor's Signature
lA 6 RDS (3) yard line - 1 RD ill 2 sec. from holster - strong hand only. 1B 6 RDS (2) RDS 3 sec. from holster, two hand point shoulder. Stay combat ready - remaining (4) RDS - 2 RDS 2 sec. 2A 12 RDS (7) yard line - 1 RD 3 sec. tactical reload (two hands from holster transfer weak hand - 15 sec - remain aimed in 1 RD/3
sec. 2B 12 RDS - (2) RDS 4 sec., two handed from holster, last (2) RDS emergency reload - 2 RDS/I5 sec., decock (2) RDS 4 sec. (strong
hand only). 3A 12 RDS (15) yard line - 3 RDS 7 sec. right standing barricade. Kneel remained in 3 RDS magazine exchange, 3 RDS left standing
barricade 20 sec. kneel 3 RDS/6 sec. 4A 6 RDS right side barricade 3 RDS/8 sec - 2 RDS/5 sec - 1 RD 3 sec. 4B 6 RDS left side barricade 3 RDS/8 sec - 2 RDS/5 sel,; - 1 RDS/3 sec.

e
DISTANCE STAGE
3 YARDS lA
DISTANCE STAGE
3 YARD IB
e
TVA PUBLIC SAFETY . PRACTICAL PISTOL COURSE FOR SEMI-AUTOMATICS
POSITION MAGAZINES ROUNDS
STANDING 2 MAGS W\6 RDS 6 RDS
POSITION MAGAZINES ROUNDS
STANDING (2ND MAG) 6
SROTS
1
SHOTS
2
TIME
2 SEC.
TIME
3 SEC. AND 2 SEC.
NOTE: FOR SEMIAUTOMATICS WITH DECOCKING I SAFETY LEVERS ....... SfiOOrERS WILL NOT D ECOCK BETWEEN SHOTS. SHOOTER'S WILL REMOVE FINGER FROM TRIGGER BETWEEN SHOT AT COMPAT READY. WHEN FIRING SINGLE ACTION (SA) SHOOTER'S WILL SCAN TARGET A.."'U:A BEFORE HOLSTERING
e
DESCRIPTION
ONE ROUND IN 2 SECONDS, POINT SHOULDER SHOOTING w\sTRONG HAND ONLY. DRAW FROM HOLSTER, REFERENCE SIGHTS, FIRE ONE ROUND FOR EACH SOUND OF THE HORN. AFTER LAST HORN, EXECUTE AN EMERGENCY RELOAD AND COVER THE TARGET HOLSTER A IJOADED WEAPON
DESCRIPTION
TWO ROUNDS IN 3 SECONDS, POINT SHOULDER, TWO HANDED DRAW FROM THE HOLSTER AND SHOOTER WILL Nir".1NTAIN A COMBAT READY POSmON WITH WEAPON SLIGHTLY BELOW EYE LEVEL. ON NEXT SOUND OF HORN SHOOTER BRINGS WEAPON UP TO EYE LEVEL AND FIRES TWO ROUNDS IN 2 SECONDS. HOLSTER AN UNLOADED WEAPON.
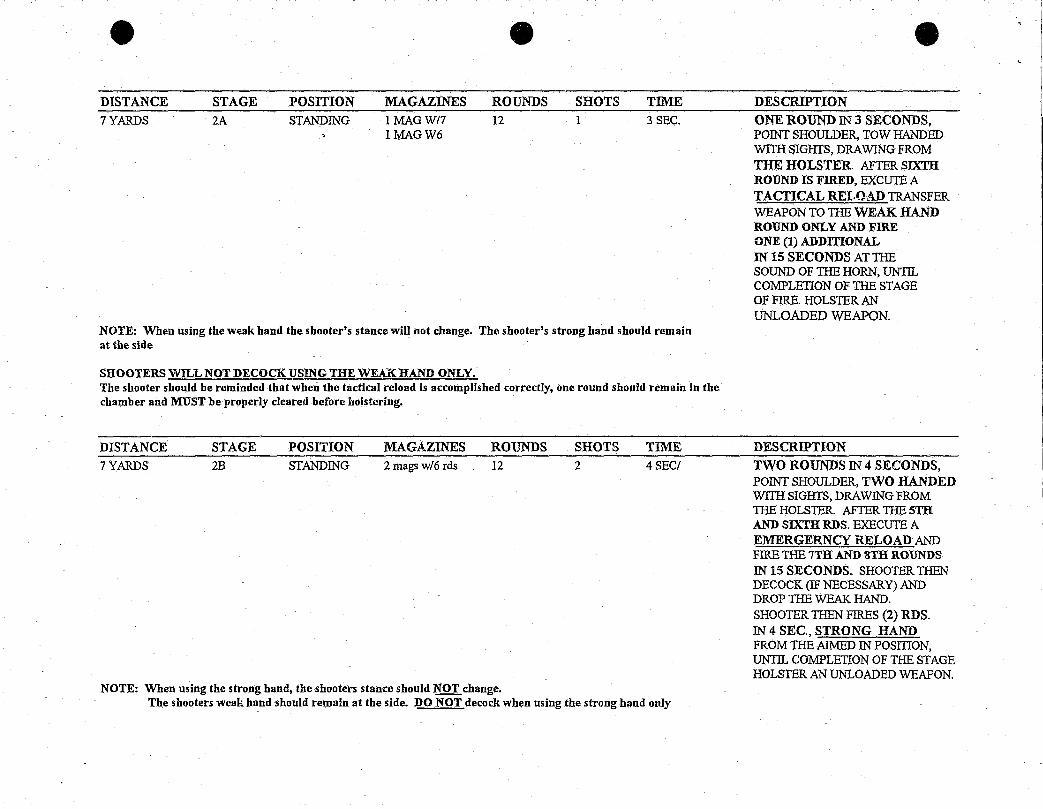
e DISTANCE STAGE POSITION 7 YARDS 2A STANDING
MAGAZINES lMAGWI7 lMAGW6
e ROUNDS 12
SHOTS TIME 1 3 SEC.
NOTE: When using the weak hand the shooter's stance will not change. The. shooter's strong hand should remain at the side
SHOOTERS WILL NOT DECOCK USING THE WEAK HAND ONLY. The shooter should be reminded that when the tactical reload is accomplished correctly, one round should remain in the chamber and MUST be properly cleared before holstering.
DISTANCE STAGE POSITION MAGAZINES ROUNDS SHOTS TIME 7 YARDS 2B STANDING 2 mags w/6 rds 12 2 4 SEC/
NOTE: When using the strong hand, the shooters stan;:e should NOT change. The shooters weak hand should remain at the side. DO NOT decock when using the strong hand only
e DESCRIPTION ONE ROUND IN 3 SECONDS, POINT SHOULDER, TOW HANDED WITH SIGHTS, DRAWING FROM THE HOLSTER. AFTER SIXTH ROUND IS FIRED, EXCUTE A TACTICAL RELOAD TRANSFER WEAPON TO TIlE WEAK HAND ROUND ONLY AND FIRE ONE (1) ADDITIONAL IN 15 SECONDS AT TIlE SOUND OF TIlE HORN, UNTIL COMPLETION OF THE STAGE OF FIRE. HOLSTER AN UNLOADED WEAPON.
DESCRIPTION TWO ROUNDS IN 4 SECONDS, POINT SHOULDER, TWO HANDED WITH SIGHTS, DRAWING FROM THE HOLSTER AFTER TIlE 5TH AND SIXTH RDS. EXECUTE A EMERGERNCY RELOAD AND FIRE TIlE 7TH AND 8TH ROUNDS IN 15 SECONDS. SHOOTER TIIEN DECOCK (IF NECESSARY) AND DROP THE WEAK HAND. SHOOTER TIIEN FIRES (2) RDS. IN 4 SEC., STRONG HAND FROM TIlE AIMED IN POSmON, UNTIL COMPLETION OF THE STAGE HOLSTER AN UNLOADED WEAPON.

e e
>
DISTANCE STAGE POSITION MAGAZINES ROUNDS SHOTS TIME 15 YARDS 3 RIGHT/LEFT 1 MAG WI7 RDS. 12 3 7 SEC.
SIDE STANDI 1 MAG W/5 RDS. INGIKNEELING 6 SEC. BARRICAL)E
NOTE: When the shooter is aimed in on a target, the finger will be ON THE TRIGGER, when firing double aciton (DA). When changing positions behind the barricade, the weapon is DECOCKED, finger OFF the nigger.
e
DESCRIPTION DRAW AND FIRE THREE ROillil)S IN 7 SEC., RIGHT SIDE STANDING BARRICADE. AT THE SOUND OF HORN THE SHOOTER WILL MOVE TO THE RIGHT SIDE KNEELlNG BARRICADE AND REMAlNG AIMED IN. NEXT SOUND ON THE HORN THE SHOOTER WILL FIRE THREE ROUNDS FROM THE AIMED IN POSmON EXECUTE A MAGAZINE EXCHANGE THEN MOVE TO THE LEFT SIDE STANDlNG POSmON AND FIRE THREE MORE ROUNDS ALL WIIH IN 20 SEC. THESHOOTER~LTHEN MOVE TO THE LEFT SIDE KNEELING BARRICADE AND REMAlN AIMED IN. AT THE SOUND OF THE HORN SHOOTER WILL FIRE THE FINAL THREE ROUNDS IN6 SECONDS. THE SHOOTER WILL THEN SCAN THE AREA TO BE CERTAlN IT IS SAFE, COhlJ)UCT A CLEARING PROCEDURE, CHECK IT TWICE AND HOLSTER AN UNLOADED WEAPON.

-DISTANCE STAGE 25 YARDS 4A
DISTANCE STAGE 25 YARDS 4B
POSITION right side Standing Barricade
POSITION Left Side Standing barricade
-MAGAZINES ROUNDS 1 mag w/l2 rds 6 (or 2 mags/w 6 Rds.)
MAGAZINES ROUNDS 6
SHOTS TIME 3 8 sec.
2 5 sec.
1 3 sec.
SHOTS TIME 3 8 sec.
2 5 sec.
1 3 SEC.
e
DESCRIPTION SHOOTER WILL DRAW AND FIRE 3 ROUNDS IN 8 SECONDS. SHOOTER WILL REMAIN AIMED IN. AT THE SOUND OF THE HORN THE SHOOTER WILL FIRE 2 ROUNDS IN FIVE SECONDS. AT THE SOUND OF THE HORN FIRE ONE ROUND IN 3 SECONDS. PREPAREFOR STANDJNG LEFT SIDE BARRICADE POSTION. hOLSTER A LOADED WEAPON.
DESCRIPTION SHOOTER WILL FIRE THE SAME SEQUENCE AS RIGHT SIDE BARRICADE ABOVE, THEN CLEAR, CHECK IT TWICE AND HOLSTER AN EMPTY WEAPON
NOTE IN COMBAT SITUATIONS (AmiED IN) THE FINGER REMAINS ON THE TRIGGER WHEN FIRING DOUBLE ACTION (DA), AND OFF THE TRIGGER WHEN FIRING SINGl .. E ACTION (SA).
TOTAL ROUNDSPOSSIBLE SCORE MINIMUM SCORE
60 300 210
MARKSMANSHIP RATINGS 210 - 254 MARKSMAN 255 - 284 SHARPSHOOTER 285· 299 EXPERT 300 - DISTINGUISHED EXPERT

•
• SIG SAUER P226/9mm
TRANSITION TRAINING

•
•
•
INTRODUCTION'
The Training Division would like to welcome you to the Tennessee Valley Authority (TVA), Public Safety Service (PSS) semi-automatic pistol transition program. The curriculum provides the necessary training for in-service firearms instructors to transition our personnel from the revolver to the semi-automatic pistol.
Introduced to PSS in April 1994, this program was developed to address the growing trend of conversion to semi-automatic pistols by law enforcement personnel.
This program is adopted by the PSS from the Federal Law Enforcement Training Center (FLETC) and will become an official "Practical Pistol Course" for the semi-automatic pistol. This training utilizes lecture, demonstration, two graded practical exercises, and a written examination. There will be no remedial training given for the written examination .

TABLE OF CONTENTS
• Introduction:
Section 1. Transition (Tab A)
1. SIGARMS Warning 2. Three-day Transition Schedule for SIG-Sauer P226
Section II. Safety (Tab B)
1. Firing Range and Safety Rules 2. Syllabus 9n® Transition - Firearms Safety 3. Safaty Handout
Section III FLETC Text (Tab C)
1. SIG-Sauer 9rnm Semi-automatic (Handout) 2. Immediate Action for Semi-nutomatic Pistols
Including 1Norksheet (Handout)
• 3. Fundamentals of Marksmanship for Semi-automatic Pistols (Handout) 4. Reduced Light for Semi-automatic Pistol (Handout) 5. SIG Pistol Familiarization Courses I-VII Practice 6. FLETC PPC Qualification for Semi-automatic
• Syllabus • Outline of Instruction • FLETC Prnctical Pistol Course for the Semi-automatic Pistol
7. P226 Functional Performance Test (Class Room Pass Fail)
Section IV. Test (Instructor Will Haintain Security On Test) (Tab D)
Record of Update and Review
Authority
• 1947N

•
SECTION I TAB A
TRANSITION
•
••

•
•
•
." ." ." ." * * S/GARMS WARNING'" * * .... *
All owners and users of SIG~Sauer pistols are reminded to use the decocking lever to decock their pistols. This is the only way to safely lower the hammer from the cocked position and prevent an accidental discharge caused by thumb-slipping or dropping the pistol.
This Warning applies to all pistols with decocking levers *. The only positive way to safely lower the hammer is by use of the decocking lever.
Hammers should. never be lowered by manually lowering the hammer by pulling the trigger. Manually lowering the hammer is dangerous in itself and prevents the full application of the pistol's safety features.
The decocking lever is the only proper method of lowering the hammer and assuring that the hammer rests in the Intercept notch. The Intercept notch prevents the hammer from striking the firing pin, whether from slipping manually, or accidentally dropping the pistol.
DO NOT thumb the hammer down: the consequence can be serious injury or death • only and ALWAYS use the decocking leverl
*P220 P225 P226
P228 P229 P230
**********
SEE THE OWNER'S MANUAL FOR FIREARMS SAFETY INSTRUCTIONS
\ . . . ' . . , . . • r ". ":'

• SIG SAUER P226 TRANSITION
DAY 1
INTRODUCTION
SAFETY
NOMENCLA TURE/CLEANING
• CYCLE OF OPERATION/LOADING/UNLOADING
FUNDAMENTALS
IMMEDIATE ACTION DRILLS/MALFUNCTIONS
COURSE OF FIRE
•

- - --~ -- - ------~
• DAY 2
QUESTIONS FROM PREVIOUE. DAY
SAFETY
IMMEDIATE ACTION DRILLS
MAGAZINE EXCHANGE
• FIELD STRIPPING WEAPON
COURSE OF FIRE FOR DAY
DIM LIGHT FIRE
•

---------------~- -- ---
DAY 3
QUESTION FROM PREVIOUS DAY
SAFETY
PRACT!CE QUALIFICATION
QUALIFICATION
• TACTICAL COURSE
•

•
SECTION II TAB B
S/~!.FETY
• I
•

•
•
•
TENNESSEE VALLEY AUTHORITY
PUBLIC SAFETY SERVICE
FIREARMS SAFETY RULES
A. GENERAL RULES:
l. 2. 3.
4.
5. 6.
7. 8.
9.
Treat all firearms as if they are loaded. Never point a firearm at anyone unless you are justified in shooting that person. When a firearm is picked up, immediately open the cylinder or action to determine whether it is unloaded. Never give a firearm to or take a firearm from anyone unless the cylinder or action IS open. Be sure there is no obstruction in the barrel of the firearm before loading. Never draw a firearm from the holster or reholster with the finger in the trigger guard. Never pennit the muzzle of a firearm to touch the ground. Never let the hammer of a revolver down on a live cartridge without first placing the thumb in front of the hammer . Never fire a succeeding shot after a malfunction without first unloading and checking the barrel for obstructions.
B. SPECIFIC RANGE RULES:
1. Eye and ear protection will be worn at all times while on the range. 2. No loaded weapons are allowed on the range except on the firing line. 3 . Weapons must remain holstered until the user reaches the firing line. If a weapon is
4. 5.
6.
7.
8. 9.
10 .
11.
to be carried on the range, the cylinder must be open or slide locked open, with the magazine out. . Do not load until the command is given. NEVER anticipate a command. Fingers are not to be placed within the trigger guard until pointing the weapon at the target. This is especially important when drawing the weapon from the holster. Weapon muzzles will be pointed down range at all times when not holstered. NEVER point over the top of the backstop. Talking is not allowed 8;t the firing line or to the shooter on the firing line except by instructors. Smoking, eating, or drinking on the firing line is prohibited. In case of a misfire or squib, keep the fireann pointed down range a least 10 seconds before opening the cylinder or slide. If a weapon is accidentally dropped, immediately inspect the weapon to ensure that it can function. Dry firing behind the firing line is prohibited.
•
•
•
-2-
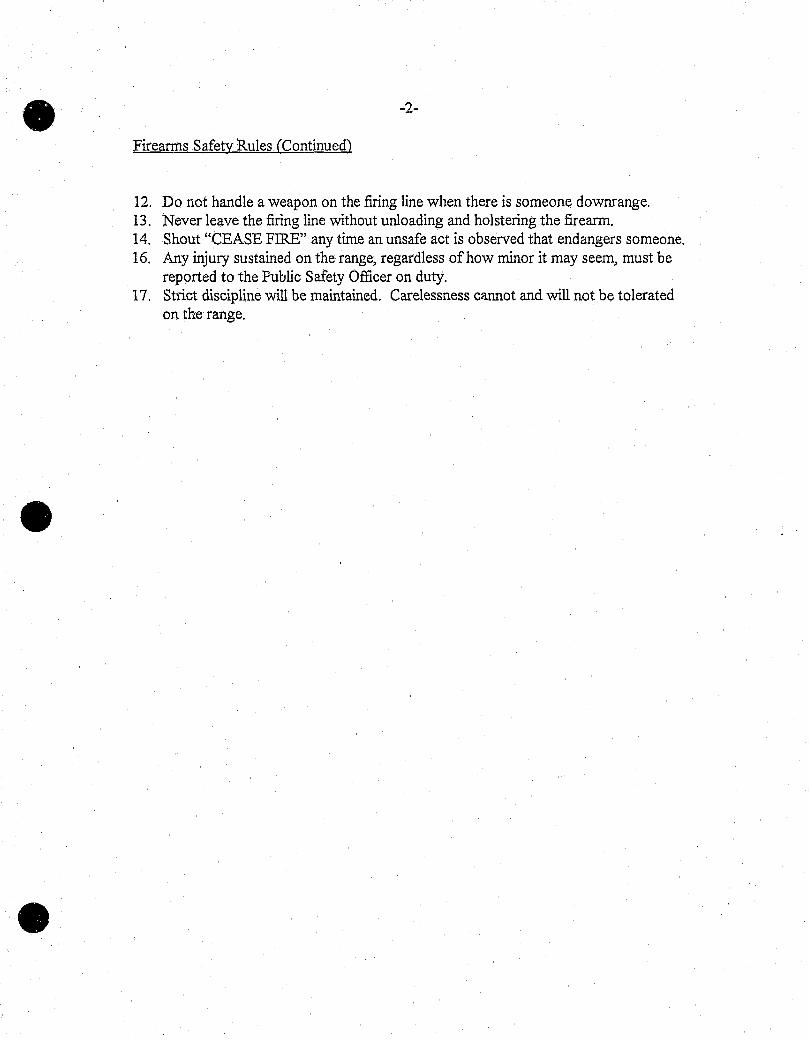
Fireanns Safety Rules (Continued)
12. Do not handle a weapon on the firing line when there is someone downrange. 13. Never leave the firing line without unloading and holstering the fireann. 14. Shout "CEASE FIRE" any time an unsafe act is observed that endangers someone. 16. Any injury sustained on the range, regardless of how minor it may seem, must be
reported to the Public Safety Officer on duty. 17. Strict discipline will be maintained. Carelessness cannot and will not be tolerated
on the range .

•
•
•
US*TVA PUBLIC SAFETY SERVICE
9MM PISTOL TRANSITION
FIREARMS SAFETY
DESCRIPTION: Through lecture, demonstration, and class discussion, this course applies to, nomenclature as it pertains to safety, safety rules and regulations, safe weapons handling, decocking, loading, unloading, and transfer of a weapon from one person to another. Students will be able to safely handle and operate the weapon.
TERMINAL PERFORMANCE OBJECTIVES: Given a written multiple choice examination and/or a weapon, the student will identify/demonstrate how to safely handle, decock, load, unload, and transfer a weapon from one person to another safely. The student must demonstrate safe operation of the weapon .
INTERIM PERFORMANCE OBJECTIVES: 1. Demonstrate/identify weapon nomenclature pertaining to safety 2. Demonstrate/defme safety rules and regulations. 3. Demonstrate/describe safe decocking procedure. 4. Demonstrate/describe safe loading and unloading procedures. 5. Demonstrate/describe safe transfer of weapon from one person to another. 6. Demonstrate/describe proper grip and safe operation of the weapon.
METHOD OF EVALUATION: 1. Instructor observation. 2. Written examination.
METHODOLOGY: 1. Lecture/discussion 2. Demonstration. 3. Hands on practical.

2
• REFERENCES:
1. Instructor. • FLETC Safety Rules & Regulations / General Range Information Supplement Handout
6001H. • FLETC Firearms Safety Rules & Regulations 6001. • TV A Public Safety Service Range Safety Rules. • TV A Public Safety Service Firearms Safety Rules & Regulations.
2. Student: o TVA Public Safety Service Range Safety Rules. • TVA Public Safety Service Firearms Safety Rules & Regulations. • Safe Attitude handout.
TRAINING AIDS: 1 . Instructor:
• • 9MM Sig Saurer Pistol. e Appropriate leather gear. • Eye and ear protection. • Dummy ammunition.
2. Student: • 9MM Sig Sauer Pistol. • Appropriate leather gear .
•

•
•
•
SAFETY HANDOUT
IlSAFETY IS AN A TTl TUDE"
ON LINE SAFETY - THREE GOLDEN RULES
I. WHEN DIRECTED TO STEP TO THE LINE, DO SO AND REMAIN THERE.
II.
III.
All command~ start and stop on the firing line.
BEGIN - "With eye and ear protection on." END - "Place feet on the firing line with
hands behind your back."
NEVER BEND OVER ON THE LINE UNLESS PERMISSION IS GIVEN.
NEVER LOOK BEHIND YOU ON THE FIRING LINE. THE ONLY EXCEPTION, IS WHEN YOU ARE RUN~ING A TACTICAL COURSE .

•
•
•
INTRODUCTION: I. This course is designed to develop officers into safe and competent pistol handlers. Safety is
first and foremost, and is never compromised. 2. Accidents do not just happen, people cause them; usually through carelessness and failure to
use good common sense. Stay alert and obey all range commands and procedures. 3. As with any Public Safety firearms qualification or training, safety violations will be
addressed immediately. 4. Refer to safety handouts,
NOMENCLATURE PERTAINING TO SAFETY: I. Muzzel; always pointed in a safe direction. 2. Trigger; finger out of the trigger guard until ready to fire the weapon. 3. Decock lever; (demo). 4. Magazine Release; drops magazine out of weapon, 5. Slide Stop; holds slide to the rear.
Automatic Firing Pin Lock; will not allow pistol to fire without squeezing trigger,
WEAPON SAFETY FEATURES: I. DISCONNECTOR;
This prevents the weapon from firing unless the slide is fully closed, and the weapon is fully cocked. It also prevents the weapon from firing fully auto.
2. FIRING PIN SAFETY LOCK
This provides optimal safety with the hammer in either the cocked or decocted position. The weapon can only be fired by pulling the trigger. . .
3. SAFETY INTERCEPT NOTCH
This catches the hammer after the decocting has been released. During and after decocking, the firing pin remains constantly locked. It also prevents discharge of a chambered round should the weapon oe dropped, much like the hammer block of a revolver
4. DECOCKING LEVER This feature drops the hammer into the Safety Intercept Notch locking the firing pin not permitting it to strike the primer.
5. SLIDE STOP
This feature holds the slide to the rear disabling the weapon.
3

•
•
•
SAFETY RULES AND REGULATIONS: 1. Review TV A Public Safety Service Firearms Safety Rules. 2. Review TVA Public Safety Service Range Rules.
LOADING/UNLOADING PROCEDURE: I. LOADING:
.. Keep muzzel pointed in a safe direction.
.. Finger OFF the trigger.
.. With the slide forward, insert the magazine and make sure it has engaged the magazine catch. Tug on the base of the magazine floor plate to ensure proper seating.
.. Draw the slide back and allow it to snap forward into battery. ( Do not ride the slide forward).
• Thumb the decock lever and allow the hammer to fall. • The weapon is now ready to fire in the double action mode.
2. UNLOADING: • Keep the muzzel pointed in a safe direction. • Finger OFF the trigger. .. Push the magazine release and remove the magazine. • Draw the slide back and lock it to the rear. • Visually and physically inspect the chamber and magazine well to ensure there are
no rounds in the weapon. • Reh~ase the slide and allow it to go forward. Decock the weapon with the decock
leVf:r and secure the weapon.
DECOC[{ING! I. Point the weapon in a safe direction 2. Finger QFF the trigger. 3. Locate the de cock lever on the side of the weapon.
4
4. Right-handed people place the weak thumb on the decock lever and press down. The hammer will fall safely, rendering the weapon into a double-action mode. Left-handed shooter will use strong hand index finger to decock.
REVIEW UNSAFE ACTS: 1. Turning around with weapon in hand. 2. Handling a weapon when people are down range. 3. Drawing weapon with finger on trigger. 4. Bending over on the line. S. Not following commands.

----------
•
SECTION III TAB C
FLETC Text
•
•

•
SIG-Sauer 9mm
SEMI-AUTOMATIC
• (Handout)
•

DEPARTMENT OF THE TREASURY
• FEDERAL LAW ENFORCEMENT TRAINING CENTER
•
•
OFFICE OF SPECIAL TRAINING
FIREARMS DIVISION
SIG SAUER 9mm SEMI-AUTOMATIC HANDOUT
6023 H 1/92

•
SlG8AlJER (P226)
INTRODUCTION
The following information concerning the SIG SAUER P226 was
compi led for you convenience and is intended only as ~ supplement to
practical instruction.
Designed by the Swiss and manufactured in West Germany, the P226
combines the- latest in engineering and technological ~dvnnces of both
countries. By entering into collaboraUon with one another, SIG
(Swiss Industrial Group) located in Neuhausen, Switzerland, and J.P.
SAUER and SON loca-ted in Eckernforde, West Germany, were able to aid
~ each other in the production of world class handguns. The SIG SAUER
P226 pistol has been specifically designed to meet the requirements
of both mi I Itary and civi I ian law enforcement.

'SPEC I F I CAT IONS
MODEL: . co •••••• It ••••• P226
CAL I BER : .••••.••••. 9rrm
OVERALL LENGTH: •••. 7.7 11
VIE I GHT I I NCLUD I NG EMPTY MAGAZINE: •••••••.•• 32 ozs.
WITHOUT MAGAZINE: .• 29.8 OZS.
HE r GHT: ••••..••.••• 5 .5 11
WIDTH: . . . . . ~ . . . . . . . 1 .51/
BARREL LENGTH: ••..• 4.41/
BARREL: Six 9 roo v e s. r i ~l h t hand tV! i s ~ I nne turn in ten inches
MAGAZINE: •..... 15 round cap'aci,ty
Tr.IGGER PUL.L, D/A •..•.•... 13 Ibs. S/A ......... 4.5 Ibs.
SIGHTS:
2
Semi-Patridge Windage adjustable with drift tool
•
•
•

)
• SAFETY FEATURES
There is no independent manuill sa rety, however, there is a rassive safety system operating at at I tlm~s. Incorporated in thi$ 'system include: Disconncctcr, Firing Pin Safety Lock, Safety Intercept Notch and Decocking Lever.
DISCONNECTOR - Prevents the weapon from firing unless it is closed
FIRING PIN
and fully locked. It Cll50 prevents the weapon from
firing fully automatic.
SAFETY LOCK - Prov i des optima I sa fe ty with the harrrne r in either the
SAFETY INTERCEPT r~OTCH' -'
DECOCKING LEVER -'-----
cocked or decocked position. The weapon can only be
fired by pul ling the trigger.
Catches the hammer after the decocking lever has been
released. During and after decockin9, the firing pin
remains constantly lockeri. The Safety Intercept Notch
also becomes effective in the case of inadvertent
harrrner tripping when thumb cocking the weapon. It
also prevents discharge of a chambered round should
the weapon be dropped.
Drops thr. hammer into the Safety Intercept Notch
locking the (iring pin.
3

LOADING PROCEDURES
1.' Insert magazine fully into the magazine well with the weapon
pointed in a safe direction.
NOTE: Trigger finger should be outside of the trigg~r guard.
2. Give magazine a tug to check for proper seating.
3. To chamber a roun'd, let the sl ide go forward. I f the s I i ge Is
a! ready forward, draw back the's I i de to the 5 top and a I low it to
snap forward. Do not ride th~ sl ide home.
4. Thumb down the decocking IGver.' The weapon is now loaded, safe
and ready to fire. (In the!doublc~acti~n mod~)
S. First round is fired double action, with each additional firing
single action.
CYCLE OF OPERATION
Feeding. Chilmbering, Locking, Firing, Unlocking, Extracti,ng,
Ejecting and Cocking.
CLEAR I NG THE WEAPON
1. Always remove the magazine first.
2. Push up on the sl ide ca,tch lever keeping the muzzle away from
you in a safe direction.
3. Grasp the s I ide by the grasping grooves and pull the s I ide to
the rear. Round should exit the weapon if chambered.
lj • L 00 kin sid e the c h a mb e r t 0 ins lJ rei tis c I ear . L 0 0 k t w icc t 0 be
sure. If it is dark, usc the small finger to check the chamber.
5. Let the sl ide go forward.
6. Thumb down the decock I ng I ever.
decocked and safe.
P,istol is now unloaded,
•
•
NOTE: There is no reason to go near the trigger while clearing •
this weapon.
4

•
•
MALFUNCTIONS
In the event of a malfunction, one can usually remedy the
situation by remembering the word SSPORTS and fol lowing its princi-
pies.
1. ~queeze the trigger again.
2. ~Iap up on the magazine floor plate to insure proper seating.
3. Pull backonthesiide.
4. Obs e rve chambe r fo r stoppage.
5. Release 51 ide.
6. !ap sl ide forward.
7. Shoot.
FIELD STRIPPING
A
FIGURE A
1 • Remove the magazine (51).

B
•
FIGURE B
2. Draw back the slide to the stop and arrest it i'n the open "
position ~y thumbing up on the sl ide catch lever (18).
3. Check visually to insure the chamber is empty. Check it twice.
4. Thumb down the take down lever 90 degrees (16).
• 4 18 c
FIGURE C
5, Draw back the sl ide (4) 51 ightly to cJisengage the sl ide catch
I~ver (18). Hold the slide firmly and allow it to glide forward
gent ly.
NOTE: Fai lUre to hold the sl ide assembly firmly whi Ie 9 1 idin~l
It forward can result in injury to yourself and others nCClr YOIJ •• ~
6, Now 51 ip the complete system comprising 51 ide (4), barrel (1).
recoi I spring and guide forward Clnd off the frame (15),

)
• o
FIGURE 0
7. Carefully remove recoi I spring (3).
E
FIGURE E
8. Remove the barrel (1) from the slide (4).
9. Field stripping is now complete. Any additional dismantl inn
should be completed by a qual ified gunsmith or armorer.
10. The field stripped weapon is shown in Figure F.
7

F
;
15
16--"""-'
51---
; __ I ." -4
18
..... _-29
FIGURE F
Assembl ing the pistol is done in reverse order:
1. Insert the barrel (1) into the slide (4).
2. Fit the recoil spring (3) lind guide (2).
3. If the recoil spring (3) and guide(2) were separated during
stripping, ensure that the narrower end of the spring (3) is
slipped over the guide (2) first.
4 . Slip the assembled slide system onto the frame (15) until it
contacts the end stop, and arrest it wi th the s I ide catch
lever (18).
Q
•
•
•

•
•
5. Thumb up the take down lever (16).
6. Thumb down the 51 ide catch lever (18) in order to close the
sl ide (4).
7. Decock the hanmer (29) with decocking lever (40).
8 • Ins e r t the rna 9 a z i n e (5 1 ) •
PREVENTIVE MAINTENANCE CLEANING:
1. Scrub the bottom and face of the breech block with a nylon bore
brush, then dry.
NOTE: Do not use steel brushes.
2. Barrel should be cleaned from the breech or chamber end. Start
3.
out with a moistened patch and go to a moistened bore brush. Do
not reverse the direction of the brush, it wi I I get stuck. Go
back to moistened patches and then to dry patches using as many
as it takes.
Remove the reeoi I spring from the guide and clean.
4. The magazine should be cleaned periodically. Press down on the
retainer pin and remove the floor plate. Take out the magazine
spring and swab the inside of the magazine with solvent. After
drying, put the magazine back together in reverse order.
NOTE: Never oi I the inside of magazine housing.
LUBRICATION
Whi Ie reassembling the weapon, a quality gun oi I should be added
to the following locations:
1.
2 •
Put a drop on the outside of the barrel and spread it evenly .
Be careful not to get any inside the bore.
Put a drop on the recoi I spring and guide and spread it evenly.
9

3. Put a few drops along the 51 ide rai Is.
4. Once the weapon is reassembled, wipe down the external rortioT)s
w:th a piece of cloth dampened with gun oi I.
NOTE: Once the weapon has been cleaned, lubricuted and reassem-
bled, work the sl ide back and forth a few times, and dry fire
the pistol to insure it is operational.
COM\-\ENTS
SIGARtvIS offers several accessories to support the users of their
weapons to i liC I ude: Spare magazines, cleaning kit, front sight
and/or rear sight pusher, holster, wooden grip plates and carrying
czse to name a few.
Addi tiona I information or corrrnents should be di rected to:
'SIGARMS SIGARMS INC. 470 Spring Park Place Herndon· Virginia 22070 Phone (703) 481 6660 ' Telex (023) 315881 Telelax (703) 4816572
10
•
•
•

SIG SAUER P226 EXPLODED DRAWl NG
•
51
\
55C:;:>
• LI5t of Pllrt~
WMn ordering 8p6fW p6rts, .'WIIYS JIQo. ~- PO! Dw>'9"4_
mention: 1 8a",,1 30 Hammer strut pm - 1)rpe of I1WIMPtJn 2 Guid". 'ecoil SPring 31 Hammer PIVot pm - ~rl.' num~r olwtJllptm 3 Recoil spring 32 Elector - Item numbt!r fr-f prt 4 Slide 33 Strut. hammer - Deslgn.tlon clf plrt 5 Front sight 516/71819110 34 Mainspring
6 Rear SIf}ht 51617/B1911 0 35 Spflng.pln 7 Inner pin H.D. 36 Seat. mamsprmg 8 OJter pin H.D. 37 Slap. hemmer 9 BrHChbiock 38 Sprmg. reset
10 Extractor 39 Pm 11 Firingpm 40 Decodang lev(]r 12 Spring. firing pin 41 Bearing. decockmglever 13 Sa/etylock 42 Sprmg. decocklnglever 14 Spring. safety Sock 43 Magazme catch 15 Frame 44 Support plate 16 'aktHkwm 'elffl( 45 Spong. magazine catch 17 Locking in56ft 46 Stop. maga.zme catch 18 Slide c.tch 1tI~..,. 47 Spring. magazine Slop 19 Spring. slide CII/ch ItIver 48 Righlgr;p plate 20 Trigger 49 Left gnp plate 21 Pivot. trigger SO Screw 22 Trigger b6r 51 Magazme lube 23 Spring. trigg"rbIJr 52 Sprmg. magazine 24 56., 53 Feeder • 25 Spring. sell' 54 FI(XJrplale. magazine 26 Shaft. sea' SS InS8rT. magaZine 27 Spring. pin H.D.
SIGSAUER 28 Safety lever 29 Hamme,
11

• "'>,;
IMMEDIATE ACTION
FOR
• SEMI-AUTOMATIC PISTOLS
(INCLUDING WORKSHEET HANDOUT
•

• DEPARTMENT OF THE TREASURY
•
•
FEDERAL LAW ENFORCEMENT TRAINING CENTER
OFFICE OF SPECIAL TRAINING
6083 H
FIREARMS DIVISION
IMMEDIATE ACTION FOR SEMI-AUTOMATIC PISTOLS
1/92

\
J
• The Primary Method of Immediate Actio!!
• \ "'.-~ -'\~' 6? ;,
TAP! The bottom of the magazine, to ensure it is fully seated.
RACK! The slide with sufficient force to clear any defective rounds/ stove piped casings, and also to chamber a new round in the weapon.
BA.l\lG! Bring the weapon back up and fire if an appropriate target is present and circumstances still call for shots to be fired.

The SecondarY
"
J
• Method of Immmediate Action
RIP! Rip or remove the magazine from the weapon to clear the double feed or defective magazine from the weapon.
WORK! Work the slide to clear any defective or loose rounds out of the chamber area and magazine well.
TAP! Tap in a fresh magazine, as the magazine may have been the source of the malfunction. It is preferable to have a fully loaded magazine in the weapon if possible.

RACK! Rack the slide to the rear to chamber a round.
Bang! Fire at the target, if appropriate.
•
•
•

• FEDERAL LAW ENFORCEMENT TRAINING CENTER
FIREARMS DIVISION
SEMI-AUTOMATIC PISTOL PROGRAM - (SAPP) Worksheet for Lesson Plan 6083
1. The primary method of clearing a malfunction is identified by
the words,
2. The officer should the bottom of the
, to ensure that it is properly seated. -----------------
3. To chamber a round, the officer should the
4. Finally, the officer should , if appropriate. -----------------
5. The me~hod of clearing a malfunction should
be done from behind
6. To perform the secondary method of clearing a malfunction,
the officer should:
a. Remove the from the weapon.
the to clear any rounds.
b. Insert a new in~o the weapon.
~ the slide to a round.

•
FUNDAMENTALS OF MARKSMANSHIP
FOR SEMI-AUTOMATIC PISTOLS
• (Handout)
•

•
•
DEPARTMENT OF THE TREASURY
FEDERAL LAW ENFORCEMENT TRAINING CENTER
~DFFICEOF SPE(~IAL TRAINING
FIREARMS DIVISION
FUNDAMENTALS OF MARKSMANSHIP FOR SEMI-AUTOMATIC PISTOLS
6087 H (SAPP) 1/92

• TECHNIQUE OF PROPER GRIP AND DRAW
•
•
Diagram #1 The initial draw is designed to fami1~ iarize the officer with the location of the holstered weapon and proper grip technique. The officer begins with the hand extended, palm down, and elbow bent, locating the holster or stock with the elbow .
Diagram #2 The officer then swings then hand straight down to the bottom of the holster, and begins to curl the last three fingers in preparation of establishing a grip.
Diagram #3 The officer slides the palm of the hand up along the side of the holster, allowing three fingers to establish a proper grip on the exposed portion of the weapon stock. The thumb is located on the retaming snap, and is prepared to unsnap the weapon for the draw. The hand should now be properly posi~ tioned for the draw.

--- -------
Diagram #4 The officer breaks the safety snap, and draws the weapon up and forward. As soon as the weapon clears the holster, the officer "Rocks" the muzzle forward and ''Locks'' the wrist. The finger is out of the trigger guard at this point. Notice the support hand is already starting toward the belt line to meet the strong hand.
•
Diagram #5 • The officer establishes a good two handed grip close to the body, at the belt line, before raising the pistol to the target.
Diagram #6 The officer brings the weapon DIRECTL Y TO THE TARGET, and establishes contact with the trigger as the weapon bears on the target. (This movement is not a sweeping movement but a straight line punch- • ing movement).

•
•
•
Diagram #7 The officer must bring the weapon up to eye level, the head should move as little as possible. (Held erect not bent down to the sights) .
Diagram #8 This diagram shows the smooth transitional movement of the draw, grip, and raising the weapon to Eye LeveL

•
•
FLETC FIREARMS DIVISION
ADV ... -'\NTAGES AND DISADVANTAGES OF REVOLVERS VS SEMI-AUTOMATIC PISTOLS
I REVOLVERS
* Easy to teach loading, unloading and safety.
* Can be difficult to learn to shoot because of long, double action trigger. More difficult to learn efficient reloading.
* Less maintenance-sensitive in domestic (police) use. Less critical of van.ous ammunition types and ammunition quality.
* Less durable for long-term use, especially with heavy loads.
',~ Smaller ammunition capacity and slower to reload.
* Less expensive gun, ammunition, and training time.
* Can be cleaned without disassembly.
* Gun is bulky for ammunition capacity and power.
* Less vulnerable to ammunition failure, but malfunctions which do occur are generally harder to solve in the field.
1
IT SEMI·AUTOMATIC PISTOLS
* Requires more training time for unloading, safe handling and disassembly. Also requires. more frequent in-service training.
* Less training time required to teach accurate shooting because of short single action trigger. Easier to teach effective reloading. .
* Critical of proper ammunition and perlect magazines. Practice ammunition must be roughly service-strength to function action properly.
* More durable for long-term use.
* Greater ammunition capacity and faster to reload. Better continuity offire. Reloading speed, easier in the dark or while moving.
* Generally more expensive.
* Can be user-disassembled (field stripped) for cleaning. .
* Gun can be more concealable/compact with equivalent power and capacity.
* Vulnerable to ammunition failure, however malfunctions can be quickly cleared in the field.

REVOLVERS
* More forgiving of careless handing. More "foolproof' for issue to large numbers of officers of varying ability, train-ing and carefulness. '
* Back-up ammunition can be bulky and cumbersome to carry. (Speedloaders)
* Recoil is transmitted upon small areas of hand thus decreasing control of weapon.
* More initial training required. Slower recoil recovery and less controllability results in slower progress in the learning cycle.
* Less reliable in training because improper unloading technique could cause malfunctions.
* Slow, less accurate shooting because of long trigger travel arJ.d increased perceived and felt recoil.
* Less chance of "unintentional' discharge" because of heavy double action trigger pull. '
* Easier for beginners or weak shooters to handle because there is ,no slide, " slide stop, magazine release or safeties to oper:ate.
* Mechanical functioning is safer because safety block prevents multiple rounds from firing, unless trigger is pulled ~
* More functional reliability if abnormal rourld is lodged.
2
SEMI-AUTOMATIC PISTOLS
* Amore efficient weapon, but requiring more thorough and frequent training and perhaps not quite as safe for large numbers of officers to use.
* More ammunition can be kept for backup and is less bulky and cumber some.
* Transmits recoil better in hand because of cushioning effect of slide, thus increas,ing control of weapon.
* The ease involved increases confidence, effectiveness and defensibility in less training time.
* Functions more reliable in training situations, however more prone to shooter induced malfunctions.
,* Fast accurate shooting because of short trigger travel and, less perceived and felt recoil.
* Greater chance of "unintentional ,discharge" because of short single action trigger and operator error.
* More strength involved in order to pull back slide and operate slide stop.
* Mechanic;al functioning is less safe 'because of weapon doubling.
* Less functional reliability if abnormal round is loaded.
JANUARY 1990
•
•
•

COURSE TITLE: Familiarization Fire for Semi-Automatics
• LENGTH AND METHOD OF PRESENTATION:
LECTURE -0-
DESCRIPTION:
LABORATORY 2:00
PRACTICAL EXERCISE TOTAL -2- 2:00
As a laboratory course designed to follow a two hour lecture, this course allows hands-on training familiarization fire drills to introduce the weapon and its operation to the student. This laboratory course is not concerned with score, and does not teach a particular course of fire. The student will perform initial loading, tactical reloads, emergency reloads, magazine exchanges, and immediate action drills. The goal of this course is to expose the student to these principles with the selected weapon. Target analysis is available to the student on an individual basis ..
TERMINAL PERFORMANCE OBJECTIVE:
Given a semi-automatic pistol, magazine, and arr~unition, the student will demonstrate initial loading procedures, emergency reloads, tactical reloads, magazine exchanges, unloading, and immediate action procedures, while engaging a target.
• INTERIM PERFORMANCE OBJECTIVES:
1. Demonstrate initial loading procedures.
2. Demonstrate emergency reloads.
3. Demonstrate tactical reloads.
4. Demonstrate magazine exchange.
5. Demonstrate unloading procedures.
6. Demonstrate immediate action procedures.
METHOD OF EVALUATION:
1. Safe completion of course
•
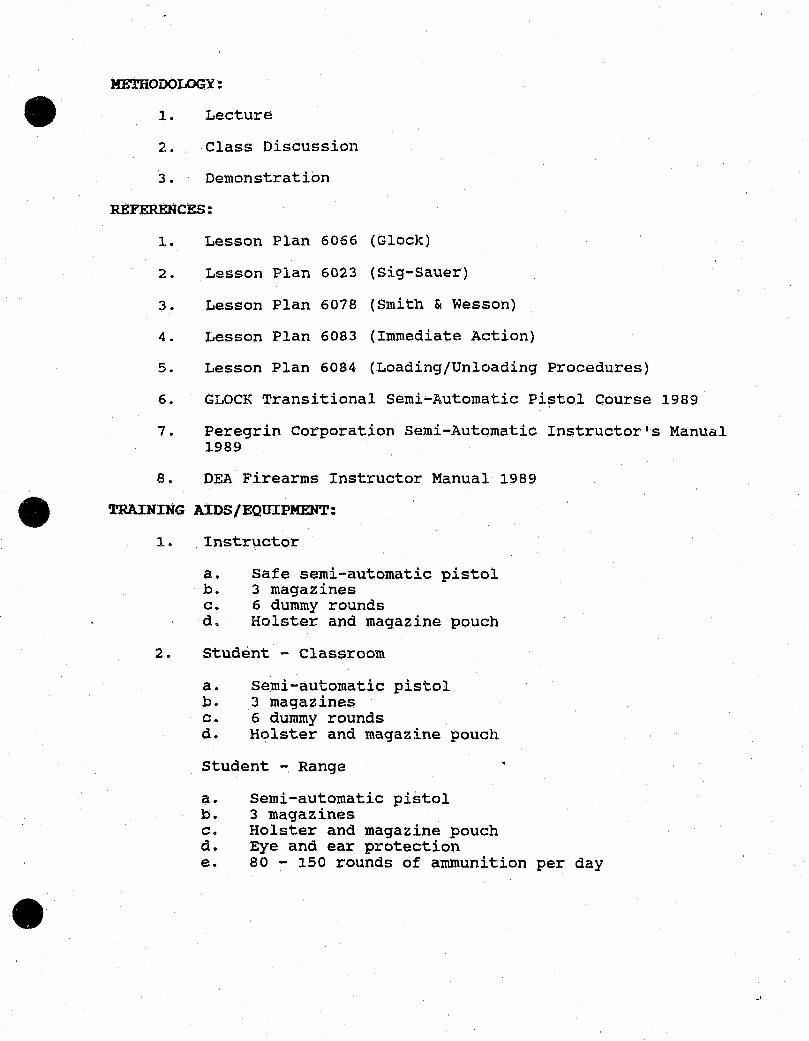
METHODOLOGY:
• 1. Lecture
2. Class Discussion
3. Demonstration
REFERENCES:
1. Lesson Plan 6066 (Glock)
2. Lesson Plan 6023 (Sig-Sauer)
3. Lesson Plan 6078 (Smith & Wesson)
4. Lesson Plan 6083 (Immediate Action)
5. Lesson Plan 6084 (Loading/Unloading Procedures)
6. GLOCK Transitional Semi-Automatic pistol Course 1989
7. Peregrin Corporation semi-Automatic Instructor's Manual 1989
8. DEA Firearms Instructor Manual 1989
• TRAINING AIDS/EQUIPMENT:
•
1. Instructor
a. Safe semi-automatic pistol h. 3 magazines c. 6 dummy rounds d. Holster and magazine pouch
2. Student - Classroom
a. Semi-automatic pistol b. 3 magazines c. 6 dummy rounds d. Holster and magazine pouch
Student - Range
a. Semi-automatic pistol b. 3 magazines c. Holster and magazine pouch d. Eye and ear protection e. 80 - 150 rounds of ammunition per day
.'

•
•
•
MAIN TOPICS TEACHING POINTS NOTES
A. INTRODUCTION:
You have heard about the operation of your semi-automatic pistol, now you have the opportunity to apply the principles of weapons handling with actual live fire. The fundamentals of marksmanship still applyu so don't forget to line up the sights when firing the course. The purpose of the exercise is to familiarize you with the loading and unloading procedures. We will not score targets, but the target will be available to you for inspection at the completion of the drills. You will also perform immediate action to clear malfunctions.
B. OBJECTIVES:
C.
1- Demonstrate initial loading procedures.
2. Demonstrate emergency reloads.
3. Demonstrate tactical reloads.
4. Demonstrate magazine exchange.
5 . Demonstrate unloading procedures.
6. Demonstrate immediate action procedures.
PRESENTATION:
1. Initial Loading
Initial loading is the term used for loading the weapon for duty carry, in a safe manner, while executing several steps that reduce the potential for accidental discharges, and ensure that the weapon will fire. There are two methods of initial loading of the weapon.
a. Initial Loading Slide Locked to the Rear -This method has the advantage of allowing you to check the weapon visually and physically (by looking down the magazine well and by feeling the chamber) to ensure that the weapon is ready to receive ammunition. The steps for this procedure are as follows:
1)
2)
Point the weapon in a safe direction.
Keep the finger out of t.he triqger guard.
1

. ,'
MAIN TOPICS
3)
TEACHING POINTS NOTES
Pull the slide to the rear and push up on the slide stop to lock the slide back. This is best accomplished by using the "Push-Pull" method. Push forward with the strong hand and the weapon while pulling with the slide to the rear.
4) Visually and physically check the magazine well and the chamber to ensure the weapon is ready to receive ammunition.
5) Insert a fully loaded magazine into the weapon, and tug on the floor plate to ensure the magazine is properly seated .
6) Allow the slide to go forward by:
a) Grasping the rear grasping grooves of the slide and pulling the slide back, allow the slide to "SlingShot" forward, chambering a round.
b) Depress the slide stop, allowing the slide to go forward and chamber a round. This should be done with the thumb of the weak hand. This allows a two hand control advantage, as the weapon may seem to leap out of the shooter's hand.
7) Decock and remove the safety, if applicable.
S) Holster
b. Initial Loading, Slide Forward - This procedure may be preferable if the student has trouble locking the slide to the rear, has on gloves, or is left-handed. The steps are as follows:
1) Point the weapon in a safe direction.
2) Keep the finger outside the trigger guard.
3) Insert a magazine, and tug on the base plate to ensure the magazine is properly seated.
2
•
•
•

•
•
•
MAIN TOPICS
4)
TEACHING POINTS NOTES
Pull the slide to the rear and allow it to "Sling-Shot" forward to chamber a round. Be careful not to ease the slide forward, as this may cause the slide to go fully forward and result in a malfunction.
5) Decock and remove the safety, if applicable.
6) Holster
c. Topping Off the Magazine - This procedure is done with the weapon in the holster to reduce weapons handling and allow two free hands to load the magazine. The steps are:
1) Ease the weapon slightly out of the holster.
2) If the magazine release is against your body, sli.de your thumb alang the waistband and depress the magazine release with your thumb .
3) Remove the magazine.
4) Insert a round in the magazine and place it back in the weapon, tugging on the floor plate to ensure the magazine is fully seated.
5) Secure the holster.
2. Emergency Reload
This term is used when you have fired all the rounds in the magazine of the weapon and the slide is locked to the rear. In a lethal force confrontation this constitutes an emergency. The officer must:
a. Establish a grip on a new magazine.
b. Remove the trigger finger from the trigger guard.
c. Depress the magazine release as you bring the weapon in to mid-torso and tilt the weapon slightly sideways (grip inboard) to receive
3
.....

MAIN ,TOPICS TEACHING POIN':t'S NOTES
fresh magazine. There are two methods of depressing the magazine release, they are:
1} The left-handed person will probably depress the magazine release with the index finger of the firing hand.
2) The right-handed shooter will probably use the thumb of the firing hand.
d. with the index finger along the front spline of the magazine, insert the magazine into the magazine well with enough pressure to fully seat the magazine.
e. Bring the weapon back up on target and allow the slide to go forward by:
1) Depressing the slide stop with the thUmb of the weak hand. (Common method used by right-handers).
2) Grasp the rear grasping grooves of the slide and "Sling-shot" the slide forward (common method used by left-handers and those wearing gloves). This method may also be preferred during high stress situations where finding the small slide stop may be difficult.
3. Tactical Reload
A tactical reload is accomplished by dropping the maga?ine from the weapon while a round is still in the chamber. This procedure would be exercised when the officer knows that he has fired a lot of rounds, but he may not know how many. He has an opportunity to reload, but may still be in the threat zone. This procedure allows the officer the ability to fire at a target once, should a target present itself (depending on the type of weapon), and speeds up an officer's loading time as he ,does not have to manipulate the slide, and fully load the weapon again to capacity. The officer should:
a. Remove the finger from the trigger guard.
b. Hit the magazine release with the thumb or index finger, depending on the handedness,
4
•
•
• i ,I
"

•
•
•
MAIN TOPICS TEACHING POINTS NOTES
NOTE:
4.
c.
while retrieving a fresh maga:!dne from the magazine pouch.
With the index finger along the magazine spline, insert a fresh magazine in the magazine well.
An optional method is to keep the weapon on target, as it is still possibly to fire the weapon once, rather than tipping the weapon sideways to insert the magazine.
d. This procedure reduces the time to reload by 50%. It should be noted that there will probably be rounds left in the magazine that is dropped to. the floor. This may be a concern for the officer.
Magazine Exchange
This procedure is the process of exchanging magazines in the weapon to allow you to top off the weapon while saving the partially loaded magazine for further use. This procedure is not as fast as the other reload procedures and is best performed behind cover. The officer does retain the ability to fire ~ at a target should it appear, after the magazine is removed, and does have the advantage of allowing the officer to keep all rounds on their person for further use. The officer should:
b.
c.
d.
e.
Use cover if available.
Remove the finger from the trigger guard
Bring the weapon to mid-torso and tilt slightly to receive the fresh magazine.
Remove the fresh magazine from the magazine pouch with the index finger along the front spline of the magazine.
Bring the magazine to the base of the grip and remove the magazine from the weapon by pressing the magazine release and catching the magazine in your hand. (Preferably between the ring finger and the little finger of the weak hand) .
5

HAIN TOPICS
f.
TEACHING POINTS NOTES
Insert the fresh magazine by rotating the old magazine down and the new magazine in the magazine well.
g. Place the partially loaded magazine in your waistband or pocket.
INSTRUCTORS NOTE:
5. Unloading
Some officers with small hands may find it awkward or impossible to juggle two magazines in tl'ie hand at the same time. An alternate method would be to have the officer remove the magazine from the weapon and place it on their person, then insert a fresh magazine from their pouch. However, this method. is less preferable as it is more time consuming.
This procedure is done as carefully as possible with no time limit and under no stress. Many accidents occur as a result of improper unloading procedures.
a. Unloading should be done as follows:
1) Point the weapon in a safe direction (downrange).
2) Remove the finger from the trigger guard.
3) If equipped with a manual safety, the safety should be place in the safe position.
4) Decock the weapon, if cocked.
5) Remove the magazine and place it in the pocket or belt.
6) Using the "Push-Pull" method, grasp the rear grasping grooves of the slide and rack the slide back with sufficient force to eject any live round from the chamber. You should visually observe the round ejecting. At this point the weapon should be unloaded.
7) With the weapon in the right hand (lefthanders should transfer the weapon to the right hand), step back with your right
6
•
•
•

•
•
•
------------------ -
MAIN TOPICS TEACHING POINTS NOTES
6.
foot to ensure the muzzle remains pointed straight downrange.
8) Grasp the slide and lock it to the rear.
9) Visually and manually inspect the weapon to ensure it is unloaded.
10) Release the slide. Decock, if appropriate, and holster.
b. The officer should be cautioned to never place his hand over the ejection port if there is a round in the chamber and should never attempt to catch an ejected round. covering the ejection port with his hand could allow the round to fall back in the ejection port, causing the ejector to strike the primer, detonating the round in the officer's hand.
Immediate Action Procedures
Immediate action is the term used to describe the process of rendering a malfunctioning semi-automatic pistol operable. There are two methods of clearing a malfunction:
a. Tap-Rack·-Bang - The primary method of clearing a malfunction is referred to as Tap-Rack-Bang.
1) Effective in approximately 80% of malfunctions, this immediate action procedure clears such problems as:
a) Improperly seated magazine
b) Defective round
c) Stove-piped casing
d) Slide not fully into battery
2} The procedure has been placed in easy to remember key words that describe the function you should perform as a primary method of clearing a malfunction. These steps are:
a) Tap the bottom of the magazine
7

MAIN TOPICS TEACHING POINTS NOTES
to ensure that it is fully seated and locked in place in the weapon.
b) RACK - Rack or work the slide to the rear to clear any defective rounds/ stove-piped casings, and to chamber a new round into the weapon.
c) BANG - Bring the weapon back up and fire if an appropriate target is present and circumstances still call for shots to be fired.
3} This procedure, if performed immediately upon recognizing that a malfunction exists, can easily be performed in about 2-3 seconds. Though best done behind cover, this brief procedure can be performed swiftly enough that the officer can render the weapon operable while remaining in the threat zone.
b. Rip-Work-Tap-Rack-Bang - This procedure is performed AFTER you have attempted the primary method of clearing a malfunction.
1) Effective in clearing approximately 95% of malfunctions, this-procedure is considered a secondary procedure, and is effective in clearing the following malfunctions:
a) Magazine not seated
b) Defective round
c) stove-piped casing
d) Slide not locked into battery
e) No round in chamber
and the following malfunctions that were not corrected by the primary clearing procedure:
f) Double feed
g) Defective magazine
8
•
•
•
MAIN TOPICS
• 2)
• 3)
INSTRUCTORS NOTE:
4)
•
TEACHING POINTS NOTES
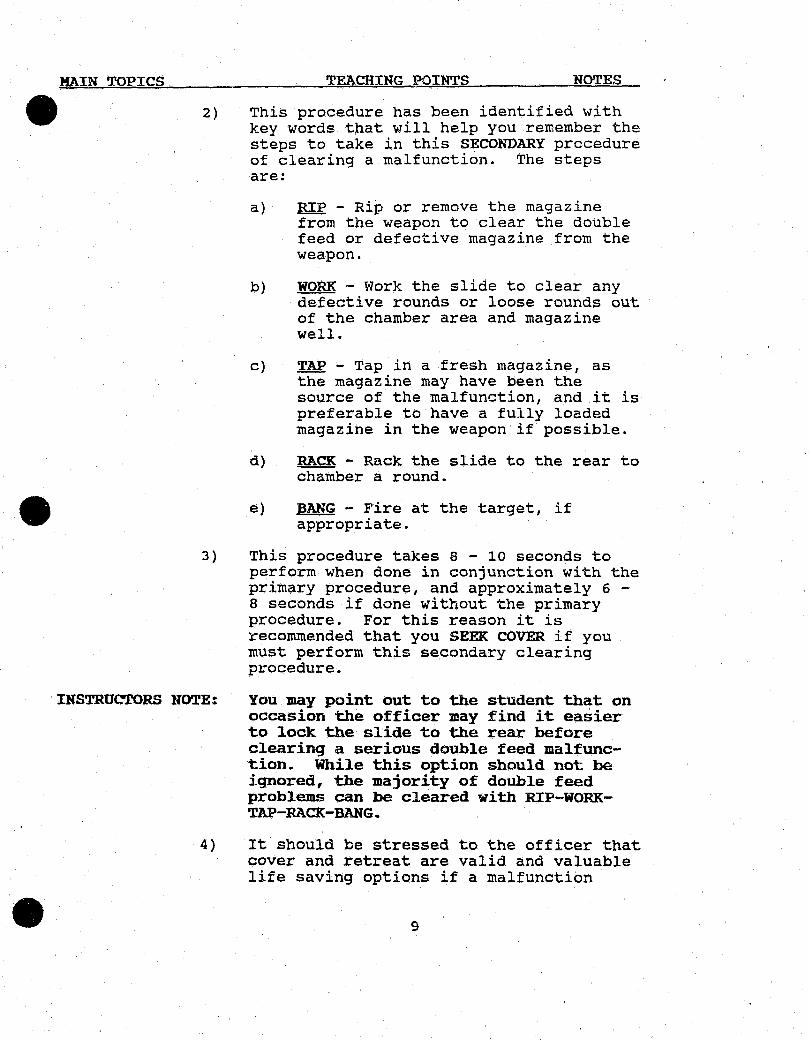
This procedure has been identified with key words that will help you remember the steps to take in this SECONDARY procedure of clearing a malfunction. The steps are:
a) RIP - Rip or remove the magazine from the weapon to clear the double feed or defective magazine from the weapon.
b) WORK - Work the slide to clear any defective rounds or loose rounds out of the chamber area and magazine well.
c) TAP - Tap in a fresh magazine, as the magazine may have been the source of the malfunction, and it is preferable to have a fully loaded magazine in the weapon if possible.
d) RACK - Rack the slide to the rear to chamber a round .
e) BANG - Fire at the target, if appropriate.
This procedure takes 8 - 10 seconds to perform when done in conjunction with the primary procedure, and approximately 6 -8 seconds if done without the primary procedure. For this reason it is recommended that you SEEK COVER if you must perform this secondary clearing procedure.
You may point out to the student that on occasion the officer may find it easier to lock the slide to the rear before clearing a serious double feed malfunction. While this option should not be ignored, the majority of double feed problems can be cleared with RIP-WORKTAP-RACK-BANG.
It should be stressed to the officer that cover and retreat are valid and valuable life saving options if a malfunction
9

MAIN TOPICS
D. StDlMARy
TEACHING POINTS NOTES
occurs and circumstances allow the use of cover or retreat.
This course of fire has exposed you to the methods of loading, unloading, and rendering immediate action to the semi-automatic pistol. To become more proficient with the operation and functions of the semi-automatic, you must practice. Through repetition you will gain speed and enhance proficiency.
10
•
•
•

-- ------~--------
COURSE OF Fum FOR IMMEDIATE ACTION
• 1. Each student will load two magazines with any combination of up to 20 live rounds and up to ten dummy rounds,
•
•
(depending on magazine capacity), split between two magazines. You must require the students to load two dummy rounds next to each other to simulate a secondary malfunction. There will be a least one secondary malfunction in the student's two magazines. Upon reaching this secondary malfunction! the student will, after having performed Tap-Rack-Bang, perform Rip-workTap-Rack-Bang.
2. The student will exchange magazines with a fellow student after loading, or, if different weapons are used, will load a fellow student's magazine.
3. The targets will be Transtar II targets at 15 yards. The targets will face for seven seconds and edge for 11 seconds.
4. The student will fire two rounds per target facings, and holster between facings, if not executing a clearing procedure.
5.
6.
Targets will continue to face until all rounds loaded in the magazines are fired .
This exercise will be performed three times. Target analysis will be available on an individual basis.
7. Remind the students to observe the following Safety Rules.
a. KEEP THE MUZZLE POINTED DOWNRANGE.
bo 00 NOT RETRIEVE ANY MAGAZINES FROM THE FLOOR IF DROPPED.
c. REKEMBER, SAFETY IS THE FIRST CONCERN. SPEED IS NOT A GOAL DURING THIS PHASE OF TRAINING •

• • • FAMILIARIZATION DRILLS FOR SEMI-AUTOMATICS
INSTRUCTORS: These drills encompass all of the teaching points addressed in the lesson plan. They are optional, and may be altered to suit individual desires of the course instructor. In addition, these drills may be repeated several times to enforce the teaching points.
DISTANCE STAGE
7 Yards 1
7 Yards 2
POSITION
standing
Standing
MAGAZINES
lst-3 2nd-3
lst-4 2nd-4
SHOTS TIME
1 3 Sec
2 4 Sec
DESCRIPTION
Lock the slide to the rear. Insert magazine. Suppress slide stop to close with the weak thumb. Holster. Fire 1 round in 3 seconds per target facing. (Total 2 facings) Perform EMERGENCY RELOAD with no time limit and holster. Fire 2 rounds in 4 seconds per target facing. (Total 2 facings) Holster an empty weapon.
Lock slide to rear. Insert magazine. Grasp rear grasping grooves and slingshot slide closed. Holster. Fire 2 rounds in 4 seconds per target facing. (Total 2 facings) Perform EMERGENCY RELOAD with no time limit and holster. Fire 2 rounds in 4 seconds per target facing. (Total 2 facings) Holster an empty weapon.

DISTANCE STAGE POSITION
7 Yards 3 standing
7 'lards 4 standing
7 'lards 5 Standing
•
MAGAZINE
lst-2 2nd-2
lst-4 2nd-4
lst-2 2nd-2
•
SHOTS
4
2
4
TIME
15 Sec
4 Sec
15 Sec
DESCRIPTION
with slide forward, insert magazine and slingshot slide to load, holster, fire 2 roundS, perform Emergency Reload, and fire 2 rounds in 15 seconds. Holster an empty weapon.
With slide forward, load, slide, and holster. Remove magazine from weapon while it is still in holster. Top off magazine. Reinsert in weapon and tug on floorplate. Fire 2 rounds per facing of 4 seconds. (Total of 2 facings) Perform Tactical Reload under no time limit and holster. Fire 2 rounds per facing of 4 seconds. (Total of 2 facings) *WEA.WN IS STILL LOADED! Go through UNLOADING procedure.
Lock slide to rear and load holster. Remove magazine from weapon and -TOP OFF- magazine with 1 round. Fire 2 rounds, perform TACTICAL RELOAD and fire 2 rounds in 15 seconds. *WEAPON IS STILL LOADED! Go through UNLOADING procedure .
•

• • • DISTANCE STAGE POSITION MAGAZINES SHOTS TIME DESCRIPTION
7 Yards 6 Standing lst-3 4 15 Sec Lock slide to the rear and 2nd-2 load. Holster. Fire 2
rounds, perform TACTICAL RELOAD and fire 2 rounds in 15 seconds. *WEAPON IS STILL LOADED! Go through proper UNLOADING procedure.
7 Yards 7 Standing 1st-6 2 No Limit Slide forward, load and 2nd-6 holster. Top off magazine
with 1 round. Fire 2 rounds, perform Magazine EXCHANGE and fire 2 rounds in 20 seconds. REPEAT TWO TIMES. UNLOAD AND HOLSTER.
7 Yards 8 Standing 1st-6 2 20 Sec Slide forward, load and 2nd-6 holster. Top off magazine
with 1 round. Fire 2 roundS, perform Magazine EXCHANGE and fire 2 rounds in 20 seconds. REPEAT TWO TIMES. UNLOAD AND HOLSTER.
7 Yards 9 Standing 1st-2 NIA NIA Slide lock to the rear, 2nd-0 load and holster. Top off
the magazine in the weapon with 1 round. Draw weapon, place in WEAK hand, and go through UNLOADING procedures with the weak hand.

DISTANCE STAGE
7 Yards 10
POSITION
standing
MAGAZINES
1st-6 ~nd-6
SHOTS TIME
2 4 Sec
..,
DESCRIPTION
Load and come to ready pistol with the WEAK hand. Fire 2 rounds in 4 seconds WEAK HAND ONLY from ready pistol. (Total of 3 facings) Perform EKERGENCY RELOAD with hand, no time limit. 2 rounds in 4 seconds HAND OllLY from ready pistol. (3 facings)
weak Fire WEAK
INSTRUCTORS NOTE: If fired as given, the student will need 75 rounds. Some of these rounds are not fired, but are unloaded onto the floor. These rounds will have to be recovered at the completion of the exercise.
TARGET:
•
Instructors option-downrange feedback 'available to the'student on an individual basis .
• •
\

•
•
•
TERMINOLOGY APPLICABLE TO SAPP
EMERGENCY RELOAD: The magazine is empty and the slide is locked to the rear. Drop the magazine, insert a fresh magazine, depress the slide stop lever to charge the weapon. (Weapon now in battery)
TACTICAL RELOAD: The magazine is almost empty, but one round remains in the chamber. Drop the magazine, insert a fresh magazine, while keeping the target covered. (Weapon remains in battery)
MAGAZINE EXCHANGE: The weapon is not loaded to capacity. The partial magazine is removed and retained. A fresh magazine is inserted into the weapon, while keeping the target covered.
(Weapon remains in battery)
RANGE COMMANDS
* On the line, with a magazine and (6) rounds, load! ** Charge your weapon! *** Holster! (Decockibg is incumbent upon ~he shooter)
When all shooters are holstered and ready,
~ Is the line loaded? ** The line is loaded and ready! (Without further comment,
tbe targets are then faced.)
When the shooting is completed,
* Draw and clear your weapon! ** Check it twice! (CIT) *** Holster! **** Place your hands behind your back and make the line safe!
SEMI-AUTOMATIC PISTOL PROGRAM - SAPP

•
REDUCED LIGHT FOR
SEMI-AUTOMATIC PISTOL
• (Handout)
• ~--

-------- - ---------
•
•
•
DEPARTMENT OF THE TREASURY
FEDERAL LA W ENFORCEMENT TRAINING CENTER
OFFICE OF SPECIAL TRAINING
6063.02
FIREARMS DIVISION
REDUCED LIGHT FOR SEMI-AUTOMATIC PISTOL
1/92

•
•
•
SYLLABUS
COURSE TITLE: Reduoed Light (semiautomatics)
COURSE NUMBER: 6063.02
LENGTH AND KETHOD OF PRESENTATION:
LECTURE 0:30
LABORATORY 1:30
PRACTICAL ~XERCISB TOTAL - 0 - 2:00
DESCRIPTION:
Through lecture, demonstration and live fire, this course will familiarize the shooter with the techniques of accurate target engagement under low light conditions. The student will gain confidence in his/her ability to load, unload, and fire the semiautomatic pistol, from the kneeling bench, standing barricade, and point shoulder positions.
TERMINAL PERFORMANCE OBJECTIVE:
The student will demonstrate his/her proficiency to safely handle, fire, load and unload the semiautomatic pistol, while engaged in low light conditions according to the principles delineated during the course of i.nstruction.
INTERIM PERFORMANCE OBJECTIVES:
1. Demonstrate proper range discipline.
2. Demonstrate FI stance, grip, loading, unloading and trigger control techniques.
3. Demonstrate "decocking procedures", if applicable.
4. Render a semiautomatic pistol to a safe condition.
KETHOD OF EVALUATION:
1. Safe completion of course.
2. Written multiple choice examination (SAPP).
3. Demonstrated proficiency (SAPP).

•
•
•
INSTRUCTOR GUIDE
METHODOLOGIES:
1. Lecture
2. Demonstration
3. Class discussion
4. Practical live fire exercise
Critique
TRAINING AIDS/EQUIPMENT:
1. Instructor
a. Safe (red handle) semiautomatic pistol with magazine.
b. Dummy rounds
c. Weapons manual
d. Ammunition as required (no live ammunition in classroom) .
e. Holster
f. Magazine pouch
:2. Student
a. semiautomatic pistol
b. Two dummy rounds
c. Three magazines
d. Holster with pouch for magazines
e. Eye/ear protection
f. 75 to 150 rounds service ammunition per student
SPECIAL INSTRUCTION:
1. Student Assignments: It is recommended that a Basic Marksmanship Instruction (BMI) Program be a prerequisite to this Reduced Light Course with semiautomatic pistols .

2. special Considerations: Students must pay particular attention to safety rules. Safety is a primary consideration while firing under'reduced light conditions. •
•
•

•
•
•
I.
-~---------
OUTLINE OF INSTRUCTIONS
INTRODUCTION:
A. Students, as a law enforcement officer with street experience, some of you mayor may not have used your weapon in an actual confrontation. However, it is imperative when using semiautomatics that the agent or officer be familiar with that particular weapon in low light conditions.
B.
C.
The purpose of the semiautomatic Reduced Light Course is to help you develop those techniques which are necessary to become proficient during reduced- light shooting exercises.
An officer properly trained in Reduced Light shooting principles and techniques, gains confidence in the ability to react to a realistic situation under low light conditions.
TERMINAL PERFORMANCE OBJECTIVE:
The student will demonstrate his/her proficiency to safely handle, fire, load and unload the semiautomatic pistol, while engaged in low light conditions according to the principles delineated during the course of instruction.
INTERIM PERFORMANCE OBJECTIVES:
1. Demonstrate proper range discipline.
2. Demonstrate FI stance, grip, loading, unloading and trigger control techniques.
3. Demonstrate "decocking procedures", if applicable.
4. Render a semiautomatic pistol to a safe condition.
II. PRESENTATION:
A. Techniques of Reduced Light Firing
1. Stance
a. Objective: To stand in a way that causes the least amount of body movement, and when the arms are raised to shoulder level, you are naturally aligned with the target. When at close range, we recommend using the field interrogation position .
1) Comfort

2) stability
3) Face your target in the F~ stance.
4) Feet, shoulder width apart.
5) DO NOT crouch.
6) Check stance py closing eyes.
7) Drop strong foot back when at close range (FI stance)~
b. Head (bring weapon to eye level instead of eye level to weapon).
1} Use nose for reference.
2) Multiple target engagement abilities enhanced.
c. Covered position~
2. Grip
1) Crouching or kneeling over the bench.
2) strong side barricade, body behind cover.
3) Body concealm.ent.
a. Objective: To have a firm hOld'of the weapon so the shooter can oper~te it effectively and repeatedly without cpanging the position of the hand on the weapon.
b. position of the ~eapon in relation to the hand.
1) Placed in V of ~trong hand.
2) High and firm grip.
c. Use of weak hand
1) For supporting the strong hand.
2) Use same pressur~ with weak hand.
3) Weak thumb down.
•
•
•

- -- -----------
•
•
•
3.
4) Do not cross over back of hand with weak thumb •
Area of Aim
a. center of mass.
b. Common tendency to shoot high when firing under reduced light conditions.
4. Double Action Semiautomatics
a. Maximum leverage of shooting finger on trigger.
b. Smooth, constant; I steady pressure.
c. Maintain same pressure on grip. Do not vary -it.
d. Wait for recoil (surprise shot).
5. Loading
a. Initial loading
*INSTRUCTORS NOTE:
1)
2)
Slide should be locked open to the rear.
Insert magazine.
3) Depress slide stop.
4) Decock/uncock if applicable, and holster.
THE SIG-SAUER HAS A DECOCK LEVER. , WESSON AND BERETTA HAVE A MANUAL SAFELY LOWER THE HAMMER, OR UNCOCK WEAPON. THE GLOCK HAS NO EXTERNAL DE COCK LEVER.
THE SMITH SAFETY TO THE SAFETY OR
b. Emergency reload
1) Slide with be locked to the rear.
2) Depress magazine release button, allow magazine to fall to the ground.
3) Insert fresh magazine .
4) Depress slide stop or "sling-shot" the slide forward and engage target, if appropriate.

---------
c. Tactical magazine exchange
1) While keeping target covered, depress magazine release button and catch magazine. Retain the magazine on your person.
2) Insert new magazine and engage target, if appropriate.
*INSTRUCTORS NOTE: RECOMMEND TO STUDENTS TO FIRST, HAVE FRESH MAGAZINE IN HAND BEFORE REMOVING MAGAZINE FROM WEAPON.
d. Tactical reload
1) Slide is in battery with a round in the chamber. Magazine is empty or nearly empty.
2} Depress magazine release button and drop magazine on the ground.
3) While keeping target covered, insert fresh magazine and engage target, if appropriate.
6. Unloading/Clearing Weapon
a. Decock or place safety on, if applicable.
b.
c.
d.
e.
f.
g. Glock) •
D. SUHKARY:
Remove magazine.
Lock slide to the rear.
Visually inspect chamber.
Physically place little finger in chamber to ensure it is empty.
Depress slide stop.
Decock/uncock and holster (pull trigger on
1. Techniques of Reduced Light Firing
a. Stance (FI)
b. Grip
c. Area of aim
d. Loading
e. Unloadinglclearing weapon
f. Safety
•
•
•

•
•
•
REFERENCES
Instructor .
a. DEA Firearms Instructor Manual, 1989
b. Indoor Reduced Light course, FLETC, No. 6061, June, 1986

• DISTANCE STAGE
3 Yards 1
2
7 Yards 1
2
• • FLETC REDUCED LIGHT WITH SEMI AUTOMATICS
POSITION ROUNDS
FI stance 1st mag-6 standing 2nd mag-6 (strong hand only)
FI stance standing point shoulder two hands
FI stance standing
1st mag-8 2nd mag
point shoulder two hands
FI Stance standing point shoulder two hands
4
SHOTS TIME
2
2
3
2
DESCRIPTION
3 sec
3 sec
5 sec
20 sec
15 sec
Load and holster. and fire 2 rounds seconds. Holster each 2 rounds.
Draw in 3 after
Load and holster (use emergency reload procedures). Same as above, 2 hand strong hand. Holster an empty weapon.
Load 8 round magazine weapon. Draw and fire 3 rounds in 5 seconds, stay aimed-in.
Fire 3 rounds, perform tactical magazine exchange, fire 2 rounds, stay aimed-in.
Fire 2 rounds, perform tactical reload, fire 2 rounds. Holster empty weapon.

• • • FLETC REDUCED LIGHT WITH SEMIAUTOMATICS
DISTANCE STAGE POSITION ROUNDS SHOTS TIME DESCRIPTION
15 Yards 1 Bench 1st mag-8 2 6 & 4 sec Load and holster. Draw, kneeling or assume a bench position crouch, two hands and fire 2 rounds in 6 secon-ds, stay aimed-in then fire 2 rounds in 4 seconds, then la-st 2 rounds in 4 seconds. Un-load, holster and remain in position until command is gi-ven to stand.
2 Standing 2nd mag-6 2 7 sec Load and holster. Draw strong side and fire 2 rounds in 7 barricade two hands seconds, then reholster.
After las two rounds, unload and holster.
TOTAL ROUNDS = 36 POSSIBLE SCORE = 180 TARGET: TRANS TAR II
MINIMUM = 126

•
SIG-PISTOL FAMILIARIZATION
COURSES I-VB PRACTICE
•
••

• TOPIC
PREPAR.I\ TION
•
COURSE
•
US-TVA SIG PISTOL TRAINING
PISTOL FAMILIARIZATION COURSE I
- Double Action, Decock, Sight in 7 -yards. Ready Position.
- Review range safety & procedures.
- Be sure all shooters have ear & eye protection.
- Shooters need "10 rounds
- Explain ready position.
- Transtar II Targets .
- Assemble shooters at the 7 - yard line.
- Check for empty weapons.
- Dry fire students through the drill first; emphasize trigger
control, grip, si(fht alignment & sight picture.
- Load 10 rounds in 2 magazines (5 in each).
- Draw weapon.
-Insert magazine (instructors watch for correct technique).
- Chamber a round.
- Decock .
- Gun at ready.
•
•
•
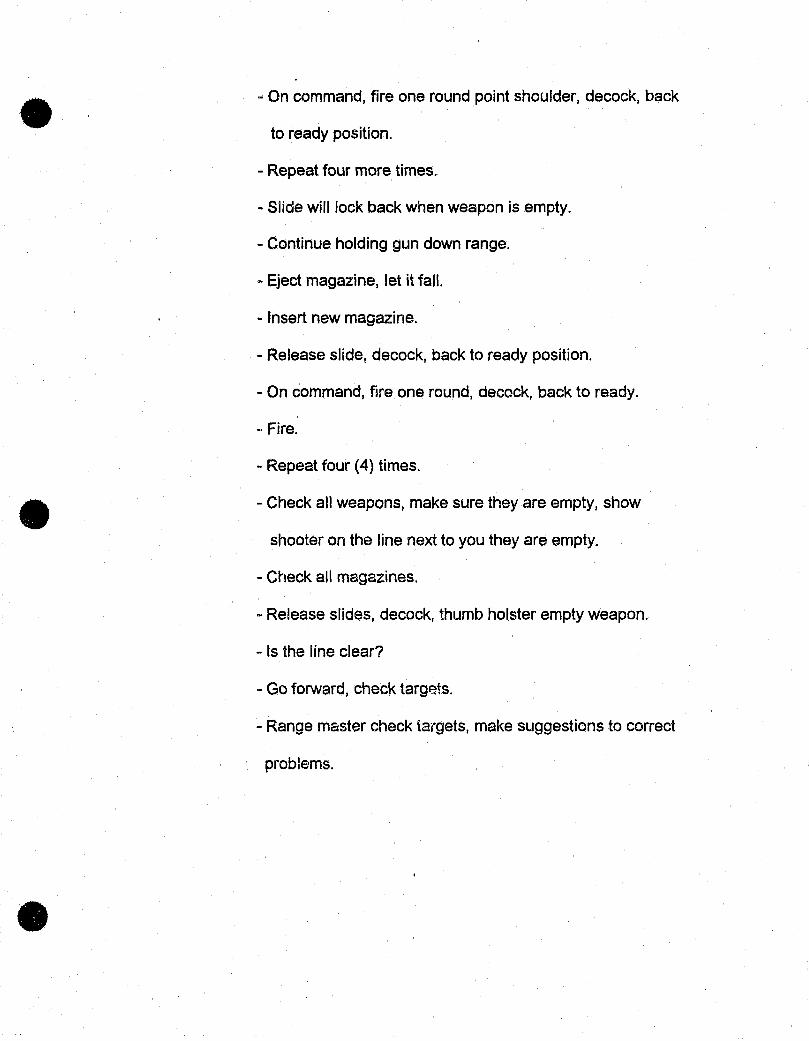
- On command, fire one round point shoulder, decock, back
to ready position.
- Repeat four more times.
- Slide will lock back when weapon is empty.
- Continue holding gun down range.
- Eject magazine, let it fall.
- Insert new magazine.
- Release slide, decock, back to ready position.
- On command, fire one round, decock, back to ready.
- Fire.
- Repeat four (4) times.
- Check all weapons, make sure they are empty, show
shooter on the line next to you they are empty.
- Check all magazines.
- Release slides, decock, thumb holster empty weapon.
- Is the line clear?
- Go forward, check targets.
- Range master check targets, make suggestions to correct
problems .

• TOPIC
PREPARATION
• FIRE COURSE
•
US-TVA SIG PISTOL TRAINING
PISTOL FAMILIARIZATION COURSE II
- Double Action, Sight in 7-Yard Line, Single Action, Ready
Position.
- 15 round course.
- Ear & eye protection.
- Transtar II Target.
- Assemble shooters on the 7 -yard line.
- Check all weapons .
- Emphasize slow fire only.
- Load 5 rounds into each of 3 magazines.
- Draw weapon, point to target.
- Insert magazines (instructors watch for correct technique).
- Chamber a round - decock - ready position.
- On command fire two rounds .at Transtar II target,
decock and return to ready.
- Repeat.
- Fire one round double action, slide will lock back, eject
magazine, insert new magazine.

• - Fire one round single action, decock, lower to ready .
- Fire 2 rounds (1 double & 1 single).
- Decock, bring to the ready.
- Repeat one round double and one single, slide will
lock back.
- With weapon still on target drop magazine and
insert new magazine.
- Drop slide, decock, lower to ready.
- Fire 2 rounds ( 1 double & 1 single).
- Decock.
- Repeat.
• - Last round fired double and slide locks back.
Remove magazine.
- Check weapons and magazines.
- Show weapon to neighbor on line.
- Decock and holster weapon.
- Make the line safe.
- Go forward & check targets.
- Rangemaster & instructors make suggestions/sight
changes .
•

• TOPIC
PREPARATION
• FIRE COURSE
•
US-TVA SIG PISTOL TRAINING
PISTOL FAMILIARIZATION COURSE 11\
- Double Action, Single Action, Sight in i5-Yard Line,
Ready Position.
- 15 round ('..curse.
- Ear & eye protection.
- Transtar II Target
- Assemble shooters on the 15-yard line.
- Check all weapons .
- Emphasize slow fire only.
- Load 5 rounds into each of 3 magazines.
- Draw weapon, point to target.
- Insert magazines (instructions watch for correct technique).
- Chamber a round - decock - ready position.
- On command fire two rounds at Transtar II target, decock
and return to ready.
- Repeat.
- Fire one round double action, slide will lock back, eject
magazine, insert new magazine .

--- ----------------
• - Fire one round single action, decock, lower to ready .
- Fire 2 rounds ( 1 double & 1 single).
- Decock, bring to the ready.
- Repeat one round double and one single, slide will
lock back.
- With weapon still on target drop magazine and insert new
magazine.
- Drop slide, decock, lower to ready.
- nre 2 rounds ( 1 double & 1 single).
- Decock.
- Repeat.
• - Last round fired double and slide locks back .
Remove magazine.
- Check weapons and magazines.
- Show weapon to neighbor on line.
- Decock and holster weapon.
- Make the line safe.
- Go forward & check targets.
- Rangemaster & instructors make suggestions .
•

•
•
•
--------------~-- ---
TQPIC
PREPARATION
FIRE COURSE
US-TVA SIG PISTOL TRAINING
PISTOL FAMILIARIZATION COURSE IV
- Decocking/Holstering
- 30 rounds/3 magazines.
- Assemble shooters on 15-yard line.
- Emphasize decocking and thumb placed over hammer
prior to holstering.
- Explain staying "on target" until told to holster.
- Finger out of trigger guard until "on target" and
ready to fire.
- Emphasize slow fire only.
- Before actual firing, have shooters dry fire and
practice holstering, decocking, drawing, etc.
- Advise them not to anticipate any commands.
(Be sure eye and ear protection is in place)
- Check all weapons to be sure they are empty.
- Load 3 magazines with 5 rounds each.
- Draw weapons, point towards target.
- Insert magazine.
- Chamber a round, decock .
- Thumb over hammer (check line), holster, snap in.

---- - ------------
•
•
•
- On command, fire 2 rounds point shoulder; stay on
target until told to holster (1 round double action
& 1 round singie action
- Finger off trigger, de cock, thumb over hammer,
holster, snap in.
- Repeat above.
- On command, fire 1 round, point shoulder, keep
weapon pointed downrange, then eject magazine (let
it fall), insert new magazine. Release slide, and
fire 1 more round. Stay on target. (They do not
need to decock before firing the 2nd round.)
- Finger off trigger, decock thumb over hammer,
holster, snap in.
- On command, fire 2 rounds, point shoulder; stay on
target until told to holster.
- Finger off trigger, decock, thumb over hammer,
holster, snap in.
- Repeat above.
- Keep weapon pointed downrange, eject empty
magazine, insert new magazine, release slide,
de cock, thumb over hammer, holster, snap in.
- On command, fire 2 rounds point shoulder, stay on
target.

---~--~--
•
•
•
- Finger off trigger, decock, thumb over hammer,
holster, snap in.
- On comm~nd, fire 3 rounds point shoulder. (Weapons
will be empty.)
- Eject magazine, release slide, decock, thumb over
hammer, holster.
- (Repeat entire fire course again)
(after second time)
- All shooters, check your weapons and magazines to
be sure they are empty. Show those next to you an
empty weapon .
- Slide forward, decock, holster an empty weapon.
-Is the line clear?
- Go forward, check your targets.
(Assess targets)

------------
• TOPIC
PREPARATION
• FIRE COURSE
•
US-TVA SIG PISTOL TRAINING
PISTOL FAMILIARIZATION COURSE V
- 3-Yard Line, Position Development, Close Combat
Distances (Weak Hand Ready & Strong Hand Draw).
-16 rounds
- Emphasize safety.
- Remind shooters to keep their fingers off the
trigger until coming onto the target.
- Transtar It target
- Slow and deliberate fire.
- On the 3-yard line load 15 rounds in a magazine.
- With weapon pOinted down range in weaver stance;
charge chamber, decock, remove magazine, holster
weapon & snap down.
- Replace missing round in magazine, replace magazine
in weapon until it clicks.
- On command draw and fire 1 round double action and
one round single action, decock and reholster. Use
a two handed grip .
- Repeat 3 more times. Decock & holster.

•
•
•
- Draw weapon and hold at the ready weak hand, two
handed grip.
- On command from rangemaster, fire two U'ounds (1
double action, 1 single action), decock and lower
weapon to ready.
- Repeat 3 times.
- When the slide locks back, remove magazine. Check
weapon for safe condition, show your neighbor on the
line your safe weapon and magazine.
- Make the line safe. Go forward, rangemaster &
instructors correct problems .

• TOPIC
PREPARATION
• FIRE COURSE
US-TVA SIG PISTOL TRAINING
PISTOL FAMILIARIZATION COURSE VI
- 25-Yard Line Barricade - Weak & Strong Hand Barricade
This course will acquaint the trainer with shooting
from a barricade with the SIG Auto Pistol.
- 1 magazine & 16 rounds ammo.
- Emphasize decocking and keeping finger out of the
trigger while changing positions.
- 25-yard line.
- Keep weapon off barricade .
- Emphasize slow fire.
- Transtar II Target
- Check all weapons to see if they are empty.
- 3 magazines with 8 rounds each, 1 round save.
- Standing behind the 25-yard barricade strong side .
. - Draw weapon, insert magazine chamber round, decock,
holster.
- Remove magazine, insert one round and replace magazine.

•
•
•
- On command to fire, fire 5 rounds standing, move to
barricade and fire 5 standing strong side barricade,
then 5 round kneeling barricade strong side, then go
to weak side barricade standing then drop to weak side
kneeling barricade, firing 5 rounds in each position.
- Combat reload.
- Decock before changing positions.
- When 25 rounds are completed, leave slide locked
back, magazine out and show magazines and weapon to
instructor or neighbor on the line.
- Make the line safe.
- Go forward on command to check targets .

.' TOPIC
PREPARATION
• COURSE
•
US-TVA SIG PISTOL TRAINING
PISTOL FAMILIARIZATION COURSE VII
- Malfunction Drill
- Break trainees into groups of three; divide the
range up into targets of three.
- Transtar II
- Put one trainee on the 7 -yard line and have the
other two students load their magazines with no
more than 5 live rounds and 2 to 3 dummy rounds or
spent cases.
- Assemble three magazines for the first shooter and
have him/her shoot all magazines and clear the
malfunctions, then repeat the exercise with the
second and third trainees. Rotate each trainee
through the exercise three times.
- One instn.i' .i:or will be with each group of students
for safety and coaching purposes .

•
FLETC PPC QUALIFICATION
FOR SEMI-AUTOMATICS
- Syllabus
• - Outline of Instruction
- P.P.C
•

SYLLABUS
~ COURSE TITLE: FLETC PPC QUALIFICATION FOR SEMI-AUTOMATICS
Course Number: 6085.02
~
•
LENGTH AND METHOD OF PRESENTATION:
LECTURE LABORATORY PRACTICAL EXERCISE TOTAL -0- -0- 2:00 2:00 (SCI, 17PIP, BOP-AET/BOT/FIP/WSET, FAM-BTP, FDA-AT, FEMAIS, INS-ASV/JDO/JSA, IRS-ISIB/SER-IS CPE, USCS-BE)
DESCRIPTION:
As a practical ex~rcise, this course tests the student's ability to fire the FLETC PPC Course for Semi-Automatics. The student will perform magazine· exchanges., tactical reloads, emergency reloads, as well as perform initial loading and proper unloading procedures. The student will perform these exercises while firing the FLETC PPC Course for Semi-Automatics, arid the score will provide the student with feedback. The student must properly observe all safety rules, while performing the course of fire, to successfully complete the pRactical exercise.
TERKI~U\L PERFORHAHCE OBJECTIVE:
Given a semi-automatic pistol, the student will fire the FLETC PPC Course for Semi-Automatics on the Transtar II target and must fire a minimum score set by agency standards and identified in the Table of Standards. The student ·must demonstrate safe weapons handling, while firing this course.
INTERIM PERFORMANCE OBJECTIVES:
1. Dem«>nstrate initial loading procedures.
2. Demonstrate emergency loading procedures.
3. Demonstrate tactical reload procedures.
4. Demonstrate magazine exchange procedures.
5. Demonstrate unloading procedures.
6. Demonstrate proper shooting positions.
7. Understand alibis and allowable refires.
S. Know the marksmanship rating tables.
KETHOD OF EVALUATION:
~. Demonstrated proficiency

2. Table of Standards • 85% 80%
(Minimum 250) (Minimum 240)
1. FAA-FAM 1. uses inspectors I (Must Score 130 Agents on back half of course)
2. FITP
75% 70%
(Minimum 225) (Minimum 210)
1. HIS 1 • All others •
•
•

•
•
•
INSTRUCTOR GUIDE
METHODOLOGIES:
1. Live fire exercise.
TRAINING AIDS/EQUIPMENT:
1. Instructor
a. Safe semi-automatic pistols b. Two (2) magazines c. 4 dummy rounds
2. Student
c. d. e.
semi-automatic pistol Two (2) magazines 60 to 120 rounds of ammunition Holster and magazine pouch Eye and ear protection
SPECIAL REQUIREMENTS:
TABLE OF STANDARDS
AGENCY PERCENT
FAM 85% USCS 80% FITP 80% NIS 75% ALL OTHERS 70%
SCORE
255 240 240 225 210

•
•
•
I.
.---------------
1
OUTLINE OF INSTRUCTION
INTRODUCTION
A. This test will measure your ability to place accurate shots on target, while firing the FLETC PPC Course for Semi-Automatics. At this point, you should be familiar with the course of fire and the various positions this course is fired from. Your targets will be scored by instructors; two targets will be used. You must fire the course in proper sequence, as described, in order to receive full credit for all the shots fired. The officer must display proper safety procedures at all times, while participating in this practical exercise.
B. TERMINAL PERFORMANCE OBJECTIVE
Given a semi-automatic pistol, the student will fire the FLETC PPC Course for Semi-Automatics on the Tran star II target and must fire a minimum score set by agency standards and identified in the Table of Standards. The student must demonstrate safe weapons handling, while firing this course.
c. INTERIM PERFORMANCE OBJECTIVES
1. Demonstrate initial loading procedures.
2. Demonstrate emergency loading procedures.
3. Demonstrate tactical reload procedures.
4. Demonstrate magazine exchange procedures.
5. Demonstrate unloading procedures.
6. Demonstrate proper shooting positions.
7. Understand alibis and allowable refires.
8. Know the marksmanship rating tables.
II PRESENTATION
A. Initial Loading
Initial loading is the term used for loading the weapon for duty carry, in a safe manner, while executing several steps that reduce the potential for accidental discharges, and ensures that the weapon will fire. There are two methods of initial loading of the weapon.

2
1. Initial loading with the slide locked to the rear
2. Initial loading with the slide forward
The student may elect to use either method if the instructor does not stipulate a method in the range commands.
B. Emergency Reload
Emergency reload is the term used when you have fired all the rounds in the magazine of the weapon and the slide is locked to the rear~ The empty magazine is dropped from the weapon directly onto the ground and a fresh magazine is inserted. The slide is dropped forward and the target is engaged, if appro~riate.
c. Tactical Reload
D.
A tactical reload is accomplished-by dropping the magazine on the ground while a round is still in the chamber. The fresh magazine is inserted and the target is engaged, if appropriate. This procedure should be lexercised when the officer knows that he has fired a lot of rounds, but he may not know how many.
Magazine Exchange
This procedure is the process of exchanging magazines in the weapon to allow you to top off the weapon while saving the partially loaded magazine for further use. There are several methods of performing this exercise, and their use may depend on the hand size and manual dexterity of the officer performing this drill.
E. Unloading
This procedure is the process of unloading a weapon as carefully as possible with no time limits and in a safe manner. The officer must demonstrate the ability to engage any safeties, properly clear the chamber, lock the slide to the rear, visually and physically inspect the chamber and holster a safe weapon.
F. Shooting Positions
There are several positions of fire that the student must demonstrate properly during the course of fire.
1. Field Interview (F.I.) - This stance is used for the three and seven yard lines. The strong side foot is dropped to the rear.
•
•
•

•
•
•
2. Isosceles - This stance may be used at any range past seven yards. The feet are parallel and the stance is approximately shoulder width. The officer should not crouch over, but rather, stand in an upright position.
3
3. Right Side Standing Barricade - The officer's position may vary, as long as the officer uses the maximum cover capabilities of the barricade, exposing little of his body off the right side of the barricade. Often, the right foot is used as a reference, and should not extend past the right edge of the barricade plane as a foundation for this position.
4. Left Side 'Standing Barricade - Th.e officer's position may vary, as long as'maximuIrl use of cover is maintained. To minimize exposure to the threat area, the body should not extend past the left plane of the barricade. The left foot c~n be used as a reference along the left edge of the barricade plane.
5. Kneeling Barricade - The officer must use cover to the maximum and at least one (1) knee must be on the ground. variations of this position allow for the officer to use one ~nee down, both knees down, or for the officer to be kneeling, and sitting on his heels for support. The muzzle must be forward of the barricade during firing.
G. Alibis and Refires
The following problems during the course of fire will warrant an alibi and allow the student to fire that portion of the course during which the alibi occurred.
1. Weapons Malfunction
a. Any broken parts, sights, or magazines that cause the shooter to not be able to proceed with the course, will be an alibi.
b. Any failure of the weapon to chamber a round or fire, through no fault of the shooter, shall be an alibi.
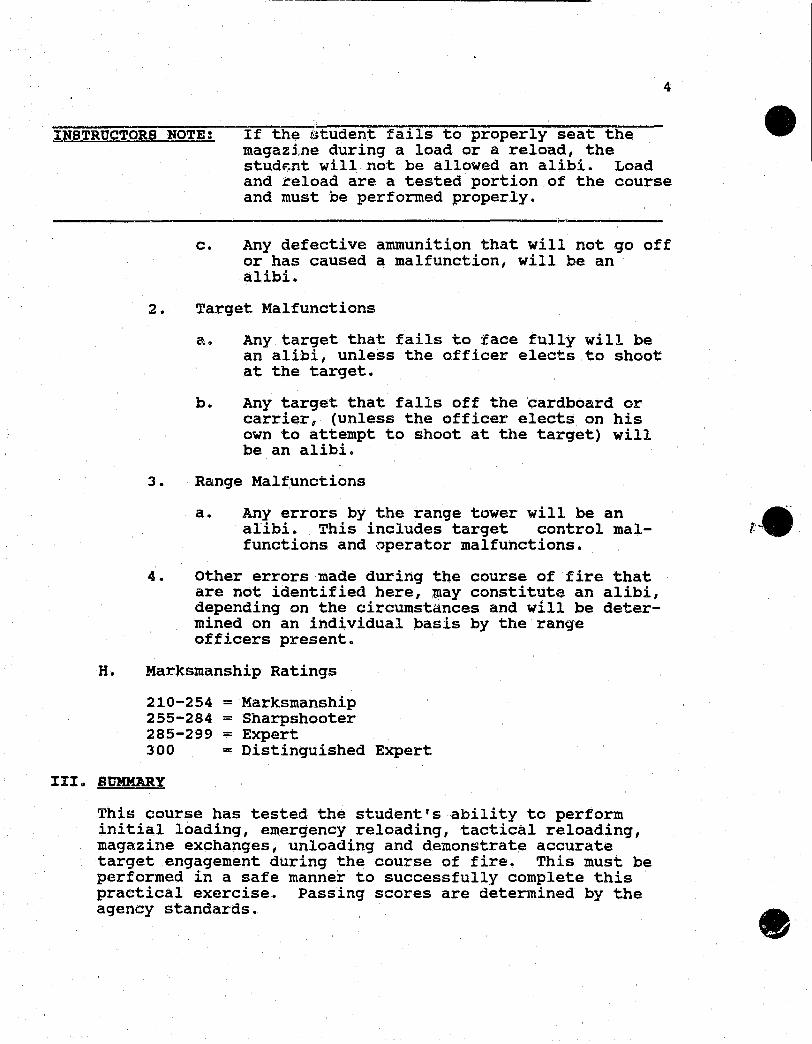
4
INSTRUCTORS NOTE: If the student fails to properly seat the magazine during a load or a reload, the stud~nt will not be allowed an alibi. Load and reload are a tested portion of the course and must be performed properly.
---_________________________ i~ ____ _
c. Any defective ammunition that will not go off or has caused a malfunction, will be an alibi.
2. Target Malfunctions
a. Any target that fails to face fully will be an alibi, unless the officer elects to shoot at the target.
b. Any target that falls off the cardboard or carrier, (unless the officer elects on his own to attempt to shoot at the target) will be an alibi.
3. Range Malfunctions
a. Any errors by the range tower will be an alibi. This includes target control malfunctions and operator malfunctions.
4. Other errors made during the course of fire that are not identified here, ~ay constitute an alibi, depending on the circumstances and will be determined on an individual basis by the rang'e officers present.
H. Marksmanship Ratings
210-254 255-284 285-299 300
1:;:1 .. SUMKARY
= Marksmanship = Sharpshooter = Expert = Distinguished Expert
This course has tested the student's ability to perform initial loading, emergency reloading, tactical reloading, magazine exchanges, unloading and demonstrate accurate target engagement during the course of fire. This must be performed in a safe manner to successfully complete this practical exercise. Passing scores are determined by the agency standards.
•
•

•
•
•
IV. APPLICATION
Practical Exercise
5

6
REFERENCES • 1. Lesson Plan # 6066 GLOCK 2. Lesson Plan # 6078 smith & Wesson 3. Lesson Plan # 6023 Sig-Sauer 4. Lesson Plan # 6005 FLETC PPC 5. Lesson Plan # 6084 Loading/Unloading Procedures 6. Lesson Plan # 6089 PPC Laboratory 7. Lesson Plan # 6087 Fundamentals of Marksmanship for
Semi-Automatic Pistols
•
•

•
•
•
I.
FLETC PRACTICAL PISTOL COURSE RANGE COMMANDS
SEMI-AUTO
3-YARD DISTANCE
A. Stage 1
1. Shooters, on the line with six rounds load, charge and holster, and have a six round magazine available for reloading.
2. Shooters, stage one at 3 yards consists of firing one round in two seconds, point shoulder, shooting with strong-hand only. Draw from holster, reference sights, fire one round for each facing of the target. Upon last facing of target, with slide locked back, execute emergency reload, cover the target, and then reholster.
3. Is the line loaded? The line is loaded and ready!
B~ stage 2
1. Shooters, stage two at 3 yards consists of firing two rounds in three seconds, point shoulder, twohanded, draw from holster and reference sights. Shooters, maintain combat ready position with weapon slightly below eye level. On the next two facings, bring weapon ,to eye level, and fire two rounds in two seconds, holster an unloaded weapon.
2. Is the line loaded? The line is loaded and ready!
II. 7-YARD DISTANCE
A. Stage 1
1. Shooters, on the line with a seven round magazine, load, charge and holster, and have a six round magazine available for reloading.
2. Shooters, stage one at seven yards consists of firing one round in three seconds, point shoulder, two-handed, with sights, drawing from the holster. After sixth round is fired, execute a tactical reload, transfer the weapon to the weak-hand only, and fire one additional round in fifteen seconds. From the aimed in position, fire one round in three seconds for each facing until completion of the stage of fire. Clear, holster an unloaded weapon (remember one round is still in the chamber) •

B.
3. Is the line loaded? The line is loaded and ready!
stage 2
1. Shooters, load with a six round magazine, charge and holster and have a six round magazine available for reloading.
2. Shooters, stage two at the seven yard line consists of firing two rounds in four seconds, point shoulder, two-handed, with sights, drawing from the holster. After the fifth and sixth rounds are fired, execute an emergency reload and fire seventh and eighth rounds in fifteen seconds. Shooters then de cock and transfer the weapon to the strong-hand. Shooters then fire two rounds in four seconds, strong-hand only, from the "aimed in" position until completion of this stage. Holster unloaded.
3. Shooters, is the line loaded? The line is loaded and ready!
III. 15 YARD LINE
A. stage 1
1. Shooters, load with a ma1qazine of seven rounds, charge and holster and have a five round magazine available for reloading.
2. Shooters, the fifteen yard line consists of firing three rounds in seven sec.onds, right side standing barricade position, drawing from the holster. When target edges away, the shooters will move to the right side kneeling barricade position. When the target faces, the shooters will fire three rounds from the aimed in position. Shooters will then execute a magazine exchange (in the kneeling position using cover). The shooters will then cover off for a left side standing barricade position and fire three more rounds in twenty seconds. The shooters will then assume a left side kneeling position. When the target refaces, the shooters will then fire their final three rounds in six seconds, unload and holster a safe weapon.
3. Shooters, is the line loaded? The line is loaded and ready!
.1
•
•

• • • DISTANCE STAGE POSITION MAGAZINES ROUNDS BHOTS TIME DESCRIPTION
-----------------------~-------------------------~-----~------------~---~---------------------25 yards A right side 1st mag
standing 12 rds barricade
6 3 2 1
8 sec 5 sec 3 sec
NOTE: If shooter is using weapon that can not load twelve in magazine, reload timing is incumbent upon the individual.
NOTE: When the shooter is aimed in on the edged target, the trigger finger will be on the trigger, when D/A.
NOTE: Shooter does not decock weapon when aimed in.
When target faces shooter will draw and fire three rounds in eight seconds. When target edges away, the shooter will remain aimed in. When target faces again the shooter will fire two rounds in five seconds. When target faces the 3rd time, fire one round in three seconds. Prepare for standing left side barrica4e position.
--------------------------------------------------------,._------------------------------------'25 yards B left side
standing barricade
6 3 2 1
8 sec 5 sec 3 sec
Shooter will fire the same sequence as right side barricade position above •.
.Then clear, double check, and holster an empty weapon.
COURSE NOTE: In combat situations, (aimed in) the finger remains on the trigger, when firing DiA, off the trigger when firing B/A.
TOTAL ROUNDS = POSSIBLE SCORE = MINIMUM SCORE =
TRANS-STAR II
60 300 210
MARKSMANSHIP RATINGS
210 - 254 255 - 284 285 - 299 300
= MARKSMAN = SHARPSHOOTER = EXPERT = DISTINGUISHED
TARGET
EXPERT
SEMI-AUTOMATIC PISTOL PROGRAH-SAPP June 17, 1992

• • • F.L~E.T.C. PRACTICAL PISTOL COURSE FOR THE
SEMI-AUTOMATIC PISTOL PROGRAM
DISTANCE STAGE POSITION MAGAZINES ROUNDS SHOTS TIME
3 yards A standing 1st mag 6 1 2 sec 6 rds
2nd mag 6 rds
NOTE: Upon last facing of target, with slide locked back, execute emergency reload and cover the target.
3 yards
NOTE:
NOTE: NOTE:
NOTE:
7 yards
NOTE:
NOTE: NOTE:
B standing 2nd mag 6 rds
6 2 3 sec
2 sec
(The following commands will depend upon the many different types of' semi-autos available in the field. The DAO or the SAO plus the addition of both DA/SA in one weapon system.)
Shooter will not decock between faqings. Shooter will remove finger from trigger between facings at combat ready, when firing S/A. Shooters must scan target area before. holstering.
A standing 1st mag 7 rds
2nd mag 6 rds
12 1 3 sec
When using weak hand, the shooters stance will not change. The shooters strong hand should remain at the side. Do not decock when using weak hand only. Tactical reload leaves on~ round to be cleared!
DESCRIPTION
One round in two seconds, point shoulder shooting with strong hand only. Draw from holster, reference sights, fire one round for each facing of the target. Holster a loaded weapon.
Two rounds in three seconds, point shoulder, two handed, rlraw from holster and reference sights. Shooter maintain a combat ready position with weapon slightly below eye level. On next facings, bring weapon to eye level, fire two rounds in two seconds until completion of stage of fire. Holster an unloaded weapon.
One round in three seconds, point s~ Jlder, two-handed, with sights drawing from the holster. After sixth round is fired, execute a tactical reload, transfer weapon to the weak hand only and fire one additional round in fifteen seconds. Then, from the aimed in . position, fire one additional round in three seconds for each facing until completion of stage of fire. Clear, holster unloaded.
---------------------------------------------------------------------------------------------

DISTANCE STAGE POSITION" MAGAZINES ROUNDS SHOTS TIME DESCRIPTION
-------------------------------~--------.. -------~--------------------------------------------7 yards B standing 1st mag 6 rds
2nd mag 6 rds
12 2 '4 sec
NOTE: When using the strong hand, the shooter's stance should not change. The shooter's weak hand should remain at the side.
NOTE: Do not decock when using strong hand only.
15 yards A right&left side standing
barricade
kneeling
barricade
1st mag 7 rds
2nd mag 5 rds
12 3 7 sec
6 sec
NOTE: When shooter is aimed in on edged targets, the finger will be on the trigger, when firing D/A.
NOTE: When changing positions behind the barricade, the weapon is decocked, finger off the trigger.
• •
Two rounds in four seconds, point ~houlder, two-handed, with sights drawing from the holster. After fifth and sixth rounds are fired, execute an .mergency reload and fire seventh and eighth rounds in fifteen seconds. Shooter then decocks and transfers the weapon to the strong hand. Shooter then fires two rounds in four seconds, strong hand only, from the "aimed in" position until completion of this stage. Holster unloaded.
Draw and fire three rounds in seven seconds, right side standing barricade. When target edges away the shooter will move to right side kneeling barricade and remain aimed in. When the target faces, shooter will fire three rounds from the aimed in position, execute a magazine exchange, then move to the left side standing position and fire three more rounds all within twenty seconds. The shooter will then move to the left side kneeling position and remain aimed in. When the target faces, fire three rounds in six seconds. 'rhe shooter will then scan the area to be certain it is safe, conduct a clearing procedure, check it twice, and holster an unloaded weapon •
•

•
•
•
IV. 25 YARD LINE
A. stage 1
1. Shooters, load one magazine with twelve rounds, charge and holster.
2. Shooters, stage one at the twenty five yard line consists of drawing the weapon from the holster and firing three rounds in eight seconds from a right side standing barricade position. When the target edges away, the shooters will remain aimed in. When the target faces again, the shooters will fire two rounds in five seconds. When the target faces again, the shooters from an aimed in position, will fire one round in three seconds. The shooters will then cover off for a left side standing barricade position.
3. Shooters, is the line loaded? The line is loaded and ready!
B. Stage 2
1 . Shooters will fire the same sequence of fire from a left side standing barricade position.
2. Shooters, unload and holster a safe weapon.
3. Score targets •

P226 FUNCTIONAL PERFORMANCE TEST
CLASS ROOM
• FLETCTEXT
ri' -'

• US-TVA SIG PISTOL TRAINING
P2~6 F.QNCTIONAL PE~FO~CE TEST - CLASS ROOM
N&~ _____________________________ DATE ________________ ATTEMPT # ______ _
PASS FAIL *
~. Lock Slide Back 1.
(Barrel Pointing Safe)
2. Slide Release: 2.
+ Two - Hand Grip (Strong and Weak) + One - Hand Grip (Strong) + One - Hand Grip (Weak)
• 3. Decocking: 3.
+ Two - Hand Grip
+ One - Hand Grip (strong)
+ One - Hand Grip (Weak)
4. Load Magazines (2) 4. -(Five Dummy Rounds Each)
5. Holster 5.
(Decocked, finger out of trigger
guard, thumb over hammer, snapped
in)
6. Duty - Load Weapon 6.
(Chamber round, decock, holster
release magazine, add 1 to
• magazine, re-insert)

•
•
•
7. Draw (Finger out of trigger guard, good grip).
8. Reload (Let magazine drop, proper grip on new magazine, barre] pointed safe, chamber round)
9. Render Safe (Safe direction, magazine released, slide locked back)
10. Malfunction Drill
7.
8.
9.
10 •
11. Disassemble, clean, reassemble 11.
comments (*Required if Failed)
Instructor's Signature
PASS FAIL

-------- --------_.- --
•
SECTION IV TAB 0
SIG-SAUER TRANSITION TEST
• (INSTRUCTOR - PLEASE KEEP SECURE)
•

•
•
•
TVA PUBLIC SAFETY SERVICE SIG SAUER TRANSITION
1. ______ Is first and foremost, and must never be compromised.
1
2. In the ready position, the shooter will be facing the target area with the weapon held fumly. The barrel
will be pointed ------------------3. The first step in preparing the semi-automatic weapon for duty carry is to point the muzzle in a
4. When charging a round into the chamber, your trigger finger should be out ofth.e-e------
5. When decocldng a Sig Sauer pistol. make sure your finger is out of the ---------
6. The primary immediate action drill for a malfunction on a semi-automatic pistol is
_____________ ,ifappropriate.
7. To safely transfer a semi·autom'l1:i.c: pistol to another person, the m&ga2ine should be removed, the --~---
should be open and the weapon banded over ------ first.
S. There are two items of safety equipment which are mandatory when on the range. They are ___ _
and protection. ----9. When cleaning your weapon. protection must be worn. ----" 10. The most important aspect iffireamu; tmining is -----11. When unloading a semi·automatic pistol you must first remove the

•
•
•
2
12. ine primary method of clearing a malfunction is identified by the words,
13. The officer should seated. --- the bottom of the ______ , to ensure that it is properly
14. To chamber a round, the officer should the ------- --------15. Finally, the officer should , if appropriate. ---16. The second method of clearing a malftmction should be don,~ behind
17. To perfonn the secondaIy method of clearing a malfunction, the officer should :
A.RanovelRip the ______ from the weapon and
________ the ______ to clear any romuis.
B. Insert a new in the weapon and the slide ------to _______ around.
c. ~ if applonate.
18. While Dring the Sig Sauer before you move or change pistol from hand to hand you must fust _____ _
the weapon.
19. The most impmtant aspect of proper loading is
20. When unloading a semi-automatic pistol, you should always physically and -------inspect the Chamber area and the Maguine well..
21. The Immediate .Action procedures will clear most --------22. The first step in unloading a semi-automatic pistol is to make sure that the weapon is ------in a safe direction.
23. In an Emergency Reload, the slide is in the _____ position.

3
24. In a Tactical reload, the slide is in the position. -----
25. In a Tactical Magazine Exchange, the partially loaded Magazine is removed and ---------------
•
•

40
39
38
36 34
35
Siq-Sauer P226

•
r RECORD OF CHANGES
AND
• AUTHORITY
•

•
•
REVIEW DATE FOR THIS DOCUMENT IS JUNE 1, 1995.
Record of aJangesjUpdates
Changes
,.,
1.
2.
3.
4.
5.
6.
7.
8 .
9.
10.
page No.
Reviewed by: ___________ _
Approved by: ___________ _
Section No.

• Tennessee Valley Authority. 400 West Summit Hill Drive. Knoxville, Tennessee 37902-1499
Robert G. Carter Vice President, Public Sarety Service
Effective Date: April 1~~,~19~9~4~ ____________ _
• TENNESSEE VALLEY AUTHORITY
•