SHRIMP CUTTER AND DEVEINER - Prawnto manufacture the "PRAWNTO™ shrimp cutter and deveiner ‐ the...
20
SHRIMP CUTTER AND DEVEINER SHRIMP CUTTER AND DEVEINER
Transcript of SHRIMP CUTTER AND DEVEINER - Prawnto manufacture the "PRAWNTO™ shrimp cutter and deveiner ‐ the...

1 Prawnto Shrimp Machine Co. of Texas
SHRIMP CUTTER AND DEVEINERSHRIMP CUTTER AND DEVEINER

2 Prawnto Shrimp Machine Co. of Texas
CONGRATULATIONS
You have just purchased one of the most exciting and serviceable machines you have ever had in your operation. With proper care, your PRAWNTO™ Shrimp Machine will provide you years of quality service!
ATTENTION Check your new PRAWNTO™ for freight damage immediately.
Do not discard the original shipping carton. The carrier will not honor a claim without the original box.
If damage has occurred, contact your delivery company and report the nature of the damage.
Also, call us for a replacement machine.
(From US – 1 800 426 7254, International – 011 903 527 4149)
WARRANTY Prawnto Shrimp Machine Co. of Texas Warrants the Prawnto™ Shrimp Machine for one year against defects in parts and workmanship, including the electrical motor, except for normal wear and tear of belts, rubber discs, roller and cutting blade sharpness. Notwith‐standing the foregoing and except as to the electric motor, this warranty is limited to a term of ninety days from date of purchase where the machine is used for commercial processing of shrimp for its initial preparation for sale to retailers. No warranty covers damage due to customer abuse or neglect. All warranty repair work shall be performed at Prawnto Shrimp Machine Co. of Texas with all shipping costs to and from Prawnto™ to be paid by the purchaser. Proof and date of purchase is a prerequisite to the effectiveness of any warranty. There are no warranties, which extend beyond the description on the face hereof. Seller does not warrant merchantability or fitness for a particular purpose.
DIELECTRIC TESTING Prawnto has a strict company standard to test all Prawnto MLG 2‐4 series machines prior to final packaging. Our
testing standards are as follow:
Test Voltage Test Time Test Voltage Test Time
1000 VAC/1400 VDC 60 s or 1200 VAC/1700 VDC 1s

3 Prawnto Shrimp Machine Co. of Texas
Owners Manual Content WARRANTY .................................................................................................................... 2
DIELECTRIC TESTING ................................................................................................. 2 OWNERS MANUAL CONTENT ................................................................................... 3 CONTROL CHANGE LOG ........................................................................................... 3 PRAWNTO™ SHRIMP MACHINE .............................................................................. 4 AVAILABLE PRODUCTS .............................................................................................. 5 ACCESSORIES .............................................................................................................................. 6 ADDITIONAL PRODUCTS ......................................................................................................... 7 IMPORTANT SAFEGUARDS ....................................................................................... 8
SETTING UP YOUR PRAWNTO ……………………………………………………………….9 CLEANING PROCEDURES ......................................................................................... 10 MAINTENANCE ............................................................................................................ 11 PREVENTATIVE MAINTENANCE ........................................................................................ 12 ALIGNMENT ................................................................................................................. 13 TROUBLE SHOOTING ................................................................................................ 14 PARTS AND ACCESSORIES ....................................................................................... 15 DIAGRAMS ......................................................................................................................... 15-18 PARTS LIST .............................................................................................................................. 19 CONTACT INFORMATION ........................................................................................ 20
Last Update Change
07/24/03 New updated version of Owner’s manual
05/13/06 MLG‐BC machine and components added to manual
10/30/13 MLG‐BC Series removed from manual
11/04/13 Dielectric Testing Policy
03/01/16 Setting Up Your Prawnto new page added to manual.
OWNERS MANUAL CONTROL CHANGE LOG
03/01/16 Revised: Table of Contents and Parts List

4 Prawnto Shrimp Machine Co. of Texas
Prawnto™ Shrimp Machine
We manufacture the "PRAWNTO™ shrimp cutter and deveiner ‐ the most dependable piece of equipment of its kind on the market today. Because it is powered by a ¼ hp. mo‐tor and constructed of aluminum and stainless steel, and high quality standards are used in the manufacturing processes, we offer a 1‐year warranty.
What exactly does the PRAWNTO™ do?
It cuts the shrimp down the back to any depth while destroying most of the sand vein. The shell is then easily removed by "pinching" or pulling it off from the underside. The tail can be removed or left on for any presentation required.
What about cu ng different sizes of shrimp?
Here is the beauty of the Prawnto... It's self‐adjusting for different sizes. With our NEW patented roller system only the depth knob is necessary for different depths of cut.
Can the PRAWNTO™ bu erfly?
Yes. The cut will be deep in the front to fan the shrimp for better presentation while stopping at the tail section for efficient breading or skewering. Round cut and western cuts are also possible with the Prawnto™.
How fast is the Prawnto™?
An inexperienced operator can cut shrimp at the rate of 4,000 shrimp per hour. That rate translates into the following pounds per hour:
An experienced operator can cut shrimp at the rate of 6,000 shrimp per hour. That rate translates into the following pounds per hour:
What are the size ranges the PRAWNTO™ can handle?
U10 down to 90/115 count green headless product. Head‐on shrimp can also be run through the Prawnto.
Will there be any damage or miss‐cut shrimp?
NO. With proper, simple maintenance and cleaning, the cutting blade will always cut down the center of the shrimp's back each and every time.
U 15 267 16 20 200 21 25 160 26 30 133 31 35 114 36 40 100 41 50 80 51 60 67 71 90 44 91 110 36
120 150 27
Count Size Lbs. U 15 400 16 20 300 21 25 240 26 30 200 31 35 171 36 40 150 41 50 120 51 60 100 71 90 67 91 110 55
120 150 40
Count Size Lbs.

5 Prawnto Shrimp Machine Co. of Texas
AVAILABLE PRODUCTS
The Prawnto™ Shrimp Machine is available in three models:
Prawnto™ Shrimp Machine MLG-2K Specifications:
Dimensions: W‐11 ½", L‐17 ¼", Hgt.‐10 ½"
Shipping Weight: 31 Pounds
Electrical: 115V, 60 C.P.S. ¼ H.P.,, 5.1 amp
Also 220V, 50 & 60 C.P.S., 2.7 amp
Listings:
MLG-2K (FIG 1.2)
Prawnto™ Shrimp Machine MLG-4 Specifications:
Dimensions: W‐11 ½", L‐17 ¼", Hgt.‐10 ½"
Shipping Weight: 34
Electrical: 115V, 60 C.P.S. ¼ H.P.,, 5 amp
Internal Cooling Fan for continuous operation
Also 220V, 50 & 60 C.P.S., 2.7 amp
Listings:
Specifications:
Dimensions: W‐11 ½", L‐17 ¼", Hgt.‐10 ½"
Shipping Weight: 32 Pounds
Electrical: 115V, 60 C.P.S. ¼ H.P.,, 5.1 amp
Also 220V, 50 & 60 C.P.S., 2.7 amp
Listings:
MLG-3 (FIG.1.1)
Prawnto™ Shrimp Machine MLG-3
MLG-4 (SHOWN WITHOUT COVER) (FIG. 1.3)

6 Prawnto Shrimp Machine Co. of Texas
Accessories
The following Prawnto Accessories, when used with the Prawnto Shrimp Machine MLG Series, allows for quicker and more efficient shrimp production.
Speed Pan Model 600
Designed with built‐in funnel for faster operation if
Model 900 processing station is not used. Fits any
model Prawnto ever sold.
MLG-3 With Speed Pan Model 600 (fig. 1.5) Processing Table Model 900
Processing Table Model 900 (fig 1.6) (Tub not included)
Welded 300 series stainless steel, NSF
listed with 5" casters, two locking.
Ergonomically correct for speed and
comfort while allowing for the fastest
speed of operation. It is a self‐
contained processing station that can
be used anywhere there is a power
plug. No assembly required!

7 Prawnto Shrimp Machine Co. of Texas
Additional Products
EZ Shucker Model EZ-100
Specifications:
Height 19”
Width 12”
Length 12”
Ship Weight 13 lbs.
Model EZ-100 (Fig 1.8)
The EZ Shucker quickly and easily opens oysters and other bivalves, including clams, scallops and mussels. The EZ Shucker is safe and easy. The knife is protected by a Lexan blade guard and is easily controlled by the machine handle. The blade never points at the hand while the knife is moved with a natural patented shucking motion. The EX Shucker is crafted from high‐quality stainless steel and commercial grade plastics. There is a 90-day guarantee on all parts, material and labor. The EZ-Shucker easily separates clusters of oysters into singles so you can save up to 50% off premium pric‐es for select grades and still purchase top quality products.

8 Prawnto Shrimp Machine Co. of Texas
Important Safeguards
When using electrical appliances, basic safety precautions should always be followed.
Use the following important safeguards whenever using your PRAWNTO SHRIMP CUTTER:
Read all instructions!
For commercial use only!
To protect against risk of electrical shock do not immerse base in water or other liquid.
Unplug from outlet when not in use, before putting on or taking off part and before cleaning.
Avoid contacting moving parts. Never put fingers or utensils into feed or discharge areas. Never take round cutting guard off when motor is running and never operate without safety guard secured.
Do not operate any appliance with a damaged cord or plug or after the appliance malfunctions, or is dropped or damaged in any manner. Return appliance to the nearest authorized service facility for examination, repair or electrical or mechanical adjustment.
The use of attachments not recommended or sold by the appliance manufacturer may cause fire, electrical shock or injury.
Do not let cord hang over edge of table or counter or touch hot surfaces.
Always operate Prawnto Shrimp Machine with all covers and guards in place.
To avoid injury, always have Prawnto Shrimp Machine in place before starting.

9 Prawnto Shrimp Machine Co. of Texas
Setting Up Your Prawnto MLG-Series
The Prawnto™ Shrimp Machine can process any size of shrimp by making some simple adjustments with the tool kit provided with your Prawnto™ Shrimp Machine. The Prawnto has been set up to process Shrimp Sizes 21/25 and 26/30 as the most common shrimp sizes in restaurants. The following instructions are to accommodate those using larger and smaller shrimp sizes. The Solid Stainless Spacer #434 S has been provided as a starting point width of the Feeder Discs
#313.
Add additional #434 Spacers (found in your tool kit) for larger shrimp
Replace the #434 S with the #434 Spacers for smaller shrimp
By setting the width of the Feeder Disc #313 you allow the disc to hold your shrimp upright and allow the centered blade to hit the middle of the shrimp’s back for the deveining process.
Feeder Discs width that are too tight will not allow larger shrimp to be inserted and a feeder discs width set too wide will cause side cuts on smaller shrimp.
The Roller Disc Assembly #314 has five plastic spacers and is set for the standard width just like the Solid Spacer #434 S. There will be three plastic spacers on the inside and two plastic spacer on the outside (one on each side) for a total of 5 plastic spacers. The Roller Disc rides between the Feeder Discs #313 and it is this contact point where the Feeder Discs turns the Roller Discs. Keep all five plastic spacers on the Roller Disc Assembly and the nut tight on the all‐thread plastic bearing.
Matching the width of both the Roller Disc Assembly and the Feeder Disc will make the best contact and will cause the Roller Disc to turn in unison with the Feeder Disc. Roller Disc will now turn clockwise and the Feeder Disc will be turning counter clockwise. This relationship pulls the shrimp down and allows the blade to cut and devein the shrimp.
Adjusting the width of the Roller Disc Assembly will affect the length of the cut. Tightening produces a long cut and loosening shortens the cut length, this is not to be confused with the depth of the cut which is controlled by the adjusting knob #503.
Centering the Feeder Discs and Blade after setting your width is accomplished by adjusting the following.
Feeder Disc Shaft — Cap Nut # 510 and Hex Nut # 416
Blade Shaft — Cap Nut #510 and MLG Back Up Nut #499 L
If you are not able to center the feeder disc and blade using the adjustments, you will need to follow the Alignment section. The Alignment Section (pg. 13) is usually for much smaller or much larger shrimp since they require the most adjustment.
Running test shrimp is the determining factor after these adjustments and once you have completed this set up you will not have to do this daily except in locations running multiple size shrimp. Keeping a record of the adjustment for each size shrimp and desired cut is recommended.
If you have any issues with these procedures please call us and we can walk you through this process.

10 Prawnto Shrimp Machine Co. of Texas
Cleaning Procedures MLG Series
1. Be sure to unplug the machine before cleaning.
2. Daily – Remove the safety guard #211 by loosening the two thumb screws securing it. Remove the round cutting guard #208. With the two 5/8” wrenches provided in your tool kit, remove the blade #310S and the set of two rubber discs #313, and the nuts and washers securing those parts. (see figure 2.1)
(fig. 2.1)
3. With step 2 accomplished; remove the motor cover #206 by loosening the Phillips screw on each side. Next, remove the short shaft #504 by pulling it out from the front splash area after loosening the set screw securing it. (see figure 2.2)
(fig. 2.2)
4. With the above parts removed, clean them in hot soapy water or place in the dishwasher. Then sanitized them.
5. Clean the splash area and food zone with hot
soapy water, sanitize, then allow to air dry in a clean protected area .
6. Replace the cutting parts, aligning the blade and rubber discs as shown in the maintenance section of this
manual. Replace the round cutting guard #208 and re‐secure the safety guard #211 with the thumbscrews. (See figure 2.4) 7. Store machine in a clean, protected place for further use.
(fig. 2.4)
(fig. 2.3)

11 Prawnto Shrimp Machine Co. of Texas
Maintenance
Apply Prawnto Oil to the Contact Points Daily : Feeder Discs #313 Roller Disc Assembly #314
Refer to figure 4.1 for daily oiling location.
MLG Series (Fig 4.1)
Prawnto Oil is a “Food Grade” lubricant design for high speed friction. Oiling Daily will keep the discs flexible and lubricated reducing the disc chattering that occurs due to friction from the contact points increasing the life of the discs. When needed, oil between the Seal Washer #427 and the MLG Stainless Plate #506 this will eliminate the high pitched squeal resulting from the seal rubbing the stainless plate.
For the alignment procedures follow directions in the Alignment section.

12 Prawnto Shrimp Machine Co. of Texas
Preventative Maintenance
In the event of unusual noise it is recommended that the cover be removed after the machine has been unplugged at the power source, and these checks be made periodically:
Feeder disks oiled
Pulleys tight on the shaft (Set screws tight) Shaft collars snug to the nylon washers against the bearing and to shaft (No in or out movement)
Belt tension snug but not too tight (About ¾” sag when pressure is applied between the motor pulley and top shaft pulley)
Prawnto Shrimp Machine Co. of Texas stocks all parts and accessories for the Prawnto Shrimp Cu er. See the section on Parts in this manual for information on ordering parts and accessories.
MLG Series (Fig 5.1)
To insure a quality cut down the center of the shrimp, the blade alignment should be checked periodically, for proper alignment, see the figure 5.1 above.
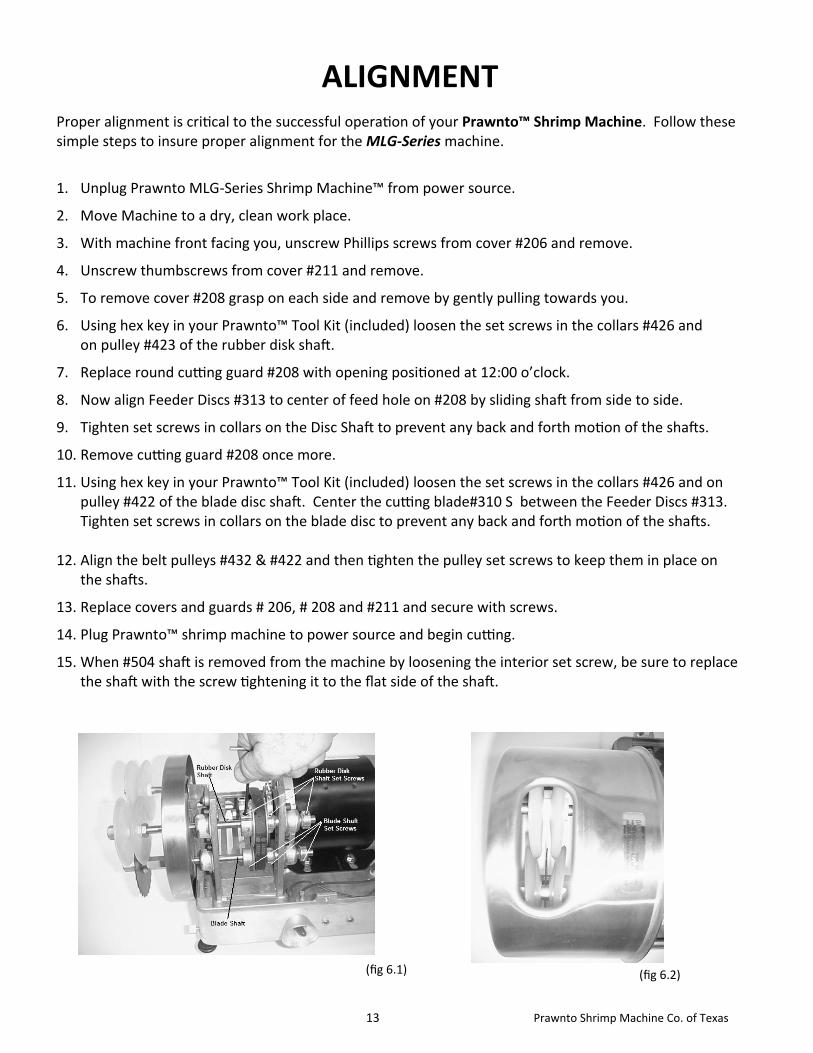
13 Prawnto Shrimp Machine Co. of Texas
ALIGNMENT
(fig 6.2)
Proper alignment is critical to the successful operation of your Prawnto™ Shrimp Machine. Follow these simple steps to insure proper alignment for the MLG‐Series machine.
1. Unplug Prawnto MLG‐Series Shrimp Machine™ from power source.
2. Move Machine to a dry, clean work place.
3. With machine front facing you, unscrew Phillips screws from cover #206 and remove.
4. Unscrew thumbscrews from cover #211 and remove.
5. To remove cover #208 grasp on each side and remove by gently pulling towards you.
6. Using hex key in your Prawnto™ Tool Kit (included) loosen the set screws in the collars #426 and on pulley #423 of the rubber disk shaft.
7. Replace round cutting guard #208 with opening positioned at 12:00 o’clock.
8. Now align Feeder Discs #313 to center of feed hole on #208 by sliding shaft from side to side.
9. Tighten set screws in collars on the Disc Shaft to prevent any back and forth motion of the shafts.
10. Remove cutting guard #208 once more.
11. Using hex key in your Prawnto™ Tool Kit (included) loosen the set screws in the collars #426 and on pulley #422 of the blade disc shaft. Center the cutting blade#310 S between the Feeder Discs #313. Tighten set screws in collars on the blade disc to prevent any back and forth motion of the shafts.
12. Align the belt pulleys #432 & #422 and then tighten the pulley set screws to keep them in place on the shafts.
13. Replace covers and guards # 206, # 208 and #211 and secure with screws.
14. Plug Prawnto™ shrimp machine to power source and begin cutting.
15. When #504 shaft is removed from the machine by loosening the interior set screw, be sure to replace the shaft with the screw tightening it to the flat side of the shaft.
(fig 6.1)

14 Prawnto Shrimp Machine Co. of Texas
TROUBLE SHOOTING The Prawnto™ Shrimp Machine is the most reliable product of it’s kind on the market today. A simple routine of daily maintenance and oiling using Prawnto™ Oil will prevent most problems and give your Prawnto™ Shrimp Machine a long and productive life. This process is described in the Maintenance section of this manual.
MLG-Series In the unlikely event that your Prawnto™ MLG Shrimp Machine develops problems use these simple trouble‐shooting steps to resolve most issues.
The machine quits running when hot
The motor has a thermal limiter that will automatically turn the motor off before damage can occur. Turn the switch to off, unplug the machine and allow to cool. The limiter will reset to allow the mo‐tor to run. Removing the motor cover will permit faster cooling.
Squealing or chatter noise
Oil the 313 and 314 disc contact points with Prawnto™ Oil (part #100) as shown in the maintenance section of this manual.
Knocking sound
Unplug machine and remove cover (#206) check for bearing wear or loosening of the shaft collars (#426) which may cause back and forth movement of the shaft.
Shrimp is cut off-center down the back
Make sure the blade (#310S) is centered between the two rubber discs (#313). No back and forth movement of shafts.
Shrimp is not cut down the back all the way or shell dented instead of being cut
This is caused by a dull cutting blade (#310S). Replace with a new blade, centering it as shown in the maintenance section of this manual.
Shrimp begins to tear instead of being cut
The cutting blade (#310S) needs to be cleaned, or back and forth shaft movement has caused the
problem; also make sure the blade is sharp.

15 Prawnto Shrimp Machine Co. of Texas
Diagrams
The Following Diagrams can be used to identify all parts number and accessories:
The Tune Up Kit can be purchased as one unit #539 (7 parts for a total of 12 pieces) or as individual pieces. It is recommended that you replace the items in the tune up kit once every year In the event of heavy use, and every two years under normal usage, or as often as necessary.
MLG-Series Tune-Up Kit #539 (Fig 9.1)
Fan Assembly Kit
The MLG‐4 has the addition of Model 601 Fan Assembly to reduce heat build up during continuous operation. Part # 602 is the piggy‐back switch connector and part #603 is the in‐line connector. This kit can be purchased for the MLG‐4 in both 110 or 220 Volts.
PARTS AND ACCESSORIES Prawnto Shrimp Machine Co. of Texas offers replacements parts and accessories for all models.
Use the following diagrams and tables to determine any parts and accessories needed for your Prawnto™ Shrimp Machine.
There are four easy way to order parts and accessories from Prawnto Shrimp
Machine Co. Of Texas,
Order by phone: 1 800 426 7254 Order by fax: 1 903 527 4951
Order by email: [email protected]
Order by mail at:
Prawnto Shrimp Machine Co. Of Texas
4770 1-30W, Caddo Mills, TX., 75135
Coming Soon Order online: www.prawnto.com
Tune Up Kit #313
#314
#427
#504
#310 S
#432
#434
MLG-4 Fan Assembly Kit #601 (Fig 9.2)

16 Prawnto Shrimp Machine Co. of Texas
MLG- Series 2-4 Interior View 1
(fig 9.4)

17 Prawnto Shrimp Machine Co. of Texas
MLG Series 2-4 Interior View 2
(fig 9.5)

18 Prawnto Shrimp Machine Co. of Texas
MLG Series 2‐4 Exterior View 1
(fig 9.8)
Exterior View 2
(fig 9.9)

19 Prawnto Shrimp Machine Co. of Texas
Parts List PART # DESCRIPTION PART # DESCRIPTION
100 Prawnto Oil 433P Press‐in Bearing (MLG‐2K)
107 Motor 433PBR Pillow Block Bearing
108 Toggle Switch 434 Spacer Washer (1/16" feeder disc spacer)
109 Power Cord 434S Solid Spacer (1/4" standard spacer)
111 Nylon Strain Relief 443 Frame Screw with Nut
112 Rubber Toggle Guard 445 Bearing Mount Screw
113 Liquid‐Tight Strain Relief 446 Motor Cover Screw & Washer
114 Ground Wire 447 Motor Bracket Bolt & Washer
115 Switch Wire 450 Tool Kit
203 Switch Guard Lock 499S MLG Back‐up Nut (Disc Shaft)
204 Switch Guard 499L MLG Back‐up Nut (Blade Shaft)
205 Frame W/ Motor Support and Small Upright 501 MLG Adjusting Arm
206 Motor Cover 502 Pivot Block
208 Round Cutting Guard (stainless) 503 Adjusting Rod W/ Knob
208A Round Cutting Guard (aluminum) 504 MLG Roller Shaft
209PB MLG Motor Support W/ Mounted Bearings 505 Roller Shaft Spacer
211S Safety Guard‐Stainless 506 MLG Stainless Plate
212 MLG Small Upright 508 ¼ " Set Collar
213 Thumb Screw 510 Cap Nut
310S Serrated Stainless Blade 511 Foot
313 Set of 2 Feeder Discs (All MLG Series) 512 Lock Nut for Pivot Block
314 Roller Disc Assemble (Butterfly Roller) 513 Pivot Block Bolt
415 Nylon Washer (For #314) 515 Spring
416 Hex Nut (For #314) 539 Tune‐Up Kit
417 Nylon Washer (For #433PBR) 600 Speed Pan
418 Shaft for Disc and Blade 601 Fan Assembly Kit
422 MLG Blade Shaft Pulley 602 Piggy‐Back Switch Connector
423 MLG Disc Shaft Pulley 603 In‐Line Connector
422M Motor Pulley 604 In‐Line Disconnect
426S Split Collar 750 Motor Strap (Set of 2‐110V)
427 Seal Washer 752 Motor Bracket (110V)
429S Blade Washer Set of Two 900 Solid Welded Process Station
430 Belt 18" (4L180) 902 Replacement Funnel for # 900 (Sm. & Lg.)
431 Belt 17" (4L170) 903 Replacement Hose and Clamps for # 900
432 Belt 16" (4L160) 904 Replacement Casters for # 900

20 Prawnto Shrimp Machine Co. of Texas
Your Prawnto™ Shrimp Machine can make virtually any type of cut you desire. Simple adjustments may be required to make some cuts.
The experts at Prawnto Shrimp Machine Co. Of Texas will be happy to answer any ques-tions on how to adjust your shrimp machine to make your desired cuts.
For these and any other technical questions contact
Prawnto Shrimp Machine Co. Of Texas
Call Toll Free 1-800-426-7254
Email [email protected]
Mailing Address Prawnto Shrimp Machine Co. Of Texas
4770 Interstate 30 W Caddo Mills, TX
75135
Or Visit our Website at www.prawnto.com Printed on March 2016