ShopNotes Issue 90
61
-
Upload
enginerdouglas -
Category
Documents
-
view
322 -
download
64
Transcript of ShopNotes Issue 90


Page 1 of 4 ShopNotes 90 ©2006 August Home Publishing. All rights reserved.
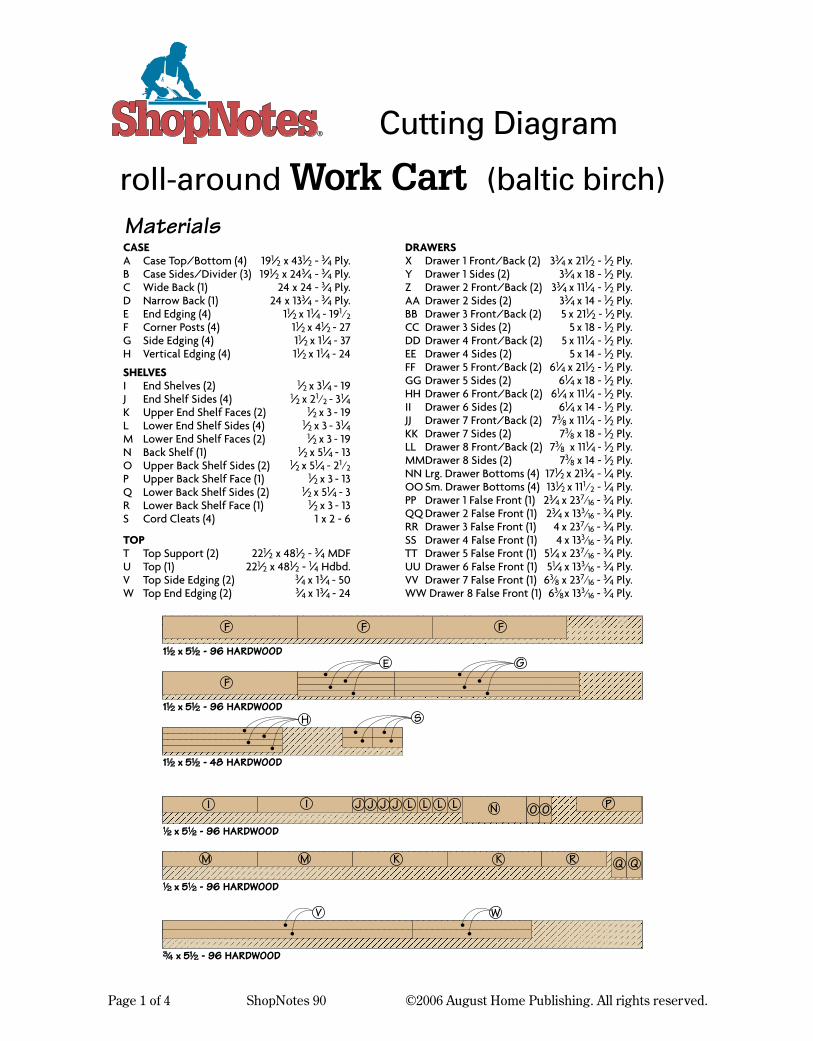
® Cutting Diagram
MaterialsCASEA CaseTop/Bottom(4) 191/2x431/2-3/4Ply.B CaseSides/Divider(3) 191/2x243/4-3/4Ply.C WideBack(1) 24x24-3/4Ply.D NarrowBack(1) 24x133/4-3/4Ply.E EndEdging(4) 11/2x11/4-191⁄2F CornerPosts(4) 11/2x41/2-27G SideEdging(4) 11/2x11/4-37H VerticalEdging(4) 11/2x11/4-24
SHELVESI EndShelves(2) 1/2x31/4-19J EndShelfSides(4) 1/2x21⁄2-31/4K UpperEndShelfFaces(2) 1/2x3-19L LowerEndShelfSides(4) 1/2x3-31/4M LowerEndShelfFaces(2) 1/2x3-19N BackShelf(1) 1/2x51/4-13O UpperBackShelfSides(2) 1/2x51/4-21⁄2P UpperBackShelfFace(1) 1/2x3-13Q LowerBackShelfSides(2) 1/2x51/4-3R LowerBackShelfFace(1) 1/2x3-13S CordCleats(4) 1x2-6
TOPT TopSupport(2) 221/2x481/2-3/4MDFU Top(1) 221/2x481/2-1/4Hdbd.V TopSideEdging(2) 3/4x13/4-50W TopEndEdging(2) 3/4x13/4-24
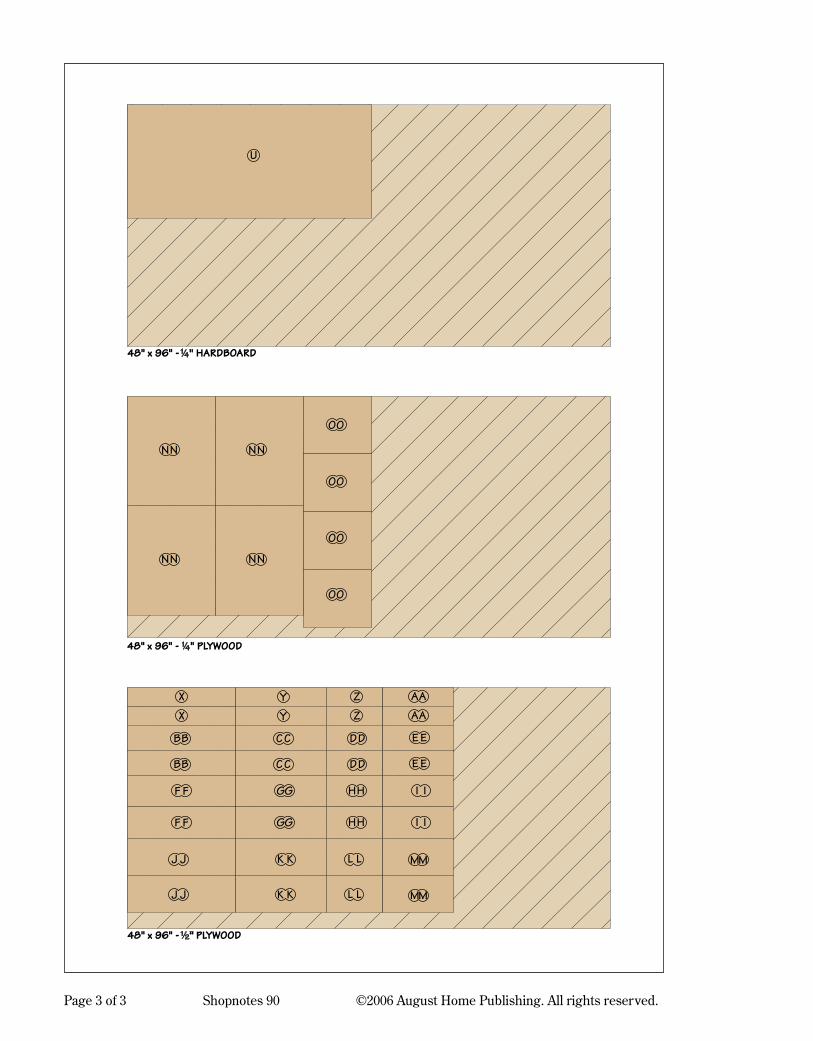
DRAWERSX Drawer1Front/Back(2) 33/4x211/2-1/2Ply.Y Drawer1Sides(2) 33/4x18-1/2Ply.Z Drawer2Front/Back(2) 33/4x111/4-1/2Ply.AA Drawer2Sides(2) 33/4x14-1/2Ply.BB Drawer3Front/Back(2) 5x211/2-1/2Ply.CC Drawer3Sides(2) 5x18-1/2Ply.DD Drawer4Front/Back(2) 5x111/4-1/2Ply.EE Drawer4Sides(2) 5x14-1/2Ply.FF Drawer5Front/Back(2) 61/4x211/2-1/2Ply.GGDrawer5Sides(2) 61/4x18-1/2Ply.HH Drawer6Front/Back(2) 61/4x111/4-1/2Ply.II Drawer6Sides(2) 61/4x14-1/2Ply.JJ Drawer7Front/Back(2) 73⁄8x111/4-1/2Ply.KK Drawer7Sides(2) 73⁄8x18-1/2Ply.LL Drawer8Front/Back(2) 73⁄8x111/4-1/2Ply.MMDrawer8Sides(2) 73⁄8x14-1/2Ply.NNLrg.DrawerBottoms(4)171/2x213/4-1/4Ply.OOSm.DrawerBottoms(4) 131/2x111⁄2-1/4Ply.PP Drawer1FalseFront(1) 23/4x237⁄16-3/4Ply.QQDrawer2FalseFront(1) 23/4x133⁄16-3/4Ply.RR Drawer3FalseFront(1) 4x237⁄16-3/4Ply.SS Drawer4FalseFront(1) 4x133⁄16-3/4Ply.TT Drawer5FalseFront(1) 51/4x237⁄16-3/4Ply.UU Drawer6FalseFront(1) 51/4x133⁄16-3/4Ply.VV Drawer7FalseFront(1) 63⁄8x237⁄16-3/4Ply.WWDrawer8FalseFront(1) 63⁄8x133⁄16-3/4Ply.
roll-around Work Cart (baltic birch)

Page 2 of 4 ShopNotes 90 ©2006 August Home Publishing. All rights reserved.

Page 3 of 4 ShopNotes 90 ©2006 August Home Publishing. All rights reserved.

Page 4 of 4 ShopNotes 90 ©2006 August Home Publishing. All rights reserved.

Page 1 of 3 ShopNotes 90 ©2006 August Home Publishing. All rights reserved.
®
Work Cart Cutting Diagram
MaterialsCASEA CaseTop/Bottom(4) 191/2x431/2-3/4Ply.B CaseSides/Divider(3) 191/2x243/4-3/4Ply.C WideBack(1) 24x24-3/4Ply.D NarrowBack(1) 24x133/4-3/4Ply.E EndEdging(4) 11/2x11/4-191⁄2F CornerPosts(4) 11/2x41/2-27G SideEdging(4) 11/2x11/4-37H VerticalEdging(1) 11/2x11/4-24
SHELVESI EndShelf(2) 1/2x31/4-19J EndShelfSides(4) 1/2x21⁄2-31/4K UpperEndShelfFace(2) 1/2x3-19L LowerEndShelfSides(4) 1/2x3-31/4M LowerEndShelfFace(2) 1/2x3-19N BackShelf(1) 1/2x51/4-13O UpperBackShelfSides(2) 1/2x51/4-21⁄2P UpperBackShelfFace(1) 1/2x3-13Q LowerBackShelfSides(2) 1/2x51/4-3R LowerBackShelfFace(1) 1/2x3-13S CordCleats(4) 1x2-6
TOPT TopSupport(2) 221/2x481/2-3/4MDFU Top(1) 221/2x481/2-1/4Hdbd.V TopSideEdging(2) 3/4x13/4-50W TopEndEdging(2) 3/4x13/4-24
DRAWERSX Drawer1Front/Back(2) 33/4x211/2-1/2Ply.Y Drawer1Sides(2) 33/4x18-1/2Ply.Z Drawer2Front/Back(2) 33/4x111/4-1/2Ply.AA Drawer2Sides(2) 33/4x14-1/2Ply.BB Drawer3Front/Back(2) 5x211/2-1/2Ply.CC Drawer3Sides(2) 5x18-1/2Ply.DD Drawer4Front/Back(2) 5x111/4-1/2Ply.EE Drawer4Sides(2) 5x14-1/2Ply.FF Drawer5Front/Back(2) 61/4x211/2-1/2Ply.GGDrawer5Sides(2) 61/4x18-1/2Ply.HH Drawer6Front/Back(2) 61/4x111/4-1/2Ply.II Drawer6Sides(2) 61/4x14-1/2Ply.JJ Drawer7Front/Back(2) 73⁄8x111/4-1/2Ply.KK Drawer7Sides(2) 73⁄8x18-1/2Ply.LL Drawer8Front/Back(2) 73⁄8x111/4-1/2Ply.MMDrawer8Sides(2) 73⁄8x14-1/2Ply.NNLrg.DrawerBottoms(4)171/2x213/4-1/4Ply.OOSm.DrawerBottoms(4) 131/2x111⁄2-1/4Ply.PP Drawer1FalseFront(1) 23/4x237⁄16-3/4Ply.QQDrawer2FalseFront(1) 23/4x133⁄16-3/4Ply.RR Drawer3FalseFront(1) 4x237⁄16-3/4Ply.SS Drawer4FalseFront(1) 4x133⁄16-3/4Ply.TT Drawer5FalseFront(1) 51/4x237⁄16-3/4Ply.UU Drawer6FalseFront(1) 51/4x133⁄16-3/4Ply.VV Drawer7FalseFront(1) 63⁄8x237⁄16-3/4Ply.WWDrawer8FalseFront(1) 63⁄8x133⁄16-3/4Ply.
roll-around

Page 2 of 3 ShopNotes 90 ©2006 August Home Publishing. All rights reserved.
Page 3 of 3 Shopnotes 90 ©2006 August Home Publishing. All rights reserved.
48" x 96" - !/4" PLYWOOD

One of the best ways to get the biggest bang from a plunge router is to put it to work routing mor-tises. The technique, explained in Shop-notes No. 90, is easy to master and the results are topnotch.And the clincher is that, from setup to completion, the whole process takes only a few minutes. The key is the simple-to-build and easy-to-use mortising jig you see in the photos.
Overview — A Simple Jig. So before you can start routing mortises, you’ll need to build the jig. My emphasis here was on keeping things very simple, so this won’t keep you away from the work for long.
Take a look at the drawing below and you’ll see that the working parts of the jig consist of an auxiliary baseplate and two adjustable guides. The baseplate is simply a “slotted” piece of hardboard that rides along the workpiece. The guides are the
heart of the jig and serve two purposes. First, they’re used to easily and accu-
rately position the mortise in the workpiece by allowing you to reference the cut off one edge. Second, the two guides sandwich the workpiece snugly to give you steady control of the router as the mortise is being cut. This makes it possible to cut accurate mortises in even very narrow stock.
First, the Baseplate. Now let me give you the “short course” on how to build the jig. As shown in the drawing, the auxiliary
baseplate is cut to size from 1⁄4" hardboard. (You could substitute 1⁄4" plywood or phe-nolic.) The long rectangular shape gives you more stability and allows for longer guides. I used the standard baseplate to locate the countersunk holes for the attach-ment screws and a centered hole for the bit. You’ll want to use the largest Forstner bit in the shop to drill the center hole. This will give you a better field of view around the bit while routing.
Two slots in the baseplate, along with carriage bolts and wing nuts, allow you to adjust and tighten down the guides. The 5"-long slots let the jig accommodate a wide range of workpieces. After routing the slots with a straight bit in the router table, I screwed the baseplate to the router.
The Guides. Next, I cut the two guides from ¾"-thick hardwood. You’ll notice that they’re a little longer than the baseplate. This simply makes them easier to grasp and adjust when the router and jig are resting on the workpiece.
Once the guides are cut to size, you’ll need to drill a pair of counterbored bolt holes through each one. The spacing of the holes in the guides should precisely match that of the slots in the baseplate. When installed, you want be able to adjust them easily on the baseplate.
And that brings us to the final step. Sink a carriage bolt firmly into each hole, pass the ends through the slots in the baseplate and add washers and wingnuts. All you need is a bit in the router and you’re ready to go to work.
Building a Simple:Plunge RouterMortising Jig
Page 1 of 1 ShopNotes No. 90 ©2006 August Home Publishing. All rights reserved.

Page 1 of 1 ShopNotes 90 ©2006 August Home Publishing. All rights reserved.
®
Multi-Tool
Cutting Diagram
Materials
3-in-1, shop built
CASEA Base(1) 14x12-1/2Ply.B Sides(2) 10x12-1/2Ply.C CaseBack(1) 10x13-1/2Ply.D Top(1) 14x12-1/2Ply.E Back(1) 14x14-1/2Ply.F RouterPlate(1) 5x12-1/4PhenolicG FillerPlate(1) 5x12-1/4PhenolicWORKPIECE SUPPORTSH Cleats(2) 21/2x121/2-1/2Ply.I Tops(2) 5x11-1/2Ply.J Sides(2) 5x8-1/2Ply.
K Supports(2) 7x7-1/2Ply.L PinchBlocks(2) 7/8x2-1/2Ply.FENCEM Face(1) 3x14-1/2Ply.N Base(1) 21/2x14-1/2Ply.O Braces(4) 2x2-1/2Ply.P DustPort(1) 33⁄8x3-1/2Ply.JOINTER FENCEQ Fence(1) 3x25-1/2Ply.MORTISING GUARDR Hold-DownFace(1) 2x12-1/2Ply.S Plate(1) 1x12-1/4Phenolic