Georgetown MBA Presentation - Zurich UAE Analysis of Central Asia 3.5.12

ShipLink 3.5.12 User Manual
Manual Release 3.5.12(Aug-2011)
ShipLink 3.5.12 User Manual
Page 2 of 52
Table of Contents Introduction .................................................................................................................................. 4 Upgrading ShipLink from earlier version ..................................................................................... 5 Installation Instructions ................................................................................................................ 6 Getting Started ............................................................................................................................ 6 ShipLink Setup Wizard ................................................................................................................ 6 ShipLink Options ....................................................................................................................... 15 1) Defaults ......................................................................................................................... 16 2) Vessels .......................................................................................................................... 16 3) Users ............................................................................................................................. 17 4) System .......................................................................................................................... 18 5) Advanced ...................................................................................................................... 20 6) Registration ................................................................................................................... 21 7) Connections .................................................................................................................. 21 8) Accounts (only available in ShipLink Standard - optional) ............................................ 22
Creating New Requisition .......................................................................................................... 23 1) Creating a Blank Requisition ......................................................................................... 23 2) Creating a Requisition based on a Previous Requisition .............................................. 24 3) Opening and re-using Templates .................................................................................. 25
Opening an Existing REQ.......................................................................................................... 26 The Document Preview Tab ...................................................................................................... 26 1) Line item search ............................................................................................................ 27 2) Banner search ............................................................................................................... 28 3) Save, Forward, Copy to Clipboard and Print options .................................................... 28
Requisition Header .................................................................................................................... 29 1) Requisition header details ............................................................................................. 29 2) Requisition Status ......................................................................................................... 29
Requisition Details ..................................................................................................................... 30 Equipment.................................................................................................................................. 31 Line Items .................................................................................................................................. 32 1) Adding Line Items .......................................................................................................... 32 2) Show Equipment Tick Box ............................................................................................ 33 3) Show Hidden Fields Tick Box ....................................................................................... 34 4) Shiplink Catalogue ........................................................................................................ 35 2) Editing Line Items .......................................................................................................... 37 3) Inserting Line Items ....................................................................................................... 37 4) Currency Dropdown Menu ............................................................................................ 38 5) Deleting Line Items ........................................................................................................ 38 6) Line Item Cut, Copy and Paste Functions..................................................................... 39 7) Keyboard Functions for Frequent Users ....................................................................... 39
Other Details .............................................................................................................................. 40 Template .................................................................................................................................... 41 1) Create Template ............................................................................................................ 41 2) Edit Template ................................................................................................................ 42 3) Importing an Excel Template ........................................................................................ 42
Delivery Details .......................................................................................................................... 44 Saving and Export Requisitions ................................................................................................ 45 1) File Formats .................................................................................................................. 45 2) Save as Compressed / Uncompressed ......................................................................... 46 3) Export as Printable/Telex .............................................................................................. 46
Sending Requisitions .................................................................................................................. 47 1) Sending the Requisition via E-mail ............................................................................... 47 4) Sending the Requisition via E-mail with Attachments ................................................... 48 5) Sending the Requisition via Telex ................................................................................. 49 6) Multiple requisitions in one telex body .......................................................................... 49
ShipLink 3.5.12 User Manual
Page 3 of 52
Transferring Reqs by Floppy Disc .............................................................................................. 49 Printing Requisitions ................................................................................................................... 49 Working with Multiple Requisitions ............................................................................................. 49 ShipServ Customer Service Centre ........................................................................................... 50 Frequently Asked Questions - FAQ’s ......................................................................................... 51 Q. How should I enter the Vessel name if I have more than one ShipLink installation on board? .................................................................................................................................... 51 Q. What should I enter in the IMO field? ................................................................................ 51 Q. What is the difference between ShipLink Lite and ShipLink Standard? ........................... 51 Q. Should I tick the box “Confirm Reqs received by E-mail*”? .............................................. 51 Q. Should I tick the box “Has Internet Connection”? ............................................................. 51 Q. Should I use the “Auto Reference” option in setup? ......................................................... 51 Q. I have forgotten a few line items. Can I amend the requisition? ....................................... 51 Q. I’ve sent a wrong requisition! Can I amend the requisition and resend it? ....................... 51 Q. How do I add equipment details for my Spare Parts requisitions? ................................... 51 Q. How do I save my requisition? .......................................................................................... 52 Q. How do I save my requisition as a template to use again? ............................................... 52 Q. What are the different file extensions to the saved requisitions?...................................... 52 Q. What e-mail address do I send the requisitions to? .......................................................... 52 Q. Can I attach more than one requisition to the same e-mail? ............................................ 52 Q. Can I attach photos or pictures to the e-mail when I send my requisition? ...................... 52 Q. Can I transfer my Excel spreadsheet templates to ShipLink? .......................................... 52

ShipLink 3.5.12 User Manual
Page 4 of 52
Introduction
ShipLink is used for sending Requisitions (Purchase Requests) to the ship’s purchasing department via the ShipServ TradeNet service. From there, the purchasing department can forward the Requisition details to the relevant supplier(s) and create the required Purchase Order without re-entering any of the line item details provided from the ship.
ShipLink comes with 2 modes, one is Shiplink Lite and the other is ShipLink Standard
• ShipLink Lite is used for creating a requisition that can be printed or e-mailed as a file attachment for the recipient to print. When the recipient has ShipLink installed, the requisition can be opened and modified.
• ShipLink Standard is used for creating and sending a requisition to the ship’s purchasing department via the ShipServ TradeNet service. Standard mode is only available if you have a current User Agreement with ShipServ. If you have a User Agreement, you will be issued a TradeNet ID and ShipLink Licence Key which can be used to activate Standard mode.
For Shiplink Standard, requisition should be sent to [email protected]
For Requisitions to be telexed, the Requisition needs to be copied into the telex body sending it to the following address:
• 94078244 SERV G for telex communication inside the UK
• 0 51 94078244 SERV G for international telexes
ShipLink 3.5.12 User Manual
Page 5 of 52
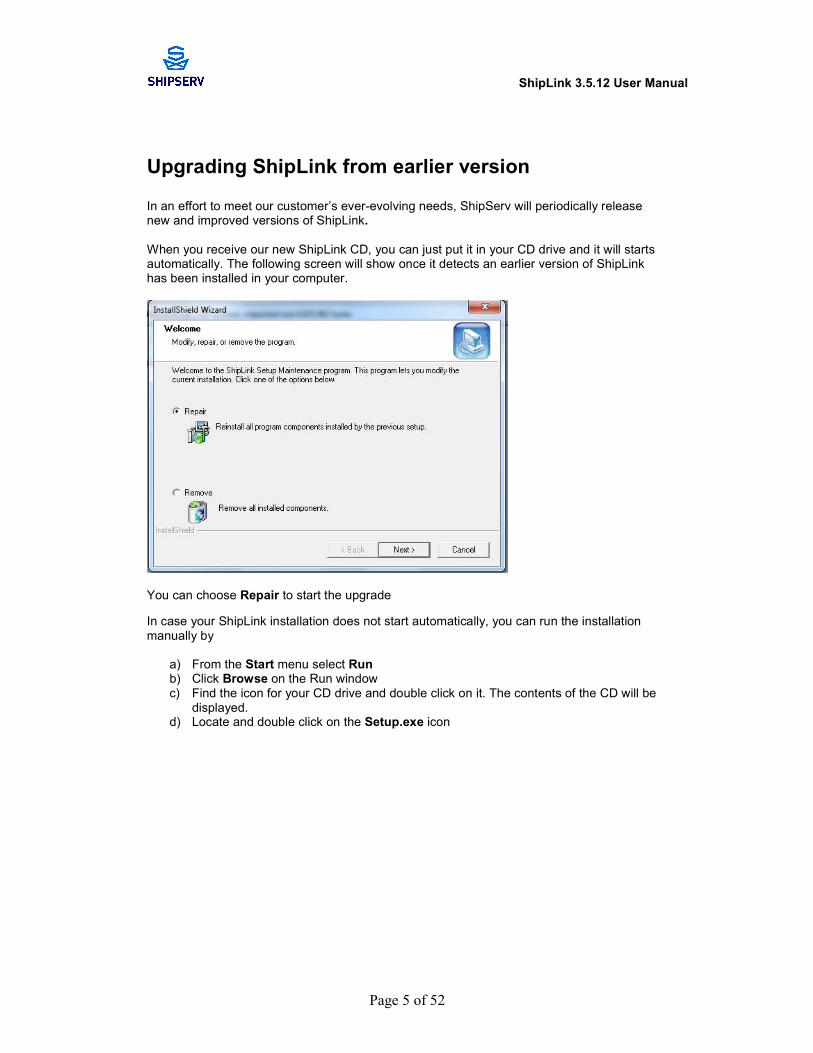
Upgrading ShipLink from earlier version In an effort to meet our customer’s ever-evolving needs, ShipServ will periodically release new and improved versions of ShipLink.
When you receive our new ShipLink CD, you can just put it in your CD drive and it will starts automatically. The following screen will show once it detects an earlier version of ShipLink has been installed in your computer.
You can choose Repair to start the upgrade
In case your ShipLink installation does not start automatically, you can run the installation manually by
a) From the Start menu select Run b) Click Browse on the Run window c) Find the icon for your CD drive and double click on it. The contents of the CD will be
displayed. d) Locate and double click on the Setup.exe icon

ShipLink 3.5.12 User Manual
Page 6 of 52
Installation Instructions ShipLink will be sent to you in CD format. The following instructions will guide you through each process.
1. Place the installation disc in your computer’s CD Drive 2. Under normal circumstance the ShipLink installation program will be started
automatically. If not you can run the installation manually by e) From the Start menu select Run f) Click Browse on the Run window g) Find the icon for your CD drive and double click on it. The contents of the CD will be
displayed. h) Locate and double click on the Setup.exe icon
1. Follow the installation instructions 2. Eject the CD after the installation process is complete
Getting Started
The installation process will create a ShipLink icon on your desktop. Double click the icon to start the application.
ShipLink Setup Wizard When you start the ShipLink version 3.5.12 for the first time, it will display the following welcome page. Starting from version 3.5.12, ShipLink has been integrated to ShipServ Pages - our online global supplier search directory. From this you can select whether to enable the access to ShipServ Pages or not. If you choose to enable access to ShipServ Pages on board, you should have inexpensive / unlimited broadband, otherwise you will be incurred with significant data charges.

ShipLink 3.5.12 User Manual
Page 7 of 52
Then Setup Wizard window will open automatically. The Wizard will guide you through the ShipLink setup procedure (The Options Wizard can be found in the ‘view ‘tab in Options Wizard). ShipLink needs to be set up for the specific ship or office where it is being used. This will ensure that the requisitions are delivered to your purchasing department by ShipServ TradeNet. It will also minimise the amount of typing required to create a requisition by providing default values for many of the standard fields on the requisition screen. 1) Step 1: There are two options you can choose from, i.e.: ShipLink Lite or ShipLink Standard on the Setup Wizard window.
• ShipLink Lite is used for creating a requisition that can be printed or e-mailed as a file attachment for the recipient to print. When the recipient has ShipLink installed, the requisition can be opened and modified.
• ShipLink Standard is used for creating and sending a requisition to the ship’s purchasing department via the ShipServ TradeNet service.
The key advantage of ShipLink Standard is that the requisition is a fully enabled e-commerce trading document which can be imported into a Purchasing System (or ShipServ WebBuyer) and, from there, it can be forwarded via TradeNet to the required supplier(s) as a Purchase Order or Request for Quotation without re-entering any of the line item details provided from the ship. Standard mode is only available if you have a current User Agreement with ShipServ. If you have a User Agreement, you will be issued a TradeNet ID and ShipLink Licence Key which can be used to activate Standard mode. Therefore select “ShipLink Standard” and enter your TradeNet ID and Licence Key and click on “Next” to continue. !NOTE: If you do not know your company’s TradeNet ID and Licence Key, please contact your purchasing department or ShipServ Customer Service at or e-mail [email protected].

ShipLink 3.5.12 User Manual
Page 8 of 52
2) Step 2: Enter the default values for each of the fields on the Setup Defaults window.
The shaded out options are decided by the Purchasing department prior to installation and cannot be changed here. You can also specify whether you have internet connection on your ShipLink computer and whether you would like to have a preview of your requisition. “Confirm Reqs Received by E-mail” should be checked if you want ShipServ to send you an acknowledgement when your requisition has been received. This is not available in ShipLink Lite. ! NOTE: The ship should only tick the box “Confirm Reqs Received by E-mail*” if you are allowed to receive e-mails from unauthorized parties. This depends on your purchasing department settings and regulations. Unless you have been instructed otherwise from your purchasing department, please do not select this option.

ShipLink 3.5.12 User Manual
Page 9 of 52
3) Step 3. Enter the details of the vessel on which ShipLink will be used on the Setup Vessel window.
To add Vessel details to the Vessel List, click the “Add” button. Doing so will open the Vessel Details (Add) window. Fill in the necessary information and click “OK”. Doing so will add the new vessel to the list.

ShipLink 3.5.12 User Manual
Page 10 of 52
4) Step 4. Enter the details of the staff going to use ShipLink on your computer in the Setup Users window.
Fill in the necessary information and click “OK”. Doing so will add the new user to the list.
Click “Add” to add details for each user and, when the list is complete, click on next to continue.

ShipLink 3.5.12 User Manual
Page 11 of 52
5) Step 5 ShipLink has an optional feature to automatically generate sequential reference numbers for your requisitions on the Setup Reference window.
To enable this feature, check the “Auto Reference” box on the “Setup Reference” Window. Use the “Prefix” and “Last Number Used” to set up the pattern and the starting point for your reference numbers. For example, prefix “ABC” and last number “000” will generate reference numbers “ABC-001”, “ABC-002” and so on. If you prefer to enter your reference numbers manually, leave “Auto Reference” unchecked and click on “Next” to continue. ! NOTE: We recommended you use Auto Reference if you have ShipLink installed on one PC only. For multiple installations please do not check this box. Enter Reference numbers manually.
ShipLink 3.5.12 User Manual
Page 12 of 52
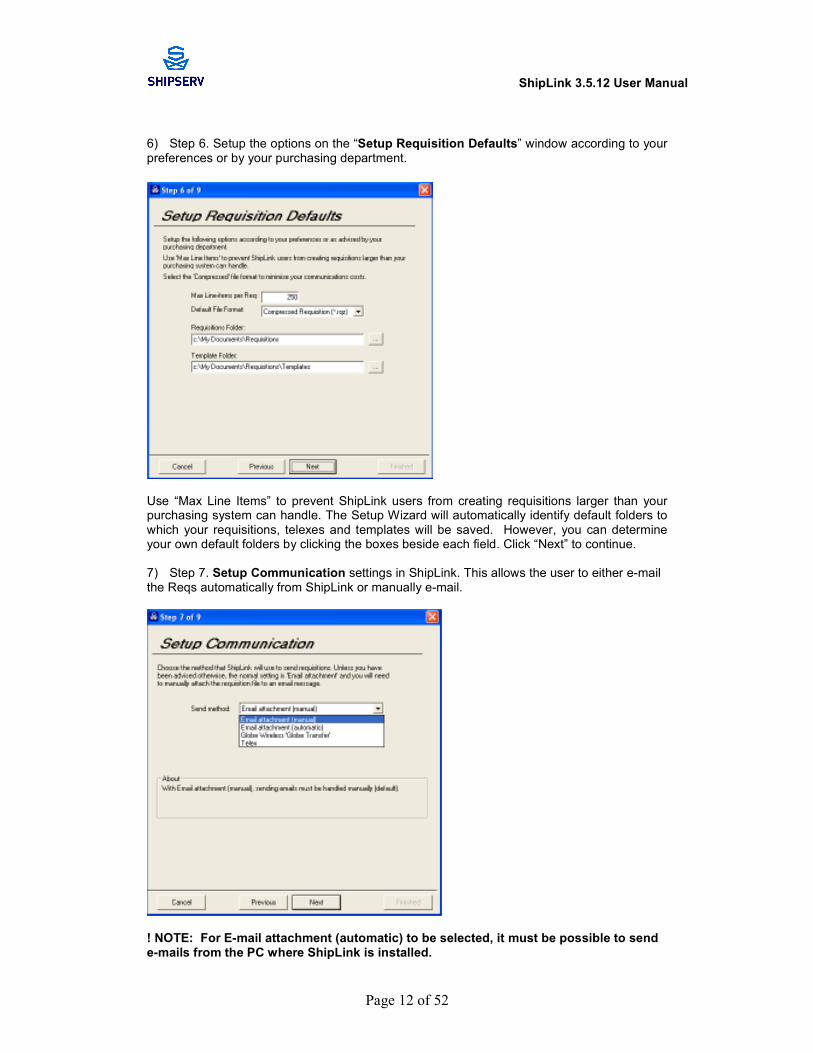
6) Step 6. Setup the options on the “Setup Requisition Defaults” window according to your preferences or by your purchasing department.
Use “Max Line Items” to prevent ShipLink users from creating requisitions larger than your purchasing system can handle. The Setup Wizard will automatically identify default folders to which your requisitions, telexes and templates will be saved. However, you can determine your own default folders by clicking the boxes beside each field. Click “Next” to continue. 7) Step 7. Setup Communication settings in ShipLink. This allows the user to either e-mail the Reqs automatically from ShipLink or manually e-mail.
! NOTE: For E-mail attachment (automatic) to be selected, it must be possible to send e-mails from the PC where ShipLink is installed.
ShipLink 3.5.12 User Manual
Page 13 of 52
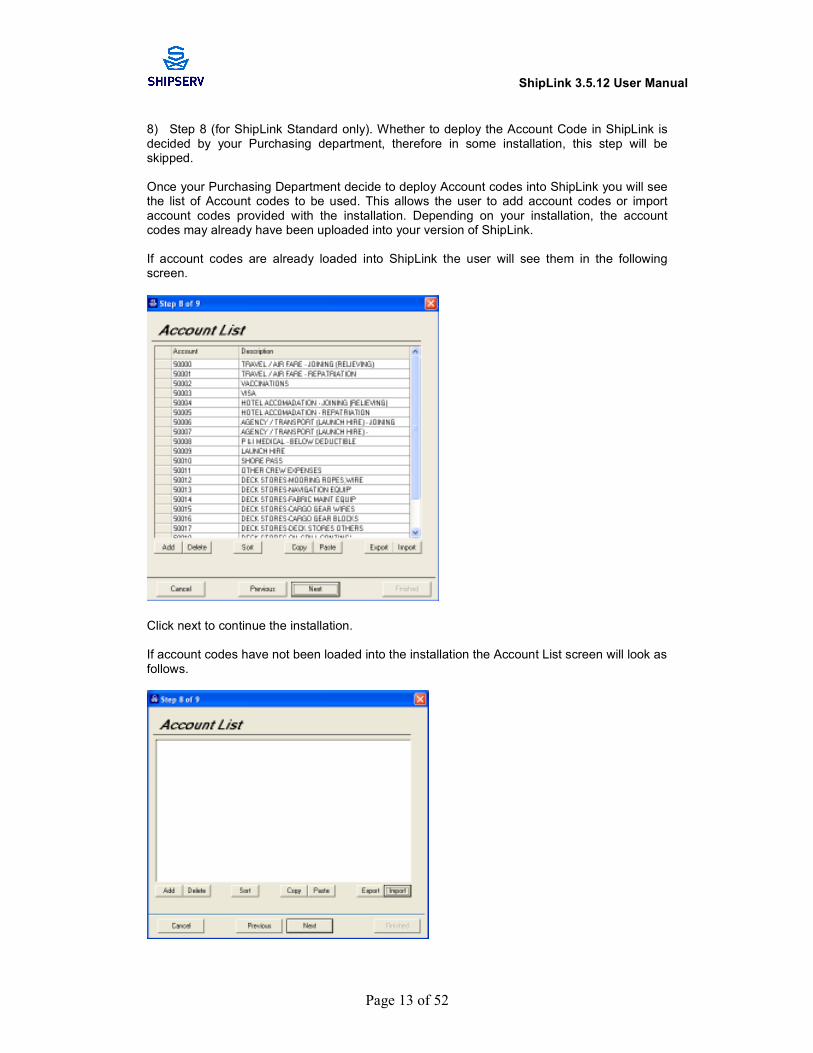
8) Step 8 (for ShipLink Standard only). Whether to deploy the Account Code in ShipLink is decided by your Purchasing department, therefore in some installation, this step will be skipped. Once your Purchasing Department decide to deploy Account codes into ShipLink you will see the list of Account codes to be used. This allows the user to add account codes or import account codes provided with the installation. Depending on your installation, the account codes may already have been uploaded into your version of ShipLink. If account codes are already loaded into ShipLink the user will see them in the following screen.
Click next to continue the installation. If account codes have not been loaded into the installation the Account List screen will look as follows.

ShipLink 3.5.12 User Manual
Page 14 of 52
If the user has been provided with Account Codes in a separate file then the codes can be imported here. The account codes for import into ShipLink are stored in the file named AcctList.rqa. To import these codes, click Import.
Find the AccList.rqa from where the user has saved the file to. The file could be on the installation CD or the file may have been e-mailed to the user. Click on the file and click Open.
The Account codes are imported into ShipLink.
Click Next.

ShipLink 3.5.12 User Manual
Page 15 of 52
9) The ShipLink setup is now complete. Click the “Finished” button to save all settings or click on “Previous” to go back and review the previous steps.
ShipLink Options The Setup Wizard has taken you through the ShipLink Options. In case you have just finished the Setup Wizard then you can skip the ShipLink Options chapter. ShipLink Options allow you to customize the application for your purposes. The Options interface is divided into six categories: Defaults, Vessel List, User List, System Settings, Advanced, Registration and Accounts (optional). ! NOTE: You can access ShipLink Options any time after the initial setup by choosing “ShipLink Options” from the View menu in the ShipLink application.
The Options window allows you to enter frequently used information into the ShipLink system.
ShipLink 3.5.12 User Manual
Page 16 of 52
The information displayed is automatically inserted every time you create a new requisition. You may edit this information at any time either on the requisition form itself, or by opening the Options window. Select “ShipLink Options” from the View menu in the ShipLink application. ! NOTE: The shaded out options have been configured for your installation of ShipLink and cannot be changed.
1) Defaults
The Default Tab of the Options window allows you to enter frequently used information into the ShipLink system.
Field Descriptions: Company Name: Fill in the name of your company
Phone: Fill in the phone number
Email Address: Company contact email address
Address: Company address
Office Contact: Fill in the name of the contact person within the purchase department.
Default Currency: From the drop down menu, select the currency in which you will conduct your transaction.
Confirm Reqs: Received by e-mail: Check this box to receive confirmation receipt. This is only available in ShipLink Standard
Has Internet Connection: This is to enable the search of item in ShipServ Pages via your Internet onboard
Show Document Preview Tab: Enable requisition preview
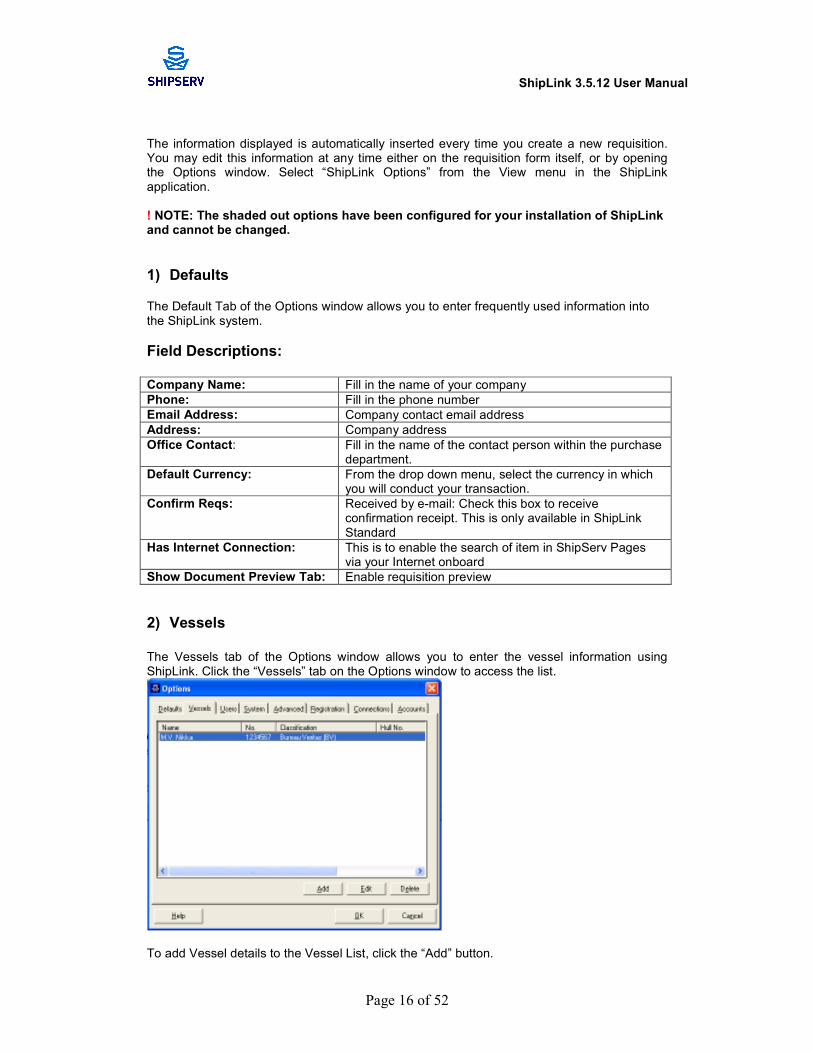
2) Vessels
The Vessels tab of the Options window allows you to enter the vessel information using ShipLink. Click the “Vessels” tab on the Options window to access the list.
To add Vessel details to the Vessel List, click the “Add” button.
ShipLink 3.5.12 User Manual
Page 17 of 52
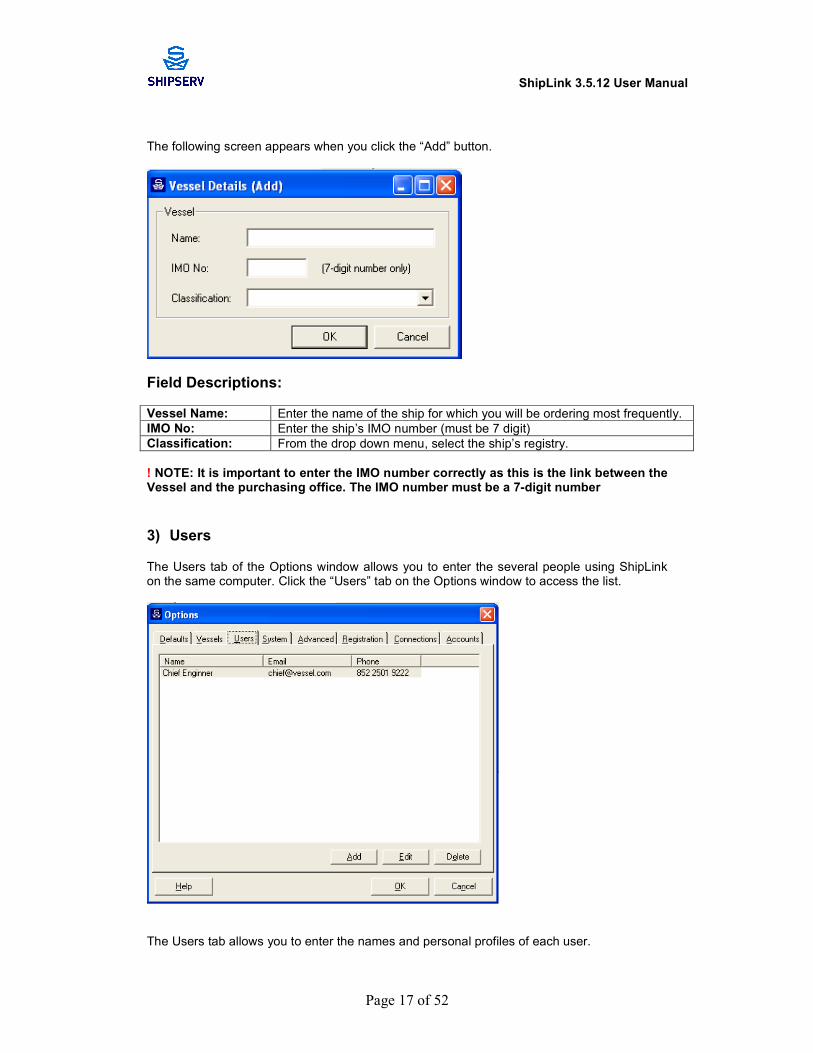
The following screen appears when you click the “Add” button.
Field Descriptions:
Vessel Name: Enter the name of the ship for which you will be ordering most frequently.
IMO No: Enter the ship’s IMO number (must be 7 digit)
Classification: From the drop down menu, select the ship’s registry.
! NOTE: It is important to enter the IMO number correctly as this is the link between the Vessel and the purchasing office. The IMO number must be a 7-digit number
3) Users
The Users tab of the Options window allows you to enter the several people using ShipLink on the same computer. Click the “Users” tab on the Options window to access the list.
The Users tab allows you to enter the names and personal profiles of each user.

ShipLink 3.5.12 User Manual
Page 18 of 52
a. Adding Users
To add names to the list, click the “Add” button. Doing so will open the User Details (Add) window:
b. Editing User Details
To edit user details, select the user’s name from the user list by clicking on it once. Click the “Edit button on the bottom of the widow. Doing so will open the “User Details (Edit)” window: Make the necessary changes and click “OK”.
c. Deleting Users
You may remove users from your User List by selecting the user’s name and clicking the delete button.
4) System
Click on the System tab to see the following screen.

ShipLink 3.5.12 User Manual
Page 19 of 52
a. Auto Reference
The System tab of the Options window allows you to set up to automatically generate a new unique reference number for each Requisition. This feature is optional and should only be used if you are able to allow ShipLink to control your numbering system (at least for a given prefix – see below).
! NOTE: Auto Reference should only be activated if you are using ShipLink on one PC. If you are using multiple installations of ShipLink, do not activate this setting as this can create duplicate requisition numbers which will be rejected by the purchasing office system.
Automatic referencing is enabled via the ShipLink Options, System Settings Menu. There are two fields to be completed:
• Prefix – this is the first part of the reference, and does not change from one
Requisition to the next. Use the prefix to ensure that the reference is unique across your organisation, e.g., to identify a particular ship (your purchasing department may advise on a specific prefix for your ship). The prefix may also be used to allow different unique references to be generated by more than one PC on board the ship, e.g., include the letter "E" for the Engineer’s PC and "C" for the Captain’s.
• Last Number Used – this is the starting point for the unique sequential number to be appended to the prefix, making up the whole reference. Include leading zeros to set the number of digits, e.g., a Last Number Used of "000" will generate subsequent numbers 001, 002, etc. You can continue a pre-existing numbering scheme by entering the last number used here.
The reference is not automatically generated until the Requisition is saved. A new requisition will show the reference <auto when saved> until the file is saved. The reference cannot be changed after the file is saved but you can use File, Save As to create a copy of the Requisition with a new reference.
If you have Auto Reference enabled, but you wish to manually allocate a different reference to a particular Requisition, you can deselect Auto Reference on the form (before the file is saved) and enter a manual reference.
! Warning: Do not use a manual reference which matches a reference that appears later in the automatic sequence, as ShipLink does not track numbers used via the manual override.
b. Max Line Items
ShipLink can handle a maximum of 500 lines per requisition. Note, however, that your purchasing department may not be able to handle such a large number. Use the Max Line Items setting to restrict the number of lines to the limit recommended by your purchasing department or by ShipServ Customer Service Centre. ! NOTE: When creating Line Items for a requisition, the user will not be able to add more lines than have been specified here in the Max Line Items field. See the Line Items section of this manual.

ShipLink 3.5.12 User Manual
Page 20 of 52
c. File Compression
ShipLink offers a choice of two file formats, Compressed (*.rqz) and Uncompressed (*.req). Always use the compressed format if the file is to be sent via low speed (or high cost) communications link, e.g., ship to shore. The uncompressed format (*.req) is compatible with earlier versions of ShipLink.
d. Default Folders
The System tab allows you to specify, and displays, the default folders to which your requisitions and templates will be saved.
5) Advanced
The Advanced Tab of the Options window allows you to enter multiple users to use ShipLink on a file-sharing network. When saving a new requisition, ShipLink will fetch the “AutoReference.xml” from a network path, and “lock” the file. When the requisition number is updated, the file is “unlocked”.
This functionality secures the flow of reference numbers, so that if two users save a new requisition at the same time, then it's only one of them who get permission to save the file and update the auto reference file, and the other user has to wait a few seconds and try again.
The System Settings Tab allows you to specify, and displays, the default Network folder. If you have an old non-ShipServ version of the IMPA CD installed, this folder will also be shown here.

ShipLink 3.5.12 User Manual
Page 21 of 52
6) Registration
The Registration Tab of the Options window allows you to select ShipLink Lite or ShipLink Standard mode. For ShipLink Standard mode you should register your ShipLink by entering the TradeNet ID and the License key into the ShipLink system.
Field Descriptions: TradeNet ID: purchasing department unique id issued on TradeNet
License key: unique license related to TradeNet ID.
7) Connections
The “Connection” tab allows the user to change the method of sending requisitions from manual to automatic.

ShipLink 3.5.12 User Manual
Page 22 of 52
8) Accounts (only available in ShipLink Standard - optional)
The “Accounts” tab allows the user to import or add Account details and descriptions to be used on the requisition. These will be provided to you by your purchasing department.
Account codes can be entered manually by clicking the Add button or imported from a spreadsheet using the Import button. ! NOTE: If you are to use Account Codes, you will be instructed to do so by your purchasing department and these codes will be provided by your purchasing department.

ShipLink 3.5.12 User Manual
Page 23 of 52
Creating New Requisition
After completion of the Setup Wizard, ShipLink will give you a choice of files to open. ! NOTE: The window below will appear every time you start ShipLink.
1) Creating a Blank Requisition
You may choose to create a completely new requisition by selecting the “Blank Requisition” option as shown in the example above. Click “OK”. Doing so will open the ShipLink application with a blank requisition form. ! NOTE: The information you supplied in the Setup Wizard will automatically appear on the Requisition Details tab of the blank Req (see below). To change the name in the Requested By field, scroll down the drop down menu to select
the appropriate User name.
ShipLink 3.5.12 User Manual
Page 24 of 52
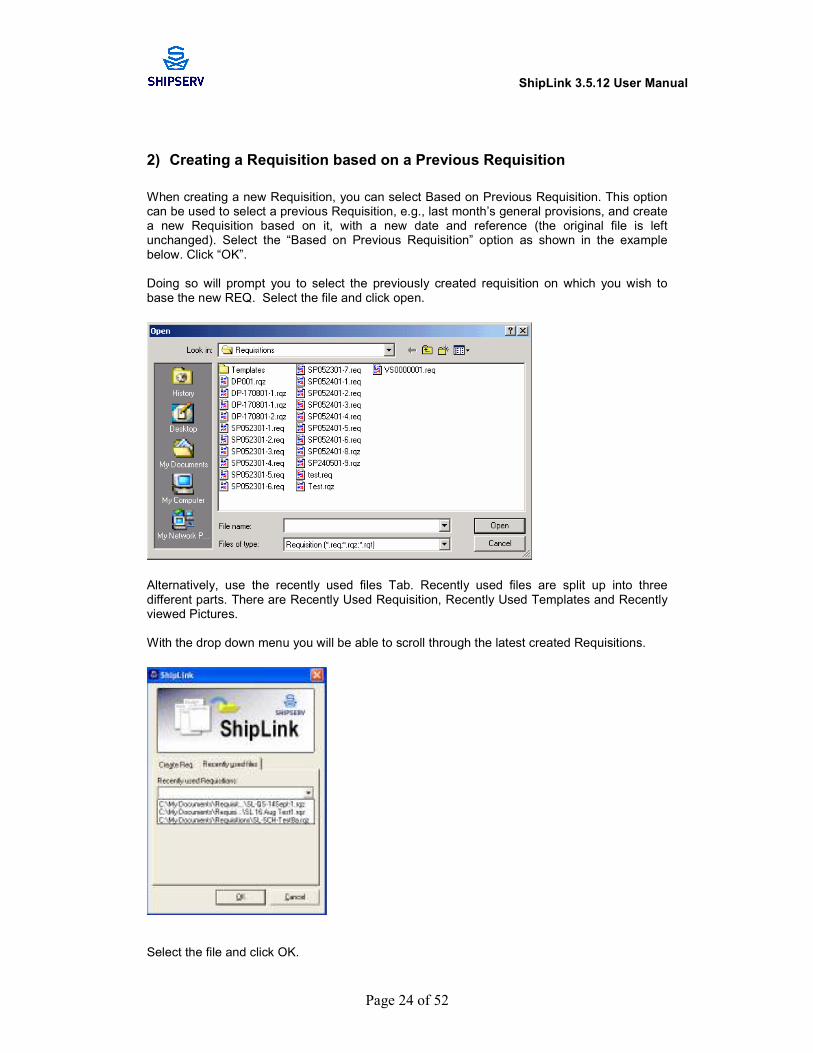
2) Creating a Requisition based on a Previous Requisition
When creating a new Requisition, you can select Based on Previous Requisition. This option can be used to select a previous Requisition, e.g., last month’s general provisions, and create a new Requisition based on it, with a new date and reference (the original file is left unchanged). Select the “Based on Previous Requisition” option as shown in the example below. Click “OK”. Doing so will prompt you to select the previously created requisition on which you wish to base the new REQ. Select the file and click open.
Alternatively, use the recently used files Tab. Recently used files are split up into three different parts. There are Recently Used Requisition, Recently Used Templates and Recently viewed Pictures. With the drop down menu you will be able to scroll through the latest created Requisitions.
Select the file and click OK.
ShipLink 3.5.12 User Manual
Page 25 of 52
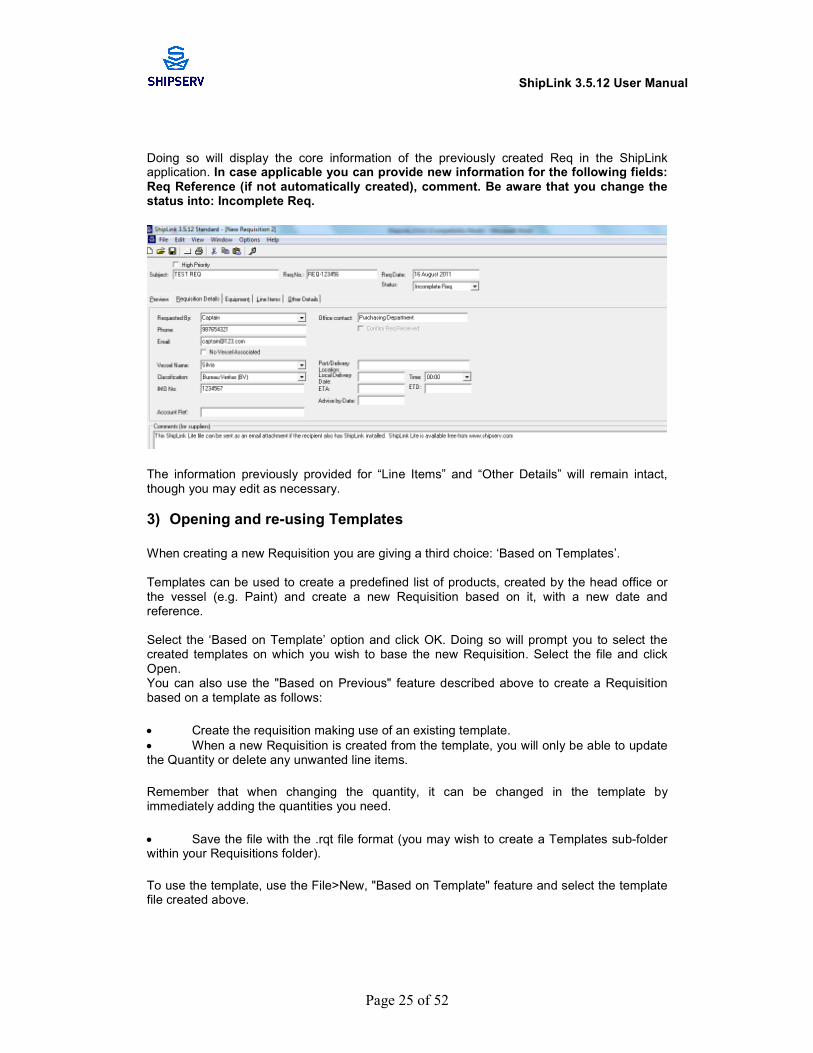
Doing so will display the core information of the previously created Req in the ShipLink application. In case applicable you can provide new information for the following fields: Req Reference (if not automatically created), comment. Be aware that you change the status into: Incomplete Req.
The information previously provided for “Line Items” and “Other Details” will remain intact, though you may edit as necessary.
3) Opening and re-using Templates
When creating a new Requisition you are giving a third choice: ‘Based on Templates’. Templates can be used to create a predefined list of products, created by the head office or the vessel (e.g. Paint) and create a new Requisition based on it, with a new date and reference. Select the ‘Based on Template’ option and click OK. Doing so will prompt you to select the created templates on which you wish to base the new Requisition. Select the file and click Open. You can also use the "Based on Previous" feature described above to create a Requisition based on a template as follows:
• Create the requisition making use of an existing template.
• When a new Requisition is created from the template, you will only be able to update the Quantity or delete any unwanted line items.
Remember that when changing the quantity, it can be changed in the template by immediately adding the quantities you need.
• Save the file with the .rqt file format (you may wish to create a Templates sub-folder within your Requisitions folder).
To use the template, use the File>New, "Based on Template" feature and select the template file created above.
ShipLink 3.5.12 User Manual
Page 26 of 52
Opening an Existing REQ
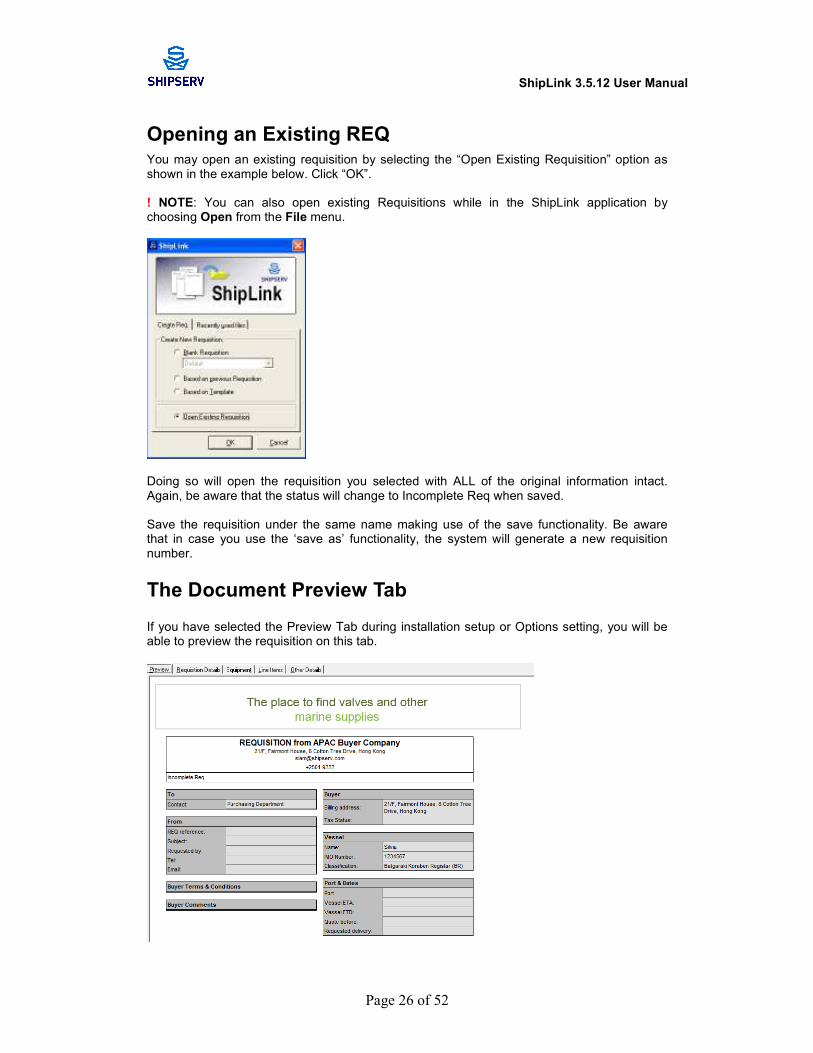
You may open an existing requisition by selecting the “Open Existing Requisition” option as shown in the example below. Click “OK”. ! NOTE: You can also open existing Requisitions while in the ShipLink application by choosing Open from the File menu.
Doing so will open the requisition you selected with ALL of the original information intact. Again, be aware that the status will change to Incomplete Req when saved. Save the requisition under the same name making use of the save functionality. Be aware that in case you use the ‘save as’ functionality, the system will generate a new requisition number.
The Document Preview Tab If you have selected the Preview Tab during installation setup or Options setting, you will be able to preview the requisition on this tab.
ShipLink 3.5.12 User Manual
Page 27 of 52
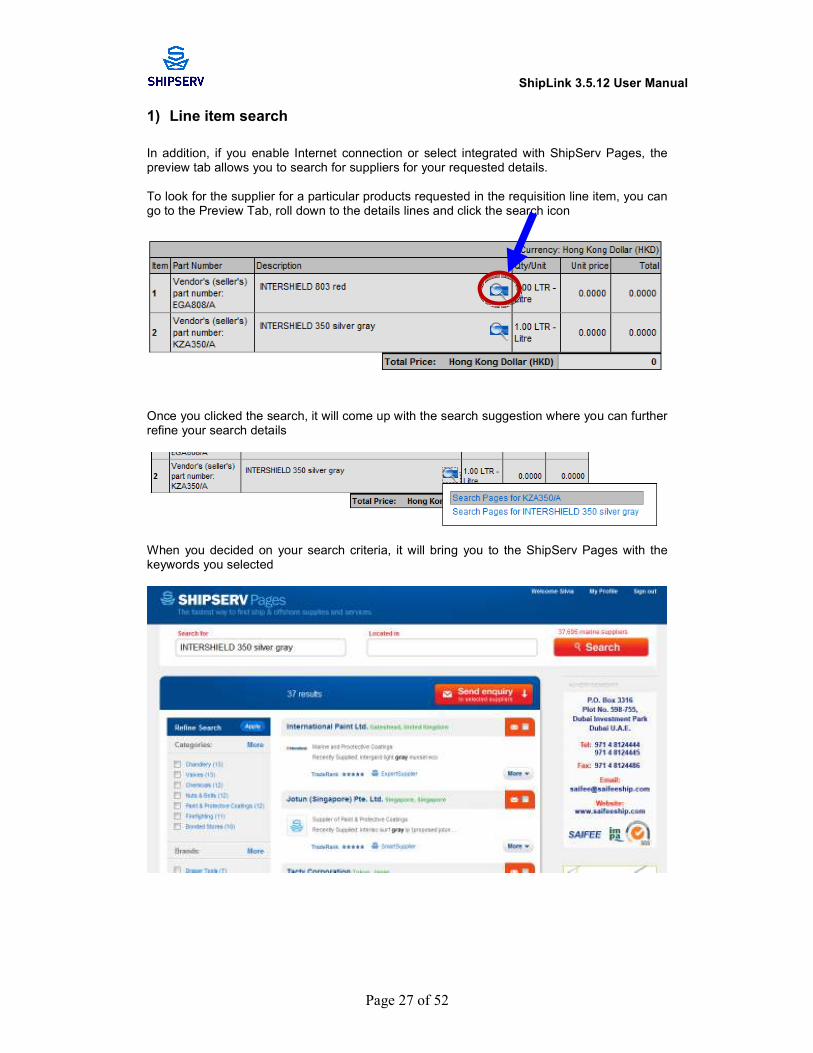
1) Line item search
In addition, if you enable Internet connection or select integrated with ShipServ Pages, the preview tab allows you to search for suppliers for your requested details. To look for the supplier for a particular products requested in the requisition line item, you can go to the Preview Tab, roll down to the details lines and click the search icon
Once you clicked the search, it will come up with the search suggestion where you can further refine your search details
When you decided on your search criteria, it will bring you to the ShipServ Pages with the keywords you selected
ShipLink 3.5.12 User Manual
Page 28 of 52
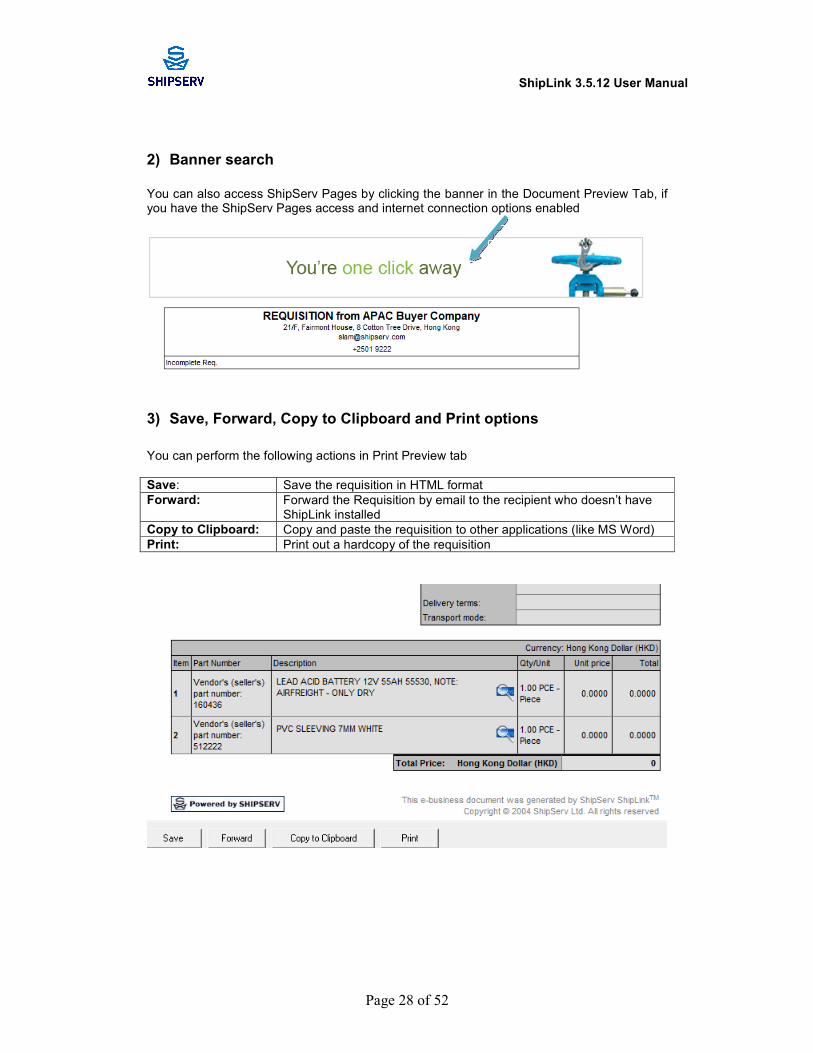
2) Banner search
You can also access ShipServ Pages by clicking the banner in the Document Preview Tab, if you have the ShipServ Pages access and internet connection options enabled
3) Save, Forward, Copy to Clipboard and Print options
You can perform the following actions in Print Preview tab
Save: Save the requisition in HTML format
Forward: Forward the Requisition by email to the recipient who doesn’t have ShipLink installed
Copy to Clipboard: Copy and paste the requisition to other applications (like MS Word)
Print: Print out a hardcopy of the requisition

ShipLink 3.5.12 User Manual
Page 29 of 52
Requisition Header The Header information section requires the input of information concerning the Requisition. The information entered here is always visible as you navigate within the ShipLink application.
1) Requisition header details
Subject: Subject of the Requisition.
High Priority indicator: Check this box if the Requisition is being sent with high priority.
Requisition Reference: Type in the Requisition reference code (See Automatic Referencing below.)
Auto Reference: Disable the Automatic Referencing function by checking this box. (Applies only if Automatic Referencing is enabled in Settings)
Requisition Date: The date will be entered automatically.
2) Requisition Status
The status field controls the requisition. The status field is not controlled by ShipLink, it is a user controlled field, and thus only the user can manually change the status on a requisition. The following statuses may be assigned, and for each status there is a set of validation rules: Incomplete Requisition
This status applies for new and unsent requisitions. It is possible to edit all fields and add/delete line items. Delivery Outstanding This status indicates that the requisition has been saved and not yet sent out. Sent
This status indicates that the requisition has been sent, and it is not possible to change requisition information except data on the Delivery Tracking tab. Delivery Partial This status indicates that the requisition is partially delivered. The same restrictions apply as in status "Outstanding" Delivery Complete Indicates that the requisition is received. No information can be changed. Template Indicates that the requisition is saved as a template .rqt file format Cancelled Indicates that the requisition has been cancelled. No information can be changed.

ShipLink 3.5.12 User Manual
Page 30 of 52
Requisition Details The Requisition Details Tab contains the vital information concerning the execution of the transaction including port and delivery details. In most cases these details are filled in by the purchase department at the shore. Most of the details are completed automatically based on the Options Settings. Some of the details may be left blank to be added by the purchasing department ashore.
Field Descriptions
Requested By: Enter or select the name of User creating the requisition.
Phone: Phone number of the User or Vessel making the request.
E-mail Address: E-mail address of the User or Vessel.
Office Contact: Enter the office contact person in the text boxes.
Confirm Req Received: If you would like e-mail confirmation that the Req has been received, check this box.
No Vessel is associated: Click on the check box when no particular vessel is associated with this requisition.
Vessel Name: Enter or Select the Vessel name in the text box.
Classification: Select the Classification of vessel from the drop down box.
IMO No: Enter the vessel IMO No in the text box.
Port / Delivery Location: Enter the port at which the order should be received
Local Delivery Date / Time: Select the local delivery time from the drop down list.
Account Reference: Enter the account reference in the text box.
VESSEL ETA: Select the expected time of arrival (day, month, year) of the vessel at the desired port from the list boxes.
VESSEL ETD: Similar to Vessel ETA, select the expected time of departure from the port.
Comments: Enter comments up to maximum 2048 characters in the text field.
Advise By: Select the day, month and year of the preferred date by which suppliers must respond to this requisition.
! NOTE. Account reference can either be for the whole requisition or for each individual line item. Click the check box to change between Account reference on line items and header.
ShipLink 3.5.12 User Manual
Page 31 of 52
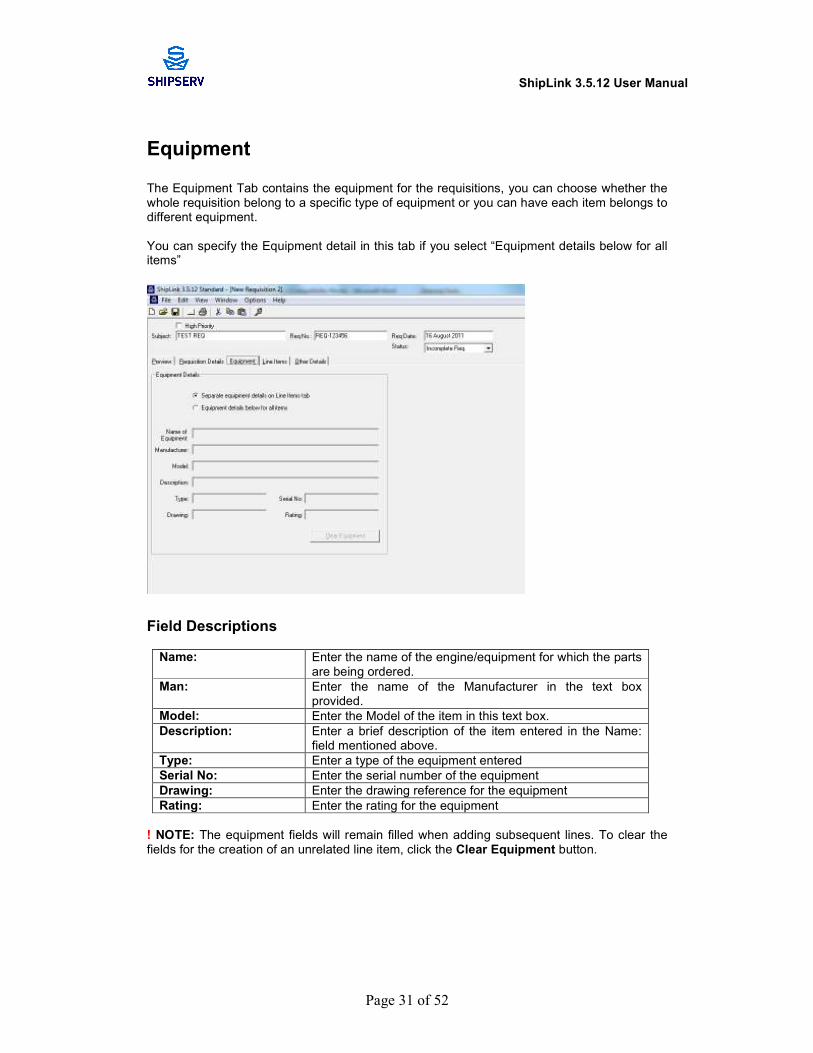
Equipment The Equipment Tab contains the equipment for the requisitions, you can choose whether the whole requisition belong to a specific type of equipment or you can have each item belongs to different equipment. You can specify the Equipment detail in this tab if you select “Equipment details below for all items”
Field Descriptions
Name: Enter the name of the engine/equipment for which the parts are being ordered.
Man: Enter the name of the Manufacturer in the text box provided.
Model: Enter the Model of the item in this text box.
Description: Enter a brief description of the item entered in the Name: field mentioned above.
Type: Enter a type of the equipment entered
Serial No: Enter the serial number of the equipment
Drawing: Enter the drawing reference for the equipment
Rating: Enter the rating for the equipment
! NOTE: The equipment fields will remain filled when adding subsequent lines. To clear the fields for the creation of an unrelated line item, click the Clear Equipment button.
ShipLink 3.5.12 User Manual
Page 32 of 52
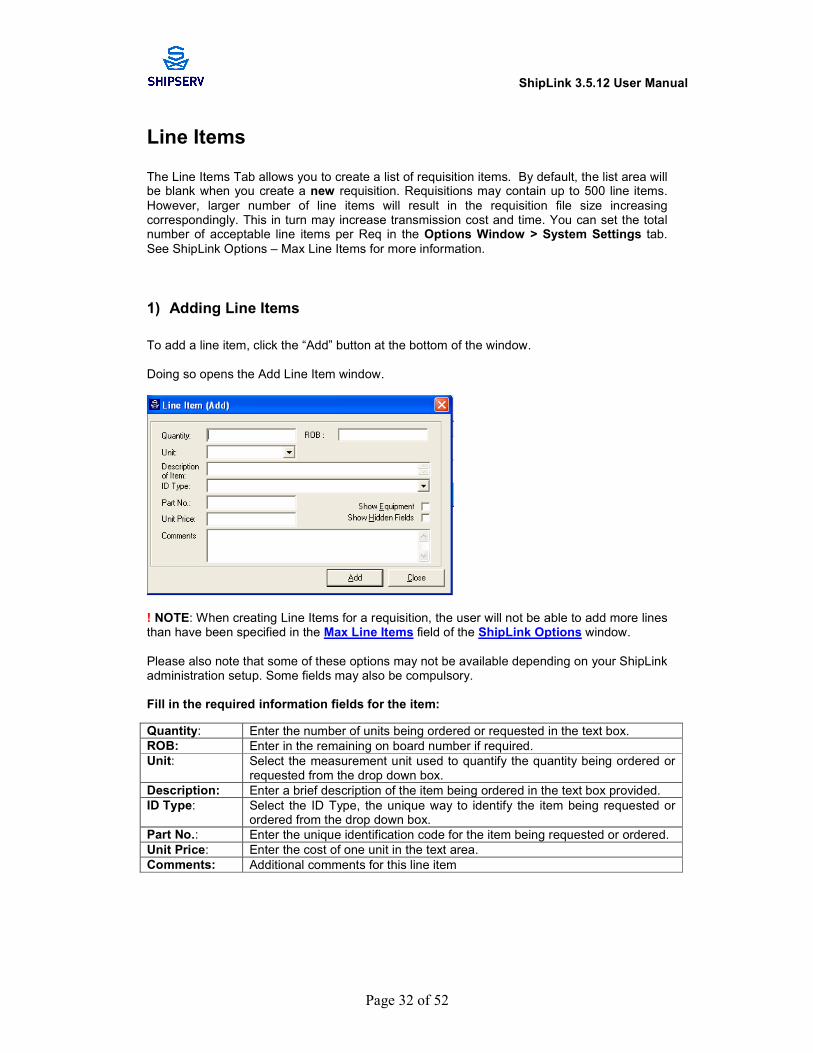
Line Items The Line Items Tab allows you to create a list of requisition items. By default, the list area will be blank when you create a new requisition. Requisitions may contain up to 500 line items.
However, larger number of line items will result in the requisition file size increasing correspondingly. This in turn may increase transmission cost and time. You can set the total number of acceptable line items per Req in the Options Window > System Settings tab.
See ShipLink Options – Max Line Items for more information.
1) Adding Line Items
To add a line item, click the “Add” button at the bottom of the window. Doing so opens the Add Line Item window.
! NOTE: When creating Line Items for a requisition, the user will not be able to add more lines than have been specified in the Max Line Items field of the ShipLink Options window. Please also note that some of these options may not be available depending on your ShipLink administration setup. Some fields may also be compulsory. Fill in the required information fields for the item:
Quantity: Enter the number of units being ordered or requested in the text box.
ROB: Enter in the remaining on board number if required.
Unit: Select the measurement unit used to quantify the quantity being ordered or requested from the drop down box.
Description: Enter a brief description of the item being ordered in the text box provided.
ID Type: Select the ID Type, the unique way to identify the item being requested or ordered from the drop down box.
Part No.: Enter the unique identification code for the item being requested or ordered.
Unit Price: Enter the cost of one unit in the text area.
Comments: Additional comments for this line item
ShipLink 3.5.12 User Manual
Page 33 of 52
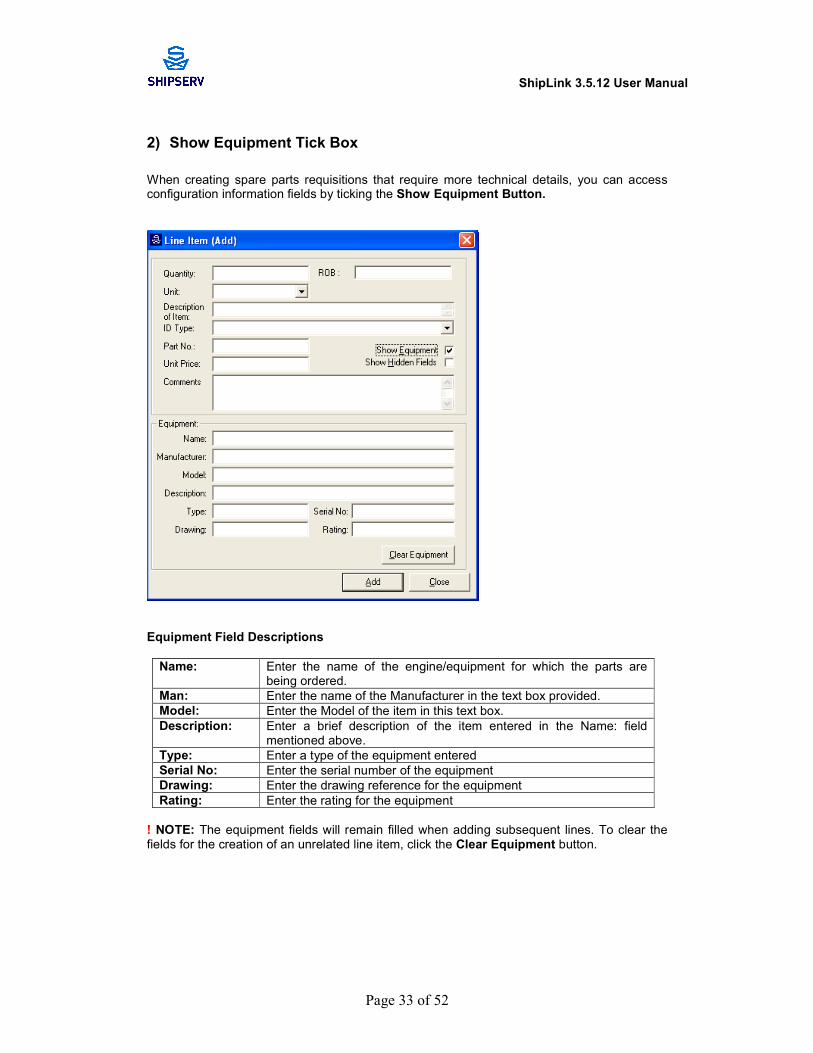
2) Show Equipment Tick Box
When creating spare parts requisitions that require more technical details, you can access configuration information fields by ticking the Show Equipment Button.
Equipment Field Descriptions
Name: Enter the name of the engine/equipment for which the parts are being ordered.
Man: Enter the name of the Manufacturer in the text box provided.
Model: Enter the Model of the item in this text box.
Description: Enter a brief description of the item entered in the Name: field mentioned above.
Type: Enter a type of the equipment entered
Serial No: Enter the serial number of the equipment
Drawing: Enter the drawing reference for the equipment
Rating: Enter the rating for the equipment
! NOTE: The equipment fields will remain filled when adding subsequent lines. To clear the fields for the creation of an unrelated line item, click the Clear Equipment button.

ShipLink 3.5.12 User Manual
Page 34 of 52
3) Show Hidden Fields Tick Box
When ordering machine parts that require even more technical details, you can access configuration information fields by ticking the Show Hidden Fields Tick Box.
Priority: Enter the priority for this item requisition
Quality: Enter the quality required for this item
! NOTE: The equipment fields will remain filled when adding subsequent lines. To clear the fields for the creation of an unrelated line item, click the Clear Equipment button.

ShipLink 3.5.12 User Manual
Page 35 of 52
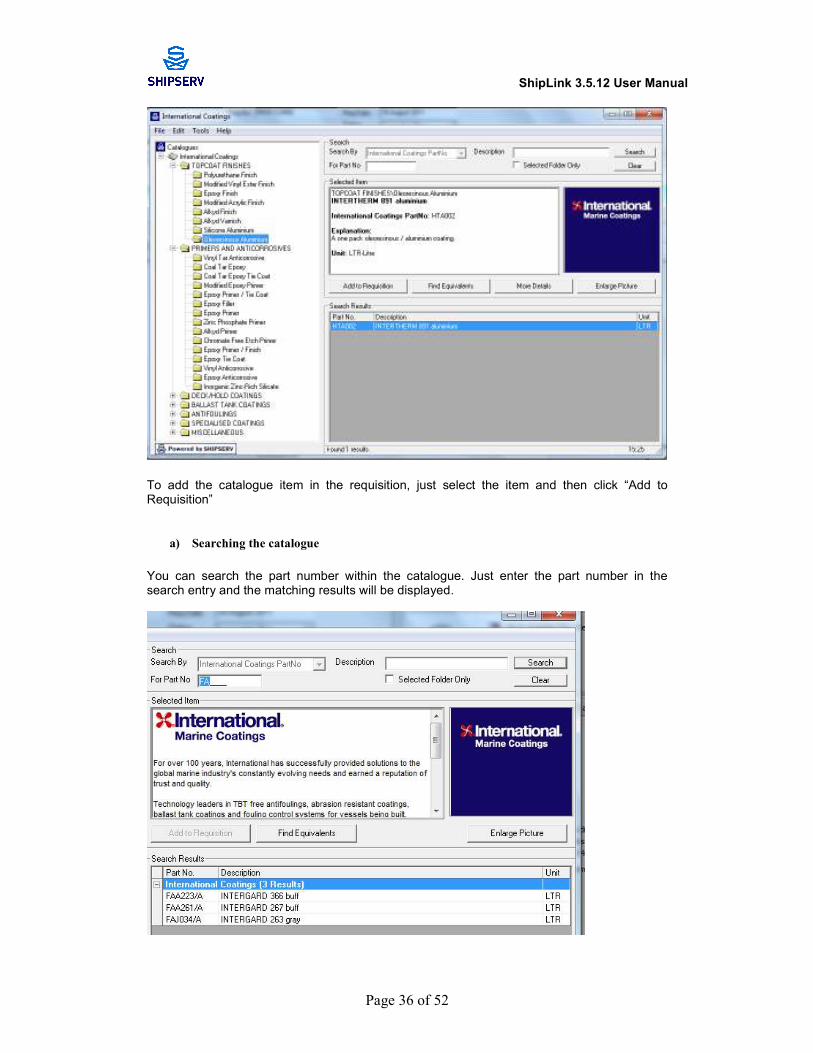
4) Shiplink Catalogue
a) Adding Catalogue items in Requisition
ShipLink can incorporate user-defined catalogue from your Purchasing department or your Purchasing department can choose to use any of our free catalogues. The use of the catalogue enable user to quickly select the request item, with detail descriptions so they can be processed quickly by your Purchasing team. To access the catalogue, select Search in the Line item tab and then select “ShipServ Catalogue viewer
To access the catalogue, select Search in the Line item tab and then select “ShipServ Catalogue viewer. The catalogue items will be available for you to choose into your requisition.
ShipLink 3.5.12 User Manual
Page 36 of 52
To add the catalogue item in the requisition, just select the item and then click “Add to Requisition”
a) Searching the catalogue
You can search the part number within the catalogue. Just enter the part number in the search entry and the matching results will be displayed.
ShipLink 3.5.12 User Manual
Page 37 of 52
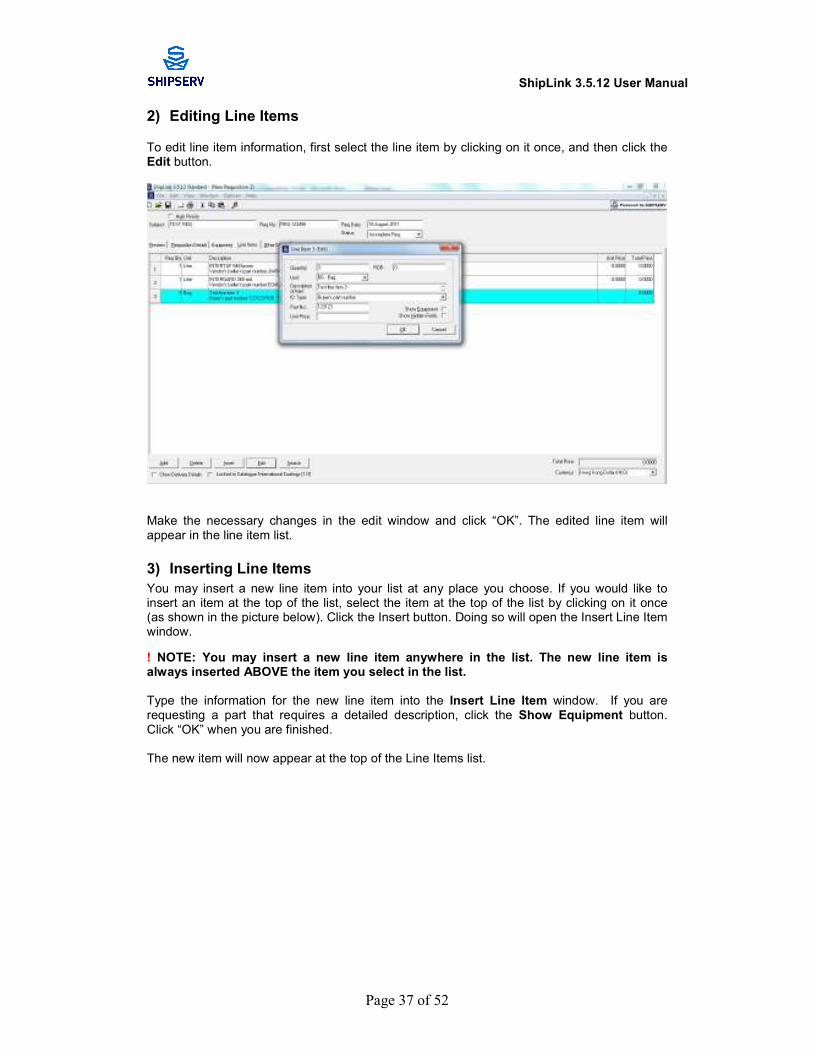
2) Editing Line Items
To edit line item information, first select the line item by clicking on it once, and then click the Edit button.
Make the necessary changes in the edit window and click “OK”. The edited line item will appear in the line item list.
3) Inserting Line Items
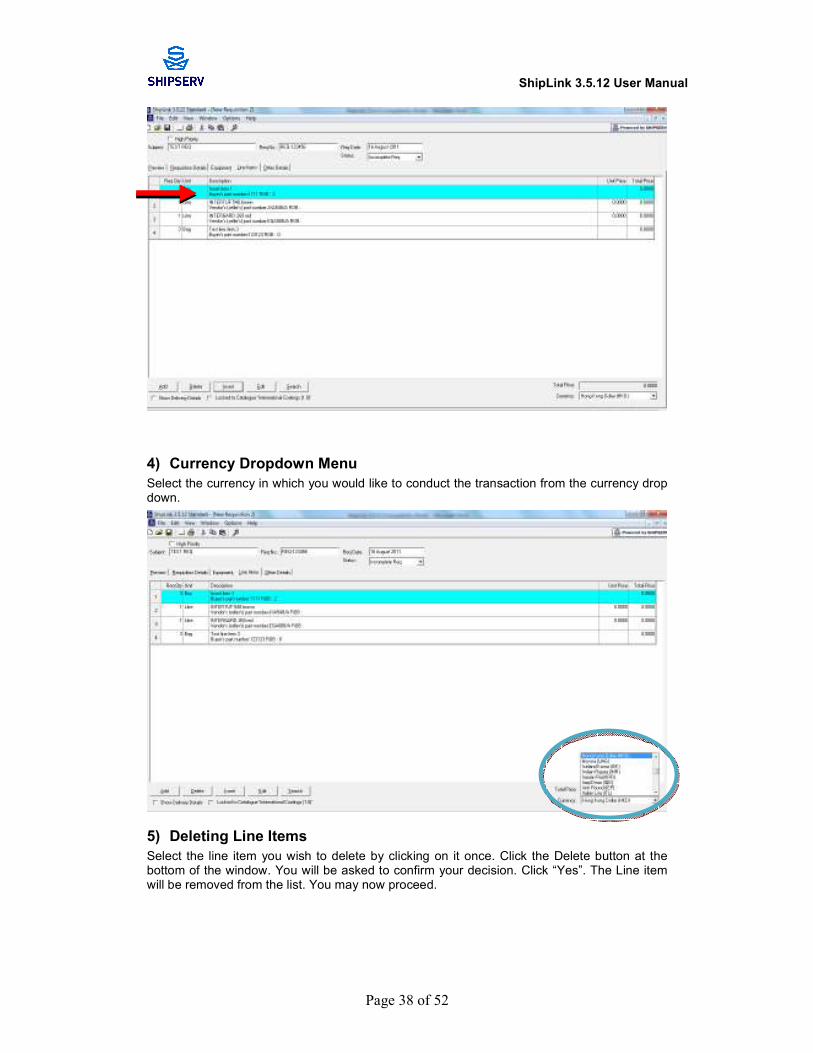
You may insert a new line item into your list at any place you choose. If you would like to insert an item at the top of the list, select the item at the top of the list by clicking on it once (as shown in the picture below). Click the Insert button. Doing so will open the Insert Line Item window.
! NOTE: You may insert a new line item anywhere in the list. The new line item is always inserted ABOVE the item you select in the list. Type the information for the new line item into the Insert Line Item window. If you are requesting a part that requires a detailed description, click the Show Equipment button. Click “OK” when you are finished. The new item will now appear at the top of the Line Items list.
ShipLink 3.5.12 User Manual
Page 38 of 52
4) Currency Dropdown Menu
Select the currency in which you would like to conduct the transaction from the currency drop down.
5) Deleting Line Items
Select the line item you wish to delete by clicking on it once. Click the Delete button at the bottom of the window. You will be asked to confirm your decision. Click “Yes”. The Line item will be removed from the list. You may now proceed.
ShipLink 3.5.12 User Manual
Page 39 of 52
6) Line Item Cut, Copy and Paste Functions
Line items can be moved within a Requisition (to change the order) or copied between Requisitions using the standard Windows Cut, Copy and Paste functions (available via the Menu or the Tool Bar) as follows:
• Select the line items to be moved or copied.
• Use Cut or Copy (as appropriate) to place the line items on the clipboard.
• Use Paste to insert the line items in their new position.
7) Keyboard Functions for Frequent Users
ShipLink is designed to be easy to use with a mouse. However, frequent users may prefer to complete certain functions with the keyboard only. ShipLink has been optimised for keyboard-only operation as follows:
• Use the [Tab] key to move from one field to the next.
• Use the [Enter] key for "OK" (e.g. on the Add/Insert Line Item screen).
• Use ShipLink hot-keys with the [Alt] key, as identified by underlined letters on all buttons, menus, etc., for example:
Alt+L Switch to Line Items page
Alt+A Add line item
Alt+D Delete selected line item
Alt+W Show the Window menu
• Use standard Windows hot-keys with the [Ctrl] key, as identified next to the relevant menu item, for example:
Ctrl+N File New
Ctrl+S File Save
Ctrl+C Edit Copy
Ctrl+V Edit Paste
Cntrl+P Print

ShipLink 3.5.12 User Manual
Page 40 of 52
Other Details The Other Details Tab allows you to enter delivery and payment information for the Requisition.
Field Descriptions Delivery Terms:
Choose the delivery terms from the dropdown menu.
Packaging Instructions:
Type specific packaging instructions for your order here.
Freight Forwarder:
Enter the name of your desired freight forwarder here.
Transportation Mode:
Choose from the dropdown menu: Maritime, Rail, Road, Air
Currency Instructions: Type in the currency with which you would like to conduct the transaction.
Tax Status:
Choose your tax status from the dropdown menu.
Payment Terms:
Type in your desired payment terms.
General Terms & Conditions:
Type in additional terms and conditions for the transaction.
Suggested Supplier: You can specify the Supplier to whom you would like your purchasing department to forward the Req.
Suggested Supplier’s TradeNet ID:
Each Supplier in ShipServ’s TradeNet has its own unique number. If you know your Suggested Supplier’s TradeNet number, entering it in this field will expedite the process.
ShipLink 3.5.12 User Manual
Page 41 of 52
Template
1) Create Template
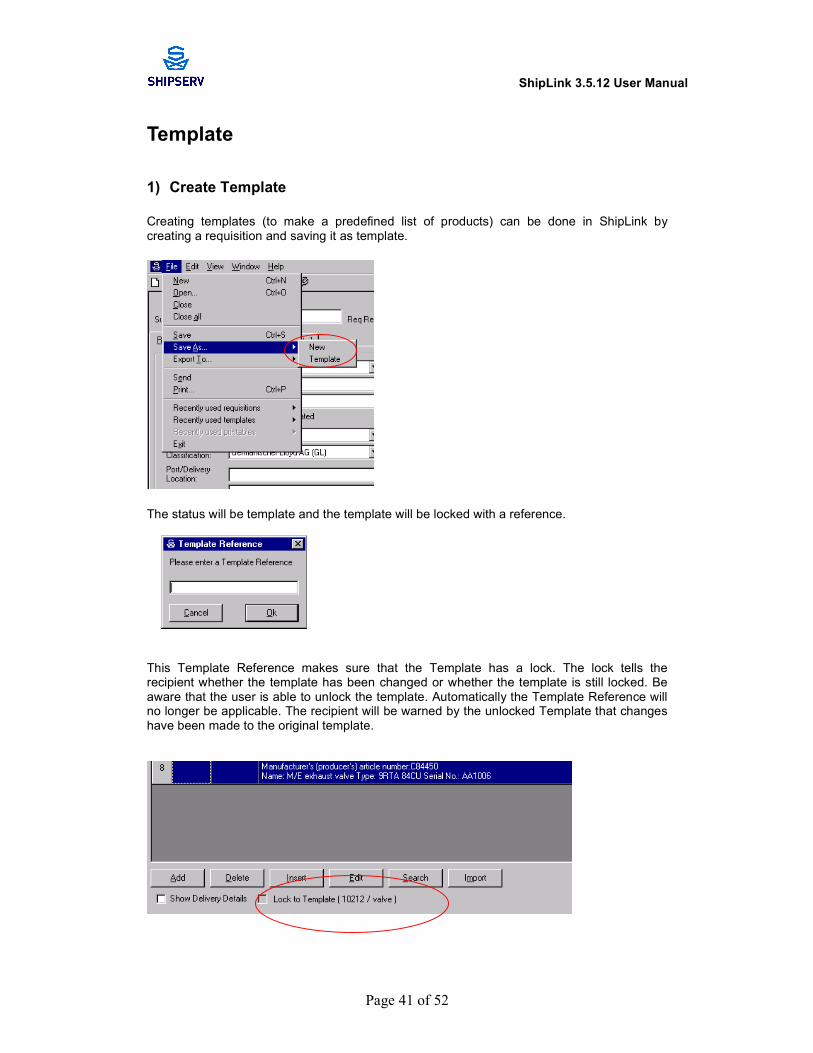
Creating templates (to make a predefined list of products) can be done in ShipLink by creating a requisition and saving it as template.
The status will be template and the template will be locked with a reference.
This Template Reference makes sure that the Template has a lock. The lock tells the recipient whether the template has been changed or whether the template is still locked. Be aware that the user is able to unlock the template. Automatically the Template Reference will no longer be applicable. The recipient will be warned by the unlocked Template that changes have been made to the original template.
ShipLink 3.5.12 User Manual
Page 42 of 52
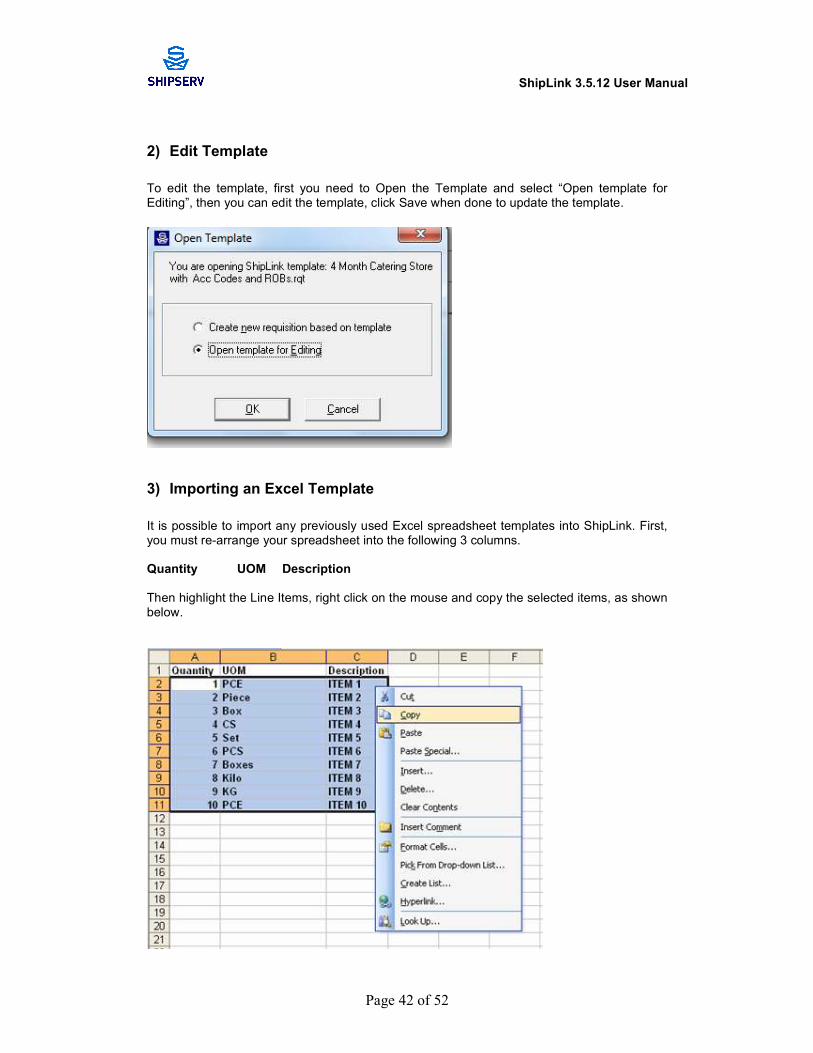
2) Edit Template
To edit the template, first you need to Open the Template and select “Open template for Editing”, then you can edit the template, click Save when done to update the template.
3) Importing an Excel Template
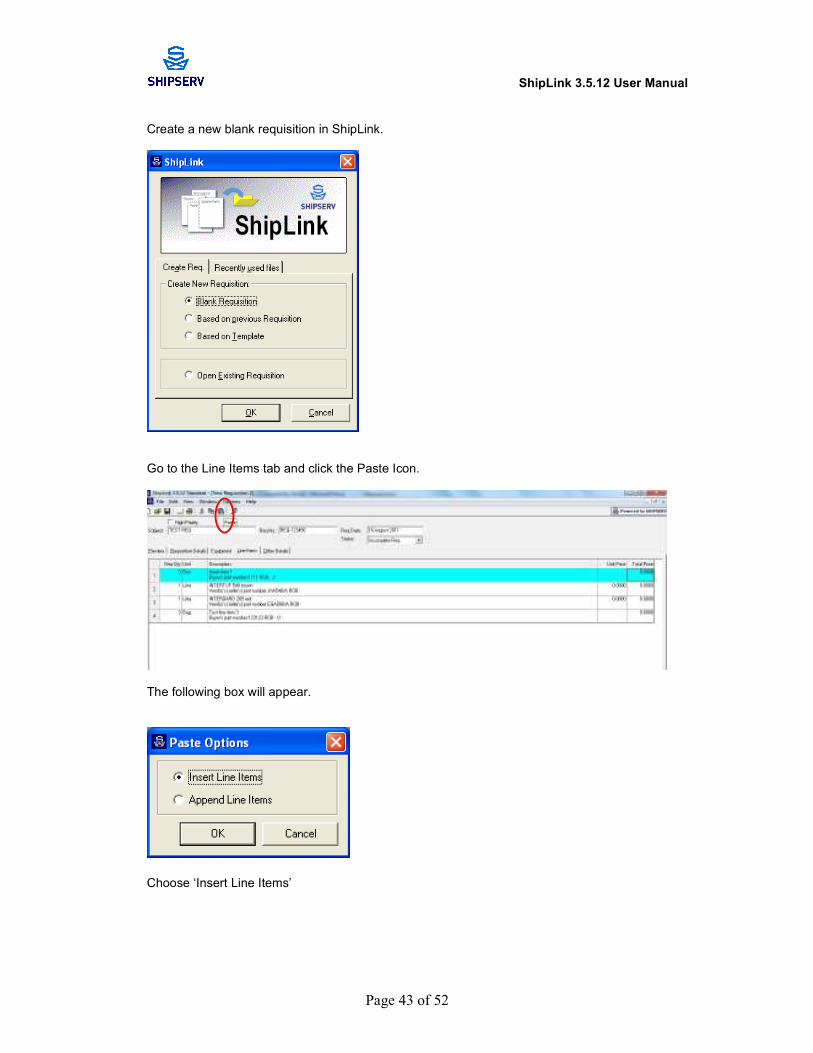
It is possible to import any previously used Excel spreadsheet templates into ShipLink. First, you must re-arrange your spreadsheet into the following 3 columns. Quantity UOM Description Then highlight the Line Items, right click on the mouse and copy the selected items, as shown below.
ShipLink 3.5.12 User Manual
Page 43 of 52
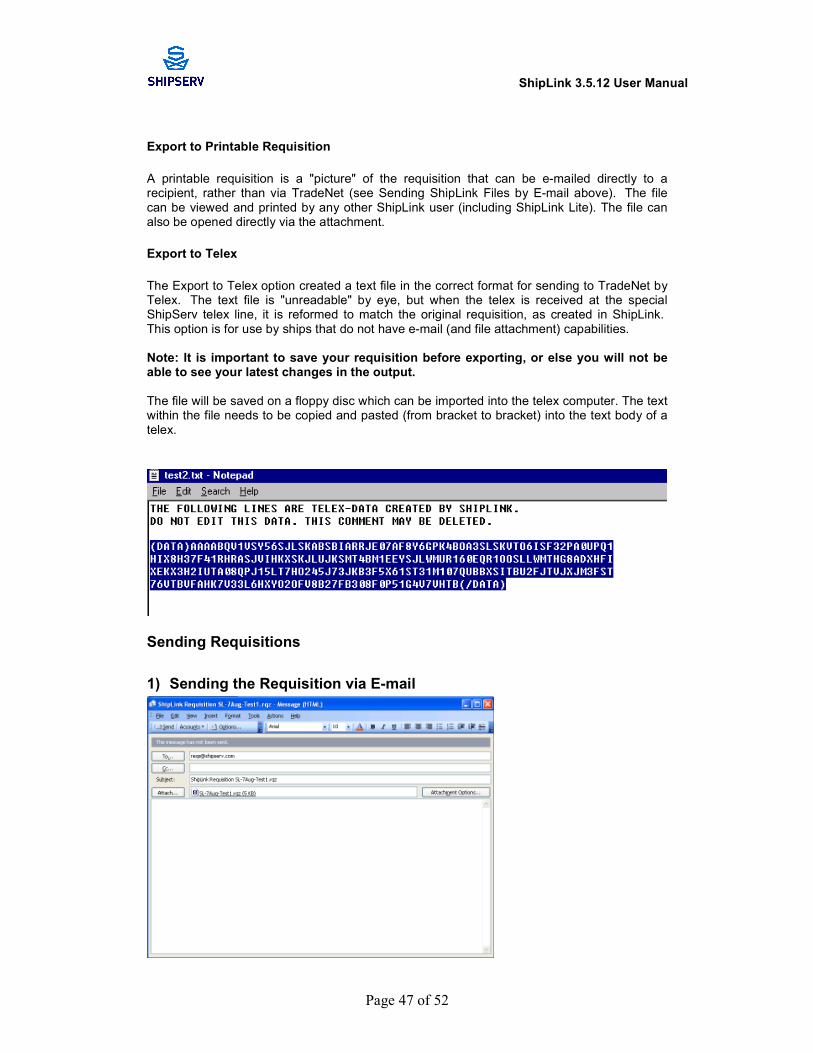
Create a new blank requisition in ShipLink.
Go to the Line Items tab and click the Paste Icon.
The following box will appear.
Choose ‘Insert Line Items’

ShipLink 3.5.12 User Manual
Page 44 of 52
The Line Items are now inserted into ShipLink.
! NOTE: Any UOM’s that are not recognised by ShipLink will be highlighted in Yellow. The user must change each highlighted UOM before the template can be saved or sent.
The requisition can now be saved as a ShipLink template to be used again in the future.
Delivery Details You can track the delivery status of each line item in a requisition. However, this information can only be changed on Reqs with “Delivery Partial or “Delivery Outstanding” status. To specify delivery statuses for line items: 1) Open a requisition that has been previously submitted. 2) Click the “Line Item” tab. 3) Check the “Show Delivery Details” box in the bottom left corner of the “Line Item” tab. 4) Select a line item to label by clicking on it (it will turn blue when selected).

ShipLink 3.5.12 User Manual
Page 45 of 52
Delivery Defaults After you have selected a line item, you can set default “Received Date” and “Received By” status by clicking the Delivery Defaults buttons. Edit
The original Quantity, Unit, and Description will be displayed in the “Edit” window. You may enter the received quantity and any comments about the item you would like to make. You can also edit the “Received Date” and “Received By” status here.
Received All Clicking the “Rec’d All” button changes the status of all line items to “received”.
Saving and Export Requisitions
1) File Formats
To save a requisition, choose Save or Save As from the File menu. Requisitions may be saved in two file formats: .rqz (New = Compressed) or .rqt (Template).

ShipLink 3.5.12 User Manual
Page 46 of 52
By default, the Req will be saved as the Req Reference code you supplied in the Header Details section. However, you may change the name of the Req in the File Name field of the “Save” window if necessary. You may also change the file type in the Save as type: field.
! NOTE: In order to ensure that reference numbers and file names stay matched, you cannot
change the Req Reference after saving the Req.
! Note to those using Automatic Referencing: After saving a requisition as a .req file and reopening it, the req reference cannot be changed. This is deliberate so that the number allocated from the sequence cannot be changed. See Using Automatic Referencing for more information. Use File>Save As to rename the Req.
2) Save as Compressed / Uncompressed
When a requisition is saved in one format, the format can now be changed without changing the requisition reference (filename).
3) Export as Printable/Telex
ShipLink has two file export options:
• Export to Printable Requisition
• Export to telex
ShipLink 3.5.12 User Manual
Page 47 of 52
Export to Printable Requisition
A printable requisition is a "picture" of the requisition that can be e-mailed directly to a recipient, rather than via TradeNet (see Sending ShipLink Files by E-mail above). The file can be viewed and printed by any other ShipLink user (including ShipLink Lite). The file can also be opened directly via the attachment.
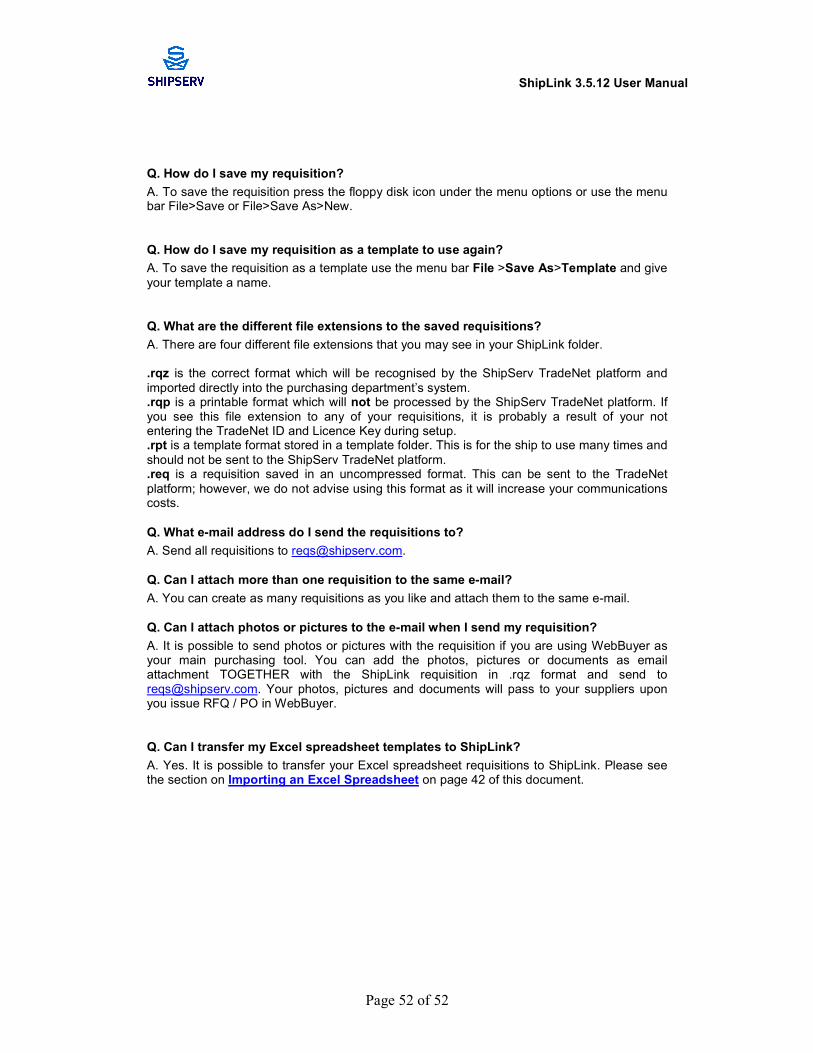
Export to Telex
The Export to Telex option created a text file in the correct format for sending to TradeNet by Telex. The text file is "unreadable" by eye, but when the telex is received at the special ShipServ telex line, it is reformed to match the original requisition, as created in ShipLink. This option is for use by ships that do not have e-mail (and file attachment) capabilities. Note: It is important to save your requisition before exporting, or else you will not be able to see your latest changes in the output.
The file will be saved on a floppy disc which can be imported into the telex computer. The text within the file needs to be copied and pasted (from bracket to bracket) into the text body of a telex.
Sending Requisitions
1) Sending the Requisition via E-mail

ShipLink 3.5.12 User Manual
Page 48 of 52
After the requisition has been created using ShipLink, the requisition file should be sent via e-mail, in the form of an attachment, to ShipServ. The figure above shows a requisition file attached to an e-mail message using Outlook. You may use Outlook or any other e-mail client. The e-mail address to which this message should be sent is [email protected]. IMPORTANT: When saving a requisition, ShipLink offers a choice of two file formats, Compressed (*.rqz) and as a Template (*.rqt). The compressed format should always be used if the file is to be sent via low speed (or high cost) communications link, e.g., ship to shore. The uncompressed format (*.req) is compatible with earlier versions of ShipLink. The default file format can be changed in ShipLink Options (System Settings). ! Note: Using the .rqz compressed file format eliminates the need to further compress the REQ for transmission (i.e., via WinZip or any other compression tool). “Zipped” files cannot be processed by the system and should not be used. In case of ShipLink Lite file, attach the "Printable Requisition" (*.rqp) file to an e-mail in the
normal way and send to your intended recipient (own e-mail address). The recipient must also have ShipLink installed.
4) Sending the Requisition via E-mail with Attachments
You can sent one or more attachments together with your saved requisitions (.rqz) to [email protected]. The attachments may be in document, drawing, images or even in compressed format. To attach a file with your requisition, you can simply include them as attachments within your requisition email as shown below.

ShipLink 3.5.12 User Manual
Page 49 of 52
5) Sending the Requisition via Telex
After the requisition has been created using ShipLink and saved as telex file (.txt), the requisition file should be sent via telex Telex needs to be sent to the following address 94078244 SERV G for telex communication inside the UK 0 51 94078244 SERV G for international telexes.
6) Multiple requisitions in one telex body
ShipLink has the ability to consolidate more than one requisition to one supplier by making use of the telex module. This can be done by copying and pasting in the text body.
Transferring Reqs by Floppy Disc
For ships that are not able to send e-mail transmissions, ShipLink allows the exchange of requisitions (Reqs) via floppy disc.
1. After creating a Req, save it to the hard drive in order to retain a copy for your records. 2. Insert a floppy disc into your computer’s disc drive. 3. Find the file on your computer to which you have saved the Req. Click once on the Req. 4. In the File dropdown menu select ‘Send To’. In the sub-menu select 3 ½ Floppy A. Doing
so will copy the file to the floppy disc 5. When the copying process is complete, eject the disc. 6. Send the disc to the land office by whatever means are available.
Printing Requisitions
You can print a paper copy of the Requisition for your records by simply selecting Print from the File menu or by clicking the printer icon on the ShipLink toolbar. Either method will allow
you to print the original Req or a delivery list.
Working with Multiple Requisitions
ShipLink allows several Requisitions to be open in different Windows within the main ShipLink program window. This is useful if you wish to work on two (or more) requisitions simultaneously or, for example, if you wish to copy and paste line items between two Requisitions. This feature is used as follows:
• Use File | New or File | Open to open as many Requisitions as appropriate, or you can find the files on your disk drive and double click the files and they will all open in the instance of ShipLink that's open.
• Use the Window menu options to switch between the various Requisitions and to position them on the screen as required (Cascade, Tile, etc.)

ShipLink 3.5.12 User Manual
Page 50 of 52
ShipServ Customer Service Centre
Should you experience any difficulties using ShipLink, the ShipServ Customer Service Centre is available 24 hours per day, 7 days per week as follows:
Americas Asia Pacific Europe
Support Hours: 0830-1700 US East Coast
1230-2100 GMT
Support Hours: 0900-1800 Hong Kong
0100-1000 GMT
Support Hours: 0830-1700 CET (DK) 0730-1600 GMT
Global support email address: [email protected]

ShipLink 3.5.12 User Manual
Page 51 of 52
Frequently Asked Questions - FAQ’s
Q. How should I enter the Vessel name if I have more than one ShipLink installation on board?
A. It is important to enter the Vessel name exactly the same for all ShipLink installations on the vessel. This includes any spacing or upper and lower cases used. This is important as the vessel name is used as an identifier for ShipServ reports.
Q. What should I enter in the IMO field?
A. Please ensure that only the IMO number for the vessel is entered here. This is the unique
identifying field that will match your requisition to the shore based purchasing department.
Q. What is the difference between ShipLink Lite and ShipLink Standard?
A. ShipLink Lite has no e-commerce capabilities. ShipLink Standard enables e-commerce capabilities and allows requisitions to be sent directly into the purchasing department’s system. ShipLink Standard requires a TradeNet ID and a license key. If you do not enter this ID and License Key then only ShipLink Lite will be installed.
Q. Should I tick the box “Confirm Reqs received by E-mail*”?
A. This box should only be ticked if you are able to receive incoming e-mails from unknown sources. Many ship owners or managers do not permit this.
Q. Should I tick the box “Has Internet Connection”?
A. This box should only be ticked if you have inexpensive / unlimited broadband access onboard. Otherwise you will be incurred with significant data charges.
Q. Should I use the “Auto Reference” option in setup?
A. The auto reference option will automatically allocate a reference number to the requisition. This is only recommended if there is only one installation of ShipLink on one PC on board. This is to ensure that there are no duplicate requisition numbers allocated to requisitions. Duplicates will be rejected by the on shore purchasing system.
Q. I have forgotten a few line items. Can I amend the requisition?
A. It is not possible to amend a requisition as this creates the possibility of duplicate requisitions being sent to the purchasing office. If you need to add some line items it is necessary to create a new requisition for the new items.
Q. I’ve sent a wrong requisition! Can I amend the requisition and resend it?
A. As it is not possible to amend a requisition, if you have sent a wrong requisition or wish to remove certain items from the requisition, it is necessary to change the status of the requisition in your ShipLink to ‘Cancelled’ and create a new requisition. If you cancel a requisition you must send a normal e-mail to the purchasing department to advise them of the requisitions you have cancelled. It is also recommended that you use the comments field when creating the new requisition to advise the purchasing department of your actions.
Q. How do I add equipment details for my Spare Parts requisitions?
A. On the equipment tab when generating your requisition, click the ‘Equipment details below for the all items’ radio button to open up the boxes for adding equipment details. Please note that the equipment maker name, and only this name, should be entered in the Manufacturer field, e.g. MAN B&W or Alfa Laval. Do not enter address details or phone details or any other
comments under equipment details. Enter any extra details in the comments field under the requisition details tab.
ShipLink 3.5.12 User Manual
Page 52 of 52
Q. How do I save my requisition?
A. To save the requisition press the floppy disk icon under the menu options or use the menu bar File>Save or File>Save As>New.
Q. How do I save my requisition as a template to use again?
A. To save the requisition as a template use the menu bar File >Save As>Template and give
your template a name.
Q. What are the different file extensions to the saved requisitions?
A. There are four different file extensions that you may see in your ShipLink folder. .rqz is the correct format which will be recognised by the ShipServ TradeNet platform and
imported directly into the purchasing department’s system. .rqp is a printable format which will not be processed by the ShipServ TradeNet platform. If you see this file extension to any of your requisitions, it is probably a result of your not entering the TradeNet ID and Licence Key during setup. .rpt is a template format stored in a template folder. This is for the ship to use many times and
should not be sent to the ShipServ TradeNet platform. .req is a requisition saved in an uncompressed format. This can be sent to the TradeNet
platform; however, we do not advise using this format as it will increase your communications costs.
Q. What e-mail address do I send the requisitions to?
A. Send all requisitions to [email protected].
Q. Can I attach more than one requisition to the same e-mail?
A. You can create as many requisitions as you like and attach them to the same e-mail.
Q. Can I attach photos or pictures to the e-mail when I send my requisition?
A. It is possible to send photos or pictures with the requisition if you are using WebBuyer as your main purchasing tool. You can add the photos, pictures or documents as email attachment TOGETHER with the ShipLink requisition in .rqz format and send to [email protected]. Your photos, pictures and documents will pass to your suppliers upon you issue RFQ / PO in WebBuyer.
Q. Can I transfer my Excel spreadsheet templates to ShipLink?
A. Yes. It is possible to transfer your Excel spreadsheet requisitions to ShipLink. Please see the section on Importing an Excel Spreadsheet on page 42 of this document.