She Loves Me, She Loves Me Not - Plum Good...
2
Transcript of She Loves Me, She Loves Me Not - Plum Good...
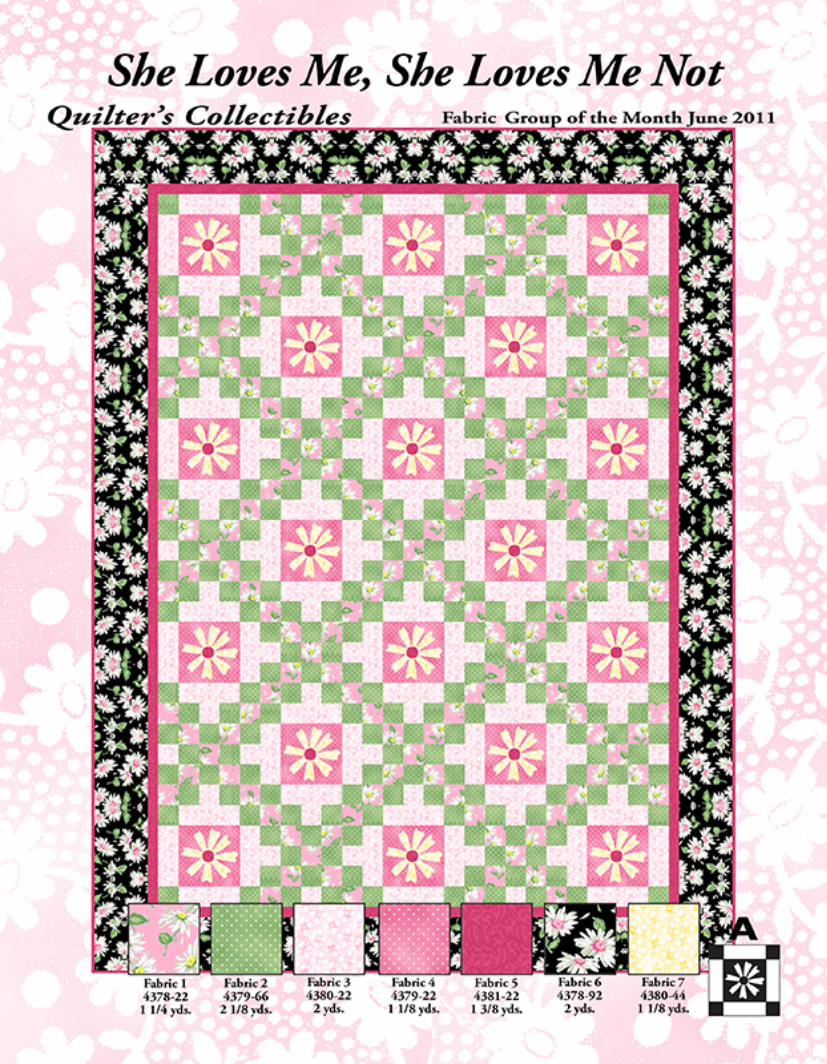
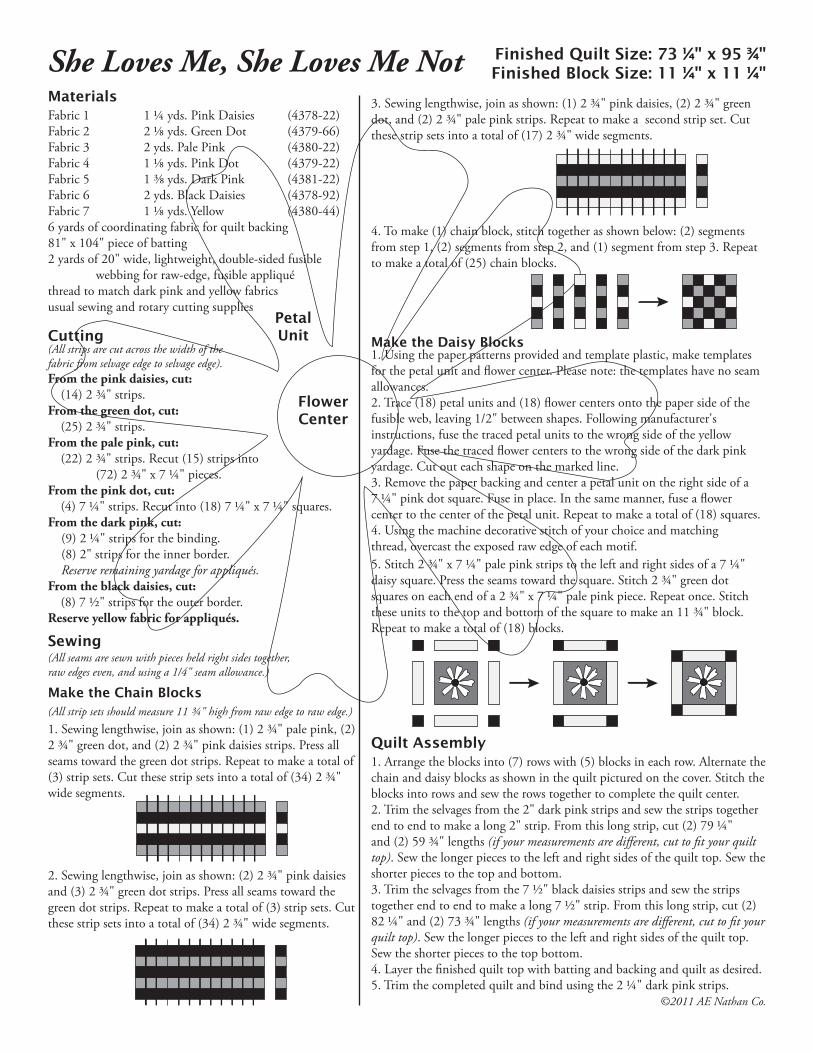
She Loves Me, She Loves Me Not Finished Quilt Size: 73 ¼" x 95 ¾"Finished Block Size: 11 ¼" x 11 ¼"
Materials
Cutting
Fabric 1 1 ¼ yds. Pink Daisies (4378-22)Fabric 2 2 ⅛ yds. Green Dot (4379-66)Fabric 3 2 yds. Pale Pink (4380-22)Fabric 4 1 ⅛ yds. Pink Dot (4379-22)Fabric 5 1 ⅜ yds. Dark Pink (4381-22)Fabric 6 2 yds. Black Daisies (4378-92)Fabric 7 1 ⅛ yds. Yellow (4380-44)6 yards of coordinating fabric for quilt backing81" x 104" piece of batting2 yards of 20" wide, lightweight, double-sided fusible webbing for raw-edge, fusible appliquéthread to match dark pink and yellow fabricsusual sewing and rotary cutting supplies
(All strips are cut across the width of the fabric from selvage edge to selvage edge).From the pink daisies, cut: (14) 2 ¾" strips. From the green dot, cut: (25) 2 ¾" strips. From the pale pink, cut: (22) 2 ¾" strips. Recut (15) strips into (72) 2 ¾" x 7 ¼" pieces. From the pink dot, cut: (4) 7 ¼" strips. Recut into (18) 7 ¼" x 7 ¼" squares.From the dark pink, cut: (9) 2 ¼" strips for the binding. (8) 2" strips for the inner border. Reserve remaining yardage for appliqués. From the black daisies, cut: (8) 7 ½" strips for the outer border.Reserve yellow fabric for appliqués.
(All seams are sewn with pieces held right sides together, raw edges even, and using a 1/4" seam allowance.)
Sewing
©2011 AE Nathan Co.
Quilt Assembly1. Arrange the blocks into (7) rows with (5) blocks in each row. Alternate thechain and daisy blocks as shown in the quilt pictured on the cover. Stitch theblocks into rows and sew the rows together to complete the quilt center.2. Trim the selvages from the 2" dark pink strips and sew the strips together end to end to make a long 2" strip. From this long strip, cut (2) 79 ¼" and (2) 59 ¾" lengths (if your measurements are di�erent, cut to �t your quilt top). Sew the longer pieces to the left and right sides of the quilt top. Sew theshorter pieces to the top and bottom.3. Trim the selvages from the 7 ½" black daisies strips and sew the strips together end to end to make a long 7 ½" strip. From this long strip, cut (2) 82 ¼" and (2) 73 ¾" lengths (if your measurements are di�erent, cut to �t your quilt top). Sew the longer pieces to the left and right sides of the quilt top. Sew the shorter pieces to the top bottom.4. Layer the �nished quilt top with batting and backing and quilt as desired.5. Trim the completed quilt and bind using the 2 ¼" dark pink strips.
Make the Chain Blocks
1. Sewing lengthwise, join as shown: (1) 2 ¾" pale pink, (2)2 ¾" green dot, and (2) 2 ¾" pink daisies strips. Press all seams toward the green dot strips. Repeat to make a total of(3) strip sets. Cut these strip sets into a total of (34) 2 ¾" wide segments.
(All strip sets should measure 11 ¾" high from raw edge to raw edge.)
3. Sewing lengthwise, join as shown: (1) 2 ¾" pink daisies, (2) 2 ¾" green dot, and (2) 2 ¾" pale pink strips. Repeat to make a second strip set. Cut these strip sets into a total of (17) 2 ¾" wide segments.
4. To make (1) chain block, stitch together as shown below: (2) segments from step 1, (2) segments from step 2, and (1) segment from step 3. Repeat to make a total of (25) chain blocks.
2. Sewing lengthwise, join as shown: (2) 2 ¾" pink daisies and (3) 2 ¾" green dot strips. Press all seams toward the green dot strips. Repeat to make a total of (3) strip sets. Cutthese strip sets into a total of (34) 2 ¾" wide segments.
Make the Daisy Blocks
5. Stitch 2 ¾" x 7 ¼" pale pink strips to the left and right sides of a 7 ¼" daisy square. Press the seams toward the square. Stitch 2 ¾" green dot squares on each end of a 2 ¾" x 7 ¼" pale pink piece. Repeat once. Stitch these units to the top and bottom of the square to make an 11 ¾" block. Repeat to make a total of (18) blocks.
1. Using the paper patterns provided and template plastic, make templatesfor the petal unit and �ower center. Please note: the templates have no seamallowances.2. Trace (18) petal units and (18) �ower centers onto the paper side of the fusible web, leaving 1/2" between shapes. Following manufacturer's instructions, fuse the traced petal units to the wrong side of the yellow yardage. Fuse the traced �ower centers to the wrong side of the dark pinkyardage. Cut out each shape on the marked line.3. Remove the paper backing and center a petal unit on the right side of a 7 ¼" pink dot square. Fuse in place. In the same manner, fuse a �ower center to the center of the petal unit. Repeat to make a total of (18) squares. 4. Using the machine decorative stitch of your choice and matching thread, overcast the exposed raw edge of each motif.
PetalUnit
FlowerCenter