SharePoint Foundation 2010 in the ProjektPortal as a … · click to the arrow and choose directly...
51
IC RL IT PLM WEB User%20Guide_SF2010_ProjektPortal_EN_6351829578976228 Seite 1/51 Datenaustausch über ProjektPorDatenaustausch über Pro Data Exchange via ProjektPortal SharePoint Foundation 2010 in the ProjektPortal as a Data exchange platform User Guide Oct. 2013 V 2
Transcript of SharePoint Foundation 2010 in the ProjektPortal as a … · click to the arrow and choose directly...

IC RL IT PLM WEB
User%20Guide_SF2010_ProjektPortal_EN_635182957897622848 Seite 1/51
Datenaustausch über ProjektPorDatenaustausch über Pro
Data Exchange via ProjektPortal
SharePoint Foundation 2010
in the ProjektPortal
as a Data exchange platform
User Guide
Oct. 2013
V 2

IC IT RL PLM WEB
User%20Guide_SF2010_ProjektPortal_EN_635182957897622848 Page 2 of 51
Document information
Filename User Guide_SF2010_ProjektPortal_EN.doc
Owner: IC IT RL PLM WEB
Responsible: Bernd Scherer
Editor: Andrea Raithel
Date 10/25/2013
Role Name Org. Unit Date Signatures
Released by Margarita Kahlert IC IT RL PLM WEB
(003) Margarita Kahlert
Checked by Bernd Scherer IC IT RL PLM WEB
(002) Bernd Scherer
Authored by Andrea Raithel IC IT RL PLM WEB
(001) Andrea Raithel

IC IT RL PLM WEB
User%20Guide_SF2010_ProjektPortal_EN_635182957897622848 Page 3 of 51
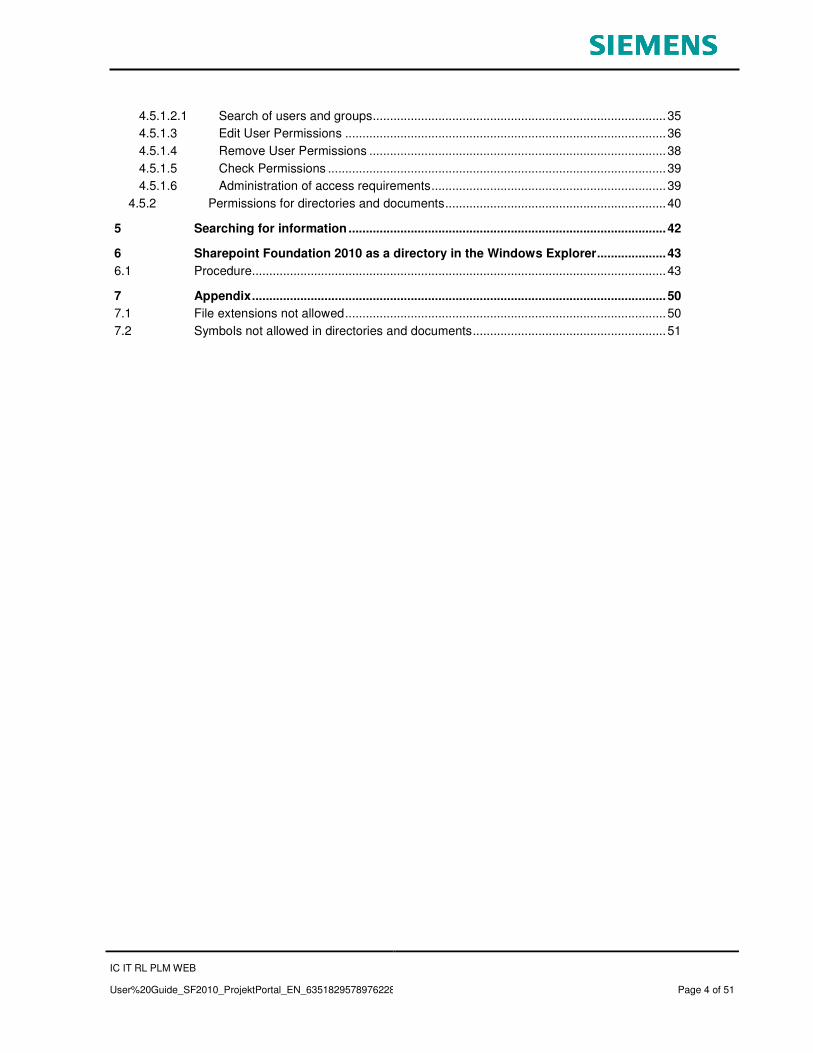
Content
1 Revisions ......................................................................................................................... 5
2 Summary .......................................................................................................................... 6 2.1 Login ................................................................................................................................. 6
3 First steps with SharePoint Foundation ....................................................................... 7 3.1 Summary of projects within SharePoint Foundation ......................................................... 7 3.2 Appearance of a SharePoint Foundation 2010 project ..................................................... 8
3.2.1 Document library “content” (usual entry) ...................................................................... 9
4 Menus in SharePoint Foundation 2010 ....................................................................... 11 4.1 Site actions...................................................................................................................... 11 4.2 Button “Navigate up” ....................................................................................................... 12 4.3 Library Tools ................................................................................................................... 12
4.3.1 Dokuments .................................................................................................................. 12 4.3.1.1 New .......................................................................................................................... 12 4.3.1.1.1 New Document ........................................................................................................ 12 4.3.1.1.2 Upload Document .................................................................................................... 13 4.3.1.1.3 New folder ................................................................................................................ 15 4.3.1.2 Open & Check Out ................................................................................................... 15 4.3.1.3 Manage documents ................................................................................................. 18 4.3.1.3.1 View Properties ........................................................................................................ 18 4.3.1.3.2 Edit Properties ......................................................................................................... 19 4.3.1.3.3 Version History......................................................................................................... 19 4.3.1.3.4 Delete Document ..................................................................................................... 20 4.3.1.4 Share & track ........................................................................................................... 21 4.3.1.4.1 E-mail a link ............................................................................................................. 21 4.3.1.4.2 Alert Me .................................................................................................................... 21 4.3.1.5 Copies ...................................................................................................................... 25 4.3.1.5.1 Download a copy ..................................................................................................... 25
4.3.2 Library ......................................................................................................................... 27 4.3.2.1 View Format ............................................................................................................. 27 4.3.2.1.1 Standard view .......................................................................................................... 27 4.3.2.2 Manage views .......................................................................................................... 28 4.3.2.2.1 Navigate up .............................................................................................................. 28 4.3.2.3 Share & Track .......................................................................................................... 28 4.3.2.3.1 E-mail a link ............................................................................................................. 28 4.3.2.3.2 Alert Me .................................................................................................................... 29 4.3.2.4 Connect & Export ..................................................................................................... 29 4.3.2.4.1 Export to Excel ......................................................................................................... 29 4.3.2.4.2 Open with Explorer .................................................................................................. 30
4.4 Settings for registered Users .......................................................................................... 30 4.4.1 Select Display Language ............................................................................................ 30 4.4.2 My Settings ................................................................................................................. 31
4.5 Library Permissions for project administrators ................................................................ 31 4.5.1 Library Permissions .................................................................................................... 31
4.5.1.1 Inherit Permissions .................................................................................................. 32 4.5.1.2 Grant permissions .................................................................................................... 32
IC IT RL PLM WEB
User%20Guide_SF2010_ProjektPortal_EN_635182957897622848 Page 4 of 51
4.5.1.2.1 Search of users and groups ..................................................................................... 35 4.5.1.3 Edit User Permissions ............................................................................................. 36 4.5.1.4 Remove User Permissions ...................................................................................... 38 4.5.1.5 Check Permissions .................................................................................................. 39 4.5.1.6 Administration of access requirements .................................................................... 39
4.5.2 Permissions for directories and documents ................................................................ 40
5 Searching for information ............................................................................................ 42
6 Sharepoint Foundation 2010 as a directory in the Windows Explorer .................... 43 6.1 Procedure........................................................................................................................ 43
7 Appendix ........................................................................................................................ 50 7.1 File extensions not allowed ............................................................................................. 50 7.2 Symbols not allowed in directories and documents ........................................................ 51
IC IT RL PLM WEB
User%20Guide_SF2010_ProjektPortal_EN_635182957897622848 Page 5 of 51
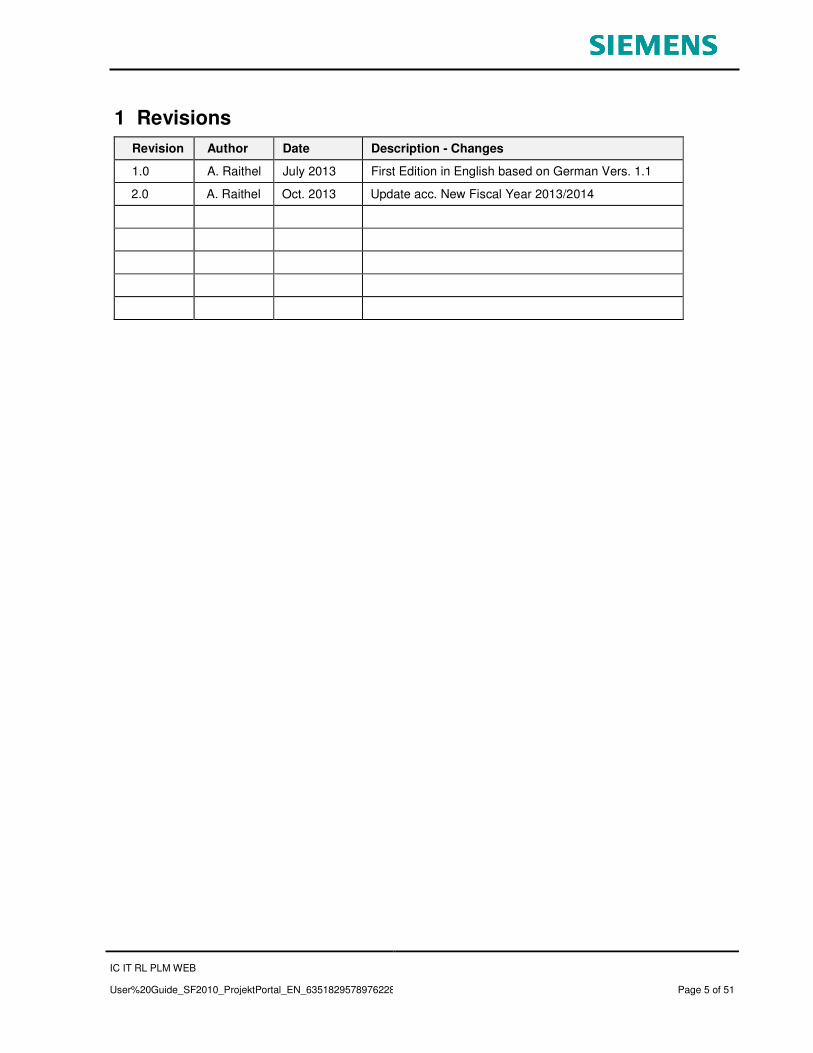
1 Revisions
Revision Author Date Description - Changes
1.0 A. Raithel July 2013 First Edition in English based on German Vers. 1.1
2.0 A. Raithel Oct. 2013 Update acc. New Fiscal Year 2013/2014
IC IT RL PLM WEB
User%20Guide_SF2010_ProjektPortal_EN_635182957897622848 Page 6 of 51
2 Summary
SharePoint Foundation 2010 (SF2010) is the successor to the formerly in the ProjektPortal used system Oracle Collaboration Service (OCS) with the Oracle Content Database (OCDB).
SF2010 offers the possibility of data exchange of electronic documents in a web-based da-ta system with external business partners.
To make it easy for you using SF2010 we created this User Guide. The handling of Share-Point Foundation 2010 will be explained "step by step". You can use it as daily help as well as a guideline for first access.
Please note: The 64 bit version of the Internet Explorer does not handle software devel-oped for a 32 bit system very well. This is a symptom of the 64 bit Internet Explorer and can not be changed. This leads to an unreliable behavior concerning 32 bit software within SharePoint Foundation 2010.
We strongly recommend to use the 32 bit version of the Internet Explorer only.
2.1 Login
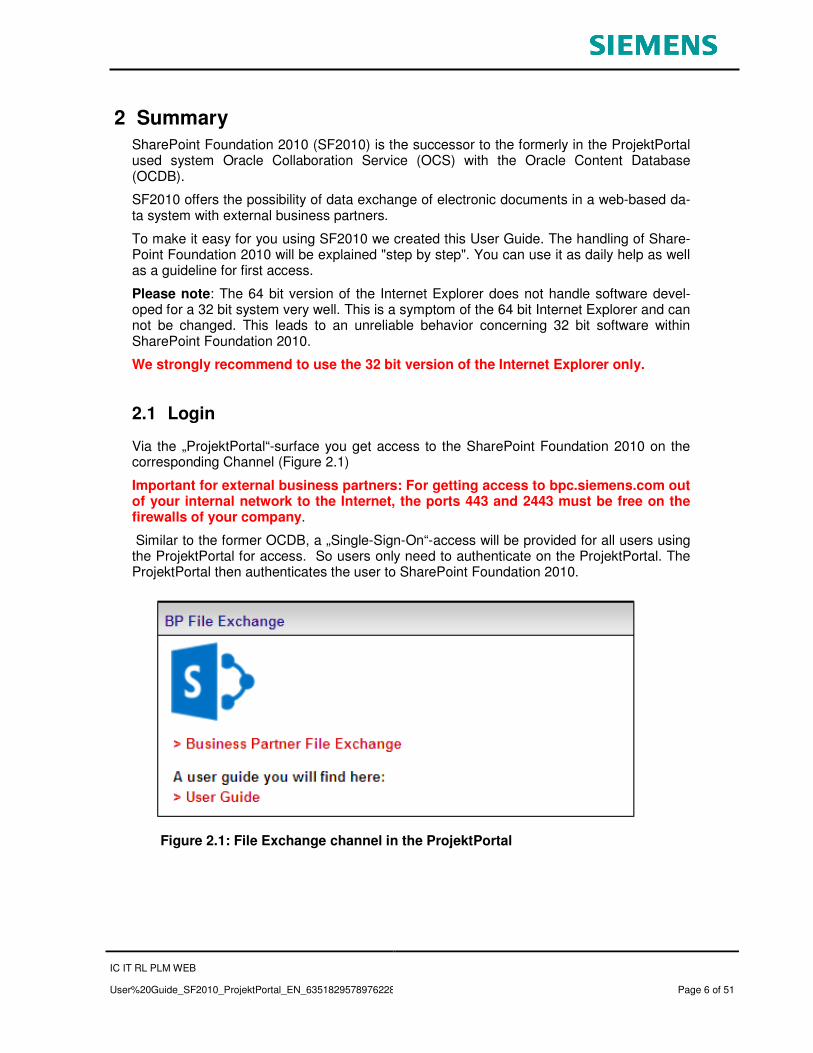
Via the „ProjektPortal“-surface you get access to the SharePoint Foundation 2010 on the corresponding Channel (Figure 2.1)
Important for external business partners: For getting access to bpc.siemens.com out of your internal network to the Internet, the ports 443 and 2443 must be free on the firewalls of your company.
Similar to the former OCDB, a „Single-Sign-On“-access will be provided for all users using the ProjektPortal for access. So users only need to authenticate on the ProjektPortal. The ProjektPortal then authenticates the user to SharePoint Foundation 2010.
Figure 2.1: File Exchange channel in the ProjektPortal

IC IT RL PLM WEB
User%20Guide_SF2010_ProjektPortal_EN_635182957897622848 Page 7 of 51
3 First steps with SharePoint Foundation
The first access ( Figure 3.1) shows the projects for which you are registered as a user. You may find more or less project links, depending on the projects you are authorized for.
This structure was created for security reasons (separation from users and groups, backup of site collections, …)
3.1 Summary of projects within SharePoint Foundation
After you have got access to the ProjektPortal and after a click to the link „Business Partner File Exchange“ in the channel you will see the following web-surface (depending on your projects). The picture shows the projects of the user zzzzzwe3.
Figure 3.1 List of projects after user login
The command bar is shown in the above third on the web surface and contains control elements for global commands and your own user name on the right side.
As this site is only a transition to the real projects and no user is allowed to make any changes on this site, all commands of SharePoint Foundation 2010 will be explained direct-ly on the project sites.
IC IT RL PLM WEB
User%20Guide_SF2010_ProjektPortal_EN_635182957897622848 Page 8 of 51
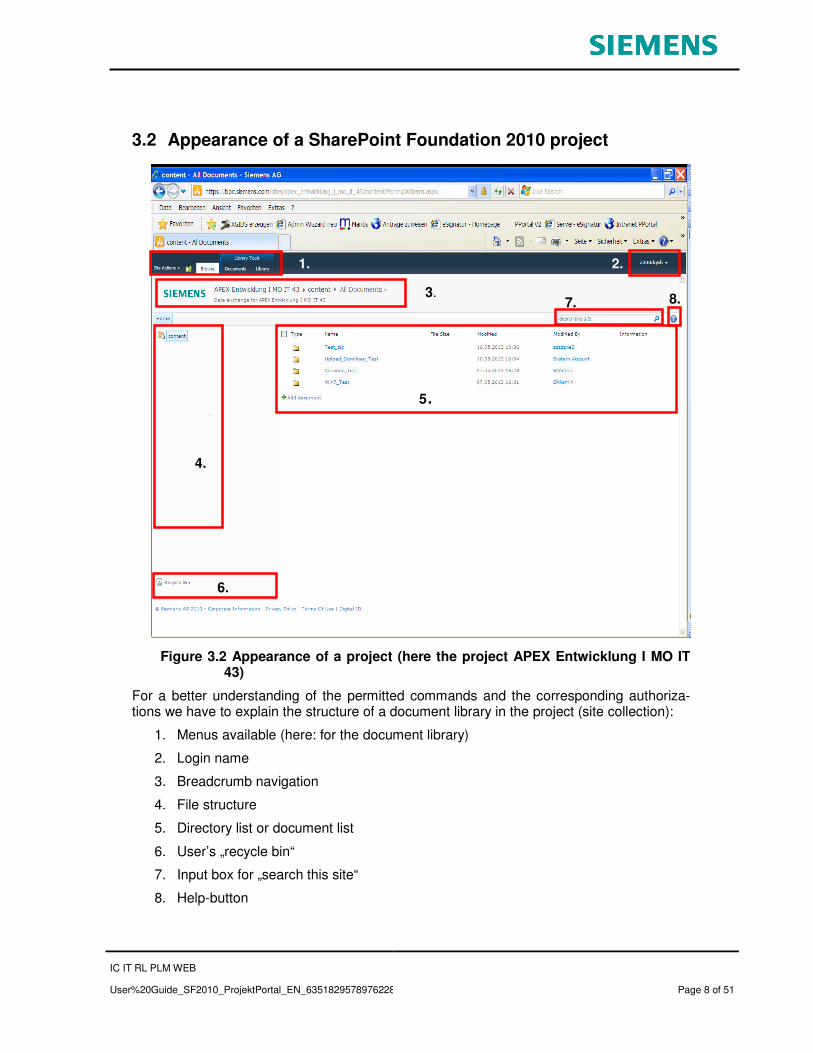
3.2 Appearance of a SharePoint Foundation 2010 project
Figure 3.2 Appearance of a project (here the project APEX Entwicklung I MO IT 43)
For a better understanding of the permitted commands and the corresponding authoriza-tions we have to explain the structure of a document library in the project (site collection):
1. Menus available (here: for the document library)
2. Login name
3. Breadcrumb navigation
4. File structure
5. Directory list or document list
6. User’s „recycle bin“
7. Input box for „search this site“
8. Help-button
2.
. 1..
3.
4.
5.
7.
4.
6.
8.
IC IT RL PLM WEB
User%20Guide_SF2010_ProjektPortal_EN_635182957897622848 Page 9 of 51
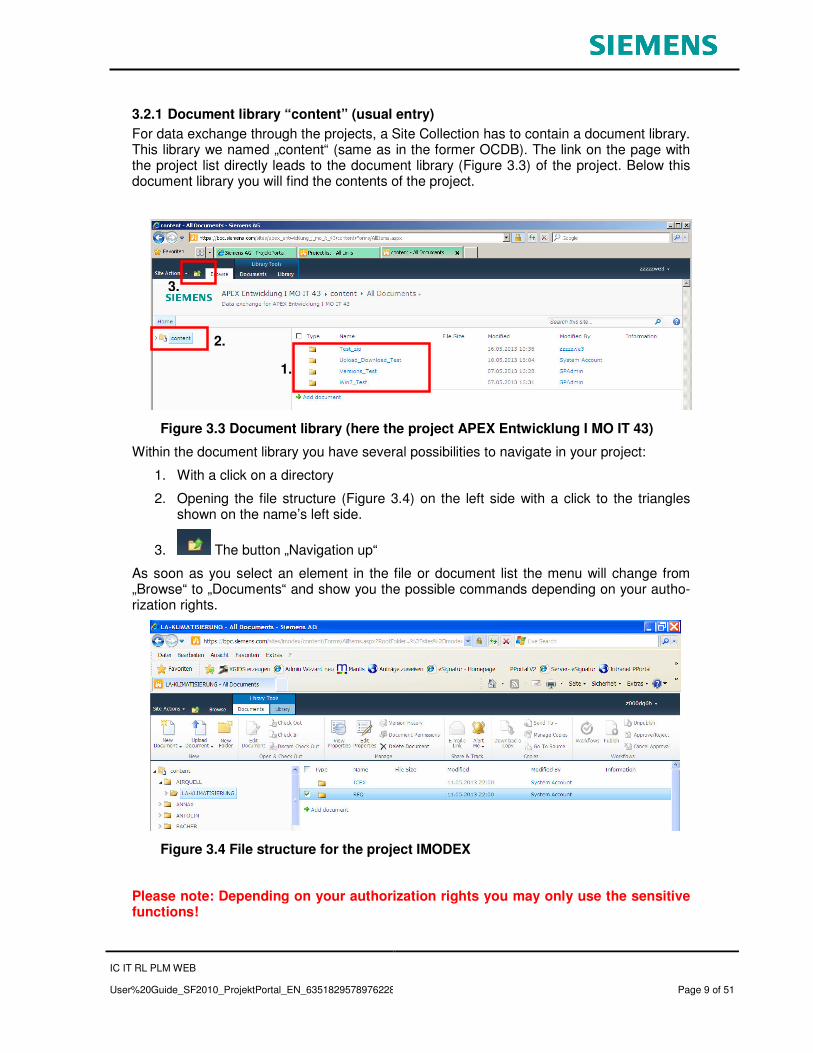
3.2.1 Document library “content” (usual entry)
For data exchange through the projects, a Site Collection has to contain a document library. This library we named „content“ (same as in the former OCDB). The link on the page with the project list directly leads to the document library (Figure 3.3) of the project. Below this document library you will find the contents of the project.
Figure 3.3 Document library (here the project APEX Entwicklung I MO IT 43)
Within the document library you have several possibilities to navigate in your project:
1. With a click on a directory
2. Opening the file structure (Figure 3.4) on the left side with a click to the triangles shown on the name’s left side.
3. The button „Navigation up“
As soon as you select an element in the file or document list the menu will change from „Browse“ to „Documents“ and show you the possible commands depending on your autho-rization rights.
Figure 3.4 File structure for the project IMODEX
Please note: Depending on your authorization rights you may only use the sensitive functions!
2.
1.
3.

IC IT RL PLM WEB
User%20Guide_SF2010_ProjektPortal_EN_635182957897622848 Page 10 of 51
In this example the user is authorized as „Author“ and is able to work with the sensitive functions in the picture.
The “Versioning” in a document library will be activated for you on request.
IC IT RL PLM WEB
User%20Guide_SF2010_ProjektPortal_EN_635182957897622848 Page 11 of 51
4 Menus in SharePoint Foundation 2010
Details for all commands you may get via the online help-button. The online help-button is always shown if you click „Browse“ in the command bar or if you choose in the menu „Site actions“ / „View All Site Content“.
The online help describes all possibilities of SharePoint Foundation 2010, also the functions not activated due to reasons of security, i.e. functions which are not at your disposal.
Chapter 4 describes the possibilities for Siemens employees in the Intranet. Business part-ners have less possibilities at their disposal due to Siemens-Policies’ restrictions.
The titles of all chapters are chosen according to the SharePoint Foundation menus in Eng-lish language.
The end of this chapter describes the special rights of an administrator.
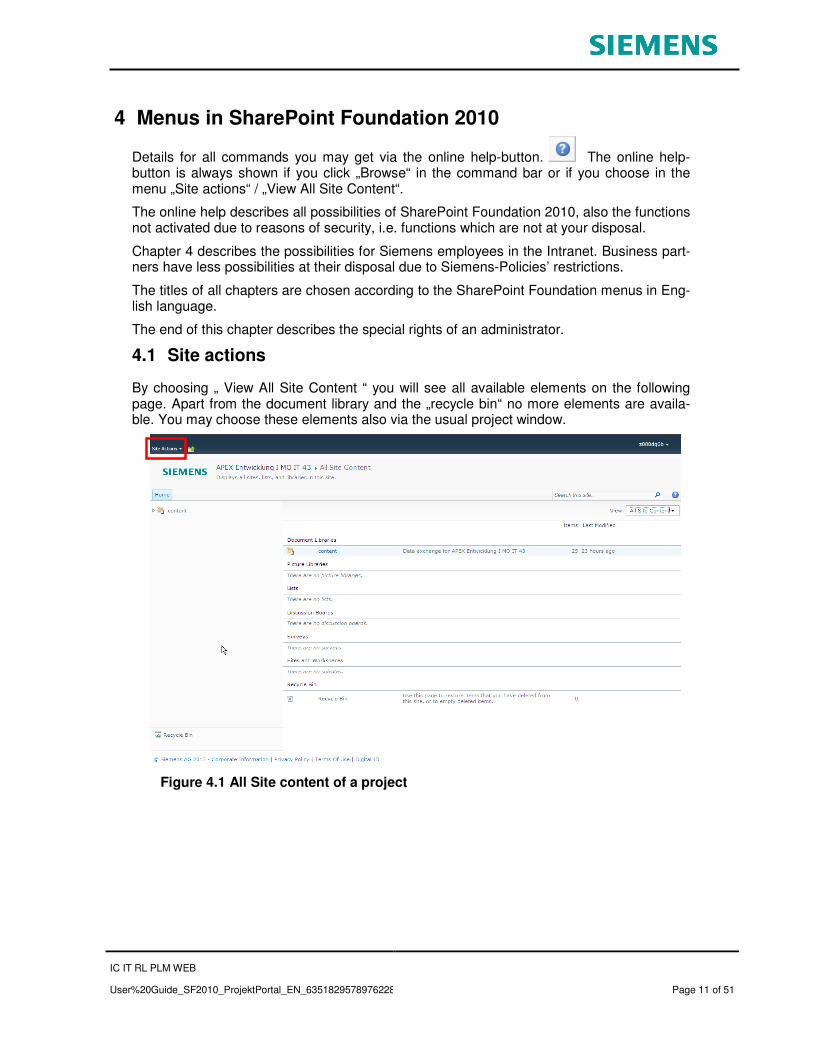
4.1 Site actions
By choosing „ View All Site Content “ you will see all available elements on the following page. Apart from the document library and the „recycle bin“ no more elements are availa-ble. You may choose these elements also via the usual project window.
Figure 4.1 All Site content of a project

IC IT RL PLM WEB
User%20Guide_SF2010_ProjektPortal_EN_635182957897622848 Page 12 of 51
4.2 Button “Navigate up”
Figure 4.2 Navigation in SharePoint via the button "Navigate up"
This button is at your disposal at any time. With this button you always find your current po-sition in the project. By choosing one of the directories displayed there you can navigate di-rectly to this directory.
4.3 Library Tools
4.3.1 Dokuments
4.3.1.1 New
4.3.1.1.1 New Document
By choosing the icon “New Document” SharePoint uses a template (here template.dotx) to start the corresponding program on the local desktop. For this a suitable Microsoft Office-installation (Office 2007 or higher) is necessary.
IC IT RL PLM WEB
User%20Guide_SF2010_ProjektPortal_EN_635182957897622848 Page 13 of 51
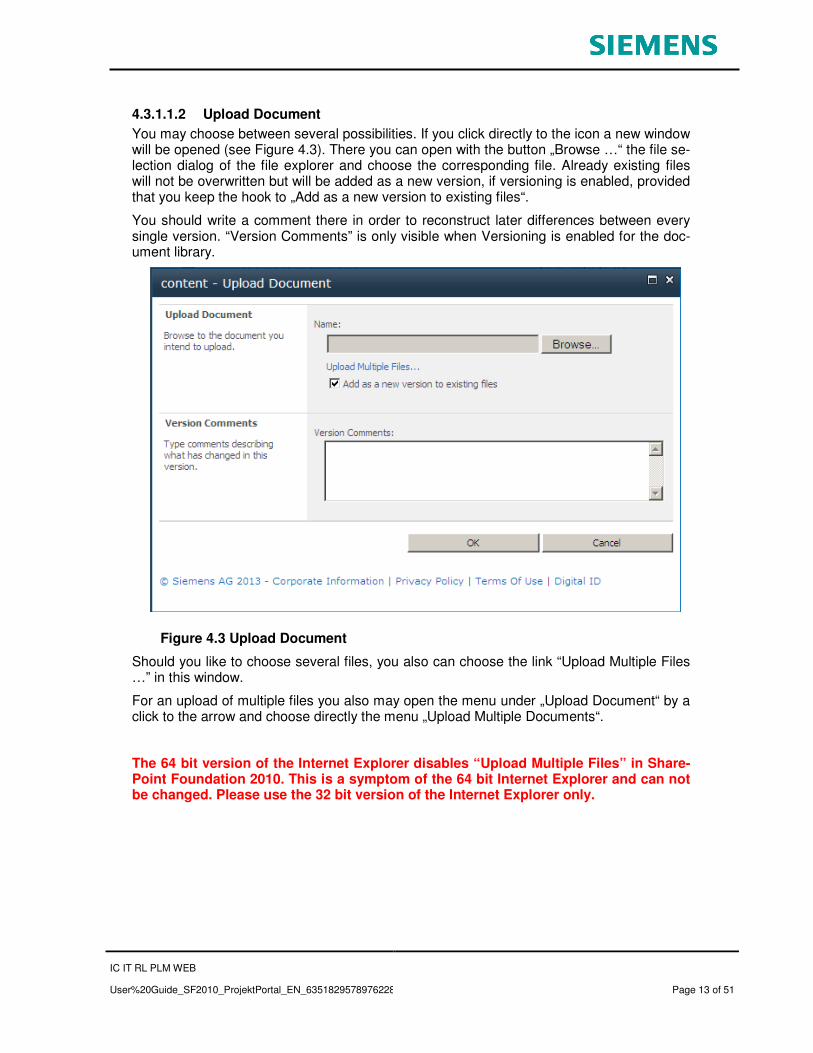
4.3.1.1.2 Upload Document
You may choose between several possibilities. If you click directly to the icon a new window will be opened (see Figure 4.3). There you can open with the button „Browse …“ the file se-lection dialog of the file explorer and choose the corresponding file. Already existing files will not be overwritten but will be added as a new version, if versioning is enabled, provided that you keep the hook to „Add as a new version to existing files“.
You should write a comment there in order to reconstruct later differences between every single version. “Version Comments” is only visible when Versioning is enabled for the doc-ument library.
Figure 4.3 Upload Document
Should you like to choose several files, you also can choose the link “Upload Multiple Files …” in this window.
For an upload of multiple files you also may open the menu under „Upload Document“ by a click to the arrow and choose directly the menu „Upload Multiple Documents“.
The 64 bit version of the Internet Explorer disables “Upload Multiple Files” in Share-Point Foundation 2010. This is a symptom of the 64 bit Internet Explorer and can not be changed. Please use the 32 bit version of the Internet Explorer only.

IC IT RL PLM WEB
User%20Guide_SF2010_ProjektPortal_EN_635182957897622848 Page 14 of 51
Figure 4.4 Menu "Upload Document"
By choosing the menu „Upload Multiple Documents“ the window will be opened as shown in Figure 4.5. You may choose and upload your files.
Figure 4.5 File selection list for multiple documents

IC IT RL PLM WEB
User%20Guide_SF2010_ProjektPortal_EN_635182957897622848 Page 15 of 51
4.3.1.1.3 New folder
With a click on the icon “New Folder” the dialog in Figure 4.6 will be opened. By this you may create a new folder in the current directory.
Figure 4.6 Creating a new folder
4.3.1.2 Open & Check Out
While working on documents in SharePoint you may protect them against changes done by other users. For this you have to select the document in order to use the necessary com-mands.
Figure 4.7 Check out a file
IC IT RL PLM WEB
User%20Guide_SF2010_ProjektPortal_EN_635182957897622848 Page 16 of 51
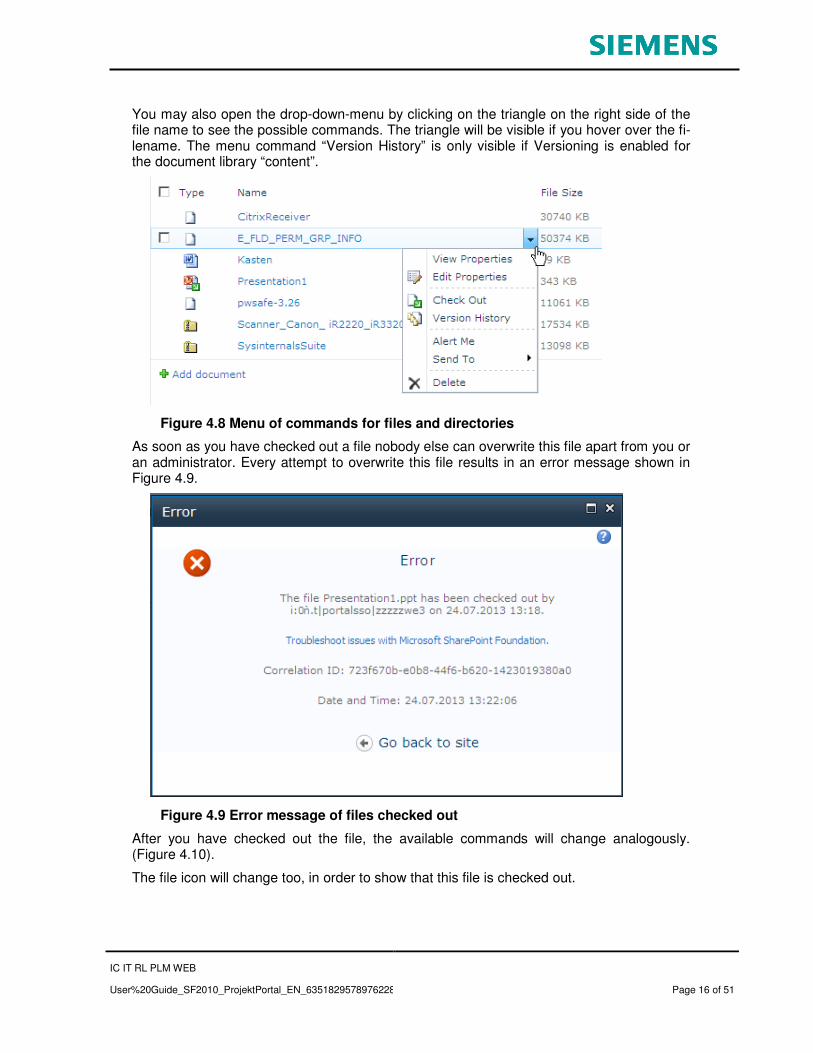
You may also open the drop-down-menu by clicking on the triangle on the right side of the file name to see the possible commands. The triangle will be visible if you hover over the fi-lename. The menu command “Version History” is only visible if Versioning is enabled for the document library “content”.
Figure 4.8 Menu of commands for files and directories
As soon as you have checked out a file nobody else can overwrite this file apart from you or an administrator. Every attempt to overwrite this file results in an error message shown in Figure 4.9.
Figure 4.9 Error message of files checked out
After you have checked out the file, the available commands will change analogously. (Figure 4.10).
The file icon will change too, in order to show that this file is checked out.
IC IT RL PLM WEB
User%20Guide_SF2010_ProjektPortal_EN_635182957897622848 Page 17 of 51
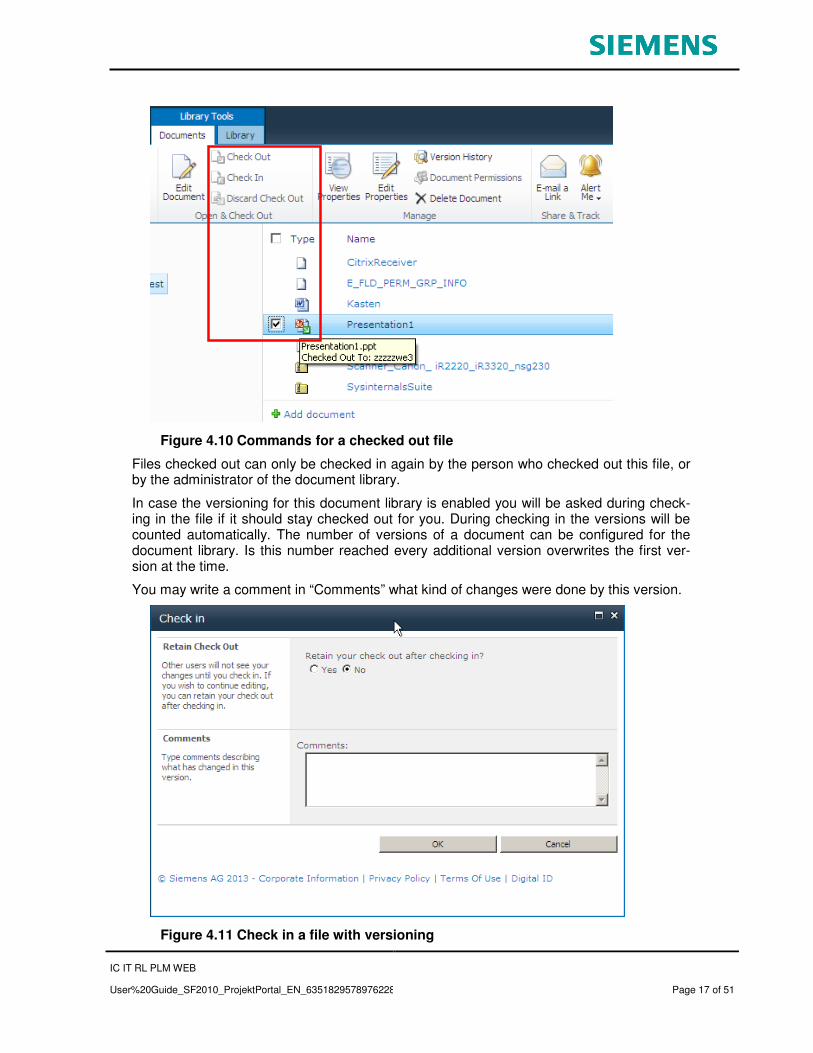
Figure 4.10 Commands for a checked out file
Files checked out can only be checked in again by the person who checked out this file, or by the administrator of the document library.
In case the versioning for this document library is enabled you will be asked during check-ing in the file if it should stay checked out for you. During checking in the versions will be counted automatically. The number of versions of a document can be configured for the document library. Is this number reached every additional version overwrites the first ver-sion at the time.
You may write a comment in “Comments” what kind of changes were done by this version.
Figure 4.11 Check in a file with versioning
IC IT RL PLM WEB
User%20Guide_SF2010_ProjektPortal_EN_635182957897622848 Page 18 of 51
4.3.1.3 Manage documents
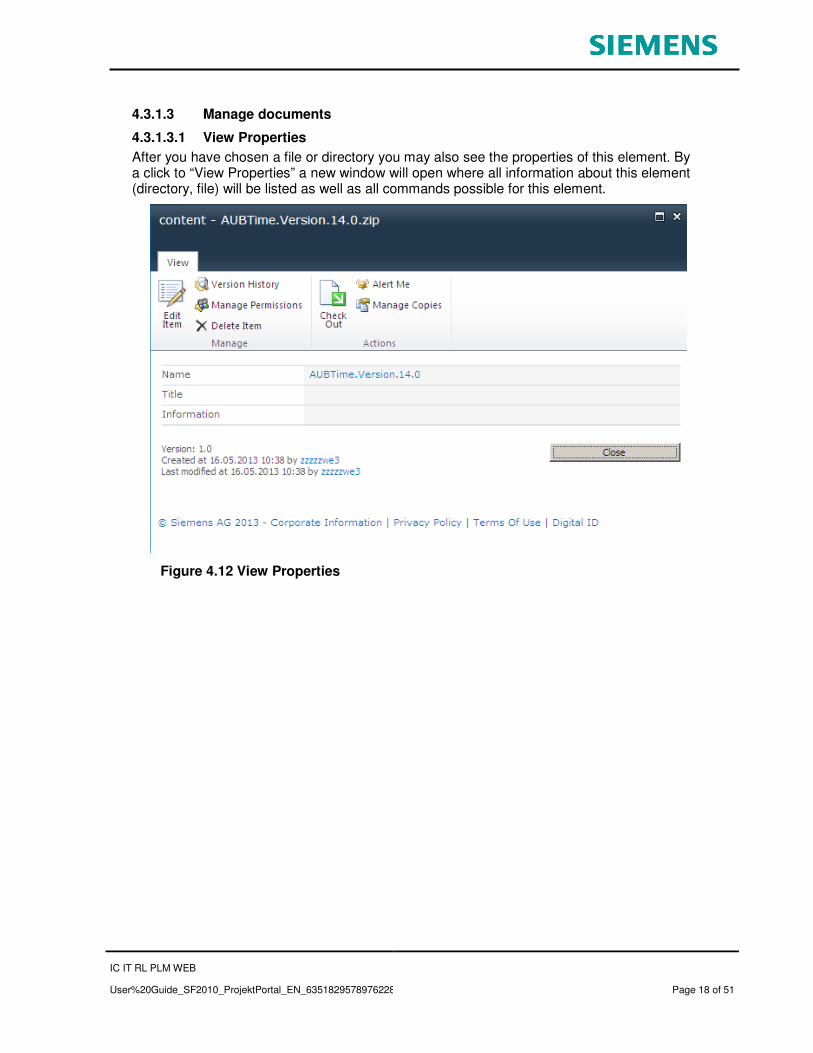
4.3.1.3.1 View Properties
After you have chosen a file or directory you may also see the properties of this element. By a click to “View Properties” a new window will open where all information about this element (directory, file) will be listed as well as all commands possible for this element.
Figure 4.12 View Properties

IC IT RL PLM WEB
User%20Guide_SF2010_ProjektPortal_EN_635182957897622848 Page 19 of 51
4.3.1.3.2 Edit Properties
With the “Edit Properties” the user may edit the name of a document or directory.
Figure 4.13 Edit Properties
4.3.1.3.3 Version History
When versioning is enabled for the document library with this command you will see wheth-er several versions are existing for this file.
You find detailed instructions for working with versioning in SharePoint using the online help.
Figure 4.14 Version History

IC IT RL PLM WEB
User%20Guide_SF2010_ProjektPortal_EN_635182957897622848 Page 20 of 51
4.3.1.3.4 Delete Document
There are two possibilities for deleting a document. After selecting the document the com-mand „Delete“ will be shown sensitively in the menu band and you can delete the document after a confirmation.
Figure 4.15 Delete Document (menu band)
The other possibility is with the context menu of the respective item (Document, Directory).
Figure 4.16 Delete Document (context menu)
By deleting a document it will be moved to the „recycle bin“ of the user who deleted the document. Only this user himself and the site collection administrator are able to see this file in the „recycle bin“ and – if necessary – are able to reactivate it. The site collection ad-ministrator also sees who deleted the files.
In the „Recycle Bin“ the files will be stored for 30 days; then they will be deleted definitively.
IC IT RL PLM WEB
User%20Guide_SF2010_ProjektPortal_EN_635182957897622848 Page 21 of 51
4.3.1.4 Share & track
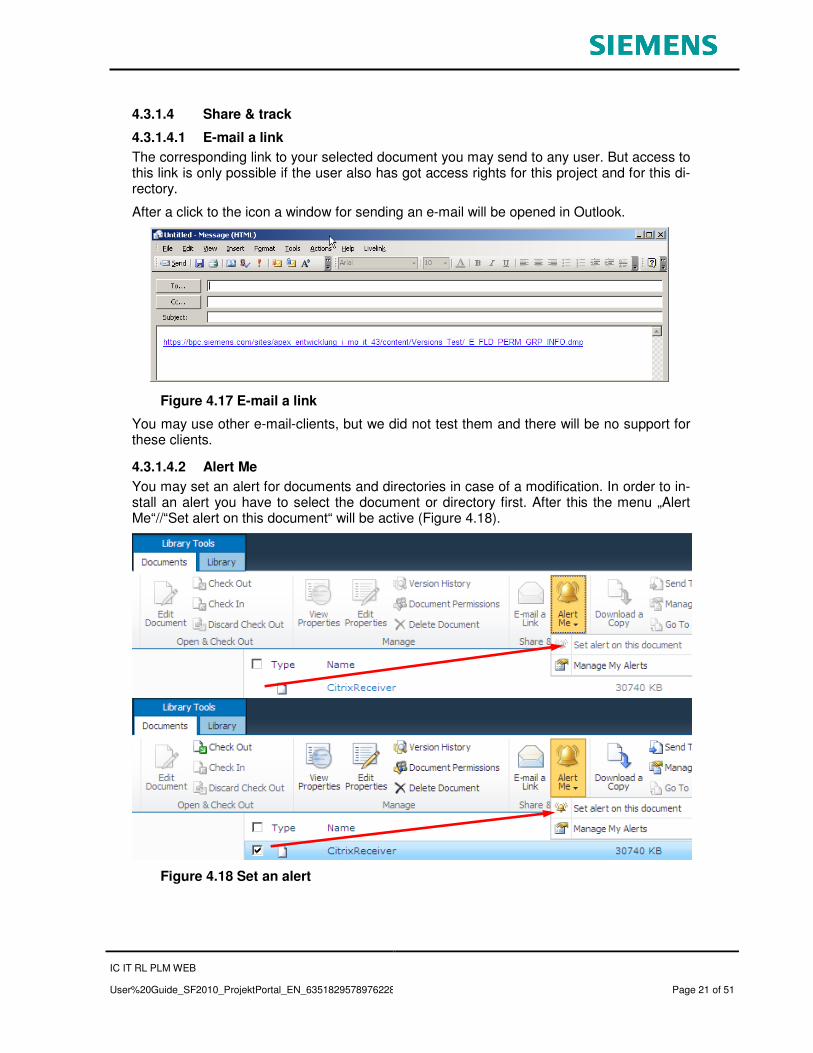
4.3.1.4.1 E-mail a link
The corresponding link to your selected document you may send to any user. But access to this link is only possible if the user also has got access rights for this project and for this di-rectory.
After a click to the icon a window for sending an e-mail will be opened in Outlook.
Figure 4.17 E-mail a link
You may use other e-mail-clients, but we did not test them and there will be no support for these clients.
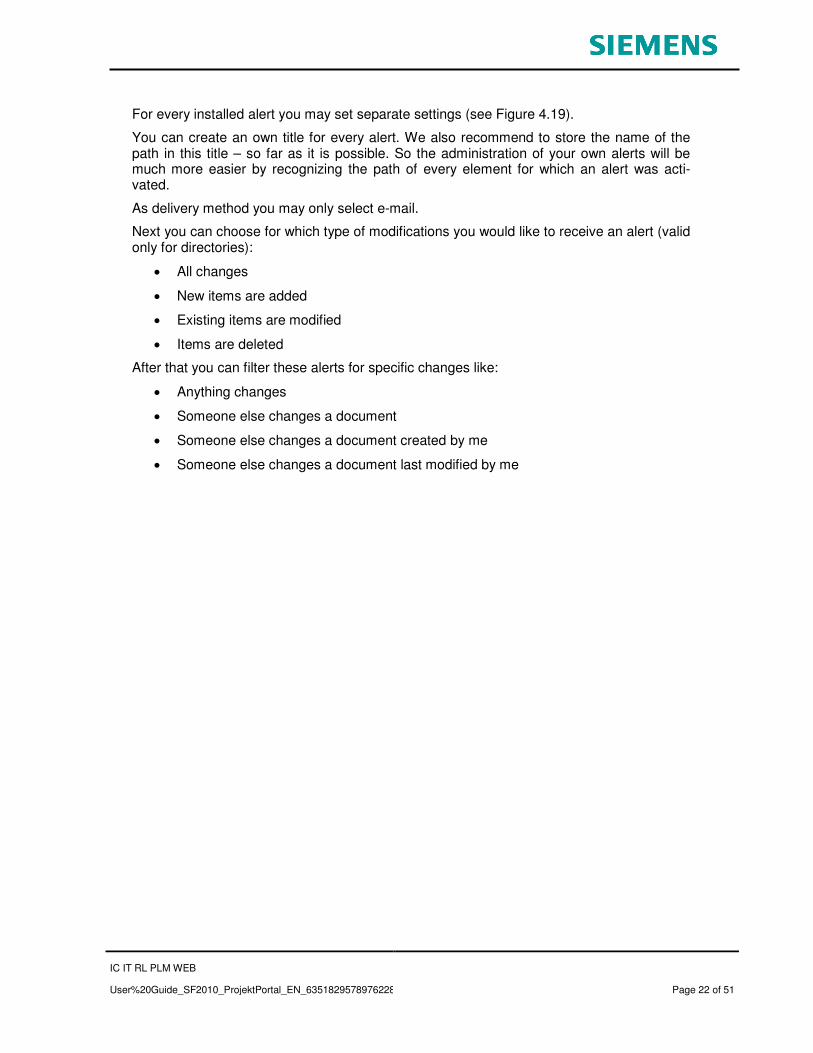
4.3.1.4.2 Alert Me
You may set an alert for documents and directories in case of a modification. In order to in-stall an alert you have to select the document or directory first. After this the menu „Alert Me“//“Set alert on this document“ will be active (Figure 4.18).
Figure 4.18 Set an alert
IC IT RL PLM WEB
User%20Guide_SF2010_ProjektPortal_EN_635182957897622848 Page 22 of 51
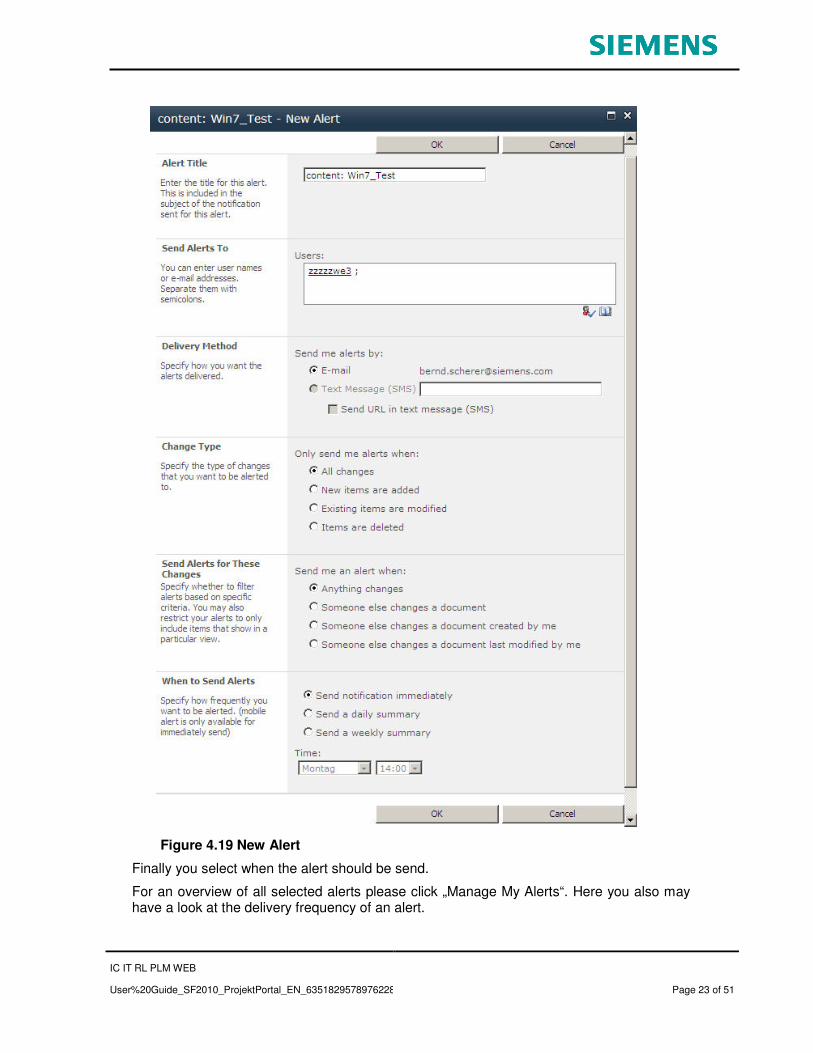
For every installed alert you may set separate settings (see Figure 4.19).
You can create an own title for every alert. We also recommend to store the name of the path in this title – so far as it is possible. So the administration of your own alerts will be much more easier by recognizing the path of every element for which an alert was acti-vated.
As delivery method you may only select e-mail.
Next you can choose for which type of modifications you would like to receive an alert (valid only for directories):
• All changes
• New items are added
• Existing items are modified
• Items are deleted
After that you can filter these alerts for specific changes like:
• Anything changes
• Someone else changes a document
• Someone else changes a document created by me
• Someone else changes a document last modified by me
IC IT RL PLM WEB
User%20Guide_SF2010_ProjektPortal_EN_635182957897622848 Page 23 of 51
Figure 4.19 New Alert
Finally you select when the alert should be send.
For an overview of all selected alerts please click „Manage My Alerts“. Here you also may have a look at the delivery frequency of an alert.
IC IT RL PLM WEB
User%20Guide_SF2010_ProjektPortal_EN_635182957897622848 Page 24 of 51
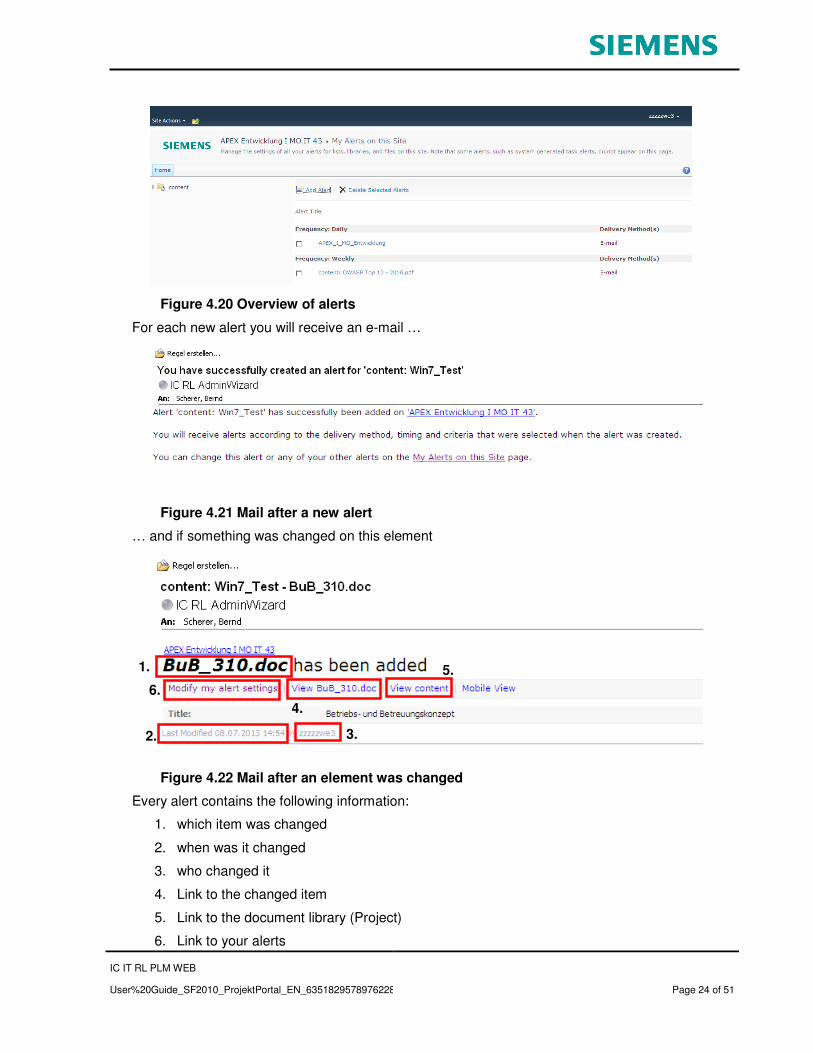
Figure 4.20 Overview of alerts
For each new alert you will receive an e-mail …
Figure 4.21 Mail after a new alert
… and if something was changed on this element
Figure 4.22 Mail after an element was changed
Every alert contains the following information:
1. which item was changed
2. when was it changed
3. who changed it
4. Link to the changed item
5. Link to the document library (Project)
6. Link to your alerts
2.
1.
3.
4.
5.
6.

IC IT RL PLM WEB
User%20Guide_SF2010_ProjektPortal_EN_635182957897622848 Page 25 of 51
4.3.1.5 Copies
4.3.1.5.1 Download a copy
There are different ways of downloading files to your PC.
Figure 4.23 Downloading copy of a document
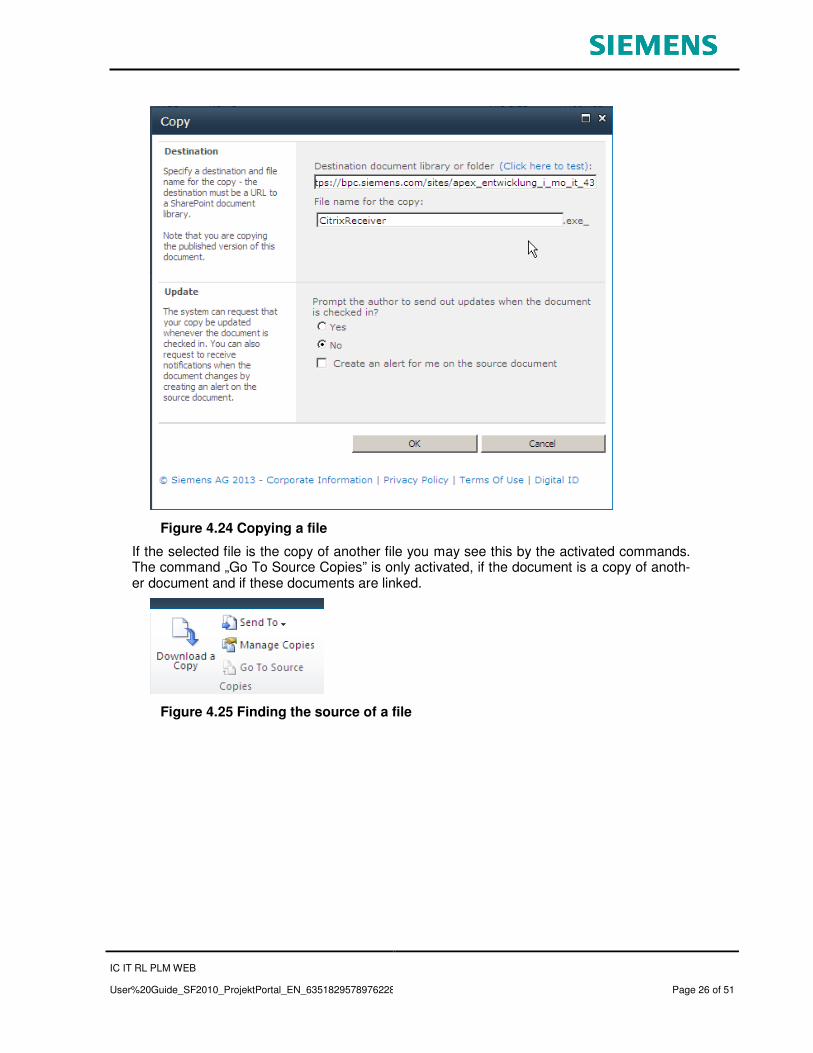
Hereby you will store a copy of the document locally on your PC. You can also copy the document to another directory (“Other location”) in the project with the possibilities of the web client.
In the opened window you have to enter the new directory and the name of the file. You may also link the copied file with the original for being always informed about changes in the original.
IC IT RL PLM WEB
User%20Guide_SF2010_ProjektPortal_EN_635182957897622848 Page 26 of 51
Figure 4.24 Copying a file
If the selected file is the copy of another file you may see this by the activated commands. The command „Go To Source Copies” is only activated, if the document is a copy of anoth-er document and if these documents are linked.
Figure 4.25 Finding the source of a file

IC IT RL PLM WEB
User%20Guide_SF2010_ProjektPortal_EN_635182957897622848 Page 27 of 51
4.3.2 Library
The possibilities of this menu are referring to the library (content) in total and not to sepa-rate directories or documents.
4.3.2.1 View Format
The selected display format does not change if you change the directory with a new selec-tion in the folder structure.
4.3.2.1.1 Standard view
After you have got access to your project this will be the standard view for users.
Figure 4.26 Standard view SF2010
Depending on the selected directory in the folder structure on the left side you will see on the right side the corresponding directories and documents.
In this view you are able to sort the directories and documents alphabetically (ascending and descending).
Figure 4.27 Sorting in standard view
The different columns also offer you the possibility of filtering the data, so that you only see the desired data.
Figure 4.28 Filter in standard view

IC IT RL PLM WEB
User%20Guide_SF2010_ProjektPortal_EN_635182957897622848 Page 28 of 51
If a filter is activated in a column you see a „funnel” near the name of the column.
Figure 4.29 Standard view with filter
4.3.2.2 Manage views
Depending on your rights you only see the icon for navigation within the project.
4.3.2.2.1 Navigate up
With a click to this icon the user may change in the directory structure one level higher.
Figure 4.30 Navigation in directories
4.3.2.3 Share & Track
Here you may create an alert for the document library and send the current link as e-mail.
4.3.2.3.1 E-mail a link
With this icon a new e-mail will be created out of the local mail client (only Microsoft Outlook is possible). In this e-mail the link for the currently selected directory will be shown.

IC IT RL PLM WEB
User%20Guide_SF2010_ProjektPortal_EN_635182957897622848 Page 29 of 51
4.3.2.3.2 Alert Me
Figure 4.31 Set alert on this library
With this icon you can install a global alert for the document library. So you will receive an alert for all changes in the library.
4.3.2.4 Connect & Export
Figure 4.32 Connecting and exporting in the document library content
4.3.2.4.1 Export to Excel
Here you may copy the actual view of directories and files to an Excel-sheet and store them locally.
Figure 4.33 Directories and files exported to Excel

IC IT RL PLM WEB
User%20Guide_SF2010_ProjektPortal_EN_635182957897622848 Page 30 of 51
4.3.2.4.2 Open with Explorer
In the Intranet (only!) you also have the possibility to open directories in the Windows Explorer.
Figure 4.34 Directory opened by WebDAV in the Windows-Explorer
4.4 Settings for registered Users
Specific settings for the registered user will be done by the menu on the right side (Figure 4.35)
Figure 4.35 Settings for the user
4.4.1 Select Display Language
Here you can change between the two possible languages (English, German). Please take care that only the language for SharePoint elements will change. The titles of the docu-ments will not change.
Changing the language will also change the language of the Online Help.
IC IT RL PLM WEB
User%20Guide_SF2010_ProjektPortal_EN_635182957897622848 Page 31 of 51
4.4.2 My Settings
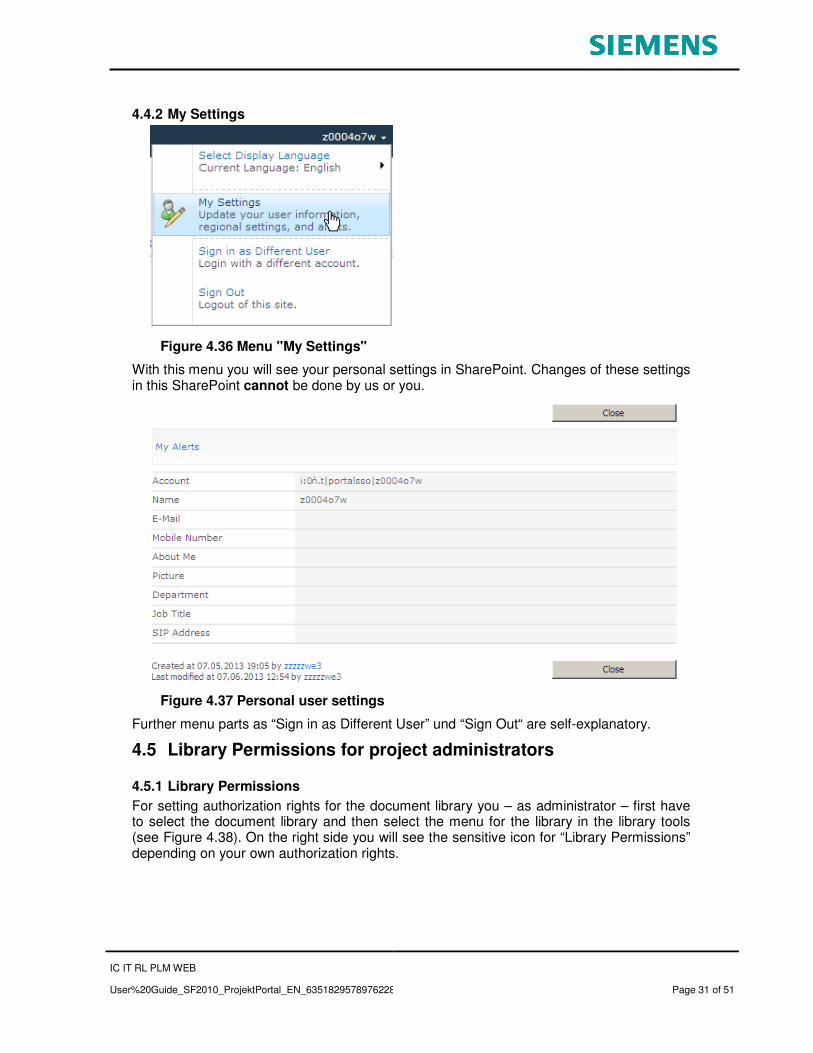
Figure 4.36 Menu "My Settings"
With this menu you will see your personal settings in SharePoint. Changes of these settings in this SharePoint cannot be done by us or you.
Figure 4.37 Personal user settings
Further menu parts as “Sign in as Different User” und “Sign Out“ are self-explanatory.
4.5 Library Permissions for project administrators
4.5.1 Library Permissions
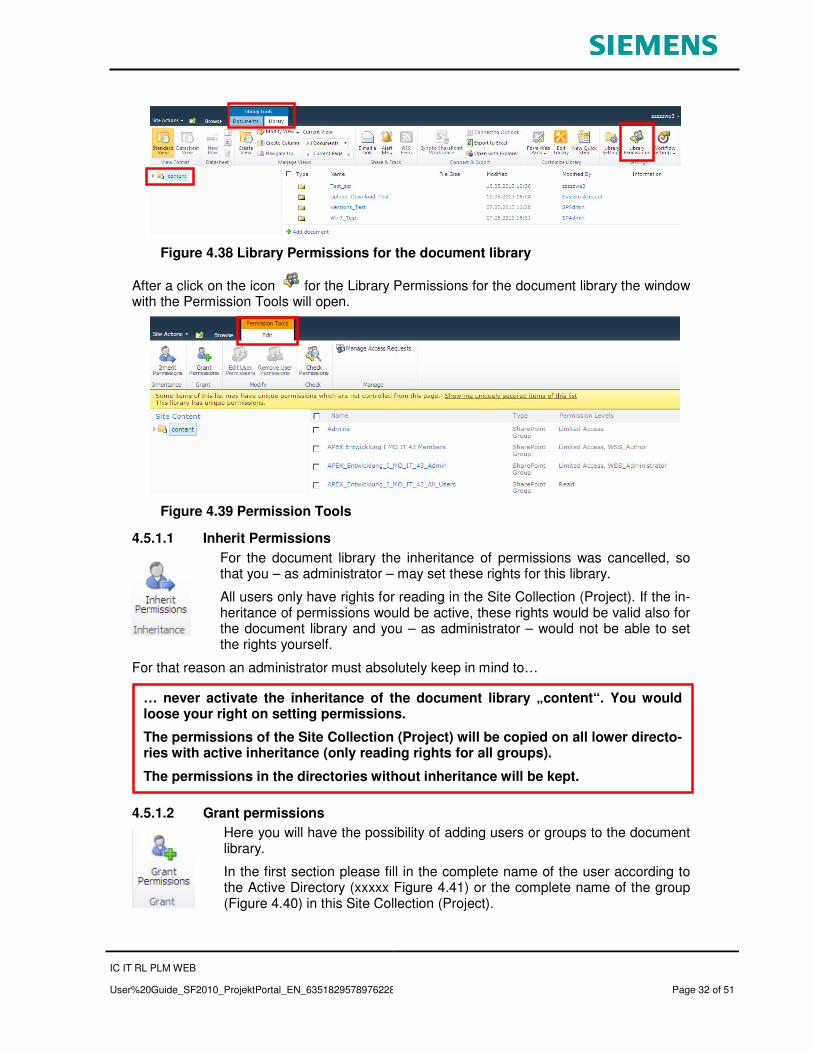
For setting authorization rights for the document library you – as administrator – first have to select the document library and then select the menu for the library in the library tools (see Figure 4.38). On the right side you will see the sensitive icon for “Library Permissions” depending on your own authorization rights.
IC IT RL PLM WEB
User%20Guide_SF2010_ProjektPortal_EN_635182957897622848 Page 32 of 51
Figure 4.38 Library Permissions for the document library
After a click on the icon for the Library Permissions for the document library the window with the Permission Tools will open.
Figure 4.39 Permission Tools
4.5.1.1 Inherit Permissions
For the document library the inheritance of permissions was cancelled, so that you – as administrator – may set these rights for this library.
All users only have rights for reading in the Site Collection (Project). If the in-heritance of permissions would be active, these rights would be valid also for the document library and you – as administrator – would not be able to set the rights yourself.
For that reason an administrator must absolutely keep in mind to…
4.5.1.2 Grant permissions
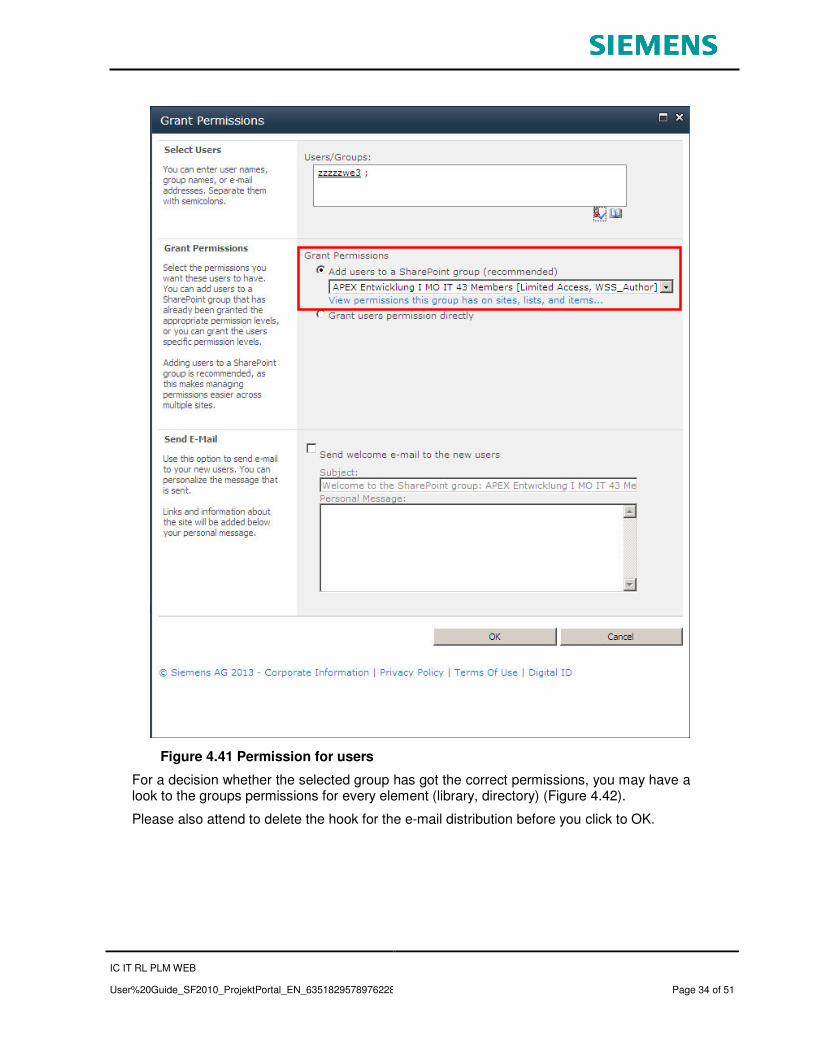
Here you will have the possibility of adding users or groups to the document library.
In the first section please fill in the complete name of the user according to the Active Directory (xxxxx Figure 4.41) or the complete name of the group (Figure 4.40) in this Site Collection (Project).
… never activate the inheritance of the document library „content“. You would loose your right on setting permissions.
The permissions of the Site Collection (Project) will be copied on all lower directo-ries with active inheritance (only reading rights for all groups).
The permissions in the directories without inheritance will be kept.

IC IT RL PLM WEB
User%20Guide_SF2010_ProjektPortal_EN_635182957897622848 Page 33 of 51
If you would like to set the permissions for a group, you may subsequently set the permis-sions for this group by choosing the permissions from the menu shown to you.
Please attend to delete the hook for the e-mail distribution. With a click to OK the group will be added to the document library with the selected permissions.
Figure 4.40 Permission for groups
If you would like to set the rights for a user, please add the user to a group with the appro-priate rights.
IC IT RL PLM WEB
User%20Guide_SF2010_ProjektPortal_EN_635182957897622848 Page 34 of 51
Figure 4.41 Permission for users
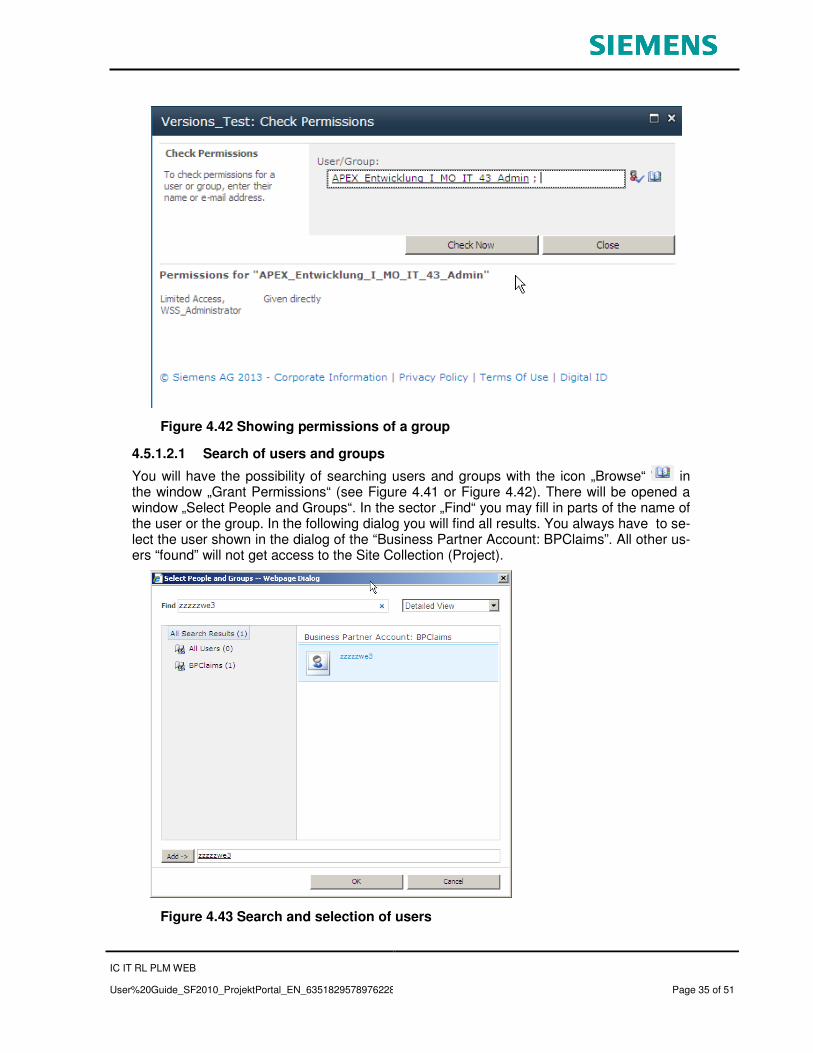
For a decision whether the selected group has got the correct permissions, you may have a look to the groups permissions for every element (library, directory) (Figure 4.42).
Please also attend to delete the hook for the e-mail distribution before you click to OK.
IC IT RL PLM WEB
User%20Guide_SF2010_ProjektPortal_EN_635182957897622848 Page 35 of 51
Figure 4.42 Showing permissions of a group
4.5.1.2.1 Search of users and groups
You will have the possibility of searching users and groups with the icon „Browse“ in the window „Grant Permissions“ (see Figure 4.41 or Figure 4.42). There will be opened a window „Select People and Groups“. In the sector „Find“ you may fill in parts of the name of the user or the group. In the following dialog you will find all results. You always have to se-lect the user shown in the dialog of the “Business Partner Account: BPClaims”. All other us-ers “found” will not get access to the Site Collection (Project).
Figure 4.43 Search and selection of users
IC IT RL PLM WEB
User%20Guide_SF2010_ProjektPortal_EN_635182957897622848 Page 36 of 51
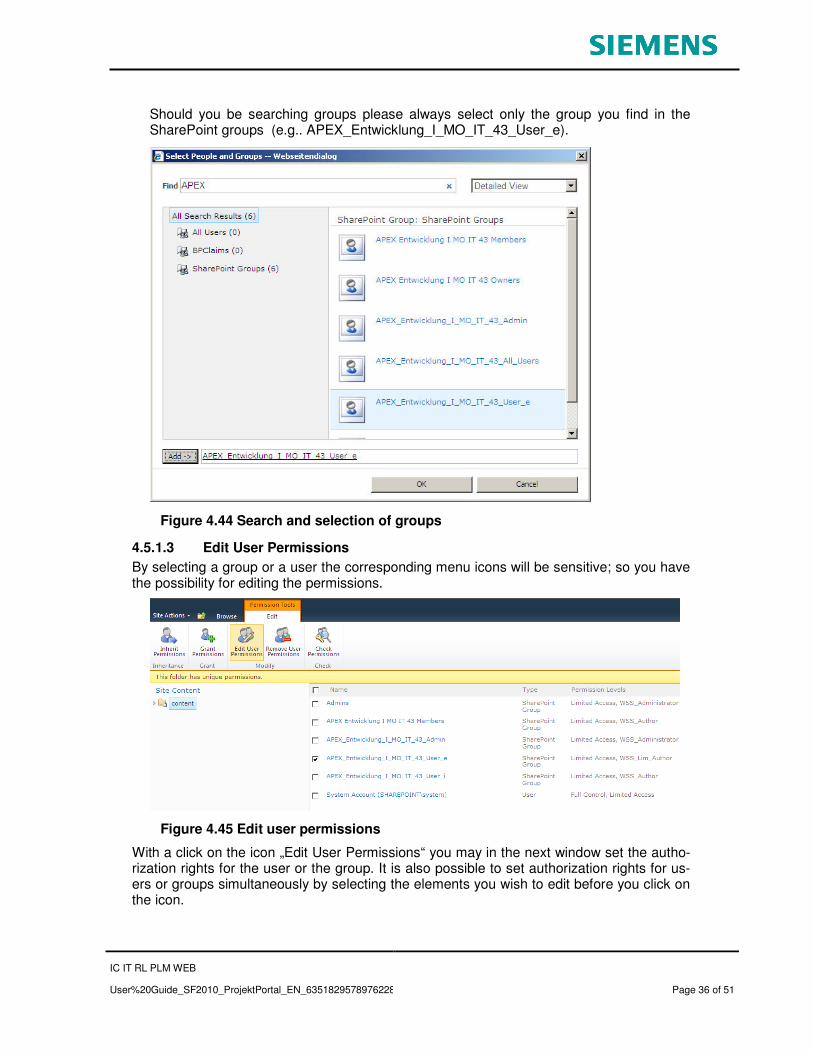
Should you be searching groups please always select only the group you find in the SharePoint groups (e.g.. APEX_Entwicklung_I_MO_IT_43_User_e).
Figure 4.44 Search and selection of groups
4.5.1.3 Edit User Permissions
By selecting a group or a user the corresponding menu icons will be sensitive; so you have the possibility for editing the permissions.
Figure 4.45 Edit user permissions
With a click on the icon „Edit User Permissions“ you may in the next window set the autho-rization rights for the user or the group. It is also possible to set authorization rights for us-ers or groups simultaneously by selecting the elements you wish to edit before you click on the icon.

IC IT RL PLM WEB
User%20Guide_SF2010_ProjektPortal_EN_635182957897622848 Page 37 of 51
Figure 4.46 Edit permissions
WSS_Limited_Author: The user may only upload documents, but is not allowed to overwrite and delete documents.
WSS_Author: The user may upload, overwrite and delete documents.
WSS_Administrator: The user may upload, overwrite, delete documents and set permis-sions to files and directories for other users.
The other possibilities in this sector are self-explanatory.

IC IT RL PLM WEB
User%20Guide_SF2010_ProjektPortal_EN_635182957897622848 Page 38 of 51
4.5.1.4 Remove User Permissions
After selecting the corresponding users or groups you can remove the permissions for the selected element (document library, directory, file).
Figure 4.47 Remove User Permissions
Before the execution of this command a security message will appear. After accepting this message the user permission will be removed.
Figure 4.48 Security message during removing of permissions

IC IT RL PLM WEB
User%20Guide_SF2010_ProjektPortal_EN_635182957897622848 Page 39 of 51
4.5.1.5 Check Permissions
Here you may check which permissions a user or group possess on the cur-rently selected element.
For this please fill in the sector „User/Group“ exactly with the name of the
user or of the group or you may search the name via the icon „Browse“ (see Figure 4.49).
Figure 4.49 Check Permissions for a user
4.5.1.6 Administration of access requirements
This command is deactivated for the Site Collection itself.
IC IT RL PLM WEB
User%20Guide_SF2010_ProjektPortal_EN_635182957897622848 Page 40 of 51
4.5.2 Permissions for directories and documents
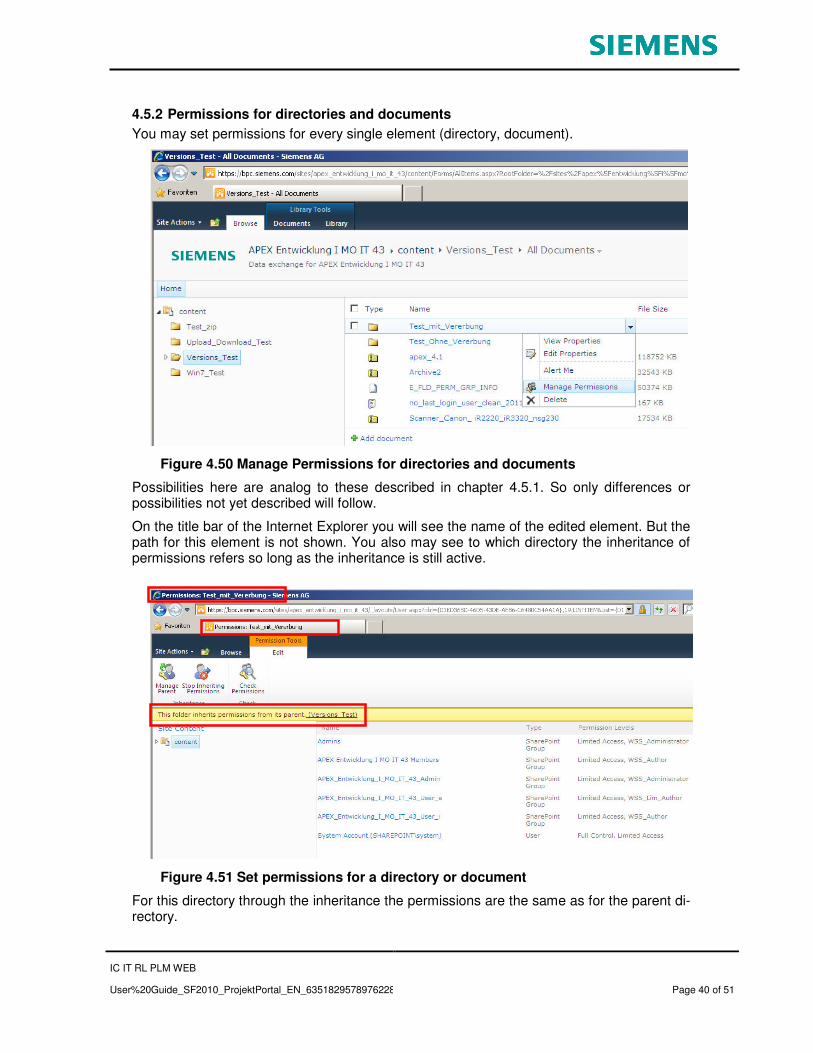
You may set permissions for every single element (directory, document).
Figure 4.50 Manage Permissions for directories and documents
Possibilities here are analog to these described in chapter 4.5.1. So only differences or possibilities not yet described will follow.
On the title bar of the Internet Explorer you will see the name of the edited element. But the path for this element is not shown. You also may see to which directory the inheritance of permissions refers so long as the inheritance is still active.
Figure 4.51 Set permissions for a directory or document
For this directory through the inheritance the permissions are the same as for the parent di-rectory.

IC IT RL PLM WEB
User%20Guide_SF2010_ProjektPortal_EN_635182957897622848 Page 41 of 51
In case you do not want to set the permission for this directory (here Test_mit_Vererbung) separately, you will have to set the permissions in the parent directory (here Versions_Test).
There you may assign the permissions as described in chapter 4.5.1.
You also may stop the inheritance and set the permissions for this file af-terwards.

IC IT RL PLM WEB
User%20Guide_SF2010_ProjektPortal_EN_635182957897622848 Page 42 of 51
5 Searching for information
The searching application in the SharePoint Foundation is a full-text search and is restricted to the corresponding project. There will be shown only the results of the current project (al-so if you have permissions for different projects).
Searching will be in indicated words, depending on the languages installed and the fre-quency of the used words. Maybe you have to change the searched word a little in order to find the right file.
For example: For finding the word “Yanmarcaterpillarspareparts” you should start the search with “caterpillar” or “spareparts”. The word “Yanmarcaterpillar” probably will not lead to a result because it will not be part of the index.

IC IT RL PLM WEB
User%20Guide_SF2010_ProjektPortal_EN_635182957897622848 Page 43 of 51
6 Sharepoint Foundation 2010 as a directory in the Win-dows Explorer
You have the possibility to connect Sharepoint Foundation with your Windows Explorer.
For this the user has to got access to the ProjektPortal and select the Sharepoint Founda-tion 2010. Afterwards he may open the project directly out of the data explorer (see 4.3.2.4.2).
The further procedure will be described on the following pages. The procedure is only poss-ible if you have got access by the Internet Explorer to the ProjektPortal before and also have got access once a time to your project.
Keep in mind: The link to your project will stay in the Windows Explorer even after you have logged out of the window system. The permissions not. If you want to use your link in the Windows Explorer again you must first authenticate yourself on the ProjektPortal using the Internet Explorer.
6.1 Procedure
1. Please click (right mouse key) in the Windows Explorer on “My Network Places” and select in the drop-down-menu „Map Network Drive“
Figure 6.1 Map Network Drive

IC IT RL PLM WEB
User%20Guide_SF2010_ProjektPortal_EN_635182957897622848 Page 44 of 51
2. In the opening window please select the link „Sign up for online storage or connect to a network server“ (left mouse key)
Figure 6.2 Connect to a network server
3. You will see the assistant for adding network resources. Here please click with the left mouse key to the button „Next >“
Figure 6.3 Assistant for adding network resources
IC IT RL PLM WEB
User%20Guide_SF2010_ProjektPortal_EN_635182957897622848 Page 45 of 51
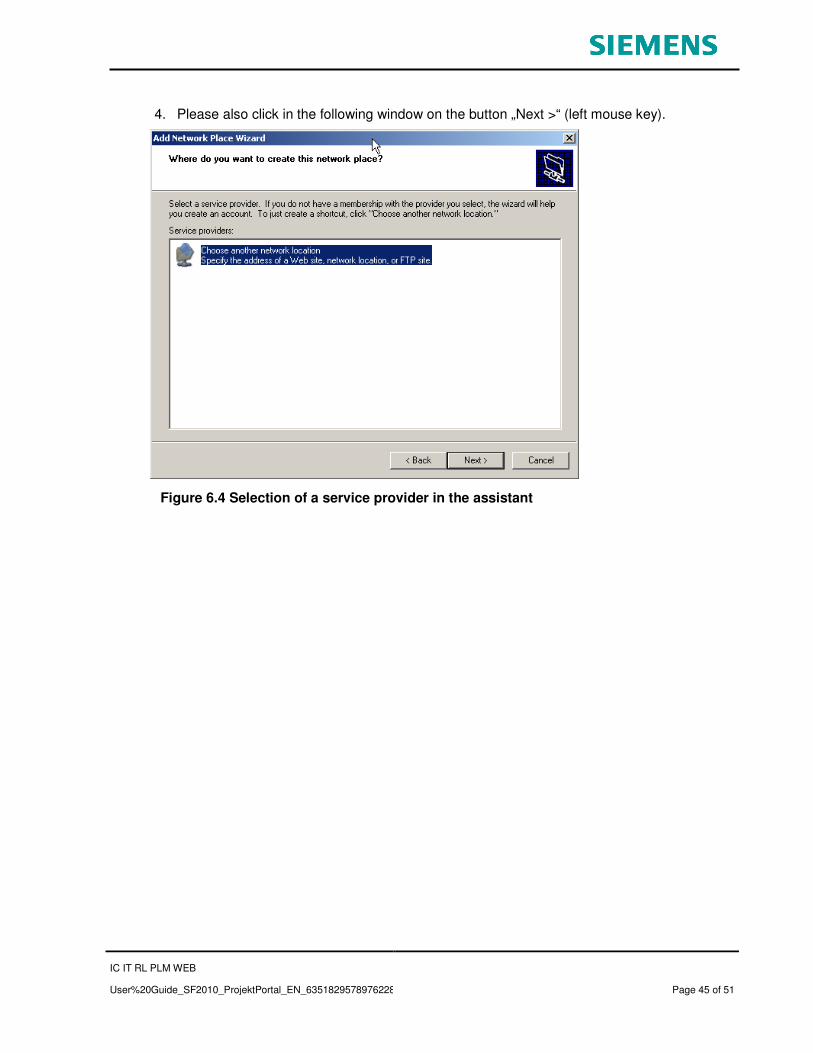
4. Please also click in the following window on the button „Next >“ (left mouse key).
Figure 6.4 Selection of a service provider in the assistant

IC IT RL PLM WEB
User%20Guide_SF2010_ProjektPortal_EN_635182957897622848 Page 46 of 51
5. As your path please fill in the following address, replacing <Project> with the name of your project: https://bpc.siemens.com/sites/<Projekt>/content As an example we used the project APEX_Entwicklung_I_MO_IT_43.
Figure 6.5 Filling in the network address of the project
6. Because you have got access to the ProjektPortal before and also once a time to your project using the Internet Explorer, no more further authentification will be ne-cessary.

IC IT RL PLM WEB
User%20Guide_SF2010_ProjektPortal_EN_635182957897622848 Page 47 of 51
7. After the successful access the assistant will ask you for a name for this connection. Please choose a coherent name because the assistant will choose automatically the name out of the document library (content) and you will not see this in the Windows Explorer to which project the connection belongs. For the project “APEX_Entwicklung_I_MO_IT_43” the name „ APEX_Entwicklung_I_MO_IT_43 on
bpc.siemens.com“ was chosen.
Figure 6.6 Choosing the name for the WebDAV-directory
IC IT RL PLM WEB
User%20Guide_SF2010_ProjektPortal_EN_635182957897622848 Page 48 of 51
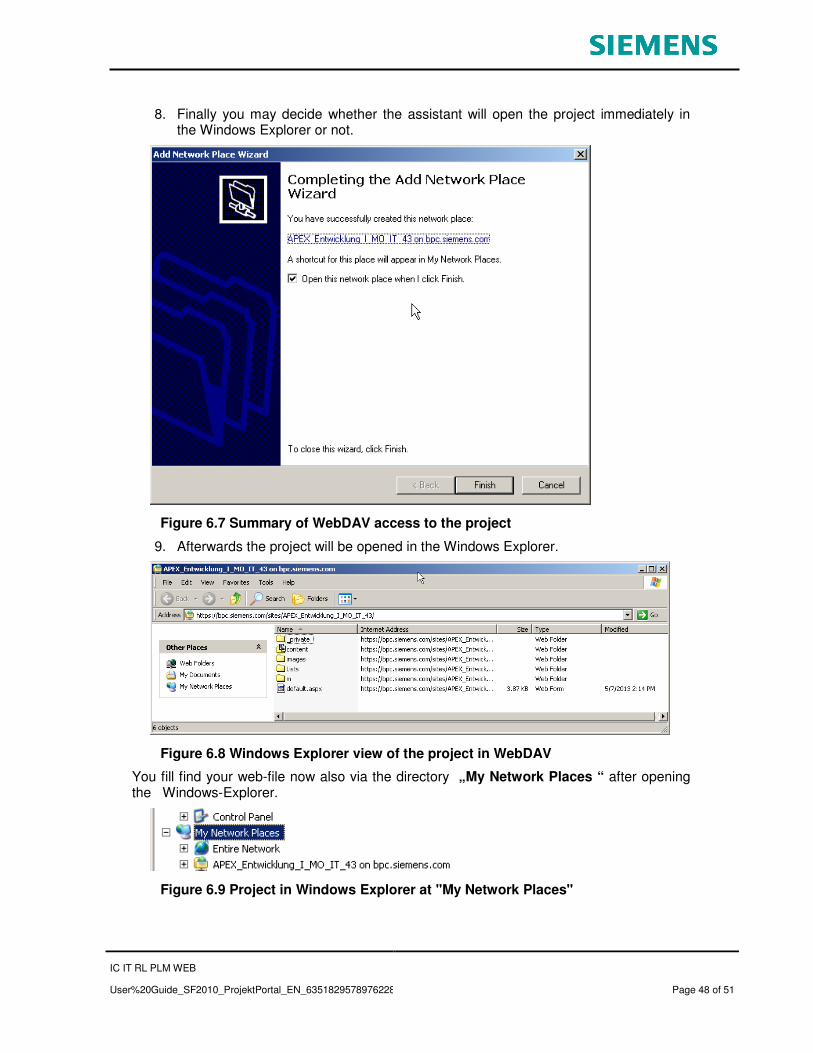
8. Finally you may decide whether the assistant will open the project immediately in the Windows Explorer or not.
Figure 6.7 Summary of WebDAV access to the project
9. Afterwards the project will be opened in the Windows Explorer.
Figure 6.8 Windows Explorer view of the project in WebDAV
You fill find your web-file now also via the directory „My Network Places “ after opening the Windows-Explorer.
Figure 6.9 Project in Windows Explorer at "My Network Places"

IC IT RL PLM WEB
User%20Guide_SF2010_ProjektPortal_EN_635182957897622848 Page 49 of 51
Caution: Please take into consideration that the searching application of the Win-dows Explorer does not work in web-files. For searching in Sharepoint Foundation 2010 you should use the searching application of the web-surface.

IC IT RL PLM WEB
User%20Guide_SF2010_ProjektPortal_EN_635182957897622848 Page 50 of 51
7 Appendix
7.1 File extensions not allowed
For the upload of files to the Site Collection are valid the Microsoft standard settings for SharePoint.
You will find a table of these file extensions within the Microsoft website of:
Types of files that cannot be added to a list or library
(https://office.microsoft.com/en-us/windows-sharepoint-services-help/types-of-files-that-cannont-be-added-to-a-list-or-library-HA010100147.aspx)
This concerns mostly all types of files with a code executable on windows systems (*.exe, *.com, *. bat, …). A simple change of the file extension will avoid this problem.

IC IT RL PLM WEB
User%20Guide_SF2010_ProjektPortal_EN_635182957897622848 Page 51 of 51
7.2 Symbols not allowed in directories and documents
As SharePoint is using certain symbols for its own administration of directories and docu-ments, please take care of not using these symbols in the names you will create.
A table of symbols which are not allowed you will find on the Microsoft website:
Information about the characters that you cannot use in site names, folder names, and file names in SharePoint
(https://support.microsoft.com/kb/905231/en-us)
Another special feature in SharePoint’s properties: Files, starting with an underscore will not be shown in a WebDAV-folder in the Windows Explorer. In the webbrowser these files are shown.
Figure 7.1 "Not visible" file in the Windows Explorer