SharePoint Community of Practice - NYS Forum Home · PDF file ·...
51
The NYS Forum, Inc. SharePoint Community of Practice November 14, 2017 1:00 - 3:00 pm (12:30 pm Check-In) The NYS Forum 24 Aviation Road, Suite 206, Albany New York 1 SharePoint Community of Practice
Transcript of SharePoint Community of Practice - NYS Forum Home · PDF file ·...

The NYS Forum, Inc.
SharePoint Community of Practice
November 14, 20171:00 - 3:00 pm
(12:30 pm Check-In)The NYS Forum
24 Aviation Road, Suite 206, Albany New York
1
SharePoint Community of Practice

2
September Agenda
11/14/2017• Opening Remarks
• Adam Neff, ITS Enterprise SharePoint & O365 App/Dev Manager, NYS ITS
• Corinne Brennen, Director of Program & Business Development, The NYS Forum
• SharePoint & O365 University, training, class offerings
• Laura Ryan, ITS Enterprise SharePoint & O365, Manager of Training & Analysis
• InfoPath Form
• Rani Abraham, ITS Enterprise SharePoint & O365 Team, Developer
• Workflows in SharePoint
• John Cross, ITS Enterprise SharePoint & O365 Team, Developer
• O365 Spotlight – Delve
• Mark Attmore, Microsoft, Technology Strategist
• Closing Remarks
• Michael Torino, ITS - Steering Committee
SharePoint Community of Practice

SHAREPOINT UNIVERSITYSITE OWNER TRAINING 2017
LAURA RYAN
Work Place Services - SharePoint Development Team
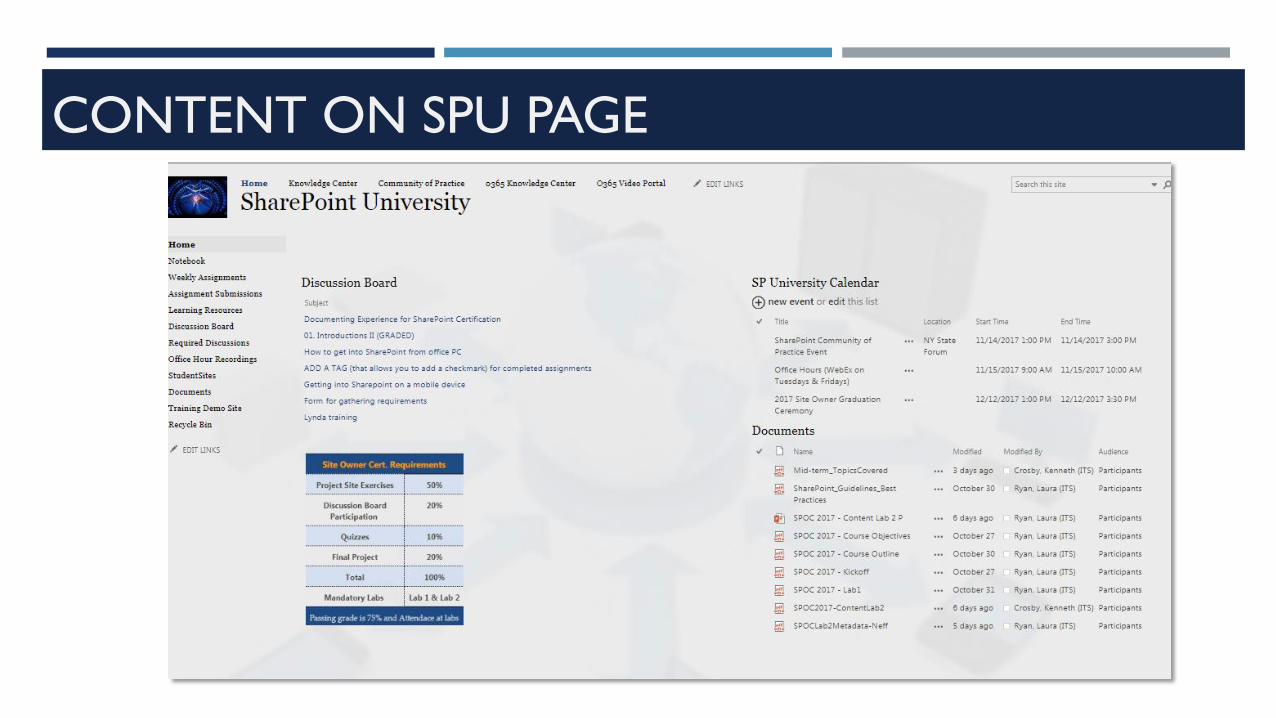
CONTENT ON SPU PAGE

PARTICIPANTS FROM ACROSS THE STATE – 92
• CS
• DEC
• DOS
• DMV
• DPS
• Health
• OGS
• OMH
• OMIG
• OTDA
• ITS
• Labor
• NYS CSEA
partnership

SITE OWNER TRAINING FORMAT
• Duration is 8 weeks
• Online discussion with SharePoint Mentor(s)
• Two SharePoint labs in 3B training rooms
• Online learning through videos, reading and implementing
• Project exercises and activities to verify learning

SUPPORT FOR PARTICIPANTS
Online Recourses
Discussion boards
Scheduled Office Hours

WEEKLY ASSIGNMENTS

PARTICIPATION IN FEATURED DISCUSSIONS
Add Responses to Featured Discussions

TOPICS FOR LAB 1
Overview of the SharePoint University Site
Understanding the Site Owner Role
Familiarizing yourself with Site Settings
Setting up Site Permissions and User Groups

TOPICS FOR LAB 2
Adding Metadata to Document Libraries and Lists
Adding Apps - Survey, Task lists
Creating Out the Box Forms & Workflows
Modifying Permissions to restrict access

GRADING
2017 Site Owner Session Ends 12/8

SHAREPOINT TRAINING 1ST QUARTER 2018
Office 365 Highlights - COP
Developer Training Labs
New / End User Online Training
Site Owner

THANK YOU!
How to create and
publish InfoPath Form to a
SharePoint SiteRANI ABRAHAM
ENTERPRISE SHAREPOINT APP/DEV TEAM

Requirements
A SharePoint Site
Full Control site permission
The SharePoint Server Enterprise Site Collection feature activated
A Microsoft InfoPath Designer 2013
Note: You will need InfoPath Designer 2013 installed on your workstation, this may not be allowed by your agency or cluster. Please check with your admin group
Download InfoPath Designer 2013: https://www.microsoft.com/en-us/download/details.aspx?id=48734

Plan a form
template
Before designing an InfoPath form it is important to plan the form design
Will your form have one view (page) or multiple views?
Have you planned out what data needs to collected or displayed?
Will any parts of your form template need to be read-only?
Whether you want to publish in a SharePoint List, Library or Email

Select a
template
SelectFrom the Form Templates, select Blank Form and click the Design Form button.(Double click the Blank Form)
Select Select the template to design a Form
Open Open InfoPath Designer 2013

Select a template

The design form will appear as shown

Design The Form
Go to the Insert tab on
the ribbon click on the
predefined table styles
and in the table
Selection(Add Table),
double click the Two-
Column 2 Heading
table to insert the table
into the Design Form.

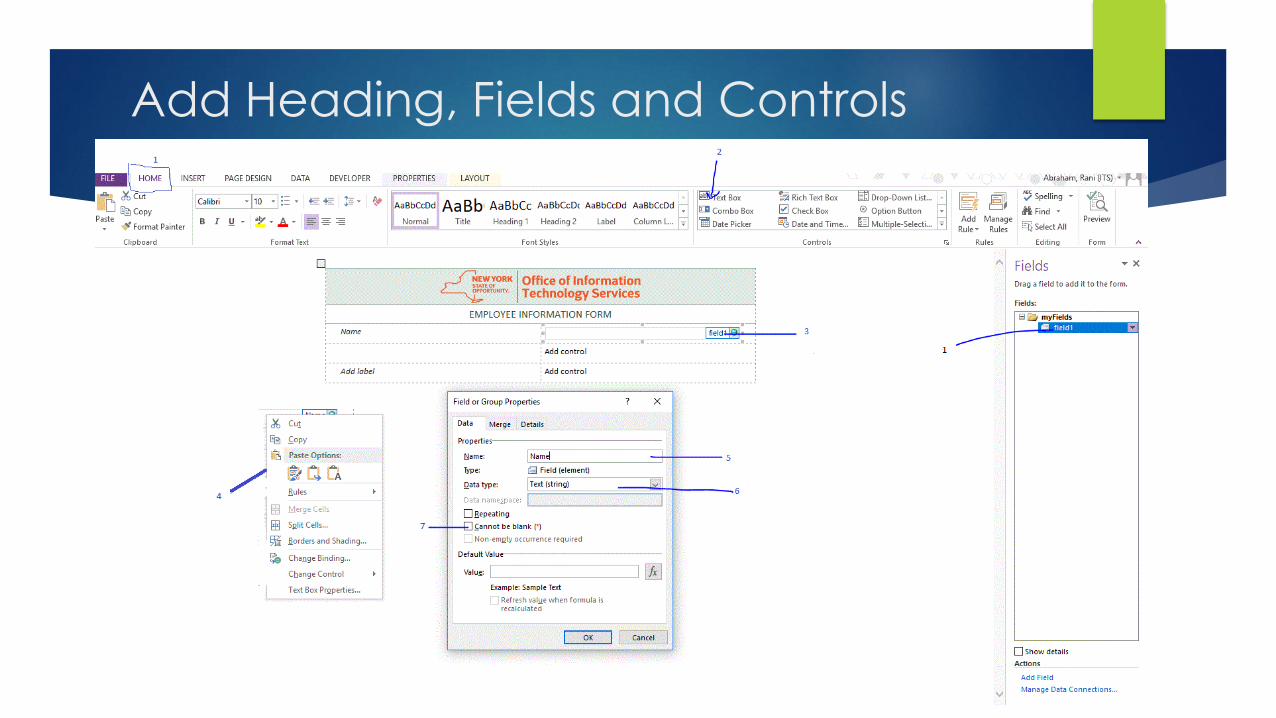
Add Heading, Fields and Controls
Fields are displayed in the Fields task pane and represent the data that is gathered by the form.
Controls are associated with fields and provide a way for the user to enter the data.
Click to add heading text and type “Employee Information Form”.
In the Fields window on the right hand, right click on the myFields folder, and click Add or Use the Controls section from the Home top ribbon bar
Add Heading, Fields and Controls

Now, we have Simple InfoPath form

Types of
Rules
Validation rules are used to validate user entered data in control. Example Validating phone number, validation e-mail address etc
Formatting rules are used to apply text formatting and background shading to controls when a condition has been met. They can also be used to hide or disable a control.
Actions are the most wide-ranging type of rule. Use these to switch views, set values in other fields, submit the form, or query for data.

Create Rules
On Home tab, in the Rules group, you can use either Add Rule menu or Manage Rules to open the Rules task pane.
Home tab, the Add Rule menu is the fastest and easiest way to add rules to your form

Preview Your Form
There are three ways to preview the form
Press the F5 key.
Click the magnifying glass icon at the very top of the InfoPath Designer application.
Click the Preview Form button on the Home ribbon bar

Publish InfoPath to SharePoint 2013
To publish the InfoPath Form, click File, click Publish,
Click SharePoint Server to bring up the Publishing Wizard
On the first page type the URL of the SharePoint site, click Next Select the option corresponding to where you want to publish
Select the Form Library option to Create a new form library or update the form template in an existing form library ; If you select create a new form library and click Next, On this page, type the Name of the new library and click Next.
Here, you have the option to promote form fields into the columns of the library. Click Add, to add those columns and click Next. These fields will be available as columns in the SharePoint Site. Then click Next
Then, click Publish to publish the InfoPath Form. Select Open this form library … and click Close

Publish InfoPath to SharePoint 2013

Publish InfoPath to SharePoint 2013

Here are some
Forms I created

Here is some Form I created

Questions?
Thank You!

Notification and Approval Workflow
with SharePoint Designer
John Cross
Enterprise SharePoint App/Dev Team

Why use a SharePoint
Designer Workflow
If you have complex approval process
A need for multiple custom notifications
It’s free

Requirements
SharePoint Designer 2013
Full Control or Designer site permission
Note: You will need SharePoint Designer 2013 installed on your
workstation, this may not be allowed by you agency or cluster. Please
check with your admin group.
Download SharePoint Designer:
https://www.microsoft.com/en-us/download/details.aspx?id=35491

Before creating the workflow
Part of the magic that makes a workflow function correctly is having triggers in
place that tell the workflow when to do what. I like to use number fields defaulting
to zero and increment the numbers up based on what phase of the process the
approval is at.

Getting started on the workflow
Open SharePoint Designer and select Open Site
Enter the url of the SharePoint site
Click on “List Workflow” and select the list the workflow will be using.
Create a name for the workflow that makes sense, add a description and
select SharePoint 2010 Workflow.


Sending the initial emails
For this workflow, when an item is created in SharePoint, the workflow starts and sends out
emails to six different employees.
Set the Start options to created and changed (manual is optional)
Create a step and add a ”If any value equals value” condition, set it to “If Submit Flag = 0”.
Add a “Send an Email” action for the number of emails to be sent.
Add an “Update List Item” action and set it to: Submit Flag to 1 (this will ensure that the
initial emails are only sent once).
Select the first email action by clicking on “these users”.

Should look something like this

Creating an email
Complete the email by populating the To, Subject, Body just like any regular email in Outlook.
You can also use columns from the SharePoint list in the email.
When creating the body of the email, we can also create a link to the form in SharePoint. Click
on the Hyperlink button located at the end of the toolbar:
1. Enter the text you want the link to be displayed as.
2. Open String Builder by clicking the ellipsis (3 dots) at the end of the address line.
3. Click “Add or Change Lookup”, change Data source to Workflow Context and set the
Field from source to Current Item URL, click OK.
4. Add &DefaultView= to the end of the string then the name of the view on the InfoPath
form. This will make the link open to the view entered.

Body of the email and the link

This is everyone who has to approve the form and what they would see if the link went to a default view.

And this is what they see after clicking on the form link if there’s a link for each.

The initial approvers have approved or
rejected the policy, what happens now?

If this phase is approved the InfoPath form will have done some math and a field
called Phase 1 Approval will equal 9 (it’s default value is zero) and I’m also using
another trigger, Phase 1 Flag.
With these two conditions met an email is sent to another approver (create it the
same way as earlier) and update the Phase 1 Flag to 1.
Phase 1 Approved

If this phase is rejected the InfoPath form will have the field Phase 1 Approval back to
zero.
With these two conditions met an email is sent to the creator of the policy with a
reason for the rejection and update the Submit Flag to 0 to restart the process if
possible.
This can be continued for as long as is necessary depending on your approval process
Phase 1 Rejected


Questions