SharePoint 2010 Sample chapter - Amazon Web … · v Brief contents PART 1G ETTING STARTED WITH...
52
Transcript of SharePoint 2010 Sample chapter - Amazon Web … · v Brief contents PART 1G ETTING STARTED WITH...

Dottie
Text Box
SAMPLE CHAPTER

SharePoint 2010 Site Owner’s Manualby Yvonne M. Harryman
Chapter 9
Copyright 2012 Manning Publications

v
Brief contents
PART 1 GETTING STARTED WITH SHAREPOINT 11 ■ Leveraging the power of SharePoint 3
2 ■ A deeper dive into SharePoint capabilities 15
3 ■ Creating sites using site and list templates 31
PART 2 IMPLEMENTATIONS USING REAL-WORLD SCENARIOS 814 ■ Setting up a document collaboration site 83
5 ■ Leveraging enterprise content management features 116
6 ■ Publishing information to the web 131
7 ■ Empowering users with business intelligence 172
8 ■ Creating application sites with SharePoint Designer 194
9 ■ Collecting and managing data by integrating with InfoPath 231
10 ■ Reporting and web applications using Access 279
11 ■ Pulling it all together with search, My Sites, and cross-site functionality 309

231
9
Collecting and managing data by integrating with InfoPath
This chapter covers
• Forms libraries
• InfoPath forms
• Forms services
n the last chapter we began our discussion of composite sites and how to buildpowerful applications using SharePoint Designer. We’ll continue ourdiscussion of composite sites in this chapter. The tool we’ll focus on is
InfoPath. The scenario that you’re going to implement, following a step-by-stepprocess, is for automating the review process of employees at the end of aproject. To begin, we’ll discuss the scenario you’ve been given and how you’llattain the solution utilizing SharePoint.
This section consists of three parts: situation, business priorities, andsolution. The first part, situation, provides a detailed explanation of the
9.1 Gathering employee feedback
I
232 CHAPTER 9 Collecting and managing data by integrating with InfoPath
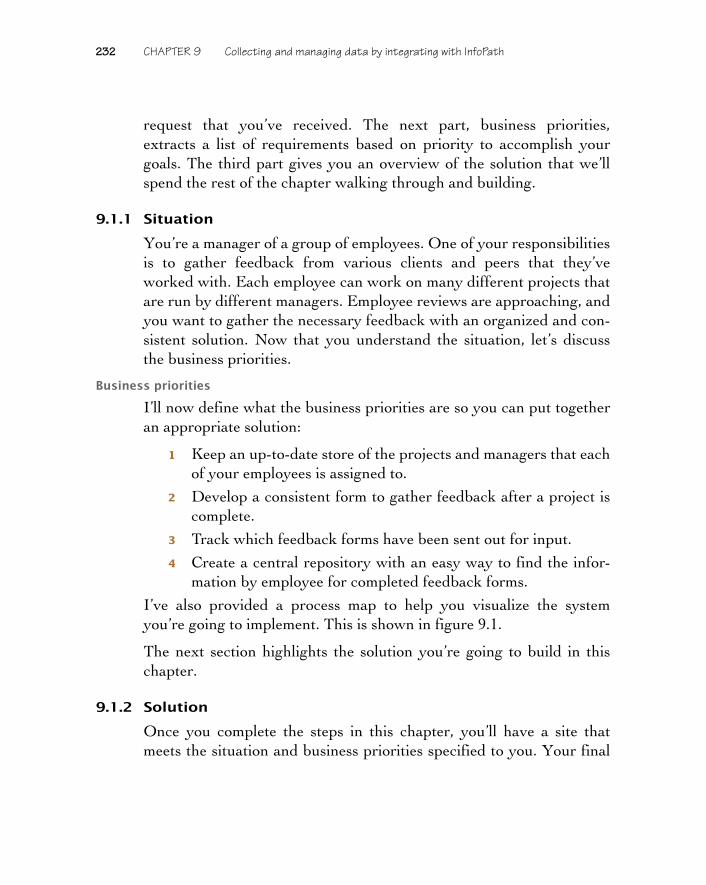
request that you’ve received. The next part, business priorities,extracts a list of requirements based on priority to accomplish yourgoals. The third part gives you an overview of the solution that we’llspend the rest of the chapter walking through and building.
9.1.1 Situation
You’re a manager of a group of employees. One of your responsibilitiesis to gather feedback from various clients and peers that they’veworked with. Each employee can work on many different projects thatare run by different managers. Employee reviews are approaching, andyou want to gather the necessary feedback with an organized and con-sistent solution. Now that you understand the situation, let’s discussthe business priorities.
Business priorities
I’ll now define what the business priorities are so you can put togetheran appropriate solution:
1 Keep an up-to-date store of the projects and managers that eachof your employees is assigned to.
2 Develop a consistent form to gather feedback after a project iscomplete.
3 Track which feedback forms have been sent out for input.
4 Create a central repository with an easy way to find the infor-mation by employee for completed feedback forms.
I’ve also provided a process map to help you visualize the systemyou’re going to implement. This is shown in figure 9.1.
The next section highlights the solution you’re going to build in thischapter.
9.1.2 Solution
Once you complete the steps in this chapter, you’ll have a site thatmeets the situation and business priorities specified to you. Your final

Gathering employee feedback 233
solution is shown in figure 9.2. To initiate the form, you’ll use a FormsLibrary web part view.
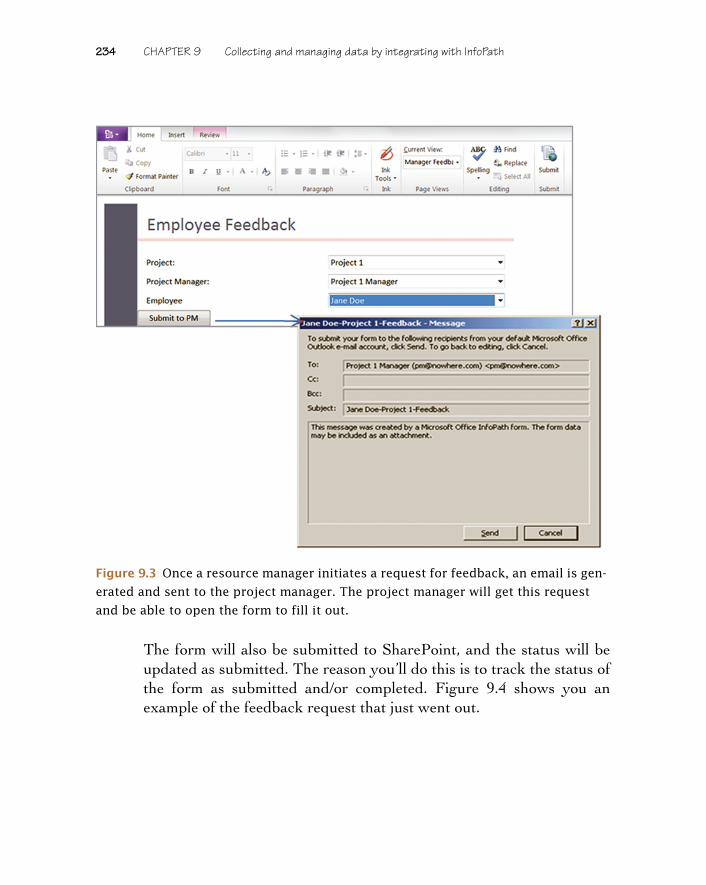
Once a manager has initiated the form, they’ll be prompted to select theinformation for the project and employee that they’d like to gatherfeedback on. This request will go out as an email submission, as shownin figure 9.3.
Gathering employee feedback
Receivesrequest via
Completesrequested
feedback form
Receivesrequest via
Re
sou
rce
ma
na
ge
rE
mp
loy
ee
Sends out form torequest feedback
on employees
Form view switchesto show the
requestedinformation
Submits tomanagers’
SharePoint library
Form viewswitches to show
the information in aread only format
Figure 9.1 Process map for the solution that you’re going to build. This explains the
roles of the resource manager and the project manager. It will help you to visualize
what the requirements are and how the users will advance through the system.
Figure 9.2 Click the New button in the web part to initiate your form. This is what
your solution will look like if you choose to initiate the form without Forms Ser-
vices, which is described in section 9.3.
234 CHAPTER 9 Collecting and managing data by integrating with InfoPath
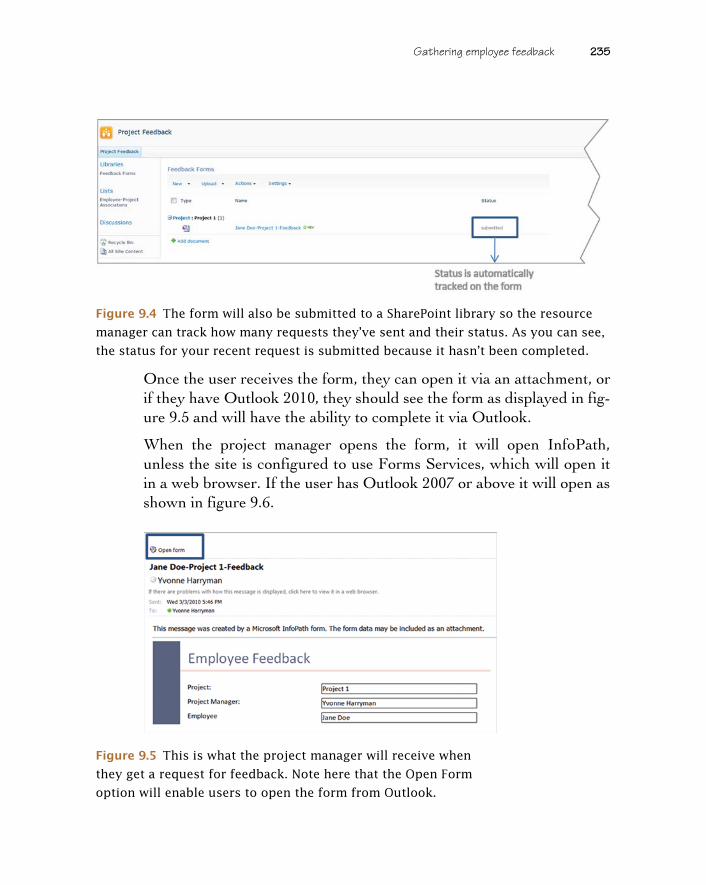
The form will also be submitted to SharePoint, and the status will beupdated as submitted. The reason you’ll do this is to track the status ofthe form as submitted and/or completed. Figure 9.4 shows you anexample of the feedback request that just went out.
Figure 9.3 Once a resource manager initiates a request for feedback, an email is gen-
erated and sent to the project manager. The project manager will get this request
and be able to open the form to fill it out.
Gathering employee feedback 235
Once the user receives the form, they can open it via an attachment, orif they have Outlook 2010, they should see the form as displayed in fig-ure 9.5 and will have the ability to complete it via Outlook.
When the project manager opens the form, it will open InfoPath,unless the site is configured to use Forms Services, which will open itin a web browser. If the user has Outlook 2007 or above it will open asshown in figure 9.6.
Figure 9.4 The form will also be submitted to a SharePoint library so the resource
manager can track how many requests they’ve sent and their status. As you can see,
the status for your recent request is submitted because it hasn’t been completed.
Figure 9.5 This is what the project manager will receive when
they get a request for feedback. Note here that the Open Form
option will enable users to open the form from Outlook.

236 CHAPTER 9 Collecting and managing data by integrating with InfoPath
Once the project manager has completed the request, the form will besubmitted to a SharePoint library. An example of what this could looklike is shown in figure 9.7.
Now that you know the solution for your scenario you can start build-ing out the site to reach the solution described previously.
Figure 9.6 If the user is using Outlook 2007 or above when they open the email, it
will appear as shown here, and the user will have the ability to complete and submit
it without leaving Outlook.
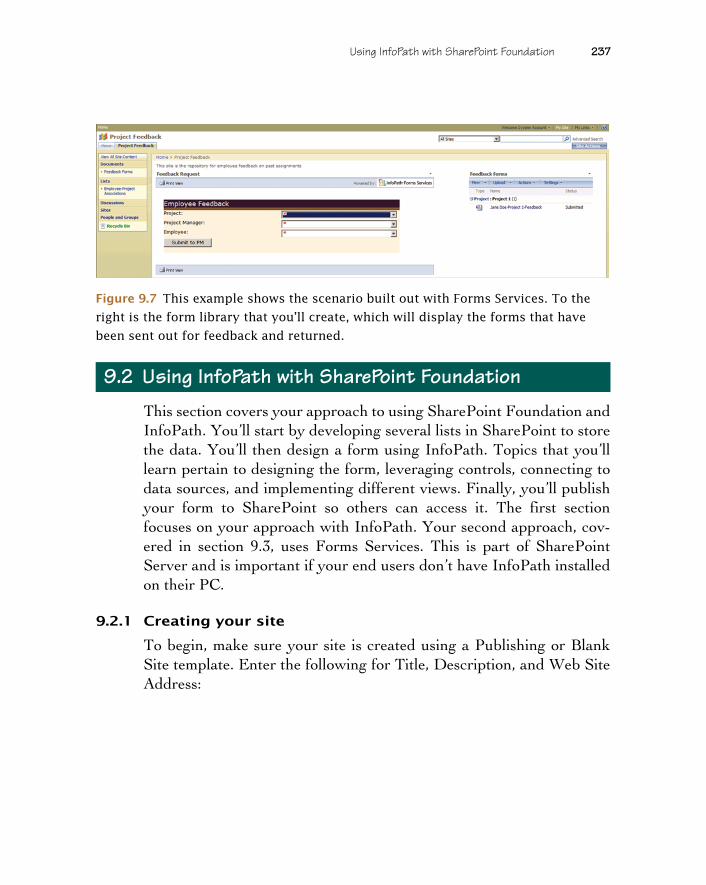
Using InfoPath with SharePoint Foundation 237
This section covers your approach to using SharePoint Foundation andInfoPath. You’ll start by developing several lists in SharePoint to storethe data. You’ll then design a form using InfoPath. Topics that you’lllearn pertain to designing the form, leveraging controls, connecting todata sources, and implementing different views. Finally, you’ll publishyour form to SharePoint so others can access it. The first sectionfocuses on your approach with InfoPath. Your second approach, cov-ered in section 9.3, uses Forms Services. This is part of SharePointServer and is important if your end users don’t have InfoPath installedon their PC.
9.2.1 Creating your site
To begin, make sure your site is created using a Publishing or BlankSite template. Enter the following for Title, Description, and Web SiteAddress:
9.2 Using InfoPath with SharePoint Foundation
Figure 9.7 This example shows the scenario built out with Forms Services. To the
right is the form library that you’ll create, which will display the forms that have
been sent out for feedback and returned.

238 CHAPTER 9 Collecting and managing data by integrating with InfoPath
Now that you’ve created your site, you’ll set up a custom list to managethe employees and projects.
9.2.2 Custom list: creating a data store of current projects
To begin, you’ll create a list to manage your employees and the projectsthey work on. To do this, create a custom list:
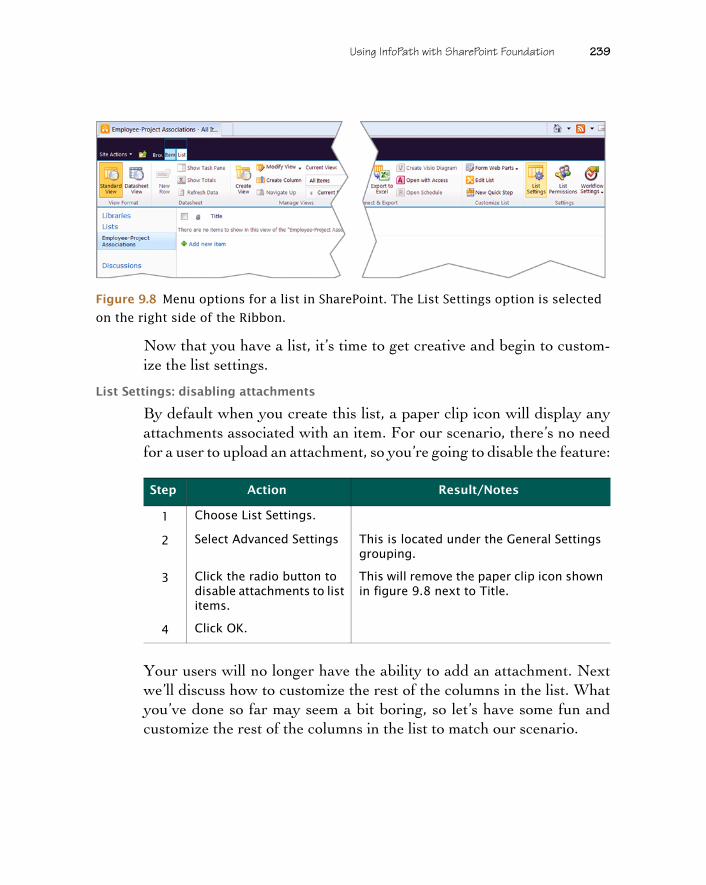
You should now be looking at the main page for the Employee-ProjectAssociations list. A series of menu options in the Ribbon have beenprovided to help you manage these items, as shown in figure 9.8. You‘llfocus on the List Settings option, which is found in the Settings sectionin the far-right side of the Ribbon, to customize the list’s metadata.
Property Value
Title Project Feedback
Description This site is the repository for employee feedback on past assignments.
Web Site Address ProjectFeedback
Step Action Result/Notes
1 Choose Site Actions > More Options, filter by Blank & Custom, and select Custom List.
For the name enter Employee-Project Associations.
Select More Options, and for the description enter The following list stores information about current projects and the employees assigned to them.
Click Yes for displaying this list in the Quick Launch bar.
2 Click Create. This will redirect you to the main page of your newly created list.
Using InfoPath with SharePoint Foundation 239
Now that you have a list, it’s time to get creative and begin to custom-ize the list settings.
List Settings: disabling attachments
By default when you create this list, a paper clip icon will display anyattachments associated with an item. For our scenario, there’s no needfor a user to upload an attachment, so you’re going to disable the feature:
Your users will no longer have the ability to add an attachment. Nextwe’ll discuss how to customize the rest of the columns in the list. Whatyou’ve done so far may seem a bit boring, so let’s have some fun andcustomize the rest of the columns in the list to match our scenario.
Step Action Result/Notes
1 Choose List Settings.
2 Select Advanced Settings This is located under the General Settings grouping.
3 Click the radio button to disable attachments to list items.
This will remove the paper clip icon shown in figure 9.8 next to Title.
4 Click OK.
Figure 9.8 Menu options for a list in SharePoint. The List Settings option is selected
on the right side of the Ribbon.
240 CHAPTER 9 Collecting and managing data by integrating with InfoPath
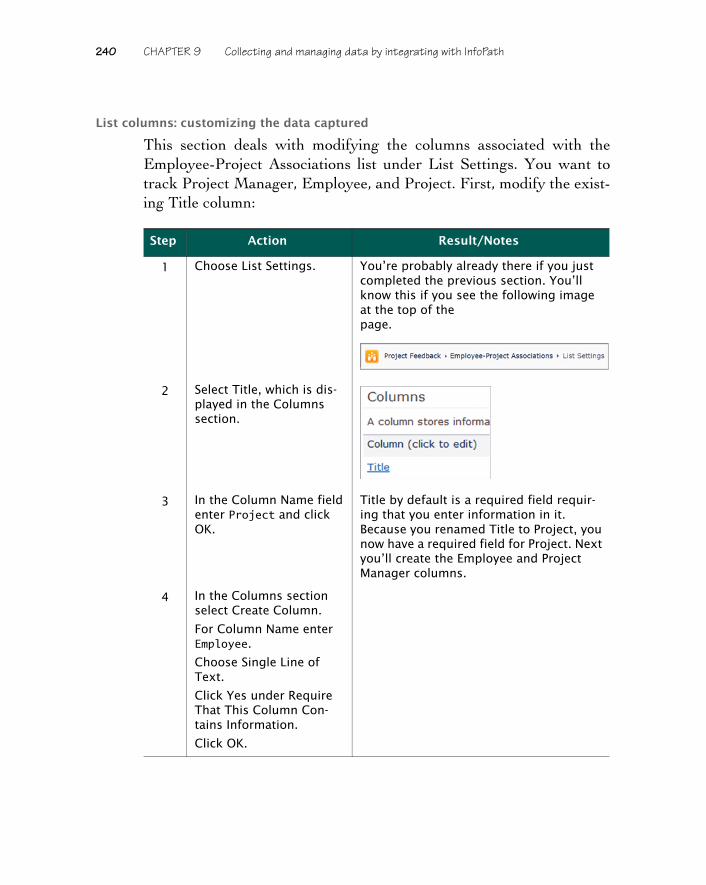
List columns: customizing the data captured
This section deals with modifying the columns associated with theEmployee-Project Associations list under List Settings. You want totrack Project Manager, Employee, and Project. First, modify the exist-ing Title column:
Step Action Result/Notes
1 Choose List Settings. You’re probably already there if you just completed the previous section. You’ll know this if you see the following image at the top of the page.
2 Select Title, which is dis-played in the Columns section.
3 In the Column Name field enter Project and click OK.
Title by default is a required field requir-ing that you enter information in it. Because you renamed Title to Project, you now have a required field for Project. Next you’ll create the Employee and Project Manager columns.
4 In the Columns section select Create Column.
For Column Name enter Employee.
Choose Single Line of Text.
Click Yes under Require That This Column Con-tains Information.
Click OK.

Using InfoPath with SharePoint Foundation 241
Yay! You’re now able to track your employees and their projects andhave a consistent approach for the data that needs to be entered. Nowthat you’ve completed this, let’s get started with the creation of a Formslibrary so you’ll have a consistent form to gather feedback at the end ofa project. You’ll need some data in the list you just created to completethe next section, so add a few items to the Employee-Project Associa-tions list.
9.2.3 Forms library: creating a library to manage the feedback form
To create the Forms library to manage the form, complete the follow-ing steps:
Your Forms library is in place, so next you’ll open up InfoPath to cre-ate a form.
5 Repeat step 4, but enter Project Manager for the column name.
You now have a list that will enable you to track your employees and their projects.
6 Complete these steps again, but enter Project Manager for the column name in step 3.
Step Action Result/Notes
1 Choose Site Actions > More Options, filter by Library, and select Forms Library.
For Name and Description enter Feedback Forms.
For the Description enter The following library is set up to manage the feedback forms.
2 Click Create. This will redirect you to the main page of your newly created list.
Step Action Result/Notes

242 CHAPTER 9 Collecting and managing data by integrating with InfoPath
9.2.4 InfoPath: creating your feedback form
Microsoft Office InfoPath is part of Office Professional Plus. It helpsusers to create rich dynamic forms without having to write a line ofcode. For the SharePoint Foundation section of this chapter, you’regoing to use the client version of InfoPath. The SharePoint Server sec-tion, 9.3, will cover Forms Services, which will allow users to accessthe form without InfoPath. For this example you’re going to generate afeedback form using InfoPath. To start, you’ll need to open InfoPathby doing the following:
NOTE If you have an existing template that you’d like to pub-lish, you can open InfoPath in design mode and click the Officebutton. Here you’ll see a series of options; the one you’re inter-ested in is called Share. There you can publish to a SharePointServer.
You’ll now see a blank form that you can design. We’re now going towalk through the powerful features of InfoPath so you can learn to cre-ate powerful forms. The designer enables you to quickly add controls,style, and logic to your forms.
Step Action Result/Notes
1 Choose Library Settings for the Forms library.
You’re probably already there if you just completed the previous section.
2 Select Advanced Settings under the General Set-tings section.
3 Select Edit Template (under the Template URL field) to open a blank Info-Path template.
You’ll now see a blank form that has been opened in InfoPath Designer.

Using InfoPath with SharePoint Foundation 243
Design task: designing your form
You now have a blank form open that you can begin to design. TheRibbon has a menu of actions that you’ll use to design your form, alongwith a column to the right to manage your fields, as shown infigure 9.9.
To begin you’ll create the layout of your form:
Step Action Result/Notes
1 Click the Insert tab in the Ribbon.
2 In the Page Layouts section select the fourth table, described as Title with Vertical Emphasis Bar.
You’ll now see an empty layout table dis-played, as shown in figure 9.10.
3 Click the section with the text Add Section Layouts.
4 In the Section Layouts sec-tion of the Insert tab of the Ribbon, select the fourth section layout, described as Two-Column with Label Left-Aligned and No Heading.
5 Select the text Click to Add Title and enter Employee Feedback.
You’ll now see the updated layout table displayed; see figure 9.11.
Figure 9.9 Ribbon is used often when designing your form. In this image it’s dis-
played at the top of the page.

244 CHAPTER 9 Collecting and managing data by integrating with InfoPath
These simple steps will enable you to quickly get started with setting adesign and format for your forms.
Now that you’ve designed your form, we’ll discuss how to input or dis-play data through the use of controls. A pretty form can take you onlyso far without the use of controls to capture the data. So let’s getstarted discussing how to add value to this form.
Figure 9.10 InfoPath form with a layout table added. This will help you to quickly
format the content and get started on your form.
Figure 9.11 InfoPath form with a layout table and section layout added. This
will help you to quickly format the content and get started on your form.

Using InfoPath with SharePoint Foundation 245
Controls: enabling users to input data
In this section you’re going to add a series of controls and a data con-nection to populate them with data from a SharePoint list. First, you’lladd the controls to your form:
Before moving on to dealing with the forms data source, let’s updatethe color scheme:
Step Action Result/Notes
1 Click the top row on the right containing the text Add Control.
2 Select the Home tab in the Ribbon, and in the Controls section select Drop-Down List Box.
3 Repeat this step for the next two rows.
4 In the left column for the first row containing the text Add Label, enter Project:.
In the next row enter Project Manager:.
In the next row enter Employee:.
In the last row add a button control by select-ing it from the controls section.
Step Action Result/Notes
1 Select the Page Design tab in the Ribbon.
246 CHAPTER 9 Collecting and managing data by integrating with InfoPath
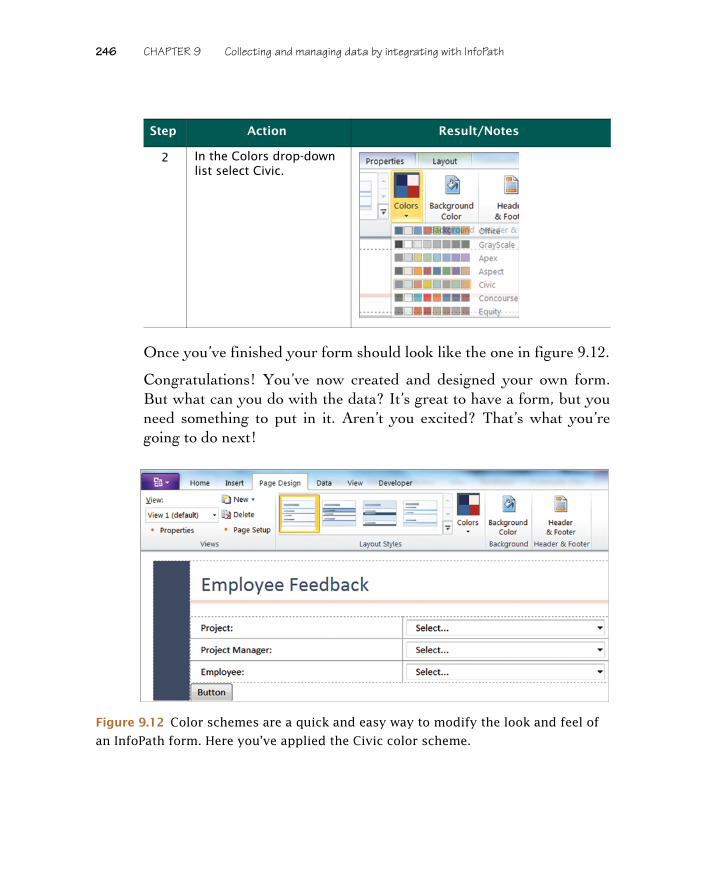
Once you’ve finished your form should look like the one in figure 9.12.
Congratulations! You’ve now created and designed your own form.But what can you do with the data? It’s great to have a form, but youneed something to put in it. Aren’t you excited? That’s what you’regoing to do next!
2 In the Colors drop-down list select Civic.
Step Action Result/Notes
Figure 9.12 Color schemes are a quick and easy way to modify the look and feel of
an InfoPath form. Here you’ve applied the Civic color scheme.
Using InfoPath with SharePoint Foundation 247
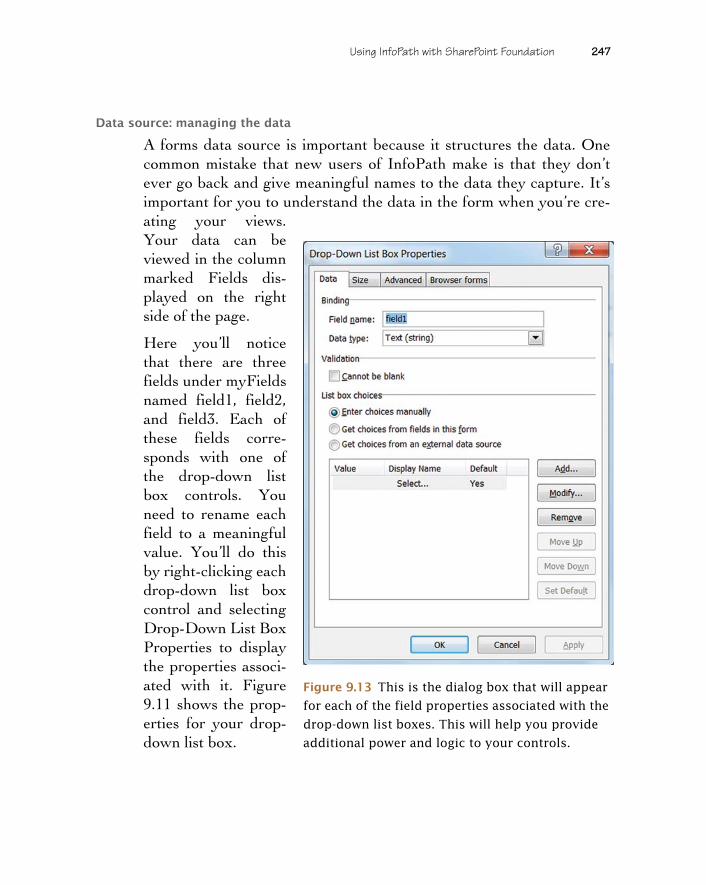
Data source: managing the data
A forms data source is important because it structures the data. Onecommon mistake that new users of InfoPath make is that they don’tever go back and give meaningful names to the data they capture. It’simportant for you to understand the data in the form when you’re cre-ating your views.Your data can beviewed in the columnmarked Fields dis-played on the rightside of the page.
Here you’ll noticethat there are threefields under myFieldsnamed field1, field2,and field3. Each ofthese fields corre-sponds with one ofthe drop-down listbox controls. Youneed to rename eachfield to a meaningfulvalue. You’ll do thisby right-clicking eachdrop-down list boxcontrol and selectingDrop-Down List BoxProperties to displaythe properties associ-ated with it. Figure9.11 shows the prop-erties for your drop-down list box.
Figure 9.13 This is the dialog box that will appear
for each of the field properties associated with the
drop-down list boxes. This will help you provide
additional power and logic to your controls.

248 CHAPTER 9 Collecting and managing data by integrating with InfoPath
Updating the properties associated with your controls will help youprovide additional functionality to how users enter the information. Thefollowing steps walk you through the needed changes to the properties:
You now want to configure this to look up values from an external datasource. The source that you’re interested in accessing is the Employee-Project Associations list you created earlier in this chapter insection 9.2.1. To do this you must create a data connection.
Click Add, and the Data Connection Wizard will appear. Figure 9.14shows the Data Connection Wizard.
Now you’ll configure your data connection:
Step Action Result/Notes
1 Right-click the first drop-down list box con-trol and select Drop-Down List Box Properties.
Enter Project for the Field Name.
Select Cannot Be Blank under Validation.
Select Get Choices from an External Data Source under List Box Choices.
Step Action Result/Notes
1 Click Create a New Con-nection To and choose Receive Data. Then click Next to go to the next step.
2 For the location where you would like to receive your data, select Share-Point Library or List, and click Next to go to the next step.
By pulling the data from a SharePoint list, you can modify the values without having to republish the form.
3 Enter in the URL to the site where the Employee-Project Associations list is located, and go to the next step.
Using InfoPath with SharePoint Foundation 249
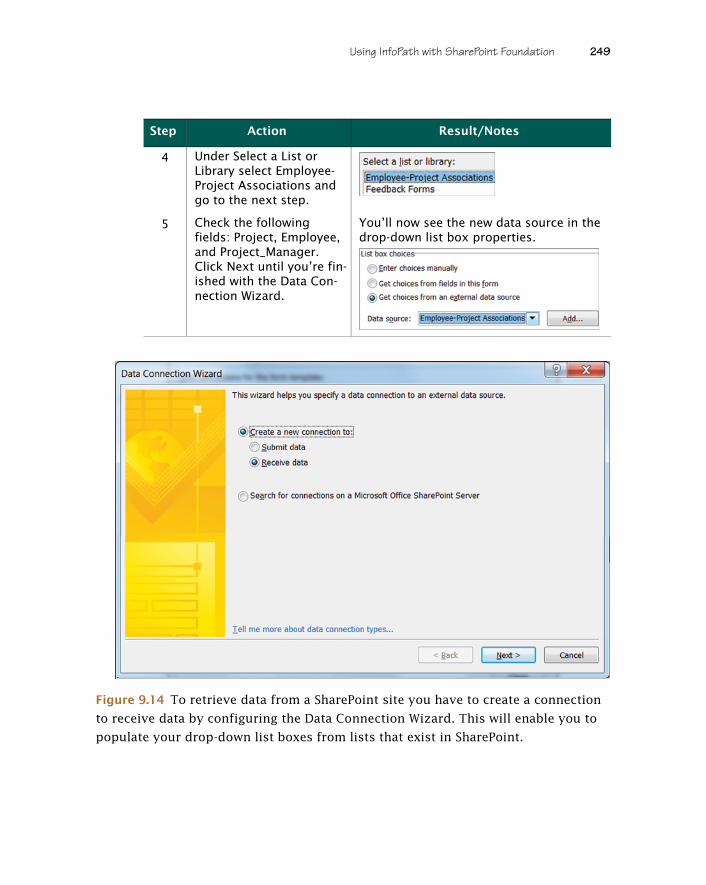
4 Under Select a List or Library select Employee-Project Associations and go to the next step.
5 Check the following fields: Project, Employee, and Project_Manager. Click Next until you’re fin-ished with the Data Con-nection Wizard.
You’ll now see the new data source in the drop-down list box properties.
Step Action Result/Notes
Figure 9.14 To retrieve data from a SharePoint site you have to create a connection
to receive data by configuring the Data Connection Wizard. This will enable you to
populate your drop-down list boxes from lists that exist in SharePoint.

250 CHAPTER 9 Collecting and managing data by integrating with InfoPath
You should now be in the Drop-Down List Box Properties dialog boxand ready to configure the details for pulling the data:
To test what you’ve done and verify that it was successful, you’ll needto have entered data into the Employee-Project Associations list. Youcan then test it by selecting Preview to ensure that the project valuesthat you’ve entered into the Employee-Project Associations list aredisplaying.
You’ll now see your form. If it’s working, the project data should bedisplayed, as shown in figure 9.15.
When you’ve finished testing your form, you can exit the previewmode by selecting Close Preview, as shown in the ribbon in figure 9.15.
You’ll need to perform these steps again for the drop-down list box forProject Manager and Employee with a few minor exceptions:
❂ For Field Name enter ProjectManager or Employee.
Step Action Result/Notes
1 Click the XPath icon next to Entries.
Expand dataFields.
Expand the SharePoint List Item grouping.
Select Project.
2 Click OK. Your configured entries should look like the following:
3 Select the check box next to Show Only Entries with Unique Display Names, and click OK.
Using InfoPath with SharePoint Foundation 251
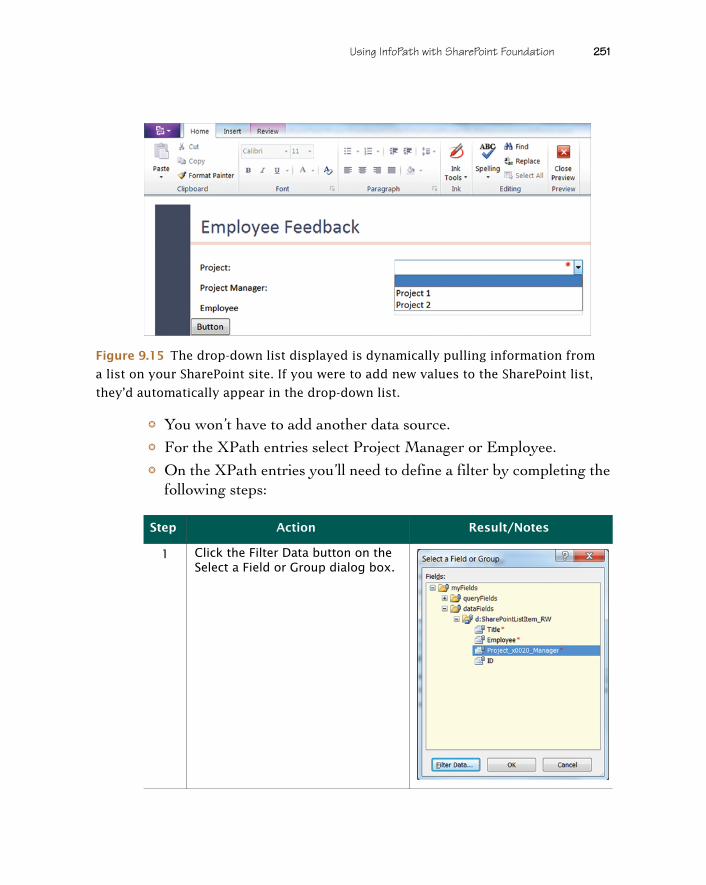
❂ You won’t have to add another data source.❂ For the XPath entries select Project Manager or Employee.❂ On the XPath entries you’ll need to define a filter by completing the
following steps:
Step Action Result/Notes
1 Click the Filter Data button on the Select a Field or Group dialog box.
Figure 9.15 The drop-down list displayed is dynamically pulling information from
a list on your SharePoint site. If you were to add new values to the SharePoint list,
they’d automatically appear in the drop-down list.

252 CHAPTER 9 Collecting and managing data by integrating with InfoPath
You’ve now applied a filter to your drop-down lists so they’ll show onlythe values that are valid based on the previous selection. To make surewe’re on the same page, verify that your data source looks like the onein figure 9.17.
In this next section we’re going to cover views. This will enable you tocreate a flow to the form so that different users will see only the datathat pertains to them. So far you have a powerful form, but you’ll wantthe resource manager to see different information than the project
2 Click Add.
For the Project Manager field, select Project Is Equal To Project from the main data source. For the Employee field, create two rules, one that matches the Project Manager rule and a second that sets Project Man-ager equal to ProjectManager from the main data source. It should look like figure 9.16.
To get to the main data source, choose Main from the drop-down list at the top of the dialog box labeled Fields, as shown in figure 9.17.
Step Action Result/Notes
Figure 9.16 This is what the filter conditions for the Employee field should look like.
This will add the logic to your drop-down controls to show only the values that are
valid based on the previous selection.

Using InfoPath with SharePoint Foundation 253
manager. This will make the information that the form is requestingeasy to identify. Remember that once you’ve finished with this, you’llhave an automated way to gather feedback on employees and to trackit. You’ll be able to quickly send out many requests within minutes andkeep the data organized.
InfoPath views: changing the way the form is displayed
This section walks you through the process of creating views. Thedefault view that you just created is for the resource manager to com-plete before sending out a feedback request. The next view will be forthe project manager to complete in order to give feedback on anemployee:
Step Action Result/Notes
1 Navigate to the Page Design tab in the Ribbon of InfoPath.
2 Select Properties, and for the View Name enter Manager Feedback Request.
3 Locate the New drop-down list box next to the views and select New View.
Figure 9.17 Your data source so far
should appear like this. Naming your
fields with recognizable terms is impor-
tant when you start to build out forms
that have many fields.
254 CHAPTER 9 Collecting and managing data by integrating with InfoPath
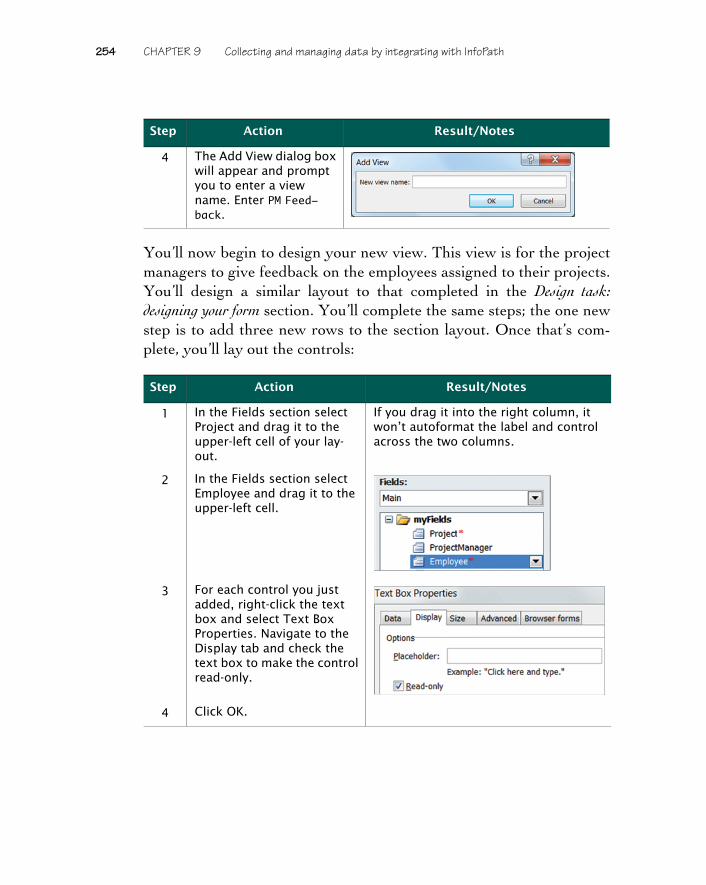
You’ll now begin to design your new view. This view is for the projectmanagers to give feedback on the employees assigned to their projects.You’ll design a similar layout to that completed in the Design task:designing your form section. You’ll complete the same steps; the one newstep is to add three new rows to the section layout. Once that’s com-plete, you’ll lay out the controls:
4 The Add View dialog box will appear and prompt you to enter a view name. Enter PM Feed-back.
Step Action Result/Notes
1 In the Fields section select Project and drag it to the upper-left cell of your lay-out.
If you drag it into the right column, it won’t autoformat the label and control across the two columns.
2 In the Fields section select Employee and drag it to the upper-left cell.
3 For each control you just added, right-click the text box and select Text Box Properties. Navigate to the Display tab and check the text box to make the control read-only.
4 Click OK.
Step Action Result/Notes

Using InfoPath with SharePoint Foundation 255
For the final control, add a button to the bottom of the page. Now thatyou’ve added the controls, you’ll need to customize them.
For the rich text boxes complete the following:
❂ Enter Question 1, Question 2, or Question 3 for the field name:❂ For the option button complete the following:❂ For the field name enter Employee_Ranking.❂ Modify the text to be labeled 1-5.
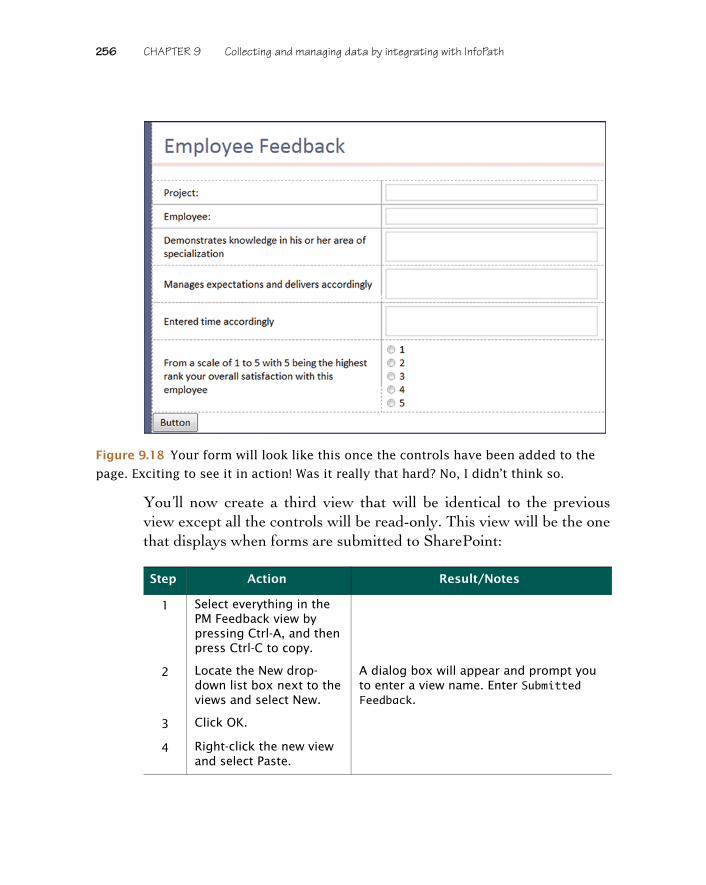
Once you’ve completed these steps, your form will look like the one infigure 9.18.
5 For the next few rows, enter the following questions and choose a control for each based on the next table.
Questions Controls
Demonstrates knowledge in his or her area of specialization
Rich text box
Manages expectations and delivers accordingly
Rich text box
Enters time accordingly Rich text box
From a scale of 1 to 5 with 5 being the highest, rank your overall satis-faction with this employee
Option button set for 5
Step Action Result/Notes
256 CHAPTER 9 Collecting and managing data by integrating with InfoPath
You’ll now create a third view that will be identical to the previousview except all the controls will be read-only. This view will be the onethat displays when forms are submitted to SharePoint:
Step Action Result/Notes
1 Select everything in the PM Feedback view by pressing Ctrl-A, and then press Ctrl-C to copy.
2 Locate the New drop-down list box next to the views and select New.
A dialog box will appear and prompt you to enter a view name. Enter Submitted Feedback.
3 Click OK.
4 Right-click the new view and select Paste.
Figure 9.18 Your form will look like this once the controls have been added to the
page. Exciting to see it in action! Was it really that hard? No, I didn’t think so.

Using InfoPath with SharePoint Foundation 257
You should now be looking at a version of the form that matchesfigure 9.18. There are just a few modifications that you’ll need to maketo this form:
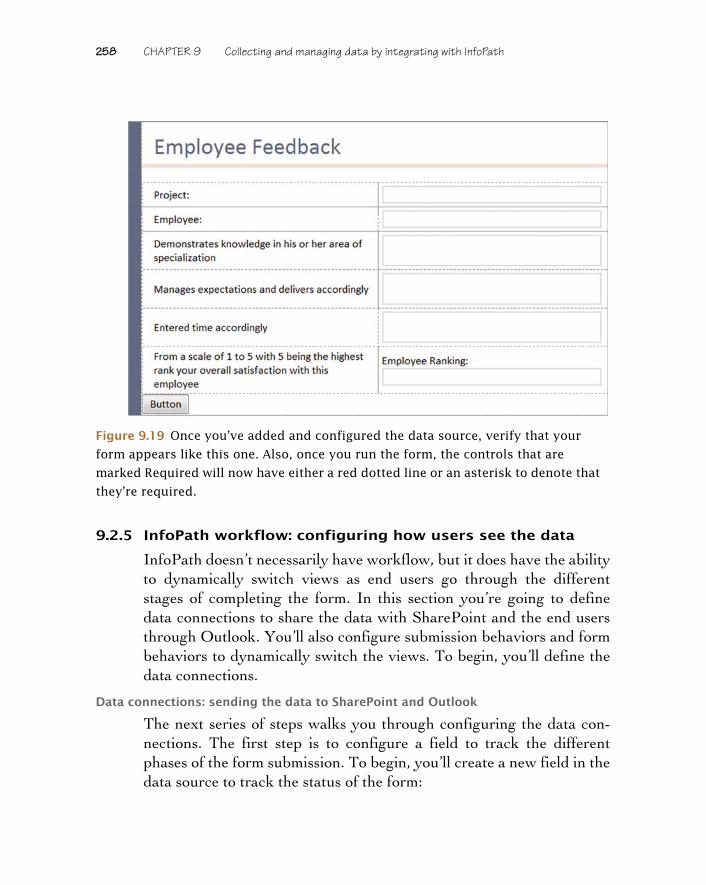
Once you’ve finished your form for the Submitted Feedback viewshould like figure 9.19.
Congratulations! You’ve now completed your form, and you should beproud of yourself. The information that you’ll capture will now be con-sistently entered and managed. Your end users have a nice way to viewthe data and see it in a format that applies to them. To finish this off,you’ll want to configure your data connections so you can send theform to SharePoint and also send it via an email to request the recipientto enter feedback. You’ll also want to ensure that this form and itsinformation are published to SharePoint so managers can quicklyaccess it and send out a request and track the responses that theyreceive. To begin, you’ll configure your data connections.
Step Action Result/Notes
1 Delete the buttons. Delete both the option and classic buttons at the bottom of the page.
2 Change the properties for all the controls to read-only.
Remember that this is under the Dis-play tab.
3 Go to Fields, and select and drag Employee_Ranking over to the section where the options buttons had been.
258 CHAPTER 9 Collecting and managing data by integrating with InfoPath
9.2.5 InfoPath workflow: configuring how users see the data
InfoPath doesn’t necessarily have workflow, but it does have the abilityto dynamically switch views as end users go through the differentstages of completing the form. In this section you’re going to definedata connections to share the data with SharePoint and the end usersthrough Outlook. You’ll also configure submission behaviors and formbehaviors to dynamically switch the views. To begin, you’ll define thedata connections.
Data connections: sending the data to SharePoint and Outlook
The next series of steps walks you through configuring the data con-nections. The first step is to configure a field to track the differentphases of the form submission. To begin, you’ll create a new field in thedata source to track the status of the form:
Figure 9.19 Once you’ve added and configured the data source, verify that your
form appears like this one. Also, once you run the form, the controls that are
marked Required will now have either a red dotted line or an asterisk to denote that
they’re required.

Using InfoPath with SharePoint Foundation 259
The next section walks you through the steps to create a data connection:
Step Action Result/Notes
1 Click the drop-down arrow for myFields in the Data Source section of the Fields bar displayed to the right of your InfoPath form.
2 Click Add.
For Name enter Status.
3 Click OK. You’ll now have a new data field to store the status of the form so the web can track what stage of the submission pro-cess you’re in.
Step Action Result/Notes
1 Select Manage Data Connections under Actions in the Data Source section of the Fields bar displayed to the right of your InfoPath form.
2 Click Add.
3 Select Create a New Con-nection To and select Sub-mit Data. Click Next to go to the next step.
4 Select As an Email Message, and go to the next step.
This will generate an email that will notify the project manager when the resource manager would like feedback on an employee.

260 CHAPTER 9 Collecting and managing data by integrating with InfoPath
NOTE Sending an email using the name of the project managerworks only if Outlook can resolve the names that are entered intothe Employee-Project Associations list. If this doesn’t work foryou, then you may want to add an Email column to your list anduse that field instead.
5 For the To line, select the option Insert a Formula, and from there choose Insert Field or Group.
Select ProjectManager and click OK.
Step Action Result/Notes
6 For the Manage Data Con-nections Subject line, select the option Insert a Formula, and from there choose Insert Field or Group.
Add both Employee and Project.
Add concat( before the two fields.
Separate the fields with , "-", and add ,"-Feed-back") at the end.
Click OK.
7 Click Next twice and leave the defaults.
8 In the next screen enter the following name for the data connection: PM Submit.
9 Click Finish.
Step Action Result/Notes

Using InfoPath with SharePoint Foundation 261
Good job! Now that you have your data connections completed forsending an email, you’ll also want to configure the data connection forsubmitting the data to SharePoint. Don’t worry—this will be just aseasy as the last set of steps:
Step Action Result/Notes
1 Select … in the Data Source section of the Fields bar displayed to the right of your InfoPath form.
You should already have the Manage Data Connections dialog box open if you’re continuing from the previous steps.
2 Click Add.
3 Select Create a New Con-nection and then click Submit Data. Click Next to go to the next step.
4 Select the destination To a Document Library on a SharePoint Site, and go to the next step.
5 For the Document Library field, enter the URL for the Forms library.

262 CHAPTER 9 Collecting and managing data by integrating with InfoPath
Now that you’ve configured your data connections, you need to config-ure how to link these connections to the different submission phases.The next section covers the configuration of form submissions.
Submissions: setting rules to customize the behavior of form submissions
The next series of steps is to configure the submissions. In this sectionyou’re going to submit forms using a series of rules so multiple actionscan take place. To begin you’ll work with the Manager FeedbackRequest view:
6 For the File Name line, select the option Insert a Formula, and from there choose Insert Field or Group.
Add both Employee and Project.
Add concat( before the two fields;
separate the fields with , "-", and add ,"-Feed-back") at the end.
Click OK.
7 Select the check box next to Allow Overwrite if File Exists, and go to the next step.
8 In the next screen enter the following name for the data connection: Submit to SharePoint.
9 Click Finish.
Step Action Result/Notes

Using InfoPath with SharePoint Foundation 263
Step Action Result/Notes
1 Select the button control. The Ribbon will automatically default to the Control Properties tab when the button is selected.
2 For the label enter Submit to PM.
3 Select Rules. The rules manager will open on the right side of the page.
4 Select New > Action.
5 In the section marked Details For, enter Submit to PM.
6 Select Add > Set a Fields Value.
For the field select Status, and for the value enter Submitted and click OK.
Note: InfoPath is case sensitive.
7 Select Add > Submit Data.
In the Data Connection drop-down list, select Submit to SharePoint and click OK.

264 CHAPTER 9 Collecting and managing data by integrating with InfoPath
You’ll complete the same series of steps for the button control on thePM Feedback view with the following exceptions:
❂ For step 5 enter Completed Feedback for the Details For section.❂ Change the label to Submit.❂ For step 6 enter the value as Completed.❂ Skip step 9.
In this section you added the actions behind the user submit andupdated the Status field. You’ll now work on customizing the formbehavior based on the Status field.
Page options: customizing the form behavior when opened
You have several options for dynamically switching the view. Onecommon way is to do it when setting the rules. Another way is to do itthrough the Page Options settings. For this section you’re going to setup the dynamic behavior of the form based on the Form Load rules,which can be found in the Data section:
8 Select Add > Submit Data. In the Data Connection drop-down list, select PM Submit and click OK.
9 Select Add > Close the Form.
If the option to prompt the user to save is selected, then deselect it and select OK.
Step Action Result/Notes
1 Navigate to the Data tab in the Ribbon.
2 Select Form Load. The rules manager for form load will dis-play on the right side of your form.
Step Action Result/Notes

Using InfoPath with SharePoint Foundation 265
3 Select New > Action.
4 In the section marked Details For, enter Open PM Feedback View.
5 Click the hyperlink under Condition to set a condi-tion.
Set it to Status Is Equal to (Type a Text) Submitted, and click OK.
6 Select Add > Switch Views. Select PM Feedback from the View drop-down list and click OK.
7 Select New > Action.
8 In the section marked Details For enter Final Submission View.
Step Action Result/Notes
266 CHAPTER 9 Collecting and managing data by integrating with InfoPath
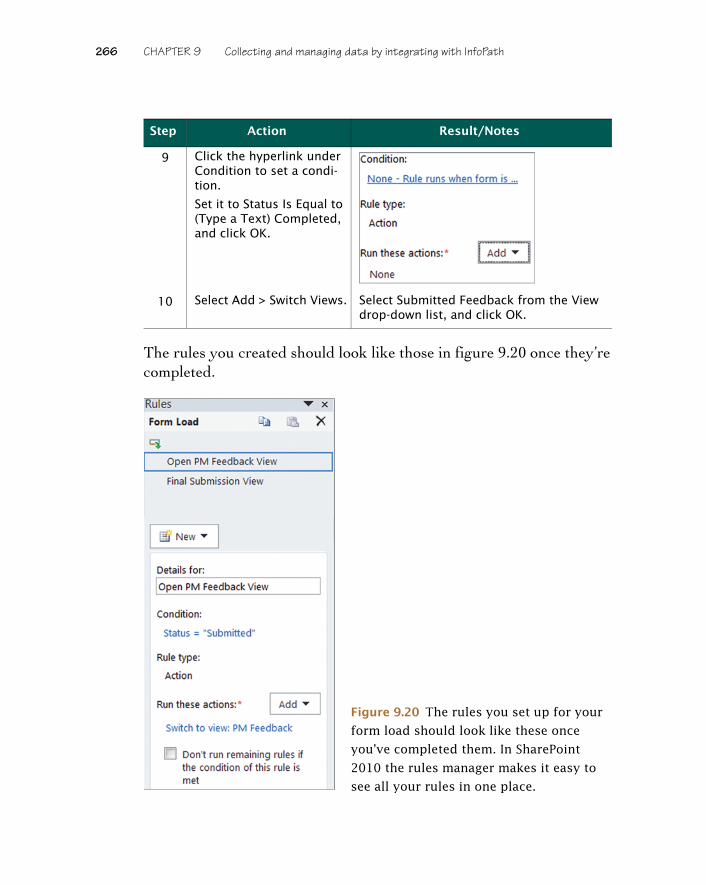
The rules you created should look like those in figure 9.20 once they’recompleted.
9 Click the hyperlink under Condition to set a condi-tion.
Set it to Status Is Equal to (Type a Text) Completed, and click OK.
10 Select Add > Switch Views. Select Submitted Feedback from the View drop-down list, and click OK.
Step Action Result/Notes
Figure 9.20 The rules you set up for your
form load should look like these once
you’ve completed them. In SharePoint
2010 the rules manager makes it easy to
see all your rules in one place.
Using InfoPath with SharePoint Foundation 267
Congratulations! You’ve finished creating your form. Now all that’sleft is to publish it. This is important because it impacts how the userswill access it. Publishing your form to a Forms library ensures that allyour end users open the same form, and any updates that you make goto one central location, so you can ensure all of the end users are usingthe same template.
9.2.6 Publishing: publishing the form to SharePoint
Now that you’ve created your library, we will go through the steps toupdate the form associated with that library. If you ever need to makechanges, you can complete the following steps to republish the updatesyou make:
Step Action Result/Notes
1 To get to the full publish-ing capabilities, click the Office button, navigate to Share, and select Publish.
Here you should see the Quick Publish bar for the current location along with other capabilities, such as publishing to a Share-Point library, email, or network location.
2 Select SharePoint Server. This will open a dialog box that will enable you to configure various publishing options. By default, the location should already be entered for the first step of the dialog box. If it isn’t, enter the URL for the site that has your Forms library and click Next.
3 Leave the default setting for Document Library and click Next.
4 Select Update the Form Template in an Existing Library.
Select Feedback Forms and go to the next step.

268 CHAPTER 9 Collecting and managing data by integrating with InfoPath
Good job! The form is now published and your users have access to it.Let’s now discuss how to share the data with SharePoint.
9.2.7 Form library views: displaying the forms
Now that the form is created and uploaded, you’ll need to reconfigurethe site to display the data. To begin, you’ll add a web part view of theFeedback Forms library:
5 Click Add. This step is important because it allows you to select columns from the form so they’ll be available in SharePoint. This is useful when working with views in a Share-Point list because it will allow the users to view and access the data in different ways.
6 Add all the columns and click Next.
7 Click Publish.
Step Action Result/Notes
1 Choose Site Actions > Edit Page.
2 Select Add a Web Part in the Left Zone.
3 Select Feedback Forms in the Web Parts section of the Ribbon, and click Add.
Step Action Result/Notes
Using InfoPath with SharePoint Foundation 269
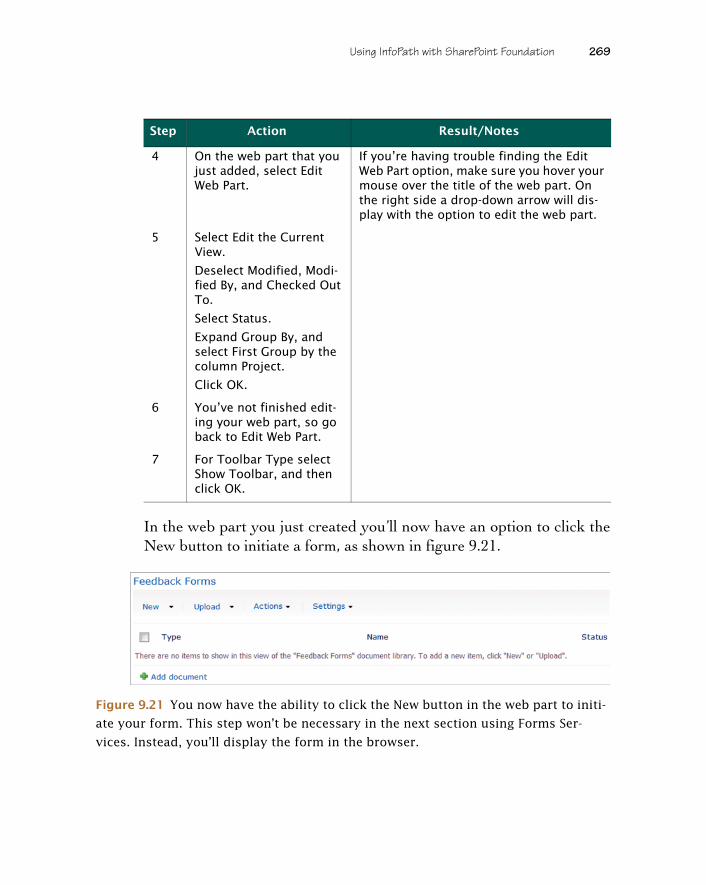
In the web part you just created you’ll now have an option to click theNew button to initiate a form, as shown in figure 9.21.
4 On the web part that you just added, select Edit Web Part.
If you’re having trouble finding the Edit Web Part option, make sure you hover your mouse over the title of the web part. On the right side a drop-down arrow will dis-play with the option to edit the web part.
5 Select Edit the Current View.
Deselect Modified, Modi-fied By, and Checked Out To.
Select Status.
Expand Group By, and select First Group by the column Project.
Click OK.
6 You’ve not finished edit-ing your web part, so go back to Edit Web Part.
7 For Toolbar Type select Show Toolbar, and then click OK.
Step Action Result/Notes
Figure 9.21 You now have the ability to click the New button in the web part to initi-
ate your form. This step won’t be necessary in the next section using Forms Ser-
vices. Instead, you’ll display the form in the browser.

270 CHAPTER 9 Collecting and managing data by integrating with InfoPath
You’ve finished configuring your feedback form for the SharePointFoundation portion of this scenario. The one catch is that it requiresyour users to have InfoPath in order to complete the form. There’s abrowser-based option called InfoPath Forms Services, which is part ofSharePoint Server, that we’ll discuss in the following section. This willallow you to use the same scenario we walked through, but it won’trequire your end users to have InfoPath installed on their machine.One key area where this would be of significant use is public-facingsites on the internet. You have no control over the software that usershave installed on their machines. This feature will be key to ensuringthey can complete the forms.
SharePoint Server provides some new options to InfoPath 2007 andabove through the addition of Forms Services. In the 2003 release,users were required to have InfoPath in order to complete the forms,but this was resolved when InfoPath Forms Services was released,which enabled users to access the forms though a browser. This contin-ues to be a strong feature with SharePoint Server 2009. This scenarioleverages the steps from section 9.2, where you created your form, butinstead it walks you through the publishing steps to make it a web-based form that doesn’t require your end users to have InfoPathinstalled on their PC.
9.3.1 Forms Services: accessing the form without InfoPath
You’ll start by enabling Forms Services on the Document library andon the form so that the behavior will change to open the forms via theweb browser when a user clicks New:
9.3 Leveraging Forms Services with SharePoint Server
Leveraging Forms Services with SharePoint Server 271
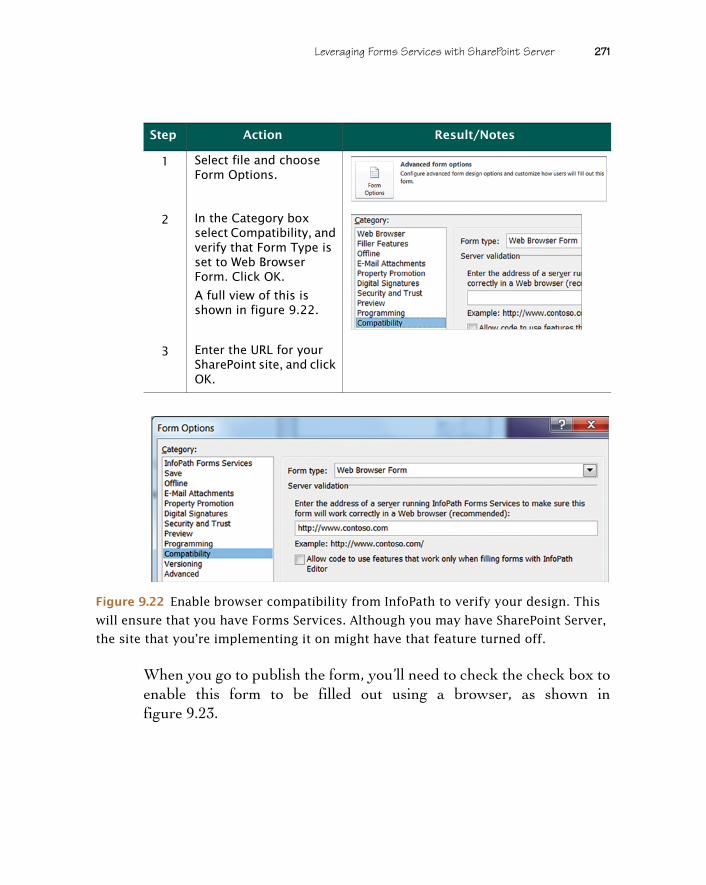
When you go to publish the form, you’ll need to check the check box toenable this form to be filled out using a browser, as shown infigure 9.23.
Step Action Result/Notes
1 Select file and choose Form Options.
2 In the Category box select Compatibility, and verify that Form Type is set to Web Browser Form. Click OK.
A full view of this is shown in figure 9.22.
3 Enter the URL for your SharePoint site, and click OK.
Figure 9.22 Enable browser compatibility from InfoPath to verify your design. This
will ensure that you have Forms Services. Although you may have SharePoint Server,
the site that you’re implementing it on might have that feature turned off.
272 CHAPTER 9 Collecting and managing data by integrating with InfoPath
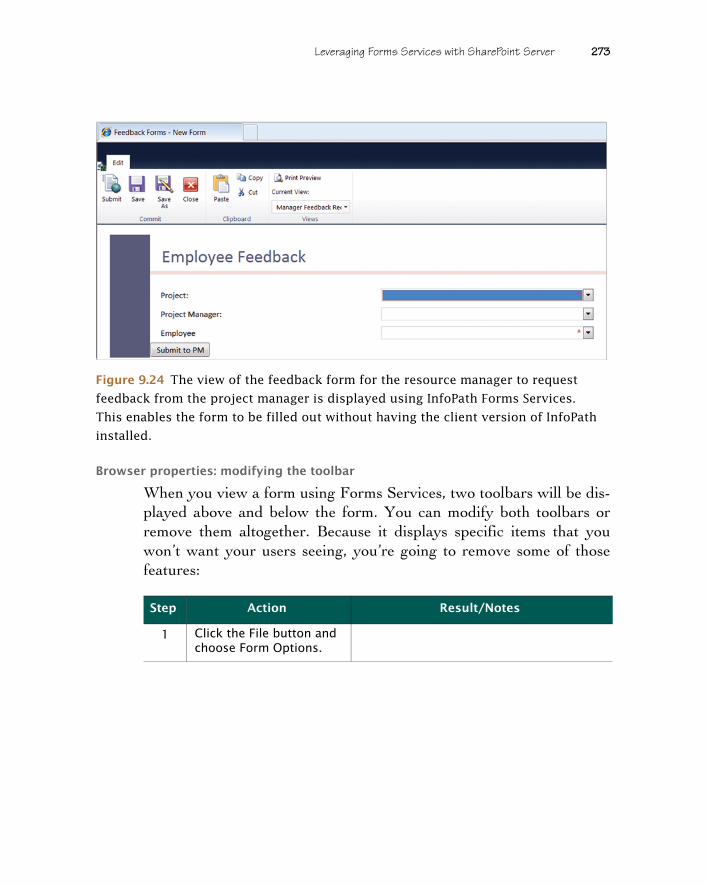
The next time you go to view the form, it will display in the browser, asshown in figure 9.24.
You’re finished with that section, so now it’s cleanup time. Your focuswill be on the toolbar to remove some of the functionality from theusers; this will prevent them from doing something that you don’t wantthem to do. An example would be switching around the views and notfollowing that nice logic that you put into your form for showing theend user the appropriate view.
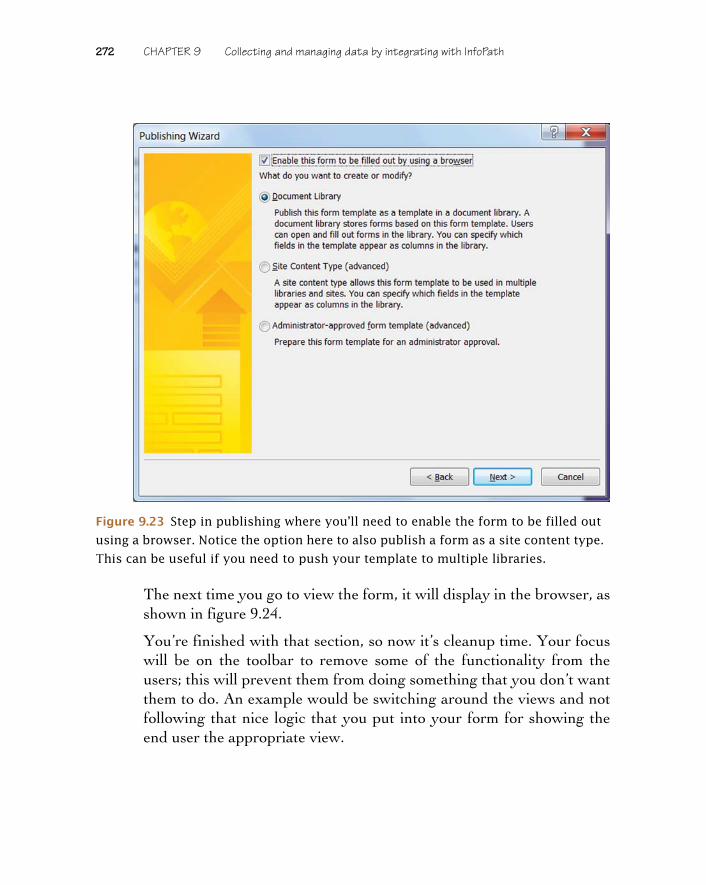
Figure 9.23 Step in publishing where you’ll need to enable the form to be filled out
using a browser. Notice the option here to also publish a form as a site content type.
This can be useful if you need to push your template to multiple libraries.
Leveraging Forms Services with SharePoint Server 273
Browser properties: modifying the toolbar
When you view a form using Forms Services, two toolbars will be dis-played above and below the form. You can modify both toolbars orremove them altogether. Because it displays specific items that youwon’t want your users seeing, you’re going to remove some of thosefeatures:
Step Action Result/Notes
1 Click the File button and choose Form Options.
Figure 9.24 The view of the feedback form for the resource manager to request
feedback from the project manager is displayed using InfoPath Forms Services.
This enables the form to be filled out without having the client version of InfoPath
installed.

274 CHAPTER 9 Collecting and managing data by integrating with InfoPath
Now that you’ve designed your form and published it to the site, let’sdiscuss an alternative approach for displaying your browser-basedform.
9.3.2 Page Viewer web part: displaying your form
The Page Viewer web part used with Forms Services can provide afantastic option for enabling users to have quick access to a form oncethey go to a page. To add the form to your SharePoint site without hav-ing your users click New, you can do the following:
2 Uncheck Save, Save As, Close, and Views,
3 Republish the form.
Step Action Result/Notes
1 Navigate to the homepage of the Project Feedback site.
2 Select Site Actions > Edit Page.
Step Action Result/Notes
Leveraging Forms Services with SharePoint Server 275
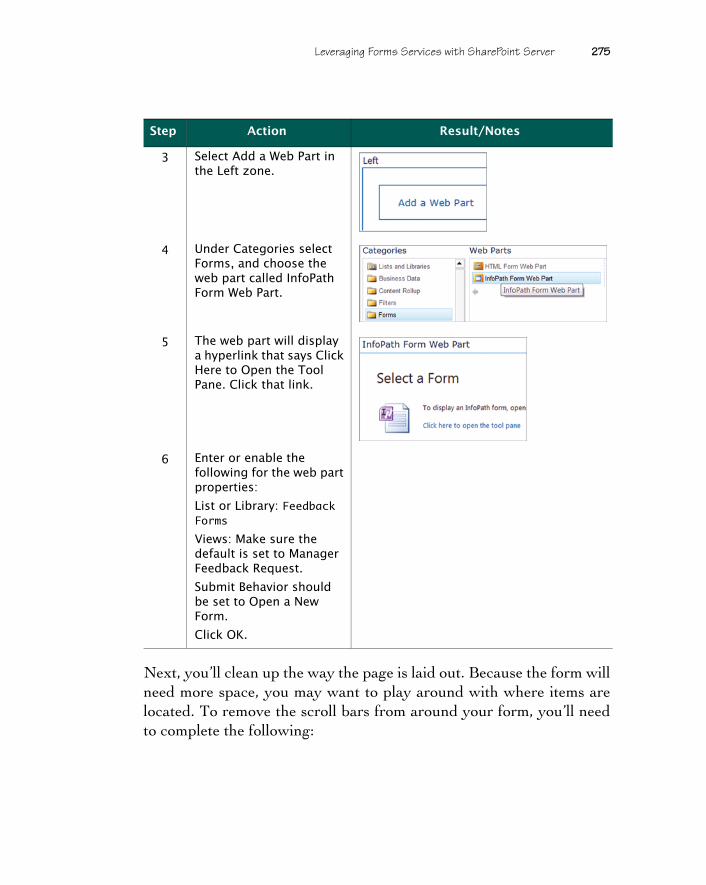
Next, you’ll clean up the way the page is laid out. Because the form willneed more space, you may want to play around with where items arelocated. To remove the scroll bars from around your form, you’ll needto complete the following:
3 Select Add a Web Part in the Left zone.
4 Under Categories select Forms, and choose the web part called InfoPath Form Web Part.
5 The web part will display a hyperlink that says Click Here to Open the Tool Pane. Click that link.
6 Enter or enable the following for the web part properties:
List or Library: Feedback Forms
Views: Make sure the default is set to Manager Feedback Request.
Submit Behavior should be set to Open a New Form.
Click OK.
Step Action Result/Notes
276 CHAPTER 9 Collecting and managing data by integrating with InfoPath
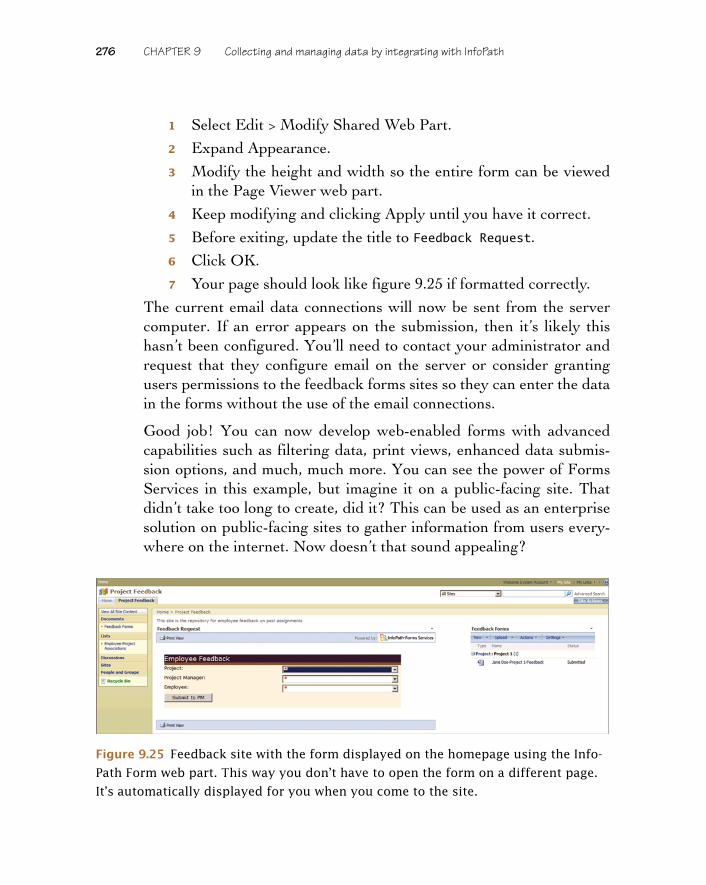
1 Select Edit > Modify Shared Web Part.
2 Expand Appearance.
3 Modify the height and width so the entire form can be viewedin the Page Viewer web part.
4 Keep modifying and clicking Apply until you have it correct.
5 Before exiting, update the title to Feedback Request.
6 Click OK.
7 Your page should look like figure 9.25 if formatted correctly.
The current email data connections will now be sent from the servercomputer. If an error appears on the submission, then it’s likely thishasn’t been configured. You’ll need to contact your administrator andrequest that they configure email on the server or consider grantingusers permissions to the feedback forms sites so they can enter the datain the forms without the use of the email connections.
Good job! You can now develop web-enabled forms with advancedcapabilities such as filtering data, print views, enhanced data submis-sion options, and much, much more. You can see the power of FormsServices in this example, but imagine it on a public-facing site. Thatdidn’t take too long to create, did it? This can be used as an enterprisesolution on public-facing sites to gather information from users every-where on the internet. Now doesn’t that sound appealing?
Figure 9.25 Feedback site with the form displayed on the homepage using the Info-
Path Form web part. This way you don’t have to open the form on a different page.
It’s automatically displayed for you when you come to the site.
Summary 277
Following is a summary to help you understand the functionality thatyou should now be comfortable with implementing from completingthis scenario:
❂ Creating a custom list and modifying the columns❂ Publishing to and creating Forms libraries❂ Designing a form in InfoPath❂ Adding controls to capture data for your InfoPath form❂ Working with data sources to retrieve and submit data via Share-
Point and email❂ Creating views and dynamically changing them based on the status
of the form❂ Displaying your form via a web browser using Forms Services
Up to this point, you’ve designed your sites in silos. They all functionperfectly without leveraging any of the data or functionality from othersites. The next chapter will walk you through some features for inte-grating these sites and provide some management tips without havingto maintain each site individually.
Let’s test your knowledge. A few of the questions that you should beable to answer are these:
❂ What’s the difference between InfoPath and InfoPath Forms Services?InfoPath requires that your users have a license for Microsoft Office InfoPathto complete the form. InfoPath Forms Services doesn’t require a licensebecause it displays the forms via the web.
❂ Why would you use a filter when populating a drop-down list boxwhen retrieving your values?This enables you to create dynamic drop-down lists where the values in thedrop-down lists that follow will show different values that are specific to theentry in a previous drop-down list.
9.4 Summary

278 CHAPTER 9 Collecting and managing data by integrating with InfoPath
❂ What are some of the benefits of using views?You can dynamically switch between different views, based on a value in yourform, so it shows the information in a relevant format.
The same data can be displayed in edit mode or read-only mode whileusing the same data source.


![Smart Phone [ Case Study ] Additional Terms--. 1G, 2G, 3G, 4G 1G-- 1G is short for first-generation wireless telephone technology. This generation of.](https://static.fdocuments.us/doc/165x107/56649c935503460f9494f8c4/smart-phone-case-study-additional-terms-1g-2g-3g-4g-1g-1g-is-short.jpg)