IS 1838-3 (2011): Preformed Fillers for Expansion Joints ...

SF 2 Bookletmaker
Op manual

2
SF 2
Introduction ........................................................ 3
Specifications ..................................................... 3
Safety ................................................................. 4
Assembly Drawing ............................................ 5
Installation .......................................................... 6
Preventive Maintenance ..................................... 6
Control Panel ..................................................... 7
Fuses .................................................................. 7
Operation & Setup ............................................ 8
Side Stitching ..................................................... 9
Corner Stitching................................................. 10
Adjustments ....................................................... 11
Trouble Shooting ............................................... 12
CONTENTS

3
INTRODUCTION
Simple Operation: Just load your booklet and it is automatically jogged, stitched, folded, and discharged ontoan accumulating output conveyor. Side stitching, corner stitching, and folding projects, with or without stitching,are easily accomplished.
Advanced Technology: StitchFold uses patented magnetic stitching head technology, providing the reliabilityand economy of wire stitching. Dual sets of folding rollers assure consistent, professional results. For safety,interlocked access guards prevent machine operation when open.
Improved Productivity: With StitchFold, you can jog, stitch, and fold more than 65,000 booklets at a maximumspeed of 2,300 finished booklets per hour - without stopping to reload staples. StitchFold's variable workthickness capacity handles from 2 sheets to a one hundred page booklet with no setup changes or adjustments.
Lower Operating Costs: The StitchFold replaces expensive preformed staples with inexpensive bookbindingwire; you save on material costs and nonproductive downtime.
BOOKLETMAKER SPECIFICATIONS
Unit Weight: 250 Pounds
Speed: Up to 2,300 booklets per hour
Capacity: 2 to 25 sheets of 20# bond (.100" thick before folding) (100 page book)
Re-load: 65,000 booklets per spool of wire
Paper Size: Min. 4.75" x 8.25" Max. 12.75" x 18.5" (also: A5 to A3)
Booklets: 4.25" x 5.5", 5.5" x 8.5", 8.5" x 11", 4.75" x 4.75 "CD", & metric sizes
(All booklets with or without trim stock on one or three sides)
Stitch Space: 5.5" on 8.5" or 11" tall books 2.75" on 5.5" tall books
Counter: Resettable 6-digit electronic counter
Folder: Knife folder with dual folding rollers
Squaring: Side jog plus full length tape feed
Output: Continuous conveyor
Footprint: 16.25" x 22.5"
Dimensions: Height 25" Width 21" Depth 52"
Modes: Stitch and Fold, Stitch, Fold, Corner Stitch, Side Stitch
Electrical: Standard outlet - 115 Volts, 60 Hz, 10 Amps (1/4 HP)

4
SF 2SAFETY
A.Front Guard: Blocks access to the stitching headsand their point of operation. An electrical inter-lock keeps the machine turned off unless thishinged guard is closed. Do not stick your fingersunder the front guard!
B. Top Guard: Blocks access to mechanism thatdrives the stitching heads. An electrical interlockkeeps the machine turned off unless this guard isclosed. Do not stick your fingers under the topguard!
C. Right Side Cover: Blocks access to mechanismsthat can pinch or cut.
D. Left Side Cover: Blocks access to dangerouselectric voltage and mechanisms that can pinchor cut. Be sure to disconnect electrical powerbefore removing this cover.
E. Front Cover: Blocks access to dangerous elec-tric voltage and mechanisms that can pinch orcut. Be sure to disconnect electrical power beforeremoving this cover.
F. Rear Cover: Blocks access to low voltage con-nections and mechanisms that can pinch or cut.Do not stick your fingers beyond this cover!
G. Roller Guard: Blocks access to a pinch points.Do not stick your fingers beyond this cover!
SAFETY GUARDS
1. Make sure electrical power is turned offbefore performing any adjustment or main-tenance.
2 . Keep hands, hair, tools, and clothing clearof stitching area.
3 . Become familiar with the moving compo-nents of your machine. Keep fingers awayfrom areas that could pinch or cut.
4 . A well maintained machine is a safer ma-chine. Clean and lubricate the machine atregular intervals. Check machine daily forbroken or worn parts. Replace as necessary.DO NOT attempt to operate the machine if apart is broken.
5 . See "SAFETY GUARDS" below! If you areunsure how to safely operate your Bookletmaker,contact your Service Representative.
SAFETY PRECAUTIONS AND PROCEDURES
DANGER
KEEP HANDS CLEAR OF STITCHING AREA AND ANY MOVING PARTS!
NEVER OPERATE MACHINE WITHOUT ALL GUARDS IN PLACE!
5
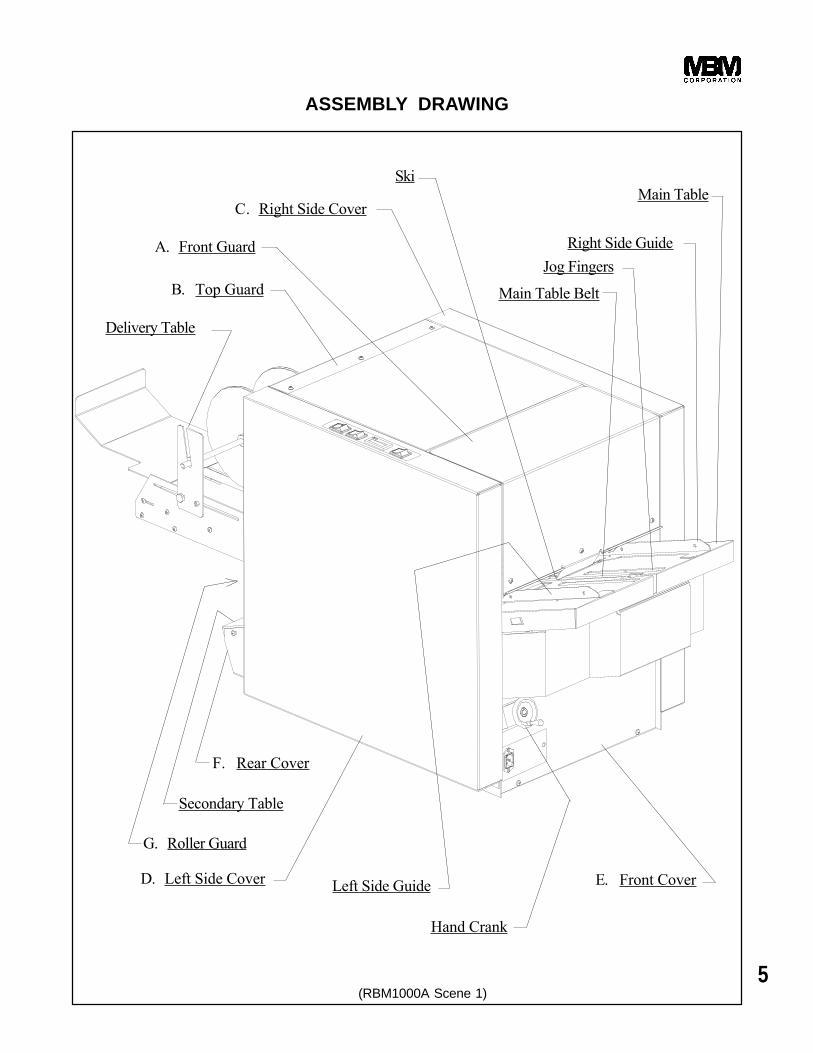
ASSEMBLY DRAWING
E. Front Cover
Secondary Table
Delivery Table
D. Left Side Cover
G. Roller Guard
B. Top Guard
Right Side Guide
C. Right Side Cover
A. Front Guard
Main Table Belt
Ski
Hand Crank
Left Side Guide
Main Table
F. Rear Cover
Jog Fingers
(RBM1000A Scene 1)

6
SF 2INSTALLATION
PREVENTIVE MAINTENANCE
LUBRICATION:
Disconnect electrical power. Next, remove the frontcover and both side covers.
Use SAE-20 oil to lubricate porous bronze bearings,plastic bearings, chains, and shafts.
Use 10 weight, SAE-10 oil, to lubricate the stitching heads every time a new coil of stitching wire is loaded.Clean and lubricate the magnetic rotator. Lubricate the driver bar and the bender bar latch. See stitchinghead owners manual for detailed lubrication instructions.
CLEANING:
Use MBM Roller Wash (#0735) to clean the belts.
Use MBM Roller Wash (#0735) to clean the foldingrollers.
LOADING & THREADING WIRE:
Use only approved stitching wire, part number 0872. Open the top guard to reach the wire spool studs.Remove the first retaining pin on each stud.While holding back the white brake pad, mount thecoil of stitching wire so the wire comes off upwardfrom the backside, and replace the pin.
Thread the wire upward through the large opening inthe spring lever assembly, over the curved section ofthe lever, and through the slot in the lever. Continueto thread the wire over the large roller on top of thestitcher head, through the straightening rollers, intothe check pawl, and down past the gripper. (Foreasier threading, temporarily turn straightening rollerto "OFF" position.) Guide the wire about 1/8" intothe hole in the top of the cutter.
When both heads are threaded, the machine is readyto operate. However, it will take two cycles beforeproper stitches are produced. See instructions in thestitching head owners manual for detailed instructionon threading wire.
BEFORE UNCRATING:
Examine the crate for visible damage. If the crate isdamaged, the machine might be damaged. Notifythe carrier who delivered the machine.
UNCRATING THE MACHINE:
Carefully remove the machine from its container. Liftthe machine by grasping its strong framework. Tug-ging on cables, covers, or other delicate componentscould cause damage.
Examine the machine for damages incurred duringshipping. Do not install a damaged machine. Notifythe carrier immediately, and be sure to get a signedcopy of the Carrier Inspector's Report of the dam-age incurred. Your service representative will assistyou in determining the cost of repairs.
ELECTRICAL POWER:
The power cord can be plugged into any 115V, 60Hz, 1 Phase, 15 Amp circuit. The machine drawsless than 10 amps.
7
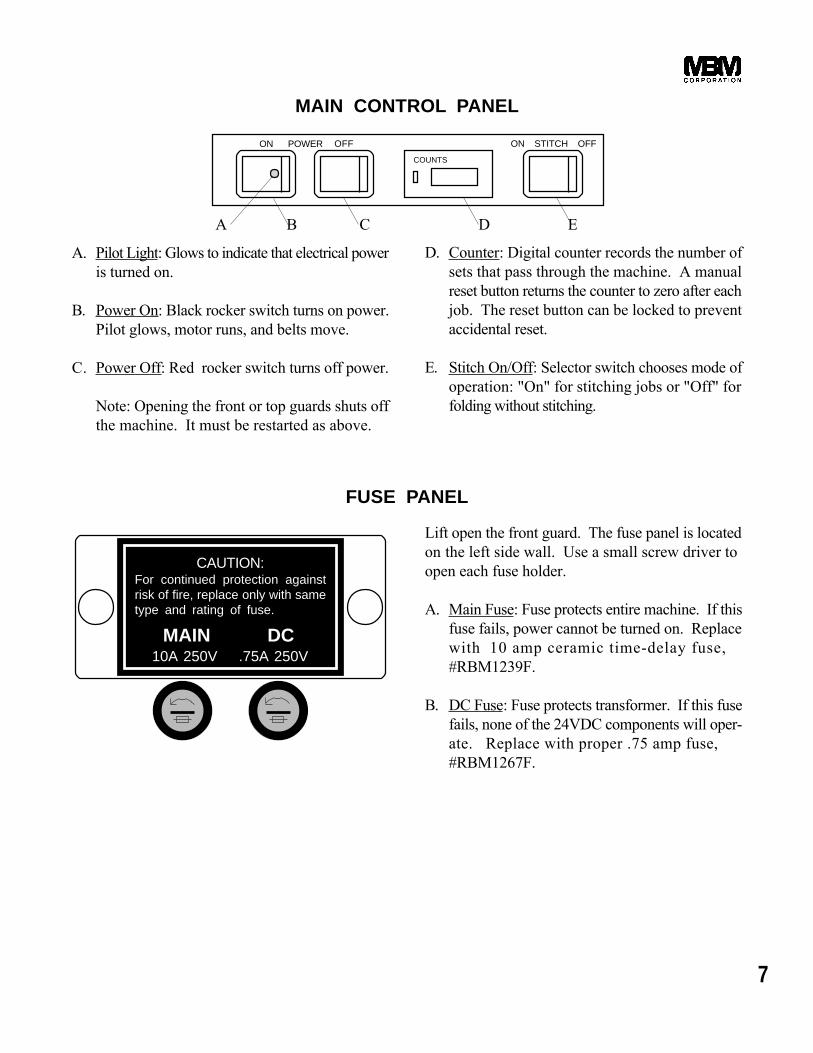
MAIN CONTROL PANEL
ON OFF
COUNTS
A. Pilot Light: Glows to indicate that electrical poweris turned on.
B. Power On: Black rocker switch turns on power.Pilot glows, motor runs, and belts move.
C. Power Off: Red rocker switch turns off power.
Note: Opening the front or top guards shuts offthe machine. It must be restarted as above.
FUSE PANEL
D. Counter: Digital counter records the number ofsets that pass through the machine. A manualreset button returns the counter to zero after eachjob. The reset button can be locked to preventaccidental reset.
E. Stitch On/Off: Selector switch chooses mode ofoperation: "On" for stitching jobs or "Off" forfolding without stitching.
A B C D E
ON STITCH OFFPOWER
Lift open the front guard. The fuse panel is locatedon the left side wall. Use a small screw driver toopen each fuse holder.
A. Main Fuse: Fuse protects entire machine. If thisfuse fails, power cannot be turned on. Replacewith 10 amp ceramic time-delay fuse,#RBM1239F.
B. DC Fuse: Fuse protects transformer. If this fusefails, none of the 24VDC components will oper-ate. Replace with proper .75 amp fuse,#RBM1267F.
MAIN DC
CAUTION:For continued protection againstrisk of fire, replace only with sametype and rating of fuse.
10A 250V .75A 250V
8
SF 2OPERATION & SETUP
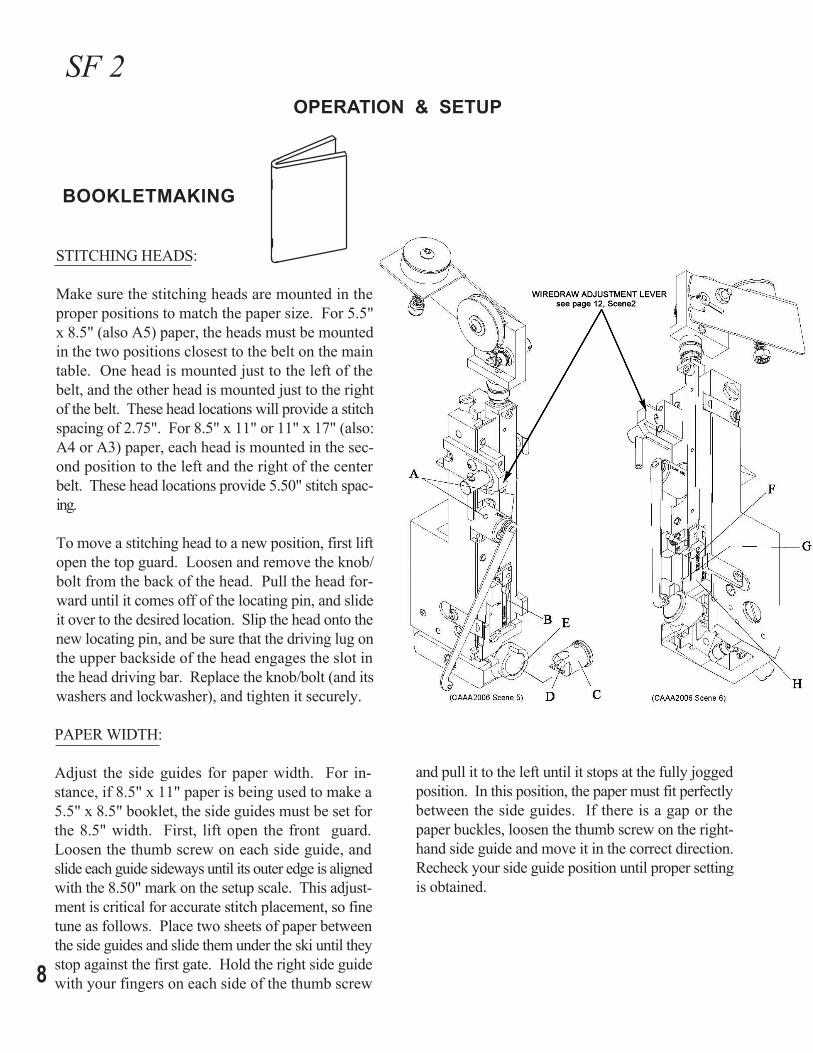
and pull it to the left until it stops at the fully joggedposition. In this position, the paper must fit perfectlybetween the side guides. If there is a gap or thepaper buckles, loosen the thumb screw on the right-hand side guide and move it in the correct direction.Recheck your side guide position until proper settingis obtained.
BOOKLETMAKING
STITCHING HEADS:
Make sure the stitching heads are mounted in theproper positions to match the paper size. For 5.5"x 8.5" (also A5) paper, the heads must be mountedin the two positions closest to the belt on the maintable. One head is mounted just to the left of thebelt, and the other head is mounted just to the rightof the belt. These head locations will provide a stitchspacing of 2.75". For 8.5" x 11" or 11" x 17" (also:A4 or A3) paper, each head is mounted in the sec-ond position to the left and the right of the centerbelt. These head locations provide 5.50" stitch spac-ing.
To move a stitching head to a new position, first liftopen the top guard. Loosen and remove the knob/bolt from the back of the head. Pull the head for-ward until it comes off of the locating pin, and slideit over to the desired location. Slip the head onto thenew locating pin, and be sure that the driving lug onthe upper backside of the head engages the slot inthe head driving bar. Replace the knob/bolt (and itswashers and lockwasher), and tighten it securely.
PAPER WIDTH:
Adjust the side guides for paper width. For in-stance, if 8.5" x 11" paper is being used to make a5.5" x 8.5" booklet, the side guides must be set forthe 8.5" width. First, lift open the front guard.Loosen the thumb screw on each side guide, andslide each guide sideways until its outer edge is alignedwith the 8.50" mark on the setup scale. This adjust-ment is critical for accurate stitch placement, so finetune as follows. Place two sheets of paper betweenthe side guides and slide them under the ski until theystop against the first gate. Hold the right side guidewith your fingers on each side of the thumb screw
9
SIDE STITCHING
Side stitching can be done with 5.5" x 8.5" or 8.5"x 11" (also: A4 or A5) paper. In either case, mountthe heads for 5.50" stitch spacing.
Lower the folding gate by pressing the toggle switchlocated on the secondary table. The side stitchedsets will drop off the end of the secondary tableunfolded. The booklet stacker assembly can be re-located to catch the finished sets.
Adjust the side guides for paper length. For in-stance, if 8.5" x 11" paper is being side stitched, theside guides must be set for the 11" length. Align theouter edge of each side guide with the 11" mark onthe table scale.
With Optional Side/Corner Stitch Gate:Use thumb screw to mount gate assembly on themiddle of the stitcher head mounting bar. Connectcord from gate to socket on left inside wall. Placetwo sheets between the side guides, and slide themunder the ski until they stop against the side stitchgate. Use the hand crank to adjust the position ofthe back jog until the paper just fits between the gateand the raised jog fingers. If the standard fold gatereturns early and causes a jam or double stitch, turnthe gate timer clockwise enough to prevent the prob-lem.
Without Optional Side/Corner Stitch Gate:Adjust the stitching gate for paper width. For in-stance, for 8.5" x 11" paper, the gate must be set forthe 8.5" width. First, lift open the front guard. Placetwo sheets between the side guides, and slide themunder the ski until they stop against the gate. Turnthe knob until the trailing edge of the paper is just infront of the clinchers.
OPERATION:
Turn on power and select "STITCH ON". Squareup a set of paper sheets by hand, and lay the frontedge on the table between the side guides. Pushuntil the front edge is under the ski, and then let go.The set will be automatically stitched, folded, andejected onto the output conveyor.
FOLDING ONLY
Adjust the machine for paper size according to theinstructions for bookletmaking. However, the stitch-ing heads may be left in any mounting positions. Onthe control panel, select "STITCH OFF".
PAPER LENGTH:Adjust the gates for paper length. For instance, for8.5" x 11" paper, the gates must be set for the 11"length. Place two sheets of paper between the sideguides and slide them under the ski until they stopagainst the first gate. While holding the paper againstthe gate, turn the hand crank under the left hand sideof the table until the paper is aligned with the 11"mark on the scale. (Clockwise rotation moves thepaper out.) This single adjustment takes care of thestitching gate, the folding gate, and the optional backjog.For machines equipped with the optional back jog,fine tune the hand crank adjustment as follows. Placeyour finger about one inch down from the top of oneof the jog fingers and raise it to the point that it hitsthe stop. Use your other hand on the hand crank toget the two sheets firmly against the back jog fingerwithout buckling the paper. In other words, twosheets should fit perfectly between the first gate andthe raised jog fingersAdjust the booklet tray at the end of the deliverytable to match the booklet size. Loosen the knobunder the tray, and slide the tray to the proper po-sition. Finally, adjust the position of the deliverytable wheels. There are four sets of slots in theframe for positioning the shaft and wheels; choose aposition that suits the booklet size. Just lift the shaftand wheels and set the ends of the shaft into theappropriate pair of slots.

10
SF 2
CORNER STITCHING
Lower the folding gate by pressing the toggle switchlocated on the secondary table. The side stitchedsets will drop off the end of the secondary tableunfolded. The booklet stacker assembly can berelocated to catch the finished sets.
With Optional Side/Corner Stitch Gate:Corner stitching can be done with 5.5" x 8.5" or 8.5"x 11" (also: A4 or A5) paper. In all cases, mountone head in the far right position. (Be sure there isa clincher in the far right position. If necessary,relocate the far left clincher to the far right position.)The other head may be removed or left in anotherposition without wire. Use thumb screw to mountgate assembly on the middle of the stitcher headmounting bar. Connect cord from gate to socket onleft inside wall.
Adjust the left side guide for paper length. For in-stance, if 8.5" x 11" paper is being corner stitched,the side guide must be set for the 12" length. Alignthe outer edge of the left side guide with the tablescale as follows:
11" paper 12" mark8.5" paper 7" markA4 paper 13.4" markA5 paper 6.5" mark
An accessory guide must be mounted on the righthand side for corner stitching. Using thumb screwsand wing nuts, attach the corner stitch guide (9" longsheet metal part) to the two holes in the right sideguide.
Place two sheets between the side guides, and slidethem under the ski until they stop against the cornerstitch gate. Pull the right side guide left to the joggedposition. If there is a gap or the paper buckles,loosen the thumb screw on the right-hand side guideand move it in the correct direction. Use the handcrank to adjust the position of the back jog until thepaper just fits between the gate and the raised jog
Without Optional Side/Corner Stitch Gate:Corner stitching can be done with 5.5" x 8.5" or 8.5"x 11" (also: A4 or A5) paper. In all cases, mountone head in the far left position. The other head maybe removed or left in any position without wire.
Two accessory guides must be mounted on the lefthand side for corner stitching. First, adjust the stan-dard left side guide as far as possible to the left.Using thumb screws and wing nuts, attach the cornerstitch guide (9" long sheet metal part) to the twoholes in the left side guide.
Next, lift open the top guard. Using two thumbscrews, attach the corner stitch bar (11" long bar) totwo holes in the table on the far left. The angle onthe bar should face the front and middle of the ma-chine. Adjust the left side guide until the cornerstitch guide is aligned with the corner stitch bar.
Adjust the right side guide for paper length. Forinstance, if 8.5" x 11" paper is being corner stitched,the side guide must be set for the 11" length. Alignthe outer edge of the right side guide with the tablescale as follows:
11" paper 11" mark8.5" paper 6" markA4 paper 12.38" markA5 paper 6.54" mark
Adjust the stitching gate for paper width. For in-stance, for 8.5" x 11" paper, the gate must be set forthe 8.5" width. First, lift open the front guard. Placea sheet on the table between the side guides, andslide it under the ski until it stops against the gate.Turn the knob until the trailing edge of the paper isjust in front of the clinchers.
fingers. If the standard fold gate returns early andcauses a jam or double stitch, turn the gate timerclockwise enough to prevent the problem.

11
GATE TIMER
The adjusting knob for the gate timer is located onthe back of the machine's left side cover. It controlsthe amount of time that the stop gate is held downeach cycle after the stitches have been driven into thebooklet. Longer booklets need more time to getpast the gate, and the next cycle cannot start until thegate has returned.
For 11" x 17" paper, set the knob as shown. Theknob can be left in this position for any other papersize with feed rates up to 2,300 booklets per hour.For faster feed rates with smaller paper, turn theknob to the 8.5x11 position.
The stitch gate must be down long enough for book-let to pass over. If the gate comes up too soon, thegate limit swich could get tripped causing a doublestitch. Turn the knob slightly clockwise.
If the stitch gate stays down longer than necessaryand the feed rate is high, booklets will will passthrough the stitching station without getting stitched.Turn the knob slightly counter clockwise.
Once the adjustment is fine tuned, the knob can becalibrated by loosening its set screw and aligning themark on the knob with the appropriate paper size.
GATE TIMER
11 x 17A3
8.5 x 115.5 x 8.5A4, A5
PAPER SIZE:
Off Center Fold
Proper Fold
Finally, if the fold is not quite square (see below), thelock nuts can be adjusted individually.
Important: Adjust the lock nuts as described belowonly as a last resort. First, carefully adjust the sideguides and hand crank per page 8.
If the stitches are off the fold (see below), open thebooklet flat and measure to see if the stitches arecentered on the length of the paper. Turn the knobuntil stitches are placed precisely on the center of thepaper. Next, remove the rear cover and locate thetwo lock nuts below the back end of the secondarytable. Turn both nuts equally in small increments untilbooklets will fold precisely on the stitches.
ADJUSTMENTSBOOKLET SQUARENESS
Check the finished booklet. If the stitches are prop-erly located on the fold, but the fold is off center,adjust the gates by turning the hand crank until setswill fold precisely in half.

SF 2
TROUBLE SHOOTING
PROBLEM:
1. Unit will not turn on.
2. Book remains in stitching position.
SOLUTION:
1. Plug unit into appropriate power supply.2. If there is no green light:
a. Check for proper line voltage. (115V or 220V)b. Check the "Main" fuse.c. Make sure front and top guards are closed.
1. Make sure motor and belt are running. If not, see prob-lem 1.
2. Check the "DC" fuse.3. Check the connection to the stitch gate microswitch (4LS).4. Turn to Stitch "off" position:
a. If stitch gate drops when putting a set through themachine, check connections to the stitch clutch.
b. If stitch gate doesn't drop when putting a setthrough, check the stitch gate microswitch (4LS).12
WIRE DRAW ADJUSTMENT:
How to change the wire draw length for the thicknessof the work being stitched.
The Stitcher head is equipped with a 3 position eccentricAdjuster Lever Assembly (CAA176) See CAAA2006 Scene 5.This lever changes the length of wire used to stitchthe book.
The down position results in the shortest length of wire forstitching books with 2-10 sheets.
The middle position results in a medium length of wire forstitching books with 10 - 15 sheets.
The up position results in the longest length of wire forstitching books with 15-25 sheets.
3-4 sample books should be stitched and inspected to seea change in the wire length inside the book.
Scene 2
MIDDLE10-15 SHEETS
UP15-25 SHEETS
DOWN2-10 SHEETS

13
PROBLEM:
6. Stitch heads won't cycle.
7. Loud banging/clicking noise when stitchheads cycle.
8. Double stitch.
9. Booklet folded but not stitched.
SOLUTION:
1. Make sure that Stitch on/off switch is in "on" position.
1. Lubricate head per the "External Lubrication Sheet" pro-vided with the stitch heads. (Lubrication instructions alsoappear in the EZ Thread Owners Manual.) Pay specialattention to the rotator lubrication.
1. Check stitch gate timer setting; see instructions on page11. The gate should stay down until the tail end of thebook clears the stitch gate. Otherwise, turn clockwise.
2. Check for sluggish operation of stitch gate. If there isbinding or the return spring is too strong, the gate will failto pull the stitch start limit switch, 4LS, away from thepaper causing repeat stitching.
1. Make sure that Stitch on/off switch is in "on" position.2. Check that you are not feeding the books so fast that the
gate has not come back up to receive the next book intime. In that case, adjust stitch gate timer setting perinstructions on page 11.
3. Book moves slowly through the machine.
4. Inconsistent fold.
5. Stitches are not square to book.
1. Make sure when feeding the book that it gets under theside guides.
2. Spray furniture polish or wax on the entry and through themachine. Caution: Do not get polish or wax on paperdrive belt.
1. Use MBM Roller Wash (#0735) to clean all four foldingrollers.
2. Use MBM Roller Wash (#0735) to clean paper drivebelt.
3. Check and tighten the set screws in all five sprockets thatdrive the folding rollers. (Three on left side; two on right.)
4. Make sure that the spring loaded folding rollers are freelyspringing out and back.
5. Check the folding knife for bends or waviness. Straightenor replace the knife.
1. Make sure the stitch stops are square to the clinchers.2. Make sure the side guides are square to the stops.