Setting up Plug-Ins Oracle FLEXCUBE Universal Banking ......Examples: If Data source is...
82
Setting up Plug-Ins Oracle FLEXCUBE Universal Banking Release 14.3.0.0.0 [May] [2019]
Transcript of Setting up Plug-Ins Oracle FLEXCUBE Universal Banking ......Examples: If Data source is...
Setting up Plug-Ins Oracle FLEXCUBE Universal Banking
Release 143000 [May] [2019]
Table of Contents 1 SETTING UP PLUG-INS 1-1
11 INTRODUCTION 1-1 12 INTEGRATING ORACLE FLEXCUBE UBS AND BPEL 1-1
121 Custom Provider Configuration 1-1 122 Configuring libovd for single Entity 1-5 123 Configuring libovd for MultiEntity 1-6 124 Configuring for Multiple Providers for Multiple Entities 1-8 125 Configuring DBAdapter 1-14 126 Configuring JMS Adapter 1-17 127 Configuring FTP Adapter 1-35 128 BAM Report Configuration settings 1-47 129 IPM configuration to edit the document 1-60 1210 Configuring Superviser Roles in EM 1-65 1211 Email Driver Configuration 1-68 1212 TimeOut Settings for BPEL 1-71
13 INTEGRATING ORACLE FLEXCUBE UBS AND SCHEDULER 1-78 131 Running Backend Scripts 1-78
14 INTEGRATING ORACLE FLEXCUBE UBS AND BIP REPORTS 1-78 141 Deploying Application Through Application Serverrsquos Admin Console 1-78
15 INTEGRATING ORACLE FLEXCUBE UBS AND MBEAN 1-78 151 Startup Script Modification 1-78
1-1
1 Setting Up Plug-Ins 11 Introduction
You need to carry out certain tasks manually before Oracle FLEXCUBE deployment This document details out the pre-deployment tasks based on the on the selected plug-ins
12 Integrating Oracle FLEXCUBE UBS and BPEL If you have created the EAR file with BPEL as a plug-in then along with the Oracle FLEXCUBE UBS EAR file the Installer creates lsquoFCJJPSProviderjarrsquo file inside the folder lsquoBPELbuildrsquo created along You need to complete the following tasks before deploying Oracle FLEXCUBE UBS EAR file
121 Custom Provider Configuration
FCUBS Custom Authenticator Provider configuration has to be done from the Weblogic console of SOA or manually update the configxml of the SOA domain Below steps needs to be followed to setup Custom Authentication Provider
1 Along with FCUBS Ear file Installer creates FCUBSAuthenticationProviderjar file inside the BPELbuild folder a Copy this file to the following path on the application server host
ltORACLE_HOMEgtwlserverserverlibmbeantypes 2 Restart the Admin Server 3 Login to the Console 4 Click on Security Realms
5 Click on myrealm
1-2
6 Click on Providers tab and click on new button to create new authentication provider
1-3
7 Give Provider name as FCJCustomProvider and type as FCUBSUserAuthenticator
8 Click Reorder to bring the newly created provider to first of all providers and click OK
1-4
9 Click on FCJCustomProvider 10 In Common tab change the control flag to ldquoSUFFICIENTrdquo
11 In Provider Specific tab
a) Set JNDIName as Flexcube JNDI Name b) If external authentications are used in FCUBS then Fill the LdapMSAD related fields
1-5
12 For manually editing the configxml go to the below path and open the configxml file
ltORACLE_HOMEgtMiddlewareuser_projectsdomainsbase_domainconfig The following codes need to be added at proper locations in the configxml
a) Search for lt realmgt tag and add the following code between ltrealmgt and lt realmgt tagsThis should be the first child of the realm Node
ltsecauthentication-provider xmlnsn1=httpfcubsofsscomsecurity xsitype=n1fcubs-user-authenticatorTypegt
ltsecnamegtFCJCustomProviderltsecnamegt ltseccontrol-flaggtSUFFICIENTltseccontrol-flaggt ltn1msad-or-ldap-login-requiredgttrueltn1msad-or-ldap-login-requiredgt ltn1external-password-requiredgttrueltn1external-password-requiredgt ltn1authentication-typegtMSADltn1authentication-typegt ltn1ldap-server-ip-and-portgtLDAPlocalhost389ltn1ldap-server-ip-and-portgt ltn1ldap-ssl-enabledgttrueltn1ldap-ssl-enabledgt ltn1security-authentication-typegtsimpleltn1security-authentication-typegt ltn1ldap-domain-namegtOFSSCOMltn1ldap-domain-namegt ltn1ldap-server-time-out-durationgt0ltn1ldap-server-time-out-durationgt
ltsecauthentication-providergt
b) Make sure tag values matches the value given during Property file creation
122 Configuring libovd for single Entity
You need to configure the libovd details Follow the steps given below
1 Along with the Oracle FLEXCUBE UBS EAR file the Installer creates lsquoFCJJPSProviderjarrsquo file inside the BPELbuild folder under SOURCE directory
2 On the application server host create a folder by name lsquoclassesrsquo at the location lsquoltMIDDLEWARE_HOMEgtsoasoamodulesoraclesoaext_111xrsquo
3 Extract the file lsquoFCJJPSProviderjarrsquo and from the extracted content copy the folder lsquocomrsquo to lsquoltMIDDLEWARE_HOMEgtsoasoamodulesoraclesoaext_111xclassesrsquo
1-6
4 Navigate to the location lsquoltMIDDLEWARE_HOMEgtsoasoamodulesoraclesoaext_111xclassescomofssfccbpelcacrsquo Edit the properties file lsquoCISPropertiespropertiesrsquo and update lsquoJNDInamersquo with the JNDI name same as Entity Name given in Multi Entity Names screen while creating property file lsquofcubspropertiesrsquo eg lsquojdbcfcjdevDSrsquo
5 Copy lsquoFCJJPSProviderjarrsquo to lsquoltMIDDLEWARE_HOMEgtuser_projectsdomainsltdomain_namegtconfigfmwconfigovdpluginslibCreate the directory structure if it does not exists
6 Copy the fcubs_adapterxml from this word doc to lsquoltMIDDLEWARE_HOMEgtoracle_commonmodulesoracleovdtemplates
fcubs_adapterxml
7 Search for param name=DataSource in fcubs_adapterxml and update its value with FCUBS Datasource name eg updated parameter would look like ltparam_name=DataSource value=jdbcfcjdevDSgt
8 Set environment variables in the command prompt eg for linux shell
export ORACLE_HOME=scratchappbpm12212(setting ORACLE_HOME) export WL_HOME=scratchappbpm12212wlserver(setting WL_HOME) export JAVA_HOME=scratchwork_areaDBAjdk180_144 (setting JAVA_HOME)
9 Execute ldquolibovdadapterconfigrdquo script which is present in lsquoltMIDDLEWARE_HOMEgtoracle_commonbinrsquo with below parameters Provide the below arguments with values for admin server host name or ip admin server port weblogic user id domain home and fcubs datasource
libovdadapterconfigsh -adapterName fcubsadapter -adapterTemplate fcubs_adapterxml -host ltADMIN_SERVER_HOSTgt -port ltADMIN_PORTgt -userName ltWEBLOGIC_USERIDgt -domainPath ltDOMAIN_HOMEgt -dataStore DB -root ou=fcubsdc=oracledc=com -contextName default -dataSourceJNDIName ltFCUBS_DATASOURCE_JNDIgt
10 Once the above steps are completed ie ldquoAdapter created successfully fcubsAdapterrdquo message is displayed restart the server
123 Configuring libovd for MultiEntity 1 Continue step 1 to step5 from 122 section
2 In the following steps replace the ltEntityIdgt tag with the proper Entity name
3 Copy the fcubs_adapter_ltEntityIdgtxml to lsquoltMIDDLEWARE_HOMEgtoracle_commonmodulesoracleovdtemplates
fcubs_adapter_ EntityIdxml
1-7
4 Search for ltFCUBSDATASOURCEgt in fcubs_adapter_lt EntityIdgtxml and update it with fcubs Datasource with the mapped Datasource for the entity in the property file
Exltparam name=DataSource value=ltFCUBSDATASOURCEgtgt
5 Search for UserIdPattern Parameter and Update the value for OU to the entity name in lower case
EX ltparam name=UserIdPattern value=cn=USERIDou=lt EntityIdgtdc=oracledc=comgt
6 Search for MultiEntityEnabled element and update the value to true
EX ltparam name=MultiEntityEnabled value=truegt
7 Search for EntityId element and update the value with the entity name in lower case which we have created
EXltparam name=EntityId value= lt EntityId gtgt
8 Serach for ou=fcubs and update with enity id in lower case
EX ou= EntityId
9 Execute ldquolibovdadapterconfigrdquo script which is present in lsquoltMIDDLEWARE_HOMEgtoracle_commonbinrsquo with below parameters Update the admin server host name or ip admin server port weblogic user id domain home root and fcubs datasource
libovdadapterconfigsh -adapterName fcubsAdapter -adapterTemplate fcubs_adapter_lt EntityId gtxml -host ltADMIN_SERVER_HOSTgt -port ltADMIN_PORTgt -userName ltWEBLOGIC_USERIDgt -domainPath ltDOMAIN_HOMEgt -dataStore DB -root ou=ltEntityIdgtdc=oracledc=com -contextName default -dataSourceJNDIName ltFCUBSDATASOURCE name which we mapped in step4gt
10 Repeat from step2 to step7 for each entity creation
11 Once the above steps are completed restart the server
Note- for any misconfiguration in libovd
We can delete the existing fcubsAdapter and re run the libovdadapterconfigsh
For deleting fcubsAdapter use the below command
Log in to the WSLT console by running the WLST scriptFor example MW_HOMEoracle_commoncommonbinwlstsh (UNIX)MW_HOMEoracle_commoncommonbinwlstcmd (Windows)
Connect to your Administration Server using the following syntax
connect (ltWLS admin user namegtltWLS admin passwordgtt3ltadmin server hostgtltadmin server portgt)
For exampleconnect(weblogicweblogict3myserver7001)
Delete the misconfigured adapter using the following syntax deleteAdapter(adapterName=fcubsAdapter)
1-8
Note the following bull In case of Multi Entity all data sources must be created separately for each
entity The JNDI name will be differentiated by suffixing entity name
Examples If Data source is lsquojdbcfcjDevDsrsquo then jdbcfcjDevDs+entity name will be lookup the application (jdbcfcjDevDs+entity name) jndi should be presented in application server
bull For multi teant deployment BPMN support will be available only for the logged entity
124 Configuring for Multiple Providers for Multiple Entities 1 Login to the Adminserver
2 Click on security Realms
3 Click on myrealms
1-9
4 Click on Providers
5 Click on New
1-10
6 Enter the Name with proper Entity Name(entity name we mapped in property file) and select the type as FCUBSUserAuthenticator
7 Click on Reorder Bring the Authenticatiorprovider to the first in the order and click ok
1-11
8 Click the Provider that we have created
9 In common tab select the control flag as SUFFICENT from the list and click on save
1-12
10 Select the provider specific tab
11 Change the JNDI name to the Datasource JNDI name which have mapped to the entity in the property file level and check the multi entity enabled checkbox
1-13
12 Enter the EntityId with the Entity name which we created in the property file level and click on save
1-14
13 Create the new datasource for each entity with the JNDI name which we mapped in the property file
14 Restart the Admin server
15 Continue the step1 to step15 for each provider creation in multientity scenario
125 Configuring DBAdapter
In order to configure DBAdapter follow the steps given below
1 Log in to lsquoWeblogic Consolersquo and click lsquoDeploymentrsquo under lsquoDomain Structurersquo
1-15
2 In the Deployments table select lsquoDbAdapterrsquo You will be navigated to lsquoSettings for DbAdapterrsquo
3 Click lsquoConfigurationrsquo tab and select lsquoOutbound Connection Poolsrsquo under it
4 Under lsquoGroups and Instancesrsquo click and expand lsquojavaxresourcecciConnectionFactoryrsquo
5 Click lsquoNewrsquo and select lsquojavaxresourcecciConnectionFactory in Outbound Connection Group
6 Define lsquoJNDI Namersquo as lsquoeisDBFCCDEVrsquo and click on lsquoFinishrsquo
The lsquojndi namersquo should be the same as the one in lsquoDbutility sub-processrsquo
7 Click lsquoDbAdapterrsquo again Click lsquoConfigurationrsquo tab and select lsquoOutbound Connection Poolsrsquo
8 Under lsquoGroups and Instancesrsquo click and expand lsquojavaxresourcecciConnectionFactoryrsquo
9 The new JNDI name is listed
10 Click on the hyperlink lsquoeisDBFCCDEVrsquo
1-16
11 Click the lsquoProperty Valuersquo field for the lsquoDataSourceNamersquo and update the application JNDI reference (given in lsquofcubspropertiesrsquo file) and then press lsquoEnterrsquo key
12 Save and restart the Admin server
1-17
126 Configuring JMS Adapter 1 Login in to console Click on JMS ServersNew
1-18
2 Please provide the below Name for JMS Server and select the file persistent store as belowNext
3 Select the target as SOA Server Finish
1-19
4 Go back to Console JMS ModulesNew
1-20
5 Create a JMS Module with the Name FCUBSJMSModule Click on NextSelect the target
as SOA ServerFinish
1-21
1-22
6 Go back to JMS ModulesFCUBSJMSModuleNew
7 Click on Connection Factory nextCreate the connection Factory with the below
NamesNext
1-23
8 Select Advanced targetingcreate New Sub Deployment with the below NameSelect the target as JMS server which we have created on topFinish
1-24
1-25
1-26
9 Go back to console Click on JMS Modules New check on Queuenext
10 Create Queue with Name NOTIFY_DEST_QUEUE and JNDI name as
jmsNOTIFY_DEST_QUEUEselect the sub deployment which we have created earlier NextFinish
1-27
1-28
11 Please create queue MDB_QUEUE_RESPONSE with JNDI name as
jmsMDB_QUEUE_RESPONSE queue eisjmsORGateway with JNDI name as eisjmsORGateway and queue FAULT_QUEUE_RESPONSE with JNDI name as jmsFAULT_QUEUE_RESPONSE as above in console within FCUBSJMSModule(Follow step 8-9 in 126)
12 Go to ConsoleDeploymentJmsAdapterConfigurationOutbound Connection PoolExpand oracletipadapterjmsIJmsConnectionFactoryNewProvide JNDI as lsquoeisQueueNotifrsquonextFinish
1-29
1-30
1-31
1-32
13 Click on the Outbound connection pool with eisQueueNotif and enter the connection factory location as jndiFCUBSConnectionfactorypress Enter and Save
1-33
14 Go to console DeploymentsJMS adapterUpdateNext Next finish
1-34
15 Create the out bound connection pool with the eiswlsQueue name in the Deployments
using connection factory jndiFCUBSConnectionfactory
1-35
127 Configuring FTP Adapter 1 Login to consoleDeployments FTP AdapterConfigurationOutbound Connection
PoolNew
2 Add JNDI name as eisftpFtpAdapterLcl
3 Click finish and save
1-36
1271 BIP Interactive reports configuration
The Following set of instructions can be followed if the BPEL needs to be configured with BIP interactive reports
1 Login to the BIP domain console httpslthostnamegtltportgtconsole
2 Follow the step 121 to add the ldquoFCJCustomProviderrdquo
After adding Navigate to security realms gtmyrealm gt Users and Groups and check if the users from the schema are displayed in Users tab and Roles from the schema are displayed under the Groups Tab
3 Login to the Enterprise Manager (em) httpslthostnamegtltportgtem
bull Right click on the domain(in which BI suite is installed) under the weblogic domain
bull Go to security and then navigate to application roles
1-37
4 After navigating to next screen as in below screenshot
bull Select application stripe as obi
bull Click on the search button
bull Click on create button to add a role
1-38
5 After navigating to next screen as in below screenshot
bull Enter the role name(mandatory) display name(optional) description(optional)
bull Click on the Add button
bull In the Add Principal pop up select type as ldquoGrouprdquo
bull In the advanced option check the checkbox and again select the type as ldquoGrouprdquo below
o Click on the Search button if the roles are listed then select the roles like ALLROLES-000 ADMINROLE-000 from the list
or
o Enter the Principal Name (mandatory) which is actually the role present in the FCUBS (ex ALLROLES-000 ADMINROLE-000) Display Name (optional)
bull After completing click on OK button in pop up window and also in the screen
6 After getting information message like ldquoA new role added successfullyrdquo then again
bull Right click on the domain(in which BI suite is installed) under the weblogic domain
bull Go to security and then navigate to application polices
1-39
7 After navigating to next screen as per screen shot
bull Select the application stripe as obi principal type as ldquoApplication Rolerdquo
bull Click on the search button
bull Select BIConsumer(it should be highlighted) from the list and click on the create like button
1-40
8 After navigating to next screen as per the screen shot
bull Click on Add button a new window ldquoAdd Principalrdquo will be launched
bull Select Type as ldquoApplication Rolerdquo and click on the search button
bull From the list select the role that has been created earlier in application role screen and click on OK button in pop up window and screen
bull Click Add button under Permissions and add the two permissions one by one as mentioned below
1-41
oraclebipublisherrunReportOnline
oraclebipublisheraccessReportOutput
9 After getting information message like ldquoA security added successfullyrdquo
bull Login into the BIPublisher httpslthostnamegtltportgtxmlpserver
bull Click on the Administration
bull Click on the Roles and Permission under Security center and check if the added role(in em) is displayed If not restart the servers
1-42
10 Then click on the Catalog then on the folder that has been created and then on permissions
11 After clicking on the permissions a new window will pop up delete all the roles if any present on click of permissions then click on Add button and then click on search button in ldquoAdd Rolesrdquo window that is launched newly and select the role that has been created and click on move button and click on OK
1-43
12 Finally the role will be added and select the options that has to be provided for the particular role and check if the permissions is only to items within the folder if necessary
Now the reports in the folder will be accessed accordingly based on the roles
Note
In the similar way we can set the permissions at report level also for particular role
1-44
13 Please login in to Bi Publisher httpserverportxmlpserver
14 Click on Adminstration JDBC connectionAdd Data Source
1-45
1-46
15 Please create the data source with data source name as FCSOA and use soa schema details to create the same
16 Add the fcubs roles to allowed Roles under security
17 Click on test connection once the connection is established succesfuly Click on Apply
1-47
18 Please follow the steps 15 to 17 to create data source for FCUBS Schema and give the name as FCBIPBPEL
128 BAM Report Configuration settings 1 The Following set of instructions can be followed if the BPEL need to be configured with BAM
reportsGenerate a deployment plan for BAM Composer Application 2 Login in to console httphostnameportconsole 3 Click on Deploymentsclick on BAM Composer
4 click on Configuration Configuration Save
1-48
5 Click on Overviewcheck the deployment plan location
6 Add variable and variable assignment as below to the Planxml in
ltmodule-namegtBamComposerWebwarltmodule-namegt and for reference please find planxml file
ltvariablegt ltnamegtoracleadfviewrichsecurityFRAME_BUSTINGltnamegt ltvaluegtneverltvaluegt ltvariablegt
1-49
ltmodule-descriptor external=truegt ltroot-elementgtweb-appltroot-elementgt lturigtWEB-INFwebxmllturigt ltvariable-assignmentgt ltnamegtoracleadfviewrichsecurityFRAME_BUSTINGltnamegt ltxpathgtweb-appcontext-param[param-name=oracleadfviewrichsecurityFRAME_BUSTING]param-valueltxpathgt ltorigingtplanbasedltorigingt ltvariable-assignmentgt ltmodule-descriptorgt
Plan3xml
7 Stop the BAM composer application in console
8 Update the deployment plan 9 Click on deployments click on BAM Composer checkbox Click on update
1-50
10 Select the Update this application in place with new deployment plan changes and click on
change path button
11 Select the latest planxml in the in the pathnextnextFinish
1-51
12 Restart the BAM Composer application in the console
1-52
13 Login in to em console httphostnameportem 14 Right Click on BAM ServerSecurityApplication Roles
15 Click on Create create application role with ALL ROLES-000Click on ADD button in the
Members
1-53
16 Select the Type as Group and add principle details be referring the below screen shot 17 Login to BAM Composer httphostnameportbamcomposer--gt Click on Administrator
1-54
18 Go to Data ObjectRight Click on CUBE_INSTANCESecurity
19 Click on Add button under Grant permission and search the list based on the Application Role
1-55
20 Move the ALLROLES-000 to Selected members
21 Click on read select and Update check boxes Click on Save
22 Follow the step 17 to 21 for other Data objects also(cube_instancewftask_different_stages
ORVW_TRACK_EXPOSURE ORVW_FACILITY_EXPOSURE GetUtilsDB SMTB_USER_TYPE_CONVERSION_VIEW FCUBSDATAOBJECTS)
1-56
23 Click on Designer open Project
24 Click on FCUBS_BAM_report
25 click on FCUBS_BAM_Report Security
1-57
26 Click on ADD button Under Grant Permission
1-58
27 Search the List based on the Application Roles and Select the ALLROLES-000
1-59
28 Move the ALLROLES-000 to Selected Members and click on ok
29 Select the Read check box for ALLROLES-000 Click on Save
1-60
129 IPM configuration to edit the document
The Following set of instructions can be followed if the BPEL need to be configured with IPM configuration
1 Login to the console httpslthostnamegtltportgtconsole with admin user 2 Follow the step 121 to add the ldquoFCJCustomProviderrdquo
After adding Navigate to security realms gt myrealm gt Users and Groups and check if the users from the schema are displayed in Users tab and Roles from the schema are displayed under the Groups Tab
3 After adding the custom authenticator
bull Navigate to security realms gtmy realm gt Users and Groups gt Groups
bull Click on the New button
4 After Clicking on the new button
bull Enter the name as ldquoIPMUserGrouprdquo
bull Description for it (optional)
bull And select the authenticator as ldquoDefaultAuthenticatorrdquo
bull And then click ldquoOkrdquo
1-61
5 Login to the Imaging URL httpslthostnamegtltportgtimaging with admin user
a Navigate to Manage Applications
b Click on the FLEXCUBE
c Then click on the modify on the right pane
1-62
6 After clicking on the modify button
a Navigate to Document Security
b Click on Add button
c Click on Search button in the pop up window
d Select the ldquoIPMUserGrouprdquo
e Click on Add
f IPMUserGroup will be listed in the panel select view writeannotate StandardAnnotate Restricted and Annotate Hidden checkboxes
g Finally click on the submit button on the right corner
1-63
7 After clicking on the submit button
a Navigate to Manage Searches
b Click on the available search (ex USER_ID in this doc)
c Click on the modify
8 After clicking on the modify button
a Navigate to Document Security
b Click on Add button
c Click on Search button in the pop up window
d Select the ldquoIPMUserGrouprdquo
e Click on Add
f IPMUserGroup will be listed in the panel donrsquot select any checkbox except the default view checkbox
g Finally click on the submit button on the right corner
1-64
ltserviceProvider class=oraclesecurityjpsinternalidstoregenericGenericIdentityStoreProvider name=customgenericprovider type=IDENTITY_STOREgt
ltdescriptiongtDB IdentityStore Providerltdescriptiongt ltserviceProvidergt
ltserviceInstance location=dumb name=idstorecustom provider=customgenericprovidergt ltdescriptiongtCustom Identity Store Service Instanceltdescriptiongt ltproperty name=idstoretype value=CUSTOMgt ltproperty name=ADF_IM_FACTORY_CLASS value=comofssfccbpelsecurityidmprovidersstddbFCIdentityStoreFactorygt ltproperty name=DATASOURCE_NAME value=jdbcfcjdevDSgt ltproperty name=INTERNAL_CONTEXT_REQUIRED value=truegt ltproperty name=INTERNAL_CONTEXT_NAME value=internalstoregt ltserviceInstancegt
9 Copy the FCJJPSProviderjar to location
ltORACLE_HOME gtuser_projectsdomainsltdomian namegtlib
10 Go to the location ndash lsquoltORACLE_HOMEgt user_projectsdomainsltDomain_createdgtconfigfmwconfigrsquo
a Open lsquojps-configxmlrsquo file Search for lsquoltserviceProvidersgtrsquo tag and add the following code between lsquoltserviceProvidersgtrsquo and lsquoltserviceProvidersgtrsquo tags
b Similarly Search for lsquoltserviceInstancesgtrsquo tag and add the following code between lsquoltserviceInstancesgtrsquo and lsquoltserviceInstancesgtrsquo tags
1-65
ltjpsContext name=internalstoregt ltserviceInstanceRef ref=credstoregt ltserviceInstanceRef ref=keystoregt ltserviceInstanceRef ref=policystorexmlgt ltserviceInstanceRef ref=auditgt ltjpsContextgt
Make sure that the JNDI (jdbcfcjdevDS) matches the value given during property file creation
c Search for lsquoltjpsContexts default=defaultgtrsquo tag and add the following code between lsquoltjpsContexts default=defaultgtrsquo and lsquoltjpsContextsgtrsquo preferably after the default lsquojpsContextrsquo
1210 Configuring Superviser Roles in EM 1 Right click on soa-infra Select securityApplication Roles
1-66
2 Search the Application Roles with ldquoStarts withrdquo option
3 Select the SOAAdmin Role and Click on lsquoEdit optionrsquo
1-67
4 Click on the ADD button and provide the Type as Group from drop down
5 Provide the principal name as (EXALLROLES-000) Param_val which is mapped to the OR_ADMINROLE in the cstb_param table and search the roleClick on ok
1-68
6 Click Ok
1211 Email Driver Configuration
The Following set of instructions can be followed if the BPEL need to be configured with Email Driver configurations
1 Login to EM console
2 Navigate to User Messaging Service
3 Right click usermessagingdriver-email (soa_server1)
4 Click on Email Driver Properties
5 Enter the sender Address and default sender address (This id will be used as sender
address)
6 Enter the supported protocols (SMTP)
1-69
7 Select the mail access protocol (IMAP) as per the mail server specification
8 Enter the Receive folder in the mailbox (INBOX)
9 Enter the Outgoing mail server hostname or IP
10 Enter the outgoing mail server port
11 Enter the outgoing default from address
12 Enter the Outgoing user name and password if required
1-70
13 Navigate to SOA Administration -gtWorkflow Properties
14 Select the notification mode as EmailALL and enter the from address Actionable address
and reply to Address
1-71
1212 TimeOut Settings for BPEL 1 The Following set of instructions has to be configured for BPEL Login in to Console
(httphostnameportconsole)
2 Click on Deployments
1-72
3 Click on rdquosoa-infrardquo application under deployments
4 Go to EJBs click on BPELEngineBeanConfigurationset Transaction TimeOut to 300
1-73
5 Go to EJBsBPEL DeliveryBean Configurationset Transaction TimeOut to 300
1-74
6 Login in to Console JTA
7 Set the JTA timeout according to the below condition Make sure BPELEngineBean + BPELDeliveryBean is lt= JTA timeout(eg 300+300lt=600)
1-75
8 Login in to EM console (httphostportem)SOA adminstrationBPEL
PropertiesMoreConfigpropeties SyncMaxWaitTimeChange the SyncMaxWaitTime to 200 secs
1-76
1-77
1-78
13 Integrating Oracle FLEXCUBE UBS and Scheduler Before deploying the Oracle FLEXCUBE UBS EAR file you need to carry out the following tasks
131 Running Backend Scripts
You need to compile certain tables pertaining to Scheduler in the schema to which the Application points The version of Quartz to be used is Latest Qualified Version
Follow the steps given below
1 Download Quartz Latest Qualified Versiongz file from the following URL httpwwwquartz-schedulerorgdownloaddownload-cataloghtml
1 Extract the gz file
2 Open the folder lsquoQuartz-Latest Qualified Version docsdbTablesrsquo folder and run lsquotables_oraclesqlrsquo (this is specific to Oracle Database) in the schema
For details on latest version of the software qualified with Oracle FLEXCUBE refer to the release certificate
14 Integrating Oracle FLEXCUBE UBS and BIP Reports You can integrate Oracle FLEXCUBE UBS and BIP reports The details are available in the chapter lsquoBIP Web Service Reportsrsquo
141 Deploying Application Through Application Serverrsquos Admin Console Deployment from Weblogic Administration Console
You can find the details pertaining to the deployment of Application using Weblogic Administration Console in the chapter lsquoDeploying Oracle FLEXCUBE Application on Weblogicrsquo
15 Integrating Oracle FLEXCUBE UBS and MBean In order to integrate Oracle FLEXCUBE UBS and MBean you need to follow the below steps before deploying the Oracle FLEXCUBE UBS EAR file created with MBean as a Plugin
151 Startup Script Modification
By default the TopLink used in MBean uses Oracle xml parser internally However Weblogic Server has to use JAXPlatform
To change the system property follow the steps given below
1 Go to the Weblogic domain home folder
c) Based on the operating system used open lsquostartWeblogiccmdrsquo or lsquostartWeblogicshrsquo from the folder lsquobinrsquo
1-79
d) Search for lsquoWLS_REDIRECT_LOGrsquo After lsquoJAVA_OPTIONSrsquo add the following code under lsquoifrsquo and lsquoelsersquo conditions
ldquo-Dtoplinkxmlplatform=oracletoplinkplatformxmljaxpJAXPPlatformrdquo
Now the details will look like this
if WLS_REDIRECT_LOG== (
echo Starting WLS with line
echo JAVA_HOMEbinjava JAVA_VM MEM_ARGS -DweblogicName=SERVER_NAME -Djavasecuritypolicy=WL_HOMEserverlibweblogicpolicy JAVA_OPTIONS PROXY_SETTINGS SERVER_CLASS
JAVA_HOMEbinjava JAVA_VM MEM_ARGS -DweblogicName=SERVER_NAME -Djavasecuritypolicy=WL_HOMEserverlibweblogicpolicy JAVA_OPTIONS -Dtoplinkxmlplatform=oracletoplinkplatformxmljaxpJAXPPlatform PROXY_SETTINGS SERVER_CLASS
) else (
echo Redirecting output from WLS window to WLS_REDIRECT_LOG
JAVA_HOMEbinjava JAVA_VM MEM_ARGS -DweblogicName=SERVER_NAME -Djavasecuritypolicy=WL_HOMEserverlibweblogicpolicy JAVA_OPTIONS -Dtoplinkxmlplatform=oracletoplinkplatformxmljaxpJAXPPlatform PROXY_SETTINGS SERVER_CLASS gtWLS_REDIRECT_LOG 2gtamp1
)
e) Restart the Weblogic server
Setting up Plug - Ins [May] [2019] Version 143000 Oracle Financial Services Software Limited Oracle Park Off Western Express Highway Goregaon (East) Mumbai Maharashtra 400 063 India Worldwide Inquiries Phone +91 22 6718 3000 Fax+91 22 6718 3001 httpswwworaclecomindustriesfinancial-servicesindexhtml Copyright copy [2007] [2019] Oracle andor its affiliates All rights reserved Oracle and Java are registered trademarks of Oracle andor its affiliates Other names may be trademarks of their respective owners US GOVERNMENT END USERS Oracle programs including any operating system integrated software any programs installed on the hardware andor documentation delivered to US Government end users are commercial computer software pursuant to the applicable Federal Acquisition Regulation and agency-specific supplemental regulations As such use duplication disclosure modification and adaptation of the programs including any operating system integrated software any programs installed on the hardware andor documentation shall be subject to license terms and license restrictions applicable to the programs No other rights are granted to the US Government This software or hardware is developed for general use in a variety of information management applications It is not developed or intended for use in any inherently dangerous applications including applications that may create a risk of personal injury If you use this software or hardware in dangerous applications then you shall be responsible to take all appropriate failsafe backup redundancy and other measures to ensure its safe use Oracle Corporation and its affiliates disclaim any liability for any damages caused by use of this software or hardware in dangerous applications This software and related documentation are provided under a license agreement containing restrictions on use and disclosure and are protected by intellectual property laws Except as expressly permitted in your license agreement or allowed by law you may not use copy reproduce translate broadcast modify license transmit distribute exhibit perform publish or display any part in any form or by any means Reverse engineering disassembly or decompilation of this software unless required by law for interoperability is prohibited The information contained herein is subject to change without notice and is not warranted to be error-free If you find any errors please report them to us in writing This software or hardware and documentation may provide access to or information on content products and services from third parties Oracle Corporation and its affiliates are not responsible for and expressly disclaim all warranties of any kind with respect to third-party content products and services Oracle Corporation and its affiliates will not be responsible for any loss costs or damages incurred due to your access to or use of third-party content products or services
- 1 Setting Up Plug-Ins
-
- 11 Introduction
- 12 Integrating Oracle FLEXCUBE UBS and BPEL
-
- 121 Custom Provider Configuration
- 122 Configuring libovd for single Entity
- 123 Configuring libovd for MultiEntity
- 124 Configuring for Multiple Providers for Multiple Entities
- 125 Configuring DBAdapter
- 126 Configuring JMS Adapter
- 127 Configuring FTP Adapter
-
- 1271 BIP Interactive reports configuration
-
- 128 BAM Report Configuration settings
- 129 IPM configuration to edit the document
- 1210 Configuring Superviser Roles in EM
- 1211 Email Driver Configuration
- 1212 TimeOut Settings for BPEL
-
- 13 Integrating Oracle FLEXCUBE UBS and Scheduler
-
- 131 Running Backend Scripts
-
- 14 Integrating Oracle FLEXCUBE UBS and BIP Reports
-
- 141 Deploying Application Through Application Serverrsquos Admin Console
-
- 15 Integrating Oracle FLEXCUBE UBS and MBean
-
- 151 Startup Script Modification
-
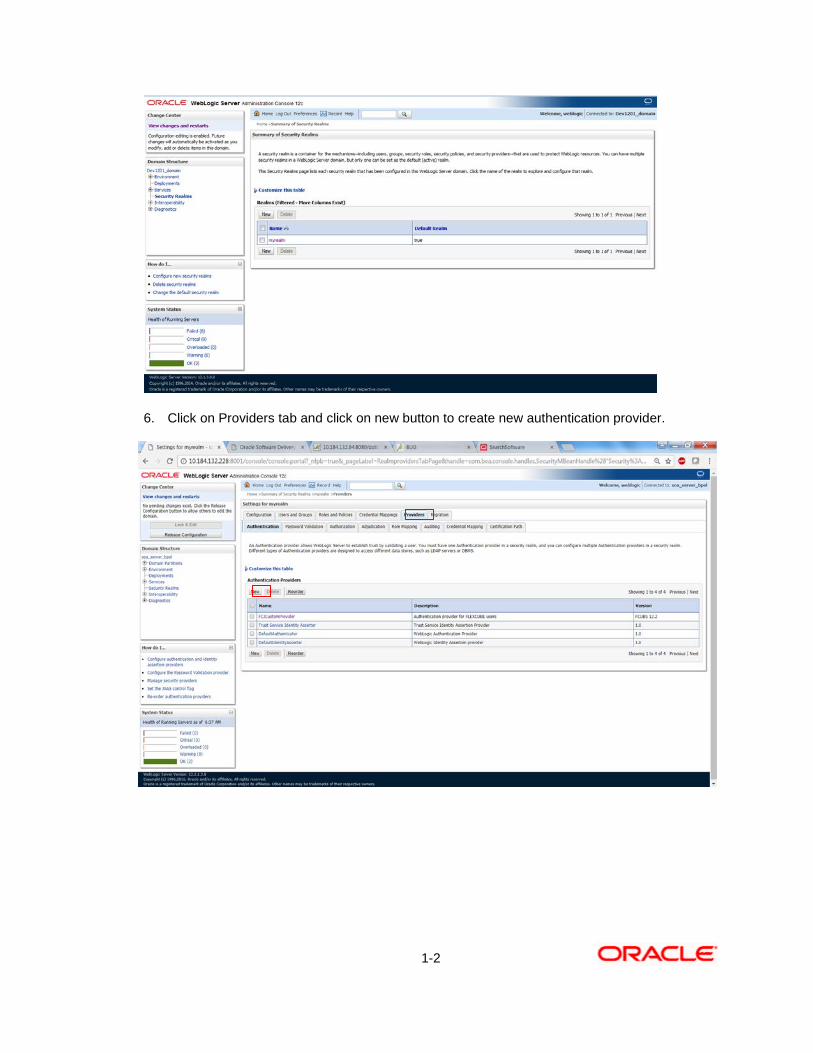
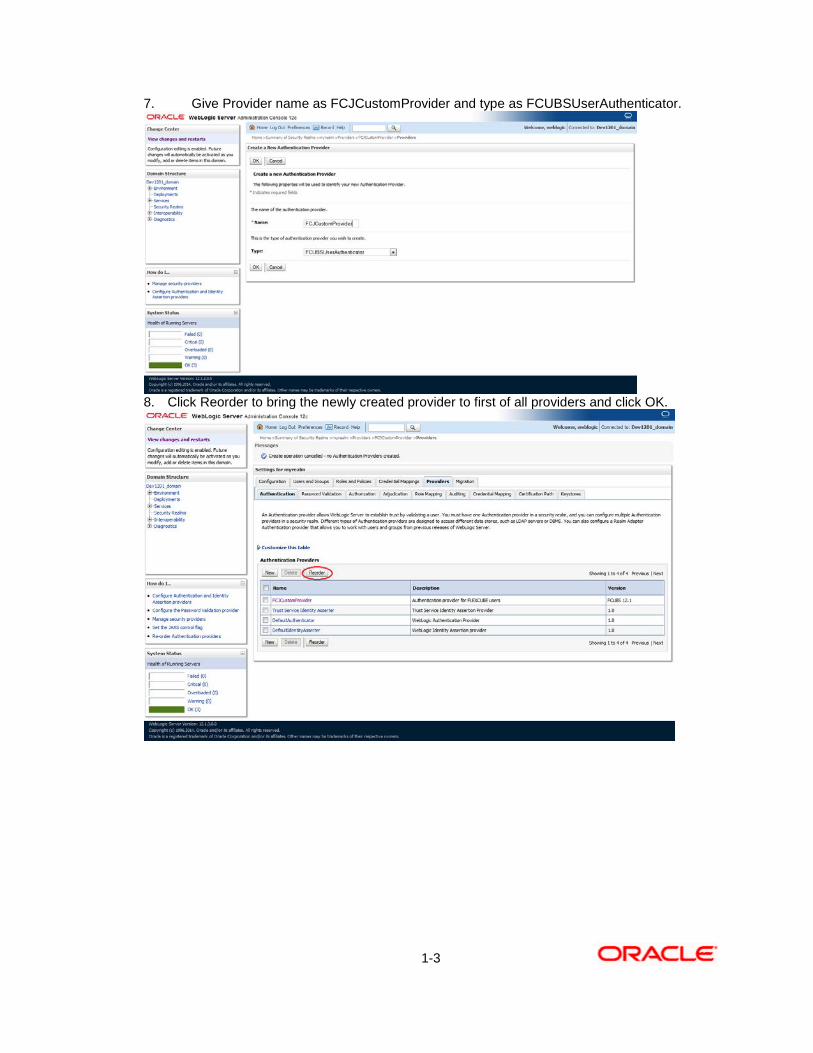
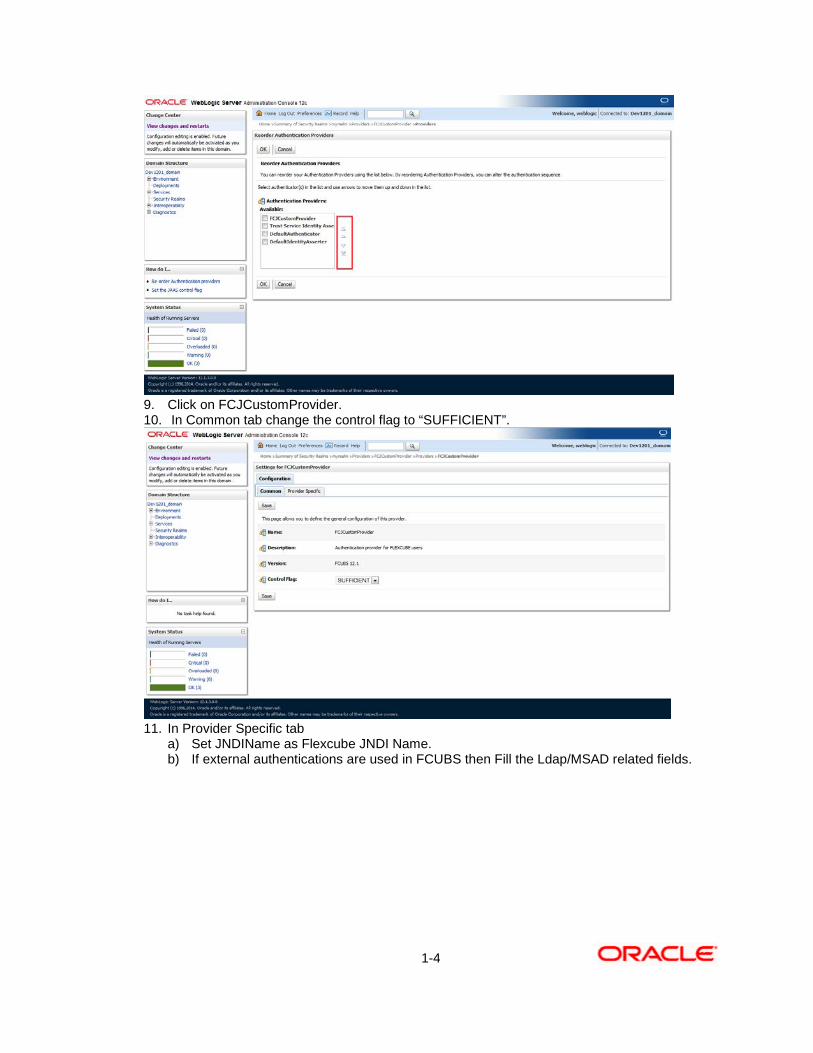
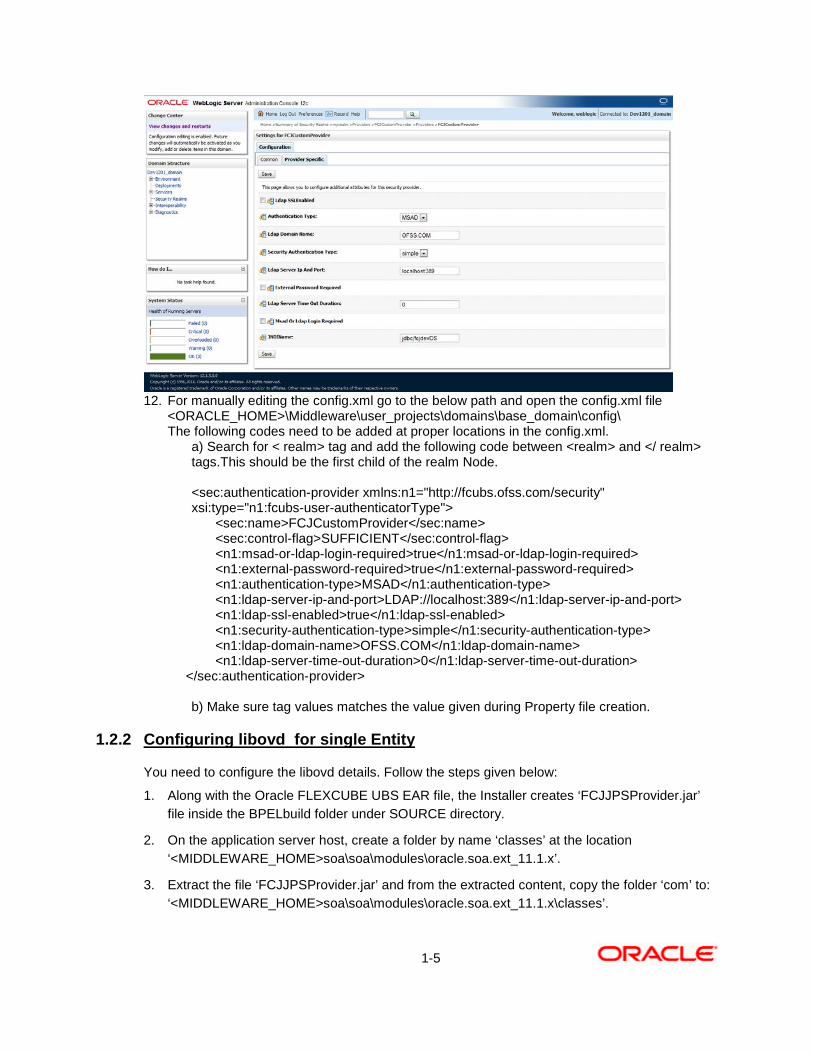
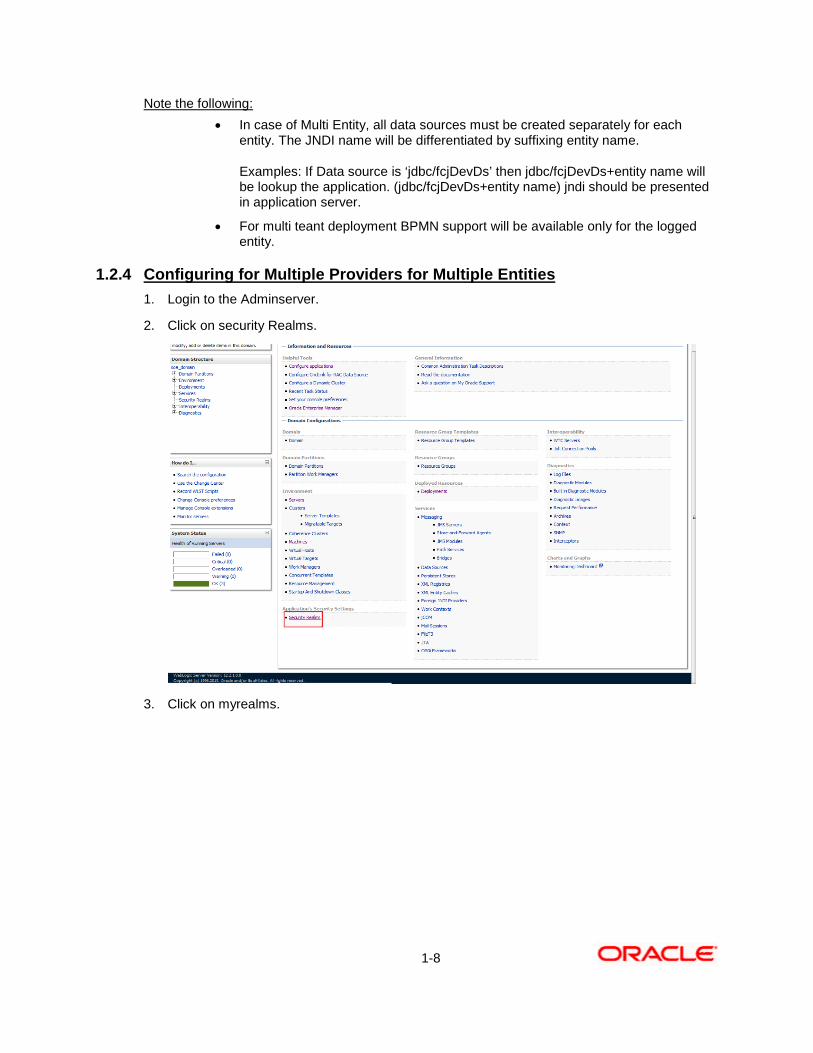
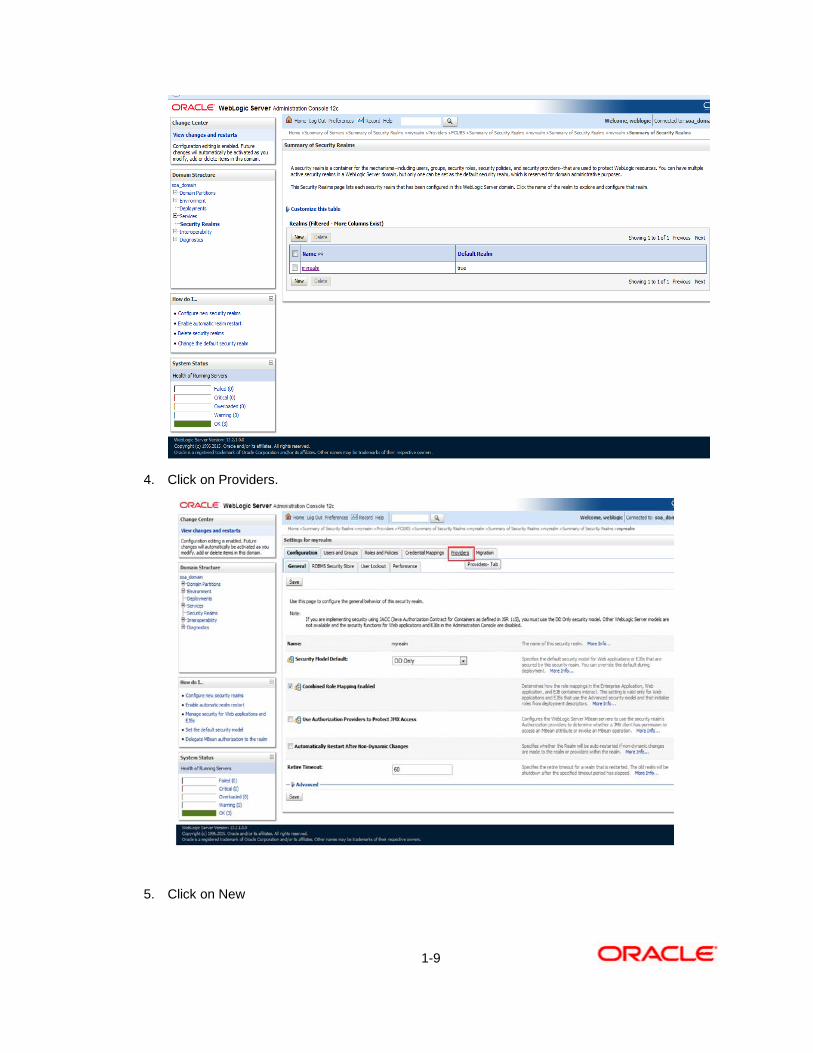
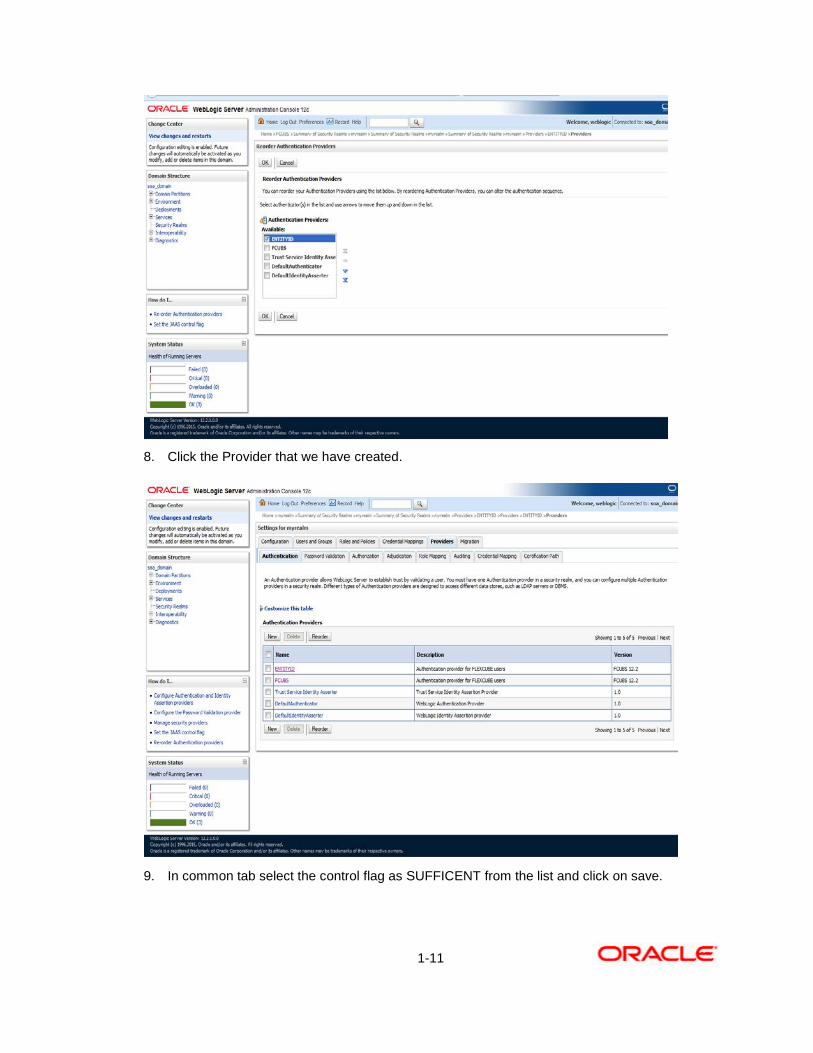
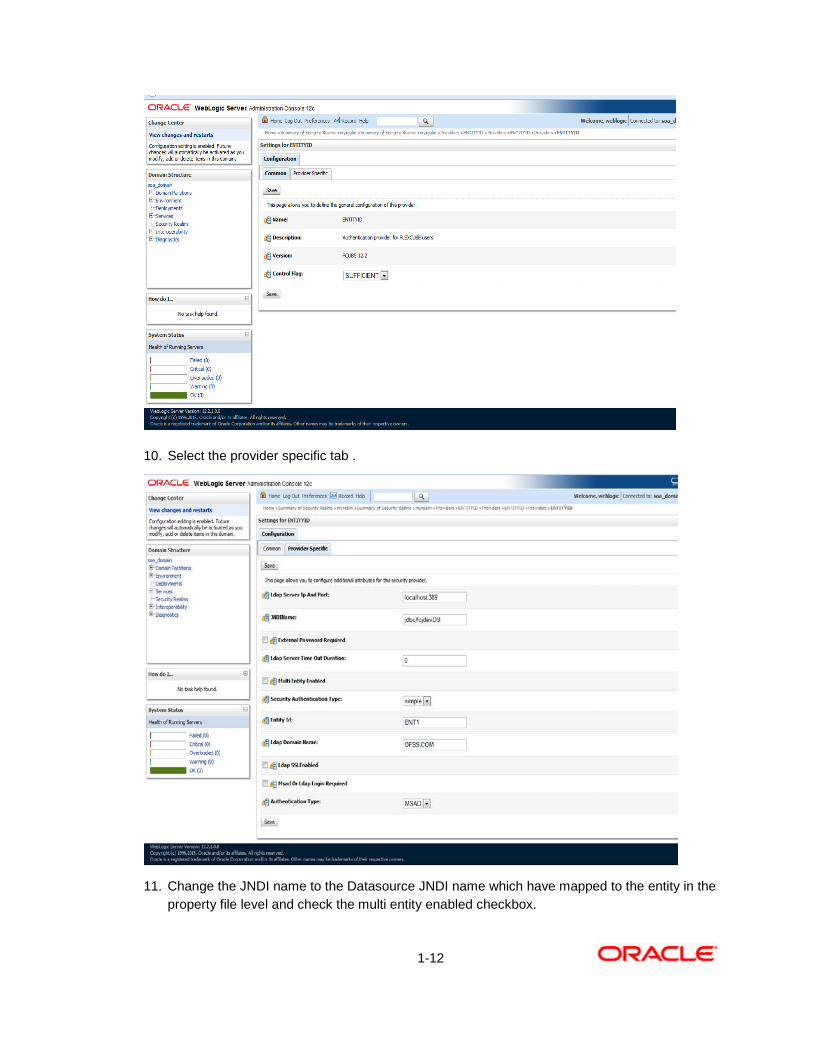
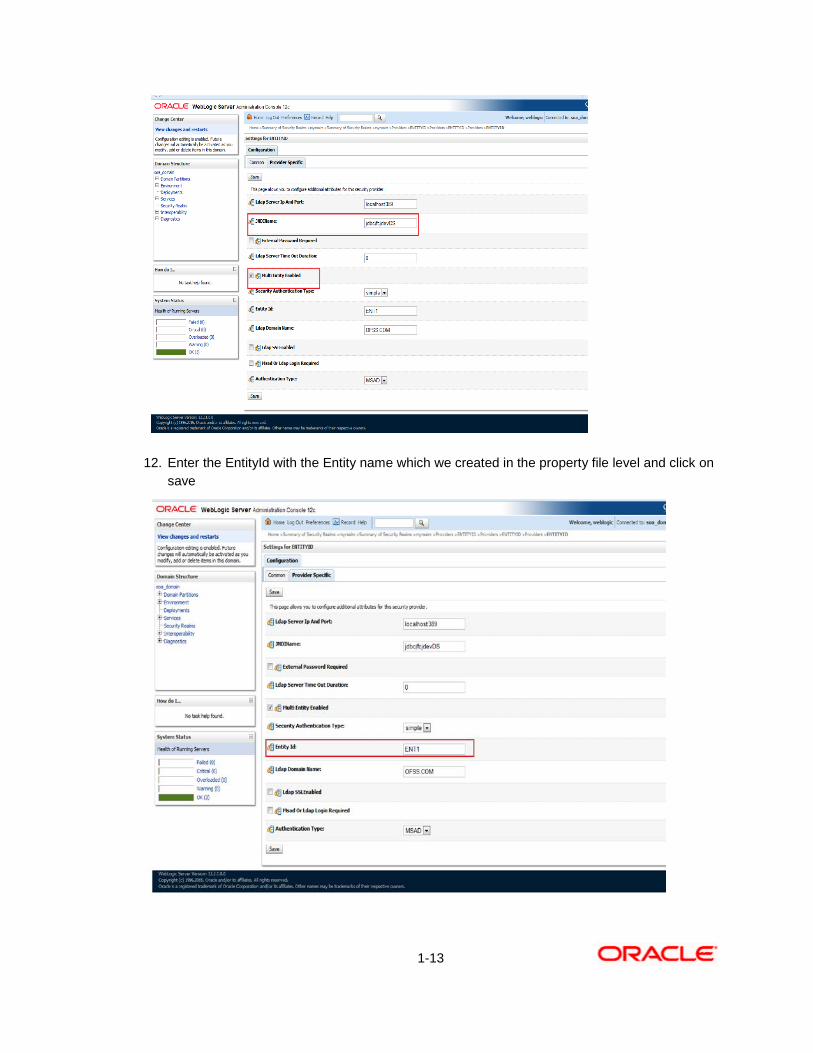
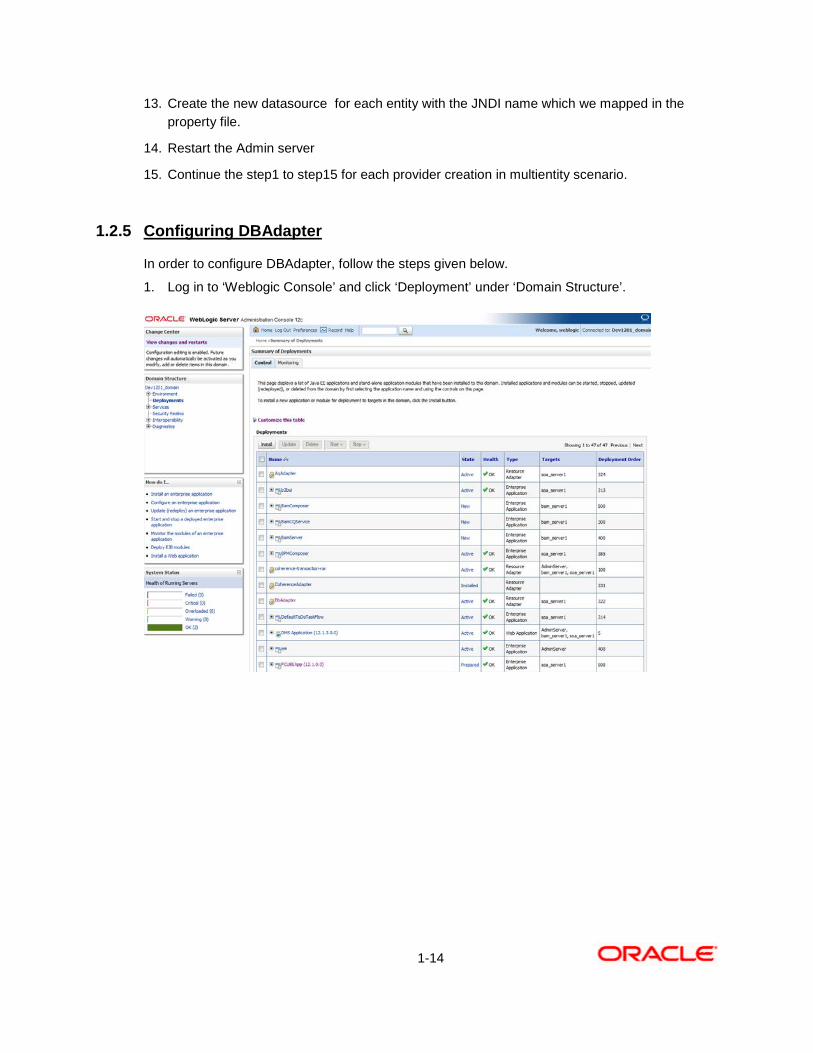
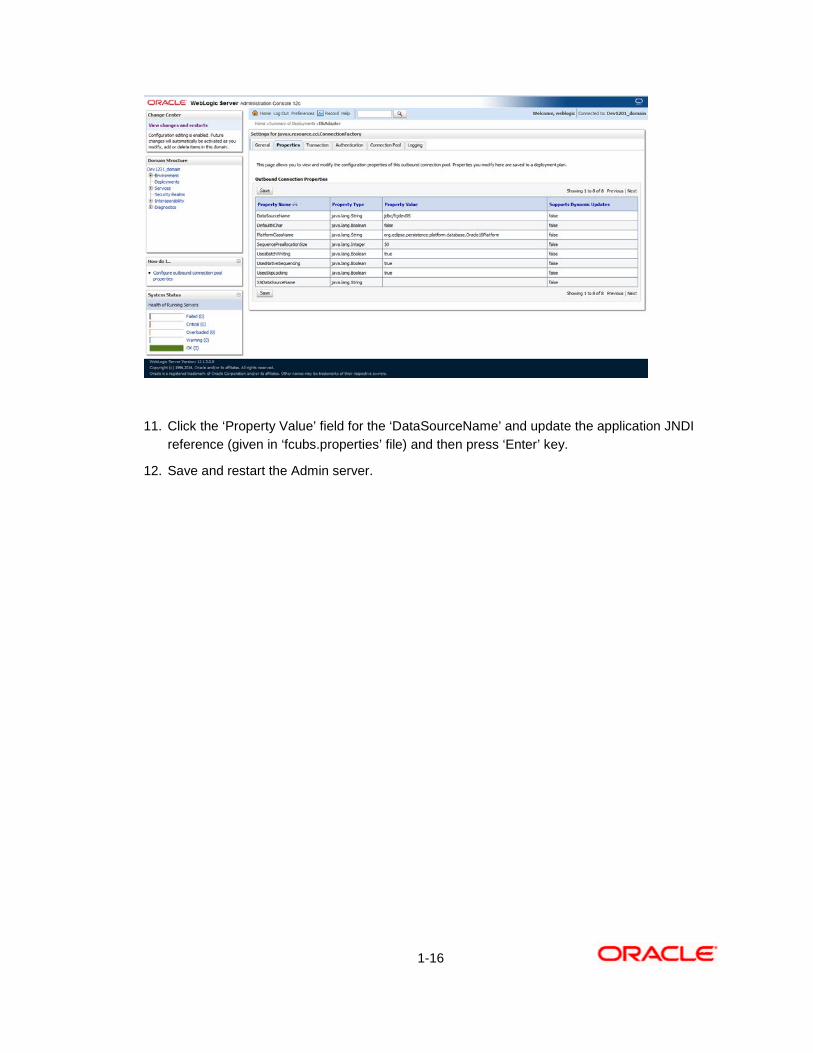
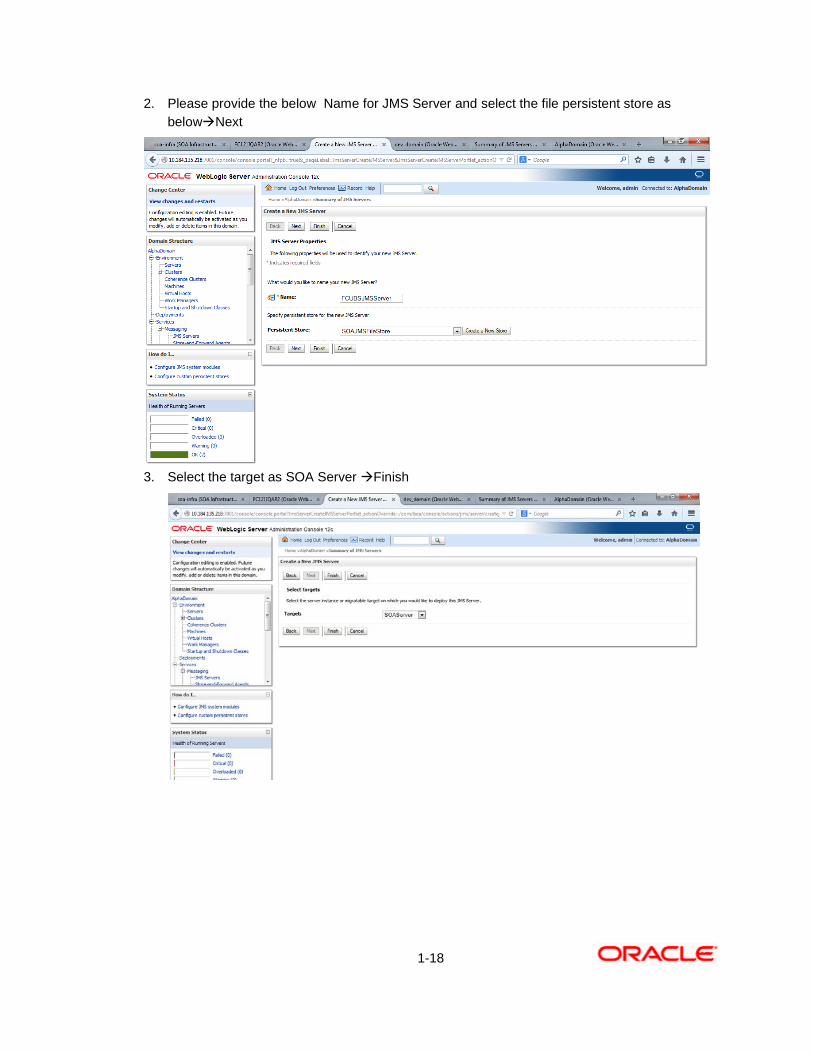
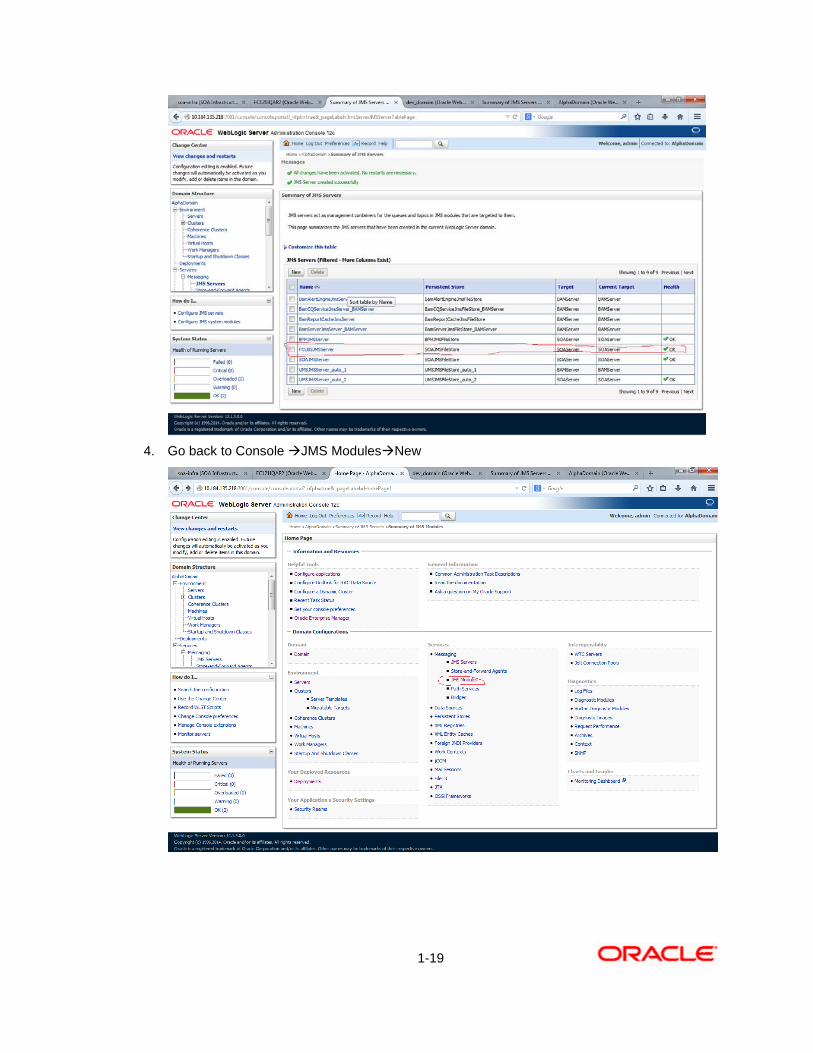
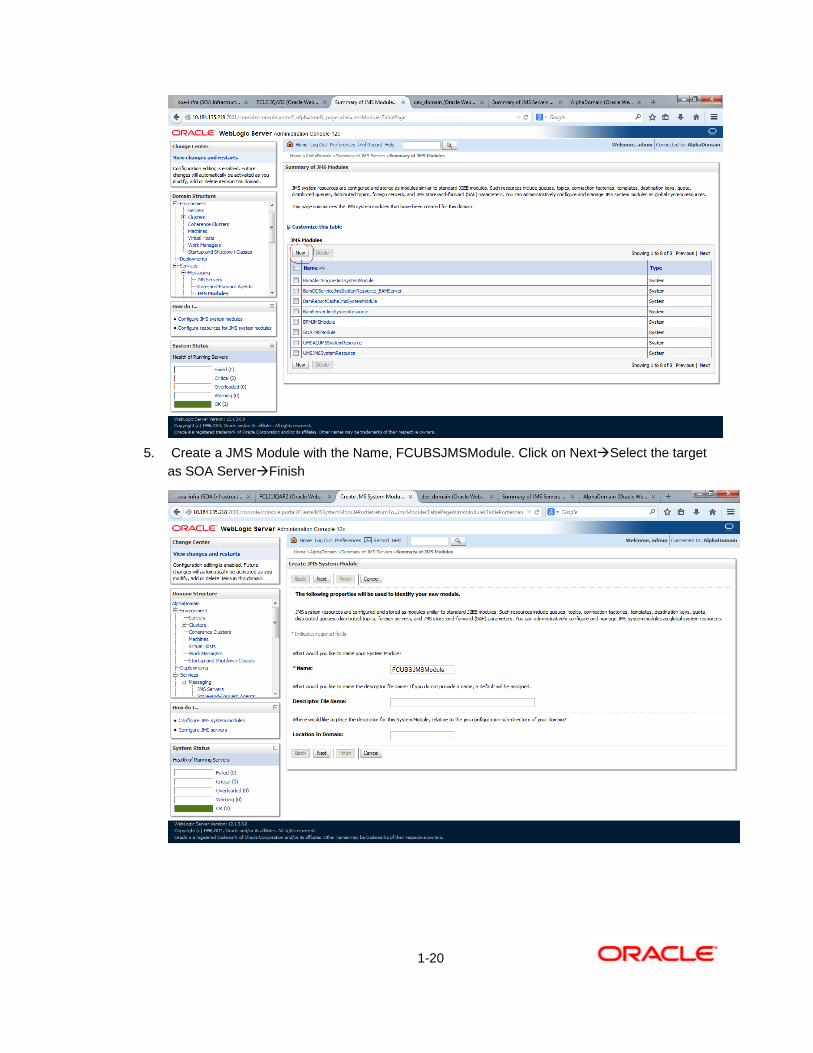
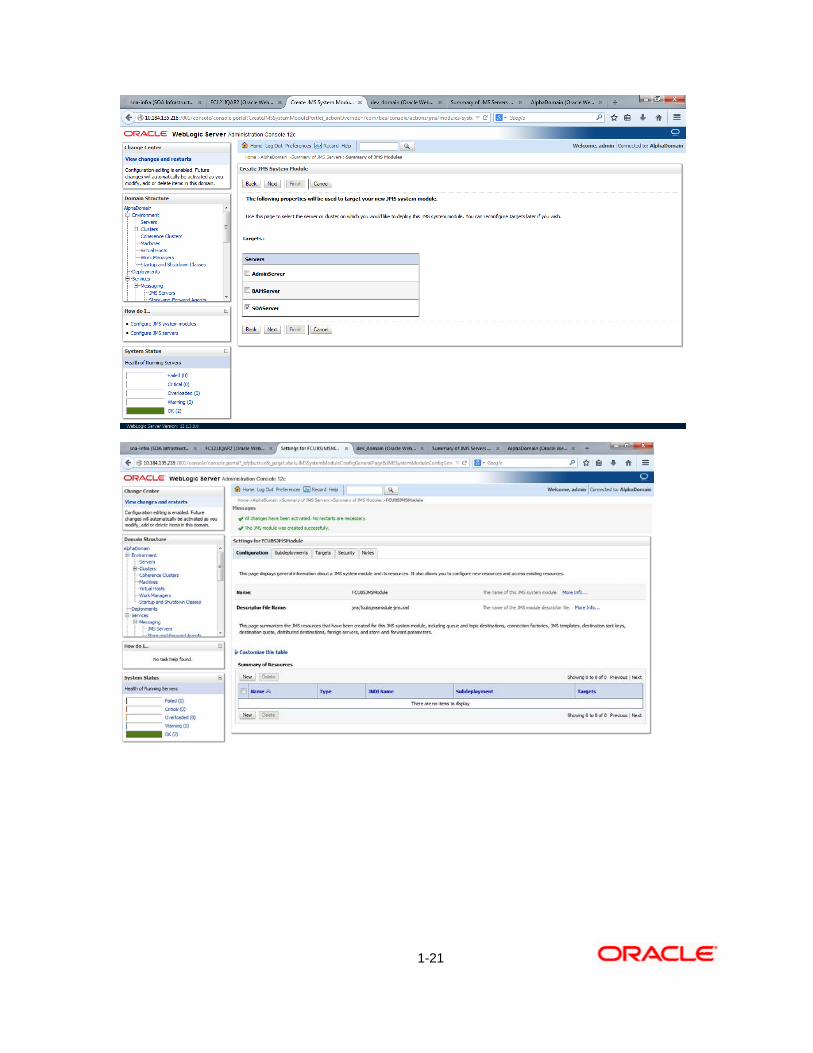
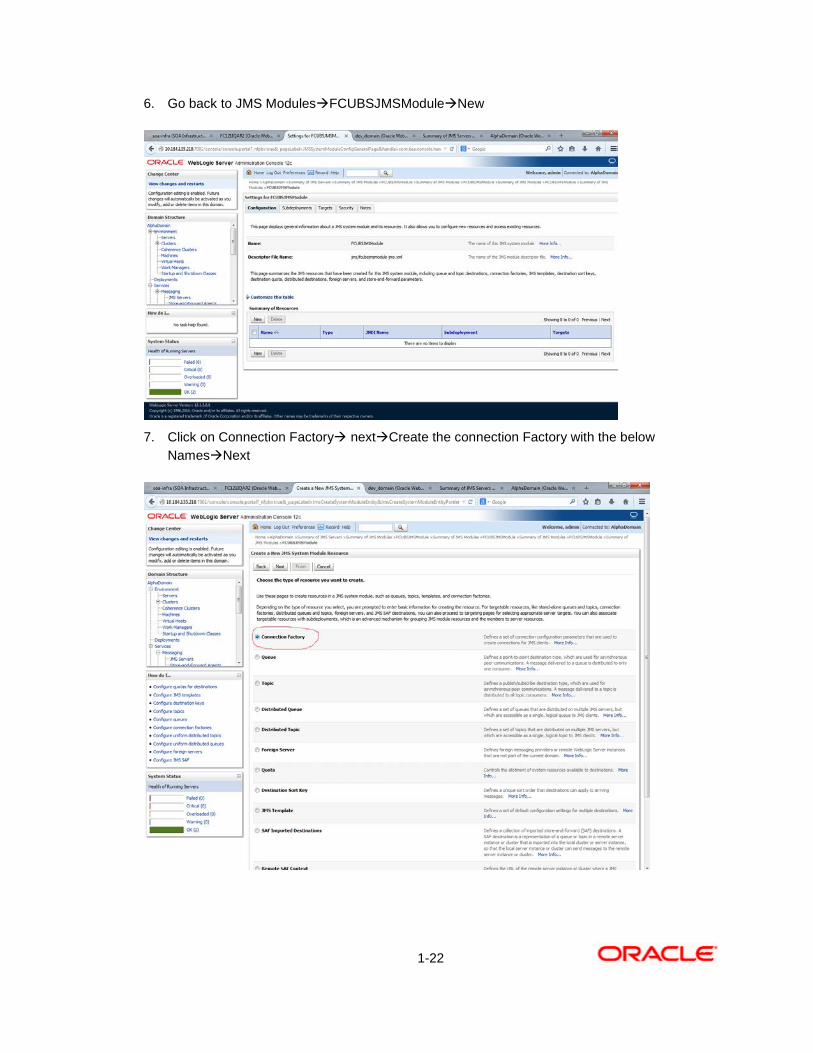
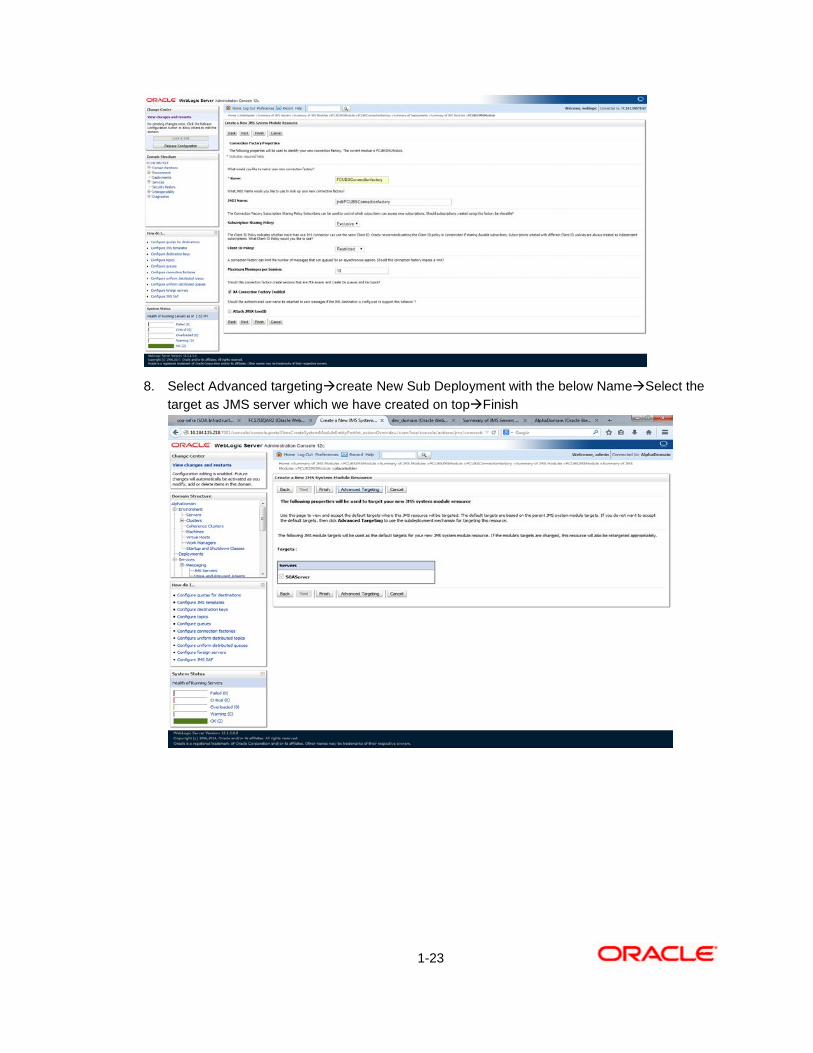
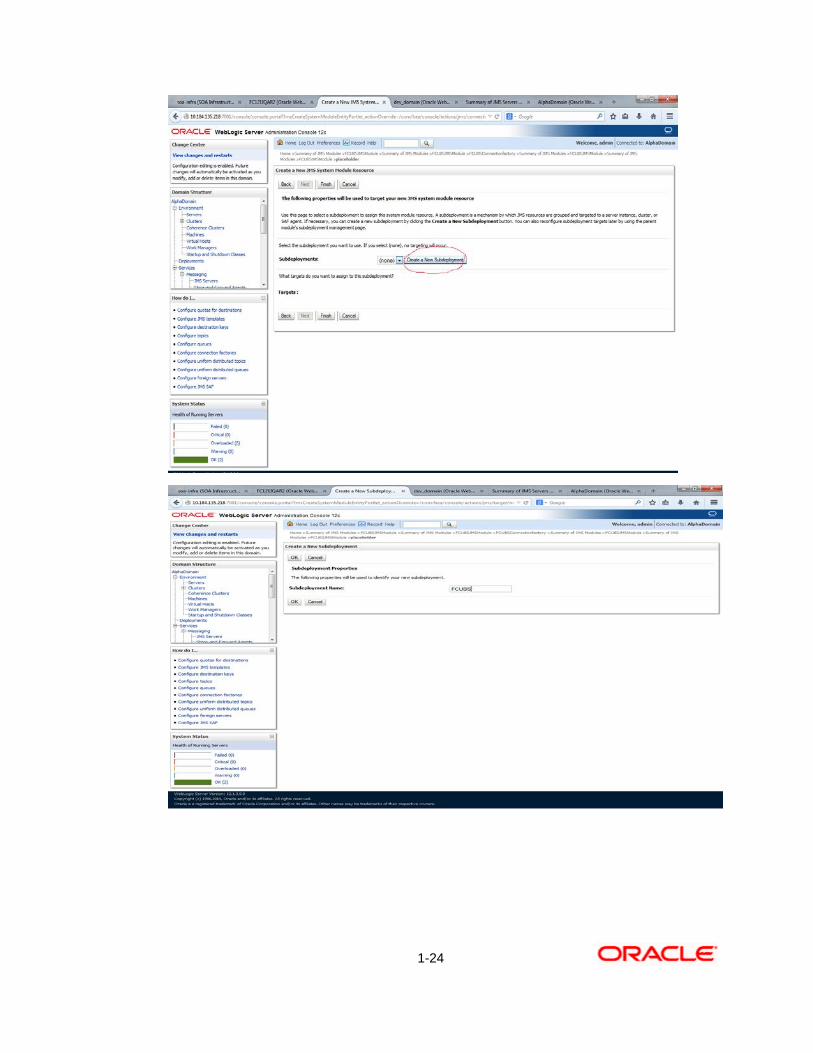
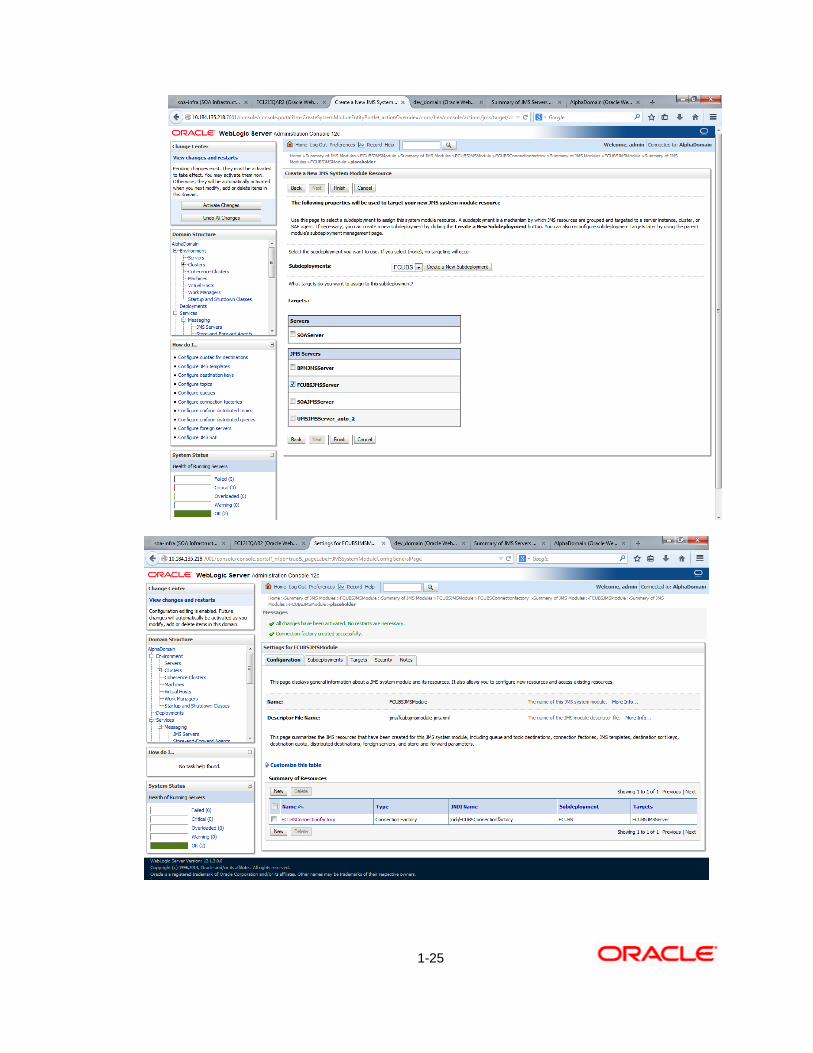
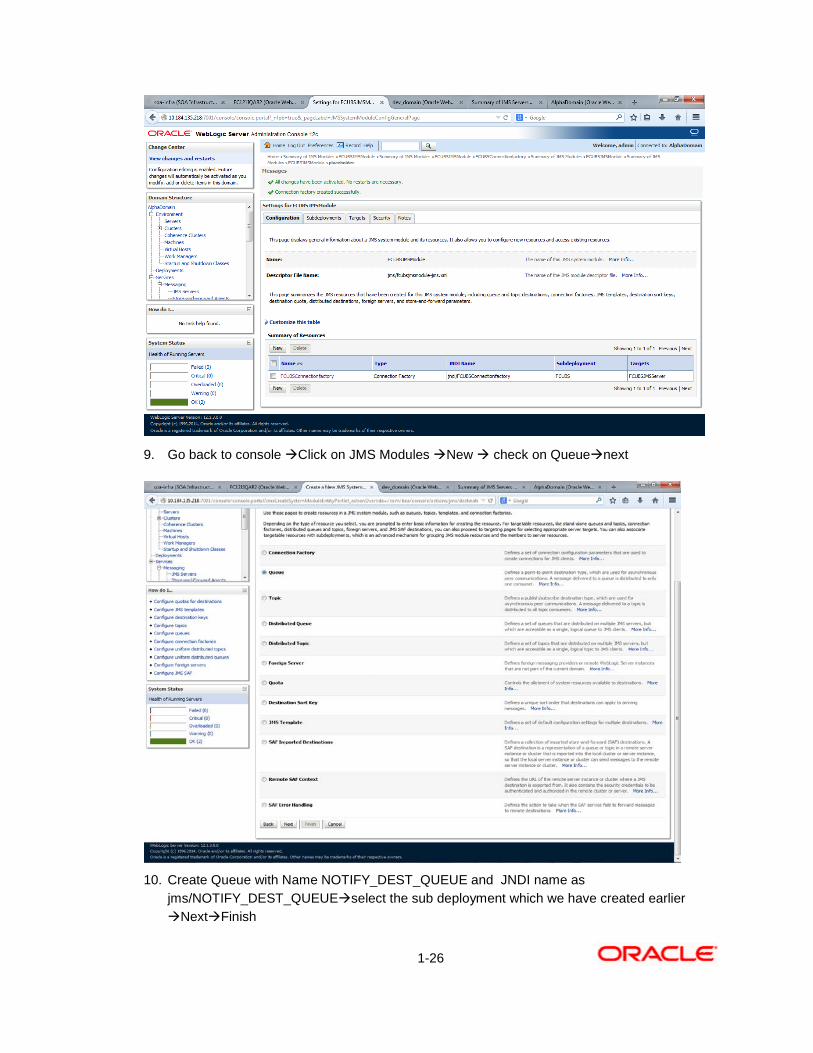
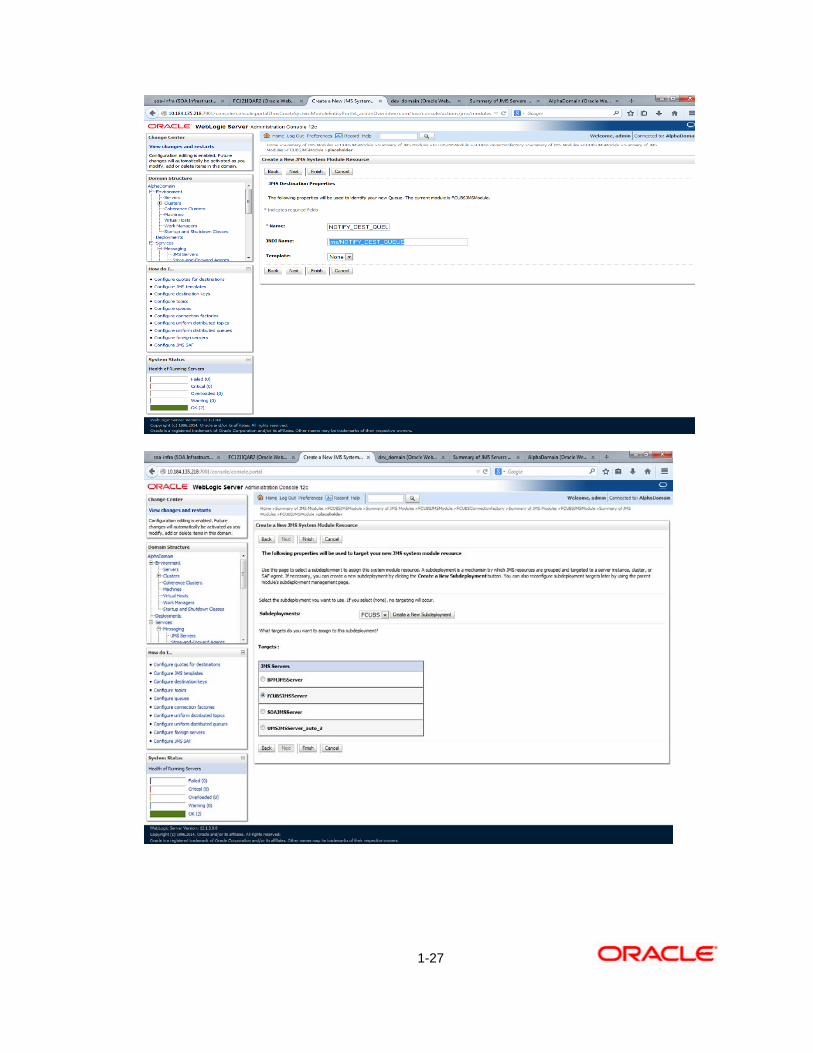
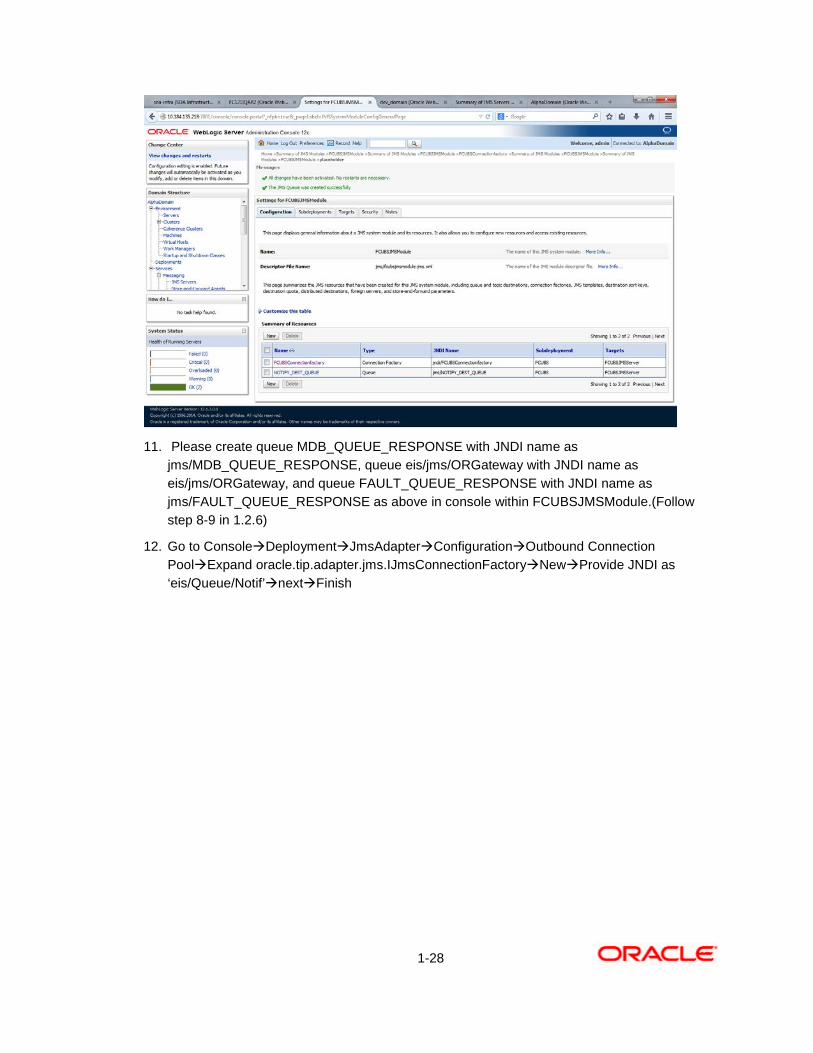
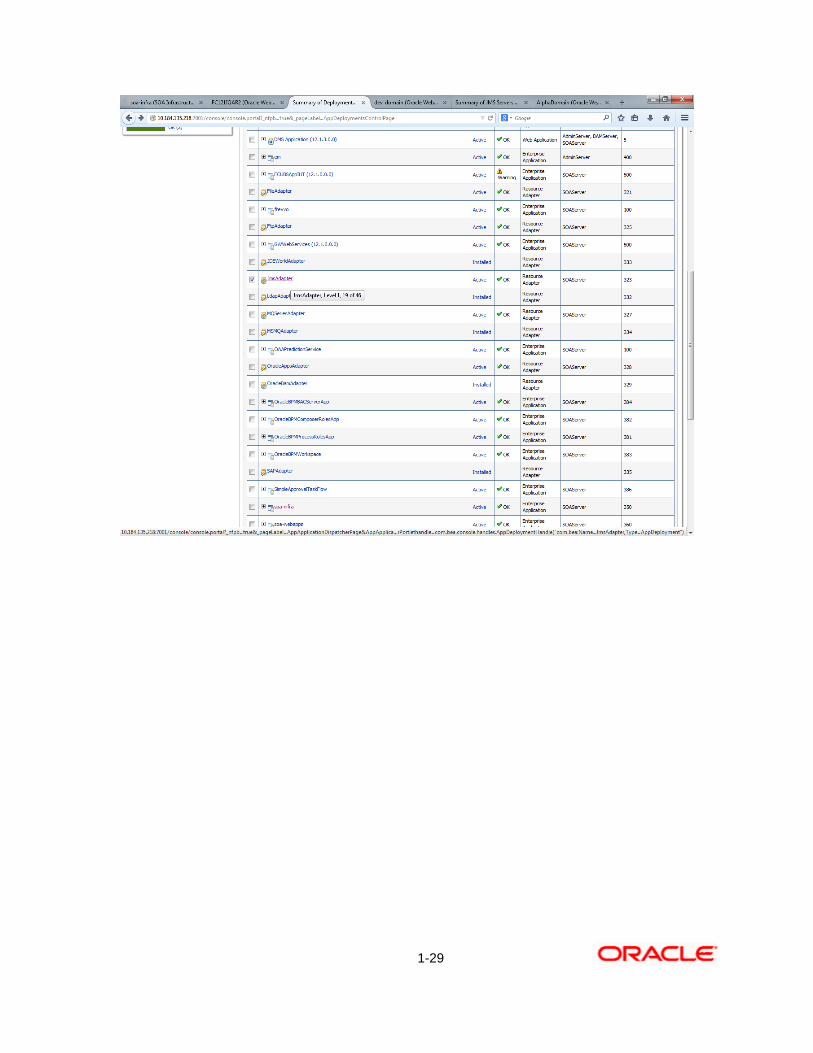
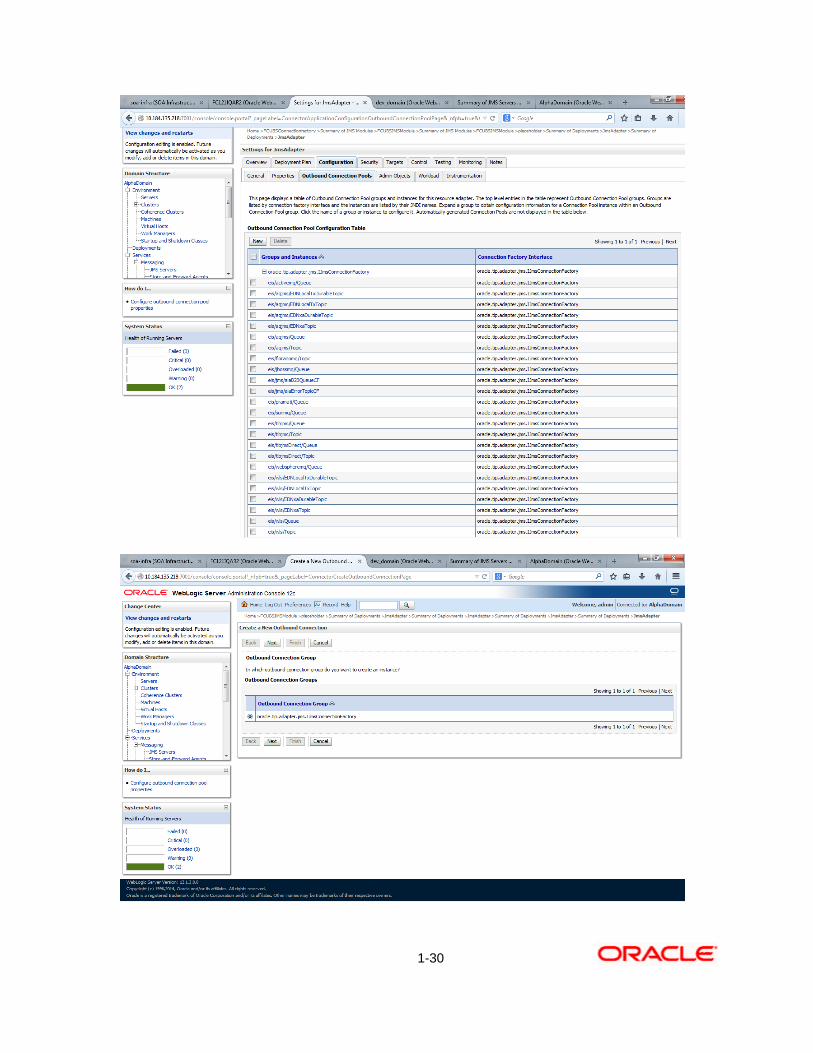
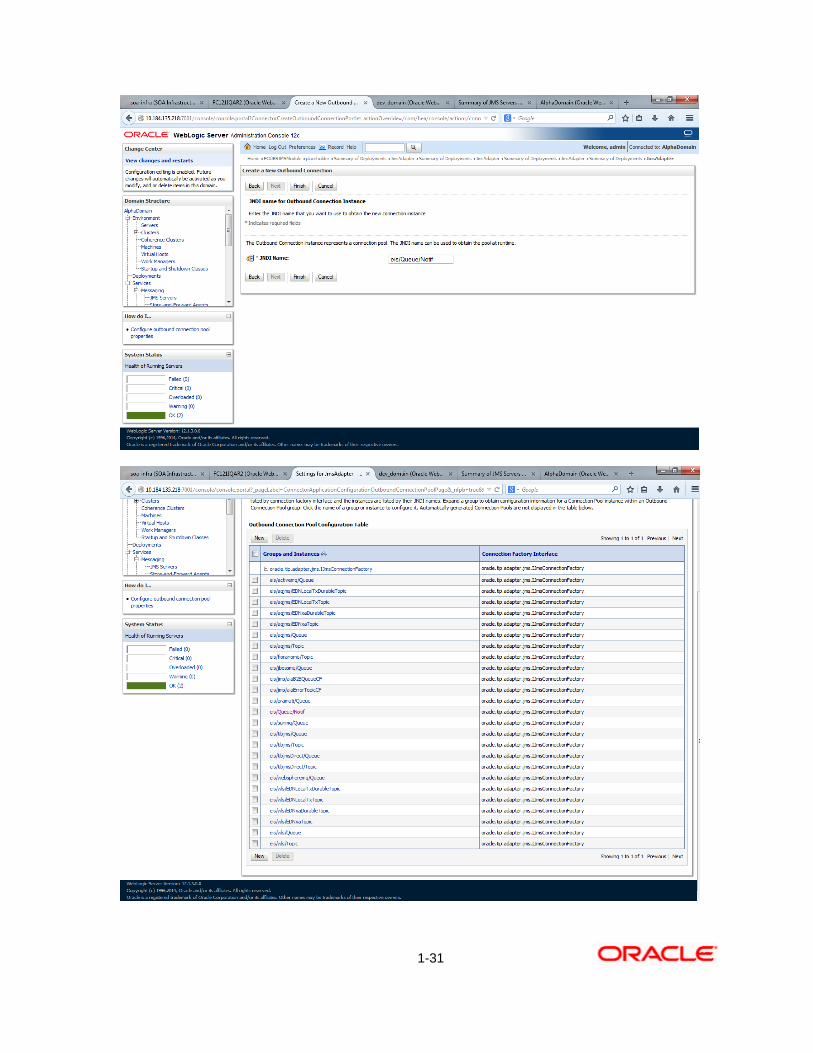
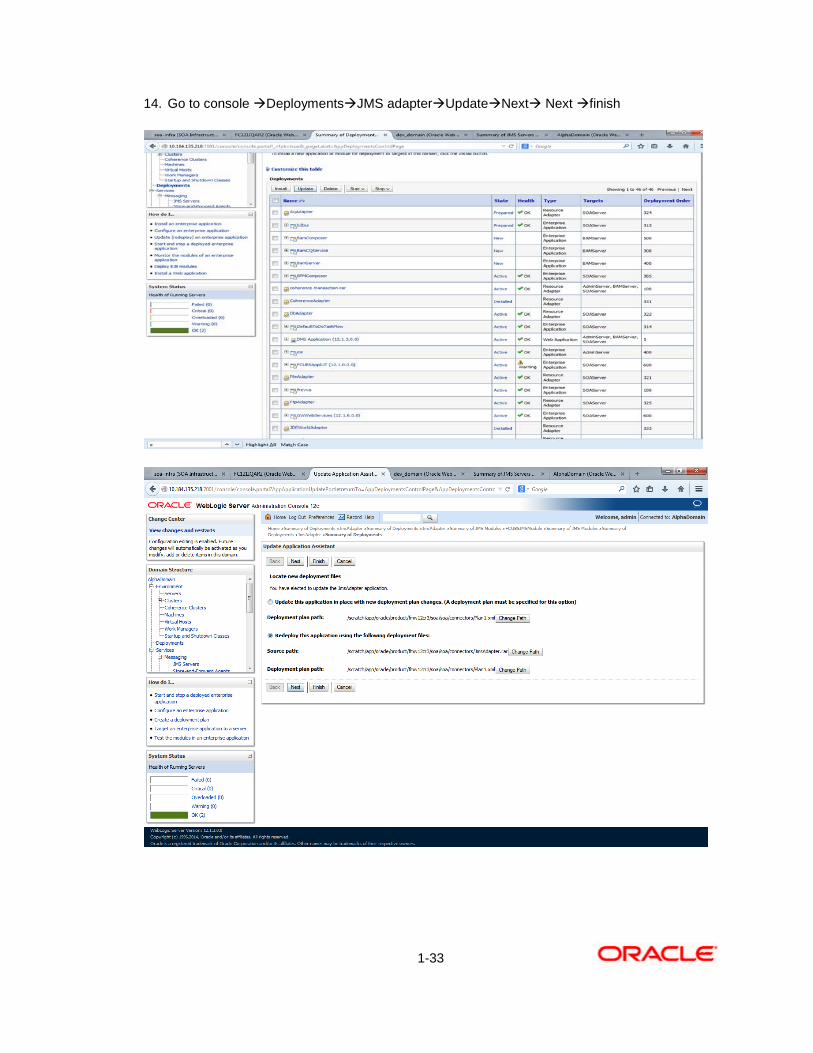
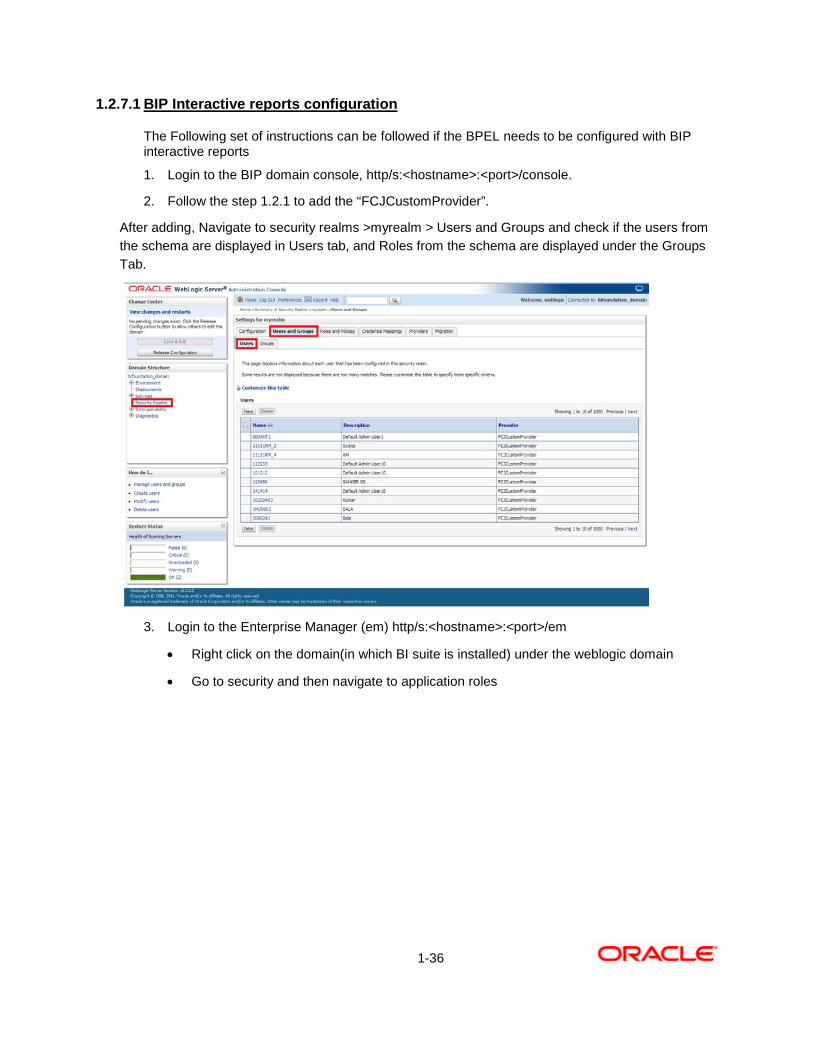
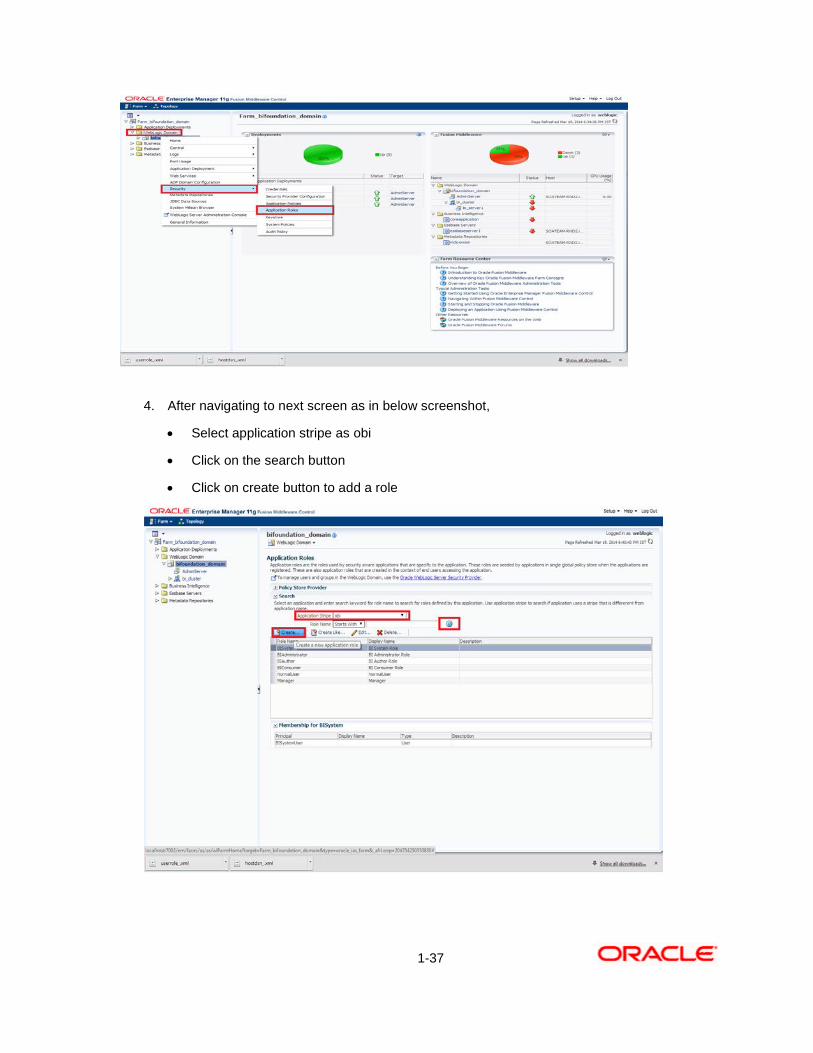
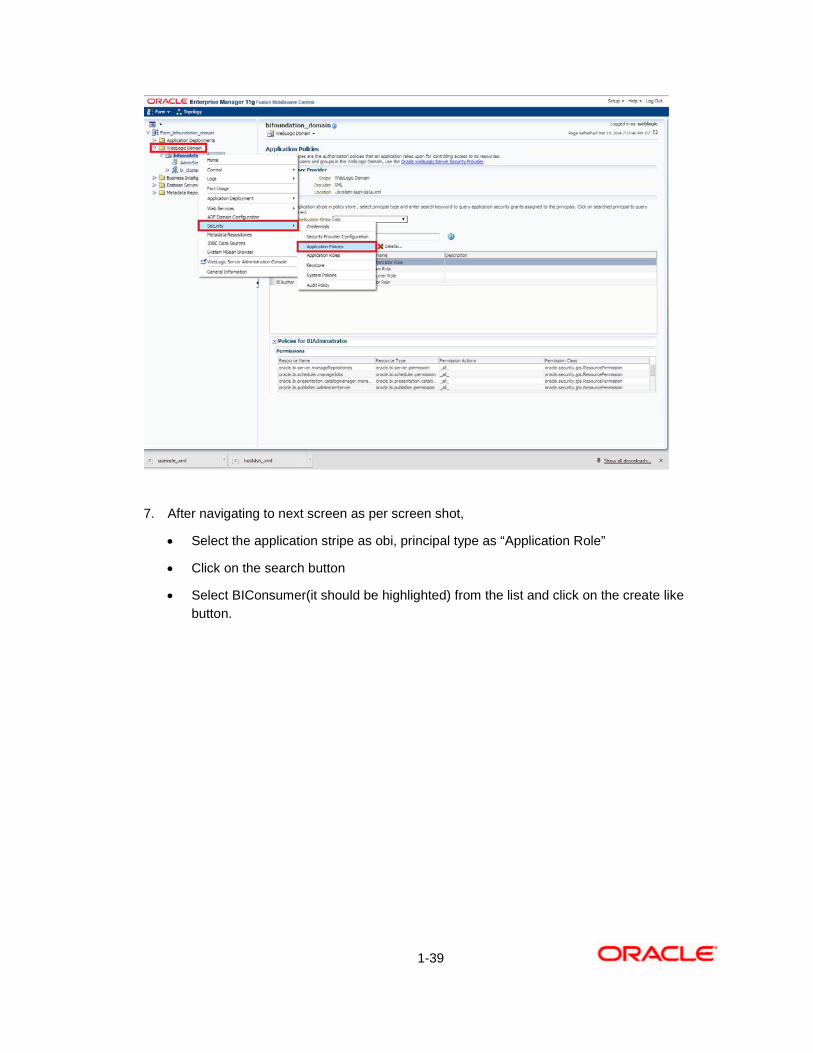
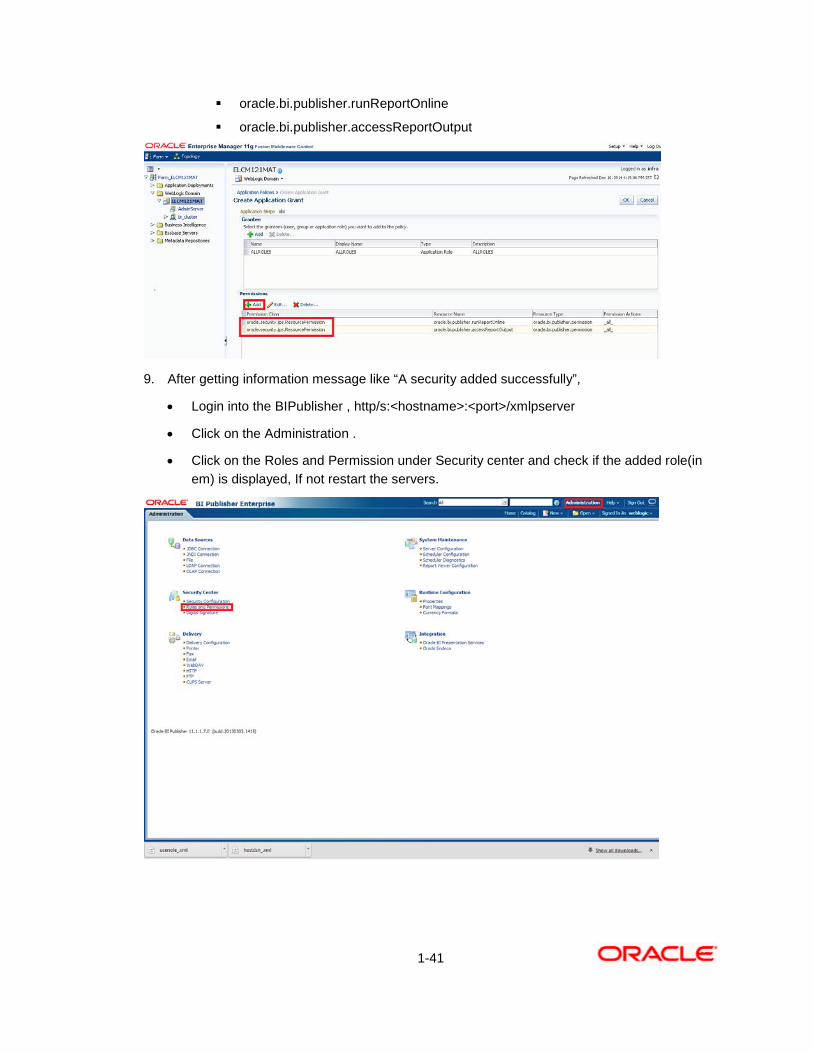
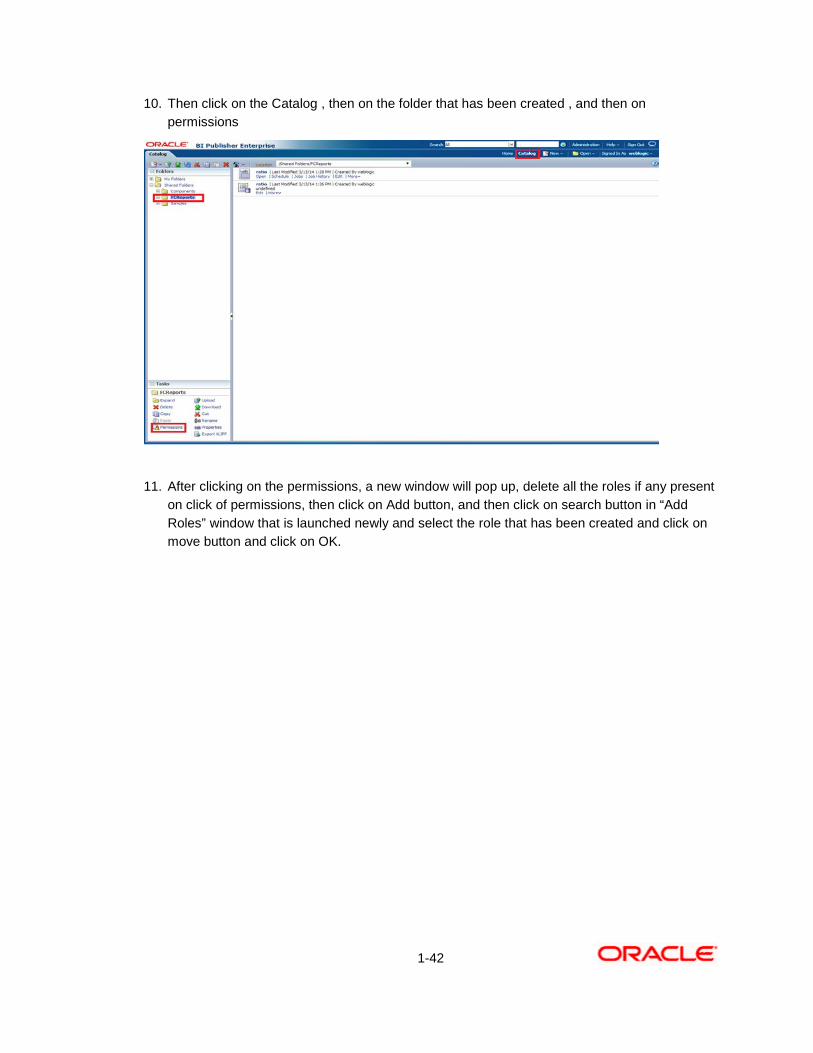
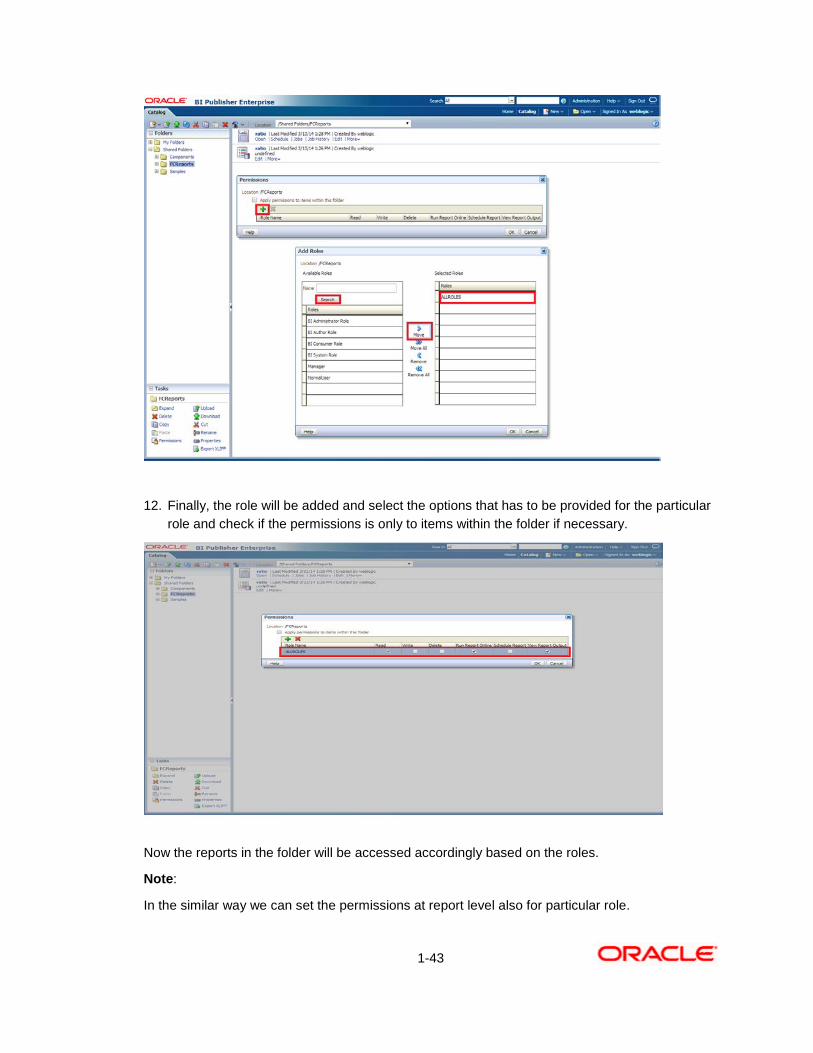
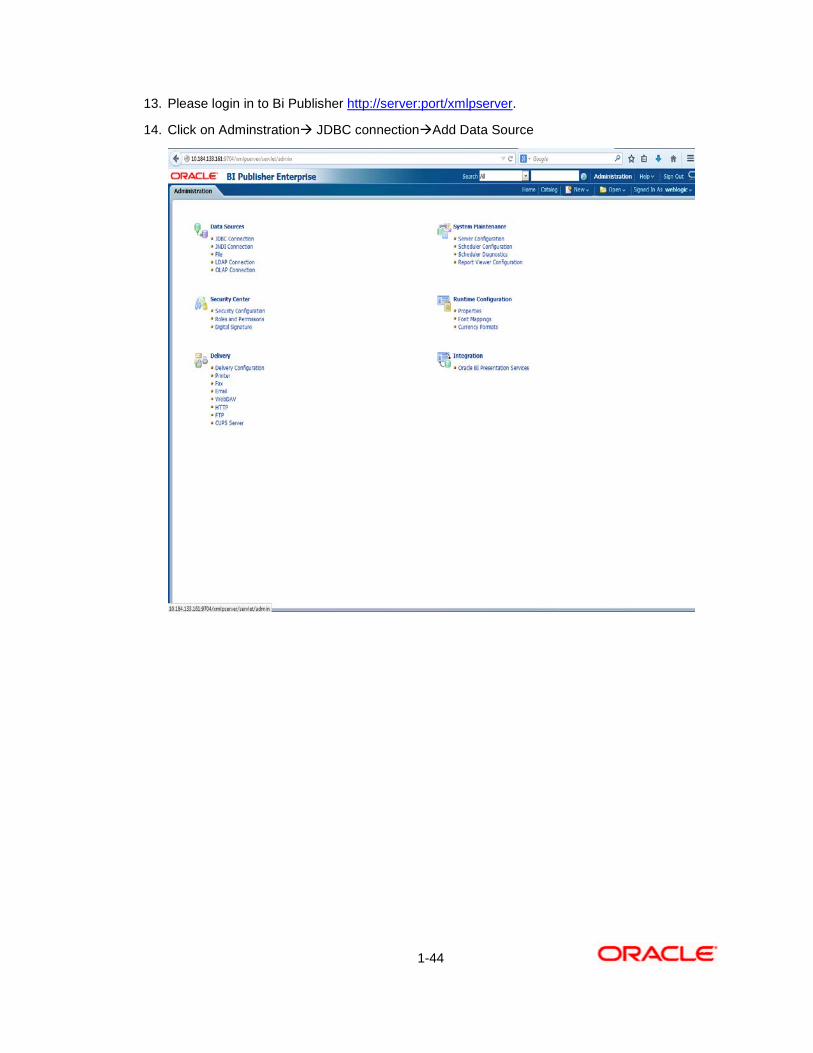
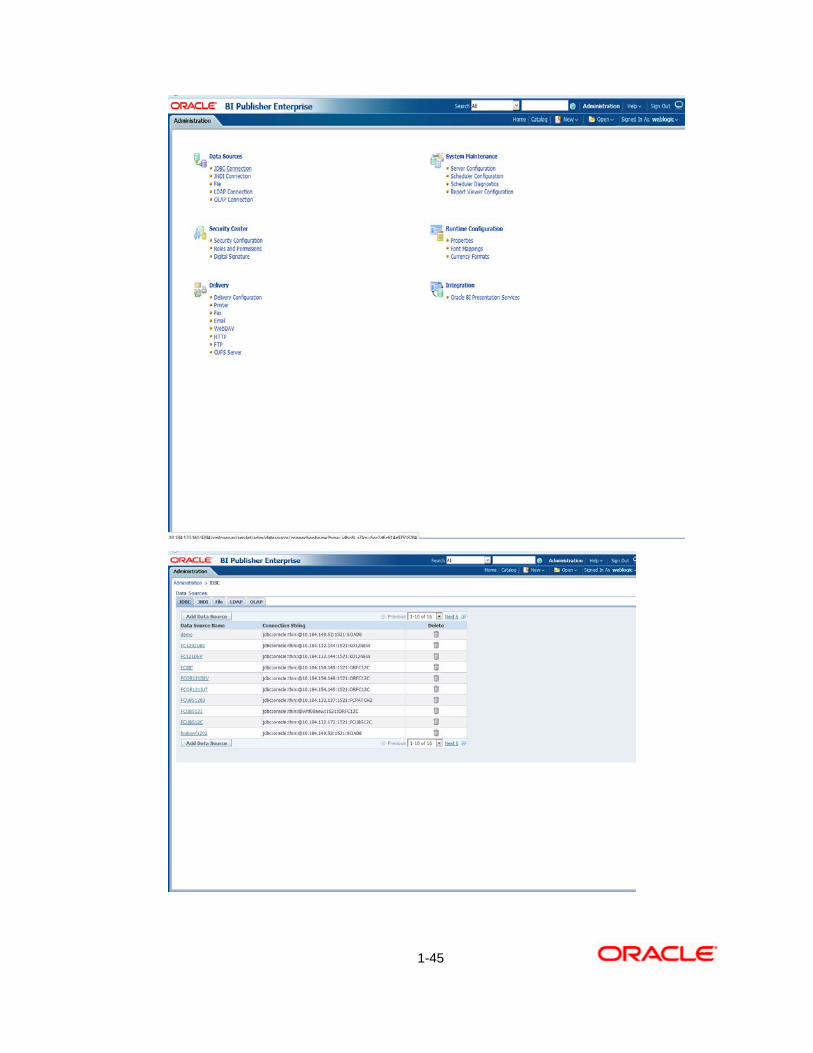
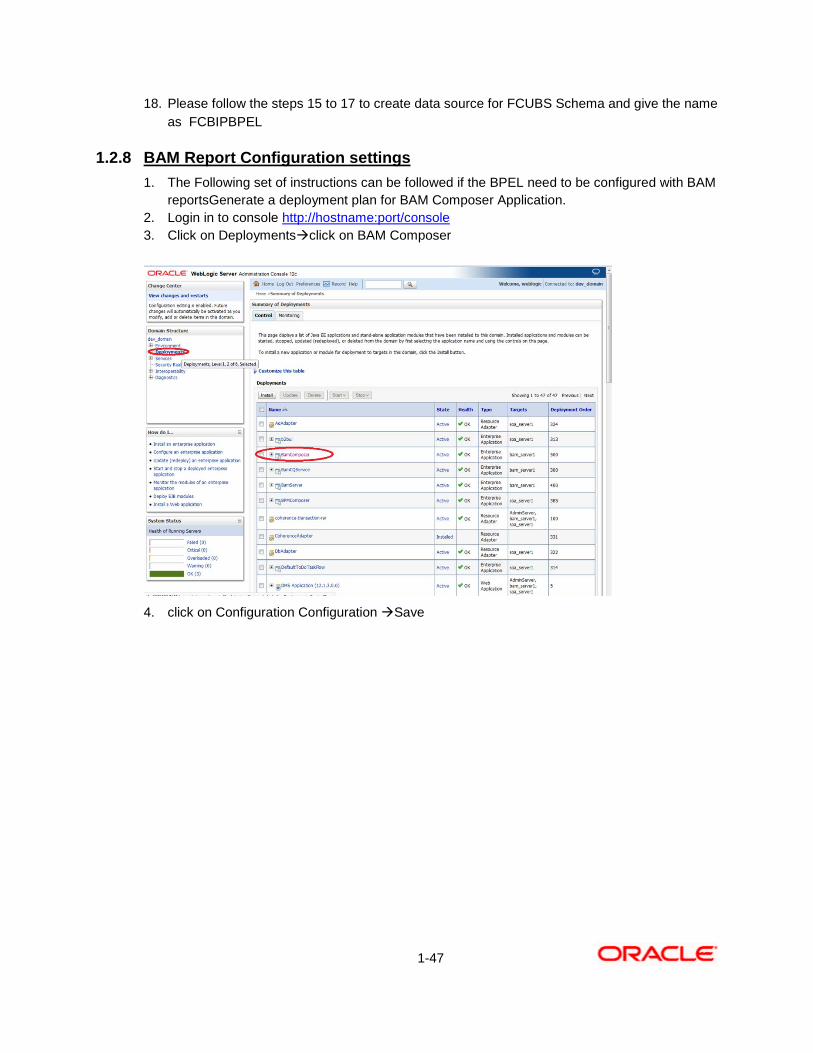
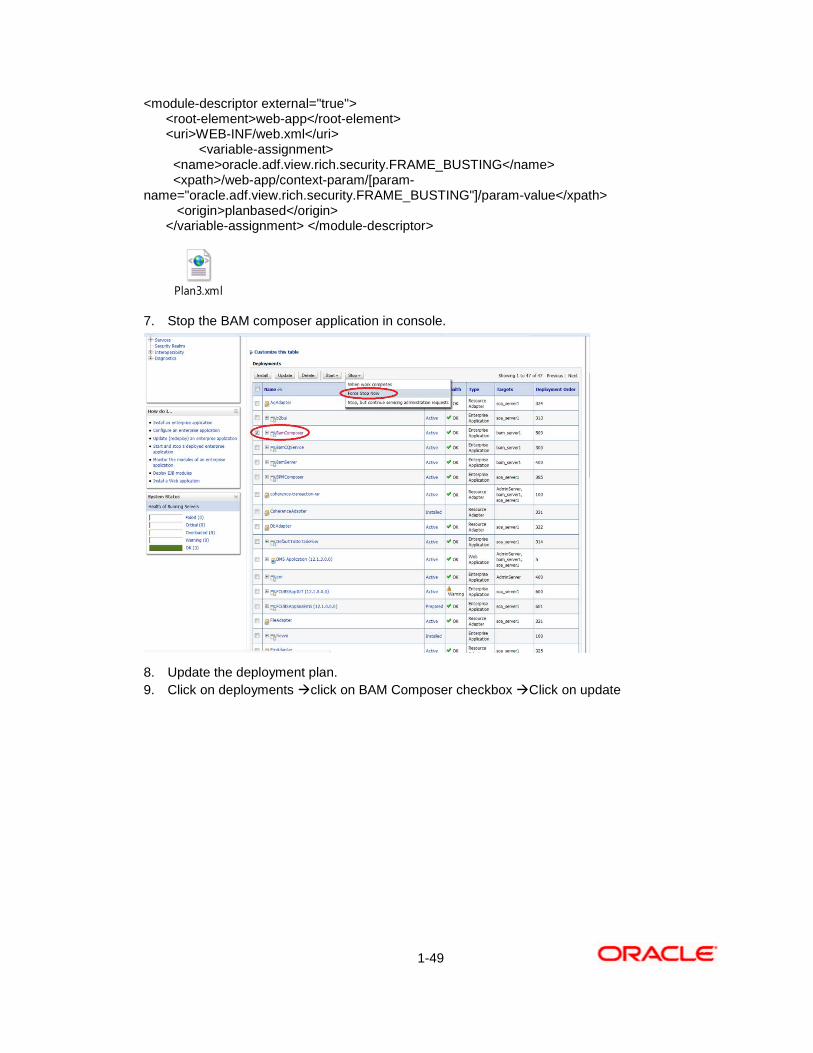
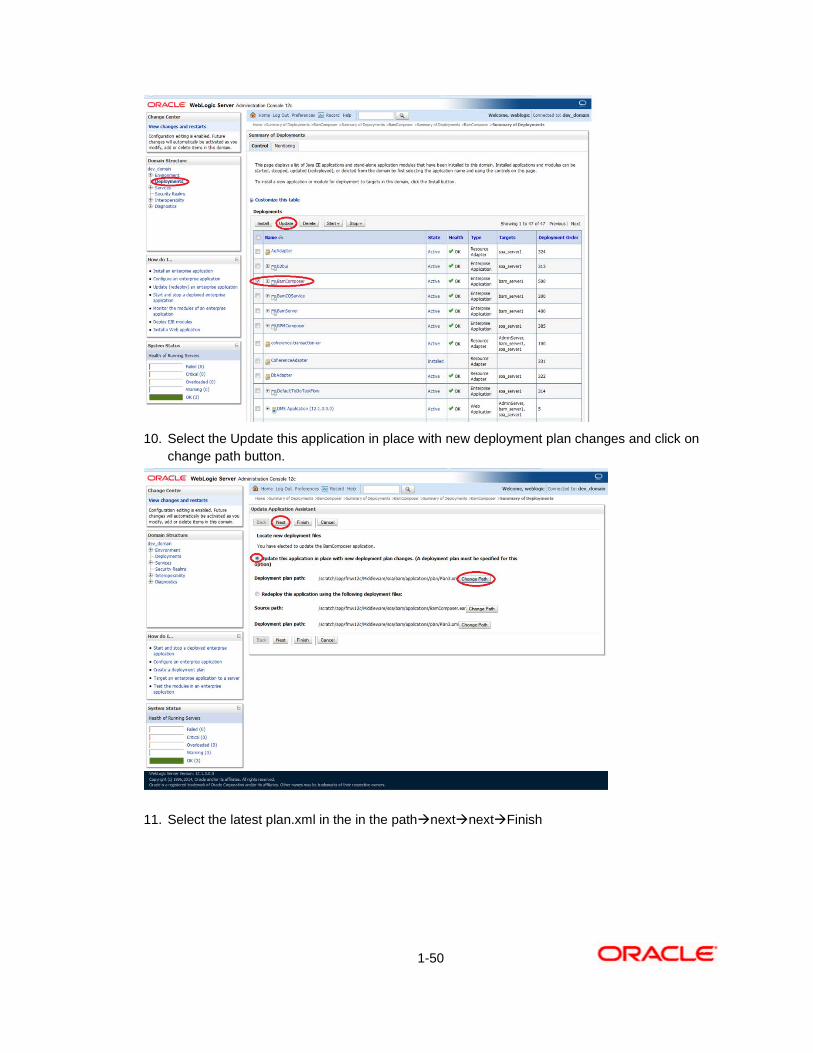
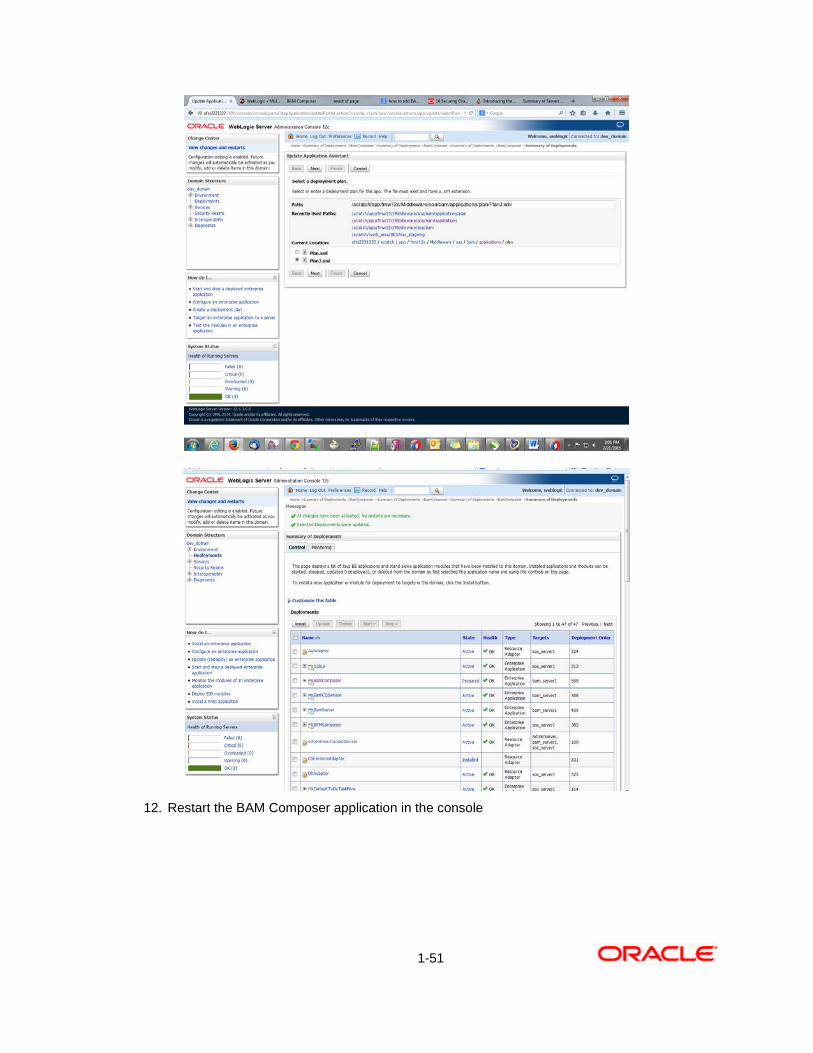
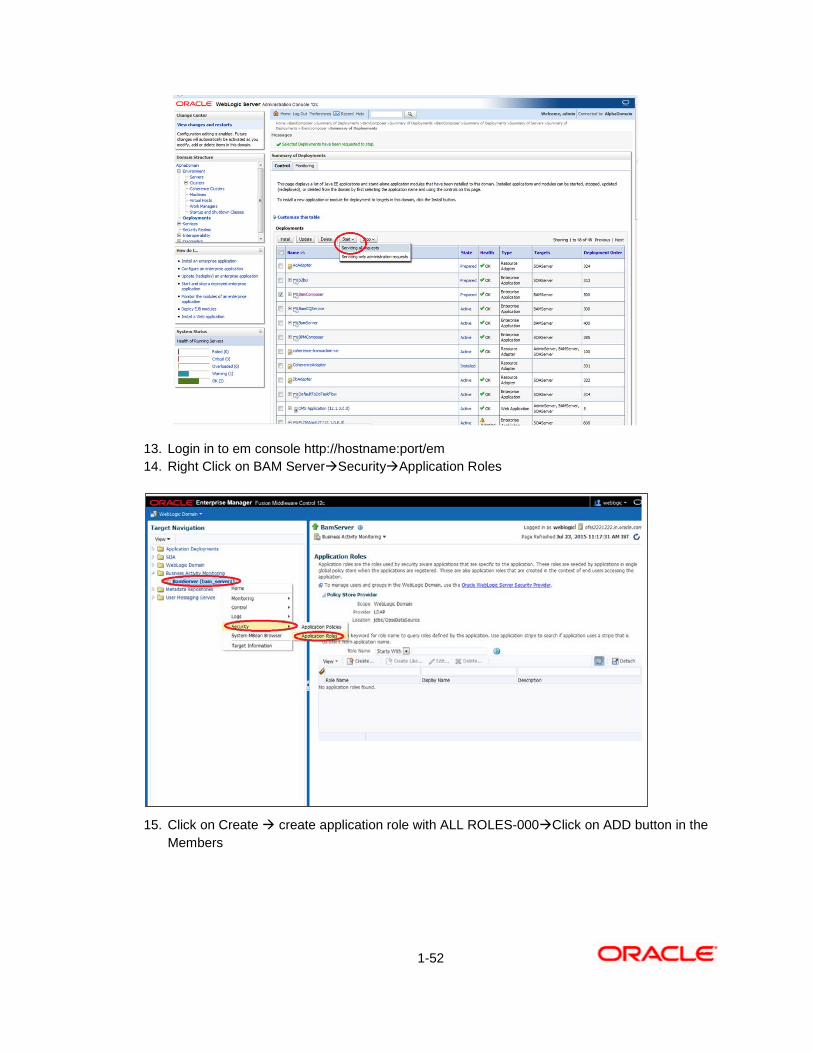
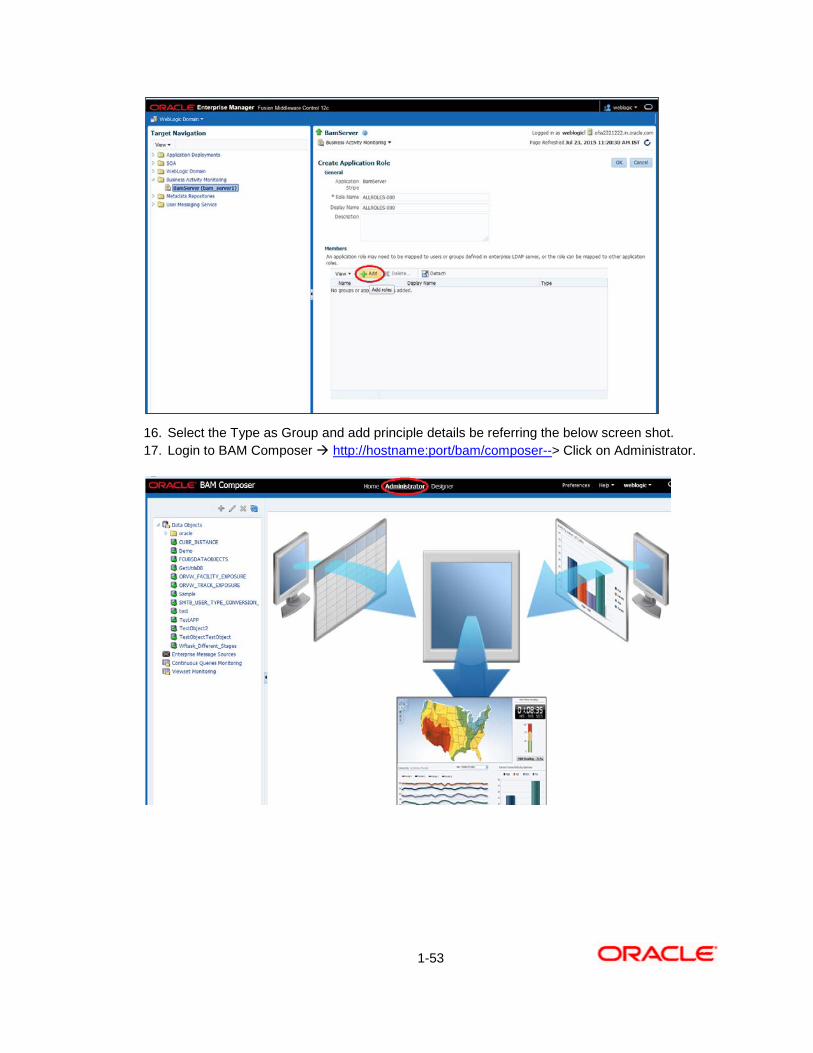
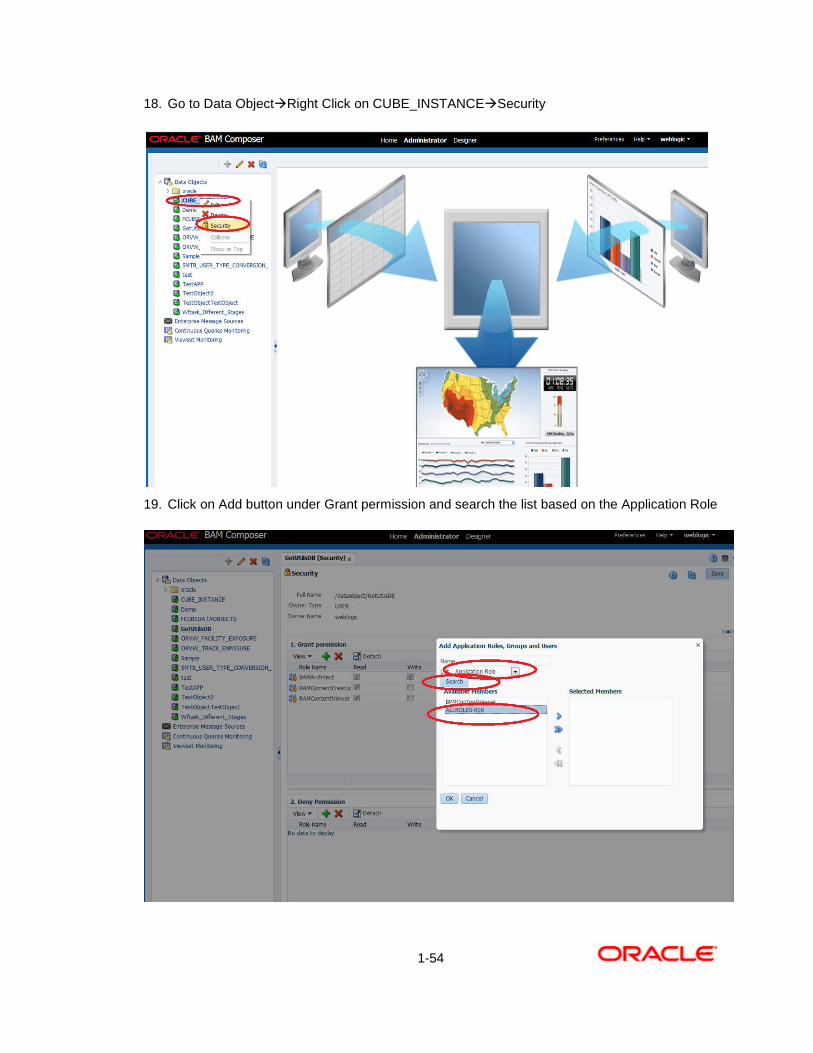
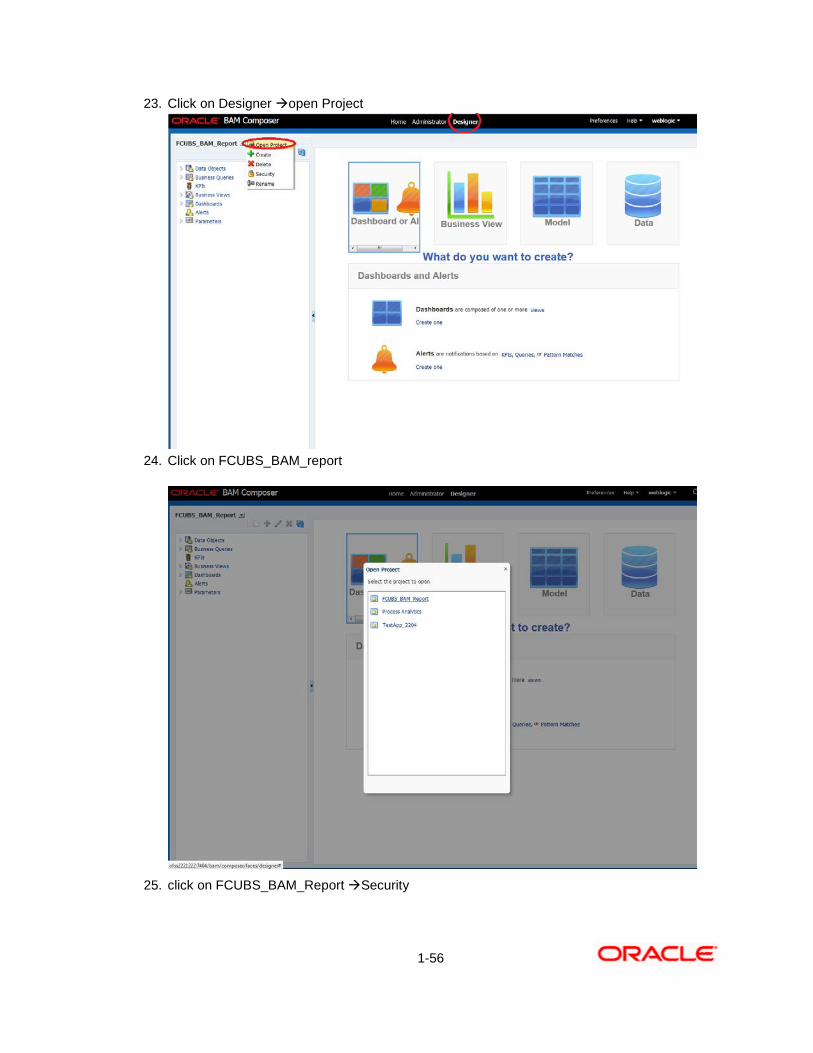
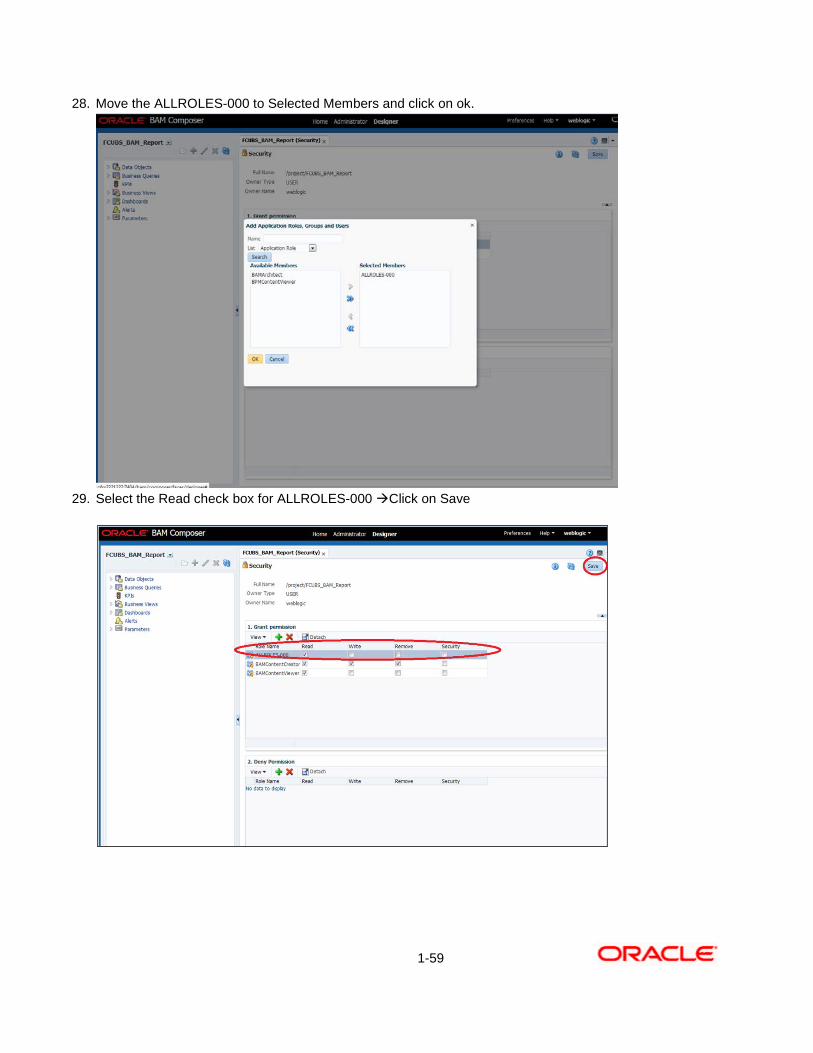
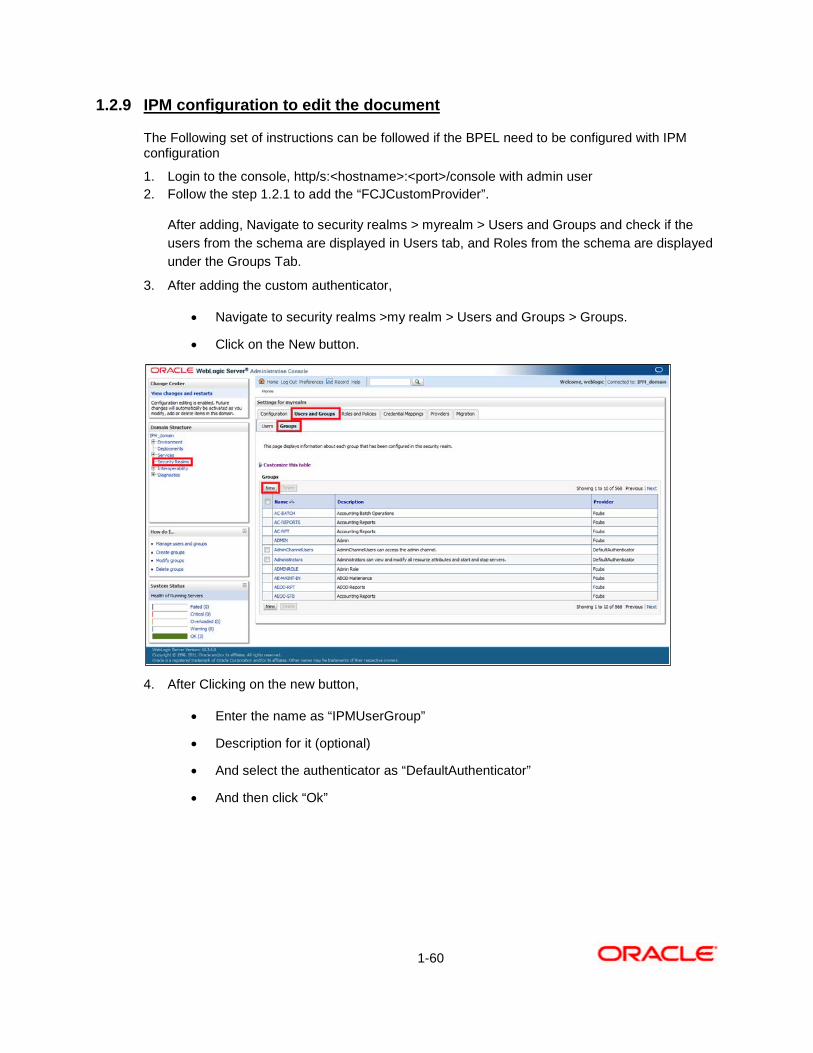
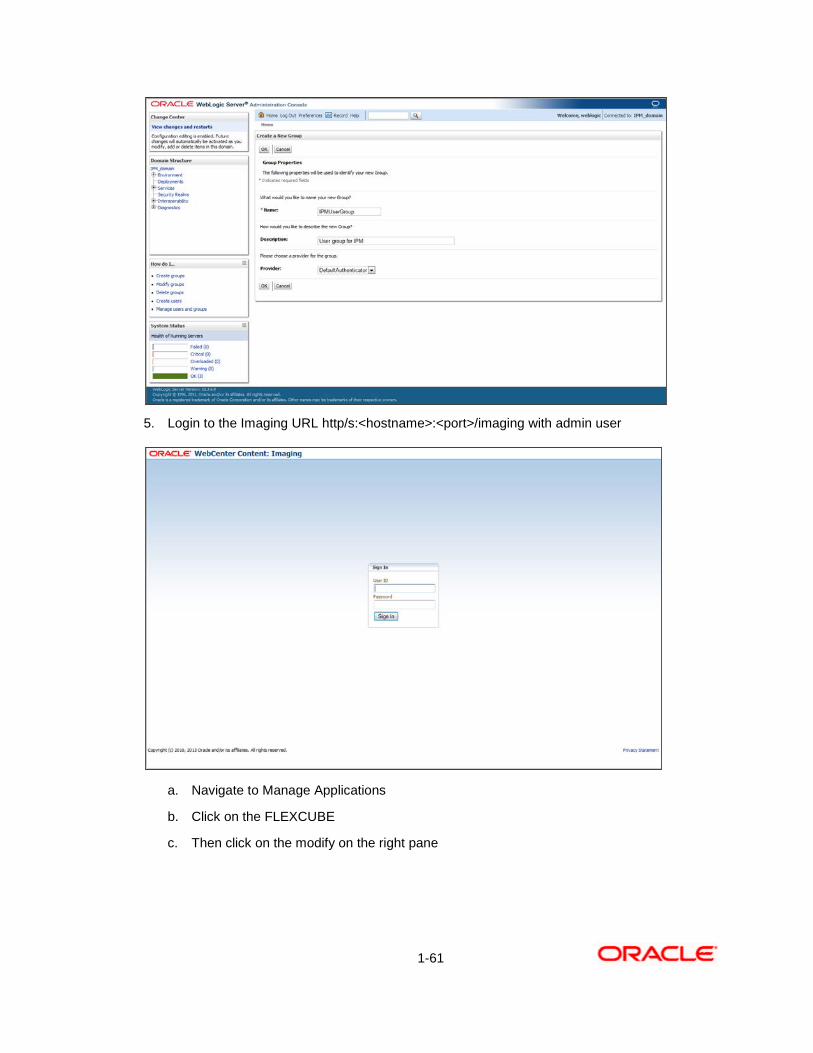
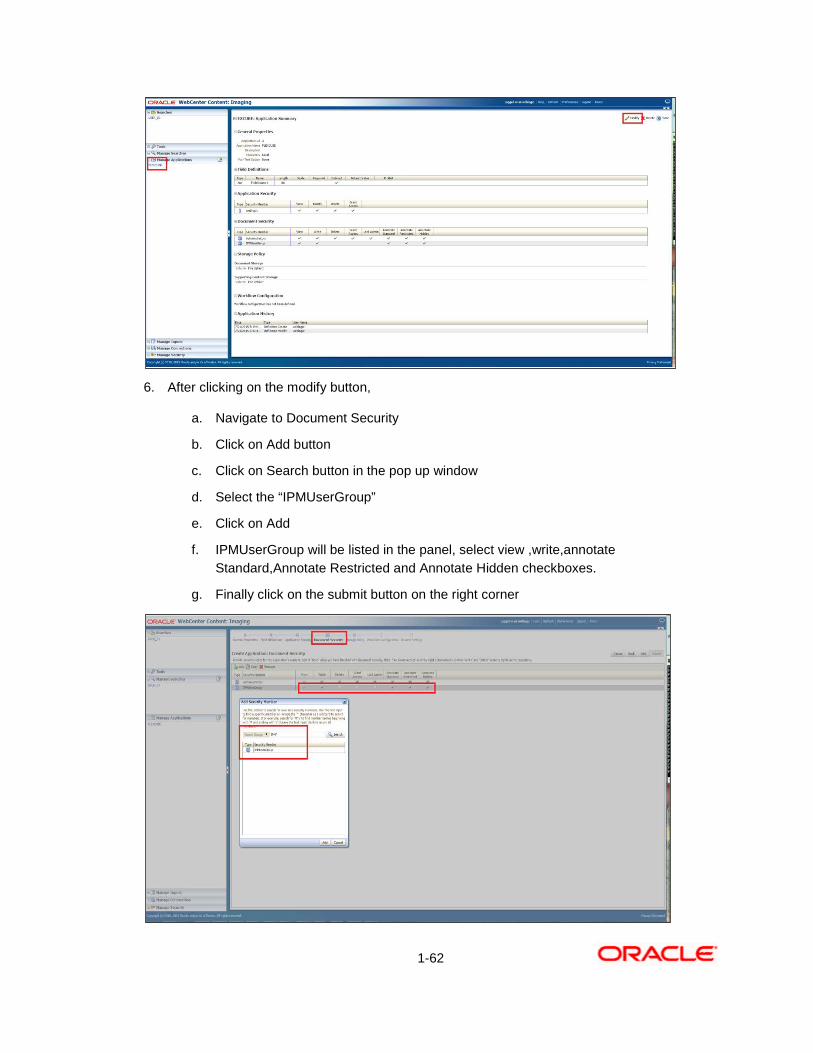
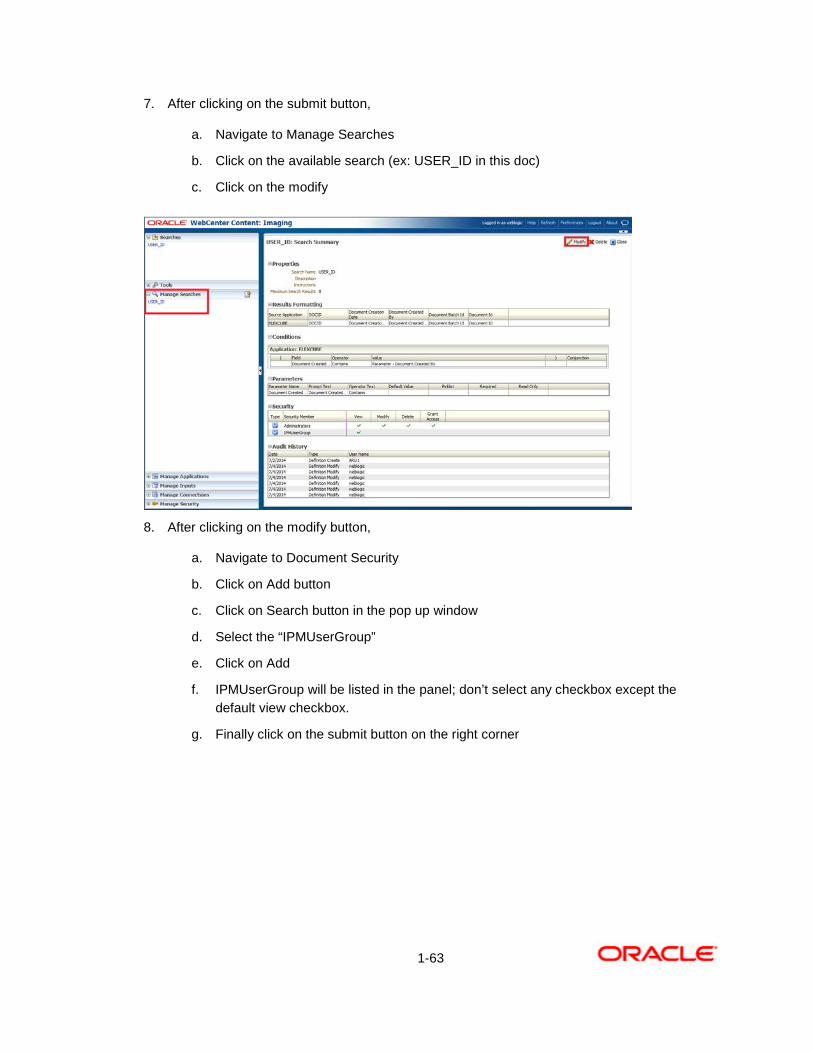
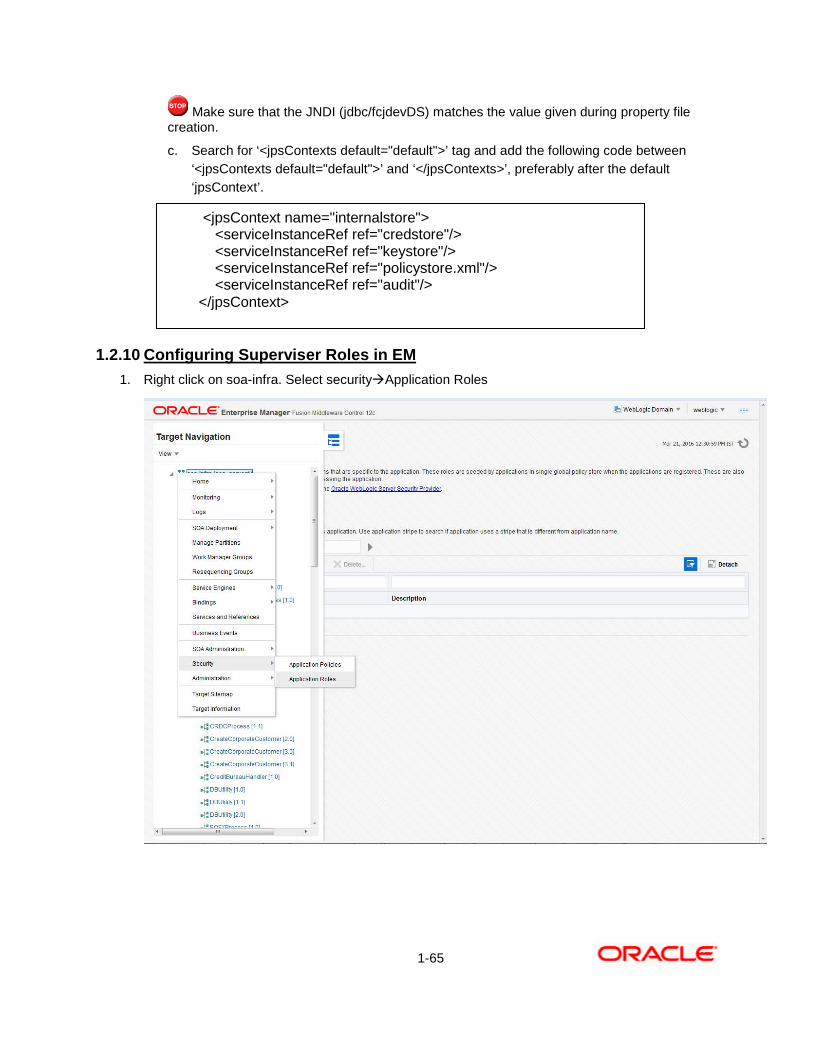
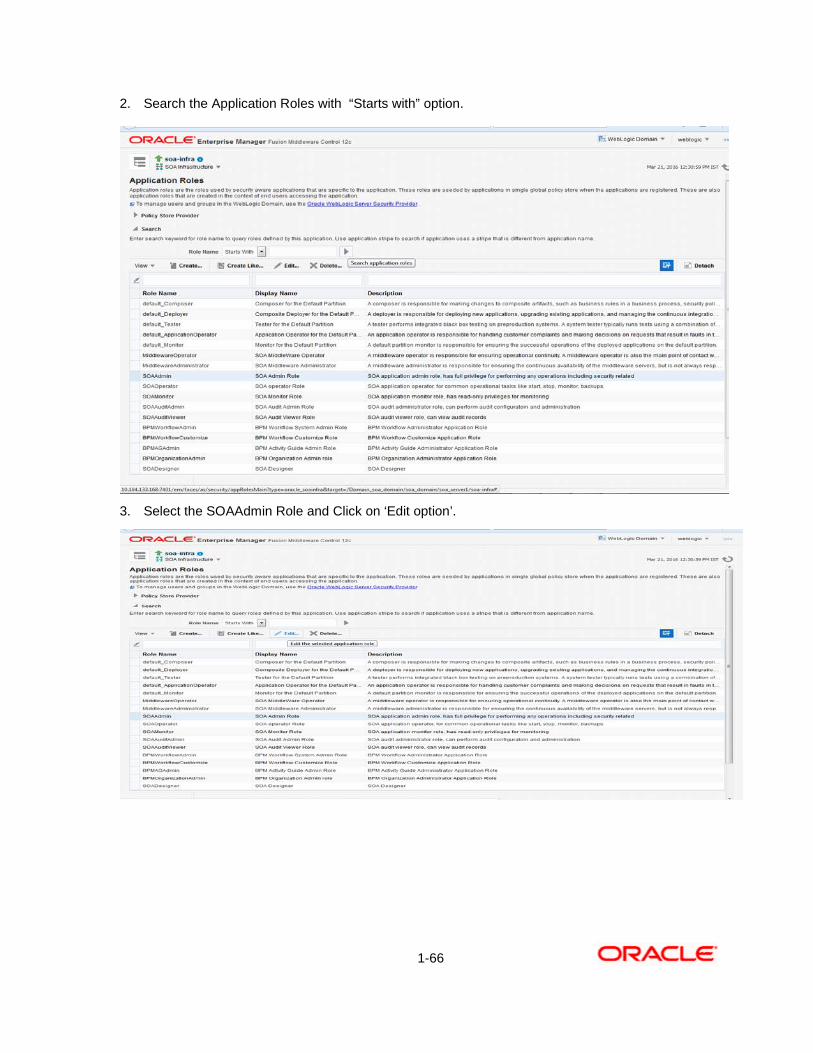
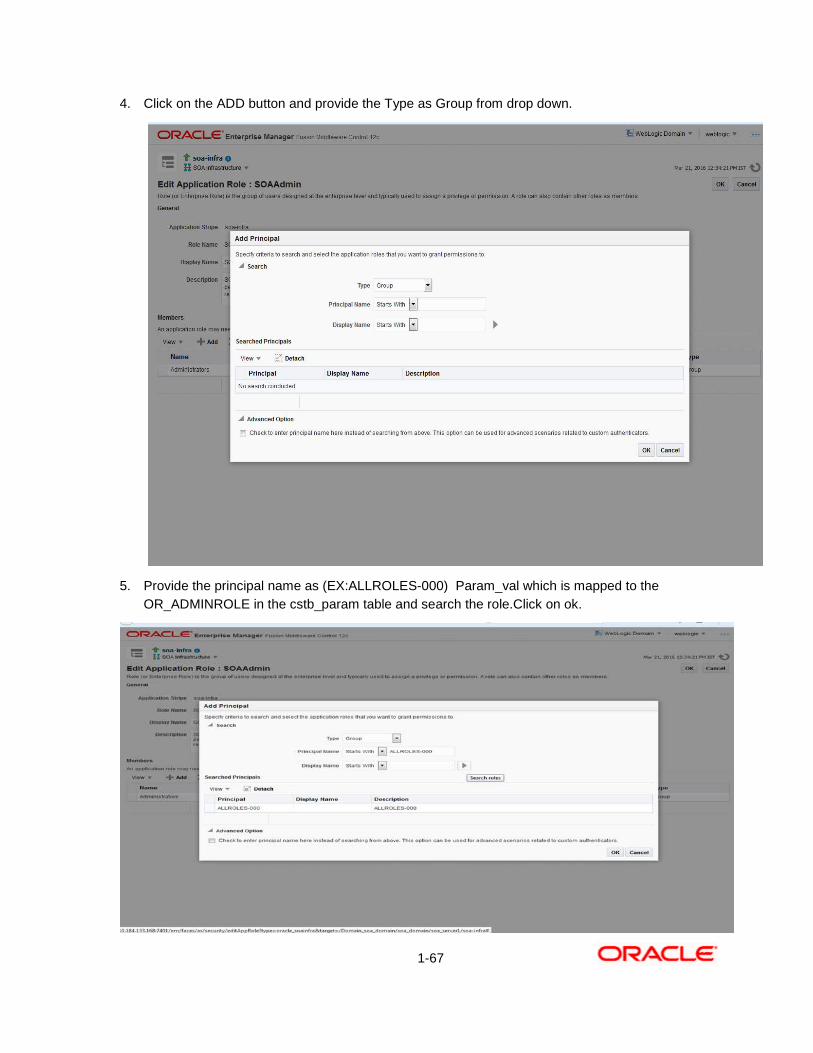
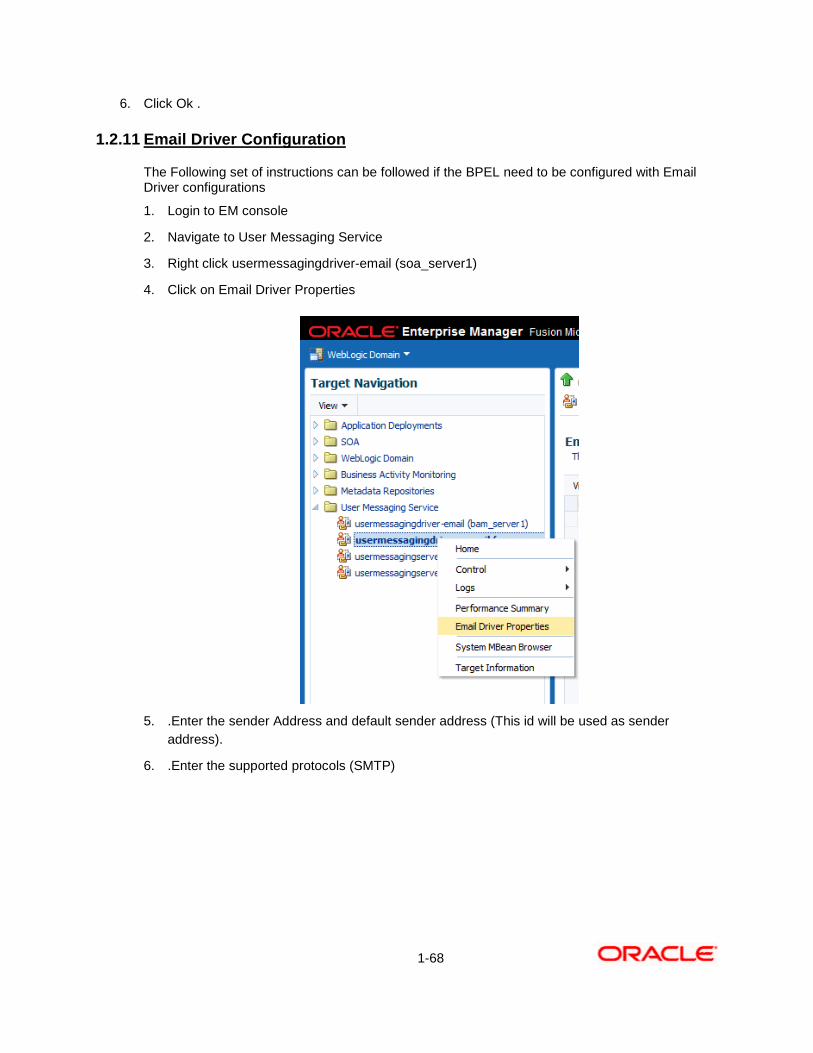
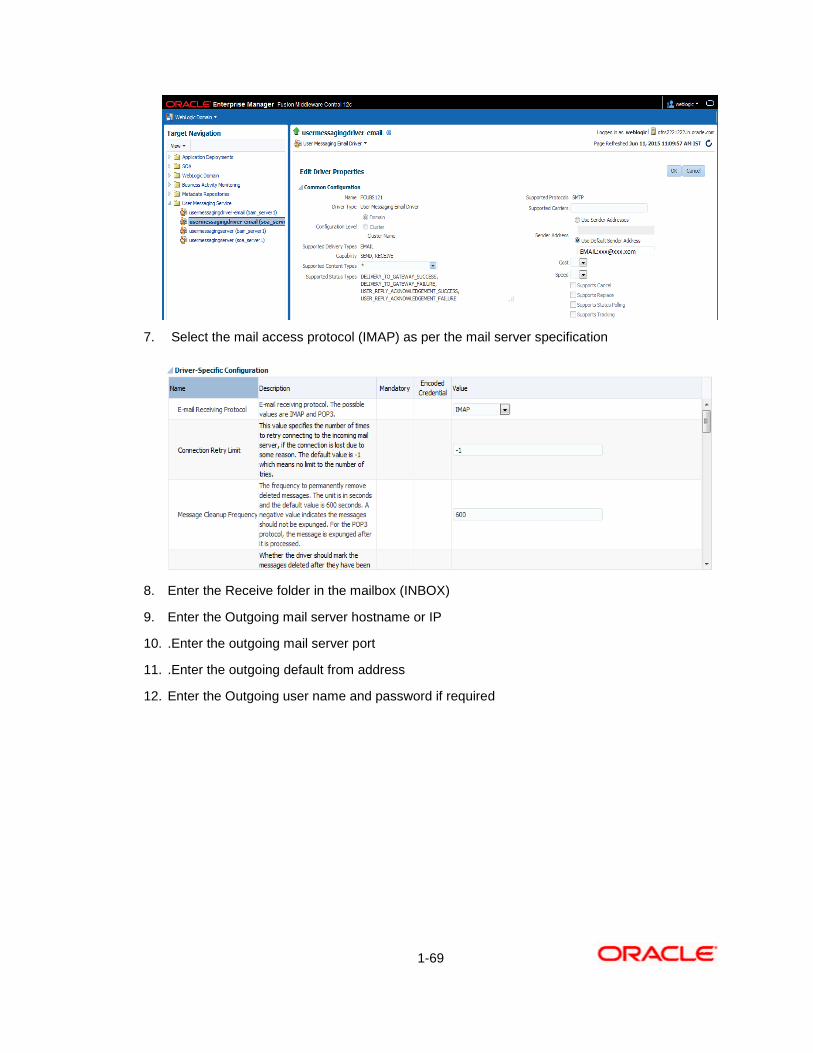
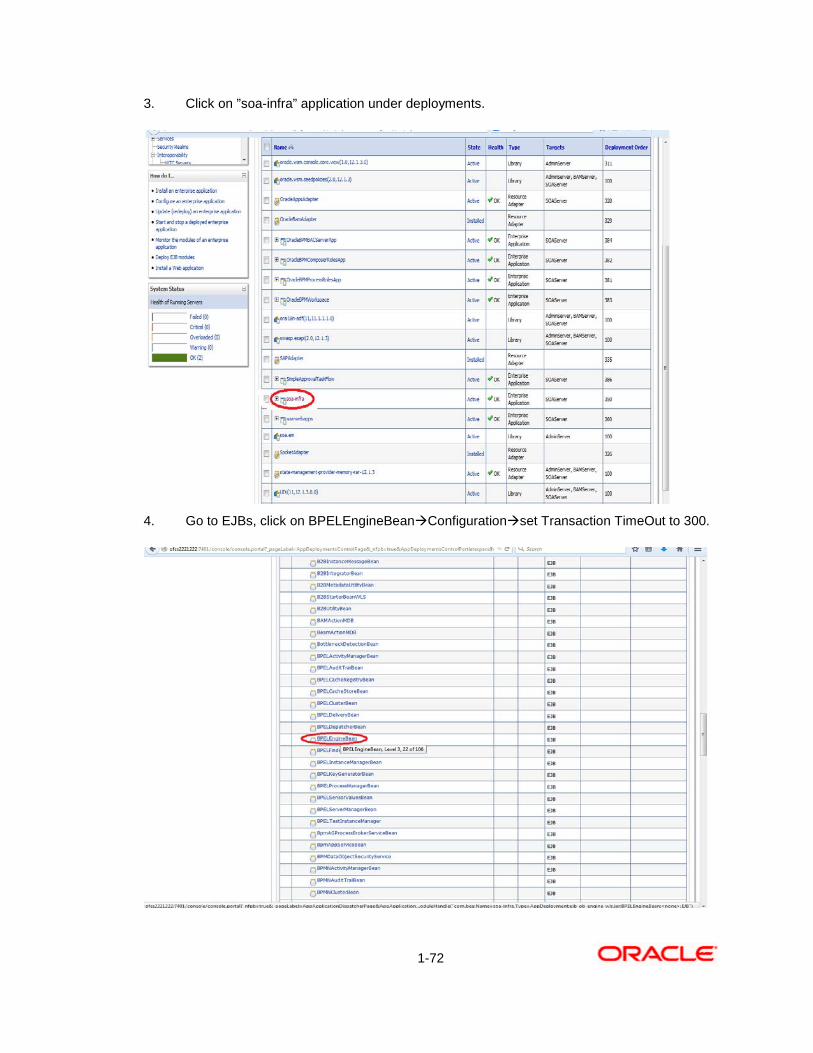
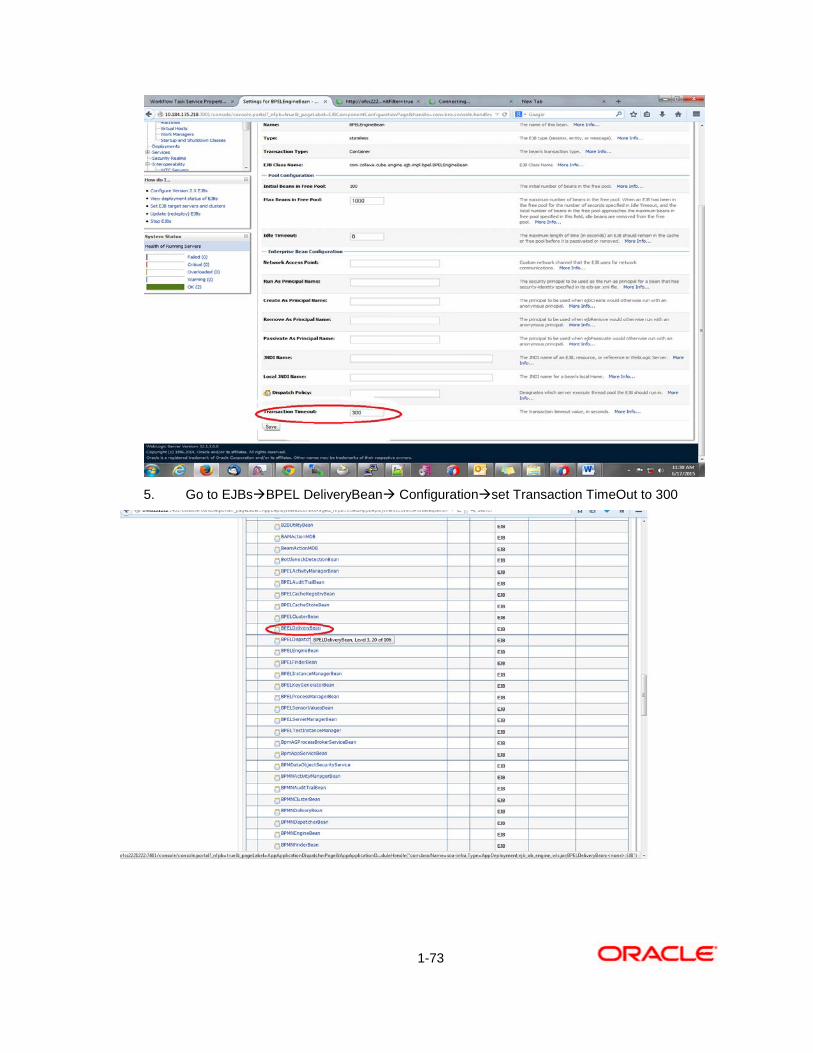
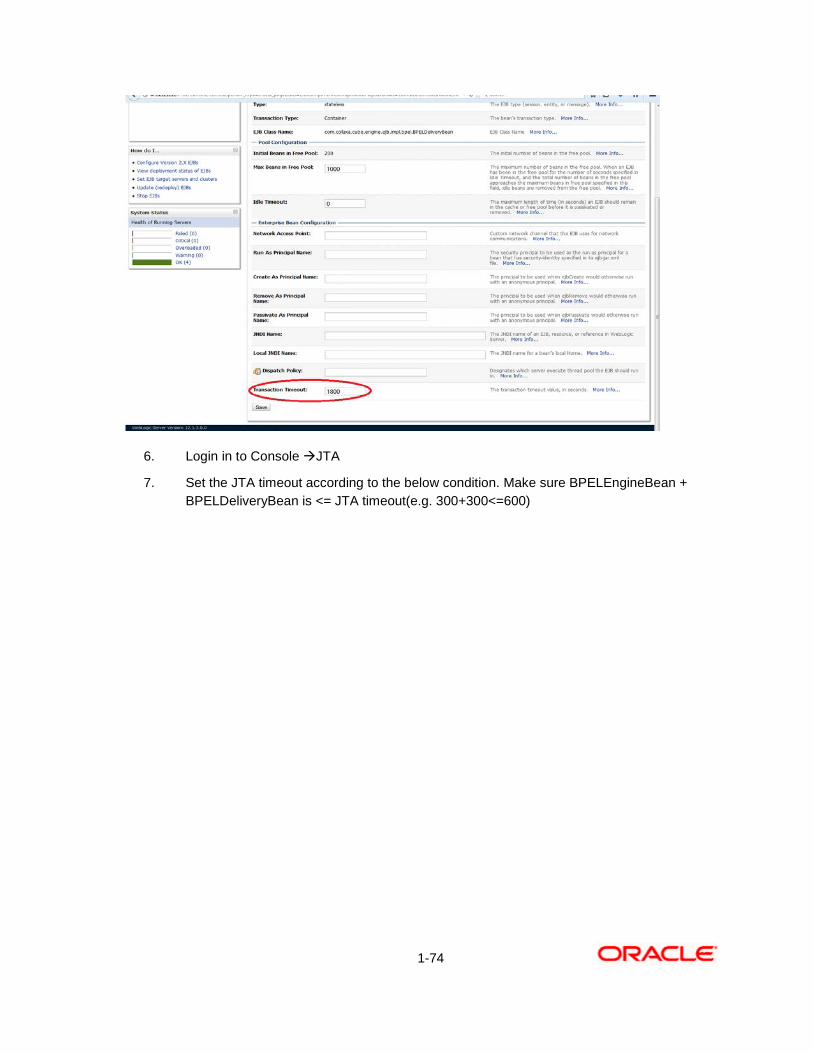
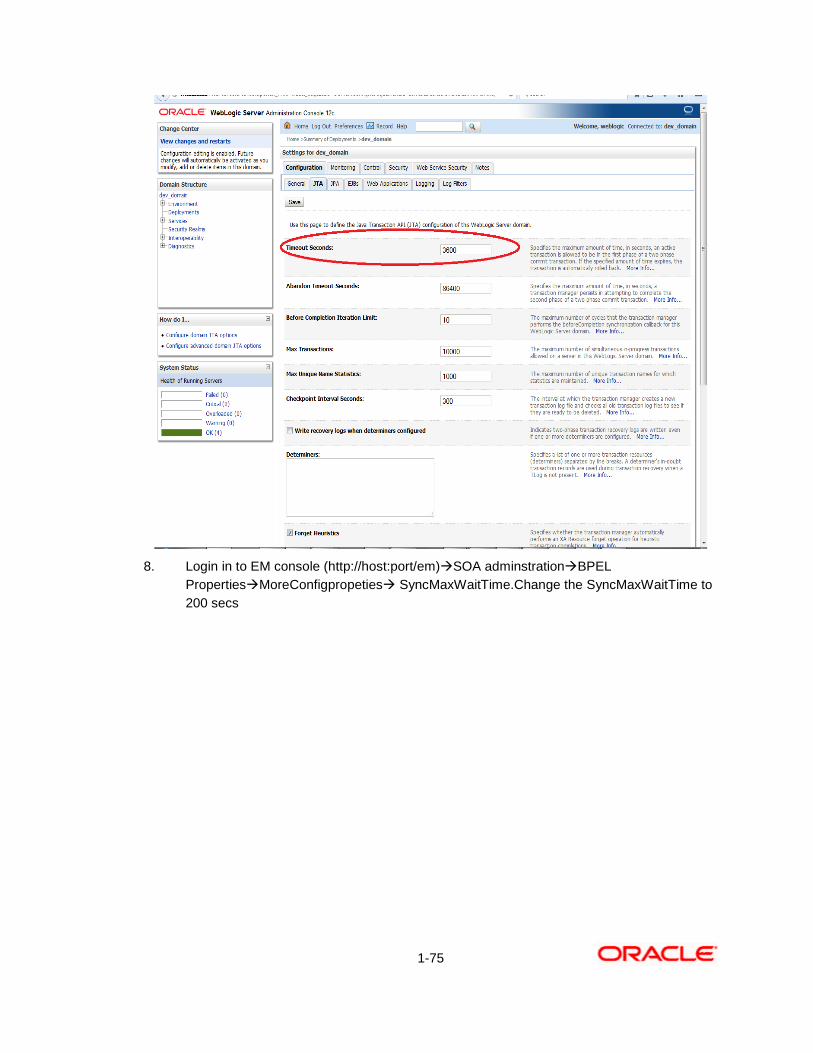
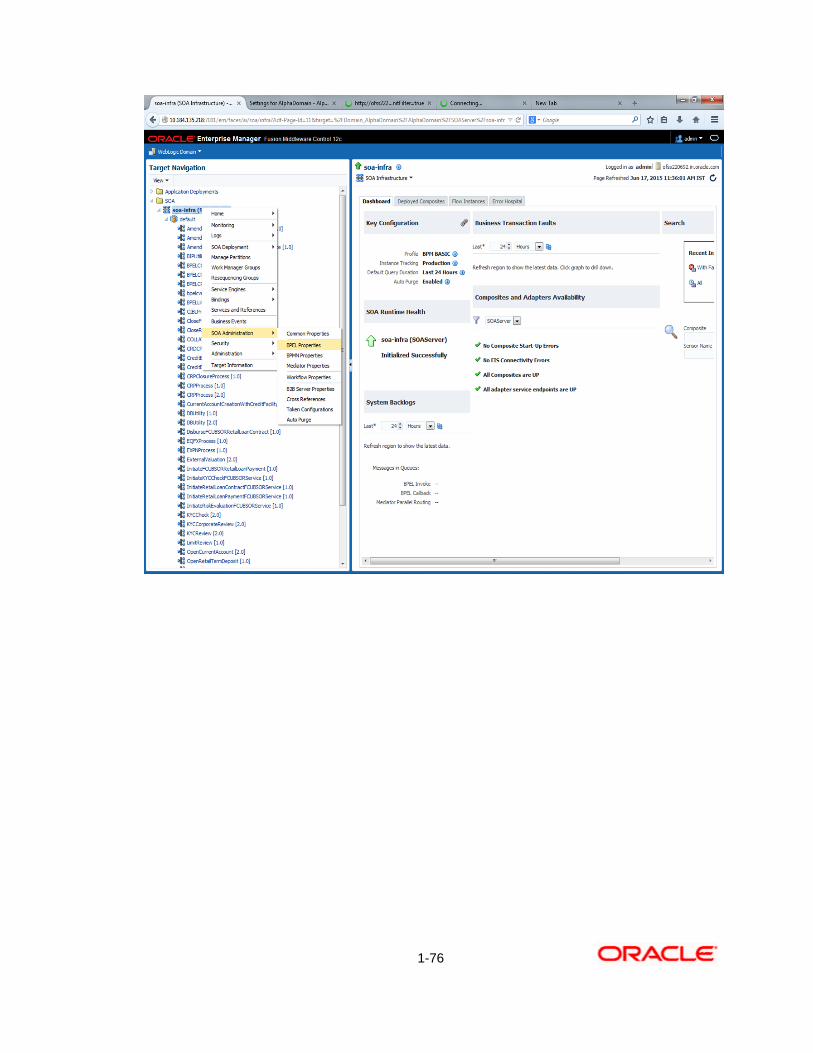
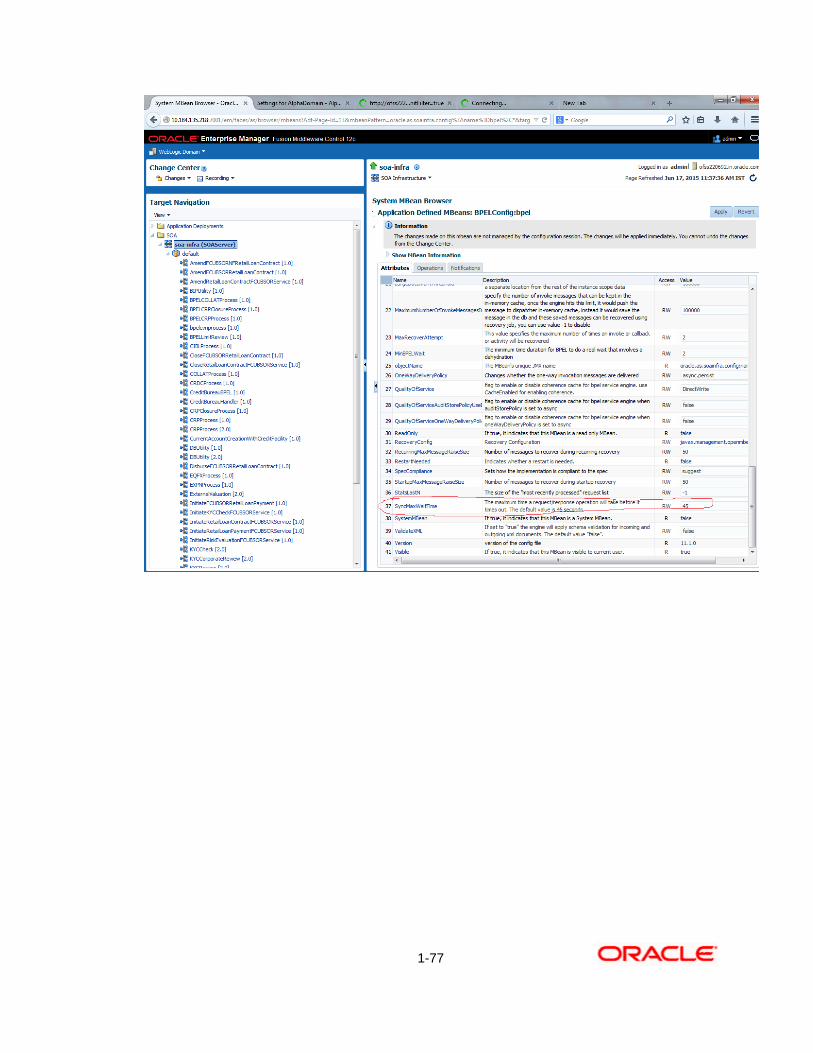


![Data Model Getting Started Oracle FLEXCUBE Universal ...€¦ · Data Model – Getting Started . Oracle FLEXCUBE Universal Banking . Release 12.4.0.0.0 [[2017May] ] ... 3 FLEXCUBE](https://static.fdocuments.us/doc/165x107/5ec5370f27ec2d0ff06b235d/data-model-getting-started-oracle-flexcube-universal-data-model-a-getting.jpg)


![Oracle FLEXCUBE Universal Banking - FLEXCUBE Core … · 1-1 Oracle FLEXCUBE Universal Banking - FLEXCUBE Core Integration Oracle FLEXCUBE Universal Banking Release 11.5.0.0.0 [July]](https://static.fdocuments.us/doc/165x107/5b0dd0227f8b9a8b038e4323/oracle-flexcube-universal-banking-flexcube-core-oracle-flexcube-universal-banking.jpg)