Setting Up Banners on Cisco Router - · PDF fileCreate a Configuration Template being used for...
10
During my study with NetMRI products I’ve created a couple to use cases to learn NetMRI capabilities. In this document I outlined the steps to add a Login Banner to all the Cisco Devices, I’m running in my lab and home-office. I assume you have NetMRI installed, either as an appliance or as virtual instance for a trial. Setting Up Banners on Cisco Router A banner is used to provide a small security warning to anyone, who wants to log into your network device. This is how you would give anyone who connects to the router or switch exactly the information you want to provide. Make sure you’re familiar with these four available banner types: • message of the day banner -> router(config)# banner motd • login banner -> router(config)# banner login • line-activation banner -> router(config)# banner exec • incoming terminal line banner -> router(config)# banner incoming Configure a Message of the Day Banner A simple Message of the Day could be some serious or funny message. You can configure a message-of-the- day (MOTD) banner to be displayed on all connected terminals. This banner is displayed at login and is useful for sending messages that affect all network users (such as impending system shutdowns). To do so, use the following command in global configuration mode: router(config)#banner motd d message d Configure a Login Banner You can configure a login banner to be displayed on all connected terminals. This banner is displayed after the MOTD banner and before the login prompts. To configure a login banner, use the following command in global configuration mode: router(config)#banner login d message d The login banner cannot be disabled on a per-line basis. To globally disable the login banner, you must delete the login banner with the no banner login command. How to use NetMRI to add a Login Banner to all Cisco Devices created by: Rainer Bemsel – Version 1.0 – Dated: July/17/2012
Transcript of Setting Up Banners on Cisco Router - · PDF fileCreate a Configuration Template being used for...

During my study with NetMRI products I’ve created a couple to use cases to learn NetMRI capabilities. In
this document I outlined the steps to add a Login Banner to all the Cisco Devices, I’m running in my lab and
home-office.
I assume you have NetMRI installed, either as an appliance or as virtual instance for a trial.
Setting Up Banners on Cisco Router
A banner is used to provide a small security warning to anyone, who wants to log into your network device.
This is how you would give anyone who connects to the router or switch exactly the information you want to
provide.
Make sure you’re familiar with these four available banner types:
• message of the day banner -> router(config)# banner motd
• login banner -> router(config)# banner login
• line-activation banner -> router(config)# banner exec
• incoming terminal line banner -> router(config)# banner incoming
Configure a Message of the Day Banner
A simple Message of the Day could be some serious or funny message. You can configure a message-of-the-
day (MOTD) banner to be displayed on all connected terminals. This banner is displayed at login and is useful
for sending messages that affect all network users (such as impending system shutdowns). To do so, use the
following command in global configuration mode:
router(config)#banner motd d message d
Configure a Login Banner
You can configure a login banner to be displayed on all connected terminals. This banner is displayed after
the MOTD banner and before the login prompts.
To configure a login banner, use the following command in global configuration mode:
router(config)#banner login d message d The login banner cannot be disabled on a per-line basis. To globally disable the login banner, you must delete
the login banner with the no banner login command.
How to use NetMRI to add a Login Banner to all Cisco Devices
created by: Rainer Bemsel – Version 1.0 – Dated: July/17/2012
How to use NetMRI to add a Login Banner to all Cisco Devices page 2 of 10
Configure a Line-Activation Banner
You can configure a line-activation banner to be displayed when an EXEC process (such as a line-activation or
incoming connection to a VTY line) is created. To do so, use the following command in global configuration
mode:
router(config)#banner exec d message d
Configure an Incoming Banner
You can configure a banner to be displayed on terminals connected to reverse Telnet lines. This banner is
useful for providing instructions to users of these types of connections. Reverse Telnet connections are
described in more detail in the "Establishing a Reverse Telnet Session to a Modem" chapter in the Dial
Solutions Configuration Guide.
To configure a banner that is sent on incoming connections, use the following command in global configuration
mode:
router(config)#banner incoming d message d
Setting Up Configuration Template on NetMRI
Create a Configuration Template being used for all Cisco Routers
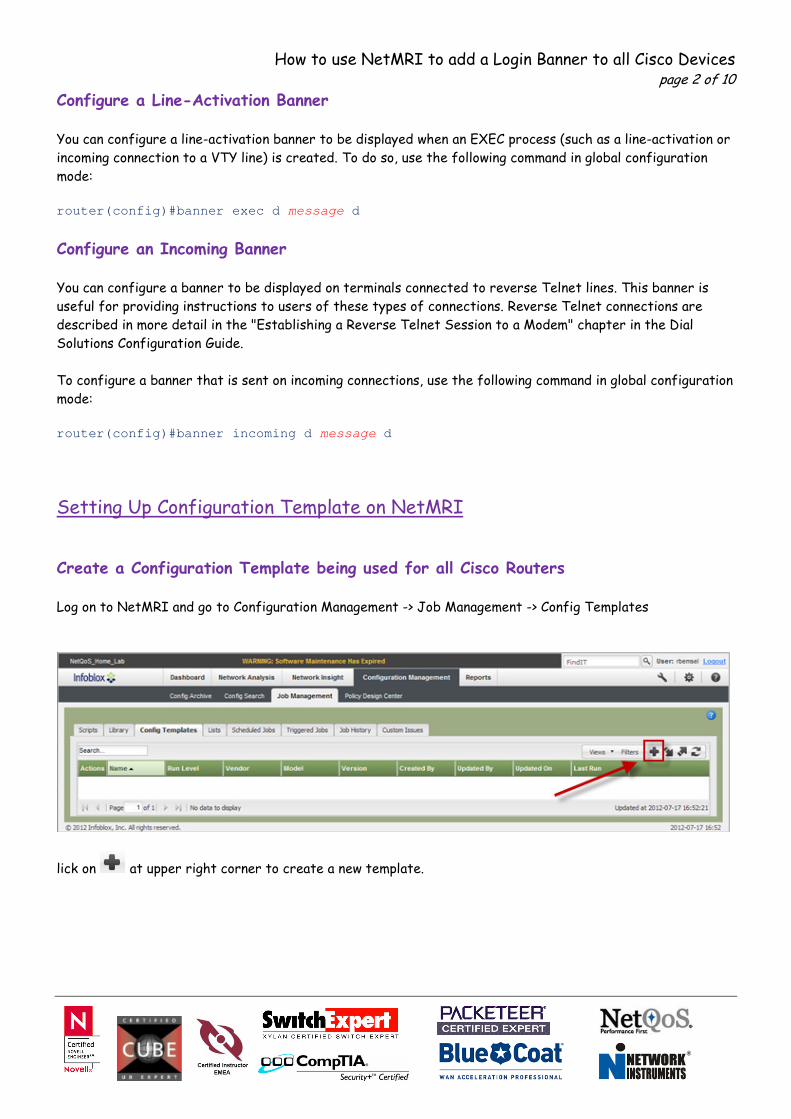
Log on to NetMRI and go to Configuration Management -> Job Management -> Config Templates
lick on at upper right corner to create a new template.
How to use NetMRI to add a Login Banner to all Cisco Devices page 3 of 10
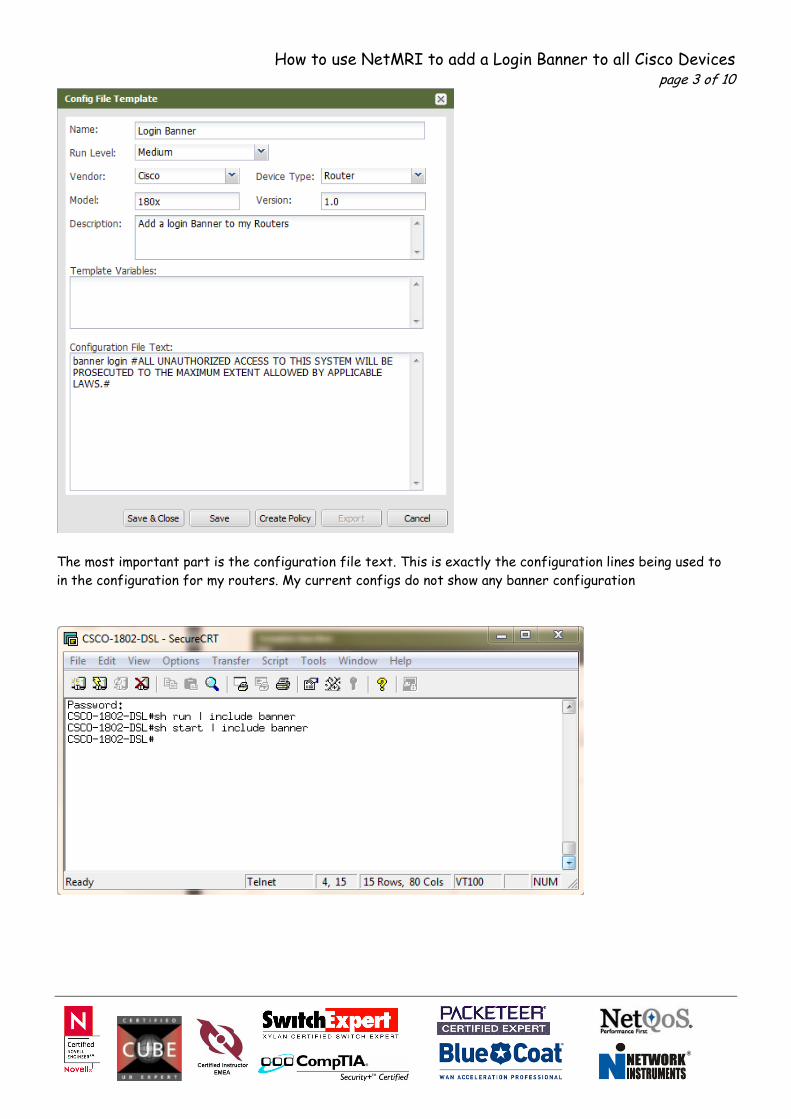
The most important part is the configuration file text. This is exactly the configuration lines being used to
in the configuration for my routers. My current configs do not show any banner configuration
How to use NetMRI to add a Login Banner to all Cisco Devices page 4 of 10
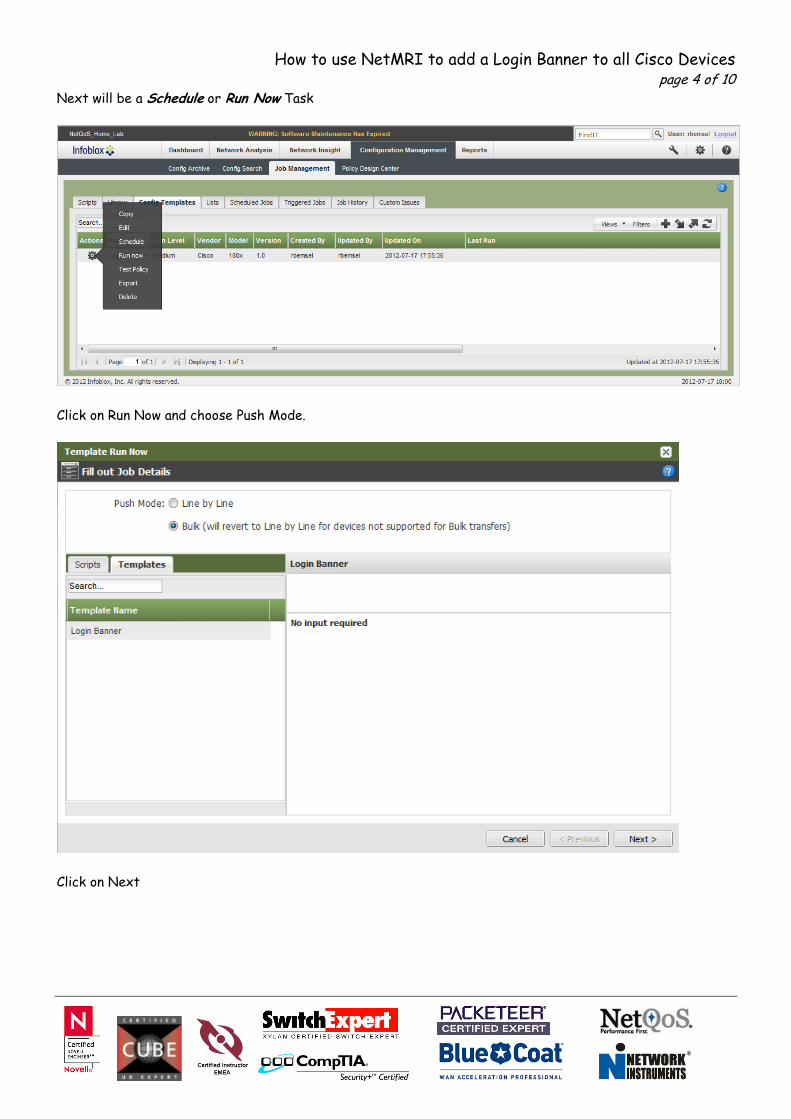
Next will be a Schedule or Run Now Task
Click on Run Now and choose Push Mode.
Click on Next
How to use NetMRI to add a Login Banner to all Cisco Devices page 5 of 10
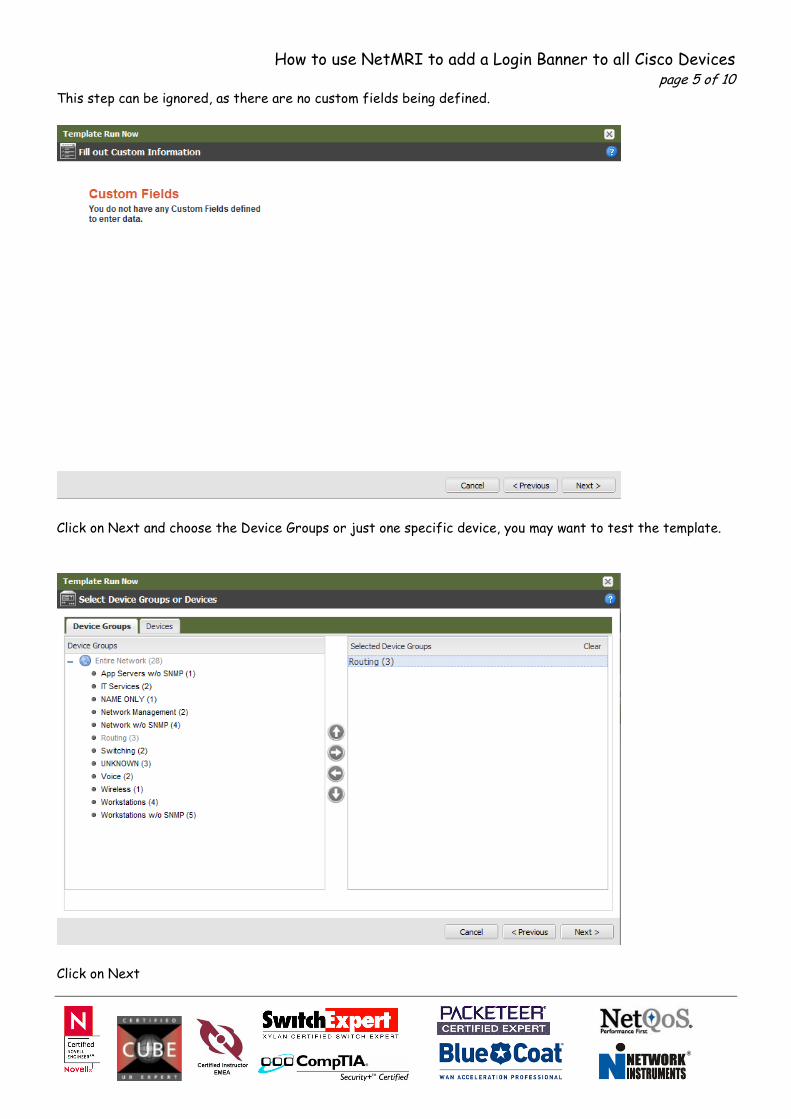
This step can be ignored, as there are no custom fields being defined.
Click on Next and choose the Device Groups or just one specific device, you may want to test the template.
Click on Next

How to use NetMRI to add a Login Banner to all Cisco Devices page 6 of 10
There is a final review. If you are happy with it, click on Run Now. You will be asked if you want to run this
job right now.
Click on Yes and let automation do the config extensions.

How to use NetMRI to add a Login Banner to all Cisco Devices page 7 of 10
If all Routers have been fueled with the new config extension you would see OK, otherwise an error status is
being displayed.
Click on the Job Name to open the Job Viewer. There you will see what and where it went wrong
In my case, 2 routers were configured and 1 router failed. Click on Error to see the Process Log
How to use NetMRI to add a Login Banner to all Cisco Devices page 8 of 10
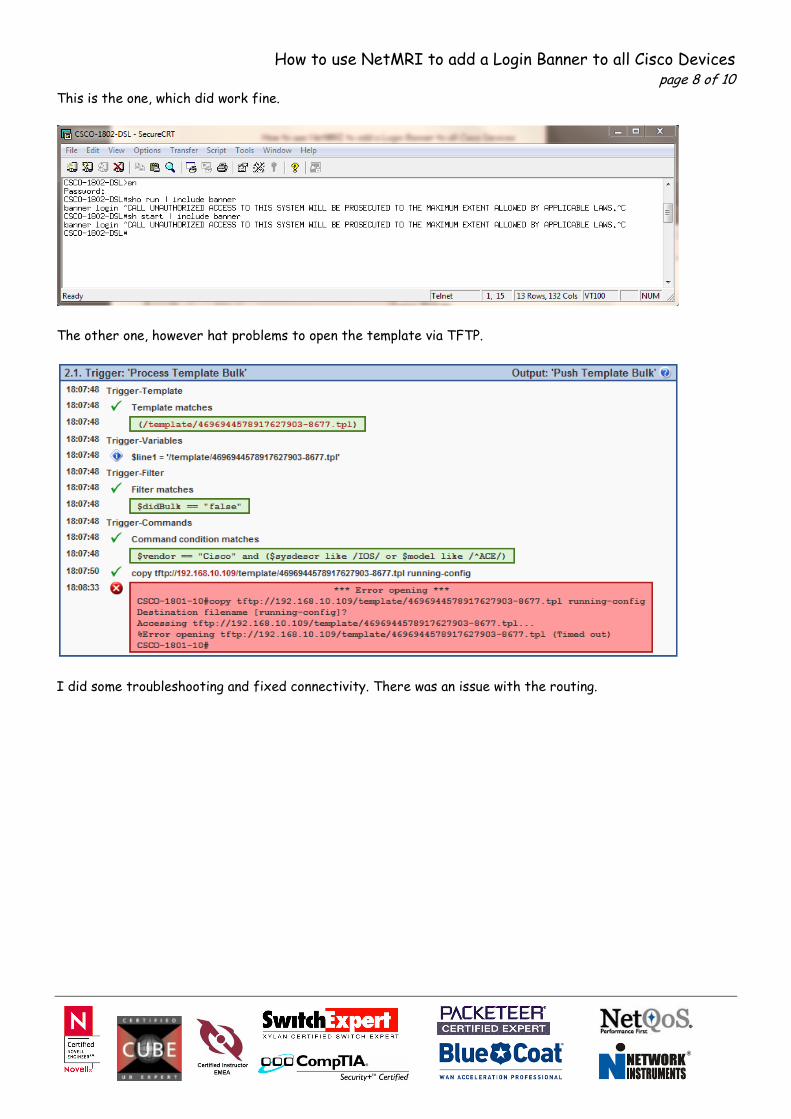
This is the one, which did work fine.
The other one, however hat problems to open the template via TFTP.
I did some troubleshooting and fixed connectivity. There was an issue with the routing.
How to use NetMRI to add a Login Banner to all Cisco Devices page 9 of 10
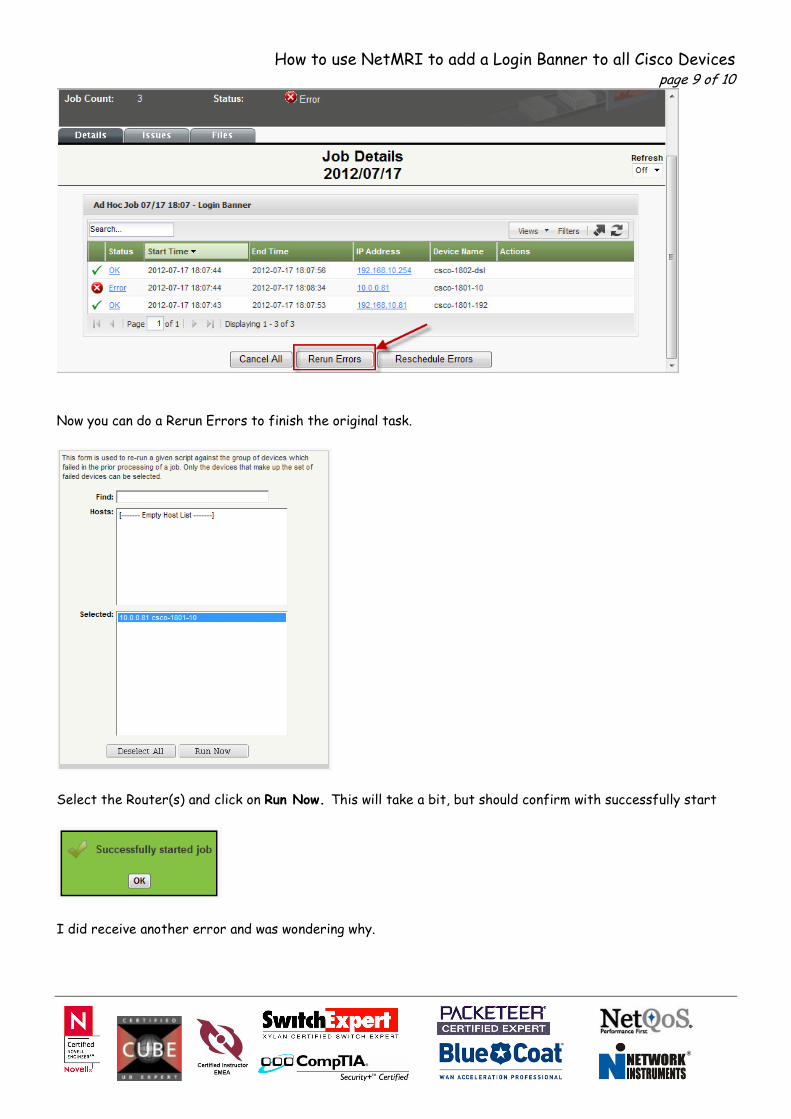
Now you can do a Rerun Errors to finish the original task.
Select the Router(s) and click on Run Now. This will take a bit, but should confirm with successfully start
I did receive another error and was wondering why.
How to use NetMRI to add a Login Banner to all Cisco Devices page 10 of 10
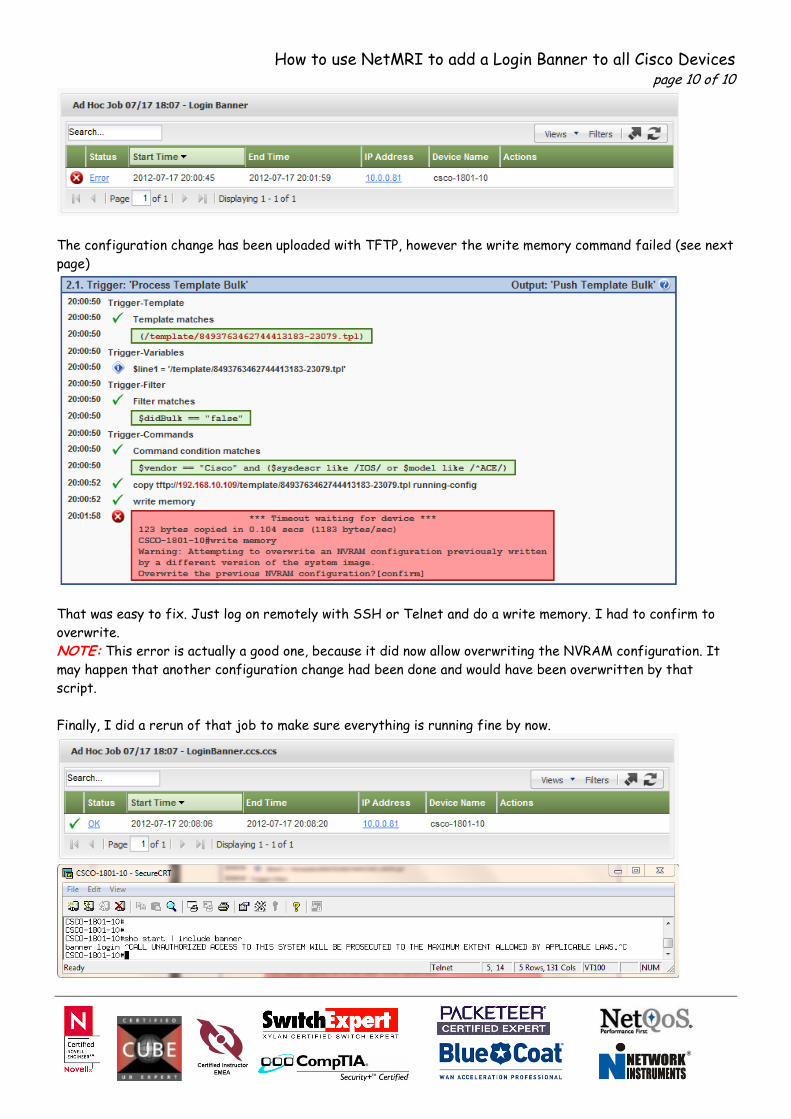
The configuration change has been uploaded with TFTP, however the write memory command failed (see next
page)
That was easy to fix. Just log on remotely with SSH or Telnet and do a write memory. I had to confirm to
overwrite.
NOTE: This error is actually a good one, because it did now allow overwriting the NVRAM configuration. It
may happen that another configuration change had been done and would have been overwritten by that
script.
Finally, I did a rerun of that job to make sure everything is running fine by now.