Setting up a Red5 streaming server on Amazon's AWSstreamingrecorder.denniehoopingarner.com/Setting...
13
Setting up a Red5 streaming server on Amazon's AWS Page 1 of 13 Setting up a Red5 streaming server on Amazon's AWS Introduction: This document has been prepared to assist in setting up the Streaming Recorder (http://streamingrecording.denniehoopingarner.com). For more information about the Streaming Recorder, contact the author at [email protected]. For more information about AWS, contact Amazon. Amazon’s AWS is a commercial service, you will have to pay Amazon to use the AWS service. No warranty is implied, and the user bears all responsibility for his actions. The Big Picture: 1. Create a server on AWS 2. Create an administrative account on your server 3. Install Red5 4. Create an “application” in Red5 5. Deploy the Red5 application to your application space 6. Restart Red5 Copyright © by Dennie Hoopingarner. All rights reserved. You may redistribute this document, provided you do not alter it in any way.
Transcript of Setting up a Red5 streaming server on Amazon's AWSstreamingrecorder.denniehoopingarner.com/Setting...

Setting up a Red5 streaming server on Amazon's AWS Page 1 of 13
Setting up a Red5 streaming server on Amazon's AWS
Introduction:
This document has been prepared to assist in setting up the Streaming Recorder (http://streamingrecording.denniehoopingarner.com).
For more information about the Streaming Recorder, contact the author at [email protected]. For more information about AWS, contact Amazon.
Amazon’s AWS is a commercial service, you will have to pay Amazon to use the AWS service.
No warranty is implied, and the user bears all responsibility for his actions.
The Big Picture:1. Create a server on AWS2. Create an administrative account on your server3. Install Red54. Create an “application” in Red55. Deploy the Red5 application to your application space6. Restart Red5
Copyright © by Dennie Hoopingarner. All rights reserved. You may redistribute this document, provided you do not alter it in any way.

Setting up a Red5 streaming server on Amazon's AWS Page 2 of 13
The Big Picture Step 1: Create a server on AWS
Go to aws.amazon.com.
Log in to your account:
After logging in, click the "EC2" link:
Copyright © by Dennie Hoopingarner. All rights reserved. You may redistribute this document, provided you do not alter it in any way.
Setting up a Red5 streaming server on Amazon's AWS Page 3 of 13
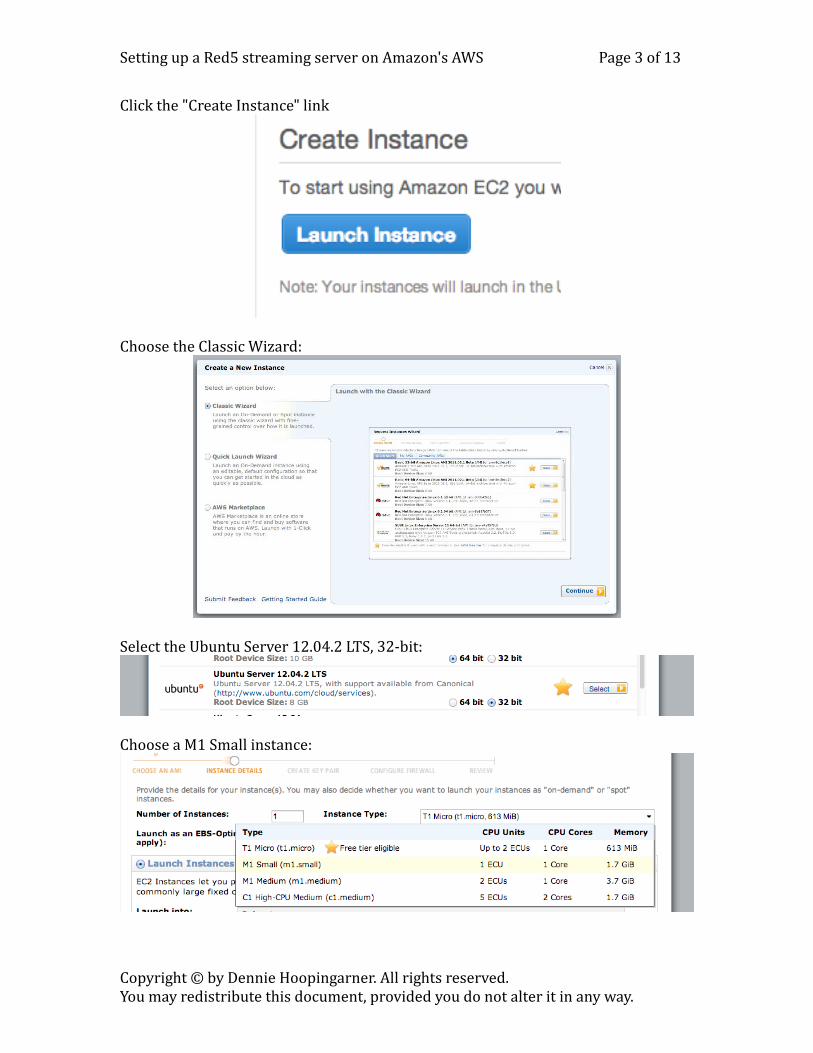
Click the "Create Instance" link
Choose the Classic Wizard:
Select the Ubuntu Server 12.04.2 LTS, 32-bit:
Choose a M1 Small instance:
Copyright © by Dennie Hoopingarner. All rights reserved. You may redistribute this document, provided you do not alter it in any way.

Setting up a Red5 streaming server on Amazon's AWS Page 4 of 13
Click "Continue"
On the next screen, accept the defaults, make no changes, and click "Continue:"
You can increase the size of the hard drive, to give more storage space, if you think you will need it. Click the "Edit" button:
Copyright © by Dennie Hoopingarner. All rights reserved. You may redistribute this document, provided you do not alter it in any way.

Setting up a Red5 streaming server on Amazon's AWS Page 5 of 13
Increase the Volume Size, and click the "Save" button:
Don't do anything on this screen, click "Continue:"
Copyright © by Dennie Hoopingarner. All rights reserved. You may redistribute this document, provided you do not alter it in any way.

Setting up a Red5 streaming server on Amazon's AWS Page 6 of 13
Create a Key Pair and download it. This file is the "pem file" that will be needed to log in to the server later.
Create a Security Group to allow network traffic in and out of the server. Open ports 22, 1935, 5080, and 80:
Copyright © by Dennie Hoopingarner. All rights reserved. You may redistribute this document, provided you do not alter it in any way.

Setting up a Red5 streaming server on Amazon's AWS Page 7 of 13
Click "Launch" to start the server:
Click "Close"
Monitor the server status:
Copyright © by Dennie Hoopingarner. All rights reserved. You may redistribute this document, provided you do not alter it in any way.

Setting up a Red5 streaming server on Amazon's AWS Page 8 of 13
This screen shows the details of the server. Important is the domain name:ec2-****.compute.amazonaws.com
Copyright © by Dennie Hoopingarner. All rights reserved. You may redistribute this document, provided you do not alter it in any way.

Setting up a Red5 streaming server on Amazon's AWS Page 9 of 13
The server is now built, and is running. Now you can log in to it and continue configuration.The Big Picture Step 2: Create an administrative account on your server
Use SSH to connect to the server
Get the Domain Name of the server from the AQS status window.ec2-****.compute.amazonaws.com
Before logging in, you have to change permissions on the pem file. From the terminal, type this command:
chmod 600 mypem.pem
Connect to the server from a terminal window:ssh -i mypem.pem ubuntu@ec2-****.compute.amazonaws.com
change to super usersudo –s
install emacsapt-get install emacs
Create an administrative account with credentials:Username: administratorPassword: @dm!n!str@t0r
sudo useradd -d /home/ administrator -m administrator
sudo passwd administrator
Make the administrator account a super user:visudo
Add a line under the root permissions:
# User privilege specificationroot ALL=(ALL:ALL) ALLadministrator ALL=(ALL:ALL) ALL
Save and exit
Copyright © by Dennie Hoopingarner. All rights reserved. You may redistribute this document, provided you do not alter it in any way.
Setting up a Red5 streaming server on Amazon's AWS Page 10 of 13
Allow the administrative account to log in without the pem file
Use Emacs to edit the sshd config file
sudo emacs /etc/ssh/sshd_config
edit line 51PasswordAuthentication no
Change toPasswordAuthentication yes
Restart ssh server:service ssh restart
Now you can log in to the server thusly:ssh administrator@ ec2-****.compute.amazonaws.com
Change default shell from sh to bash
emacs /etc/passwd
Look for line:administrator:x:1001:1001::/home/administrator:/bin/sh
Change to:administrator:x:1001:1001::/home/administrator:/bin/bash
Save, log out, log back in.
Install apache web server sudo apt-get install apache2
Copyright © by Dennie Hoopingarner. All rights reserved. You may redistribute this document, provided you do not alter it in any way.

Setting up a Red5 streaming server on Amazon's AWS Page 11 of 13
The Big Picture Step 3: Install Red5
(Do this as superuser. Enter superuser mode by typing sudo –s)
1. Add respositoriesemacs /etc/apt/sources.list
uncomment lines 33-36
deb http://us.archive.ubuntu.com/ubuntu/ precise multiversedeb-src http://us.archive.ubuntu.com/ubuntu/ precise multiversedeb http://us.archive.ubuntu.com/ubuntu/ precise -updates multiversedeb-src http://us.archive.ubuntu.com/ubuntu/ precise -updates multiverse
Uncomment line 52deb http://archive.canonical.com/ precise partner
2. Update repositories apt-get update
3. Install Java
apt-get install openjdk-7-jdk
4. Download and install Red5
cd ~wget http://red5.org/downloads/red5/1_0/red5-1.0.0-RC1.tar.gztar xvfz red5-1.0.0-RC1.tar.gzmv red5-1.0.0 red5mv red5 /usr/share/
5. Test runcd /usr/share/red5sh red5.sh &
Last line of output should be:[INFO] [Launcher:/installer] org.red5.server.service.Installer - Installer service created
Should be able to see the test page http:// ec2-****.compute.amazonaws.com:5080
Copyright © by Dennie Hoopingarner. All rights reserved. You may redistribute this document, provided you do not alter it in any way.

Setting up a Red5 streaming server on Amazon's AWS Page 12 of 13
Red5 Commands:
Must be run as root or in superuser mode
Start Red5:cd /usr/share/red5/./red5.sh &
Stop Red5:cd /usr/share/red5/./red5-shutdown.sh
Copyright © by Dennie Hoopingarner. All rights reserved. You may redistribute this document, provided you do not alter it in any way.

Setting up a Red5 streaming server on Amazon's AWS Page 13 of 13
The Big Picture Step 4: Create an “application” in Red5
Create application space in Red5.
cd /usr/share/red5/webappsmkdir slimrecorder
NOTE: slimrecorder is the name of the application in this example. You can choose to name your application anything that you like.
Give administrator account permission on the application directorieschown –R administrator slimrecorder
The Big Picture Step 5: Deploy the Red5 application to your application space
Copy Red5 application files to the application space
If you chose to name your Red5 application space something other than "slimrecorder," follow these two steps:
1. Rename the JAR file: Change name of WEB-INF/lib/slimrecorder.jar to the name of the new Red5 application
2. Edit WEB-INF/red5-web.properties and WEB-INF/web.xml. Change each occurrence of the word "slimrecorder" to the name of the new Red5 application.
The Big Picture, Step 6: Restart Red5
Stop Red5:cd /usr/share/red5/./red5-shutdown.sh
Start Red5:cd /usr/share/red5/./red5.sh &
You will see a lot of status messages as Red5 initializes. One of the messages will be “slimrecorder 1.7 initialized.” If you see that, your application is ready.
Copyright © by Dennie Hoopingarner. All rights reserved. You may redistribute this document, provided you do not alter it in any way.