

Session 1 Big Data and Hadoop - Overview - · PDF fileSession 1 Big Data and Hadoop - Overview...
107
Session 1 Big Data and Hadoop - Overview - Dr. M. R. Sanghavi
Transcript of Session 1 Big Data and Hadoop - Overview - · PDF fileSession 1 Big Data and Hadoop - Overview...

Session 1 Big Data and Hadoop - Overview
- Dr. M. R. Sanghavi

Acknowledgement
Prof. Kainjan M. Sanghavi For preparing this prsentation
This presentation is available on my blog
https://maheshsanghavi.wordpress.com/expert-talk-fdp-workshop/

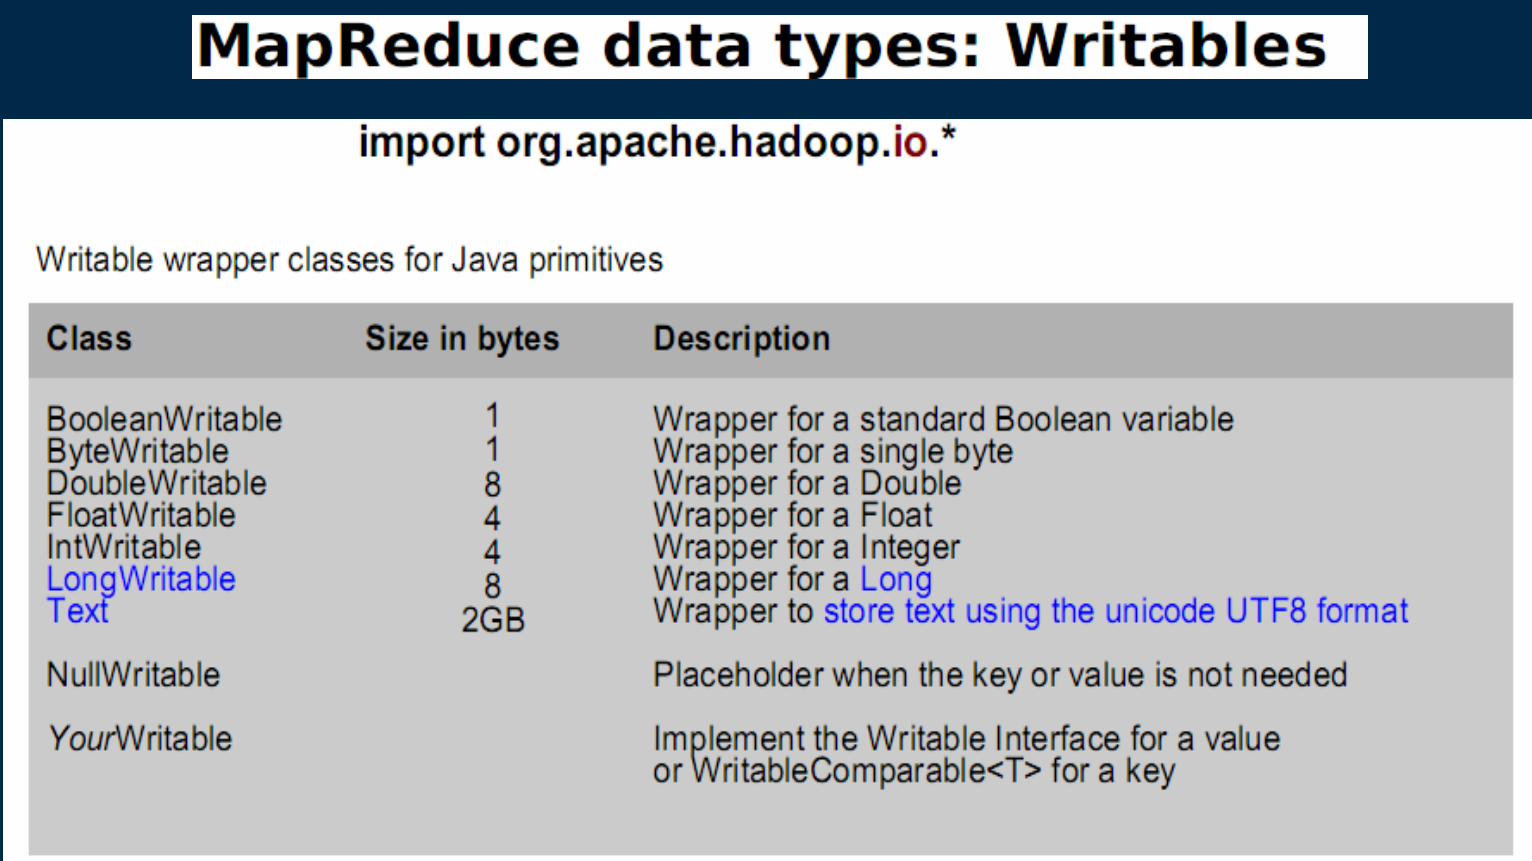
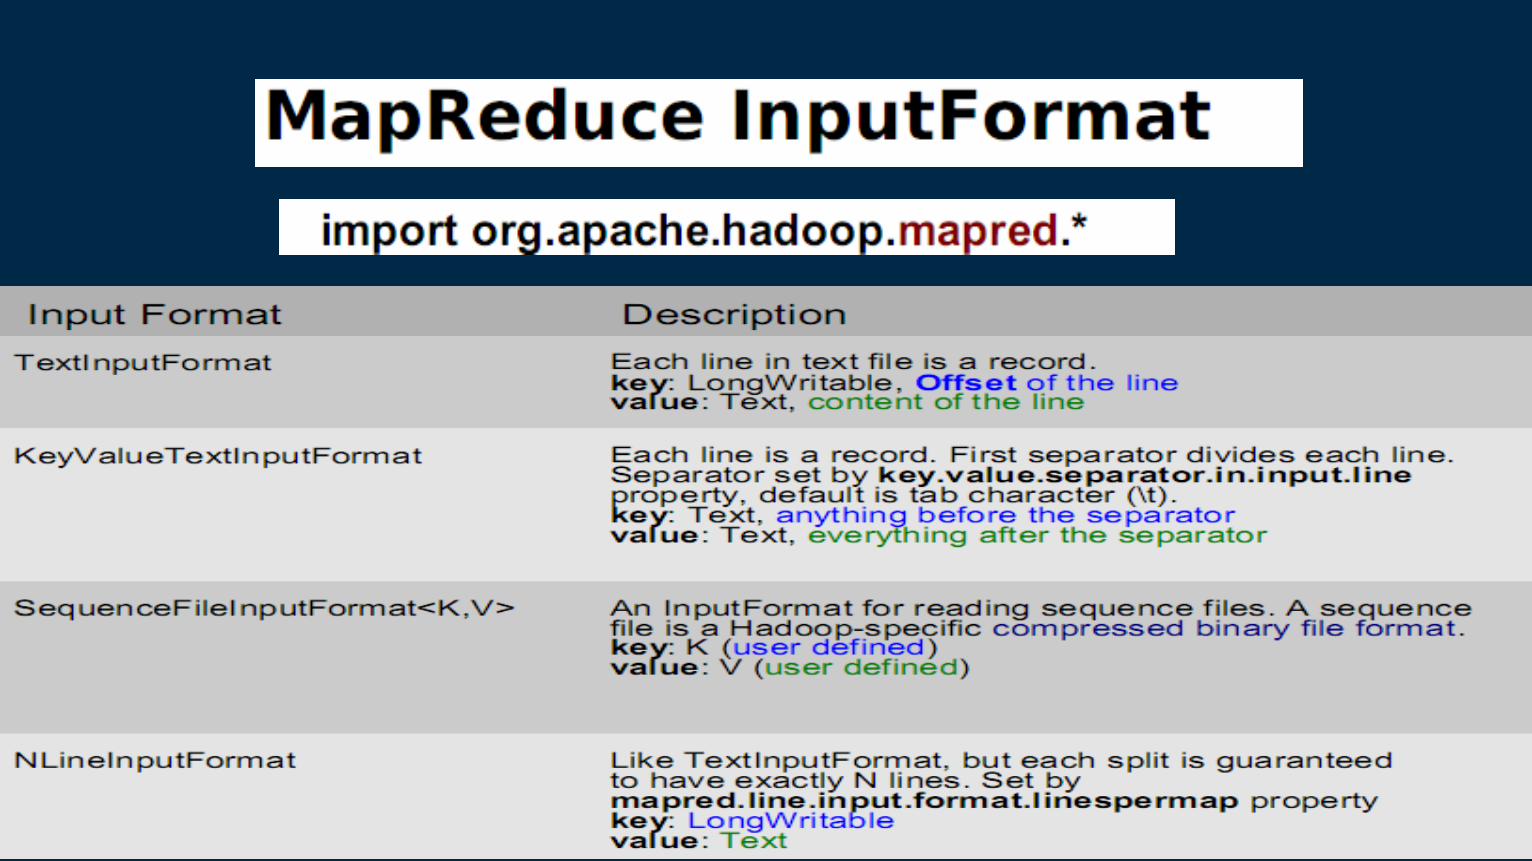
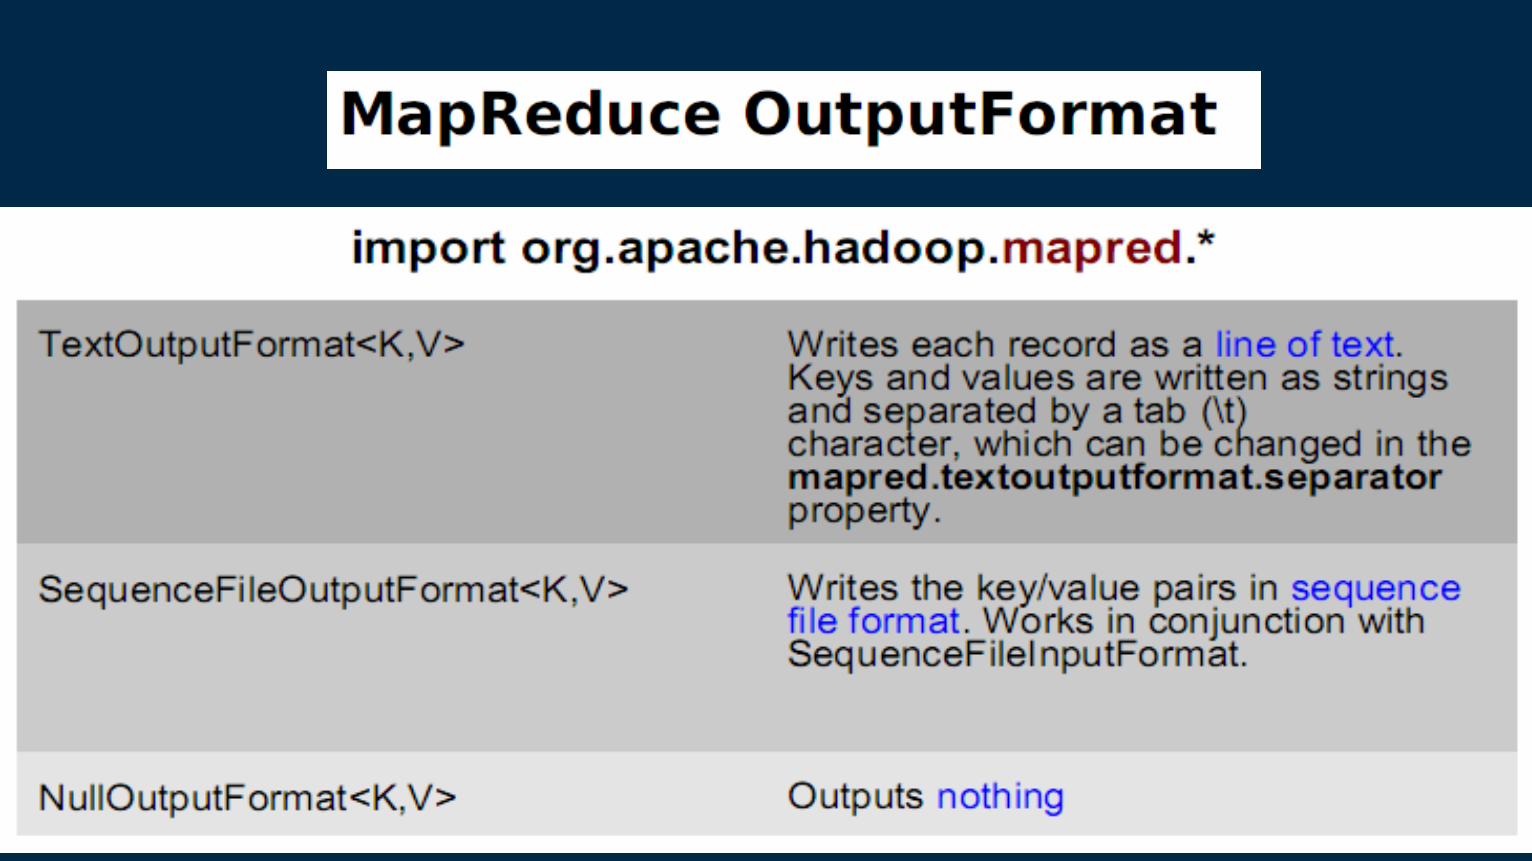
Big Data & Hadoop

Topics

What is Data?
Distinct pieces of information, usually formatted in a special way.
Data can exist in a variety of forms -- as numbers or text on pieces of paper,
as bits and bytes stored in electronic memory, or as facts stored in a person's mind.
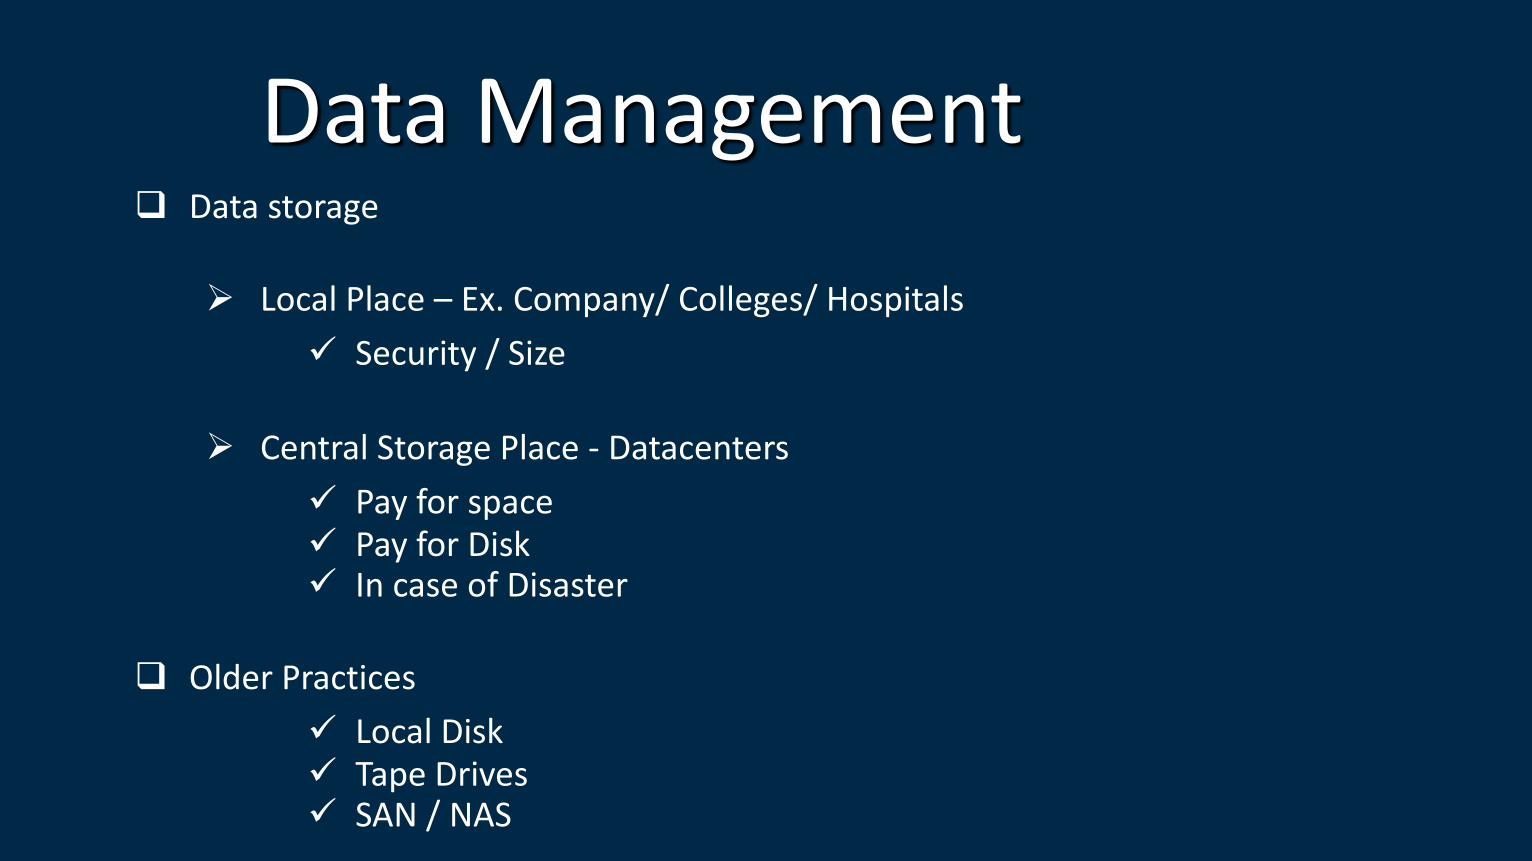
Data Management
Data storage
Local Place – Ex. Company/ Colleges/ Hospitals
Security / Size
Central Storage Place - Datacenters
Pay for space Pay for Disk In case of Disaster
Older Practices
Local Disk Tape Drives SAN / NAS
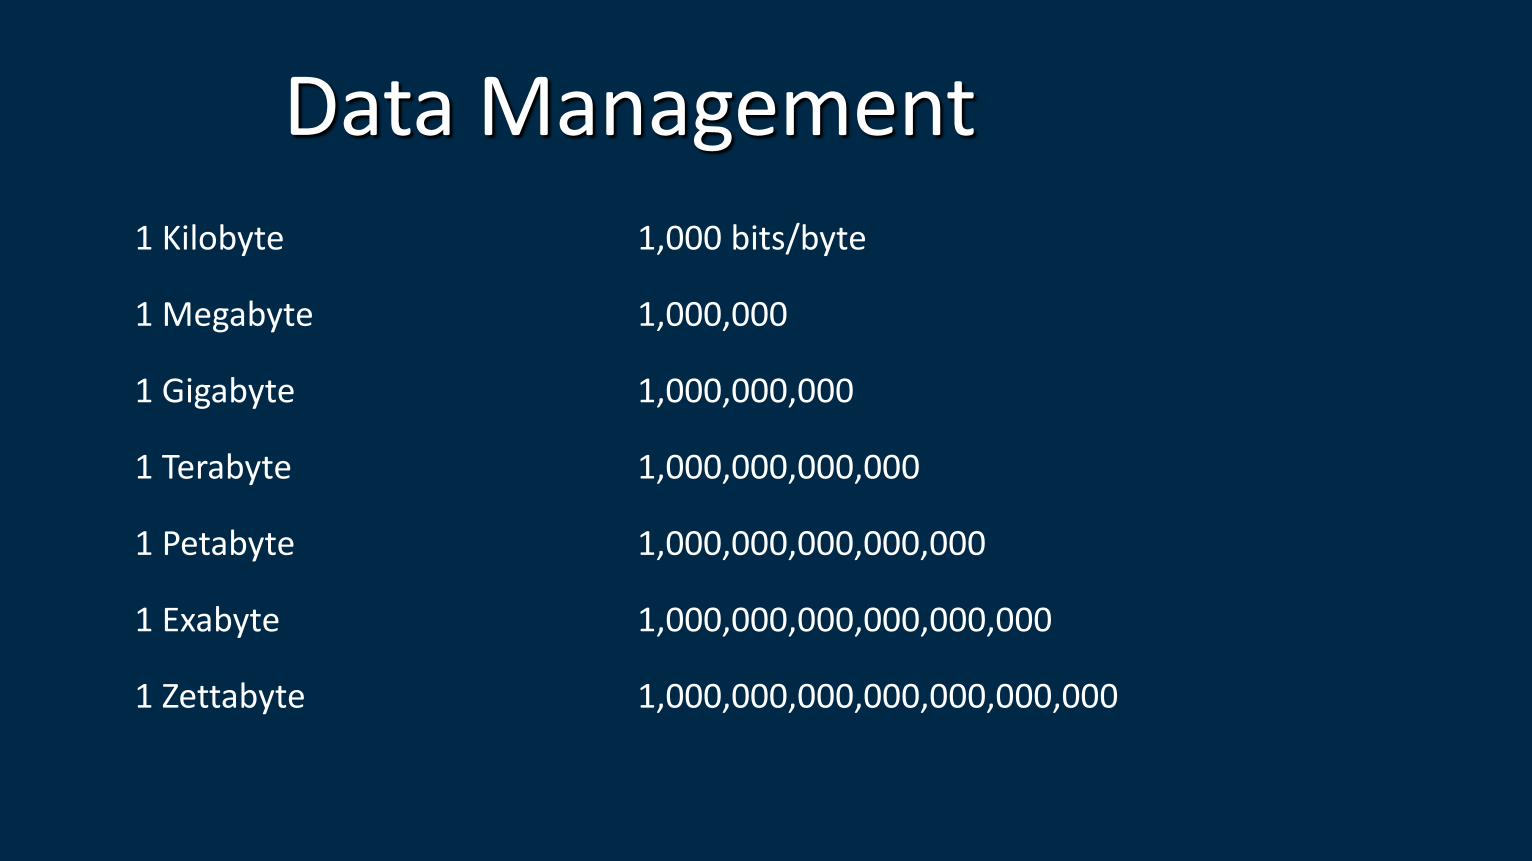
Data Management 1 Kilobyte 1,000 bits/byte
1 Megabyte 1,000,000
1 Gigabyte 1,000,000,000
1 Terabyte 1,000,000,000,000
1 Petabyte 1,000,000,000,000,000
1 Exabyte 1,000,000,000,000,000,000
1 Zettabyte 1,000,000,000,000,000,000,000

What is Bigdata? No single standard definition…
“Big Data” is data whose scale, diversity, and complexity require new architecture, techniques, algorithms, and analytics to manage it and extract value and hidden knowledge from it…
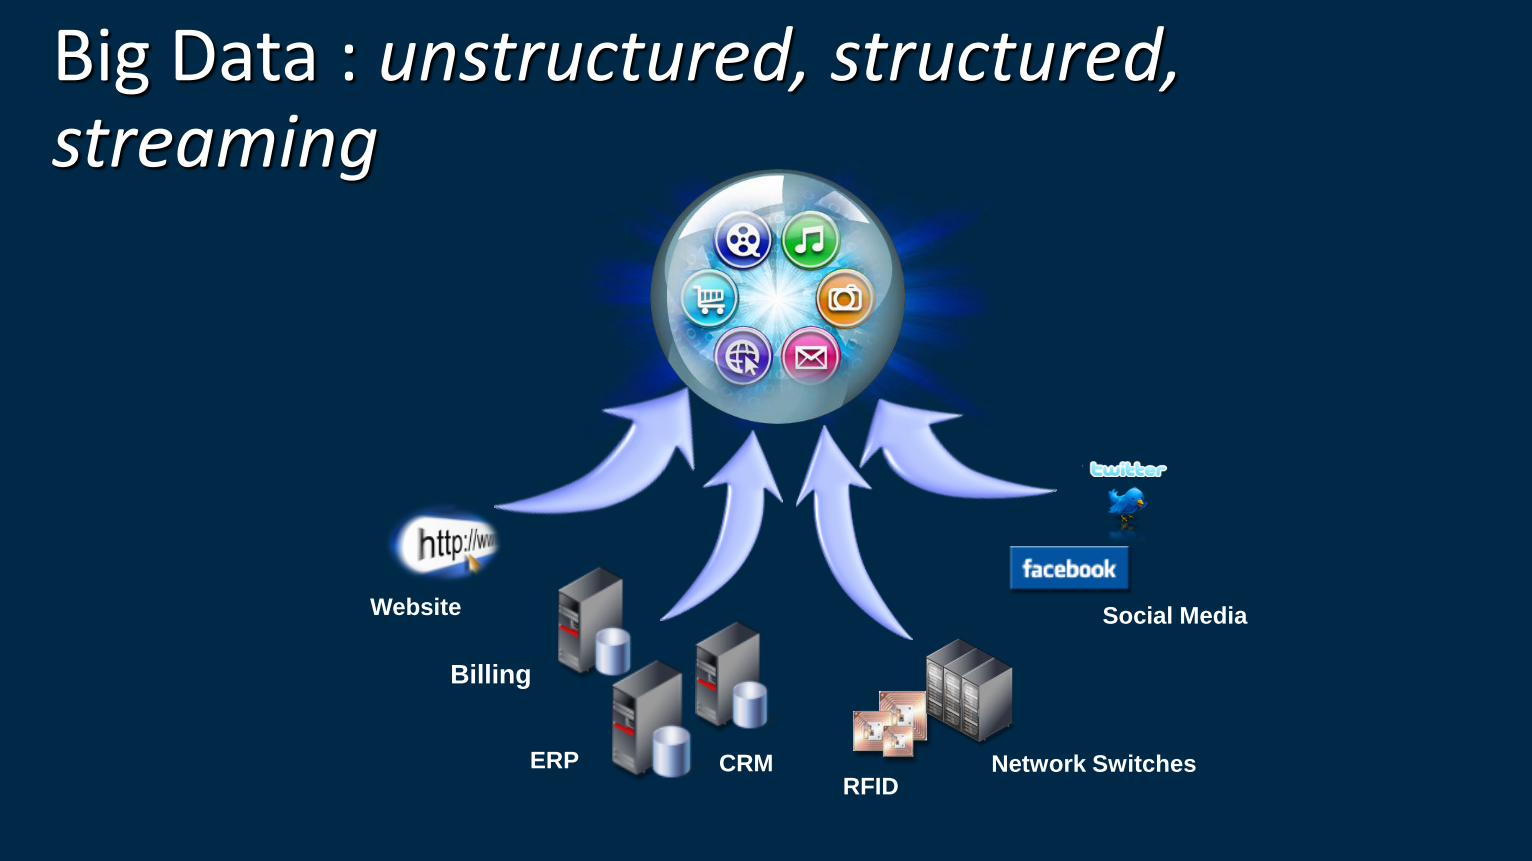
Big Data : unstructured, structured, streaming
ERP CRM RFID
Website
Network Switches
Social Media
Billing

Digital Media & Retail
200+ Customer Stories
10
Finance & Insurance Healthcare & Life Sciences
Manufacturing & High Tech Academic & Gov’t

Nu
mb
er o
f A
tten
dee
s
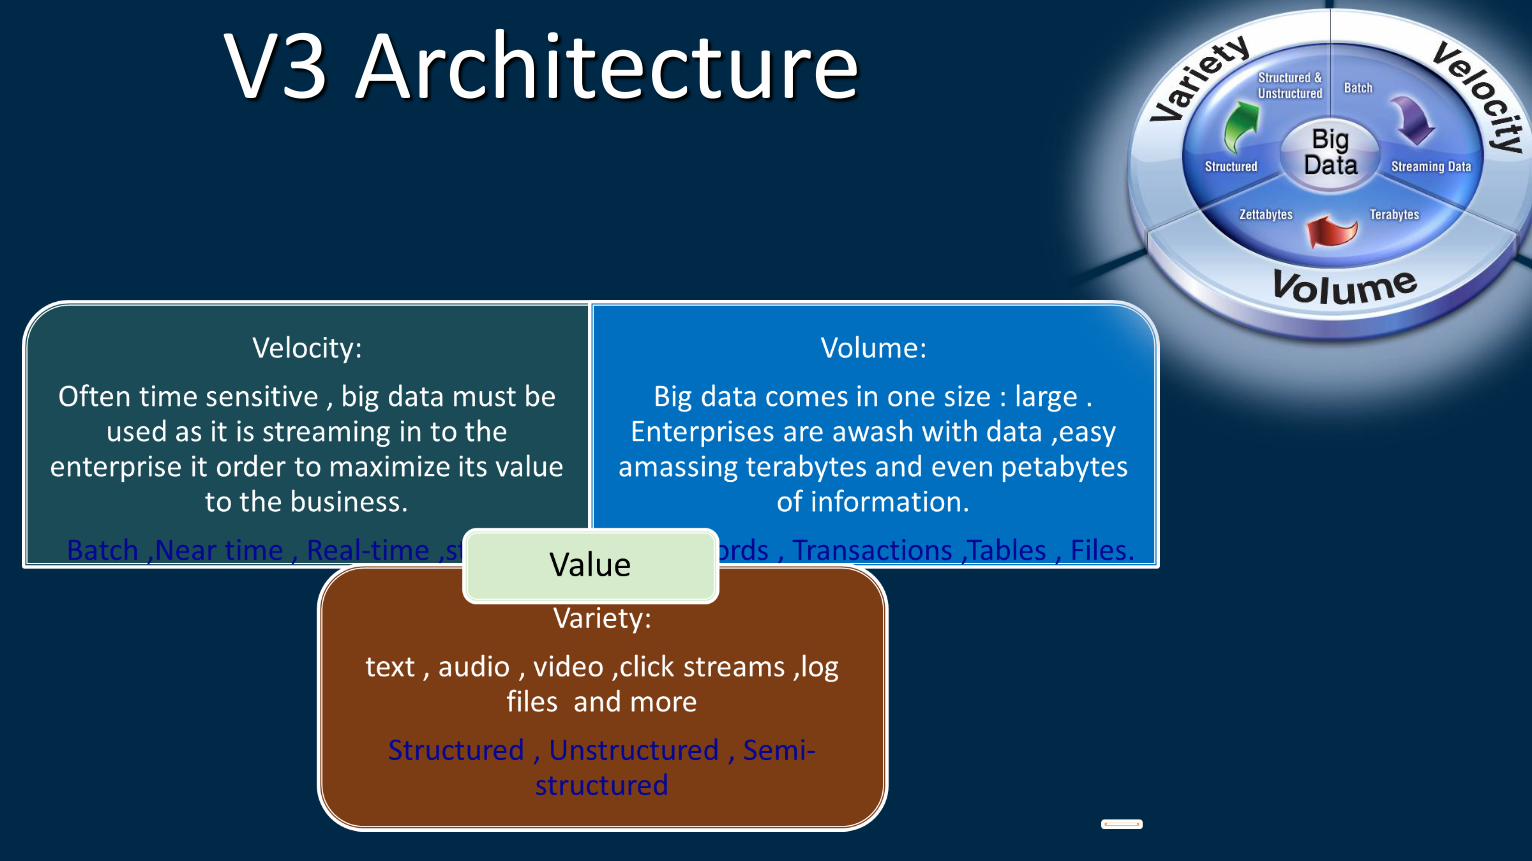
V3 Architecture

Existing challenges
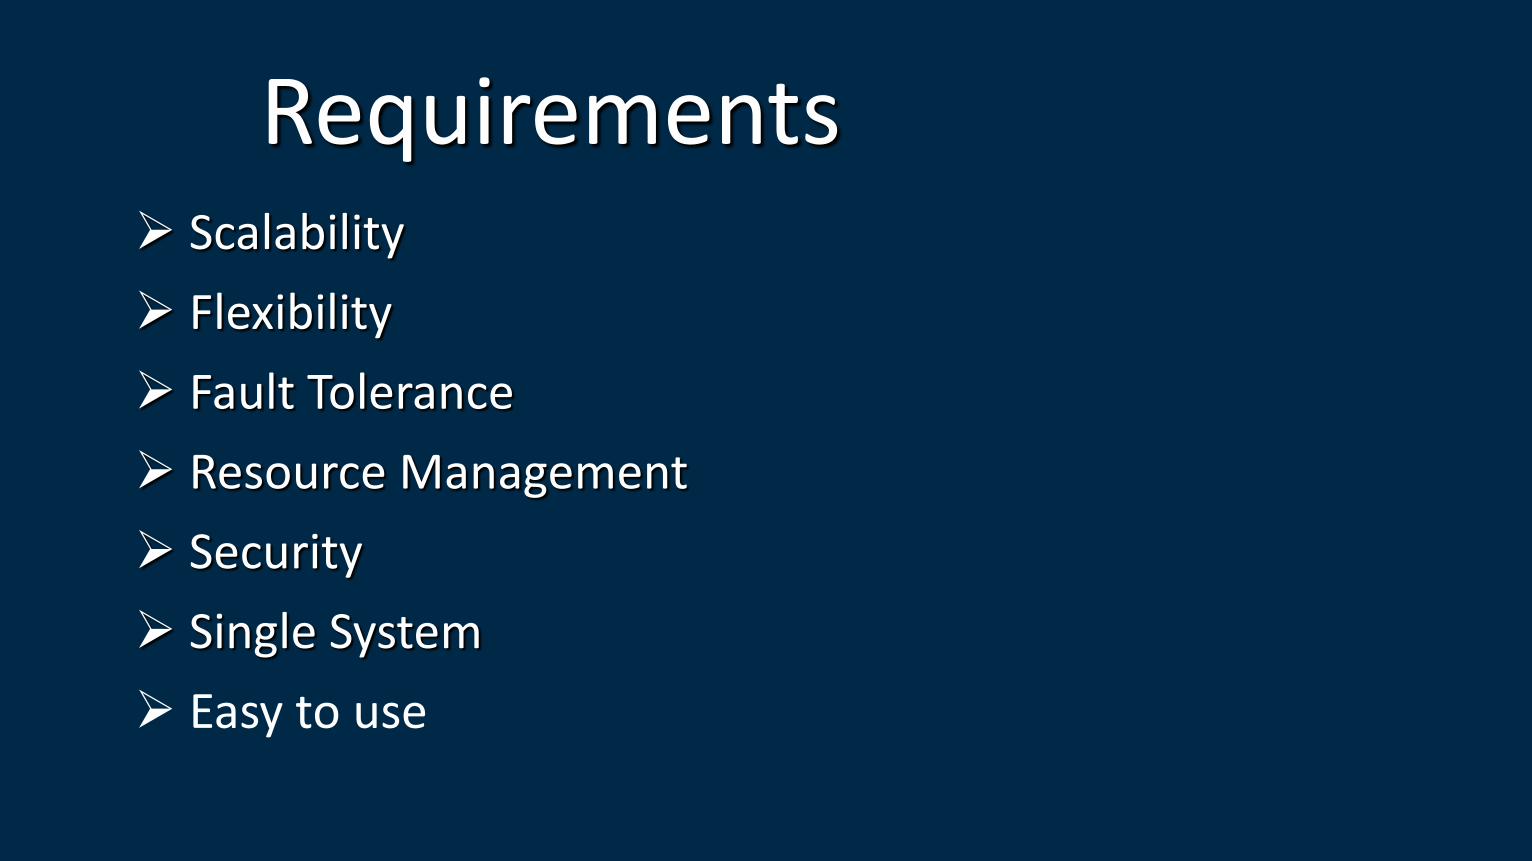
Requirements Scalability
Flexibility
Fault Tolerance
Resource Management
Security
Single System
Easy to use

HADOOP IS THE
SOLUTION

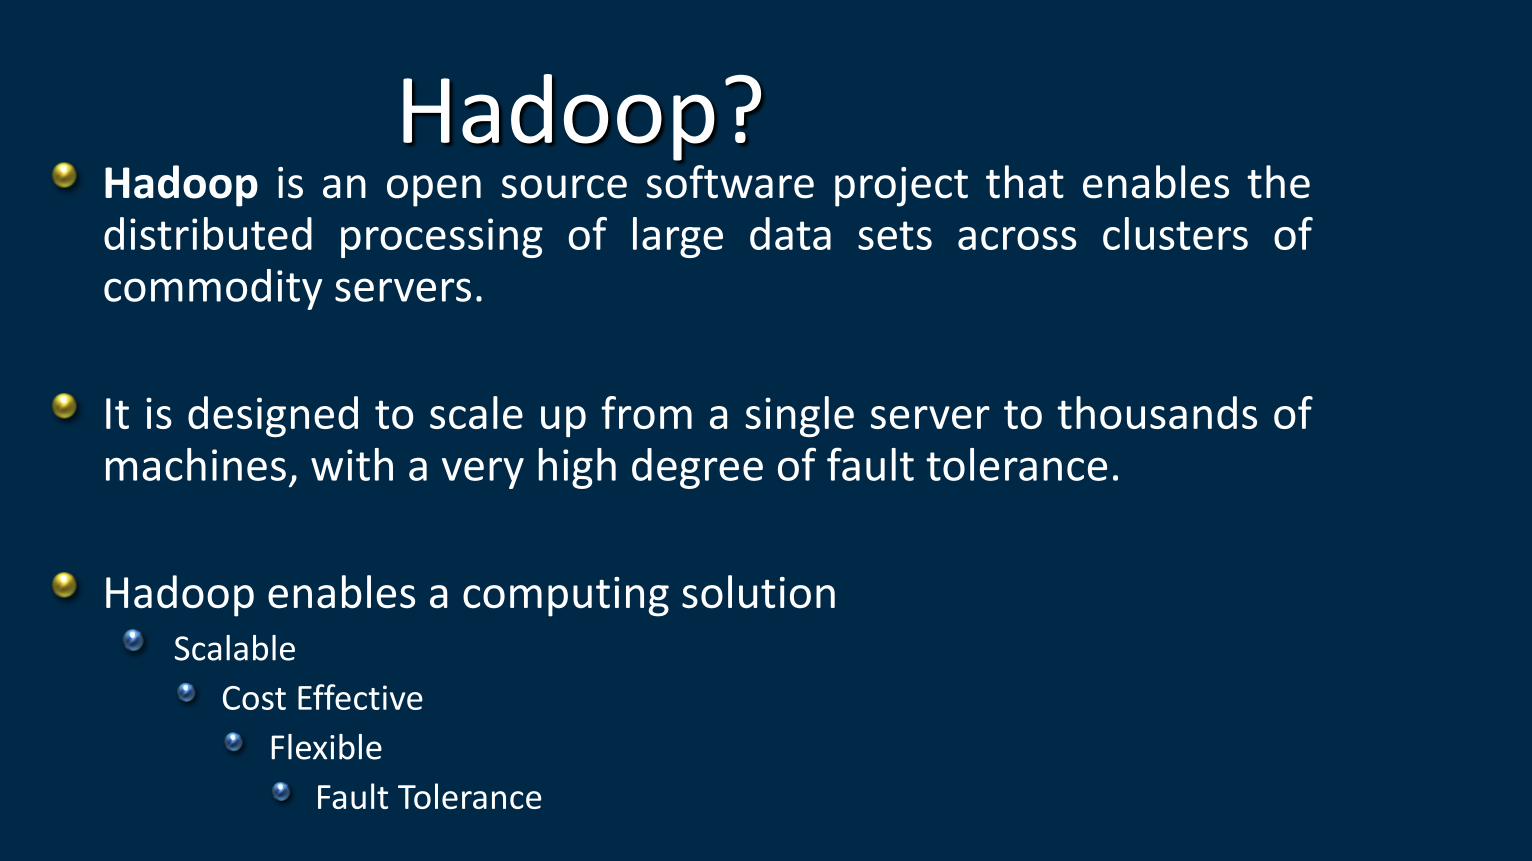
Hadoop? Hadoop is an open source software project that enables the distributed processing of large data sets across clusters of commodity servers.
It is designed to scale up from a single server to thousands of machines, with a very high degree of fault tolerance.
Hadoop enables a computing solution Scalable
Cost Effective
Flexible
Fault Tolerance
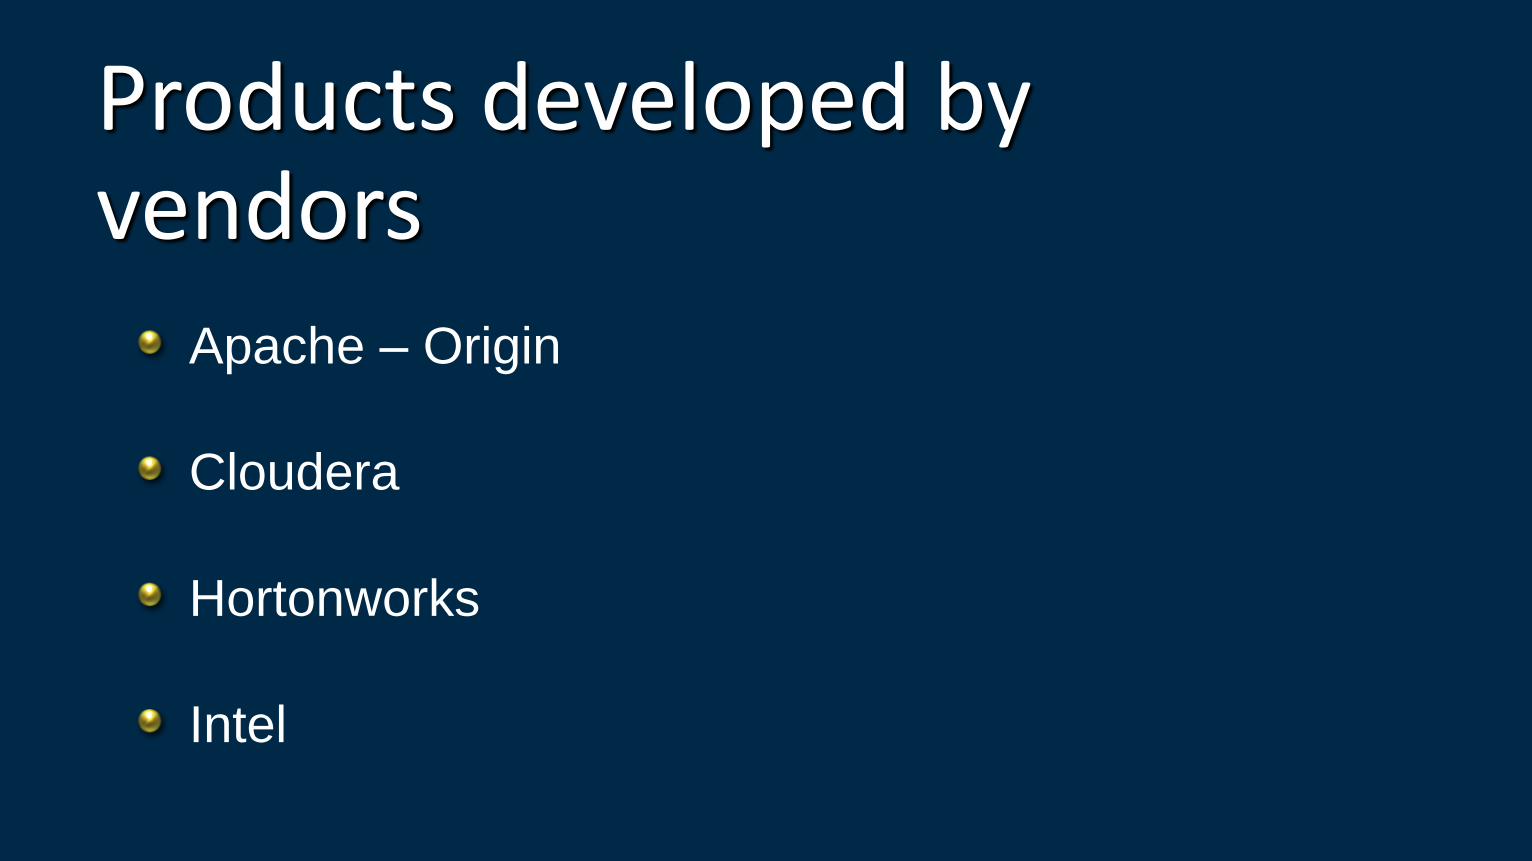
Products developed by vendors
Apache – Origin
Cloudera
Hortonworks
Intel
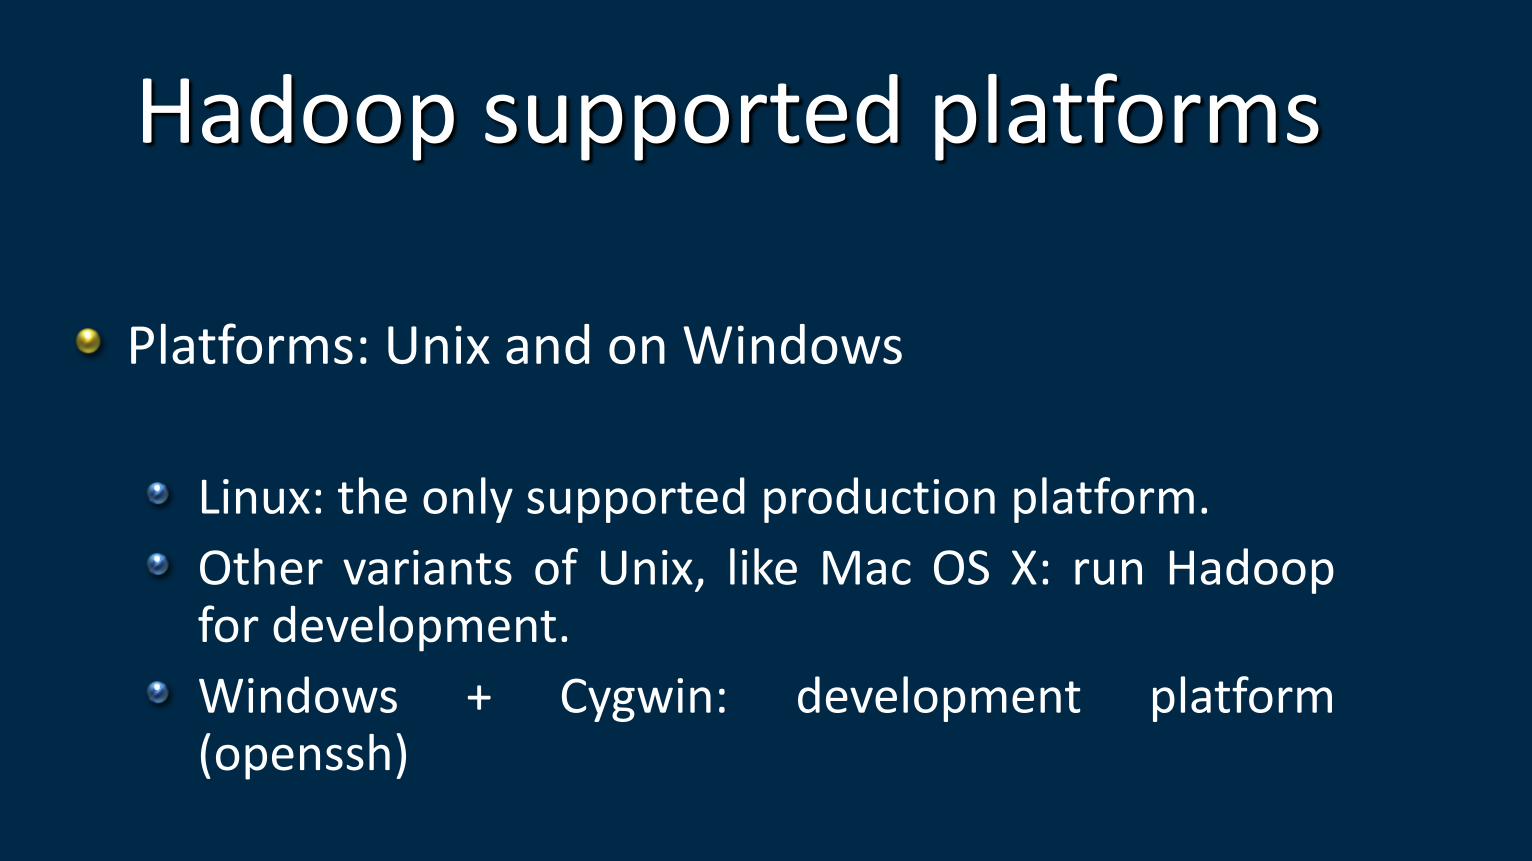
Hadoop supported platforms
Platforms: Unix and on Windows
Linux: the only supported production platform.
Other variants of Unix, like Mac OS X: run Hadoop for development.
Windows + Cygwin: development platform (openssh)

Hadoop Components
HDFS
Mapreduce
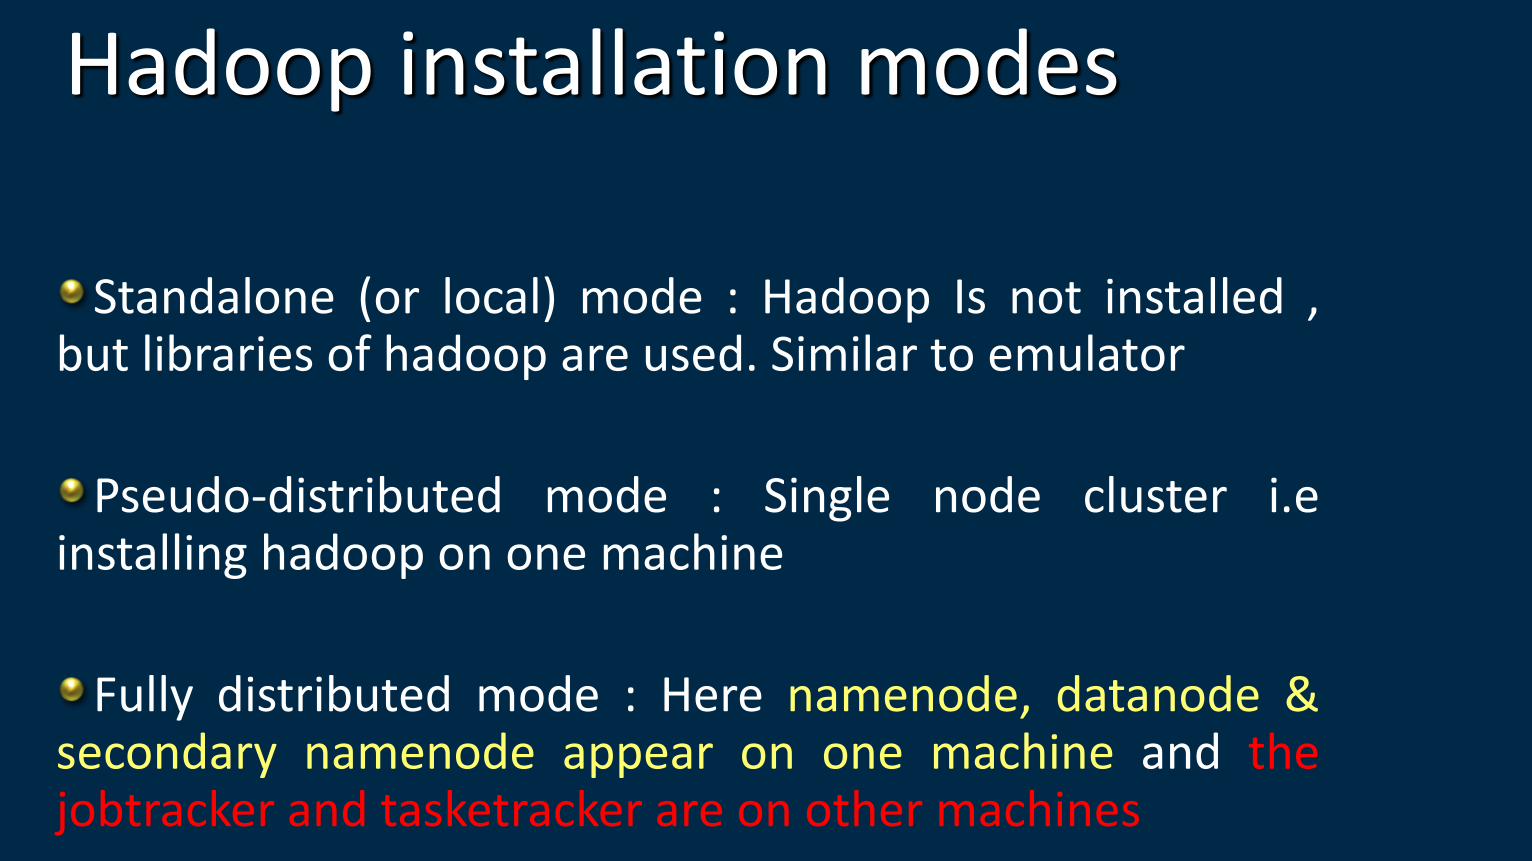
Hadoop installation modes
Standalone (or local) mode : Hadoop Is not installed , but libraries of hadoop are used. Similar to emulator
Pseudo-distributed mode : Single node cluster i.e installing hadoop on one machine
Fully distributed mode : Here namenode, datanode & secondary namenode appear on one machine and the jobtracker and tasketracker are on other machines
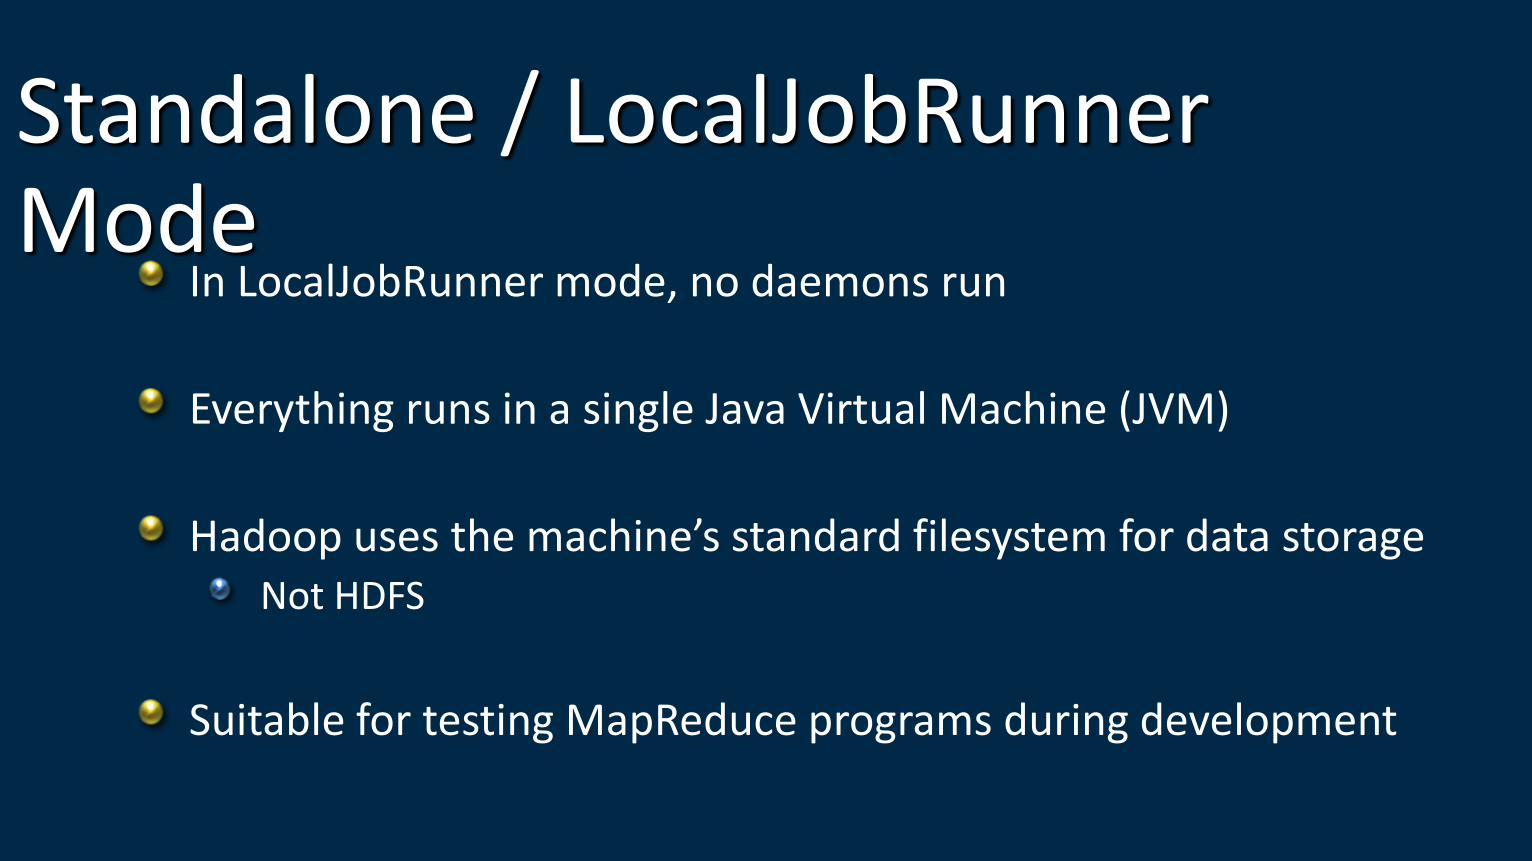
Standalone / LocalJobRunner Mode
In LocalJobRunner mode, no daemons run
Everything runs in a single Java Virtual Machine (JVM)
Hadoop uses the machine’s standard filesystem for data storage Not HDFS
Suitable for testing MapReduce programs during development
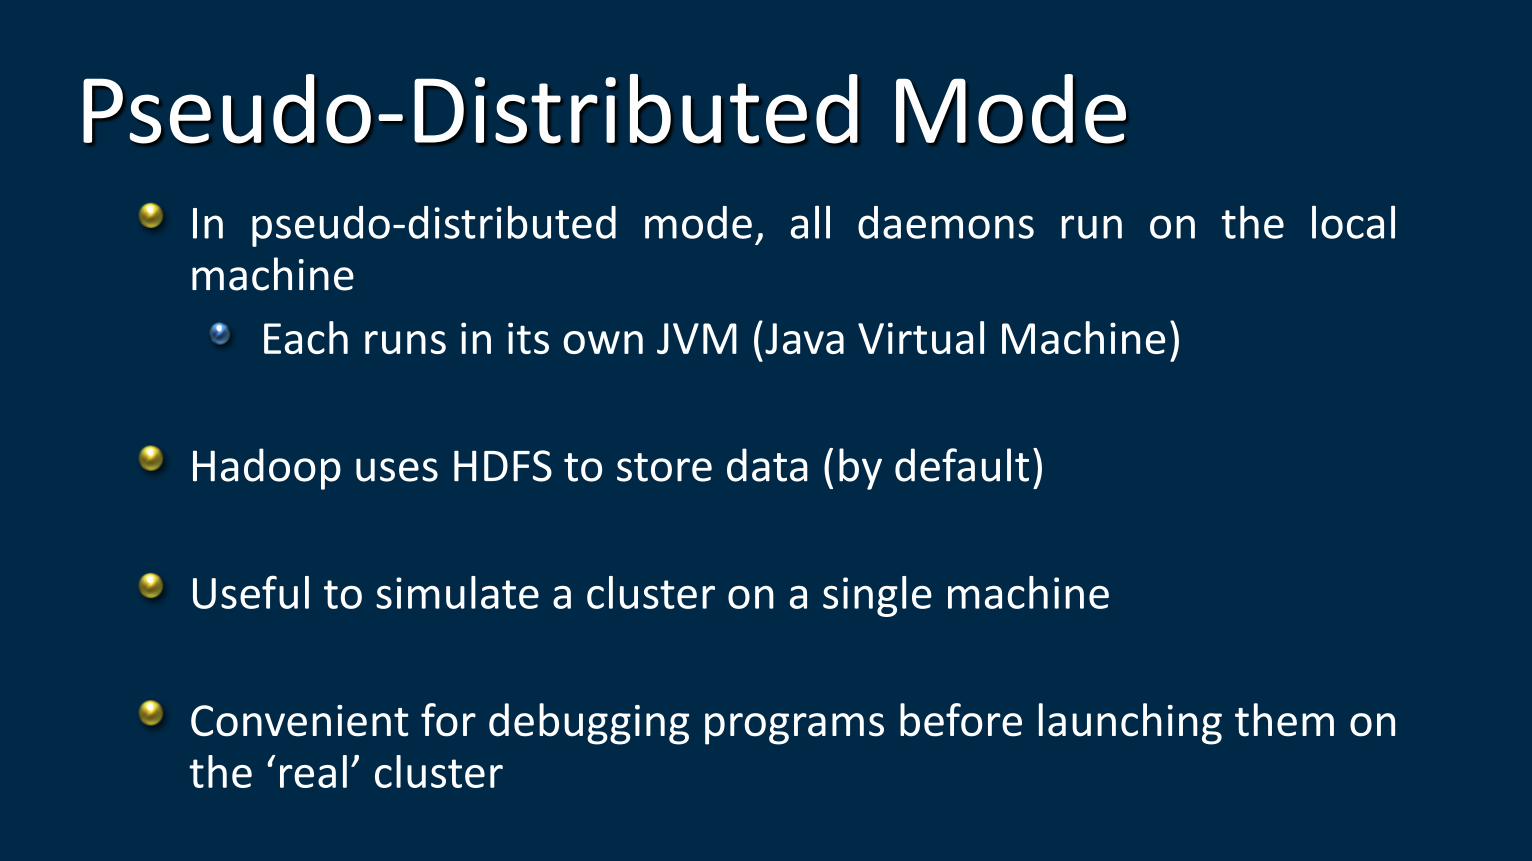
Pseudo-Distributed Mode In pseudo-distributed mode, all daemons run on the local machine
Each runs in its own JVM (Java Virtual Machine)
Hadoop uses HDFS to store data (by default)
Useful to simulate a cluster on a single machine
Convenient for debugging programs before launching them on the ‘real’ cluster
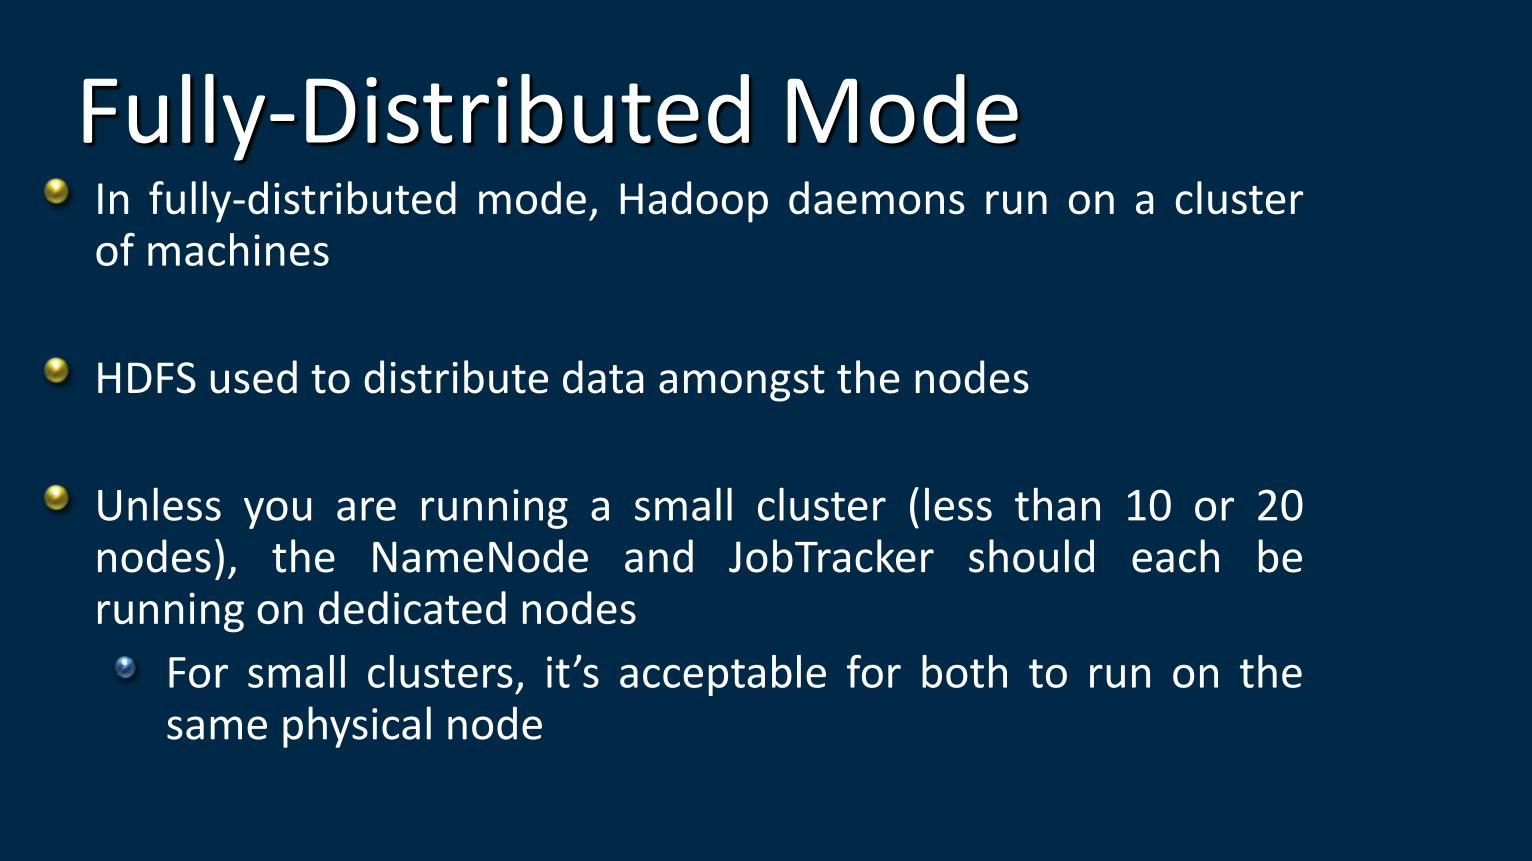
Fully-Distributed Mode In fully-distributed mode, Hadoop daemons run on a cluster of machines
HDFS used to distribute data amongst the nodes
Unless you are running a small cluster (less than 10 or 20 nodes), the NameNode and JobTracker should each be running on dedicated nodes
For small clusters, it’s acceptable for both to run on the same physical node
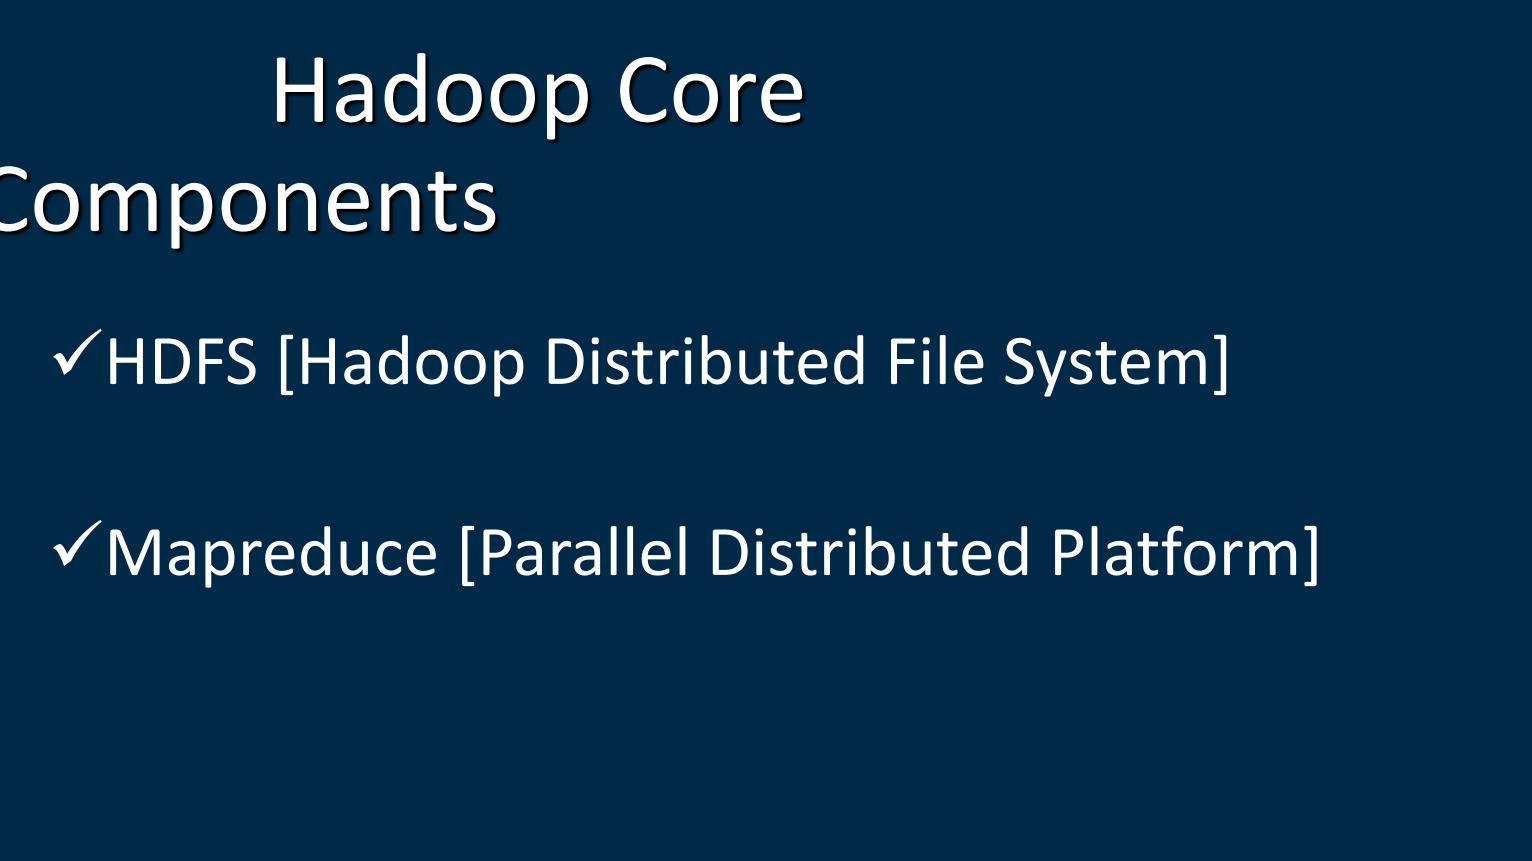
Hadoop Core Components
HDFS [Hadoop Distributed File System]
Mapreduce [Parallel Distributed Platform]
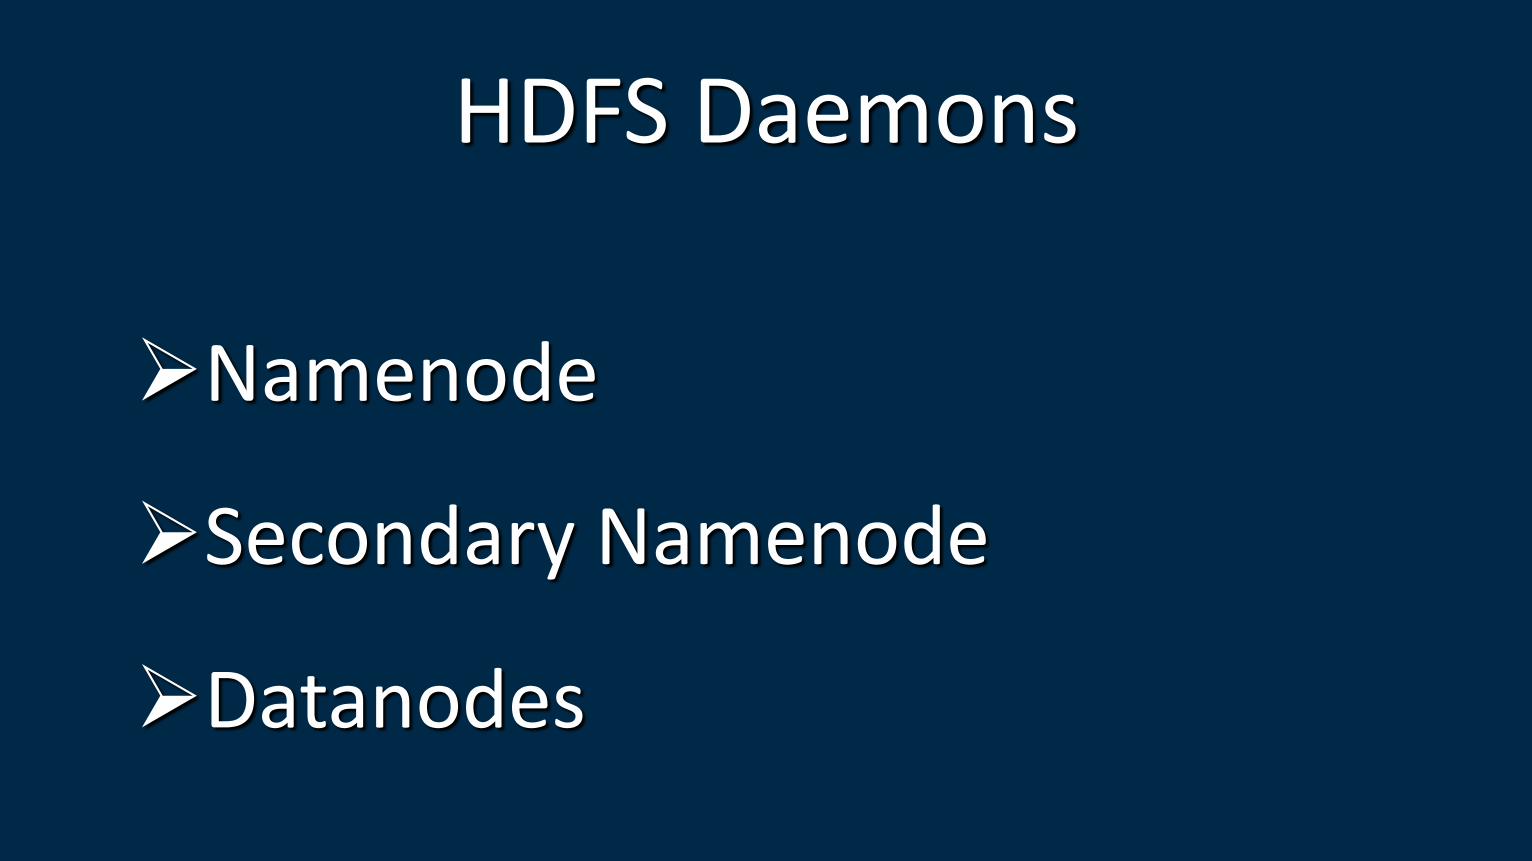
HDFS Daemons
Namenode
Secondary Namenode
Datanodes
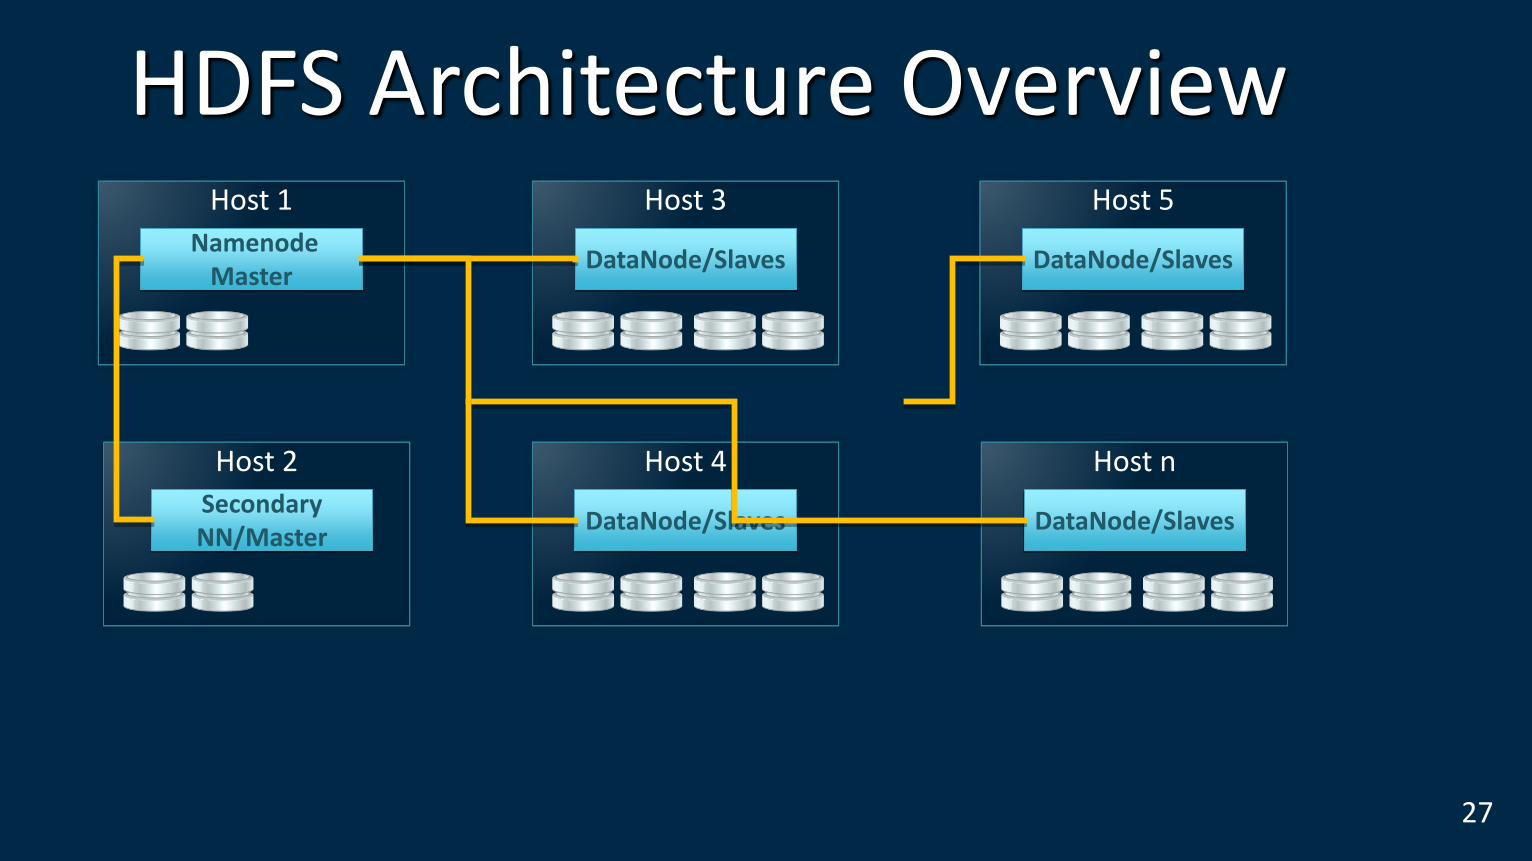
HDFS Architecture Overview
27
Secondary NN/Master
Host 2
Namenode Master
Host 1
DataNode/Slaves
Host 3
DataNode/Slaves
Host 4
DataNode/Slaves
Host 5
DataNode/Slaves
Host n
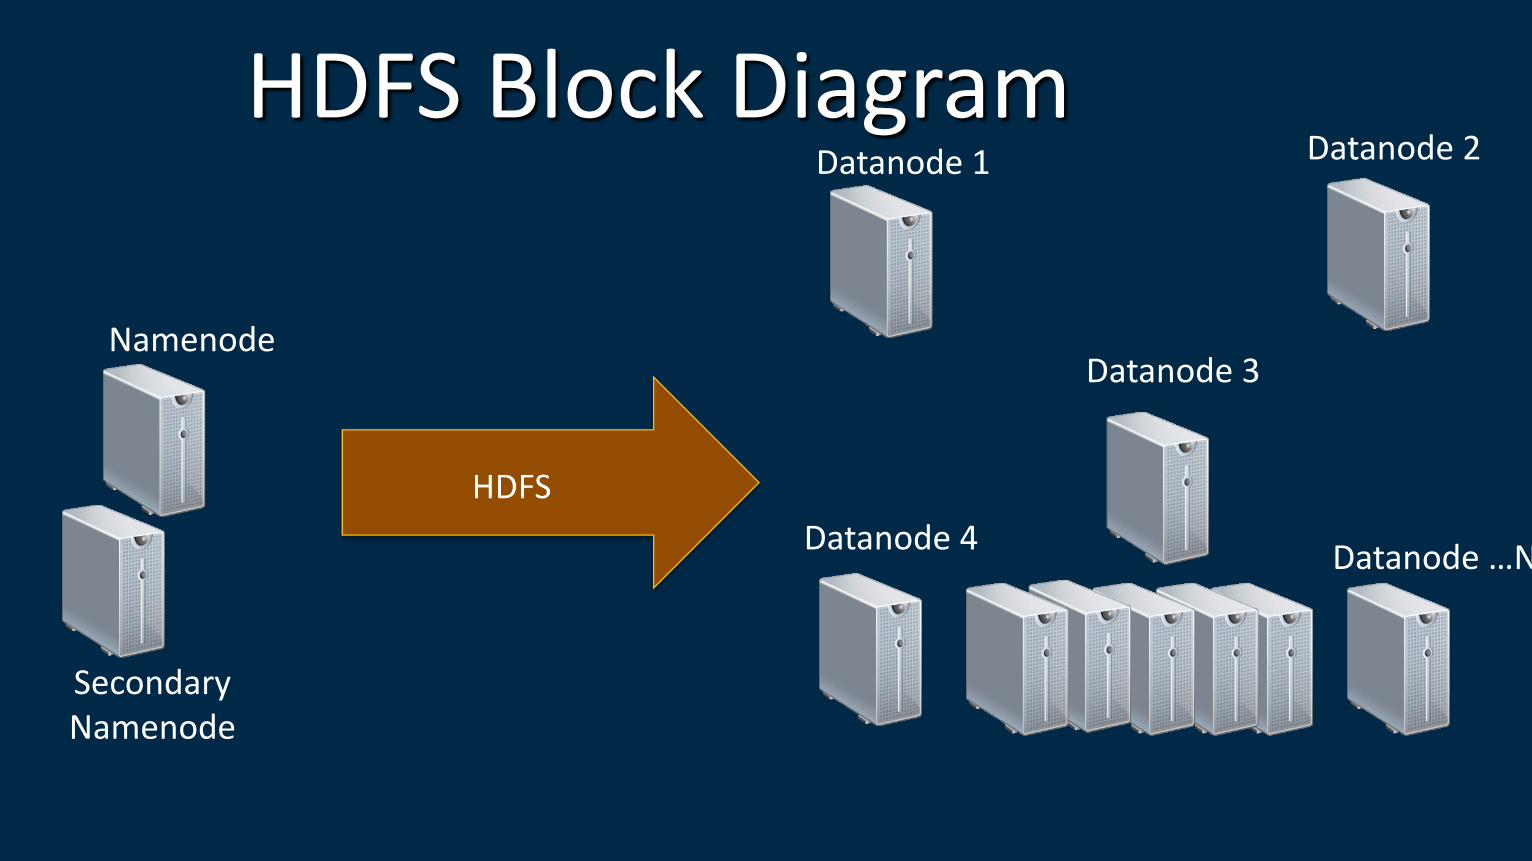
HDFS Block Diagram Datanode 1 Datanode 2
Datanode 3
Datanode 4 Datanode …N
Secondary Namenode
Namenode
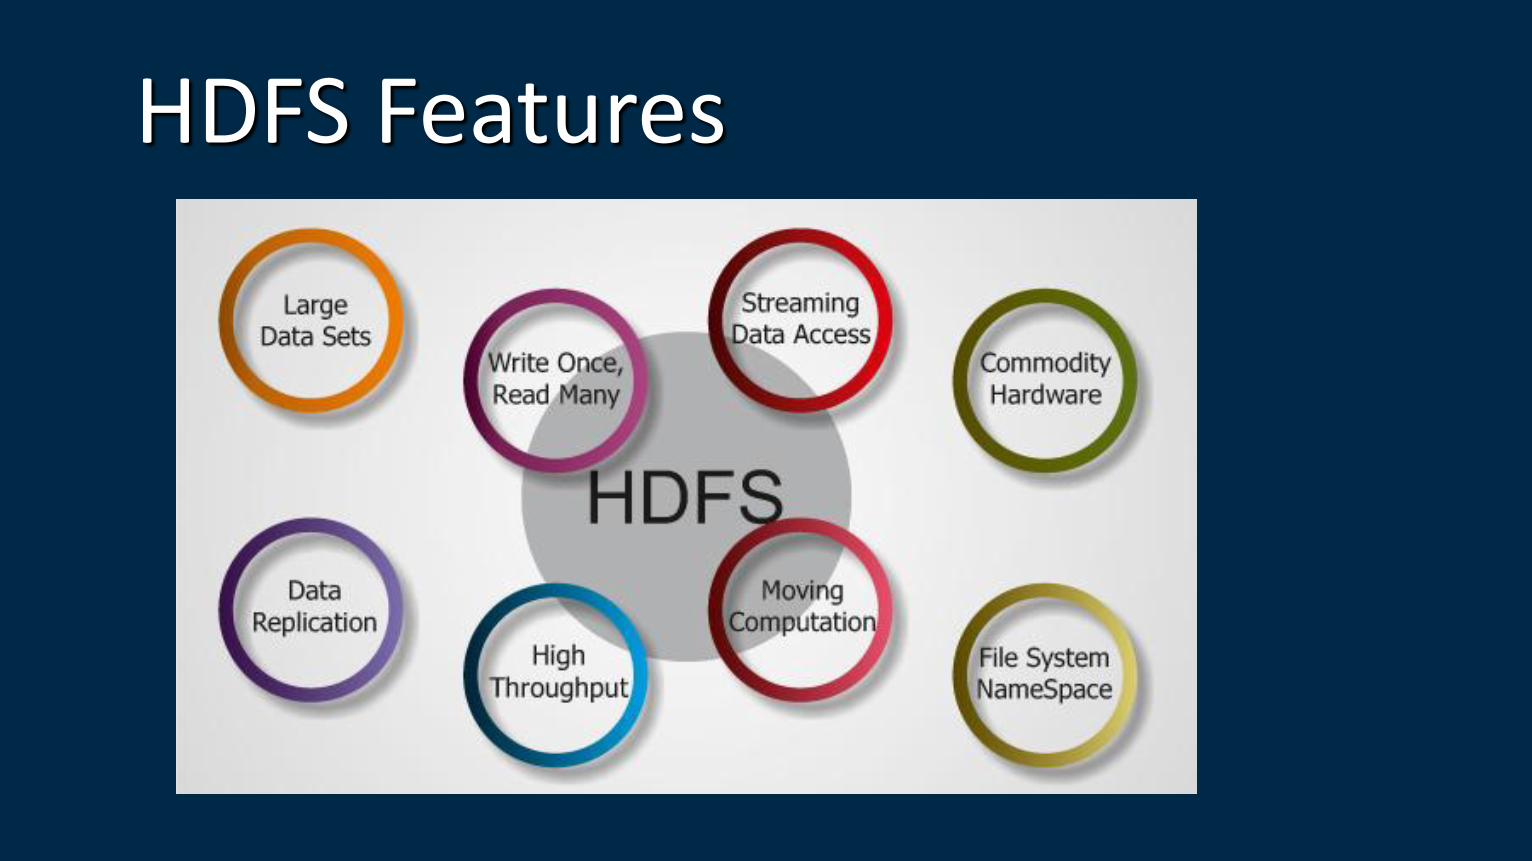
HDFS Features
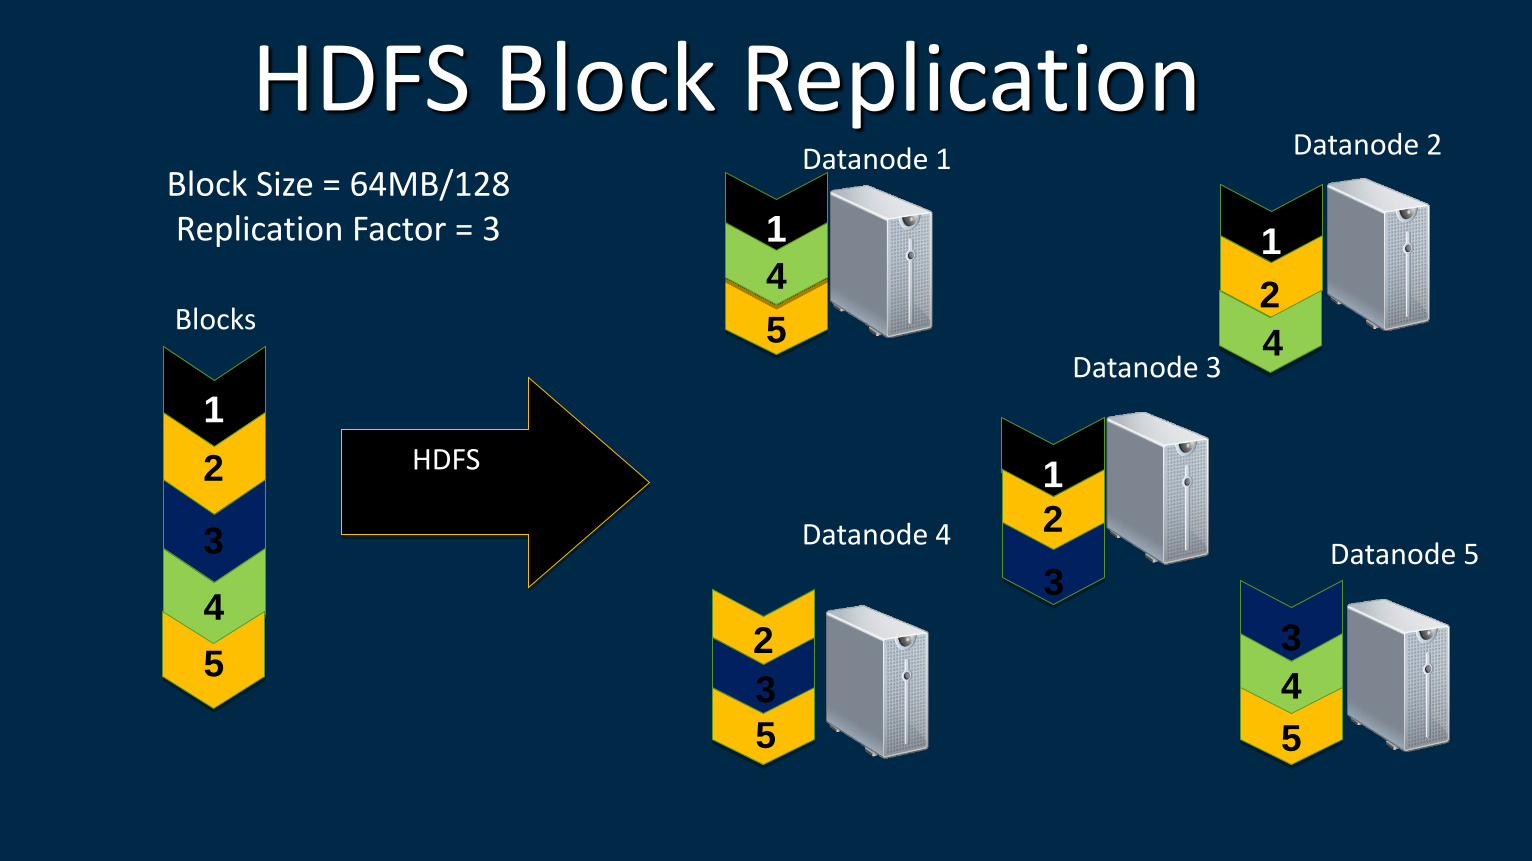
Block Size = 64MB/128 Replication Factor = 3
HDFS Block Replication
1
2
3
4
5
HDFS
Datanode 1 Datanode 2
Datanode 3
Datanode 4 Datanode 5
Blocks
1 1
1
2
2
2
3
3
3
4
4
4
5
5
5
Namenode (Master node) The NameNode stores all metadata
• Information about file locations in HDFS
• Information about file ownership and permissions
• Names of the individual blocks
• Locations of the blocks
Metadata is stored on disk and read when the NameNode daemon starts up
• Filename is fsimage
When changes to the metadata are required, these are made in RAM
• Changes are also written to a log file on disk called edits
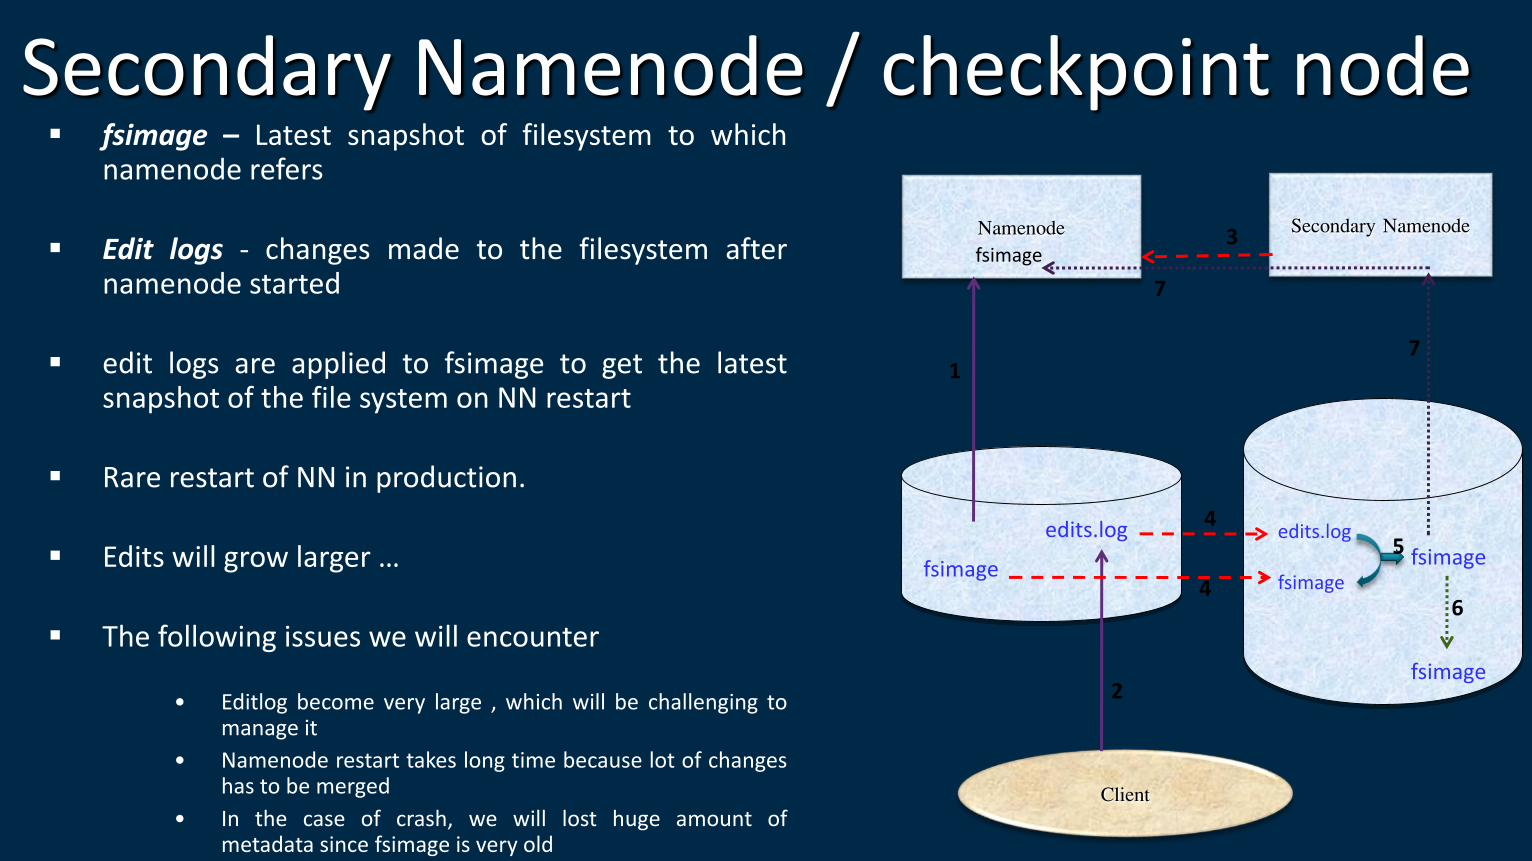
Secondary Namenode / checkpoint node fsimage – Latest snapshot of filesystem to which
namenode refers Edit logs - changes made to the filesystem after
namenode started edit logs are applied to fsimage to get the latest
snapshot of the file system on NN restart Rare restart of NN in production. Edits will grow larger …
The following issues we will encounter
• Editlog become very large , which will be challenging to manage it
• Namenode restart takes long time because lot of changes has to be merged
• In the case of crash, we will lost huge amount of metadata since fsimage is very old
Namenode Secondary Namenode
fsimage
edits.log
Client
edits.log fsimage
fsimage
fsimage
fsimage
1
2
3
7
7
4
4 6
5
Datanodes / Slave nodes Actual contents of the files are stored as blocks on the slave nodes
Blocks are simply files on the slave nodes’ underlying filesystem
Named blk_xxxxxxx
Nothing on the slave node provides information about what
underlying file the block is a part of
- (That information is only stored in the NameNode’s metadata)
Each block is stored on multiple different nodes for redundancy
Default is three replicas
Each slave node runs a DataNode daemon
Controls access to the blocks
Communicates with the NameNode
DataNodes send hearbeat to the NameNode Once every 3 seconds
NameNode uses heartbeats to detect DataNode failure

Mapreduce
What is Mapreduce
MapReduce is a method for distributing a task across multiple nodes
Consists of two developer-created phases – Map
– Reduce
In between Map and Reduce is the shuffle and sort – Sends data from the Mappers to the Reducers
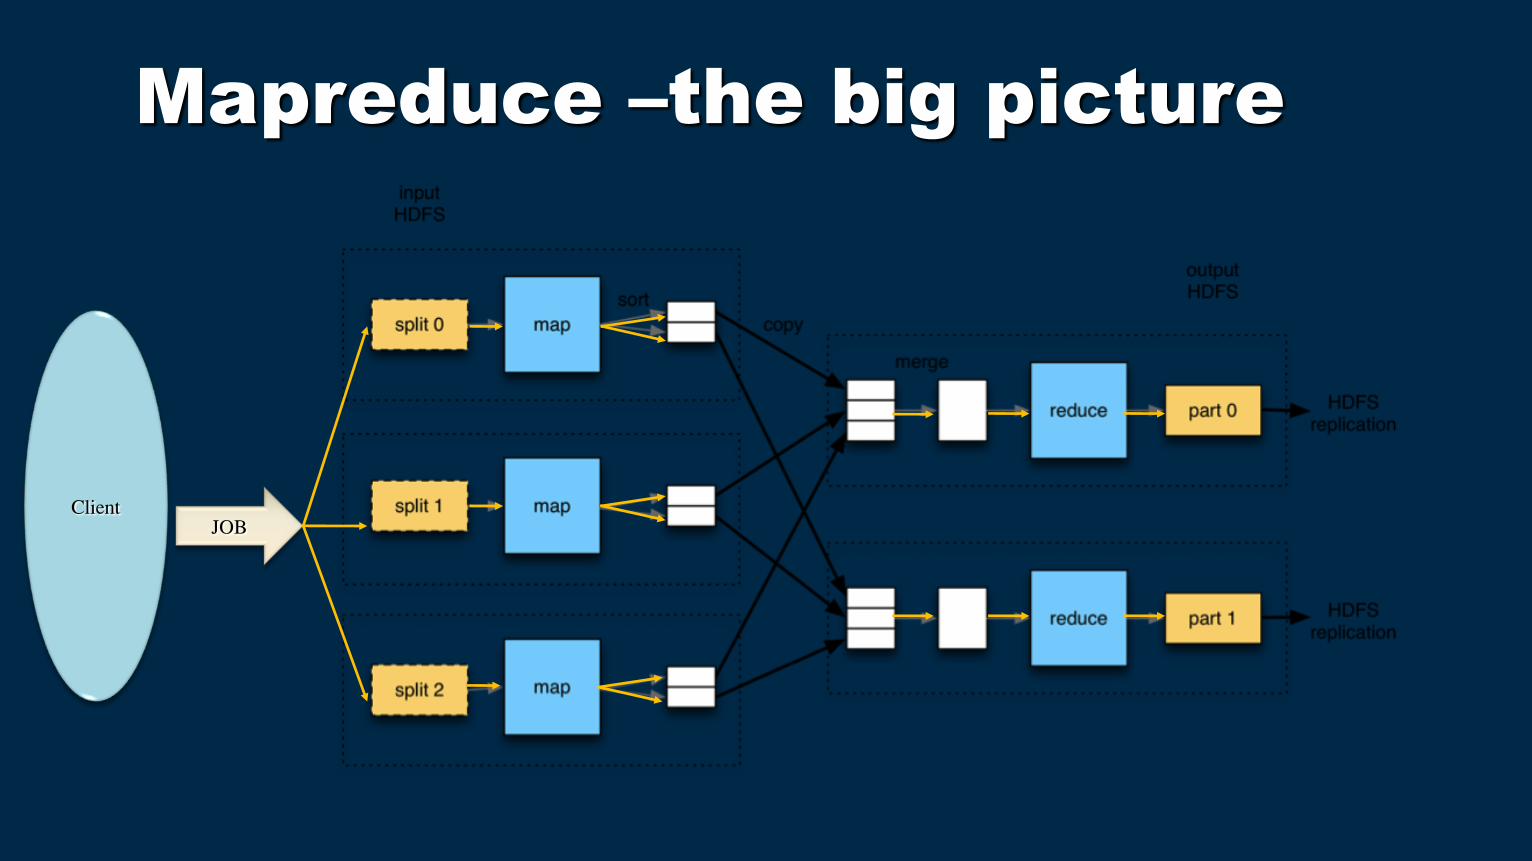
Mapreduce –the big picture
Client JOB
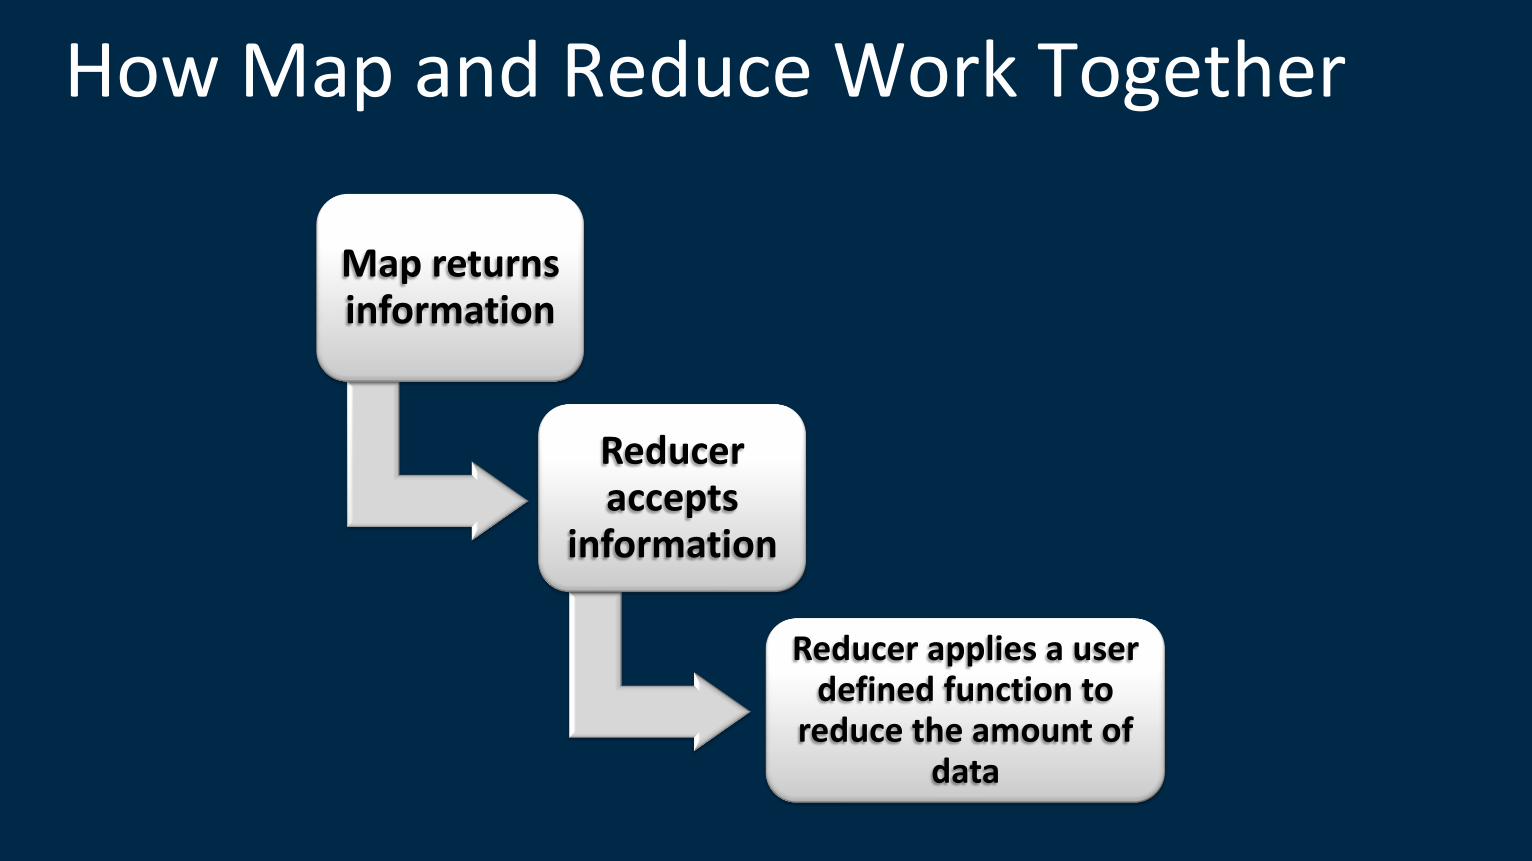
How Map and Reduce Work Together
Map returns information
Reducer accepts
information
Reducer applies a user defined function to
reduce the amount of data
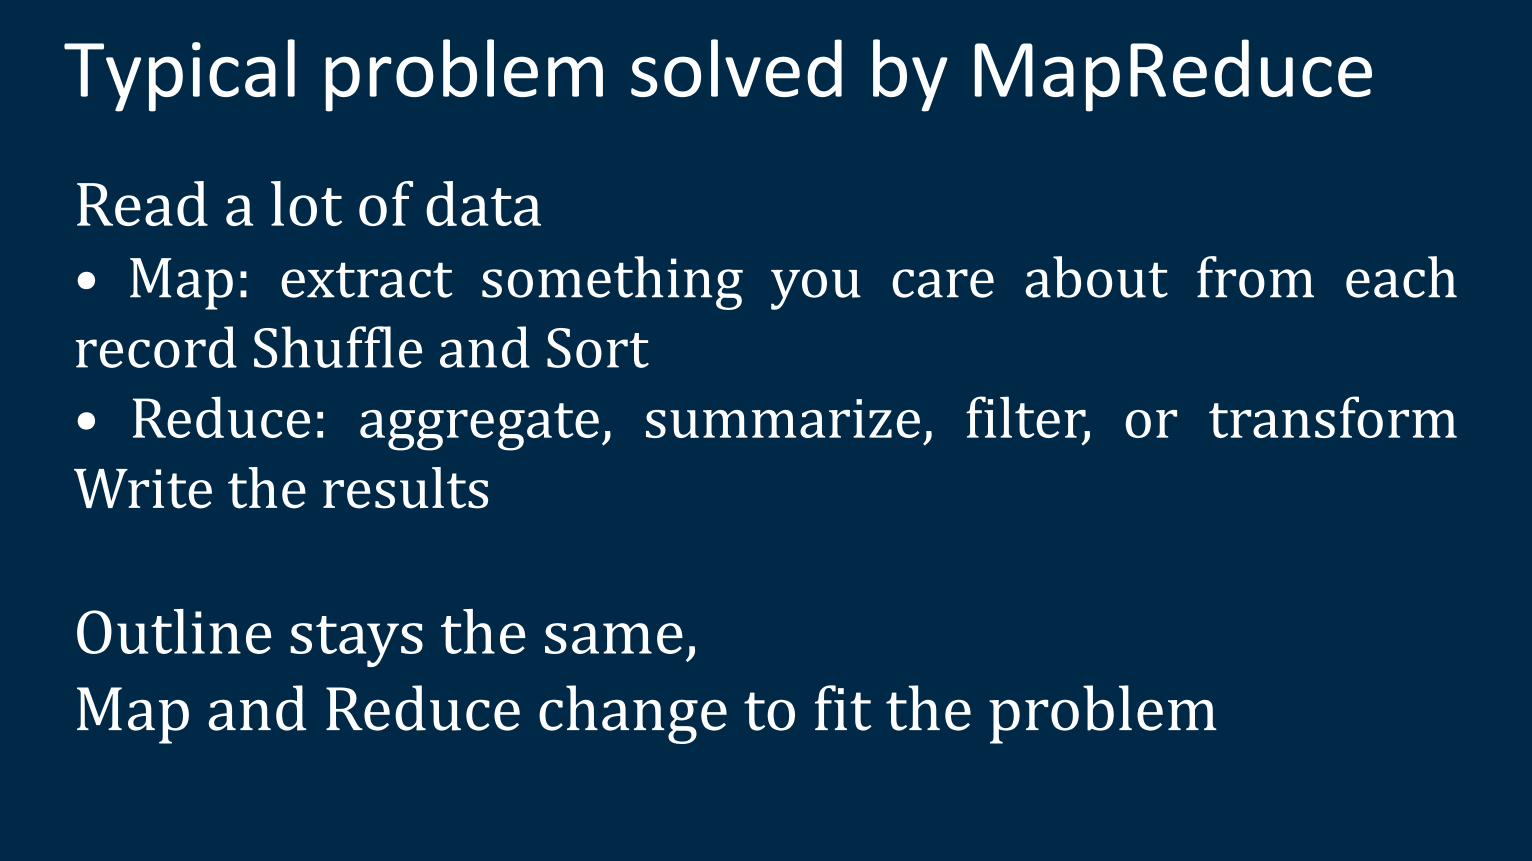
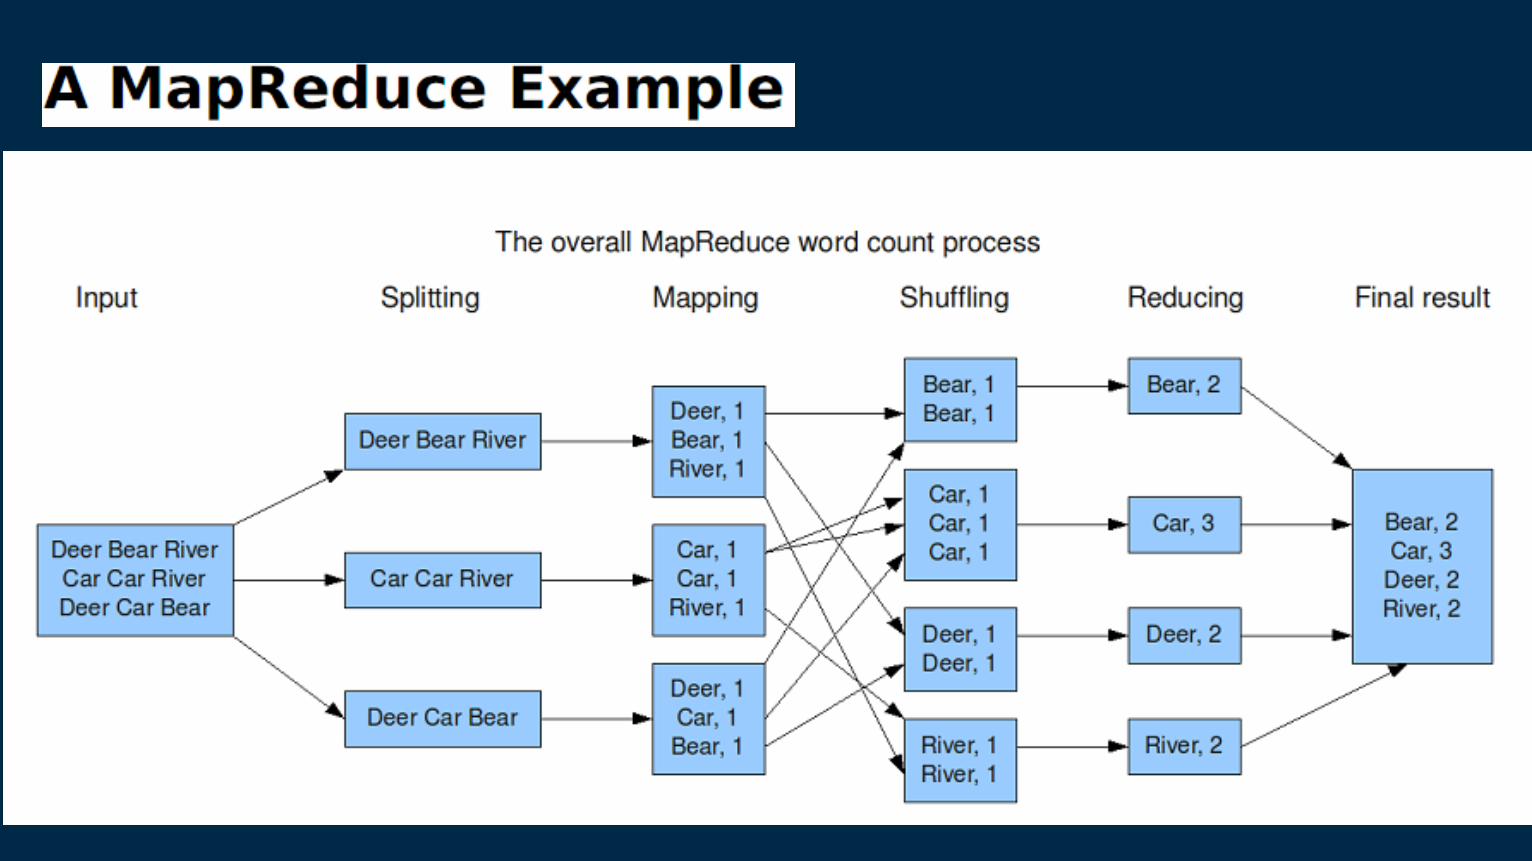
Typical problem solved by MapReduce
Read a lot of data • Map: extract something you care about from each record Shuffle and Sort • Reduce: aggregate, summarize, filter, or transform Write the results
Outline stays the same, Map and Reduce change to fit the problem

Data Flow
1. Mappers read from HDFS
2. Map output is partitioned by key and sent to Reducers
3. Reducers sort input by key
4. Reduce output is written to HDFS
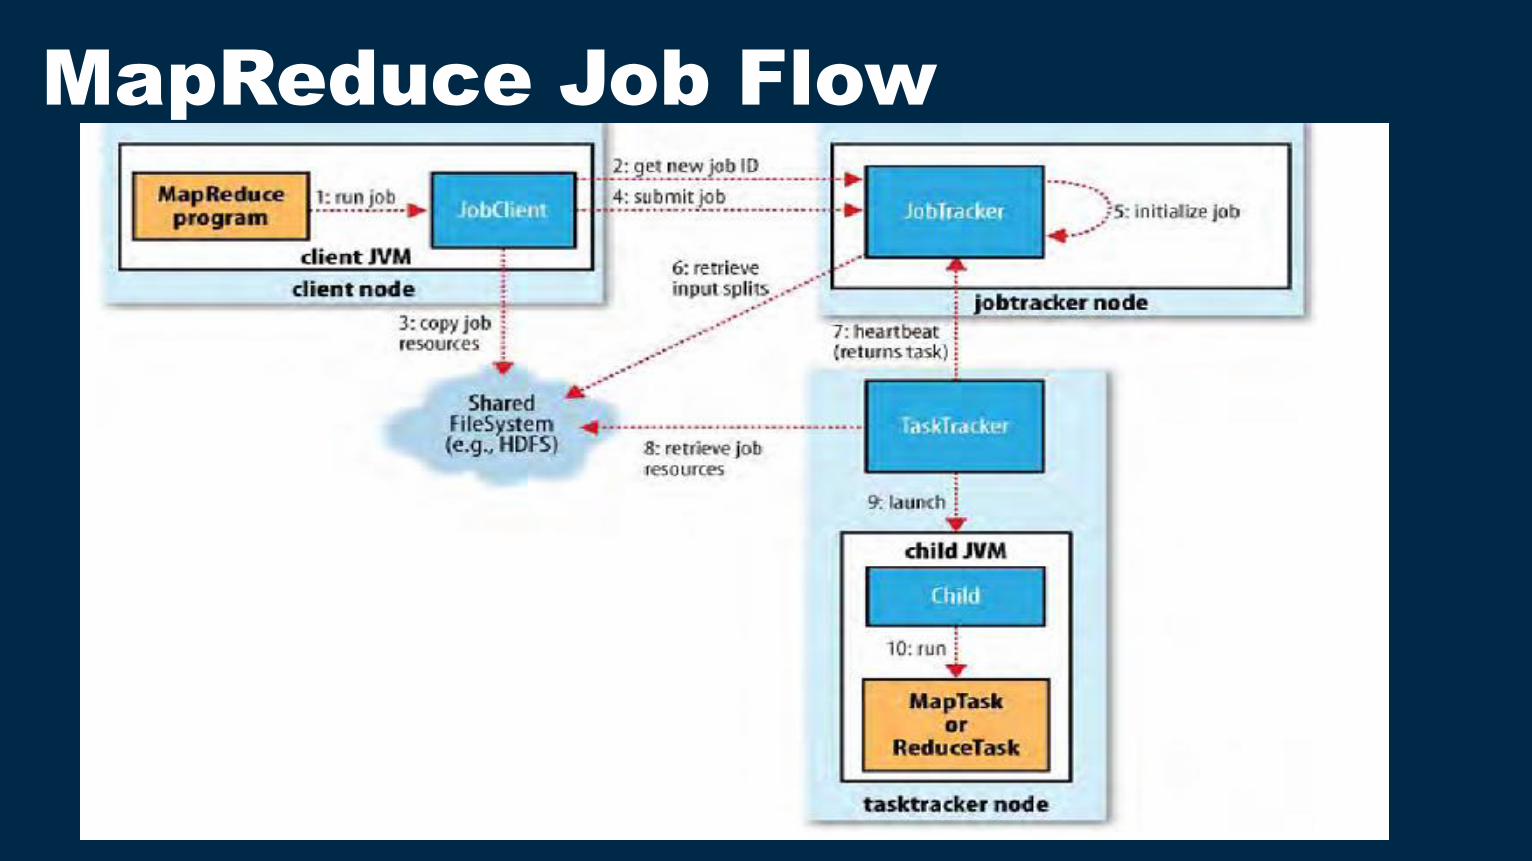
MapReduce Job Flow
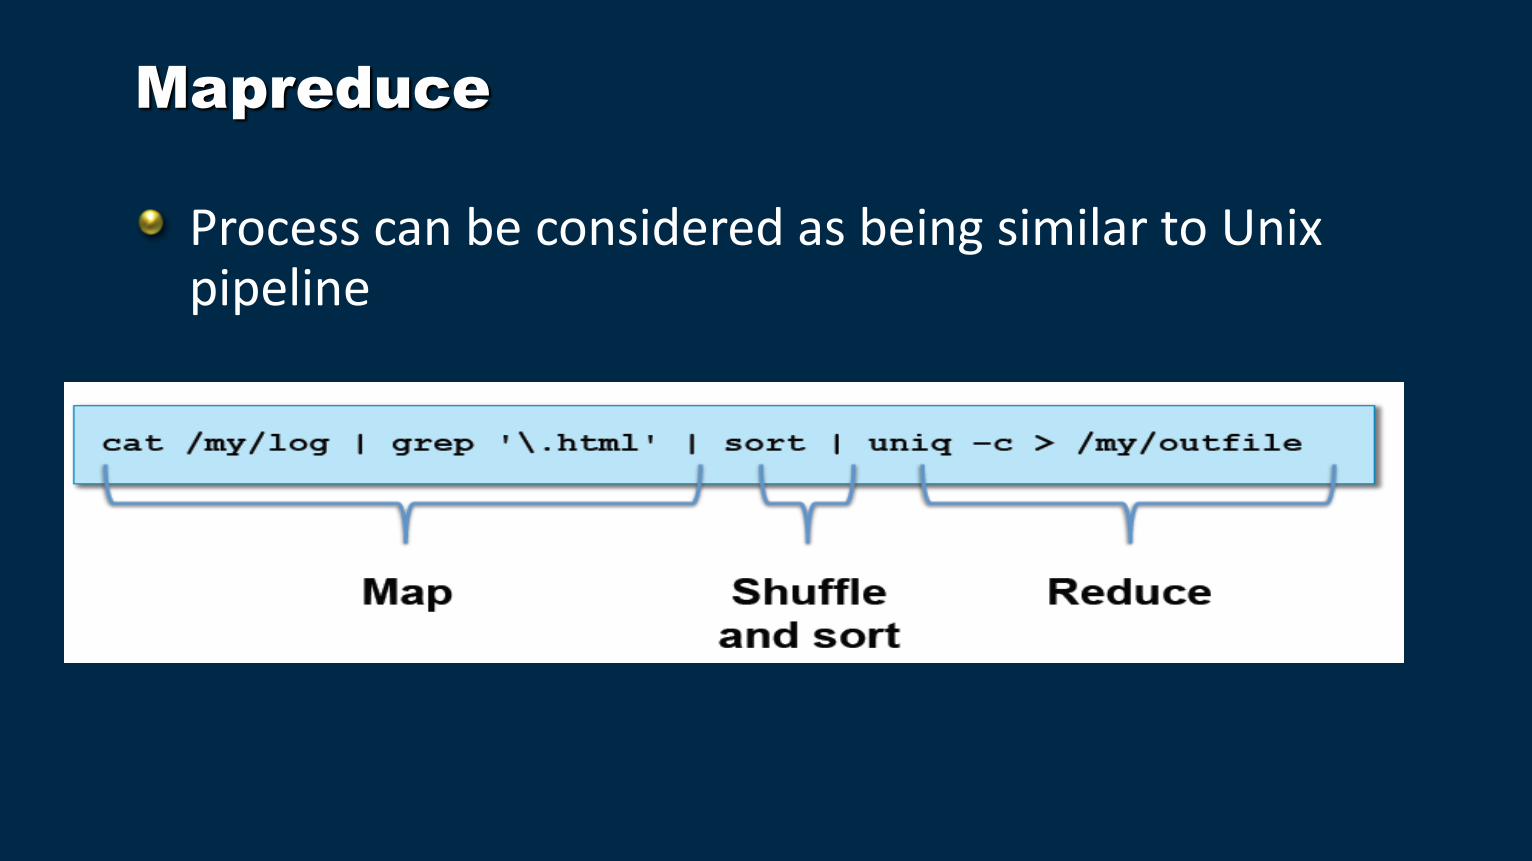
Mapreduce
Process can be considered as being similar to Unix pipeline
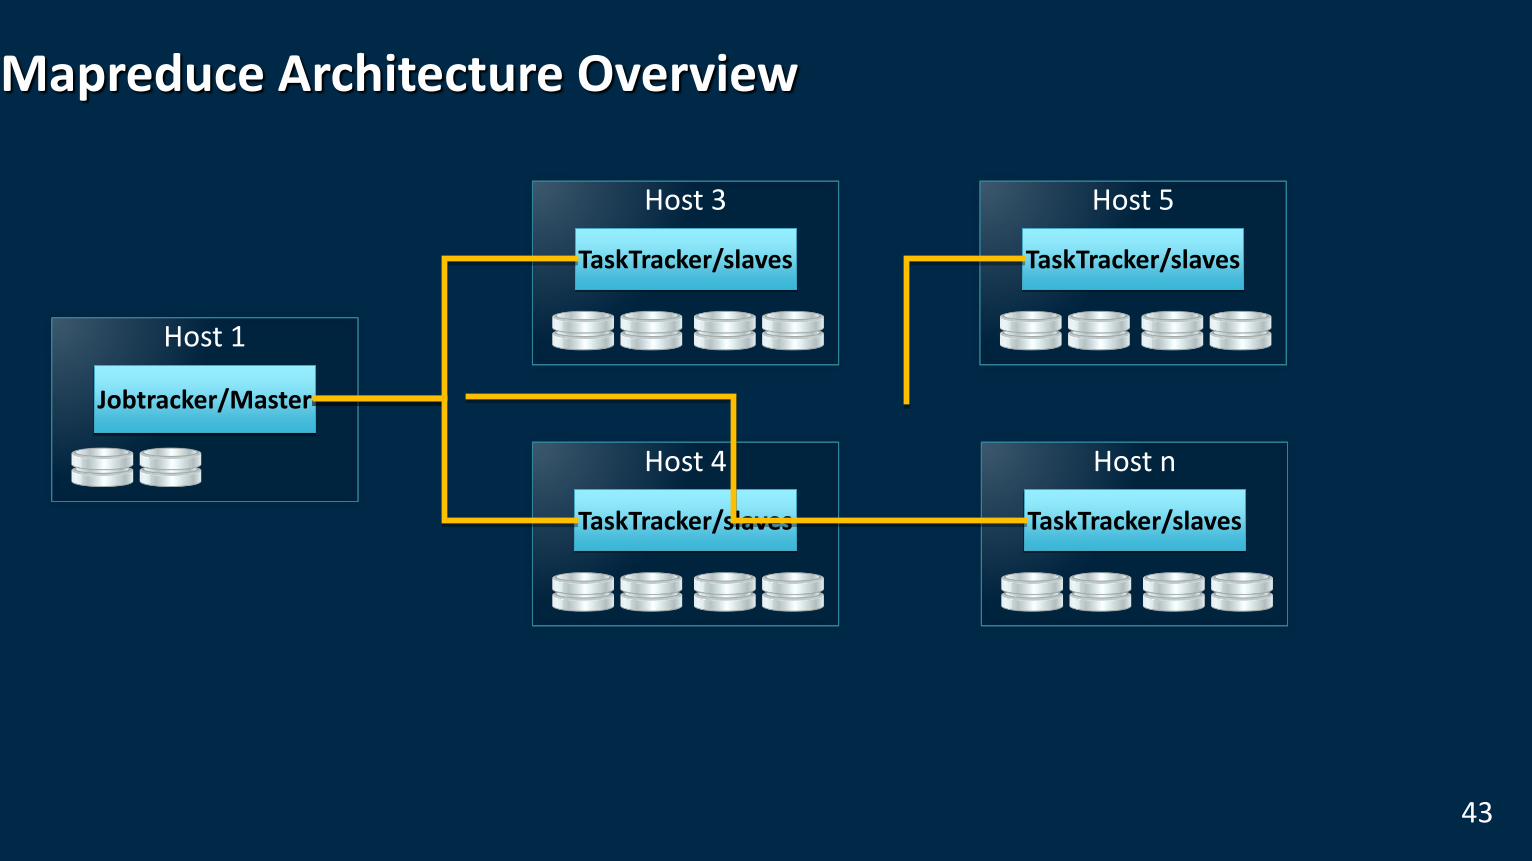
Mapreduce Architecture Overview
43
Jobtracker/Master
Host 1
TaskTracker/slaves
Host 3
TaskTracker/slaves
Host 4
TaskTracker/slaves
Host 5
TaskTracker/slaves
Host n
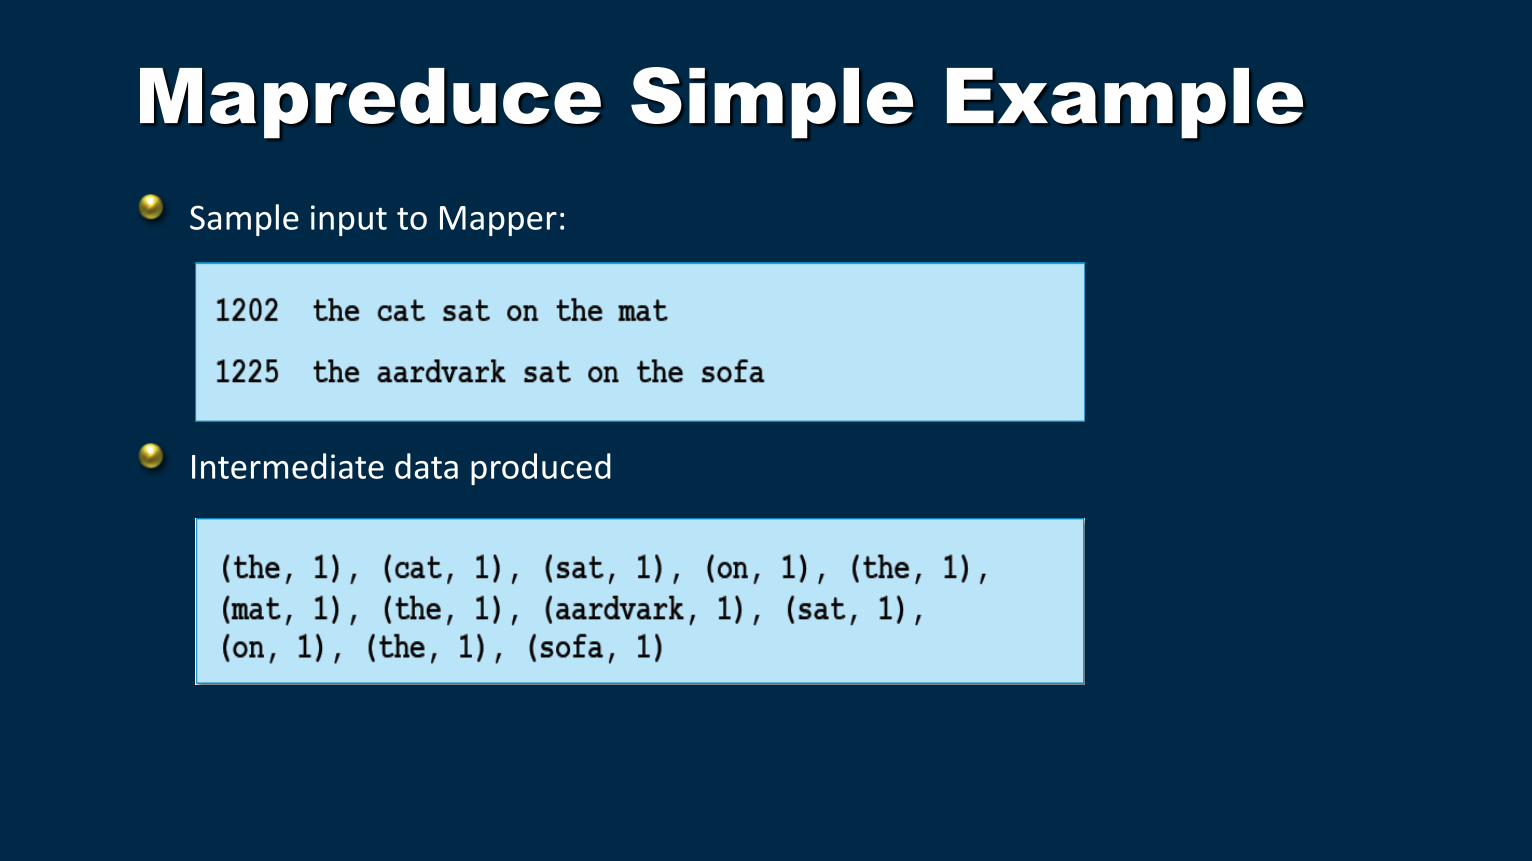
Mapreduce Simple Example
Sample input to Mapper:
Intermediate data produced
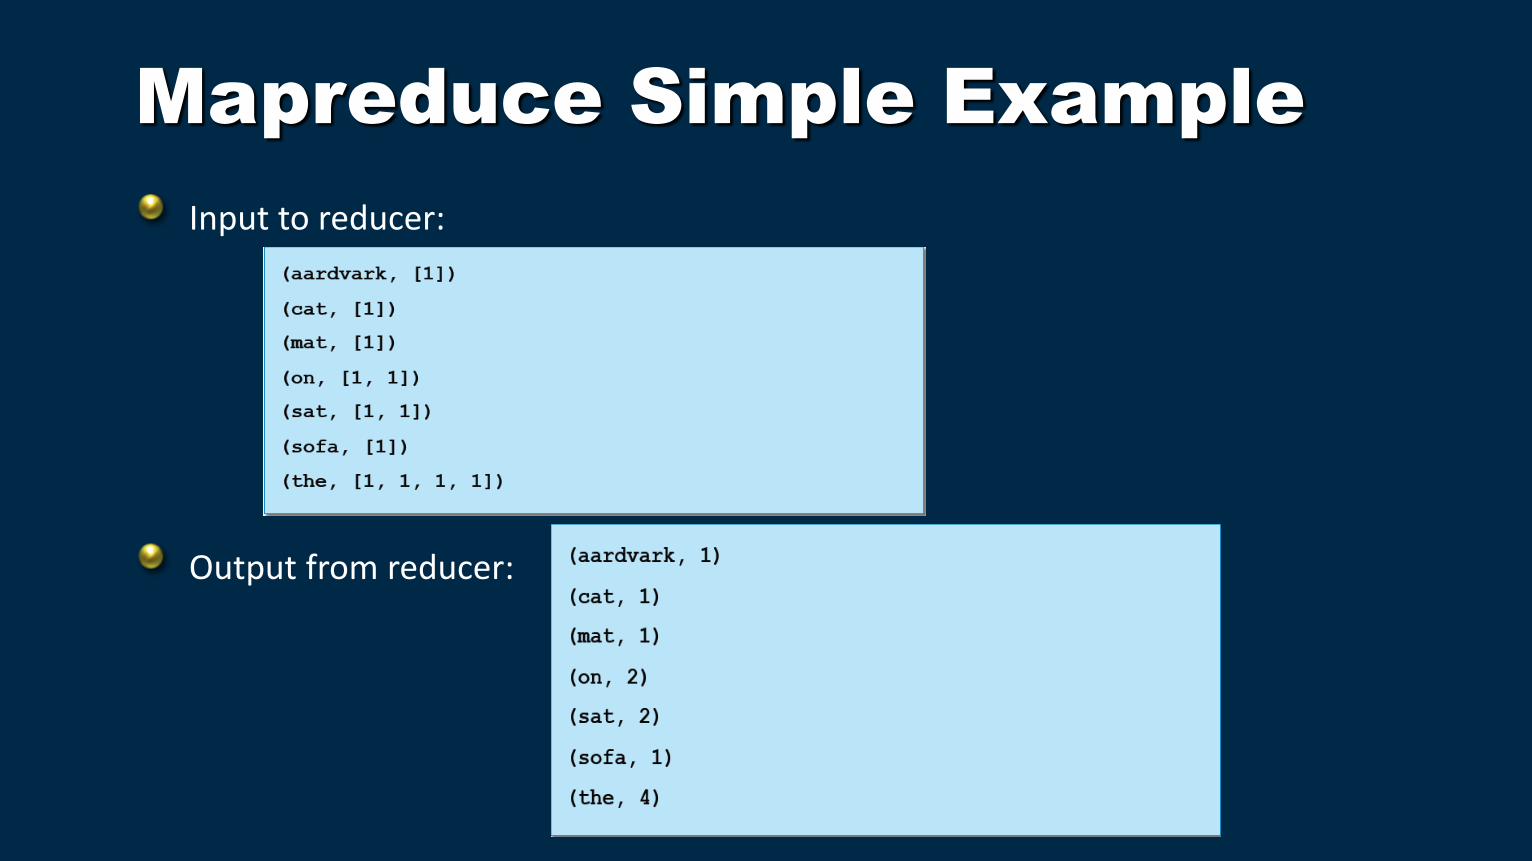
Mapreduce Simple Example
Input to reducer:
Output from reducer:
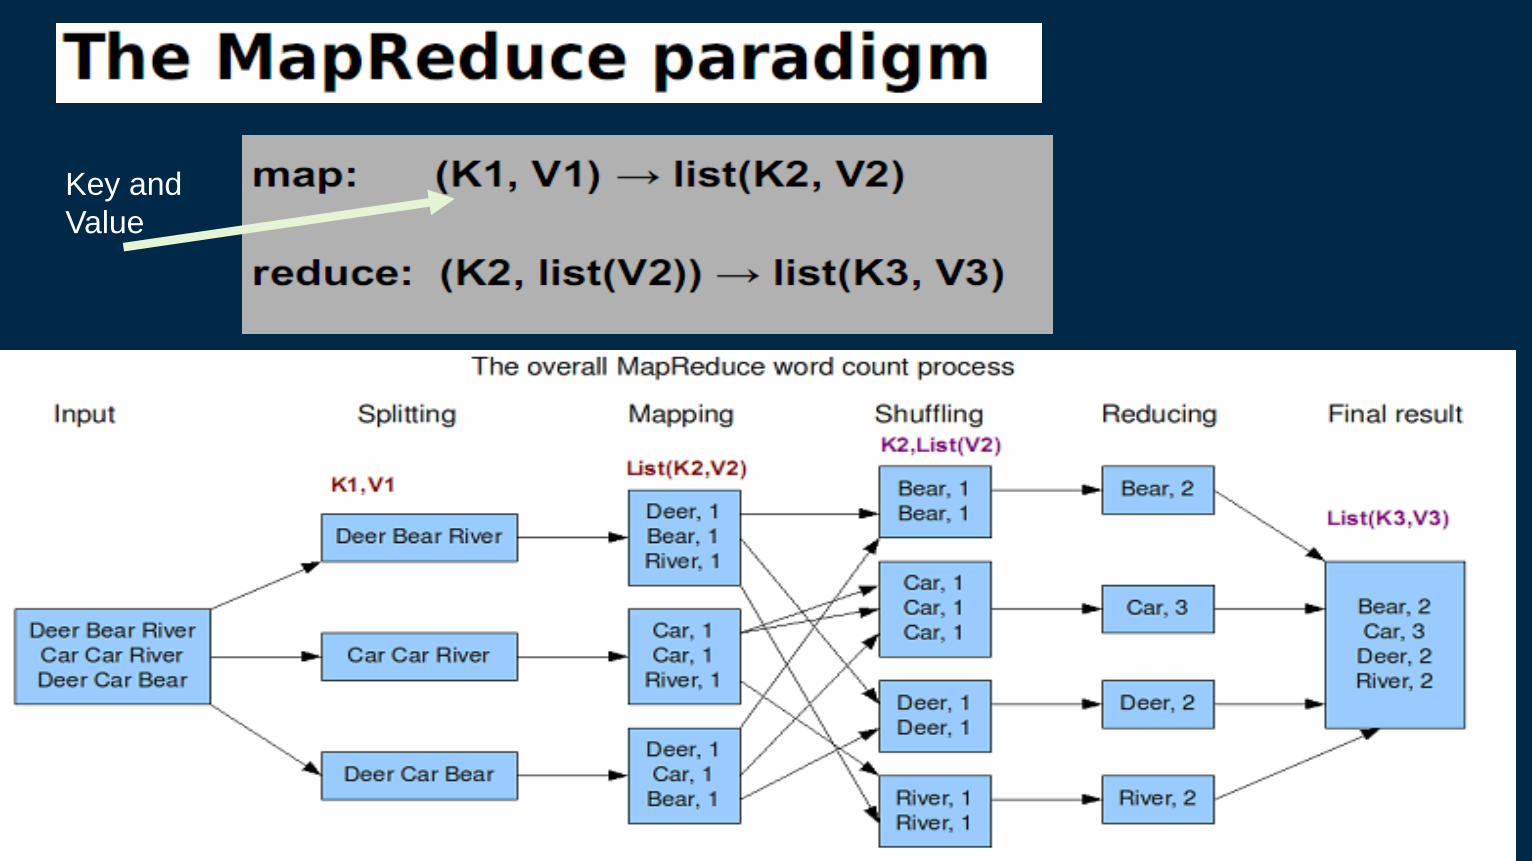
Key and
Value
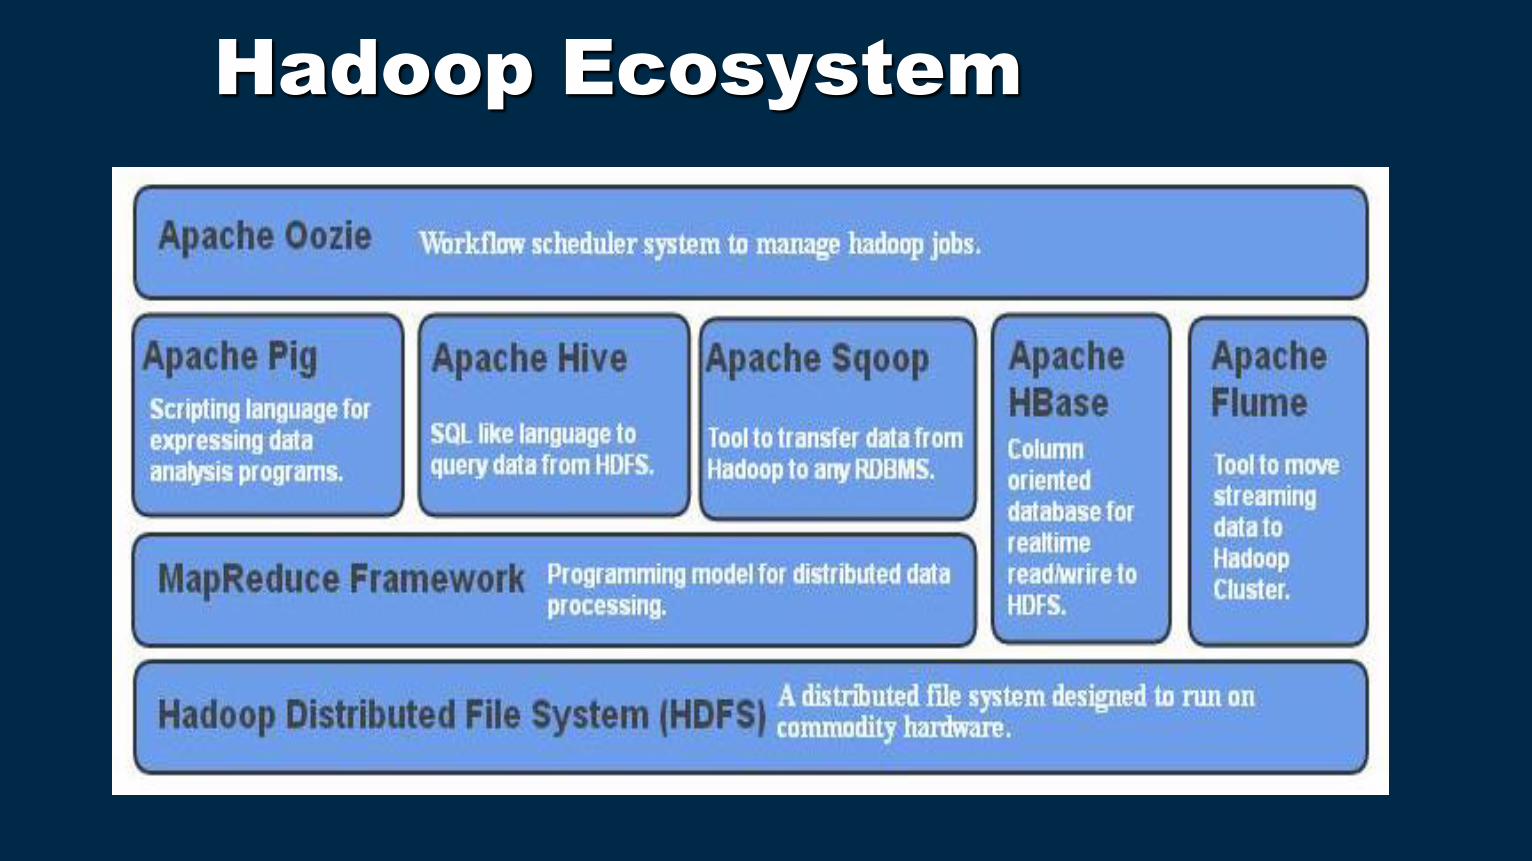
Hadoop Ecosystem
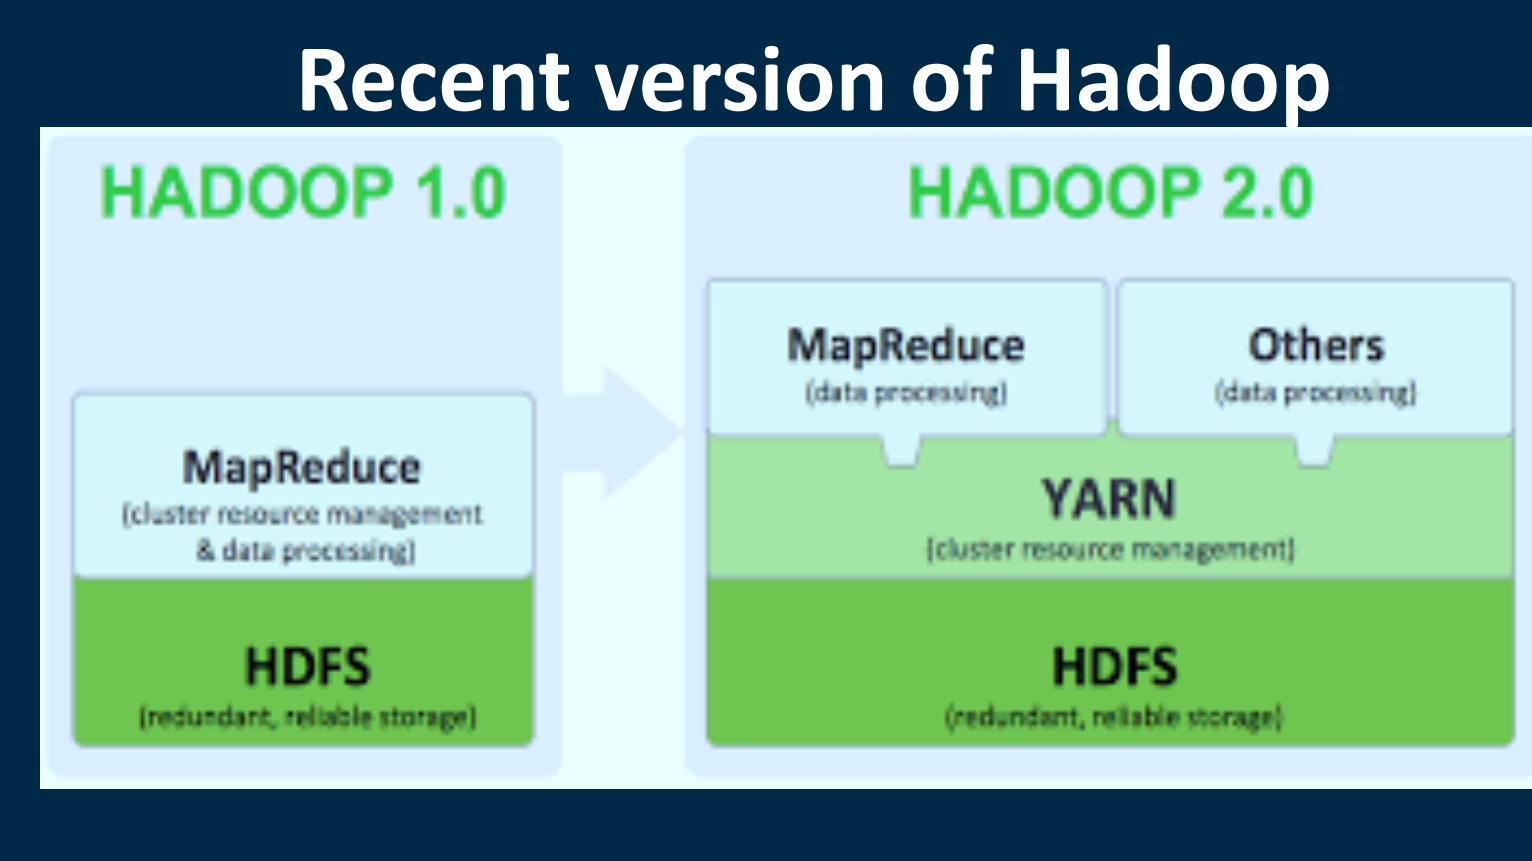
Recent version of Hadoop

Questions ?

Session 2 Installation Hadoop – Single Mode
- Ms B. A. Khivasara and Ms K. R. Nirmal
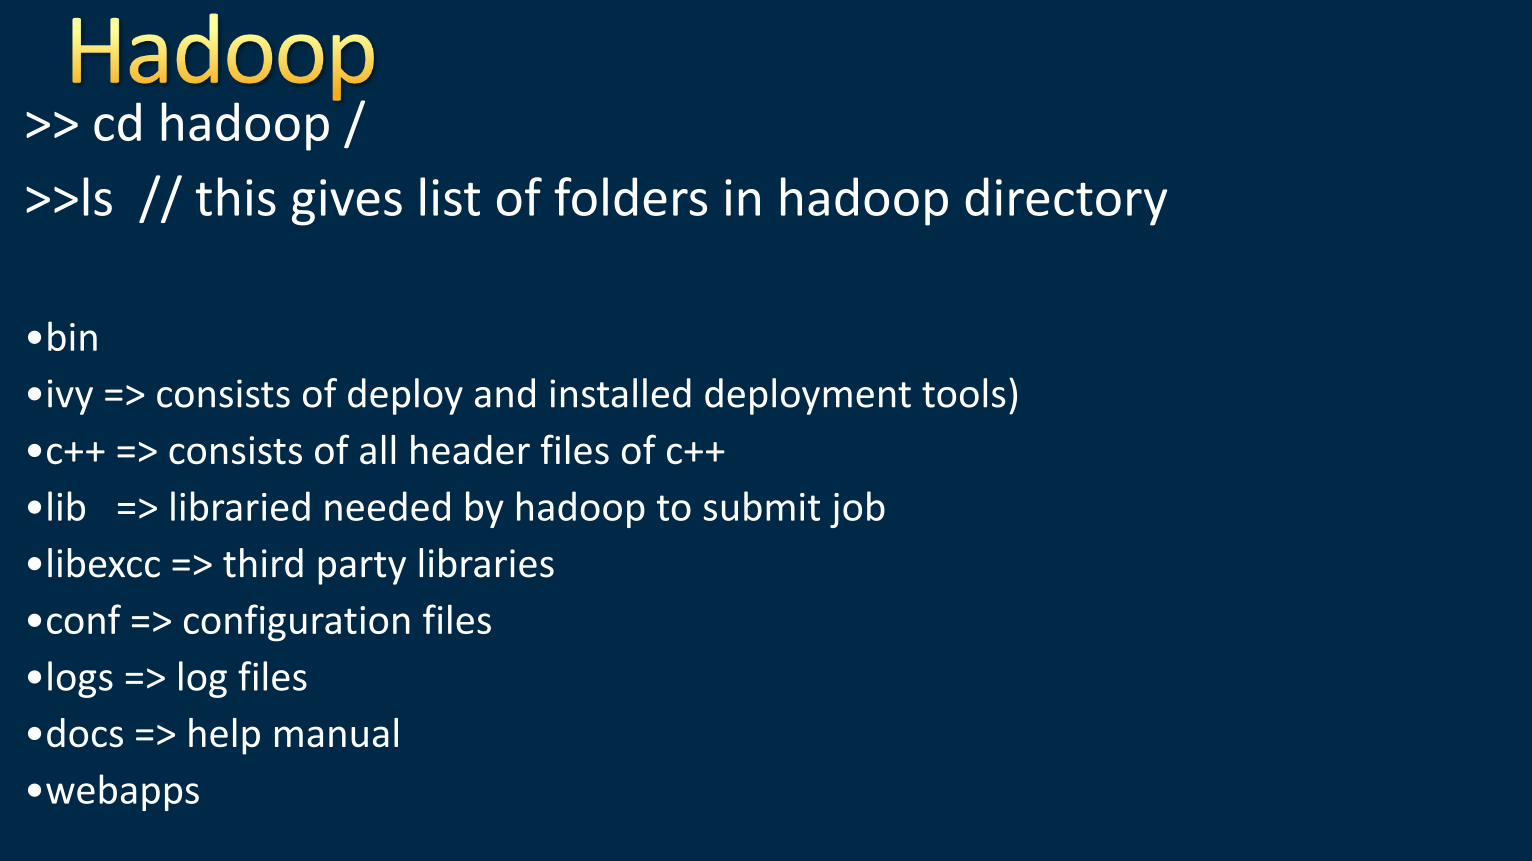
>> cd hadoop /
>>ls // this gives list of folders in hadoop directory
•bin
•ivy => consists of deploy and installed deployment tools)
•c++ => consists of all header files of c++
•lib => libraried needed by hadoop to submit job
•libexcc => third party libraries
•conf => configuration files
•logs => log files
•docs => help manual
•webapps
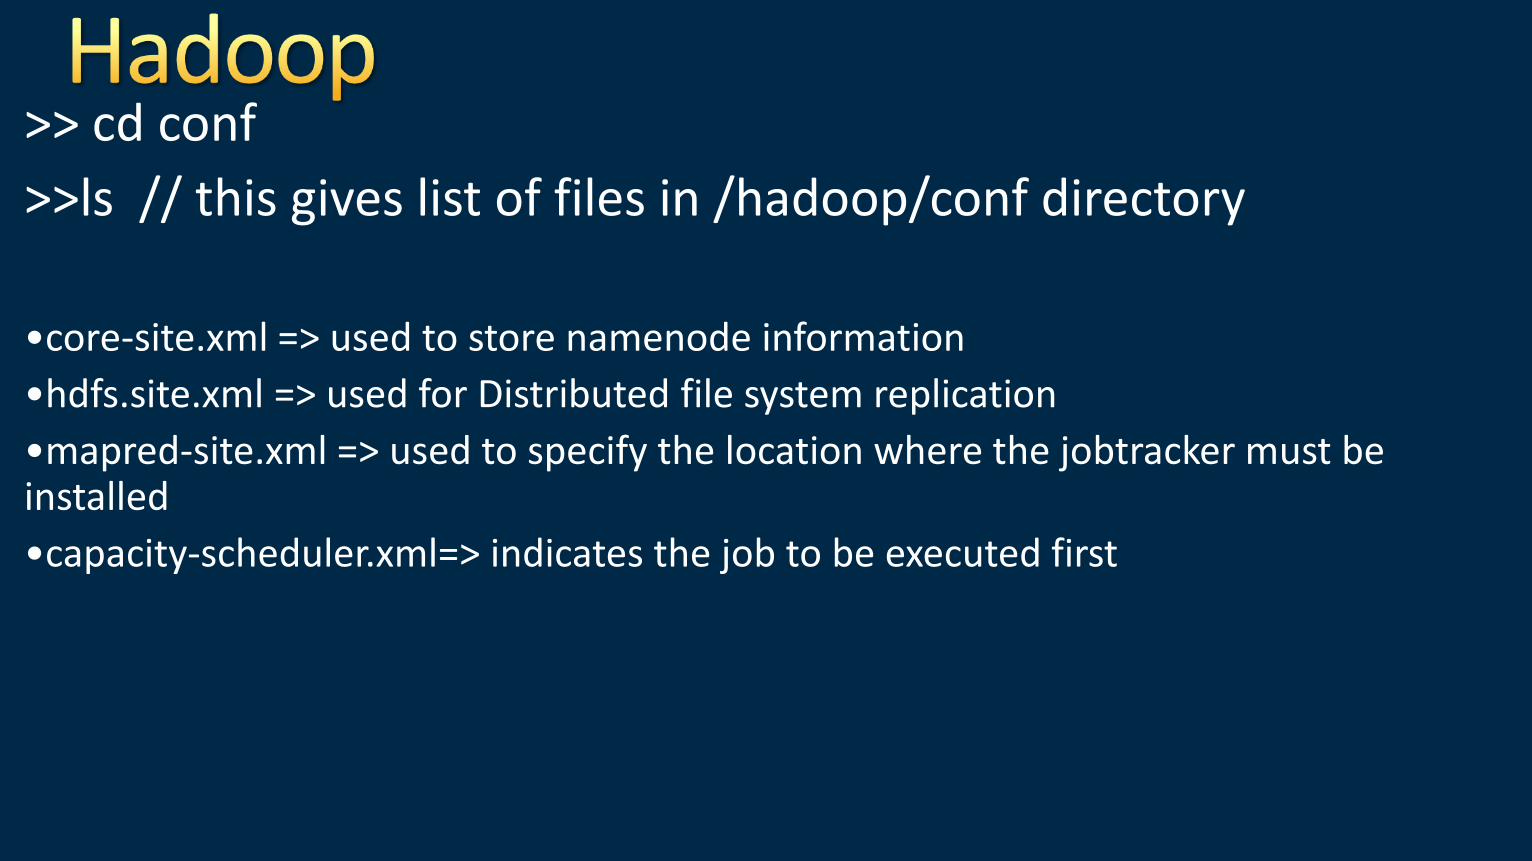
>> cd conf
>>ls // this gives list of files in /hadoop/conf directory
•core-site.xml => used to store namenode information
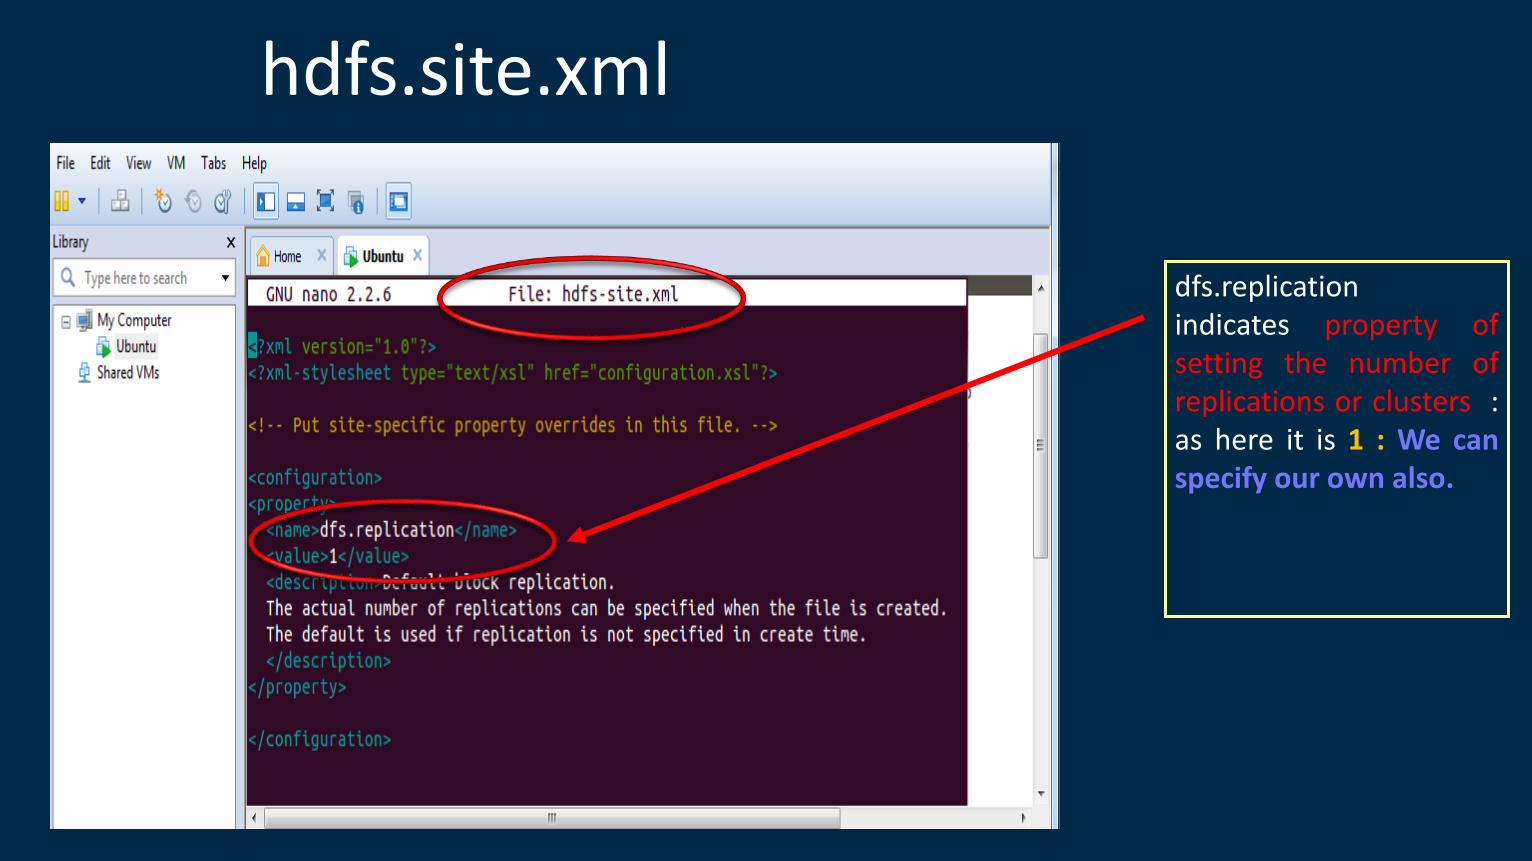
•hdfs.site.xml => used for Distributed file system replication
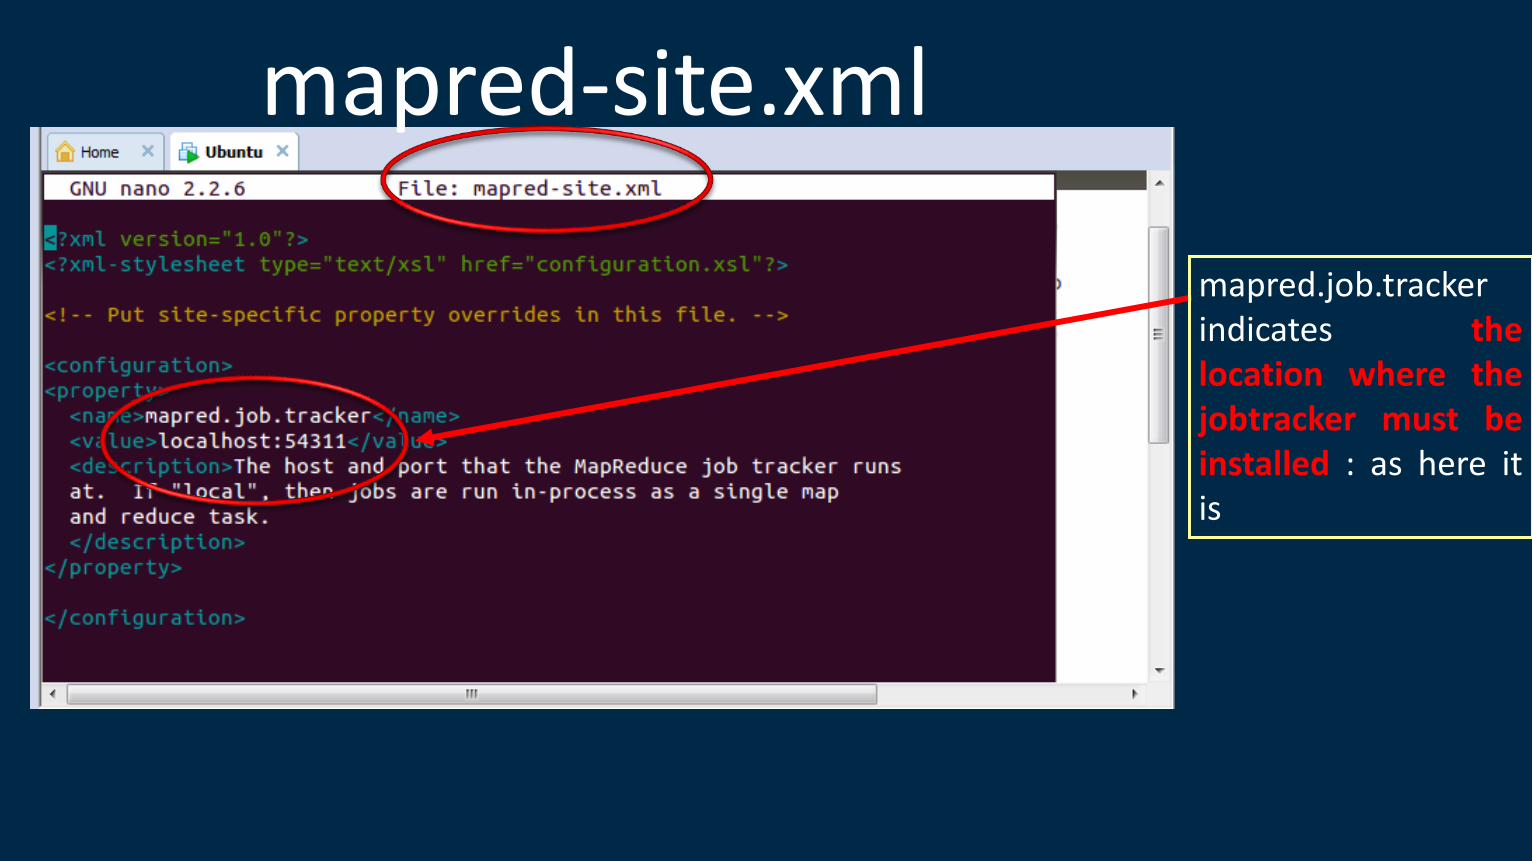
•mapred-site.xml => used to specify the location where the jobtracker must be installed
•capacity-scheduler.xml=> indicates the job to be executed first
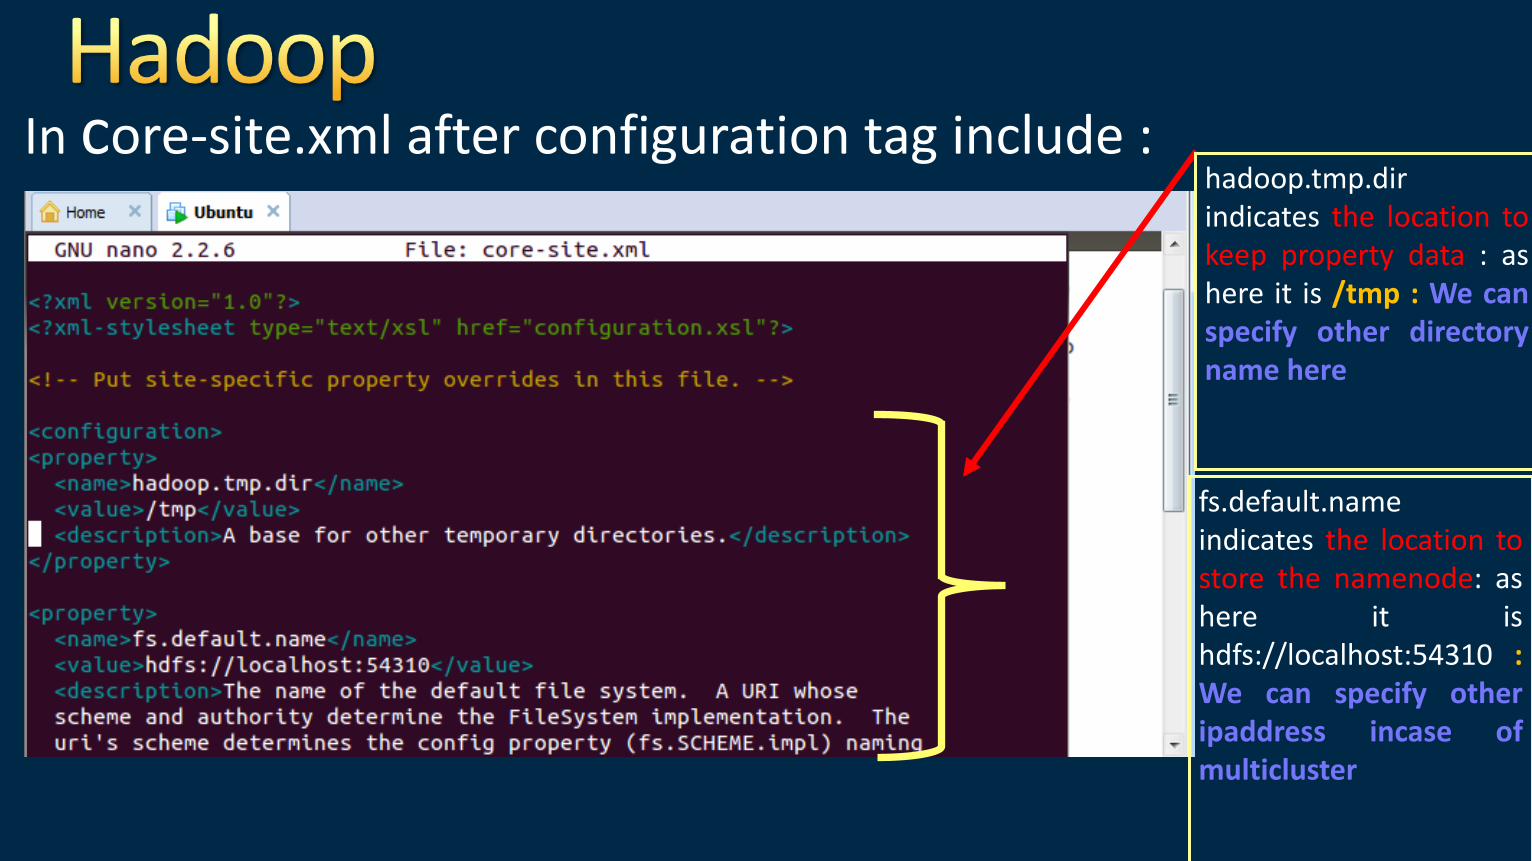
In core-site.xml after configuration tag include :
hadoop.tmp.dir indicates the location to keep property data : as here it is /tmp : We can specify other directory name here
fs.default.name indicates the location to store the namenode: as here it is hdfs://localhost:54310 : We can specify other ipaddress incase of multicluster

dfs.replication indicates property of setting the number of replications or clusters : as here it is 1 : We can specify our own also.
hdfs.site.xml
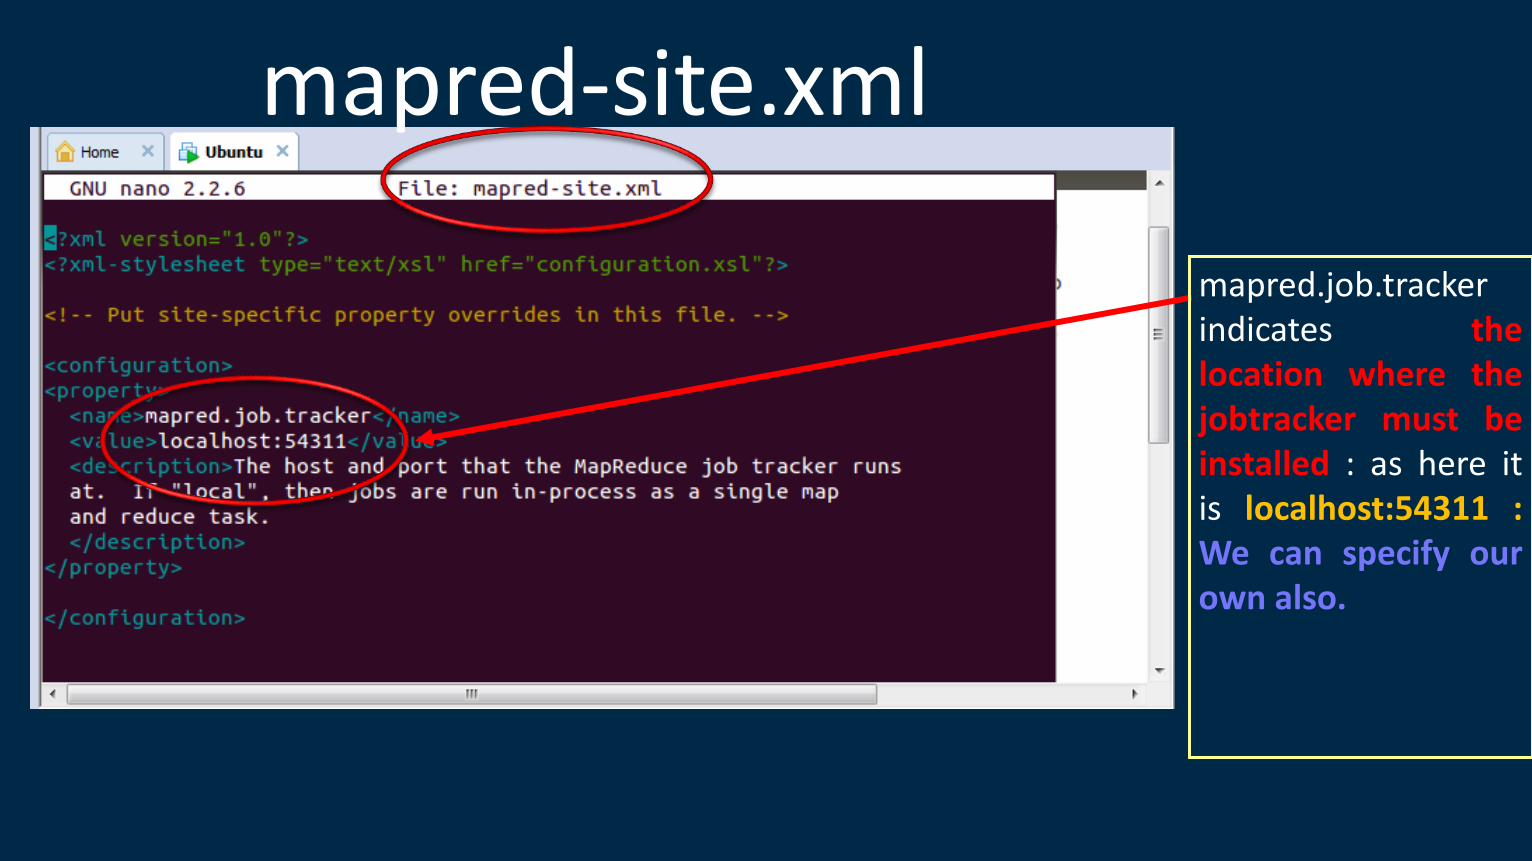
mapred.job.tracker indicates the location where the jobtracker must be installed : as here it is localhost:54311 : We can specify our own also.
mapred-site.xml
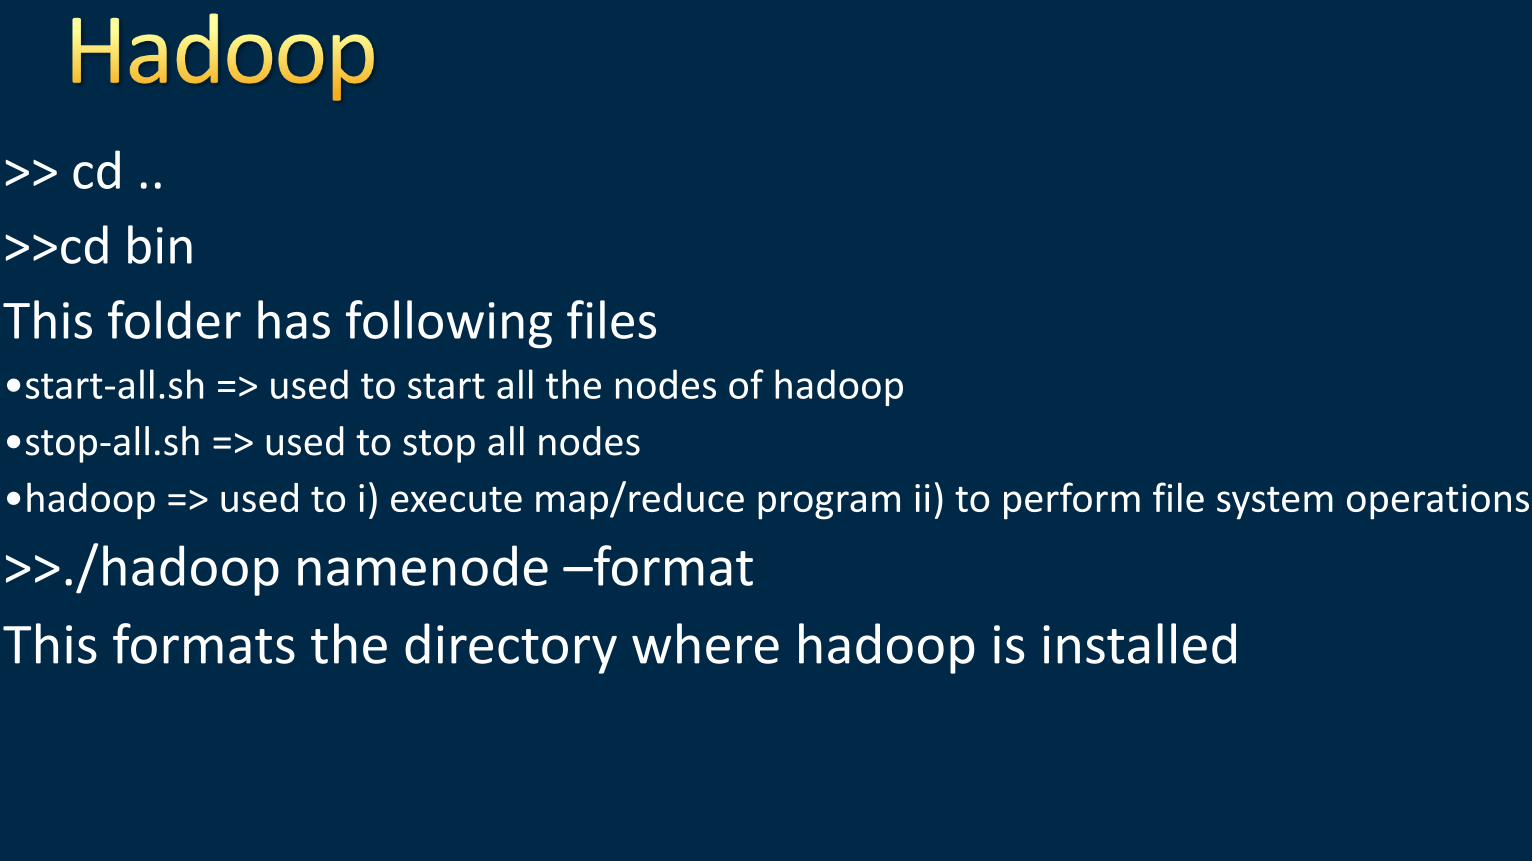
>> cd ..
>>cd bin
This folder has following files •start-all.sh => used to start all the nodes of hadoop
•stop-all.sh => used to stop all nodes
•hadoop => used to i) execute map/reduce program ii) to perform file system operations
>>./hadoop namenode –format
This formats the directory where hadoop is installed
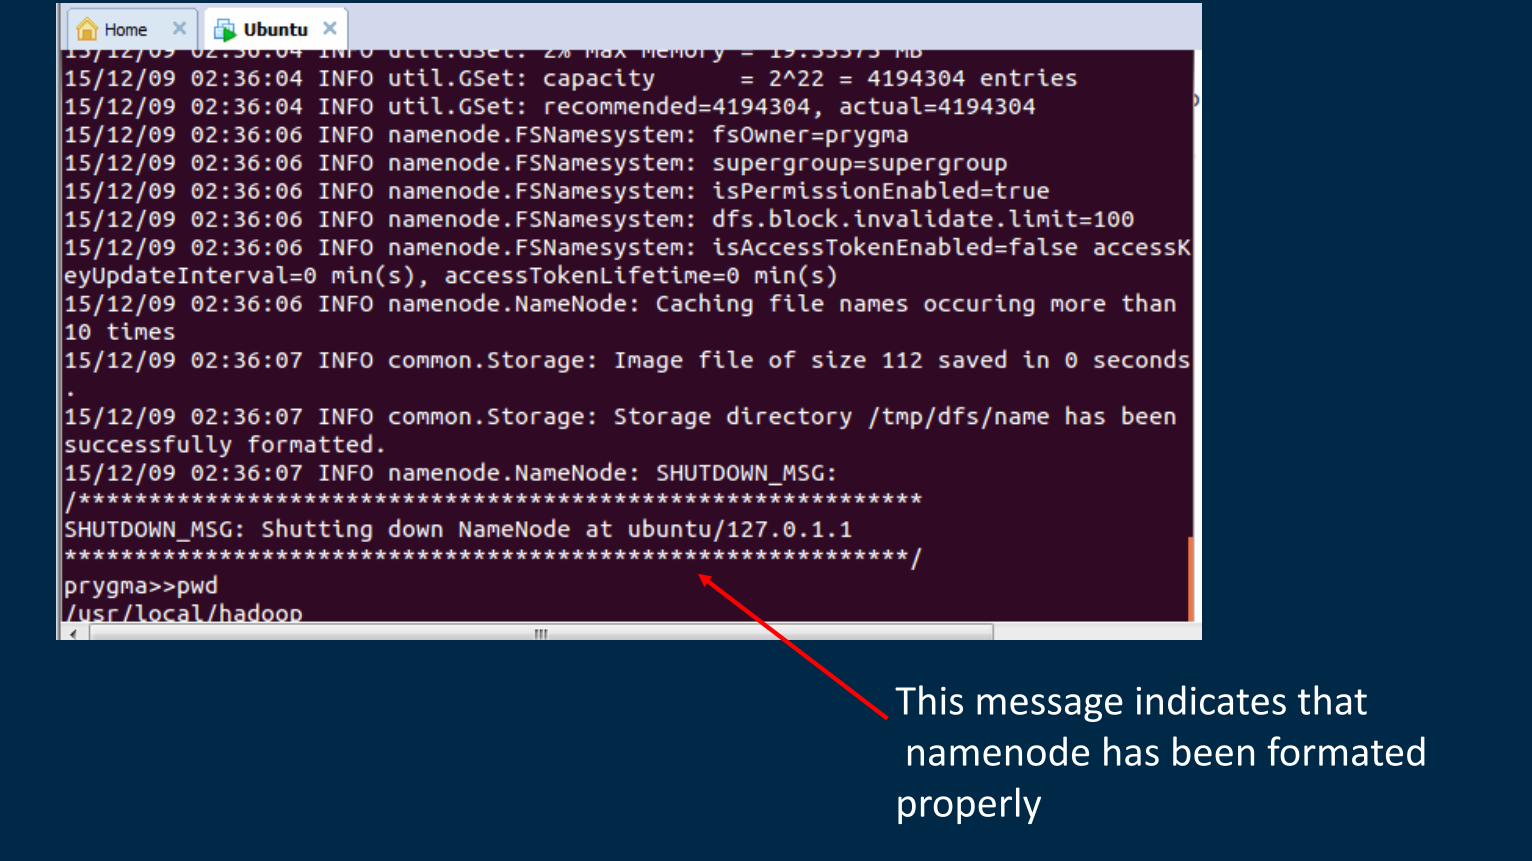
This message indicates that namenode has been formated properly
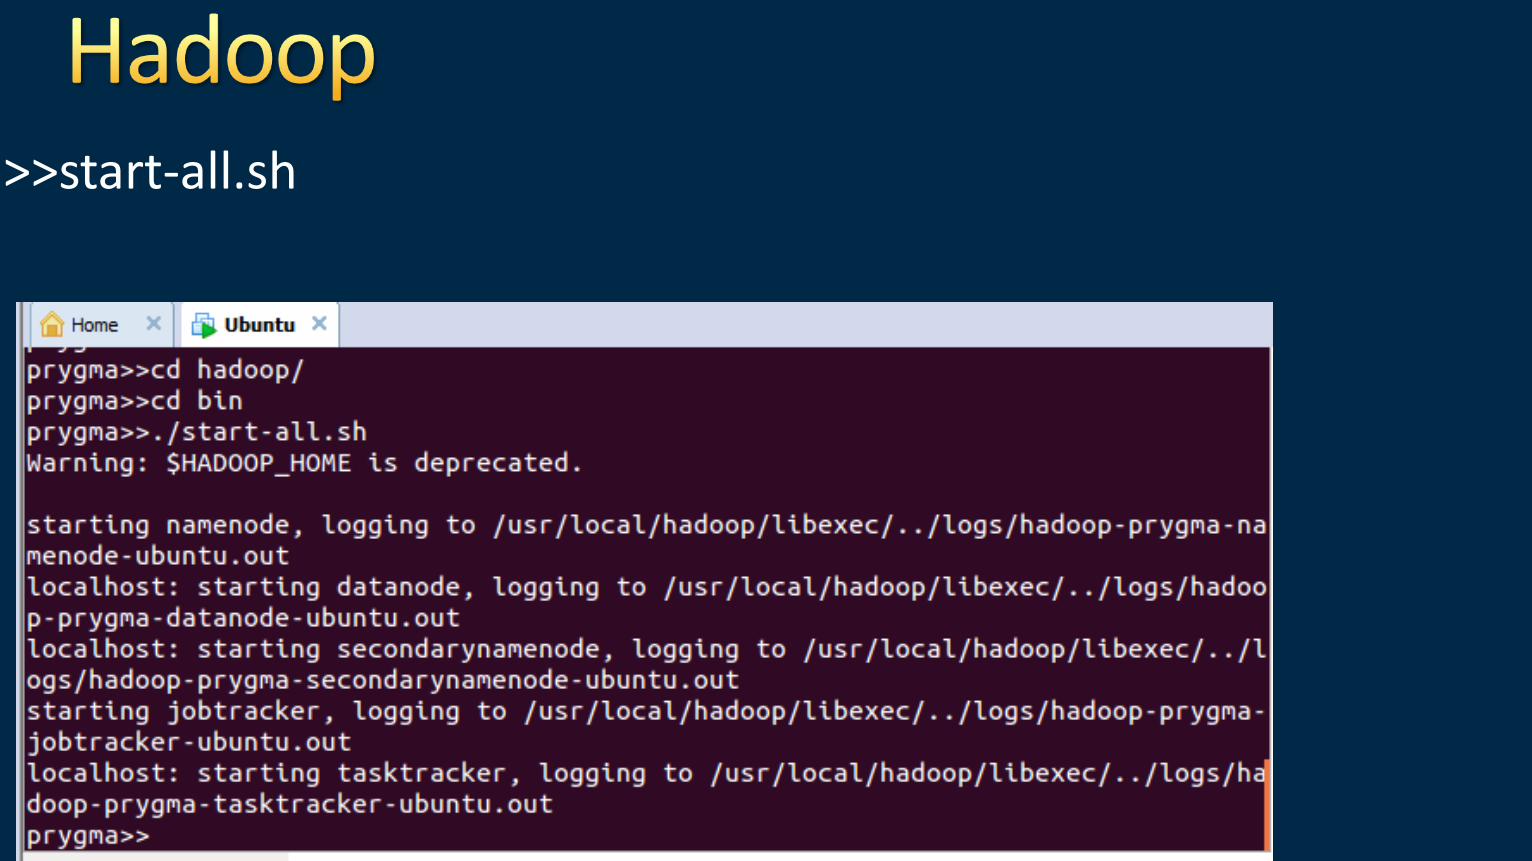
>>start-all.sh
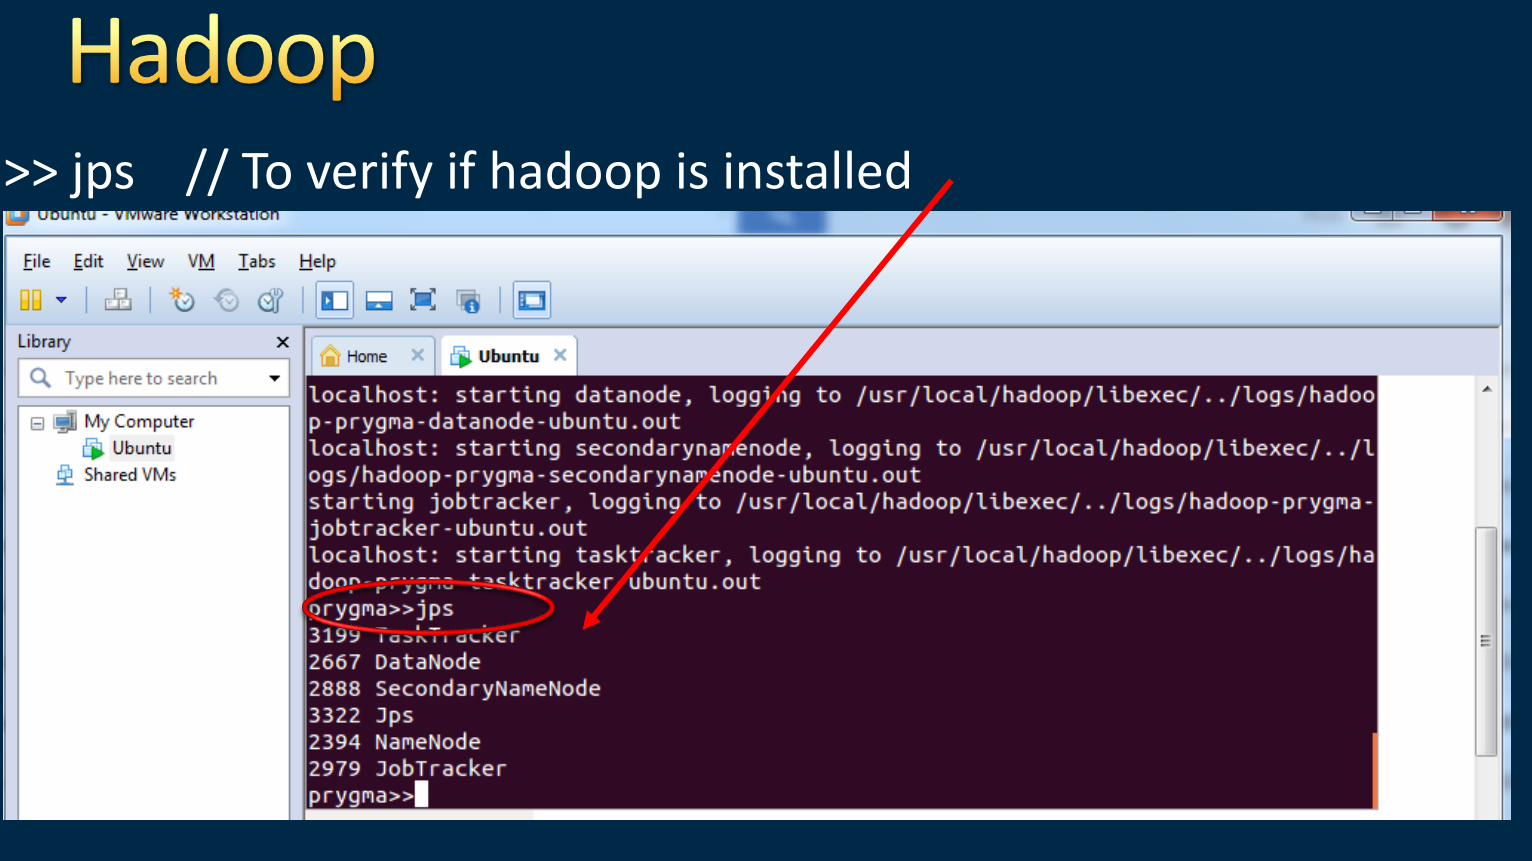
>> jps // To verify if hadoop is installed
Jdk must be installed
Machine should be password less ssh (When two m/c’s communicate with each other in linux they do it through ssh: i.e secured shell)
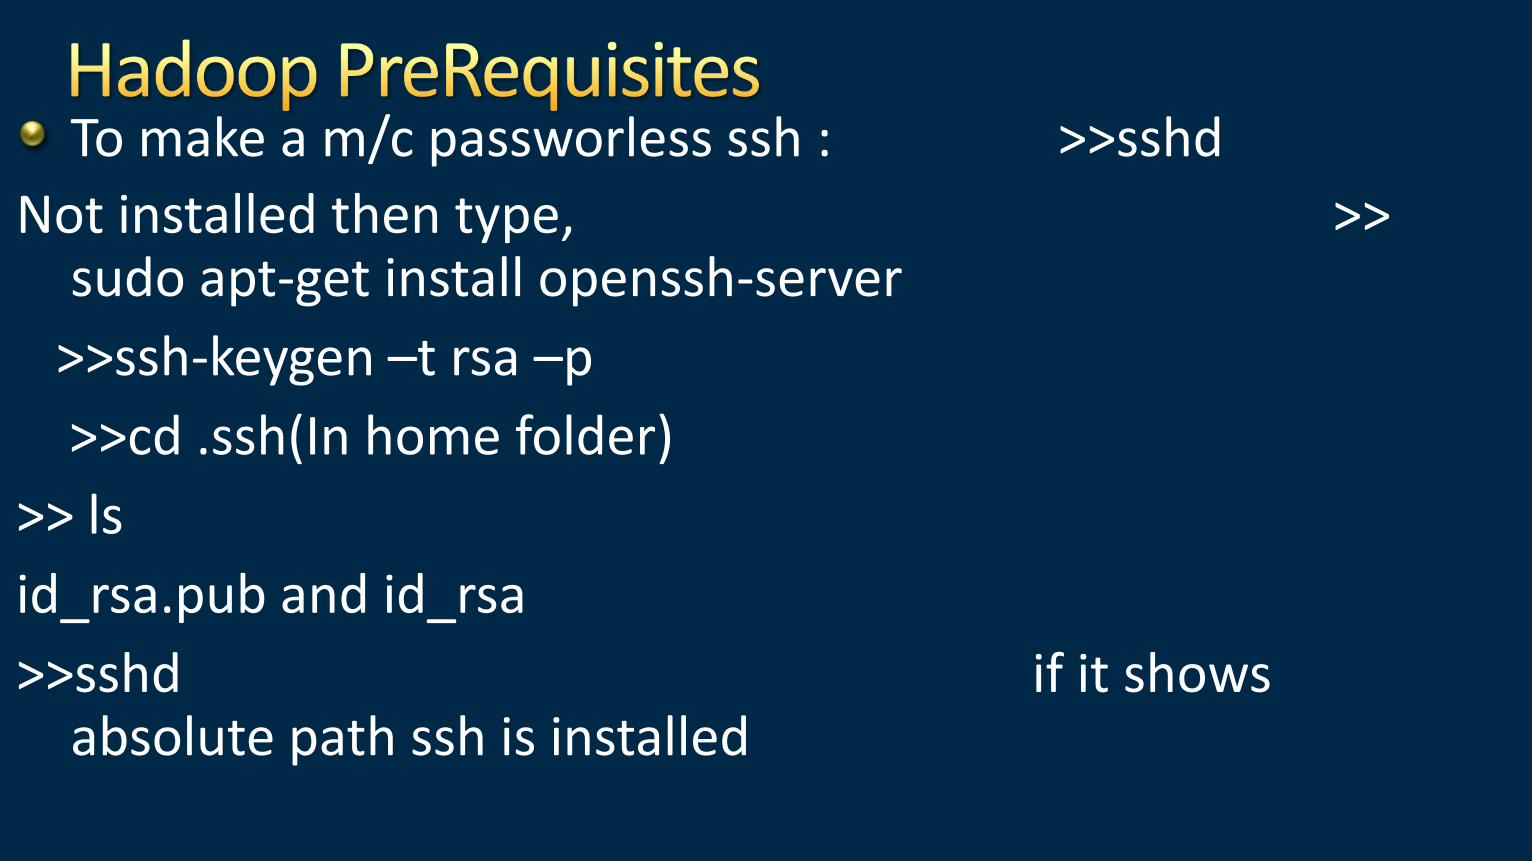
To make a m/c passworless ssh : >>sshd
Not installed then type, >> sudo apt-get install openssh-server
>>ssh-keygen –t rsa –p
>>cd .ssh(In home folder)
>> ls
id_rsa.pub and id_rsa
>>sshd if it shows absolute path ssh is installed
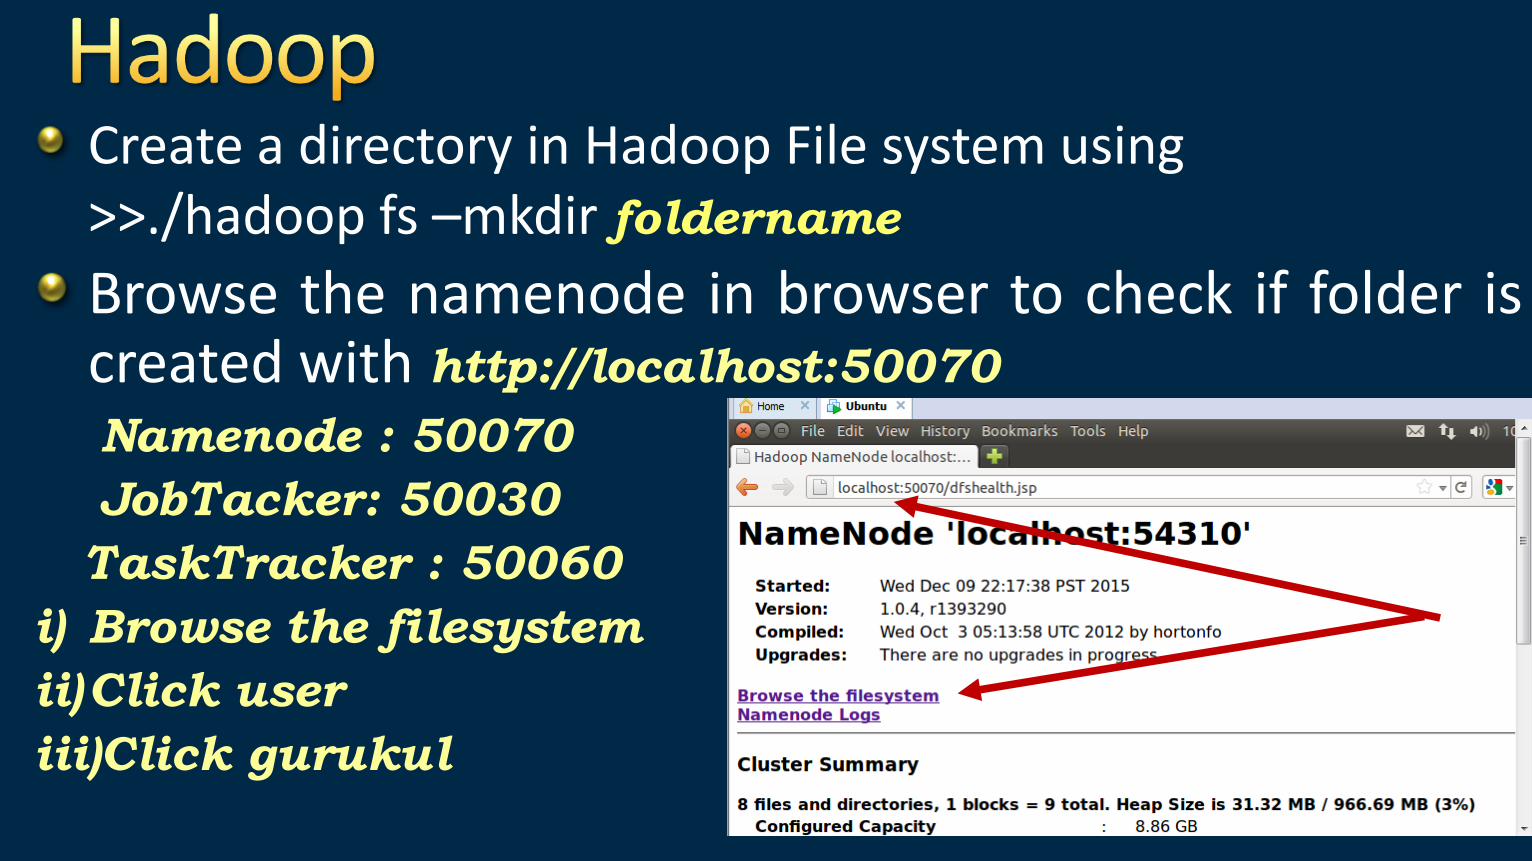
Create a directory in Hadoop File system using >>./hadoop fs –mkdir foldername
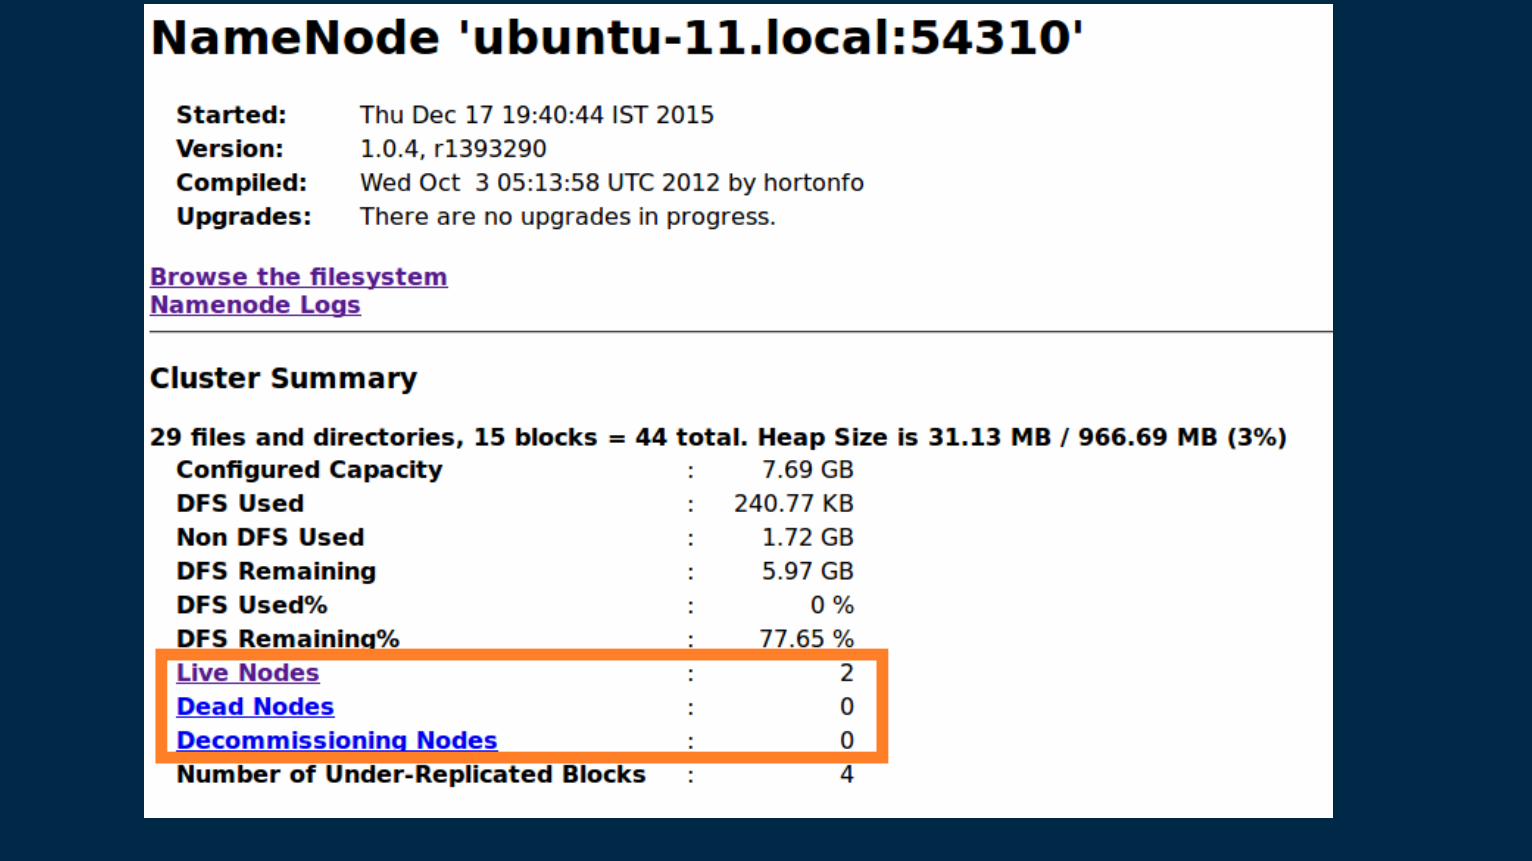
Browse the namenode in browser to check if folder is created with http://localhost:50070
Namenode : 50070
JobTacker: 50030
TaskTracker : 50060
i) Browse the filesystem
ii)Click user
iii)Click gurukul

Session 3 Hadoop as Pseudo Distributed Mode (WordCount Program in Hadoop)
- Ms K. M. Sanghavi
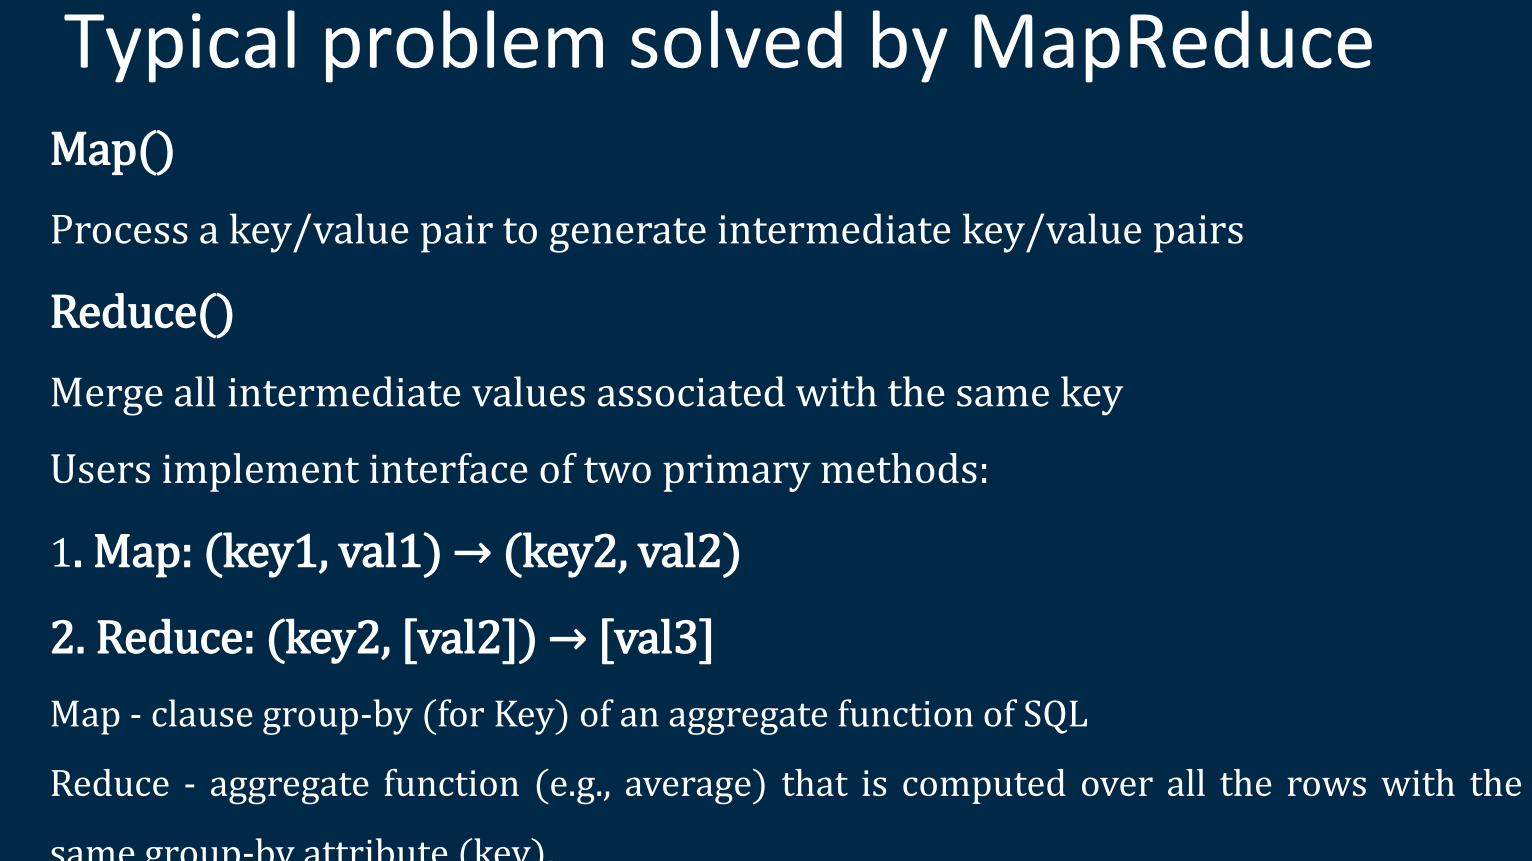
Typical problem solved by MapReduce Map()
Process a key/value pair to generate intermediate key/value pairs
Reduce()
Merge all intermediate values associated with the same key
Users implement interface of two primary methods:
1. Map: (key1, val1) → (key2, val2)
2. Reduce: (key2, [val2]) → [val3]
Map - clause group-by (for Key) of an aggregate function of SQL
Reduce - aggregate function (e.g., average) that is computed over all the rows with the
same group-by attribute (key).
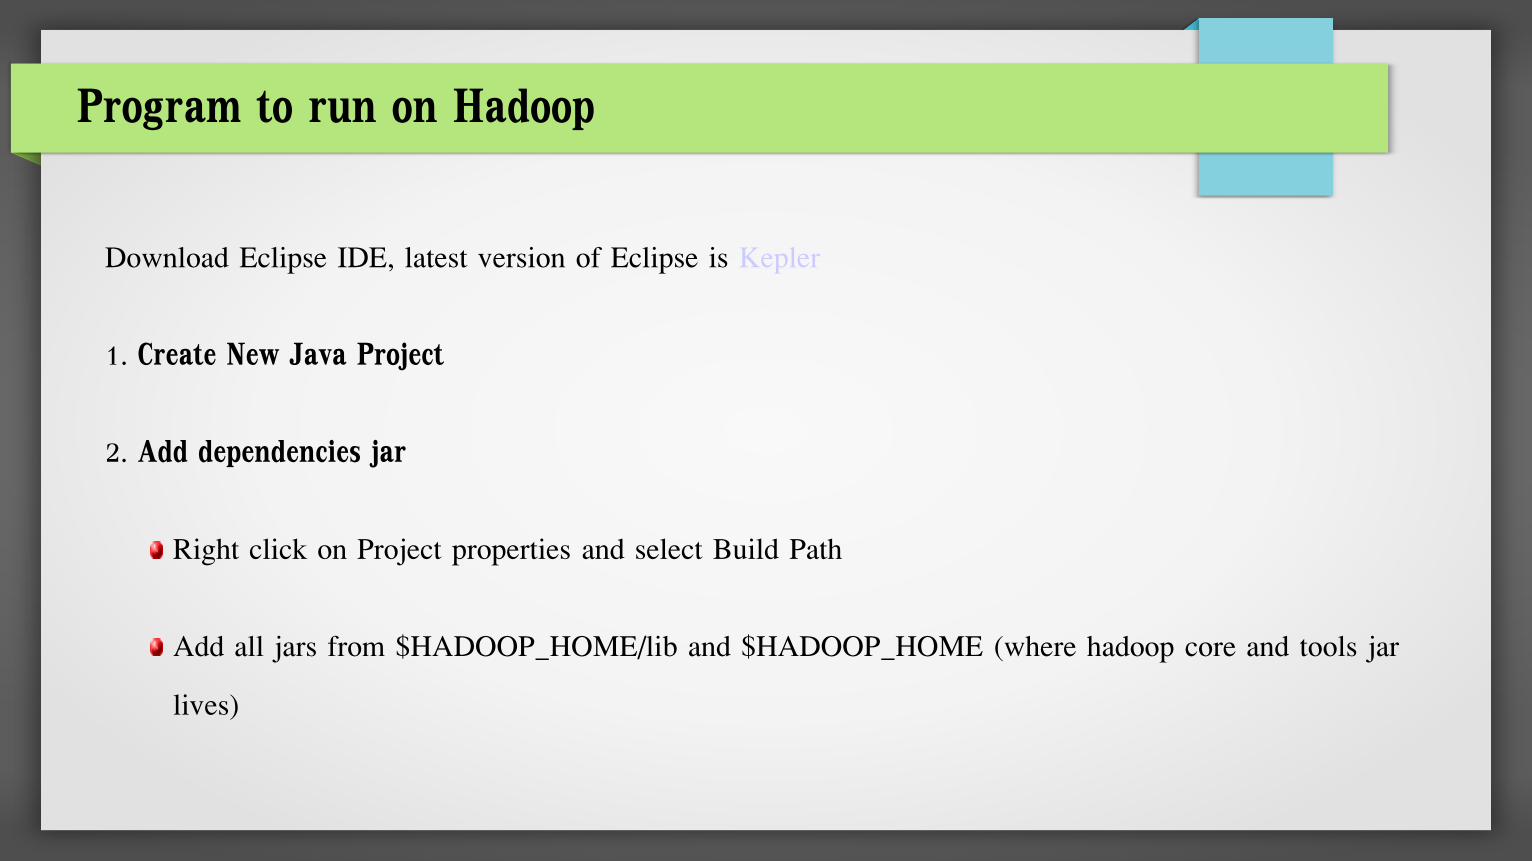
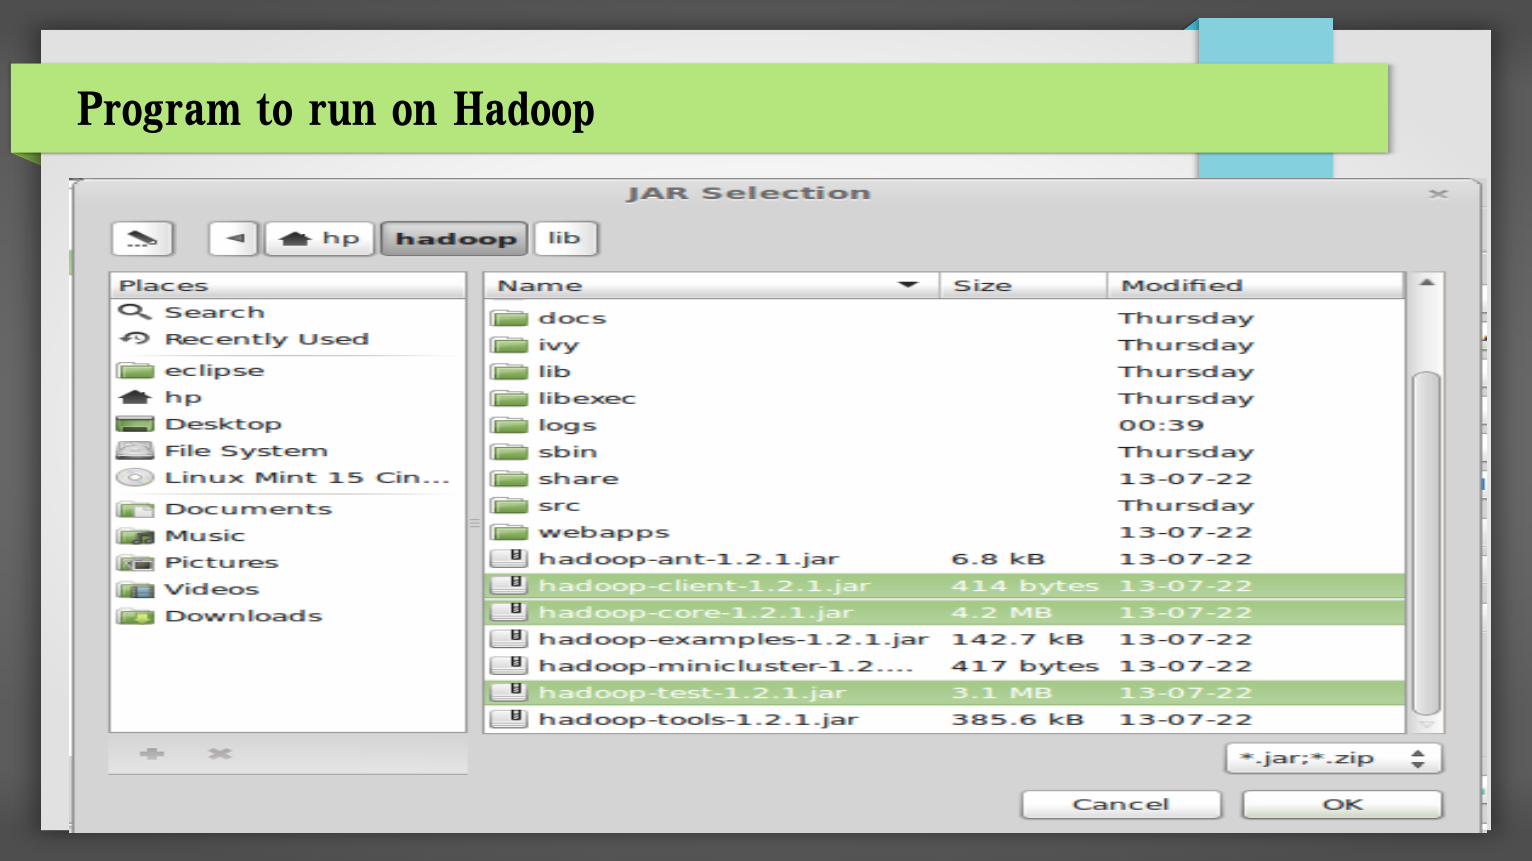
Program to run on Hadoop
Download Eclipse IDE, latest version of Eclipse is Kepler
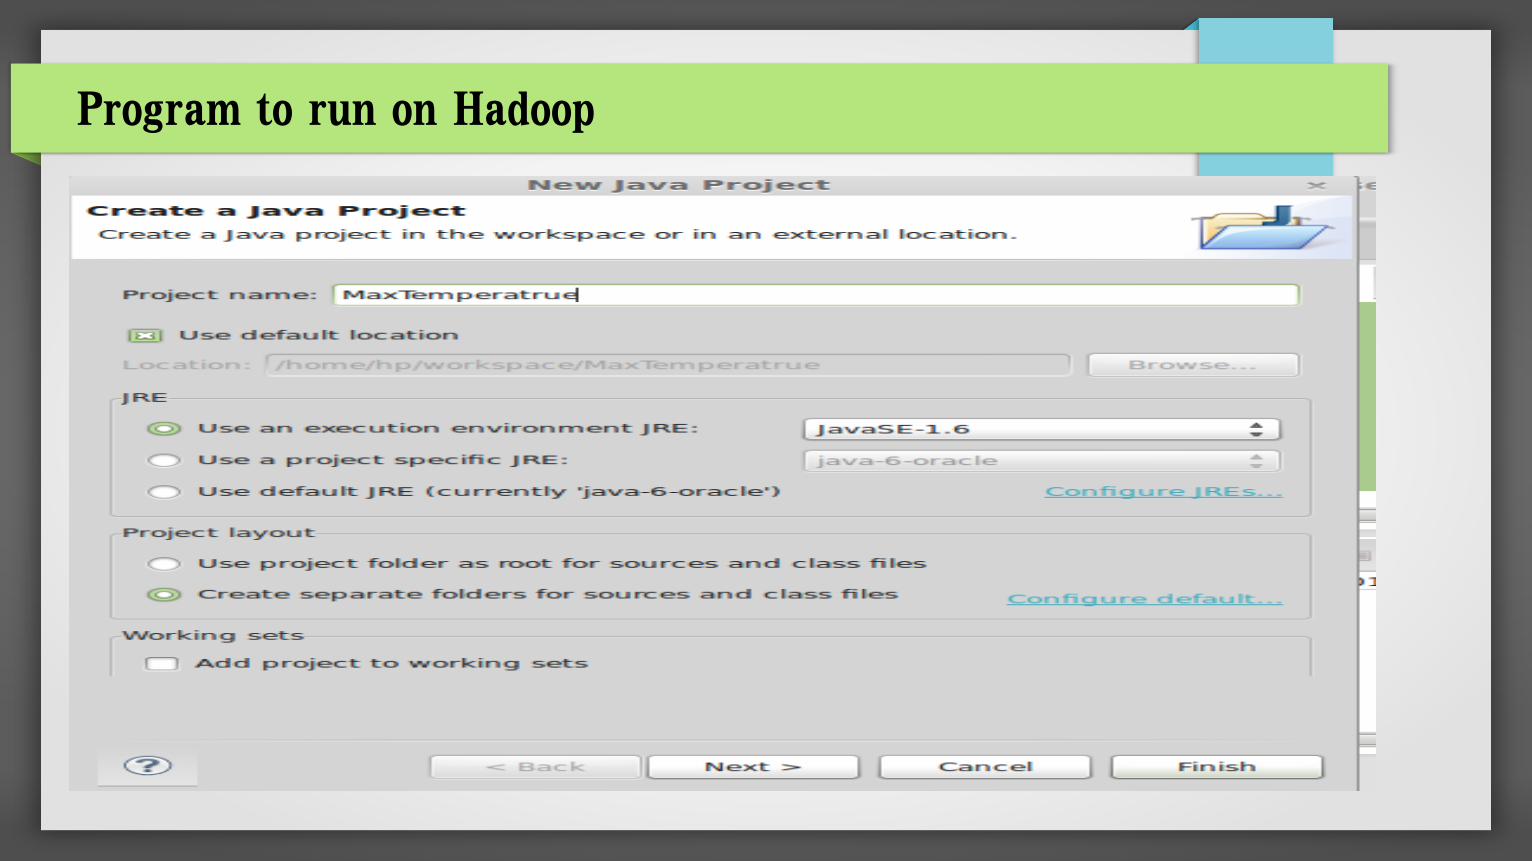
1. Create New Java Project
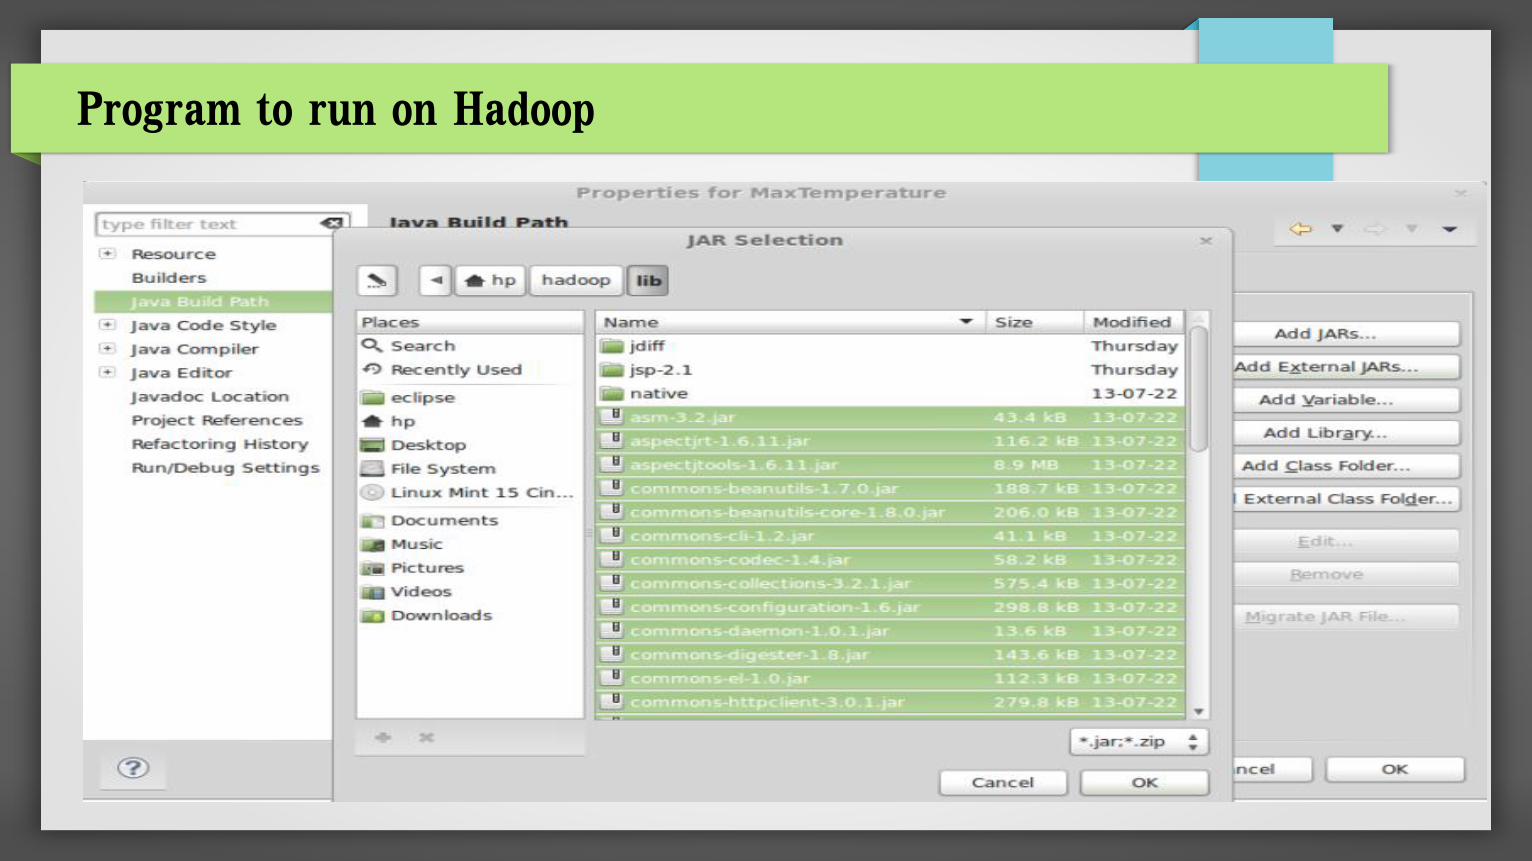
2. Add dependencies jar
Right click on Project properties and select Build Path
Add all jars from $HADOOP_HOME/lib and $HADOOP_HOME (where hadoop core and tools jar
lives)
Program to run on Hadoop
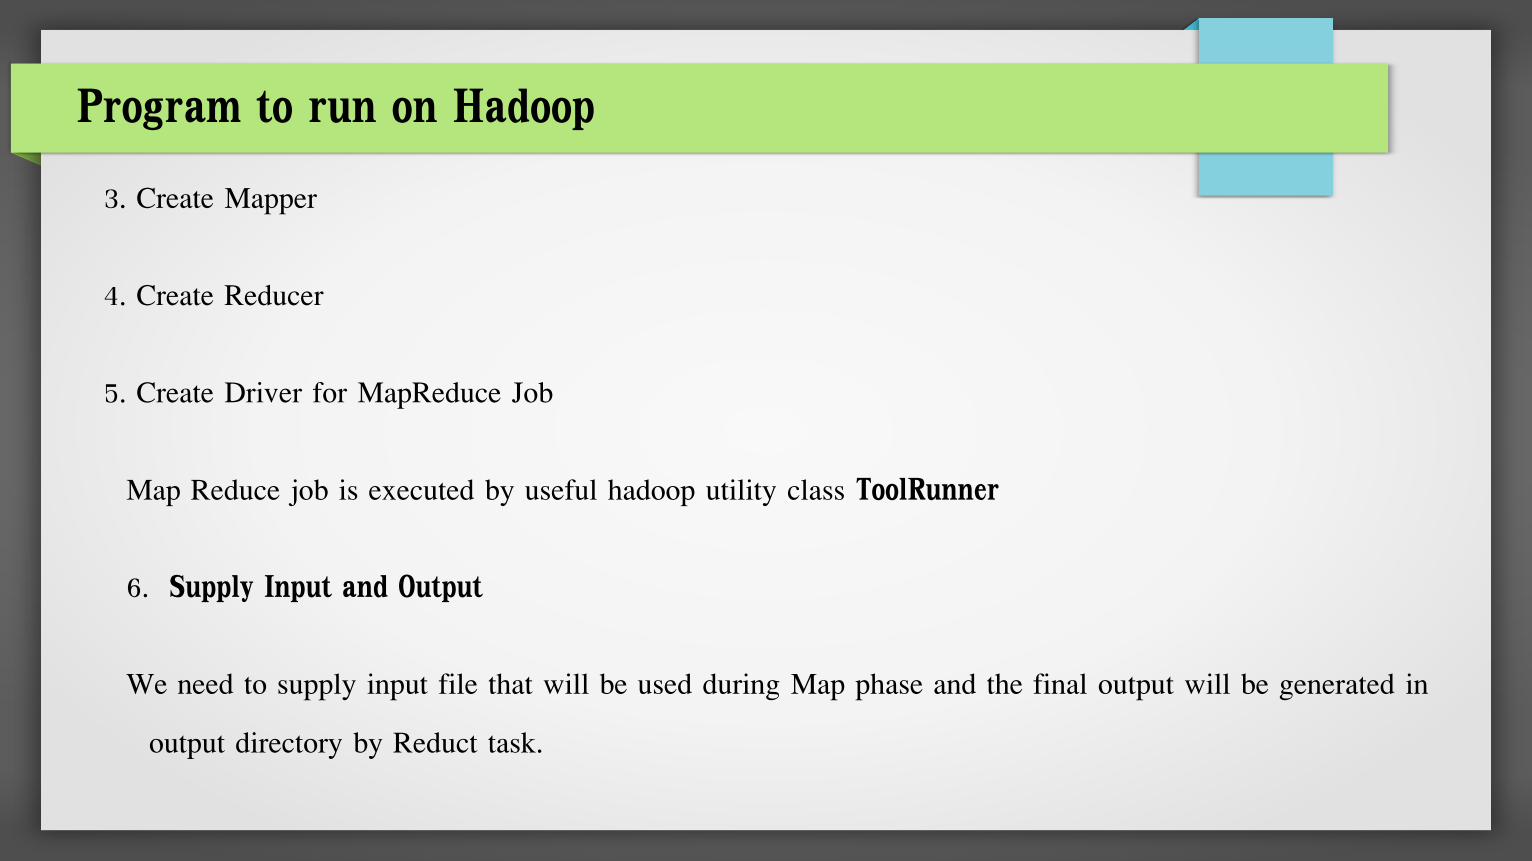
3. Create Mapper
4. Create Reducer
5. Create Driver for MapReduce Job
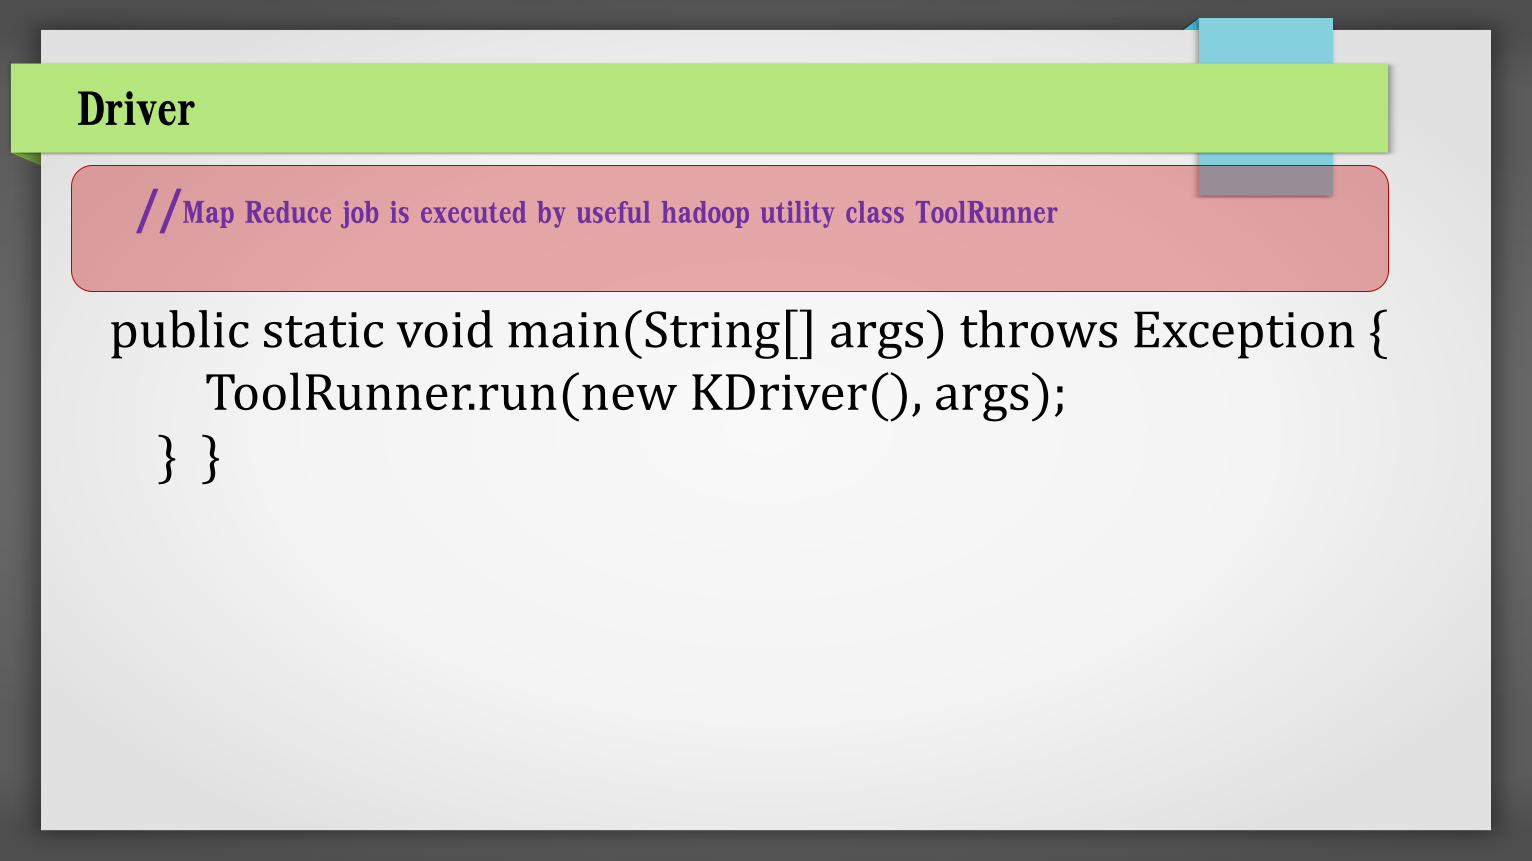
Map Reduce job is executed by useful hadoop utility class ToolRunner
6. Supply Input and Output
We need to supply input file that will be used during Map phase and the final output will be generated in
output directory by Reduct task.
Program to run on Hadoop
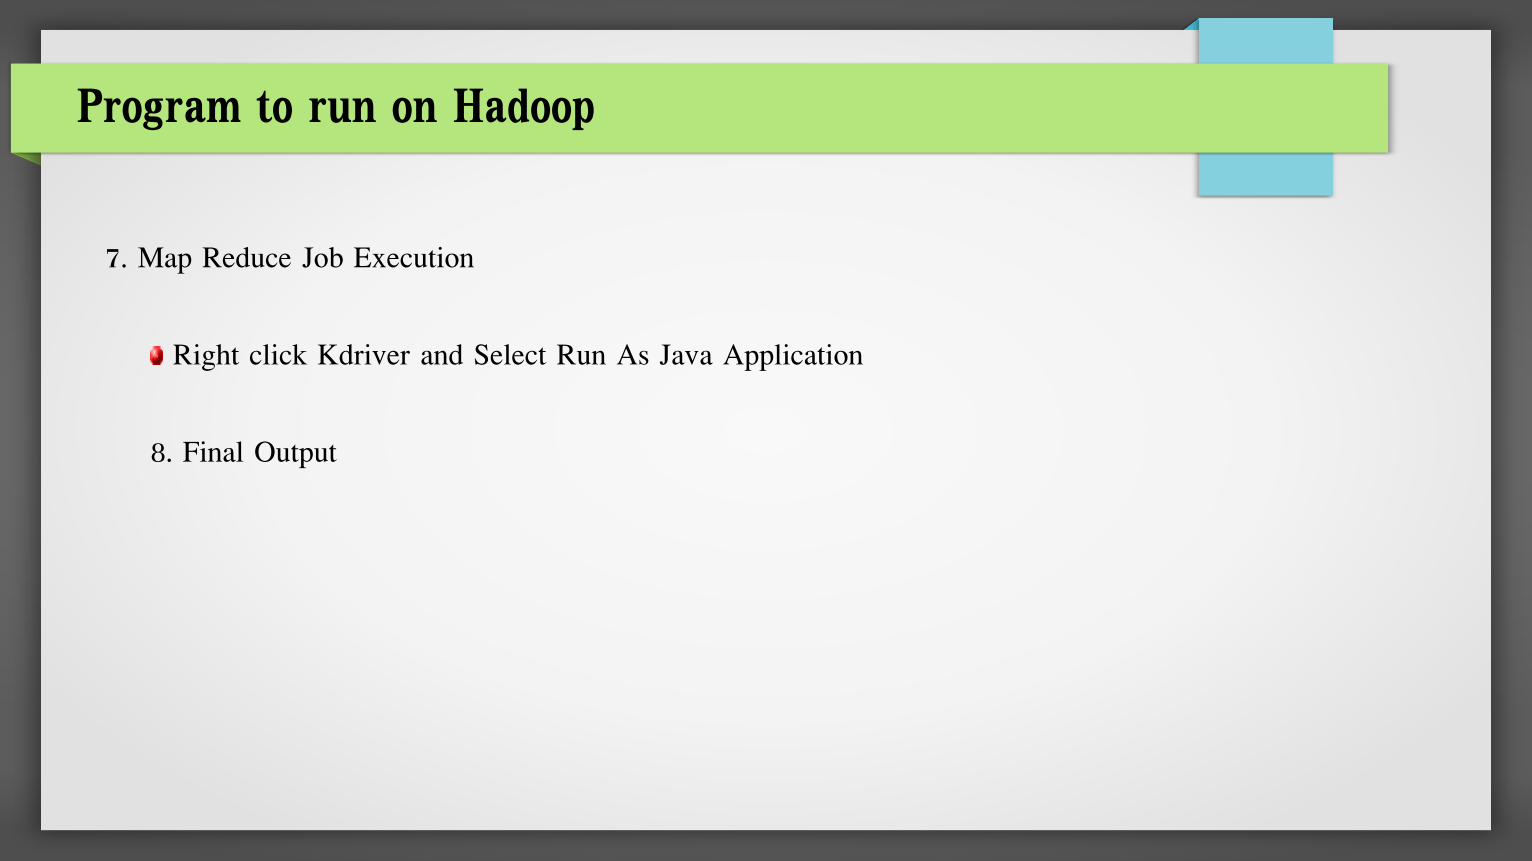
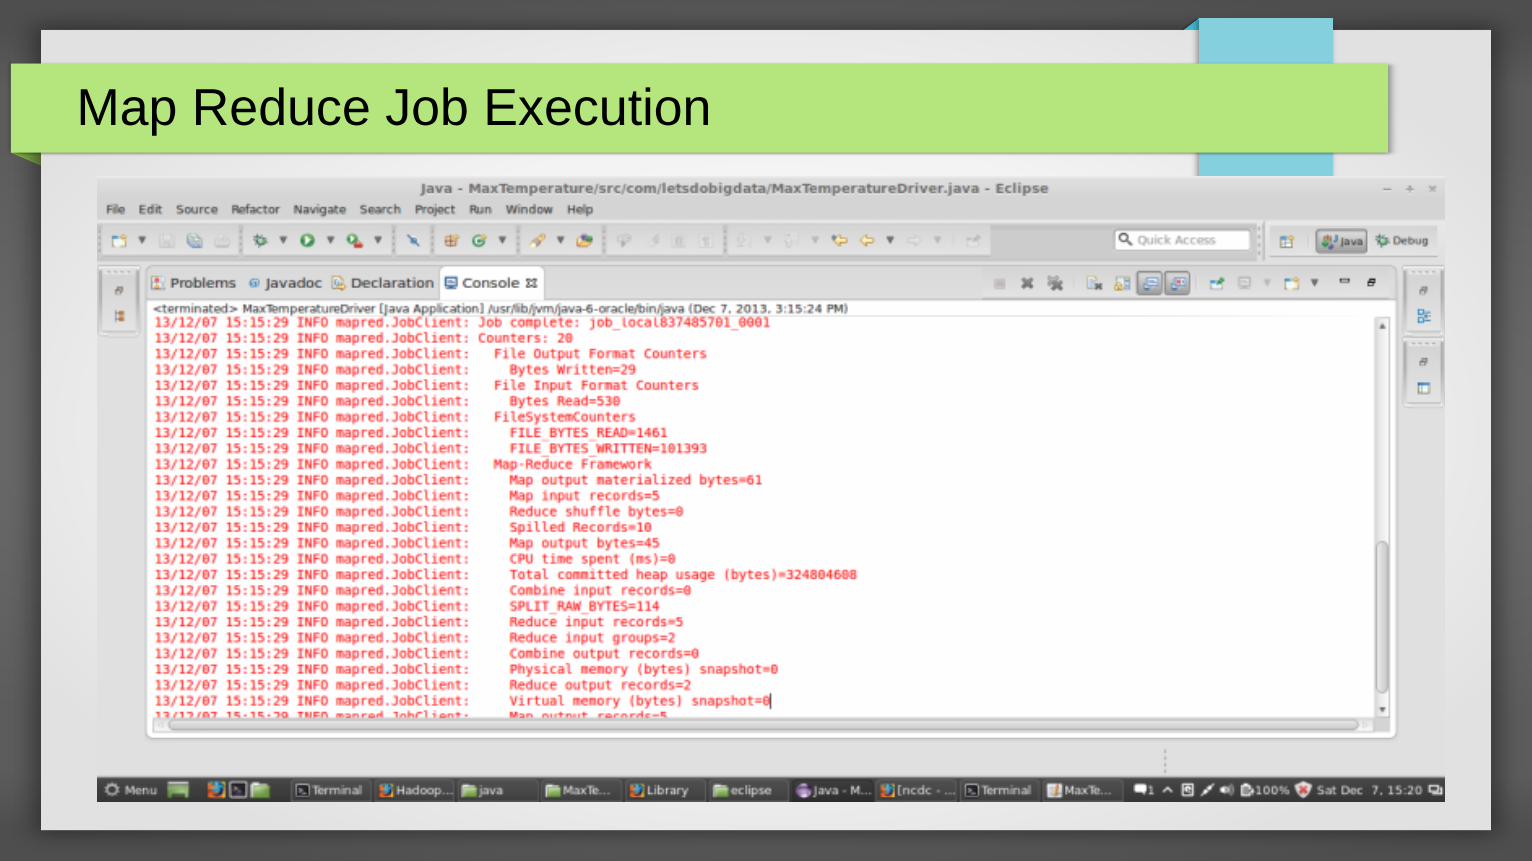
7. Map Reduce Job Execution
Right click Kdriver and Select Run As Java Application
8. Final Output
Program to run on Hadoop
Program to run on Hadoop
Program to run on Hadoop
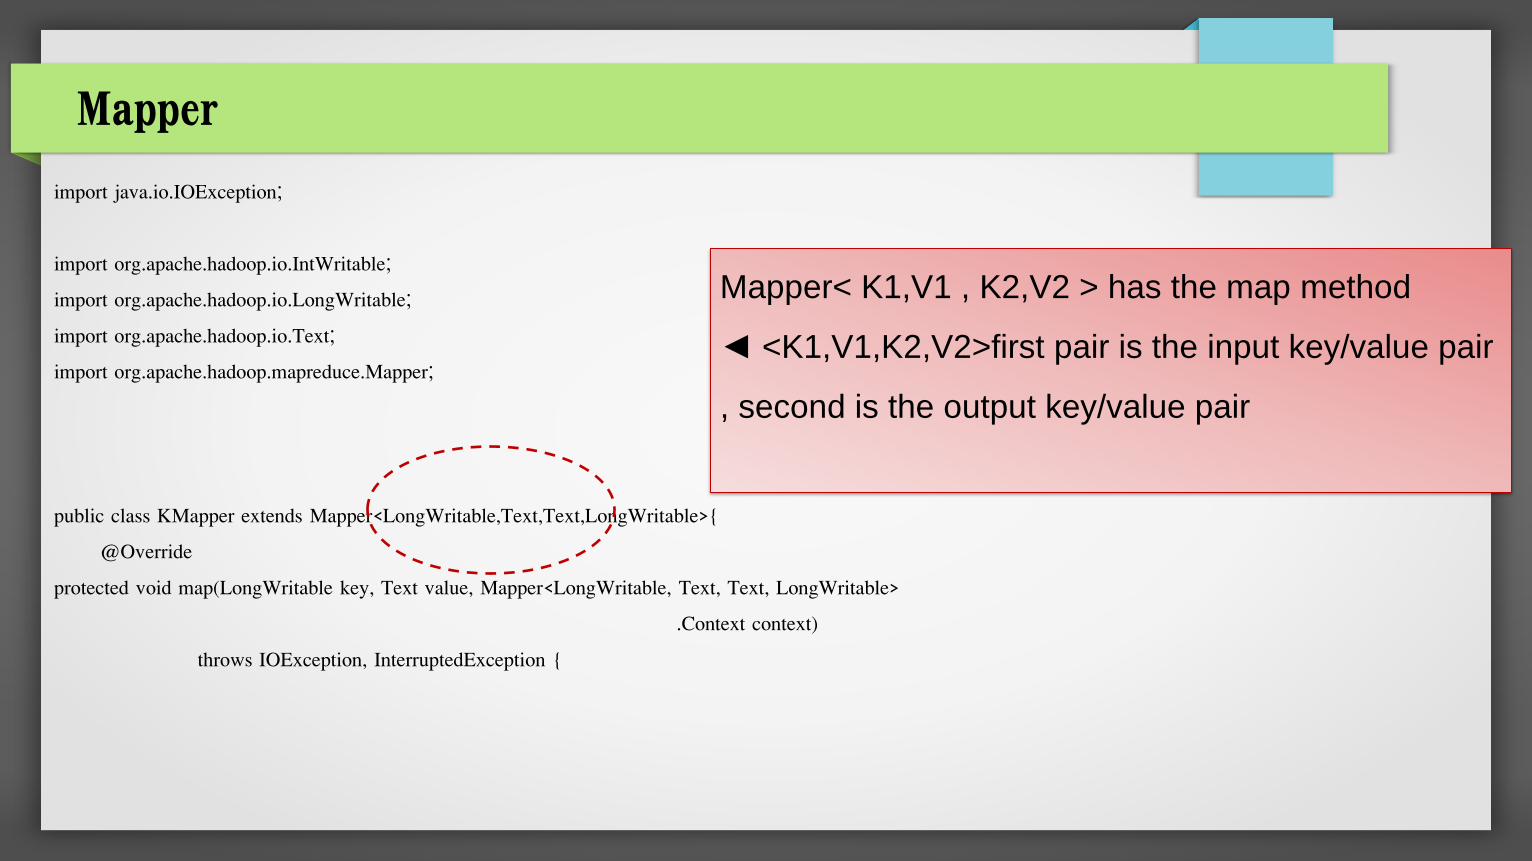
Mapper
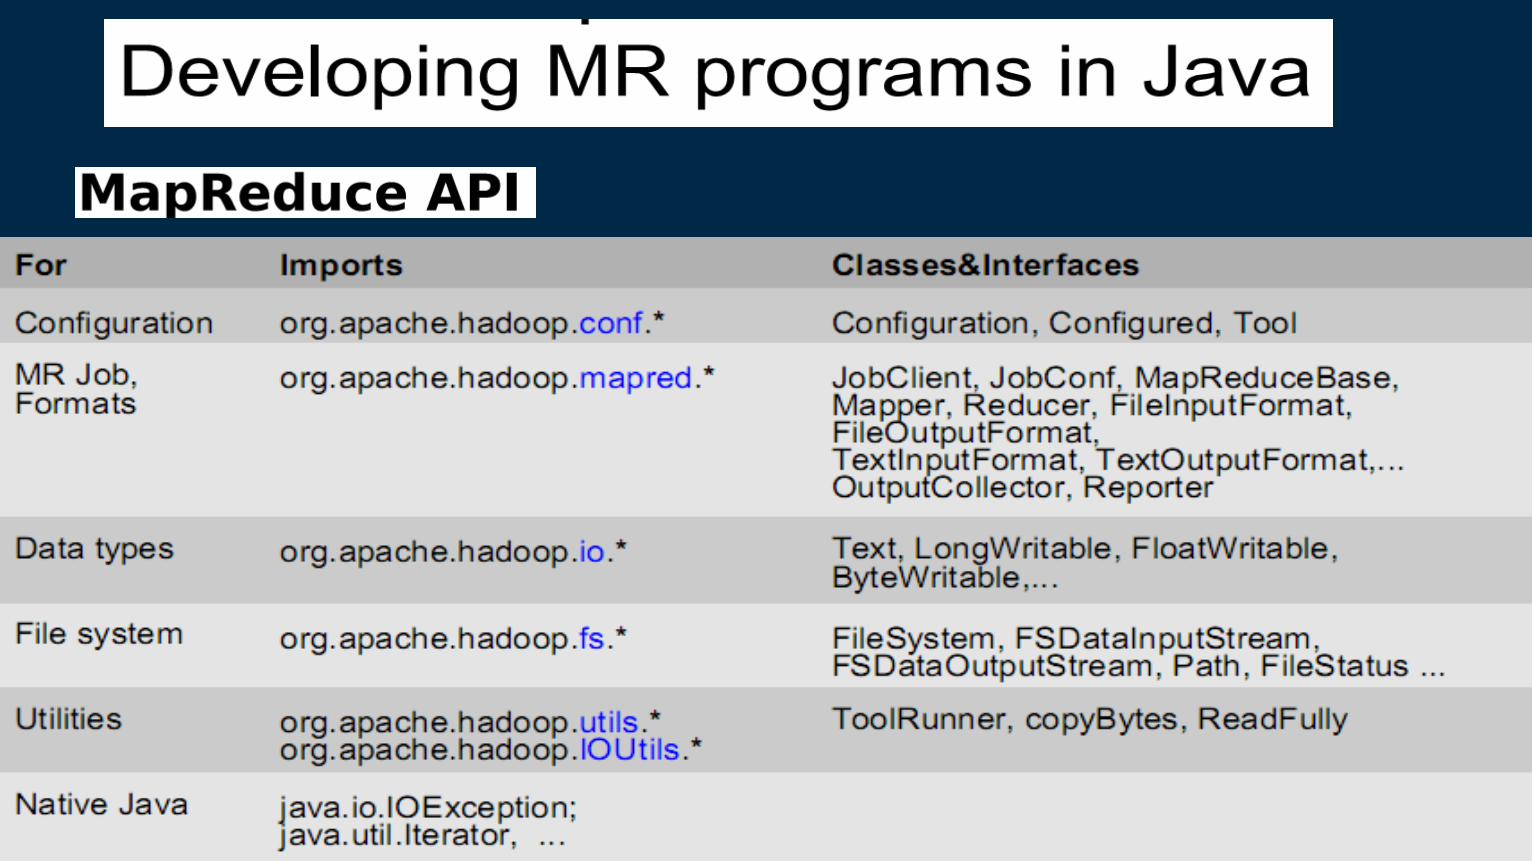
import java.io.IOException;
import org.apache.hadoop.io.IntWritable;
import org.apache.hadoop.io.LongWritable;
import org.apache.hadoop.io.Text;
import org.apache.hadoop.mapreduce.Mapper;
public class KMapper extends Mapper<LongWritable,Text,Text,LongWritable>{
@Override
protected void map(LongWritable key, Text value, Mapper<LongWritable, Text, Text, LongWritable>
.Context context)
throws IOException, InterruptedException {
Mapper< K1,V1 , K2,V2 > has the map method
◄ <K1,V1,K2,V2>first pair is the input key/value pair
, second is the output key/value pair
Mapper
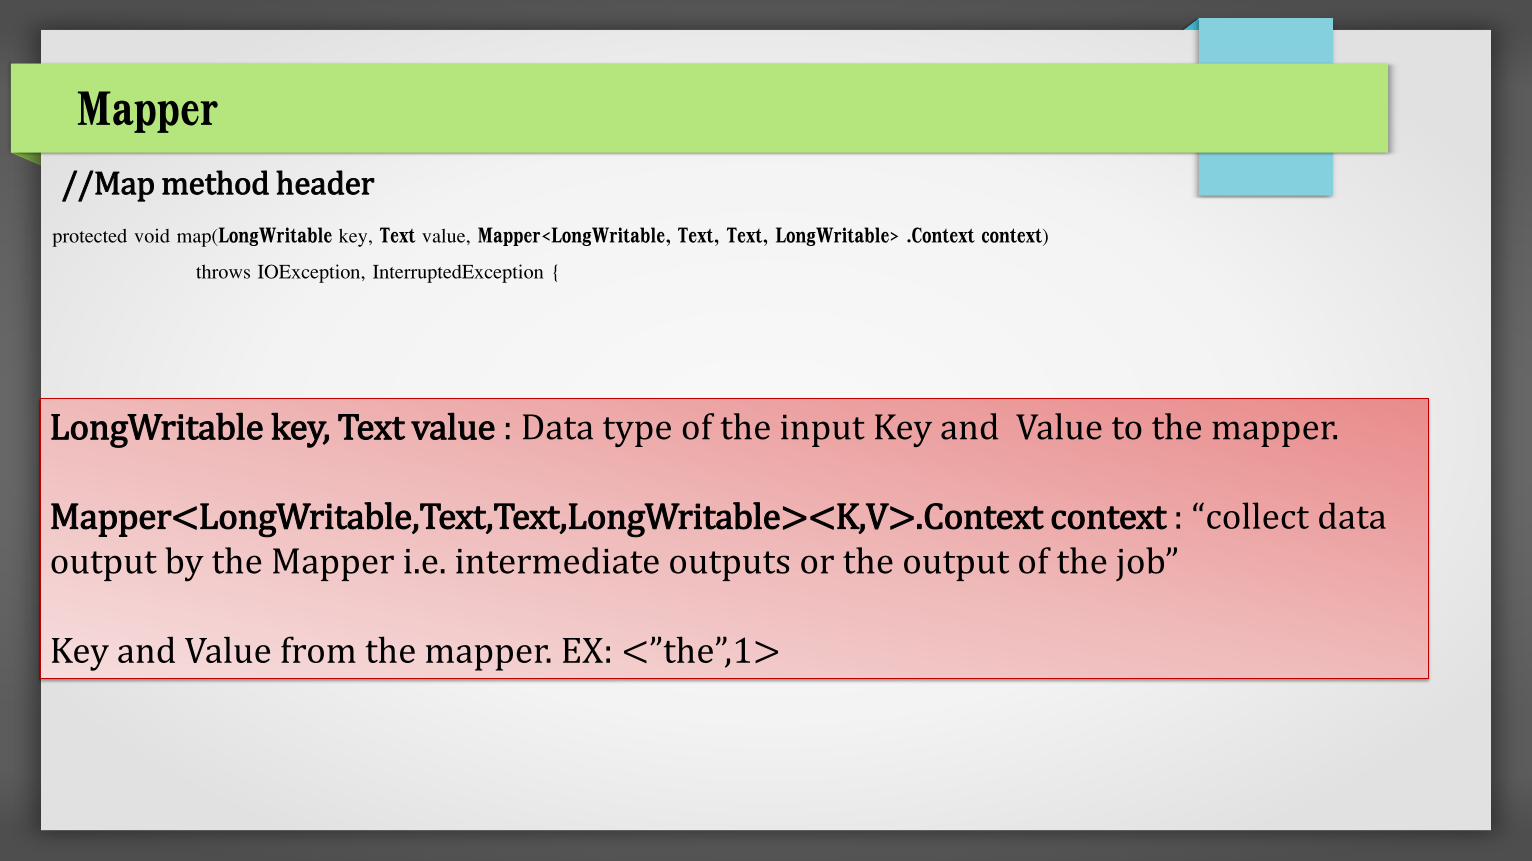
protected void map(LongWritable key, Text value, Mapper<LongWritable, Text, Text, LongWritable> .Context context)
throws IOException, InterruptedException {
LongWritable key, Text value : Data type of the input Key and Value to the mapper. Mapper<LongWritable,Text,Text,LongWritable><K,V>.Context context : “collect data output by the Mapper i.e. intermediate outputs or the output of the job” Key and Value from the mapper. EX: <”the”,1>
//Map method header
Mapper
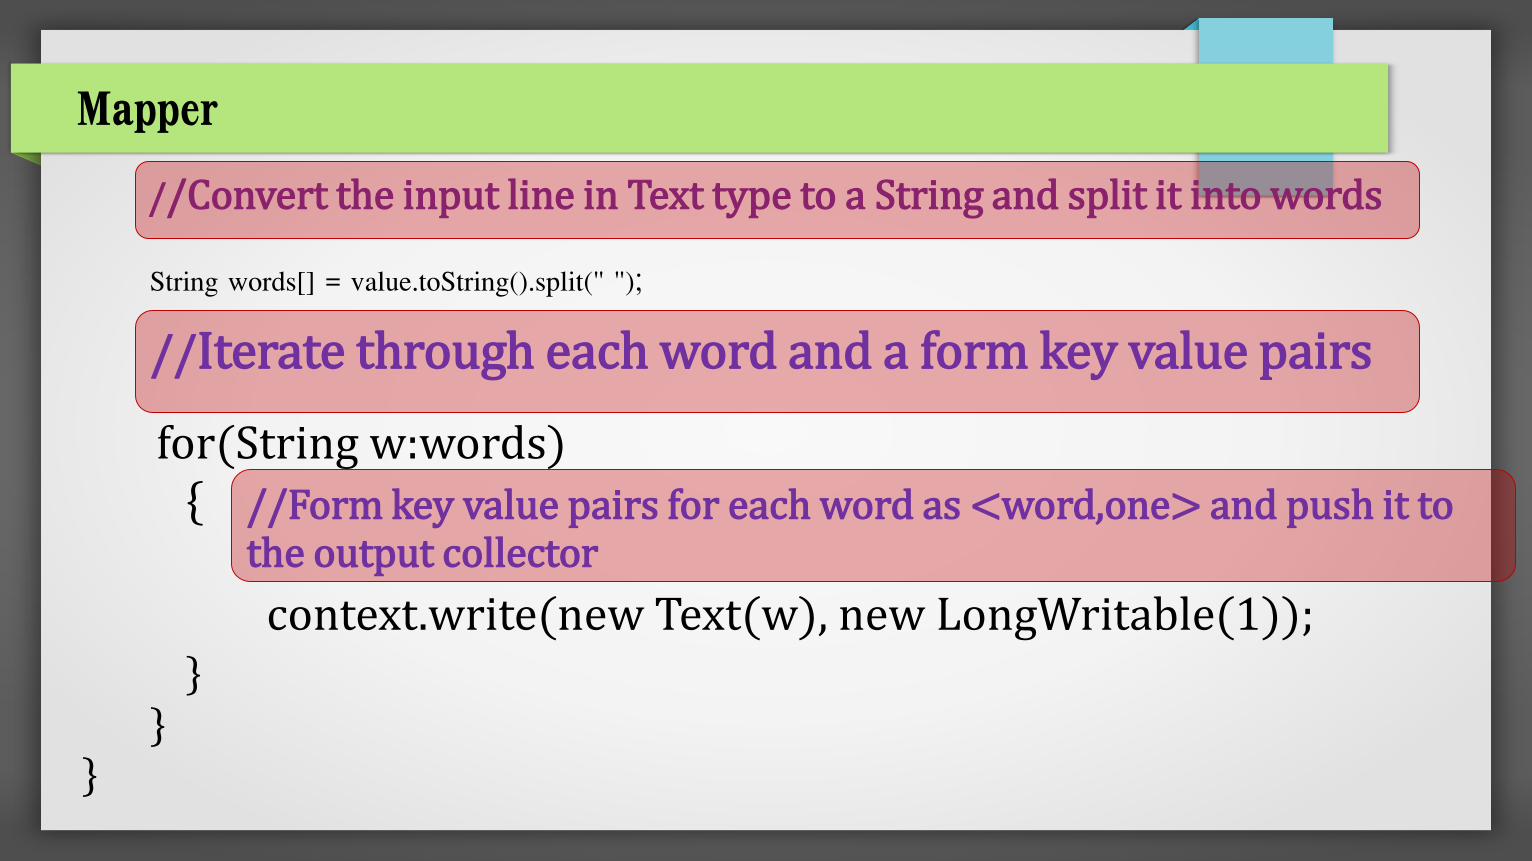
//Convert the input line in Text type to a String and split it into words
String words[] = value.toString().split(" ");
for(String w:words) { context.write(new Text(w), new LongWritable(1)); } } }
//Iterate through each word and a form key value pairs
//Form key value pairs for each word as <word,one> and push it to the output collector
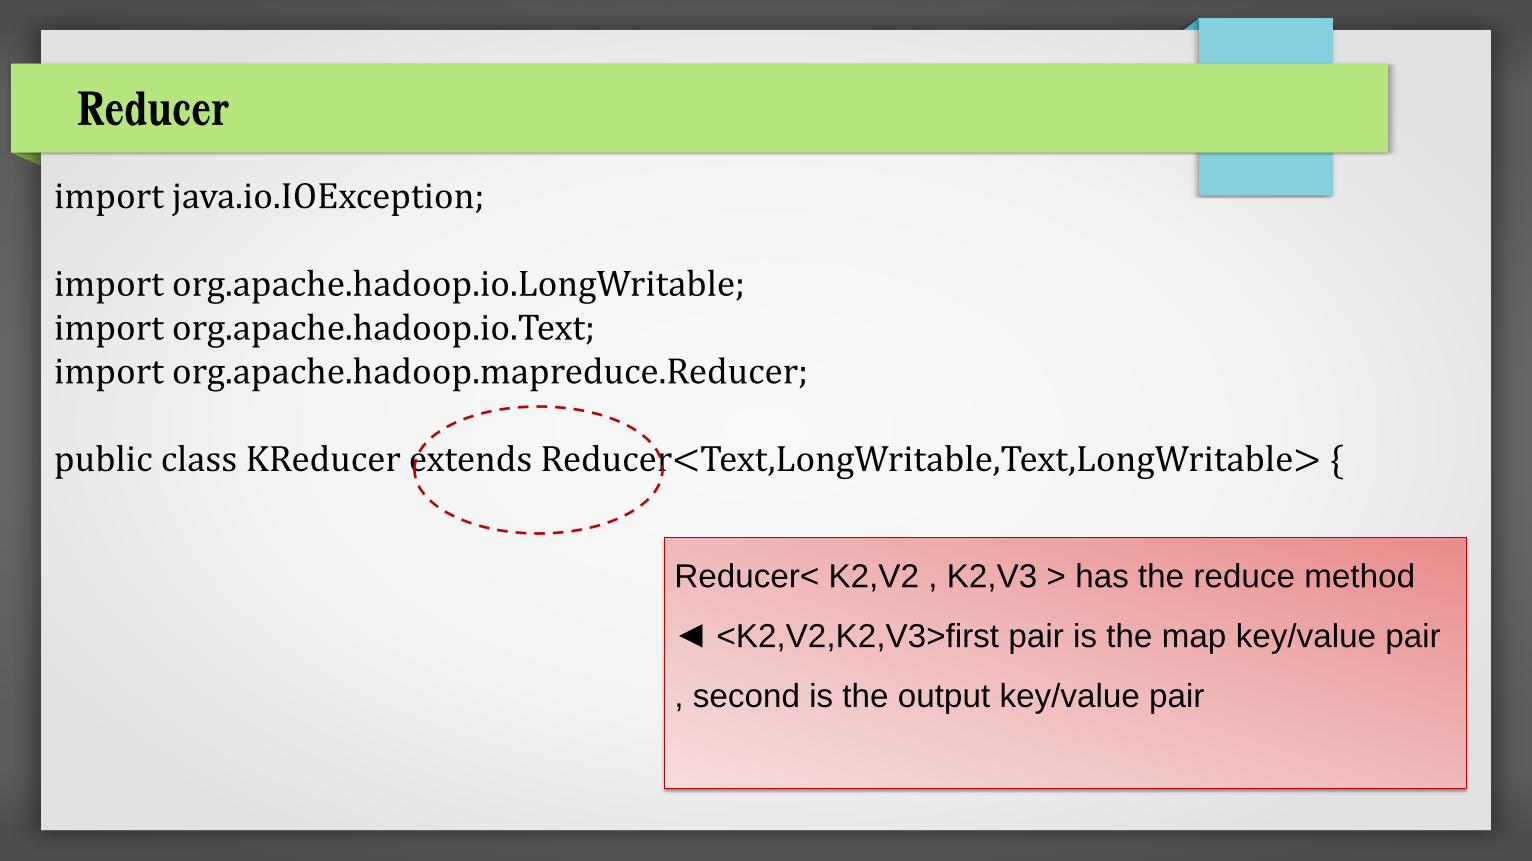
Reducer
import java.io.IOException; import org.apache.hadoop.io.LongWritable; import org.apache.hadoop.io.Text; import org.apache.hadoop.mapreduce.Reducer; public class KReducer extends Reducer<Text,LongWritable,Text,LongWritable> {
Reducer< K2,V2 , K2,V3 > has the reduce method
◄ <K2,V2,K2,V3>first pair is the map key/value pair
, second is the output key/value pair
Reducer
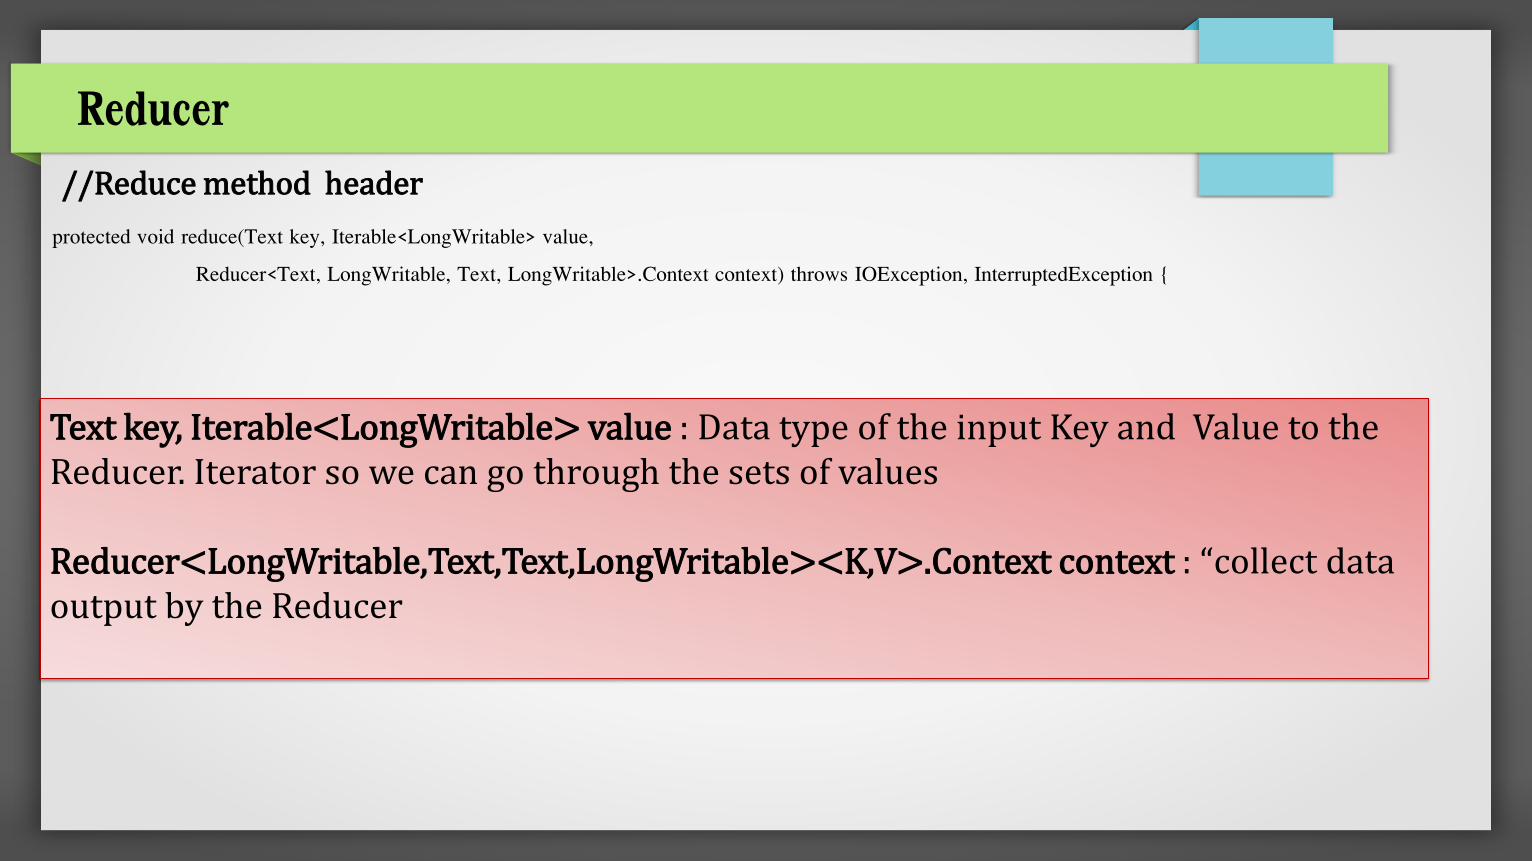
protected void reduce(Text key, Iterable<LongWritable> value,
Reducer<Text, LongWritable, Text, LongWritable>.Context context) throws IOException, InterruptedException {
Text key, Iterable<LongWritable> value : Data type of the input Key and Value to the Reducer. Iterator so we can go through the sets of values Reducer<LongWritable,Text,Text,LongWritable><K,V>.Context context : “collect data output by the Reducer
//Reduce method header
Reducer
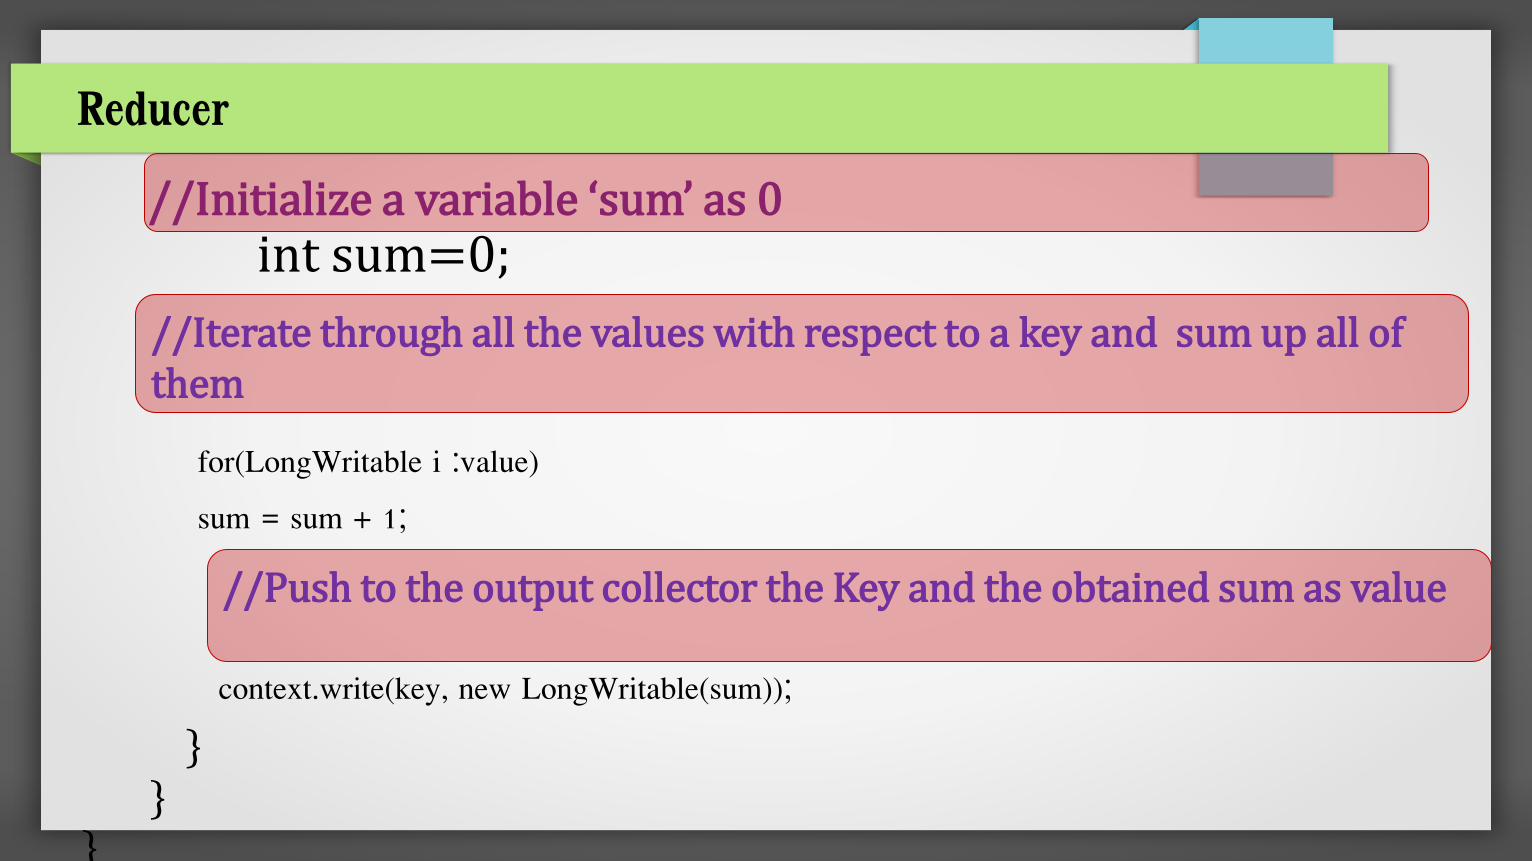
//Initialize a variable ‘sum’ as 0
int sum=0;
for(LongWritable i :value)
sum = sum + 1;
context.write(key, new LongWritable(sum));
} } }
//Iterate through all the values with respect to a key and sum up all of them
//Push to the output collector the Key and the obtained sum as value
Driver
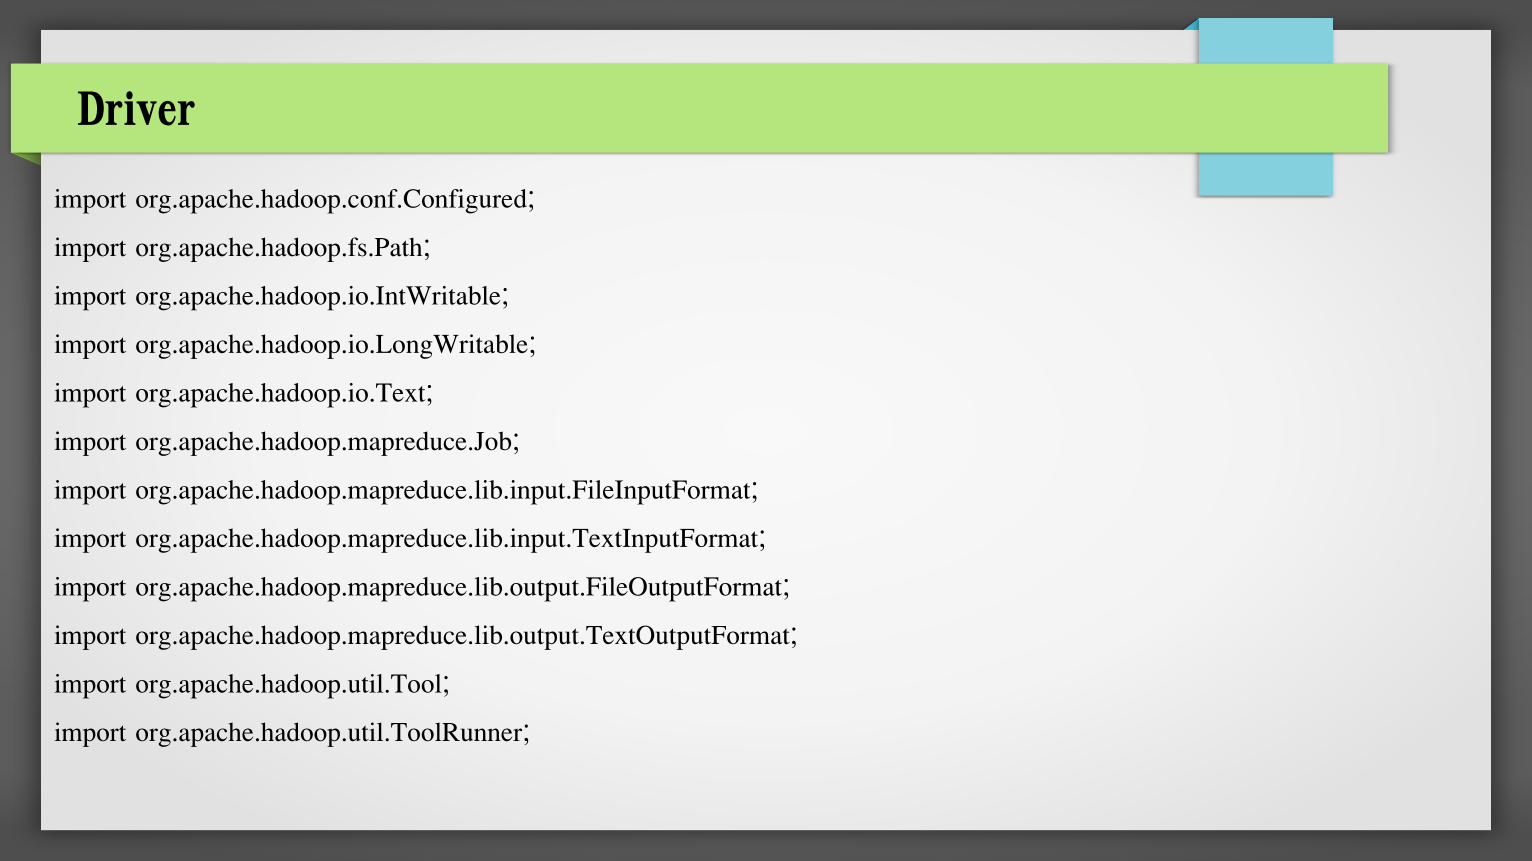
import org.apache.hadoop.conf.Configured;
import org.apache.hadoop.fs.Path;
import org.apache.hadoop.io.IntWritable;
import org.apache.hadoop.io.LongWritable;
import org.apache.hadoop.io.Text;
import org.apache.hadoop.mapreduce.Job;
import org.apache.hadoop.mapreduce.lib.input.FileInputFormat;
import org.apache.hadoop.mapreduce.lib.input.TextInputFormat;
import org.apache.hadoop.mapreduce.lib.output.FileOutputFormat;
import org.apache.hadoop.mapreduce.lib.output.TextOutputFormat;
import org.apache.hadoop.util.Tool;
import org.apache.hadoop.util.ToolRunner;

Driver
public class KDriver extends Configured implements Tool { @Override public int run(String[] arg0) throws Exception {
Job job= new Job(getConf(),"KMS");
job.setInputFormatClass(TextInputFormat.class);
job.setOutputFormatClass(TextOutputFormat.class);
//creating a JobConf object and assigning a job name for identification purposes
// The default input format, "TextInputFormat," will load data in as (LongWritable, Text) pairs. The long value is the byte offset of the line in the file. // The basic (default) instance is TextOutputFormat, which writes (key, value) //pairs on individual lines of a text file.
Driver
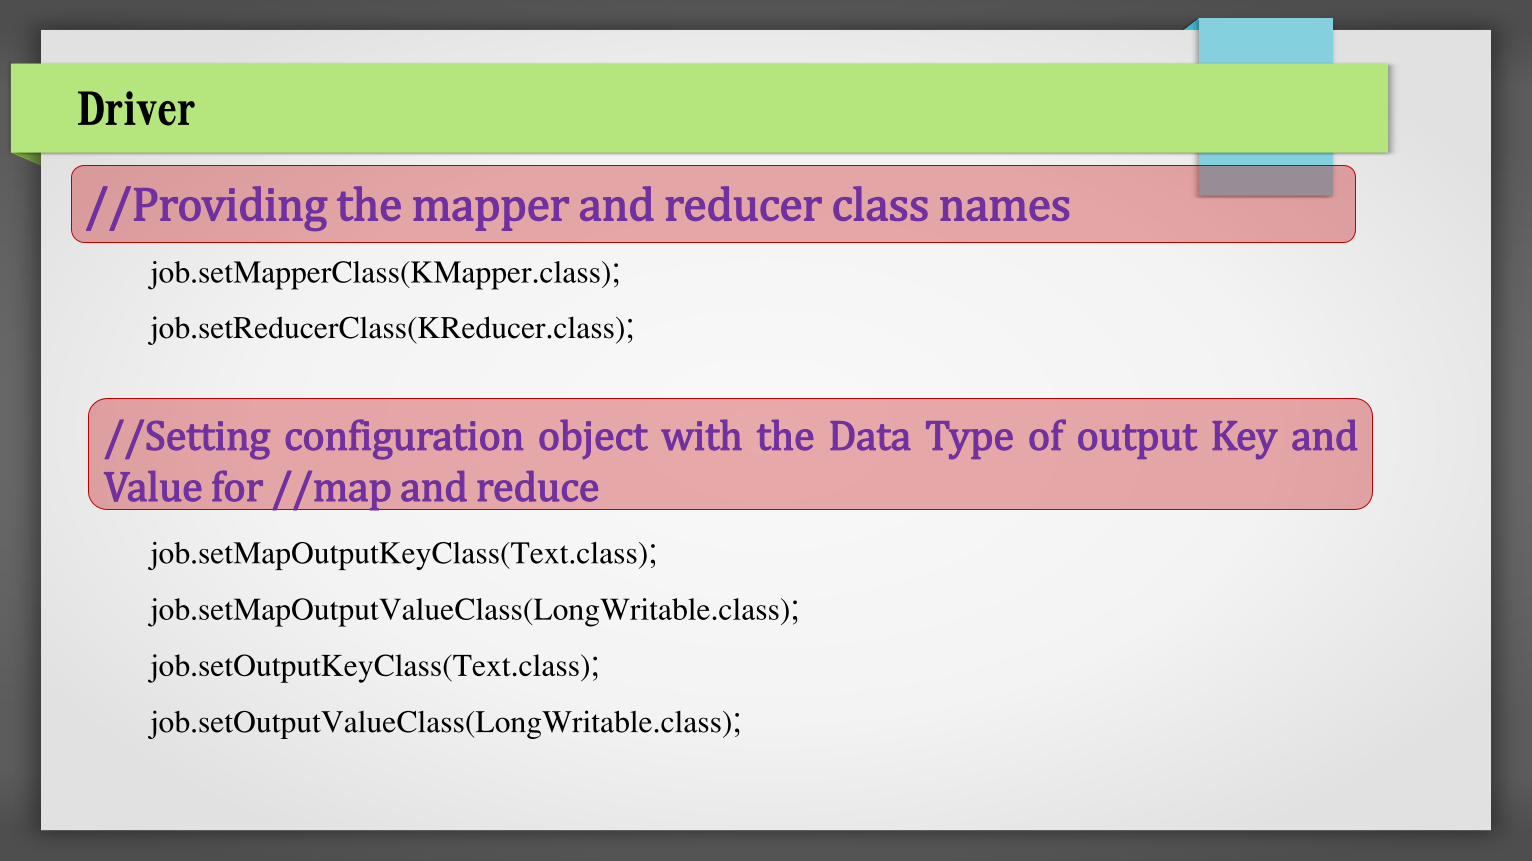
job.setMapperClass(KMapper.class);
job.setReducerClass(KReducer.class);
job.setMapOutputKeyClass(Text.class);
job.setMapOutputValueClass(LongWritable.class);
job.setOutputKeyClass(Text.class);
job.setOutputValueClass(LongWritable.class);
//Providing the mapper and reducer class names
//Setting configuration object with the Data Type of output Key and Value for //map and reduce
Driver
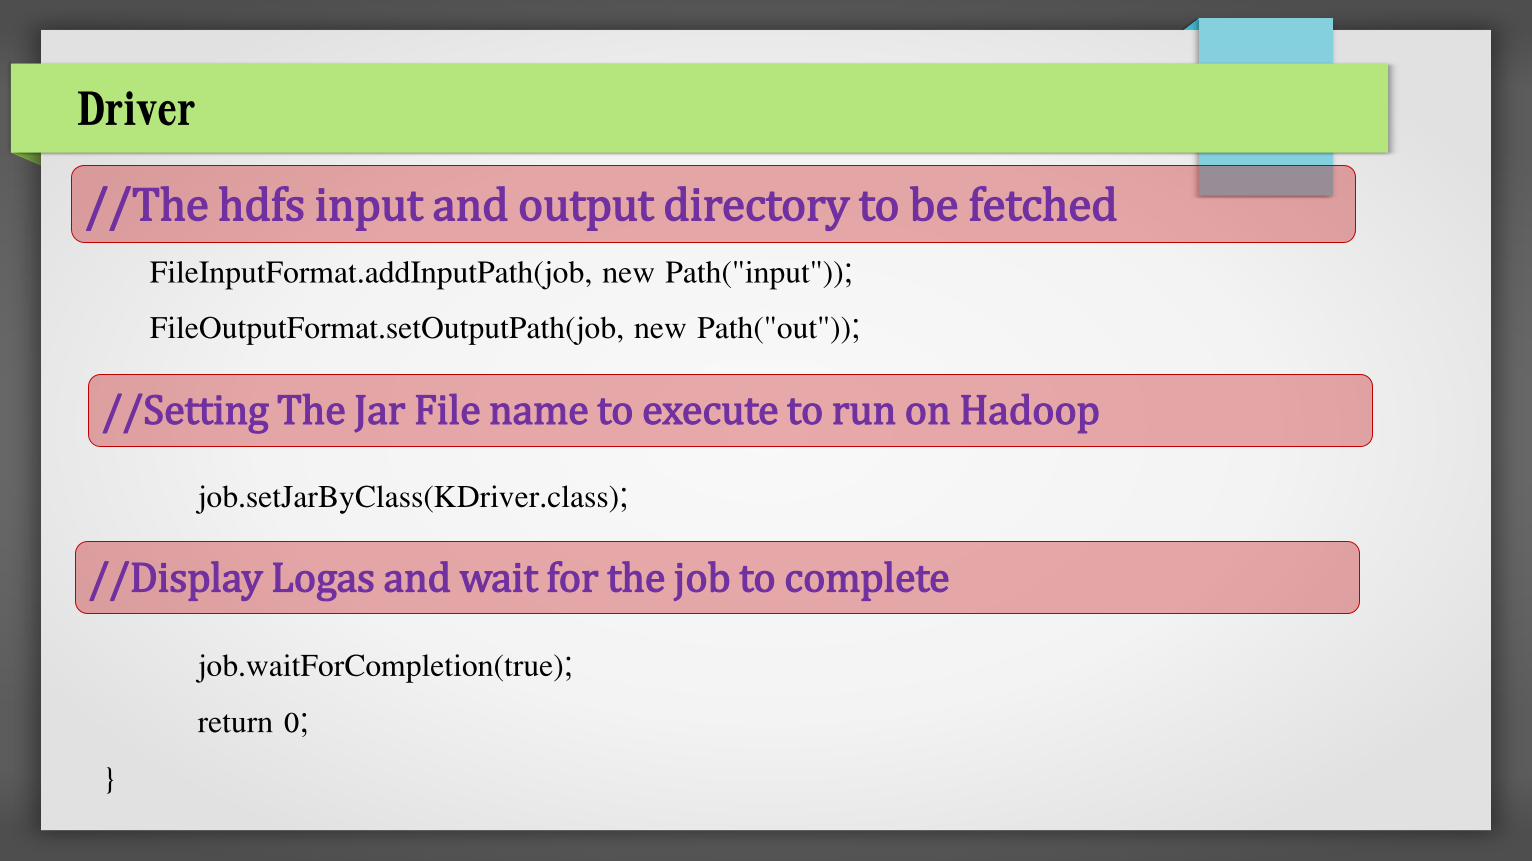
FileInputFormat.addInputPath(job, new Path("input"));
FileOutputFormat.setOutputPath(job, new Path("out"));
job.setJarByClass(KDriver.class);
job.waitForCompletion(true);
return 0;
}
//The hdfs input and output directory to be fetched
//Setting The Jar File name to execute to run on Hadoop
//Display Logas and wait for the job to complete
Driver
//Map Reduce job is executed by useful hadoop utility class ToolRunner
public static void main(String[] args) throws Exception { ToolRunner.run(new KDriver(), args); } }
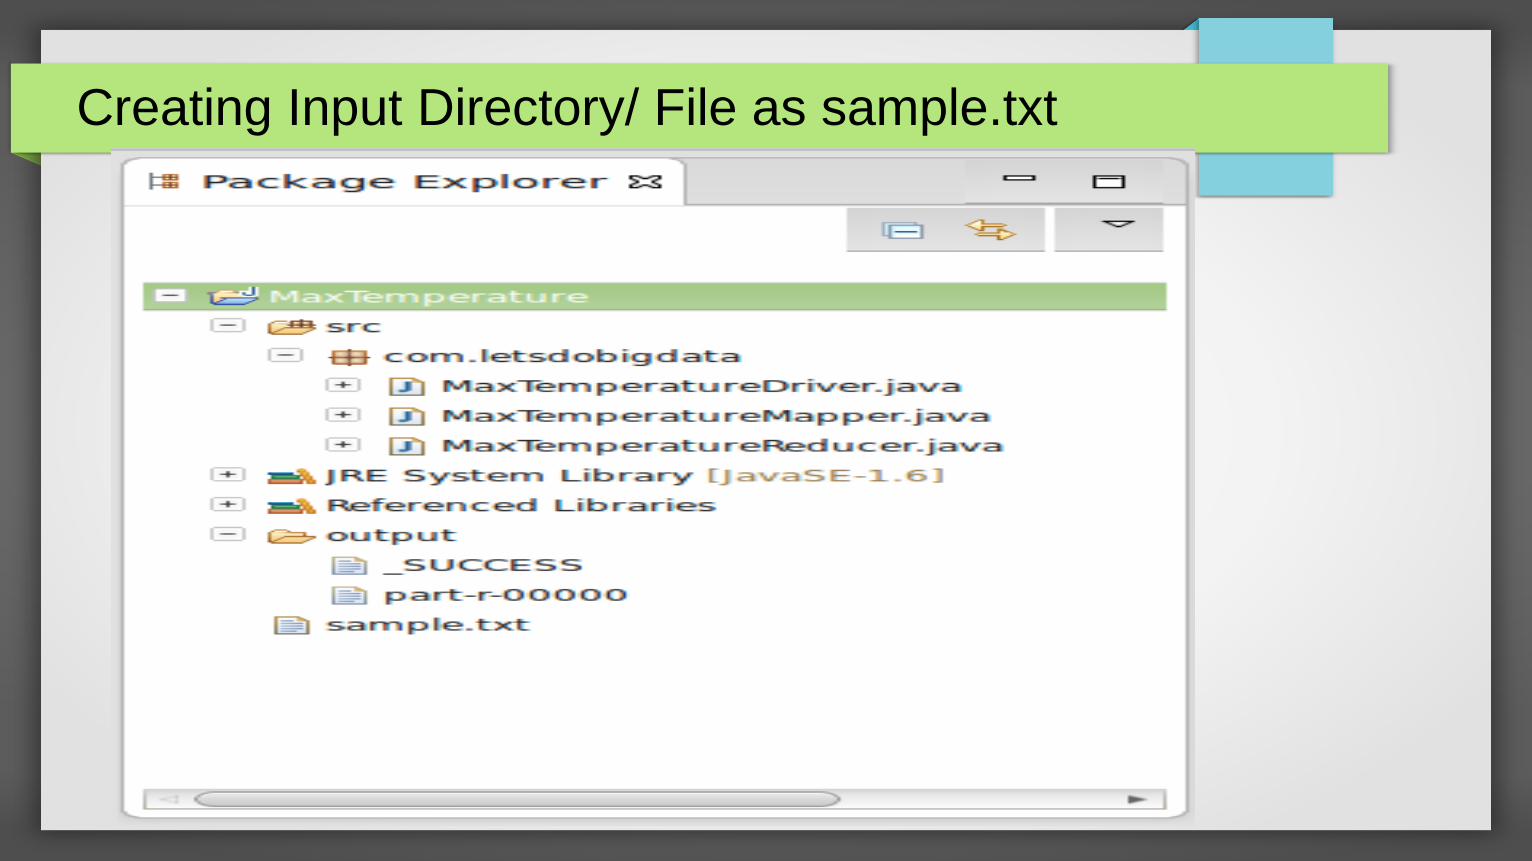
Creating Input Directory/ File as sample.txt
Map Reduce Job Execution
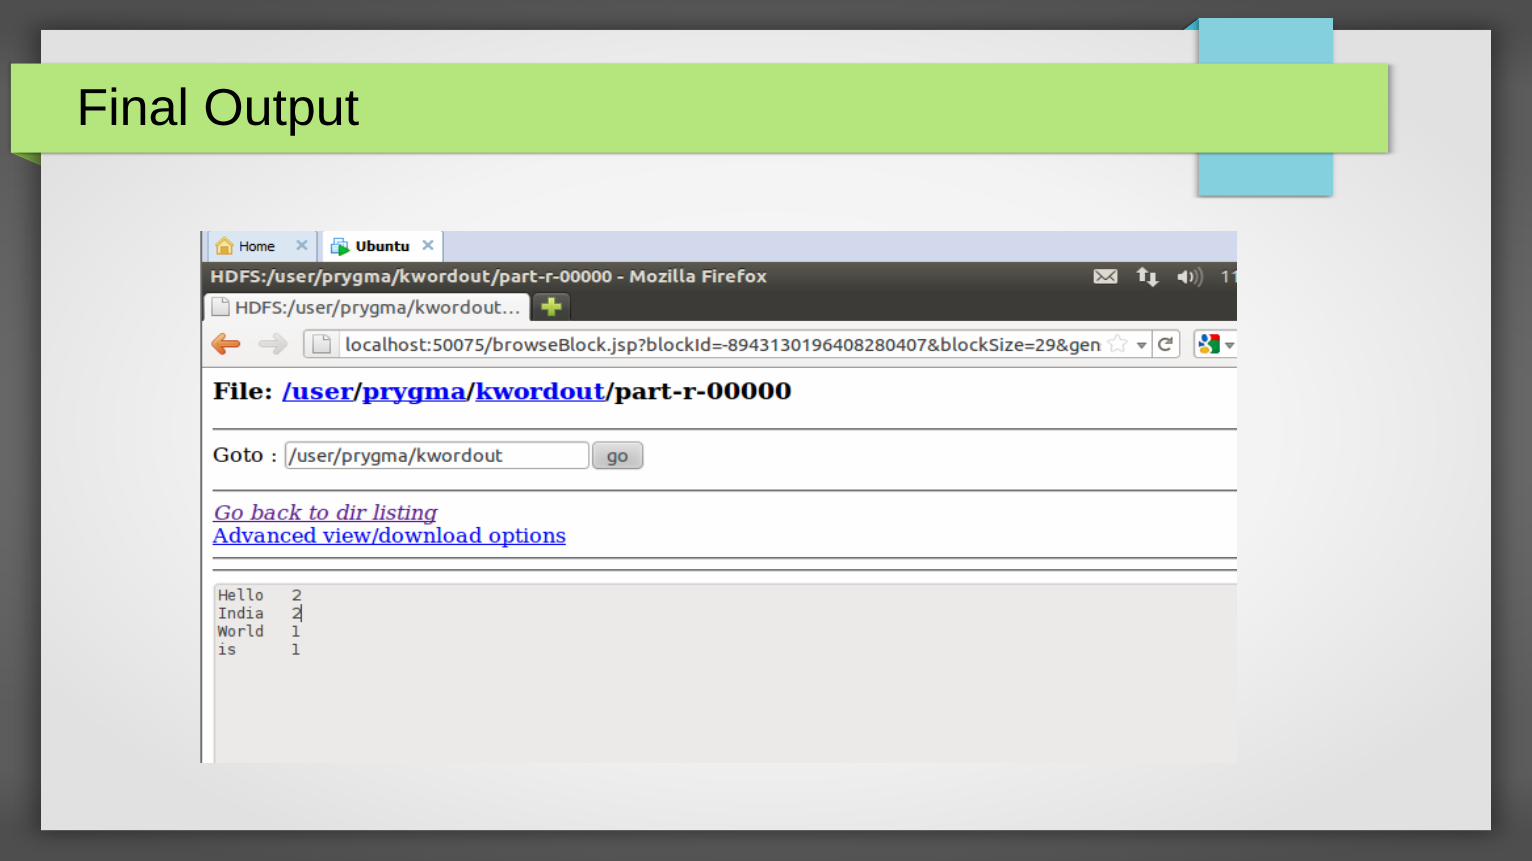
Final Output
Create a text file with some text in Ubuntu system using
>>nano filename
Check if the file is created using >>ls
Copy this file from Ubuntu to Hadoop using >>./hadoop fs –copyFromLocal filename foldername
For this command to run we must be in hadoop/bin as hadoop
command is in bin folder
Goto hadoop folder as it contains wordcount jar file >>cd ..
Execute the wordcount program >>bin/hadoop jar hadoop-examples-1.0.4.jar wordcount foldername ouputfoldername
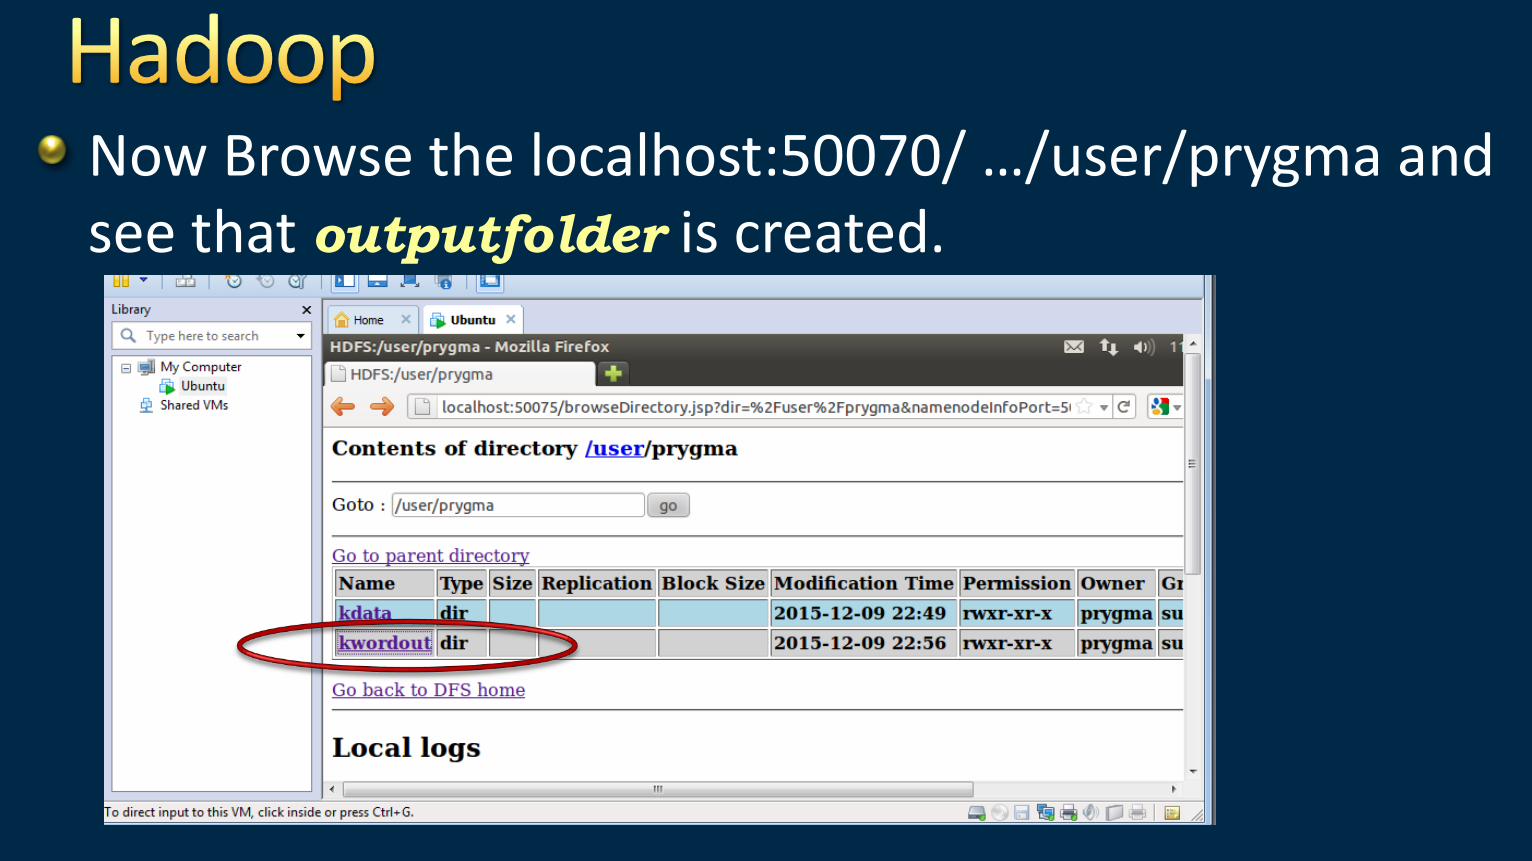
Now Browse the localhost:50070/ …/user/prygma and see that outputfolder is created.
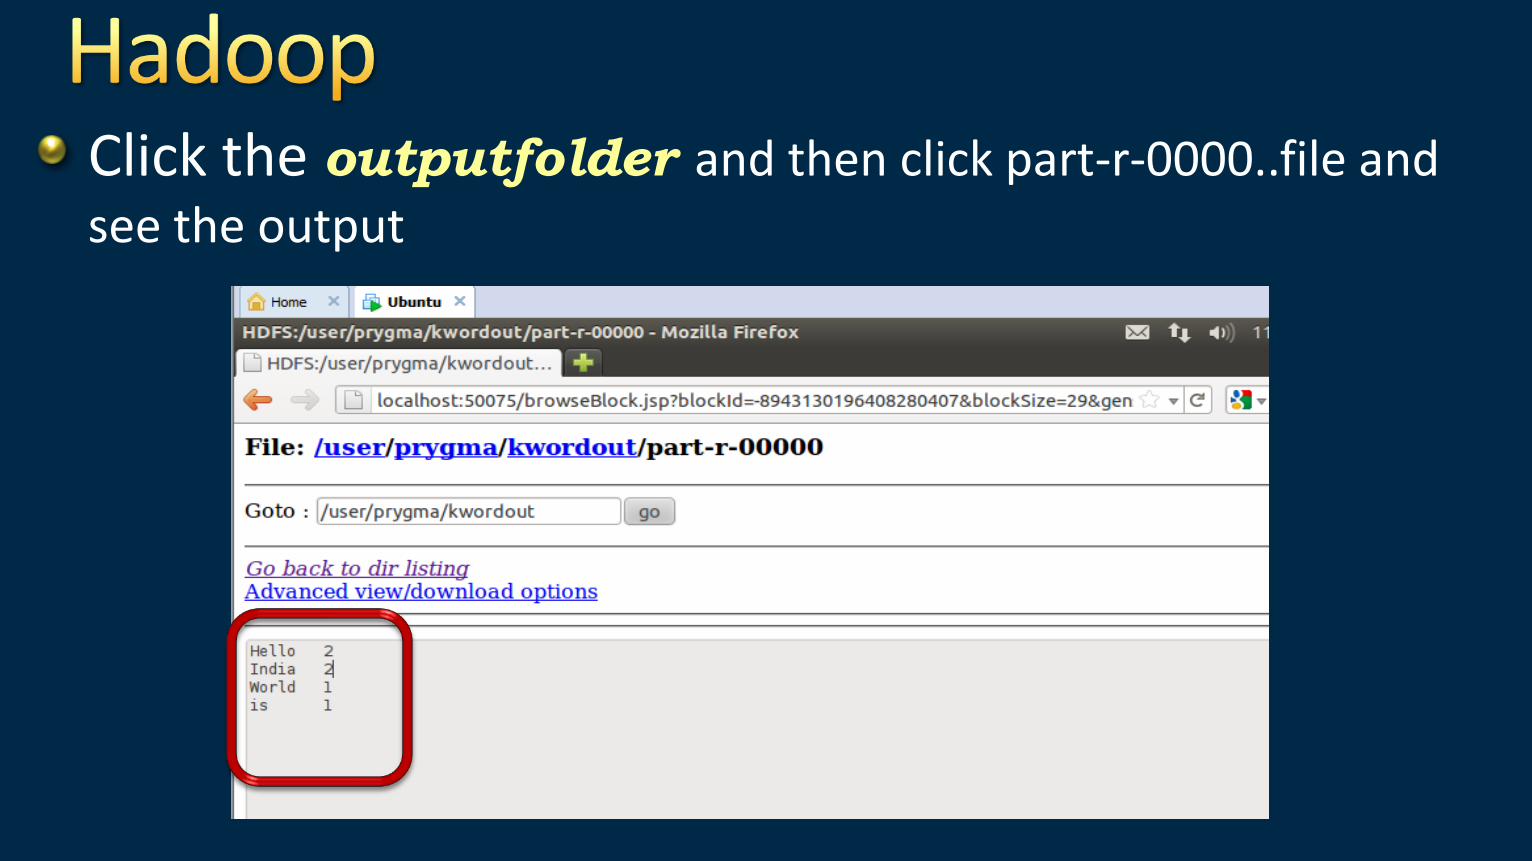
Click the outputfolder and then click part-r-0000..file and
see the output
Now Browse the localhost:50070/ …/user/prygma and see that outputfolder is created.
Click the outputfolder and then click part-r-0000..file and
see the output
Session 4 Installation Hadoop – Fully Distributed Node
- Ms B. A. Khivasara and Ms K. R. Nirmal

Stop Hadoop if it is running
>>stop-all.sh
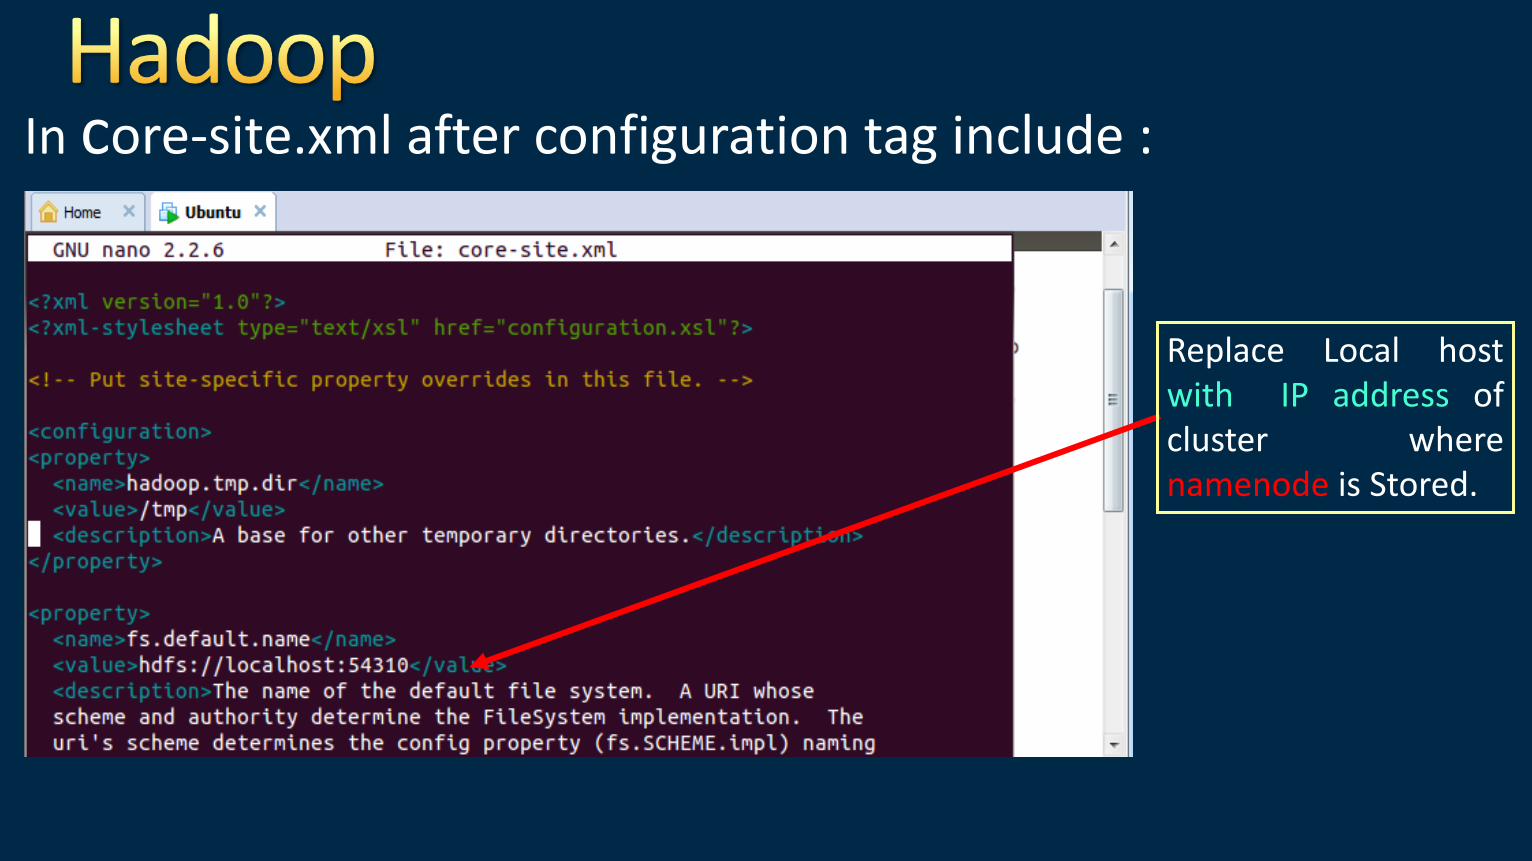
In core-site.xml after configuration tag include :
Replace Local host with IP address of cluster where namenode is Stored.
mapred.job.tracker indicates the location where the jobtracker must be installed : as here it is
mapred-site.xml
dfs.replication indicates property of setting the number of replications or clusters : as here it is 1 : We can specify our own also.
hdfs.site.xml
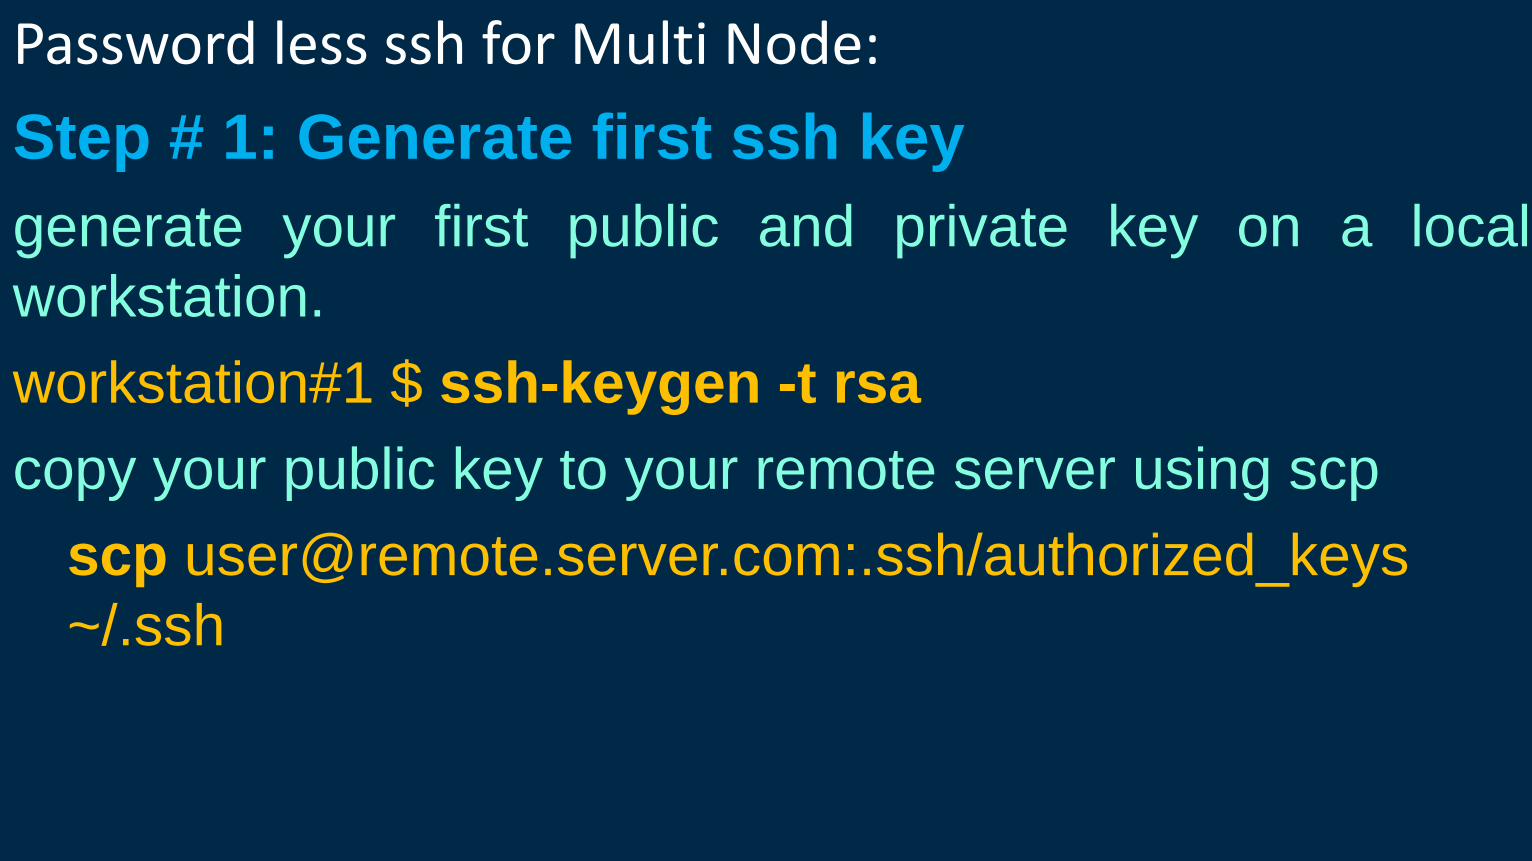
Password less ssh for Multi Node:
Step # 1: Generate first ssh key
generate your first public and private key on a local
workstation.
workstation#1 $ ssh-keygen -t rsa
copy your public key to your remote server using scp
scp [email protected]:.ssh/authorized_keys
~/.ssh
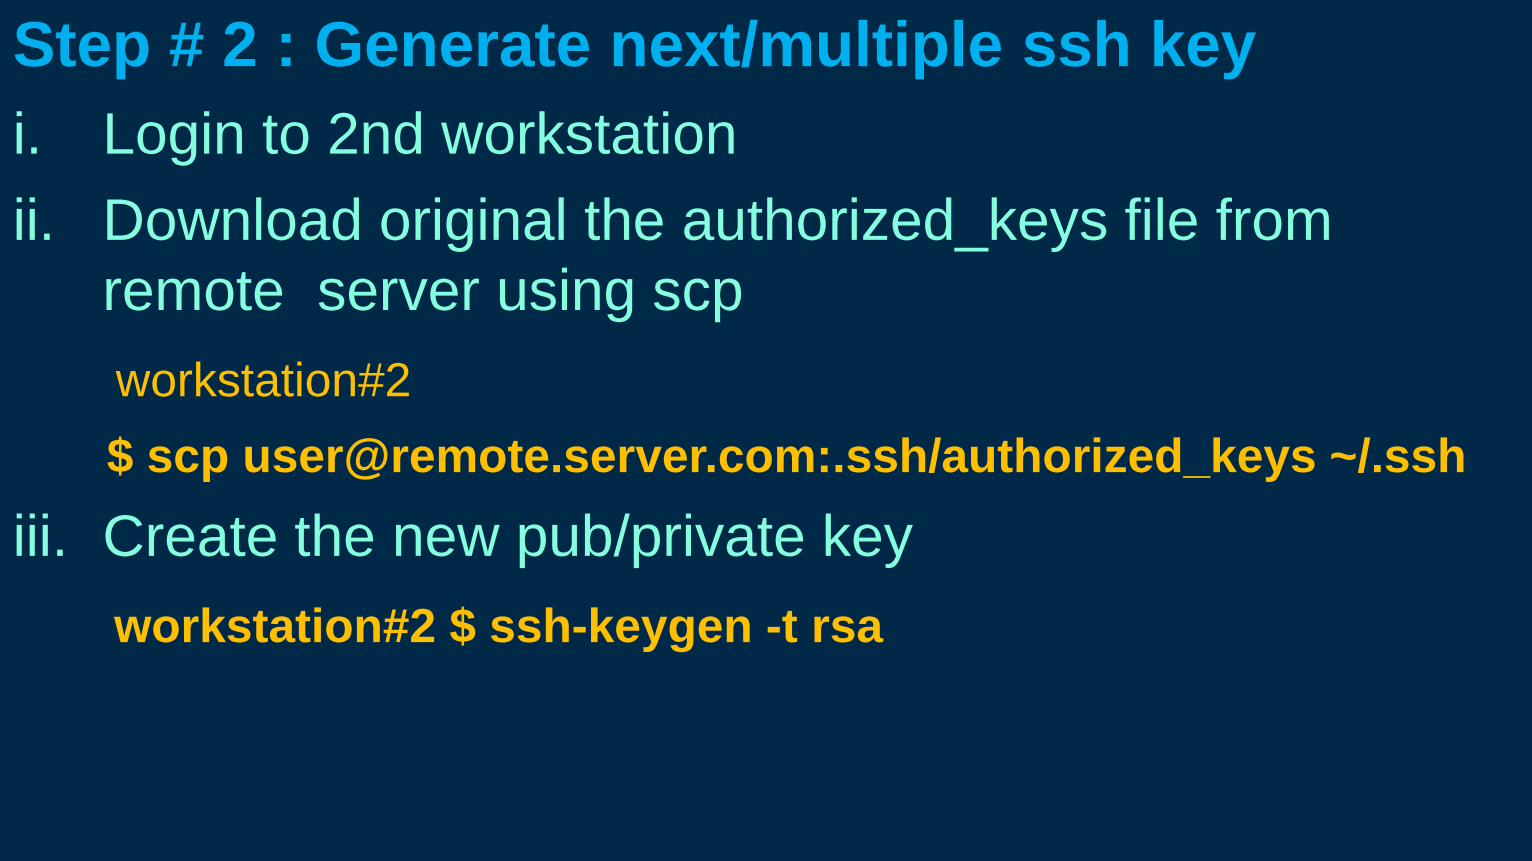
Step # 2 : Generate next/multiple ssh key
i. Login to 2nd workstation
ii. Download original the authorized_keys file from
remote server using scp
workstation#2
$ scp [email protected]:.ssh/authorized_keys ~/.ssh
iii. Create the new pub/private key
workstation#2 $ ssh-keygen -t rsa
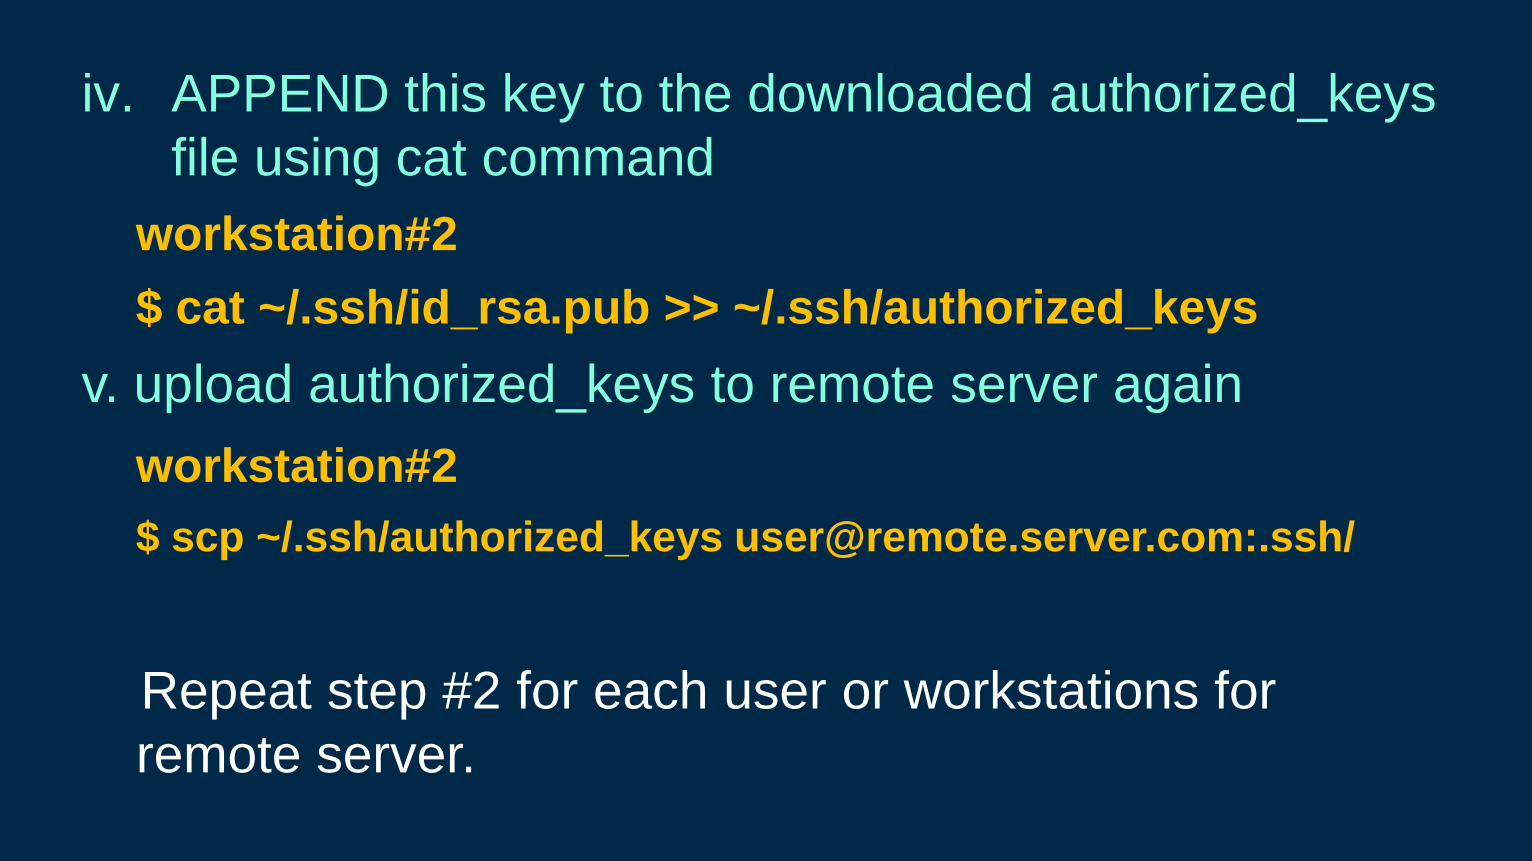
iv. APPEND this key to the downloaded authorized_keys
file using cat command
workstation#2
$ cat ~/.ssh/id_rsa.pub >> ~/.ssh/authorized_keys
v. upload authorized_keys to remote server again
workstation#2
$ scp ~/.ssh/authorized_keys [email protected]:.ssh/
Repeat step #2 for each user or workstations for
remote server.
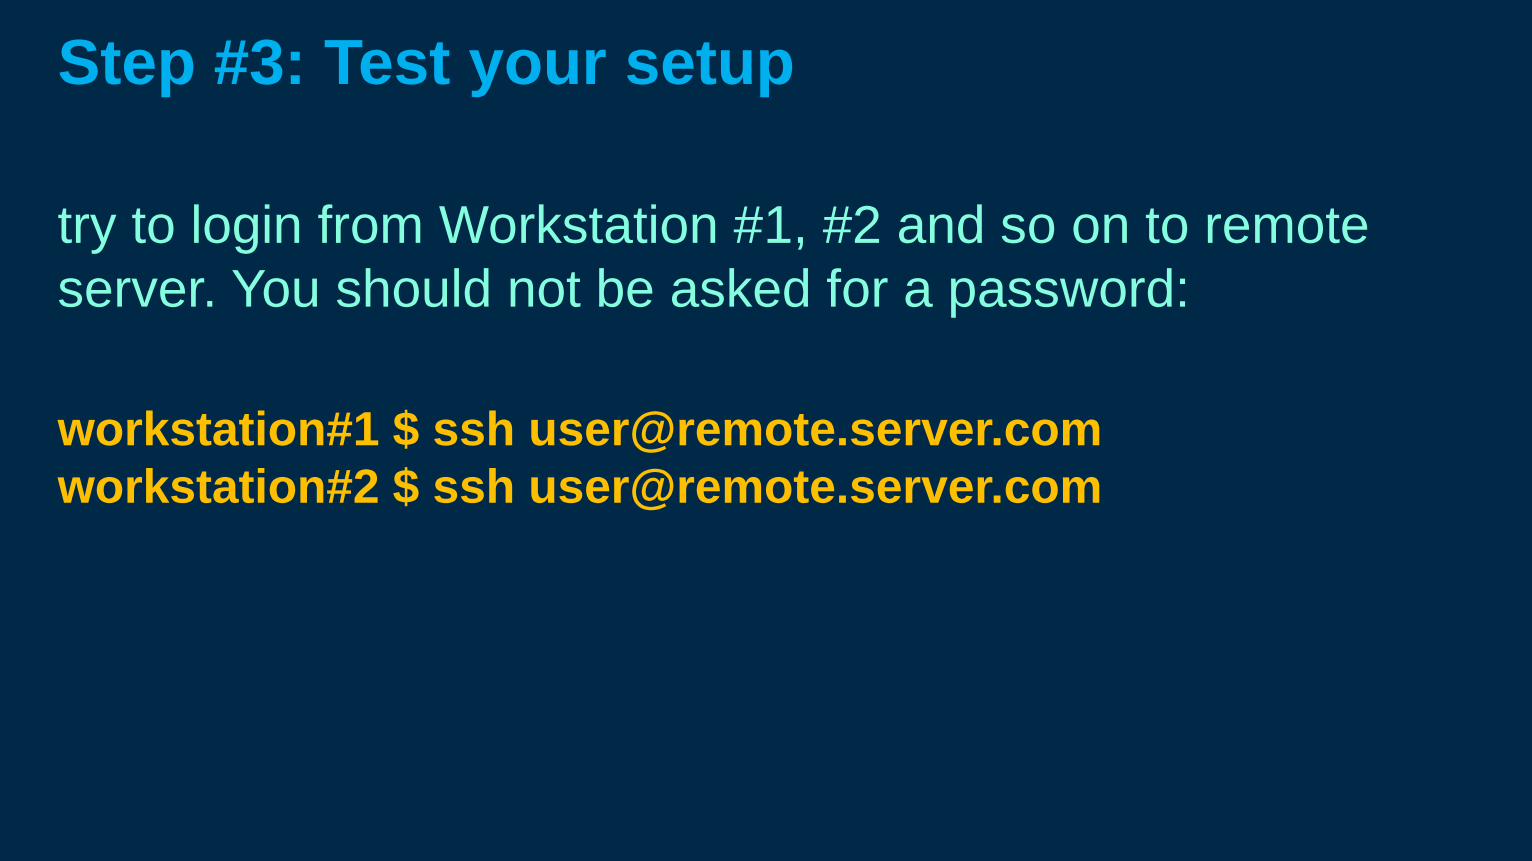
Step #3: Test your setup
try to login from Workstation #1, #2 and so on to remote
server. You should not be asked for a password:
workstation#1 $ ssh [email protected]
workstation#2 $ ssh [email protected]
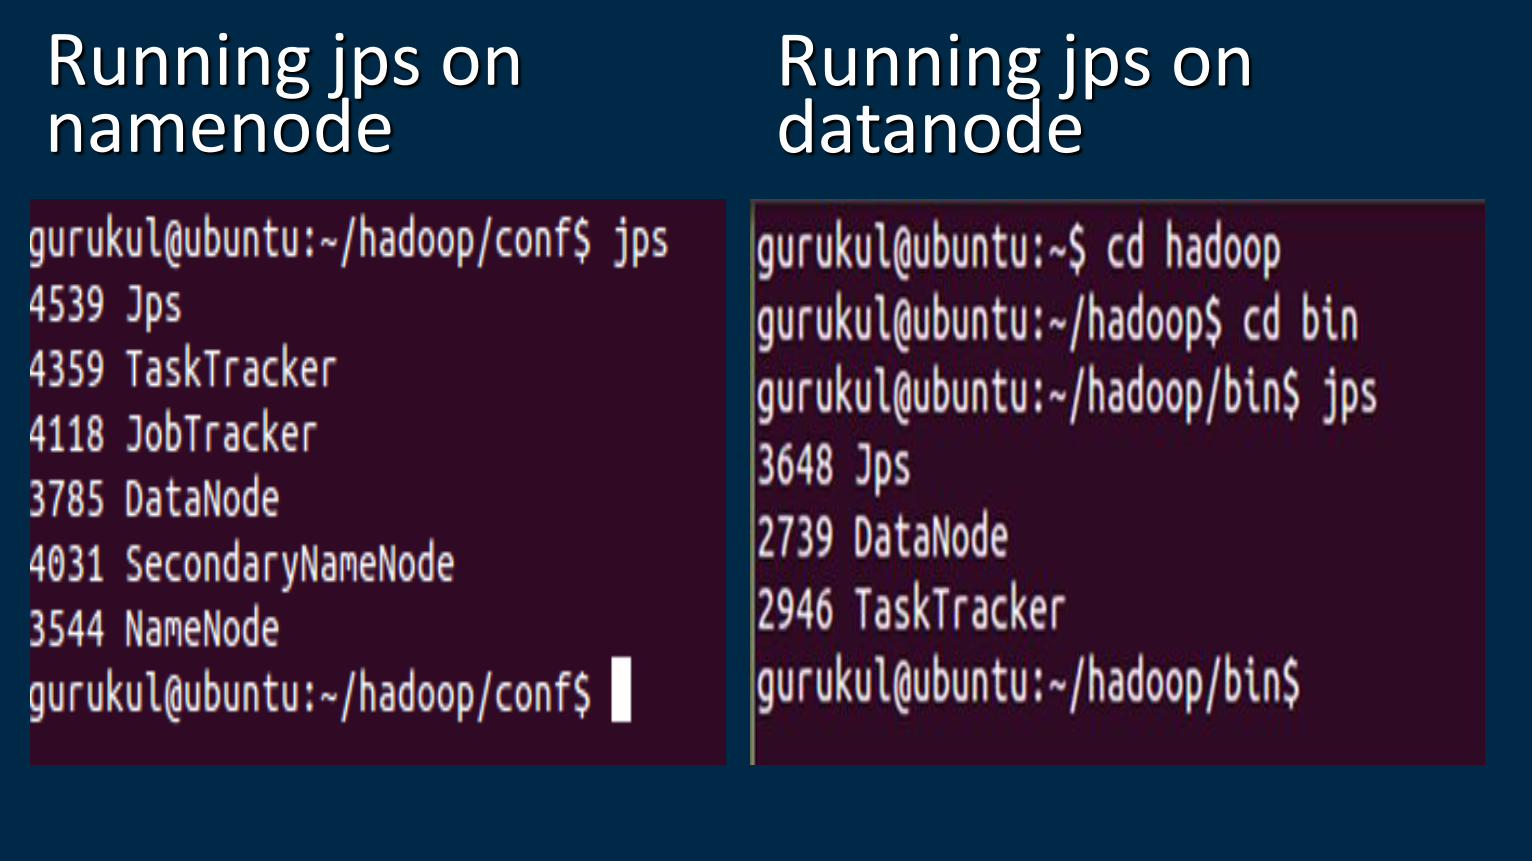
Running jps on namenode
Running jps on datanode
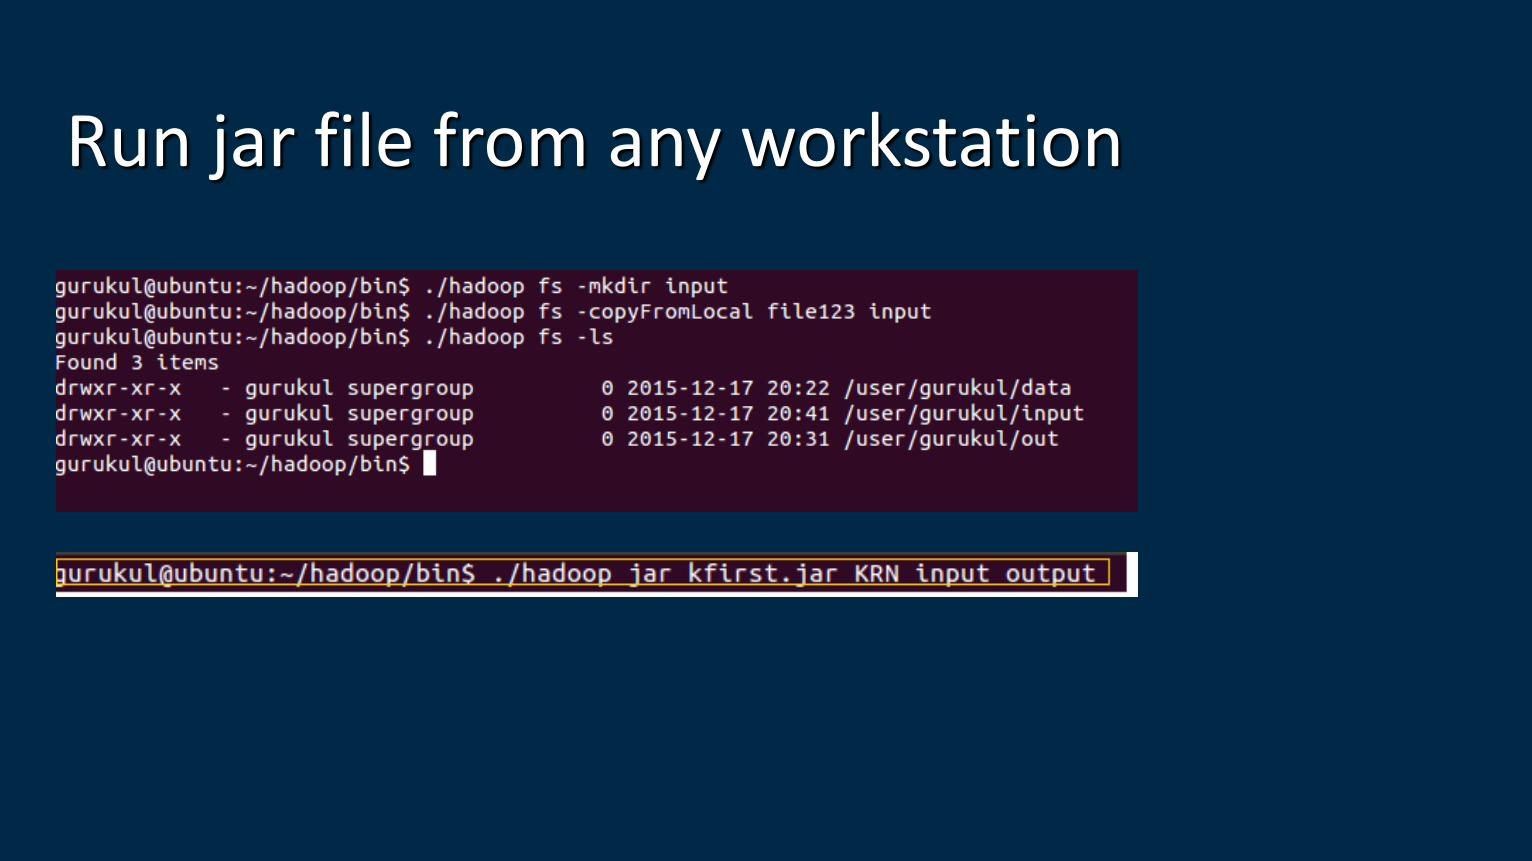
Run jar file from any workstation

Lastly do not forget to stop hadoop using
>>stop-all.sh