
Service Manual Hemodialysis System 5008...Blood pump 5-1 BPM 5-10 BTM 5-11 C Concentrates 3-6 D...
168
Edition: 1/08.04 Part number: M35 179 1 Service Manual Hemodialysis System 5008 Fresenius Medical Care 0123
Transcript of Service Manual Hemodialysis System 5008...Blood pump 5-1 BPM 5-10 BTM 5-11 C Concentrates 3-6 D...

Edition: 1/08.04Part number: M35 179 1
Service Manual
Hemodialysis System5008
FreseniusMedicalCare
0123


Page
Table of Contents
1 Index
2 Important Information2.1 Organization of the Technical Document................................................................................ 2-1
2.2 How to Use the Technical Document ...................................................................................... 2-1
2.3 Precautions for Working on the System ................................................................................. 2-2
2.4 Addresses .................................................................................................................................. 2-2
3 Specifications
4 Installation4.1 Preface........................................................................................................................................ 4-1
4.2 Important Information on Initial Start-Up ................................................................................ 4-1
4.3 Initial Start-Up Report ............................................................................................................... 4-2
4.4 Explanations on the Initial Start-Up Report ............................................................................ 4-9
5 Setup5.1 Operator Setup .......................................................................................................................... 5-1
5.2 Technician's SETUP................................................................................................................ 5-13
5.3 Information Regarding the Setting of Concentrates in the Technician’s Setup................ 5-21
6 TSC / TMC / Maintenance6.1 Important Information ............................................................................................................... 6-1
6.2 Test Report – Technical Safety Checks, Technical Measurements Checks and Maintenance Procedures6-3
6.3 Explanations on Technical Safety Checks, Technical Measurement Checks and Maintenance Procedures6-11
6.4 TSC / TMC Report .................................................................................................................... 6-27
Fresenius Medical Care 5008 SM 1/08.04 i

Kapitel :
7 Error Messages
8 Tools (Service Equipment)
9 Calibration / Adjustment
10 Repair
11 Functional Description11.1 Overall System......................................................................................................................... 11-1
11.2 Overview of P.C.B.s................................................................................................................. 11-3
11.3 Monitor...................................................................................................................................... 11-4
11.4 EBM (Extracorporeal Blood Module) ..................................................................................... 11-6
11.5 Hydraulics Unit ........................................................................................................................ 11-8
11.6 Power Supply Unit ................................................................................................................. 11-10
11.7 Pneumatic Unit....................................................................................................................... 11-12
11.8 Hydraulics Unit ...................................................................................................................... 11-14
12 Service Program (Option)
ii Fresenius Medical Care 5008 SM 1/08.04

Chapter 1: Index
1 Index
How to use the index: E.g., index entry 1-3 is to be interpreted as: Chapter 1, page 3
AAddresses 2-2Alarm processing 5-4AutoFlow 3-6
BBlood pump 5-1BPM 5-10BTM 5-11
CConcentrates 3-6
DDIASAFE®plus 3-8
EEcoFlow 3-6Emergency 5-8External connections 3-3
FFlow diagram 11-14
HHeparin pump 3-8
OOCM 3-9, 5-9ONLINEplus™ 5-9Operating programs 3-4Operator Setup 5-1Optical detector 3-7Override conditions 3-4
PPatient card 5-8
RReinfusion 5-2
TTemperature 3-6
UUltrafiltration 5-3User interface 5-5
Fresenius Medical Care 5008 SM 1/08.04 1-1

Kapitel 1: Index
1-2 Fresenius Medical Care 5008 SM 1/08.04

Chapter 2: Important Information
2 Important Information
2.1 Organization of the Technical Document
Page identification Page number 1-3 is to be interpreted as: Chapter 1, page 3.
Document changes Document changes will be released as new editions or supplements. In general: this manual is subject to change without notice.
Editorial information The current edition of this technical document is:
1/08.04 = 1st edition, August 2004
2.2 How to Use the Technical Document
Intended use This technical document is intended for service technicians and is to be used for first studies (to acquire a basic knowledge) and for reference purposes (for TSC, maintenance and repair). The study of this document, however, does not replace the training courses offered by the manufacturer.
Requirements Knowledge of the current Operating Instructions of the respective system.Background experience in mechanics, electrical and medical engineering.
Note and Caution symbols
Explanation of the Note and Caution symbols used:
Note
Informs the operator that in case of a failure to follow the steps as described, a specific function will be executed incorrectly or will not be executed at all, or will not produce the desired effect.
Caution
Advises the operator against certain procedures or actions that could cause damage to the equipment or may have adverse effects on operators and patients.
Fresenius Medical Care 5008 SM 1/08.04 2-1

Chapter 2: Important Information
2.3 Precautions for Working on the System
Authorized persons Assembly, extensions, adjustments, modifications or repairs may only be carried out by the manufacturer or persons authorized by him.
Measuring equipment and accessories
The activities described in this technical document require the availability of the necessary technical measuring equipment and accessories.
Precautions Before turning power on, repair any visible damage.
Prior to opening the system and when working on the open system, the following precautions have to be taken:– Protect the components against ingress of liquids.– Do not touch live parts.– All plugs, connections and components may only be disconnected or
connected if de-energized.
ESD precautions When repairing the system and replacing spare parts, observe applicable ESC precautions (e.g. EN 100 015-1).
Monitor support arm If the 5008 hemodialysis system is to be placed in a horizontal position for servicing, the monitor support arm must be protected with the transport protection to prevent it from flipping over.
To be observed after working on the system
A disinfection and a T1 test must be performed after working on the system.
To be observed after aborting a disinfection program
After a disinfection program has been aborted or if the system is to be preserved, the hemodialysis system must be disconnected from the water supply after a maximum of 3 days. When the system is returned to use, check that the pressure of the water supply meets the prescribed minimum pressure.
2.4 Addresses
Please address any inquires to:
Fresenius Medical Care AG61346 Bad HomburgGermanyPhone: + 49 6172 609-0www.fmc-ag.com
2-2 Fresenius Medical Care 5008 SM 1/08.04

Chapter 2: Important Information
ServiceCentral Europe
Fresenius Medical CareDeutschland GmbHGeschäftsbereich ZentraleuropaKundendienst / ServicecenterSteinmühlstraße 24 I61352 Bad HomburgGermanyPhone: +49 6172 609-7100Fax: +49 6172 609-7102E-mail: [email protected]
ServiceInternational
Fresenius Medical CareDeutschland GmbHService Support InternationalHafenstraße 997424 SchweinfurtGermanyPhone: +49 9721 678-333 (hotline)Fax: +49 9721 678-130
Local Service
Fresenius Medical Care 5008 SM 1/08.04 2-3

Chapter 2: Important Information
2-4 Fresenius Medical Care 5008 SM 1/08.04

Chapter 3: Specifications
3 Specifications
Dimensions, weight and housing material
Dimensions Height: approx. 162 cm (approx. 210 cm incl. IV pole)Width: approx. 48 cm (on base incl. brake)Depth: approx. 72 cm (approx. 86 cm with extended concentrate rack)
Weight Approx. 135 kg (without options)
Housing material PU vacuum cast resin
Type label
1 Type identification, serial number
2 Power requirements
3 Protection against ingress of liquids: drip-proof
4 Caution, consult accompanying documents
5 Degree of protection against electric shock: Type B
6 CE mark
Electrical safety (classification according to EN 60601-1, IEC 601-1)
Type of protection against electric shock
Safety class I
Degree of protection against electric shock
Type B, symbol:
1
6
2
3
4 5
Fresenius Medical Care 5008 SM 1/08.04 3-1

Chapter 3: Specifications
Applicable only to the BPM blood pressure cuff:Degree of protection against electric shock
Type CF, symbol:
Degree of protection against ingress of liquids
Drip-proof, symbol: IPX1
Leakage currents According to EN 60601-1
EMC specifications according to EN 60601-1-2 (IEC 601-1-2)
RFI emissions:Limit class A according to EN 55011, Group 1
Immunity:– Electrostatic discharge, atmospheric discharge: 8 kV– Electromagnetic fields: 27 MHz – 1000 MHz: 3 V/m– Bursts: Power line (alternating current): 1 kV– Surge voltages (alternating current): 2 kV
Electric supply
Line voltage 100 to 230 V AC, ±10 %, 47 to 63 Hz(The decisive criterion is the line voltage and the operating current specified on the type label of the system)
Connection to power supply
16 A at 230 V, regulation according to VDE 0100 part 0107
Operating currentdialysis
Approx. 6 A, (at 230 V)at a water inlet temperature of 17 °CDialysate temperature 37 °CDialysate flow: 500 ml/min
Power supply(internal)
+24 V ± 3 %, 20 A short-circuit proof+18 V ± 3 %, 14 A short-circuit proof480 W total power output
Battery Lead-acid battery (maintenance-free)24 V, 7 Ah
Fuses
Main power switch 2 x G 16 A (miniature circuit-breaker) rear of power supply unit
Operating conditions
Water inlet pressure 1.5 to 6.0 bar
Water inlet temperature 5 °C to 30 °Cwith "Integrated hot rinse": 85 °C to 95 °C
Water inlet rate 1.5 l/min; at an inlet pressure of 1.5 bar
3-2 Fresenius Medical Care 5008 SM 1/08.04

Chapter 3: Specifications
Water drain 0 to 100 cm above the floor, minimum 5 cm free fall. The water drain must be located at a lower level than the dialyzer position.
Concentrate supply 0 to -100 mbar; maximum suction height 1 mwith Central Delivery System (option): 0.05 to 2.0 bar
Heat dissipation Dialysis:approx. 400 Watt (at an ambient temperature of 20 °C)
Range of operating temperature
15 °C to 35 °C
Atmospheric pressure 700700 hPa to 1060 hPa
Relative humidity 30 % to 75 %, temporarily 95 %
Stability 5°
IV pole load capacity Maximum: 5 kgMaximum load capacity of one hook: 5 kg
External connection options
LAN Interface for the exchange of data.Electrically isolated by transformer.Port: RJ 45
RS232 Interface for the exchange of data.Electrically isolated by optocoupler.Port: DSUB 9-pin
Caution
Any additional equipment connected to the analog and digital interfaces of the machine must comply with the applicable EN specifications (e.g. EN 60950 for data processing equipment and EN 60601 (IEC 601) for electro-medical equipment).Apart from this requirement, all configurations must comply with the system standard EN 60601-1-1 (IEC 601-1-1), or their applicability with regard to safety has to be proven by a certificate issued by a testing agency authorized to test the ready-for-use machine.The connection of additional equipment to the signal input or output component affects the system configuration and anyone connecting additional equipment is therefore responsible for compliance with the system standard EN 60601-1-1 (IEC 601-1-1).
Caution
The external alarm indicators do not relieve the operator of the obligation to observe the local alarms of the system.
Fresenius Medical Care 5008 SM 1/08.04 3-3

Chapter 3: Specifications
Service/diagnostics (Protected by cover!)For inhouse computer diagnostics.Port: DSUB 15-pin
24 V (Protected by cover!)24 V connection (2 A fuse)Port: Flanged socket, 4-pin
Alarm output For the connection of an external alarm indicator (nurse call). (Potential-free alarm output. Alternating contact maximum 24 V/24 W).Port: 5-pin diode plug via a shielded line; shield grounded on either side.
Override conditions
When overriding a safety system the responsibility for the patient’s safety rests with the operator of the machine.
Audible alarm suppression Mute alarm time: maximum 2 minutes(adjustable in the SETUP)
Alarm override After confirmation of the error message and start of the blood systems:Arterial and venous pressure alarm for approx. 10 seconds (window inactive)Air detector alarm for approx. 2 seconds
Blood leak override Override time: maximum 2 minutes
Override air-bubble detector
Override time: after starting removal of air: approx. 4 seconds
Operating programs
T1 test Automatic test for verification of the operating and safety systems.The T1 test is mandatory,– after power on (not following a power failure)– after a cleaning program
Preparation Defined by the optical detector located below the venous bubble catcher. Preparation is terminated as soon as the optical detector senses opaque fluid in the blood lines.
Priming and rinsing the blood lines
Minimum rinse volume 500 ml; automatic switching to rinsing, if level in bubble catcher detected. Automatic raising of the fluid level during the rinse phase.
Reinfusion Reinfusion volume adjustable in the SETUP.Return to dialysis still possible.
Dialysis Bicarbonate dialysis
ISO-UF Ultrafiltration without dialysate flow (Bergström method)
3-4 Fresenius Medical Care 5008 SM 1/08.04

Chapter 3: Specifications
Cleaning programs Rinse clear/rinse/mandatory rinse:Time adjustable in the TECHNICIAN's SETUP,Temperature: approx. 37 °C,Flow: 600, 800 ml/min (adjustable in the SETUP)
Cold disinfection/degreasing, cold disinfection:Time adjustable in the TECHNICIAN's SETUP,Temperature: approx. 37 °C,Flow: max. 900 ml/min
Heat disinfection:Time adjustable in the TECHNICIAN's SETUP,Flow: max. 900 ml/min
In all programs:Blood pump stops, arterial and venous line occlusion clamp closed.Progress of the program (time-counting) is interrupted in the event of a flow alarm.The cleaning programs can be aborted.The chemical disinfection program is followed by a mandatory rinse.
Flush Rinsing of the water supply area
Dialysate circuit and safety systems
Blood leak detector Threshold of response ≤ 0.5 ml blood loss per minute into the dialysate at a hematocrit of 0.25.(flow rate 100 ml/min to 1000 ml/min)
Transmembrane pressure Display range: –100 to 400 mmHgResolution: 5 mmHg
Definition:
Ultrafiltration Selectable UF rate: 0 ml/h to 4000 ml/h (in 10 ml increments)Maximum rate internally adjustable to 1, 2, 3, or 4 l/h.Pump volume accuracy: ±1 % (at Pdi > –500 mbar)
The UF rate/effective blood flow ratio is being monitored during the treatment. If an incongruity occurs a warning will be displayed after approx. 10 seconds.
Pressure holding test Event-controlled
TMP = Pbo – (Pdi + Pdo) / 2 + Offset
TMP = Transmembrane pressurePbo = Blood pressure on the outlet side of the dialyzerPdi = Dialysate pressure on the inlet side of the dialyzerPdo = Dialysate pressure on the outlet side of the dialyzerOffset = Flow-dependent pressure fluctuations
Fresenius Medical Care 5008 SM 1/08.04 3-5

Chapter 3: Specifications
Balancing Accuracy: ±0.1 % related to the total dialysate volume
Maximum balancing error
Example: Ultrafiltration error: with 1000 ml in 1 hour: ±1 % = ±10 ml/hBalancing error: with 30 l fluid flow in 1 hour at a dialysate flow of 500 ml/min: ±0.1 %= ± 30 ml/hMaximum balancing error: F = FUF + FBil = (±10 ml/h) + (±30 ml/h) = ±40 ml/h
Degassing Method: Negative pressure
Dialysate concentration (conductivity)
Display range: 12.8 to 15.7 mS/cmResolution: 0.1 mS/cmAccuracy: 0.1 mS/cmMethod:Temperature-compensated electronic conductivity meter with adjustable alarm limits.
Concentrates Entering concentration typesAdjustment range: 125 to 151 mmol/l, depending on the concentrate used ±10 % of the base value.Bicarbonate readjustment range: corresponds to ±8 mmol/l
bibag® Bicarbonate concentrate preparation from the bibag®
Temperature range: 15 to 35 °C
Dialysate temperature Adjustment range: (prescribed temperature) 34.0 °C to 39.0 °CResolution: 0.5 °CMeasuring accuracy: ±0.2 °C
Dialysate flow Display range: 100 to 1000 ml/minResolution: 100 ml/minDesired values: 100 to 1000 ml/minMeasurement by means of time pulse monitoring and balancing chamber volume
Auto flow: dialysate flow controlled in relation to the blood flow, determined by the dialyzer.
EcoFlow: dialysate flow automatically reduced to 100 ml/min in Preparation
Rinse and chemical disinfection temperature
Desired temperature: 37 °CResolution: 0.5 °CMeasuring accuracy: ±0.2 °C
Rinse and chemical disinfection flow
Desired value: 600 ml/min
F = FUF + FBil
F = Maximum balancing errorFUF = Ultrafiltration errorFbil = Balancing error
3-6 Fresenius Medical Care 5008 SM 1/08.04

Chapter 3: Specifications
Hot rinse and heat disinfection temperature
Desired temperature: 85 °CResolution: 0.5 °CMeasuring accuracy: ±2.0 °C
Hot rinse and heat disinfection flow
Desired value: 600 ml/min
Concentration of disinfectant
Dilution: Disinfectant is diluted with purified water in the dialysis system at a ratio of 1+24.
Flow alarm Dependent on the programmed flow
Extracorporeal blood circuit and safety systems
Arterial pressure measurement
Display range: –300 to +300 mmHgResolution: 5 mmHgAccuracy: 7 mmHg (typical)OD senses non-opaque presence:Alarm window width: –300 to +300 mmHgOD senses opaque presence:Alarm window width: +40 to +200 mmHgDefault value adjustable in the SETUP, factory setting 120 mmHg
Blood pump Delivery rate: 30 to 600 ml/minResolution: 10 ml/min (with a line diameter of 8 mm)Accuracy: < 5 % (without lines)Line diameter: 4.4 mm, 6.4 mm, 8.0 mmBlood pump stop alarm: 60 seconds
Spring-loaded rollers, fully occluding, pressure-limited to 2 bar with 8 x 2.1 pump line segment (when using the prescribed tubing systems).(The blood pump design allows manual operation, hand crank in the rotor, in clockwise direction only.)
Venous pressure measurement
Display range: –100 to +500 mmHgResolution: 5 mmHgAccuracy: 7 mmHg (typical)OD senses non-opaque presence:Alarm window width: –100 to +500 mmHgOD senses opaque presence:Alarm window width: 40 to 200 mmHgDefault value adjustable in the SETUP,Factory setting 120 mmHgadjustable over a range of 20 to 500 mmHg(adjustable from -100 to 500 mmHg via SETUP.)
Fill level detector Method:Capacitive measurement
Switching point 13 mm, ±4 mm from upper edge
Optical detector Method:Infrared transmission
Fresenius Medical Care 5008 SM 1/08.04 3-7

Chapter 3: Specifications
Distinguishes betweenOD light (saline or air in the tubing system)OD dark (blood in the tubing system).
Air bubble detector Method:Ultrasonic transmission measurement on the line
Sensitivity:– Air bubbles:
Bubble volume ≥ 20 µl– Blood foam (air-blood mixture)
Air alarm:– BP rate < 100 ml/min:
Air bubble: Volume ≥ 20 µlBlood foam
– BP rate ≥ 100 ml/min:10 air bubbles with an air bubble volume of < 50 µl eachor 1 air bubble with an air bubble volume of ≥ 50 µl,Blood foam
The specified data refer to the most unfavorable case with a BP rate of 0 to 600 ml/min when using the blood lines specified in chapter
Consumables.
Heparin pump Delivery rate: 0.5 to 10 ml/hResolution: 0.1 ml/hAccuracy: ±5 % for delivery rates of 0.5 to 10 ml/h and a measuring time of 2 hours up to 1.2 bar counter-pressure(calibrated for 30 ml Fresenius heparin syringes)With delivery rates of <1.0 ml/h the tolerance may exceed the specified ±5 %.
Stop time: 0 minutes up to 2 hours.Resolution: 1 minuteBolus injection: 1.0 up to 20.0 mlResolution: 0.1 ml
30 ml Fresenius heparin syringe
Audible alarm Setting range of the loudness of the audible alarm:Factory setting ≥ 65 db (adjustable)Minimum setting: ≥ 65 db
DIASAFE®plus (option)
Filter life: maximum 12 weeks.Monitored by the dialysis system and a warning (Filter change) is displayed.
3-8 Fresenius Medical Care 5008 SM 1/08.04

Chapter 3: Specifications
When using ONLINEplus™ (option):Filter life: maximum 100 treatments.Monitored by the dialysis system and a warning (Filter change) is displayed. If the warning is ignored, ONLINEplus™ will be disabled after the respective number has been exceeded.After 90 treatments the number of the remaining treatments will be displayed in the cleaning programs.
OCM (option)
Measuring accuracy of the clearance: ± 6 % standard deviationShortest measuring interval: 25 minTime scale of the display: 10 s
ONLINEplus™ (option)
Delivery rate: 25 to 600 ml/min (inside line diameter: 8.0 mm)Resolution: 1 ml/min
Exchange volume: substituate goal 500 l adjustable in relation to treatment parameters
Accuracy: < 5 % (without lines)(This specification only applies to the range from 30 to 350 ml/min. With delivery rates of < 30 ml/min the deviation may be greater.)
Volume counter display: 0.1 to 210 litersResolution: 0.1 liter
Spring-loaded rollers, fully occluding, pressure-limited to < 1.3 bar.(The blood pump design allows manual operation, hand crank in the rotor, in clockwise direction only.)
Auto sub: The sub rate is determined as a function of:– UF rate– Blood flow– Hematocrit (HCT)– Total protein (TP)– Filter performance
Single Needle (option)
Blood pumpstop alarmSingle Needle pump
During Single Needle operation 180 seconds.
Stroke volume 10 to 50 ml in increments of 5 ml
External compliance chamber
50 ml or 60 ml stroke volume
Fresenius Medical Care 5008 SM 1/08.04 3-9

Chapter 3: Specifications
Auto SNDelivery rate of theSingle Needle pump
+20 % (programmable in the Operator setup.)
BPM (option)
Blood pressure Display Area– Systole: 30 mmHg to 280 mmHg– Diastole: 10 mmHg to 240 mmHg– MAP: 20 mmHg to 255 mmHg
Resolution: 1 mmHg
Accuracy of measured value ±3 mmHg
Pulse Display range: 20 to 245 1/min
Resolution: 1/min
BTM (option)
Required blood flow for accurate BTM function
≥ 120 ml/min(The measuring and control functions of the BTM are deactivated if the blood flow is < 100 ml/min.)
Temperature measurement
Accuracy of the fistula temperatures (if correct ambient temperature is indicated): ± 0.5 °C
Error in fistula temperatures per °C error of the set ambient temperature0.08 °C (at a blood flow of 100 ml/min)0.03 °C (at a blood flow of 300 ml/min)
Body temperature change accuracy: ± 0.2 °C
Recirculation measurement
Accuracy of recirculation measurement(for 2.5 °C venous bolus amplitude): ± 2 %
Maximum bolus amplitude: – 3 °C or + 3 °C
Maximum duration of the bolus: up to 10 min
Maximum dialysate temperature range used by the BTM: 33.5 °C to 39.5 °C
Body temperature control Allowed range of desired values for body temperature change rate: – 0.5 °C/h to + 0.5 °C/h
Maximum dialysate temperature range used by the BTM: 33.5 °C to 39.5 °C
3-10 Fresenius Medical Care 5008 SM 1/08.04

Chapter 3: Specifications
Network (option)
Caution
The responsible organization of the network is responsible for protecting the machine from excessive network load (e.g. by accumulation of broadcast messages or port scans). If necessary, the connection to the network must be established via a router or a firewall, for example.
The system configurator is responsible for the further secure data processing, e.g. in PC software applications.
The responsible organization of the network is responsible for the protection of the not encrypted, transferred data.
The data transfer of alarm states via the network must not be used as an external alarm alert (nurse call).
Fresenius Medical Care 5008 SM 1/08.04 3-11

Chapter 3: Specifications
3-12 Fresenius Medical Care 5008 SM 1/08.04

Chapter 4: Installation
4 Installation
4.1 Preface
Instructions for all technicians who are authorized to commission our hemodialysis systems.
We, as manufacturers, permanently aim at delivering systems of highest quality.
To reach this aim, we need your support.
Please commission our hemodialysis systems by uniformly using the enclosed "initial start-up report" and enter the values determined in the columns provided.
The following is applicable:Corrections are necessary only if the measured values are outside of the tolerances specified!
We will then evaluate the initial start-up reports, which will enable us to monitor the quality of our systems on their delivery.
After initial start-up, please asap send – by mail or by fax – the completed form (Initial Start-Up Report) back to the following address:
Fresenius Medical CareDeutschland GmbHWerk SchweinfurtHerrn Alfred Laus, Abt. BMHafenstraße 997424 SchweinfurtFax: 09721/ 678450
Thank you very much for your help!
4.2 Important Information on Initial Start-Up
This technical document is intended for initial start-up only. It is not intended for restarting hemodialysis systems that have been shut down or have been put out of service temporarily.
The initial start-up must be performed by the Technical Service of Fresenius Medical Care or a person authorized by them!
Any information on initial start-up and the specifications in the Operating Instructions must be observed.
When bringing the hemodialysis system from a cooler to a warmer room, allow approx. 2 hours for the system to adjust to the ambient temperature before turning the unit on.
Fresenius Medical Care 5008 SM 1/08.04 4-1

Chapter 4: Installation
4.3 Initial Start-Up Report
5008 Initial Start-Up Report
Technician's name: Service report number:
Customer/Customer no.:
Inventory no.: Device no. Operating hours:
Device type including option(s):
FreseniusMedicalCare
4-2 Fresenius Medical Care 5008 SM 1/08.04

Chapter 4: Installation
No. Description Measure-ment value
1 Preparation
1.1 Hemodialysis system without visible shipping damage.
1.2 Remove the transport protection for the monitor support arm.
Install the IV pole.
1.3 Connect the water supply tubing.
Connect the drain and the flush tubings.
Protect the tubings from slipping out.
Standard: Length 3 m, internal diameter 6 mmTubing dimensions, adjusted: Length _____ m, internal diameter_____ mm
1.4 Connect the CDS tubings and protect them from slipping out.
Apply a shrink tube marking for the CDS tubings.
CDS 1
CDS 2
BIC
1.5 Remove the shipping plugs from the overflows.
1.6 When turning the hemodialysis system on, perform an audible check of the watchdog alarm.
1.7 Rinse out the anti-freeze.
1.8 Select the Filter change program.Connect the filter. DIASAFE®plus/ONLINEplus™In the service mode, delete mandatory disinfection.Then completely run the rinse program.
2 SETUP settings (Technician's SETUP/Operator SETUP)
2.1 Check the SETUP on the hemodialysis system.
3 Check – water inlet flow / adjustment – degassing
3.1 Check MaxWaterFlow.Desired value: 1300 ml/min to 1550 ml/min
________ Corr.: Yes No
3.2 Perform the degassing adjustment.
4 Check – dialysate flow
4.1 Check flow at 800 ml/min.Desired value: 770 ml/min to 830 ml/min
________
Fresenius Medical Care 5008 SM 1/08.04 4-3

Chapter 4: Installation
5 Check – temperature
5.1 Check PT07 (temperature) at 37 °C. (flow 500 ml/min)Desired value: 36.8 °C to 37.2 °C (display on hemodialysis system)
________ Corr.: Yes No
Measure the reference temperature with an external measuring instrument.Difference = Reference temperature minus PT07Desired value – difference: –0.5 °C to +0.2 °C
________
6 Check – conductivity
6.1 Check CD7 (conductivity).Desired value: approx. 13.5 mS/cm to approx. 14.5 mS/cm
________ Corr.: Yes No
Measure the reference conductivity with an external measuring instrument.Difference = Reference conductivity minus CD7Desired value – difference: ±0.2 mS/cm
________
7 Check – blood leak detector
7.1 Check the blood leak:Desired value: 4.8 V to 5.2 V
________ Corr.: Yes No
7.2 Check the dimness:Desired value: 4.8 V to 5.2 V
________
No. Description Measure-ment value
4-4 Fresenius Medical Care 5008 SM 1/08.04

Chapter 4: Installation
8 Check – dialysate pressure
8.1 Zero point S03/S07 Corr.: Yes NoReference measuring instrument: 0 mbar ________
Check S03.Desired value: +16 mbar to +76 mbar
________
Check S07.Desired value: +16 mbar to +76 mbar
________
8.2 Slope S03/S07 (+)
Reference measuring instrument: +533 mbar (± 26 mbar) ________
Check S03.Desired value: S03 = Display of reference measuring instrument + (+16 mbar to +76 mbar)
________
Check S07.Desired value: S07 = Display of reference measuring instrument + (+16 mbar to +76 mbar)
________
8.3 Slope S03/S07 (–)
Reference measuring instrument: –533 mbar (± 26 mbar) ________
Check S03.Desired value: S03 = Display of reference measuring instrument + (+16 mbar to +76 mbar)
________
Check S07.Desired value: S07 = Display of reference measuring instrument + (+16 mbar to +76 mbar)
________
No. Description Measure-ment value
Fresenius Medical Care 5008 SM 1/08.04 4-5

Chapter 4: Installation
9 Check – electrical safetyIn Germany according to DIN VDE 0751-1, edition 10/2001.In other countries, observe the local regulations!
9.1 Visual inspection performed.
9.2 Protective earth resistance maximum 0.3 ohms (with power cord) ______ Ω
9.3 Leakage current measurement (device leakage current)
Differential current measurement according to figure C.6or
Direct measurement according to figure C.5
Nominal voltage of power supply: __________ V
Device leakage current mains polarity 1 __________ µA
with line voltage __________ V
scaled to nominal voltage (maximum 500 µA, see Additional requirements) _____ µA
Device leakage current mains polarity 2 __________ µA
with line voltage __________ V
scaled to nominal voltage (maximum 500 µA, see Additional requirements) _____ µA
Test equipment used: ________________________
10 Check – zero point arterial/venous pressure display and venous clamp
10.1 Zero point arterial pressure display Corr.: Yes NoCheck the arterial pressure display (standby operation).
Desired value: –5 mmHg to +5 mmHg________
10.2 Zero point venous pressure display Corr.: Yes NoCheck the venous pressure display (standby operation).
Desired value: –5 mmHg to +5 mmHg________
10.3 Check – venous clamp:
A pressure change within 3 minutes must not exceed the following values:
Arterial pressure displayMaximum pressure change: ±5 mmHg
Reference measuring instrument for pressure displayMaximum pressure drop: –0.1 bar
No. Description Measure-ment value
4-6 Fresenius Medical Care 5008 SM 1/08.04

Chapter 4: Installation
11 Final check
11.1 Check the error memory.
11.2 Save calibration data and SETUP settings on a data disk.
11.3 Perform the T1 test.
11.4 Run the disinfection program(with Puristeril 340 or Puristeril plus or Diasteril or Citrosteril).
11.5 Check the alarm function during the disinfection program.Open the shunt interlock.Audible alarm and traffic light
11.6 Check absence of disinfectant by means of test strips (not with Citrosteril).
11.7 Record entries in the medical device register and on the machine card.
11.8 Operating Instructions and accessories package complete and appropriate for the system.
No. Description Measure-ment value
Fresenius Medical Care 5008 SM 1/08.04 4-7

Chapter 4: Installation
Date: Signature: Stamp:
The system has been released for the intended use. Yes No
Test equipment used: Temperature, conductivity, pressure(type, serial number):Protective earth resistance, leakage current(type, serial number):
________________________________________________________________________________________________
Comments:
Date: Signature: Stamp:
4-8 Fresenius Medical Care 5008 SM 1/08.04

Chapter 4: Installation
4.4 Explanations on the Initial Start-Up Report
No. Description
1 Preparation
1.1 Hemodialysis system without visible shipping damage.
1.2 Remove the transport protection for the monitor support arm.
Unscrew and remove the screw.(Keep the screw for subsequent transportation.)
Install the IV pole.Insert the IV pole into the monitor support arm. Secure the IV pole with a threaded pin.Place the protective cover for the monitor support arm.Screw the IV pole hanger onto the IV pole.
1.3 Connect the water supply tubing.Connect the drain and the flush tubings.Protect the tubings from slipping out.(Standard: Length 3 m, internal diameter 6 mm)
When using other tubing dimensions,adjust the tubing parameters in the technician's-SETUP.Tubing dimensions, adjusted: Length _____ m, internal diameter_____ mm
1.4 Connect the CDS tubings and protect them from slipping out.Apply a shrink tube marking for the CDS tubings.
CDS 1
CDS 2
BIC
Fresenius Medical Care 5008 SM 1/08.04 4-9

Chapter 4: Installation
1.5 Remove the shipping plugs from the overflows.
1. Vent (water inlet chamber)
2. Vent (mixing chamber)
1.6 When turning the hemodialysis system on, perform an audible check of the watchdog alarm.
1.7 Rinse out the anti-freeze.
1.8 Select the Filter change program.Connect the filter. DIASAFE®plus/ONLINEplus™In the service mode, delete mandatory disinfection.Then completely run the rinse program.
2 SETUP settings (Technician's SETUP/Operator SETUP)
2.1 Check the SETUP on the hemodialysis system.Make the appropriate settings for the respective hospital, if necessary.
3 Check – water inlet flow / adjustment – degassing
3.1 In the service mode, select FLOW DIAGRAM.
Basic requirements:The hemodialysis system must be closed.Flow on.
Check MaxWaterFlow.Desired value: 1300 ml/min to 1550 ml/min
Use A04 for making corrections, if necessary.
(If it is not possible to set a water inlet flow ≥ 1300ml/min, it will not always be possible to achieve the dialysate flow of 1000ml/min.)
3.2 In the service mode, select CALIBRATE.
Basic requirements:Flow on.
Perform the degassing adjustment.Touch the Degassing (A01/P01) button.
No. Description
1
2
4-10 Fresenius Medical Care 5008 SM 1/08.04

Chapter 4: Installation
4 Check – dialysate flow
4.1 In the service mode, select CALIBRATE.
Basic requirements:The hemodialysis system must be closed.Flow on, flow 800 ml/min
Check flow.Desired value: 770 ml/min to 830 ml/min
5 Check – temperature
5.1 In the service mode, select CALIBRATE.
Basic requirements:The hemodialysis system must be closed.Temperature 37 °C, flow on, flow 500 ml/min,Response time approx. 10 min.
Check PT07 (temperature).Desired value: 36.8 °C to 37.2 °C (display on hemodialysis system)
Measure the reference temperature with an external measuring instrument.
Difference = Reference temperature minus PT07Desired value – difference: –0.5 °C to +0.2 °C
Example:PT07: 37 °CDesired value reference temperature: 36.5 °C to 37.2 °C
6 Check – conductivity
6.1 In the service mode, select CALIBRATE.
Basic requirements:The hemodialysis system must be closed.External measuring instrument (e.g. UMED) connected for at least 5 minutes.Temperature 37 °C, flow on
Check CD7 (conductivity).Desired value: approx. 13.5 mS/cm to approx. 14.5 mS/cm
Measure the reference conductivity with an external measuring instrument.
Difference = Reference conductivity minus CD7Desired value – difference: ±0.2 mS/cm
7 Check – blood leak detector
In the service mode, select CALIBRATE.
Basic requirements:The hemodialysis system must be closed. (Avoid external light.)Temperature of approx. 37 °C achieved, flow on, flow 500 ml/min,
7.1 Check the blood leak:Desired value: 4.8 V to 5.2 V
7.3 Check the dimness:Desired value: 4.8 V to 5.2 V
No. Description
Fresenius Medical Care 5008 SM 1/08.04 4-11

Chapter 4: Installation
8 Check – dialysate pressure
In the service mode, select CALIBRATE.
Basic requirements:The hemodialysis system must be closed.The reference measuring instrument must be placed at the bottommost position of the IV pole.Dialyzer couplings must be connected to the reference instrument.Flow on until dialysate lines and reference measuring instrument are free from air. Then flow off.
8.1 Zero point S03/S07
Reference measuring instrument: 0 barOpen the vent valve (UMED).Using a syringe (filled with fluid) set a value of 0 bar, via the vent valve.
Check S03.Desired value: +16 mbar to +76 mbar
Check S07.Desired value: +16 mbar to +76 mbar
8.2 Slope S03/S07 (+)
Reference measuring instrument: +533 mbar (± 26 mbar)Using a syringe (filled with fluid) set a value of +533 bar, via the vent valve.
Check S03.Desired value: S03 = Display of reference measuring instrument + (+16 mbar to +76 mbar)
Check S07.Desired value: S07 = Display of reference measuring instrument + (+16 mbar to +76 mbar)
8.3 Slope S03/S07 (–)
Reference measuring instrument: –533 mbar (± 26 mbar)Using a syringe (filled with fluid) set a value of –533 bar, via the vent valve.
Check S03.Desired value: S03 = Display of reference measuring instrument + (+16 mbar to +76 mbar)
Check S07.Desired value: S07 = Display of reference measuring instrument + (+16 mbar to +76 mbar)
No. Description
4-12 Fresenius Medical Care 5008 SM 1/08.04

Chapter 4: Installation
9 Check – electrical safetyIn Germany according to DIN VDE 0751-1, edition 10/2001.In other countries, observe the local regulations!
9.1 Visual inspection performed.– Fuses accessible from the outside comply with the indicated values.– Labels and labelings are present and legible.– The mechanical condition permits further safe use.– There are no signs of damage or dirt.– No signs of damage on the power cord.
9.2 Protective earth resistance maximum 0.3 ohms (with power cord)The protective earth resistance must be checked on the following four measurement points.
1. Measurement point: power supply unit (power supply unit housing)
2. Measurement point: shunt door
No. Description
Fresenius Medical Care 5008 SM 1/08.04 4-13

Chapter 4: Installation
3. Measurement point: potential equalization
4. Measurement point: heater rod chamber
No. Description
4-14 Fresenius Medical Care 5008 SM 1/08.04

Chapter 4: Installation
9.3 Leakage current measurement (device leakage current)
Differential current measurement according to figure C.6
or
Direct measurement according to figure C.5
No. Description
L
N
PE
L(N)
N(L)
M1
L
N
PEMD
Fresenius Medical Care 5008 SM 1/08.04 4-15

Chapter 4: Installation
Basic requirements:– Measurement of the protective earth resistance performed.– Perform the measurement with the hemodialysis system being at operating temperature.– Dialysate:
Dialysis temperature: ≥ 37 °CDialysate flow: ≥ 300 ml/minConductivity: ≥ 13 mS/cm
– When performing a direct measurement, the following precautions also must be observed:The system must be insulated when installed.All external connections must have been removed from the system.
The line voltage during the measurement will be recorded, as well as the maximum device leakage current of both mains polarities, scaled to the nominal voltage of the power supply. Maximum device leakage current: 500 µA
Example:Line voltage during the measurement: 225 VDevice leakage currentfor mains polarity 1: 180 µAfor mains polarity 2: 120 µAMaximum value of both mains polarities: 180 µANominal voltage of power supply: 230 VScaled to nominal voltage: 184 µA(180 µA: 225 V x 230 V = 184 µADevice leakage current < 500 µA: OK
Additional requirements:If the device leakage current, scaled to the nominal voltage, is higher than 90 % of the admissible alarm limit (450 µA), the last measured value or the first measured value must additionally be considered for the rating.If the device leakage current has considerably increased since the last measurement or has continuously increased since the first measurement (creeping deterioration of the insulation), or if the sum composed of the current value plus the difference since the last measurement is >500 µA, the measurement has not been completed successfully.
Example 1:Device leakage current: 470 µALast measured value: 450 µA470 + (470 – 450) = 470 + 20 = 490; is OK
Example 2:Device leakage current: 470 µALast measured value: 390 µA470 + (470 – 390) = 470 + 80 = 550; not passed
10 Check – zero point arterial/venous pressure display and venous clamp
10.1 Zero point arterial pressure display
Basic requirements:Blood lines inserted, pressure domes coupled, standby operation.
Check the arterial pressure display.Desired value: –5 mmHg to +5 mmHg
No. Description
4-16 Fresenius Medical Care 5008 SM 1/08.04

Chapter 4: Installation
10.2 Zero point venous pressure display
Basic requirements:Blood lines inserted, pressure domes coupled, standby operation.
Check the venous pressure display.Desired value: –5 mmHg to +5 mmHg
10.3 Check – venous clamp
Basic requirements:– Blood lines inserted, standby operation.– Connect the arterial and the venous branch using the adapter fitting included.– Remove the line from the arterial clamp.– Clamp the blood line before the blood pump and on the venous drip chamber.– Connect the external pressure measuring instrument to the venous bubble catcher.– Connect the syringe and the one-way valve (if present) to the venous bubble catcher.
Pressure build-up – arterial side:
Open the venous clamp.
Using a syringe, build up an arterial pressure of 50 mmHg to 100 mmHg.
Observe the arterial display on the hemodialysis system.
Close the venous clamp.
Pressure build-up – venous side:
Venous clamp closed.Using a syringe, build up a pressure of 2.5 bar to 2.7 bar.
Observe the display on the external reference measuring instrument.
Maximum pressure change within 3 minutes on the arterial pressure display of the hemodialysis system ±5 mmHg.
Maximum pressure drop within 3 minutes on the display of the reference measuring instrument –0.1 bar.
No. Description
Fresenius Medical Care 5008 SM 1/08.04 4-17

Chapter 4: Installation
11 Final check
11.1 Check the error memory.
With service program:Erase error memory and service data recorder.
11.2 With service program:Save calibration data and SETUP settings on a data disk.
11.3 Perform the T1 test.
11.4 Run the disinfection program:(with Puristeril 340 or Puristeril plus or Diasteril or Citrosteril)
11.5 Check the alarm function during the disinfection program.Open the shunt interlock.Audible alarm and traffic lightAlarm messageClose the shunt interlock.The disinfection program will be continued.
11.6 Check absence of disinfectant by means of test strips (not with Citrosteril).
11.7 Record entries in the medical device register and on the machine card.
11.8 Operating Instructions and accessories package complete and appropriate for the system.
No. Description
4-18 Fresenius Medical Care 5008 SM 1/08.04
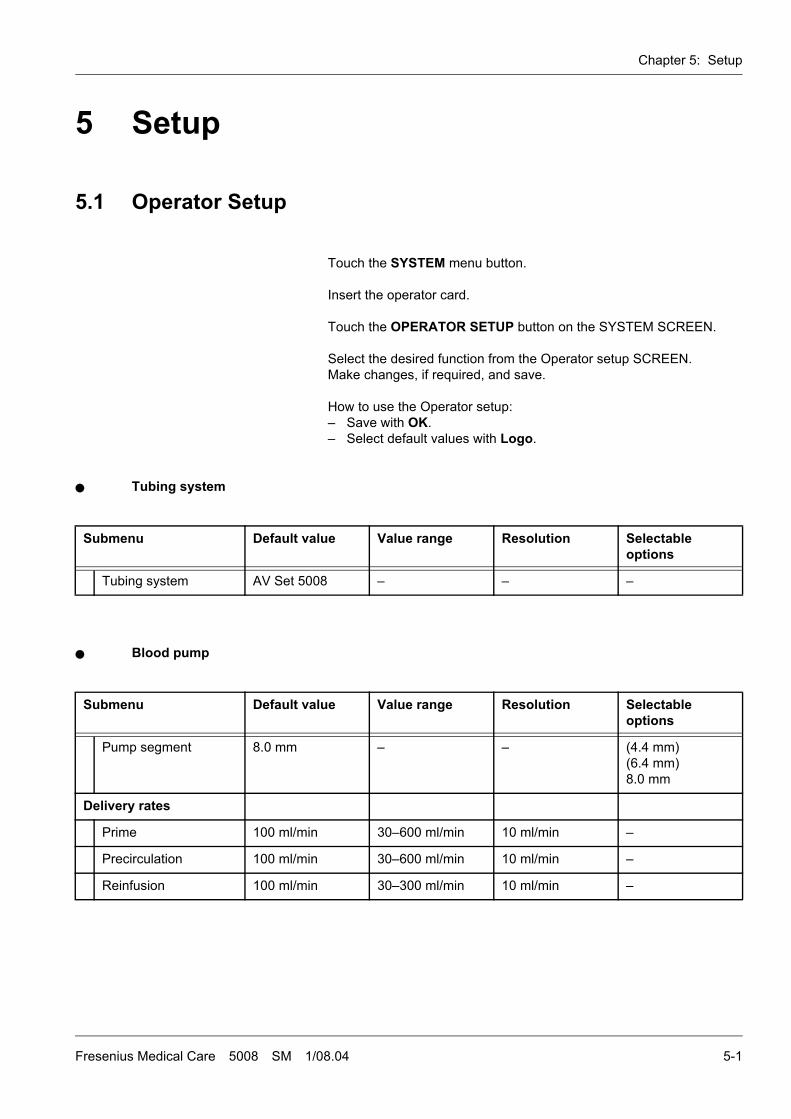
Chapter 5: Setup
5 Setup
5.1 Operator Setup
Touch the SYSTEM menu button.
Insert the operator card.
Touch the OPERATOR SETUP button on the SYSTEM SCREEN.
Select the desired function from the Operator setup SCREEN.Make changes, if required, and save.
How to use the Operator setup:– Save with OK.– Select default values with Logo.
Tubing system
Blood pump
Submenu Default value Value range Resolution Selectable options
Tubing system AV Set 5008 – – –
Submenu Default value Value range Resolution Selectable options
Pump segment 8.0 mm – – (4.4 mm)(6.4 mm)8.0 mm
Delivery rates
Prime 100 ml/min 30–600 ml/min 10 ml/min –
Precirculation 100 ml/min 30–600 ml/min 10 ml/min –
Reinfusion 100 ml/min 30–300 ml/min 10 ml/min –
Fresenius Medical Care 5008 SM 1/08.04 5-1

Chapter 5: Setup
Rinse/reinfusion volume
Anticoagulation
Submenu Default value Value range Resolution Selectable options
Preparation (NaCl)
Rinse vol. 500 ml 500–5000 ml 100 ml –
(UF rinse vol.) (0 ml) (0–5000 ml) (100 ml) (–)
Reinfusion (NaCl)
Reinfusion volume 250 ml 0–480 ml 10 ml –
Submenu Default value Value range Resolution Selectable options
Heparin
Heparinization Yes – – YesNo
Heparin unit ml – – mlI.U.
Heparin start Automatic – – AutomaticManual
Hep. rate 1.2 ml/h 0.5–10.0 ml/h 0.1 ml/h –
10 I.U./h 10–25 000 I.U./h 10 I.U./h –
Stop time 0:30 0:00–2:00 0:01 –
Syringe Fresenius 30 ml – – Depending on Technician's Setup(define syringe types)
Bolus 5.0 ml/h 1.0–20.0 ml/h 0.1 ml/h –
1000 I.U./h 0–15 000 I.U./h 10 I.U./h –
5-2 Fresenius Medical Care 5008 SM 1/08.04

Chapter 5: Setup
Dialysate
Ultrafiltration
Submenu Default value Value range Resolution Selectable options
Dialyzer FX series – – FX seriesF seriesothers
Auto flow factor 1.2 (depending on dialyzer)
– – not adjustable
Empty bibag Automatic – – AutomaticManual
Submenu Default value Value range Resolution Selectable options
Maximum UF rate 3000 ml/h 500–4000 ml/h 10 ml/h –
Maximum profile rate 3500 ml/h 3010–4000 ml/h 10 ml/h –
Program. UF profile Closed – – ClosedReleased
UF start Automatic – – AutomaticManual
UF goal 0 ml 0–9990 ml 10 ml –
UF time 0 hrs 0 min 0–24 hrs. 1 min –
UF rate 0 ml/min 0–4000 ml/min 10 ml/min –
Fresenius Medical Care 5008 SM 1/08.04 5-3

Chapter 5: Setup
Alarm processing
Submenu Default value Value range Resolution Selectable options
Tone Mute time 120 seconds 60–120 seconds 10 seconds –
Warning times
Flow off 10 min – – 10 min20 min30 min
UF off 5 min 5–15 min 1 min –
Heparin off 1 min 1–5 min 1 min –
Arterial/venous pressure settings
Art. alarm limit Centered – – CenteredAsymmetric
Art. window width 100 mmHg 40–200 mmHg 10 mmHg –
Ven. alarm limit Asymmetric – – AsymmetricCentered
Ven. window width 100 mmHg 40–200 mmHg 10 mmHg –
Ven. window position Unlimited – – Unlimited≥ 20 mmHg
5-4 Fresenius Medical Care 5008 SM 1/08.04

Chapter 5: Setup
User interface
Submenu Default value Value range Resolution Selectable options
Screen saver
Screen saver Yes – – YesNo
Delay 5 min 1–60 min 1 min –
Graphics The diagram types listed under selectable options can be assigned to a group. Each group can contain a maximum of 4 graphics. Each diagram type can be contained in any group, but only once. Graphics can be assigned only if the particular option is available.
Group 1 UF Na diagramOCM diagramPressure graphsBPM history
– – UF Na diagramPressure graphsBTMBPMBPM (MAP)BVMOCM diagramBPM history
Group 2 BPMBPM (MAP)
– – See group 1
Group 3 – – See group 1
Group 4 – – See group 1
Defining options A maximum of 4 option buttons may be added The option buttons which have been added will appear on the lower right above the SYSTEM button.(If the BPM option is available, a maximum of 3 options may be created.)Options can be added only if the particular option is available.
Option HEPARINONLINE
– – HEPARINEMERGENCYCIRCULATESINGLE NEEDLEONLINEOCMBPMBVMBTM
Defining controls
– – – – –
Fresenius Medical Care 5008 SM 1/08.04 5-5

Chapter 5: Setup
Cleaning
Submenu Default value Value range Resolution Selectable options
Mand. cleaning pgm. after treatment
Yes – – YesNo
5-6 Fresenius Medical Care 5008 SM 1/08.04

Chapter 5: Setup
Auto On
Requirements:– Pre-program the T1 test under Auto On.
(Observe the time programming of the osmosis installation.)– CDS for acid connected.
Submenu Default value Value range Resolution Selectable options
Weekly programs The program and the power-up time may be preselected.Then turn programming on or off via Status.If various programming actions have been performed, it is possible to turn them all on or off via the Auto On Programs I/O button.
Program No program – – RinseHeat disinfectionT1 TestNo program
Power-up time 00:00 00:00–24:00 1 min –
Single programs The program and the power-up time may be preselected.Then turn programming on or off via Status.If various programming actions have been performed, it is possible to turn them all on or off via the Auto On Programs I/O button.
Program No program – – RinseHeat disinfectionT1 TestNo program
Power-up time 00:00 00:00–24:00 1 min –
The bibag® may be installed after completion of the last disinfection of the 5008 hemodialysis system (72 hours maximum before the treatment).For profiting from this possibility, observe the following notes.
Caution
After removal of the foil, immediately connect the bibag® using aseptic techniques. Then close the bicarbonate flap.
Fresenius Medical Care 5008 SM 1/08.04 5-7

Chapter 5: Setup
Emergency (response after touching the Emergency button)
Patient card
Submenu Default value Value range Resolution Selectable options
UF off Yes – – YesNo
Blood flow reduction Yes – – YesNo
Blood pressure measurement
No – – YesNo
Online bolus Yes – – YesNo
Bolus 90 ml 90–240 ml 30 ml –
Bolus rate 200 ml/min 50–250 ml/min 10 ml/min –
Submenu Default value Value range Resolution Selectable options
Patient card Writing to the patient card:– Patient card button In the Operator setup touched.– Remove the operator card.– Insert the patient card.– Message: Patient card for ... date of birth... – OK.– Touch the OK button.– Insert the desired patient data.
(After touching the desired field, the patient data may be entered via the keypad.)
– Touch the OK button to confirm the entered patient data.Visually check the confirmed patient data.
– Touch the Create patient card button.– Message: Saving data to card. Leave card inserted!– Remove the patient card after the message disappeared.
First name – – – –
Surname – – – –
Finesse ID – – – –
Date of birth – – – –
5-8 Fresenius Medical Care 5008 SM 1/08.04

Chapter 5: Setup
ONLINE (Can only be selected if the device option exists and if Filter 2 is set in the submenu Machine options in the Technician's Setup.)
OCM (Can only be selected if the device option exists.)
Submenu Default value Value range Resolution Selectable options
Treatment mode
Treatment mode HDF postdilution – – HDHDF predilutionHDF postdilutionHF predilutionHF postdilution
Bolus
Bolus 150 ml 90–240 ml 30 ml –
Bolus rate 200 ml/min 100–250 ml/min 10 ml/min –
Preparation (Online)
Onl. rinse vol. 800 ml 500–5000 ml 100 ml –
Onl. UF rinse vol. 500 ml 0–5000 ml 100 ml –
Reinfusion (online)
Reinfusion volume 360 ml 60–480 ml 60 ml –
Substitution
Auto-sub Yes – – YesNo
Submenu Default value Value range Resolution Selectable options
OCM start Automatic – – AutomaticManual
Kt/V warning(see OCM description)
Yes – – YesNo
Fresenius Medical Care 5008 SM 1/08.04 5-9

Chapter 5: Setup
Single Needle (Can only be selected if the device option exists.)
Miscellaneous
BPM (Can only be selected if the device option exists.)
Submenu Default value Value range Resolution Selectable options
Maximum stroke vol. 50 ml – – –
Stroke volume 35 ml 10-50 ml 5 ml –
Rate ratio(ratio blood pump speed to SN pump speed)
+20 % –60 % to +60 % 5 % –
Submenu Default value Value range Resolution Selectable options
Installation place Installation place of the 5008 hemodialysis system may be entered here (e.g. name of the clinic).
Submenu Default value Value range Resolution Selectable options
SYS max 165 mmHg 100–280 mmHg 1 mmHg –
DIA max 100 mmHg 100–240 mmHg 1 mmHg –
MAP max 120 mmHg 80–255 mmHg 1 mmHg –
PULSE max 150 1/min 50–245 1/min 1 1/min –
SYS min 90 mmHg 30–140 mmHg 1 mmHg –
DIA min 50 mmHg 10–90 mmHg 1 mmHg –
MAP min 70 mmHg 20–120 mmHg 1 mmHg –
PULSE min 40 1/min 20–140 1/min 1 1/min –
Pressure preselection 160 mmHg 100–290 mmHg 1 mmHg –
5-10 Fresenius Medical Care 5008 SM 1/08.04

Chapter 5: Setup
BTM (Can only be selected if the device option exists.)
Submenu Default value Value range Resolution Selectable options
BTM
BTM(Tubing detection after turning power on)
Active – – ActivePassive
Recirculation
Recirculation measurement
Automatic – – AutomaticManual
Body temperature
Temp. control Automatic – – AutomaticManual
Temperature change 0.0 °C –0.5 to +0.5 °C/h 0.1 °C/h –
Room temperature
Room temperature 20.0 °C 15.0–35.0 °C 1.0 °C –
Fresenius Medical Care 5008 SM 1/08.04 5-11

Chapter 5: Setup
5-12 Fresenius Medical Care 5008 SM 1/08.04

Chapter 5: Setup
5.2 Technician's SETUP
Selecting the technician's SETUP
System turned power on.
Insert the technician's card.
Touch the SYSTEM button.
Touch the SERVICE button in the SYSTEM screen.
Touch the SETUP button on the SERVICE SCREEN.
How to use the OPERATOR SETUP
Save with OK.
Touch the logo to select default values.
Hydraulics settings
EBM settings
Submenu Default value Value range Resolution Selectable options
Machine options
Machine options DIASAFE®plus or ONLINEplus™(not adjustable)
– – –
Filter 1 – – – Filter not presentPresent
Filter 2 – – – Filter not presentPresent
Water inlet tube
Length 3.0 m 1.0–5.0 m 0.1 m –
Internal diameter 6 mm 3–20 mm 1 mm –
Submenu Default value Value range Resolution Selectable options
Machine options
Motor type Premotec – – PremotecPapstothers
Fresenius Medical Care 5008 SM 1/08.04 5-13

Chapter 5: Setup
Dialysate default values
Submenu Default value Value range Resolution Selectable options
Concentrate Depending on the setting in the technician's SETUP item "Define concentrates".SK-F 203
– – Depending on the setting in the technician's SETUP item "Define concentrates".
Prescr. Na 138 mmol/l 125–160 mmol/l 1 mmol/l –
Prescr. Bic 32.0 mmol/l 0–40.0 mmol/l 1 mmol/l –
Flow 500 ml/min 100–1000 ml/min 100 ml/min –
Auto flow Yes – – YesNo
Auto flow factor 1.9 1.0–2.0 0.1 –
Temperature 36.5 °C 34 °C–39 °C 0.5 °C –
5-14 Fresenius Medical Care 5008 SM 1/08.04

Chapter 5: Setup
Define concentrates
Submenu Default value Value range Resolution Selectable options
Operator list AC-F 113 (10 l)AC-F 219/3 (6 l)AC-F 311 (6 l)AC-F 411 (6 l)AC-F 419 (6 l)SK-F 203 (6 l)SK-F 311 (10 l)AC-F 213 (6 l)
– – SK-F 003SK-F 016SK-F 119SK-F 119/4SK-F 119/1SK-F 119/5SK-F 119/2SK-F 113/1SK-F 118SK-F 109SK-F 103SK-F 112SK-F 113SK-F 1/513SK-F 219/0SK-F 219/3SK-F 207SK-F 219/1SK-F 2129SK-F 21/56SK-F 213/4SK-F 212/1SK-F 216/1SK-F 219SK-F 21/53SK-F 209SK-F 218/1SK-F 218SK-F 202SK-F 203SK-F 212SK-F 216SK-F 213SK-F 223SK-F 212/2SK-F 2/513SK-F 318/1SK-F 313/2SK-F 301SK-F 309SK-F 311SK-F 312/1SK-F 316SK-F 313/1SK-F 318
SK-F 303SK-F 313SK-F 3/513SK-F 412/1SK-F 419SK-F 416SK-F 411/1SK-F 413/1SK-F 401SK-F 411SK-F 413
AC-F 113AC-F 119AC-F 113/1AC-F 119/1AC-F 203AC-F 213AC-F 218AC-F 219AC-F 223AC-F 212/1AC-F 213/4AC-F 216/1AC-F 218/1AC-F 219/0AC-F 219/1AC-F 219/3AC-F 219/4AC-F 219/5AC-F 303AC-F 311AC-F 313AC-F 316AC-F 318AC-F 312/1AC-F 313/3AC-F 318/1AC-F 216AC-F 411AC-F 413AC-F 419AC-F 412/1AC-F 413/1AC-F 016
Fresenius Medical Care 5008 SM 1/08.04 5-15

Chapter 5: Setup
Define syringe types
Define cleaning parameters
Submenu Default value Value range Resolution Selectable options
Operator list Fresenius 30 ml – – B&D 10 mlFresenius 10 mlNipro 10 mlTerumo 10 mlNipro 20 mlB&D 20 mlTerumo 20 mlJMS 20 mlB. Braun 30 mlB&D 30 mlDispomed 30 mlFresenius 30 mlNipro 30 mlTerumo 30 ml
Submenu Default value Value range Resolution Selectable options
PAGE 1
Cleaning pgm combination
Heat disinfection – – RinseHeat disinfectionDegreasing/cold disinfection
Disinfection port 1 Diasteril® (6 l) – – Diasteril®(6000 ml)Citrosteril®(5000 ml)Puristeril® 340(4400 ml)
Disinfection port 2 Sporotal® 100 (4.3 l)
– – Sporotal® 100(4300 ml)
5-16 Fresenius Medical Care 5008 SM 1/08.04

Chapter 5: Setup
Submenu Minimum time (minutes : seconds) Maximum time (minutes)
Resolution(minutes)
Flow 600 ml/min Flow 800 ml/min
PAGE 2
Rinse clear Not programmable – see Rinse clear below
Hot rinse
with/without DIASAFE®plus
15:00 12:50 60 1
ONLINEplus™ 17:30 14:50 60 1
Integrated hot rinse
with/without DIASAFE®plus
05:00 05:00 60 1
ONLINEplus™ 05:00 05:00 60 1
Cool down rinse
with/without DIASAFE®plus
03:45 03:20 not adjustable not adjustable
ONLINEplus™ 04:30 03:55 not adjustable not adjustable
Rinse
with/without DIASAFE®plus
06:50 05:50 600 1
ONLINEplus™ 07:45 06:35 600 1
Rinse clear
with/without DIASAFE®plus
06:15 05:15 60 1
ONLINEplus™ 07:10 06:00 60 1
Disinfection
with/without DIASAFE®plus
08:40 08:40 60 1
ONLINEplus™ 10:15 10:15 60 1
Heat disinfection
with/without DIASAFE®plus
13:40 13:40 60 1
ONLINEplus™ 15:40 15:40 60 1
Mandatory rinse
with/without DIASAFE®plus
16:10 13:35 60 1
ONLINEplus™ 18:10 15:05 60 1
Fresenius Medical Care 5008 SM 1/08.04 5-17

Chapter 5: Setup
Define options (cannot be set yet)
Define screen pages (cannot be set yet)
Novram
Submenu Default value Value range Resolution Selectable options
PAGE 2
Cleaning flow 800 ml/min – – 800 ml/min600 ml/min
Heater rod power rating
2000 W(not adjustable)
– – –
Audible info No(not adjustable)
– – –
Auto Off 10 min – – Immediately10 min30 min60 minNo
Mandatory disinfection after treatment
No(not adjustable)
– – –
Disinfection note No(not adjustable)
– – –
Submenu Selectable options
Novram Delete mandatory disinfection
Delete mandatory rinse
5-18 Fresenius Medical Care 5008 SM 1/08.04

Chapter 5: Setup
Miscellaneous
Submenu Default value Value range Resolution Selectable options
Date(current date)
Time(current time)
Loudness 6 – – 1–9
Sound 1 – – 0–3
Sound check Off – – OffAudible alarmAudible warningAudible infoStart-up sound
Skip T1 test No – – NoYes
Records Yes – – YesNo
Flash Flash 1 – – Flash 1Flash 2
Recording rate Low – – LowHigh
Fresenius Medical Care 5008 SM 1/08.04 5-19

Chapter 5: Setup
5-20 Fresenius Medical Care 5008 SM 1/08.04

Chapter 5: Setup
5.3 Information Regarding the Setting of Concentrates in the Technician’s Setup
The following setting limits must be observed in the technician’s menu for the specification of the concentrates:
Explanation of the terms used in the Settings menu
Na+ (sodium),K+ (potassium),Ca2+ (calcium),Mg2+ (magnesium),C- (chloride),HCO3- (bicarbonate)
Is the concentration of the respective ions in the ready-to-use dialysate.
NaB Is the concentration of the sodium in the ready-to-use dialysate which originates from the bicarbonate concentrate. If the bicarbonate concentrate does not contain any additional saline, this value equals the total of the values for bicarbonate and acid (acid is most cases identical with the acetate)If the bicarbonate concentrate contains additional saline, the value for NaB equals the total of the final concentration of this saline in the ready-to-use dialysate, the bicarbonate and the acid.If the value set for NaB is zero it is assumed that the concentrate is pure bicarbonate concentrate, the software will set NaB = HCO3-
CH3COO- Acetate, is the concentrate of the acetate in the ready-to-use dialysate.In case of bicarbonate dialysis:If the value set here is zero, it is assumed that the prescription contains hydrochloric acid (HCl).
Acid CH3COOH or HCl, is the concentration of the acid which originates from the acidic or sodium concentrate (prior to the reaction with the bicarbonate component), in case of bicarbonate dialysis it is in most cases identical with the acetate. If the value set here is zero, it is assumed that it is identical with acetate, i.e. that the acetate of the ready-to-use dialysate is produced by the reaction of the acetic acid of the acid concentrate with the bicarbonate and that the concentrates did not contain any acetate prior to this reaction. This is the normal case. Acetic acid and hydrochloric acid are considered as acid.
Glucose Is the concentration of the glucose in the ready-to-use dialysate. Caution: The unit of measure is g/L
Mixing ratio
Acid proportion Proportion of the acidic concentrate of the composition, is the reference quantity of the mixing ratio, constant = 1
Bic components Proportion of the bicarbonate concentrate of the composition. In case of acetate dialysis the value is 0.
Fresenius Medical Care 5008 SM 1/08.04 5-21

Chapter 5: Setup
H2O components Proportion of the RO water of the composition.
3mix dialysis
Indi components Proportion of the individual concentrate of the composition. The value 0 stands for no individual concentrate dialysis.
NaI Is the concentration of the sodium (NaCl) in the ready-to-use dialysate which originates from the individual concentrate.
ConcI Is the concentration of the acid in the ready-to-use dialysate which originates from the individual concentrate. The Fresenius 3mix system currently uses hydrochloric acid. The use of acetic acid is possible if this is considered in the specification of the acetate proportion.
Setting limits for acetate dialysis
Name Unit Min. value Max. value Condition
Na+ sodium 1 mmol/L 125 150
K+ potassium 1/100 mmol/L 0.00 5.00
Ca2+ calcium 1/1000 mmol/L 0.00 2.500
Mg2+ magnesium
1/100 mmol/L 0.20 1.00
Cl- chloride 1/100 mmol/L 80.00 126
HCO3- bicarbonate
1/10 mmol/L 0 0
CH3COO- acetate
30.00 40.00
Glucose gm/L 0 3
Acid proportion(here = acetate concentrate proportion)
non-dimensional
1 ( = constant)
Bic components non-dimensional
0
H2O components
non-dimensional
19 40
All others 0
5-22 Fresenius Medical Care 5008 SM 1/08.04

Chapter 5: Setup
Setting limits for bicarbonate dialysis (3mix settings are not implemented)
The table with possible settings offers optimum flexibility. It is, however, indispensable that all persons entering prescriptions are specially trained and instructed.The input limits cannot guarantee that the prescriptions entered will affect several setting limits and will not generate a conductivity alarm, are physiologic.
The allowed concentrate setting limits specified above also affect the limits which can be set by the operator. Some of the expected operator adjustments may then no longer be possible:
Operator setting limits:
Name Unit Min. value Max. value Condition
Na+ sodium 1 mmol/L 125 150
Requirements: the NaCl (saline) concentration in the acidic concentrate must be ≥ 1800 mmol/l.
K+ potassium 1/100 0.00 5.00
Ca2+ calcium 1/1000 mmol/l 0.00 2.500
Mg2+ magnesium
1/100 mmol/l 0.20 1.00
Cl- chloride 1/100 mmol/l 80.00 126
HCO3- bicarbonate
1/10 mmol/l 24.0 40.0
Requirements: the concentration of bicarbonate in the bicarbonate concentrate must be ≥ 6 %.
CH3COO- acetate
1/100 mmol 0.00 10.00 Acetate and acid input ≤ 10.00
Acid 1/100 mmol 1.50 4 in most cases = acetate
Glucose gm/L 0 3
Acid proportion non-dimensional
1 ( = constant)
Bic components non-dimensional
Bic components =
H2O components x 0.017
MixBic =
H2O components x 0.055
H2O components
non-dimensional
17 800 and additional 19 000 bic components
50.000 The following mixing ratio facilitates the calculation:
Mix = 1+Bic components +H2O components ≥ 20
Indi components Not implemented.
NaB 1/10 mmol/L = bicarbonate = bicarbonate +30.0
Fresenius Medical Care 5008 SM 1/08.04 5-23

Chapter 5: Setup
Prescribed Na Concentration of the prescription ± 10% (rounded off)and:12.8 mS/cm ≤ expected conductivity ≤15.7 mS/cm and:125 mmol/L ≤ prescribed Na ≤ 155 mmol/L
Prescribed bicarbonate Concentration of the prescription ± 8 mmol/Land:20 mmol/L ≤ prescribed bicarbonate ≤ 40 mmol/Land:12.8 mS/cm ≤ expected conductivity ≤15.7 mS/cm
Whichever condition is the most stringent applies.
5-24 Fresenius Medical Care 5008 SM 1/08.04

Chapter 6: TSC / TMC / Maintenance
6 TSC / TMC / Maintenance
6.1 Important Information
This chapter includes the Technical Safety Checks (TSC), the Technical Measurement Checks (TMC) and the Maintenance Procedures (MA) to be performed.(Technical Measurement Checks are applicable only to Item 6.4 BPM.)
The Technical Safety Checks (TSC) and the Technical Measurement Checks (TMC) must be carried out every 2 years (24 months).
Performance of the Technical Safety Checks must be entered in the Medical Device Register.
The following applies to the technical measurement checks. After successful completion of the technical measurement checks, the respective parts of the hemodialysis system must be identified with a sign (label). This label must, in a unique and traceable manner, specify the year of the next Technical Measurement Check and the authority or person having performed the Technical Measurement Check.
Performance of the Maintenance Procedures (MA) is recommended by the manufacturer. The maintenance procedures must also be carried out every 2 years (24 months) and ensure smooth operation.
Precautions for working on the system
Assembly, extensions, adjustments, modifications or repairs may only be carried out by the manufacturer or persons authorized by him.The activities described in the Technical Manual require the availability of the necessary technical measuring equipment and accessories.Respect the following precautions when working on the open system:Protect the components against ingress of fluids.Do not touch live parts (e.g. connectors of the power cord or heater).When repairing and when replacing spare parts, observe the applicable ESD precautions (e.g. EN 100 015-1).
Fresenius Medical Care 5008 SM 1/08.04 6-1

Chapter 6: TSC / TMC / Maintenance
6-2 Fresenius Medical Care 5008 SM 1/08.04

Chapter 6: TSC / TMC / Maintenance
6.2 Test Report – Technical Safety Checks, Technical Measurements Checks and Maintenance Procedures
TSC / TMC / MA Test Report
5008 for the Technical Safety Checks andTechnical Measurement Checks and Maintenance Procedures to be performed every 2 years (24 months)
The following inspections must be carried out by persons who are qualified to properly perform the Technical Safety Checks and Technical Measurement Checks owing to their educational background and training, their knowledge and experience gained in practice and who are not bound to any directions with regard to their inspection activity.
Technician's name: Service report number:
Customer/Customer no.:
Inventory no.: Serial no.: Operating hours:
Machine type:
including option(s):
FreseniusMedicalCare
Fresenius Medical Care 5008 SM 1/08.04 6-3

Chapter 6: TSC / TMC / Maintenance
TSCTMC
MA No. Description Measure-ment value
1 Visual inspections
TSC 1.1 Labels and labelings are present and legible.
TSC 1.2 The mechanical condition permits further safe use.There are no signs of damage or safety-reducing dirt.
TSC 1.3 No signs of damage on the power cord.
TSC 1.4 Leakage sensors (S14, S35, EBM) inspected visually. Leakage sensors cleaned.
TSC 1.5 Check valve for heat exchanger (A05) checked for proper function.
TSC 1.6 Rotor position (blood pump) checked. Rotor cleaned.
MA 1.7 Dirty or shabby tubes replaced.
MA 1.8 Only applicable to CDS:Bicarbonate and concentrate flaps checked for proper functioning.
MA 1.9 Seal of rinse chamber replaced.
MA 1.10 Filters (F06, F08, F10, F11, F12, F13, F14, F15, F16) changed.
MA 1.11 Filters (F01, F07) checked and changed if necessary.
MA 1.12 O-rings in dialyzer couplings replaced.
MA 1.13 Disinfectant suction valves (V20, V34) replaced.
MA 1.14 Arterial and venous clamps checked.
2 General checks
TSC 2.1 Power failure alarm checked.
Permanent tone; alarm message: Power failure – Machine is battery-operated.
MA 2.2 Torque setting of monitor arm checked in all 3 axes.
MA 2.3 Every 4 years only:Battery replaced.
3 Hydraulics unit
MA 3.1 Loading pressure of balancing chamber checked. ________
MA 3.2 Level sensor (S17, S19) checked. (Not applicable to bibag.)
MA 3.3 Leakage sensors (S14, S35) inspected.
6-4 Fresenius Medical Care 5008 SM 1/08.04

Chapter 6: TSC / TMC / Maintenance
4 Dialysis mode
TSC 4.1 PT7 (temperature) checked at 37 °C. (Flow 500 ml/min)
Desired value: 36.8 °C to 37.2 °C (display on hemodialysis system)
________
Measure the reference temperature with an external measuring instrument.Difference = Reference temperature minus PT7Desired value – difference: –0.5 °C to +0.2 °C
________
TSC 4.2 CD7 (conductivity) checked.
Desired value: approx. 13.5 mS/cm to approx. 14.5 mS/cm ________
Measure the reference conductivity with an external measuring instrument.Difference = Reference conductivity minus CD7Desired value – difference: ±0.2 mS/cm
________
MA 4.3 Dialysate pressure checked.
4.3.1 Zero point S03/S07
Reference measuring instrument: 0 mbar ________
Check S03.Desired value: +16 mbar to +76 mbar
________
Check S07.Desired value: +16 mbar to +76 mbar
________
4.3.2 Slope S03/S07 (+)
Reference measuring instrument: +533 mbar (± 26 mbar) ________
Check S03.Desired value: S03 = Display of reference measuring instrument + (+16 mbar to +76 mbar)
________
Check S07.Desired value: S07 = Display of reference measuring instrument + (+16 mbar to +76 mbar)
________
4.3.3 Slope S03/S07 (-)
Reference measuring instrument: -533 mbar (± 26 mbar) ________
Check S03.Desired value: S03 = Display of reference measuring instrument + (+16 mbar to +76 mbar)
________
Check S07.Desired value: S07 = Display of reference measuring instrument + (+16 mbar to +76 mbar)
________
TSCTMC
MA No. Description Measure-ment value
Fresenius Medical Care 5008 SM 1/08.04 6-5

Chapter 6: TSC / TMC / Maintenance
5 Extracorporeal components
5.1 Arterial pressure display checked.
MA 5.1.1 Zero point of arterial pressure display (standby operation)
Desired value: –5 mmHg to +5 mmHg ________
MA 5.1.2 Slope of arterial pressure display (standby operation)
Desired value: –5 mmHg to +5 mmHg ________
5.2 Venous pressure display checked.
MA 5.2.1 Zero point of venous pressure display (standby operation)
Desired value: –5 mmHg to +5 mmHg ________
MA 5.2.2 Slope of venous pressure display (standby operation)
Desired value: –5 mmHg to +5 mmHg ________
TSC 5.3 Venous clamp checked.
A pressure change within 3 minutes must not exceed the following values:
Arterial pressure display, maximum pressure change: ±5 mmHg
Pressure display of reference measuring instrument, desired maximum pressure drop: –0.1 bar
MA 5.4 Leakage sensor (EBM) cleaned.
TSCTMC
MA No. Description Measure-ment value
6-6 Fresenius Medical Care 5008 SM 1/08.04

Chapter 6: TSC / TMC / Maintenance
6 Options
6.1 biBag
TSC MA 6.1.1 O-ring at connector replaced.
6.2 Diasafe
TSC MA 6.2.1 Hydrophobic filter DIASAFEplus changed.
6.3 ONLINEplus
TSC 6.3.1 Rotor position (ONLINEplus) checked. Rotor cleaned.
MA 6.3.2 Tube in tube squeeze valve replaced.
TSC 6.3.3 Hydrophobic filter changed.
TSC 6.3.4 O-rings at substituate port and rinse port replaced.
6.4 BPM
MA 6.4.1 Attachments of internal blood pressure module, printed circuit boards and cable connections checked.
MA 6.4.2 Tube connection properly fixed to hemodialysis system.
MA 6.4.3 Tubings and cuffs checked for damage.(damaged parts replaced)
TMC 6.4.4 Leakage test performed.
Pressure leakage rate: <6 mmHg/min ________
TMC 6.4.5 Safety valve tested.
System emptied at 320 mmHg, ±10 mmHg ________
TMC 6.4.6 Blood pressure measurement performed.
Measured values are plausible.
TMC 6.4.7 Calibration performed.
Pressure values / tolerance250 mmHg / ±3 mmHg200 mmHg / ±3 mmHg150 mmHg / ±3 mmHg100 mmHg / ±3 mmHg50 mmHg / ±3 mmHg
System / ref.System / ref.System / ref.System / ref.System / ref.
____/________/________/________/________/____
6.5 Single Needle
TSC 6.3.1 Rotor position (Single Needle) checked. Rotor cleaned.
TSCTMC
MA No. Description Measure-ment value
Fresenius Medical Care 5008 SM 1/08.04 6-7

Chapter 6: TSC / TMC / Maintenance
7 Check – electrical safetyIn Germany according to DIN VDE 0751-1, edition 10/2001.In other countries, observe the local regulations!
TSC 7.1 Visual inspections performed according to item 1.
TSC 7.2 Protective earth resistance measured.
max. 0.3Ω (with ) ______ Ω
TSC 7.3 Leakage current (device leakage current) measured.
Differential current measurement according to figure C.6or
Direct measurement according to figure C.5
Nominal voltage of power supply: __________ V
Device leakage current mains polarity 1 __________ µA
with line voltage __________ V
scaled to nominal voltage (maximum 500 µA, see Additional requirements)
_____ µA
Device leakage current mains polarity 2 __________ µA
with line voltage __________ V
scaled to nominal voltage (maximum 500 µA, see Additional requirements)
_____ µA
Test equipment used: ________________________
8 Final inspection and testing
TSC MA 8.1 T1 test performed with all options.
TSC MA 8.2 Disinfection performed.
TSCTMC
MA No. Description Measure-ment value
6-8 Fresenius Medical Care 5008 SM 1/08.04

Chapter 6: TSC / TMC / Maintenance
Date: Signature: Stamp:
The system has been released for further use. Yes No
Comments:
Date: Signature: Stamp:
Fresenius Medical Care 5008 SM 1/08.04 6-9

Chapter 6: TSC / TMC / Maintenance
6-10 Fresenius Medical Care 5008 SM 1/08.04

Chapter 6: TSC / TMC / Maintenance
6.3 Explanations on Technical Safety Checks, Technical Measurement Checks and Maintenance Procedures
TSCTMC
MA No. Description
1 Visual inspections
TSC 1.1 Labels and labelings are present and legible.
Front view:
Applicable to ONLINEplus™ (option):Substituate and rinse ports; warning of scalding and cauterizing risks.
Bicarbonate and concentrate flaps; warning of scalding and cauterizing risks.
Under bicarbonate flap: reference to bibag®.
Rear view:
IV pole; maximum load warning
Upper door area; warning of tilting risk andtype label.
Disinfection connectors; warning of cauterizing risk.
Hydraulics connectorPotential equalization labelZKV/CDS 1, ZKV/CDS 2 and BIC labelsWarning of scalding and cauterizing risks.Accumulator label
Fresenius Medical Care 5008 SM 1/08.04 6-11

Chapter 6: TSC / TMC / Maintenance
To the right:
Under shunt interlock: warning of scalding and cauterizing risks.Arrow labels on dialyzer connectors.
On inside of door of dialysate filter chamber;Warning of scalding and cauterizing risks.
On filter holders;filter 1 and filter 2 labels;warning of scalding and cauterizing risks.
TSC 1.2 The mechanical condition permits further safe use.There are no signs of damage or safety-reducing dirt.
There must not be any damage or dirt affecting the electrical and mechanical properties.The following and other checks must be performed:The monitor can be swivelled and stays in the position desired.If its brakes are not locked, the carriage can be moved as desired. Check the brake.Check EBM, concentrate connectors, filter chamber, and complete hydraulics (e.g. leaks, corrosion, broken parts, loose parts).
TSC 1.3 No signs of damage on the power cord.
TSCTMC
MA No. Description
6-12 Fresenius Medical Care 5008 SM 1/08.04

Chapter 6: TSC / TMC / Maintenance
TSC 1.4 Leakage sensors (S14, S35, EBM) inspected visually. Leakage sensors cleaned.
Visually check leakage sensors for cleanliness and mechanical damage. The lacquer coat of the sensors must not be damaged.
EBM(leakage sensor)
S 14(leakage sensor of filter chamber)
S 35(leakage sensor of hydraulics)
TSC 1.5 Check valve for heat exchanger (A05) checked for proper function.
.
TSC 1.6 Rotor position (blood pump) checked. Rotor cleaned.
Visually check the rotor position (blood pump); rotor in proper stator. Line rollers and guide pulleys are running smoothly.
MA 1.7 Dirty or shabby tubes replaced.
The following and other checks must be performed: Dialyzer supply and drain line
MA 1.8 Only applicable to CDS:Bicarbonate and concentrate flaps checked for proper functioning.
Check engagement and microswitch.
MA 1.9 Seal of rinse chamber replaced.
Replace seal and iron ring.
TSCTMC
MA No. Description
Fresenius Medical Care 5008 SM 1/08.04 6-13

Chapter 6: TSC / TMC / Maintenance
MA 1.10 Filters (F06, F08, F10, F11, F12, F13, F14, F15, F16) changed.
To the left:F06Hydrophobic filter compressor
To the right:F08Filter of UF pump
To the left:F10Filter, disinfectant 1
To the right:F16Filter, disinfectant 2
Change filter including O-ring. Grease O-rings before installing them.
After installation, the mark must be at the top.
F11Suction rod with acetate filter
F12Suction rod with bicarbonate filter
TSCTMC
MA No. Description
6-14 Fresenius Medical Care 5008 SM 1/08.04

Chapter 6: TSC / TMC / Maintenance
To the right:F15Filter, CDS acid 1
Middle:F14Filter, CDS acid 2
To the left:F15Filter, CDS bicarbonate
Change filter including O-ring. Grease O-rings before installing them.
After installation, the mark must be at the top.
MA 1.11 Filters (F01, F07) checked and changed if necessary.
To the right:F01Water inlet filter
To the left:F07Dialysate filter
If necessary, change filter including O-rings. Grease O-rings before installing them.
After installation, the mark must be at the top.
MA 1.12 O-rings in dialyzer couplings replaced.
(Grease O-rings before installing them.)
MA 1.13 Disinfectant suction valves (V20, V34) replaced.
To the left:V20Disinfection valve 1
To the right:V34Disinfection valve 2
TSCTMC
MA No. Description
Fresenius Medical Care 5008 SM 1/08.04 6-15

Chapter 6: TSC / TMC / Maintenance
MA 1.14 Arterial and venous clamps checked.
Integrity of:1 Grip handle2 Valve tappet3 Clamping and tappet surfaces
2 General checks
TSC 2.1 Power failure alarm checked.Permanent tone; alarm message: Power failure – Machine is battery-operated.
Pull off power plug to check the power failure alarm.
MA 2.2 Torque setting of monitor arm checked in all 3 axes.
MA 2.3 Every 4 years only:Battery replaced.
Monitor batteryReplace battery swiftly to prevent loss of data.
Power supply unit batteryTurn on the hemodialysis system after having replaced the battery.The current time is applied after the next power-on.
BatteryPlace the battery connection cable in the appropriate guides.
3 Hydraulics unit
MA 3.1 Loading pressure of balancing chamber checked.
This pressure should be measured in the course of maintenance procedures. Is done in the 5008 service program
TSCTMC
MA No. Description
1 32
6-16 Fresenius Medical Care 5008 SM 1/08.04

Chapter 6: TSC / TMC / Maintenance
MA 3.2 Level sensor (S17, S19) checked. (Not applicable to biBag.)
MA 3.3 Leakage sensors (S14, S35) inspected.
Visually check leakage sensors for cleanliness and mechanical damage. The lacquer coat of the sensors must not be damaged.
EBM(leakage sensor)
S 14(leakage sensor of filter chamber)
4 Dialysis mode
TSC 4.1 PT7 (temperature) checked at 37 °C. (Flow 500 ml/min)
Desired value: 36.8 °C to 37.2 °C (display on hemodialysis system)
Measure the reference temperature with an external measuring instrument.Difference = Reference temperature minus PT7Desired value – difference: –0.5 °C to +0.2 °C
TSC 4.2 CD7 (conductivity) checked.
Desired value: approx. 13.5 mS/cm to approx. 14.5 mS/cm
Measure the reference conductivity with an external measuring instrument.Difference = Reference conductivity minus CD7Desired value – difference: ±0.2 mS/cm
TSCTMC
MA No. Description
Fresenius Medical Care 5008 SM 1/08.04 6-17

Chapter 6: TSC / TMC / Maintenance
MA 4.3 Dialysate pressure checked.
In the service mode, select CALIBRATE.
Basic requirements:The hemodialysis system must be closed.The reference measuring instrument must be placed at the bottommost position of the IV pole.Dialyzer couplings must be connected to the reference instrument.Flow on until dialysate lines and reference measuring instrument are free from air. Then flow off.
4.3.1 Zero point S03/S07
Reference measuring instrument: 0 barOpen the vent valve (UMED).Using a syringe (filled with fluid) set a value of 0 bar, via the vent valve.
Check S03.Desired value: +16 mbar to +76 mbar
Check S07.Desired value: +16 mbar to +76 mbar
4.3.2 Slope S03/S07 (+)
Reference measuring instrument: +533 mbar (± 26 mbar)Using a syringe (filled with fluid) set a value of +533 bar, via the vent valve.
Check S03.Desired value: S03 = Display of reference measuring instrument + (+16 mbar to +76 mbar)
Check S07.Desired value: S07 = Display of reference measuring instrument + (+16 mbar to +76 mbar)
4.3.3 Slope S03/S07 (–)
Reference measuring instrument: –533 mbar (± 26 mbar)Using a syringe (filled with fluid) set a value of –533 bar, via the vent valve.
Check S03.Desired value: S03 = Display of reference measuring instrument + (+16 mbar to +76 mbar)
Check S07.Desired value: S07 = Display of reference measuring instrument + (+16 mbar to +76 mbar)
5 Extracorporeal components
MA 5.1 Zero point of arterial pressure display checked (standby operation)
Desired value: –5 mmHg to +5 mmHg
MA 5.2 Zero point of venous pressure display checked (standby operation)
Desired value: –5 mmHg to +5 mmHg
TSCTMC
MA No. Description
6-18 Fresenius Medical Care 5008 SM 1/08.04

Chapter 6: TSC / TMC / Maintenance
TSC 5.3 Venous clamp checked.
Basic requirements:
Blood lines inserted, standby operation.
Connect the arterial and the venous branch using the adapter fitting included.
Remove the line from the arterial clamp.
Clamp the blood line before the blood pump and on the venous drip chamber.
Connect the external pressure measuring instrument to the venous bubble catcher.
Connect the syringe and the one-way valve (if present) to the venous bubble catcher.
Pressure build-up – arterial side:
Open the venous clamp.
Using a syringe, build up an arterial pressure of 50 mmHg to 100 mmHg.
Observe the arterial display on the hemodialysis system.
Close the venous clamp.
Pressure build-up – venous side:
Venous clamp closed.Using a syringe, build up a pressure of 2.5 bar to 2.7 bar.
Observe the display on the external reference measuring instrument.
Maximum pressure change within 3 minutes on the arterial pressure display of the hemodialysis system ±5 mmHg.
Maximum pressure drop within 3 minutes on the display of the reference measuring instrument –0.1 bar.
TSCTMC
MA No. Description
Fresenius Medical Care 5008 SM 1/08.04 6-19

Chapter 6: TSC / TMC / Maintenance
MA 5.4 Leakage sensors (EBM) cleaned.
Visually check leakage sensor for cleanliness and mechanical damage. The lacquer coat of the sensors must not be damaged.
EBM(leakage sensor)
6 Options
6.1 biBag
TSC MA 6.1.1 O-ring at connector replaced.
6.2 Diasafe
TSC MA 6.2.1 Hydrophobic filter DIASAFEplus changed.
6.3 ONLINEplus
TSC 6.3.1 Rotor position (ONLINEplus) checked. Rotor cleaned.
MA 6.3.2 Tube in tube squeeze valve replaced.
TSC 6.3.3 Hydrophobic filter changed.
TSC 6.3.4 O-rings at substituate port and rinse port replaced.
6.4 BPM
MA 6.4.1 Attachments of internal blood pressure module, printed circuit boards and cable connections checked.
MA 6.4.2 Tube connection properly fixed to hemodialysis system.
MA 6.4.3 Tubings and cuffs checked for damage.(damaged parts replaced)
TMC 6.4.4 Leakage test performed.
In the service mode, select DIAGNOSTICS. Select BPM from the DIAGNOSTICS menu.
Basic requirements:
Tube and blood pressure cuff connected.
The blood pressure cuff must be placed on an artificial limb.
Pressure preselection 250 mmHg
Touch the Leakage test I/O button. (Test time approx. 4 minutes)
Read off the leakage rate from Info BPM. The maximum pressure leakage rate must be ≤6 mmHg/min.
TSCTMC
MA No. Description
6-20 Fresenius Medical Care 5008 SM 1/08.04

Chapter 6: TSC / TMC / Maintenance
TMC 6.4.5 Safety valve tested.
In the service mode, select DIAGNOSTICS. Select BPM from the DIAGNOSTICS menu.
Basic requirements:
Tube and blood pressure cuff connected.
The blood pressure cuff must be placed on an artificial limb.
Pressure preselection 290 mmHg
Touch the Calibration test I/O button.
Once the pressure has reached approx. 290 mmHg, increase the pressure by slowly pressing the blood pressure cuff. If 320 mmHg ±10 mmHg is exceeded, the cuff must deflate immediately.
Touch the Status button in the Service menu. Touch the Error memory button. Touch the BPM button. Check the error memory. Turn the hemodialysis system off and back on again.
TMC 6.4.6 Blood pressure measurement performed.
Touch the SYSTEM button.
Touch the Blood pressure button. The blood pressure measurement starts.After the measurement, check whether the values are plausible.
TMC 6.4.7 Calibration performed.
In the service mode, select DIAGNOSTICS. Select BPM from the DIAGNOSTICS menu.
Remove tube and blood pressure cuff from the pressure connector.
Connect a rigid metal vessel (1), a pressure gauge (2), and an aspirator bulb with drain valve (3) to the pressure connector.Touch the Calibration test I/O button.
Set the appropriate test pressure using the drain valve. Wait until the pressure has stabilized. Check the test pressure.
250 mmHg/ ±3 mmHg200 mmHg / ±3 mmHg150 mmHg / ±3 mmHg100 mmHg / ±3 mmHg50 mmHg / ±3 mmHg
6.5 Single Needle
TSC 6.5.1 Rotor position (Single Needle) checked. Rotor cleaned.
TSCTMC
MA No. Description
1
2
3
Pressureport
Fresenius Medical Care 5008 SM 1/08.04 6-21

Chapter 6: TSC / TMC / Maintenance
7 Check – electrical safetyIn Germany according to DIN VDE 0751-1, edition 10/2001.In other countries, observe the local regulations!
TSC 7.1 Visual inspections performed according to item 1.
– Labels and labelings are present and legible.– The mechanical condition permits further safe use.
There are no signs of damage or dirt.– No signs of damage on the power cord.– Fuses accessible from the outside comply with the indicated values.– Labels and labelings are present and legible.
TSC 7.2 Protective earth resistance measured.
No more than 0.3 ohms (with power cord)The protective earth resistance must be checked on the following four measurement points.
1. Measurement point: power supply unit
2. Measurement point: shunt door
TSCTMC
MA No. Description
6-22 Fresenius Medical Care 5008 SM 1/08.04

Chapter 6: TSC / TMC / Maintenance
3. Measurement point: potential equalization
4. Measurement point: heater
TSCTMC
MA No. Description
Fresenius Medical Care 5008 SM 1/08.04 6-23

Chapter 6: TSC / TMC / Maintenance
TSC 7.3 Leakage current (device leakage current) measured.
Differential current measurement according to figure C.6
or
Direct measurement according to figure C.5
Basic requirements:
Measurement of the protective earth resistance performed.
Perform the measurement in the dialysis or preparation mode with the system at operating temperature.
Dialysate:Dialysis temperature: ≥ 37 °CDialysate flow: ≥ 300 ml/minConductivity: ≥ 13 mS/cm
When performing a direct measurement, the following precautions also must be observed:The system must be insulated when installed.All external connections must have been removed from the system.
The line voltage during the measurement will be recorded, as well as the maximum device leakage current of both mains polarities, scaled to the nominal voltage of the power supply. Maximum device leakage current: 500 µA
Example:Line voltage during the measurement: 225 VDevice leakage currentfor mains polarity 1: 180 µAfor mains polarity 2: 120 µAMaximum value of both mains polarities: 180 µANominal voltage of power supply: 230 VScaled to nominal voltage: 184 µA(180 µA: 225 V x 230 V = 184 µADevice leakage current < 500 µA: OK
TSCTMC
MA No. Description
L
N
PE
L(N)
N(L)
M1
L
N
PE
MD
6-24 Fresenius Medical Care 5008 SM 1/08.04

Chapter 6: TSC / TMC / Maintenance
Additional requirements:If the device leakage current, scaled to the nominal voltage, is higher than 90 % of the admissible alarm limit (450 µA), the last measured value or the first measured value must additionally be considered for the rating.If the device leakage current has considerably increased since the last measurement or has continuously increased since the first measurement (creeping deterioration of the insulation), or if the sum composed of the current value plus the difference since the last measurement is > 500 µA, the measurement has not been completed successfully.
Example 1:Device leakage current: 470 µALast measured value: 450 µA470 + (470 – 450) = 470 + 20 = 490; is OK
Example 2:Device leakage current: 470 µALast measured value: 390 µA470 + (470 – 390) = 470 + 80 = 550; not passed
8 Final inspection and testing
TSC MA 8.1 T1 test performed with all options.
TSC MA 8.2 Disinfection performed.
TSCTMC
MA No. Description
Fresenius Medical Care 5008 SM 1/08.04 6-25

Chapter 6: TSC / TMC / Maintenance
6-26 Fresenius Medical Care 5008 SM 1/08.04

Chapter 6: TSC / TMC / Maintenance
6.4 TSC / TMC Report
5008 TSC / TMC Report
for the Technical Safety Checks andTechnical Measurement Checksto be performed every two years (24 months)
The following inspections must be carried out by persons who are qualified to properly perform the Technical Safety Checks and Technical Measurement Checks owing to their educational background and training, their knowledge and experience gained in practice and who are not bound to any directions with regard to their inspection activity.
Technician's name: Service report number:
Customer/Customer no.:
Inventory no.: Serial no.: Operating hours:
Machine type:
including option(s):
No. Description Measurement value
1 Visual inspections
1.1 Labels and labelings are present and legible.
1.2 The mechanical condition permits further safe use.There are no signs of damage or safety-reducing dirt.
1.3 No signs of damage on the power cord.
1.4 Leakage sensors checked visually. Leakage sensors cleaned.
1.5 Check valve for heat exchanger (A05) checked for proper function.
1.6 Rotor position (blood pump) checked. Rotor cleaned.
2 General checks
2.1 Power failure alarm – continuous sound – display message: Emergency operation
FreseniusMedicalCare
Fresenius Medical Care 5008 SM 1/08.04 6-27

Chapter 6: TSC / TMC / Maintenance
4 Dialysis mode
4.1 Temperature tested with reference instrument.Desired temperature on temperature displayDifference between system temp. / ref. temp.: –0.5 to +0.2 °C
System / ref. ____/____
4.2 Conductivity tested with reference instrument.(The bibag® option requires connection of a bibag®.)Difference between system CD / ref. CD: ≤±0.2 mS/cm
System CD / ref. CD ____/____
5 Extracorporeal components
5.3 Check of venous clamp performed.A change in pressure must not exceed the following values within 3 minutes:Arterial pressure display, maximum change in pressure: ±5 mmHgPressure display of reference measuring instrument, maximum pressure drop: –0.1 bar
6 Options
6.3 ONLINEplus
6.3.1 Rotor position (ONLINEplus) checked. Rotor cleaned.
6.4 BPM
6.4.4TMC
Leakage test performed.Pressure leakage rate: <6 mmHg/min ________
6.4.5TMC
Calibration performed.Pressure values / tolerance250 mmHg / ±3 mmHg200 mmHg / ±3 mmHg150 mmHg / ±3 mmHg100 mmHg / ±3 mmHg50 mmHg / ±3 mmHg
System / ref.System / ref.System / ref.System / ref.System / ref.
____/________/________/________/________/____
6.4.6 Safety valve tested.System emptied at 320 mmHg ±10 mmHg ________
6.4.7TMC
Blood pressure measurement performed.Measured values are plausible.
6.5 Single Needle
6.5.1 Rotor position (Single Needle) checked. Rotor cleaned.
No. Description Measurement value
6-28 Fresenius Medical Care 5008 SM 1/08.04

Chapter 6: TSC / TMC / Maintenance
7 Check – electrical safetyIn Germany according to DIN VDE 0751-1, edition 10/2001.In other countries, observe the local regulations!
7.1 Visual inspections performed according to item 1.
7.2 Protective earth resistance maximum 0.3 ohms (with power cord) ______ Ω
7.3 Leakage current measurement (device leakage current)
Differential current measurement according to figure C.6or
Direct measurement according to figure C.5
Nominal voltage of power supply: __________ V
Device leakage current mains polarity 1 __________ µA
with line voltage __________ V
scaled to nominal voltage (maximum 500 µA, see Additional requirements) _____ µA
Device leakage current mains polarity 2 __________ µA
with line voltage __________ V
scaled to nominal voltage (maximum 500 µA, see Additional requirements) _____ µA
Test equipment used: ________________________
8 Final inspection and testing
8.1 T1 test performed with all options.
8.2 Disinfection performed.
No. Description Measurement value
Fresenius Medical Care 5008 SM 1/08.04 6-29

Chapter 6: TSC / TMC / Maintenance
Date: Signature: Stamp:
The system has been released for further use. Yes No
Comments:
Date: Signature: Stamp:
6-30 Fresenius Medical Care 5008 SM 1/08.04

Chapter 7: Error Messages
7 Error Messages
The messages can be filed in the Message button.Touch the X button to file the messages.To retrieve the messages, touch the Message button.If several messages are displayed, select the desired message.
The windows contain a brief description of the condition for the technician and the required instructions to correct the problem.Help can be displayed directly by touching the ? button in the window. The associated Information window will be opened automatically.
Power failure and depleted batteryScreen failure
Fresenius Medical Care 5008 SM 1/08.04 7-1

Chapter 7: Error Messages
7-2 Fresenius Medical Care 5008 SM 1/08.04

Chapter 8: Tools (Service Equipment)
8 Tools (Service Equipment)
Caution
Only for OCM (option):The accuracy of the measuring equipment used during the calibration is decisive for the accuracy of the OCM measurement.
The measuring equipment used for the calibration of the conductivity must have an accuracy of 0.05 mS/cm in the temperature range of 35 °C to 39 °C.
We recommend using the measuring device UMED (part no. M32 403 1) available from Fresenius Medical Care.
HMED pressure measuring device with case (set)
Part number: M30 770 1
UMED pressure measuring device with case (set)(conductivity, pressure, temperature)
Part number: M32 403 1
Fresenius Medical Care 5008 SM 1/08.04 8-1

Chapter 8: Tools (Service Equipment)
Connection cable UMED - 5008
Part number: M35 152 1
Secutest VDE test device(without printer module)
Part number: 631 064 1
Printer module (without illustration)
Part number: 630 652 1
Carrying bag (without illustration)
Part number: 630 648 1
PC Service Software
Part number: M35 016 1
8-2 Fresenius Medical Care 5008 SM 1/08.04

Chapter 8: Tools (Service Equipment)
Graduated cylinder 100 ml
Part number: 510 085 1
ESD Service Kit
Part number: 630 387 1
ESD Workshop Kit
Part number: 630 388 1
Fresenius Medical Care 5008 SM 1/08.04 8-3

Chapter 8: Tools (Service Equipment)
Toolcase 5008
Part number: M35 463 1
8-4 Fresenius Medical Care 5008 SM 1/08.04

Chapter 9: Calibration / Adjustment
9 Calibration / Adjustment
Selecting calibration
Turn the system on.
Insert the technician's card.
Touch the SYSTEM button.
Touch the SERVICE button in the SYSTEM screen.
Message: Please remove service card.
Touch the CALIBRATE button on the SERVICE SCREEN.
If a red "K" is shown in one of the fields, this indicates that no valid calibration value is available.
Calibrating the touch screen
Select the Calibrate touch screen field. Touch the Start calibration button.
The following message will be displayed on the upper left: Please touch the target points. Touch the "target points".
The following message will be displayed on the lower right: Please touch the target points. Touch the "target points".
When the touch screen has been calibrated, the CALIBRATE SCREEN will be displayed.
INFOIf the menu cannot be selected (touch screen decalibrated), use the following combination of buttons on the monitor. Consecutively press and hold the Mute key, the Blood system Start key and the Blood system Stop key.
Pressure transducer (S03/ S07/ S16)
Select the Pressure transducer (S03/ S07/ S16) field. Touch the Start calibration button.
Automatic adjustment of the zero of the pressure transducers S03, S07 and S16.
When the pressure transducers have been calibrated, the following message will be displayed: Please check or recalibrate degassing (A01/P01) and loading pressure (A02/P02).Touch the Confirm button.
Fresenius Medical Care 5008 SM 1/08.04 9-1

Chapter 9: Calibration / Adjustment
The CALIBRATE SCREEN will be displayed.
Degassing (A01 / P01)
Select the Degassing (A01/P01) field. Touch the Start calibration button.
The following message will be displayed: Adjustment of relief valve A01. between 1200 and 1300 mbar Pressure S16: XXXX mbar. If the pressure is within the range, touch the Confirm button.
When the degassing (A01/P01) has been calibrated, the CALIBRATE SCREEN will be displayed.
If the pressure limitation is not within the desired range, it must be adjusted using A01.
A01
9-2 Fresenius Medical Care 5008 SM 1/08.04

Chapter 9: Calibration / Adjustment
Loading pump (A02 / P02)
Select the Loading pump (A01/P01) field. Touch the Start calibration button.
The following message will be displayed: Adjustment of relief valve A02. between 1800 and 1900 mbar Pressure S03: XXXX mbar. If the pressure is within the range, touch the Confirm button.
When the loading pump (A02/P02) has been calibrated, the CALIBRATE SCREEN will be displayed.
If the pressure limitation is not within the desired range, it must be adjusted using A02.
A02
Fresenius Medical Care 5008 SM 1/08.04 9-3

Chapter 9: Calibration / Adjustment
Flow pump (A03)
Select the Flow pump (A03) field. Touch the Start calibration button.
The following message will be displayed: Adjustment of relief valve A03. between 2550 and 2650 mbar Pressure S15: XXXX mbar. If the pressure is within the range, touch the Confirm button.
The CALIBRATE SCREEN will be displayed. The flow pump (A03) is now calibrated.
If the pressure limitation is not within the desired range, it must be adjusted using A03.
Temperature (PT7/ PT8/ PT9)
Select the Temperature (PT7/ PT8/ PT9) field. Touch the Start calibration button.
Measure the reference temperature with an external measuring instrument.
Basic requirements:The hemodialysis system must be closed.Flow on, response time approx. 10 minutes
Select the Ref. temp. field. Enter the reference temperature. Touch the OK button to confirm the value entered. Touch the Accept value button.
The CALIBRATE SCREEN will be displayed.
A03
9-4 Fresenius Medical Care 5008 SM 1/08.04

Chapter 9: Calibration / Adjustment
Conductivity (CD7/CD9)
Select the Conductivity (CD7/CD9) field. Touch the Start calibration button.
Measure the reference conductivity with an external measuring instrument.
Basic requirements:The hemodialysis system must be closed.Temperature 37 °C, flow on, response time approx. 10 minutes
Adjust the prescribed Na to obtain a value of approx. 13.00 mS/cm.Select the Ref. CD 13.00 mS/cm field. Enter the reference conductivity. Touch the OK button to confirm the value entered. Touch the Accept value button.
Adjust the prescribed Na to obtain a value of approx. 15.00 mS/cm.Select the Ref. CD 15.00 mS/cm field. Enter the reference conductivity. Touch the OK button to confirm the value entered. Touch the Accept value button.
The CALIBRATE SCREEN will be displayed.
Volumes
Select the Volumes field. Touch the Start calibration button.
The hydraulic volumes will be displayed.Balancing chamberDosing chamberUF pumpUF pump 2 (not yet active)
The values displayed must match the values on the labels of the above components.
Blood leak
Select the Blood leak field. Touch the Start calibration button.
The following message will be displayed: Please confirm that the cuvette is clear and properly inserted into the blood leak detector! Calibration will then be performed automatically! – Confirm – Abort. Touch the Confirm button.
When the blood leak detector has been calibrated, the CALIBRATE SCREEN will be displayed.
OCM (option)
Before calibrating the OCM, the temperature must have been calibrated.
Fresenius Medical Care 5008 SM 1/08.04 9-5

Chapter 9: Calibration / Adjustment
Select the OCM field. Touch the Start calibration button.
Automatic OCM adjustment.
When the OCM detector has been calibrated, the CALIBRATE SCREEN will be displayed.
9-6 Fresenius Medical Care 5008 SM 1/08.04

Chapter 10: Repair
10 Repair
(no contents yet)
Fresenius Medical Care 5008 SM 1/08.04 10-1

Chapter 10: Repair
10-2 Fresenius Medical Care 5008 SM 1/08.04

Chapter 11: Functional Description
11 Functional Description
11.1 Overall System
OS
OS
OS
OS
SSRS 232
SSRS 232
SSRS 232
MONITOR
EBM
HYDRAULICS
PSU
CAN_SSCAN_OS
Extensions
Fresenius Medical Care 5008 SM 1/08.04 11-1

Chapter 11: Functional Description
11-2 Fresenius Medical Care 5008 SM 1/08.04

Chapter 11: Functional Description
11.2 Overview of P.C.B.s
Hydraulics
LP 1110 LP 1109LP 1108
EMP
LP 1102
C167 I/O SSModule
PSUI/O SS
LP 952
Valves
LP 1113
LP 1102
C167
HydraulicsDistributor, front
LP 1124
EMP
LP 952
EMP
LP 952
EMP
LP 952
EMP
LP 952
HydraulicsDistributor, left door
LP 1123
HydraulicsDistributor, right door
LP 1125Valves
LP 1113
Valves
LP 1113
Valves
LP 1113
Valves
LP 1113
Valves
LP 1113
Valves
LP 1113
EBM
LP 1126
EBMI/O
LP 1112
LP 1107
LP 1111
Heparinpump
Pressure domesensor
Ejector
LP 1111
Pressure domesensor
LP 1102
C167
LP 1102
C167
PSU
Power Supply
PSUOperation
LP 1105
PSUDistributor
LP 1106
LP 1134
Card reader
LP 1132
Keys
LP 1129
Distributor
LP 1139
Monitor
PC
LP 1102
MonitorPSU
Backlig
htIn
vert
er
OS
LP 1104
C167Traffic light
LP 1103
Interface
Valves
LP 1113
Fresenius Medical Care 5008 SM 1/08.04 11-3

Chapter 11: Functional Description
11.3 Monitor
Block diagram
OI
LA
N
Alarm outputDiode socket
5-pin
RS 232DSUB9-pin
LANRJ 45
Service/DiagnosticsDSUB15-pin
24 VFlanged socket
4-pin
DC/DCconverter
LP 1104
Interface
SS
OSPC LP 1102
LP 1103
24V
OS, SS, CAN
On/Off LP 1106
LP 1106
LP 1106
TFT/BacklightsensorKeys
LEDs
Touch
TFT screen
Traffic light
On/Off
Blood systemStop
Blood systemStart
AlarmMute green
Yellow
red
Cardreader
Distributor
Loud-speaker Microphone
LP 1129
LP
1134
LP
1131
LP
1132
11-4 Fresenius Medical Care 5008 SM 1/08.04

Chapter 11: Functional Description
Description
P.C.B. LP 1104 houses the voltage supply for the entire monitor unit. Independent voltages are generated from the +24 V supplied by the power supply unit. +5 V for the OS/SS, +12 V or +5 V for the backlighting, +12 V/+5 V or 3.3 V for the TFT electronics.
P.C.B. LP 1103 provides the signal connections to the peripheral equipment. It has a LAN interface (Ethernet) and an opto-decoupled serial interface (RS 232). A Service/Diagnostics plug and a plug with 24 V connection (1 V) is available for the technician. An alarm output for the nurse call is also present.
Fresenius Medical Care 5008 SM 1/08.04 11-5

Chapter 11: Functional Description
11.4 EBM (Extracorporeal Blood Module)
Block diagram
DC
DC
DC
DC
+5 V
LP 1106 +24 V
LP 1106 +18 V
24
V_S
W
Contr
ol
SS
RS 232
OS
LP 1102
LP 1107
LP 1106
LP 1102
WD
+12 V linear +12 V_PWR
+12 Vlinear
LP 1106
Senso
rsi
gnal
CAN SSCAN OS
+24 V_SW
- Line occlucion clamps 1..4(arterial, venous, 2 x SN)
- Pumps 1...3(Blood pump, substituate pump)
- Compressor- Solenoid valve 1...6- Syringe detection/
motor control (LP 1126)- Ejector (LP 1112)
ActuatorsSensors
- Pressure transducer 1...4(arterial, venous, 2 x SN)
- Pressure dome sensors (LP 1111)(arterial, venous)
- Syringe pump position- Syringe detection/
motor control (LP 1112)- Air detector- ABD (air bubble detector)- OD (optical detector)- Rotor Hall sensor 1...3- Fluid sensor- Door sensors
(left, right)- Ejector(LP 1112)
11-6 Fresenius Medical Care 5008 SM 1/08.04

Chapter 11: Functional Description
Description
The power supply unit supplies the P.C.B. LP 1107 with +24 V and +18 V via P.C.B. LP 1106. The +5 V, +12 V linear and +12 V_PWR voltages are generated on P.C.B. LP1107. The +24 V_SW are enabled via the watchdog.
The sensor signals are routed via P.C.B. LP 1107 to the OS and the SS where they are evaluated. The OS controls the actuators via P.C.B. LP 1107. The 24_V_SW are controlled independently by the SS via P.C.B. LP 1107.
Distribution of the CAN bus of the OS and the SS is done via P.C.B. LP 1107. P.C.B. LP 1107 is connected to the OS (LP 1102) via the plug connector X1_OS, X2_OS and to the SS (LP1102) via the plug connector X1_SS, X2_SS.
The serial connection between the OS and the SS is also established via P.C.B. LP 1107.
Fresenius Medical Care 5008 SM 1/08.04 11-7

Chapter 11: Functional Description
11.5 Hydraulics Unit
Block diagram
Example
OS
LP 1102
VG2 SS124/18VV37sV10V09VI2
VG1 SS224/18VV35sVS8sVS4sVB4s
VG2 SS224/18Vn. usedV26V22V25
VG1 OS124/18VV02V03V19V38
VG2 OS124/18Vn. usedVS10sVS9sVS7s
VG1 OS224/18VV14V13V12V11
VG2 OS224/18VV18V17V16V15
VG1 OS324/18VV28V29sV32V33
VG2 OS324/18VV08V07V06V05
VG1 OS424/18VV36VI1VB1VS1
VG2 OS424/18VVS6sVS5sVS3sVF2
VG1 OS524/18Vn. usedV30V23V21
VG2 OS524/18Vn. usedn. usedVS2VB2
VG1 OS624/18Vn. usedVB6sVB5sVB3s
VG2 OS624/18VVF1V04V20V34
VG1 SS124/18Vn. usedn. usedV24V31
LP 1108
LP 1113 OS6
LP 1113 OS5
LP 1113 OS4
LP 1113 OS3
LP 1113 OS2
LP 1113 OS1
LP 1113 SS1
LP 1113 SS2
LP 1109
LP
11
06
CA
NO
S
RS
23
2
(OS)
LP
11
06
CA
NS
S
LP 1110
SS
LP 1102
CD9, PT2, PT8, PT9, S01, S09, S15
LP 1124
LP 1125
LP 1123CD5, PT5, S19, S20, S21, S22
--------------------Sensors--------------------
PT6, CD6, S17, S18, S23, S24, S25
CD1, CD7, PT1, PT7, S04, S05, S06,S07, S08, S10, S11, S14, S16, S27,S28, S29, S30, S35, S36, S37, S42,S43, S44, S45
CD3, CD4, PT3, PT4
S02, (S33), (S34)(SS)
P01, P03
P02
P04, P05, P06, P07, P08
--------------------Sensors--------------------
--------------------Sensors--------------------
- - - - - - - Actuators - - - - - - -
- - - - - - - Actuators - - - - - - -
- - - - - - - Actuators - - - - - - -
--------------------Sensors--------------------
--------------------Sensors--------------------
--------------------Sensors--------------------
(Hydraulics, center front)
(Hydraulics front, right door)
(Hydraulics front, left door)
(+5 V and +24V_SW on LP 1124)
+24 V
+18 V +24 V_SW
+18 V_SW
+12 V, -12 V
+5 V
+24 V_SW
+5 V+24 V_SW
XXX XXX54321
Connector PIN
11-8 Fresenius Medical Care 5008 SM 1/08.04

Chapter 11: Functional Description
Description
The power supply unit supplies the P.C.B. LP 1108 with +24 V and +18 V via P.C.B. LP 1106. The +5 V, ±12 V voltages are generated on P.C.B. LP1108. The +24 V_SW and the +18 V_SW are enabled via the watchdog. P.C.B. LP 1108 controls certain actuators and distributes the OS and SS CAN bus. P.C.B. LP 1108 is connected to the OS via P.C.B. LP 1109 and to the SS via the P.C.B. LP 1110.
P.C.B. LP 1109 includes the OS with the evaluation circuits for temperature, conductivity, pressure, optical sensors and switches, for example, and the gear pump motor control.
P.C.B. LP 1110 includes the SS with the evaluation circuits for temperature, conductivity, pressure, optical sensors, blood leak sensor, voltage monitoring and switches.
The P.C.B. LP 1102 houses the central processing unit with the CPU (C 167), a battery-buffered data memory, a CAN bus driver, an analog reference voltage source and a triple serial interface. P.C.B. LP 1102 requires the operating voltage +5 V, GND, +24 V and the Reset signal.
The valves are controlled by P.C.B. LP 1113. 8 valves, split in two valve groups with 4 valves each, are controlled. P.C.B. LP 1113 also provides for switching the valve groups between making and withstand voltage. The control states of the valves are read back to both the OS and the SS.
P.C.B. LP 1123 is used to distribute the electrical connections to the components installed on the front in the left door of the hydraulic unit. P.C.B. LP 1123 is connected to P.C.B. LP 1109.
P.C.B. LP 1124 is used to distribute the electrical connections to the components installed on the front in the center of the hydraulic unit. P.C.B. LP 1124 includes a 5 V switching power supply for the supply of the eccentric membrane pumps. P.C.B. LP 1124 is connected with P.C.B. LP 1109, LP 1110, the valve drivers LP 1113 and the +24 V_SW of P.C.B. LP 1108.
P.C.B. LP 1125 is used to distribute the electrical connections to the components installed on the front in the right door of the hydraulic unit. P.C.B. LP 1125 is connected with P.C.B. LP 1109 and the valve drivers LP 1113.
Fresenius Medical Care 5008 SM 1/08.04 11-9

Chapter 11: Functional Description
11.6 Power Supply Unit
Block diagram
5V
(Sta
nd
by)
0-100 %Push-button
On/Off
He
ate
rro
d
Power Supply(Rating output 1+2 480W)
Output 1 (24V/20A)
Ba
tte
ryte
st
LP 1105
Po
we
rF
ail
On
/Off
LP 1106
24
V
90 - 264V/ AC
OS
CAN
LP 1106
Output 2 (18V/14A) LP 1106
Battery (24V/7Ah) LP 1106
Ou
tpu
t3
LP 1106 Heatercontrol
Heater relay
ON
/OF
F
LP 1106 Heater
(of hydraulics)
90
-2
64
V/A
C
11-10 Fresenius Medical Care 5008 SM 1/08.04

Chapter 11: Functional Description
Description
The voltage is supplied by a primary-switched power supply unit. It does therefore not require a power transformer and can be connected to all common line voltages without switching. The charging circuit integrated in the power supply unit, charges the batteries to provide battery-backup in the event of a power failure. If a power failure occurs, the 24 V supply is buffered by the batteries.
P.C.B. LP 1105 includes a processor C515. This processor provides for the regulation and control of the heater and the On/Off logic for the entire system. A control chip with pulse-duration modulation controls the heater rod via two triacs. The data required for the control is sent via the CAN bus to the processors.
Fresenius Medical Care 5008 SM 1/08.04 11-11

Chapter 11: Functional Description
11.7 Pneumatic Unit
Block diagram
Compressor unit
Hydraulics
Deaeration/ventilation
Arterial pressuremeasurement unit
Venous pressuremeasurement unit
11-12 Fresenius Medical Care 5008 SM 1/08.04

Chapter 11: Functional Description
Description
The pneumatic unit is located in the EBM. In the EBM it is used to control the arterial and the venous pressure measurement unit. In the hydraulics unit, the pneumatic unit is required for the membrane integrity test and for the filter change program.
Fresenius Medical Care 5008 SM 1/08.04 11-13

Chapter 11: Functional Description
11.8 Hydraulics Unit
Flow diagram
Bic
BA
GB
icB
AG
Bic
Sod
P
Onlin
e+
3x
ZKV
VERSIO
N1
8.4
So
ftw
are
ve
rsio
n3
.20
Temp
PT
4Te
mp
P
Temp
Te
mp
P
Sa
fety
Syste
m
Op
era
ting
Syste
m
VF
2
VF
1V
03
Wasser-
ein
gang
Flu
sh
-A
bfluß
V04
V09
V10
V11
V12
V13
V14
V15
V16
V17
V18
V30
V19
V28
V29s
V21
V22
V26
V23
V24
V25
VS
2V
B2
VB
1
VB
4s
VS
1
VB
3s
V31 V32
V33
S01
CD
4
S02
CD
7PT
8
S03
S07
S08
PT
9
CD
9
S09
S10
S15
S17
S18Temp
PT
6
S19
S20Temp
PT
5CD
5
S21
PT
1
CD
1
S27
S28
S29
S30
P01
P03
P06
P05
Abfluß
A05
A02
A03
H01
F01
H02
H03
H04
H0
6
Temp
PT
2
H08
H07
H09
H13
H14
F04
F06
H34
Dialysator
KST
S04
S05
S06
H42
H42
H16
H17
F07
H18
H19
H21
F11
H22
F12
H23
F13
H27
F05
H32
H3
3
H05
V05
V06
V07
V08
H11
A01
M
S11
P04
PT
7
VB
5s
VS
5s
VS
3s
F14
H29
VS
4s
S35
S14
P
S1
6
V20 H20F10
CD
6
S36 S38
VS
6s
VB
6s
V34
S22
S47
V37s
P0
2
A1
B
D1
D2
V02
V38
V35s
V36
F08
A04
H35F16
V40
V41
H43
H44
A2
F1
5
Vs10s
VS
9s
VS
8s
VS
7s
H31
11-14 Fresenius Medical Care 5008 SM 1/08.04

Chapter 11: Functional Description
Flow diagram – legend
Explanation of symbols
Axx Elements for adjustmentCDx Conductivity cellsFxx FiltersHxx Hydraulic componentsPxx Pumps
PTx Temperature sensorsSxx Other sensorsVxx ValvesVxxs Small valves (s)
Legend
A01 Loading pressure valve, dosing chamberA02 Loading pressure valve, balancing chamberA03 Relief valveA04 Pressure reducing valve, water inletA05 Check valve for heat exchanger
CD1 Conductivity cell, permeateCD4 Conductivity cell, mixed bicarbonateCD5 Conductivity cell, bicarbonateCD6 Conductivity cell, concentrateCD7 Conductivity cell, overall conductivityCD9 Conductivity cell, OCM
F01 Filter, water inletF04 DIASAFE®plusF05 ONLINEplus™F06 Hydrophobic filter, compressor EBMF07 Particle filterF08 Filter, UF pumpF10 Filter, disinfectant 1F11 Suction tube with filter, concentrateF12 Suction rod tube filter, bicarbonateF13 Filter, CDS bicarbonateF14 Filter, CDS concentrate 1F15 Filter, CDS concentrate 2F16 Filter, disinfectant 2
H01 Male connector, water inletH02 Male connector, FlushH03 Water inlet chamberH04 Heat exchangerH05 Degassing orificeH06 Degassing chamberH07 Heater rod chamberH08 Heater rodH09 Primary air separatorH11 Dosing chamberH13 Mixing chamberH14 Balancing chamberH16 Dialyzer coupling, to dialyzerH17 Dialyzer coupling, from dialyzerH18 Secondary air separatorH19 Male connector, drainH20 Male connector, disinfectant 1H21 Rinse chamber, concentrateH22 Rinse chamber, bicarbonateH23 Connector, bibag®
H27 Male connector, CDS bicarbonateH29 Male connector, CDS concentrate 1
H31 Male connector, CDS concentrate 2H32 Substituate portH33 Rinse portH34 Male connector, compressor EBMH35 Male connector, disinfectant 2H42 Male connectors, potential (2x)H43 Male connector, vent water inlet chamberH44 Male connector, vent mixing chamber
P01 Degassing pumpP02 Loading pumpP03 Flow pumpP04 UF pumpP05 Bicarbonate pumpP06 Concentrate pump
PT1 Temperature sensor, CD permeatePT2 Temperature sensor, controlPT4 Temperature sensor, CD mixed bicarbonatePT5 Temperature sensor, CD bicarbonatePT6 Temperature sensor, CD concentratePT7 Temperature sensor, overall CD / CD and temperature displayPT8 Temperature sensor, re-adjustmentPT9 Temperature sensor, CD OCM
S01 Float switch, water inlet chamberS02 Float switch, mixing chamberS03 Pressure transducer, to dialyzerS04 Sensor, shunt interlock inS05 Sensor, shunt interlock openS06 Sensor, shunt interlock outS07 Pressure transducer, from dialyzerS08 Blood leak detectorS09 Level sensor, secondary air separatorS10 Sensor, air separation valveS11 UF pump, CD inletS14 Leakage sensor, filter chamberS15 Pressure transducer, balancing chamber switchingS16 Pressure transducer, fill dry concentrate bagS17 Level sensor, concentrate rinse chamberS18 Sensor, concentrate rinse chamber lockS19 Level sensor, bicarbonate rinse chamberS20 Sensor, bicarbonate rinse chamber lockS21 bibag® flap, bag operation positionS22 bibag® connectedS27 Sensor 1, substituate portS28 Sensor 2, substituate portS29 Sensor 1, rinse portS30 Sensor 2, rinse port
(continued next page)
Fresenius Medical Care 5008 SM 1/08.04 11-15

Chapter 11: Functional Description
S35 Leakage sensor, hydraulicsS36 UF pump, CD outletS38 UF pump monitoringS47 bibag® flap, cleaning position
V02 Water inlet valveV03 Recirculation valve, cleaningV04 Degassing orifice bypass valveV05 Dosing chamber valveV06 Dosing chamber valveV07 Dosing chamber valveV08 Dosing chamber valveV09 Fill valve, dry concentrate bagV10 Rinse valve, mixing chamberV11 Balancing chamber valveV12 Balancing chamber valveV13 Balancing chamber valveV14 Balancing chamber valveV15 Balancing chamber valveV16 Balancing chamber valveV17 Balancing chamber valveV18 Balancing chamber valveV19 Drain valveV20 Disinfection valve 1V21 Vent valve, DIASAFE®plusV22 Retentate valveV23 Test valve/shutoff valve compressor EBMV24 Dialyzer valve, to dialyzerV25 Dialyzer valve, from dialyzerV26 Bypass valveV28 Fill valve, secondary air separatorV29s Air separation valveV30 Outlet valveV31 Substituate valve inletV32 Rinse valve 1, H(D)FV33 Rinse valve 2, H(D)FV34 Disinfection valve 2V35s Negative pressure valveV36 Rinse valve, dry concentrate pathV37s Vent valve, mixing chamberV38 Bypass valve, heat exchangerV40 Shutoff valve, disinfectionV41 Rinse valve, disinfection
VB1 Fill valve, bibag®
VB2 Vent valve, bicarbonate rinse chamberVB3s CDS valve, bicarbonate shutoff valve OSVB4s CDS valve, bicarbonate shutoff valve SSVB5s CDS valve, bicarbonate testVB6s CDS valve, bicarbonate inVF1 Flush valve 1VF2 Flush valve 2, drainVS1 Fill valve, sobag®
VS2 Vent valve, concentrate rinse chamberVS3s CDS valve, concentrate 1 shutoff valve OSVS4s CDS valve, concentrate 1 shutoff valve SSVS5s CDS valve, concentrate 1 testVS6s CDS valve, concentrate 1 inVS7s CDS valve, concentrate 2 shutoff valve OSVS8s CDS valve, concentrate 2 shutoff valve SSVS9s CDS valve, concentrate 2 testVS10s CDS valve, concentrate 2 in
11-16 Fresenius Medical Care 5008 SM 1/08.04

Chapter 11: Functional Description
Description
Turning power On To ensure regular rinsing of the water inlet tubing, flushing is started after turning the machine on.
The flush is diverted between the measurement port (M01) and the water inlet valve (V02).
When the water inlet valve is closed (V02), a clocked circuit will open the flush valve (V01). The permeate is rinsed via the water inlet tubing, the flush valve (V01) and the water outlet tubing into the drain 1.
Degassing Controlled by the float switch (S01) in the water inlet chamber (H03) the permeate flows into the degassing chamber (H06). A negative pressure is created due to the volumetric capacity of the degassing pump (P01) and the restriction of the degassing orifice (H05). This negative pressure is sufficient to force the air in the permeate to form air bubbles. These accumulate in the primary air separator (H09). The air bubbles are discharged via the loading pressure valve (A01) and the air outlet of the water inlet chamber (H03).
Heating The permeate flowing through the heater rod chamber (H07) is heated to the regular dialysis temperature.
Mixing A patient-specific dialysate is prepared by proportional and volumetric mixing of permeate with different dialysis concentrates.
The volume of the permeate is defined by means of the dosing chamber (H11). On its way to the mixing chamber (H13), a volume of bicarbonate and acid concentrate which matches the proportional mixing ratio is added (P05, P06) to the permeate at the dosing points (H12).
The concentrates can either be drawn in with the suction tubes (F11/F12) from canisters, via connectors (H23/H24) from bags or can be supplied by a central delivery system (H27/H29/H31).
Optional it is possible to add an individual concentrate which is electrolytically adapted to the patient. At the dosing point (H10) this concentrate is added to the permeate by the pump (P07) even before the dosing chamber.
The float switch (S02) in the mixing chamber (H13) controls the cyclic switching of the dosing chamber. It ensures that freshly prepared dialysate is permanently available to fill the balancing chambers.
Balancing and ultrafiltration
The design of the hydraulics of the dialysis system provides for a dialysate circuit which is closed against the atmosphere.
This presents the basis for volumetrically controlled ultrafiltration.
The balancing chambers (H14) are operated at inverse sequences to ensure that the volume of dialysate which enters the dialyzer equals the volume which flows back across the balancing chambers. An impermeable elastic membrane separates the used from the fresh dialysate.
Fresenius Medical Care 5008 SM 1/08.04 11-17

Chapter 11: Functional Description
Reduction of the weight is solely determined by the UF pump (P04). The UF pump removes a predefined volume (UF goal) from the closed system which it pumps to the drain 2, bypassing the balancing chambers. This volume is removed from the patient's blood as ultrafiltrate and is replaced by an equal volume flowing through the dialyzer membrane.
Dialysate circuit Via the valves (V11, V13) fresh dialysate is fed in cycles by the balancing chambers via the filter (F04) and the dialyzer valve (V24) to the dialyzer.
The flow pump (P03) ensures that the dialysate discharged by the dialyzer is fed to the balancing chambers via the secondary air separator (H18).
If the level sensor (S09) detects air, the air separation valve (V29s) starts its activity. The air is discharged by the negative pressure in the degassing path and can therefore not enter the balancing chambers.
After the balancing process the dialysate is passed via the outlet valve (V30), the heat exchanger (H04) and the drain valve (V19) to the drain 2.
Correct mixing and the temperature of the fresh dialysate are monitored by the conductivity cells (CD3, CD4, CD7) and the temperature sensor (PT7). If the values are outside the predefined limits, the system will alert the operator and will switch to the bypass mode. The dialyzer valve (V24) closes, the bypass valve (V26) opens, which prevents the improper dialysate from being fed to the dialyzer.
The pressure transducer (S07) and the blood leak detector (S08) are further safety elements.
11-18 Fresenius Medical Care 5008 SM 1/08.04

Chapter 12: Service Program (Option)
12 Service Program (Option)
Quick Guide
PC Service-Software 5008
4/29.04
Fresenius Medical Care 5008 SM 1/08.04 12-1

Chapter 12: Service Program (Option)
12-2 Fresenius Medical Care 5008 SM 1/08.04

Chapter 12: Service Program (Option)
i
Table of contents
General Information ................................................................................................ 5 Preparation ................................................................................................................. 7
System Requirements............................................................................................. 7 Software Installation................................................................................................ 8 Hardware Installation ............................................................................................ 10 Description of the Service Card ............................................................................ 11 Starting the Software............................................................................................. 12 Changing the IP Address ...................................................................................... 13
Menu/Toolbar ........................................................................................................... 15 Overview............................................................................................................... 15 Connection............................................................................................................ 16 Diagnosis .............................................................................................................. 18 Extras.................................................................................................................... 19 Settings ................................................................................................................. 20 View ...................................................................................................................... 22 Help/About ............................................................................................................ 23
Views........................................................................................................................ 25 Machine Info ......................................................................................................... 25 NOVRAM / Calibration data .................................................................................. 27 Setup Data ............................................................................................................ 29 Error Memory ........................................................................................................ 31 Service Data Recorder.......................................................................................... 33 Software Update ................................................................................................... 35 Print Preview......................................................................................................... 37
Modification .............................................................................................................. 39 Quick Guide .......................................................................................................... 39
Index......................................................................................................................... 41
Fresenius Medical Care 5008 SM 1/08.04 12-3

Chapter 12: Service Program (Option)
12-4 Fresenius Medical Care 5008 SM 1/08.04

Chapter 12: Service Program (Option)
4/29.04 Page 5 from 41
General Information
Caution:
After each transfer of data from the Service program to the dialysis
system, the operator of the Service program must check the data on
the dialysis system for plausibility. The operator himself/herself is
responsible that the data are correct.
Caution:
After each transfer of data from the Service program to the dialyis
system, the dialysis system must be turned off and back on again
before treating a patient.
Caution:
This Service program is intended for service purposes only. During
patient treatment neither the interface cable to the PC nor the modem
must be connected to a dialysis system.
Fresenius Medical Care 5008 SM 1/08.04 12-5

Chapter 12: Service Program (Option)
12-6 Fresenius Medical Care 5008 SM 1/08.04

Chapter 12: Service Program (Option)
4/29.04 Page 7 from 41
Preparation
Preparation
System Requirements
Minimum system requirements:
PC with at least 10 MByte of free hard disk space
Microsoft Windows 98, ME, 2000 or XP
32 MByte RAM
1 CD-ROM drive
1 free USB port (for Service Card Reader)
1 free RS232 interface or
1 network card or
1 TAPI compatible modem
(for communication with the 5008)
Fresenius Medical Care 5008 SM 1/08.04 12-7

Chapter 12: Service Program (Option)
PC Service-Software 5008
Page 8 from 41 4/29.04
Preparation
Software Installation
Caution:
Install the Towitoko Card Reader drivers before connecting the
Service Card Reader to the PC!
These will be installed when the PC Service Software 5008 is
installed.
Caution:
If a previous version of the PC Service Software 5008 is already
installed on the computer, this version must be uninstalled.
Make sure this version is completely uninstalled before installing the
new software.
Caution:
Windows NT, 2000 or XP require administrator rights to install the PC
Service Software 5008!
Start Windows on your computer.
Insert the installation CD in the CD-ROM drive.
If the setup does not start automatically:
o Start the Windows Explorer.
o Then select the CD-ROM drive and start the setup.exe file.
In the setup dialog box Installations-Code (installation code), enter the
installation code indicated on the CD cover.
12-8 Fresenius Medical Care 5008 SM 1/08.04

Chapter 12: Service Program (Option)
Preparation
4/29.04 Page 9 from 41
When the setup is complete, the installation routine for the Service Card
Reader driver will be started automatically.
Click Start to install the driver.
The software installation is complete.
Fresenius Medical Care 5008 SM 1/08.04 12-9

Chapter 12: Service Program (Option)
PC Service-Software 5008
Page 10 from 41 4/29.04
Preparation
Hardware Installation
Use the enclosed interface cable to connect the PC to the 5008 dialysis
system.
Caution:
The interface cable for the RS232 connection is not a standard
cable. It is therefore imperative to use the enclosed interface cable
(M35111).
Caution:
In case of a direct network connection (PC <-> 5008) the included
Cross-Over patch cable (M36433) must be used.
Caution:
Install the Towitoko Card Reader drivers before connecting the
Service Card Reader to the PC!
These will be installed when the PC Service Software 5008 is
installed.
Connect the Service Card Reader to a free USB port.
12-10 Fresenius Medical Care 5008 SM 1/08.04

Chapter 12: Service Program (Option)
Preparation
4/29.04 Page 11 from 41
Preparation
Description of the Service Card
The use of the PC Service Software 5008 requires an appropriate authorization.
This is checked by the PC Service Software 5008 and the associated Service card.
The Service card is read out via:
1. the Service Card Reader on the PC.
Connect the Service Card Reader to a free USB port.
Insert the Service card into the Service Card Reader.
The Service card will be checked when starting the application and when
using the software. If the card is not inserted or if it is removed, an error
message will be displayed. The software will be exited after 10 seconds.
2. the Card Reader of the 5008.
Insert the Service card into the Card Reader of the 5008.
The authorizations will be set after establishing the communications.
The Service card is checked by a run-time monitoring function. The expiration date
of the Service card is displayed in the About dialog.
30 days prior to expiration, an informational message is displayed when starting the
application.
Once the expiration date is exceeded, the PC Service Software 5008 can no longer
be accessed.
Fresenius Medical Care 5008 SM 1/08.04 12-11

Chapter 12: Service Program (Option)
PC Service-Software 5008
Page 12 from 41 4/29.04
Preparation
Starting the Software
After the hardware has been properly connected, the 5008 dialysis system can be
turned on.
Caution:
For establishing a network connection with the 5008 via a Cross-
Over patch cable, the following requirements must be met:
• before starting the application the IP Address of the Service
PC must be set to 192.168.0.2! (see Changing the IP
Address)
• in the 5008 network setup Service-PC active must be
checked, the selection must be confirmed with OK and the
5008 must be restarted!
The software can now be started on the PC by selecting
Start->Programs->Fresenius->Service 5008->Service 5008
.
12-12 Fresenius Medical Care 5008 SM 1/08.04

Chapter 12: Service Program (Option)
Preparation
4/29.04 Page 13 from 41
Changing the IP Address
Step 1:
Windows:
Select Start->Setting->Network- and Dial-up connections
Step 2:
In this dialog, select the network card used. Then click the right mouse button to
select the Properties pop-up menu.
The following dialog will be displayed:
Step 3:
Select Internet Protocol (TCP/IP) and click the Properties button.
The following dialog will be displayed:
Fresenius Medical Care 5008 SM 1/08.04 12-13

Chapter 12: Service Program (Option)
PC Service-Software 5008
Page 14 from 41 4/29.04
Step 4:
Adjust the settings as shown in the illustration above, then confirm the dialog with
OK.
Step 5:
Restart the PC.
12-14 Fresenius Medical Care 5008 SM 1/08.04

Chapter 12: Service Program (Option)
4/29.04 Page 15 from 41
Menu/Toolbar
Menu Options/Toolbar:
Overview
Brief explanation of the menu option/toolbar functions:
Connection
Diagnosis
Extras
Settings
View
Help/About
Fresenius Medical Care 5008 SM 1/08.04 12-15

Chapter 12: Service Program (Option)
PC Service-Software 5008
Page 16 from 41 4/29.04
Menu Options/Toolbar:
Connection
Online/Offline Mode (establishing/disconnecting communications):
This menu option is used to establish and disconnect communications with
the 5008.
• Online (establishing communications):
Caution:
All windows within the Service software must be
closed to establish communications.
After clicking the menu option, the following dialog will be displayed:
The operator here can select the desired connection:
RS232 connection, e.g. via COM1
modem connection, via a modem installed under Windows
network connection
(see chapter Starting the Software)
12-16 Fresenius Medical Care 5008 SM 1/08.04

Chapter 12: Service Program (Option)
Menu/Toolbar
4/29.04 Page 17 from 41
After clicking the Connect button, the following dialog will be displayed:
The PC Service Software 5008 establishes communications with the
5008 and synchronizes with the 5008.
• Offline (disconnecting communications):
After clicking this menu option, communications with the 5008 will be
disconnected.
Fresenius Medical Care 5008 SM 1/08.04 12-17

Chapter 12: Service Program (Option)
PC Service-Software 5008
Page 18 from 41 4/29.04
Menu Options/Toolbar:
Diagnosis
Machine Info:
When clicking this menu option the Machine Information view will be
displayed. Here the operator can view machine data such as
• Machine No.
• Date
• Time
• Machine options
• Filter1
• Filter2
• Operating Hours:
• ...
NOVRAM/Calibration Data:
When clicking this menu option the NOVRAM / Calibration data view will be
displayed.
Here the operator can
• read, display and save the NOVRAM data of the individual modules of
the 5008.
• delete the NOVRAM data of individual modules.
• read and display the NOVRAM data from a file in order to upload the
NOVRAM data, the calibration data or individual NOVRAM data to the
5008.
Machine Setup:
When clicking this menu option the Setup Data view will be displayed.
Here the operator can
• read, partly display and save the setup data of the 5008.
• edit the setup data for the network settings.
• read and partly display the setup data from a file in order to upload
them to the 5008.
Error Memory:
When clicking this menu option the Error Memory view will be displayed.
Here the operator can
• read, display and save the error memory of the individual modules of
the 5008.
• delete the error memory data of individual modules.
12-18 Fresenius Medical Care 5008 SM 1/08.04

Chapter 12: Service Program (Option)
Menu/Toolbar
4/29.04 Page 19 from 41
Service Data Recorder:
When clicking this menu option the Service Data Recorder view will be
displayed.
Here the operator can
• read which service data recorder files have been saved to the
CompactFlash of the 5008.
• save selected service data recorder files.
• delete selected service data recorder files.
Menu Options/Toolbar:
Extras
Software Update:
When clicking this menu option the Software Update view will be displayed.
Here the operator can
• download the Service report from the 5008.
This report includes the software versions, the CRC, the creation date of
the individual modules and information on missing files.
• select if files on the CompactFlash and/or modules are to be updated.
• upload the selected files to the 5008 and update the selected modules.
Fresenius Medical Care 5008 SM 1/08.04 12-19

Chapter 12: Service Program (Option)
PC Service-Software 5008
Page 20 from 41 4/29.04
Menu Options/Toolbar:
Settings
Interface Settings:
When clicking this menu option, the dialog for the selection of the serial
interface or for the selection of the modem for a modem connection will be
displayed.
RS232 Connection:
Selection of the RS232 interface.
Caution:
For a direct connection via RS232 the serial
interface cable (M35111) is required.
Modem Connection:
Selection of the modem.
The modem must be configured in the Window Control Panel.
12-20 Fresenius Medical Care 5008 SM 1/08.04

Chapter 12: Service Program (Option)
Menu/Toolbar
4/29.04 Page 21 from 41
Network Connection:
Entry/selection of the 5008 IP address.
If the 5008 (network setup) is in the PC Service mode, IP address
192.168.0.5. must be set.
Caution:
For a direct connection via a network a Cross-
Over patch cable (M36433) is required.
Fresenius Medical Care 5008 SM 1/08.04 12-21

Chapter 12: Service Program (Option)
PC Service-Software 5008
Page 22 from 41 4/29.04
Menu Options/Toolbar:
View
Toolbar:
When clicking this menu option the toolbar of the active window will be shown
or hidden.
Status Bar:
When clicking this menu option the status bar of the active window will be
shown or hidden.
Cascade:
When clicking this menu option all open windows will be displayed as
cascading windows.
Tile Vertically:
When clicking this menu option all open windows will be displayed one next
to the other.
Tile Horizontally:
When clicking this menu option all open windows will be displayed one above
the other.
Open views:
In this field, the currently open views are listed. The active view is checked.
12-22 Fresenius Medical Care 5008 SM 1/08.04

Chapter 12: Service Program (Option)
Menu/Toolbar
4/29.04 Page 23 from 41
Menu Options/Toolbar:
Help/About
?:
Clicking this menu option will open the help file.
Context Help:
When clicking this menu option, the software will be set to the Context Help
mode. In this mode the operator can click with the mouse on dialogs, views,
to obtain context-sensitive on-screen help.
About Service5008 ...:
When clicking this menu option, the About ... dialog will be opened.
This dialog informs the operator of
• the software version
• the expiration date of the Service card
• his Service card ID
• his name
• his authorization.
Fresenius Medical Care 5008 SM 1/08.04 12-23

Chapter 12: Service Program (Option)
12-24 Fresenius Medical Care 5008 SM 1/08.04

Chapter 12: Service Program (Option)
4/29.04 Page 25 from 41
Views
View
Machine Info
Downloads machine information from the 5008.
Downloads machine information from the 5008 and saves them to a file.
Uploads the selected operating hours (example above: complete system and
monitor OS) to the 5008.
Deletes the selected operating hours (example above: complete system and
monitor OS) of the 5008.
Opens machine information from a file.
Saves machine information to a file.
Fresenius Medical Care 5008 SM 1/08.04 12-25

Chapter 12: Service Program (Option)
PC Service-Software 5008
Page 26 from 41 4/29.04
Prints machine information.
Displays the Print Preview.
Indicates the file name to which the machine information was saved or from
which file the machine information was read.
Indicates the machine number of the 5008.
Clicking the button will upload the machine number to the 5008.
Clicking the button will upload the time set by the operator to the 5008.
Clicking the button will upload the current time of the PC to the 5008.
Informs the operator of
- the machine options (Diasafe, ONLINE Plus)
- the status of filter1 (available, shunted)
- the status of filter2 (available, shunted)
Indicates module information.
- Module: module name of the respective module
- SW Version: software version of the respective module
- CRC: cyclic redundancy check
- Serial No.: serial number of the respective module
- Date: Date when the respective module was created
- Operating Hours: Indicates the operating hours of the module.
The operator here can edit the operating hours of the complete system or of
the individual modules.
For this purpose, click the appropriate field.
You must change to the Edit mode. It is sufficient to enter the value for the
new operating hours.
Operating hours edited but not yet uploaded are identified by an asterisk (*).
Clicking the will upload the selected operating hours.
The operator may deselect the highlighted operating hours or select all of
them.
12-26 Fresenius Medical Care 5008 SM 1/08.04

Chapter 12: Service Program (Option)
Views
4/29.04 Page 27 from 41
View
NOVRAM / Calibration data
Downloads NOVRAM data of the selected assembly from the 5008.
Downloads NOVRAM data of the selected assembly from the 5008 and
saves them to a file.
Uploads, depending on the selection of the operator,
the entire NOVRAM data, only the calibration data or only the highlighted
NOVRAM variables to the 5008.
Opens a file and uploads, depending on the selection of the operator, the
entire NOVRAM data or only the calibration data to the 5008.
Deletes the NOVRAM data of the selected assembly.
Fresenius Medical Care 5008 SM 1/08.04 12-27

Chapter 12: Service Program (Option)
PC Service-Software 5008
Page 28 from 41 4/29.04
Opens NOVRAM data from a file.
By default NOVRAM data (*.5008nov) will be opened.
Calibration data (*.5008cal) which have been recorded with software version
V1.01 can be opened provided communications to the 5008 have been
established.
Saves the NOVRAM data that was viewed to a file (*.5008nov).
Prints the NOVRAM data.
Displays the Print Preview.
Shows general information (machine number, file name, software version of
the 5008, download time and date) on the NOVRAM data downloaded from the
5008.
Shows general information (machine number, file name, software version of
the 5008, download time and date) on the NOVRAM data saved to the file.
Checkboxes where the operator can select for which assemblies the NOVRAM
data are to be downloaded, to be deleted, to be displayed or which data are to
be uploaded to the 5008.
Dimmed assemblies have been reported by the 5008 as not present.
Shows the operator the number selected by him and the total number of
NOVRAM variables.
The operator can select if all NOVRAM data or only the calibration data are to
be displayed.
Shows the NOVRAM data.
- Module: module name of the respective module
- Variable Name: internal name of the NOVRAM variable
- Description: brief description of the variable
- Type: calibration data are identified by CAL
- Value 5008: indicates the NOVRAM value of the 5008.
• ... [hex]: hexadecimal representation
• ... [bin]: binary representation
• ... : value with associated unit (if available)
- Valid: • empty: NOVRAM variable without validity
flag
• [ ]: validity flag present
NOVRAM variable identified as invalid
• [ X ]: validity flag present
NOVRAM variable identified as valid
- Value File: indicates the NOVRAM value from the file.
• ... [hex]: hexadecimal representation
• ... [bin]: binary representation
• ... : value with associated unit (if available)
- Valid • empty: NOVRAM variable without validity
flag
• [ ]: validity flag present
NOVRAM variable identified as invalid
• [ X ]: validity flag present
NOVRAM variable identified as valid
12-28 Fresenius Medical Care 5008 SM 1/08.04

Chapter 12: Service Program (Option)
Views
4/29.04 Page 29 from 41
Explanation of colors:
• black: everything ok.
• red: the NOVRAM value does not correspond with the value of the file.
• blue: the NOVRAM value of the file no longer exists in the software
version of the 5008.
The sort order can be changed by clicking the column header.
The width of the columns can be changed with the mouse.
If the text inside the column is not shown completely, this will be indicated by
"...".
The operator can undo the selection of the NOVRAM variables or select all
NOVRAM variables.
View
Setup Data
Fresenius Medical Care 5008 SM 1/08.04 12-29

Chapter 12: Service Program (Option)
PC Service-Software 5008
Page 30 from 41 4/29.04
Caution:
The complete setup (operator and technician’s) is always transferred
from/to 5008.
In case of setup transmission to 5008 it might be necessary to verify
the operator setup parameters!
Uploads setup data from the 5008.
Uploads setup data from the 5008 and saves them to a file
Downloads setup data to the 5008.
Loads setup data from a file and downloads them to the 5008.
Loads setup data from a file.
Saves the setup data displayed to a file (*.5008setup).
Indicates general information
- Machine no.
- File name
- SW version of the 5008
(in versions marked with an asterisk (*), the setup was modified)
- Download time
- Download date
on the error memory data downloaded from the 5008.
Service-PC active must be selected if the PC Service Software 5008 is to be
used for network communication with the 5008.
The operator can view, edit and save the network settings of the 5008 and
upload them with all other setup data to the 5008.
Caution:
The network settings become active after restart of the 5008 only.
12-30 Fresenius Medical Care 5008 SM 1/08.04

Chapter 12: Service Program (Option)
Views
4/29.04 Page 31 from 41
View
Error Memory
Downloads error memory data of the selected assembly from the 5008.
Downloads error memory data of the selected assembly from the 5008 and
saves them to a file.
Deletes the error memory data of the selected assembly .
This should not be done before a backup of the error memory data has been
created.
Opens the error memory data from a file (*.5008err).
Saves the error memory data to a file (*.5008err).
Prints the error memory data.
Displays the Print Preview.
Indicates general information
- Machine no.
- File name
- Software version of the 5008
- Download time
- Download date
on the error memory data downloaded from the 5008.
Checkboxes where the operator can select for which assemblies the error
Fresenius Medical Care 5008 SM 1/08.04 12-31

Chapter 12: Service Program (Option)
PC Service-Software 5008
Page 32 from 41 4/29.04
memory data are to be downloaded, displayed or to be deleted.
Dimmed assemblies have been reported by the 5008 as not present.
Shows the error memory data.
- Error Code: error code of the 5008
- Module: module name of the respective module
- Mode: current mode when the error occurred.
- Error message: error message in plain text.
Explanation of colors (see section ):
• black: text for the operator is displayed in a
message box on the 5008 and written into
the error memory.
• red: text is only written into the error
memory.
- Date: date when the problem occurred.
01.01.2001 means: the problem occurred prior to
the initialization
- Time: time when the problem occurred.
- Pos: consecutive number as the data were downloaded
from the 5008.
The sort order can be changed by clicking the column header.
The width of the columns can be changed with the mouse.
If the width of the column is too small for the text, this will be indicated by "...".
The complete text will be displayed in a tool tip as soon as the mouse
pointer is on the respective field.
12-32 Fresenius Medical Care 5008 SM 1/08.04

Chapter 12: Service Program (Option)
Views
4/29.04 Page 33 from 41
View
Service Data Recorder
Downloads service data recorder file information from the 5008.
Caution:
The service data recorder files have not yet been
downloaded from the 5008.
Deletes the service data recorder files selected under from the Compact-
Flash.
Downloads the service data recorder files selected under from the 5008
and saves them to a compressed filed (*.5008fly).
Indicates the file name to which the service data recorder files have been
saved.
Indicates information on the service data recorder file on the Compact-Flash.
- Folder: indicates where the service data recorder files are
saved
- File name: indicates the file name of the service data recorder file.
- Size: indicates the size of the service data recorder file in
bytes.
Fresenius Medical Care 5008 SM 1/08.04 12-33

Chapter 12: Service Program (Option)
PC Service-Software 5008
Page 34 from 41 4/29.04
- Date: indicates the date when the service data recorder file
was saved.
- Time: indicates the time when the service data recorder file
was saved.
Number of the selected and total number of service data recorder files.
Current file size of the selected service data recorder files.
Deselects the selected service data recorder files or selects all.
12-34 Fresenius Medical Care 5008 SM 1/08.04

Chapter 12: Service Program (Option)
Views
4/29.04 Page 35 from 41
View
Software Update
Downloads the service report from the 5008.
This report includes the software versions, revisions, the CRC, the creation
date of the individual modules and information on missing files.
Fresenius Medical Care 5008 SM 1/08.04 12-35

Chapter 12: Service Program (Option)
PC Service-Software 5008
Page 36 from 41 4/29.04
Starts the software update of the 5008 in accordance with the operator's
selection .
Opens the software update file.
Saves the software status to a file (*.5008sws).
Prints the software status.
Displays the Print Preview.
Shows the file name of the software update file that has been opened.
Shows information on the software versions of the individual modules.
- Module: Symbols:
The module shall not be updated.
The module shall be updated.
The module shall be updated but with an older
version!
The update status can be changed by double-clicking
the symbols.
Module name of the respective module, e.g. Monitor-OS
- Type: • File: the information in this line refers to the
version in the software update file for the
respective module.
• Flash: the information in this line refers to the
version on the CompactFlash of the 5008 for the
respective module.
• Module: the information in this line refers to the
version installed in the respective module.
- Version: version
- CRC: cyclic redundancy check
- Date: data and time of compilation
The operator can select if all modules are to be updated completely (check box
checked) or if only the files listed in the service report which are missing or
which are defective are to be updated (check box not checked).
More service report information for the operator:
• Files which are required by 5008 but which are missing or defective.
12-36 Fresenius Medical Care 5008 SM 1/08.04

Chapter 12: Service Program (Option)
Views
4/29.04 Page 37 from 41
View
Print Preview
Click the Print Preview button to view the print preview.
Selects individual pages
Zooms in
Prints the pages
Fresenius Medical Care 5008 SM 1/08.04 12-37

Chapter 12: Service Program (Option)
12-38 Fresenius Medical Care 5008 SM 1/08.04

Chapter 12: Service Program (Option)
4/29.04 Page 39 from 41
Modification
List of Modifications
Quick Guide
Release Modification
0/04.03 First edition
1/09.03 Help adapted to version V1.01
• Layout revised
• Caution: Software for service purposes only, added on cover
page
• Table of contents added
• Item 1 - Preparation - amended
• Item 2.8 - Software Update - revised
2/49.03
Help adapted to version V1.10
• Screenshots updated
• NOVRAM / Calibration data description adapted
• Software Update description adapted
3/17.04
Help adapted to version V1.11
• Machine Info description (operating hours) adapted
• List of Modifications: Software added
4/29.04 Help adapted to version V1.20
• System Requirements
Network card added
• Hardware Installation
Part numbers of interface cables added
• Starting the Software:
Network access description added
• Description of the Service Card (Access Protection)
Note on ServiceCard expiration date added
• Menu Options/Toolbar: Settings
Network access description adapted
• Menu/Toolbar: View added
• View: Machine Info
Setting/deleting operating hours added
• View: Error Memory
Error memory view description extended
• View: Setup Data
Note: Operator/Technician's setup added
Description for Service-PC active added
• View: Software Update
Release number omitted
Fresenius Medical Care 5008 SM 1/08.04 12-39

Chapter 12: Service Program (Option)
12-40 Fresenius Medical Care 5008 SM 1/08.04

Chapter 12: Service Program (Option)
,
4/29.04 Page 41 from 41
Index
D Description of the Service Card
(Access Protection).......................11
G General Information............................5
H Hardware Installation........................10
M Menu Options/Toolbar
Connection....................................16
Diagnosis ......................................18
Extras............................................19
Help/About ....................................23
Overview.......................................15
Settings ........................................ 20
S Screen
Error Memory ............................... 31
Machine Info................................. 25
NOVRAM/Calibration data ........... 27
Print Preview................................ 37
Service Data Recorder................. 33
Setup Data ................................... 29
Software Update .......................... 35
Software Installation .......................... 8
Starting the Software ....................... 12
System Requirements ....................... 7
Fresenius Medical Care 5008 SM 1/08.04 12-41

Chapter 12: Service Program (Option)
12-42 Fresenius Medical Care 5008 SM 1/08.04