Service Manual - Canon...
49
6 5 4 3 2 1 Advanced Box Service Manual October 23, 2012 Revision 3
Transcript of Service Manual - Canon...

654321
Advanced BoxService Manual
October 23, 2012Revision 3
ApplicationThis manual has been issued by Canon Inc. for qualified persons to learn technical theory, installation, maintenance, and repair of products. This manual covers all localities where the products are sold. For this reason, there may be information in this manual that does not apply to your locality.
CorrectionsThis manual may contain technical inaccuracies or typographical errors due to improvements or changes in products. When changes occur in applicable products or in the contents of this manual, Canon will release technical information as the need arises. In the event of major changes in the contents of this manual over a long or short period, Canon will issue a new edition of this manual.
The following paragraph does not apply to any countries where such provisions are inconsistent with local law.
TrademarksThe product names and company names used in this manual are the registered trademarks of the individual companies.
CopyrightThis manual is copyrighted with all rights reserved. Under the copyright laws, this manual may not be copied, reproduced or translated into another language, in whole or in part, without the consent of Canon Inc.
© CANON INC. 2012
CautionUse of this manual should be strictly supervised to avoid disclosure of confidential information.

Explanation of SymbolsThe following symbols are used throughout this Service Manual.
Symbols Explanation Symbols Explanation
Check. Remove the claw.
Check visually. Insert the claw.
Check the noise. Use the bundled part.
Disconnect the connector. Push the part.
Connect the connector. Plug the power cable.
Remove the cable/wire from the cable guide or wire saddle.
Turn on the power.
Set the cable/wire to the cable guide or wire saddle.
Remove the screw.
Tighten the screw.
The following rules apply throughout this Service Manual:
1. Each chapter contains sections explaining the purpose of specific functions and the relationship between electrical and mechanical systems with reference to the timing of operation.
In the diagrams, represents the path of mechanical drive; where a signal name accompanies the symbol, the arrow indicates the direction of the electric signal. The expression "turn on the power" means flipping on the power switch, closing the front door, and closing the delivery unit door, which results in supplying the machine with power.
2. In the digital circuits, '1' is used to indicate that the voltage level of a given signal is "High", while '0' is used to indicate "Low". (The voltage value, however, differs from circuit to circuit.) In addition, the asterisk (*) as in "DRMD*" indicates that the DRMD signal goes on when '0'.
In practically all cases, the internal mechanisms of a microprocessor cannot be checked in the field. Therefore, the operations of the microprocessors used in the machines are not discussed: they are explained in terms of from sensors to the input of the DC controller PCB and from the output of the DC controller PCB to the loads.
The descriptions in this Service Manual are subject to change without notice for product improvement or other purposes, and major changes will be communicated in the form of Service Information bulletins.All service persons are expected to have a good understanding of the contents of this Service Manual and all relevant Service Information bulletins and be able to identify and isolate faults in the machine.

Contents1 Functional Overview
Functional Overview ----------------------------------------------------------1-2Outline of Advanced Box/ Advanced Space--------------------------------- 1-2Comparison with Mail Box ------------------------------------------------------- 1-2Supporting Document: Common Office Formats -------------------------- 1-3Shared Space and Personal Space ------------------------------------------- 1-4Document filtering ----------------------------------------------------------------- 1-5User Authentication(User Access Control for Advanced Box/Space) - 1-5Open to Public function ----------------------------------------------------------- 1-7
Path for setting ------------------------------------------------------------------------------ 1-7Points to Note when Operating SMB Server ---------------------------------------- 1-7WebDAV Server Function ---------------------------------------------------------------- 1-8Points to Note: ------------------------------------------------------------------------------- 1-8
Setting to disable the function -------------------------------------------------1-10Read-only setting ----------------------------------------------------------------- 1-11Memory Media ---------------------------------------------------------------------1-12
File Format ----------------------------------------------------------------------------------1-12Note -------------------------------------------------------------------------------------------1-12Validation of Memory Media ------------------------------------------------------------1-12
2 SpecificationsSpecifications ------------------------------------------------------------------2-2
Specifications regarding Advanced Box/ Advanced Space ------------- 2-2Advanced Box/ Advanced Space capacity ---------------------------------- 2-2Exclusive control of documents in operation -------------------------------- 2-3Specifications regarding SMB/WebDAV ------------------------------------- 2-3Specifications when iW SAM function is enabled-------------------------- 2-3Specifications in Dept. ID management -------------------------------------- 2-4Specifications regarding link to Memory Media ---------------------------- 2-4Save to network (external connection setting)------------------------------ 2-5
External Connection Settings ------------------------------------------------------------ 2-5
New Functions -----------------------------------------------------------------2-6Preview ------------------------------------------------------------------------------- 2-6
Basic functions are same as BOX preview ------------------------------------------ 2-6Object functions ----------------------------------------------------------------------------- 2-6File Format ----------------------------------------------------------------------------------- 2-6
URI (Uniform Resource Identifier) Sending Function --------------------- 2-7Overview -------------------------------------------------------------------------------------- 2-7Functions ------------------------------------------------------------------------------------- 2-7
Internal transfer of reception document -------------------------------------- 2-7Functions ------------------------------------------------------------------------------------- 2-7
Others --------------------------------------------------------------------------------- 2-7Scan / Print individual prohibition of MemoryMedia -------------------------------- 2-7Document name change (Network) ---------------------------------------------------- 2-7Interrupt printing ----------------------------------------------------------------------------- 2-7
3 Installation/SettingsInstallation/Settings -----------------------------------------------------------3-2
Outline of User Mode settings -------------------------------------------------- 3-2Open to Public ---------------------------------------------------------------------- 3-2Allow to Create Personal Space ----------------------------------------------- 3-2Delete All Personal Space ------------------------------------------------------- 3-3Initializing Shared Space --------------------------------------------------------- 3-3Disabling writing from external device/PC ----------------------------------- 3-3Authentication management ---------------------------------------------------- 3-4
Saving password---------------------------------------------------------------------------- 3-4Mechanism ----------------------------------------------------------------------------------- 3-4
Saved file format (file storage filter) ------------------------------------------- 3-5Creating Personal Space -------------------------------------------------------- 3-5Creating Folder --------------------------------------------------------------------- 3-5User Management of Advanced Box ------------------------------------------ 3-6
4 Maintenance WorkMaintenance Work ------------------------------------------------------------4-2
Backup of Advanced Box/ Advanced Space -------------------------------- 4-2Backup Method Changes ---------------------------------------------------4-3
Conditions of Backup Method Changes-------------------------------------- 4-3

Detailed behavior --------------------------------------------------------------------------- 4-3Backup ---------------------------------------------------------------------------------------- 4-3Restore ---------------------------------------------------------------------------------------- 4-4Back Up/Restore Log --------------------------------------------------------------------- 4-4
USB HDD Backup ------------------------------------------------------------4-5Setup of USB HDD ---------------------------------------------------------------- 4-5
Preparation ----------------------------------------------------------------------------------- 4-5Connecting USB HDD --------------------------------------------------------------------- 4-5Setting Backup Destination -------------------------------------------------------------- 4-5Back up ---------------------------------------------------------------------------------------- 4-6Restore ---------------------------------------------------------------------------------------- 4-8
After for Clearing MN-CON 1 ----------------------------------------------4-9Overview ----------------------------------------------------------------------------- 4-9
After Clearing MN-CON 2 ------------------------------------------------- 4-10Overview of Recovery Scenario -----------------------------------------------4-10
Preparation ----------------------------------------------------------------------------------4-10Execution ------------------------------------------------------------------------------------4-11Recovery Action ----------------------------------------------------------------------------4-11
5 TroubleshootingTroubleshooting1 --------------------------------------------------------------5-2
“Advanced Box/ Advanced Space Settings” is disabled ----------------- 5-2Personal Space failed to be created ------------------------------------------ 5-2URL to Advanced Box/ Advanced Space ------------------------------------ 5-2
Troubleshooting2 --------------------------------------------------------------5-3Unable to open PDF file saved from the external device ---------------- 5-3Unable to activate Advanced Box ---------------------------------------------- 5-3
Background ---------------------------------------------------------------------------------- 5-3Start check procedure --------------------------------------------------------------------- 5-3
Others --------------------------------------------------------------------------------- 5-4Protection against virus ------------------------------------------------------------------- 5-4
A list of User Access Control for Advanced Box errors ------------------- 5-5

1
1 Functional Overview
Functional Overview
■Functional Overview

1
11-2
1-2
Functional Overview > Functional Overview > Comparison with Mail Box
Functional Overview > Functional Overview > Comparison with Mail Box
Functional Overview
Outline of Advanced Box/ Advanced SpaceAdvanced Box/ Advanced Space is a newly-added built-in storage function for iR devices besides the Mail Box.
F-1-1
Comparison with Mail BoxFollowing shows differences between Mail Box and Advanced Box/ Advanced Space:
Item Mail Box Advanced Box/ Advanced SpaceStorage format Dedicated format Universal formatPrint setting Keeps the setting Perform another iR / PC and cooperation of
Advanced Box. The print setting does not maintain it to make much of cooperation with the outside.
Text editing function Add FilesDeleteMove/DuplicateMerge Multiple FilesInsert PagesDelete Pages
Add FilesDelete
Password Enter the password when open the Mail Box.
Enter the ID and password for Advanced Box.
Access from network Use remote UI for operations.
Using the Windows network, connect with SMB Server and WebDAV Server on the iR machine.
Backup Available with SMB Server, USB HDD.
Available with SMB Server, USB HDD.But not available when using large capacity HDD of option.
About Print Settings, Mail Box keeps the settings but Advanced Box/ Advanced Space doesn't..This is to perform Advanced Box/ Advanced Space cooperation between different machines.
T-1-1

1
11-3
1-3
Functional Overview > Functional Overview > Supporting Document: Common Offi ce Formats
Functional Overview > Functional Overview > Supporting Document: Common Offi ce Formats
Supporting Document: Common Offi ce Formats • With Mail Box, documents are saved in a dedicated format that suits printing for respective
devices. • With Advanced Box/ Advanced Space, documents are saved in a universal format that has
high affi nity with PC.
Dedicated formatDedicated format
Printable Formats(Print Ready)
Printable Formats(Print Ready)
PDF,XPS,JPEG,TIFFPDF,XPS,JPEG,TIFF
Common Office Formats(Connect Ready)
Common Office Formats(Connect Ready)
Word,ExcelPowerPoint,TXT
Mail BoxMail Box Advanced Box/Advanced SpaceAdvanced Box/Advanced Space
Adobe
Word,ExcelPowerPoint,TXT
WW
Printable Formats(Print Ready)
Printable Formats(Print Ready)
Printable Formats : PDF, JPEG,TIFF, XPS* *Since XPS does not support print in the early stage of Advanced Box1.0, it is not handled as Print Ready but handled as Connect Ready. Once it supports print, it is categorized in print ready format (Print Ready). Common Offi ce Formats : Word, Excel, Power Point, TXT, imageWARE document (iwd), Shortcut fi le (lnk)
F-1-2
1
11-4
1-4
Functional Overview > Functional Overview > Shared Space and Personal Space
Functional Overview > Functional Overview > Shared Space and Personal Space
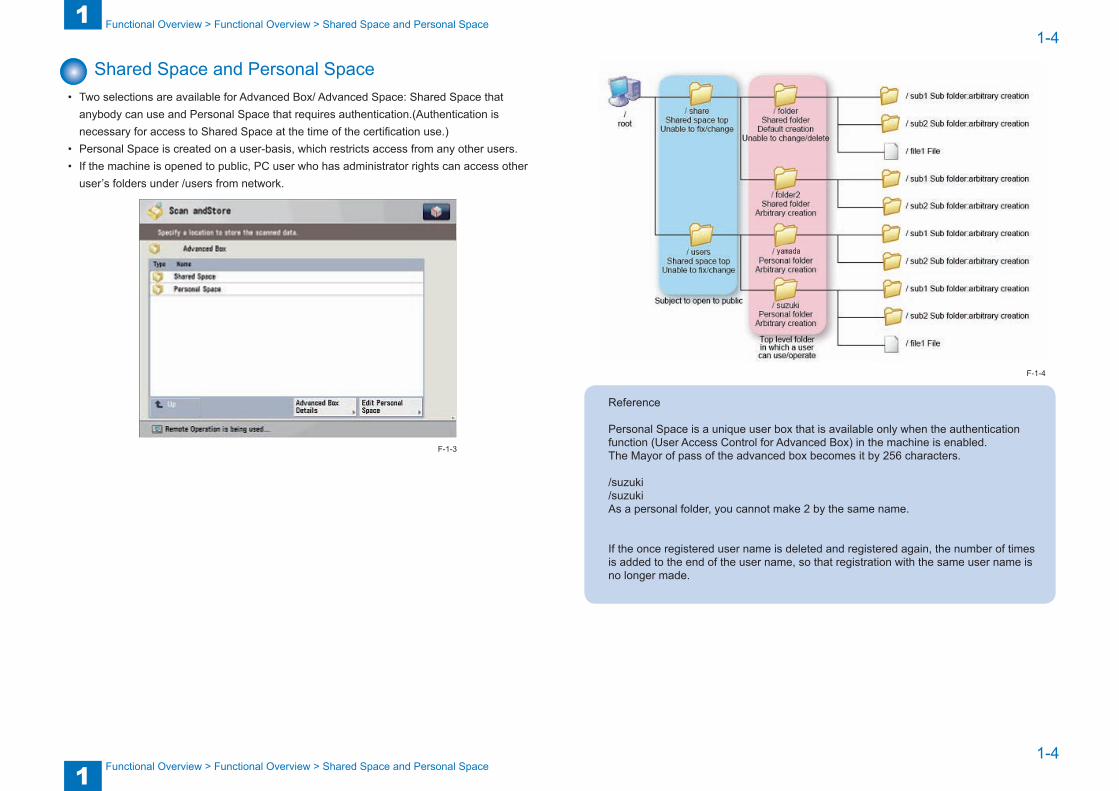
Shared Space and Personal Space• Two selections are available for Advanced Box/ Advanced Space: Shared Space that
anybody can use and Personal Space that requires authentication.(Authentication is necessary for access to Shared Space at the time of the certification use.)
• Personal Space is created on a user-basis, which restricts access from any other users.• If the machine is opened to public, PC user who has administrator rights can access other
user’s folders under /users from network.
F-1-3
yamada
Reference
Personal Space is a unique user box that is available only when the authentication function (User Access Control for Advanced Box) in the machine is enabled.The Mayor of pass of the advanced box becomes it by 256 characters.
/suzuki/suzukiAs a personal folder, you cannot make 2 by the same name.
If the once registered user name is deleted and registered again, the number of times is added to the end of the user name, so that registration with the same user name is no longer made.
F-1-4

1
11-5
1-5
Functional Overview > Functional Overview > User Authentication(User Access Control for Advanced Box/Space)
Functional Overview > Functional Overview > User Authentication(User Access Control for Advanced Box/Space)
Document fi ltering Restriction of fi le formats, which can be saved in Advanced Box/ Advanced Space, can prevent from saving of unwilling fi les.
• Printable Formats (Default): PDF, JPEG and TIFF only
• Common Offi ce Formats
Printable Formats, Word, Excel, Power Point, XPS, TXT, imageWARE document (iwd), Shortcut fi le (lnk)
• All:
Files in any format
Filtering
Adobe
The control panel displays only fi les in Printable Formats.
F-1-5
User Authentication(User Access Control for Advanced Box/Space)
This is the authentication function which was installed from iR-ADVANCE. Database is stored in the device, but it is the different database from SSO-H (local). ID and password for user authentication are recorded on HDD. • User authentication function (UAC) is used for access to Advanced Box/ Advanced Space. • UAC is a database different from Dept. ID management, SDL and SSO-H. • User management is executed by access from RUI. • Using Export/Import function enables backup of the user information. • Importing the exported user information to a different device enables to share the
information of registered users.(When you use the same ID by some people, you export and use it. Even if a password is same as the ID that you registered in another iR, UAC distinguish it as the other user.)
• When you perform SSO-H which is MEAP login service, you save a user ID/ password certifying by UAC, and it is possible for the certifi cation in a one-button.("Save a password"; a button)
• Registration descriptions: User Name, Password, User Type (Administrator/User)
• Up to 5000 users can be registered.

1
11-6
1-6
Functional Overview > Functional Overview > User Authentication(User Access Control for Advanced Box/Space)
Functional Overview > Functional Overview > User Authentication(User Access Control for Advanced Box/Space)
Default user name for administrator: AdministratorDefault password: password
Important:
A user name registered in User Management screen of Advanced Box/ Advanced Space is a unique and only name. After deleting the name and registering even the same text as a user name again, the newly registered name is recognized another user name other than the deleted one.
User name is required when opening user’s personal space.
When user name has been deleted, and even when personal space of the user name remains in the iR main body, no one can access the personal space.
To restore the deleted user name, import the user name that has been exported in advance.
F-1-6
Points to Note:
When logging out of the User Management screen of User Access Control for Advanced Box, select “Log Out from User Access Control” to close the screen. Otherwise, the next login is blocked for more than 30 minutes after the log-out.When immediate login is required, turn OFF and then ON the main power supply to restart the main body.
F-1-7

1
11-7
1-7
Functional Overview > Functional Overview > Open to Public function > Points to Note when Operating SMB Server
Functional Overview > Functional Overview > Open to Public function > Points to Note when Operating SMB Server
Open to Public function Using WebDAV server function (to be supported after the version upgrade) of the device or SMB server enables to use the document in Advanced Box/ Advanced Space from a PC on the network.
Advanced Box/Advanced Space
Personal spaceShared space
SMB or WebDAV
*WebDAV also supports SSL
F-1-8
■ Path for setting Select Settings/Registration > Function Settings > Store/Access Files > Advanced Box Settings > Open to Public.
■ Points to Note when Operating SMB Server 1. Main body of iR does not have browsing function. In the network environment without domain, the names of browser master PC and workgroup must be same. Clearing MN-CON in service mode changes the workgroup name that has been set in Settings/Registration to default. Therefore, the workgroup name should be set again.
F-1-9

1
11-8
1-8
Functional Overview > Functional Overview > Open to Public function > Points to Note:
Functional Overview > Functional Overview > Open to Public function > Points to Note:
F-1-10
■WebDAV Server FunctionWhen selecting WebDAV in the “Scan and Send” screen, since iR main body works as a client, sending to WebDAV server is required. Client PC must access WebDAV server, also.By Selecting WebDAV in “Open to Public” in Advanced Box/ Advanced Space, the iR main body works as WebDAV server.
Client PC WebDAV Server
New!WebDAV Server
Advanced Box
WebDAV Client
SEND
imageRUNNER ADVANCE
■ Points to Note:1.For opening to public via WebDAV, set “Use WebDAV Server” to “On”.Path:Settings/Registration > Preferences > Network > TCP/IP Settings > Use WebDAV Server
F-1-11

1
11-9
1-9
Functional Overview > Functional Overview > Open to Public function > Points to Note:
Functional Overview > Functional Overview > Open to Public function > Points to Note:
2. Path:Settings/Registration > Function Settings > Store/Access Files > Advanced Box Settings > WebDAV Server SettingsSelect Basic for Authentication Type.
F-1-12
F-1-13
3.When “Use SSL” is set to “On” in the WebDAV server setting screen, communication between iR main body and PC is encrypted by SSL. When setting an address by adding My Network Places in PC, set “https//host name/folder”.When “http//host name/folder” is set, access cannot be accomplished.Instead of host name, IP address can be used.
Reference:Folder path can be seen from the following path. Scan and Store > Advanced Box > Advanced Box Details > Location
F-1-14
F-1-15

1
11-10
1-10
Functional Overview > Functional Overview > Setting to disable the function
Functional Overview > Functional Overview > Setting to disable the function
4.The host name entered in the field of Network address should be the same name entered in the field of DNS Host/Domain Name Settings.Path:Settings/Registration > Preferences > Network > TCP/IP > DNS Settings > DNS Host/Domain Name Settings
F-1-16
5.If the ColorPASS or the imagePASS is attached to the machine for external reference, set WebDAV as the protocol. The URLs to register are as follows: If the SSL is invalid: http://IP address:18080/share If the SSL is valid: https://IP address:18443/share
Setting to disable the function• The respective functions of Mail Box, Advanced Box/ Advanced Space and Memory Media
can be masked (display: ON/OFF) separately.• Setting is available by selecting the following:
User Mode > Preferences > Display Settings > Store Location Display Settings
Activating display of storing location (setting to On) makes icons of “Advanced Box/Network” or “Advanced Space/Network” visible.
ON
OFF
*Each region can specify its own default settings F-1-17

1
11-11
1-11
Functional Overview > Functional Overview > Read-only setting
Functional Overview > Functional Overview > Read-only setting
Read-only setting• The setting to disable document writing into Advanced Box/ Advanced Space from the
outside.• The setting can be limited to read-only by disabling writing to Advanced Box/ Advanced
Space from a PC on the network. The default is ON (writing is disabled).• Following functions are subject to restriction when enabling “Prohibit Writing from External”:• Operations from the remote client (PC or other devices) as follows:
creating folder, changing folder name, deleting folder(only PC), storing document, changing document name, deleting document.
• There is exception that connecting to the network with specified loopback address (127.0.0.1, etc) from device machine, you can write under “Prohibit Writing from External.
Reference• [deleting folder] from network (other device) is not possible regardless of writing
prohibition setting.• [Moving/duplicating document (including folders)] is not possible regardless of writing
prohibition.• It is not possible to move/duplicate from MemoryMedia to Advanced Box.
F-1-18

1
11-12
1-12
Functional Overview > Functional Overview > Memory Media > Validation of Memory Media
Functional Overview > Functional Overview > Memory Media > Validation of Memory Media
Memory Media
Memory Media is a storage location that can be used by connecting a USB memory to the USB port of this machine. The original read from this machine can be saved in the memory media in a file format that can be used by the computer (such as PDF) and the file saved in the memory media can be printed from this machine.The SD card, Memory Stick, CF card and Microdrive can be used by installing the USB device port - B1 and the Multimedia Reader/Writer – A2.
■ File FormatIcons displaying file types handled by Memory Media are as follows.
■ Note• XPS files are not supported.• Only no security media are available.• There are no capacity limit on memory media. Only FAT32 file format is available.
F-1-19
F-1-20
■ Validation of Memory MediaAt first, Memory Media is unavailable. You have to activate it from User Mode.
1.User ModeSettings/Registration > Preferences > Display Settings > Store Location Display SettingsSelect “On” at the section and restart the machine.
F-1-21
1
11-13
1-13
Functional Overview > Functional Overview > Memory Media > Validation of Memory Media
Functional Overview > Functional Overview > Memory Media > Validation of Memory Media
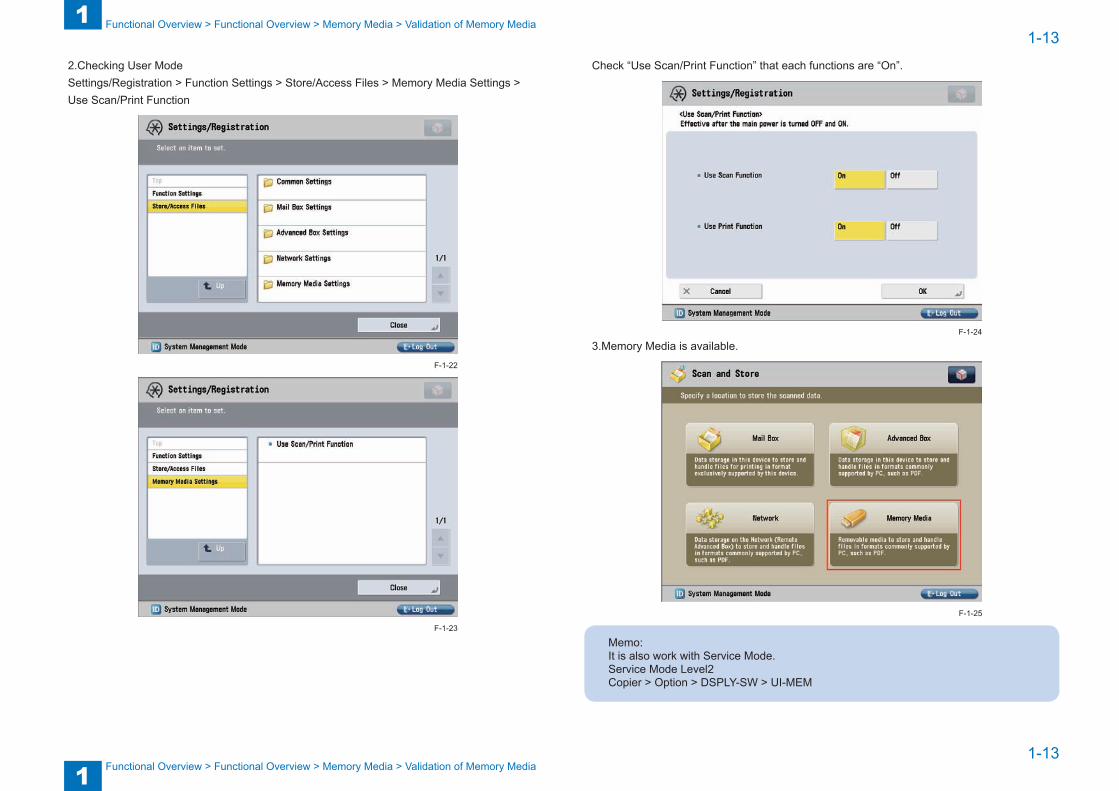
2.Checking User ModeSettings/Registration > Function Settings > Store/Access Files > Memory Media Settings > Use Scan/Print Function
F-1-22
F-1-23
Check “Use Scan/Print Function” that each functions are “On”.
3.Memory Media is available.
Memo:It is also work with Service Mode.Service Mode Level2Copier > Option > DSPLY-SW > UI-MEM
F-1-24
F-1-25

2
2 Specifications
Specifications ■Specifications ■New Functions

2
22-2
2-2
Specifications > Specifications > Advanced Box/ Advanced Space capacity
Specifications > Specifications > Advanced Box/ Advanced Space capacity
Specifications
Specifications regarding Advanced Box/ Advanced Space
• Up to 1,000 files (including folders) can be stored for a layer (level) in Advanced Box/ Advanced Space (same applies to the display and sorting).
• Up to 100 PDL jobs, which include the PDL jobs in which the other application has input, can be input at the same time. If the total jobs exceeds 100, the excess jobs are cancelled.
• If storing document after scanning, up to 32 saved jobs can be input at the same time.• Approximately up to 100,000 documents (including folders) can be stored in Advanced Box/
Advanced Space of the host machine (100,000 is not the guaranteed number because some hidden files are used for internal process).
• HDD The upper limit of a file size that can be stored in Advanced Box/ Advanced Space is 2GB.
• The capacity of Advanced Box/ Advanced Space varies depending on the HDD capacity (see the next page).
• Direct Print needs to be enabled to print documents in Advanced Box/ Advanced Space.• Respective options are necessary to generate (highly functional) PDF. • Only the management function (settings, etc.) is available from the remote UI.• If the machine shifts to the HDD protection mode(shut down sequence), the job is
cancelled.• Personal spaces are created under “\users”• In the case of SMB, access from a PC is available from \\server\. In the case of access
from the other iR device, however, the access to the folder just below \\server\ causes an error.
• “\share” and “\users” folders cannot be changed because they are created as unchanged folders.
• “\users” folder exists even when the authentication operation is disabled.• “\folder” folder just below “\share” is the shared folder created as default (changing/deleting
of the folder is available).• The folders just below “\share” and “\users” are managed as “the top folder”, and cannot
be created/deleted or the name of the folders cannot be changed from a PC connected through SMB/WebDAV.
• Any file cannot be placed just below “\share” or “\users” folders.• To create a folder just below “\users”, use “Create Personal Space”.• Creating a folder just below “\share” is available.• If the network list is viewed from "Scan and Send" > "Browse" button while a fax is received
and sent to Advanced Box, this fax reception/transmission fails. (#751 error occurs.) • Maximum path length: 256 characters
Advanced Box/ Advanced Space capacity• Advanced Box/ Advanced Space is a function that does not replace Mail Box, but coexists
with Mail Box.• Following shows the system area and the area allocation with Mail Box:
HDD Advanced Box/
Advanced Space
functions
Segment System Mail Box capacity
Advanced Box/
Advanced Space
capacity80GB Yes Standard 46GB 23GB
6000 pages9.6GB
250GB Yes OP 46GB 48GB6000 pages
112.7GB
1TB Yes OP 46GB 48GB6000 pages
663.9GB
*1: 20% of Advanced Box/ Advanced Space is used as a snapshot area.*2: HDD partition cannot be changed after the HDD is delivered/shipped.OP:
HDD Model250GB HDD iR ADVANCE C5051/5045/5035/5030 Series
iR ADVANCE 8105/8095/8085 SeriesiR ADVANCE 6075/6065/6055 SeriesiR ADVANCE 4051/4045/4035/4025 Series
1TB HDD iR ADVANCE C7065/C7055 SeriesiR ADVANCE C9075PRO/C9070PRO/C9065PRO/C9060PRO SeriesiR ADVANCE C5255/C5250/C5240/C5235 SeriesiR ADVANCE 8205/8285/8295 SeriesiR ADVANCE 6275/6265/6255 Series
T-2-1
T-2-2

2
22-3
2-3
Specifications > Specifications > Specifications when iW SAM function is enabled
Specifications > Specifications > Specifications when iW SAM function is enabled
Exclusive control of documents in operationWhen handling documents, the machine does not execute logical copy just like Mail Box, but executes lock process of the document to prevent modification during handling process.
• To print documents• The operation is locked during data scanning.• The lock is released once the data scanning is complete even when the document has
been printed (because printing is succeeded once the data has been scanned)• To scan documents to store
• The operation is locked during data writing
Specifications regarding SMB/WebDAV• Number of clients to be connected at the same time:
• SMB: 32 clients• WebDAV: No limit
• Connectable clients:• Windows 2000• Windows XP• Windows Vista• Windows 7
• When PS Print Server Unit is connected, Open to Public function with SMB is not available because the PS Print Server Unit works as SMB server.To enable Open to Public function while the PS Print Server Unit is connected, use WebDAV to execute.
Specifications when iW SAM function is enabledFollowing functions are disabled when imageWARE/iW Secure Audit Manager function is enabled. But there is a switch of the limit relaxation, and the following functions become available for service mode Lv.2 by turning it on.Copier > Option > User > JA-SBOX
• Functions linked to the external Advanced Box/ Advanced Space.• Executing management of the external connection settings.• Open to Public.

2
22-4
2-4
Specifications > Specifications > Specifications regarding link to Memory Media
Specifications > Specifications > Specifications regarding link to Memory Media
Specifications in Dept. ID management• To manage Advanced Box/ Advanced Space with Dept. ID, select ON for “Main Box” in
“Limited Functions” setting.Path:Settings/Registration> Management Settings > User Management > Department ID Management > ON > Register PIN > Limit Functions
• When selecting the forced black/white mode, printing in black and white is available without entry of Dept. ID just like Mail Box (Dept. ID needs to be entered if the color mode (including ACS) is selected when making prints).
F-2-1
F-2-2
Specifications regarding link to Memory Media
• The number of slots for Memory Media differs depending on the model. If multiple partitions are specified in a Memory Media, it is recognized that multiple Memory Medias are attached. Up to 16 memory medias can be recognized.
• Memory Media supports FAT32 format only.• Supported Memory Media
• USB memory• SD card and SDHC card• CF card and Micro Drive• MemoryStick and MemoryStickPro
• The machine shift to the deep-sleep state while Memory Media is inserted.

2
22-5
2-5
Specifications > Specifications > Save to network (external connection setting) > External Connection Settings
Specifications > Specifications > Save to network (external connection setting) > External Connection Settings
Save to network (external connection setting)Users of the iR devices can register other Advanced Box/Space of iR-ADVANCE which is connected to the network (up to 20 destinations).(Advanced Box/Advanced Space in other iR is object of the connected to.)• Name of the external connecting destination: within 32 ASCII characters• Name of network place: Within 128 characters (1-byte)/64 characters (2-byte).
• It can cause an error if WebDAV server/Proxy server does not support the character codes other than ASCII.
• Example:SMB shared folder: \\server\shareWebDAV folder: http://webserver/share
*Proxy server can be used in the case of using WebDAV.
F-2-3
F-2-4
■ External Connection Settings
● Settings for Server• Open to Public
Function Settings > Store/Access Files > Advanced Box Settings > Open to Public > By SMBPreferences > Network > SMB Server Settings > Use SMB Server > ON
• SMB Authentication SettingsPreferences > Network > SMB Server Settings > SMB Authentication Settings > Use SMB Authentication ON > AuthenticationType (NTLMv1/NTLMv2)
• Authentication Management SettingsFunction Settings > Store/Access Files > Advanced Box Settings > Authentication Management > ON
● Settings for Client• Protocol Settings
Function Settings > Store/Access Files > Network Settings > Protocol for External Reference > SMB/WebDAV > ON
• Network SettingsFunction Settings > Store/Access Files > Network Settings > Network Place Settings > Register(The place appoints "share" or "users")

2
22-6
2-6
Specifications > New Functions > Preview > File Format
Specifications > New Functions > Preview > File Format
New Functions
Preview ■ Basic functions are same as BOX preview
• Preview of stored file• Page preview• Page moving• Zoom in / Zoom out
■ Object functions• Advanced Box/Space• Memory Media• Network
■ File FormatJPEG, TIFF, PDF(Encrypted PDF/Policy is after log-in)
F-2-5
F-2-6
2
22-7
2-7
Specifications > New Functions > Others > Interrupt printing
Specifications > New Functions > Others > Interrupt printing
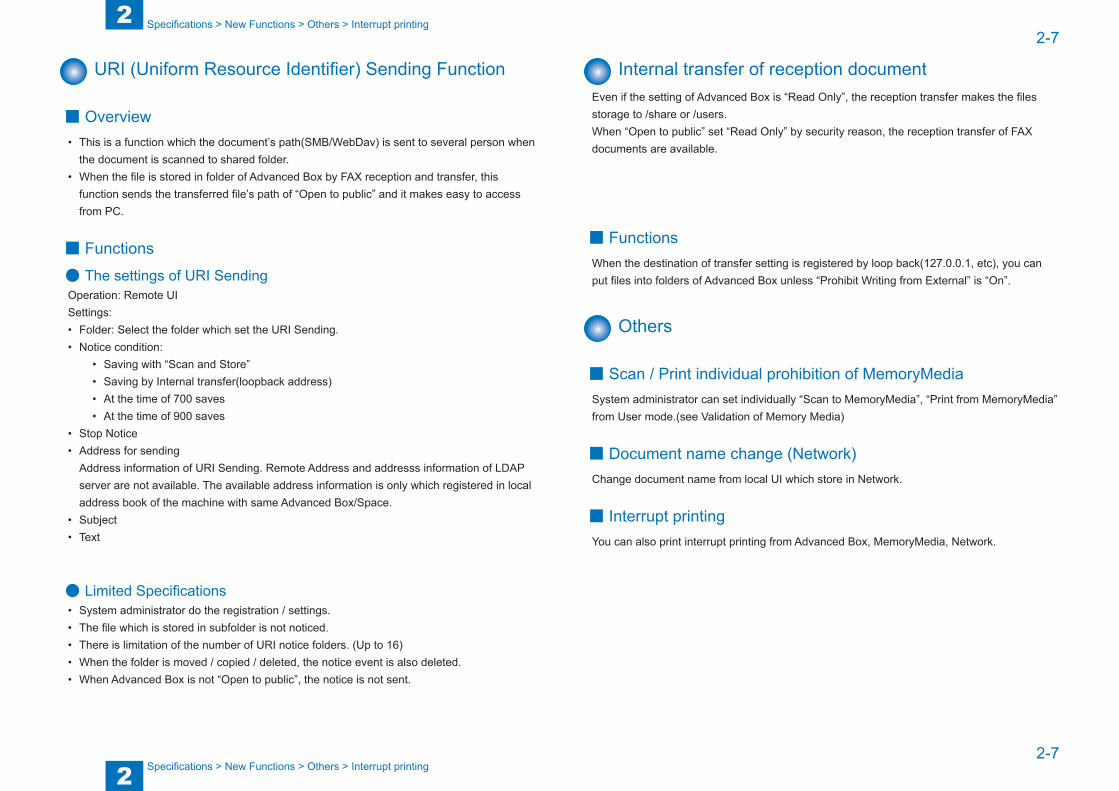
URI (Uniform Resource Identifier) Sending Function
■ Overview• This is a function which the document’s path(SMB/WebDav) is sent to several person when
the document is scanned to shared folder.• When the file is stored in folder of Advanced Box by FAX reception and transfer, this
function sends the transferred file’s path of “Open to public” and it makes easy to access from PC.
■ Functions
● The settings of URI SendingOperation: Remote UISettings:• Folder: Select the folder which set the URI Sending.• Notice condition:
• Saving with “Scan and Store”• Saving by Internal transfer(loopback address)• At the time of 700 saves• At the time of 900 saves
• Stop Notice• Address for sending
Address information of URI Sending. Remote Address and addresss information of LDAP server are not available. The available address information is only which registered in local address book of the machine with same Advanced Box/Space.
• Subject• Text
● Limited Specifications• System administrator do the registration / settings.• The file which is stored in subfolder is not noticed.• There is limitation of the number of URI notice folders. (Up to 16)• When the folder is moved / copied / deleted, the notice event is also deleted.• When Advanced Box is not “Open to public”, the notice is not sent.
Internal transfer of reception documentEven if the setting of Advanced Box is “Read Only”, the reception transfer makes the files storage to /share or /users.When “Open to public” set “Read Only” by security reason, the reception transfer of FAX documents are available.
■ FunctionsWhen the destination of transfer setting is registered by loop back(127.0.0.1, etc), you can put files into folders of Advanced Box unless “Prohibit Writing from External” is “On”.
Others
■ Scan / Print individual prohibition of MemoryMediaSystem administrator can set individually “Scan to MemoryMedia”, “Print from MemoryMedia” from User mode.(see Validation of Memory Media)
■ Document name change (Network)Change document name from local UI which store in Network.
■ Interrupt printingYou can also print interrupt printing from Advanced Box, MemoryMedia, Network.

3
3 Installation/Settings
Installation/Settings
■Installation/Settings

3
33-2
3-2
Installation/Settings > Installation/Settings > Allow to Create Personal Space
Installation/Settings > Installation/Settings > Allow to Create Personal Space
Installation/Settings
Outline of User Mode settings• File format that can be saved (file storage filter)
• Printable Formats only• Printable Formats + Common Office Formats• Any format
• Extension of Printable Formats• PDF: pdf • Jpeg: jpg, jpe, jpeg• Tiff: tif, tiff
• Extension of Common Office Formatsdoc, docx, docm, rtf, xls, xlsx, xlsm, csv, ppt, pptx, pptm, txt,iwd, iwt, iws, lnk, xps
• XPS is handled as Office format because printing is not available with Advanced Box/ Advanced Space. XPS is to be handled as Printable Formats once printing is available.
• Open to Public setting (rebooting required): Off/By WebDAV/By SMB• Prohibit Writing from External (rebooting required): On*/Off• If Prohibit Writing from External is (selected) On, restrictions apply with the folder/file
operation from the remote client.
Memo:Reboot is necessary to reflect the setting change of User mode.
Open to Public• A function to use Advanced Box/ Advanced Space from the other PC or device on the
network.• Select either “By WebDAV” or “By SMB”.Path:
Settings/Registration > Function Settings > Store/Access Files > Advanced Box/ Advanced Space Settings > Open to Public
Allow to Create Personal Space• To enable/disable creation of Personal Space.• Select either “ON” or “OFF”.• Selecting ON enables to create Personal Space.
Path:Settings/Registration > Function Settings > Store/Access Files > Advanced Box/ Advanced Space Settings > Allow to Create Personal Space
F-3-1
F-3-2

3
33-3
3-3
Installation/Settings > Installation/Settings > Disabling writing from external device/PC
Installation/Settings > Installation/Settings > Disabling writing from external device/PC
Delete All Personal Space• To delete all of the registered Personal Spaces as one job• Select “Yes” to delete, or “No” to cancel
Path: Settings/Registration > Function Settings > Store/Access Files > Advanced Box/ Advanced Space Settings > Delete All Personal Space
Reference: Remote UI is not only able to delete all personal space but also delete appointment folder.
Initializing Shared Space• To delete the data in Shared Space
Path: Settings/Registration > Function Settings > Store/Access Files > Advanced Box/ Advanced Space Settings > Initializing Shared Space
F-3-3
F-3-4
Disabling writing from external device/PC• To disable writing to the files in Advanced Box/ Advanced Space from the other PC on the
network.• Under this setting, the user who access from outside only can do browse.
Path:Settings/Registration > Function Settings > Store/Access Files > Advanced Box/ Advanced Space Settings > Prohibit Writing from External
F-3-5

3
33-4
3-4
Installation/Settings > Installation/Settings > Authentication management > Mechanism
Installation/Settings > Installation/Settings > Authentication management > Mechanism
Authentication management• Execute authentication setting with Advanced Box/ Advanced Space. After that, you need
User ID and password to access Advanced Box/ Advanced Space. It is necessary to do this setting for using Personal Space.Path: Settings/Registration > Function Settings > Store/Access Files > Advanced Box/ Advanced Space Settings > Authentication Management
Get ready to make a personal space after Authentication management setting as follows.1. Make User in UAC from Remote UI.2. Access Advanced Box/ Advanced Space with User ID and password.
■ Saving passwordWhen the user has been defined by SSO-H, the user can register his/her user name and password to login Advanced Box/ Advanced Space.Method of registration: In the login screen of Advanced Box/ Advanced Space, press “Store Password” button.
■ MechanismWhen user name and password are entered first time, they are related to user name data in SSO-H and then recorded in HDD. For this reason, even when SSO-H password has been changed, user name and password of Advanced Box/ Advanced Space are not affected at all.
F-3-6
F-3-7

3
33-5
3-5
Installation/Settings > Installation/Settings > Creating Folder
Installation/Settings > Installation/Settings > Creating Folder
Saved file format (file storage filter)• Select the file format that can be saved in Advanced Box/ Advanced Space from the
selections below:• Printable Formats Only
To allow Printable Formats only• Common Office Formats
To allow storage in Printable Formats and Common Office Formats• All
To allow storage in any file format
Creating Personal Space• To create a Personal Space (personal folder)
There is no Personal Space with the default setting. Personal Space can be created after enabling user authentication.
• Access to Advanced Box/ Advanced Space• Select “Edit Personal Space”• Select “Create Personal Space”
F-3-8
F-3-9
Creating Folder• To create a folder in Shared Space or Personal Space
• Access to Shared Space or Personal Space• Select “Folder Operations”• Select “Create Folder”• Enter a folder name
F-3-10

3
33-6
3-6
Installation/Settings > Installation/Settings > User Management of Advanced Box
Installation/Settings > Installation/Settings > User Management of Advanced Box
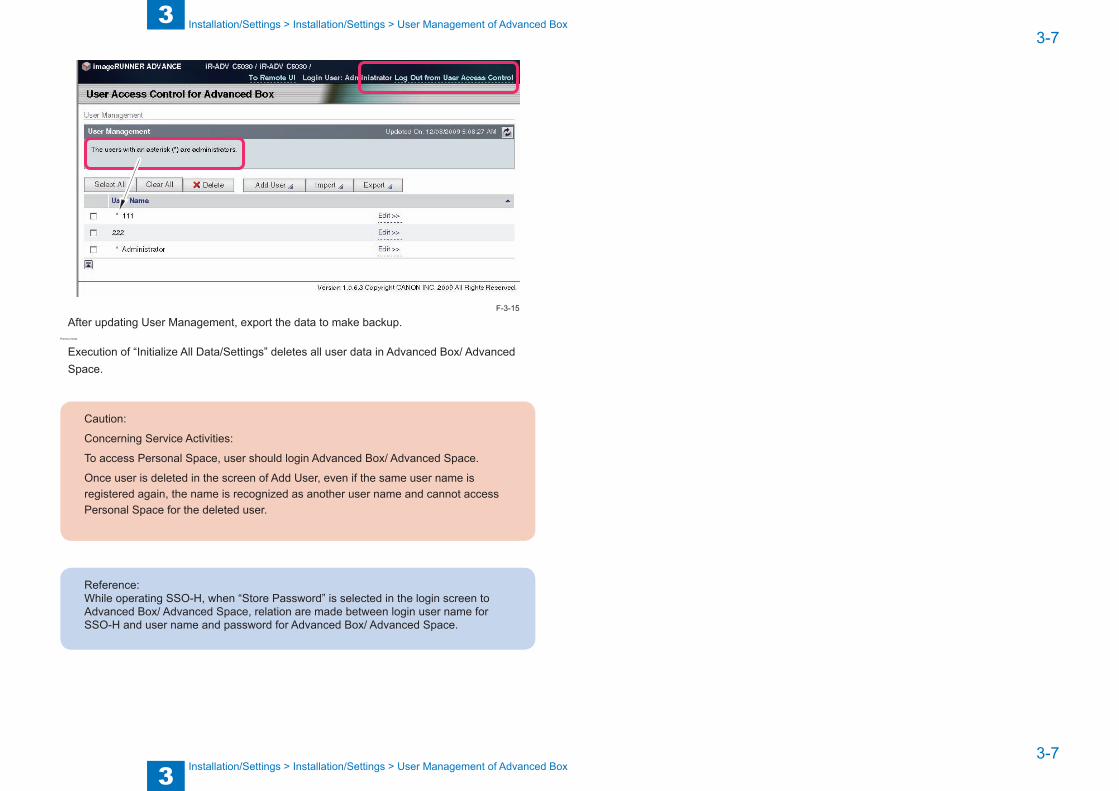
User Management of Advanced BoxTo use Personal Space of Advanced Box/ Advanced Space, execute Add User by User Management in RUI Advanced Box/ Advanced Space.
• Administrator’s default is shown below.User Name: AdministratorPassword: password
F-3-11
F-3-12
• When adding a new user, use “Add User” function.• To back up user name and password, export them.• The exported file can be imported to other iR ADVANCE main bodies.
• As User Type, select “End User” or “Administrator”.
• When Administrator is selected, “*” is displayed.• When logging out, press “Log Out from User Access Control”. Otherwise, the next login is
blocked for the following 30 minutes.• When login is required immediately, the main body should be restarted.
F-3-13
F-3-14
3
33-7
3-7
Installation/Settings > Installation/Settings > User Management of Advanced Box
Installation/Settings > Installation/Settings > User Management of Advanced Box
After updating User Management, export the data to make backup.Points to Note:
Execution of “Initialize All Data/Settings” deletes all user data in Advanced Box/ Advanced Space.
Caution:
Concerning Service Activities:
To access Personal Space, user should login Advanced Box/ Advanced Space.
Once user is deleted in the screen of Add User, even if the same user name is registered again, the name is recognized as another user name and cannot access Personal Space for the deleted user.
Reference: While operating SSO-H, when “Store Password” is selected in the login screen to Advanced Box/ Advanced Space, relation are made between login user name for SSO-H and user name and password for Advanced Box/ Advanced Space.
F-3-15

4
4 Maintenance Work
Maintenance Work
■Maintenance Work ■Backup Method Changes ■USB HDD Backup ■After for Clearing MN-CON 1 ■After Clearing MN-CON 2

4
44-2
4-2
Maintenance Work > Maintenance Work > Backup of Advanced Box/ Advanced Space
Maintenance Work > Maintenance Work > Backup of Advanced Box/ Advanced Space
Maintenance Work
Backup of Advanced Box/ Advanced Space• The backup of Advanced Box/ Advanced Space is backed up with Mail box by performing
Box backup operation in Remote UI.• As backup, you can choose SMB server or a USB HDD. But you can use the SMB server
only in the case of standard HDD.• Take the backup of UAC before backing up Advanced Box/ Advanced Space. It is
necessary for the user management data of Advanced Box/ Advanced Space to synchronize with the data of Advanced Box/ Advanced Space.
• When You do restoration of the data of the advanced box, the user management data of Advanced Box/ Advanced Space let you restore to the original state.
• Re-to machinery equipped with an HDD of the size that is smaller than HDD size of the machinery which backed up; cannot store it. As for the backup data of Advanced Box/ Advanced Space, a re-store is possible in iR-ADVANCE corresponding to the advanced box function.
• The upper limit of backup operations to the same folder is to be 100 times regardless of what is backed up (all data or only changes).
F-4-1

4
44-3
4-3
Maintenance Work > Backup Method Changes > Conditions of Backup Method Changes > Backup
Maintenance Work > Backup Method Changes > Conditions of Backup Method Changes > Backup
Backup Method Changes
Conditions of Backup Method Changes• Backup Method Changes executes backup of the only data that has been updated since
the last Backup Method All.• To run Backup Method Changes, there must be a data in which Backup Method All has
been executed on the path to the folder of the server specified as the backup destination. • In the case of specifying Backup Method Changes immediately after executing restoration,
it works as a full backup even though the conditions for Backup Method Changes are satisfied.
• When you set different encrypted password at the time of Backup Method All, it works as Backup Method Changes.
Remote UI settings sample is shown below.
F-4-2
■ Detailed behavior• Backup order Advanced Box/Advanced Space>Mail Box Backup• During backup execution, Advanced Box/Advanced Space can be used. When executing
the following operation within 5 minutes (approx.) since the start of backup, it results in a backup error.
a. Performing the operation of Advanced box, Memory media, Network by Local UI.b. Executing Settings/Registration operation from Local UI / Remote UIc. Opening the Advanced Box file from a client PC on the network.
• The document which it stored after backup operation in Advanced Box does not become the backup object.
• Backup of Mail Box is carried out after backup of Advanced Box.
■ Backup
● Display of Reply Response Display Description Cause of error
Backup and started
Server error occurred The error is caused by the server• Faulty server network• Wrong host IP address• Wrong user name/password• No path to the folder
USB failure occurred. The error is caused by the USB HDD• USB HDD is not connected• Multiple USB HDDs are connected (including multi-partition)• No path to the folder• Failure in writing to USB HDD
Already carrying out the back up.
Backup function has been already running• Backup is in progress• Restore list retrieval is in progress
T-4-1

4
44-4
4-4
Maintenance Work > Backup Method Changes > Conditions of Backup Method Changes > Back Up/Restore Log
Maintenance Work > Backup Method Changes > Conditions of Backup Method Changes > Back Up/Restore Log
■ Restore
● Display of Restore screen is shown below. Display Description
(Restore)Cause of error
Make restoration at the time of start on the next time.
OK
Server error occurred The error is caused by the server• Faulty server network• Wrong host IP address• Wrong user name/password• No path to the folder
USB failure occurred. The error is caused by the USB HDD• USB HDD is not connected• Multiple USB HDDs are connected (including multi-partition)• No path to the folder• Failure in writing to USB HDD
Processing... Backup function has been already running• Backup is in progress• Restore list retrieval is in progress
The entered password is incorrect.
Wrong encryption password when executing backup
Server fi le failure occurred.There is no fi le that is necessary for operation in the server.
Display of Restore screen is shown below.
T-4-2
■ Back Up/Restore Log • Log can be displayed up to latest 100 records. • Log records are deleted in chronological order.
F-4-3
F-4-4

4
44-5
4-5
Maintenance Work > USB HDD Backup > Setup of USB HDD > Setting Backup Destination
Maintenance Work > USB HDD Backup > Setup of USB HDD > Setting Backup Destination
USB HDD Backup
Setup of USB HDD
■ PreparationConnect the USB HDD to the PC to check if data can be written to the folder in the USB HDD.Create a folder and note down the folder path.
Ex.) \USBHDD
Note:The device can recognize HDDs only in FAT32 format.Confirm that only one HDD with the capacity of 32GB or more is connected before starting Backup/Restore. When confirmed, start Backup/ Restore.The Backup folder can be named up to 128 single-bite characters (64 double-byte characters).
When formatting the drive in FAT32 on Windows2000/ XP/ Vista, the capacity is limited to 32GB. If the file size exceeds 32GB, obtain a commercial tool to meet larger capacity requirements.
F-4-5
■ Connecting USB HDDConnect the HDD to the USB connector on the iR Host .Check on the touch panel that the USB HDD is surely recognized.
■ Setting Backup DestinationSet the Backup destination on RUI.Settings/Registration:Management Settings:Data Management > Set backup destination
Backup data destination: ex.) USB HDDUSB HDD setting -> the path to the folder: ex.) \USBHDDIt is recommended to encrypt the backup data for better security maintenance.The backup time will take about 1.8 times when the data is encrypted.
F-4-6

4
44-6
4-6
Maintenance Work > USB HDD Backup > Setup of USB HDD > Back up
Maintenance Work > USB HDD Backup > Setup of USB HDD > Back up
Points to note:The encrypted data cannot be restored unless the password is kept.Ensure to maintain the password for encryption.
F-4-7
■ Back upAccess to Advanced Box is allowed even during backup, but the document which it stored after backup operation in Advanced Box does not become the backup object.
Settings/ Registration: Management Settings: Data Management > Backup
F-4-8

4
44-7
4-7
Maintenance Work > USB HDD Backup > Setup of USB HDD > Back up
Maintenance Work > USB HDD Backup > Setup of USB HDD > Back up
● How to estimate Backup timeDepending on the USB HDD performance and condition, the backup time varies. The following shows the method to estimate the backup time.
Important
The best condition was used for the method to estimate the backup time, so the actual backup time might take longer, depending on the HDD and data storage conditions.
The factor which the backup time varies remarkably is the file storage condition of the USB HDD. If the data is already written in the HDD, the access speed is decreased. In case of all backup, it is preferred that USB HDD is initialized beforehand.
If data was backed up in the past, the capacity and time at backup can be checked from the Remote UI (Back Up / Restore Log screen) and the backup time per second can be calculated. If the "Required Available Space" which is displayed in the Remote UI (Back Up screen) is divided by the calculated value, the backup time in the user environment can be estimated.
Example
In case of Figure F-4-9
Required Available Space divided by (End Date/Time - Start Date/Time) = Backup capacity per second
Required memory space divided by the data transfer speed of USB HDD = time for backup
Additional condition:
• When encrypting data, a double time is required.
● Confirming backup completionConfirm that backup is completed via Remote UI.Check that “OK” is shown in the result field.In the case of the error, it solves a problem in mention of the Result column and backs it up again.
Settings/ Registration: Management Settings: Data Management > Backup/ Restore History
Note:Data can be fully backed up in the same USB HDD folder for 100 times.Before starting backup, take measures not to exceed the USB HDD capacity.
F-4-9

4
44-8
4-8
Maintenance Work > USB HDD Backup > Setup of USB HDD > Restore
Maintenance Work > USB HDD Backup > Setup of USB HDD > Restore
■ RestorePress the "Perform Restart." button carrying out a restore from RUI.Host Machine reboots automatically and starts re-store movement.When restore movement is finished, please "cut the main power switch of the main body right side surface" and display it in touch panel.OFF of the main power supply.ON of the main power supply.
Caution:
Backup Method All cannot be performed but Backup Method changes when the backup data are restored even once.
Select the data to be restored and press [Execute].
Select the data to be restored and press [Execute].F-4-10
F-4-11
Press [Restart Device…] button on the Host Machine .
Press [OK] button.
Check in Backup/ Restore History that restoration is completed.
F-4-12
F-4-13
F-4-14
F-4-15

4
44-9
4-9
Maintenance Work > After for Clearing MN-CON 1 > Overview
Maintenance Work > After for Clearing MN-CON 1 > Overview
After for Clearing MN-CON 1
OverviewExecution of MN-CON in service mode deletes data in SRAM in iR main body.Since SRAM contains data of user name and Settings/Registration data, etc, restoring operation is required after clearing MN-CON.In System ver. 37 or later of iR ADVANCE C5051/5045/5035/5030 Series, modification has been done and now after clearing MN-CON and deleting data in SRAM, backup data recorded on HDD is automatically written back to SRAM.The following sections describe points to note in MN-CON clearing/ restoration for System firmware version V37 and later.For details, refer to "Action for Clearing MN-CON 2".
Points to Note1 Set manually are limited to IP address and settings around Network.
IP Address => 0.0.0.0SMB Server Name => Default (E.g. Canon332070)
IP Addresses and the network settings should be reconfigured.IP addresses obtained via DHCP may be changed after restoration.SMB Server Name is reset to the default.For devices using Advanced Box as SMB Server, the association between computer names and IP addresses is changed.Folders are hidden on the network before the browsing function of the PC is updated.
2 When login application other than Default Authentication is running, access SMS to change the login application to Default Authentication before operating service mode.
When clearing MN-CONT while login application other than Default Authentication is running, log in screen is not displayed.In this case, changing login application once to Default Authentication restores the normal status.
3 Settings/Registration is fully reset to the default.Exported files should be imported in the device for restoration.
4 System Manager password is reset to “7654321”. Change the password again.
T-4-3
CAUTION:
When MN-CON is cleared during SSO-H operation, a user can go to Setting/ Registration with System Manager User Type only one time without login.
If IP Address is not set at this time, it cannot be restored via Remote UI after the main power is turned OFF/ON. To log in, clear MEAP applications by clearing JV-CACHE in service mode to reset the device to the default. However, users have to restore necessary MEAP applications in such a case. Explain the user about this before JV-CACHE clearing.
(Clearing JV-CACHE, also clear user information (ID/Pasword) of User Access Control for Advanced Box.)
Requirement:
Set the IP address to access from Remote UI.
Set the System Manager password to update Settings/Registration.
Other than the items above, ID and password for Advanced Box are associated with key chain when TPM is ON.
For other cases related to MN-CON clearing, see the service manual for the host machine on how to restore TPM.

4
44-10
4-10
Maintenance Work > After Clearing MN-CON 2 > Overview of Recovery Scenario > Preparation
Maintenance Work > After Clearing MN-CON 2 > Overview of Recovery Scenario > Preparation
After Clearing MN-CON 2
Overview of Recovery Scenario ■ Preparation
The followings describe data backup required for troubleshooting.When clearing MN-CON is normally executed, recovery is possible only with record of IP address settings of iR main body and password for system administrator.
a) Export of user name for SSO-Hb) Export of user name for Advanced Box/ Advanced Spacec1) Export
c1-1) Checking if backup is perfect (if possible).c1-2) Address List <- included in the item of the Device settingc1-3) Device settings (frequently used settings of transfer, address list, sending)c1-4) Settings/Registration c1-5) Printer settingsc1-6) Paper information
F-4-16
c2)Mail Box Memory RX Inbox Confidential Fax Inbox Advanced Box Form for Superimpose Image
c3) Export of Quick MenuF-4-17

4
44-11
4-11
Maintenance Work > After Clearing MN-CON 2 > Overview of Recovery Scenario > Recovery Action
Maintenance Work > After Clearing MN-CON 2 > Overview of Recovery Scenario > Recovery Action
■ Executiond) When MN-CON is cleared, the message, “Turn the main power switch (on the right side of the main unit) OFF and ON.”, is shown. Follow the instruction as shown in the message.
F-4-18
F-4-19
■ Recovery Actione1) Select On for “Confirm Network Connection Set. Changes”
e2) Registering IP address => RestartF-4-20
F-4-21

4
44-12
4-12
Maintenance Work > After Clearing MN-CON 2 > Overview of Recovery Scenario > Recovery Action
Maintenance Work > After Clearing MN-CON 2 > Overview of Recovery Scenario > Recovery Action
e3) Entering SMB server name after following the path: Settings/Registration > Preferences > Network > SMB Server Settings
e4) Return from Default Authentication to SSO-H.F-4-22
F-4-23
e5) Import the file containing exported Setting/Registration for restoration.
e6) System Manager password is reset to “7654321”. Change the password again.e7) The Advanced Box ID can be restored by import, but it is necessary for the authority of the manager of the user except the manager of the default to set it again.
F-4-24

5
5 Troubleshooting
Troubleshooting ■Troubleshooting1 ■Troubleshooting2

5
55-2
5-2
Troubleshooting > Troubleshooting1 > URL to Advanced Box/ Advanced Space
Troubleshooting > Troubleshooting1 > URL to Advanced Box/ Advanced Space
Troubleshooting1
“Advanced Box/ Advanced Space Settings” is disabledQ: When I tried to specify the setting of Advanced Box/ Advanced Space, the selection menu was disabled (grayed-out).
A: Return to the top screen in User Mode, and log in as an administrator.Normal users do not have a right to specify the setting of Advanced Box/ Advanced Space.To specify the setting of Advanced Box/ Advanced Space, the user needs to log in as an administrator.
Personal Space failed to be createdQ: I could not create a Personal Space although I tried. The button is disabled (grayed out).
A: Authentication setting does not become effective for this.Implementation of the personal space is not admitted.Select “On” at “Allow to Create Personal Space”.
Path: User Mode > Function Settings > Store/Access Files > Advanced Box/ Advanced Space Settings > Authentication Management
F-5-1
URL to Advanced Box/ Advanced SpaceQ: I forgot URL for Advanced Box/ Advanced Space
A: URL is shown in Details of Advanced Box/ Advanced Space.URL for Advanced Box/ Advanced Space is \\device name\Share or \\device name\Users”.You can check URL in Details of Advanced Box/ Advanced Space.
F-5-2
F-5-3

5
55-3
5-3
Troubleshooting > Troubleshooting2 > Unable to activate Advanced Box > Start check procedure
Troubleshooting > Troubleshooting2 > Unable to activate Advanced Box > Start check procedure
Troubleshooting2
Unable to open PDF file saved from the external device
Q.I saved the PDF file in Advanced Box open to public via WebDAV. When I tried to open this file directly from Advanced Box, Adobe READER was not started with the message, “Error occurred when opening this document. The name of the file or the directory, or the volume label syntax is wrong.”This file was normally open when it is copied from Advanced Box to the HD of the local PC.This symptom also occurred in Shared and Personal Spaces.
A.For Windows XP or Vista, find the software update program named “KB907306” in Web folder to apply it to your PC.If this program is unable to solve the problem, also apply KB943337.
Unable to activate Advanced BoxChecking Advanced Box activation at installation
■ BackgroundIn iR devices, management files and folders are created upon Advanced Box firstly started.If the power goes OFF during this process, the data required to activate Advanced Box may be crashed.If the data are crashed, Advanced Box may not be activated at power-on.To avoid such a problem, check the procedure described in this document at the initial start of the touch panel initial screen (Blue-sky screen).
■ Start check procedure
● For iR ADVANCE C5051/ 5045/ 5035/ 5030 Series1. Turn ON the power to show the Top screen.2. (While buttons are shown one after another, Advanced Box is under initialization.)3. [Access Stored Files] button is shown.4. Press [Access Stored Files] button.5. Select “Advanced Box”.6. Select “Shared Space” in the document list.6-1 Go to Step 7, if “Shared Space” showed.6-2 Repeat Step 5, if the error message except “Due to an unknown reason…,” is shown.
6-3 Execute “Recovery procedure for the error occurred when Advanced Box is selected”, if the error message “Due to an unknown reason…,” is shown.7. Check that “folder” folder is shown in the document list.8. The procedure is successfully completed.
● For iR ADVANCE C7065/ C7055 Series ● For iR ADVANCE C9075PRO/ C9070PRO/ C9065PRO/ C9060PRO Series
1. Connect the power connector of the device to the outlet.2. Open the switch cover and turn ON the main power switch (Advanced Box is under initialization).3. The message is shown to prompt restarting the device. Do not turn OFF the main power and wait for 5 minutes.4. When 5 minutes elapsed, turn OFF the main power switch.5. Turn ON the power again to show Blue-sky screen.6. (While buttons are shown one after another, Advanced Box is under initialization.)7. [Access Stored Files] button is shown.8. Press [Access Stored Files] button.9. Select “Advanced Box”.10. Select “Shared Space” in the document list.10-1 Go to Step 11, if “Shared Space” showed.10-2 Repeat Step 9, if the error message except “Due to an unknown reason…,” is shown.10-3 Execute “Recovery procedure for the error occurred when Advanced Box is selected”, if the error message “Due to an unknown reason…,” is shown.11. Check if “folder” folder is shown in the document list.12. The procedure is successfully completed.
● Recovery procedure for the error message “Due to an unknown reason...,”is shown when Advanced Box is selected
By setting CHK-TYPE=9, the area of Advanced Box is deleted. For details, refer to Appendix in the Service Manual.
(*Clearing Advanced Box area)1. In service mode> COPIER> Function> SYSTEM, select CHK-TYPE=9.2. Execute HD-CHECK and then HD-CLEAR.3. Restart the device.4. When the device is restarted, perform the start check procedure.

5
55-4
5-4
Troubleshooting > Troubleshooting2 > Others > Protection against virus
Troubleshooting > Troubleshooting2 > Others > Protection against virus
Others ■ Protection against virus
Q: There is no anti-virus software with this machine. Is there anything I should do?
A: Execute the following to protect the system against virus:The host machine will not execute any exe.file that contains virus. However, there is a risk that a virus-contained exe.file is executed from a remote PC connected with SMB/WebDAV.To avoid such a risk, following operation is available:
• Use a PC that equips anti-virus software and execute virus-check with Advanced Box/ Advanced Space to be included as detection target.
• Install anti-virus software to PC which connects Adbanced Box/ Advanced Space.• Execute filtering settings in User Mode to disable storage of exe.file in Advanced Box/
Advanced Space (If filtering setting is not available, take note not to double-click (execute) any exe.file from the client PC).

5
55-5
5-5
Troubleshooting > Troubleshooting2 > A list of User Access Control for Advanced Box errors
Troubleshooting > Troubleshooting2 > A list of User Access Control for Advanced Box errors
A list of User Access Control for Advanced Box errors
The list of error message to be related to setting in User Access Control for Advanced Box from Remote UI is as follows.
Error message An outbreak screen
Origin Workaround
Log in to User Access Control for Advanced Box.
Screenful except the login screen
You tried to access one of the User Access Control for Advanced Box screens when you are not logged in to User Access Control for Advanced Box.
Log in to User Access Control for Advanced Box.
No right to display <Function Name>. To display <Function Name>, log in as an administrator.
User's registration screen User editing screen Import screen Export screen
You do not have permission to use the specified function.
Log in as the administrator.
A timeout occurred. Please wait a while and then try to access again.
Login screen User's registration screen User editing screen Import screen Export screen User management screen
The session has timed out because specified time has elapsed.
Wait a while, and try accessing again. If the session continues to time out, restart the device.
Could not access the database due to an error. Restart the device and then try to access again.
Login screen User's registration screen User editing screen Import screen Export screen User management screen
Failed to access the database for reasons such as user database is damaged.
Restart the device.
Could not display user information due to an error.
User management screen
An error occurred when acquiring the user information.
If the error continues to appear after retrying, restart the device.
Error message An outbreak screen
Origin Workaround
Could not delete users due to an error.
User deletion An error occurred when deleting the user information.
If the error continues to appear after retrying, restart the device.
Up to 5000 users can be registered.
User's registration screen
You are trying to register user information when 5,000 user information is already registered.
To register new user information, delete the unnecessary user information.
T-5-1