Service Centre five Call Control - DKSHtec-service.dksh.com/SC5/help/RG01GS01_SC5.pdf · Index,...
194
Please consider the environment before printing this document. Edition 18
-
Upload
phungkhanh -
Category
Documents
-
view
217 -
download
0
Transcript of Service Centre five Call Control - DKSHtec-service.dksh.com/SC5/help/RG01GS01_SC5.pdf · Index,...

Please consider the environment before printing this document.
Edition 18

SERVICE CENTRE FIVE GETTING STARTED REFERENCE GUIDE (RG01GS01)
COMMERCIAL IN CONFIDENCE Page 2
Service Centre five Getting Started
Contents Getting Started Reference Guide Service Centre five Welcome ............................................................................................................ 3 About this Guide ................................................................................................. 3 Glossary ............................................................................................................ 3 Connecting to Service Centre five .......................................................................... 4
Creating a Shortcut ....................................................................................... 5 Adding a Favourite ........................................................................................ 7
Service Centre five Login ..................................................................................... 8 Service Centre five Version .................................................................................. 8 Service Centre five Logout ................................................................................... 9 Service Centre five Change Password .................................................................. 10 System Structure Overview................................................................................. 11
System Navigation ...................................................................................... 13 System Standards ....................................................................................... 14 Web Layout ................................................................................................ 14 Data Types ................................................................................................ 19 Data Standards .......................................................................................... 20 System Keys .............................................................................................. 20 Key to Definitions ........................................................................................ 21
Reporting ......................................................................................................... 22 Getting Started – add, query, modify data ............................................................ 27 Getting Started with User IDs .............................................................................. 29 System Code Directory ....................................................................................... 30 Tesseract Support & Services ............................................................................ 182 Tesseract Training & Tutorial Services ................................................................ 183 Copyright ....................................................................................................... 191 References ..................................................................................................... 191 Document Control ........................................................................................... 191 Index ............................................................................................................ 192

SERVICE CENTRE FIVE GETTING STARTED REFERENCE GUIDE (RG01GS01)
COMMERCIAL IN CONFIDENCE Page 3
Welcome Developed using Microsoft.Net technology, Service Centre five is a browser based product supporting a range of databases and allowing for a ‘zero footprint client’. Running on an IIS server the system also supports remote communications via the Internet.
Modules have been developed to allow technicians to dispatch & complete service calls remotely together with parts usage & signature capture while customers can log & monitor their service calls.
A range of API’s have also been developed enabling customers to integrate Tesseract to other systems using XML.
For more information please access our Web site on www.tesseract.co.uk. The Tesseract Web site provides a Product Overview, information on Online Support and Training, forthcoming events and much, much more.
Functionality includes:-
Asset tracking & configuration control with serial/asset numbers & full audit trail. Contract Administration with SLA, billing, warranty control & third party support. Meter billing; usage, minimum & block together with consumables. Service call logging with diary, SLA escalation & full audit trail. Engineer dispatch with job update, parts usage & job invoicing. Logistics control for warehouse and van, both repairable & disposal parts. Sales Tracking System with Remote Access for salesmen. Generation of sales, service or contract quotations using simple wizard.
About this guide The topics documented in this Reference Guide can be used in conjunction with the Tesseract Service Centre five Online Help, Administrators Guide and other user Reference Guides.
In Service Centre five we have tried to standardise the pages so that the user, once familiar with the basic conventions, will feel comfortable throughout the system. It is worth therefore, taking a little time to familiarise yourself with these basic conventions.
Throughout the Reference and System Guides working conventions and basic commands apply to aid the user to progress quickly and efficiently through the Service Centre five Web pages and fields.
What are you looking for? Refer to the Contents for the main section headers and the Index, page 192 for more detail.
Glossary For a Key to Definitions and Data Types refer to the Service Centre five Administrators Guide.
Assumptions and Dependencies A basic knowledge of Windows is a pre-requisite. It is also recommended that each delegate attending a training course must have the necessary mouse and keyboard skills.

SERVICE CENTRE FIVE GETTING STARTED REFERENCE GUIDE (RG01GS01)
COMMERCIAL IN CONFIDENCE Page 4
System Login Service Centre five is accessed via the Microsoft Internet/Intranet Explorer. This displays the Service Centre five Login page (see page 8) where the user has access to the Service Centre five modules.
The user requires an access login name and if set-up, an access password to login to Service Centre five. (Your System Administrator will issue access to Service Centre). For System administration and set-up refer to the Service Centre five System Guide.
For Service Centre five Installation refer to the Service Centre five System Guide.
Connecting to Service Centre five To connect to Service Centre five start the Internet Explorer on either the Server or a client machine. Make sure that the Server or a client machine has access to your Server, if you are in doubt contact by your System Administrator or IT Technician. Specify the following web address or URL (where SERVERNAME is your Web Server name):-
If the user has access to another Database (Training database for example) this will also be specified in the system INI file found on the Server:
C:\Inetpub\wwwroot\SC5\Components\SC5Demo.ini. In this case the URL’s could be as the following examples:
http://SERVERNAME/SC5/SC_Login/aspx/login_frameset.aspx?source=LIVEDB for the Live Datasource where LIVEDB is cross referenced against the Live Datasource, TESS5SQL and http://SERVERNAME/SC5/SC_Login/aspx/login_frameset.aspx?source=TRAINDB for the Training Datasource where TRAINDB is cross referenced against the Test Data source, TRAIN5SQL.
Section of the Service Centre five Connecting to Service Centre.
Please Note: – Depending on your Network configuration it is sometimes necessary to specify the IP (Internet Protocol) Address of the Server, for example only, this is not a true address -136.129.2.258, instead of the SERVERNAME (Server Name). If you are familiar with Internet Service Manager (Internet Information Services in Windows XP/2003) you can set-up Virtual folders so again, the URL (Uniform Resource Locator) that is entered may be different.
To create a Shortcut to Service Centre five on your Desktop or add Service Centre five on to your Favourite List please refer to page 7.

SERVICE CENTRE FIVE GETTING STARTED REFERENCE GUIDE (RG01GS01)
COMMERCIAL IN CONFIDENCE Page 5
Creating a Shortcut Creating a Shortcut to your Service Centre five, Remote Engineer Access and Remote Customer Access IP Address can be done from your Desktop screen. Follow the example below for Service Centre five shortcut.
Navigation:
• Right click anywhere on the Desktop and select ‘New’. Now select Shortcut.
• Enter the IP Address in the Command Line or use the Browse button. Depending on your Network configuration it is sometimes necessary to specify the IP Address of the Server, for example of Service Centre five, (this is not a true address) –
• http://SERVERNAME/SC5/SC_Login/aspx/login_frameset.aspx?source=LIVEDB for the Live Datasource where LIVEDB is cross referenced against the Live Datasource, TESS5SQL. This will access the relevant Server specified in the system INI file found on the Server, C:\Inetpub\wwwroot\SC5\Components\SC5Demo.ini.

SERVICE CENTRE FIVE GETTING STARTED REFERENCE GUIDE (RG01GS01)
COMMERCIAL IN CONFIDENCE Page 6
• Click Next. • Enter the name of the Shortcut. This can be anything, for example, ‘Service
Centre 5 LiveDB’ or Remote Engineer Access. • Click Finish.
Do the same for any Training or Test Databases.
• http://SERVERNAME/SC5/SC_Login/aspx/login_frameset.aspx?source=TRAINDB
for the Training Datasource where TRAINDB is cross referenced against the Test Data source, TRAIN5SQL. This will access the relevant Server specified in the system INI file found on the Server, C:\Inetpub\wwwroot\SC5\Components\SC5Demo.ini.
For URL’s that can be set-up for more than one Data source please refer to Connecting to Service Centre five page 4, Connecting to Remote Engineer Access and Connecting to Remote Customer Access refer to the Service Centre five Administrators Guide. This will create a Shortcut to Service Centre five Live and a Shortcut to Training on your Desktop.

SERVICE CENTRE FIVE GETTING STARTED REFERENCE GUIDE (RG01GS01)
COMMERCIAL IN CONFIDENCE Page 7
Adding a Favourite
Navigation: • In Internet Explorer enter the IP Address to Service Centre five. For example
only, this is not a true address - http://SERVERNAME/SC5/SC_Login/aspx/login_frameset.aspx?source=LIVEDB for the Live Datasource where LIVEDB is cross-referenced against the Live Datasource, TESS5SQL. This will access the relevant Server specified in the system INI file found on the Server, C:\Inetpub\wwwroot\SC5\Components\SC5Demo.ini. or
• http://SERVERNAME/SC5/SC_Login/aspx/login_frameset.aspx?source=TRAINDB for the Training Datasource where TRAINDB is cross-referenced against the Test Data source, TRAIN5SQL. This will access the relevant Server specified in the system INI file found on the Server, C:\Inetpub\wwwroot\SC5\Components\SC5Demo.ini.
• Click Go to find. • Click the Favourites drop-down menu along the toolbar. Select from the menu -
Add to Favourites.
• Select a directory under Favourites or create a New Folder and enter the name of the IP Address in the Name field, for example only, Service Centre five Live or Training.
• Click Add.
Use the Favourites drop-down menu along the toolbar or use the Favourites button to find this IP Address in the future.

SERVICE CENTRE FIVE GETTING STARTED REFERENCE GUIDE (RG01GS01)
COMMERCIAL IN CONFIDENCE Page 8
Service Centre five Login Service Centre five is accessed via the Microsoft Internet/Intranet Explorer. This displays the Service Centre five Login page where the user has access to the Service Centre five modules.
The user requires an access login name and if set-up, an access password to login to Service Centre five. (Your System Administrator will issue Access to Service Centre). For System administration and set-up refer to the Service Centre five System Guide. For more information on mandatory data refer to section 3, page 16.
Log In Navigation:
• From the Desktop click the Service Centre five Shortcut or enter the Microsoft Internet/Intranet Explorer and select the Service Centre five Favourite link. The relevant Data source will be displayed which is part of the connecting URL (refer to page 4). The source is the Service Centre central database on your Server.
• Enter your user access name (mandatory) and password (if set-up). • Click the Logon button or press the Return key.
Section of the Service Centre five Login page.
Service Centre five Version Service Centre five is accessed via the Microsoft Internet/Intranet Explorer. Once logged into Service Centre the version number will display on each ‘tab’ if tabs are used (see below) and on the explorer bar along the top of the desktop. For example, TG2008 is the database name, 5.20.0 is the Service Centre version.
Section of the Service Centre five version page.

SERVICE CENTRE FIVE GETTING STARTED REFERENCE GUIDE (RG01GS01)
COMMERCIAL IN CONFIDENCE Page 9
The user Name is mandatory, the password is optional if setup by the system administrator. For more information on mandatory data refer to the Getting Started section of the Service Centre five Administrators Guide. Depending on the configuration of your database both user name and password can be case sensitive.
Incorrect User Name: If your User Name or Password is not correct you may get an error message. Try entering your login name again. If this message still appears contact your System Administrator or IT Technician.
Correct User Name: If your User Name and/or or Password is correct you will enter the Service Centre five System.
After Logon the Main Welcome page will appear.
Log Out To Log Out click the log out link from the main menu (the user interface menu to the left).

SERVICE CENTRE FIVE GETTING STARTED REFERENCE GUIDE (RG01GS01)
COMMERCIAL IN CONFIDENCE Page 10
Change Password The user login password can be changed or removed either by the system administrator (if forgotten) or via the user interface menu once logged in.
To login to Service Centre five refer to page 8. The main Welcome page is displayed. It displays the main module presentation page and the user interface menu in the left pane. (Also refer to System Navigation page 13 and System Standards page 14).
Navigation:
• From the user interface menu in the left pane click the change password link. • Enter the old password. • Enter a new password. • Re-enter the new password to verify.
Section of the Service Centre five Change Password Page.

SERVICE CENTRE FIVE GETTING STARTED REFERENCE GUIDE (RG01GS01)
COMMERCIAL IN CONFIDENCE Page 11
System Structure
System Structure Overview Service Centre five is a service management system relational database linking many tables via primary key fields. A Table is made up of fields of data relating to the type of module, for example customer assets data. The customer database table holds key information relating to customers, their equipment sites, their installed products and contract information. When a call or job is logged on the system in call control, the customer data is linked and validated. If on a call or job, parts are used, these parts are taken from the stock system in parts centre and so on.
Below is a simple diagram illustrating the system table structure and how it links together. Service Centre five System Overview.
Customer
Site
Serialised Product
Invoicing
Contract
Prospect
Quote
Call/Job Parts Request
Service Report
Parts Used
Mobile Stock
Stock
REA RCA
Stock Movement
Purchase Order
Sales Order
Repair Order
Task
Diary
Supplier Contract

SERVICE CENTRE FIVE GETTING STARTED REFERENCE GUIDE (RG01GS01)
COMMERCIAL IN CONFIDENCE Page 12
The customer assets system structure is illustrated above in simple form and is only a small part of the whole system. Basically a customer is created in the customer assets module. A site containing the customer’s assets (serialised products) is created and a contract is linked if required.
For a full break-down on the customer assets module, other modules and their related system codes please refer to the Service Centre five Customer Assets Reference Guides.
Parts Centre has a Stock Control system where the user can run stock take, purchase orders, sales orders, parts requests etc.
Workshop is where jobs are generated for parts and products repairs or replacements and shipped back to customer.
Prospect Centre is where sales personnel can create prospects and monitor activities.
Quote Centre is where contract and sales quotes are generated and monitored and if accepted, customer, contracts and site can be generated or updated.
Call Control is where calls are generated, allocated to engineers, dispatched, monitored and closed.
Remote Engineer Access is where an engineer can monitor, dispatch and close calls logged and allocated via the call control system.
The reporting system used in Service Centre five utilises the above tables and table fields to generate and run custom or system supplied reports. Please refer to the Service Centre five System Guide for more information on standard reports and page 22.

SERVICE CENTRE FIVE GETTING STARTED REFERENCE GUIDE (RG01GS01)
COMMERCIAL IN CONFIDENCE Page 13
System Navigation After logging in to Service Centre five (refer to page 8) the main Welcome page is displayed. It displays the main module presentation page and the user interface menu in the left pane. (Refer to the following pages for more information on the user interface menu).
This Welcome page on the right will remain displayed until a sub-module or link, for example, customer assets is selected.
Once in a module page, for example, Customer, if a button, as example above, on the main page is clicked the system will drill-down to that code or page.
For more information on Tesseract Products, for example, Customer Assets, Parts Centre etc. refer to the Administrators Guide, Product Overview. For Tesseract Support and Services refer to page 182.
Section of the Service Centre five Main Menu page. Please note that the logged in database name, user login name, DLL version and page version are displayed in the dark blue bar at the top of every ‘Microsoft Internet Explorer’ page. Once logged into Service Centre the version number will display on each ‘tab’ if tabs are used (see below) and on the explorer bar along the top of the desktop. For example, TG2008 is the database name, 5.20.0 is the Service Centre version.
Section of the Service Centre five version page.

SERVICE CENTRE FIVE GETTING STARTED REFERENCE GUIDE (RG01GS01)
COMMERCIAL IN CONFIDENCE Page 14
System Standards There are many system standards that have to be adopted. Throughout Service Centre five system and documentation we have tried to standardise the pages so that the user, once familiar with the basic conventions, will feel comfortable throughout the system. It is worth therefore, taking a little time to familiarise yourself with these basic conventions.
Web Layout The Service Centre five Web Page layout is designed to help the user search for or add data in a quick and efficient way. It also helps in finding your way around the system quickly using the user interface menu, pick-lists and drill-down buttons (Also refer to System Navigation page 13). Each part of every page has a function, for example, pink fields (refer to the illustration below), mean that data has to be selected or entered, grey fields are display only, buttons are used to drill-down to another area of the system and so on. This will all be explained in this section.
Section of the Service Centre five System Standards.

SERVICE CENTRE FIVE GETTING STARTED REFERENCE GUIDE (RG01GS01)
COMMERCIAL IN CONFIDENCE Page 15
Layout detail explanation
user interface menu The user interface menu is
displayed in the left pane of every page within the system.
The user interface menu accesses the relevant functionality for that topic. The Welcome page on the right of the screen will remain displayed until a sub-module, for example, customer assets is selected. When a menu link is clicked the relevant links will show in the user interface menu.
Hidden detail
Hidden detail or Roll-up Text can be found throughout the Service
Centre five system.
Hidden detail or Roll-up Text is normally identified by text in a shaded box as below.
e.g. contract page.
The text, being relevant to the operation is hiding more detail. By clicking the text, details can be turned on and off allowing for uncluttered pages, only being turned on if the details are required. For an example, in Service Centre five click contract then click contract add. With the text being boxed (default) the customer details are hidden. By clicking the text the customer details are displayed.
option or flag Options or Flags (sometimes known as Radio Buttons) usually
default to the most common option, for example if there is a billable option (Part, Contract Type), then this is normally set to ‘No’.
calendar The pick-list button adjacent to any date field will display a
calendar. The calendar has a next and previous arrows (< and >) to move to the next or previous month. The year can be changed and once a date is selected it closes. Dates can be typed in using / between day, month and year.
display fields These fields display data relating to the information being
added. The user cannot change this data from this page.
drill-down buttons
Drill-Down buttons are used throughout Service Centre five.
They allow the user to drill down to another lever to update the
relevant data.
For example, in the contract add page the user can update or create an area code by clicking the area code drill-through button. After changing or adding an area code the user can drill back up to the previous page.
pick-lists
Pick-list are sometimes known as data combo boxes or drop-down
menus. Pick-lists provide a popup List or Web Page Dialog (list) of
available data relevant to the operation.
For example, if the user clicks the pick-list arrow for area codes a list appears containing all area codes available to the user. If the field is a date field then a calendar is displayed.

SERVICE CENTRE FIVE GETTING STARTED REFERENCE GUIDE (RG01GS01)
COMMERCIAL IN CONFIDENCE Page 16
mandatory & optional fields
Service Centre five is built on a structure of tables. Each table
containing fields of varying sizes and format types (refer to Data Types page 19), some of which
require mandatory information (a key field for linking to other tables,
therefore mandatory means the user must enter data).
In the Add mode red/pink shaded fields are mandatory fields. The remaining fields in a table are for optional information (necessary for reporting but not essential). For example, a number or code field may allow a maximum of 10 characters therefore the user can enter 1 - 10 characters. These fields may allow alphanumeric (letters and/or numbers) or numeric only.
User Login: In Service Centre five the user access name is mandatory, the password is not unless it has been set-up in the System Utilities. Accessing Service Centre five Web pages will only be allowed after a valid user name has been entered. (For user access names and passwords refer to the Service Centre five System Guide, System Utilities, User Administration).
Key Fields: A Primary key is a constraint, it cannot be a null and it cannot be duplicated. In Service Centre a Code or Number (e.g. Area Code, Contract Number) is a mandatory and unique Primary key field.
Field Size: Each field has a set size. For example, a number or code field may require for example, 1 character or 10 characters (if 10 then the maximum will be 10 characters).
Format type: These can be alphanumeric (letters and/or numbers, refer to Data Types) or numeric only.
Display fields: These fields display data relating to the information being added. The user cannot change this data from this page.
Upper or lower case characters: This only matters if the user have an internal procedural naming convention (part of the system planning and set-up). If the database is configured to be case sensitive then it will matter when using the query facility.

SERVICE CENTRE FIVE GETTING STARTED REFERENCE GUIDE (RG01GS01)
COMMERCIAL IN CONFIDENCE Page 17
Control buttons
The control buttons are situated in the control bar at the top of every
page within Service Centre five, these are submit, clear, print, help
and delete. Validation is maintained throughout to permit or not permit deletion of certain
records in the database.
Submit:
This activates an action. New and modified data is saved to the relevant database table displaying an information popup 'This record was successfully added to the database'. (In the case of Call Handling, 'Call Number ... has been successfully logged'). Submit will also activate a query.
Clear:
This will clear the page data ready for query or addition of new data.
Print:
From any page in Service Centre five click the print button to access the report selector page. This page displays the report directories where the user can browse for the relevant reports. (Refer to Reporting below and the System Guide for more information on Reporting).
Delete:
This will run a validation against this record before it deletes it. If the record is linked to another table it cannot be removed.
Help:
Clicking the help button will activate the Service Centre Online Help system. If in the add mode (adding a new record to the database), clicking the help button displays the Online Help page for the current topic, which will contain field level and operational detail. In the query mode clicking the help button will access the ‘How to Add, Query and Modify Records’, see page 27. Once in the Online Help pages the user can search on other topics.
Page Name
The page name (top left of the page in the control bar along side the control buttons), displays the
name of the function currently being carried out for that module.
The main page (directly after login and directly after selecting one of
the main modules) does not display a page name.
Query page:
When you first enter a page, for example contract, click the contract query text to display contract query page. If the user clicks the submit button (on a blank query page or on a selection of data) the page name would change to either ‘contract list’ showing a list of contracts or ‘contract modify’ if one record is queried.
Modify page:
After a query to find data the modify page will be displayed. This means that the data can be modified and submitted to the database (saved).
List page:
After submitting a query on more than one contract record the page name would become ‘contract list’ where the user can pick a contract. Also refer to page 18.
Add page:
When you first enter a page, for example contract, click the contract add text to display contract add page. After entering the relevant data, especially the mandatory data the user must click the submit button to save this data to the database.

SERVICE CENTRE FIVE GETTING STARTED REFERENCE GUIDE (RG01GS01)
COMMERCIAL IN CONFIDENCE Page 18
List Page The List Page, instead of being a continuous list that requires the use of a scroll bar, it is displayed in pages. This list also applies to the list shown when clicking a pick list, for example, in the contract query or add page click area code pick-list.
These pages are configurable to display the quantity of lines per page and display the total records. Any column selected can also sort this list.
The example below shows a site query.
In customer assets click site link, click site query link and submit. This will display a list of all sites in the database.
The column header (shaded) can be clicked to sort that column alphabetically. The next page can be selected by clicking the page number at the bottom of the list page. If a site is chosen from the list (a single click), that site will be displayed in site modify page.
Section of the Service Centre five List Page.
Section of the Service Centre five List Page.

SERVICE CENTRE FIVE GETTING STARTED REFERENCE GUIDE (RG01GS01)
COMMERCIAL IN CONFIDENCE Page 19
Data Types Each field within each table within the Service Centre database has a data type. System codes (refer to page 30), customer numbers, contract numbers, site numbers, product numbers, part numbers etc. are classed as a key field (primary keys that link the database tables together and are as a rule mandatory). For example the area code has an area code field which is a 6 alphanumeric field and the area code description is a 30 alphanumeric field.
There are common fields that exist in almost all the tables. Most codes, numbers and names are mandatory key fields such as the Contract Number, Site Number and Serialised Product number. These fields can be populated manually, however the Contract, Site and Serialised Product numbers can be automatically generated using System Keys values (refer to page 20). For all other field sizes refer to the Service Centre five System Guide and for data types and data standards page 20.
In most cases the Reference Guides will provide the size and data type of the key field, for example, area code (refer to the System Code Directory page 30). The size may be 12 alphanumeric - Where 30 is the field size and where alphanumeric is the format type, either letters or numbers. See below for data types.
In the table below, the Setting column of the data types below is Tesseract's description, for further help and information please call Tesseract Support Desk on 0844 482 0226 or email [email protected].
Setting Type of data
Text Any combination of alphanumeric characters, i.e. letters, numbers, punctuation, etc.
Memo Lengthy text or combinations of text and numbers. For example, Remarks field.
Integer Whole numbers in the range +/- 32,000 (approx.).
Decimal Numbers that require a decimal point, typically monetary values.
Long Whole numbers in the range +/-2 billion (approx.).
Boolean True / false values.
Date/Time Date and time values.

SERVICE CENTRE FIVE GETTING STARTED REFERENCE GUIDE (RG01GS01)
COMMERCIAL IN CONFIDENCE Page 20
Data Standards Service Centre five does not impose data standards, for example what and how to add data into a database apart from the above data types. Standards should be documented locally, for example, your own processes and standards, so each user will adopt these standards.
For example, key fields (primary keys that link tables together and are as a rule mandatory), should be maintained in upper case using no spaces and no special characters. Special characters are used for query (wildcard keys) such as the % sign (refer to Add, query, and modify data page 27).
Address fields can be entered in the customer and/or site fields without commas or text wrapping and using the county and post codes fields for their own purpose.
System Keys System and Private Keys in general control the use of various functions in the Service Centre five System.
Created and modified in system utilities, System and Private Keys are used to add and update values in the System Keys table.
For System, Private and Global Keys please contact Tesseract Support for more information.
Disclaimer System Keys should not be modified or added except under the direction of Tesseract Support team. Changing System Keys can invalidate your Support Agreement.
Data query, creation and modification For individual system data query, creation, modification, field types and field sizes refer to page 27.

SERVICE CENTRE FIVE GETTING STARTED REFERENCE GUIDE (RG01GS01)
COMMERCIAL IN CONFIDENCE Page 21
Key to Definitions In Service Centre five documentation you will notice definitions that may not be familiar and could be seen as ‘jargon’. Below is a list of commonly used definitions in Service Centre five.
Abbreviation Definition
CRW Crystal Report Writer DLL Dynamic Link Library (For example SCSite.DLL) D.P. Decimal Point (or d.p.) IE Internet Explorer IIS Internet Information Server IP Internet Protocol URL Uniform Resource Locator EOM End of Month (Period) ETA Estimated Time of Arrival PAGE Commonly known as page for add, modify or query SR or FSR Service Report (or FSR Field Service Report) SRH or FSRH Service Report History (or FSRH Field Service Report History) SRL or FSRL Service Report Lines (or FSRL Field Service Report Lines) SRLH or FSRLH Service Report Lines History (or FSRLH Field Service Report Lines History) GRN Goods Receipt Note INDEX Index key field for table MC Maintenance Charge MRN Manufacturers Reference Number MTB Meter Billing MTBP Meter Billing Price Band ODBC Open Data Base Connectivity OLE2 Object Linking and Embedding P.O. Purchase Order P.R. Parts Request PM Preventative Maintenance or Planned Maintenance R.O. Repair Order RCF Product Repeat Call Frequency RJF Repeat Job Frequency S.O. Sales Order SC42/SC5 Service Centre version 4.2 and version 5. TABLE A database table making up part of a database TBA To be assigned

SERVICE CENTRE FIVE GETTING STARTED REFERENCE GUIDE (RG01GS01)
COMMERCIAL IN CONFIDENCE Page 22
Reporting To be able to run a report you need to click the print button from any page in Service Centre five. For example, in Customer Assets, Contract, print. Some reports are set as defaults reports for the relevant action. For example in the Customer Query, Add or Modify page click the print button to print the Detailed Customer Report. If another Customer Report is required find it in the relevant tree or click report list in the user interface menu, choose Customer Assets.
Hi-light the report to print and click submit.
Use the Basic or Advanced Selections to submit the required data from Customer Assets (refer to the Service Centre five Customer Assets Reference Guide).
Standard Reports List
For the Standard Reports List refer to the Service Centre five Administrators Guide. Standard reports are part of the Service Centre five installation; refer to the Service Centre five Administrators Guide.
Reports Selection
If the reports selection page is displayed then the module you entered by had a report name fixed. For example if in Call Control, Call Handling the print button will display the reports print page showing the Call Job Sheet Report. Sometimes the reports list is displayed but it is pointing at a default report. These parameters are setup in system utilities, reporting (refer to the Service Centre five Administrators Guide).
• Click reports list in the user interface menu. In the reports list page select a
report from the report selector. To do this select the relevant directory which in turn will display either a sub-directory or a list of available reports for that category.
• Click the relevant report name and click submit to display the report criteria page.
Section of the Service Centre five Basic Selections Page.
Please Note:
If the reports list does not show contact Tesseract Support for help. If you do not have permissions to see reports refer to the Service Centre five System Utilities Reference Guide or contact Tesseract Support for help. Refer to Basic Selections over the page or Advanced Selections, page 24.

SERVICE CENTRE FIVE GETTING STARTED REFERENCE GUIDE (RG01GS01)
COMMERCIAL IN CONFIDENCE Page 23
Basic Selections Using the Call List Report Report as an example, the Basic Selections is default.
• Set both values opens the Selection From and Selection To. This allows the user to select, for example a Customer Contract range, an Area Code range etc. (The range depends on the report selected).
• Set From value only opens the Selection From field only. This allows the user to select the first report, this being the first and therefore any after this in alphabetical / numerical order.
• Set To value only opens the Selection To field only. This allows the user to select the last report, this being the last and therefore any before this in alphabetical / numerical order.
• Set no value only closes the Selection From and To fields. This allows the user to select the last report, this being the last and therefore any before this in alphabetical / numerical order.
• Order By allows the user to select from a pre-defined order list, the order in which they would like to see the report.
• Ascending and Descending This allows the information to appear on the report in ascending or descending order.
• Show Selection Formula in Report This will display the formula used to create the report information (selection from and to and order by).
• Show Company Name in Report This will display the Company Name as entered in the Service Centre five Registration Details.
• Contract Options This will display the Date fields available for query.
• Click submit.

SERVICE CENTRE FIVE GETTING STARTED REFERENCE GUIDE (RG01GS01)
COMMERCIAL IN CONFIDENCE Page 24
Advanced Selections Using the Contract Maintenance Schedule Report as an example, choose Advanced Selections.
Order By:
• For the first pick-list field select ORDER BY if you wish to set a field as the field to order the report by.
• In the second pick-list field select from the product table the field you wish to order by.
• Once you have made the selections click the Add Selection button to add the query to the ‘Order By’.
First Selection:
• Now make a selection for the report. Leave the first pick-list blank and in the second pick-list choose Call_Status.
• In the third pick-list field select the ‘comparison” you want to query by. For example, ‘Equals’ means you have to make an exact selection in the last pick-list field. Choosing ‘Like’ gives you a larger selection using wildcards in the last pick-list field. Choosing ‘Is one of’ allows you to choose a selection of records in the last pick-list field and so on. For date and number fields use ‘Greater then’ or Less than’.
Section of the Service Centre five Advanced Selections Page.
• Once you have made the selections click the Add Field button to add the query ready for submit.

SERVICE CENTRE FIVE GETTING STARTED REFERENCE GUIDE (RG01GS01)
COMMERCIAL IN CONFIDENCE Page 25
Second Selection:
• Now make another selection for the report. The first pick-list should contain AND which adds to the last query. Other selections from this pick-list are - AND NOT, which excludes this selection from the query, OR, if the first cannot be found use this selection, OR NOT, if the first cannot be found do not use this selection.
• In the second pick-list choose Call_Employ_Num.
• In the third pick-list field select the ‘comparison” you want to query by. For example, ‘Equals’ means you have to make an exact selection in the last pick-list field.
Section of the Service Centre five Advanced Selections Page.
• Once you have made the selections click the Add Field button to add the query ready for submit.
Section of the Service Centre five Advanced Selections Page.

SERVICE CENTRE FIVE GETTING STARTED REFERENCE GUIDE (RG01GS01)
COMMERCIAL IN CONFIDENCE Page 26
Other fields and buttons:
If one of the selections for query needs changing or deleting click the relevant field (radio button) in Selected Fields or Order By field. This populates the edit fields.
• Make the change and click Edit Selection or click Remove Selection to remove
this selection.
• The user can save the query by clicking Save Query and entering a query name.
• The user can load an existing query by clicking Load Query and selecting a query name.
• The user can create a new query by clicking New Query.
• Show Selection Formula in Report. This will display the formula used to create the report information (selection from and to and order by).
• Show Company Name in Report. This will display the Company Name as entered in the Service Centre five Registration Details.
Submit Report After selecting the data to be reported click the Submit button. This will run the report in the ActiveX Viewer (For more information contact Tesseract Support for help). This will display the report display page where the user can print the report using the Print button (as illustrated below).
• Export report At the top of the preview page click the export button. This will
display the Crystal Smart Viewer Export screen where the user can enter a file name to export. Click OK in this screen to export. Another screen will ask if the user 'Would you like to open it'. Click yes or no accordingly.
• Refresh this will refresh the page.
• Go to first, previous, last or next page if there is more than one page the user can move to the first, previous, next or last page of the report.
• Stop Loading if you wish to stop the processing of the report.
• Search text this will display a Search screen where the user can enter text. To search for the entered text click Find Next.
• Zoom the user can select a new zoom level for viewing the report details.
• Click the Close button to return to the report selection criteria page.
Section of the Service Centre five View Report Page.

SERVICE CENTRE FIVE GETTING STARTED REFERENCE GUIDE (RG01GS01)
COMMERCIAL IN CONFIDENCE Page 27
Getting Started The getting Started section explains how to query, modify and add data, getting started with User Id’s and getting started with System Codes on Service Centre five. To log in refer to page 8 and for help in system navigation refer to page 13.
Before starting please read the below topics for a thorough understanding of –
System Structure Overview and System Navigation pages 11 and 13. Data Types and Key to Definitions pages 19 and 21. System Keys page 20. Reporting page 22.
Add, query, and modify data The add, query and modify pages allow the user add new records, search for a specific record or many/all records by entering the relevant data in a field or a combination of fields (a record could be an area code, a contract, a call number). The ‘add, query and modify’ pages can be found anywhere on the system, for example, add customer, add site, add call, query customer, query site etc. Once a record is found the user can modify it in the Modify page.
Add mode It is from the add page that the user can add new records. If in the add mode the relevant 'add record' information appears in the Online Help when using the help button.
For example, in system codes click area, then the area add link. Once data is entered a submit will save the data to the database. Refer to page 17 for submit. Validation will occur checking for duplication of records and mandatory data (Refer to page 16 for Mandatory Data requirements).
Query mode It is from the query page that the user can search for a specific record or many/all records by entering the relevant data in a field or a combination of fields (a record could be an area code or a contract). Clicking the help button in query mode displays the Online help topic - How to Add, Query and Modify data.
For example, in customer assets click customer, then customer query. Once data is entered a submit will query the data.
If an exact data match is entered into a field, a record will be found, for example a customer number. If data is entered into a field that is not an exact match then no records will be found. The user can query records using wildcard characters at the beginning, the middle and/or the end of a word or number. For example, AS% will find any record beginning with AS (see below for more information on wildcards).

SERVICE CENTRE FIVE GETTING STARTED REFERENCE GUIDE (RG01GS01)
COMMERCIAL IN CONFIDENCE Page 28
Wildcard characters can be entered with the data to be queried. For example, by replacing part of a word or sentence with a special character the system will search and find the matching records.
Wildcards must be used unless an exact match is entered. The wildcard for SQL and Oracle databases is % for multiple characters and _ for single characters.
• A Wildcard need not be entered by itself allowing the query of all data in that page. A
blank page will perform an ‘open’ query returning all records (A maximum limit can be set to prevent queries from returning excessive volumes of data).
• A Wildcard can be entered at the beginning (and/or the end) of a word. An example of this could be an address field (in the Contract or Customer or Site pages). If the user types the full address and submits the query the system will find the exact match. This would not be realistic as typing an exact address match would be almost impossible, as the user may not be aware of the punctuation etc. It would however, be realistic in a code or number field. If the user were to type part of the address using wildcard characters, for example the word 'Road' and submits the query the system would find every record with 'Road' in the address.
Modify mode Once a record is found using query the user can modify it in the modify page. Clicking the help button in modify mode displays the Online help topic - How to Add, Query and Modify data.
For example, in customer assets click customer, then customer query. Once data is entered a submit will query the data. The data will be displayed in the modify page.
If one record is found the query page becomes a modify page. If several records are found the query page becomes a list page where the user can pick the relevant record to modify. Once a record is found the user can modify this record and submit to save the changes to the database.

SERVICE CENTRE FIVE GETTING STARTED REFERENCE GUIDE (RG01GS01)
COMMERCIAL IN CONFIDENCE Page 29
Getting Started with User IDs Service Centre five is accessed via the Microsoft Internet/Intranet Explorer. To login to Service Centre five a User ID needs to be created. User ID’s are explained in more detail in the Service Centre five System Guide.
Depending on the type of user and the environment they work in, certain set-ups need to be considered.
User ID Groups User Groups or Group is used to group User ID’s together with the relevant user rights or permissions. Many User ID’s can be attached to one Group. For example, if the users under a Group called Call Centre the permissions would be set-up for that group of User ID’s to access the Call Control module.
User Types Question: Is the user working in Administration?
Administration of what is a question to ask. If System Administration (Refer to the Service Centre five System Guide) then full user rights or permissions will be attached to the User ID through Groups.
If the user is an Administrator of data, data being Customers, Contracts etc. then the User ID would have a Group of its own with the relevant user rights or permissions. In this case several User ID’s for Administration of data could be attached to that Group (Refer to the Service Centre five Administrators Guide for Customer Assets, Quote Centre, Invoicing and Accounts).
Question: Is the user working in the Call Centre or Helpdesk environment?
These User ID’s will be attached to a Group with the relevant user rights or permissions for Call Control (Refer to the Service Centre five Administrators Guide).
Question: Is the user working in the Engineer environment?
These user ID’s will have User ID’s under a Group with the relevant user rights or permissions set-up for Remote Engineer Access (Refer to the Service Centre five Administrators Guide).
Question: Is the user a customer?
These user ID’s will have User ID’s under a Group with the relevant user rights or permissions set-up for Remote Customer Access (Refer to the Service Centre five Administrators Guide).
Question: Is the user working in the Stock Control or Logistics environment?
These user ID’s will have User ID’s under a Group with the relevant user rights or permissions set-up for Parts Centre (Refer to the Service Centre five Administrators Guide).
Question: Is the user working in the Sales environment?
These user ID’s will have User ID’s under a Group with the relevant user rights or permissions set-up for Prospect Centre (Refer to the Service Centre five Administrators Guide).

SERVICE CENTRE FIVE GETTING STARTED REFERENCE GUIDE (RG01GS01)
COMMERCIAL IN CONFIDENCE Page 30
System Code Directory The following pages show a table of System Codes (around 50-55 Codes) that are used throughout the system. Many System Codes are mandatory (Mand) and many are optional (refer to the “Mand” column).
The “Area Used” column explains where the codes are used. For a full description of a System Control Code refer to the page number in the “Page” column.
Careful consideration and planning must be made before the creation of any system control code. For example, although an area code is used in a contract, consider where this code is mandatory, for instance in an equipment site.
Each field within each table within the Service Centre database has a data type. refer to the Service Centre five System Guide and for data types and data standards refer to page 19.
How can we help you find what you’re looking for? Refer below for all of the Service Centre five System Codes.
To find the System Code you require click the page number in the left hand column of the table (there are more over the page).
Or, refer to the Contents, page 2 for the main section headers.
Or, refer to the Index, page 192 for more detail.
Page Code Areas Used Mand.
33 Area Customer Contract, Product Family, Supplier Contract, Serialised Product.
No
Site, Employee, Call Handling, REA, Flow Code. Yes 36 Account Parts Centre Purchase Order Lines. No Budget. Yes
38 Activity Call Control Timesheets. Yes Parts, Prospect. No
40 Analysis Parts Centre Purchase Order Lines. No Budget Code. Yes
42 Adjustment Parts Centre Stock Control, Parts Centre Stock Movement.
Yes
44 Attachment Customer, Serialised Product, Site, Employee. No 45 Budget Analysis and Account Codes. No 47 Call Type Call Details, Task Automation. Billable Flags. Yes Contract Call Type, Cover Charge, Product
Options. Billable Flags. No
52 Billable Flags Billable Flags. 56 Configuration Parts Centre Purchase Orders, Sales Orders, Parts
Requests. No
59 Contract Customer Assets Service Contracts. No Type Quote Details. Yes
Continued over the page….

SERVICE CENTRE FIVE GETTING STARTED REFERENCE GUIDE (RG01GS01)
COMMERCIAL IN CONFIDENCE Page 31
Page Code Areas Used Mand.
62 Country Supplier Account, DateSet ID (Holiday Date), Employee.
No
Prospect, Customer, Site Details, Parts and VAT Code.
Yes
64 Cover Contract, Contract Type, Supplier Contract, Quote, Quote Terms, Serialised Product.
Yes
71 Cover Charge Cover Code. No 79 Company Code Customer. No 81 Credit Type
Code Credit Notes. No
82 Currency Customer, Contract, Quote, Supplier, Supplier Account.
No
84 Department Call Details, Employee. No 87 Deferral Reason Deferral Reason is used in Call Handling. No 93 Duty Parts. No 95 Employee Customer, Employee Skill, Timesheet, Call Service
Report, Quote Sales Person. Yes
Parts Request, Call Details, Prospect. No 99 Employee Skill Employee Details. No 101 Escalation
Config Call Escalation Monitor. No
104 ECO Engineer Change Order in Product and Call Details. No 108 Fault Code Call Service Report. Yes 110 Flow Code Transfer Call to Workshop Job. Yes
Workshop. No 89 Language Code User ID. No 91 Holiday Date Country Code and Call Diary. Yes 112 Note Action Call Notes. No 114 Order Type Parts Centre Sales Orders. No 141 Prospect Source Prospect Details. Yes 116 Parts and
Charge Codes Engineer Change Order (ECO). No
Products (*If using Parts Centre), Stock Control, Purchase and Sales Order Lines, Parts Request Lines.
* Yes
Contract Inclusive Parts, Call and Job Service Report Lines, Configuration, Part by Product, Supplier Part Relationship.
Yes
118 Part Discounts Refer to page 118 for Part Discounts, Part Charge Rate and Parts Mark-up.
123 Postcode Area Call Details. No 125 Problem Code Call Details. No 127 Product Code Serialised Product, Quote Lines, Stock Control,
ECO, Part by Product, Product Terms. Yes
Prospect. No 133 Product Family Product, Cover Charge. No
Employee Skill. Yes
Continued over the page….

SERVICE CENTRE FIVE GETTING STARTED REFERENCE GUIDE (RG01GS01)
COMMERCIAL IN CONFIDENCE Page 32
Page Code Areas Used Mand.
136 Product Option Product, Parts. Yes 139 Product Term Quote Lines. No 143 Period End Date Period Close. Yes 145 Quote Status Quotes, Prospects. Yes 147 Quote Term Quote Lines, Product Terms. Yes 149 Quote Action Quote Action Notes. Yes 153 Receipt Type Invoicing, Accounts Received. Yes 151 Repair Code Call Service Report. Yes 155 Resolution Code Call and Job Details. No 157 Serialised Serialised Product. Prospect. No
Status Quote, Quote Terms. Yes 159 Site Contact
Type Site Contact Name, Prospect. No
161 Shift Pattern Type
Call Handling Diary. For Shift Pattern set-up refer to the Service Centre five Tasks, Diary & Dispatch Reference Guide.
Yes
163 Shift Pattern Day
Call Handling Diary. For Shift Pattern set-up refer to the Service Centre five Tasks, Diary & Dispatch Reference Guide.
Yes
165 Std Industry Class
Customer. Prospect. No
167 Supplier Part Relation
Purchase Orders. No
169 Symptom Code Call Service Report, Cover Charge, Employee. No 176 Time Zone Site Details. Yes 171 Task Type Call Handling Tasks, Task Automation. No 173 Task
Automation Call Handling Tasks. No
178 VAT Code Customer, Contract Details, Parts and Site Details. Yes 180 Vehicle Code Used in Employee Details and REAII. No

SERVICE CENTRE FIVE GETTING STARTED REFERENCE GUIDE (RG01GS01)
COMMERCIAL IN CONFIDENCE Page 33
Area Code Area Codes are used throughout Service Centre five to define geographical, departmental, skill, technical or financial boundaries. They must be unique and are used within Call Control to enable the user to link engineers and sites to service areas for call logging and dispatch. Area Codes are one of the three main codes (area codes, call types and cover codes) by which all service calls are sequenced and can be used to link engineers to equipment sites.
Where they are used:
Refer to System Code Directory page 30.
Area default in call handling:
Area Codes can be attached to several tables within the system - site, contract, serialised product, product family, supplier contract and employee. Depending on which tables they are attached to govern which area code a newly logged call will contain.
For example:
If an area code is attached to a site (this is mandatory) and a call is logged against that site then the site area code will be used in the call. This only applies if there is no contract or serialised product against the call or, if there is, then the contract does not have an area code attached and/or serialised product does not have an area code attached.
If a call is logged against a site and a product is selected that contains a product family and that product family contains an area code then that area code will be the area code used in the call, not the site area code. The product family area code will over-ride a site area code but not a contract area code, a serialised product area code or a supplier contract area code.
If a call is logged against a site and a contract, and that contract has an area code attached then that area code will be the area code used in the call, not the site area code. The contract area code will over-ride a product family area code and the site area code but not a serialised product area code or a supplier area code.
If a call is logged against a site and a serialised product, and that serialised product has an area code attached then that area code will be the area code used in the call, not the site area code. The serialised product area code will over-ride a contract area code, a product family area code and the site area code but not a supplier contract area code.
If a call is logged against a site and a supplier contract, and that supplier contract has an area code attached then that area code will be the area code used in the call, not the site area code. The supplier contract area code will over-ride a serialised product area code, a contract area code, a product family area code and the site area code.
Postcode Area:
When logging a call this functionality will replace the default Area Code with an alternative based on the Postcode district.
When setting up the Postcode area table you should specify the Postcode district only (eg. HP12, B1, etc…) and the Area Code you wish to convert From and To.
Please refer to page 123 for further information.

SERVICE CENTRE FIVE GETTING STARTED REFERENCE GUIDE (RG01GS01)
COMMERCIAL IN CONFIDENCE Page 34
Add an area code Navigation:
After logging in to Service Centre five (refer to page 8) the main Welcome page is displayed. It displays the main module presentation page and the user interface menu in the left pane. (Also refer to System Navigation page 13 and System Standards page 14).
• From the user interface menu in the left pane click the system codes link.
• Select the relevant link, area.
• Select the relevant link, area add.
Section of the Service Centre five Area Add page.
Mandatory & Optional Data Fields
System Codes new or existing require mandatory data (refer to page 16).
• Area Code is a mandatory field allowing 6 alphanumeric (Where 6 is the field size and where alphanumeric is the format type, either letters or numbers) characters.
• Area Code description is a mandatory field allowing 30 alphanumeric (Where 30 is the field size and where alphanumeric is the format type, either letters or numbers) characters.
• Lock Calls: o If the checkbox is set, it locks call in an area code and does not allow changes
to be made to this area code. o If the checkbox is not set, the system checks the area code against the private
key (1128) prefix to see if it should lock the call.
• Redirection is for reporting purposes. • Workshop Site: A Workshop Site can be entered against an Area Code. If this
Area Code is attached to an engineer’s code and that engineer wants to return a faulty part in PDA REA then this will be the default Workshop Site used in the Workshop Job created.
Refer to the Remote Engineer Access Reference Guide and Workshop Reference Guide.
• Once the required data has been entered or selected click submit (submit will save the entered data to the relevant table). An information popup will appear stating: This Area Code record was successfully added to the database.
Date query and modification
For individual system data query, modification and field types refer to Getting Started page 27.

SERVICE CENTRE FIVE GETTING STARTED REFERENCE GUIDE (RG01GS01)
COMMERCIAL IN CONFIDENCE Page 35
Data Standards & Examples
The user can set-up area codes in various ways including the following example for engineer teams. Engineer naming convention could be used to cross-reference the set-up of Area codes, for example area F2A for team A, name the engineer in that team F2A001 etc. Also, please refer to Data Standards, page 20 and data types, refer to page 19.
Area Code examples for Call Handling
Code Description Locked Workshop
F1 Area for area 1 (e.g. area 1 = North West) N WMAIN F1A Area for area 1, team A N F1B Area for area 1, team B N SF2 Area for area 2 Parts Shipped by Parts Centre N

SERVICE CENTRE FIVE GETTING STARTED REFERENCE GUIDE (RG01GS01)
COMMERCIAL IN CONFIDENCE Page 36
Account Code Account Codes are used in Parts Centre Purchase Order Lines for reporting and accounting purposes. Account Codes and Analysis Codes can be attached to a Budget Code.
Where they are used:
Refer to System Code Directory page 30. Add an account code Navigation:
After logging in to Service Centre five (refer to page 8) the main Welcome page is displayed. It displays the main module presentation page and the user interface menu in the left pane. (Also refer to System Navigation page 13 and System Standards page 14).
• From the user interface menu in the left pane click the system codes link.
• Select the relevant link, account.
• Select the relevant link, account add.
Section of the Service Centre five Account Add page.
Mandatory & Optional Data Fields
System Codes new or existing require mandatory data (refer to page 16).
• Account Code is a mandatory field allowing 5 alphanumeric (Where 5 is the field size and where alphanumeric is the format type, either letters or numbers) characters.
• Account Code description is a mandatory field allowing 30 alphanumeric (Where 30 is the field size and where alphanumeric is the format type, either letters or numbers) characters.
• Once the required data has been entered or selected click submit (submit will save the entered data to the relevant table). An information popup will appear stating: This Account Code record was successfully added to the database.
Date query and modification
For individual system data query, modification and field types refer to Getting Started page 27.

SERVICE CENTRE FIVE GETTING STARTED REFERENCE GUIDE (RG01GS01)
COMMERCIAL IN CONFIDENCE Page 37
Data Standards & Examples
Account Code can be set-up in various ways including the following examples. Also, please refer to Data Standards, page 20.
Code Description
101 Service 201 Workshop

SERVICE CENTRE FIVE GETTING STARTED REFERENCE GUIDE (RG01GS01)
COMMERCIAL IN CONFIDENCE Page 38
Activity Code Activity Codes contain the codes and descriptions of Engineers or Sales activities. Activity Codes are used in the Call Diary Engineer Unavailability and in the Engineer Timesheet table to identify how time is being spent, e.g. travel, workshop, telephone support etc.
An activity code can be added to a part (refer to page 116).
Where they are used:
Refer to System Code Directory page 30.
Add an activity code Navigation:
After logging in to Service Centre five (refer to page 8) the main Welcome page is displayed. It displays the main module presentation page and the user interface menu in the left pane. (Also refer to System Navigation page 13 and System Standards page 14).
• From the user interface menu in the left pane click the system codes link.
• Select the relevant link, activity.
• Select the relevant link, activity add.
Section of the Service Centre five Activity Add page.
Mandatory & Optional Data Fields
System Codes new or existing require mandatory data (refer to page 16).
• Activity Code is a mandatory field allowing 4 numeric (Where 4 is the field size and where numeric is the format type, just numbers) characters.
• Activity Code description is a mandatory field allowing 30 alphanumeric (Where 30 is the field size and where alphanumeric is the format type, either letters or numbers) characters.
• Cost Price. The cost analysis or engineer activities.
• Sale Price. The sales analysis or engineer activities.
• Unavailability Colour can be set-up to show a specified colour in the Call Diary for unavailable time for the chosen Activity.
• Once the required data has been entered or selected click submit (submit will save the entered data to the relevant table). An information popup will appear stating: This Activity Code record was successfully added to the database.

SERVICE CENTRE FIVE GETTING STARTED REFERENCE GUIDE (RG01GS01)
COMMERCIAL IN CONFIDENCE Page 39
Date query and modification
For individual system data query, modification and field types refer to Getting Started page 27.
Data Standards & Examples
Activity Code can be set-up in various ways including the following examples. Also, please refer to Data Standards, page 20.
Code Description Code Description
1 Service Visit 4 Training 2 Installation 5 Travel 3 Holiday

SERVICE CENTRE FIVE GETTING STARTED REFERENCE GUIDE (RG01GS01)
COMMERCIAL IN CONFIDENCE Page 40
Analysis Code Analysis Codes are used in Parts Centre Purchase Order Lines for reporting and accounting purposes. Account Codes and Analysis Codes can be attached to a Budget Code.
Where they are used:
Refer to System Code Directory page 30.
Add an analysis code Navigation:
After logging in to Service Centre five (refer to page 8) the main Welcome page is displayed. It displays the main module presentation page and the user interface menu in the left pane. (Also refer to System Navigation page 13 and System Standards page 14).
• From the user interface menu in the left pane click the system codes link.
• Select the relevant link, analysis.
• Select the relevant link, analysis add.
Section of the Service Centre five Analysis Add page.
Mandatory & Optional Data Fields
System Codes new or existing require mandatory data (refer to page 16).
• Analysis Code is a mandatory field allowing 5 alphanumeric (Where 5 is the field size and where numeric is the format type, either letters and numbers) characters.
• Analysis Code description is a mandatory field allowing 30 alphanumeric (Where 30 is the field size and where alphanumeric is the format type, either letters or numbers) characters.
• Once the required data has been entered or selected click submit (submit will save the entered data to the relevant table). An information popup will appear stating: This Account Code record was successfully added to the database.
Date query and modification
For individual system data query, modification and field types refer to Getting Started page 27.

SERVICE CENTRE FIVE GETTING STARTED REFERENCE GUIDE (RG01GS01)
COMMERCIAL IN CONFIDENCE Page 41
Data Standards & Examples
Analysis Code can be set-up in various ways including the following examples. Also, please refer to Data Standards, page 20.
Code Description
100 Customer 200 Stock

SERVICE CENTRE FIVE GETTING STARTED REFERENCE GUIDE (RG01GS01)
COMMERCIAL IN CONFIDENCE Page 42
Adjustment Code Adjustment Codes are used in Parts Centre allows the user to enter a reason code for a Stock Control adjustment. Each Stock Control Record change must have an Adjustment Code attached for the audit trail.
Where they are used:
Refer to System Code Directory page 30.
Add an adjustment code Navigation:
After logging in to Service Centre five (refer to page 8) the main Welcome page is displayed. It displays the main module presentation page and the user interface menu in the left pane. (Also refer to System Navigation page 13 and System Standards page 14).
• From the user interface menu in the left pane click the system codes link.
• Select the relevant link, adjustment.
• Select the relevant link, adjustment add.
Section of the Service Centre five Adjustment Add page.
Mandatory & Optional Data Fields
System Codes new or existing require mandatory data (refer to page 16).
• Adjustment Code is a mandatory field allowing 6 alphanumeric (Where 6 is the field size and where numeric is the format type, both letters and numbers) characters.
• Adjustment Code description is a mandatory field allowing 30 alphanumeric (Where 30 is the field size and where alphanumeric is the format type, either letters or numbers) characters.
• Once the required data has been entered or selected click submit (submit will save the entered data to the relevant table). An information popup will appear stating: This Adjustment Code record was successfully added to the database.
Date query and modification
For individual system data query, modification and field types refer to Getting Started page 27.

SERVICE CENTRE FIVE GETTING STARTED REFERENCE GUIDE (RG01GS01)
COMMERCIAL IN CONFIDENCE Page 43
Data Standards & Examples
Adjustment Code can be set-up in various ways including the following examples. Also, please refer to Data Standards, page 20.
Code Description
AS Add Stock Control Records CH Change Stock Levels UP Update Stock Quantities SM Stock Movement

SERVICE CENTRE FIVE GETTING STARTED REFERENCE GUIDE (RG01GS01)
COMMERCIAL IN CONFIDENCE Page 44
Attachment Attachment is used throughout the Service Centre five system to allow attachments to be added to a page. For example, a product may have a specification document, a contract may have a proposal document and an employee/engineer may have a photograph.
Many document types can be attached but only one per page, for example, jpg, doc, bmp etc.
Clicking the attachment button prompts the user to browse for the relevant file.
Once attached the document name including the file extension (e.g. document.doc) populates the attachment field allowing the user to view, replace it, delete it or copy it locally.
Where they are used:
Refer to System Code Directory page 30.
Add an attachment Navigation:
After logging in to Service Centre five (refer to page 8) the main Welcome page is displayed. It displays the main module presentation page and the user interface menu in the left pane. (Also refer to System Navigation page 13 and System Standards page 14).
Attachment can be found in many areas of the system, for example the customer page. For Attachment click the customer assets link, then customer link.
• Click the attachment link to add an attachment.
• Use the Browse button to locate and select an attachment. Click Open to populate the Source File field.
• Click submit.
• Once an attachment is attached to a page click the attachment link to View it, Replace it, Delete it or Copy it locally.
Date query and modification
For individual system data query, modification and field types refer to Getting Started page 27.
Data Standards & Examples
There are no current examples of attachments. Many document types can be attached but only one per page, for example, jpg, doc, bmp etc.

SERVICE CENTRE FIVE GETTING STARTED REFERENCE GUIDE (RG01GS01)
COMMERCIAL IN CONFIDENCE Page 45
Budget Code Budget Code contains an Account Code and an Analysis Code which are used in Parts Centre Purchase Order Lines for reporting and accounting purposes. They contain a Target and Revised quantity with a start and end target dates.
Where they are used:
Refer to System Code Directory page 30.
Add a budget code Navigation:
After logging in to Service Centre five (refer to page 8) the main Welcome page is displayed. It displays the main module presentation page and the user interface menu in the left pane. (Also refer to System Navigation page 13 and System Standards page 14).
• From the user interface menu in the left pane click the system codes link.
• Select the relevant link, budget.
• Select the relevant link, budget add.
Section of the Service Centre five Budget Add page.
Mandatory & Optional Data Fields
System Codes new or existing require mandatory data (refer to page 16).
• Select an account code (refer to page 36).
• Select an analysis code. (refer to page 40).
• Target and Revised quantity and select the start and end target dates.
• Once the required data has been entered or selected click submit (submit will save the entered data to the relevant table). An information popup will appear stating: This Budget Code record was successfully added to the database.
Date query and modification
For individual system data query, modification and field types refer to Getting Started page 27.

SERVICE CENTRE FIVE GETTING STARTED REFERENCE GUIDE (RG01GS01)
COMMERCIAL IN CONFIDENCE Page 46
Data Standards & Examples
Budget Code can be set-up in various ways including the following examples. Also, please refer to Data Standards, page 20.
Account Code Analysis Code Target Revised Start End
100 100 10000 1000 01/03/07 01/03/08

SERVICE CENTRE FIVE GETTING STARTED REFERENCE GUIDE (RG01GS01)
COMMERCIAL IN CONFIDENCE Page 47
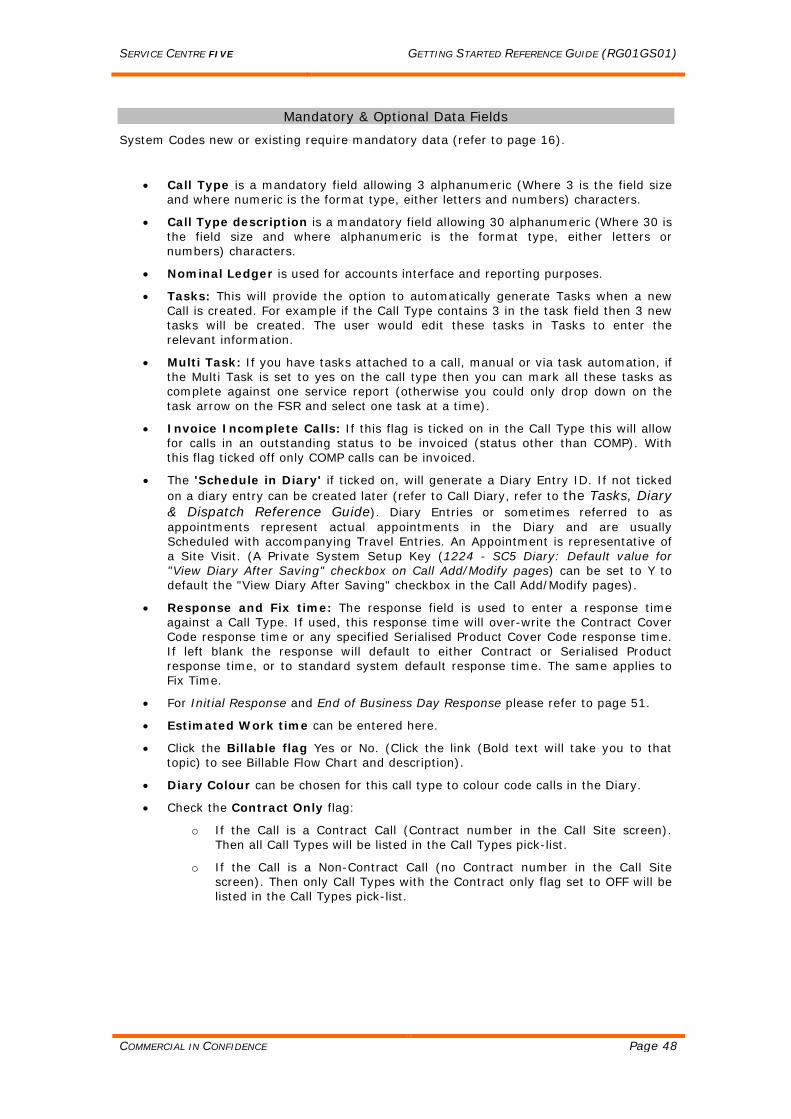
Call Type Call Type provides the initial categorisation of the Service Call at Call entry. The system uses the Call Type to check for billable and response sequences (see Billable Call Flow, page 52). A response (in hours and minutes, initial and normal) can be entered against a Call Type. If used, this response time will over-write the Contract Cover Code response time or any specified Serialised Product Cover Code response time. If left blank the response will default to either Contract or Serialised Product response time, or to standard system default response time. The same applies to Fix Time. See below for more details.
Call Types contain fields that hold standard charge codes for Work, Travel, Callout and Callout Included. These fields also exist in the Contract and Product Family tables. When a Service Report (SR) is created and saved these charge codes are automatically created as Service Report Lines (SRL) where certain conditions are met. If none of the fields exist in any of the above tables then no SRL’s are created. See below for more details.
Using ‘Defer Call Clock’ set to on will hold the call clock so the call does not go out of response. It also records an RHold and FHold time that can be deducted from performance reports if required. When a Call is logged and saved the user may change the Response Date/Time and tick the ‘Defer Call Clock’. By using a Call Type with ‘Defer Call Clock’ set to on this will be done automatically. Where they are used:
Refer to System Code Directory page 30.
Add a call type Navigation:
After logging in to Service Centre five (refer to page 8) the main Welcome page is displayed. It displays the main module presentation page and the user interface menu in the left pane. (Also refer to System Navigation page 13 and System Standards page 14).
• From the user interface menu in the left pane click the system codes link.
• Select the relevant link, call type.
• Select the relevant link, call type add.
Section of the Service Centre five Call Type Add page.
SERVICE CENTRE FIVE GETTING STARTED REFERENCE GUIDE (RG01GS01)
COMMERCIAL IN CONFIDENCE Page 48
Mandatory & Optional Data Fields
System Codes new or existing require mandatory data (refer to page 16).
• Call Type is a mandatory field allowing 3 alphanumeric (Where 3 is the field size and where numeric is the format type, either letters and numbers) characters.
• Call Type description is a mandatory field allowing 30 alphanumeric (Where 30 is the field size and where alphanumeric is the format type, either letters or numbers) characters.
• Nominal Ledger is used for accounts interface and reporting purposes.
• Tasks: This will provide the option to automatically generate Tasks when a new Call is created. For example if the Call Type contains 3 in the task field then 3 new tasks will be created. The user would edit these tasks in Tasks to enter the relevant information.
• Multi Task: If you have tasks attached to a call, manual or via task automation, if the Multi Task is set to yes on the call type then you can mark all these tasks as complete against one service report (otherwise you could only drop down on the task arrow on the FSR and select one task at a time).
• Invoice Incomplete Calls: If this flag is ticked on in the Call Type this will allow for calls in an outstanding status to be invoiced (status other than COMP). With this flag ticked off only COMP calls can be invoiced.
• The 'Schedule in Diary' if ticked on, will generate a Diary Entry ID. If not ticked on a diary entry can be created later (refer to Call Diary, refer to the Tasks, Diary & Dispatch Reference Guide). Diary Entries or sometimes referred to as appointments represent actual appointments in the Diary and are usually Scheduled with accompanying Travel Entries. An Appointment is representative of a Site Visit. (A Private System Setup Key (1224 - SC5 Diary: Default value for "View Diary After Saving" checkbox on Call Add/Modify pages) can be set to Y to default the "View Diary After Saving" checkbox in the Call Add/Modify pages).
• Response and Fix time: The response field is used to enter a response time against a Call Type. If used, this response time will over-write the Contract Cover Code response time or any specified Serialised Product Cover Code response time. If left blank the response will default to either Contract or Serialised Product response time, or to standard system default response time. The same applies to Fix Time.
• For Initial Response and End of Business Day Response please refer to page 51.
• Estimated Work time can be entered here.
• Click the Billable flag Yes or No. (Click the link (Bold text will take you to that topic) to see Billable Flow Chart and description).
• Diary Colour can be chosen for this call type to colour code calls in the Diary.
• Check the Contract Only flag:
o If the Call is a Contract Call (Contract number in the Call Site screen). Then all Call Types will be listed in the Call Types pick-list.
o If the Call is a Non-Contract Call (no Contract number in the Call Site screen). Then only Call Types with the Contract only flag set to OFF will be listed in the Call Types pick-list.

SERVICE CENTRE FIVE GETTING STARTED REFERENCE GUIDE (RG01GS01)
COMMERCIAL IN CONFIDENCE Page 49
• The RCA flag is checked to filter the Call Types displayed in Remote Customer Access.
• The Customer flag is used in the Repeat Call calculation to determine that only Customer Call Types (checked is switched on) will be included. Where the current Call is a Customer Call Type the system will search for previous Calls within the Repeat Period (The Repeat Period is based on the time elapsed since the current item (Serial number/Part number) was shipped).
Calculations: o If the Previous Call has a Job Repeat Count =>0, the current Job Repeat
Counter will be set to the Counter of the previous Call + 1. o Where the current Call is a Customer Call Type but not within the Repeat
Period, the Job Repeat Counter will be set to 0. o Where the current Call is not a Customer Call Type the Repeat Counter will
be set to indicate not a repeat Call (Null, -1 or 0 TBA).
Charge Codes • The Call Type page contains fields to hold the standard charge codes for Work,
Travel and Callout. These fields also exist in the Contract and Call Types. When a Service Report (SR) is created and saved these charge codes are automatically created as Service Report Lines (SRL) where certain conditions are met. If none of the fields exist in any of the above tables then no SRLs are created.
o Rounding in Call Type, Symptom Code, Product Family and Contract: The rounding factor will round the SRL quantity to the value in the factor field. For Example if the work time is 1.17 hours and the rounding factor is 0.25 the charge code will be rounded up to 1.25. There is also the ability to put in a minimum quantity so if the work time is 0.5 (half an hour) and the minimum charge is for 1 hour then the minimum qty would be 1. The system would then create a SRL for one hour.
o Callout Included: Any hours shown in the Callout inclusive field will be subtracted from the Travel time before any excess hours are billed against the Travel Charge code.
o If Call out Inclusive is greater than the Travel time, the excess from above is subtracted from the Work time before any remaining excess is billed against the Work time Charge code.
o For more information Callout Included refer to SR Charge Codes refer to the Standard Contract Reference Guide.
Section of the Service Centre five Call Type Add page.
• Check the PM flag: The PM flag is checked for the PM Arrears Call Types used in Call Control. This flag has to be set to allow PM Arrears Contract invoicing. The Contract Invoice routine will ignore Contracts where either of the PM flags are set in the Arrears section.

SERVICE CENTRE FIVE GETTING STARTED REFERENCE GUIDE (RG01GS01)
COMMERCIAL IN CONFIDENCE Page 50
• Using 'Defer Call Clock' set to on will hold the call clock so the call does not go out of response. It also records an Rhold and Fhold time that can be deducted from performance reports if required. When a Call is logged and saved the user may change the Response Date/Time and tick the 'Defer Call Clock'. By using a Call Type with 'Defer Call Clock' set to on this will be done automatically. Also refer below.
• Once the required data has been entered or selected click submit (submit will save the entered data to the relevant table). An information popup will appear stating: This Call Type record was successfully added to the database.
Defer Call Clock Calls clocks may be put on hold at any point during the life of an OPEN, DISP or DOWN Call to record the Hold time for Response and Fix. The Defer Call Clocks flag can be set ON or OFF via the Call update page (Refer to the Service Centre five Call Control Reference Guide), set to ON will equal Response/Fix times deferred.
Defer Call Clocks can be used if the user wants to move the Response and/or Fix Times on. This can either be changed when submitting a new call or by updating a call. For example, the Call Response Time is 15:00 but the customer does not want you to respond until 17:00. To record this two hour change click the Defer Call Clock tick box in call update page and change the Response Time and/or Fix Time by two hours. Two hours will be recorded in the RHold (Fhold for Fix Times) field to let you know that you had moved the Response Time on by two hours
This will take Coverage and Public Holidays into account.
Date query and modification
For individual system data query, modification and field types refer to Getting Started page 27.
Data Standards and examples
Call Type can be set-up in various ways including the following examples. Also, please refer to Data Standards, page 20.
Billable Flags
Type Code Description Parts Time Response
Call Type ASW Agreed Service Work Parts I Time I. 0 Call Type C01 Contract Call Parts I Time I. 0 Call Type C02 Non Contract Chargeable Parts Y Time Y. 0 Call Type WA Warranty call Parts I Time I. 0 Call Type PM Planned Maintenance Parts I Time I. 0 Call Type EM1 Emergency 1 hour Parts I Time I. 1 hours Call Type INS Installation Parts I Time I. 0

SERVICE CENTRE FIVE GETTING STARTED REFERENCE GUIDE (RG01GS01)
COMMERCIAL IN CONFIDENCE Page 51
End of Business Day Response and Fix (EBD) Currently the End of Business Day (EBD) response functionality is driven by the standard hourly response logic. This works fine when every day has the same hours of coverage as you know exactly how many hours represent the whole working day and as such you can specify the necessary number of hours response to achieve your target number of days response.
If you set initial response with response offset set then this will over-ride the cover code (refer to page 64) initial response. If you set the end of business day response then this will over-ride the cover code (refer to page 64) end of business day response.
Initial Response
If this is set to 1 hour then the Response Date and Time is 1 hour after the In date and time.
Response Offset = Y
Response offset is used in conjunction with the initial response functionality, having this checked will ensure that once initial response has been made then the response will be recalculated from the initial response date.
End of Business Day Response
End of Business Day Response = Y
This over-rides response times entered but not initial response times. End of Business Day logic is only required for regular response not initial response.
Days Offset
This is used to specify the number of days you want to respond by so if you enter Days Offset = 2 then the response will be end of business day in 2 days time.
Private Key (or in the contract?)
‘Call Handling: End of business day cut off period’.
If you have a 9-5 cover, that makes the end of business day 5pm. If you take a call at 4:59pm then the logic will put the response at 5pm, giving you 1min to respond. Call Handling: End of business day cut off period lets you determine a cut off time so that if you take a call after that period it will set the response to the end of the following day giving you a sensible time to respond.

SERVICE CENTRE FIVE GETTING STARTED REFERENCE GUIDE (RG01GS01)
COMMERCIAL IN CONFIDENCE Page 52
Billable Flags Billable flags are checked throughout the system to determine whether a part or a charge code will be billable or not (for parts and charge codes refer to page 116). It is therefore important to understand the billable flow.
The Billable Flow Chart illustrates (refer to the Billable Sequence below) and describes how the Billable Flags are set when the user creates a Service Report Line. In other words, when a Part or a Charge Code is selected to identify parts used and charges against the call out.
• The Billable flag can be set to Yes, No or Ignore. Refer to Billable Flow Chart.
During Call Handling the system validates the Cover Code for cover, response, fix and charge codes. (Please note that response can be overwritten by the Call Type response). The call Cover Code could come from several places:
• No Contract or expired Contract: If there is no valid Contract the System Default
Cover Code will be used, unless the Serialised Product has a different Cover Code.
• On Contract: The Contract Cover Code will be used, which will overwrite the Cover Code in the Contract Type if different.
• Product only on call: If a call is logged against a Product only, with no valid Contract and that Product has a Cover Code then that Cover Code is used.
If a Serialised Product has a Supplier Contract the system will ignore the Supplier Contract Cover Code.
Billable Sequence The Billable Sequence (over the page) illustrates and describes how the Billable Flags are set when the user creates a Service Report Line. In other words, when a Part or a Charge Code is selected to identify parts used and charges against the call out, billable flags are checked throughout the system to determine whether it will be billable or not.
Please refer to the Billable Flow Chart on the following the page.

SERVICE CENTRE FIVE GETTING STARTED REFERENCE GUIDE (RG01GS01)
COMMERCIAL IN CONFIDENCE Page 53
Service Centre five Billable Sequences.

SERVICE CENTRE FIVE GETTING STARTED REFERENCE GUIDE (RG01GS01)
COMMERCIAL IN CONFIDENCE Page 54
Billable Call Sequence
• PART (Parts and Charge Codes, refer to page 116).
o How is the Part Billable Flag set? o If set to Yes charge for this part regardless of any other circumstances. o If set to No look at the Call Type. Refer to CALL TYPE below.
• CALL TYPE (Call Type and Job Type, refer to page 47). o Are Parts and Time Billable? o If set to Yes charge for Parts and Time in the Service or Workshop Report
Line. o If set to No do not charge for Parts and Time in the Service or Workshop
Report Line. o If set to Ignore is the Call logged against a Serialised Product? Refer to
SERIALISED PRODUCT below. • SERIALISED PRODUCT (Refer to the Service Centre five Customer Assets
Reference Guide). o If Yes is the Warranty Period valid? Refer to WARRANTY below. o If No look at the Cover displayed on the Call. Refer to COVER below.
• WARRANTY. o Is the Warranty Period valid? o If Yes how are the Billable Flags set on the warranty? Refer to WARRANTY
PART AND TIME BILLABLE below. o If No is there a Serialised Status? Refer to SERIALISED STATUS below.
• WARRANTY PART AND TIME BILLABLE. o Are Parts and Time Billable? o If set to Yes charge for Parts and Time. o If set to No do not charge for Parts and Time. o If set to Ignore is there a Serialised Status? Refer to SERIALISED STATUS
below. • SERIALISED STATUS (Refer to page 157).
o If Yes is the Serialised Status valid? Refer to SERIALISED STATUS VALID below.
o If No look at the Cover displayed on the Call. Refer to COVER below. • SERIALISED STATUS VALID.
o If Yes how are the Billable Flags set on the Serialised Status? Refer to SERIALISED STATUS PART AND TIME BILLABLE below.
o If No look at the Cover displayed on the Call. Refer to COVER below.
• SERIALISED STATUS PART AND TIME BILLABLE.
o If set to Yes charge for Parts and Time.
o If set to No do not charge for Parts and Time.
o If set to Ignore look at the Cover displayed on the Call. Refer to COVER below.

SERVICE CENTRE FIVE GETTING STARTED REFERENCE GUIDE (RG01GS01)
COMMERCIAL IN CONFIDENCE Page 55
• COVER (Refer to page 64).
o Is the time that the work was carried out on the Call populated in the Cover Charge Grid?
o If Yes is there a Cover Charge Code relevant to the Call? Refer to COVER CHARGE CODE below.
o If No is the call logged against a valid Contract? Refer to CONTRACT below.
• COVER CHARGE CODE (Refer to page 71).
o Is there a Cover Code relevant to the Call?
o If Yes how are the Billable Flags set on the Cover Charge Code? Refer to COVER CHARGE CODE TIME BILLABLE below.
o If No is the call logged against a valid Contract? Refer to CONTRACT below.
• COVER CHARGE CODE TIME BILLABLE.
o Is Time Billable?
o If Yes charge for auto-generated Time SRL’s.
o If No do not charge for auto-generated Time SRL’s.
o If Ignore, is the call logged against a valid Contract? Refer to CONTRACT below.
• CONTRACT (Refer to the Service Centre five Customer Assets Reference Guide).
o Is the Contract valid?
o If Yes is there a Contract Type? Refer to CONTRACT TYPE below.
o If No charge for Parts and Time (not covered by the Contract).
• CONTRACT TYPE (Refer to page 59).
o If Yes how are the Billable Flags set on the Contract Type? Refer to CONTRACT TYPE BILLABLE FLAGS below.
o If No do not charge for Parts and Time (inclusive in Contract maintenance charge).
• CONTRACT TYPE BILLABLE FLAGS.
o Are the Parts and Time Billable?
o If Yes charge for Parts and Time.
o If No do not charge for Parts and Time (inclusive in Contract maintenance charge).

SERVICE CENTRE FIVE GETTING STARTED REFERENCE GUIDE (RG01GS01)
COMMERCIAL IN CONFIDENCE Page 56
Configuration Configuration is used as Bill of Material (BOM) in Parts Centre Purchase Order Lines, Sales Order Lines and Part Request Lines. After setting up a Configuration file and assuming the parts in that file are in stock the user can sell or purchase a product or part, which includes other related parts. These parts will be allocated from stock and sold as a unit rather than individually. The stock will be updated accordingly.
In the Configuration file the master part is the whole product, which will include the build. The sub-parts are the build of that product. The sub-parts are attached to the Configuration file (Refer to the following examples).
When a Purchase Order is created the part costs (refer to parts, page 116) are pulled from the part table against the PO Lines. A System Set-up key (1206) will switch this on and off. Set to yes, the part cost for configuration sub-parts of purchase order and sales order lines will be taken into account. This will be zero if set to No.
In addition, if stock records do not exist for subparts when you add POL or SOL warning box will display to say no stock records for subparts. The allow creation and stock records can be checked on.
Where they are used
Refer to System Code Directory page 30.
How Configuration works
Where a Part (master part which relates to any Configuration) is added to a Sales Order, Purchase Order and Parts Request Order Line a form will display the list of Configurations associated with that Part.
• In the Sales Order Line, Purchase Order Line and Request Order Line select the
master part (iRC2380i).
• Select a quantity of 1 (this will allocate 1 from stock if available).
• Click Ok. A form will display the list of Configurations associated with that Part (iRC2380i) and prompt the user to select a Configuration.
The related Charge Code will be added to the order and the list of Parts for that Configuration will be displayed for the user to accept as additional lines on the Order. Where the option is mandatory, it may not be de-selected by the user and must therefore be included on the order. Where the option is not mandatory the user may de-select them individually, or by cancelling the prompt, before placing the order.
• Click Finish and Cancel from the Add New Order Line page.
The Order will display the list of Parts for that Configuration.
• All except the master and Config, open (double-click) each line and allocate the quantity from stock and click OK. This will display a message saying 'Warning: you are about to edit a configuration line. Do you wish to continue? Click Yes.
For Shipping and Goods In refer to Sales Orders, Purchase Orders and Parts Requests.
If for any reason a mandatory line item cannot be included in the order, the whole order for the master Product will be rolled back. Where a non-mandatory part cannot be included that individual line will be rolled back.

SERVICE CENTRE FIVE GETTING STARTED REFERENCE GUIDE (RG01GS01)
COMMERCIAL IN CONFIDENCE Page 57
Add a configuration
Navigation:
After logging in to Service Centre five (refer to page 8) the main Welcome page is displayed. It displays the main module presentation page and the user interface menu in the left pane. (Also refer to System Navigation page 13 and System Standards page 14).
Example of a Configuration set-up for a CAN567 Photocopier Kit:
First create these parts (refer to page 116):
Part Number: Part Description: Part Type: iRC2380i iRC2380i Canon Photocopier R iRC2380i-CONFIG Configuration C 8695A005AA Canon iRC2380i Cass Feed D Y2986986 Canon iRC2380i Finisher Saddle R 8203A002AA Canon iRC2380i Key Switch Unit R
• From the user interface menu in the left pane click the system codes link.
• Select the relevant link, configuration.
• Select the relevant link, configuration add.
Section of the Service Centre five Configuration Add page.
Mandatory & Optional Data Fields
System Codes new or existing require mandatory data (refer to page 16).
• In the Master Part field select iRC2380i.
• In the Sub Part field select iRC2380i-CONFIG (the quantity for this is always 1).
• Check the Mandatory field if required (Where the option is mandatory, it may not be de-selected by the user and must therefore be included on the order).
• Once the required data has been entered or selected click submit.

SERVICE CENTRE FIVE GETTING STARTED REFERENCE GUIDE (RG01GS01)
COMMERCIAL IN CONFIDENCE Page 58
• Click configuration add button to enter new details.
Section of the Service Centre five Configuration Add page.
• In the Master Part field select iRC2380i-CONFIG.
• In the Sub Part field select 8695A005AA (the quantity for this is always 1).
• Check the Mandatory field if required (Where the option is mandatory, it may not be de-selected by the user and must therefore be included on the order). If the Configuration subparts are mandatory the SO/PO/PR lines cannot be created if no stock is available.
• Once the required data has been entered or selected click submit.
• Like the 8695A005AA above create the other part records - the quantity for these can be more than 1 and click submit to save details.
Note that the line created for the 'config' charge part will have the price of the part stored in the part table but the line(s) of the config 'sub' parts themselves will have a price of zero regardless of the price in the part table.
Date query and modification
For individual system data query, modification and field types refer to Getting Started page 27.
Data Standards & Examples
Configuration Code can be set-up in various ways including the following examples. Also, please refer to Data Standards, page 20.
Master Part: Sub Part: Qty: Master Type:
Sub Type:
Mandatory:
iRC2380i iRC2380i-CONFIG 1 R C N iRC2380i-CONFIG 8695A005AA 1 C D Y iRC2380i-CONFIG Y2986986 1 C D Y iRC2380i-CONFIG 8203A002AA 1 C R Y
Part type "D" must not be used as the master part of a configuration. The Configuration part must be a “C” part type.

SERVICE CENTRE FIVE GETTING STARTED REFERENCE GUIDE (RG01GS01)
COMMERCIAL IN CONFIDENCE Page 59
Contract Type Contract Types standardise Contracts, setting Coverage and parts and time Billable flags. When entering a Customer Contract selecting a Contract Type will pull through Response, Coverage and Fix times taken from the Cover Code (refer to page 64). Contract Type is also checked during the billable sequence and allows the user to set a contract MC factor (a surcharge or discount on the Contract cost). Any Coverage in Contract Type will over-write the System Default Coverage (refer the Service centre five System Guide, System Utilities section).
A template can be created for the contract creation. Using 'Default Only' will pull through the Contract Type settings but can be changed during Contract creation. Using 'Default and Fix' will pull through the Contract Type settings but these setting will be fixed and cannot be changed during Contract creation.
Where they are used:
Refer to System Code Directory page 30.
Add a contract type Navigation:
After logging in to Service Centre five (refer to page 8) the main Welcome page is displayed. It displays the main module presentation page and the user interface menu in the left pane. (Also refer to System Navigation page 13 and System Standards page 14).
• From the user interface menu in the left pane click the customer Assets, contract
link. • Select the relevant link, contract type. • Select the relevant link, contract type add.
Section of the Service Centre five Contract type Add page.

SERVICE CENTRE FIVE GETTING STARTED REFERENCE GUIDE (RG01GS01)
COMMERCIAL IN CONFIDENCE Page 60
Mandatory & Optional Data Fields
System Codes new or existing require mandatory data (refer to page 16).
• Contract Type is a mandatory field allowing 4 alphanumeric (Where 4 is the field size and where alphanumeric is the format type, either letters or numbers) characters.
• Contract Type description is a mandatory field allowing 30 alphanumeric (Where 30 is the field size and where alphanumeric is the format type, either letters or numbers) characters.
• Nominal Ledger is used for accounts interface and reporting purposes.
• Click the Billable flag Yes or No. Billable flags are checked throughout the system to determine whether a part or a charge code will be billable or not (for parts and charge codes refer to page 116). It is therefore important to understand the billable flow.
• If setting Parts or Time flags as billable the user can also enter a discount, for example 15 for 15%. This will discount any part used in the Call Service Report Line (FSRL) for the Contract (on the Call) using this Contract Type. Also refer to Part Discounts page 118.
The Billable Flow Chart (refer to page 52) illustrates and describes how the Billable Flags are set when the user creates a Service Report Line. In other words, when a Part or a Charge Code is selected to identify parts used and charges against the call out.
• A template can be created for the contract defaults creation. Using 'Default Only'
will pull through the Contract Type settings but can be changed during Contract creation. Using 'Default and Fix' will pull through the Contract Type settings but these setting will be fixed and cannot be changed during Contract creation.
• The 'Combined Equipment Contract' flag is used for reporting purposes to suggest that the Contract has a combination of products against it, for example some standard and some meter billing.
• Factor: This can be set-up as a discount or a surcharge. If entered this will be pulled through. It can then be changed or removed if required.
• Cover Code: The Cover Code will pull through Response, Coverage and Fix times set in the Cover Code details. If the Contract Type has been selected which is set to ‘Default and Fix’ then the Cover Code cannot be changed in the Contract details.
• If the Cover Code is changed on individual Customer Contracts then this Contract Cover will overwrite the Contract Type Cover.
• If the Serialised Products Cover Code is changed for individual Serialised Products then this will overwrite the Contract, Contract Type and System Default Cover Codes.
The Call Type Response will overwrite all of the above Response times.
Inclusive Parts and Exclusive Parts
Inclusive Parts, with 'Parts Billable Except Inclusive' checked includes parts that are FOC in Service Report Lines, all other parts are billable.
Exclusive Parts, with 'Parts NOT Billable Except Inclusive' checked includes parts
that are chargeable in Service Report Lines and all other parts are FOC.
To set-up and use Inclusive part by product - This uses the Parts by Product functionality in Parts Centre to enable a list of FOC (Free of Charge - Parts Billable Except Inclusive) or Chargeable Parts (Parts NOT Billable Except Inclusive). This is a list of Parts against a Product to be incorporated into the Contract Terms without having to set it up in Inclusive Parts (for Inclusive Parts set-up refer to the Customer Assets Reference Guide).

SERVICE CENTRE FIVE GETTING STARTED REFERENCE GUIDE (RG01GS01)
COMMERCIAL IN CONFIDENCE Page 61
To create the Parts by Product in Parts Centre the actual product could be chosen against the parts list. Alternatively create a special Product which could be named accordingly.
For example, Product INC1 for inclusive parts, or Product EXC1 for exclusive Parts. Use these Products to create the list of parts that are either inclusive or exclusive. For example, with a car service, oil, oil filter and plugs may be FOC, this could simply be a Product named INC1, with relevant service Parts attached in Parts by Product. In the Contract Type select this Parts by Product and choose the relevant option - Parts Billable Except Inclusive.
For EXC1, parts that are not FOC, choose Parts NOT Billable Except Inclusive. Please note that Contract Type settings are pulled through to the new contract upon creation. Once saved the Contract ‘Sales Order’ section will contain the Part by Product, which cannot be changed.
Standard Maintenance
• Maintenance Cycle – This will populate the Maintenance Cycle in the Contract. Used against the Invoice Cycle Unit this could be 1 day (every day), 1 month (every month) and so on.
• Invoice Cycle Unit – Can be entered in units of days, weeks, months or years. (Cycle 1, unit Years = a one year contract term).
• Maintenance Charge either invoiced in Advance or Arrears. • Factor - This can be set-up as a discount or a surcharge. If entered this will be
pulled through. It can then be changed or removed if required. Meter Set-up
• Meter Cycle – This will populate the Meter Cycle in the Contract for Usage and Minimum Billing. Used against the Invoice Cycle Unit this could be 1 day (every day), 1 month (every month) and so on.
• MTB Excess Cycle – This will populate the Meter Cycle in the Contract for Minimum Billing Excess. Used against the Invoice Cycle Unit this could be 1 day (every day), 1 month (every month) and so on.
• Usage Billing invoiced in Arrears. • Block Billing invoiced in Advance. • Minimum Billing either invoiced in Advance or Arrears.
Date query and modification
For individual system data query, modification and field types refer to Getting Started page 27.
Data Standards & Examples
Contract Type can be set-up in various ways including the following examples. Also, please refer to Data Standards, page 20.
Code Description Billable Flags
FULL Full (24 hours, 4 hour) Parts N, Time N. STD Standard (M-S, 09:00 - 17:30, 8 hour) Parts Y, Time N. MIN Minimum (M-F, 09:00 - 17:30, 16 hour) Parts Y, Time Y.

SERVICE CENTRE FIVE GETTING STARTED REFERENCE GUIDE (RG01GS01)
COMMERCIAL IN CONFIDENCE Page 62
Country Code Country Codes are used in Customer Assets to define the default country for that customer or customer site, in the VAT Code to define the Country Code for the customer using this VAT Code, in Employee to define the default country for that employee/engineer and in Parts to define the default country for that part.
When logging a Call in Call Handling the customer site Country Code will be the default.
DateSet ID is an optional code used to select Date Sets. Date Sets are set-up in Holiday Dates in System Utilities (refer to page 91), which contain a set of Dates used in the Call Control Diary and Call Handling.
Where they are used:
Refer to System Code Directory page 30.
Add a country code Navigation:
After logging in to Service Centre five (refer to page 8) the main Welcome page is displayed. It displays the main module presentation page and the user interface menu in the left pane. (Also refer to System Navigation page 13 and System Standards page 14).
• From the user interface menu in the left pane click the system codes link.
• Select the relevant link, country code.
• Select the relevant link, country code add.
Section of the Service Centre five Country Code Add page.
Mandatory & Optional Data Fields
System Codes new or existing require mandatory data (refer to page 16).
• Country Code is a mandatory field allowing 4 alphanumeric (Where 4 is the field size and where alphanumeric is the format type, either letters or numbers) characters.
• Country Code description is a mandatory field allowing 30 alphanumeric (Where 30 is the field size and where alphanumeric is the format type, either letters or numbers) characters.
• Select a DateSet ID. DateSet ID is an optional code used to select Date Sets. Date Sets are set-up in Holiday Dates.
• Once the required data has been entered or selected click submit (submit will save the entered data to the relevant table). An information popup will appear stating: This Country Code record was successfully added to the database.

SERVICE CENTRE FIVE GETTING STARTED REFERENCE GUIDE (RG01GS01)
COMMERCIAL IN CONFIDENCE Page 63
Date query and modification
For individual system data query, modification and field types refer to Getting Started page 27.
Data Standards & Examples
Country Code can be set-up in various ways including the following examples. Also, please refer to Data Standards, page 20.
Code Description Code Description
GB Default Country Code S1 Site Country Code

SERVICE CENTRE FIVE GETTING STARTED REFERENCE GUIDE (RG01GS01)
COMMERCIAL IN CONFIDENCE Page 64
Cover Code Cover Code is used to define coverage, response and fix by:- (a) Type of Contract (Contract Type) (b) Individual Customers, via their unique Contracts and (c) Serialised Products. A Cover Code is pulled into the Customer Contract via Contract Type but can be overwritten in individual Contracts. The Contract Cover is then pulled into the Serialised Product table but can be overwritten. Cover Codes are also used in Products and Supplier Contracts.
A Cover Code also defines response and fix times, where the user would enter time in hours and minutes fields and click Set All Response Times To.
Cover Codes can also contain Cover Charge Codes to enable different work, travel and callout SR Charge Lines according to the time of day the work is done. Travel time and callout charges are taken to be the time period before arrival on site.
Where they are used:
Refer to System Code Directory page 30.
Add a cover code Navigation:
After logging in to Service Centre five (refer to page 8) the main Welcome page is displayed. It displays the main module presentation page and the user interface menu in the left pane. (Also refer to System Navigation page 13 and System Standards page 14).
• From the user interface menu in the left pane click the customer assets, contract link.
• Select the relevant link, cover.
• Select the relevant link, cover add.
Section of the Service Centre five Cover Add page. For more information and setup of Cover Codes, Cover Code Grid, refer to the Cover Codes & Cover Charges Reference Guide.

SERVICE CENTRE FIVE GETTING STARTED REFERENCE GUIDE (RG01GS01)
COMMERCIAL IN CONFIDENCE Page 65
Mandatory & Optional Data Fields
System Codes new or existing require mandatory data (refer to page 16).
• Cover Code is a mandatory field allowing 20 alphanumeric (Where 20 is the field size and where alphanumeric is the format type, either letters or numbers) characters.
• Cover Code description is a mandatory field allowing 30 alphanumeric (Where 30 is the field size and where alphanumeric is the format type, either letters or numbers) characters.
• Enter the coverage period by selecting the start time in the Cover From field and the end time in the Cover To field. Select the days of the week for the cover, response and fix. Click Add Cover.
• Set Ignore Public Holidays on or off. If this flag is set to yes (ticked) Public Holiday setup will be ignored. The coverage, response and cover charges will apply on Public Holidays. (Public Holidays are setup in Utilities Setup).
• Response offset is used in conjunction with the initial response functionality, having this checked will ensure that once initial response has been made then the response will be recalculated from the initial response date (refer to page 66).
Section of the Service Centre five Cover Add page.
• Enter the response and fix hour and minutes in the Hours and Minutes fields individually or in the fields directly under the Set All Resp/Fix Times To button. Click Set All Resp/Fix Times To.
• For Initial Response and EBD refer to End of Business Day Response refer to page 66.
• Cover Charges can be added at this stage or added after the Cover Code is saved.
• Once the required data has been entered or selected click submit (submit will save the entered data to the relevant table). An information popup will appear stating: This Cover Code record was successfully added to the database.

SERVICE CENTRE FIVE GETTING STARTED REFERENCE GUIDE (RG01GS01)
COMMERCIAL IN CONFIDENCE Page 66
End of Business Day Response Currently the End of Business Day (EBD) response functionality is driven by the standard hourly response logic. This works fine when every day has the same hours of coverage as you know exactly how many hours represent the whole working day and as such you can specify the necessary number of hours response to achieve your target number of days response.
End of Business Day Response can be set-up in Cover Codes and Call Types (refer to page 47).
If End of Business Day Response = N then the response entered in the Response fields in the cover code is used.
If End of Business Day Response = Y - then this over-rides response times entered but not initial response times. End of Business Day logic is only required for regular response not initial response. If the Cover Code used is 9am - 5pm when logging a call, the call in date and time is 09/01/2008 13:00 then the response will be 09/01/2008 17:00 (depending on the Private Key for End of business day cut off period, see below).
Days Offset
This is used to specify the number of days you want to respond by so if you enter Days Offset = 2 then the response will be end of business day in 2 days time.
Private Key for End of business day cut off period
A private Key ‘Call Handling: End of business day cut off period’ requires setting for the EBD cut off.
If you have a 9-5 cover, that makes the end of business day 5pm. If you take a call at 4:59pm then the logic will put the response at 5pm, giving you 1min to respond. Call Handling: End of business day cut off period lets you determine a cut off time so that if you take a call after that period it will set the response to the end of the following day giving you a sensible time to respond.
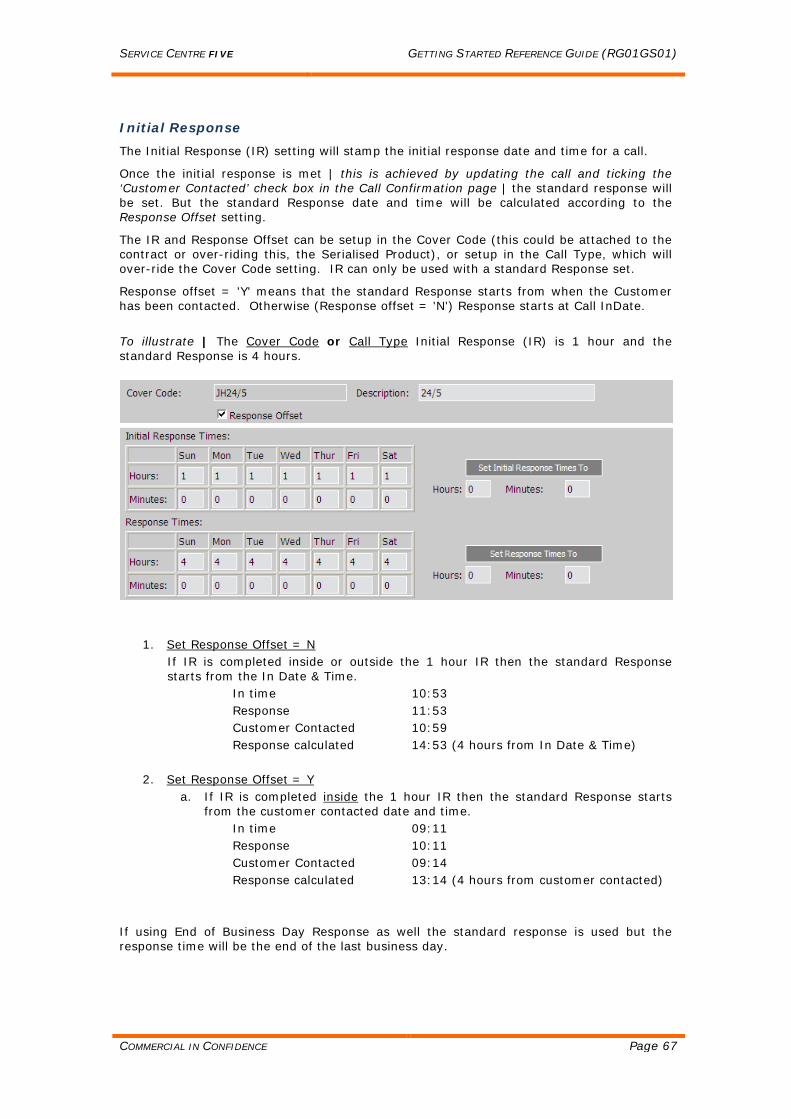
SERVICE CENTRE FIVE GETTING STARTED REFERENCE GUIDE (RG01GS01)
COMMERCIAL IN CONFIDENCE Page 67
Initial Response
The Initial Response (IR) setting will stamp the initial response date and time for a call.
Once the initial response is met | this is achieved by updating the call and ticking the ‘Customer Contacted’ check box in the Call Confirmation page | the standard response will be set. But the standard Response date and time will be calculated according to the Response Offset setting.
The IR and Response Offset can be setup in the Cover Code (this could be attached to the contract or over-riding this, the Serialised Product), or setup in the Call Type, which will over-ride the Cover Code setting. IR can only be used with a standard Response set.
Response offset = 'Y' means that the standard Response starts from when the Customer has been contacted. Otherwise (Response offset = 'N') Response starts at Call InDate.
To illustrate | The Cover Code or Call Type Initial Response (IR) is 1 hour and the standard Response is 4 hours.
1. Set Response Offset = N If IR is completed inside or outside the 1 hour IR then the standard Response starts from the In Date & Time.
In time 10:53 Response 11:53 Customer Contacted 10:59 Response calculated 14:53 (4 hours from In Date & Time)
2. Set Response Offset = Y
a. If IR is completed inside the 1 hour IR then the standard Response starts from the customer contacted date and time.
In time 09:11 Response 10:11 Customer Contacted 09:14 Response calculated 13:14 (4 hours from customer contacted)
If using End of Business Day Response as well the standard response is used but the response time will be the end of the last business day.

SERVICE CENTRE FIVE GETTING STARTED REFERENCE GUIDE (RG01GS01)
COMMERCIAL IN CONFIDENCE Page 68
Cover Charge Grid A standard Cover Code defines coverage, response and fix. However Cover Codes can also contain Cover Charge Codes to enable different work, travel and callout SR Charge Lines according to the time of day the work is done. Travel time and callout charges are taken to be the time period before arrival on site.
Before the Cover Charge Codes can be entered the ‘Weekend’, ‘Overtime’ and ‘Standard’ Charge Codes have to be created as Charge Code Parts (For Parts refer to page 116) and the Cover Charges have to be created (refer to a page 71).
• Select the Cover Charge Code, in this case W for weekend rates. • Select the Charge From and Charge To as in the illustration below. • Tick the days for the rate as below. • Click Add Charge.
Section of the Service Centre five Cover Code, Cover Charge Grid.
• Select the Cover Charge Code, in this case O for overtime rates. • Select the Charge From and Charge To as in the illustration below. • Tick the days for the rate as below. • Click Add Charge.
Section of the Service Centre five Cover Code, Cover Charge Grid.
Continued over the page………..

SERVICE CENTRE FIVE GETTING STARTED REFERENCE GUIDE (RG01GS01)
COMMERCIAL IN CONFIDENCE Page 69
• Select the Cover Charge Code, in this case S for standard rates. • Select the Charge From and Charge To as in the illustration below. • Tick the days for the rate as below. • Click Add Charge.
Section of the Service Centre five Cover Code, Cover Charge Grid. The example above shows Cover Charge Codes entered into different parts of the day.
• W represents the weekend Cover Charge has Charge Codes for weekend labour, travel and callout. These charges will apply to weekends only, for example, Saturday and Sunday 00:00 – 24:00.
• O represents the weekday overtime Cover Charge for weekday overtime labour, travel and callout. These charges will apply outside normal working hours, for example, Monday to Friday 00:00 – 09:00 and 17:00 – 24:00.
• S represents the standard Cover Charge for standard labour, travel and callout.
These charges will apply during normal working hours, for example, Monday to Friday 09:00 – 17:00.
• Click submit to save the Cover Code.
Date query and modification
For individual system data query, modification and field types refer to Getting Started page 27.
Data Standards & Examples
Cover Code can be set-up in various ways including the following examples. Also, please refer to Data Standards, page 20.
Code Description Charges
STANDARD 8 Hour response 5 days M-F, 9-5pm Standard Cover Code
CCC1 8 Hour response 5 days M-F, 8-6pm Standard SR Charge Codes CCSP 8 Hour response 7 days 24 hours Cover Code with Cover Charges per hour

SERVICE CENTRE FIVE GETTING STARTED REFERENCE GUIDE (RG01GS01)
COMMERCIAL IN CONFIDENCE Page 70
Examples of Charge Codes:
Code Description LABSTD Labour Standard Working Hours TRASTD Travel Standard Working Hours CALLSTD Callout Standard Working Hours LABOT Labour Weekday Overtime TRAOT Travel Weekday Overtime CALLOT Callout Weekday Overtime LABWE Labour Weekend Hours TRAWE Travel Weekend Hours CALLWE Callout Weekend Hours
Billable Flags Billable flags are checked throughout the system to determine whether a part or a charge code will be billable or not (for parts and charge codes refer to page 116). It is therefore important to understand the billable flow.
The Billable Flow Chart (refer to page 52) illustrates and describes how the Billable Flags are set when the user creates a Service Report Line. In other words, when a Part or a Charge Code is selected to identify parts used and charges against the call out.
During Call Handling the system validates the Cover Code for cover, response, fix and charge codes. (Please note that response can be overwritten by the Call Type response). The call Cover Code could come from several places:
• No Contract or expired Contract: If there is no valid Contract the System Default
Cover Code will be used, unless the Serialised Product has a different Cover Code.
• On Contract: The Contract Cover Code will be used, which will overwrite the Cover Code in the Contract Type if different.
• Product only on call: If a call is logged against a Product only, with no valid Contract and that Product has a Cover Code then that Cover Code is used.
If a Serialised Product has a Supplier Contract the system will ignore the Supplier Contract Cover Code.

SERVICE CENTRE FIVE GETTING STARTED REFERENCE GUIDE (RG01GS01)
COMMERCIAL IN CONFIDENCE Page 71
Cover Charge A standard Cover Code defines coverage, response and fix. However Cover Codes, which contain Cover Charge Codes, enable different work, travel and callout Service Report Lines (SR Lines) to be generated according to the time of day the work is done. Travel time and Callout charges are taken to be during the time period before arrival on site.
Cover Charges can be attached to any time of the day according to the Coverage. Refer to Cover Codes (page 64 for more detail on attaching Cover Charges to a Cover Code).
Cover Charges can be used on their own (with charge codes only) or associated with a combination of Symptom, Call Type, Product Family and/or Contract Number. Charge Codes, Symptom, Call Type, Product Family and Contract Numbers need to exist before creating Cover Charges (refer to the Standard Contract Reference Guide for Contract creation). Cover Charge ‘S’ (Standard Monday – Friday, 0900-1730), for example, could be many combinations of Symptom, Call Type, Product Family and Contract. For example, Cover Charge ‘S’ could be:
• Just Charge Codes (refer to page 116 to create charge codes). No Symptom, Call Type, Product Family or Contract is attached. If an engineer visit is in this time zone then the Cover Charge charges will apply.
• Contract Number Only with Charge Codes. If an engineer visit is in this time zone and the call is logged against the contract in the ‘S’ Cover Charge then the charges attached to that ‘S’ Cover Charge will apply. There could be an ‘S’ Cover Charge for every contract on the database. 100 Contracts, 100 S Cover Codes.
• Contract Number, Call Type with Charge Codes. If an engineer visit is in this time zone and the call is logged against the contract in the ‘S’ Cover Charge and the call type in the ‘S’ Cover Charge then the charges attached to that Cover Charge will apply. There could be an S Cover Charge for every contract on the database but only the calls with a contract and the Call Type in the ‘S’ Cover Charge will apply.
These combinations can go on and on until all combinations of contract, call type, product family and symptom code is reached.
Cover Charge Codes will be used in Service Report Lines under certain conditions. Please refer to page 78 for more information on Charge Codes against the Symptom Code, Call Type, Contract and Product Family.
Also refer to the Cover Charge Codes vs Charge Codes and Cover Charge Hierarchy illustrations over the page.
Billable flags (refer to page 52) are checked throughout the system to determine whether a part or a charge code will be billable or not (parts and charge codes). It is therefore important to understand the billable flow if adding Cover Charges to a Cover Code.
Additional Information
Cover Charge Codes (e.g. S, O and W) may be saved more than once, provided the combination of Symptom, Call Type, Product Family and / or Contract Number are different each time. As Service Reports are entered and Service Report Lines generated, the most appropriate SR Charge Lines will be generated according to the circumstances of the Call.
Therefore a further three Cover Charges could therefore be created using the same Cover Charge Codes (S, O and W) but using a Call Type for example. If this Call Type is used in the Call then different Cover Charges would apply. (See Cover Charge Codes Examples).
If the Cover Charge Grid is populated in the Cover Code, the appropriate Cover Charge Codes will be applicable. All other Charge Codes will be ignored. If an area of the Cover Charge Grid is not filled in, the usual Charge Code sequence will apply.

SERVICE CENTRE FIVE GETTING STARTED REFERENCE GUIDE (RG01GS01)
COMMERCIAL IN CONFIDENCE Page 72
Add a cover charge Navigation:
After logging in to Service Centre five (refer to page 8) the main Welcome page is displayed. It displays the main module presentation page and the user interface menu in the left pane. (Also refer to System Navigation page 13 and System Standards page 14).
• From the user interface menu in the left pane click the customer assets, contract link.
• Select the relevant link, cover charge. • Select the relevant link, cover charge add.
Section of the Service Centre five Cover Charge Add page.
Mandatory & Optional Data Fields
System Codes new or existing require mandatory data (refer to page 30).
• Cover Charge is a mandatory field allowing 1 alphanumeric (Where 1 is the field
size and where alphanumeric is the format type, either letters or numbers) characters.
• Cover Charge description is a mandatory field allowing 30 alphanumeric (Where 30 is the field size and where alphanumeric is the format type, either letters or numbers) characters.
• Select the work, travel and call out charge codes. o Charge Codes - The Cover Charge page contains fields to hold the standard
charge codes for Work, Travel and Callout. These fields also exist in the Contract, Call Type, Product Family and Symptom Code. When a Service Report (SR) is created and saved these charge codes are automatically created as Service Report Lines (SRL) where certain conditions are met. If none of the fields exist in any of the above tables then no SRLs are created (Refer to Parts page 116).
o Callout Included - Any hours shown in the Callout inclusive field will be subtracted from the Travel time before any excess hours are billed against the Travel Charge code. If Call out Inclusive is greater than the Travel time, the excess from above is subtracted from the Work time before any remaining excess is billed against the Work time Charge code.
For more information on Callout Included refer to SR Charge Codes in the Standard Contract Reference Guide.

SERVICE CENTRE FIVE GETTING STARTED REFERENCE GUIDE (RG01GS01)
COMMERCIAL IN CONFIDENCE Page 73
• Click the Billable flag Yes, No or Ignore. The system uses the Charge Code to
check for billable and response sequences. (Refer to page 52). • Select a Symptom Code (optional). If the chosen Symptom in this Cover Charge
is the one used in the Field Service Report then the charges in this Cover Charge Code will apply.
• Select a Call Type (optional). If the chosen Call Type in this Cover Charge is the one used in the Call then the charges in this Cover Charge Code will apply.
• Select a Product Family (optional). If the chosen Product Family in this Cover Charge is the one used in the Call then the charges in this Cover Charge Code will apply.
• Select a Contract Number (optional). If the chosen Contract in this Cover Charge is the one used in the Call then the charges in this Cover Charge Code will apply.
• Once the required data has been entered or selected click submit (submit will save the entered data to the relevant table) to save the details. An information popup will appear stating: This Cover Charge Code record was successfully added to the database.
For an example of three Cover Charges (S, W and O) entered in the Cover Charge Grid section of the Cover Code please refer to the Online Help (go to cover code query page and click the Help button).
To create Charge Codes for Cover Charges refer to page 116. For more examples refer over the page. Once the Cover Charges are created attach them to the Cover Code Grid (refer to page 64).
Date query and modification
For individual system data query, modification and field types refer to Getting Started page 27.
Data Standards & Examples
Cover Charge Code can be set-up in various ways including the following examples. Also, please refer to Data Standards page 20.
Code Description Work Travel Callout Symptom Call Type
Prod Family
Contract
S Standard Standard Standard Standard None None None None
O Overtime Overtime Overtime Overtime None None None None
W Weekend Weekend Weekend Weekend None None None None
S Standard Standard Standard Standard None ASW None None
O Overtime Overtime Overtime Overtime None ASW None None
W Weekend Weekend Weekend Weekend None ASW None None
Refer to more examples over the page.

SERVICE CENTRE FIVE GETTING STARTED REFERENCE GUIDE (RG01GS01)
COMMERCIAL IN CONFIDENCE Page 74
Standard Cover Charges:
Section of the Service Centre five Cover Charge Add page.
Section of the Service Centre five Cover Charge Add page.
Section of the Service Centre five Cover Charge Add page.
Section of the Service Centre five Cover Charge Add page.
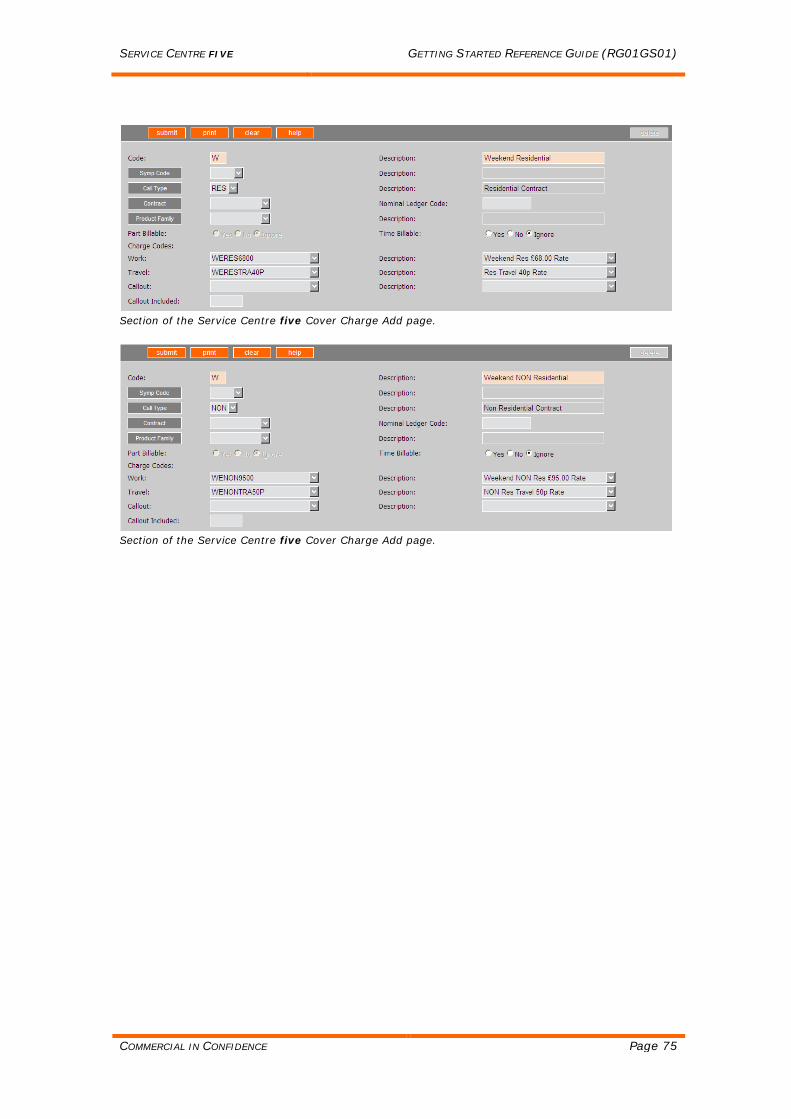
SERVICE CENTRE FIVE GETTING STARTED REFERENCE GUIDE (RG01GS01)
COMMERCIAL IN CONFIDENCE Page 75
Section of the Service Centre five Cover Charge Add page.
Section of the Service Centre five Cover Charge Add page.

SERVICE CENTRE FIVE GETTING STARTED REFERENCE GUIDE (RG01GS01)
COMMERCIAL IN CONFIDENCE Page 76
Cover Charge Codes vs Charge Code flow
Section of the Service Centre five Cover Code, Cover Charge Flow.
Continued over the page…….

SERVICE CENTRE FIVE GETTING STARTED REFERENCE GUIDE (RG01GS01)
COMMERCIAL IN CONFIDENCE Page 77
COVER CODE.
Is the WORK / TRAVEL time during a period of time populated in the Cover Charge Grid in the Cover Code?
• If Yes, look at the Cover Charge Code.
• If No, follow the normal flow, look at the Symptom Code.
Is there a Cover Charge Code with an appropriate match to the circumstances of the Call?
Check the Cover Charge Code Hierarchy (over the page).
• If Yes, generate relevant SR Charge Lines.
• If No, follow the normal flow, look at the Symptom Code (Refer to SYMPTOM CODE below).
SYMPTOM CODE.
• If Yes, generate relevant SR Charge Lines if applicable.
• If No, look at the Call Type (Refer to CALL TYPE over the page).
CALL TYPE.
• If Yes, generate relevant SR Charge Lines if applicable.
• If No, look at the Contract (Refer to CONTRACT below).
CONTRACT (Valid Contract?).
• If Yes, generate relevant SR Charge Lines if applicable.
• If No, look at the Product Family (Refer to PRODUCT FAMILY below).
PRODUCT FAMILY.
• If Yes, generate relevant SR Charge Lines if applicable.
• If No, do not generate relevant SR Charge Lines
Continued over the page…….

SERVICE CENTRE FIVE GETTING STARTED REFERENCE GUIDE (RG01GS01)
COMMERCIAL IN CONFIDENCE Page 78
Cover Charge Hierarchy
Combination Symptom Call Type Contract Product
Family 1
2 3
4 5
6 7
8 9
10 11
12 13
14 15
16
The diagram above shows the combinations of system codes against Cover Charge Codes and it relates to the previous flow chart ‘Cover Charge Code vs Charge Code’ Flow.
The system will first look at combination 1. Is a Cover Charge being used that has a combination of all four system codes? If not then it looks at combination 2 and so on until it finds a match. If for example the Call has a Call Type and a Product Family and a Symptom Code that matches combination number 3, then the charges on this Cover Charge Code are generated as Service Report Lines.
For example Cover Charge Code S (standard) may just have Charge Codes attached for the standard call out charges (combination number 16). A second Cover Charge can be created for S (standard) but this time with different Charge Codes and a Call Type attached (combination number 12). If this Call Type is used in the Call, the Charge Codes stated on the latter Cover Charge Code would be generated as Service Report Lines, as combination number 12 comes before combination number 16.

SERVICE CENTRE FIVE GETTING STARTED REFERENCE GUIDE (RG01GS01)
COMMERCIAL IN CONFIDENCE Page 79
Company Code Company Code is used in Customers to define a group of Customers Owned by a parent Company. For example, a group of Customers may be owned by one company, therefore attaching a Company to this group of Customers would enable easy reporting and analysis.
Where they are used:
Refer to System Code Directory page 30.
Add a company code Navigation:
After logging in to Service Centre five (refer to page 8) the main Welcome page is displayed. It displays the main module presentation page and the user interface menu in the left pane. (Also refer to System Navigation page 13 and System Standards page 14).
• From the user interface menu in the left pane click the customer assets, customer link.
• Select the relevant link, company code.
• Select the relevant link, company code add.
Section of the Service Centre five Company Code Add page.
Mandatory & Optional Data Fields
System Codes new or existing require mandatory data (refer to page 16).
• Company Code is a mandatory field allowing 12 alphanumeric (Where 12 is the
field size and where alphanumeric is the format type, either letters or numbers) characters.
• Company Code description is a mandatory field allowing 30 alphanumeric (Where 30 is the field size and where alphanumeric is the format type, either letters or numbers) characters.
• Once the required data has been entered or selected click submit (submit will save the entered data to the relevant table). An information popup will appear stating: This Company Code record was successfully added to the database.
Date query and modification
For individual system data query, modification and field types refer to Getting Started page 27.

SERVICE CENTRE FIVE GETTING STARTED REFERENCE GUIDE (RG01GS01)
COMMERCIAL IN CONFIDENCE Page 80
Data Standards & Examples
Company Code can be set-up in various ways including the following examples. Also, please refer to Data Standards, page 20.
Code Description
WHIT001 Whitbread PLC

SERVICE CENTRE FIVE GETTING STARTED REFERENCE GUIDE (RG01GS01)
COMMERCIAL IN CONFIDENCE Page 81
Credit Type Credit Type is used in Credit Notes to enable easy reporting and analysis.
Where they are used:
Refer to System Code Directory page 30.
Add a credit type Navigation:
After logging in to Service Centre five (refer to page 8) the main Welcome page is displayed. It displays the main module presentation page and the user interface menu in the left pane. (Also refer to System Navigation page 13 and System Standards page 14).
• From the user interface menu in the left pane click the system codes link.
• Select the relevant link, credit type.
• Select the relevant link, credit type add.
Section of the Service Centre five Credit Type Code Add page.
Mandatory & Optional Data Fields
System Codes new or existing require mandatory data (refer to page 16).
• Credit Type Code is a mandatory field allowing 5 alphanumeric (Where 5 is the
field size and where alphanumeric is the format type, either letters or numbers) characters.
• Credit Type description is a mandatory field allowing 30 alphanumeric (Where 30 is the field size and where alphanumeric is the format type, either letters or numbers) characters.
• Once the required data has been entered or selected click submit (submit will save the entered data to the relevant table). An information popup will appear stating: This Credit Type Code record was successfully added to the database.
Date query and modification
For individual system data query, modification and field types refer to Getting Started page 27.
Data Standards & Examples
Company Code can be set-up in various ways including the following examples. Also, please refer to Data Standards, page 20.
Code Description
R Residential

SERVICE CENTRE FIVE GETTING STARTED REFERENCE GUIDE (RG01GS01)
COMMERCIAL IN CONFIDENCE Page 82
Currency Code Currency Codes allow the user to attach a specified currency to the Customer, if attached will be automatically pulled into Contract when created. Providing the exchange rate is kept up to date reports can be run which will convert base currency to that specified. Invoicing uses currency table to convert invoice values to the customer’s currency.
Where they are used:
Refer to System Code Directory page 30.
Add a currency code Navigation:
After logging in to Service Centre five (refer to page 8) the main Welcome page is displayed. It displays the main module presentation page and the user interface menu in the left pane. (Also refer to System Navigation page 13 and System Standards page 14).
• From the user interface menu in the left pane click the system codes link.
• Select the relevant link, currency.
• Select the relevant link, currency add.
Section of the Service Centre five Currency Add page.
Mandatory & Optional Data Fields
System Codes new or existing require mandatory data (refer to page 16).
• Currency Code is a mandatory field allowing 3 alphanumeric (Where 3 is the field size and where alphanumeric is the format type, either letters or numbers) characters.
• Currency Code description is a mandatory field allowing 30 alphanumeric (Where 30 is the field size and where alphanumeric is the format type, either letters or numbers) characters.
• Exchange Rate: Providing the exchange rate is manually kept up to date reports can be run which will convert base currency to that specified.
• Once the required data has been entered or selected click submit (submit will save the entered data to the relevant table) to save the details. An information popup will appear stating: This Currency Code record was successfully added to the database.
Date query and modification
For individual system data query, modification and field types refer to Getting Started page 27.

SERVICE CENTRE FIVE GETTING STARTED REFERENCE GUIDE (RG01GS01)
COMMERCIAL IN CONFIDENCE Page 83
Data Standards & Examples
Currency can be set-up in various ways including the following examples. Also, please refer to Data Standards, page 20.
Code Description Exchange Rate
£ Sterling 0 $ US Dollars 1.75 EU Euro 1.48

SERVICE CENTRE FIVE GETTING STARTED REFERENCE GUIDE (RG01GS01)
COMMERCIAL IN CONFIDENCE Page 84
Department Code Department Code is used in Call Control / Helpdesk. Call Handling, for the most part, is based on linkage of Calls to Employees (Engineers) by Area Code. However, increasingly service organisations are looking to reduce the number of field interventions, or make them more effective, by pre analysing Calls before they are put out to the field. Most organisations find that the percentage of Calls avoided and reduction in the number of return visits in this way makes the process cost effective. Whilst this can be controlled within the Area Code structure, treating the Helpdesk staff as Employees, the Department Code provides automatic linkage between System Users and Calls.
Department will provide:
• Default entry of current User/Employee • Listings of all outstanding Calls for the current User's Department • Listings of all Calls allocated to the current User/Employee • A view of all related Call Actions • Entry of Call Actions and Notes • Update of any selected Call directly or via Call Note Entry • Change of Call Department
Allocating and Viewing the relevant Department:
Once the Department Codes have been set up and the User Details have been set up the system is prepared for use of the Department Code in a Helpdesk environment. Refer over the page for examples and setup.
Department Codes are optional in the Call Handling Details pages. With no Department code set against users, there is no change to the standard system operation.
Please refer to the Call Logging & Helpdesk Reference Guide, Helpdesk section. Where they are used:
Refer to System Code Directory page 30.
Add a department code Navigation:
After logging in to Service Centre five (refer to page 8) the main Welcome page is displayed. It displays the main module presentation page and the user interface menu in the left pane. (Also refer to System Navigation page 13 and System Standards page 14).
• From the user interface menu in the left pane click the system codes link.
• Select the relevant link, department code.
• Select the relevant link, department code add.
Section of the Service Centre five Department Code Add page.

SERVICE CENTRE FIVE GETTING STARTED REFERENCE GUIDE (RG01GS01)
COMMERCIAL IN CONFIDENCE Page 85
Mandatory & Optional Data Fields
System Codes new or existing require mandatory data (refer to page 16).
• Department Code is a mandatory field allowing 12 alphanumeric (Where 12 is the field size and where alphanumeric is the format type, either letters or numbers) characters.
• Department Description is a mandatory field allowing 30 alphanumeric (Where 30 is the field size and where alphanumeric is the format type, either letters or numbers) characters.
• Select the Department Type, Helpdesk or Other. • Once the required data has been entered or selected click submit (submit will
save the entered data to the relevant table). An information popup will appear stating: This Department Code record was successfully added to the database.
Date query and modification
For individual system data query, modification and field types refer to Getting Started page 27.
Data Standards & Examples
Department Code can be set-up in various ways including the following examples. Also, please refer to Data Standards, page 20.
The User Login ID must have an Employee attached and that Employee must have the relevant Department Code.
Helpdesk Environment:
Code Department Description Department Type
TECHSUP Tech Support Department H (Helpdesk)
FIELD Field Service H (Helpdesk)
SALES Sales Department H (Helpdesk)
HELPDESK Helpdesk Department H (Helpdesk)
CONTROL Call Control Department H (Helpdesk)
Non-Helpdesk Environment:
Code Department Description Department Type
ADMIN Administration Department O (Other)
ACCOUNTS Accounts Department O (Other)

SERVICE CENTRE FIVE GETTING STARTED REFERENCE GUIDE (RG01GS01)
COMMERCIAL IN CONFIDENCE Page 86
Helpdesk User Examples
Employee Details User Details (Login details) ID Name Emp
Type Department Dep
Type User Password Group
T1A001 Dave Pope H TECHSUP H Dave Pope TECHSUP T1A002 Rory
Lambert H TECHSUP H Rory Lambert TECHSUP
F1A001 Harry Smith F FIELD H Harry Smith FIELD F1A002 Doug Price F FIELD H Doug Price FIELD H1A003 Carol River H HELPDESK H Carol River HELPDESK H1A004 David
Winter H HELPDESK H Davi
d Winter HELPDESK
H1A001 Tony John H CONTROL H Tony John CONTROL H1A002 Helen Cape H CONTROL H Hele
n Cape CONTROL
S1A001 Sally Taylor S SALES H Sally Taylor SALES W1A001 S Townsend W WORKSHOP O Simo
n Townsend
WORKSHOP
W1A002 Holly Berry W WORKSHOP O Holly Berry WORKSHOP
A001 Gary Neaves
ADMIN O Gary Neaves ADMIN
A002 Janet Sharp ACCOUNTS O Janet Sharp ACCOUNTS Key: Emp Type: H = Helpdesk, F = Field, S = Sales (Quote Centre), W = Workshop. S and W cannot be selected in Call Handling. Dep Type: O = Other, H = Helpdesk.

SERVICE CENTRE FIVE GETTING STARTED REFERENCE GUIDE (RG01GS01)
COMMERCIAL IN CONFIDENCE Page 87
Deferral Reason Deferral Reason is used to define the reason for deferring a call clock (refer to the Service Centre five Call Logging Reference Guide).
System Set-up Key: Call audit deferral reason code mandatory. If set to "Y" then whenever the defer call clocks checkbox is checked the new deferral reason code will become mandatory
Where they are used:
Refer to System Code Directory page 30.
Add a deferral reason Navigation:
After logging in to Service Centre five (refer to page 8) the main Welcome page is displayed. It displays the main module presentation page and the user interface menu in the left pane. (Also refer to System Navigation page 13 and System Standards page 14).
• From the user interface menu in the left pane click the call control, call handling link.
• Select the relevant link, deferral reason.
• Select the relevant link, deferral reason add.
Section of the Service Centre five Deferral Reason Add page.
Mandatory & Optional Data Fields
System Codes new or existing require mandatory data (refer to page 16).
• Deferral Reason is a key field which is automatically generated.
• Deferral Reason Description is a mandatory field allowing 30 alphanumeric (Where 30 is the field size and where alphanumeric is the format type, either letters or numbers) characters.
• Once the required data has been entered or selected click submit (submit will save the entered data to the relevant table). An information popup will appear stating: This Deferral Reason record was successfully added to the database.
Date query and modification
For individual system data query, modification and field types refer to Getting Started page 27.

SERVICE CENTRE FIVE GETTING STARTED REFERENCE GUIDE (RG01GS01)
COMMERCIAL IN CONFIDENCE Page 88
Data Standards & Examples
Deferral Reason can be set-up in various ways including the following examples. Also, please refer to Data Standards, page 20.
Code Description
1 Customer Away 2 Customer Preferred Date

SERVICE CENTRE FIVE GETTING STARTED REFERENCE GUIDE (RG01GS01)
COMMERCIAL IN CONFIDENCE Page 89
Language Code Selected in the User details, Language Code allows the logged in user to view and/or change page labels to the language selected.
Language Codes are set-up in System Utilities and are optional in User details (refer to User Administration in the Service Centre five Administrators Guide).
Where they are used:
Refer to System Code Directory page 30.
Add a language code Navigation:
After logging in to Service Centre five (refer to page 8) the main Welcome page is displayed. It displays the main module presentation page and the user interface menu in the left pane. (Also refer to System Navigation page 13 and System Standards page 14).
• From the user interface menu in the left pane click the system codes link.
• Select the relevant link, language code.
• Select the relevant link, language code add.
Section of the Service Centre five Language Code Add page.
Mandatory & Optional Data Fields
System Codes new or existing require mandatory data (refer to page 16).
• The Language Code will automatically populate upon submit.
• Language Description is a mandatory field allowing 30 alphanumeric (Where 30 is the field size and where alphanumeric is the format type, either letters or numbers) characters.
• Once the required data has been entered or selected click submit (submit will save the entered data to the relevant table). An information popup will appear stating: This Language Code record was successfully added to the database).
Date query and modification
For individual system data query, modification and field types refer to Getting Started page 27.

SERVICE CENTRE FIVE GETTING STARTED REFERENCE GUIDE (RG01GS01)
COMMERCIAL IN CONFIDENCE Page 90
Data Standards & Examples
Language Code can be set-up in various ways including the following examples. Also, please refer to Data Standards, page 20.
Code Description
1 English 2 German

SERVICE CENTRE FIVE GETTING STARTED REFERENCE GUIDE (RG01GS01)
COMMERCIAL IN CONFIDENCE Page 91
Holiday Date Holiday Dates are created under System Utilities.
Holiday Dates can be selected in Country Codes (for different country Bank Holidays) and Employee Shift Patterns. There is also a tick box in Cover Codes to ‘Ignore Bank Holidays’.
Please refer to the following Reference Guides; Getting Started for Country Codes and Cover Codes, Tasks, Diary & Dispatch for Shift Patterns and Call Diary and System Utilities for Holiday Dates.
If a Holiday Date (DateSet ID) is selected in a Shift Pattern and that shift pattern is attached to an employee then the holiday dates will display against that employees diary view. To view this enter Call Control, Diary, select Single Employee / Date Range view, select an employee and submit. Alternatively click the employee name in the left hand pane.
Where they are used:
Refer to System Code Directory page 30.
Add a holiday date Navigation:
After logging in to Service Centre five (refer to page 8) the main Welcome page is displayed. It displays the main module presentation page and the user interface menu in the left pane. (Also refer to System Navigation page 13 and System Standards page 14).
• From the user interface menu in the left pane click the system utilities link.
• Select the relevant link, holiday date.
• Select the relevant link, holiday date add.
Section of the Service Centre five Holiday Date Add page.
Mandatory & Optional Data Fields
System Codes new or existing require mandatory data (refer to page 16).
• ID is a mandatory field allowing 10 alphanumeric (Where 4 is the field size and where alphanumeric is the format type, either letters or numbers) characters.

SERVICE CENTRE FIVE GETTING STARTED REFERENCE GUIDE (RG01GS01)
COMMERCIAL IN CONFIDENCE Page 92
• Description is a mandatory field allowing 30 alphanumeric (Where 30 is the field
size and where alphanumeric is the format type, either letters or numbers) characters. For example UK Bank Holidays.
• Enter the number of dates for this Holiday Dates, for example 8 for 8 Bank Holidays.
• Click Grid Update. • Select or enter each date in each of the mandatory date fields. • Once the required data has been entered or selected click submit (submit will
save the entered data to the relevant table). An information popup will appear stating: This Holiday Date record was successfully added to the database.
Date query and modification
For individual system data query, modification and field types refer to Getting Started page 27.
Data Standards & Examples
Holiday Date can be set-up in various ways including the following examples. Also, please refer to Data Standards, page 20.
Code Description Date Type ID No. of dates
1004 UK Bank Holidays 1 (Bank Holidays) 8 1005 Scotland Bank Holidays 2 (Scot Holidays) 8 1006 Northern Ireland bank Holidays 3 (NI Holidays) 10

SERVICE CENTRE FIVE GETTING STARTED REFERENCE GUIDE (RG01GS01)
COMMERCIAL IN CONFIDENCE Page 93
Duty Code Duty Codes are used for strict import/export controls if required. They can be attached to individual Parts in Part table and has no specific function in the standard system. They could, however be used for your own reporting purposes.
Where they are used:
Refer to System Code Directory page 30.
Add a duty code Navigation:
After logging in to Service Centre five (refer to page 8) the main Welcome page is displayed. It displays the main module presentation page and the user interface menu in the left pane. (Also refer to System Navigation page 13 and System Standards page 14).
• From the user interface menu in the left pane click the system codes link.
• Select the relevant link, duty code.
• Select the relevant link, duty code add.
Section of the Service Centre five Duty Code Add page.
Mandatory & Optional Data Fields
System Codes new or existing require mandatory data (refer to page 16).
• Duty Code is a mandatory field allowing 10 alphanumeric (Where 10 is the field size and where alphanumeric is the format type, either letters or numbers) characters.
• Licence Number is an optional field allowing 10 alphanumeric (Where 10 is the field size and where alphanumeric is the format type, either letters or numbers) characters.
• Percentage is a mandatory field allowing 10 alphanumeric (Where 10 is the field size and where alphanumeric is the format type, either letters or numbers) characters.
• Once the required data has been entered or selected click submit (submit will save the entered data to the relevant table) to save the details. An information popup will appear stating: This Duty Code record was successfully added to the database.
Date query and modification
For individual system data query, modification and field types refer to Getting Started page 27.

SERVICE CENTRE FIVE GETTING STARTED REFERENCE GUIDE (RG01GS01)
COMMERCIAL IN CONFIDENCE Page 94
Data Standards & Examples
There are no current examples available, as Duty Codes have no specific function in the standard system.

SERVICE CENTRE FIVE GETTING STARTED REFERENCE GUIDE (RG01GS01)
COMMERCIAL IN CONFIDENCE Page 95
Employee Employee page contains the details of Employees, Field Engineers, Support Engineers, Sales Employees, Workshop Employees, Helpdesk Employees, Call Control Employees or any person, such as Sub-Contractors working on a particular Call, Job or Quote.
The Field Engineer check box must be checked for Engineers to appear in the Diary. More than one check box can be checked and if no type is checked at all then those Employees will only appear in the Call Escalation Monitor and monitor Config.
Types:
If an employee has no type, or is Sales or is Workshop you cannot select this employee in call query, add and modify, it does not show in the list. In the Call Escalation Monitor and Monitor Config you can select any employee type even if it has no type.
In Workshop you can only select WORKSHOP employee types.
In Quote you can only select SALES employee types.
In Prospect Centre you can select any employee with any type.
Employee Skills can be attached to an Engineer to enable full visibility of all products within a particular engineer’s skill set. (Engineer Skills are linked to Product Family, refer to pages 99 and 133).
A Country Code can be attached to an Employee for reporting purposes and views.
The Employee (Field Engineer) Stock Site can be attached for Stock Control, Service Report Lines and Parts Request.
A Department Code can be attached to an Employee to identify that employees department for Helpdesk functionality.
The Employee Start and End dates can be entered but this has no impact on the system, Employees/Engineers will still appear in Call Control and other related parts of the system.
Standard Hours can be entered. This will state the normal and maximum working hours per day in order to avoid over-allocation. Using the three-week diary (refer to Call Control) the user can monitor the number of Calls allocated to an Engineer according to the normal and maximum working hours per day set in the Employee record.
WebREA User field can be checked to allow this employee to use WebREA.
Supervisor is used with WebREA. The Supervisor Employee is able to view all other engineer work in WebREA.
A Shift Tolerance can be set-up in the Employee table. This represents the maximum amount of time an Appointment or Travel entry could run over the Shift End (overtime) when using the Call Diary.
Where they are used:
Refer to System Code Directory page 30.

SERVICE CENTRE FIVE GETTING STARTED REFERENCE GUIDE (RG01GS01)
COMMERCIAL IN CONFIDENCE Page 96
Add an employee Navigation:
After logging in to Service Centre five (refer to page 8) the main Welcome page is displayed. It displays the main module presentation page and the user interface menu in the left pane. (Also refer to System Navigation page 13 and System Standards page 14).
• From the user interface menu in the left pane click the call control link.
• Select the relevant link, employee.
• Select the relevant link, employee add.
Section of the Service Centre five Employee Add page.
Mandatory & Optional Data Fields
System Codes new or existing require mandatory data (refer to page 16).
• Employee Code is a mandatory field allowing 8 alphanumeric (Where 8 is the field size and where alphanumeric is the format type, either letters or numbers) characters.
• Employee Code description is a mandatory field allowing 30 alphanumeric (Where 30 is the field size and where alphanumeric is the format type, either letters or numbers) characters.
• Country Code: A Country Code can be attached to an Employee for reporting purposes.
• Area Code: This is the employee/engineers home area. • Symptom Code: A symptom code can be attached to an employee. If the
employee is chosen in a service report the symptom code will be populated and any charges attached will be generated.
• Stock Site: This is the employee/engineers stock site (car stock) and although optional if the user is maintaining a stock control in Parts Centre then this is recommended.
• Vehicle Reg Number field can be added to the Employee page allowing the user to pick a Vehicle Code. This functionality is used in Remote Engineer Access II.

SERVICE CENTRE FIVE GETTING STARTED REFERENCE GUIDE (RG01GS01)
COMMERCIAL IN CONFIDENCE Page 97
• Department: This is the employee/engineers Department. Department Code is
used in Call Control and Help Desk. Call Handling, for the most part, is based on linkage of Calls to Employees (Engineers) by Area Code. Most organisations find that the percentage of Calls avoided and reduction in the number of return visits in this way makes the process cost effective. Whilst this can be controlled within the Area Code structure, treating the Help Desk staff as Employees, the Department code provides automatic linkage between System Users and Calls.
• Type of Employee: The type is used to determine the type of employee/engineer. For example, a field engineer is seen in the diary, a salesperson is used in Quote Centre, a Workshop engineer is used in Call Control and a Helpdesk employee is for general use (refer to Types, page 95).
• Standard Hours can be entered: This will state the normal and maximum working hours per day in order to avoid over-allocation. Using the three-week diary (refer to Call Control) the user can monitor the number of Calls allocated to an Engineer according to the normal and maximum working hours per day set in the Employee record.
• Employee Skills can be attached to an Engineer to enable full visibility of all products within a particular engineer's skill set. (Engineer Skills are linked to Product Family).
• WebREA User field can be checked to allow this employee to use WebREA. • Supervisor is used with WebREA. The Supervisor Employee is able to view all
other engineer work in WebREA. • Select the employees Start Date and End Date if required. This could be used to
record the employment start and end date.
• Shift Starts Tolerance: A Shift Tolerance can be set-up in the Employee table. This represents the maximum amount of time an Appointment or Travel entry could run over the Shift End (overtime) when using the Call Diary.
• Employee/Engineer Home details and Contact details are optional. • The Pager Number is displayed throughout Call Handling and therefore should
contain the main Engineers contact number, normally mobile phone. (In Call Details in Call Handling click Page Call Details (This screen automatically populates with the relevant Call Details) to send a Short Message Service (SMS) to the allocated engineer.
• The Home number and Office number can also be entered. • The PSUB is used for SC Host information and is an 8 character numeric field. • The Last Dispatched At information shows the last visit details. • Attachment: This is used to store the file and pathname of a document or other
file that is pertinent to the record, for example, further information for this part. When the Attachment button is clicked the new OleAuto DLL is launched and acts as a container for the attachment.
• Once the required data has been entered or selected click submit (submit will
save the entered data to the relevant table) to save the details. An information popup will appear stating: This Employee Code record was successfully added to the database.
Date query and modification
For individual system data query, modification and field types refer to Getting Started page 27.

SERVICE CENTRE FIVE GETTING STARTED REFERENCE GUIDE (RG01GS01)
COMMERCIAL IN CONFIDENCE Page 98
Data Standards & Examples
Employee Code can be set-up in various ways including the following examples. Also, please refer to Data Standards, page 20. Employee Number
Employee Name Area Code
Employee Type Department
F1A001 Harry Smith F1A Engineer FIELD F1A002 Doug Price F1A Engineer FIELD F2B001 Tom Cat F2B Remote Engineer FIELD W1A001 Simon Townsend W1A Workshop HARDWARE W1A002 Holly Berry W1A Workshop HARDWARE H1A001 Tony John H1A Call Control CONTROL H1A002 Helen Cape H1A Call Control CONTROL H1A003 Carol River H1A Helpdesk HELPDESK H1A004 David Winter H1A Helpdesk HELPDESK T1A001 Dave Pope T1A Technical Support TECHSUP T1A002 Rory Lambert T1A Technical Support TECHSUP S1A001 Sally Taylor S1A Sales SALES

SERVICE CENTRE FIVE GETTING STARTED REFERENCE GUIDE (RG01GS01)
COMMERCIAL IN CONFIDENCE Page 99
Employee Skill The Employee Skills page allows the user to enter engineer/employee skill sets. The Product Family (refer to page 133) is selected against the engineer/employee, which in turn is the skill set. This Product Family should also be attached to the relevant Product.
Used in Engineer Dispatch the system will search for calls that have Products with the same Product Family as the Engineer. Selecting an engineer will list his/her skills allowing the user to check the box and search for the appropriate job for that engineer. Another example of employee skills would be a dated list of training courses and experiences for that employee.
Where they are used:
Refer to System Code Directory page 30.
Add an employee skill Navigation:
After logging in to Service Centre five (refer to page 8) the main Welcome page is displayed. It displays the main module presentation page and the user interface menu in the left pane. (Also refer to System Navigation page 13 and System Standards page 14).
• From the user interface menu in the left pane click the call control link.
• Select the relevant link, employee. Query an employee.
• Select the relevant link, employee skill.
Section of the Service Centre five Employee Skill Add page.
Mandatory & Optional Data Fields
System Codes new or existing require mandatory data (refer to page 16).
• Employee Skill is a mandatory field allowing 8 alphanumeric (Where 8 is the field size and where alphanumeric is the format type, either letters or numbers) characters.
• Product Family is a mandatory field allowing 12 alphanumeric (Where 12 is the field size and where alphanumeric is the format type, either letters or numbers) characters.
• Optionally select the date when this skill training took place. • Optionally enter more information in the memo field. • Once the required data has been entered or selected click submit (submit will
save the entered data to the relevant table) to save the details. An information popup will appear stating: This Employee Skill record was successfully added to the database.

SERVICE CENTRE FIVE GETTING STARTED REFERENCE GUIDE (RG01GS01)
COMMERCIAL IN CONFIDENCE Page 100
Date query and modification
For individual system data query, modification and field types refer to Getting Started page 27.
Data Standards & Examples
Employee Skill can be set-up in various ways including the following examples. Also, please refer to Data Standards, page 20.
Number Name Product Family Product Family Description
F1A001 Harry Smith PHOTOCOPIERS Photocopiers W1A001 S Townsend SPORTS Sports Superbikes F2B001 Tom Cat SPORTS Sports Superbikes T1A001 Dave Pope ROAD Road Bikes

SERVICE CENTRE FIVE GETTING STARTED REFERENCE GUIDE (RG01GS01)
COMMERCIAL IN CONFIDENCE Page 101
Escalation Configuration Escalation Configuration is where the user can define unique configurations for the call escalation monitor, selecting a combination of search criteria from customer number to department. The user can also select call status, response bands, views and call types and change the response bands and colours.
In Call Handling if a query is executed on outstanding calls the list will show is colour-coded. The Call List Colours are hard-coded as followed.
Red = Out of Response
Orange = between 0 and 3 hours
Yellow = between 3 and 6 hours
Green = more than 6 hours
Where they are used:
Refer to System Code Directory page 30.
Add an escalation configuration Navigation:
After logging in to Service Centre five (refer to page 8) the main Welcome page is displayed. It displays the main module presentation page and the user interface menu in the left pane. (Also refer to System Navigation page 13 and System Standards page 14).
• From the user interface menu in the left pane click the call control link.
• Select the relevant link, call monitor config.
• Select the relevant link, call monitor config add.
Section of the Service Centre five Escalation Config Add page.

SERVICE CENTRE FIVE GETTING STARTED REFERENCE GUIDE (RG01GS01)
COMMERCIAL IN CONFIDENCE Page 102
Mandatory & Optional Data Fields
System Codes new or existing require mandatory data (refer to page 16).
• Escalation Config is a mandatory field allowing 10 alphanumeric (Where 10 is the field size and where alphanumeric is the format type, either letters or numbers) characters.
• Escalation Config description is a mandatory field allowing 30 alphanumeric (Where 30 is the field size and where alphanumeric is the format type, either letters or numbers) characters.
• Order By - Response Date or Fix Date is used to set the display to show calls in response date/time order or fix date/time order.
• View By – List View or Graph View. The Call Escalation Monitor can be displayed in a List format or a Graph format showing the Response bands in four different colours depending on the Response band set.
• Job Type – Service only means that only service calls will display. Workshop only means that only workshop jobs will display. Service and Workshop means that Service and Workshop calls will display.
• Exclude Arrived – Calls with an arrival time (updated via Call Handling) can be excluded from the monitor.
• To specify search criteria for a customer select a Customer Number (the user can enter wildcards to search on several Customers at once as long as the Customer Number or Description is similar).
• To specify search criteria for an engineer select an Engineer (the user can enter wildcards if applicable).
• To specify search criteria for a call type select a Call Type (the user can enter wildcards if applicable).
• To specify search criteria for an area select an Area Code (the user can enter wildcards if applicable).
• To specify search criteria for a department select a Department (the user can enter wildcards if applicable).
• To specify search criteria click a Call Status or a combination of Call Statuses. Response Bands
• Response Band 1 - any call with a response time within the time specified will be displayed in the colour set by Out of Response Colours. For example, if 1 then the calls for a response time of less than 1 hour will display in a particular colour (see out of response colours), Less than Band 1 will be Yellow by default. Missed response will be Red by default.
• Response Band 2 - any call with a response time over the time specified will be displayed in the colour set by Out of Response Colours. For example, if 3 then the calls for a response time of more than 3 hour will display in a particular colour. More than Band 2 will be Cyan by default. Any call between Band 1 and 2 will display in Green.
• Refresh Rate is used to dynamically refresh the display in the specified time. For example, entering 1 will refresh the display every minute.
Out of Response Colours
• Now means that calls that are Red in the monitor have missed their response. • Between Bands - Any call between Band 1 and 2 will display in Green. • Less than Band 1 - Less than Band 1 will be Yellow by default. • More than Band 2 - More than Band 2 will be Cyan by default. • Once the required data has been entered or selected click submit (submit will
save the entered data to the relevant table) to save the details. An information popup will appear stating: This Escalation Config record was successfully added to the database.

SERVICE CENTRE FIVE GETTING STARTED REFERENCE GUIDE (RG01GS01)
COMMERCIAL IN CONFIDENCE Page 103
Date query and modification
For individual system data query, modification and field types refer to Getting Started page 27.
Data Standards & Examples
Escalation Config can be set-up in various ways including the following examples. Also, please refer to Data Standards, page 20.
Code Description Area Code Status Job Type SOUTH South SOUTH OPEN, DOWN, WAIT Service Only NORTH North NORTH OPEN, DOWN, WAIT Service Only WS Workshop WIP OPEN (WORK) Workshop Only

SERVICE CENTRE FIVE GETTING STARTED REFERENCE GUIDE (RG01GS01)
COMMERCIAL IN CONFIDENCE Page 104
Product Engineer Change Order (ECO) The ECO functionality is used to enable Calls to be generated for Product recalls issued by a Supplier, where the Part or Product must be withdrawn and / or exchanged. For example, the Product may be faulty and / or unsafe.
An ECO is added to the relevant Product. Calls are then generated in a batch process for the relevant Serialised Products with a non-billable Call Type of ECO. A Task is created detailing the Serialised Product, and if a Part is associated with the ECO, this will be created as a Task Line.
To generate the ECO Calls firstly create the Product ECO, then refer to page for Serialised Product ECO, page 106.
The user may select an Affected Date range, which filters the Installation Date on the relevant Serialised Products. With no Affected Date all the Serialised Products will be displayed in the Serialised Product ECO List. With an Affected Date, the Install Date of the Serialised Product must be within the Affected Date range.
In Date is when the ECO is added.
Created Date is when the ECO was issued by the FDA (Federal Drug Agency) or Supplier.
Priority (1-9).
FDA / Supplier and Mandatory have no effect on Calls generated. They are all reporting / querying fields in ECO only.
Where they are used:
Refer to System Code Directory page 30.
Add a product engineer change order Navigation:
After logging in to Service Centre five (refer to page 8) the main Welcome page is displayed. It displays the main module presentation page and the user interface menu in the left pane. (Also refer to System Navigation page 13 and System Standards page 14).
• From the user interface menu in the left pane click the customer assets link.
• Select the relevant link, product.
• Select the relevant link, eco.
• Select the relevant link, eco add.
Section of the Service Centre five Product ECO Add page.

SERVICE CENTRE FIVE GETTING STARTED REFERENCE GUIDE (RG01GS01)
COMMERCIAL IN CONFIDENCE Page 105
Mandatory & Optional Data Fields
System Codes new or existing require mandatory data (refer to page 16).
• Product ECO is a mandatory field allowing 24 alphanumeric (Where 24 is the field size and where alphanumeric is the format type, either letters or numbers) characters.
• Product ECO description is a mandatory field allowing 30 alphanumeric (Where 30 is the field size and where alphanumeric is the format type, either letters or numbers) characters.
• Select a Product. An ECO is added to the relevant Product. Calls are then generated in a batch process for the relevant Serialised Products with a non-billable Call Type of ECO. A Task is created detailing the Serialised Product, and if a Part is associated with the ECO, this will be created as a Task Line.
• Select a Priority. Priority (1-9). • In Date is when the ECO is added. • Created Date is when the ECO was issued by the FDA (Federal Drug Agency) or
Supplier. • FDA / Supplier and Mandatory have no effect on Calls generated. They are all
reporting / querying fields in ECO only. • The user may select an Affected Date range, which filters the Installation Date on
the relevant Serialised Products. With no Affected Date all the Serialised Products will be displayed in the Serialised Product ECO List. With an Affected Date, the Install Date of the Serialised Product must be within the Affected Date range.
• Select a Part if required. If a Part is associated with the ECO, this will be created as a Task Line.
• Remarks can be added to this ECO. • Mandatory ECO can be checked if this ECO is mandatory. • Once the required data has been entered or selected click submit (submit will save
the entered data to the relevant table) to save the details. An information popup will appear stating: This Product ECO record was successfully added to the database.
Date query and modification
For individual system data query, modification and field types refer to Getting Started page 27.
Data Standards & Examples
Product ECO can be set-up in various ways including the following examples. Also, please refer to Data Standards, page 20.
ECO Num Product Priority In Date Affected Date
Source Mandatory
RECALL7676 CAN2567 1 01/01/08 01/01/08 Supplier Yes

SERVICE CENTRE FIVE GETTING STARTED REFERENCE GUIDE (RG01GS01)
COMMERCIAL IN CONFIDENCE Page 106
Serialised Product Engineer Change Order (ECO) Serialised Product ECO (Engineering Change Order) functionality is used to enable Calls to be generated for Product recalls issued by a Supplier, where the Part or Product must be withdrawn and / or exchanged. For example, the Product may be faulty and / or unsafe.
Where they are used:
Refer to System Code Directory page 30.
View serialised product ECO Navigation:
After logging in to Service Centre five (refer to page 8) the main Welcome page is displayed. It displays the main module presentation page and the user interface menu in the left pane. (Also refer to System Navigation page 13 and System Standards page 14).
• From the user interface menu in the left pane click the customer assets link.
• Select the relevant link, product.
• Select the relevant link, product, eco code, serialised product eco list.
Section of the Service Centre five Serialised Product ECO list page.
Mandatory & Optional Data Fields
System Codes new or existing require mandatory data (refer to page 16). The selection may be filtered to show those ECOs that have already had Calls generated, those that have not yet been generated, or both. The selection may be displayed in ECO or Serial Number order. The selection may be filtered to display only those Serialised Products that have the On Contract tick-box on.
• Once the required data has been entered or selected click submit (Submit will query on the entered data).
ECOs that already have Calls generated will not display a tick box. Select the required ECOs, or Select All. A message box will confirm how many Calls have been generated and the Serialised Product ECO List screen will remove the tick box from those Serialised Products that now have ECO Calls against them and also detail the Call Number, In Date and Status of those Calls.

SERVICE CENTRE FIVE GETTING STARTED REFERENCE GUIDE (RG01GS01)
COMMERCIAL IN CONFIDENCE Page 107
Call Modify
• The ECO Call will be created with a Call Type of ECO Engineering Change Order, which has both the Parts and Time billable flags set to No. If this Call Type does not exist prior to the ECO Calls being generated, it will be automatically added to the existing list of Call Types.
• On the Call Modify page under Call Details rollup an ECO Num field with drill-thru. This can be used to filter ECO Calls and once queried, displays the ECO Number that the Call relates to.
• No Problem code is selected. • Call In Date is when the ECO Calls were generated. • Cover / Response Date/Times are applied as per the usual flow.
Task Modify
• A Task will be automatically generated against the Call, which will detail the Serial Number and Product Number.
• Task Remarks pull through from the ECO Remarks. Task Lines
• If a Part is selected on the ECO, this will be created as a Task Line with a quantity of 1.
Date query and modification
For individual system data query, modification and field types refer to Getting Started page 27.
Data Standards & Examples
Serialised Product ECO can be set-up in various ways including the following examples. Also, please refer to Data Standards, page 20.
ECO Num Product Priority In Date Affected Date
Source Mandatory
RECALL7676 CAN2567 1 01/01/07 01/01/07 Supplier Yes

SERVICE CENTRE FIVE GETTING STARTED REFERENCE GUIDE (RG01GS01)
COMMERCIAL IN CONFIDENCE Page 108
Fault Code Fault Codes are mandatory in Engineer Service Reports and are used to reflect the equipment fault specified by the Engineer.
Where they are used:
Refer to System Code Directory page 30.
Add a fault code Navigation:
After logging in to Service Centre five (refer to page 8) the main Welcome page is displayed. It displays the main module presentation page and the user interface menu in the left pane. (Also refer to System Navigation page 13 and System Standards page 14).
• From the user interface menu in the left pane click the system codes link.
• Select the relevant link, fault code.
• Select the relevant link, fault code add.
Section of the Service Centre five Fault Code Add page.
Mandatory & Optional Data Fields
System Codes new or existing require mandatory data (refer to page 16).
• Fault Code is a mandatory field allowing 3 alphanumeric (Where 3 is the field size and where alphanumeric is the format type, either letters or numbers) characters.
• Fault Code description is a mandatory field allowing 30 alphanumeric (Where 30 is the field size and where alphanumeric is the format type, either letters or numbers) characters.
• Once the required data has been entered or selected click submit (submit will save the entered data to the relevant table) to save the details. An information popup will appear stating: This Fault Code record was successfully added to the database.
Date query and modification
For individual system data query, modification and field types refer to Getting Started page 27.

SERVICE CENTRE FIVE GETTING STARTED REFERENCE GUIDE (RG01GS01)
COMMERCIAL IN CONFIDENCE Page 109
Data Standards & Examples
Fault Code can be set-up in various ways including the following examples. Also, please refer to Data Standards, page 20.
Codes Description PM Preventative Maintenance M1 Mechanical - noisy E1 Electrical - fused E2 Electrical - wire loose NFF No Fault Found

SERVICE CENTRE FIVE GETTING STARTED REFERENCE GUIDE (RG01GS01)
COMMERCIAL IN CONFIDENCE Page 110
Flow Code Flow Codes are mandatory in when transferring a Call to Workshop. They are not mandatory in Workshop Jobs they are useful for escalation of a Workshop Job.
Each Job is assigned a number, Job Type and a Flow Code allowing the user to predefine the route any Job takes through the Workshop. While any Job is in the Workshop technical reports can be added indicating what has been done and by whom as well as what Parts have been used.
Where they are used:
Refer to System Code Directory page 30.
Add a flow code Navigation:
After logging in to Service Centre five (refer to page 8) the main Welcome page is displayed. It displays the main module presentation page and the user interface menu in the left pane. (Also refer to System Navigation page 13 and System Standards page 14).
• From the user interface menu in the left pane click the system codes link.
• Select the relevant link, flow code.
• Select the relevant link, flow code add.
Section of the Service Centre five Flow Code Add page.
Mandatory & Optional Data Fields
System Codes new or existing require mandatory data (refer to page 16).
• Flow Code is a mandatory field allowing 12 alphanumeric (Where 6 is the field size and where alphanumeric is the format type, either letters or numbers) characters. This is a descriptive name for the type of flow through the Workshop. The user can create several different types of flow dependent on the level and variety of repair service they wish to provide, e.g. Repair, Quote, Refurb, Upgrade etc.
• Enter the numerical Position Allows the user to define the position in the Workshop repair cycle to which both the Flow and Area code belong in the repair cycle to which the Area Code and Flow Code belong.
• Select the Area Code: This is used to define the ownership of the Job within the Workshop areas. For example; Goods In, Workshop Repairs, Cleaning, Q&A, Goods Out (If the required Area Code does not exist use the Area Code Drill-through button to create one).
• Once the required data has been entered or selected click submit (submit will save the entered data to the relevant table) to save the details. An information popup will appear stating: This Fault Code record was successfully added to the database.

SERVICE CENTRE FIVE GETTING STARTED REFERENCE GUIDE (RG01GS01)
COMMERCIAL IN CONFIDENCE Page 111
Date query and modification
For individual system data query, modification and field types refer to Getting Started page 27.
Data Standards & Examples
Flow Code can be set-up in various ways including the following examples. Also, please refer to Data Standards, page 20.
Codes Position Area Code Area Code Description F1 1 W1 Book into Workshop F1 2 W2 Work in Progress F1 3 W3 Shipped Loan F1 4 W4 Fixed Product F1 5 W5 Not Fixed Move to Bad Stock

SERVICE CENTRE FIVE GETTING STARTED REFERENCE GUIDE (RG01GS01)
COMMERCIAL IN CONFIDENCE Page 112
Note Action Note Action Code (or Action Code) is mandatory within Helpdesk (Call Actions) page.
Where they are used:
Refer to System Code Directory page 30.
Add a note action Navigation:
After logging in to Service Centre five (refer to page 8) the main Welcome page is displayed. It displays the main module presentation page and the user interface menu in the left pane. (Also refer to System Navigation page 13 and System Standards page 14).
• From the user interface menu in the left pane click the system codes link.
• Select the relevant link, note action.
• Select the relevant link, note action add.
Section of the Service Centre five Note Action Add page.
Mandatory & Optional Data Fields
System Codes new or existing require mandatory data (refer to page 16).
• Note Action is a mandatory field allowing 12 alphanumeric (Where 12 is the field size and where alphanumeric is the format type, either letters or numbers) characters.
• Note Action description is a mandatory field allowing 30 alphanumeric (Where 30 is the field size and where alphanumeric is the format type, either letters or numbers) characters.
• Type flag of Internal or External and a Send Email tick box. When logging a call in the helpdesk environment, the call details will contain the logged in ‘users’ department code. Submitting the call will display the call confirmation page. The Update Call flag is automatically ticked due to the Department Code being present (if the Call Update is un-ticked then the Call Actions will NOT display). After submitting the call confirmation the Call Actions page appears waiting for further information. An Action Code is required which determines whether the next action is internal or external and if external whether an email is sent to the call email address.
• Once the required data has been entered or selected click submit (submit will save the entered data to the relevant table). An information popup will appear stating: This Note Action record was successfully added to the database.

SERVICE CENTRE FIVE GETTING STARTED REFERENCE GUIDE (RG01GS01)
COMMERCIAL IN CONFIDENCE Page 113
Date query and modification
For individual system data query, modification and field types refer to Getting Started page 27.
Data Standards & Examples
Note Action can be set-up in various ways including the following examples. Also, please refer to Data Standards, page 20.
Code Description
ICR Initial Customer Response SUPPORT Second Line Support ALLO Allocate an Engineer

SERVICE CENTRE FIVE GETTING STARTED REFERENCE GUIDE (RG01GS01)
COMMERCIAL IN CONFIDENCE Page 114
Order Type Order Type is used in Parts Centre allowing the user to select an Order Type for a Sales Order. This allows for reporting on particular types of Sales Orders processed in Parts Centre.
Where they are used:
Refer to System Code Directory page 30.
Add a order type Navigation:
After logging in to Service Centre five (refer to page 8) the main Welcome page is displayed. It displays the main module presentation page and the user interface menu in the left pane. (Also refer to System Navigation page 13 and System Standards page 14).
• From the user interface menu in the left pane click the parts centre, sales order link.
• Select the relevant link, order type.
• Select the relevant link, order type add.
Section of the Service Centre five Order Type Add page.
Mandatory & Optional Data Fields
System Codes new or existing require mandatory data (refer to page 16).
• Order Type is a mandatory field allowing 10 alphanumeric (Where 10 is the field size and where alphanumeric is the format type, either letters or numbers) characters.
• Order Type description is a mandatory field allowing 30 alphanumeric (Where 30 is the field size and where alphanumeric is the format type, either letters or numbers) characters.
• Once the required data has been entered or selected click submit (submit will save the entered data to the relevant table) to save the details. An information popup will appear stating: This Order Type record was successfully added to the database.
Date query and modification
For individual system data query, modification and field types refer to Getting Started page 27.

SERVICE CENTRE FIVE GETTING STARTED REFERENCE GUIDE (RG01GS01)
COMMERCIAL IN CONFIDENCE Page 115
Data Standards & Examples
Order Type can be set-up in various ways including the following examples. Also, please refer to Data Standards, page 20.
Code Description
CSO Contract Sales Order STD Standard Sales Order

SERVICE CENTRE FIVE GETTING STARTED REFERENCE GUIDE (RG01GS01)
COMMERCIAL IN CONFIDENCE Page 116
Parts and Charge Codes The Parts page allows the user to create and view a list of all valid Part Numbers and Charge Codes. Every Part can have prices which are used for cost and sale values, these values are used in Service Report Lines, Purchase, Sales, Repair Orders and Stock Control Records to enable full cost of sale analysis.
Parts can be physical repairable or disposable or in the case of SRL chargeable time can be tagged as charge codes (refer to Part Types page 119).
Part / Product Relationship Notes:
In Service Centre any item of equipment is a Part. Repairable or disposable parts can be controlled via Parts Centre Stock Control in Stock and Workshop sites. Repairable Parts may also be entered in the Product table and be given a unique Product number (this need not be the same as its Part number).
Products can be installed as Serialised Products on internal and customer sites. This linkage permits stock used, replaced on or sold to customer sites to be installed as Serialised Products. Likewise Products can be recovered to stock.
Where they are used:
Refer to System Code Directory page 30.
Add a part Navigation:
After logging in to Service Centre five (refer to page 8) the main Welcome page is displayed. It displays the main module presentation page and the user interface menu in the left pane. (Also refer to System Navigation page 13 and System Standards page 14).
• From the user interface menu in the left pane click the customer assets, product or parts centre, stock link.
• Select the relevant link, part.
• Select the relevant link, part add.
Section of the Service Centre five Part Add page.

SERVICE CENTRE FIVE GETTING STARTED REFERENCE GUIDE (RG01GS01)
COMMERCIAL IN CONFIDENCE Page 117
Mandatory & Optional Data Fields
System Codes new or existing require mandatory data (refer to page 16).
• Part Code is a mandatory field allowing 24 alphanumeric (Where 24 is the field size and where alphanumeric is the format type, either letters or numbers) characters.
• Part Description is a mandatory field allowing 30 alphanumeric (Where 30 is the field size and where alphanumeric is the format type, either letters or numbers) characters.
• Alt Part - additional free text. • Class Code: To classify a part. This could also be used to identify that a part is a
product (refer to Products). • Status: The status of a part, for example 1 for obsolete for reporting purposes.
Also used with Supercession. • Min Order Quantity: This is used in Inclusive Parts (refer to the Standard
Contract Reference Guide or Service Centre five Administrators Guide). • Minimum Usage: This is used in Inclusive Parts (refer to the Customer Assets
Reference Guide or Service Centre five Administrators Guide). • Disc Type: The user can enter a discount of 1, 2 or 3. Three discounts can be set-
up in the customer invoice details for Parts Centre Sales Orders. Refer to page 118 for Part Discounts.
• Nominal Ledger Code, Tariff Code: These are for accounts interface and reporting purposes.
• Country Code: A Country Code can be attached to a Part for reporting purposes. • VAT Code: Used in Contract Sales Orders, Sales Orders and Service Report Lines.
If a part is sold to a customer in a Sales Order or Service Report Line the system will first look in the Part VAT Code for a rate. If this field is zero it will take the contract VAT followed by the site VAT and finally by the customer VAT.
• Billable Yes or No (Click the link (Bold text will take you to that topic) to see Billable Flow Chart and description).
• Select a Supplier (this can be used for reporting purposes and/or for the Parts Centre - Automatic Purchase Order facility) and Supplier Warranty duration in Days, Weeks, Months or Years.
Details The part Details rollup text provides additional fields:
• Activity Code: This is required for automatic Time Sheet creation from ‘charge codes’ entered as SRL, otherwise optional. (Refer to page 38).
• Duty Code: This is used for strict import/export controls if required. They can be attached to individual Parts in Part table and has no specific function in the standard system. They could, however be used for your own reporting purposes. (Refer to page 93).
• Part ABCD is used for Stock Take (refer to the Service Centre five Stocktake Reference Guide). A Stock Take Schedule is created against part ABCD so Parts with A can be scheduled for stock take at a different frequency to parts with B or C or D and so on. This field is a 1 alphanumeric character field.
• The remaining fields in the Part Details page are for your own reporting purposes.
Important Note:
Part ABCD (under the hidden text ‘Details’) is used for Stock Take (refer to the Service Centre five Stocktake Reference Guide). A Stock Take Schedule is created against part ABCD so Parts with A can be scheduled for stock take at a different frequency to parts with B or C or D and so on. This field is a 1 alphanumeric character field.

SERVICE CENTRE FIVE GETTING STARTED REFERENCE GUIDE (RG01GS01)
COMMERCIAL IN CONFIDENCE Page 118
Part Discounts Part Discounts can be setup in the following codes for Sales Order Lines (SOL) and Service Report Lines (FSRL).
• The Contract Type Part Billable discount can be setup for FSRL’s. (For Contract Type refer to page 59).
• The Serialised Status Part Discount can be setup for FSRL. For Serialised Status refer to page 157).
• The Customer Discounts can be setup for SOL’s. Refer to the Customer, Site & Serialised Product Reference Guide.
• Serialised Product Warranty Part Discount can be setup for FSRL. Refer to the Customer, Site & Serialised Product Reference Guide.
Sales Orders:
• For Sales Orders you can setup part discounts at the Customer level. There are three discount fields available in the customer add/modify pages and a ‘Disc Type’ field in the part add/modify page (please refer to the Getting Started Reference Guide, Parts & Charge Codes, Disc Type:
• The user can enter a discount of 1, 2 or 3. Three discounts can be set-up in the Customer Invoice details for Sales Orders (refer to the Customer, Site & Serialised Product Reference Guide for Customer Invoice details section, Discount details). When a part is sold to the customer with the discounts setup it will refer to the part being sold for the ‘Discount type’.
Service Report Lines:
• You can setup a discount at Contract Type level for Service Report Lines (FSRL). • You can setup a discount at Serialised Status. This discount will over-ride the
Contract Type discount. The Serialised Product must attached to the Sales Order header.
• You can setup a discount at Serialised Product Warranty level. Refer to the Customer, Site & Serialised Product Reference Guide.
o If the Parts Billable flag is set to Y this discount will be used for parts on a FSRL.
o If set to Ignore it will use the Contract Type discount. Parts Charge Rate The Part Charge Rate % is used in Contract Charges (refer to part types page 119) for Usage and Block Meter Billing Contracts. The Part Charge Rate Excess % is used in Contract Charges for Minimum Meter Billing Contracts. These Rate % are pulled through to Contract Charges for Meter Billing Contracts. Refer to the Meter Contract Reference Guide.
Section of the Service Centre five Part Add page.

SERVICE CENTRE FIVE GETTING STARTED REFERENCE GUIDE (RG01GS01)
COMMERCIAL IN CONFIDENCE Page 119
Parts Mark-Up Parts Markup allows the user to add a ‘mark-up’ on disposable parts.
A System Key cane be set for Parts markup (Parts_Markup) for adding and modifying disposable part types (refer to part types page 119). If this key is set (for example 50) the Part_Sale_End price is automatically calculated as Part_Cost increased by Part Markup % (System Key: Parts Markup – 50), when adding or modifying a Part record.
To switch this Key on enter 50 (50%) in the ‘Parts_Markup’ value field.
To switch this Key off enter 0 in the ‘Parts_Markup’ value field.
Section of the Service Centre five Part Add page. Part Type
[D] Disposable Part of low value and not repairable, usually discarded when used. Spare parts that an engineer may use during a customer visit that cannot be returned to stock.
[R] Repairable • Spare parts that can be replaced during an engineer visit and therefore returned to stock normally as bad. These parts are as a rule serialised stock therefore traceable as good or bad stock in the Audit Trail.
• Parts created purely for the creation of Products. The Part Number (product number) and the Part Description (product description) and the type selection, repairable, is all that’s required when creating the part.
[C] Charge Code
A Charge Code type part is exactly what it says. For example, Labour, Travel, Callout. Each charge code is defined with part prices and they are used after engineer customer site visits where charges apply. These charge codes can be selected manually in the Fields Service Report Lines or selected in Call Type, Symptom Code, Product Family and Contracts for automatic billable items against Fields Service Report details. (Also refer to the Service Centre five Customer Assets Reference Guides).
[V] Variable Ability to create variable type parts where usage of their content can be discreet values or part thereof. The content quantity has a Supply type that will decrease with use and will increase in that of a Return type. This information is used in conjunction with Serialised Stock and Content Unit Cost – Please refer to the Parts Centre Stock Browser Reference Guide and below. When this type is chosen the Max Content Qty and Content Type field/flag appears. The content (under End User Sales prices) can be kg for example. The content type Supply or Return flag must be set. For more details refer over the pages. For further information on the use of Variable Parts please contact Tesseract Support.
Continued over the page…..

SERVICE CENTRE FIVE GETTING STARTED REFERENCE GUIDE (RG01GS01)
COMMERCIAL IN CONFIDENCE Page 120
Variable Part Types Parts Centre allows traceability of variable type parts and usage of their content can be discreet values or part thereof. The content quantity of a Supply type will decrease with use and will increase in that of a Return type. This information is used in conjunction with Serialised Stock and Content Unit Cost.
Variable type parts can be utilised within organisations where variable content is used and needs to be measured, for example gas refrigerant (can be Supply and Return), cable or other liquid such as oils (would be Supply only). Variable part will record the content quantity that a container holds, the unit type (Supply or Return), unit cost (for Purchase Orders), sales price (for Sales Orders) and content unit prices (for FSRL). When variable part type is chosen the ‘Max Content Qty’ field can be expressed for example as kg/litres, and the Supply or Return flag must be set. Refer below on how to add the supply and return variable parts.
Creating the Variable Part When this type is chosen the ‘Max Content Qty’ field can be populated with the maximum quantity for this container and could be measured in kg for example. The Supply or Return flag must be set.
• Add a part and select the ‘Variable’ Type (found under the Details bar). • Select the Content Type, ‘Supply’ or ‘Return’. In this example select Supply. • Enter the ‘Max Content Quantity’, for example 100 (kgs). • The Content (found under prices for end user, distributor, internal and cost) is the
content price per unit. • Submit and repeat for the RETURN Variable Part.
Section of the Service Centre five Variable Part Add page. For further information on the use of Variable Parts please contact Tesseract Support.

SERVICE CENTRE FIVE GETTING STARTED REFERENCE GUIDE (RG01GS01)
COMMERCIAL IN CONFIDENCE Page 121
Part Prices When adding a Part you have the option to enter prices as per the example below. If Part Type is Disposable only Sales Price line is displayed.
End User Distributor Internal Cost
Sales: 30.00 20.00 10.00 5.00
For Repairable and Variable Part Types both Sales and Repair Price lines are displayed.
The Repair cell below is also for “Content” for V (Variable) type parts.
End User Distributor Internal Cost
Sales: 30.00 20.00 10.00 5.00
Repair: 40.00 30.00 20.00 20.00
Private Key 1148 ‘Enable Part Pricing Based On Customer Type’
When adding a service report line with Private Key 1148 ‘Enable Part Pricing Based On Customer Type’, set to Yes the part price is the price depending on the Customer Type and Part Type. If the customer type is End User then the price will be taken from the Part Repair End User Price field on a Repairable Part and Sales End User Price on a Disposable Part and so on.
With this Private Key 1148 ‘Enable Part Pricing Based On Customer Type’, set to No only the Repair (R Part) or Sales (D Part) End User Price is used regardless of customer type.
Sales Orders ignore Private Key 1148 and uses Part Pricing based on Customer Type regardless.
End User Distributor Internal Cost
Sales: 30.00 20.00 10.00 5.00
Sales End User: Area used Type Part Type End User - SRL Unit Charge Disposable, Charge Code, Variable End User - Task Line Unit Charge Disposable, Charge Code End User - Sales Orders Sale Price Disposable, Repairable, Variable Sales Distributor: Area used Type Part Type Distributor - Sales Orders Sale Price Disposable, Repairable, Variable Sales Internal: Area used Type Part Type Internal - Sales Orders Sale Price Disposable, Repairable, Variable

SERVICE CENTRE FIVE GETTING STARTED REFERENCE GUIDE (RG01GS01)
COMMERCIAL IN CONFIDENCE Page 122
Sales Cost: Area used Type Part Type End User - SRL Unit Cost Disposable, Charge Code, Repairable End User - Task Line Unit Cost Disposable, Charge Code, Repairable, Variable Stock Control Cost Disposable, Repairable Purchase Orders Cost Price Disposable, Repairable, Variable
End User Distributor Internal Cost
Sales: 30.00 0 0 5.00
Repair: 40.00 30.00 20.00 20.00
Repair/Content End User: Area used Type Part Type End User - SRL Unit Charge Repairable End User - Task Lines Unit Charge Repairable Repair Distributor: Area used Type Part Type Distributor - SRL Unit Charge Repairable, Variable Repair Internal: Area used Type Part Type Internal - SRL Unit Charge Repairable, Variable Repair Cost: Area used Type Part Type Repair Order Cost Price Repairable
Date query and modification
For individual system data query, modification and field types refer to Getting Started page 27.
Data Standards & Examples
Part Codes can be set-up in various ways including the following examples. Also, please refer to Data Standards, page 20.
Code Description Type DEL7658 Computer (Product) * Repairable 785960 PCB (Part) Repairable 785961 Filter (Part) Disposable CARB Carburettor (Part) Disposable LABOUR Engineer Labour charge Charge Code CALLOUT Engineer Call Out charge Charge Code TRAVEL Engineer Travel Time Charge Code MILEAGE Engineer Mileage Charge Code REF/S Container Supply Variable REF/R Container Return Variable

SERVICE CENTRE FIVE GETTING STARTED REFERENCE GUIDE (RG01GS01)
COMMERCIAL IN CONFIDENCE Page 123
Postcode Area When logging a call (on demand or existing site) this functionality will replace the default Area Code (as determined by the standard area code sequence) with an alternative based on the Postcode district. Private Key 1139 - Call Handling: Set Area Codes by Postcode needs to be set to Y.
When setting up the Postcode area table you should specify the Postcode district only (eg. HP12, B1, etc…) and the Area Code you wish to convert From and To.
To use this functionality you will need to set this Key to Y. You will also need to set an Area Code pattern to define which Area Codes should be candidates for conversion. Area Code patterns are defined in Private Key 1207. The default value here is “*” which means any Area Code.
For example;
You set up a Postcode lookup to convert default Area Code “ABC” to Area Code “DEF” where the Postal District is HP12.
If a call is logged where the Postcode is HP12 3RE and the default Area Code (from the standard Area Code sequence) is “ABC” and this Area Code matches the pattern in Private Key 1207 then a lookup is performed in the PCAreaMap table.
If a match is found then the default Area Code is replaced with the new Area Code, in this case “DEF”.
Further flexibility is built into this functionality in that when the Postcode Area lookup is performed the lookup also searches for matches in all sub areas and districts. In our example, as well as searching for HP12 lookups will also be performed on HP1, HP and H. If multiple matches are found then the “best” (most granular) one is returned. In our case that is HP12.
This feature must be used very cautiously as it could easily lead to unexpected Area Code assignments. Consider the Postcode GU51 1BU.
The logic will perform lookups on GU51, GU5, GU and G. The first three postcodes all pertain to Guildford in Surrey, the last to Glasgow.
Please note that the site post code and the post code entered in an On Demand call must be the FULL post code.
Where they are used:
Refer to System Code Directory page 30.

SERVICE CENTRE FIVE GETTING STARTED REFERENCE GUIDE (RG01GS01)
COMMERCIAL IN CONFIDENCE Page 124
Add a postcode area Navigation:
After logging in to Service Centre five (refer to page 8) the main Welcome page is displayed. It displays the main module presentation page and the user interface menu in the left pane. (Also refer to System Navigation page 13 and System Standards page 14).
• From the user interface menu in the left pane click the call control link.
• Select the relevant link, postcode area.
• Select the relevant link, postcode area add.
Section of the Service Centre five Postcode Area Add page.
Mandatory & Optional Data Fields
System Codes new or existing require mandatory data (refer to page 16).
• Postcode is a mandatory field allowing 4 alphanumeric (Where 4 is the field size and where alphanumeric is the format type, either letters or numbers) characters. When setting up the Postcode area table you should specify the Postcode district only (eg. HP12, B1, etc…) and the Area Code you wish to convert From and To.
• Select the Area Code you wish to replace when logging a call. • Select an Area Code you wish to replace with. • Once the required data has been entered or selected click submit (submit will
save the entered data to the relevant table) to save the details. An information popup will appear stating: This Postcode record was successfully added to the database.
Date query and modification
For individual system data query, modification and field types refer to Getting Started page 27.
Data Standards
Postcode Area can be set-up in various ways including the following examples. Also, please refer to Data Standards, page 20.

SERVICE CENTRE FIVE GETTING STARTED REFERENCE GUIDE (RG01GS01)
COMMERCIAL IN CONFIDENCE Page 125
Problem The Problem Code should reflect the Customers interpretation of the symptom when logging a Call. When a problem code is selected the description populates the Call memo field assisting Call Handlers.
Where they are used:
Refer to System Code Directory page 30.
Add a problem code Navigation:
After logging in to Service Centre five (refer to page 8) the main Welcome page is displayed. It displays the main module presentation page and the user interface menu in the left pane. (Also refer to System Navigation page 13 and System Standards page 14).
• From the user interface menu in the left pane click the system codes link.
• Select the relevant link, problem.
• Select the relevant link, problem add.
Section of the Service Centre five Problem Add page.
Mandatory & Optional Data Fields
System Codes new or existing require mandatory data (refer to page 16).
• Problem Code is a mandatory field allowing 5 alphanumeric (Where 5 is the field size and where alphanumeric is the format type, either letters or numbers) characters.
• Problem Code description is a mandatory field allowing 30 alphanumeric (Where 30 is the field size and where alphanumeric is the format type, either letters or numbers) characters.
• Once the required data has been entered or selected click submit (submit will save the entered data to the relevant table) to save the details. An information popup will appear stating: This Problem Code record was successfully added to the database.
Date query and modification
For individual system data query, modification and field types refer to Getting Started page 27.

SERVICE CENTRE FIVE GETTING STARTED REFERENCE GUIDE (RG01GS01)
COMMERCIAL IN CONFIDENCE Page 126
Data Standards & Examples
Problem Code can be set-up in various ways including the following examples. Also, please refer to Data Standards, page 20.
Codes Description Codes Description PM Preventative Maintenance ERR1 Error message - invalid code M1 Mechanical - noisy ERR2 Error message - invalid operator M2 Mechanical - jamming SV1 First Service E1 Electrical - fused SV2 Interim Service E2 Electrical - wire loose SV3 Full Service E3 Electrical - No power DA1 Damaged - Internal DA1 Damaged - Internal DA2 Damaged - External DA2 Damaged - External

SERVICE CENTRE FIVE GETTING STARTED REFERENCE GUIDE (RG01GS01)
COMMERCIAL IN CONFIDENCE Page 127
Product The Products page stores the details of all the Products that are to be controlled by the system. A population count is maintained for the number of items of each equipment type which are installed at Customer Sites. Once the population is greater than zero a Product cannot be deleted. Maintenance Charges entered here will be retrieved as a default contract charge into the Contract, Serialised Product and Quote table.
The Meters button within the Products page (refer to page 131) enables the user to define the configuration of any meters installed on the Product. The number of meters is driven by the quantity entered into the Meter Qty field. Validation is performed on saving those records, allowing partial entry of meter details at any time. However once a record has been saved, the details of Maximum Digits and Decimeter Flags cannot be changed for that meter so as to prevent unwanted effects on any existing data.
Selecting a Part number is only mandatory if the user has Parts Centre. Refer to Parts (page 116) and to Call Service Report Line, Call Control Reference Guide, if a Serialised Product is installed or replaced the user will be given the option to remove existing Product. A product must be created as a part when using Parts Centre otherwise a Part Number is not required. Selecting a part will link to the Product being created therefore it is recommended that the Part and Product Numbers and Descriptions are identical. This link will allow Products to be part of Stock Control in Parts Centre for the same reasons as Stock Controlled Parts. For users of Parts Centre, refer to Parts page 116. Also refer to Call Service Report Line, if a Serialised Product is installed or replaced the user will be given the option to remove existing Product.
Product Family helps to group Products and if used in conjunction with Employee Skill will enable the user to dispatch Calls according to Employee skill sets.
A Cover Code (refer to page 64) can be selected in the Product table, which enables the user to over-ride the default system coverage. This is used for logging a Call against a Product (not an installed product) at a Site without a Contract. The Cover Code selected in the Product will not over-ride the Cover Code attached to a Contract, which is attached to a Site or a Serialised Product Contract Coverage.
The Total and Contract Population fields are populated with the quantities of products installed and on Contract. It is recommended to run Product Population (refer to page 132) on a regular basis to maintain these figures.
The EOSL Date (‘End of Service Life’ date) can be selected in the Product for reporting purposes.
Repeat Call Freq This field is used by the Repeat Call Analysis option to determine the threshold for potential repeat Calls. Set here as the default to be used for products to be entered in the Serialised Product Table. Enter the number of days - 30, 60, 90 etc.
Enter the quantity of meters for this product (refer to Product Meter Details).
Work Response - Response is used by Workshop Jobs only.
PM Usage – Used to generate PM frequencies based on Metered Usage if required. Period Close automatically recalculates these figures.
MC Amount Maintenance Charge. Enter a maintenance charge for the Product - used to calculate Contract charges. This is also pulled into Serialised Product table and Quotes.
Meter Cost Inclusive and Exclusive These fields are used by Meter Billing Systems only and a quantity must be entered into Meter Quantity for these fields to be activated. These two fields have been added to record the Meter Unit Cost that will enable the user to create meter billing contract profitability reports. This is the anticipated cost per copy including and excluding consumables.
For Engineer Change Order (ECO) refer to page 104.

SERVICE CENTRE FIVE GETTING STARTED REFERENCE GUIDE (RG01GS01)
COMMERCIAL IN CONFIDENCE Page 128
Warranty
The user can specify warranty duration of the warranty provided on the Product. This user can define the warranty by either Customer and/or Supplier.
• Enter the Customer Warranty duration in Days, Weeks, Months or Years.
• Enter the Supplier Warranty duration in Days, Weeks, Months or Years.
Where they are used:
Refer to System Code Directory page 30.
Add a product Navigation:
After logging in to Service Centre five (refer to page 8) the main Welcome page is displayed. It displays the main module presentation page and the user interface menu in the left pane. (Also refer to System Navigation page 13 and System Standards page 14).
• From the user interface menu in the left pane click the customer assets link.
• Select the relevant link, product.
• Select the relevant link, product add.
Section of the Service Centre five Product Add page.
Mandatory & Optional Data Fields
System Codes new or existing require mandatory data (refer to page 16).
• Product number is a mandatory field allowing 24 alphanumeric (Where 24 is the field size and where alphanumeric is the format type, either letters or numbers) characters.

SERVICE CENTRE FIVE GETTING STARTED REFERENCE GUIDE (RG01GS01)
COMMERCIAL IN CONFIDENCE Page 129
• Product description is a mandatory field allowing 30 alphanumeric (Where 30 is
the field size and where alphanumeric is the format type, either letters or numbers) characters.
• Select a Part: For users of Parts Centre. Refer to Parts. Also refer to Call Service Report Line, if a Serialised Product is installed or replaced the user will be given the option to remove existing Product.
• Product Family helps to group Products and if used in conjunction with Employee Skill will enable the user to dispatch Calls according to Employee skill sets.
• Country Code pick-list selection enables products to be grouped by country. This will be useful for customers potentially running country based SQL views.
• Select a Cover Code: A Cover Code can be selected in the Product table, which enables the user to over-ride the default system coverage. This is used for logging a Call against a Product (not an installed product) at a Site without a Contract. The Cover Code selected in the Product will not over-ride the Cover Code attached to a Contract, which is attached to a Site or a Serialised Product Contract Coverage.
• The Manufacturer, Manufacturer Part Number and Product Type fields are free text fields.
• Product Group and Division are open fields for reporting purposes. • Enter the Product Cost if required. • The Total and Contract Population fields are populated with the quantities of
products installed and on Contract. It is recommended to run Product Population on a regular basis to maintain these figures.
• Repeat Call Freq: This field is used by the Repeat Call Analysis option to determine the threshold for potential repeat Calls. Set here as the default to be used for products to be entered in the Serialised Product Table. Enter the number of days - 30, 60, 90 etc.
• Meter Quantity: The quantity of meters for this product (refer to Setting up Product Meter Details).
• Work Response: Response is used by Workshop Jobs only. • PM Usage: Used to generate PM frequencies based on Metered Usage if required.
Period Close automatically recalculates these figures. • Min PM Cycle and Cycle Unit is for reporting purposes only. • Risk is for reporting purposes only. • MC Amount Maintenance Charge. Enter a maintenance charge for the Product -
used to calculate Contract charges. This is also pulled into Serialised Product table and Quotes.
• Meter Cost Inclusive and Exclusive: These fields are used by Meter Billing Systems only and a quantity must be entered into Meter Quantity for these fields to be activated. These two fields have been added to record the Meter Unit Cost that will enable the user to create meter billing contract profitability reports. This is the anticipated cost per copy including and excluding consumables.
• EOSL Date allows the user to pick an ‘End of Service Life’ date for reporting purposes.
• Memo: Free text field. • Warranty: The user can specify warranty duration of the warranty provided on the
Product. This user can define the warranty by either Customer and/or Supplier.
o Enter the Customer Warranty duration in Days, Weeks, Months or Years. o Enter the Supplier Warranty duration in Days, Weeks, Months or Years.
• Once the required data has been entered or selected click submit (submit will
save the entered data to the relevant table) to save the details. An information popup will appear stating: This Product record was successfully added to the database.
Date query and modification
For individual system data query, modification and field types refer to Getting Started page 27.

SERVICE CENTRE FIVE GETTING STARTED REFERENCE GUIDE (RG01GS01)
COMMERCIAL IN CONFIDENCE Page 130
Data Standards & Examples
Product Codes can be set-up in various ways including the following examples. Also, please refer to Data Standards, page 20.
Code Description CANON6500 CANON Model 6500 IKON1234 Ikon Model 1234 DIGFX-2 Digital PC 133 PEN133 Pentium 133 RAM32Mb RAM 32 MB RAM64Mb RAM 64 MB RAM120Mb RAM 120 MB HONDA-CBR900RR HONDA CBR 900 FireBlade

SERVICE CENTRE FIVE GETTING STARTED REFERENCE GUIDE (RG01GS01)
COMMERCIAL IN CONFIDENCE Page 131
Product Meter Details The Meter button within the Product page enables the user to define the configuration of any meters installed on the Product. The number of meters on a Product is populated in the Meter quantity field after the Meter set-up is complete. Validation is performed on saving those records allowing partial entry of meter details at any time. However once a record has been saved, the details of Maximum Digits and Decimeter Flags cannot be changed for that meter so as to prevent unwanted effects on any existing data.
After saving a new product or updating an existing product (refer to page 127) click the meters button in the navigation bar. If a meter already exists either update or create a new meter by clicking meter add. If no meters exist the user is taken to meter add page.
• Meter Number and Description: The meter number will be populated after submit. The description of the meter is mandatory.
• Max Digits: To enable the user to enter a maximum number of digits allowed (maximum is 9).
• Decimeter: To enable the user to choose whether a meter has a decimeter reading, for example a reading like, 9999.9.
• Average Use: Average usage is calculated on the basis of a 30 day month. Estimate readings can be automatically generated from existing averages. Refer to the Meter Billing Contracts Reference Guide.
• Expected Use: To enable the user to enter an expected usage for a meter (mandatory). This is the recommended monthly copy volume.
• Usage: To enable the user to specify whether a meter is counted in usage calculations.
• Usage Weight: To enable the user to put a ‘weighting’ on a meter usage. For example, meter number 1 could have a weight of 2 meaning the number of meter clicks is multiplied by 2. Weighting for Usage can only be entered for an item with an expected life (Set-up in Product Standard Options). It is recommended that the Usage and Billable weight is set to 1 in the product. This will be the default.
• Meter Mandatory: To enable the user to make a meter mandatory for readings. All meters can be set as mandatory by default in the Utilities Set-up Multiple Meters. To set all Meters as Mandatory refer to the Meter Billing Contracts Reference Guide.
• Billable: To enable the user to specify whether a meter is counted in billing calculations.
• Bill Weight: To enable the user to put a ‘weighting’ on a meter. When setting up the weighting consideration should be given to the copy prices of individual meters. For example, a product has 2 meters where meter 1 (Black & White) is 10 per copy and meter 2 (Colour) is 13p per copy. In the Contract enter the price band at 0.1. Refer to the Customer, Site & Serialised Product Reference Guide.
• Exclude from REA: In some cases, either by request or by contract terms, a customer is the only entity that can provide a meter reading so we need to have the ability to prevent engineers from entering readings during service call closing. For some meters the customer would like disable the meter readings page in PDA REA. A flag has been added at the meter detail level to either show or not show the meter within the PDA REA pages. New checkboxes have been added for Product Meter Details and Serialised Product Meter Details.
NOTE: The ‘Meter Mandatory’ has precedence over ‘Exclude from REA’. If a Meter is Mandatory then it will ALWAYS be displayed in PDA REA regardless of the value of ‘Exclude from REA’.

SERVICE CENTRE FIVE GETTING STARTED REFERENCE GUIDE (RG01GS01)
COMMERCIAL IN CONFIDENCE Page 132
Product Population Product Population compares the number of Serialised Products against Products and Contracts. It then in turn recalculates the numbers to equal Serialised Products with Products and the number on Contract.
Refer to the Total and Contract Population fields in Product, page 127.
Navigation:
After logging in to Service Centre five (refer to page 8) the main Welcome page is displayed. It displays the main module presentation page and the user interface menu in the left pane. (Also refer to System Navigation page 13 and System Standards page 14).
For Product Population click the user utilities link. Select the relevant link, product population.

SERVICE CENTRE FIVE GETTING STARTED REFERENCE GUIDE (RG01GS01)
COMMERCIAL IN CONFIDENCE Page 133
Product Family Product Family is used to group Products and if used in conjunction with Employee Skill will enable the user to filter calls for dispatch according to Employee skill sets.
Product Family codes contain fields to hold the standard charge codes for Work, Travel, Callout and Callout Included. These fields also exist in the Symptom Code, Call Type and Contract tables. When a Service Report (SR) is created and saved these charge codes are automatically created as Service Report Lines (SRL) where certain conditions are met. If none of the fields exist in any of the above tables then no SRLs are created. Refer to SR Charge Codes for more details.
Area Code: Product family codes are used to categorise products, therefore saved against the relevant products. If a call is logged against a product containing a product family that has an area code, then that area code will be used within the call, not the site area code. The product family area code will over-ride a site area code but not a contract area code, a serialised product area code or a supplier contract area code. Also refer to Area Codes page 33.
Rounding (also in Call Type, Cover Charge, Symptom Code and Contract): The rounding factor will round the SRL quantity to the value in the factor field. For Example if the work time is 1.17 hours and the rounding factor is 0.25 the charge code will be rounded up to 1.25. There is also the ability to put in a minimum quantity so if the work time is 0.5 (half an hour) and the minimum charge is for 1 hour then the minimum qty would be 1. The system would then create a SRL for one hour.
Callout Included: Any hours shown in the Callout inclusive field will be subtracted from the Travel time before any excess hours are billed against the Travel Charge code. For more information Callout Included refer to SR Charge Codes in the Standard Contract Reference Guide).
If Call out Inclusive is greater than the Travel time, the excess from above is subtracted from the Work time before any remaining excess is billed against the Work time Charge code.
Where they are used:
Refer to System Code Directory page 30.

SERVICE CENTRE FIVE GETTING STARTED REFERENCE GUIDE (RG01GS01)
COMMERCIAL IN CONFIDENCE Page 134
Add a product family Navigation:
After logging in to Service Centre five (refer to page 8) the main Welcome page is displayed. It displays the main module presentation page and the user interface menu in the left pane. (Also refer to System Navigation page 13 and System Standards page 14).
• From the user interface menu in the left pane click the customer assets link.
• Select the relevant link, product. Query a product.
• Select the relevant link, product family.
Section of the Service Centre five Product Family Add page.
Mandatory & Optional Data Fields
System Codes new or existing require mandatory data (refer to page 16).
• Product Family is a mandatory field allowing 12 alphanumeric (Where 12 is the field size and where alphanumeric is the format type, either letters or numbers) characters.
• Product Family description is a mandatory field allowing 30 alphanumeric (Where 30 is the field size and where alphanumeric is the format type, either letters or numbers) characters.
• Select an Area Code: Product family codes are used to categorise products, therefore saved against the relevant products. If a call is logged against a product containing a product family that has an area code, then that area code will be used within the call, not the site area code. The product family area code will over-ride a site area code but not a contract area code, a serialised product area code or a supplier contract area code. Also refer to Area Codes.
• Charge Codes: The Product Family page contains fields to hold the standard charge codes for Work, Travel and Callout. These fields also exist in Symptom Codes, Contract and Call Types. When a Service Report (SR) is created and saved these charge codes are automatically created as Service Report Lines (SRL) where certain conditions are met. If none of the fields exist in any of the above tables then no SRLs are created.
• Rounding in Call Type, Symptom Code and Contract: The rounding factor will round the SRL quantity to the value in the factor field. For Example if the work time is 1.17 hours and the rounding factor is 0.25 the charge code will be rounded up to 1.25. There is also the ability to put in a minimum quantity so if the work time is 0.5 (half an hour) and the minimum charge is for 1 hour then the minimum qty would be 1. The system would then create an SRL for one hour.

SERVICE CENTRE FIVE GETTING STARTED REFERENCE GUIDE (RG01GS01)
COMMERCIAL IN CONFIDENCE Page 135
• Callout Included: Any hours shown in the Callout inclusive field will be subtracted from the Travel time before any excess hours are billed against the Travel Charge code.
• If Call out Inclusive is greater than the Travel time, the excess from above is subtracted from the Work time before any remaining excess is billed against the Work time Charge code. For more information Callout Included refer to the Cover Codes & Charge Codes Reference Guide.
• Once the required data has been entered or selected click submit (submit will save the entered data to the relevant table) to save the details. An information popup will appear stating: This Product Family record was successfully added to the database.
Date query and modification
For individual system data query, modification and field types refer to Getting Started page 27.
Data Standards & Examples
Product Family can be set-up in various ways including the following examples. Also, please refer to Data Standards, page 20.
Code Description
PC Personal Computers PRT Printers MON Monitor SB Super bikes CU Custom Bikes

SERVICE CENTRE FIVE GETTING STARTED REFERENCE GUIDE (RG01GS01)
COMMERCIAL IN CONFIDENCE Page 136
Product Option The Standard Product Options in Products enables the user to set-up the standard options (parts) for this product. These options are carried through to the Serialised Product Options. This is to monitor the usage of consumable parts.
Meter Usage: When logging a new call against a Serialised Product that has meters the user will be informed that the Serialised Options expected meter usage life. Parts Usage is the metered usage on a part (a Serialised Product Option). Each option defined in a Serialised Product will show the Metered Life, which is set-up in the Product, Metered Usage Expected Life set-up as clicks (meter readings). In the Call warning page, click the Parts Usage button. Clicking Option allows the user to view Parts Usage (expected life) details in the Serialised Product Options. If the part expected life has expired that part needs to be replaced in the Service Report In the SRL select the new part to replace the old one. When saving the SRL the system will ask the user 'Do you wish to create Product Options?' Answering Yes will create a Serialised Product Option with a new life expectancy. It is recommended that the user should to go to the old Serialised Product Option and delete it. (This is only activated when using Meter Usage functionality and it is set-up in System Utilities).
Enter the Meter Usage Expected Life of this part is only activated when using Meter Usage functionality and it is set-up in Utilities. When logging a new call against a Serialised Product that has meters the user will be informed that the Serialised Options expected meter usage life. Parts Usage is the metered usage on a part (a Serialised Product Option). Each option defined in a Serialised Product will show the Metered Life, which is set-up in the Product, Metered Usage Expected Life set-up as clicks (meter readings). In the Call warning page, click the Parts Usage button. Clicking Option allows the user to view Parts Usage (expected life) details in the Serialised Product Options. If the part expected life has expired that part needs to be replaced in the Service Report In the SRL select the new part to replace the old one. When saving the SRL the system will ask if the user 'Do you wish to create Product Options?' Answering Yes will create a Serialised Product Option with a new life expectancy. It is recommended that the user should to go to the old Serialised Product Option and delete it.
Where they are used:
Refer to System Code Directory page 30.

SERVICE CENTRE FIVE GETTING STARTED REFERENCE GUIDE (RG01GS01)
COMMERCIAL IN CONFIDENCE Page 137
Add a product option Navigation:
After logging in to Service Centre five (refer to page 8) the main Welcome page is displayed. It displays the main module presentation page and the user interface menu in the left pane. (Also refer to System Navigation page 13 and System Standards page 14).
• From the user interface menu in the left pane click the customer assets link.
• Select the relevant link, product. Query or add a product.
• Select the relevant link, product option.
Section of the Service Centre five Product Option Add page.
Mandatory & Optional Data Fields
System Codes new or existing require mandatory data (refer to page 16).
• Product number is a mandatory field allowing 24 alphanumeric (Where 24 is the field size and where alphanumeric is the format type, either letters or numbers) characters.
• Part number must be selected. This is the option for this product. o Repairable and disposable part can be selected as options but not parts
that are linked to products (refer to parts, page 116). o Charge Code parts are used for PM Options. PM Options can be created to
generate (for example), an interim (monthly PM visit), with a 6 monthly PM visit. The 6 monthly PM visit being more important than the interim monthly visits, a Threshold can be set. This will generate a 6 monthly PM visit and not the monthly PM visit.
• If a Charge Code part is selected enter the PM cycle and unit of this cycle. For example, if this is a monthly PM Option enter cycle 1 and unit ‘months’.
• Select a Call Type. This is optional as the Call Type is mandatory within the Serialised Option for this Product. (Refer to Customer, Site & Serialised Product Reference Guide).
• Enter a quantity. • Enter the Metered Life can be viewed if an Expected Meter Life is set-up in the
Standard Product Options.

SERVICE CENTRE FIVE GETTING STARTED REFERENCE GUIDE (RG01GS01)
COMMERCIAL IN CONFIDENCE Page 138
PM Options If 2 or more PM Options are set-up, say one for each month (P1) and the other every 6 months (P6) then the priority and threshold need to be considered. If the dates clash when running PM Option Call Generation (1 monthly will eventually clash with 6 monthly) the option with the highest priority will be generated. The threshold parameter is to signify in days a bandwidth where service conflicts could occur.
• Once the required data has been entered or selected click submit (submit will save the entered data to the relevant table) to save the details. An information popup will appear stating: This Product Option record was successfully added to the database.
Run PM Generation by Option (refer to the PM Call Generation & Set-up Reference Guide).
Date query and modification
For individual system data query, modification and field types refer to Getting Started page 27.
Data Standards & Examples
Product Options can be set-up in various ways including the following examples. Also, please refer to Data Standards, page 20.
Part Code Description Type SN785960 PCB Repairable D8457-120 Drum 120 Disposable CARB Carburettor (Part) Disposable SN785961 Filter Disposable P1 Monthly PM Charge Code P6 6 Monthly Pm Charge Code

SERVICE CENTRE FIVE GETTING STARTED REFERENCE GUIDE (RG01GS01)
COMMERCIAL IN CONFIDENCE Page 139
Product Term The Product Term provides a matrix of fixed prices relating Products with Quote Terms. This will permit the same Product to have a range of maintenance charges based on the Coverage, Serialised Status, PM Cycle plus two other miscellaneous factors. Also refer to Quote Terms page 147 and Quote Centre Reference Guide.
Where, from the above, a specific maintenance charge exists for a Product/Term, the fixed charge will be populated in to the Quote Line overriding the Product MC and Terms factor (%) calculation.
When creating new Quote Lines if the Product selected has a Maintenance Charge (MC), then this MC will populate the Adjusted MC on the Quote Line. In turn the Quote Term selected will adjust the MC by the factor (if one exists in the Terms).
If a Product Term has been created against the selected Product and selected Quote Term then the Product Term MC will be populated in the Quote Line and the Term factor (%) will be ignored. The same applies for Coverage, Serialised Status and PM Cycles. Many Terms can be created against the same Product.
Where they are used:
Refer to System Code Directory page 30.
Add a product term Navigation:
After logging in to Service Centre five (refer to page 8) the main Welcome page is displayed. It displays the main module presentation page and the user interface menu in the left pane. (Also refer to System Navigation page 13 and System Standards page 14).
• From the user interface menu in the left pane click the quote centre, customer assets, product link.
• Select the relevant link, product term.
• Select the relevant link, product term add.
Section of the Service Centre five Product Term Add page.
Mandatory & Optional Data Fields
System Codes new or existing require mandatory data (refer to page 16).
• Product Term is a mandatory field allowing 24 alphanumeric (Where 24 is the field size and where alphanumeric is the format type, either letters or numbers) characters.
• Term The user can only select from the list of available Quote Terms. • Enter a Maintenance Charge and select the MC Charge period of Weeks, Days,
Months or Years. Default is Months.

SERVICE CENTRE FIVE GETTING STARTED REFERENCE GUIDE (RG01GS01)
COMMERCIAL IN CONFIDENCE Page 140
• Once the required data has been entered or selected click submit (submit will save
the entered data to the relevant table) to save the details. An information popup will appear stating: This Product Term record was successfully added to the database.
Date query and modification
For individual system data query, modification and field types refer to Getting Started page 27.
Data Standards & Examples
Product Term can be set-up in various ways including the following examples. Also, please refer to Data Standards, page 20.
Product Description MC MC Cycle Unit
Term Total %
HONDA-CBR900 HONDA CBR900 Fireblade 50 Months Standard Terms 10 HONDA-CBR1100XX HONDA CBR1100 FireBird 88 Months Product Terms 25 HONDA-CBR1100XX HONDA CBR 1100 FireBird 77 Months Standard terms 5 HONDA-AFR-XRV750
HONDA Africa Twin XRV750
100 Months Standard terms 5

SERVICE CENTRE FIVE GETTING STARTED REFERENCE GUIDE (RG01GS01)
COMMERCIAL IN CONFIDENCE Page 141
Prospect Source Prospect Source Codes are used to determine how the prospective customer heard about us or how this prospective customer was found. Use the pick-list button to select a source code for this Prospect.
Where they are used:
Refer to System Code Directory page 30.
Add a prospect source Navigation:
After logging in to Service Centre five (refer to page 8) the main Welcome page is displayed. It displays the main module presentation page and the user interface menu in the left pane. (Also refer to System Navigation page 13 and System Standards page 14).
• From the user interface menu in the left pane click the prospect centre link.
• Select the relevant link, prospect source.
• Select the relevant link, prospect source add.
Section of the Service Centre five Prospect Source Add page.
Mandatory & Optional Data Fields
System Codes new or existing require mandatory data (refer to page 16).
• Source Code is a mandatory field allowing 10 alphanumeric (Where 10 is the field size and where alphanumeric is the format type, either letters or numbers) characters.
• Source description is a mandatory field allowing 30 alphanumeric (Where 30 is the field size and where alphanumeric is the format type, either letters or numbers) characters.
• Once the required data has been entered or selected click submit (submit will save the entered data to the relevant table) to save the details. An information popup will appear stating: This Prospect Source Code record was successfully added to the database.
Date query and modification
For individual system data query, modification and field types refer to Getting Started page 27.

SERVICE CENTRE FIVE GETTING STARTED REFERENCE GUIDE (RG01GS01)
COMMERCIAL IN CONFIDENCE Page 142
Data Standards & Examples
Prospect Source can be set-up in various ways including the following examples. Also, please refer to Data Standards, page 20.
Code Description
WOM Word of Mouth WBS Website MED Media

SERVICE CENTRE FIVE GETTING STARTED REFERENCE GUIDE (RG01GS01)
COMMERCIAL IN CONFIDENCE Page 143
Period End Date Period End Dates are a set of predefined dates used in Period Close, (refer to Service Centre five Administrators Guide) and are set-up in System Utilities.
Where they are used:
Refer to System Code Directory page 30.
Add a period end date Navigation:
After logging in to Service Centre five (refer to page 8) the main Welcome page is displayed. It displays the main module presentation page and the user interface menu in the left pane. (Also refer to System Navigation page 13 and System Standards page 14).
• From the user interface menu in the left pane click the system utilities link.
• Select the relevant link, period end date.
• Select the relevant link, period end date add.
Section of the Service Centre five Period End Dates Add page.
Mandatory & Optional Data Fields
System Codes new or existing require mandatory data (refer to page 16).
• ID is a mandatory field allowing 10 alphanumeric (Where 10 is the field size and where alphanumeric is the format type, either letters or numbers) characters.
• Description is a mandatory field allowing 30 alphanumeric (Where 30 is the field size and where alphanumeric is the format type, either letters or numbers) characters. For example 2009-2010 Period End.
• Enter the number of dates for this Holiday Dates, for example 8 for 8 Bank Holidays.

SERVICE CENTRE FIVE GETTING STARTED REFERENCE GUIDE (RG01GS01)
COMMERCIAL IN CONFIDENCE Page 144
• Click Grid Update. • Select or enter each date in each of the mandatory date fields. • Once the required data has been entered or selected click submit (Submit will
query on the entered data).
Date query and modification
For individual system data query, modification and field types refer to Getting Started page 27.
Data Standards & Examples
Period End Date can be set-up in various ways including the following examples. Also, please refer to Data Standards, page 20.
Date Type ID Description No. of dates
20092010 2009 - 2010 4

SERVICE CENTRE FIVE GETTING STARTED REFERENCE GUIDE (RG01GS01)
COMMERCIAL IN CONFIDENCE Page 145
Quote Status Quote Status is used in Quote Centre for every stage of the Quote process. Whether creating or updating a Quote, the user will be required to select a Quote Status to reflect the stage that the quotation has reached. There are four Quote Status categories and within these categories the user can create many different sub categories. It is recommended that Quote Status codes reflect the status type.
When processing the Quote the user must go through each status type in turn. For example, a Quote cannot be Accepted or Rejected until it has been in a Fixed status.
Quote Status is also used in Prospect Centre for Prospect Status. Whether creating or updating a Prospect, the user will be required to select a Status to reflect the stage that the prospect has reached. There are four Status categories and within these categories the user can create many different sub categories. It is recommended that Status codes reflect the status type.
The Quote Status can be defined for Quote Centre or Prospect Centre by selecting a Category or Quote or prospect. This means that when in Quote Centre only Quote Status for Quotes can be selected and in Prospect Centre only Quote Status for Prospects can be selected.
Where they are used:
Refer to System Code Directory page 30.
Add a quote status Navigation:
After logging in to Service Centre five (refer to page 8) the main Welcome page is displayed. It displays the main module presentation page and the user interface menu in the left pane. (Also refer to System Navigation page 13 and System Standards page 14).
• From the user interface menu in the left pane click the quote centre link. • Select the relevant link, quote status. • Select the relevant link, quote status add.
Section of the Service Centre five Quote Status Add page.
Mandatory & Optional Data Fields
System Codes new or existing require mandatory data (refer to page 16).
• Quote Status Code is a mandatory field allowing 6 alphanumeric (Where 6 is the field size and where alphanumeric is the format type, either letters or numbers) characters.
• Quote Status description is a mandatory field allowing 30 alphanumeric (Where 30 is the field size and where alphanumeric is the format type, either letters or numbers) characters.

SERVICE CENTRE FIVE GETTING STARTED REFERENCE GUIDE (RG01GS01)
COMMERCIAL IN CONFIDENCE Page 146
• Select a Category: The Quote Status can be defined for Quote Centre or Prospect
Centre by selecting a Category or Quote or Prospect. This means that when in Quote Centre only Quote Status for Quotes can be selected and in Prospect Centre only Quote Status for Prospects can be selected.
• Select a Status Type: Open Used when a Quote is in the creation stage and the Terms, Product details and costs are being added to the Quote. Quote with an Open status type can be modified at any time, Fixed Used when the Quote has been sent to the Customer. The majority of the Quote information becomes fixed and cannot be amended. Only information relating to the Customer details (address etc) and Actions can be amended or added to the Quote, Accepted Used when the Customer has accepted the Quote and the user requires the Customer, Contract and Product details entered into the Quote to be converted to a Contract on the database. The Quote has to have been in Fixed status before an Accepted status can be used or Rejected Used to close the Quote when the Customer has declined the Terms set in the Quote. The Quote has to have been in Fixed status before it can be rejected.
• Once the required data has been entered or selected click submit (submit will save the entered data to the relevant table) to save the details. An information popup will appear stating: This Quote Status record was successfully added to the database.
Date query and modification
For individual system data query, modification and field types refer to Getting Started page 27.
Data Standards & Examples
Quote Status can be set-up in various ways including the following examples. Also, please refer to Data Standards, page 20.
Code Type Category Description Comments OP1 OPEN Quote New Quote Used when a Quote is in the creation stage and the
Terms, Product details and costs are being added to the Quote. Quote with an Open status type can be modified at any time
F1 FIXED Quote Quote Sent to Customer
Used when the Quote has been sent to the Customer. The majority of the Quote information becomes fixed and cannot be amended. Only information relating to the Customer details (address etc) and Actions can be amended or added to the Quote
A1 ACCEPTED Quote Quote Accepted Used when the Customer has accepted the Quote and the user requires the Customer, Contract and Product details entered into the Quote to be converted to a Contract on the database. The Quote has to have been in Fixed status before an Accepted status can be used
R1 REJECTED Quote Quote Rejected Used to close the Quote when the Customer has declined the Terms set in the Quote. The Quote has to have been in Fixed status before it can be rejected
P1 OPEN Prospect New Prospect Used when a Prospect is in the creation stage.
P2 ACCEPTED Prospect Prospect Accepted
Used when a Prospect is accepted.
P2 REJECTED Prospect Prospect Rejected
Used when a Prospect is Rejected.

SERVICE CENTRE FIVE GETTING STARTED REFERENCE GUIDE (RG01GS01)
COMMERCIAL IN CONFIDENCE Page 147
Quote Term Quote Terms in Quote Centre are mandatory when creating the lines for the Quotation. They are used to set various parameters that affect the Contract price of the Serialised Product. Against each Parameter a % uplift or discount can be applied which will be applied to the Standard product maintenance Charge in calculating the Quote value.
Serialised Status: Terms are used purely in Quote Centre for calculating proposed Contract Charges. Serialised Status is included to permit a Terms identification to be kept with the Serialised Product once attached to the Contract. Serialised Status is a mandatory field when defining the Quote Terms.
Cover Code: In the Quote Terms a Cover Code must be selected to define the Contract Coverage for this Quote.
Other Details: The user can, as a percentage, either enter an uplift or discount against the 5 different options. The first 3 options are based on the Serialised Status, the type of Cover required and the PM Cycle (Preventative Maintenance) to be applied to the Products defined in the Lines. Two miscellaneous fields are available for the users to define additional uplifts or discounts based on their own business requirements.
Total Adjustment: reflects the total of the uplifts or discounts that will be applied to the Maintenance Charge for the Products defined in the Quotation Lines.
PM Cycle in this instance the mandatory flag indicates this field should not be left blank. The 0 default can be saved if Preventative Maintenance does not form part of the terms.
Where they are used:
Refer to System Code Directory page 30.
Add a quote term Navigation:
After logging in to Service Centre five (refer to page 8) the main Welcome page is displayed. It displays the main module presentation page and the user interface menu in the left pane. (Also refer to System Navigation page 13 and System Standards page 14).
• From the user interface menu in the left pane click the quote centre link.
• Select the relevant link, quote term.
• Select the relevant link, quote term add.
Section of the Service Centre five Quote Term Add page.

SERVICE CENTRE FIVE GETTING STARTED REFERENCE GUIDE (RG01GS01)
COMMERCIAL IN CONFIDENCE Page 148
Mandatory & Optional Data Fields
System Codes new or existing require mandatory data (refer to page 16).
• Quote Term is a mandatory field allowing 8 alphanumeric (Where 8 is the field size and where alphanumeric is the format type, either letters or numbers) characters.
• Quote Term description is a mandatory field allowing 30 alphanumeric (Where 30 is the field size and where alphanumeric is the format type, either letters or numbers) characters.
• Serialised Status Terms are used purely in Quote Centre for calculating proposed Contract Charges. Serialised Status is included to permit a Terms identification to be kept with the Serialised Product once attached to the Contract. Serialised Status is a mandatory field when defining the Quote Terms.
• Cover Code: In the Quote Terms a Cover Code must be selected to define the Contract Coverage for this Quote.
• Other Details: The user can, as a percentage, either enter an uplift or discount against the 5 different options. The first 3 options are based on the Serialised Status, the type of Cover required and the PM Cycle (Preventative Maintenance) to be applied to the Products defined in the Lines. Two miscellaneous fields are available for the users to define additional uplifts or discounts based on their own business requirements.
• Total Adjustment reflects the total of the uplifts or discounts that will be applied to the Maintenance Charge for the Products defined in the Quote Lines.
• PM Cycle in this instance the mandatory flag indicates this field should not be left blank. The 0 default can be saved if Preventative Maintenance does not form part of the terms.
• Miscellaneous 1 & 2 are optional open descriptive fields for additional discount/uplift functionality.
• Once the required data has been entered or selected click submit (submit will save the entered data to the relevant table) to save the details. An information popup will appear stating: This Quote Term record was successfully added to the database.
Date query and modification
For individual system data query, modification and field types refer to Getting Started page 27.
Data Standards & Examples
Quote Term can be set-up in various ways including the following examples. Also, please refer to Data Standards, page 20.
Code Description
STD Standard Terms GLD Gold Terms

SERVICE CENTRE FIVE GETTING STARTED REFERENCE GUIDE (RG01GS01)
COMMERCIAL IN CONFIDENCE Page 149
Quote Action Quote Actions in Quote Centre are used to define the actions to be taken by the salesperson to 'manage' tasks associated with the Quote through to acceptance. The Quote Action code is used when defining Quote Action Notes against a Quote. An action date can be selected and additional text can be entered and saved. Where they are used:
Refer to System Code Directory page 30.
Add a quote action Navigation:
After logging in to Service Centre five (refer to page 8) the main Welcome page is displayed. It displays the main module presentation page and the user interface menu in the left pane. (Also refer to System Navigation page 13 and System Standards page 14).
• From the user interface menu in the left pane click the quote centre link.
• Select the relevant link, quote action.
• Select the relevant link, quote action add.
Section of the Service Centre five Quote Action Add page.
Mandatory & Optional Data Fields
System Codes new or existing require mandatory data (refer to page 16).
• Quote Action Code is a mandatory field allowing 12 alphanumeric (Where 12 is the field size and where alphanumeric is the format type, either letters or numbers) characters.
• Quote Action description is a mandatory field allowing 30 alphanumeric (Where 30 is the field size and where alphanumeric is the format type, either letters or numbers) characters. The description is used to define the actions to be taken by the salesperson to 'manage' tasks associated with the Quote through to acceptance. The Quote Action code is used when defining Quote Action Notes against a Quote.
• Once the required data has been entered or selected click submit (submit will save the entered data to the relevant table) to save the details. An information popup will appear stating: This Quote Action record was successfully added to the database.
Date query and modification
For individual system data query, modification and field types refer to Getting Started page 27.

SERVICE CENTRE FIVE GETTING STARTED REFERENCE GUIDE (RG01GS01)
COMMERCIAL IN CONFIDENCE Page 150
Data Standards & Examples
Quote Action can be set-up in various ways including the following examples. Also, please refer to Data Standards, page 20.
Code Description
RECEIPT Customer received Quote CONTACT Discuss terms with Customer PROGRESS Chase customer for decision

SERVICE CENTRE FIVE GETTING STARTED REFERENCE GUIDE (RG01GS01)
COMMERCIAL IN CONFIDENCE Page 151
Repair Code Repair Codes are used in conjunction with Fault Codes to categorise Service Report activities. Typically these will define the type of action taken by the Employee/Engineer. The Repair Code is a numeric only field. Where they are used:
Refer to System Code Directory page 30.
Add a repair code Navigation:
After logging in to Service Centre five (refer to page 8) the main Welcome page is displayed. It displays the main module presentation page and the user interface menu in the left pane. (Also refer to System Navigation page 13 and System Standards page 14).
• From the user interface menu in the left pane click the system codes link.
• Select the relevant link, repair.
• Select the relevant link, repair add.
Section of the Service Centre five Repair Code Add page.
Mandatory & Optional Data Fields
System Codes new or existing require mandatory data (refer to page 16).
• Repair Code is a mandatory field allowing 2 numeric (Where 2 is the field size and where numeric is the format type, only numbers) characters.
• Repair Code description is a mandatory field allowing 30 alphanumeric (Where 30 is the field size and where alphanumeric is the format type, either letters or numbers) characters.
• Once the required data has been entered or selected click submit (submit will save the entered data to the relevant table) to save the details. An information popup will appear stating: This Repair Code record was successfully added to the database.
Date query and modification
For individual system data query, modification and field types refer to Getting Started page 27.

SERVICE CENTRE FIVE GETTING STARTED REFERENCE GUIDE (RG01GS01)
COMMERCIAL IN CONFIDENCE Page 152
Data Standards & Examples
Repair Code can be set-up in various ways including the following examples. Also, please refer to Data Standards, page 20.
Code Description Code Description
11 Replaced Part 50 Moved to Workshop 12 Replaced Product 51 Workshop Book In and Repair 13 Parts/Products returned 52 Workshop Fixed and Serviced 20 Temp fix - Cleaned component 53 Workshop Tested and Approved 30 No action taken 99 Preventative Maintenance

SERVICE CENTRE FIVE GETTING STARTED REFERENCE GUIDE (RG01GS01)
COMMERCIAL IN CONFIDENCE Page 153
Receipt Type Receipt Type is used in Accounts Received in Invoicing.
Receipt Type holds the receipt type received from the customer, for example, cheque, cash, etc. This is a mandatory field on the Receipt Add form when entering a new receipt.
Where they are used:
Refer to System Code Directory page 30.
Add a receipt type Navigation:
After logging in to Service Centre five (refer to page 8) the main Welcome page is displayed. It displays the main module presentation page and the user interface menu in the left pane. (Also refer to System Navigation page 13 and System Standards page 14).
• From the user interface menu in the left pane click the system codes link.
• Select the relevant link, receipt type.
• Select the relevant link, receipt type add.
Section of the Service Centre five Receipt Type Add page.
Mandatory & Optional Data Fields
System Codes new or existing require mandatory data (refer to page 16).
• Receipt Type is a mandatory field allowing 12 alphanumeric (Where 12 is the field size and where alphanumeric is the format type, only numbers) characters.
• Receipt Type description is a mandatory field allowing 30 alphanumeric (Where 30 is the field size and where alphanumeric is the format type, either letters or numbers) characters.
• Tick the ‘Cheque Number Mandatory’ if the Cheque number field in Accounts Received (refer to the Invoicing Reference Guide) is required as mandatory.
• Once the required data has been entered or selected click submit (submit will save the entered data to the relevant table) to save the details. An information popup will appear stating: This receipt Code record was successfully added to the database.
Date query and modification
For individual system data query, modification and field types refer to Getting Started page 27.

SERVICE CENTRE FIVE GETTING STARTED REFERENCE GUIDE (RG01GS01)
COMMERCIAL IN CONFIDENCE Page 154
Data Standards & Examples
Receipt Type can be set-up in various ways including the following examples. Also, please refer to Data Standards, page 20.
Type Description Cheque (Card) Number Mandatory
CASH Cash Receipt N CHEQUE Cheque Receipt Y CREDIT CARD Credit Card Receipt Y DEBIT CARD Debit Card Receipt Y DD Direct Debit Receipt N

SERVICE CENTRE FIVE GETTING STARTED REFERENCE GUIDE (RG01GS01)
COMMERCIAL IN CONFIDENCE Page 155
Resolution Code Resolution Codes should reflect the final fix or maybe a 3rd party issue. This is useful for reporting.
Where they are used:
Refer to System Code Directory page 30.
Add a resolution code Navigation:
After logging in to Service Centre five (refer to page 8) the main Welcome page is displayed. It displays the main module presentation page and the user interface menu in the left pane. (Also refer to System Navigation page 13 and System Standards page 14).
• From the user interface menu in the left pane click the system codes link.
• Select the relevant link, resolution.
• Select the relevant link, resolution add.
Section of the Service Centre five Resolution Add page.
Mandatory & Optional Data Fields
System Codes new or existing require mandatory data (refer to page 16).
• Resolution Code is a mandatory field allowing 4 alphanumeric (Where 4 is the field size and where alphanumeric is the format type, either letters or numbers) characters.
• Resolution Code description is a mandatory field allowing 30 alphanumeric (Where 30 is the field size and where alphanumeric is the format type, either letters or numbers) characters.
• Once the required data has been entered or selected click submit (submit will save the entered data to the relevant table) to save the details. An information popup will appear stating: This Resolution Code record was successfully added to the database.
Date query and modification
For individual system data query, modification and field types refer to Getting Started page 27.
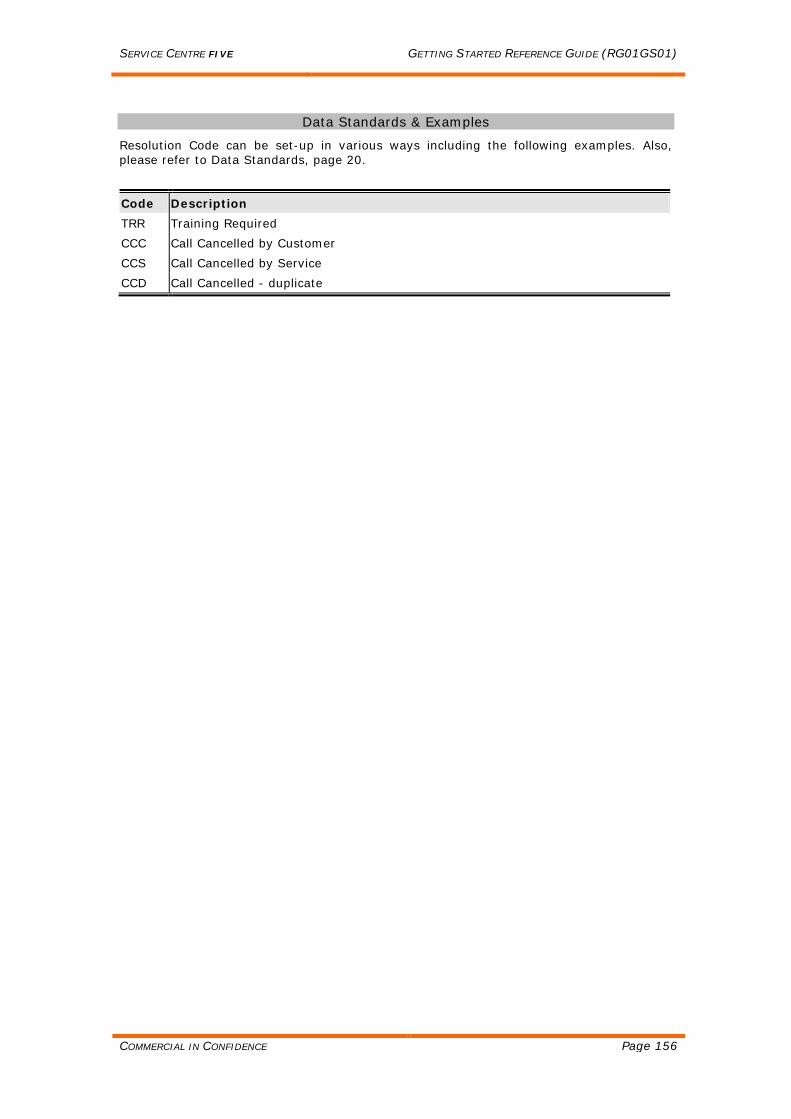
SERVICE CENTRE FIVE GETTING STARTED REFERENCE GUIDE (RG01GS01)
COMMERCIAL IN CONFIDENCE Page 156
Data Standards & Examples
Resolution Code can be set-up in various ways including the following examples. Also, please refer to Data Standards, page 20.
Code Description
TRR Training Required CCC Call Cancelled by Customer CCS Call Cancelled by Service CCD Call Cancelled - duplicate

SERVICE CENTRE FIVE GETTING STARTED REFERENCE GUIDE (RG01GS01)
COMMERCIAL IN CONFIDENCE Page 157
Serialised Status Serialised Status can be used to tag a Serialised Product with a status of, for example, Specific Terms, on loan, rented or owned etc. If selecting Yes to Billable Flag for Parts (For Billable Flow Charts refer to page 52) a discount can be entered.
Active Function: The product population value for the customer contract (refer to the Customer, Site & Serialised product Reference Guide) in the contract page will display the count of active serialised products that are attached to that contract.
To activate this function an activate check box in the serialised product status needs to be checked on. This will allow the user to activate/deactivate a serialised product and increase/reduce the product population of the customer contract accordingly. The serialised status start and end dates have no bearing on the product population calculation.
Billable Flags
Please refer to Billable Call Sequence, page 54.
Where they are used:
Refer to System Code Directory page 30.
Add a serialised status Navigation:
After logging in to Service Centre five (refer to page 8) the main Welcome page is displayed. It displays the main module presentation page and the user interface menu in the left pane. (Also refer to System Navigation page 13 and System Standards page 14).
• From the user interface menu in the left pane click the customer assets, serialised product link.
• Select the relevant link, serialised status.
• Select the relevant link, serialised status add.
Section of the Service Centre five Serialised Status Add page.
Mandatory & Optional Data Fields
System Codes new or existing require mandatory data (refer to page 16).
• Serialised Status is a mandatory field allowing 3 alphanumeric (Where 3 is the field size and where alphanumeric is the format type, either letters or numbers) characters.

SERVICE CENTRE FIVE GETTING STARTED REFERENCE GUIDE (RG01GS01)
COMMERCIAL IN CONFIDENCE Page 158
• Serialised Status description is a mandatory field allowing 30 alphanumeric
(Where 30 is the field size and where alphanumeric is the format type, either letters or numbers) characters.
• Billable Yes or No (Click the link (Bold text will take you to that topic) to see Billable Flow Chart and description).
• If setting Parts or Time flags as billable the user can also enter a discount, for example 15 for 15%. This will discount any part used in the Call Service Report Line (FSRL) for the Serialised Product (on the Call) using this Serialised Status. Also refer to Part Discounts page 118.
• Active: The product population value for the customer contract will display the count of active serialised products that are attached to that contract. This also applies to supplier contracts. To activate this function an activate check box in the serialised product status needs to be checked on. This will allow the user to activate/deactivate a serialised product and increase/reduce the product population of the customer contract accordingly. The serialised status start and end dates have no bearing on the product population calculation. To activate this flag in serialised status update Private Key 1123, value = Y.
• Once the required data has been entered or selected click submit (submit will save the entered data to the relevant table) to save the details. An information popup will appear stating: This Serialised Status record was successfully added to the database.
Date query and modification
For individual system data query, modification and field types refer to Getting Started page 27.
Data Standards & Examples
Serialised Status can be set-up in various ways including the following examples. Also, please refer to Data Standards, page 20.
Code Description Module used
LOA Loan Equipment Customer Assets LEA Leased Equipment Customer Assets GLD Gold Terms Apply Quote Centre STD Standard Terms Apply Quote Centre P1 Purchased Direct Customer Assets P2 Purchased from a Supplier Customer Assets

SERVICE CENTRE FIVE GETTING STARTED REFERENCE GUIDE (RG01GS01)
COMMERCIAL IN CONFIDENCE Page 159
Site Contact Type In addition to the main contact person on the Site Details, the Site Contacts are used in Call Handling to identify other people logging the call. The Site Contact Type is used in the Site Contact to identify the type of contact, for example Manager, Supervisor etc.
Where they are used:
Refer to System Code Directory page 30.
Add a site contact type Navigation:
After logging in to Service Centre five (refer to page 8) the main Welcome page is displayed. It displays the main module presentation page and the user interface menu in the left pane. (Also refer to System Navigation page 13 and System Standards page 14).
• From the user interface menu in the left pane click the customer assets, site link.
• Select the relevant link, site contact type. • Select the relevant link, site contact type add.
Section of the Service Centre five Site Contact Type Add page.
Mandatory & Optional Data Fields
System Codes new or existing require mandatory data (refer to page 16).
• Site Contact Type is a mandatory field allowing 10 alphanumeric (Where 10 is the field size and where alphanumeric is the format type, either letters or numbers) characters.
• Site Contact Type description is a mandatory field allowing 30 alphanumeric (Where 30 is the field size and where alphanumeric is the format type, either letters or numbers) characters.
• Once the required data has been entered or selected click submit (submit will save the entered data to the relevant table). An information popup will appear stating: This Site Contact Type record was successfully added to the database.
Date query and modification
For individual system data query, modification and field types refer to Getting Started page 27.

SERVICE CENTRE FIVE GETTING STARTED REFERENCE GUIDE (RG01GS01)
COMMERCIAL IN CONFIDENCE Page 160
Data Standards & Examples
Site Contact Type can be set-up in various ways including the following examples. Also, please refer to Data Standards, page 20.
Type Description
SALES Sales Personnel ENQUIRES Enquiry Personnel TECHNICAL Technical Personnel ENGINEER Engineering Personnel MANAGER Manager SUPERVISOR Supervisor

SERVICE CENTRE FIVE GETTING STARTED REFERENCE GUIDE (RG01GS01)
COMMERCIAL IN CONFIDENCE Page 161
Shift Pattern Type The shift pattern type categorises the type of shift pattern. It is used in the actual Shift Pattern set-up. For example, shift pattern type 1 could be the Standard Engineer Shift Pattern.
Where they are used:
Refer to System Code Directory page 30.
Add a shift pattern type Navigation:
After logging in to Service Centre five (refer to page 8) the main Welcome page is displayed. It displays the main module presentation page and the user interface menu in the left pane. (Also refer to System Navigation page 13 and System Standards page 14).
• From the user interface menu in the left pane click the user utilities link. • Select the relevant link, employee shift pattern. • Select the relevant link, shift pattern type. • Select the relevant link, shift pattern type add.
Section of the Service Centre five Shift Pattern Type page.
Mandatory & Optional Data Fields
System Codes new or existing require mandatory data (refer to page 16).
• Shift Pattern Type is a mandatory field allowing 10 alphanumeric (Where 10 is the field size and where alphanumeric is the format type, either letters or numbers) characters.
• Shift Pattern Type description is a mandatory field allowing 30 alphanumeric (Where 30 is the field size and where alphanumeric is the format type, either letters or numbers) characters.
• Once the required data has been entered or selected click submit (submit will save the entered data to the relevant table). An information popup will appear stating: This Shift Pattern Type record was successfully added to the database.
Date query and modification
For individual system data query, modification and field types refer to Getting Started page 27.

SERVICE CENTRE FIVE GETTING STARTED REFERENCE GUIDE (RG01GS01)
COMMERCIAL IN CONFIDENCE Page 162
Data Standards & Examples
Shift Pattern Type can be set-up in various ways including the following examples. Also, please refer to Data Standards, page 20.
Type Description
STD Standard Mon-Fri 09:00 - 17:30 12 Hour Shift

SERVICE CENTRE FIVE GETTING STARTED REFERENCE GUIDE (RG01GS01)
COMMERCIAL IN CONFIDENCE Page 163
Shift Pattern Day The shift pattern day categorises the type of day for the Shift Pattern. It is used in the actual shift pattern set-up, for example, D represents a Day shift, N represents a night shift, O represents a day off and B could represent a Bank Holiday and so on. A Shift Pattern Day, for example B will be used in conjunction with Holiday Dates (for Holiday Dates refer to the Getting Started Reference Guide) when setting up a Shift Pattern.
Each day will have a start time and duration.
The Shift Pattern Day can only be created if a Shift Pattern exists.
Where they are used:
Refer to System Code Directory page 30.
Add a shift pattern day Navigation:
After logging in to Service Centre five (refer to page 8) the main Welcome page is displayed. It displays the main module presentation page and the user interface menu in the left pane. (Also refer to System Navigation page 13 and System Standards page 14).
• From the user interface menu in the left pane click the user utilities link. • Select the relevant link, employee shift pattern. • Select the relevant link, shift pattern day (Alternatively, during the creation of a
Shift Pattern click the Add New Shift Pattern Day button).
Section of the Service Centre five Shift Pattern Day page.
Mandatory & Optional Data Fields
System Codes new or existing require mandatory data (refer to page 16).
• Select an existing Shift Pattern (refer to the Call Control, Tasks, Diary & Dispatch Reference Guide).
• Day Code, for example, enter D for day, N for night. • Start Time: Enter the start time for the shift. • Duration: Enter the Duration in hours of this shift. • Description: Enter the Shift Pattern Day description. This is a mandatory field
allowing 30 alphanumeric (Where 30 is the field size and where alphanumeric is the format type, either letters or numbers) characters.
• Click Not Working if this shift is a day off (O represents a day off). • Once the required data has been entered or selected click submit (submit will
save the entered data to the relevant table). An information popup will appear stating: This Shift Pattern Day record was successfully added to the database.

SERVICE CENTRE FIVE GETTING STARTED REFERENCE GUIDE (RG01GS01)
COMMERCIAL IN CONFIDENCE Page 164
Date query and modification
For individual system data query, modification and field types refer to Getting Started page 27.
Data Standards & Examples
Shift Pattern Day can be set-up in various ways including the following examples. Also, please refer to Data Standards, page 20.
Type Description
D Day Shift O Day Off

SERVICE CENTRE FIVE GETTING STARTED REFERENCE GUIDE (RG01GS01)
COMMERCIAL IN CONFIDENCE Page 165
Standard Industry Class (SIC) Standard Industry Class allows the user to create a classification for the industry associated with this customer. This table is used for reporting purposes only.
Where they are used:
Refer to System Code Directory page 30.
Add a standard industry class Navigation:
After logging in to Service Centre five (refer to page 8) the main Welcome page is displayed. It displays the main module presentation page and the user interface menu in the left pane. (Also refer to System Navigation page 13 and System Standards page 14).
• From the user interface menu in the left pane click the system codes link.
• Select the relevant link, standard industry class.
• Select the relevant link, standard industry class add.
Section of the Service Centre five Standard Industry Code Add page.
Mandatory & Optional Data Fields
System Codes new or existing require mandatory data (refer to page 16).
• Standard Industry Class is a mandatory field allowing 10 alphanumeric (Where 10 is the field size and where alphanumeric is the format type, either letters or numbers) characters.
• Standard Industry Class description is a mandatory field allowing 30 alphanumeric (Where 30 is the field size and where alphanumeric is the format type, either letters or numbers) characters.
• Once the required data has been entered or selected click submit (submit will save the entered data to the relevant table). An information popup will appear stating: This Standard Industry Class Code record was successfully added to the database.
Date query and modification
For individual system data query, modification and field types refer to Getting Started page 27.

SERVICE CENTRE FIVE GETTING STARTED REFERENCE GUIDE (RG01GS01)
COMMERCIAL IN CONFIDENCE Page 166
Data Standards & Examples
Standard Industry Class can be set-up in various ways including the following examples. Also, please refer to Data Standards, page 20.
Code Description 31100 Government 31200 Education 31600 Restaurant

SERVICE CENTRE FIVE GETTING STARTED REFERENCE GUIDE (RG01GS01)
COMMERCIAL IN CONFIDENCE Page 167
Supplier Part Relation A Supplier Part Relation can be set-up to link to Purchase Orders to allow different purchase prices from different suppliers. Also the user can set a lead-time by supplier for use in Purchase Orders.
For example a Part with a cost price of £300 (Part definition) may be linked to a supplier which is used in Purchase Order Generation. The Supplier Part Relation is where this part is linked to several suppliers with different prices and lead times (optional) and the user can also enter the supplier part number (optional). The cost price in the Part will be over-written in the Purchase Order Lines (POL) by the Supplier Part Relation cost price (see illustration) for that part.
Within Purchase Order Lines (POL) the part number is selected, the user will see the selected part number as many times as it has different suppliers. The Supplier Part Relation for this part differs for each supplier so whichever part is chosen from the list (below) only the cost price for the chosen Supplier (in the PO Header page) will be populated.
For example, if the Supplier in the PO Header is DCLTD01 then the part chosen in POL would be part with the Supplier Part Number HAND68765-DCLTD5d. This will populate the Supplier Part number in the POL. However if the other part had been chosen the cost price would still be that of the DCLTD01 supplier (In other words if either of the parts in this list is chosen it will only populate the cost price for the supplier chosen in the PO header page).
Where they are used:
Refer to System Code Directory page 30.

SERVICE CENTRE FIVE GETTING STARTED REFERENCE GUIDE (RG01GS01)
COMMERCIAL IN CONFIDENCE Page 168
Add a supplier part relation Navigation:
After logging in to Service Centre five (refer to page 8) the main Welcome page is displayed. It displays the main module presentation page and the user interface menu in the left pane. (Also refer to System Navigation page 13 and System Standards page 14).
• From the user interface menu in the left pane click the parts centre, supplier link.
• Select the relevant link, supplier part relation.
• Select the relevant link, supplier part relation add.
Section of the Service Centre five Supplier Part Relation Add page.
Mandatory & Optional Data Fields
System Codes new or existing require mandatory data (refer to page 16).
• Supplier - This will populate the Supplier number and name and the lead time • Part - This will populate the Part number and name and cost price. • Supplier Part is an optional free text field. • Enter a Cost and Lead Time. • Once the required data has been entered or selected click submit (submit will
save the entered data to the relevant table) to save the details. An information popup will appear stating: This Supplier Part Relation record was successfully added to the database.
Date query and modification
For individual system data query, modification and field types refer to Getting Started page 27.
Data Standards & Examples
Standard Industry Class can be set-up in various ways including the following examples. Also, please refer to Data Standards, page 20.
Part Number Description Cost Supplier Part Number HAND68765 Hand Held Scanner 68765 300 HAND68765-DCLTD5d HAND68765 Hand Held Scanner 68765 300 HAND68765-INTEL2d

SERVICE CENTRE FIVE GETTING STARTED REFERENCE GUIDE (RG01GS01)
COMMERCIAL IN CONFIDENCE Page 169
Symptom Symptom Codes are used in a Service Report as a symptom reported by the engineer as the equipment problem. If you consider the Problem Code in the Call to be the 'symptom' as reported by the Customer then the Symptom Code in the SR is the 'problem' found by the Engineer (as opposed to the area of work and type of work - Fault and Repair Code).
The user can select Charge Codes in a Symptom Code. If the Symptom Code (selected in the Call FSR) has Charge Codes this will over-ride the Call Type, Contract and Product Family SR Charge Codes. (For SR Charge Codes refer to the Standard Contract Reference Guide).
There are two System Keys for automatic population of Symptom Codes, Call Handling: Symptom code for initial FSR and Call Handling: Symptom code for subsequent FSR. The Symptom Code can also be set to mandatory within the Field Service Report Add page by updating private Key 1225 to Y.
Refer to Service Centre five System Guide, System Keys & Private Keys.
Charge Codes
Symptom Codes contain fields to hold the standard charge codes for Work, Travel, Callout and Callout Included. These fields also exist in the Call Type, Contract and Product Family tables. When a Service Report (SR) is created and saved these charge codes are automatically created as Service Report Lines (SRL) where certain conditions are met. If none of the fields exist in any of the above tables then no SRL’s are created. Refer to FSR Charge Codes for more details.
Where they are used:
Refer to System Code Directory page 30.
Add a symptom code Navigation:
After logging in to Service Centre five (refer to page 8) the main Welcome page is displayed. It displays the main module presentation page and the user interface menu in the left pane. (Also refer to System Navigation page 13 and System Standards page 14).
• From the user interface menu in the left pane click the system codes link.
• Select the relevant link, symptom.
• Select the relevant link, symptom add.
Section of the Service Centre five Symptom Add page.

SERVICE CENTRE FIVE GETTING STARTED REFERENCE GUIDE (RG01GS01)
COMMERCIAL IN CONFIDENCE Page 170
Mandatory & Optional Data Fields
System Codes new or existing require mandatory data (refer to page 16).
• Symptom Code is a mandatory field allowing 6 alphanumeric (Where 6 is the field size and where alphanumeric is the format type, either letters or numbers) characters.
• Symptom Code description is a mandatory field allowing 30 alphanumeric (Where 30 is the field size and where alphanumeric is the format type, either letters or numbers) characters.
• Charge Codes: The Symptom Code page contains fields to hold the standard charge codes for Work, Travel and Callout. These fields also exist in Product Family, Contract and Call Types. When a Service Report (SR) is created and saved these charge codes are automatically created as Service Report Lines (SRL) where certain conditions are met. If none of the fields exist in any of the above tables then no SRLs are created.
• Rounding in Symptom Code, Call Type, Product Family and Contract: The rounding factor will round the SRL quantity to the value in the factor field. For Example if the work time is 1.17 hours and the rounding factor is 0.25 the charge code will be rounded up to 1.25. There is also the ability to put in a minimum quantity so if the work time is 0.5 (half an hour) and the minimum charge is for 1 hour then the minimum qty would be 1. The system would then create an SRL for one hour.
• Callout Included: Any hours shown in the Callout inclusive field will be subtracted from the Travel time before any excess hours are billed against the Travel Charge code.
o If Call Out Inclusive is greater than the Travel time, the excess from above is subtracted from the Work time before any remaining excess is billed against the Work time Charge code.
• Once the required data has been entered or selected click submit (submit will save the entered data to the relevant table) to save the details. An information popup will appear stating: This Symptom Code record was successfully added to the database.
Date query and modification
For individual system data query, modification and field types refer to Getting Started page 27.
Data Standards & Examples
Symptom Code can be set-up in various ways including the following examples. Also, please refer to Data Standards, page 20.
Code Description
1 No Power 2 Vandalism/User Damage 3 Third Party Problem 4 Access Not Allowed

SERVICE CENTRE FIVE GETTING STARTED REFERENCE GUIDE (RG01GS01)
COMMERCIAL IN CONFIDENCE Page 171
Task Type Task Type is used in Tasks to categorise the type of task to be carried out. For using within Task Automation the task types have been created with a numeric or alphabetic prefix to fix the order in which the Tasks are created in the call logging process.
Where they are used:
Refer to System Code Directory page 30.
Add a task type Navigation:
After logging in to Service Centre five (refer to page 8) the main Welcome page is displayed. It displays the main module presentation page and the user interface menu in the left pane. (Also refer to System Navigation page 13 and System Standards page 14).
• From the user interface menu in the left pane click the system codes link.
• Select the relevant link, task type.
• Select the relevant link, task type add.
Section of the Service Centre five Task Type Add page.
Mandatory & Optional Data Fields
System Codes new or existing require mandatory data (refer to page 16).
• Task Type is a mandatory field allowing 3 alphanumeric (Where 3 is the field size and where alphanumeric is the format type, either letters or numbers) characters.
• Task Type description is a mandatory field allowing 30 alphanumeric (Where 30 is the field size and where alphanumeric is the format type, either letters or numbers) characters.
• Once the required data has been entered or selected click submit (submit will save the entered data to the relevant table) to save the details. A message will appear at the top of the form: This Task Type record was successfully added to the database.
Date query and modification
For individual system data query, modification and field types refer to Getting Started page 27.

SERVICE CENTRE FIVE GETTING STARTED REFERENCE GUIDE (RG01GS01)
COMMERCIAL IN CONFIDENCE Page 172
Data Standards & Examples
Task Type can be set-up in various ways including the following examples. Also, please refer to Data Standards, page 20.
Task Type Task Type Description
SUR Survey INS Install Equipment COM Commission QUC Quality Check

SERVICE CENTRE FIVE GETTING STARTED REFERENCE GUIDE (RG01GS01)
COMMERCIAL IN CONFIDENCE Page 173
Task Automation Task Automation allows the user to build a list of tasks by Task Type and attach this to a specific Call Type. Using this Call Type in the call logging process the system will check Task Automation for the selected Call Type and create the Tasks in Task Type order. Using the examples three task types have been created with a numeric (could be alphabetic) prefix to fix the order in which the Tasks are created.
Once the Tasks are created in the call the user can enter the engineer for the task and any remarks. Please refer to Tasks in the Tasks, Diary & Dispatch Reference Guide.
Please note that the ‘number of tasks’ field in the Call Type is ignored if Task Automation is used (For Call Types refer to page 47).
Task Automation is optional in call logging, Task Types and Call Types are mandatory in Task Automation.
Where they are used:
Refer to System Code Directory page 30.
Add a task automation Navigation:
After logging in to Service Centre five (refer to page 8) the main Welcome page is displayed. It displays the main module presentation page and the user interface menu in the left pane. (Also refer to System Navigation page 13 and System Standards page 14).
• From the user interface menu in the left pane click the call control link.
• Select the relevant link, task automation.
• Select the relevant link, task automation add.
Section of the Service Centre five Task Automation Add page.
Mandatory & Optional Data Fields
System Codes new or existing require mandatory data (refer to page 16).
• Select a Call Type from the list of available Call Types. • Select a Task Type from the list of available Task Types. • Enter a Dependency if required. The first task created may not depend on
another task, however the next and subsequent tasks can depend on the tasks before.
• Once the required data has been entered or selected click submit (submit will save the entered data to the relevant table) to save the details. An information popup will appear stating: This Task Automation record was successfully added to the database.
• To add lines go to Task Line Automation over the page.

SERVICE CENTRE FIVE GETTING STARTED REFERENCE GUIDE (RG01GS01)
COMMERCIAL IN CONFIDENCE Page 174
Date query and modification
For individual system data query, modification and field types refer to Getting Started page 27.
Data Standards & Examples
Task Automation can be set-up in various ways including the following examples. Also, please refer to Data Standards, page 20.
Call Type Call Type Description Task Type Task Type Description
Task Type
Dependency
INS Installation SU Survey 1SU 1 INS Installation IN Install Equipment 2IN 2 INS Installation CM Commission 3CM 3 INS Installation QA Quality Check 4QA 4

SERVICE CENTRE FIVE GETTING STARTED REFERENCE GUIDE (RG01GS01)
COMMERCIAL IN CONFIDENCE Page 175
Task Line Automation Task Line Automation is where you build a list of lines for the related Task Type. A Product Family must be attached to these lines.
Task Automation is optional in call logging, Task Types and Call Types are mandatory in Task Automation.
Data Standards & Examples
Task Line Automation can be set-up in various ways including the following examples. Also, please refer to Data Standards, page 20.
Task Type
Description Product Family
Part Description Quantity
INS Install Equipment DP3580 4400345090 K-THRMO-523 1 INS Install Equipment DP3580 4400345095 K-THRMO-524 2

SERVICE CENTRE FIVE GETTING STARTED REFERENCE GUIDE (RG01GS01)
COMMERCIAL IN CONFIDENCE Page 176
Time Zone Time Zone codes, attached to customer equipment sites permit Service Centre 5 users to work across different countries time zones.
A user can log a call against a site in a different time zone. This in turn will pick up the sites local time for call in date and time and response date and time. After saving the call the response time is displayed in the call details and is colour coded similar to the call escalation monitor.
For example, if a call is logged at 09:00 GMT against a site that has a bias of -60 (+01:00 GMT). For example, in Amsterdam, Berlin, Rome, Vienna, Paris, then the in time would be 10:00 and the response calculated from that.
Where they are used:
Refer to System Code Directory page 30.
Add a time zone Navigation:
After logging in to Service Centre five (refer to page 8) the main Welcome page is displayed. It displays the main module presentation page and the user interface menu in the left pane. (Also refer to System Navigation page 13 and System Standards page 14).
• From the user interface menu in the left pane click the customer assets, site link.
• Select the relevant link, timezone.
• Select the relevant link, timezone add.
Section of the Service Centre five Timezone Add page.
Mandatory & Optional Data Fields
System Codes new or existing require mandatory data (refer to page 16).
• Time Zone Code is a mandatory field allowing 5 numeric (Where 5 is the field size and where numeric is the format type, either letters or numbers) characters.
• Time Zone Description is a mandatory field allowing 30 alphanumeric (Where 30 is the field size and where alphanumeric is the format type, either letters or numbers) characters.
• Time Zone Bias is a mandatory field allowing 4 numeric (Where 4 is the field size and where numeric is the format type, numbers only) characters.
• Once the required data has been entered or selected click submit (submit will save the entered data to the relevant table) to save the details. An information popup will appear stating: This Time Zone record was successfully added to the database.

SERVICE CENTRE FIVE GETTING STARTED REFERENCE GUIDE (RG01GS01)
COMMERCIAL IN CONFIDENCE Page 177
Date query and modification
For individual system data query, modification and field types refer to Getting Started page 27.
Data Standards & Examples
Time Zone can be set-up in various ways including the following examples. Also, please refer to Data Standards, page 20.
Code Description Bias
26 (GMT) Greenwich Mean Time : London 0 27 (GMT+01:00) Amsterdam, Berlin, Rome, Vienna -60 56 (GMT+08:00) Beijing, Chongqing, Hong Kong, Urumqi -480

SERVICE CENTRE FIVE GETTING STARTED REFERENCE GUIDE (RG01GS01)
COMMERCIAL IN CONFIDENCE Page 178
VAT Code VAT Codes are used in Customer Assets to define the default VAT code.
The VAT Code is attached to the Customer details, Site details, Contract details and Part details for the sales orders and service call VAT rate.
A VAT Code attached to a Part will over-ride the VAT Code attached to the Customer when using Sales Orders.
A VAT Code attached to a Contract will over-ride the VAT Code attached to the Customer when using Contract Sales Orders, Meter Billing and Maintenance contract invoicing.
A VAT Code attached to a Site will over-ride the VAT Code attached to the Customer and the Part sold when using Service Call Invoicing.
When creating a new Customer the default VAT Code (set in System Keys, refer to the 5 System Guide) is populated. The Country Code (refer to page 62) attached to this VAT Code will also be populated. If you wish to change the VAT Code then remove the Country Code too, as the list of available VAT Codes will only show those with that Country Code.
Where they are used:
Refer to System Code Directory page 30.
Add a VAT code Navigation:
After logging in to Service Centre five (refer to page 8) the main Welcome page is displayed. It displays the main module presentation page and the user interface menu in the left pane. (Also refer to System Navigation page 13 and System Standards page 14).
• From the user interface menu in the left pane click the system codes link.
• Select the relevant link, vat code.
• Select the relevant link, vat code add.
Section of the Service Centre five VAT Code Add page.
Mandatory & Optional Data Fields
System Codes new or existing require mandatory data (refer to page 16).
• VAT Code is a mandatory field allowing 3 numeric (Where 3 is the field size and where numeric is the format type) characters.
• VAT Code description is a mandatory field allowing 30 alphanumeric (Where 30 is the field size and where alphanumeric is the format type, either letters or numbers) characters.
• Select a Country Code from the list of available Country Codes.

SERVICE CENTRE FIVE GETTING STARTED REFERENCE GUIDE (RG01GS01)
COMMERCIAL IN CONFIDENCE Page 179
• VAT Code Rate (%) is an optional field containing the VAT percentage for that
VAT Code. • Once the required data has been entered or selected click submit (submit will
save the entered data to the relevant table) to save the details. An information popup will appear stating: This VAT Code record was successfully added to the database.
Date query and modification
For individual system data query, modification and field types refer to Getting Started page 27.
Data Standards & Examples
VAT Code can be set-up in various ways including the following examples. Also, please refer to Data Standards, page 20.
Code Description Country Description VAT Rate Account Code
1 VAT Code 1 GB Default Country Code 17.50 A
2 VAT Code 2 GB Default Country Code 0 1
1 European VAT Code 1 EU European Country Code 176 0
2 European VAT Code 2 EU European Country Code 177 0
3 VAT Code 3 GB Default Country Code 0 0
4 VAT Code 4 GB Default Country Code 0 0
5 VAT Code 5 GB Default Country Code 0 0
666 Default VAT Code GB Default Country Code 17.50 0

SERVICE CENTRE FIVE GETTING STARTED REFERENCE GUIDE (RG01GS01)
COMMERCIAL IN CONFIDENCE Page 180
Vehicle Code The ‘Vehicle Reg Number’ code in System Codes which allows the user to pick and save as part of the Employee details.
The ‘Vehicle Reg Number’ field can be added to the Employee page (please refer to page 95 for Employee Registration Number) allowing the user to pick a Vehicle Code.
This functionality is used in Remote Engineer Access II. Please refer to the Remote Engineer Access II Reference Guide.
Where they are used:
Refer to System Code Directory page 30.
Add a vehicle code Navigation:
After logging in to Service Centre five (refer to page 8) the main Welcome page is displayed. It displays the main module presentation page and the user interface menu in the left pane. (Also refer to System Navigation page 13 and System Standards page 14).
• From the user interface menu in the left pane click the system codes link.
• Select the relevant link, vehicle code.
• Select the relevant link, vehicle code add.
Section of the Service Centre five Vehicle Code Add page.
Mandatory & Optional Data Fields
System Codes new or existing require mandatory data (refer to page 16).
• Vehicle Code is a mandatory field allowing 8 numeric (Where 8 is the field size and where numeric is the format type) characters.
• Vehicle Code description is a mandatory field allowing 30 alphanumeric (Where 30 is the field size and where alphanumeric is the format type, either letters or numbers) characters.
• Enter a ‘Last Mileage’ if known. This is an options field allowing 7 numeric characters.
• Once the required data has been entered or selected click submit (submit will save the entered data to the relevant table) to save the details. An information popup will appear stating: This Vehicle Code record was successfully added to the database.

SERVICE CENTRE FIVE GETTING STARTED REFERENCE GUIDE (RG01GS01)
COMMERCIAL IN CONFIDENCE Page 181
Date query and modification
For individual system data query, modification and field types refer to Getting Started page 27.
Data Standards & Examples
Vehicle Code can be set-up in various ways including the following examples. Also, please refer to Data Standards, page 20.
Reg Number Description Last Mileage FB09 NHT John Smiths Registration Number 42000

SERVICE CENTRE FIVE GETTING STARTED REFERENCE GUIDE (RG01GS01)
COMMERCIAL IN CONFIDENCE Page 182
Tesseract Support & Services
Tesseract Support Telephone support is available from 08:00 until 18:00, Monday - Friday as standard, however it is possible to retain an out of hours Support Contract. If the user is interested and requires further details on the various contracts please contact us on the main line number listed below.
Telephone
Direct Support Line 0844 482 0226
Facsimile Line + 44 (0) 1494 464756
Tesseract Main + 44 (0) 1494 465066
Email and Web Sites
Web - www.tesseract.co.uk
Software Version Control Displayed in the dark blue bar at the top of every 'Microsoft Internet Explorer' page in Service Centre five there is information about a Tesseract Database, user name, DLL version and page version. This information is very useful when supporting our customers. Tesseract also provides extensive Online Help.
Tesseract User Group (TUG) There is an active Tesseract User Group where all supported Customers automatically become members. You will be invited to attend the Tesseract User Group Meetings, which take place approximately every four months.
Consulting Services Tesseract Consultants are available to assist the user with any aspect of their implementation of Service Centre five or any Service management issues. Consultants can be engaged on an ad-hoc daily or project basis. Please call Tesseract for more information.

SERVICE CENTRE FIVE GETTING STARTED REFERENCE GUIDE (RG01GS01)
COMMERCIAL IN CONFIDENCE Page 183
Tesseract Training Services Tesseract offers a full suite of Service Management Training Courses for the range of Modules and Services we sell. This includes different levels of Training to meet the needs of both the Users and System Administrators required to operate Service Centre.
The Tesseract Service Centre five courses (apart from the Getting Started, refer to page 187) guide the user/administrator through the relevant Service Centre five modules on a step-by-step basis, with easy to follow instructions.
For Standard Courses, emphasis is placed on the user/administrator taking an active role in the training with participation in the exercises and practical sessions.
Reference Guides for each module can be used in conjunction with theory and hands-on during each training course session.
The courses are intended for staff using Tesseract Service Centre five.
Training Delivery Options Tesseract offers a full suite of Service Management Training Courses, onsite, open or closed at the Tesseract Training Centre and Tesseract Online Tutorials.
Tesseract Onsite Training Courses
Standard day courses delivered at a customer site directly to a group of end users, who will benefit from this hands-on approach. Emphasis is placed on the user taking an active role in practical sessions.
Courses delivered on-site to a group of your delegates will be restricted to a maximum of 6 delegates and preferably there would be a dedicated training environment where each delegate would have a networked PC. (It is recommended that each PC is fully installed with Service Centre five and attached to a networked environment with a working database).
This Standard Course will include all the ‘Course Codes’ in that category, for example, Standard Course TA03CC has 4 elements (for example TA03CC01 etc.) and all these elements will be delivered in one day.
A standard course as a rule, starts at 10:00 and finishes at 16:00. There are a couple of half day courses available, however half day courses must be booked as whole days if onsite. A half-day (0.5) course starts at 09:30 and finishes at 12:30 or starts at 13:30 and finishes at 16:30 (These times can vary depending on availability of resource and location).
A standard course could be at the customer site as a ‘closed course’ or at Tesseract as a ‘closed course’ or an ‘open course’. Refer below.
Tesseract Open Training Courses
Open Courses, with other Customers attending, run from our Tesseract Training Centre in High Wycombe are based on the standard Tesseract Module Courses in a classroom environment. These may also be run as ‘closed’ courses for one specific customer if preferred.
Courses delivered at the Tesseract Training Centre will be restricted to a maximum 4 delegates, minimum 2 delegates and are, as a rule scheduled, (although currently many courses are scheduled at the convenience of Tesseract and the customer).
A standard course as a rule, starts at 10:00 and finishes at 16:00. There are a couple of half day courses available, however half day courses must be booked as whole days if onsite. A half-day (0.5) course starts at 09:30 and finishes at 12:30 or starts at 13:30 and finishes at 16:30 (These times can vary depending on availability of resource and location).

SERVICE CENTRE FIVE GETTING STARTED REFERENCE GUIDE (RG01GS01)
COMMERCIAL IN CONFIDENCE Page 184
Tesseract Online Tutorials
Online Instructor led Tutorial for existing Service Centre 4.2 and Service Centre five users are offered as a one hour (up to one hour) tutorial using ‘Online Meeting Tools’ via an invitation from a Tesseract Instructor.
• The instructor: Instructor centred -- essentially, the information is presented and you are the observer.
• The benefits: The Tutorials are at your convenience, minimises loss of staff productivity over traditional training methods, more focussed and shorter training sessions enabling information to be more easily absorbed and there is no paper trail with agendas and reference guides all online.
• The delegates: The delegates (having provided an email address for the session) will communicate via telephone with the instructor in a conference style meeting whilst viewing the Instructors screen and mouse movements.
Please contact our Training Centre ([email protected]) for a Training Brochure, agendas and more information on availability and pricing.
The Service Centre five courses currently offered are listed over the page.
Exercises and hands-on approach Throughout each standard course the instructor will take the trainee dynamically through the system using exercises and practical sessions.
Course Format and Certificates The courses (apart from the Getting Started) guide the user/administrator through the relevant Service Centre five Module on a step-by-step basis, with easy to follow instructions.
Emphasis is placed on the user/administrator taking an active role in the training with participation in the exercises and practical sessions.
Reference Guides for each module can be used in conjunction with theory and hands-on during each training course session.
The courses are intended for staff using Tesseract Service Centre five.
Delegates who attend and successfully complete a standard full days training course will be presented with an associated training certificate.
For further information
For further information please contact or email our Training Centre ([email protected]) for a catalogue which includes: Course Format and Delivery Options, Exercises and Hands-on, Course Certificates and Course Descriptions, Information, Local Map and Course Booking Form.

SERVICE CENTRE FIVE GETTING STARTED REFERENCE GUIDE (RG01GS01)
COMMERCIAL IN CONFIDENCE Page 185
Service Centre five Training & Tutorials Below is a catalogue of Standard Course codes and Online Tutorial codes and names. For a Training Brochure, agendas or more detailed information on any tutorial or course please contact the Tesseract Training Department at [email protected].
Course/Tutorial Agendas and Reference Guides
Agendas Course Tutorial
Reference Guides
Standard Course Name Online Tutorial name
Online Duration
Standard Duration
TA00QA NA
NA Ad-hoc question & answer session. 1 h NA
TA01GS TA01GS01
RG01GS01
Getting Started Getting Started & System Code Directory
NA 1 d
TA02CA TA02CA01 TA02CA02 TA02CA03 TA02CA04 TA02CA05 TA02CA06 TA02CA07 TA02CA08
RG02CA01 RG02CA02 RG02CA03 RG02CA04 RG02CA05 RG02CA06 RG02CA07 RG02CA08
Customer Assets Customer, Site & Serialised Product Cover Codes & Cover Charges Standard Contract Meter Contract Contract Update & Modify Contract Inclusive Parts Supplier, Supplier Account & Contract PM Call Generation & Set-up
1 h 1 h 1 h 1 h 1 h 1 h 1 h 1 h
1 d
TA03CC TA03CC01 TA03CC02 TA03CC03 TA03CC04
RG03CC01 RG03CC02 RG03CC03 RG03CC04
Call Control Call Logging & Helpdesk Tasks, Diary & Dispatch Parts Request, SR & Timesheets Checklist, Knowledge Base
1 h 1 h 1 h 1 h
1 d
TA04SU TA04SU01
RG04SU01
System Utilities System Utilities
1 h
0.5 d
TA05PC TA05PC01 TA05PC02 TA05PC03 TA05PC04
RG05PC01 RG05PC02 RG05PC03 RG05PC04
Parts Centre Stock Browser Stocktake Parts Centre Orders Parts Centre Additional Functionality
1 h 1 h 1 h 1 h
1 d
TA06QC TA06QC01
RG06QC01
Quote Centre Quote Centre
1 h
0.5 d
TA07PR TA07PR01
RG07PR01
Prospect Centre Prospect Centre
1 h
0.5 d
TA08IN TA08IN01
RG08IN01
Invoicing Contract, Serialised Product & PM Meter Billing Service Calls Sales Orders & Contract Sales Orders Credit Notes & Invoice Viewer
1 h 1 h 1 h 1 h 1 h
0.5 - 1 d
TA09RE TA09RE01
RG09RE01
Remote Engineer Access Remote Engineer Access (Classic) Remote Engineer Access (PDA)
1 h 1 h
0.5 d
TA10RA TA10RA01
RG10RA01
Remote Customer Access Remote Customer Access
1 h
0.5 d
TA11WS TA11WS01
RG11WS01
Workshop Workshop
1 – 2 h
1 d
TA12CR01
RG12CR01_CR85
Service Centre Report Writing Service Centre Report Writing v8.5
NA
1 d
TA12CR01
RG12CR01_CR11
Service Centre Report Writing Service Centre Report Writing v11 (XI)
NA
1 d

SERVICE CENTRE FIVE GETTING STARTED REFERENCE GUIDE (RG01GS01)
COMMERCIAL IN CONFIDENCE Page 186
* Please note: It is recommended, due to data set-up and comprehension where all Invoice Types are required, that the Invoicing and Credit Notes training course should be taken as a whole day. It is also recommended that the invoicing delegates have attended the Customer Assets, Call Control and Parts Centre standard courses. Only under special circumstances can this course be taken as a half day. Key: Example Course Code: TAxxyy TAxxyyxx Training Agenda d = days
h = hours Where TA Is the type of course or tutorial, TA = Training Agenda. Where xxyyxx
Is the document ID, xx = ID number (01, 02 etc), yy = Course ID (GS, CC, CA etc), xx = course breakdown (for standard course and online tutorials).
Where Dur: =
Duration of the course in days (d). A one day course as a rule, starts at 10:00 and finishes at 16:00. A half-day (0.5) course starts at 09:30 and finishes at 12:30 or starts at 13:30 and finishes at 16:30 (These times can vary depending on availability of resource and location). Duration of the course in hours (h). Online Tutorials are offered as a one hour (up to one hour) Online Tutorial Session. Please contact our Training Department for a Training Brochure, agendas and more information on availability and prices.
N/OT Online Tutorial not available.
Service Centre Report Writing Courses With the relevant permissions any user can run a standard report with any chosen data within the system, however you will need Crystal Report Writer to create and modify reports. The Crystal Report Writer package can be purchased through Tesseract. Please contact the Tesseract Sales Team for more information on the Crystal Report Writer.
The Service Centre Report Writing course can be delivered in several versions depending on the customers purchased version (this does not apply to Open Courses where several customers attending may be on different versions), for example, Crystal Report Writer Version 8.5 or Version 9.0 and so on.
Course Code Course Element
Code (See key) Course name Dur:
TA12CR01 TA12CR01_CR85 Service Centre Report Writing (Ver 8.5) 1 day
TA12CR01 TA12CR02_CR11 Service Centre Report Writing (Ver 11) 1 day

SERVICE CENTRE FIVE GETTING STARTED REFERENCE GUIDE (RG01GS01)
COMMERCIAL IN CONFIDENCE Page 187
Course Descriptions The Tesseract Service Centre five courses (apart from the Getting Started) guide the user/administrator through the relevant Service Centre five Module on a step-by-step basis, with easy to follow instructions.
Emphasis is placed on the user/administrator taking an active role in the training with participation in the exercises and practical sessions.
Reference Guides for each module can be used in conjunction with theory and hands-on during each training course session (refer to page 185).
The courses are intended for staff using Tesseract Service Centre five.
Delegates who attend and successfully complete a standard full days training course will be presented with an associated training certificate.
Getting Started The Getting Started day is a simple, basic step-by-step presentation providing an introduction and overview of all aspects of the functionality contained in Service Centre five Customer Assets and Call Control. It covers an outline of the System Codes used within Service Centre five and how to apply them effectively. After attending this presentation the delegates will have a better understanding of the data structure, Call Control and other Service Centre five operations. To gain a ‘hands-on’ and in-depth understanding of Service Centre five the user who enters Codes, Customer Contract Details and Calls must, at the minimum, attend Customer Asset and Call Control training courses.
This overview is intended for the management and supervisory staff responsible for setting up and maintaining the users Service Centre five system. A basic knowledge of Windows is a pre-requisite.
This presentation does not include Quote Centre, Remote Engineer Access, Workshop, Period Close or System Utilities, User Utilities.
Customer Assets The purpose of this one day practical, hands-on course is to cover the methods used to create the necessary system codes and customer asset information to enable a user/administrator of the Service Centre five to create and update data and perform Service Centre five operations.
This course intended for contract data entry staff new to Service Centre five. The pre-requisite is to have basic knowledge of Windows and to have attended course one, Getting Started.
This day includes Customer Contract Invoicing but does not include Call Control, Parts Centre, Period Close, Quote Centre, Workshop, System Utilities, User Utilities, Remote Engineering Access and Call Escalation.

SERVICE CENTRE FIVE GETTING STARTED REFERENCE GUIDE (RG01GS01)
COMMERCIAL IN CONFIDENCE Page 188
Call Control The purpose of this one day practical, hands-on course is to cover the methods used to enable a user/administrator of the Service Centre five to log a Call, dispatch an engineer, generate Service Reports and Service Reports Lines, access and view Call Escalation Monitor, run reports and Service Call Invoicing. To obtain a better understanding of the Service Centre five functionality the user must, at the minimum attend course one, Getting Started and course two, Customer Assets.
This course intended for Call Handling/Control staff new to Service Centre five. The pre-requisite is to have basic knowledge of Windows and to have attended course one, Getting Started.
This day includes Service Calls Invoicing but does not include Customer Assets, Parts Centre, Workshop, Period Close, Quote Centre, Remote Engineering Access or System Utilities, User Utilities.
Quote Centre The purpose of this half day training course is to enable a user/administrator of Service Centre five to capture enough data, in a flexible format, to provide a basic Sales or Contract Quote but in a structured way which makes conversion to a live Contract simple. A new Quote can be built from scratch, copied from a previous Contract or built from a combination of these. For ease of use, ‘Wizards’ guide all stages of Quote preparation including conversion to Contract. Quote Centre also includes facilities to assist in managing the Quote from initial creation, through the stages of being revised and offered, to acceptance (or rejection) with user definable status codes for analysis and action notes at each stage.
The pre-requisite is to have attended course one, Getting Started and course 2, Customer Assets.
This course does not include Customer Assets, Call Control, Parts Centre, Period Close, Workshop, Remote Engineering Access, System Utilities, User Utilities or Call Escalation. Parts Centre The purpose of this one day practical, hands-on course is to cover the methods used to create and update data and perform Parts Centre operations. After attending this tutorial, a user/administrator of the Parts Centre will be able to enter purchase order, sales orders and perform other Parts Centre operations. However, to obtain a better understanding of the Service Centre five functionality the user must, at the minimum attend course one, Getting Started - Introduction & Overview.
This course is intended for logistics staff new to the Tesseract Parts Centre. The pre-requisite is to have basic knowledge of Windows and to have attended course one, Getting Started.
This course includes Sales Order Invoicing but does not include Customer Assets, Call Control, Period Close, Quote Centre, Workshop, System Utilities, User Utilities, Remote Engineering Access or Call Escalation.

SERVICE CENTRE FIVE GETTING STARTED REFERENCE GUIDE (RG01GS01)
COMMERCIAL IN CONFIDENCE Page 189
Workshop The purpose of this one day practical, hands-on course is to cover Job Control for the return to base Repair Workshop operation. Integrated with Parts Centre, it handles repairs of Customer Equipment or Stock items as single Jobs or in batches. All aspects of the Job are tracked from booking in through pre-defined or non-standard engineering workflow to upgrades and shipping. It also handles exchange items.
Integrated with Service Centre, a Call can be traced from its source in the field through Workshop and back to the field as a single Call record but with a full history at all stages.
To obtain a better understanding of the Service Centre five functionality the user must, at the minimum attend course one, Getting Started - Introduction & Overview.
This course is intended for workshop staff new to the Tesseract Workshop. The pre-requisite is to have basic knowledge of Windows and to have attended course one, Getting Started.
This course includes Workshop Job Invoicing but does not include Customer Assets, Call Control, Period Close, Quote Centre, Parts Centre, System Utilities, User Utilities, Remote Engineering Access or Call Escalation. Remote Engineer Access The purpose of this half day training course is to enable a Field Engineer of Service Centre five to access a Central Database to dispatch their own Calls, generate Field Service Reports and Service Reports Lines and transfer Calls back to the Central Database.
The pre-requisite is to have basic knowledge of Windows and to have attended course three, Call Control.
This course does not include Customer Assets, Call Control, Parts Centre, Workshop, Period Close, Quote Centre, System Utilities, User Utilities, Invoicing or Call Escalation.
Invoicing The purpose of this ½ - 1 day training course is to enable a user/administrator of Service Centre five to run and print invoices. In addition to this half day course users who attend Customer Assets and Call Control training will cover the relevant invoicing. To obtain a better understanding of the Service Centre five functionality it is advisable that the user attends courses, Getting Started and Customer Asset.
The pre-requisite is to have basic knowledge of Windows and to have attended the Getting Started and Customer Assets courses.
This course does not include any other module.
* Please note: It is recommended, due to data set-up and comprehension where all Invoice Types are required, that the Invoicing and Credit Notes training course should be taken as a whole day. It is also recommended that the invoicing delegates have attended the Customer Assets, Call Control and Parts Centre standard courses. Only under special circumstances can this course be taken as a half day. Prospect Centre The purpose of this half day practical, hands-on course is to cover the methods used to create prospective customers.
This course is intended for sales staff new to Service Centre five. The pre-requisite is to have basic knowledge of Windows and to have attended course one, Getting Started.
This half day does not include Customer Assets, Call Control, Parts Centre, Workshop, Period Close, Quote Centre, System Utilities, Remote Engineering Access and Call Escalation.

SERVICE CENTRE FIVE GETTING STARTED REFERENCE GUIDE (RG01GS01)
COMMERCIAL IN CONFIDENCE Page 190
System Utilities The purpose of this half day practical, hands-on course is to cover the methods used to enable the user/administrator to set-up and maintain the Service Centre five system.
A full days training is necessary if the customer requires, as an SQL Server client, SQL Administration.
This course is intended for the system manager and the pre-requisite is previous knowledge of IT practices and databases.
This day does not include Call Control, Customer Assets, Parts Centre, Quote Centre, Workshop, Invoicing Module, Remote Engineering Access or Call Escalation.
Service Centre Report Writing This one day entry-level course is designed to explain database structures, indexes and field types. A step-by-step guide takes the user through the Crystal Reports module with explanations of all the icons and facilities available. It includes a hand-held lesson into creating, structuring and customising one and two table reports taken from a database and how to incorporate the users Reports into Service Centre. Additionally, the delegates will be shown how to add simple formulas to enhance reports, define record selections and learn how to customise the Standard Tesseract Reports supplied with Service Centre five to suit their company practice.
This is an essential course for clerical, managerial or professional users looking to incorporate a report writing utility for routine data summaries.
The pre-requisite is to have basic knowledge of Windows environment and for the delegates to have attended at least course one, Getting Started.

SERVICE CENTRE FIVE GETTING STARTED REFERENCE GUIDE (RG01GS01)
COMMERCIAL IN CONFIDENCE Page 191
COPYRIGHT Copyright 2011 by Tesseract. All rights reserved. No part of this publication may be reproduced, transmitted, transcribed, stored in a retrieval system, or translated into any language or computer language, in any form or by any means, electronic, mechanical, magnetic, optical, chemical, manual or otherwise, without the prior written permission of Tesseract.
1 Newmans Row, Lincoln Inn Office Village, Lincoln Rd, Cressex Industrial Estate High Wycombe, Buckinghamshire, HP12 3RE. England.
DISCLAIMER Tesseract makes no representations or warranties with respect to the contents hereof and specifically disclaims any implied warranties of merchantability or fitness for any particular purpose. Furthermore, Tesseract reserves the right to revise this publication and to make any changes from time to time in the content thereof without obligation of Tesseract to notify any person of such revision or changes.
TRADEMARKS SERVICE CENTRE (and Service Center) are trademarks of TESSERACT.
References Documents supplied with the Service Centre five Software
Service Centre five Release Notes Service Centre five Installation Guide Service Centre five Administrators Guide Service Centre five System Guide Service Centre five Licence (Registration) Service Centre five Online Help
Documents supplied with the Service Centre five User Training Service Centre five Training Catalogue Service Centre five Reference Guides (refer to Tesseract Training Services, page 183 for a list of Standard Course and Online Instructor led Tutorial Names and Codes).
Documents supplied by Sales and Support
Service Centre five Sales Brochures Web - www.tesseract.co.uk SupportNews - Your monthly update from your service management software provider. Go to www.tesseract.co.uk for more information.
Document Control This Reference Guide was written and compiled by the Tesseract Training Group. Copyright Tesseract 1997 - 2011. Part Number: RG01GS01_SC5 Edition: 18 (Web Based, On-Line Service Centre five). Last Update: September 2011.

SERVICE CENTRE FIVE GETTING STARTED REFERENCE GUIDE (RG01GS01)
COMMERCIAL IN CONFIDENCE Page 192
Index Getting Started Reference Guide Service Centre five
A
About this guide ....................................... 3 Account Code ......................................... 36 Activity Code .......................................... 38 Add, query, & modify data ....................... 27 Adding a Favourite .................................... 7 Adjustment Code .................................... 42 Analysis Code ......................................... 40 Area Code .............................................. 33 Assumptions and Dependencies .................. 3 Attachment ............................................ 44
B
Budget Code .......................................... 45
C
Call Type ............................................... 47 Change Password .................................... 10 Chargecode Part Type ............................ 119 Company Code ....................................... 79 Configuration .......................................... 56 Connecting to Service Centre five ............... 4 Contract Type ......................................... 59 Country Code ......................................... 62 Course Descriptions ............................... 187 Cover Charge ......................................... 71 Cover Code ............................................ 64 Cover Code Initial Response ..................... 67 Creating a Shortcut ................................... 5 Credit Type ............................................ 81 Currency Code ........................................ 82
D
Data Standards ....................................... 20 Data Types ............................................. 19 Deferral Reason ...................................... 87 Department Code .................................... 84 Disposable Part Type ............................. 119 Duty Code .............................................. 93
E
Employee ............................................... 95 Employee Skill ........................................ 99 End of Business Day Response .................. 66 Escalation Configuration......................... 101
F
Fault Code ............................................ 108 Flow Code ............................................. 110
G
Getting Started ....................................... 27 Getting Started add, query, modify ............ 27 Getting Started with User IDs ................... 29 Glossary .................................................. 3
H
Help Desk User Examples ......................... 86 Holiday Date ........................................... 91
K
Key to Definitions .................................... 21
L
Language Code ....................................... 89 Log In ..................................................... 8 Log Out ................................................... 9
N
Note Action ........................................... 112
O
Order Type ........................................... 114
P
Part ABCD ............................................ 117 Part Discounts ....................................... 118 Part Prices ............................................ 121 Part Type .............................................. 119 Parts and Charge Codes ......................... 116 Parts Charge Rate .................................. 118 Parts Mark-up ....................................... 119 Period End Date .................................... 143 Postcode Area ....................................... 123 Problem................................................ 125 Product ................................................ 127

SERVICE CENTRE FIVE GETTING STARTED REFERENCE GUIDE (RG01GS01)
COMMERCIAL IN CONFIDENCE Page 193
Product Engineer Change Order (ECO) .... 104, 106
Product Family ...................................... 133 Product Meter Details ............................ 131 Product Option ...................................... 136 Product Population ................................ 132 Product Term ....................................... 139 Prospect Source .................................... 141
Q
Quote Action ........................................ 149 Quote Status ........................................ 145 Quote Term .......................................... 147
R
Receipt Type ........................................ 153 References ........................................... 191 Repair Code ......................................... 151 Repairable Part Type ............................. 119 Reporting ............................................... 22 Reports - Standard List ............................ 22 Resolution Code .................................... 155
S
Serialised Status ................................... 157 Service Centre five Connecting ................... 4 Service Centre five Login ........................... 8 Service Centre five Version ........................ 8 Shift Pattern Day .................................. 163 Shift Pattern Type ................................. 161
Site Contact Type .................................. 159 Standard Industry Class (SIC) ................. 165 Submit Report ......................................... 26 Supplier Part Relation............................. 167 Symptom ............................................. 169 System Code Directory ............................. 30 System Keys ........................................... 20 System Login ........................................... 4 System Navigation ................................... 13 System Standards ................................... 14 System Structure .................................... 11
T
Task Automation ................................... 173 Task Line Automation ............................. 175 Task Type ............................................. 171 Tesseract Support .................................. 182 Tesseract Training Services ..................... 183 Time Zone ............................................ 176 Training & Tutorials................................ 185 Training Delivery Options ....................... 183
V
Variable Part Type ................................. 120 VAT Code ............................................. 178 Vehicle Code ......................................... 180 Version of Service Centre five .................... 8
W
Wildcard ................................................. 28
SERVICE CENTRE FIVE GETTING STARTED REFERENCE GUIDE (RG01GS01)
COMMERCIAL IN CONFIDENCE Page 194