Service Bulletin Mazda North American Operations … Bulletin Mazda North American Operations...
15
Page 1 of 15 CONSUMER NOTICE: The information and instructions in this bulletin are intended for use by skilled technicians. Mazda technicians utilize the proper tools/ equipment and take training to correctly and safely maintain Mazda vehicles. These instructions should not be performed by “do-it-yourselfers.” Customers should not assume this bulletin applies to their vehicle or that their vehicle will develop the described concern. To determine if the information applies, customers should contact their nearest authorized Mazda dealership. Mazda North American Operations reserves the right to alter the specifications and contents of this bulletin without obligation or advance notice. All rights reserved. No part of this bulletin may be reproduced in any form or by any means, electronic or mechanical---including photocopying and recording and the use of any kind of information storage and retrieval system ---without permission in writing. © 2010 Mazda Motor of America, Inc. Subject: WATER ACCUMULATION IN FOOTWELL / PLUGGED SOFT TOP DRAINS Bulletin No: 09-046/10 Last Issued: 10/15/2010 Service Bulletin Mazda North American Operations Irvine, CA 92618-2922 2006-2009 MX-5 - WATER ACCUMULATION IN FOOTWELL / PLUGGED SOFT TOP DRAINS BULLETIN NOTE • This bulletin supersedes the previous bulletins 09-001/07 issued on 04/17/07, 09-021/09 issued on 04/06/09, 05/15/09 and 07/17/09. The PARTS INFORMATION has been revised. • Changes are noted below in Red beside the change bar. APPLICABLE MODEL(S)/VINS TYPE A VEHICLES: 2006-2007 MX-5 soft top models with VINs lower than JM1NC****7*131735 (produced before November 20, 2006) TYPE B VEHICLES: 2007-2009 MX-5 soft top models with VINs between JM1NC****7*131736 (November 21, 2006) and JM1NC****9*203430 (March 1, 2009) DESCRIPTION Some vehicles equipped with the folding soft top may experience water accumulation in the foot wells due to the soft top drains becoming clogged with leaves and other debris. As mass production changes: - A filter has been added to the drain valve assembly to prevent leaves or other foreign substance from clog- ging the drain. - Ribs have been added to the upper and lower valves of the drain valve assembly to prevent the valves (rub- ber flaps) from being forced out of position in the event compressed air is used to clear the drains from under the vehicle. - A foam urethane filter has been established for the drain cover. DRAIN VALVE ASSEMBLY DRAIN COVER 1736a
Transcript of Service Bulletin Mazda North American Operations … Bulletin Mazda North American Operations...

Page 1 of 15CONSUMER NOTICE: The information and instructions in this bulletin are intended for use by skilled technicians. Mazda technicians utilize the proper tools/ equipment and take training to correctly and safely maintain Mazda vehicles. These instructions should not be performed by “do-it-yourselfers.” Customers should not assume this bulletin applies to their vehicle or that their vehicle will develop the described concern. To determine if the information applies, customers should contact their nearest authorized Mazda dealership. Mazda North American Operations reserves the right to alter the specifications and contents of this bulletin without obligation or advance notice. All rights reserved. No part of this bulletin may be reproduced in any form or by any means, electronic or mechanical---including photocopying and recording and the use of any kind of information storage and retrieval system ---without permission in writing.
© 2010 Mazda Motor of America, Inc.
Subject:WATER ACCUMULATION IN FOOTWELL / PLUGGED SOFT TOP DRAINS
Bulletin No: 09-046/10
Last Issued: 10/15/2010
Service Bulletin Mazda North American OperationsIrvine, CA 92618-2922
2006-2009 MX-5 - WATER ACCUMULATION IN FOOTWELL / PLUGGED SOFT TOP DRAINSBULLETIN NOTE• This bulletin supersedes the previous bulletins 09-001/07 issued on 04/17/07, 09-021/09 issued on 04/06/09,
05/15/09 and 07/17/09. The PARTS INFORMATION has been revised.• Changes are noted below in Red beside the change bar.
APPLICABLE MODEL(S)/VINSTYPE A VEHICLES: 2006-2007 MX-5 soft top models with VINs lower than JM1NC****7*131735 (produced before November 20, 2006)
TYPE B VEHICLES: 2007-2009 MX-5 soft top models with VINs between JM1NC****7*131736 (November 21, 2006) and JM1NC****9*203430 (March 1, 2009)
DESCRIPTIONSome vehicles equipped with the folding soft top may experience water accumulation in the foot wells due to the soft top drains becoming clogged with leaves and other debris.
As mass production changes:- A filter has been added to the drain valve assembly to prevent leaves or other foreign substance from clog-
ging the drain.- Ribs have been added to the upper and lower valves of the drain valve assembly to prevent the valves (rub-
ber flaps) from being forced out of position in the event compressed air is used to clear the drains from under the vehicle.
- A foam urethane filter has been established for the drain cover.
DRAIN VALVEASSEMBLY
DRAIN COVER
1736a
Bulletin No: 09-046/10© 2010 Mazda Motor of America, Inc.
Last Issued: 10/15/2010
Page 2 of 15
Vehicles with clogged drains should have the drain assemblies updated as described in the following repair pro-cedure, also included in this bulletin are maintenance tips for the customers to perform to ensure dependable operation of these drains.
REPAIR PROCEDURENOTE: Removal of the soft top is not required to perform the repair procedure. Illustrations in this bulletin are
for component identification and location purposes only.
1. Verify customer concern.
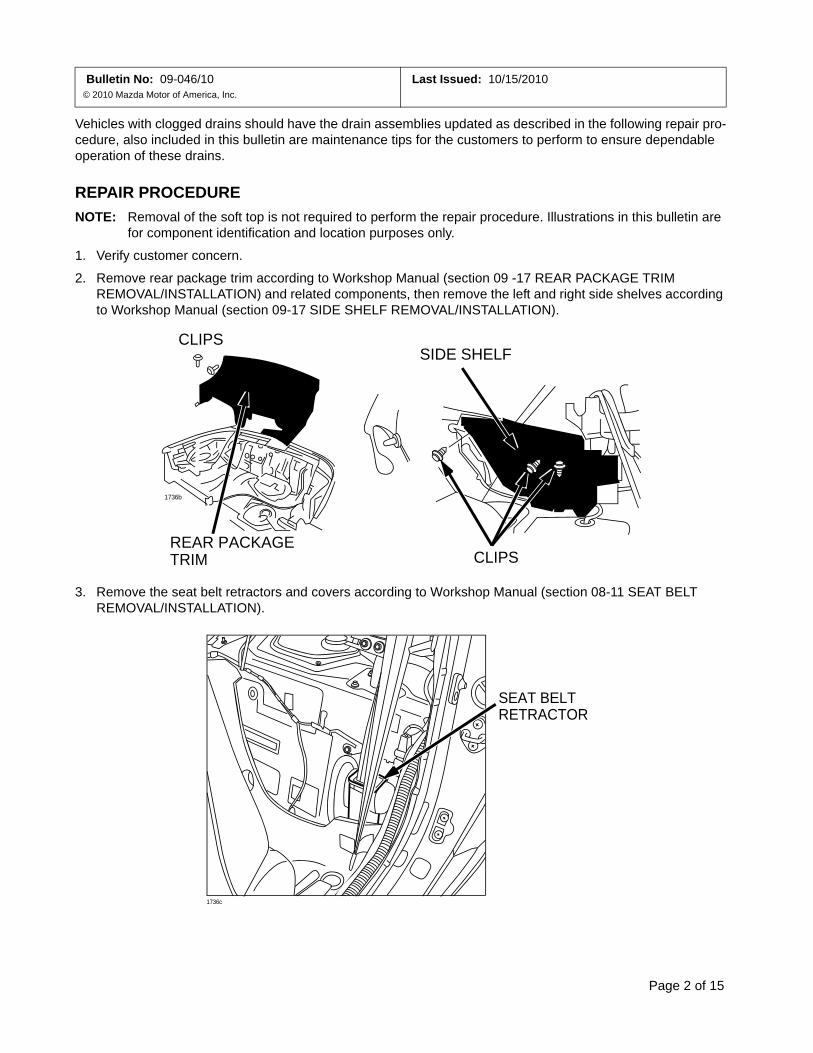
2. Remove rear package trim according to Workshop Manual (section 09 -17 REAR PACKAGE TRIM REMOVAL/INSTALLATION) and related components, then remove the left and right side shelves according to Workshop Manual (section 09-17 SIDE SHELF REMOVAL/INSTALLATION).
3. Remove the seat belt retractors and covers according to Workshop Manual (section 08-11 SEAT BELT REMOVAL/INSTALLATION).
CLIPS
REAR PACKAGETRIM
SIDE SHELF
CLIPS
1736b
SEAT BELTRETRACTOR
1736c

Bulletin No: 09-046/10© 2010 Mazda Motor of America, Inc.
Last Issued: 10/15/2010
Page 3 of 15
- TYPE A VEHICLES: Proceed to next step.- TYPE B VEHICLES: Proceed to “TYPE B VEHICLES” under DRAIN VALVE REPLACEMENT.
4. Using seat belt retractor holes for access, remove the drain valve assemblies.
DRAINVALVEASSEMBLY
DRAIN COVER
DRAIN VALVEASSEMBLY
SEAT BELTRETRACTOROPENING
VIEW THROUGH THE RETRACTOR OPENING
1736d
TO VEHICLE BODY TO DRAIN COVER

Bulletin No: 09-046/10© 2010 Mazda Motor of America, Inc.
Last Issued: 10/15/2010
Page 4 of 15
DRAIN COVER FILTER INSTALLATION1. Clean and degrease the drain cover assemblies.
2. To ensure proper adhesion of the filter to drain cover assemblies, wipe down contact area with Isopropyl alcohol.
DRAIN COVER
1736e
1736f
CLEAN THIS AREAWITH ISOPROPYLALCOHOL
Bulletin No: 09-046/10© 2010 Mazda Motor of America, Inc.
Last Issued: 10/15/2010
Page 5 of 15
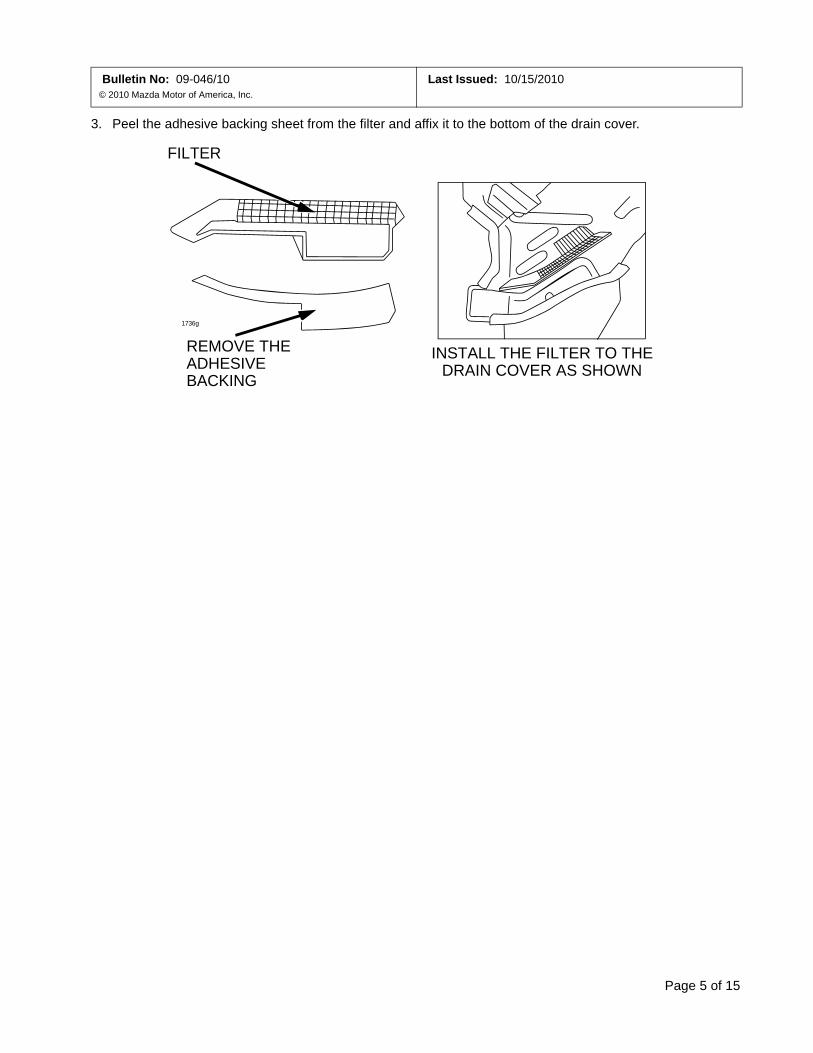
3. Peel the adhesive backing sheet from the filter and affix it to the bottom of the drain cover.
REMOVE THEADHESIVEBACKING
FILTER
INSTALL THE FILTER TO THEDRAIN COVER AS SHOWN
1736g

Bulletin No: 09-046/10© 2010 Mazda Motor of America, Inc.
Last Issued: 10/15/2010
Page 6 of 15
DRAIN VALVE REPLACEMENT1. Disassemble the drain valve assembly. Note installation position of the lower valve for proper orientation
during assembly.
2. Replace the upper and lower valves with modified ones.
NOTE: The modified valves can be identified by the ribs inside the valve.
3. Install the modified lower valve in the same position as the old valve when removed.
1736h
LOWERVALVE
UPPERVALVE
TO VEHICLE BODY TO DRAIN COVER
BLACKHOSE
LOWERVALVE
UPPERVALVE
RIBS
1736i

Bulletin No: 09-046/10© 2010 Mazda Motor of America, Inc.
Last Issued: 10/15/2010
Page 7 of 15
4. Install the modified upper valve with the small end inside the drain valve assembly hose.
5. Using seat belt retractor hole for access, install drain valve assembly. Connect upper valve to drain cover hose and plug lower valve into body.
NOTE: Insert fingers into drain cover hose from top to aid when installing upper valve into drain cover hose.
LOWERVALVE
UPPERVALVE
SMALLDIAMETER
LARGEDIAMETER
1736j
TOWARD DRAINCOVER
BE CAREFUL OF THE DIRECTION TO WHICH THE
UPPER VALVE FITTED.
DRAINCOVER
RETRACTORHOLE
1736k INSTALLED DRAIN VALVE ASSEMBLY

Bulletin No: 09-046/10© 2010 Mazda Motor of America, Inc.
Last Issued: 10/15/2010
Page 8 of 15
6. Insert a foam urethane filter in the drain cover.
7. Verify repair by pouring water into the drain covers prior to reassembly to confirming water only exits under vehicle and does not leak from drain valve tubes assemblies into retractor holes and/or overflow drain cover assemblies.
POUR WATER INTO THE DRAIN COVER TO MAKE SURE THE
WATER DOES NOT OVERFLOW.
1736l

Bulletin No: 09-046/10© 2010 Mazda Motor of America, Inc.
Last Issued: 10/15/2010
Page 9 of 15
8. Install the seat belt retractors and covers according to Workshop Manual (section 08-11 SEAT BELT REMOVAL/INSTALLATION).Tightening Torque:Retractor Upper Bolts (2): 583-797 in-lbf (7.8-10.8 N.m)Retractor Lower Bolt: 28.2 -57.8 ft-lbf (38.2 -78.4 N.m)
9. Install the left and right side shelves, rear package trim and related components according to Workshop Manual (section 09-17 SIDE SHELF REMOVAL/INSTALLATION).
NOTE: If the carpet has become wet as a result of water entry into the vehicle, the normal procedure is to dry and reuse the carpet and felt pads. If felt pad replacement is necessary due to odor, replace the felt pads with the newly established service felt parts according to Service Bulletin 09-012/09 (Establishment Of Service Felt Under Floor Mat) issued March 11, 2009.
10. Communicate to customer that periodic cleaning of leaves and other debris from bottom of convertible top is required. Please provide a copy of “Convertible Top Drain Maintenance Tips” to customers for their refer-ence.

Bulletin No: 09-046/10© 2010 Mazda Motor of America, Inc.
Last Issued: 10/15/2010
Page 10 of 15
TYPE B VEHICLES:1. Clean all debris from the drains.
2. Insert a foam urethane filter in the drain cover.
3. Verify repair by pouring water into the drain covers prior to reassembly to confirming water only exits under vehicle and does not leak from drain valve tubes assemblies into retractor holes and/or overflow drain cover assemblies.
POUR WATER INTO THE DRAIN COVER TO MAKE SURE THE
WATER DOES NOT OVERFLOW.
1736l
Bulletin No: 09-046/10© 2010 Mazda Motor of America, Inc.
Last Issued: 10/15/2010
Page 11 of 15
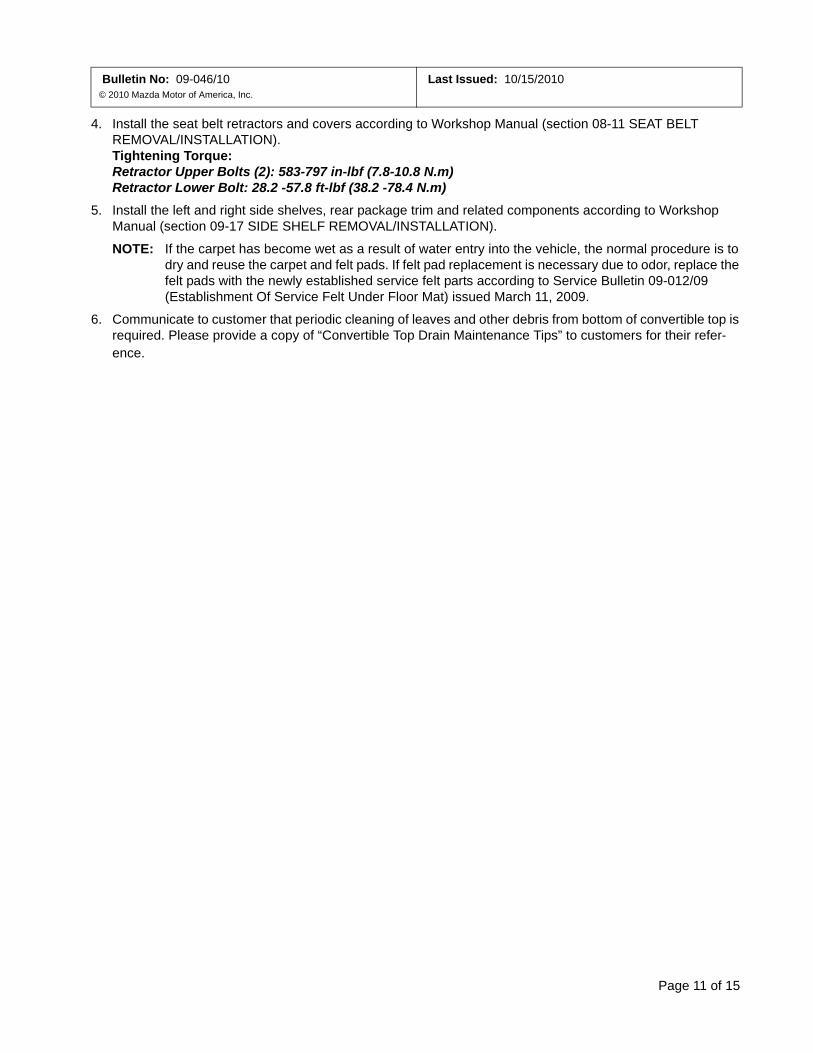
4. Install the seat belt retractors and covers according to Workshop Manual (section 08-11 SEAT BELT REMOVAL/INSTALLATION). Tightening Torque:Retractor Upper Bolts (2): 583-797 in-lbf (7.8-10.8 N.m)Retractor Lower Bolt: 28.2 -57.8 ft-lbf (38.2 -78.4 N.m)
5. Install the left and right side shelves, rear package trim and related components according to Workshop Manual (section 09-17 SIDE SHELF REMOVAL/INSTALLATION).
NOTE: If the carpet has become wet as a result of water entry into the vehicle, the normal procedure is to dry and reuse the carpet and felt pads. If felt pad replacement is necessary due to odor, replace the felt pads with the newly established service felt parts according to Service Bulletin 09-012/09 (Establishment Of Service Felt Under Floor Mat) issued March 11, 2009.
6. Communicate to customer that periodic cleaning of leaves and other debris from bottom of convertible top is required. Please provide a copy of “Convertible Top Drain Maintenance Tips” to customers for their refer-ence.
Bulletin No: 09-046/10© 2010 Mazda Motor of America, Inc.
Last Issued: 10/15/2010
Page 12 of 15
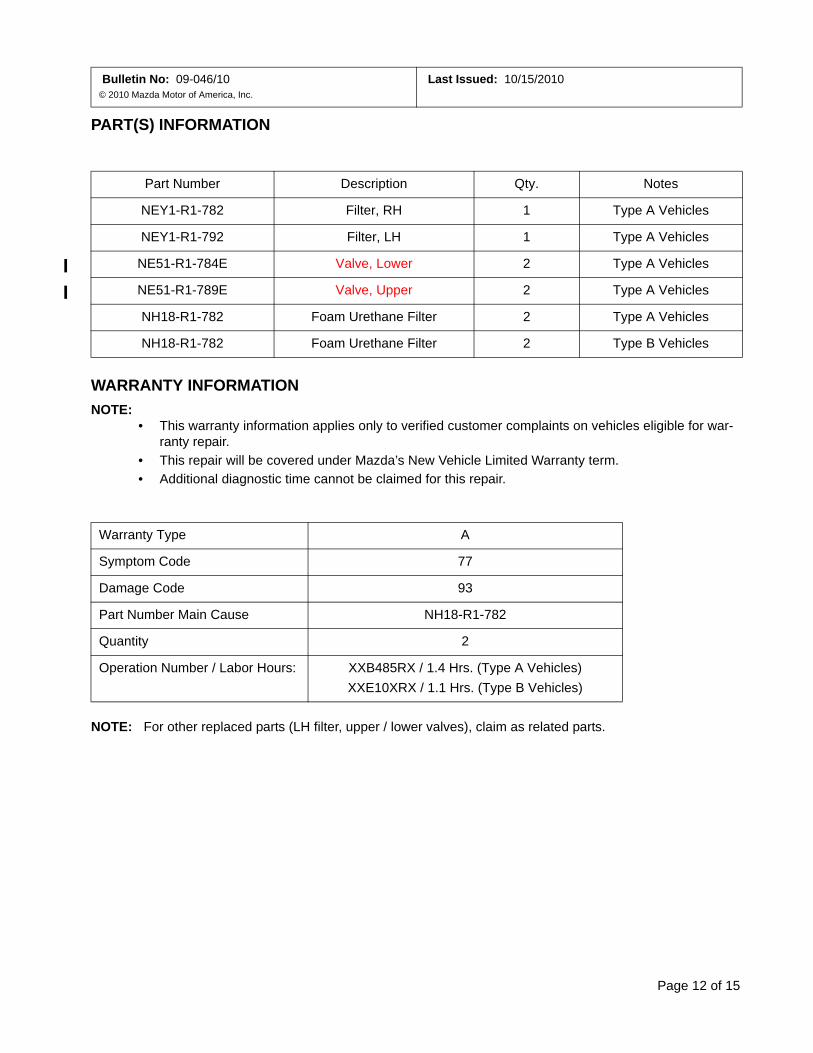
PART(S) INFORMATION
WARRANTY INFORMATIONNOTE:
• This warranty information applies only to verified customer complaints on vehicles eligible for war-ranty repair.
• This repair will be covered under Mazda’s New Vehicle Limited Warranty term.• Additional diagnostic time cannot be claimed for this repair.
NOTE: For other replaced parts (LH filter, upper / lower valves), claim as related parts.
Part Number Description Qty. Notes
NEY1-R1-782 Filter, RH 1 Type A Vehicles
NEY1-R1-792 Filter, LH 1 Type A Vehicles
NE51-R1-784E Valve, Lower 2 Type A Vehicles
NE51-R1-789E Valve, Upper 2 Type A Vehicles
NH18-R1-782 Foam Urethane Filter 2 Type A Vehicles
NH18-R1-782 Foam Urethane Filter 2 Type B Vehicles
Warranty Type A
Symptom Code 77
Damage Code 93
Part Number Main Cause NH18-R1-782
Quantity 2
Operation Number / Labor Hours: XXB485RX / 1.4 Hrs. (Type A Vehicles)XXE10XRX / 1.1 Hrs. (Type B Vehicles)
Bulletin No: 09-046/10© 2010 Mazda Motor of America, Inc.
Last Issued: 10/15/2010
Page 13 of 15
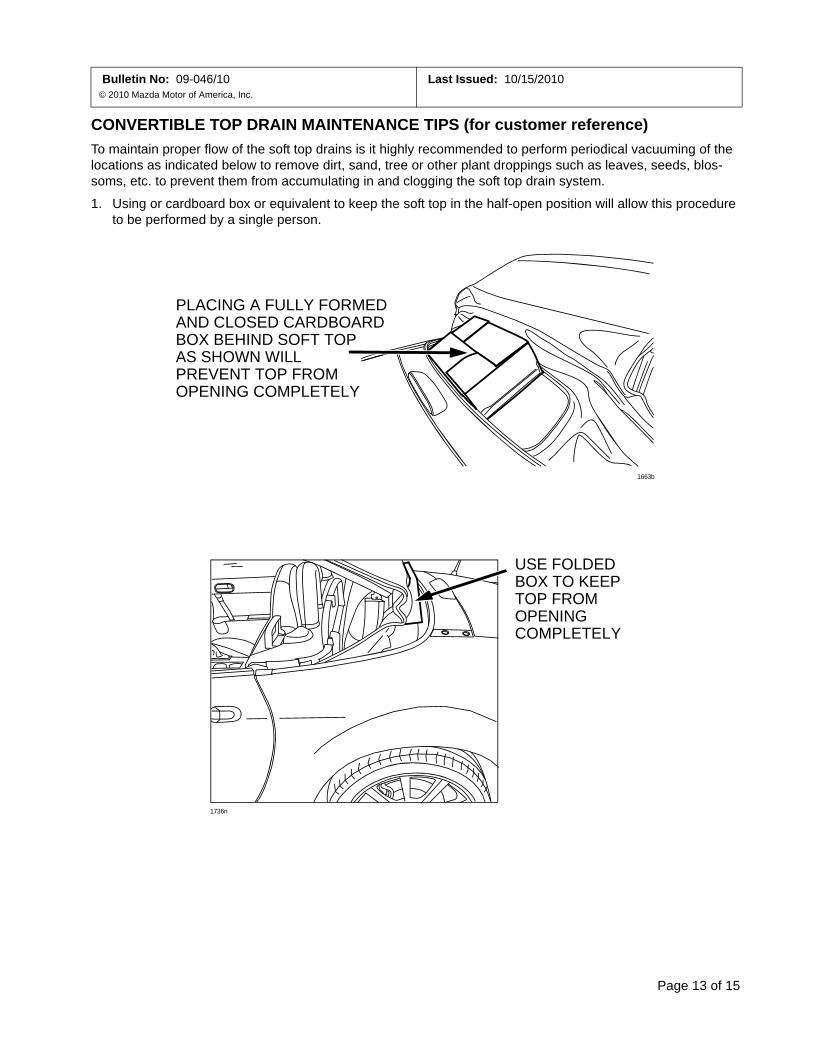
CONVERTIBLE TOP DRAIN MAINTENANCE TIPS (for customer reference)To maintain proper flow of the soft top drains is it highly recommended to perform periodical vacuuming of the locations as indicated below to remove dirt, sand, tree or other plant droppings such as leaves, seeds, blos-soms, etc. to prevent them from accumulating in and clogging the soft top drain system.
1. Using or cardboard box or equivalent to keep the soft top in the half-open position will allow this procedure to be performed by a single person.
PLACING A FULLY FORMEDAND CLOSED CARDBOARDBOX BEHIND SOFT TOPAS SHOWN WILL PREVENT TOP FROMOPENING COMPLETELY
1663b
USE FOLDED BOX TO KEEP TOP FROMOPENING COMPLETELY
1736n

Bulletin No: 09-046/10© 2010 Mazda Motor of America, Inc.
Last Issued: 10/15/2010
Page 14 of 15
2. With the soft top down, Using a vacuum cleaner, remove the foreign substances (such as leaves) from around the rear edge of convertible top (A) between the soft top and the vehicle body.
NOTE: Pay special attention to areas “B” and “C” when vacuuming the convertible top filters.
AREA "B": Insert the vacuum cleaner hose inside the convertible top, remove leaves and/or debris from top of the drain cover filter on right and left side of vehicle.
1736o
CB B C
A
1736p
B

Bulletin No: 09-046/10© 2010 Mazda Motor of America, Inc.
Last Issued: 10/15/2010
Page 15 of 15
AREA "C": Insert the vacuum cleaner hose inside the convertible top, remove the leaves and/or debris from the top of the filter through the rear package trim slits on right and left side of vehicle.
SLIT1736q
C