SERIES AL4000 AU LIGHT TOWER - Geniemanuals.gogenielift.com/Parts And Service...
69
SERIES AL4000 AU LIGHT TOWER OPERATION & SERVICE MANUAL SERIAL NUMBER FOF-15872 AND LATER P/N - AL4000 AU REV. 19-02-2007
Transcript of SERIES AL4000 AU LIGHT TOWER - Geniemanuals.gogenielift.com/Parts And Service...

SERIES AL4000 AULIGHT TOWER
OPERATION & SERVICE MANUAL
SERIAL NUMBER FOF-15872 AND LATER
P/N - AL4000 AU REV. 19-02-2007

TABLE OF CONTENTS
1.0 Safety Precautions Page #
Safety Precautions 4-8
2.0 Operating Instructions
Light Tower Operating Instructions 9-16General Specifications and Routine Maintenance 17-18Recommended Engine Oil 19Fastener Torque Specifications 20Traceable Numbered Wiring System 21Criteria for Replacement of Wire Rope 22Broken Cable Replacement Procedure 23-24Cable Replacement Diagram 25Shim Placement Diagram 26Rear Bearing Inspection Requirements 27Engine (see manufacturer’s handbook) n/aGenerator (see manufacturer’s handbook) n/a
3.0 Troubleshooting Guide
Light Fixture Troubleshooting Guide 28-30Light Tower Troubleshooting Guide 31-33Engine (refer to manufacturer’s handbook) n/aGenerator (refer to manufacturer’s handbook) n/a
4.0 Wiring Diagrams
Fixture with Joy Connector (MH) 36Metal Halide Ballast / 3-Pin Connector Wiring Diagram 37AC Wiring 38Trailer Wiring 39Coil Cord Wiring 40DC Wiring 41Control Box Wiring, Auto Shutdown Timer 42
(continued next page)
2

5.0 Parts Manual Page #
Decals 44Trailer and Related Part 45Fuel Tank Assembly 46Axle and Wheels 47Cabinet Assembly 48-49Tower Base Assembly – Electric Winch 50Tower Assembly 51Tower Section – Six inch diameter base tube 52Sheave and Shim Assembly - Four inch tower section 53Tower Section – Four inch square tube 54Tower Section – Three inch square tube 55Tower Section - Two inch square tube 56Crossarm 57Floodlight Fixtures 58Radiator Right Side Mounting Bracket 59Generator Mounting 60Engine and Generator (Kubota D1105 / Leroy Somer 8 kW) 61-62Radiator Assembly and Mounting 63Ballast Box Assembly – 50 Hz 64Electrical Box Assembly 65Auto Shutdown Timer 66
6.0 Warranty Information
Terex Light Tower Model Coding System 68Manufacturer’s warranty statement 69
3

SECTION 1
S A F E T Y P R E C A U T I O N S
The following symbols in this manual signal potentially dangerous conditions to the operator or equipment.Read this manual carefully. Know when unsafe conditions can exist. Then, take necessary steps to protectpersonnel, as well as equipment.
WARNING: TEREX-Amida uses this symbol throughout this manual to warn of possible injuryincluding death.
CAUTION: TEREX-Amida uses this symbol to point out potential damage to equipment.
Lamps, fuels, electrical equipment, batteries, exhaust gases, loose fasteners, and moving parts presentpotential hazards that could result in serious personal injury. Be diligent in following the procedures recom-mended below. Also, observe the many additional general safety rules practiced by trained operation andmaintenance personnel in your company and industry.
WARNING: Always wear a hard hat when operating the light tower!
• Guard Against Electric Shock
This light tower also has provisions for producing high voltage electricity that can produce a fatalshock to a person who accidentally places their self in the electrical circuit. Use every precautionto avoid contact with the high voltage electric circuit.
Beware of a cut or damaged power cord. Replace immediately.
Take extra precautions when troubleshooting electrical problems:
When troubleshooting indicates a malfunction in the high voltage AC system, pass thetroubleshooting task on to a qualified and trained electrician.
Disconnect electrical power and turn off engine before removing protective covers on high voltageelectrical enclosures.
Understand that the electrical circuits in this light tower complete their paths back to the generatorwithin the equipment. The neutral conductor at the generator is bonded to the equipment frame.
Earth (ground) wires within the system are also bonded to the equipment frame.
4

• Guard Against Electric Shock (Power Lines)
Ensure protection against overhead high voltage power lines. This light tower is not insulated.Any contact with high voltage power lines will result in death or serious injury. See diagrambelow for recommended clearances from overhead aerial conductors.
Note: The specified clearances are recommendations. It is the responsibility of the person incharge to comply with the applicable regulations in force in the State in which theequipment is being operated.
5

• Guard Against Battery Hazards
WARNING: Lead acid batteries can be dangerous. The sulfuric acid in the battery can cause severeskin and eye burns. The hydrogen gas emitted during charging can explode if an arc or flame ispresent near the battery. Use precautions to prevent acid burns or explosive conditions.
Do not smoke while servicing batteries.
Do not allow tools to touch battery terminals and create an arc. Do not test battery voltage by settinga brief arc at the terminals, use a multimeter instead.
Disconnect the negative terminal of the battery when working on the engine or other parts to preventaccidental arcing. Disconnect the negative cable at the end away from the battery.
Always wear eye protection when servicing the battery.
When charging the battery, do not remove the vent caps.
If acid does get on skin or in eyes, immediately flush under running water, and then obtain medicalhelp as soon as possible.
• Guard Against Fire Hazard
Use caution with diesel fuel and motor oil because of fire hazards.
Do not fill fuel tank while engine is running.
Do not smoke or use open flame near the unit or the fuel tank.
Be sure the fuel supply has a positive shut-off valve.
Do not replace fuel lines with materials different from those supplied as original equipment.
Have a fire extinguisher nearby. Be sure the extinguisher is properly maintained and be familiar withits proper use. Extinguishers rated ABE by the FPAA are appropriate for all applications.
Keep this unit clean of excessive build-up of spilled oil and fuel. Accumulated oil and fuel can causeoverheating and subsequent engine damage as well as present a fire hazard.
• Protect The Environment And Practice Good Industrial Hygiene
WARNING : DO NOT USE INDOORS UNLESS PROPERLY VENTILATED OR AN EX-HAUST SCRUBBER IS USED. EXHAUST GASES ARE TOXIC. Provide an adequate exhaustsystem to properly expel discharged gases. Check exhaust system regularly for leaks. Periodicallycheck to ensure that the exhaust manifolds are secure and not warped (see maintenance schedule inmanufacturers handbook). Make sure the unit is well ventilated.
Prevent pollution by catching used oil in a container for proper disposal.
Wash hands to remove oil and fuel. Practice good industrial hygiene.
6

• Do Not Touch Hot Parts
WARNING : The exhaust manifold and tailpipe are very hot. Parts of the engine are also hot.Avoid touching hot parts of the engine or tailpipe. Use protective gloves when handling hot partsTake note of CAUTION: Hot Surface decal adjacent to exhaust tailpipe.
• Be Alert And Attentive To The Task
Read the safety instructions and operating procedures before attempting to troubleshoot or workon this unit. Also read the engine and generator manuals, which are separate booklets that areprovided with this manual.
Do not work on this equipment when mentally or physically fatigued.
Do not work on or operate this equipment when under the influence of performance impairing drugsor alcohol.
If this manual becomes lost, order a new one from Genie Australia so future operation andmaintenance personnel may read these instructions.
• Beware Of Moving Parts
Avoid being hit or pinched by moving parts of this unit
WARNING: Loose jackets, shirts, sleeves and especially neckties should not be worn while work-ing on or running the unit. Serious injury or death may result.
Only remove guards or protective devices from unit temporarily to gain access for maintenance.Always replace guards and protective devices promptly.
Keep your hands away from moving parts. Particularly, be sure to keep hands clear of the blowerand alternator belts when the engine is running. Take note of WARNING: Entanglement Hazarddecal on kerbside and roadside doors.
• Beware Of Traffic Hazards
Stand clear of traffic when starting or checking the unit along the road. Implement a traffic manage-ment system before setting up the unit.
Check the fuel tank, oil pan, and fuel and oil lines for leaks that would spill fuel or oil on the road.Check fasteners and mounting brackets periodically to ensure all are tight and nothing is in danger offalling off during transit.
• Be Careful When Lifting
Use the lifting eye or forklift pockets on the tower for lifting the trailer and tower assembly only.Make sure any tie-downs at the bottom of the trailer are released, and the cradle retaining pin isinserted and secured, prior to lifting.
WARNING: NEVER suspend any other equipment from the shipping tie-downs. Seriousinjury or damage to equipment may result.
7

• Use Only Equal Replacement Parts
When a part fails and needs to be replaced only use equivalent parts of equal performance andstrength.
When a bolt is lost or fails, replace only with the equivalent size, length, thread, grade, and material.Replace stainless steel fasteners with stainless steel fasteners. The engine may use metric or SAEbolts, but all other bolts are generally SAE thread. Be sure to use Grade 8 bolts and nuts to mount thegenset to the trailer. If the material/ grade of a fastener is in question, contact Genie Australia forinformation or part replacement.
Replace the fuel and oil hoses with items of equal material, diameter and length.
The wire rope must only be replaced with the genuine Terex part. Contact Genie Australia regardingreplacement parts.
• Use Caution Working Near Lamps
WARNING : This unit is equipped with metal halide lamps. Metal halide lamps produce short-waveultra-violet radiation and can cause serious skin and eye burns/ inflammation if the outer enve-lope of the lamp is broken or punctured. Do not operate this unit near people if the outer envelopeof the halide lamp is broken.
• Never Climb On Top Of Unit
WARNING: NEVER climb on top of the cabinet and/ or tower when erected or retracted.Serious injury or death may result.
• Never Carry Additional Items or Equipment
WARNING: The trailer is not intended to carry any additional items or equipment. The light toweris not intended to carry any additional equipment such as banners or signs. Risk of overturning oroverload.
• Site Specific Hazards
WARNING: Be mindful of the particular risks that may arise in certain locations. It is the end usersresponsibility to identify the hazards associated with setting up the light tower and to control thoserisks. Additional precautions may be necessary for example to isolate the public from the tower if itis left unsupervised in public spaces. In particular the unit should be secured to protect againstvandalism or unauthorised entry into or onto the unit.
• Check Safety Systems Have Not Been Tampered With
WARNING: Be aware of injuries arising from tampering with safety systems. It is the usersresponsibility to ensure safety systems are functional before use.
8

SECTION 2
OPERATING INSTRUCTIONS
I M P O R T A N T : READ ALL DIRECTIONS IN MANUAL CAREFULLYBEFORE OPERATING EQUIPMENT
WARNING: DO NOT RAISE TOWER IN THE VICINITY OFOVERHEAD POWER LINES! ALWAYS WEAR AHARD HAT WHEN OPERATING MACHINERY!
O P E R A T I N G I N S T R U C T I O N S
In addition to the standard model light tower, a mine spec. variation is available which can beidentified by the following additions:
• Drip trays under fuel tank and engine sump• Louvred vents in engine enclosure doors• Mast tiedown chains• Flexible conduit installed on light fixture cables• Battery isolation switch• Auxiliary power outlet deleted• Residual current device (RCD) installed in generator output circuit
Where appropriate, differences in operating instructions and parts information for each modelare highlighted.
I. MOVE LIGHT TOWER TO DESIRED LOCATION KEEPING THE FOLLOWINGIN MIND:
NOTE: Although the light tower is designed to withstand the rigors of the environment it canonly do so if it is properly set up and monitored to ensure that it remains set up according tothe specification.
A. Beware, particularly during inclement weather conditions, of the following:• Wind conditions, maximum wind speed 100 km/h - risk of overturning• Subsidence under stabilising pads or the trailer in general - risk of overturning• Proximity to vehicular traffic - risk of collision• Proximity to power lines - risk of electrocution• When left in public places - risk of vandalism or theft• In winter environments risk of structural or mechanical damage• It is recommended that a contact phone number is displayed on the unit.
9

B. The light tower should not be placed where those working under the light are either:
1) Forced to look into the light regularly.2) Forced to work with their backs to the light (shadows will block the light from the work area).
C. The area where the tower is positioned should be firm and relatively level. The trailer must be set upwithin the range indicated on the level gauge provided on the drawbar.
D. The light tower should be located on the same level or on ground higher than the area being lighted(higher light mounting heights reduce shadow length).
E. Unit should be level to ensure smooth, trouble-free tower telescoping. Tower may not telescopedown properly when unit is not level.
II. UNHITCH FROM THE TOWING VEHICLE AS FOLLOWS:
A. CAUTION: Ensure manual park brake is applied before unhitching from vehicle.
B. Swing the jockey wheel into position and crank jack up to lift tongue off the towing vehicle.
III. LEVEL THE TRAILER, USING THE JACKS AS FOLLOWS:
A. Extend the front and rear outriggers until the lock pins snap into place. Swing the jack on eachoutrigger into vertical position and lock into place. Use dunnage under the pad if the ground surfaceis soft.
B. Start at the highest jack position. Rotate the jack handle until the jack foot touches the ground.
C. Raise the other jacks to level trailer. Use the level gauge provided on the drawbar to ensure the traileris level. Ensure that all jacks are down to prevent the tower from tipping over when raised.
WARNING: NEVER use the jacks to raise tires off ground!
IV. DRIVE GROUNDING ROD INTO EARTH
A. A grounding rod is provided. Please refer to local authorities for use of grounding rods. Drive the roda minimum of 1.2 meters into the ground and secure the earth wire to the lug located on the trailerframe.
10

V. INSTALL THE FLOODLIGHTS ON THE CROSSARM (MINE SPEC. EXCLUDED)
A. Remove the light fixtures from their travel position and install them on the crossarm studs. Fixturesshould be mounted on the crossarm so that the plugs are closest to the mast. Ensure all fixtures arerotated down, and that adjacent fixtures face each other to minimize possible damage duringtransportation.
B. Route the cords so that they do not interfere with rotating or tilting the light fixtures.
C. Set the vertical aim for each light fixture.
D. Set the spread between the light fixtures horizontal axis.
E. Plug each fixture into the receptacles provided. If they are plugged into the numbered receptacles in aclockwise rotation, starting at upper or 1:00 position, it will be easy to troubleshoot the electricalsystem without lowering the tower (see diagram under Light Fixture Trouble-Shooting).
CAUTION: If Tungsten Halogen lamps are used, the cord must be routed through the cordsupport rings. Failure to do so may result cord burn-through and short circuit due to the highfixture temperature.
11
"T" BOLT
KICK-OUT SPRING
TELESCOPING LOCKING PIN
TRAVEL LOCKING PIN
VERTICAL LOCKING PIN
PIVOT PIN
FIXTURE STORAGE BRACKETS

VI. RAISING THE TOWER (refer to drawing on the previous page)
A. MINE SPEC. ONLY: Disconnect the two (2) mast tiedown chains from the crossarm.
B. Remove the tower travel locking pin from the cradle at the rear of the cabinet. Failure toremove the tower travel locking pin may cause winch overload.
C. Aim the fixture, both horizontally and vertically, to the estimated angles that will light thework area.
CAUTION: Ensure that the safety locking pin is removed from the vertical locking pin atthe base of the pivot post prior to raising the tower.
D. Activate the electric winch by pressing the winch toggle switch in the control box in the updirection this will raise the tower to the vertical position. The vertical locking pin at the baseof the pivot post will lock automatically and you will hear it “snap” into place. Manuallyinsert the safety locking pin into the locking device and secure with the attached hairpin clip.
E. Release the tension on the cable by pressing the winch toggle switch in the control box to thedown direction (loosen cable approximately ¼ - ½ turn). Pull the telescoping locking pin onthe galvanized tower section. Hold this out while pressing the electric winch toggle switch inthe up direction to raise the tower. After the tower has telescoped slightly, the locking pin canbe released. Raise the tower to the desired height. Stop when the red paint is visible on the75mm (3 inch) middle section.
CAUTION: Do not over extend the light tower beyond the lower red mark on the middlemast section.
WARNING: DO NOT ATTEMPT TO LEAN THE TOWER DOWN WHENEXTENDED - DEATH, SERIOUS INJURY OR DAMAGE MAY OCCUR.
VII. STARTING THE ENGINE / GENERATOR SET
CAUTION: Ensure the circuit breakers are turned “OFF”. This prevents the engine fromstarting under load and prevents electrical equipment from being damaged due to impropervoltage and frequency.
A. If the engine was previously shutdown by the auto shutdown timer elapsing (see Section XV),the RESET button must be depressed before the engine can be re-started.
B. Check the oil, fuel, and coolant levels. If the fuel tank is empty, it may be necessary to bleedthe fuel line after filling the tank (see engine instruction book for procedure).
C. Turn the ignition switch to the “ACC” position (see adjacentdiagram). Press the preheat push-button for a maximum of 20SECONDS. Do not engage the preheat button longer than thetime specified or damage may occur.
12

D. Turn the ignition switch to the “START” position to engage the engine. After the enginestarts, release the switch so that it returns to the “RUN” position. Let the engine come up tospeed and stabilize (review the engine operating procedures in the manufacturers handbook).Note: If engine will not start, leave switch in run position for additional 15-20 seconds(maximum of 45 seconds) to completely prime the fuel system. Then repeat step “D” andstart engine.
VIII. TURN ON THE FLOODLIGHTS
A. Turn on the main circuit breaker. Turn the circuit breakers “ON” and check to ensure alllamps come on. Allow a minimum of two (2) minutes for lamps to reach full luminance.
B. If required, rotate the tower to aim the lights as desired. Tighten the tower rotation T-bolt.
C. Adjust the tower vertically and adjust lighting direction of individual fixtures if required.
IX. TURN OFF FLOODLIGHTS
A. Turn light circuit breakers off. Turn main breaker off.
B. Allow the engine to run approximately 30 seconds after load has been removed prior toturning off the engine.
C. Turn engine switch to “OFF” to shut down the engine.
CAUTION: Do not shut down engine prior to turning lights off.
CAUTION: Allow lamps to cool at least ten to fifteen (10-15) minutes before moving thetower to avoid lens or bulb breakage.
X. LOWERING THE TOWER TO TRAVELING POSITION
A. Using the electric winch, telescope the tower down to its fully retracted position until thetelescoping locking pin snaps into place.
CAUTION: Ensure that the telescoping locking pin locks before pulling the vertical lockingpin at the base of the pivot post. This ensures the tower is completely lowered and cannot bedamaged by telescoping out while in the travel position.
B. Loosen the tower rotation T-bolt.
C. Rotate the tower so that the groove in the galvanised ring at the pivot is pointing to the rear ofthe trailer to enable the tower to be lowered into the travel position.
D. Tighten the tower rotation T-bolt.
CAUTION: Ensure that personnel are not in close vicinity to the tower, particularly behindthe trailer when the tower is being lowered.
13

E. Pull the vertical locking pin at the base of the pivot post (the kick-out spring should providesufficient pressure to start the tower pivoting over when the electric winch toggle switch ispressed in the down direction).
F. Continue to lower the tower into the cradle using the electric winch.
G. Insert the tower travel locking pin into the cradle. Secure with hairpin clip.
XI. RELOCATING LIGHT TOWER TO NEW LOCATION
A. Ensure that tower has been properly lowered (see Section X) and all locking pins areengaged.
B. Ensure all fixtures are rotated down, and that adjacent fixtures face each other to minimizepossible damage during transportation.
C. MINE SPEC. ONLY: Attach the two (2) mast tiedown chains to the crossarm and tensionusing the turnbuckle.
CAUTION: Ensure manual park brake is engaged before retracting outriggers.
D. All jacks must be raised, swivelled up and all outriggers locked into travel position.Disconnect the earth rod and lead and place in the storage provided inside the trailer.
E. Ensure that the tow coupling is properly secured to the towing vehicle and safety chains areattached. Raise the jockey wheel and rotate and lock in position. Release the manual parkbrake.
F. Do not tow at excessive speeds (100 km/h or 60 mph maximum) as the weight of the lighttower can cause loss of vehicle control, especially under emergency conditions.
XII. AUXILIARY POWER OUTLET (MINE SPEC. EXCLUDED)
A. Total auxiliary power cannot exceed 2500 W. A 10 Amp residual current device (RCD) isinstalled in the auxiliary power outlet circuit.
B. Before plugging in extensions cords, feed them up through the trailer frame and connect tothe outlet. Close the cabinet doors to protect control panel and other components fromweather (see Miscellaneous Specifications and Routine Maintenance section for powercontrol details).
C. Ensure that all extension cords are protected from damage and water.
D. The operator must test the RCD using the test button daily, or before every use, whichever isthe longer. Ensure that the RCD is on, then push the test button and check that it trips.
14

XIII. GENERATOR RESIDUAL CURRENT DEVICE (MINE SPEC. ONLY)
A. A 20 Amp residual current device (RCD) is installed in the generator output circuit.
B. The operator must test the RCD using the test button daily, or before every use, whichever isthe longer. Ensure that the RCD is on, then push the test button and check that it trips.
XIV. LEAVING THE LIGHT TOWER UNATTENDED
A. Before leaving the light tower unattended, secure all items and lock the cabinets to preventunauthorised use.
B. Be mindful that weather conditions may change and ensure that an emergency responseprocedure is in place.
C. Arrange for periodic inspections where necessary.
D. Protect the light tower against vandalism and wilful damage by securing the tower andlocating it in a secure area.
XV. AUTO SHUTDOWN TIMER (OPTION)
An auto shutdown timer is available as an option for standard and mine spec. light towers.The timer will shutdown the engine after a preset run time so that the light tower may be leftunattended (see Section XIV).
A. The engine must first be running before the timer can be started.
15

B. To start timer, hold switch in START position until ON lamp illuminates (for about 3 sec.)
C. Select desired run time using rotary switch (6-14 hours).
D. The timer can be stopped before the preset run time has elapsed by toggling the switch to theSTOP position (ON lamp switches off).
E. After the preset run time has elapsed, the RESET button will trip and the engine willshutdown.
F. The RESET button must be depressed before the engine can be re-started.
CAUTION: Ensure the circuit breakers are turned “OFF” before re-starting the engine. Thisprevents the engine from starting under load and prevents electrical equipment from beingdamaged due to improper voltage and frequency.
XVI. BATTERY ISOLATOR SWITCH (MINE SPEC. ONLY)
A lockable battery isolator switch is provided to prevent unauthorised use of the light tower.
16

TEREX-AMIDA MODEL AL4000 AULIGHT TOWER GENERAL SPECIFICATIONS
AND ROUTINE MAINTENANCE
TEREX-Amida Model AL4000 AU Series Light Tower provides mobile, trailer mounted floodlighting fornight time maintenance, construction, mining, and emergency work. It consists of a trailer with dieselpowered 8 kW 50 Hz 240 Volt generator, and a 30 foot cable actuated tower with four (4) 1000 watt flood-light fixtures. It is ideally suited for heavy-duty use and is built to meet the following specifications:
SPECIFICATIONS
Overall length, travel position w/fixtures & tongue ................... 4547 mm (179”)Overall length, tower vertical w/tongue & jacks ........................ 3150 mm (124”)Trailer frame length .................................................................... 1778 mm (70”)Overall height, floodlighting position ........................................ 9.14 m (30ft)Overall height, travel position .................................................... 1727 mm (68”)Overall width with fenders ......................................................... 1549 mm (61”)Overall width with outriggers pulled out .................................... 2591 mm (102”)Trailer frame width ..................................................................... 1041 mm (41”)Tongue length ............................................................................. 1333 mm (52.5”)Tongue weight w/lights on crossarm .......................................... 56.7 kg (125 lb)Wheel size .................................................................................. 381 mm (15”)Tyre pressure................................................................................ 220 kPa (32 psi)Axle Rating ................................................................................. 1587 kg (3500 lb)Total weight no fuel .................................................................... 1014 kg (2235 lb)Fuel Capacity .............................................................................. 114 L (30 gal)Unit weight with full fuel tank ................................................... 1109 kg (2445 lb)Maximum towing speed...............................................................100 km/h (60 MPH)Maximum wind speed..................................................................100 km/h (60 MPH)
Beaufort scale - 10 (whole gail)Noise Level ................................................................................. 62 dBA @ 7 mElectric Winch ............................................................................ 12 V 1800 kg (4000 lb)Auxiliary Power Outlet (Mine Spec. Excluded) ......................... 10 A, 240 V 50 Hz, 2500 W
17

BRAKE SYSTEM
This light tower is fitted with hydraulic surge brakes and a manual park brake.- Hydraulic brake system requires DOT3 or higher brake fluid- Service interval for brake adjustment every 200 hours.
ELECTRIC WINCH
CAUTION: The winch wire rope must be inspected periodically according to the instructions onpage 22. The wire rope must only be replaced with the genuine Terex part.
WARNING: Never stand under any object lifted by a winch.
The electric winch is permanently sealed and does not need any periodic lubrication.
The electric winch must only be replaced with the genuine Terex part.
AUXILIARY POWER OUTLET (MINE SPEC. EXCLUDED)
A competent person must test the RCD according to AS/NZS 3760 every 12 months.
GENERATOR RESIDUAL CURRENT DEVICE (MINE SPEC. ONLY)
A competent person must test the RCD according to AS/NZS 3760 every 12 months.
TRAILER
Periodically check the condition of the trailer including the fuel tank, lighting and structure.
NOISE LEVEL
Mean SPL (sound pressure level) hemispherically at 7 meters:..................62.01 dBASound Power Level:.....................................................................................90.0 LWA re 1 pW
WIND SPEED RATING
The AL4000 AU light tower has a wind speed rating of 100 km/h (Beaufort Scale 10).The light tower must be set up as per the operating instructions in this manual to achieve themaximum wind speed rating of 100km/h in any direction.
STATUTORY APPROVALS
The Terex AL4000 AU light tower is built to the following standards:- AS 2790 Electricity generating sets - Transportable- AS 3010 Electricity installations - Generating sets- AS 3713 Acoustics - Industrial trucks - Noise measurement- AS 1170.2 Structural design actions - Wind actions
18

OIL/AIR SERVICE
Change the engine oil after the first 50 hours of use, and then every 200 hours thereafter.Replace the oil filter at 250 hours (2nd oil change) and after every 400 hours of use thereafter.The air filter element should be replaced once every year, or after six cleanings (seemanufacturer’s operation manual for details).
RECOMMENDED ENGINE OIL & FUEL
KUBOTA D1105 DIESEL ENGINE
Engine oil should be MIL-L-2104C or have properties of API classification of CD grades or higher.Change the type of engine oil according to the ambient operating temperature:
Above 25°C (77°F) SAE 300 to 25°C (32°F to 77°F) SAE 20Below 0°C (32°F) SAE 10W
SAE 10W-30Use #2 diesel fuel.
NOTES:
1. The temperatures in the table are the ambient temperatures at the time when the engine isstarted. If the running ambient temperatures are much higher than the starting temperatures, acompromise must be struck and a higher viscosity oil used. Multi-grade oils overcome theproblem, provided they possess a suitable specification.
2. MIL-L-2104B or MIL-L-2104C or API CD must also be used if the sulfur content of the fuelexceeds 0.5%.
3. Always use a reputable brand of diesel fuel. The sulfur content should be below 0.5%(higher sulfur content would require more frequent oil changes). Observe strict cleanlinesswhen filling the fuel tank.
4. Check the engine oil level before starting the engine or more than five minutes after it hasbeen stopped. Remove the dipstick, wipe clean, reinsert it, take it out again, and check theoil level. If the oil level is too low, remove the oil filler cap and add new oil until the FULLline on the dipstick is reached.
19

FASTENER SIZE UNF
& UNC
STAINLESS STEEL*
STAINLESS STEEL* NYLOC
NUT
SAE GRADE 5 PLATED (METRIC
8.8)
SAE GRADE 5 PLATED NYLOC
NUT
SAE GRADE 8 PLATED (METRIC
10.9)
SAE GRADE 8 PLATED NYLOC
NUT#6 .92 (1.24) .75 (1.0) 1.3 (1.7)#8 1.8 (2.4) 1.5 (2.1) 2.2 (3.0)
#10 2.43 (3.3) 2.1 (2.8) 3.5 (4.8)1/4" 7.1 (9.5) 6.0 (8.1) 8.0 (11.0) 13 (17.6)5/16" 11 (15) 13 (17.6) 16 (21.6) 25 (34)3/8" 21 (28.5) 23 (31.2) 31 (42) 47.5 (64.4)7/16" 32 (43.4) 33.5 (45.4) 42.5 (57.6) 72 (97)1/2" 44 (60) 47 (64) 80 (108) 75 (102) 105 (142) 100 (135)9/16" 60 (81) 63 (85) 90 (122) 85 (115) 153 (207) 142 (193)5/8" 99 (133) 102 (138) 150 (203) 145 (197) 190 (258) 180 (244)3/4" 132 (179) 145 (197) 230 (312) 215 (292) 400 (542) 385 (522)
4 mm 2.0 (2.7) 1.8 (2.4) 2.1 (2.8)6 mm 4.0 (5.4) 3.4 (4.6) 6.3 (8.5)8 mm 1.0 (1.4) 10 (13.6) 15 (20.3)10 mm 19 (25.7) 16 (21.7) 48 (65) 43 (58) 73 (99)12 mm 43 (58) 37 (50) 58 (79) 53 (72) 100 (135)16 mm 144 (195)18 mm 193 (262)20 mm 285 (386)
FASTENER TORQUE SPECIFICATIONS
All fasteners should be torqued to the following specifications in ft-lb (Nm). These areaverage values and a +/- 5% tolerance is acceptable.
* An anti-seize lubricant MUST be used on all stainless steel hardware.
20

TRACEABLE NUMBERED WIRING SYSTEM
(Using plug in ballasts to troubleshoot)
When troubleshooting the proceeding problems, minimize down time by following the traceablenumbered wiring system, always follow these steps:
STEP1: Ensure all ballasts, which are numbered, are plugged into lead wires withcorresponding numbers.
STEP 2: Looking at the lights from the glass side and following the diagram below,plug each fixture into the appropriately numbered plug at the top of the tower.
WARNING: Ensure that the engine is not running and that the breakers are turnedoff when connecting and disconnecting the light fixtures and ballast cables.
By adhering to the traceable numbered wiring system, troubleshooting, fixture aiming, and fixturecontrol will follow a standard predictable pattern.
21
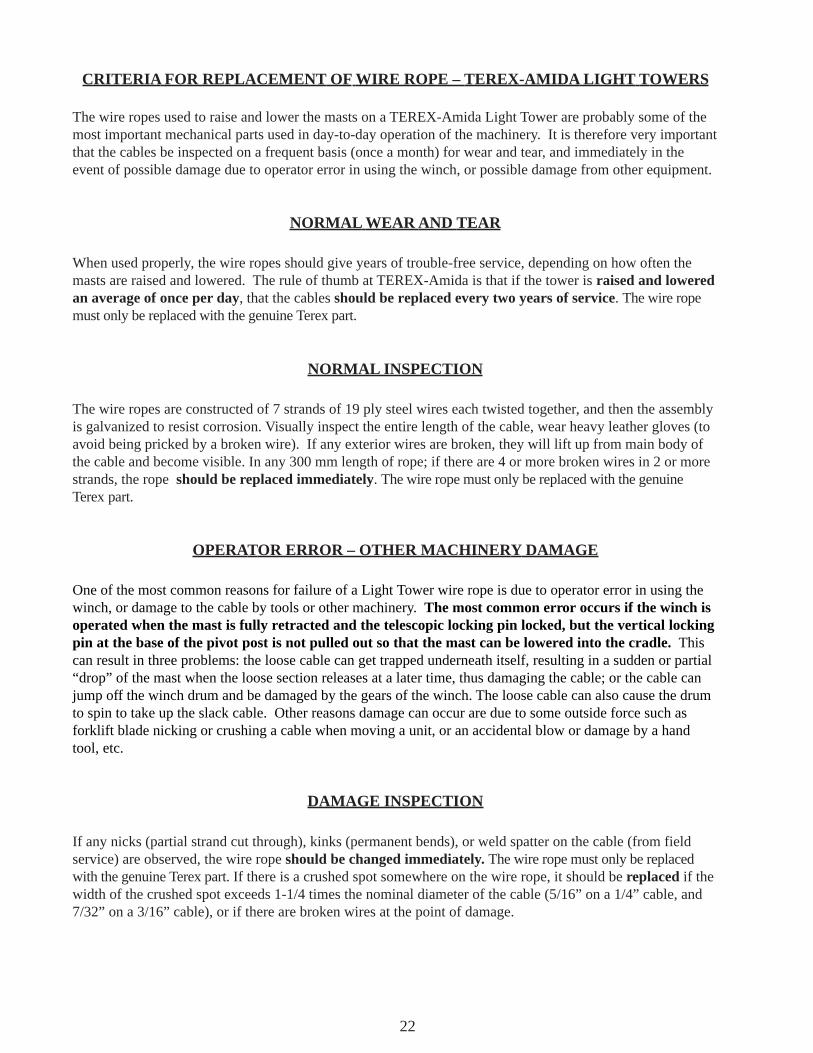
CRITERIA FOR REPLACEMENT OF WIRE ROPE – TEREX-AMIDA LIGHT TOWERS
The wire ropes used to raise and lower the masts on a TEREX-Amida Light Tower are probably some of themost important mechanical parts used in day-to-day operation of the machinery. It is therefore very importantthat the cables be inspected on a frequent basis (once a month) for wear and tear, and immediately in theevent of possible damage due to operator error in using the winch, or possible damage from other equipment.
NORMAL WEAR AND TEAR
When used properly, the wire ropes should give years of trouble-free service, depending on how often themasts are raised and lowered. The rule of thumb at TEREX-Amida is that if the tower is raised and loweredan average of once per day, that the cables should be replaced every two years of service. The wire ropemust only be replaced with the genuine Terex part.
NORMAL INSPECTION
The wire ropes are constructed of 7 strands of 19 ply steel wires each twisted together, and then the assemblyis galvanized to resist corrosion. Visually inspect the entire length of the cable, wear heavy leather gloves (toavoid being pricked by a broken wire). If any exterior wires are broken, they will lift up from main body ofthe cable and become visible. In any 300 mm length of rope; if there are 4 or more broken wires in 2 or morestrands, the rope should be replaced immediately. The wire rope must only be replaced with the genuineTerex part.
OPERATOR ERROR – OTHER MACHINERY DAMAGE
One of the most common reasons for failure of a Light Tower wire rope is due to operator error in using thewinch, or damage to the cable by tools or other machinery. The most common error occurs if the winch isoperated when the mast is fully retracted and the telescopic locking pin locked, but the vertical lockingpin at the base of the pivot post is not pulled out so that the mast can be lowered into the cradle. Thiscan result in three problems: the loose cable can get trapped underneath itself, resulting in a sudden or partial“drop” of the mast when the loose section releases at a later time, thus damaging the cable; or the cable canjump off the winch drum and be damaged by the gears of the winch. The loose cable can also cause the drumto spin to take up the slack cable. Other reasons damage can occur are due to some outside force such asforklift blade nicking or crushing a cable when moving a unit, or an accidental blow or damage by a handtool, etc.
DAMAGE INSPECTION
If any nicks (partial strand cut through), kinks (permanent bends), or weld spatter on the cable (from fieldservice) are observed, the wire rope should be changed immediately. The wire rope must only be replacedwith the genuine Terex part. If there is a crushed spot somewhere on the wire rope, it should be replaced if thewidth of the crushed spot exceeds 1-1/4 times the nominal diameter of the cable (5/16” on a 1/4” cable, and7/32” on a 3/16” cable), or if there are broken wires at the point of damage.
22

BROKEN CABLE REPLACEMENT PROCEDURE
CAUTION: The wire rope must only be replaced with the genuine Terex part. This ensures therope is replaced with the correct grade and rope construction and also a rope of sufficientlength.
1. PREPARATION (refer to fig. 1 cable replacement diagram and fig.2 shim placement)
1.1 Collapse tower to where mast is retracted, then pivot tower to horizontal position.1.2 Remove the fixtures and the power cord from the tower.1.3 Remove the tower from the trailer and place it on a work surface such as two saw horses.
horses. Large Section Middle SectionSmall Section
Sheave BracketsLower Cable Rivets
Clevis PinTelescoping Lock
2. REMOVING TOP CABLE AND TOP MAST SECTION
2.1 Tie middle section and large section together by wrapping band, cable, chain, or ropearound the sheave brackets on these two sections. This ensures that the middle section staysinside the large section during removal of the small section.
2.2 Remove or lock the telescope lock pin open. This is the pin that locks the three sectionstogether during travel.
2.3 Drill out the pop rivets holding the plastic guides at the top of the middle section. Using ascrewdriver, remove these guides.
2.4 Remove the clevis pin anchoring the cable to the top of the middle section and remove theclevis pin and the sheave from the middle section.
2.5 Pass the free end of the cable through the sheave slot between the middle and small section,and out of the top of the tower. Pull the cable and the small section completely out of themiddle section together. Be sure to keep the cable tight; if slack accumulates it is mostdifficult to remove.
2.6 Unfasten the cable by removing the bolt at the base of the small section.
3. REINSTALLING THE SMALL SECTION
3.1 Fasten new cable to the base of the small section.3.2 Reversing the procedure described in steps 2.1 through 2.5, reinstall the small section.3.3 Reinstall the plastic guides with new pop rivets. New plastic guides should be used, but the
old guides can be used if their mounting position is shifted to the point where new holes canbe drilled in the tower section to provide a good fit when installing new pop rivets.
23

4. REMOVING THE LOWER CABLE AND MIDDLE TOWER SECTION
4.1 Remove or lock open the telescope lock pin if not previously done in step 2.2.4.2 Drill out the pop rivets holding the plastic guides at the top of the large section. Using a
screwdriver, remove these guides.4.3 Remove the cable from the winch drum.4.4 Remove the sheave clevis pin and the sheave from the top of the large section.4.5 If the old cable is not frayed between the winch and the bottom mast pulley, attach a flexible
“fish wire” or “snake” (wire, rope, cord, etc.) to the end of the cable to be used to thread thenew cable through the lower tower and pulleys. This can be done by “untwisting” the cableand inserting the wire or cord into the middle of the cable and thus letting the cable twistback tightly around the fish wire. If the old cable is frayed, cut off the frayed portion andproceed as above and then remove tower and cable as instructed in section 4.6.Pass the free end of the cable through the sheave slot between the large and middle sections,and out of the top of the tower. Pull the cable and the middle section completely out of thelarge section together. Be sure to keep the cable tight – if slack accumulates it is mostdifficult to remove.
4.6 If the fish wire doesn’t work, it is necessary to remove the square mast section from the roundmast section. Remove the pivot pin from the pivot post and lift the mast from the pivot postand place the mast assembly on a work surface. Remove the hex nut from the bottom of theround section, remove the “T” bolt at the top of the round section, and pull the square mastassembly out of the round section, and proceed as instructed in section 4.6.
4.7 Unfasten the cable by removing the bolt at the base of the middle section.
5. REINSTALLING THE LOWER CABLE AND MIDDLE SECTION
5.1 If the “fish wire” worked, attach the new cable to the fish wire and pull through the pulleysand the round section.
5.2 If the square tower section was removed from the round section, thread the cable through thepulleys at the bottom of the large section and out of the tubular stud. Reinstall the largesquare section into the round section, making sure the white plastic “doughnut” is placed onthe threaded tube on the bottom of the large square section. Install the “T” locking bolt, andthe hex nut on the bottom of the round section. The hex-locking nut should be tightened andthen backed off approximately one-half turn or until the tower rotates freely.
5.3 Fasten the new cable to the base of the middle section.5.4 Reversing the procedures detailed in sections 4.4 through 4.7, reinstall the middle section.5.5 Fasten the new cable to the winch drum.5.6 Reinstall the plastic shims as described in section 3.3.
24

Point BCable 2
Point ACable 1
Point ACable 2
2" Section
"Hat" Section
TowerBase
Winch
Cable 1Point B
6" Round Tube
4" Section
3" Section
AL4000 LIGHT TOWER
Cable Replacement DiagramFigure 1
25

SHIM PLACEMENTFigure 2
4" TOWER SECTION3" TOWER SECTION
2" TOWER SECTION
183286 (5/16" thk)
177830 (1/4" thk)
183288 (3/16" thk)
185290 (3/8" thk)
177820 (5/16" thk)
177820 (5/16" thk)
177820 (5/16" thk)
177830 (1/4" thk)
SHIM PLACEMENT( as viewed from crossarm end)
26

Rear Bearing Inspection RequirementsLeroy-Somer 6 & 8 kW Generators
The rear bearing on all 6 & 8 kW generators should be inspected every two (2) years or 2000 hours,whichever occurs first. The bearing should be replaced at three (3) years or 3000 hours. Carefulattention to this inspection procedure will prevent total generator failure resulting from bearing orbearing carrier deterioration.
There are two areas to examine during the inspection. First is the clearance between the bearingouter case and the generator bearing carrier (NDE Bracket). The bearing should fit snugly into thecarrier so that it can be rotated only with some resistance. Side to side movement should be lessthan .010". If the bearing can be moved easily inside the carrier or if there is visible evidence ofbearing carrier wear, the housing carrier should be replaced with End Kit #836835 (which includesthe carrier, bearing and 0-Ring). The second area of concern is the bearing itself. If roughness can befelt when rotating the outer race of the bearing, the bearing needs to be replaced (#836828). Theother area to check is to see if the outer race will rock back and forth along the bearing axis. If thereis movement in this axis, replace the bearing. If neither of these conditions exist, replace thebearing retaining 0-Ring (#836830) and reassemble. Note: These bearings are sealed units andcannot be field serviced.
Follow the same procedure at three (3) years or 3000 hours. At this time replace both the bearingand O-Ring as well as inspecting the bearing carrier.
27

SECTION 3
LIGHT FIXTURE TROUBLESHOOTING GUIDE
DANGER! Do not open fixtures while light circuit breaker is “ON”.Allow lamp to cool before touching.
**TAKE EXTRA PRECAUTIONS WHEN TROUBLESHOOTING ELECTRICALPROBLEMS**DANGER! NO USER SERVICEABLE PARTS INSIDE! THIS IS ONLY AGUIDE. UNIT TO BE SERVICED BY QUALIFIED ELECTRICIAN ONLY!!!
A. Only use a voltmeter with two well-insulated pin probes rated for 600 V.B. Treat all conductors as potentially hot.C. Proceed through circuits systematically, operating only one section at a time.D. Before disconnecting ballast, turn off circuit breaker and wait 30 seconds for capacitor to
discharge.E. If all the lights are out and all the ballasts are receiving power, suspect burned out tower
power cable.
SYMPTOM CAUSES CORRECTIVE ACTION
LAMP WILL Lamp loose in socket Inspect lamp base to see if there is arcing at centerNOT START contact button. Tighten lamp snugly. Check socket for
damage. Replace if defective.
Floodlight plugs not tight Check plug and receptacle. Tighten if loose.
Defective ballast Interchange ballast plugs in generator enclosure. Iflamp starts, replace ballast. Check ballast wiringdiagram. Check for swollen capacitors, charred wiring,core and coil, or other signs of excessive heat.
Low voltage Check line voltage at ballast input. Voltage should bewithin 10% of nameplate rating when operating atnormal load. Increase supply voltage or removeexternal load.
Improper ballast Proper HID lamps will perform erratically or fail tostart on an improper ballast. The ballast name platedata should agree with the line voltage and lamp used.Improper ballast will cause lamp to fail.
LAMP STARTS Lamp has been operating MH lamps require from 4 to 8 minutes cool-downSLOWLY (ARC time before lamp is cool enough to restrike. SwitchDOES NOT off breaker and allow lamp to cool.STRIKE WHENSWITCH IS Defective lamp Lamp may glow for extended period of time. ReplaceFIRST TURNED ON) after checking voltage and ballast.
28

LIGHT FIXTURE TROUBLESHOOTING GUIDE (CONTINUED)
SYMPTOM CAUSES CORRECTIVE ACTION
CIRCUIT Short circuit or ground Check wiring against diagram. Check for shorts orBREAKER ground.TRIPS ON LAMPSTARTUP
LAMP LIGHT Normal lamp depreciation Replace lampOUTPUT LOW
Dirty lamp or fixture Clean lamp and fixture
Defective ballast Interchange ballast plugs in generator enclosure. Iflamp returns to normal light output, replace ballast.Check for swollen capacitors, charred wiring, core andoil, or other signs of excessive heat.
Wrong voltage Check voltage at ballast input. Voltage should bewithin 10% of nameplate rating. Check wiring connec-tions for voltage loss. Check socket contact point.
Improper ballast Check ballast nameplate against lamp data.
LAMP COLORS Normal lamp depreciation Lamp color and brightness decreases and colorsDIFFERENT change slightly as lamps age. Spot replacement with
new lamps may cause noticeable differences in lampcolors. Group replacement minimizes colordifferences.
Dirty fixture Dirty fixtures will cause lamps to appear different incolor. Clean fixture.
Wrong lamp Check data on lamps which appear different in color.Replace with correct color lamp.
ARC TUBE Over voltage from power Check voltage at ballast. Check for current or voltageDISCOLORED supply surges. Check for shorted capacitors and replace ifOR SWOLLEN defective.
Improper ballast Lamp operated on ballast designed for higher wattagelamp. Check ballast nameplate against lamp data.
SHORT LAMP Lamp damaged Check for outer bulb cracks. If air enters outer bulb,LIFE arc tube may continue to burn for 100 hours before
failure. Check for bulb cracks where glass meets thebase due to tightening lamp too firmly in socket. Lookfor broken arc tube or loose metal parts. Replacelamp.
29

LIGHT FIXTURE TROUBLESHOOTING GUIDE (CONTINUED)
SYMPTOM CAUSES CORRECTIVE ACTION
SHORT LAMP Improper ballast Ballast nameplate data should agree with lamp lineLIFE voltage and lamp use. If improper ballast is used, the
lamp life will be shortened. A mismatch may alsocause the ballast to fail.
LAMP Improper ballast Improper ballasting can cause flickering or erraticFLICKERS AND operation. In the start-up period the lamp may ignite,GOES OUT - start to warm-up and then extinguish (cycle).INTERMITTENTOR CYCLING New lamp Under certain conditions new lamps may “cycle”.
Usually after three (3) tries to start at 30 to 60 secondintervals, lamps will stabilize and operatesatisfactorily.
Defective lamp Replace lamp
High spike ballast Ballast produces high spike current. Measure withoscilloscope. Replace ballast as required.
30
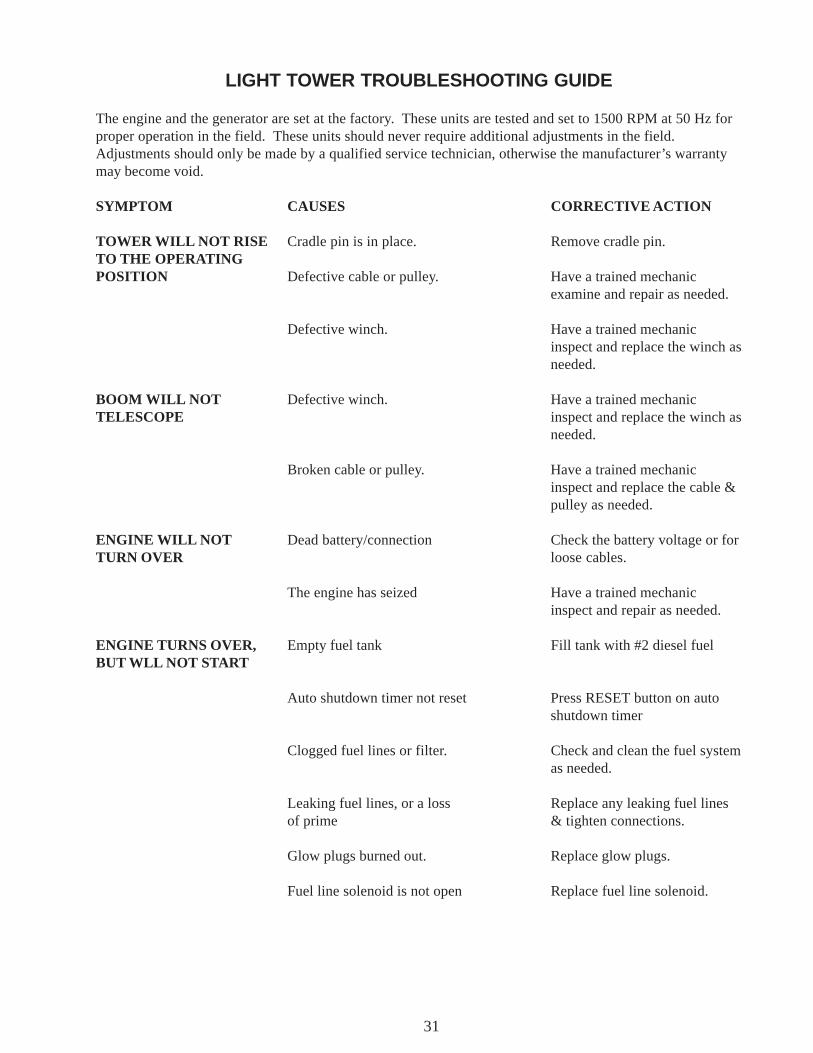
LIGHT TOWER TROUBLESHOOTING GUIDE
The engine and the generator are set at the factory. These units are tested and set to 1500 RPM at 50 Hz forproper operation in the field. These units should never require additional adjustments in the field.Adjustments should only be made by a qualified service technician, otherwise the manufacturer’s warrantymay become void.
SYMPTOM CAUSES CORRECTIVE ACTION
TOWER WILL NOT RISE Cradle pin is in place. Remove cradle pin.TO THE OPERATINGPOSITION Defective cable or pulley. Have a trained mechanic
examine and repair as needed.
Defective winch. Have a trained mechanicinspect and replace the winch asneeded.
BOOM WILL NOT Defective winch. Have a trained mechanicTELESCOPE inspect and replace the winch as
needed.
Broken cable or pulley. Have a trained mechanicinspect and replace the cable &pulley as needed.
ENGINE WILL NOT Dead battery/connection Check the battery voltage or forTURN OVER loose cables.
The engine has seized Have a trained mechanicinspect and repair as needed.
ENGINE TURNS OVER, Empty fuel tank Fill tank with #2 diesel fuelBUT WLL NOT START
Auto shutdown timer not reset Press RESET button on autoshutdown timer
Clogged fuel lines or filter. Check and clean the fuel systemas needed.
Leaking fuel lines, or a loss Replace any leaking fuel linesof prime & tighten connections.
Glow plugs burned out. Replace glow plugs.
Fuel line solenoid is not open Replace fuel line solenoid.
31

LIGHT TOWER TROUBLESHOOTING GUIDE (CONTINUED)
SYMPTOM CAUSES CORRECTIVE ACTION
ENGINE RUNS ROUGH Clogged or leaking fuel system. Replace fuel lines, tighten allconnections. Inspect the pickuptube, and inspect the fuel filter.
Clogged exhaust system. Clear the exhaust system.
Clogged air filter. Replace the air filter.
Clogged or stuck fuel Have a trained mechanicinspect the injectors.
Valve clearances are out of Have a trained mechanicadjustment, or the valve spring(s) inspect the valves.may be damaged
Defective governor Have a trained mechanicinspect the governor andinjector pumps.
ENGINE RUNS, BUT Crankcases oil level is too high Drain oil to its proper level.PRODUCES A DENSESMOKE Low compression. Have a trained mechanic
inspect for broken or seizedrings. Also inspect the valveclearance.
ENGINE OVERHEATS Blocked radiator air intake. Inspect the front and rearintakes and clean/clear asneeded.
LOW COOLANT LEVEL Heavy duty use/small leak. Replace the coolant with a50% water/coolant solution.
Radiator fins have become clogged. Clear the radiator fins.
Fan belt is loose. Tighten fan belt.
ENGINE RUNS, BUT THE Alternator has failed. Have a trained mechanicBATTERY VOLTAGE IS inspect the alternator.LOW
32

LIGHT TOWER TROUBLESHOOTING GUIDE (CONTINUED)
SYMPTOM CAUSES CORRECTIVE ACTION
ENGINE RUNS, BUT THE Circuit breakers are tripped. Reset the circuit breaker.LIGHTS WILL NOTOPERATE Loose connections in the wiring system. Have a trained electrician
inspect the ballast box wiringsystem.
BURNED OUT BULB Replace bulbs as needed.
Defective capacitor (Leroy Somer Have a trained electriciangenerator). inspect the capacitor.
Defective AC generator. Have a trained electricianinspect the generator.
Engine speed is too low. Have a trained mechanicinspect the engine speed andreset to 1500 RPM @ 50 Hz.
UNUSUAL NOISE The generator has a defective bearing Have a trained electricianCOMING FROM THE or has a damaged fan blade. inspect the generator.GENERATOR
WARNING: If you feel an electric shock at any time while operating this unit,SHUT IT DOWN IMMEDIATELY! Have the unit inspected by a trained electrician.
This engine/generator set is factory installed, tested, and set for operation in the field. Any damageto the engine or generator units occurring after adjustments are made in the field by unauthorizedpersonnel will not be covered by your manufacturer’s warranty and will also void the manufacturer’swarranty on this particular unit. If you can not reach your local dealer, contact the factory ServiceManager TOLL FREE at 1800-331-660.
33

34
This Page Left Intentionally Blank

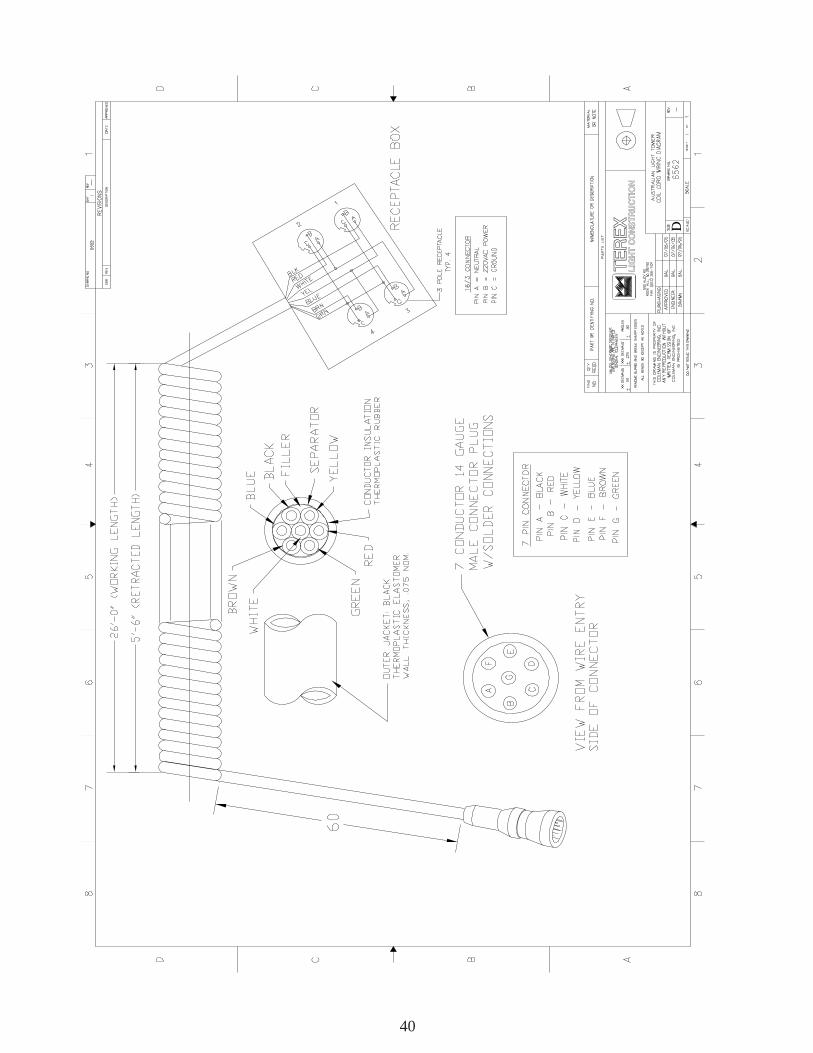
SECTION 4WIRING DIAGRAMS
35

36
PLO
T4/
30/9
1D
ATE
TOLE
RAN
CES
UN
LES
S O
THER
WIS
E SP
EC
IFIE
D:
NO
NE
NO
TE:
PIN
CO
NFI
GU
RA
TIO
N IS
TH
E SA
ME
FOR
TU
NG
STE
N H
ALO
GE
N F
IXTU
RES
CIR
CU
ITC
OLO
RD
OM
ESTI
C
CO
DE
EU
RO
PEAN
CO
LOR
LIG
HT
BLU
E
GR
EEN
W/Y
ELLO
WB
RO
WN
WD
2985
2985
A
WIR
ING
DIA
GR
AM
, MH
OR
HPS
FIX
TUR
EW
/JO
Y C
ON
NE
CTO
R
4/30
/91
WD
2985
2985
A
#REQ
DES
CR
IPTI
ON
PAR
T#IT
EM#
DW
G.#
PAR
T#
ECO
#R
EV.
DA
TEC
HAN
GE
590
HU
EY R
d, R
OC
K H
ILL,
S.C
.P
h. (8
03) 3
24-3
011
FAX
366
-110
1
DR
BY
SC
ALE
PAR
T#D
WG
.#
MAT
L.M
AT P
/NBO
RD
ER"B
"R
EM
OV
E AL
L B
UR
RS
& S
HA
RP
ED
GES
.XXX
X=±
.005
Dec
imal
s .X
X=±
.030
.XXX
=±.0
10
Deg
rees
±1/
2°
Frac
tions
±1/
16
A3/
15/0
0A
DD
ED E
UR
OP
EAN
(CE)
WIR
ING
DAT
A
CO
DE
BLA
CK
(BR
OW
N)
GR
EEN
(GR
N/Y
EL)
WH
ITE
(BLU
E)
14/3
GR
EEN
BLA
CK
WH
ITE
CO
MM
ON
FR
OM
BA
LLAS
TH
OT
FRO
M B
ALL
AST
(LIV
E)
GR
OU
ND
(EA
RTH
)

LAM
P C
OM
MO
N
INP
UT
CO
MM
ON
INP
UT
120V
CO
MG
RN
WH
ITE
RE
CE
PTA
CLE
5-P
OLE
RE
D
OR
AN
GE
GR
EEN
GR
OU
ND
480V
24 M
FC
1
WH
ITE
BLA
CK
CO
LOR
CIR
CU
IT
RE
DLA
MP
HO
T
OR
AN
GE
BLA
CK
120V
TRA
NS
FOR
ME
R
CA
P
#RE
QD
ESC
RIP
TIO
NP
AR
T#IT
EM
#
DW
G.#
PA
RT#
EC
O #
REV
.D
ATE
CH
AN
GE
590
HU
EY
Rd,
RO
CK
HIL
L, S
.C.
Ph. (
803)
324
-301
1 FA
X 36
6-11
01
DR
BY:
CN
MS
CAL
E: N
ON
EP
ART#
DW
G.#
MA
TL.
MAT
P/N
BO
RD
ER
"B"
RE
MO
VE
ALL
BU
RR
S &
SH
ARP
ED
GE
S
.XX
XX
=±.0
05D
ecim
als
.XX
=±.0
30 .X
XX
=±.0
10
Deg
rees
±1/
2°
Frac
tions
±1/
16
WD
2986
2986
MA
TL
WD
2986
2986
(100
0W M
ETA
L H
ALID
E B
ALLA
ST)
TOLE
RAN
CES
UN
LESS
OTH
ERW
ISE
SPEC
IFIE
D:
WIR
ING
DIA
GR
AM -
1000
MH
BAL
LAST
W /
JOY
CO
NN
ECTO
RU
SAG
EP
LOT:
4/3
0/91
DAT
E: 4
/30/
91
37

D
12
34
LIG
HT
CO
NS
TR
UC
TIO
NT
ER
EX
38

D
TE
RE
XL
IGH
T C
ON
ST
RU
CT
ION
39
D
LIG
HT
CO
NS
TR
UC
TIO
NT
ER
EX
40

D
TE
RE
XL
IGH
T C
ON
ST
RU
CT
ION
41

42

SECTION 5PARTS MANUAL
43

44
amidaTEREX TM
Decals

TEREX amidaTM
6714, Bubble Level
(4) 721051, Cap Outrigger Tube
45

amidaTEREX TM
Standard: 188630, Fuel Tank PanMine Spec: AUS1860 Drip Tray Fuel Tank
Standard: (8) 990210, Flat WasherMine Spec: (4) 990210, Flat Washer
(4) AUS1881, Stat-O-Seal
46

amidaTEREX TM
47

amidaTEREX TM
Mine Spec: AUS1031, Battery Isolator Switch AUS1190, Isolator Switch Lockout Kit
48

amidaTEREX TM
Standard: (2) 188560, Cabinet DoorMine Spec: AUS1858, Cabinet Door Assembly
(Includes LH and RH Doors)
49

amidaTEREX TM
50

amidaTEREX TM
51

amidaTEREX TM
52

amidaTEREX TM
53

amidaTEREX TM
54

amidaTEREX TM
55

amidaTEREX TM
56

993180, Nut, lock, 3/4
990230, Washer, Flat 3/4
720495, Plastic Washer
790720Spring
59972Clevis pin
981285Rue ring
69207Plate, lock
amidaTEREX TM
57

amidaTEREX TM
Mine Spec: AUS1873, Tie Down Lug
663850 Cordset, 3 Pin, 5’
Mine Spec: AUS1873, Conduit Fitting AUS1874, Adaptor AUS1877, Flexible Conduit
58

amidaTEREX TM
59

3434
amidaTEREX TM
60

732200, Engine
116398, Genset Complete116775, Engine Wiring Harness
866100, Starter836833, Rear Bearing
836832, O-Ring
836831, End-Kit With Bearing
839190, Low Oil Press. Sensor
866090, Alternator
amidaTEREX TM
61

amidaTEREX TM
62

amidaTEREX TM
63

amidaTEREX TM
64

amidaTEREX TM
65

66

67
SECTION 6WARRANTY
INFORMATION

LIGHT TOWER MODEL CODING SYSTEM
IMPORTANT
WHEN REQUESTING TECHNICAL HELP AND ORDERING REPLACEMENT PARTS THE MODELAND SERIAL NUMBER ARE NECESSARY.
REFER TO THE TEREX SERIAL NUMBER TAG ON THE UNIT FOR CORRECT MODEL NUMBERAND SERIAL NUMBER.
MODEL NUMBER IDENTIFICATION
Samp1e:
Light Tower Product Line AL4 080 D 4 MH CE
Tower Series
AL4000 (AL4) = 30 Foot Basic Tower with winch in cabinetAL5000 (AL5) = 30 Foot Basic Tower with in-cabinet light
storage and door insulationLT7000 (LT7) = 30 Foot Deluxe Hydraulic Tower w/optional Acoustic Enclosure and Complete Instrumentation
KW Rating(080 is 8.0 kW)
Diesel (D)
Number of Lights
*Type of Lights
European Version (AL4000 Only)
* HPS = High Pressure Sodium MH= Metal Halide MV= Mercury Vapor TH= Tungsten Halogen
68

TEREX LIGHT CONSTRUCTIONP.O. Box 3147
Rock Hill, S.C. 29732
MANUFACTURER’S LIMITED WARRANTY
TEREX LIGHT CONSTRUCTION (“TLC”) warrants to the original purchaser that such equip-ment, accessories, parts and other products manufactured by TLC will be free from defects in work-manship and material for a period of one (1) year after the date of first delivery or for one thousand(1,000) hours of use, whichever comes first; provided that Buyer sends TLC notice of such defectwithin thirty (30) days of its discovery. Should defects be discovered, the Buyer must clearly establishthat (I) the equipment, parts, etc. have been properly installed and set up, maintained and operatedwithin the limits of rated and normal usage and (II) the defect did not result in any manner from theintentional or negligent action or inaction of Buyer. Buyer must also return the defective item or itemsto TLC, Rock Hill, SC for inspection at TLC’s request. If Buyer cannot establish that conditions (I) and(II) have been met, then this warranty shall not cover the alleged defect. Failure to give notice of defectwithin such period shall be a waiver of this Warranty and any assistance rendered thereafter shall notextend or revive it. THIS WARRANTY IS LIMITED TO THE BUYER AND IS NOT ASSIGNABLEOR OTHERWISE TRANSFERABLE.
TLC MAKES NO WARRANTY WITH RESPECT TO PARTS, COMPONENTS, EQUIPMENT ANDACCESSORIES NOT MANUFACTURED BY TLC SUCH AS FIXTURES, BALLASTS, ENGINES,HYDRAULIC PUMPS, FUEL PUMPS, ALTERNATORS, GENERATORS, WINCHES, TIRES ANDELECTRICAL COMPONENTS. Accessories, assemblies and components included in products ofTLC, which are not manufactured by TLC, are subject only to the warranty of their respectivemanufacturers. TLC makes no other warranty, express or implied, and makes no warranty ofmerchantability or fitness for any particular purpose. This warranty shall not cover misuse, alteration,abuse, negligence, accident, acts of God, sabotage or any item in which serial numbers have beenaltered, defaced or removed, but shall be limited to repair or replacement of those parts which, uponinspection by TLC, appear to have been defective in material or workmanship.
TLC’s liability and Buyer’s sole and exclusive remedy for a failure of goods to perform as warrantedand/or for any and all other claims arising out of the purchase and use of the goods, including negli-gence on the part of TLC, shall be limited to the repair or replacement of defective parts returned,transportation prepaid to TLC. TLC shall in no event be liable for incidental or consequential or otherdamages or losses resulting from a breach of warranty such as, but not by way of limitation, labor costs,loss of profits, loss of use of other than equipment, third party repairs, personal injury, emotional ormental distress, improper performance of work, penalties of any kind, loss of service of personnel, orany other damages or losses which may be experienced by the Buyer.
A product warranty certificate must be filled out in its entirety and returned to TLC in order toprocess any warranty claims submitted.
THIS WARRANTY IS EXPRESSLY IN LIEU OF AND EXCLUDES ALL OTHER WARRAN-TIES, EXPRESSED OR IMPLIED (INCLUDING ANY WARRANTY OF MERCHANTABIL-ITY AND FITNESS OF ANY PRODUCT OR GOODS FOR A PARTICULAR PURPOSE) ANDALL OTHER OBLIGATIONS OR LIABILITIES ON TLC’S PART, AND TLC NEITHERASSUMES NOR AUTHORIZES ANY OTHER PERSON TO ASSUME FOR TLC ANY OTHERLIABILITY IN CONNECTION WITH THE SALE OF TLC’S PRODUCTS. THERE ARE NOWARRANTIES WHICH EXTEND BEYOND THE DESCRIPTION ON THE FACE HEREOF.
69