SEQUENTIAL SHIFTING MECHANISM SQS - SQS … sequential shifting mechanism allows you to change gears...
12
SEQUENTIAL SHIFTING MECHANISM SQS We wish to thank You for purchasing our product and hope you compete successfuly with this equipment. This product is intended to Mitsubishi Lancer EVO from IV to IX with 5 speed transmission W5M51. You can use it for STOCK SYNCHRO transmission or for DOG transmissions from different manufacturers. Type of transmission is stated on the box. In the appendix is described, how to determine the type of your transmission after bowden travels. Our product is industrial protected - U1 No. 10686. This product is intended only for racing and is not homologated for highway use. Index: Page Operating instructions 2 Fitting procedure -1. Disassembling of the stock shift mechanism 2 -2. Modification of gear lever on the transmission 2 -3. Modification of stock bowdens 3 -4. Installation of the SQS 3 -5. Installation of indication display 4 -6. Adjustment of the SQS 5 -7. Installation of control unit for shifting solenoid 5 Maintenance 5 Appendix - Types of transmissions - Modification stock bowdens - Photos Operating instructions
-
Upload
duongquynh -
Category
Documents
-
view
232 -
download
0
Transcript of SEQUENTIAL SHIFTING MECHANISM SQS - SQS … sequential shifting mechanism allows you to change gears...

SEQUENTIAL SHIFTING MECHANISM SQS
We wish to thank You for purchasing our product and hope you compete successfuly
with this equipment.
This product is intended to Mitsubishi Lancer EVO from IV to IX with 5 speed
transmission W5M51. You can use it for STOCK SYNCHRO transmission or for
DOG transmissions from different manufacturers.
Type of transmission is stated on the box.
In the appendix is described, how to determine the type of your transmission after
bowden travels.
Our product is industrial protected - U1 No. 10686.
This product is intended only for racing and is not homologated for highway use.
Index: Page
Operating instructions 2
Fitting procedure -1. Disassembling of the stock shift mechanism 2
-2. Modification of gear lever on the transmission 2
-3. Modification of stock bowdens 3
-4. Installation of the SQS 3
-5. Installation of indication display 4
-6. Adjustment of the SQS 5
-7. Installation of control unit for shifting solenoid 5
Maintenance 5
Appendix - Types of transmissions
- Modification stock bowdens
- Photos
Operating instructions
The sequential shifting mechanism allows you to change gears by moving the gear shift lever
forward and backward. Shifting of the neutral and the reverse gear is blocked. The
transmission is put into neutral as follows: by repeated forward movements of the gear shift
lever shift 1st gear, indicated “1” on the display. To engage the neutral, lift the ring on the
gear shift lever with your fingers upwards, towards the gear shift lever knob, and by moving
the gear shift lever all the way forward engage the neutral, indicated “0” on the display and
the reverse gear, indicated “r” .
Forward gears from 1st to 5th are indicated by displaying the corresponding number.
!Attention! From the neutral it is possible shift 1st gear or the reverse gear without blocking.
Fitting Procedure
Before you start, make sure that the product is the right type for your car and gearbox.
-1. Disassembling the stock shift mechanism
-2. Modification of gear lever on the transmission
-3. Modification of stock bowdens
-4. Installation of the SQS
-5. Installation of an indication display
-6. Adjustment of the SQS
-7. Instalation of control unit for shifting solenoid
1. Disassembling of the original shifting mechanism
- Shift the neutral
- Remove the battery and its holder
- Disassemble stock shifting „H“ mechanism including bowdens, according to original
service documentation.
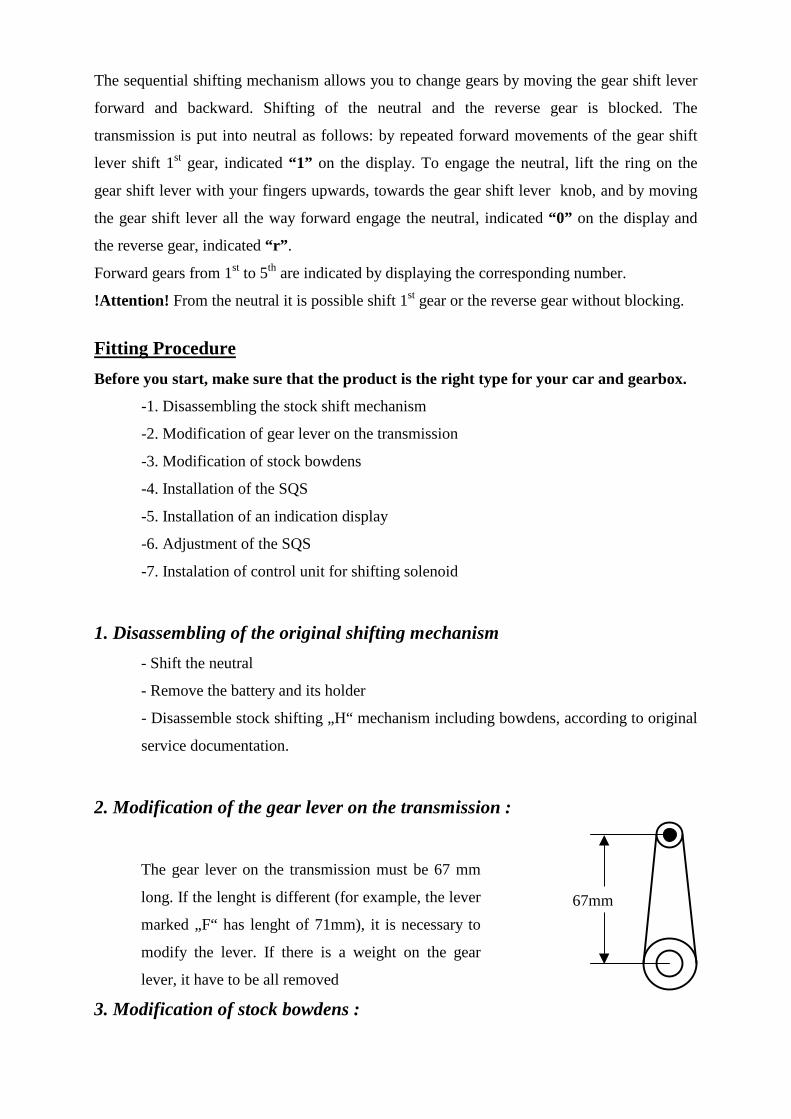
2. Modification of the gear lever on the transmission :
The gear lever on the transmission must be 67 mm
long. If the lenght is different (for example, the lever
marked „F“ has lenght of 71mm), it is necessary to
modify the lever. If there is a weight on the gear
lever, it have to be all removed
3. Modification of stock bowdens :
67mm

- Modify the bowdens according to picture in the appendix. Screwing dies M6 and all
needed parts are supplied with the SQS.
4. Installation of the SQS:
- Put the gear shift lever on the SQS, tight its bolt M10 cca 25 Nm.
- Bowden and cable of blocking mechanism (for blocking the reverse gear and
neutral):
Push in ends of the bowden. Adjust the cable as follows: Loosen the bolt M4 and draw
the cable to lift the pin cca 1mm, but not more and tight the bolt.
If you want to inactivate the blocking of the reverse gear and neutral, lift fully the pin
and then tight the bolt.
- Disassemble the cover 5 – see picture bellow
- Insert shifting bowden 1 into hole 9 in SQS body 6 (its end has thread M6, without
eye) and screw it fully into ball joint on the ball journal 7. Apply locking agent
(Loctite).
- Insert selection bowden 2 into hole 10 and eye on its end put on journal 8 and
secure with clip 3.
- Assemble cover 5.
- Mount SQS holders on car body with M8 bolts.
- Insert bowdens into body.
- Mount on these holders with M6 bolts.
- Secure bowdens in its holder on the transmission. Don´t connect bowdens with levers
on the transmission.
Don´t mistake the selection bowden and shifting bowden.
5. Installation of indication display
Carry out all necessary fitting and disassembling in interior as instructed in the Service
Manual.
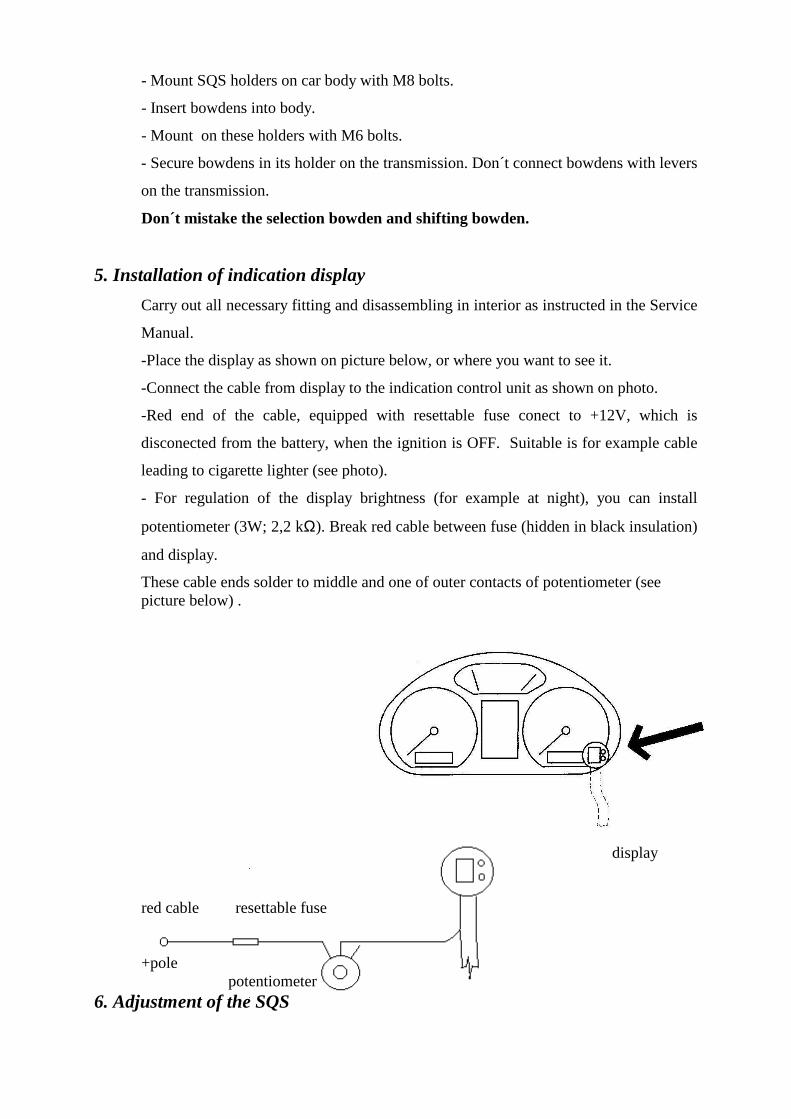
-Place the display as shown on picture below, or where you want to see it.
-Connect the cable from display to the indication control unit as shown on photo.
-Red end of the cable, equipped with resettable fuse conect to +12V, which is
disconected from the battery, when the ignition is OFF. Suitable is for example cable
leading to cigarette lighter (see photo).
- For regulation of the display brightness (for example at night), you can install
potentiometer (3W; 2,2 kΩ). Break red cable between fuse (hidden in black insulation)
and display.
These cable ends solder to middle and one of outer contacts of potentiometer (see picture below) .
display
red cable resettable fuse
+pole potentiometer
6. Adjustment of the SQS

The travels of gear levers on the transmission from neutral position must be equivalent
on both sides and must match with travels of SQS.
- Connect the battery.
- By movements of gear shift lever shift the neutral on SQS, indicated „0“ on display.
- Disconnect the battery
- Check, if there is neutral on the transmission too.
- Adjust ends of bowdens to be easy to put them on ball journals on gear levers. Put
them on and secure them with clips.
- Try to shift all gears and neutral. It is recommended to try it when engine works.
- If everything is OK, adjustment is finished.
- If you have any problems, call your SQS distributor.
7. Instalation of control unit for shifting solenoid
- Connect supply cable equipped with 40A fuse directly to +12V on battery. Take out
this fuse before you start. Place the cable as shown on picture and fasten delivered
connector on its end in interior.
-Install the control unit near to the SQS connect its connectors.
-Fasten the brown cable to the body. It must be reliably connected to the body, because
of high amperage.
-Thin red cable connect as to the same cable as the red one from the display to +12V,
which is disconnected from battery, when the ignition is OFF. Suitable is yelow-red
cable leading to cigarette lighter (see picture).
-Install the 40A fuse.
Maintenance
Most of parts are moving in roling bearings. It is enough to lubricate them yearly.
Suitable is for example oil spray with hose. Lubricate the joint of shifting lever and all
accessible parts.
All bolts and nuts connections must be properly tighten. Shifting mechanism must be
always well adjusted. After all transmission works and repairs must be the shifting
mechanism adjusted again.
Fast check of SQS adjustment: Shift neutral, indicated „0“ on display. Disconnect
bowdens from shifting levers on the transmission. The position of bowdens ends and ball
joints on shifting levers must match.

Caution
The shifting solenoid is always activated, when shifting lever moves from neutral
position towards any gear. Its activity last for 0,3 s.
This solenoid is only power assisting device and in higher rpms it is necessary to
shift with sufficient energy and speed before power assistance ends.
If you dont shift the gear succesfully, you can then shift this gear without
assistance of the solenoid, but you have to overcome strong shifting forces of the
transmisstion, or shift the previous geat and then shift again.
! When the ignition is ON while mounting on the
transmission, pay attention to possibility of activation of the
shifting solenoid and following movement of the shifting
mechanism. You can prevent this by shifting neutral
indicated by „0“ on the display !
In case of racing DOG transmission it is possible to use built in Shift cut switch in SQS.
Shift cut connector (only on dog type) is on opposite side to bowdens. It could be used for
shift cut during nonclutch shifting – e.g. for reducing fuel injection or disconnection ignition.
Switch is pressed by every shifting (up and down) – its contacts are connected by this shifting
– utilize that according your ECU possibilities.