SEMI-AUTOMATIC SHOTGUN INSTRUCTION MANUAL...Your Tristar shotgun is gas operated. The gas created...
19
READ THE INSTRUCTIONS AND WARNINGS IN THIS MANUAL CAREFULLY BEFORE USING THIS FIREARM SEMI-AUTOMATIC SHOTGUN INSTRUCTION MANUAL
Transcript of SEMI-AUTOMATIC SHOTGUN INSTRUCTION MANUAL...Your Tristar shotgun is gas operated. The gas created...

READ THE INSTRUCTIONS AND
WARNINGS IN THIS MANUAL CAREFULLY
BEFORE USING THIS FIREARM
SEMI-AUTOMATIC SHOTGUNINSTRUCTION MANUAL

GUN SAFETY RULES
Observe these rules of safe gun habdling.
1. Always keep the muzzlepointed in a safe direction. Watch the muzzle atall times: never point a gun, accidentally or inttentionally, at any person oranything you do not intend to shoot. ldentify the target before shooting;do not shoot at sounds.
2. Always treat any gun as if it is loaded - it may be!
3. Keep your finger off the trigger while operating the action and at all othertimes until you are ready to shoot.
4. Keep the safety "on" or in the "safe" position at all times until you are ready to fire the gun. Move to shoot. Up to the previous line after the wordintend. to shoot.Do not rely on your gun's safety, the safety on any gun is a mechanicaldevice and is not intended as a substitute for common sence or safe gunhandling.
5. Learn how your gun functions and handles. If you do not thoroughlyunderstand the proper use and cafe of your gun, seek the advice of someonewho is knowledgeable.
6. Do not alter or modify and parts of a firearm.
7. Store guns unloaded, separate from any ammunition, and where childrencannot get to them.
8. Be sure the barrel is clear of any obstructions before loading. Make it ahabit to check the barrel every time before loading.
9. Be sure you have and use the proper ammunition. A 20 gauge shell will enter a12 gauge chamber far enough so that a 12 gauge shell can be loaded behind it.Also, a 3 inch shell may fit into a 2 3/4 inch chamber, but the crimp at the mouthof the shell will unfold into the forcing cone. If either of these things occur and youfire the gun, the gun will explode, damaging the gun and possibly causing seriousinjury or death to you and those around you
10. Wear protective shooting glasses and adequate ear protection whenshooting.
11. Never climb or jump over anything, such as a tree, fence, or ditch, with aloaded gun. Open the barrel, remove the shells, and hand the gun to a friend
1

or place it on the ground on the other side of the obstacle before crossing it your-self. Do not lean a gun against a tree or other object; it could fall and possiblydischarge.
12. Do not shoot at a hard surface or at water. Bullet and shot can ricochet orbounce off and travel in unpredictable directions with great velocity.
13. Never transport a loaded gun. Do not place a loaded gun into a vehicle.
The gun shold be unloaded and placed into a case when not in use.
14. Never drink alcoholic beverages before or during shooting.
INTRODUCTION TO TRİSTAR
For many of years, Tristar has been associated with the gun industry. After the word with modern technology and youhave a product of true value and affordable quality. You have Tristar
We at Tristar thank you for the privilage of delivering a product to you thatwill provide you with years of pleasurable use. Happy shotgunning.
ABOUT YOUR SEMI-AUTOMATIC SHOTGUN
Your Tristar shotgun is gas operated. The gas created from firing a live shotshelloperates the action. Once the first shell has been fired, the next shell in the mag-azine will automatically cycle into the chamber, and this cycle will continue (eachtime the trigger is pulled) until all shells loaded in the magazine have been fired.The bolt will remain locked in the open position after the last shell is fired.
The technologically advanced gas metering system allows you to shoot 2 3/4 " and3" shells interchangeably with any ammunition of the proper gauge for your shot-gun with flawless performance. This and other fine feratures ensure that your shot-gun will be a source of pride and pleasure for years to come.For 3 1/2" models the meterring system allows you to shott heavy 2 3/4", 3" and3 1/2" shells interchangeably.
SAFETY SWITCH OR BUTTON
The safety is designed to stop the trigger mechanism.
DON'T RELY ON YOUR GUN'S SAFETY. TREAT EVERY GUN AS IF IT WERELOADED AND READY TO FIRE. The safety on any gun is a mechanical device,and it is not intended as a substitute for common sense or safe gun handling.Always keep the muzzle pointed in a safe direction.
2
3
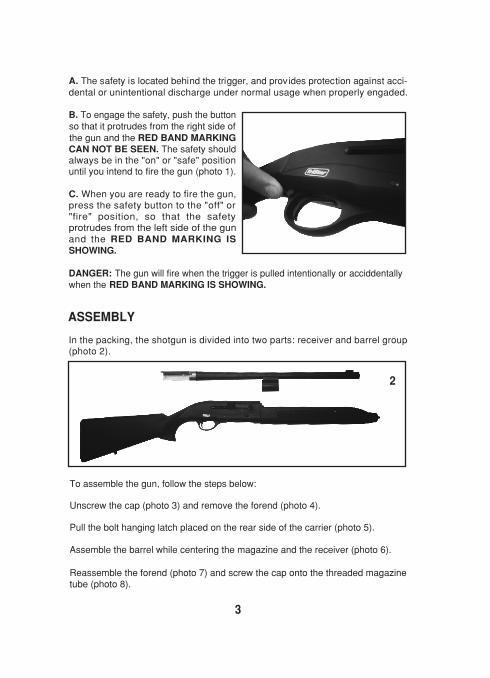
A. The safety is located behind the trigger, and provides protection against acci-dental or unintentional discharge under normal usage when properly engaded.
B. To engage the safety, push the buttonso that it protrudes from the right side ofthe gun and the RED BAND MARKINGCAN NOT BE SEEN. The safety shouldalways be in the "on" or "safe" positionuntil you intend to fire the gun (photo 1).
C. When you are ready to fire the gun,press the safety button to the "off" or"fire" position, so that the safetyprotrudes from the left side of the gunand the RED BAND MARKING ISSHOWING.
DANGER: The gun will fire when the trigger is pulled intentionally or acciddentallywhen the RED BAND MARKING IS SHOWING.
ASSEMBLY
In the packing, the shotgun is divided into two parts: receiver and barrel group(photo 2).
To assemble the gun, follow the steps below:
Unscrew the cap (photo 3) and remove the forend (photo 4).
Pull the bolt hanging latch placed on the rear side of the carrier (photo 5).
Assemble the barrel while centering the magazine and the receiver (photo 6).
Reassemble the forend (photo 7) and screw the cap onto the threaded magazinetube (photo 8).
2

3 4
5 6
7 8
4

LOADING YOUR SHOTGUN
You can load your shotgun in the following ways:
1. Be certain the safety is in the "on" or "safe" position (see section regard- ing operation of the safety on pages 3 and 4).
Draw or pull the bolt rearward until it locks in the open position (photo 12). Placea shell into the breach (photo 9). Release the bolt by pressing the button locatedtoward the front of the receiver (photo 10). This chambers a round, and the gunwill fire if the trigger is pulled with the safety in the "off" or "fire" position.You can then load additional shells into the magazine by inserting them through the loading port on the bottom of the receiver and pushing them into the magazine(photo11).
2. Be certain the safety is in the "on" or "safe" position (see section regard-ing operation of the safety on pages 3 and 4).
Draw or pull the bolt rearward until it locks in the open position (photo 12). Load
shells into the magazine by inserting them through the loading port on the bottomof the receiver and pushing them into the magazine (photo 11). Push back the magazine shell latch on the rear side of the carrier (photo 13). This allows theshell to exit the magazine and move onto the carrier. Release the bolt by pressingthe buttom located toward the front of the receiver (photo 10). This chambers around, and the gun will fire if the trigger is pulled with the safety in the "off"or "fire" position.
9
1011
5

UNLOADING YOUR SHOTGUN
Be cartain the safety is in the "on" or "safe" position (see the section regardingoperation of the safety on pages 3 and 4). Repidly draw or pull the bolt reaward toeject any shell in the chamber (photo 12). Lock the bolt open by pressing the but-ton located toward the front of the receiver (photo 13). Lift thecarrier and push on
the magazine shell latch (photo 14). The shells in the magazine will be ejected.
12
13
14
6
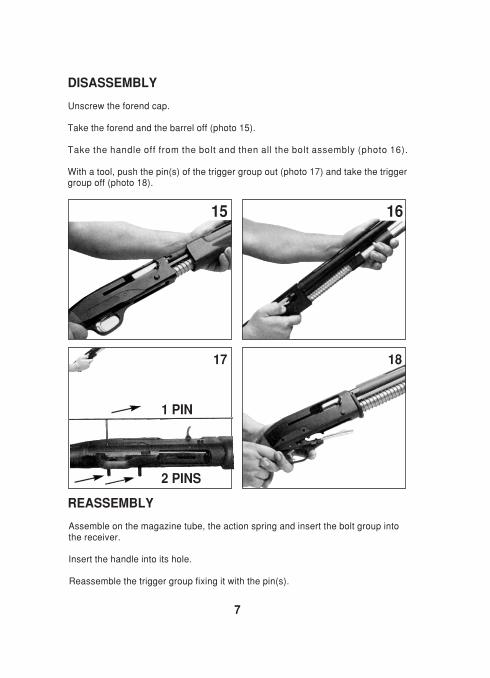
DISASSEMBLY
Unscrew the forend cap.
Take the forend and the barrel off (photo 15).
Take the handle off from the bolt and then all the bolt assembly (photo 16).
With a tool, push the pin(s) of the trigger group out (photo 17) and take the triggergroup off (photo 18).
REASSEMBLY
Assemble on the magazine tube, the action spring and insert the bolt group into
Reassemble the trigger group fixing it with the pin(s).
the receiver.
Insert the handle into its hole.
15 16
1 PIN
2 PINS
17 18
7
8
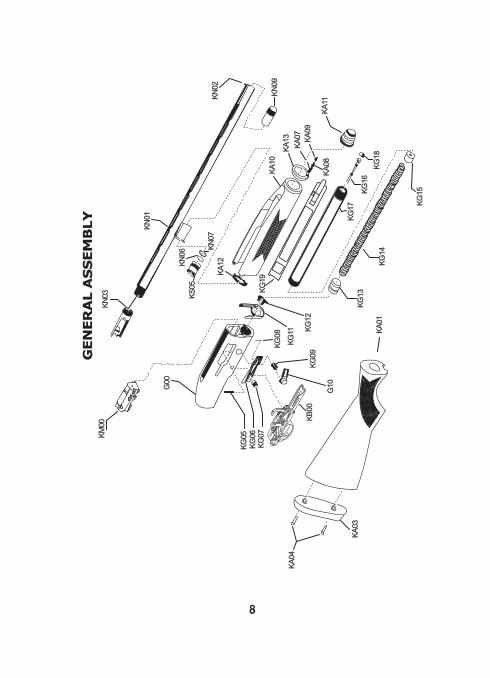
GE
NE
RA
L A
SS
EM
BLY
KG
06
KG
07
G10
KG
05
KG
09
KN
03
KN
01
KN
02
KN
09
KN
07
KN
06
KS
05
KM
00
G00
KG
08
KG
11 KG
12
KA
12
KA
10
KA
13
KA
07
KA
09
KA
11K
A08
KG
17
KG
16
KG
18
KG
15
KG
14
KG
13
KA
01
KA
03
KA
04
KB
00
KG
19

9
De
scrip
tio
n
RU
BB
ER
RC
OIL
PA
D S
CR
EW
FO
RE
-EN
D B
LO
CK
ER
SP
RIN
G
FO
RE
-EN
D B
LO
CK
ER
FO
RE
-EN
D B
LO
CK
ER
SC
RE
W
WA
LN
UT
FO
RE
-EN
D
SY
NT
HE
TIC
FO
RE
-EN
D
FO
RE
-EN
D N
UT
FO
RE
-EN
D P
INN
ED
PL
AT
E
FO
RE
-EN
D P
LA
TE
BA
RR
EL
FR
ON
T S
IGH
T
BR
EE
CH
GA
S H
OL
E O
-RIN
G
Sto
ck N
o
KSA0
1
12
GA
. G
EN
ER
AL A
SS
EM
BLY
- P
AR
T L
IST
Sto
ck N
o
De
scrip
tio
n
KBOO
KGOO
KGO
1
KGO
3
KGO
4
KGO
5
KGO
6
KGO
7
KGO
8
KGO
9
KG
10
KG
11
KG
12
KG
13
KG
14
KG
15
KG
16
KG
17
KG
18
KA
01
KA
03
TR
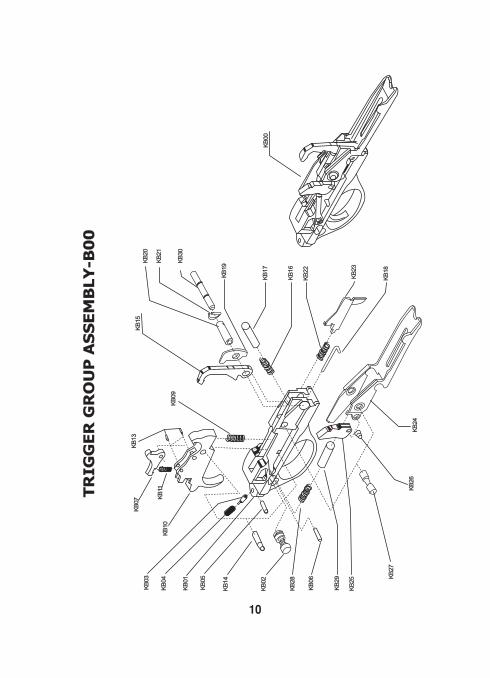
IGG
ER
GR
OU
P A
SS
EM
BLY
RE
CE
IVE
R
RE
CO
IL S
PR
ING
TU
BE
RE
CO
IL S
PR
ING
RE
CO
IL S
PR
ING
CA
P
CA
RR
IER
LA
TC
H P
IN
CA
RR
IER
LA
TC
H
CA
RR
IER
LA
TC
H S
PR
ING
CA
RR
IER
LA
TC
H B
UT
TU
N P
IN
CA
RR
IER
LA
TC
H B
UT
TU
N S
PR
ING
CA
RR
IER
LA
TC
H B
UT
TU
N
FO
RE
-EN
D L
AT
CH
FO
RE
-EN
D L
AT
CH
SC
RE
W
MA
GA
ZIN
E L
OG
N S
PR
ING
CU
P
MA
GA
ZIN
E S
PR
ING
MA
GA
ZIN
E S
HO
RT
SP
RIN
G C
UP
MA
GA
ZIN
E P
LU
G
MA
GA
ZIN
E T
UB
E
MA
GA
ZIN
E P
LU
G B
LO
CK
ER
WA
LN
UT
ST
OC
K
SY
NT
HE
TIC
ST
OC
K
RU
BB
ER
RE
CO
IL P
AD
KA
04
KA
07
KA
08
KA
09
KA
10
KS
A10
KA
11
KA
12
KA
13
KN
01
KN
02
KN
03
KN
07
KN
09
KN
10
KN
11
KS
05
KS
06
KS
07
CH
OK
E T
UB
E
GA
S H
OL
E J
OIN
T
GA
S H
OL
E P
LU
G
PIS
TO
N
PIS
TO
N O
-RIN
G
PIS
TO
N R
ING
KG
19A
CT
ION
BA
R
KB
20
TR
IG
GE
R G
RO
UP
AS
SE
MB
LY
-B0
0
KB
21
KB
30
KB
19
KB
17
KB
16
KB
22
KB
23
KB
18
KB
24
KB
26
KB
27
KB
25
KB
29
KB
06
KB
28
KB
02
KB
14
KB
05
KB
01
KB
04
KB
03
KB
09
KB
15
KB
00
KB
11
KB
07
KB
10
KB
13
10

Sto
ck N
o
Description
12
GA
. T
RIG
GE
R G
RO
UP
AS
SE
MB
LY
- P
AR
T L
IST
KB
01
KB
02
KB
03
KB
04
KB
05
KB
06
KB
07
KB
09
KB
10
KB
11
KB
12
KB
13
KB
14
KB
15
Sto
ck N
o
Description
TR
IGG
ER
GU
AR
D
HA
ND
SA
FE
TY
SA
FE
RY
PLU
NG
ER
SP
RIN
G P
IN
SA
FE
RY
PLU
NG
ER
SP
RIN
G
SA
FE
RY
SP
RIN
G R
ETA
ININ
G P
IN
TR
IGG
ER
FIX
ING
PIN
DIS
CO
NN
EC
TO
R
TR
IGG
ER
SP
RIN
G
TR
IGG
ER
HA
MM
ER
DR
OP
SP
RIN
G
HA
MM
ER
DR
OP
PA
RT
HA
MM
ER
DR
OP
PIN
TR
IGG
ER
PIN
HA
MM
ER
KB
16
KB
17
KB
18
KB
19
KB
20
KB
21
KB
22
KB
23
KB
24
KB
25
KB
26
KB
27
KB
28
KB
29
KB
30
HA
MM
ER
SP
RIN
G
HA
MM
ER
SP
RIN
G C
AP
HA
MM
ER
LA
TC
H S
PIN
DLE
HA
MM
ER
LA
TC
H
HA
MM
ER
TU
BE
PIN
HA
MM
ER
TU
BE
PIS
TO
N R
ING
TR
IGG
ER
GU
AR
D L
AT
CH
SP
RIN
G
TR
IGG
ER
GU
AR
D L
AT
CH
SP
RIN
G
CA
RR
IER
BR
EE
CH
BO
LT L
AT
CH
BR
EE
CH
BO
LT L
AT
CH
PIN
CA
RR
IER
PIN
CA
RR
IER
SP
RIN
G
CA
RR
IER
SP
RIN
G P
IN
RE
CE
IVE
R P
IN
11
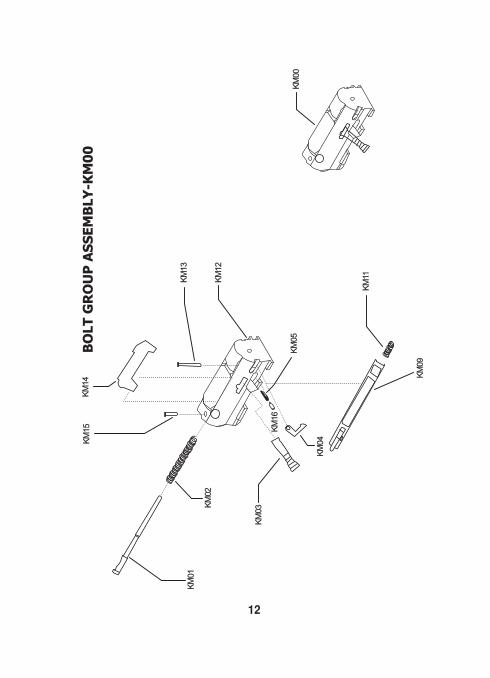
BO
LT
GR
OU
P A
SS
EM
BLY
-KM
00
KM
15
KM
14
KM
13
KM
12
KM
00
KM
11
KM
09
KM
05
KM
04
KM
03K
M02
KM
01
KM
16
12

12
GA
. B
OLT
GR
OU
P A
SS
EM
BLY
- P
AR
T L
IST
Sto
ck N
o
KM
01
KM
02
KM
03
KM
04
KM
05
KM
06
KM
07
KM
08
KM
09
KM
10
KM
11
Description
FIR
ININ
G P
IN
IRIN
ING
PIN
SP
RIN
G
BO
LT H
AN
DLE
EX
TR
AC
TO
R
EX
TR
AC
TO
R S
PR
ING
BO
LT H
AN
DL
E P
IN S
PR
ING
BO
LT
EX
TR
AC
TO
R P
IN
LO
CK
ING
BL
OC
K
FIR
ING
RE
T A
ININ
G P
IN
KM
12
EX
TR
AC
TO
R S
PR
ING
PIN
13
AC
TIO
N B
AR
hamper proper functioning and will soak the wood. After extended periods ofheavy use, your gun sholud be taken to a qualified gunsmith to have the actiondisassembled for professional cleaning and lubrication.
3. Care for your wood stock and forearem the same way you would a piece offurniture with the same finish.
STORAGE
Clean thoroughly and oil your gun before storage. Store the gun in a case to pre-vent scratches and dents. Store in a dry place to prevent corrosion. Store the gun away from children and in place where it cannot be obtained by thoseunauthorized to use it. Always store gun unloaded and separatelyfrom any ammunition.
IMPORTANT
USAGE OF STEEL SHOTThe choke (bore constriction) in all modern shotguns has been established based on the pattern performance of shot shells loaded with lead shot. When using thesteel shot shells, you will notice a different performance in pattern density versusthe established lead shot pattern, because the steel shot is harder and lighterthan lead shot.
You should be aware of the following differences and cautions:Never shoot steel shot loads in a full choked barrel or full choke tubedbarrel. To do so may cause the barrel to swell or rupture. In general, steelshot fired with a modified choke will produce the equivalent of a lead full chokepattern. This will be true of all steel shot sizes up to and including no. 2. Theestablished improved cylinder chokes will produce the equivalent of a (lead)modified choke pattern.All steel shot sized larger than no. 2, and including special sized such as -F-, "T",etc., should be used only with improved cylinder chokes. These steel shot sized,when used in improved cylinder chokes, will produce patterns equivalent to (lead)full choke patterns. The established cylinder choke or bore will produce theequivalent of a modified (lead) pattern.
Additional information concerning the use of steel shot is available fromRemington, Winchester, Federal and other ammunition companies.
PARTS
To order parts, please furnish the following information: Your name, address, tele-phone number, firearm serial number, maker and model. When we receive yourrequest we will send you an order from and a parts breakdown with prices.
14
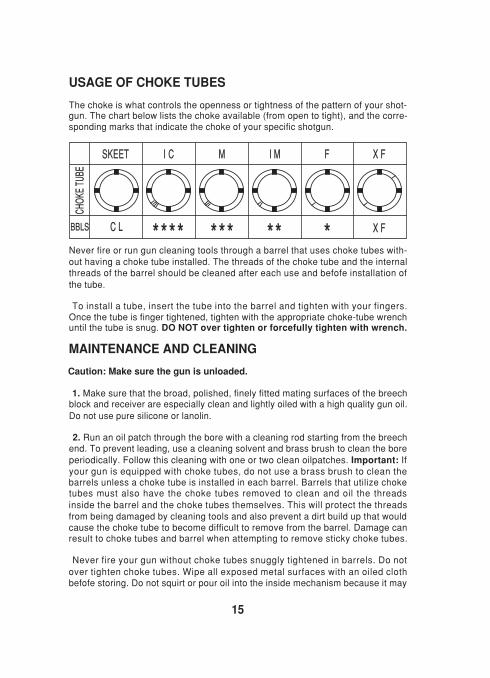
USAGE OF CHOKE TUBES
The choke is what controls the openness or tightness of the pattern of your shot-gun. The chart below lists the choke available (from open to tight), and the corre-sponding marks that indicate the choke of your specific shotgun.
SKEET I C M I M F X F
C L X F
CHO
KE T
UBE
BBLS
Never fire or run gun cleaning tools through a barrel that uses choke tubes with-out having a choke tube installed. The threads of the choke tube and the internalthreads of the barrel should be cleaned after each use and befofe installation of
the tube.
To install a tube, insert the tube into the barrel and tighten with your fingers.Once the tube is finger tightened, tighten with the appropriate choke-tube wrenchuntil the tube is snug. DO NOT over tighten or forcefully tighten with wrench.
MAINTENANCE AND CLEANING
Caution: Make sure the gun is unloaded.
1. Make sure that the broad, polished, finely fitted mating surfaces of the breechblock and receiver are especially clean and lightly oiled with a high quality gun oil.
Do not use pure silicone or lanolin.
2. Run an oil patch through the bore with a cleaning rod starting from the breechend. To prevent leading, use a cleaning solvent and brass brush to clean the boreperiodically. Follow this cleaning with one or two clean oilpatches. Important: Ifyour gun is equipped with choke tubes, do not use a brass brush to clean thebarrels unless a choke tube is installed in each barrel. Barrels that utilize choketubes must also have the choke tubes removed to clean and oil the threads
inside the barrel and the choke tubes themselves. This will protect the threadsfrom being damaged by cleaning tools and also prevent a dirt build up that wouldcause the choke tube to become difficult to remove from the barrel. Damage canresult to choke tubes and barrel when attempting to remove sticky choke tubes.
Never fire your gun without choke tubes snuggly tightened in barrels. Do not
over tighten choke tubes. Wipe all exposed metal surfaces with an oiled clothbefofe storing. Do not squirt or pour oil into the inside mechanism because it may
15
SERVICE AGREEMENT AND LIMITED WARRANTY
Tristar agrees to service its products free of charge for defects in materials and workmanship in accordancewith the service agreement listed below. The obligation of Tristar under this agreement is limited to the repair or replacement of unserviceable parts and does not cover any incidental or consequential damages. Other than the express warranty contained herein Tristarmakes no warranties, express or implied.
Tristar will repair or replace any unserviceable part(s) for one (1) year from date of purchase and furtherwill supply free parts (Wood not included) for an addition-al four (4) years in accordance with the above warrantystatement provided your firearm had not been altered,abused, willfully damaged, or damaged by overpressureammunition. This agreement is not transferable; its bene-fits apply only to the original purchaser.
To obtain free service during the time this agreement is in effect, make sure your firearm is unloaded, and send it to Tristar
This agreement and the warranties contained herein arevoid if your registration card is not received with a copyof your sales slip within 30 days from date of purchase
SHIPPING
When returning your gun for service, please take care in packing. Disassembleyour gun, wrap in paper or other protective media and place gun in the originalbox. (THIS BOX WILL PROTECT THE GUN BUT IS NOT DESIGNED FORSHIPPING). Warp box in a cardboard box approved for interstate shipping.Tristar is not responsible for damage incurred during shipping.
16
Ship the firearm prepaid to:
INSTALLATION OF MAGAZINE PLUG
Some Federal, State and local hunting regulation may require that a shotgun belimited to a maximum shell capacity of three (3) rounds.
Your shotgun has been packed with a magazine plug for this purpose.
Installation:1. Remove the forend screw cap, the forend and the barrel.2. At the threaded end of the magazine tube (where the forend screw cap fits)you will locate a black snap ring.3. A large blade screw driver should be used to remove the snap ring.CAUTION: The snap ring will be under pressure from the magazine spring.Do not remove the snap ring in a manner where the ring could fly out and strikeyou or anyone else causing injury, particularly to the eye.4. Compress the magazine spring into the magazine tube, and insert the maga-zine plug (small end first). Push the magazine plug and insert the snap ring sothe snap ring end is flush with the end of the tube.
THANK YOU
Thank you for purchasing a Tristar shotgun We are sure this gun will bringyou years of hunting and/or shootin pleasure. Your satisfaction is the key to oursuccess. Please let us know if we can be of service and please relay any obser-vations about your guns performance or appearance.
PURCHASER'S RECORD
Model Number
Purchase Date
Gauge or Caliber
Serial Number
Purchase Price
Store Name
17
TriStar Arms
1816 Lim St.
North Kansas City, MO 6416

BE COURTEOUS
When shooting or hunting always acquire the permission of the landowner. Respect the land. Do not
litter, use gates when possible, leave open gates open and closed gates closed. Dirive vehicles only
where advance permission has been granted and always express gratitude for use of another
persons land. offer your labor or game as repayment for the privilege of use. Remember you are
helping develop a reputation for all sportsmen/sportswomen.