Self Check In Mode Configuration Guide
22
One Blue Hill Plaza, 16 th Floor, PO Box 1546 Pearl River, NY 10965 1-800-PC-AMERICA, 1-800-722-6374 (Voice) 845-920-0800 (Fax) 845-920-0880 Self Check In Mode Configuration Guide This document provides step-by-step instructions on configuring the Self Check in for CRE. You must be on version 12.8042 or higher to use this feature. Note: Must configure self check in using CRE. Feature is only available with the retail store business type.
Transcript of Self Check In Mode Configuration Guide

One Blue Hill Plaza, 16th Floor, PO Box 1546
Pearl River, NY 10965 1-800-PC-AMERICA, 1-800-722-6374
(Voice) 845-920-0800 (Fax) 845-920-0880
Self Check In Mode Configuration Guide
This document provides step-by-step instructions on configuring the Self Check in for CRE.
You must be on version 12.8042 or higher to use this feature.
Note: Must configure self check in using CRE. Feature is only available with the retail store business type.
2
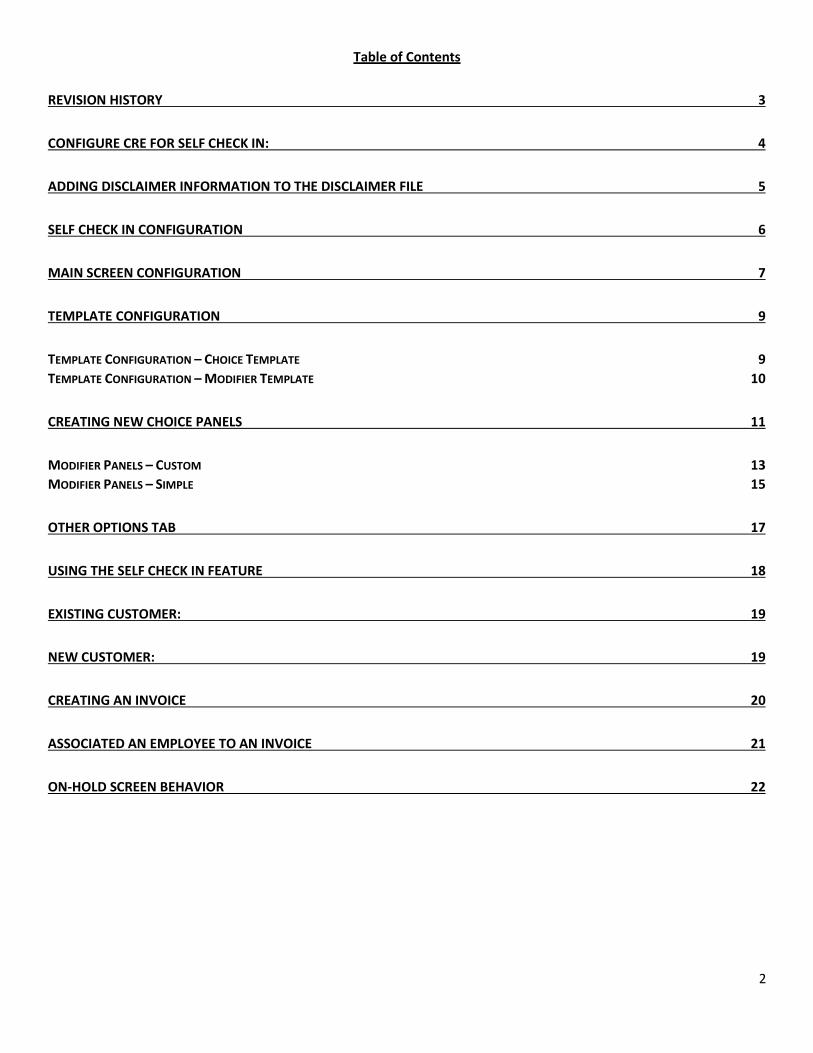
Table of Contents
REVISION HISTORY 3
CONFIGURE CRE FOR SELF CHECK IN: 4
ADDING DISCLAIMER INFORMATION TO THE DISCLAIMER FILE 5
SELF CHECK IN CONFIGURATION 6
MAIN SCREEN CONFIGURATION 7
TEMPLATE CONFIGURATION 9
TEMPLATE CONFIGURATION – CHOICE TEMPLATE 9
TEMPLATE CONFIGURATION – MODIFIER TEMPLATE 10
CREATING NEW CHOICE PANELS 11
MODIFIER PANELS – CUSTOM 13
MODIFIER PANELS – SIMPLE 15
OTHER OPTIONS TAB 17
USING THE SELF CHECK IN FEATURE 18
EXISTING CUSTOMER: 19
NEW CUSTOMER: 19
CREATING AN INVOICE 20
ASSOCIATED AN EMPLOYEE TO AN INVOICE 21
ON-HOLD SCREEN BEHAVIOR 22

3
Revision History
Document Version Date Author Description of Changes 1.0 6/29/2018 JC Internal Release

4
Configure CRE for Self Check In:
Configuring CRE to use the Self Check in feature is as follows.
1. With CRE open select the Manager or Options button. Enter the Administrative ID & password.
2. Select Setup [4] followed by Display Setup [E].
3. Select Self Check in. Then Select Update. Exit back to the login screen.
4. Login screen should now display a new button.

5
Adding disclaimer Information to the Disclaimer file
For the disclaimer panel to show the custom disclaimer information. You must paste that information into the self check
in disclaimer file. Follow the steps below. Please do this while the program is closed.
1. Locate the
SelfCheckInDisclaimer.txt, in your CRE.NET folder.
64 bit C:\Program Files (x86)\CRE.NET
32 Bit C:\Program Files\CRE.NET
2. Right Click, Open file (should be notepad).
If asked “open with” you can use any text editor.
(Make sure the name and extension stays the same.)
3. Add your disclaimer information you would like your customers to accept when using the self check in feature. Save file, replacing the existing file.
All text is centered in the panel.
4. Example, Disclaimer Panel from step 3.

6
Self Check in Configuration
1. Open CRE select the Manager or Options button. Enter the Administrative ID & password.
2. Select Setup [4] followed by Self Service Configuration [N].
When configuring the self check in screens (the screens that the customer will see when placing their order), we must customize the following:
Main Screen Configuration - This is the background screen for all of the panels. The main screen holds the important information pertaining to the invoice such as:
o Invoice readout - This will show the customer everything that has been added to the order, as well as the total that they owe (with tax included).
o Invoice Options - These options will allow customers to delete items off of the invoice as well as move them up and down on the invoice.
o Order Options - These options will allow the customer to cancel the item currently being ordered, start the complete order over and complete the order.
Template Configuration - Templates are a way to create a predefined layout, when new panels are created they will use the options you specified for the template. There are two types of templates that can be created:
o Template Configuration – Choice Template - Choice templates are the templates used when creating new Choice Panels, where the customer will select the departments and items in the departments.
o Template Configuration – Modifier Template - Modifier templates are templates used when creating new Modifier Panels.
Creating New Choice Panels - Choice Panels are the main screens where the customer will select the
departments and items in the departments.
Modifier Panels - Modifier Panels are used if an item selected from a choice panel has modifiers or modifier groups attached to it.
o Modifier Panels – Custom - Custom modifier panels display up to 6 uniform buttons per page. A change to one button’s properties will change all of the buttons on the page.
o Modifier Panels – Simple - Simple modifier panels display up to 20 uniform buttons per page. A change to one button’s properties will change all of the buttons on the page.

7
Main Screen Configuration
1. Select Main Screen under Panel Configuration.
Note: The following is editable on the Main Screen: o All buttons (including, images, color, and caption) o Totals labels o Background color
2. To edit a section, double-click an empty area of the section (i.e. background). Depending on what kind of control
you clicked, and what type of panel you are editing, the editable options vary. The options that are not valid will be disabled and you will be unable to edit them.
8
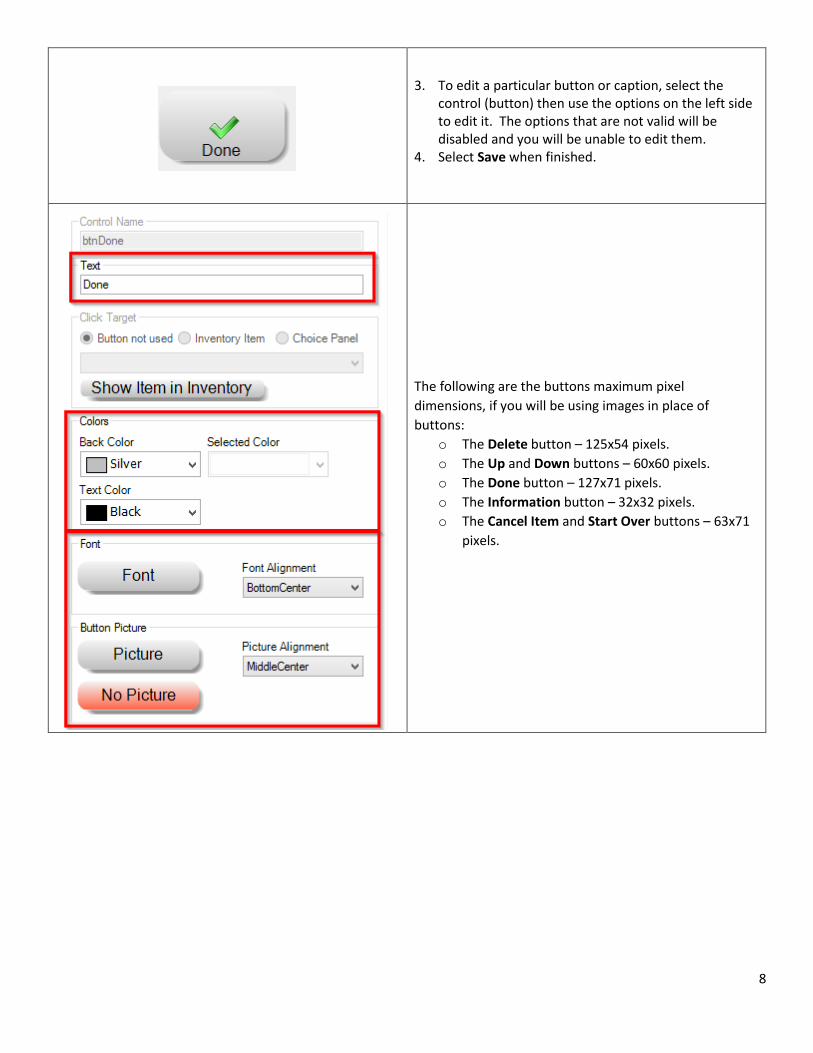
3. To edit a particular button or caption, select the control (button) then use the options on the left side to edit it. The options that are not valid will be disabled and you will be unable to edit them.
4. Select Save when finished.
The following are the buttons maximum pixel
dimensions, if you will be using images in place of
buttons:
o The Delete button – 125x54 pixels.
o The Up and Down buttons – 60x60 pixels.
o The Done button – 127x71 pixels.
o The Information button – 32x32 pixels.
o The Cancel Item and Start Over buttons – 63x71
pixels.

9
Template Configuration
Templates can be edited to set default fonts, sizes and alignments, text, button and background colors and/or pictures.
There are two types of templates that can be created:
Choice Template - Choice templates are the templates used when creating new Choice Panels, where the customer will
select the departments and items in the departments.
Modifier Template - Modifier templates are templates used when creating new Modifier Panels.
When you add a new Choice panel or Modifier panel, these defaults that you created will be used.
Template Configuration – Choice Template There are 2 types of templates: Choice and Modifier. The Choice template can be edited to set default fonts, sizes and
alignments, text, button and background colors and/or pictures. When you add a new Choice panel, these defaults that
you created will be used.
1. Select Templates then Template Choice Panel under Panel Configuration.
Note: The following is editable on the Template Choice Panel: o All buttons (including images, font, color, and caption) o Font o Logo o Background color
2. To edit a button simply select the button in question and use the options on the left to edit it. The edits for the buttons include changing the buttons color, the font of the text and, adding a picture of your item.
The following are the buttons maximum pixel dimensions, if you will be using images in place of
buttons:
o The Placeholder buttons – 162x102 pixels.
o The Left and Right buttons – 60x60 pixels.
3. To edit the background color, or the logo, simply select an area of the background and, use the
controls on the left, to make any changes.
4. To edit the Top Caption 1, simply select the text. Using the controls on the left, make any changes.
5. Select Save.

10
Template Configuration – Modifier Template When an item has a modifier group attached to it, the program will automatically create a “Simple” Modifier screen
based on the template you have setup. You can override this behavior on a group, per item basis by adding a modifier
panel manually.
6. Select Templates then Template Modifier Panel under Panel Configuration.
Note: The following is editable on the Template Modifier Panel: o All buttons (including images, font, color, and caption) o Font o Background color
7. To edit a button simply select the button in question and use the options on the left to edit it. The edits for the
buttons include changing the buttons color, the font of the text and, adding a picture of your item. The following are the buttons maximum pixel dimensions, if you will be using images in place of buttons:
o The Placeholder buttons – 162x102 pixels.
o The Left and Right buttons – 60x60 pixels.
o The Next Step button – 140x60 pixels.
8. To edit the background color, simply select an area of the background. Using the controls on the left, make any
changes.
9. To edit the Top Caption 1, simply select the text. Using the controls on the left, make any changes.
10. Select Save.

11
Creating New Choice Panels
Choice panels are the main type of panel, and at least 1 must be created in order to get a working self service screen. In
our example we will be creating a Main Choice Panel (which will be the first panel that your customer views) and then a
subpage containing items.
1. To create a new panel, select the node you’d like to add a panel to (Choice Panels), and select the green plus icon next to the tree.
2. This will create a new blank panel, based on the template, with a name that says Not Set. Click on the panel’s background and change the Control Name to give it a friendlier name (i.e. Main). We will then want to create another Choice Panel and name it Appetizer.
Note: Remove a panel by selecting it in the list and selecting the minus button. Note: You can create an unlimited number of choice panels and link them however you’d like.
3. Choice panels have buttons that have 2 different functions:
Inventory Item – Choose the item from the dropdown that you wish to sell when the button is pressed.
Choice panel – Select the panel from the dropdown you want to display when the button is pressed.
Note: Any buttons whose Click Target is Button not used, will not be displayed to the customer. If there are not enough items for more than 1 page, the next and previous buttons will be hidden as well. 4. Select a button on the layout and then change the
Text to Appetizer. We will then change the Click Target to Choice Panel. We will then use the dropdown to select the Choice Panel that we created (Appetizer).
5. To change the Sample Top Captions, select the text and enter something on the left under the Text field (e.g. Welcome!).
Note: If adding Inventory items that have modifiers or modifier groups attached to them, the Modifier Panel Template will be used by default. However, each Modifier/Modifier Group Panel can be customized per item.

12
Modifier Panels
1. When adding new Modifier Panels there are two choices of panels to create:
Custom
o Custom modifier panels display up to 6 uniform buttons per page. A change to one button’s properties will change all of the buttons on the page.
o Custom modifier panels have a picture available at the bottom left of the page.
Simple o Simple modifier panels display up to 20 uniform
buttons per page. A change to one button’s properties will change all of the buttons on the page.
o Simple modifier panels do not use pictures.

13
Modifier Panels – Custom
1. To add a new Custom Modifier Panel, highlight Custom under Modifier Panels and select the green plus icon next to the tree.
2. When you choose to add a new modifier panel, you will first be asked to select the parent item (item to be modified), followed by which modifier group to add.
Note: Any modifier groups that have a single item in them are converted into a yes/no question. You are able to modify the yes/no buttons.
14
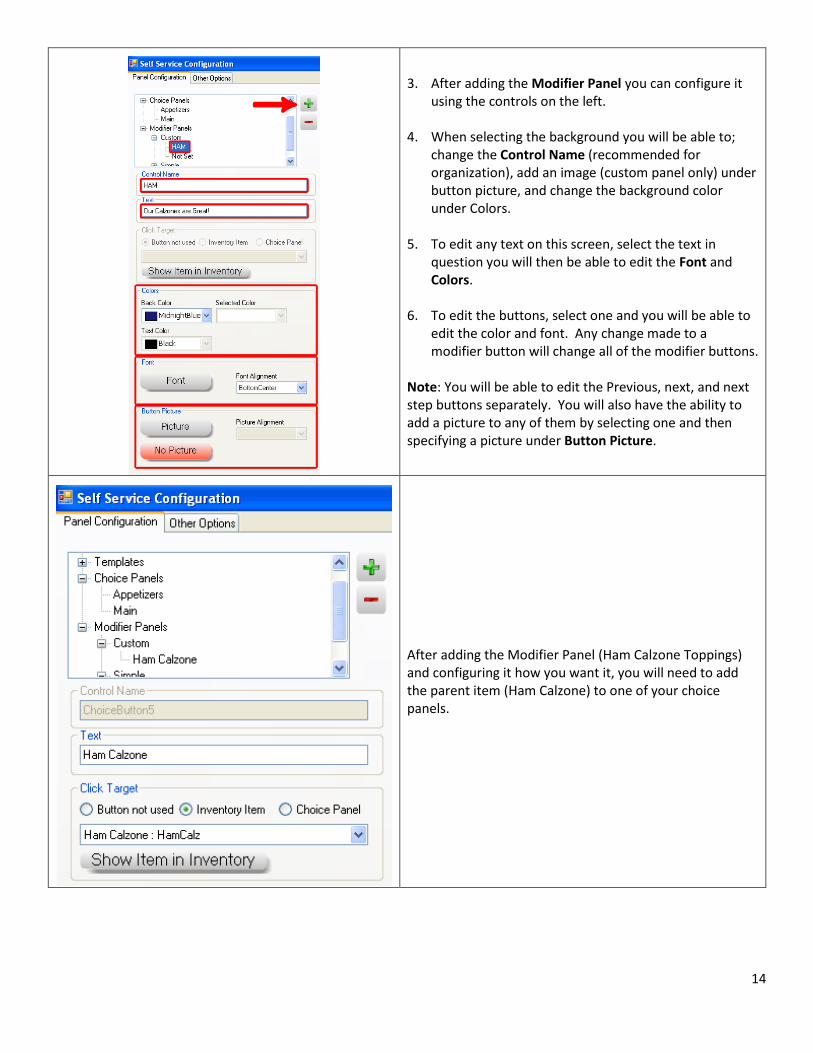
3. After adding the Modifier Panel you can configure it using the controls on the left.
4. When selecting the background you will be able to; change the Control Name (recommended for organization), add an image (custom panel only) under button picture, and change the background color under Colors.
5. To edit any text on this screen, select the text in
question you will then be able to edit the Font and Colors.
6. To edit the buttons, select one and you will be able to edit the color and font. Any change made to a modifier button will change all of the modifier buttons.
Note: You will be able to edit the Previous, next, and next step buttons separately. You will also have the ability to add a picture to any of them by selecting one and then specifying a picture under Button Picture.
After adding the Modifier Panel (Ham Calzone Toppings) and configuring it how you want it, you will need to add the parent item (Ham Calzone) to one of your choice panels.

15
Modifier Panels – Simple
1. To add a new Custom Modifier Panel, highlight Simple under Modifier Panels and select the green plus icon next to the tree.
2. When you choose to add a new modifier panel, you will first be asked to select the parent item (item to be modified), followed by which modifier group to add.

16
3. After adding the Modifier Panel you can configure it using the controls on the left.
4. When selecting the background you will be able to change the Control Name (recommended for organization), and change the background color under Colors.
5. To edit any text on this screen, select the text in
question you will then be able to edit the Font and Colors.
6. To edit the buttons, select one and you will be able to edit the color and font. Any change made to a modifier button will change all of the modifier buttons.
Note: You will be able to edit the Previous, next, and next step buttons separately. You will also have the ability to add a picture to any of them by selecting one and then specifying a picture under Button Picture.
After adding the Modifier Panel (Ham Calzone Toppings) and configuring it how you want it, you will need to add the parent item (Ham Calzone) to one of your choice panels.

17
Other Options Tab
1. For Order timeout set an amount of time (in seconds) that the screen will reset due to inactivity. If the customer doesn’t touch any buttons or screen at all, when 15 seconds are remaining in the countdown, they will be presented with a question asking if they would like to cancel their order. If they choose to continue, the timer will reset.
2. Set the Initial panel to the choice panel you would like the customer to see by default.
3. Set a Custom Message Setup for Salon to display a message for the customer to see after they selected done on the invoice screen.
Default message if blank is: Thank You For your business Please wait for your Turn

18
Using the Self check in feature
Using this feature customer will have the availability to create their own Invoice and set it On-hold.
1. Select the Self check in mode button from the login screen.
2. The disclaimer panel displays. This will be the starting point for the customer’s check in process. When the customer completes their order it will return to this screen for the next customer to check in.
3. Select Accept & Check In to continue with the Check In process
Return to POS brings you to the login screen.
4. Enter phone number 5. Select Next (Must enter area code along with number). Once the 10 digits are entered the next button will be enable to continue.

19
Existing Customer:
Existing Customer will be required to select their name from the list. You can have several Name associated with phone
number.
1. Select your name. If your name isn’t there, you can add a new customer by selecting New.
2. Select Next. Selecting New will bring to the new customer screen The New Name will be added to the list for the next time.
New Customer:
New Customers will be required to create an account before they can create an order.
1. Enter First Name 2. Enter Last Name 3. Enter Email 4. Select Next Once all fields are complete the next button will become enabled to continue.
20
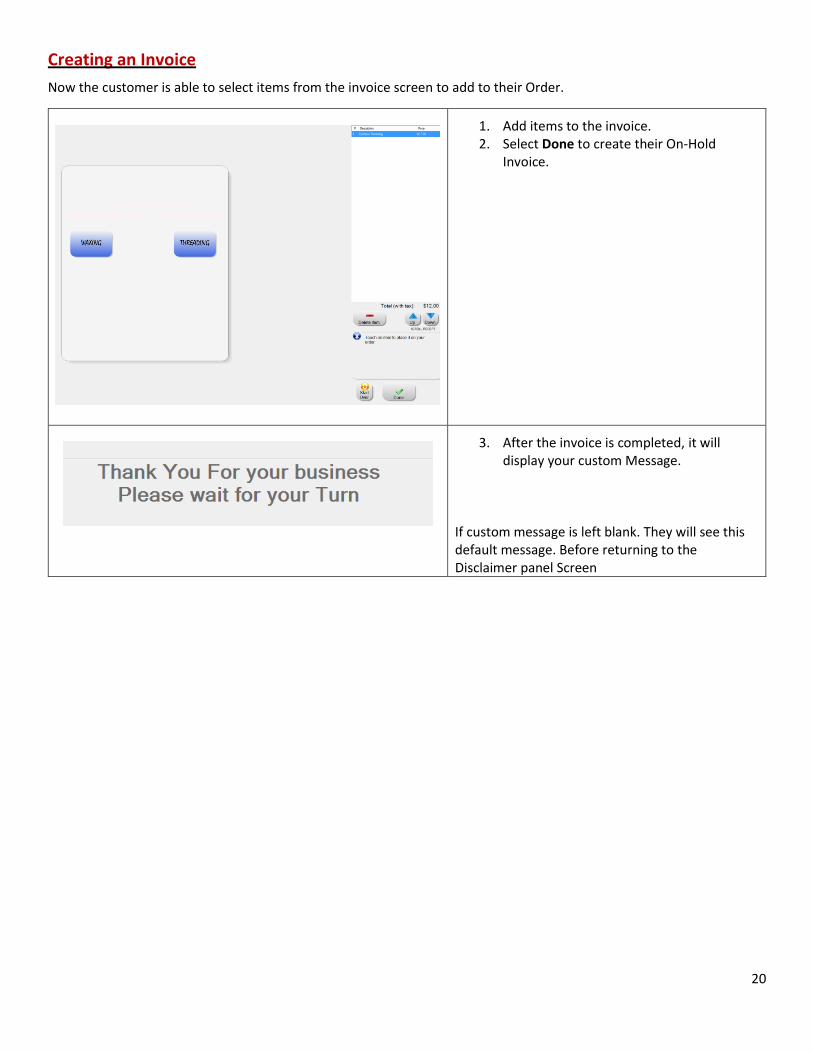
Creating an Invoice
Now the customer is able to select items from the invoice screen to add to their Order.
1. Add items to the invoice. 2. Select Done to create their On-Hold
Invoice.
3. After the invoice is completed, it will display your custom Message.
If custom message is left blank. They will see this default message. Before returning to the Disclaimer panel Screen

21
Associated an Employee to an Invoice
Employee can associated themselves to an invoice. Following these steps
1. If Disclaimer panel shown, Select Return to POS button to return to login screen.
2. Login screen, Enter ID and then Password
3. Select an Invoice tab that is green in color. (Waiting)
Invoice Screen button will take you to the CRE invoice screen.
4. Invoice screen, Select the Hold button and exit Invoice screen.
5. Now that invoice is associated with the employee.

22
On-Hold Screen Behavior
When an Employee logs in, they will see the on-hold invoice screen.
1. On-Hold Invoices are in order they’re created. On the Invoice button Customer Name is displayed. Green – Invoice without an employee.(Waiting)
2. Once the employee select the invoice, and
puts it back on hold. That employee is now assigned to that invoice. Name will show on the invoice button. (yellow) Yellow – invoice associated with the Current Employee logged into that Station.
Red – Employee associated with that invoice that is not currently logged into that station