SedonaOffice - Accounts Payable...Accounts Payable Page 4 of 36 Accounts Payable Setup G/L Account...
36
Accounts Payable Reference Guide Last Updated: January 8, 2010
Transcript of SedonaOffice - Accounts Payable...Accounts Payable Page 4 of 36 Accounts Payable Setup G/L Account...

Accounts
Payable
Reference Guide
Last Updated: January 8, 2010

Accounts Payable
Page 2 of 36
About this Guide This Guide is for use by SedonaOffice customers only. This guide is not meant to serve as an
operating or training manual, its purpose is to provide an overview of the content contained
within, and to be used as a reference guide only.
SedonaOffice reserves the right to modify the SedonaOffice product described in this guide at
any time and without notice. Information in this guide is subject to change without notice.
Companies, names and data used in examples herein are fictitious unless otherwise noted. In no
event shall SedonaOffice be held liable for any incidental, indirect, special, or consequential
damages arising out of or related to this guide or the information contained herein. The
information contained in this document is the property of SedonaOffice.
This guide may be updated periodically, be sure to check our website at www.sedonaoffice.com
for the most current version.
Copyright 2010
Accounts Payable
Page 3 of 36
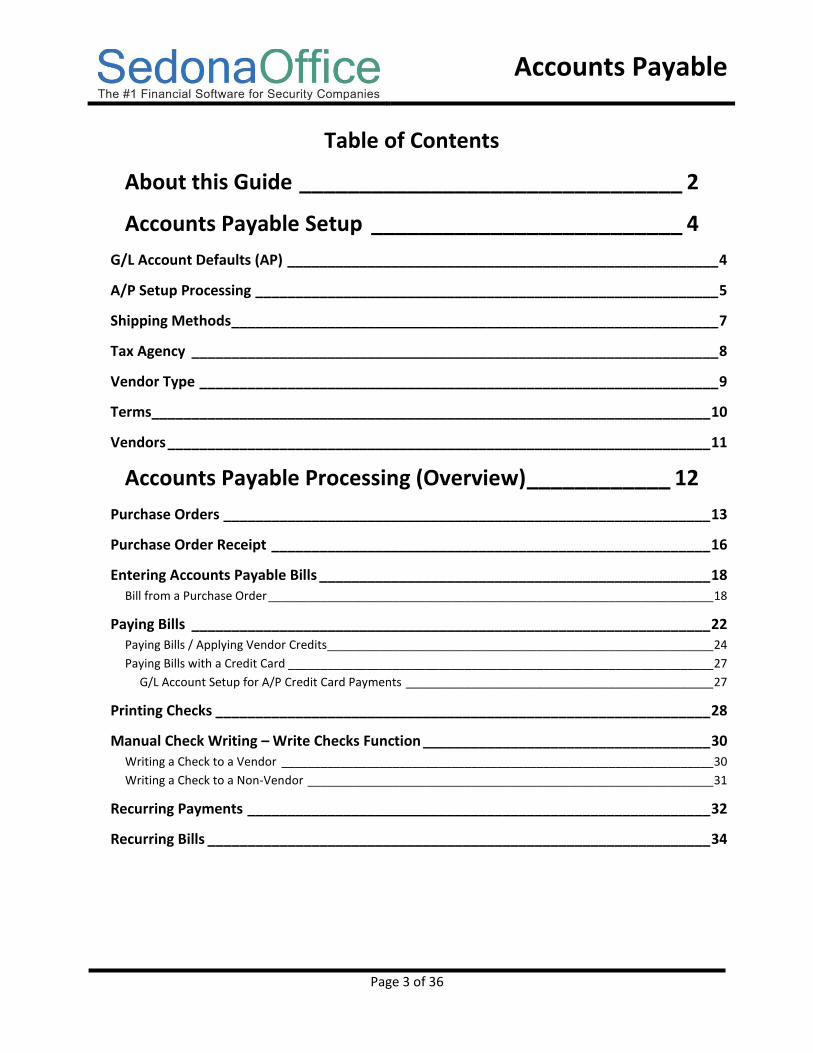
Table of Contents
About this Guide ________________________________ 2
Accounts Payable Setup __________________________ 4
G/L Account Defaults (AP) ______________________________________________________ 4
A/P Setup Processing __________________________________________________________ 5
Shipping Methods _____________________________________________________________ 7
Tax Agency __________________________________________________________________ 8
Vendor Type _________________________________________________________________ 9
Terms ______________________________________________________________________ 10
Vendors ____________________________________________________________________ 11
Accounts Payable Processing (Overview) ____________ 12
Purchase Orders _____________________________________________________________ 13
Purchase Order Receipt _______________________________________________________ 16
Entering Accounts Payable Bills _________________________________________________ 18
Bill from a Purchase Order ____________________________________________________________________ 18
Paying Bills _________________________________________________________________ 22
Paying Bills / Applying Vendor Credits___________________________________________________________ 24
Paying Bills with a Credit Card _________________________________________________________________ 27
G/L Account Setup for A/P Credit Card Payments _______________________________________________ 27
Printing Checks ______________________________________________________________ 28
Manual Check Writing – Write Checks Function ____________________________________ 30
Writing a Check to a Vendor __________________________________________________________________ 30
Writing a Check to a Non-Vendor ______________________________________________________________ 31
Recurring Payments __________________________________________________________ 32
Recurring Bills _______________________________________________________________ 34

Accounts Payable
Page 4 of 36
Accounts Payable Setup
G/L Account Defaults (AP)
The G/L Account Defaults allows you to specify default General Ledger accounts to be used for
processing accounts payable transactions. No manual journal entries should be made into any of
the accounts on this form.
You will select default G/L Accounts for Accounts Payable, Primary Checking Account, Inventory
Receipt Account, Customer Refunds Account, Inter-Branch Billing Account, Pre-Pay A/P, and an
A/P Discount account from your Chart of Accounts.

Accounts Payable
Page 5 of 36
A/P Setup Processing
The Setup Processing for Accounts Payable form allows you to specify default information related
to Purchase Orders, Check Printing, GST Tax information for accounts payable bills (Canadian use
only), and other accounts payable related information.
Purchase Order Setup
Auto Create PO Numbers - select whether you want the system to automatically assign
Purchase Order Numbers or if you will enter your own numbers. If you decide to let the
system automatically assign Purchase Order Numbers, you will need to enter the starting PO
Number.

Accounts Payable
Page 6 of 36
Next PO Number – If you have selected to auto create PO numbers, you must enter a starting
PO number.
Check Options
Allow Printed and Voided Checks to be Edited – If this option is selected, a User will be able
to make changes to a printed or voided accounts payable check.
Show Account Balance – Selecting this option will print the Vendor open accounts payable
balance on the stub of accounts payable checks.
GST Information
This section is used for companies operating in Canada only.
GST Number – Enter the government issued Goods and Services Tax identification number
for your company.
GST Rate – Enter the current GST tax rate that will be used on accounts payable bills and
credits.
GST Pay Account – Select the general ledger account number to use for posting GST tax on
accounts payable bills and credits.
Other
Enter Separate Posting Date for Bills and Credits – Selecting this option will enable a posting
date field on the accounts payable bills and credits form. This allows you to enter the date
you want the transaction to post to the general ledger. Normally the general ledger posting
date is the date of the accounts payable bill or credit. The posting date entered must be in an
accounting period with an open or re-opened status.
Auto Update Purchase Price when Billed – If this option is selected, when an accounts
payable bill is entered for an inventory parts receipt and the amount being billed is different
that the amount at which the parts were received, the application will automatically update
the current purchase cost of the part for the vendor when the bill is saved.
Allow Receipt of Part Over Shipments – If this option is selected, the system will allow you
to receive more parts on a purchase order then were actually ordered. Uncheck this option if
you want to only receive the quantity that was ordered and no more.

Accounts Payable
Page 7 of 36
Shipping Methods
Shipping Methods are appear on Purchase Orders and are selectable from the list that is created
in this setup table. The shipping method is the method in which you want your Vendor to ship
materials to your warehouse.

Accounts Payable
Page 8 of 36
Tax Agency
A Tax Agency is a jurisdiction to whom your company will remit sales tax that was collected from
your customers. Tax Agencies may be a state, county, city or any other entity to whom sales tax
is remitted.
If your company does not collect and remit sales tax to a government agency, you should still set
up a Tax Agency for the state in which your main office is located.
Accounts Payable
Page 9 of 36
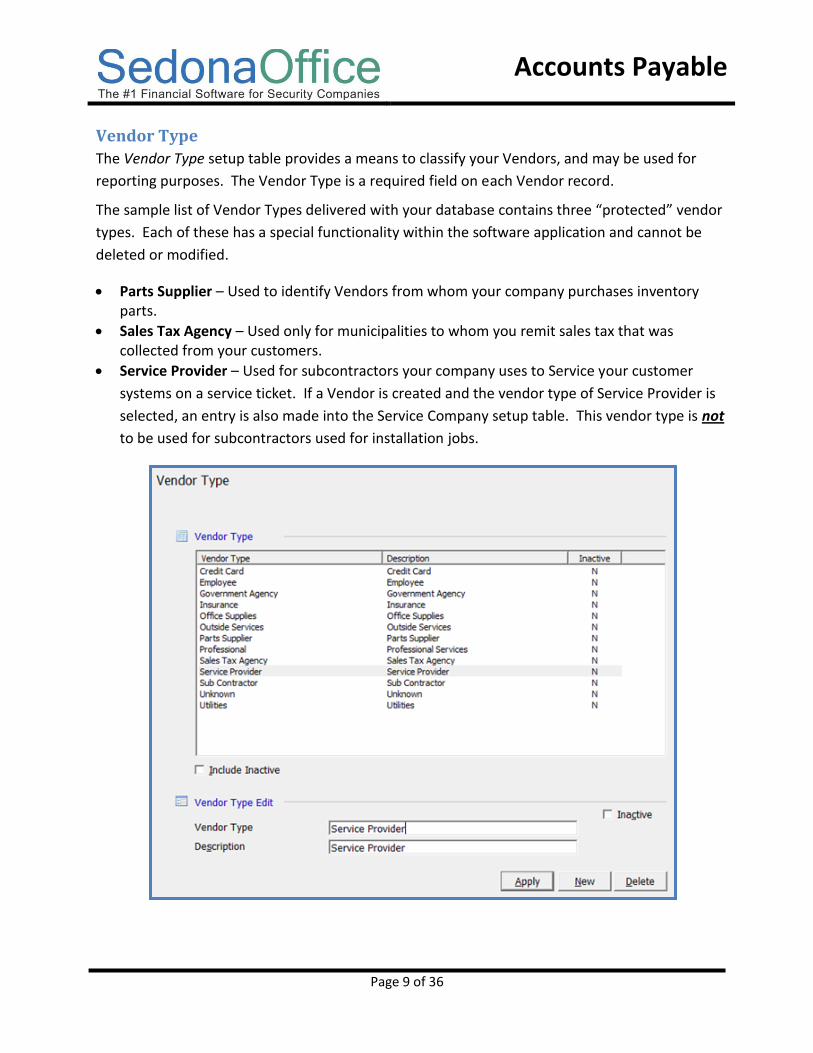
Vendor Type
The Vendor Type setup table provides a means to classify your Vendors, and may be used for
reporting purposes. The Vendor Type is a required field on each Vendor record.
The sample list of Vendor Types delivered with your database contains three “protected” vendor
types. Each of these has a special functionality within the software application and cannot be
deleted or modified.
Parts Supplier – Used to identify Vendors from whom your company purchases inventory parts.
Sales Tax Agency – Used only for municipalities to whom you remit sales tax that was collected from your customers.
Service Provider – Used for subcontractors your company uses to Service your customer
systems on a service ticket. If a Vendor is created and the vendor type of Service Provider is
selected, an entry is also made into the Service Company setup table. This vendor type is not
to be used for subcontractors used for installation jobs.

Accounts Payable
Page 10 of 36
Terms
A default Term Code is assigned to each Vendor record. For each accounts payable bill that is entered, the terms code assigned to the vendor will be the default, however, you may override the Terms Code on any bill.
General
Term Code: Enter a Terms Code that is easily identifiable by the user that will be making
selections during data entry.
Description: Enter a description for the Terms Code.
Aging Based On
Invoice Aging Date (A/R Only): Is used for Aging purposes. This determines at which point
Invoices will appear as past due.
Due Date: The number of days from the invoice date that the invoice is due to be paid.
A/P Discounts
If the term code is to be used for an Accounts Payable term and the Vendor offers discount
terms, you will enter the number of days in which the invoice must be paid and the percentage
that will be deducted from the bill amount for the discount.
Discount Days: The number of days from the bill date that the discount is valid.
Discount %: The discount percentage you will be taking from the bill amount.

Accounts Payable
Page 11 of 36
Vendors
If using the Accounts Payable module, you will need to create one record for each Vendor from
whom you receive bills for materials or services. The Vendor records created will be selectable
from the drop down list when creating Purchase Orders, entering Vendor bills or receiving parts.
Required fields on the Vendor setup form are: Vendor Code, Vendor Type, Name, Address,
Branch, Category, Terms.
The SedonaSetup form for Vendors is currently being redesigned. You will need to create your
Vendor records from the main application. Navigate to the main application menu tree and
select Accounts Payable/Vendors. Press the new button at the bottom of the Vendor List to
enter a new Vendor. Press the Save button when finished.

Accounts Payable
Page 12 of 36
Accounts Payable Processing (Overview) The accounts payable system within Sedona Office is designed to be used with the use of
Purchase Orders. If your company has elected not to use Purchase Orders, you may still enter
and pay bills, however will lose much of the tracking and reporting functionality provided by the
use of Purchase Orders.

Accounts Payable
Page 13 of 36
Purchase Orders
A Purchase Order is used to order inventory parts or services from a Vendor. A Purchase Order
may be created from a Job, a Service Ticket, the Purchase Order List or the Vendor record.
Purchase Orders may be linked to a Job Number or a Service Ticket Number for costing purposes.
Purchase Order for a Service Ticket

Accounts Payable
Page 14 of 36

Accounts Payable
Page 15 of 36
Purchase Order for Stock Parts
Accounts Payable
Page 16 of 36
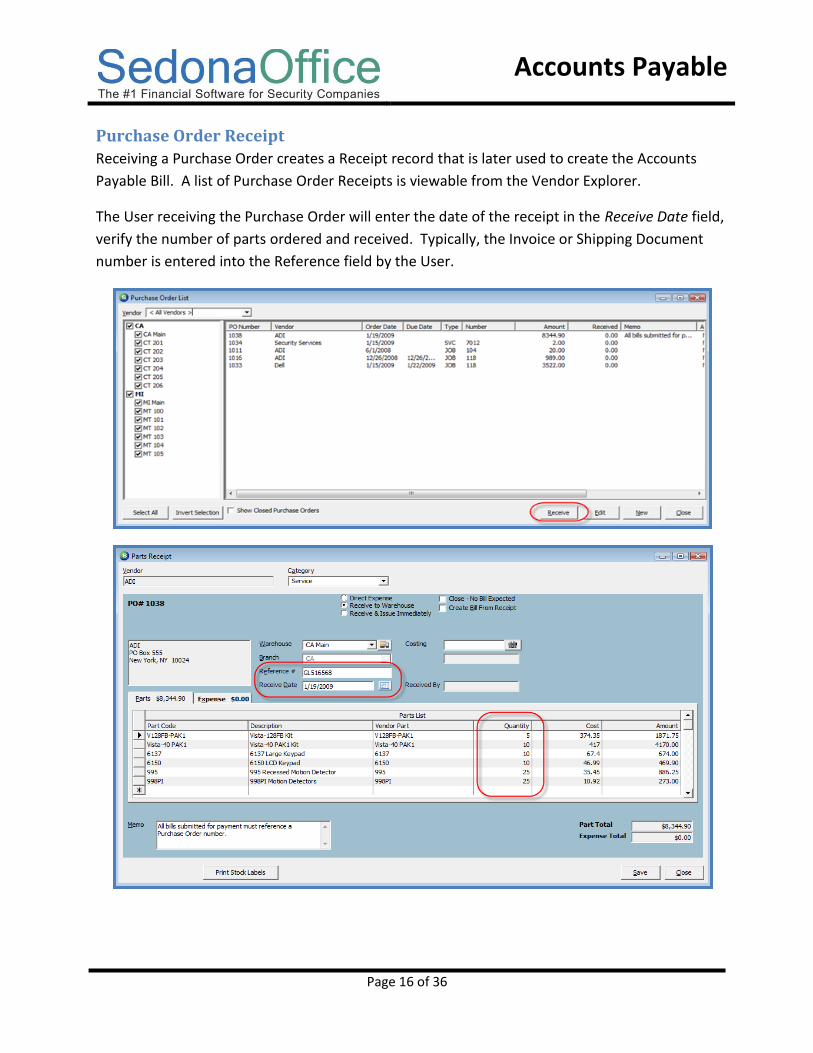
Purchase Order Receipt
Receiving a Purchase Order creates a Receipt record that is later used to create the Accounts
Payable Bill. A list of Purchase Order Receipts is viewable from the Vendor Explorer.
The User receiving the Purchase Order will enter the date of the receipt in the Receive Date field,
verify the number of parts ordered and received. Typically, the Invoice or Shipping Document
number is entered into the Reference field by the User.

Accounts Payable
Page 17 of 36
G/L Transaction from the Parts Receipt
Vendor Explorer – Receipts List
When viewing the list of Purchase Order Receipts for a Vendor, the items displayed in a red font
indicate a bill was entered for that receipt.

Accounts Payable
Page 18 of 36
Entering Accounts Payable Bills
Bill from a Purchase Order
When entering a new bill, the User may be prompted with one or two messages:
Vendor has open Purchase Orders…
Vendor has open Inventory Receipts…
If Yes is selected to the Open Purchase Orders message, a list of all open Purchase Orders will be
displayed from which to make a selection.
Vendor Bill Created from a Purchase Order

Accounts Payable
Page 19 of 36

Accounts Payable
Page 20 of 36
If Yes is selected to the Open Inventory Receipts message, a list of all open Inventory Receipts
will be displayed from which to make a selection.
Vendor Bill Created from an Inventory Receipt

Accounts Payable
Page 21 of 36
G/L Transaction from A/P Bill (created from a Parts Receipt)

Accounts Payable
Page 22 of 36
Paying Bills
Accounts Payable Bills may be paid individually using the Write Checks function within the
Accounts Payable module, or several bills are marked for payment using the Pay Bills function,
also located within the Accounts Payable module.
You have the option to select bills for payment from one branch or all branches. You also have
the option of paying the bills with a credit card. Credit card payment will be discussed in the
following section.
If you have Vendor Credits that you want to apply to bills, you must select that one Vendor
during an individual bill payment session.
When selecting bills for payment, you may pay the entire amount of the bill that is due or change
to a lesser amount if you are making a partial payment.

Accounts Payable
Page 23 of 36
G/L Transaction from Bill Payment
For each Vendor selected for payment in the Pay Bills form, one entry will be made to the
General Ledger.

Accounts Payable
Page 24 of 36
Paying Bills / Applying Vendor Credits
When paying bills and using Vendor Credits, in the Pay Bills form, you must select the Vendor in
the header area of the form of the Vendor for which you want to use credits.

Accounts Payable
Page 25 of 36
Using a Vendor Credit without Generating a Check
When saving the payment, a message will be displayed indicating no check will be generated for
the transaction.

Accounts Payable
Page 26 of 36
G/L Transaction from Applying a Vendor Credit to a Bill (no check generated)
Because an open Vendor Credit applies as a debit to Accounts Payable, there is no GL activity
posted when applying an open vendor credit to an open bill.

Accounts Payable
Page 27 of 36
Paying Bills with a Credit Card
You have the option of paying a Vendor Bill with a Credit Card. When paying a bill with a Credit
Card, the bills you are selecting for payment are transferred to the Credit Card Vendor’s account.
These bills transferred to the Credit Card Vendor will be an item you can reconcile when you
receive your credit card statement. You must first have a G/L Account set up to use this
functionality.
G/L Account Setup for A/P Credit Card Payments
For each credit card that you want to use for paying bills, you must setup a unique G/L account
number with the account type of CC. When selecting the Account Type of CC, a Vendor field is
displayed below the account type field. Select which Vendor you wish to link to the credit card
account.
Accounts Payable
Page 28 of 36
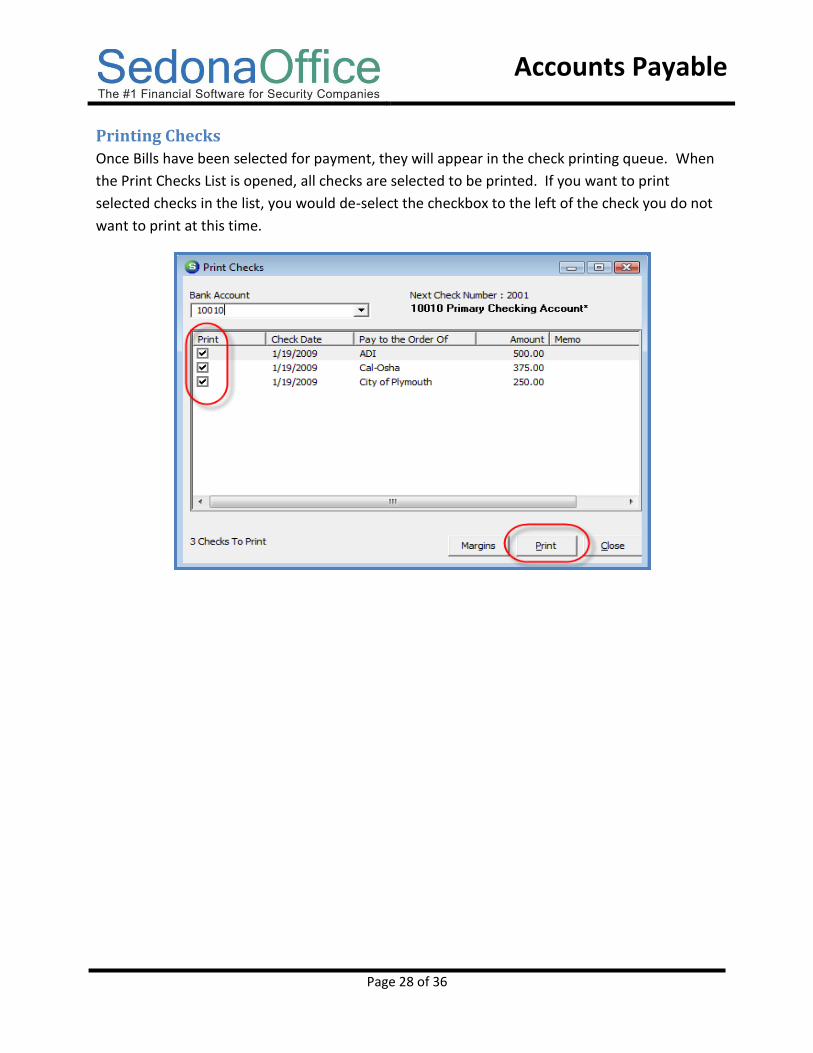
Printing Checks
Once Bills have been selected for payment, they will appear in the check printing queue. When
the Print Checks List is opened, all checks are selected to be printed. If you want to print
selected checks in the list, you would de-select the checkbox to the left of the check you do not
want to print at this time.

Accounts Payable
Page 29 of 36
Sample A/P Check

Accounts Payable
Page 30 of 36
Manual Check Writing – Write Checks Function
In addition to printing checks after using the Pay Bills function, Sedona Office provides the
functionality to write and print checks from the Write Checks menu option of the Accounts
Payable menu for the following situations:
To Vendors without going through the Pay Bills function.
To Vendors where payments are automatically deducted from your bank account.
To Companies or individuals that have not been set up as a Vendor.
To a Customers for a refund. *Functionality exists from the Customer Explorer record to
initiate a refund check to a customer.
Writing a Check to a Vendor
When opening the Write Checks form and selecting the Vendor option button, and selecting a
particular Vendor, any open bills that for the Vendor will be displayed in the Bills section. You
may select one or multiple bills to pay or enter a check for parts and/or expense items by filling
in the information on either of these forms.
Once the information for the check has been entered or selected, you may press the Print button
to print the check now, or select the In Print Queue option to print the check later.

Accounts Payable
Page 31 of 36
Writing a Check to a Non-Vendor
When opening the Write Checks form and selecting the Other option button, and selecting a
particular Vendor, any open bills that for the Vendor will be displayed in the Bills section. You
may select one or multiple bills to pay or enter a check for parts and/or expense items by filling
in the information on either of these forms.
Once the information for the check has been entered, you may press the Print button to print the
check now, or select the In Print Queue option to print the check later.

Accounts Payable
Page 32 of 36
Recurring Payments
If you pay a Vendor on a periodic basis and want a reminder to generate the payment each
month, you may set up a Recurring Payment for any number of Vendors. Recurring Payments
are created using the Write Checks function. When marking a check as a Recurring Payment, the
user is prompted to select how frequently the check should be generated and whether the
checks should stop generating on a particular date or continue generating indefinitely.
When Recurring Payments have been set up, they are displayed in the Recurring Items list which
is accessible from the Accounts Payable module options.

Accounts Payable
Page 33 of 36

Accounts Payable
Page 34 of 36
Recurring Bills
Sedona Office provides the functionality to setup Recurring Bills which are paid on a regular basis
for expenses such as utilities, rent, loans etc. One initial bill is created and the frequency and
length of time you want to have this bill automatically created is selected. If the payment
changes each time, such as in the case of a utility bill, you may make the modification when
generating the bill. These recurring items are viewable from the Recurring Items menu option of
the Accounts Payable menu.
Using this functionality saves time in data entry for bills that are manually entered every month
or another frequency.

Accounts Payable
Page 35 of 36
When Recurring Bills have been set up, they are displayed in the Recurring Items list which is
accessible from the Accounts Payable module options.

Accounts Payable
Page 36 of 36
Notes: