SecurEnvoy Windows Login Agent login agent.pdf · SecurEnvoy Global HQ Merlin House, Brunel Road,...
26
SecurEnvoy Global HQ Merlin House, Brunel Road, Theale, Reading. RG7 4AB Tel: 0845 2600010 Fax: 0845 260014 www.SecurEnvoy.com SecurEnvoy Windows Login Agent Including support for SecurPassword Version 8.1.200
Transcript of SecurEnvoy Windows Login Agent login agent.pdf · SecurEnvoy Global HQ Merlin House, Brunel Road,...

SecurEnvoy Global HQ Merlin House, Brunel Road, Theale, Reading. RG7 4AB Tel: 0845 2600010 Fax: 0845 260014 www.SecurEnvoy.com
SecurEnvoy Windows Login Agent
Including support for SecurPassword Version 8.1.200
© 2015 SecurEnvoy All Rights reserved Page 2
SecurEnvoy Windows Login Agent Including support for SecurPassword
Installation and Admin Guide v8.1.200
© 2015 SecurEnvoy
The SecurEnvoy Security server is the main central component of the SecurEnvoy suite of products. It has direct integration into a LDAP directory server (Microsoft Active Directory, Novell e-Dir, Sun Directory Server and Linux Open LDAP Directory Server) for user information, controls and manages the authentication of SMS passcodes and the subsequent sending of them. This must be installed for SecurAccess, SecurPassword SecurICE and SecurMail.
© 2015 SecurEnvoy All Rights reserved Page 3
SecurEnvoy Windows Login Agent Including support for SecurPassword
Installation and Admin Guide v8.1.200 © 2015 SecurEnvoy All rights reserved. No parts of this work may be reproduced in any form or by any means - graphic, electronic, or mechanical, including photocopying, recording, taping, or information storage and retrieval systems - without the written permission of the publisher. Products that are referred to in this document may be either trademarks and/or registered trademarks of the respective owners. The publisher and the author make no claim to these trademarks. While every precaution has been taken in the preparation of this document, the publisher and the author assume no responsibility for errors or omissions, or for damages resulting from the use of information contained in this document or from the use of programs and source code that may accompany it. In no event shall the publisher and the author be liable for any loss of profit or any other commercial damage caused or alleged to have been caused directly or indirectly by this document. Printed: 2015 in United Kingdom
Publisher SecurEnvoy Publishing Managing Editor SecurEnvoy Training Dept Technical Editors A Kemshall Technical Director P Underwood EMEA Pre – Sales Cover Designer SecurEnvoy Marketing Revision v1.0 AK PU 3/7/2009 V1.1 PU 7/7/2009 V1.3 PU 9/10/2009 V1.4 PU 11/10/2010 V1.5 PU 29/6/2011 V1.6 PU 20/4/2012 V1.7 PU 14/5/2012 V1.8 PU 25/7/2013 V1.9 TD 17/1/2015 V2.0 TD 23/5/2015

© 2015 SecurEnvoy All Rights reserved Page 4
Foreword
SecurEnvoy is the trusted global leader of tokenless two-factor authentication. As the pioneers of mobile phone based tokenless authentication; SecurEnvoy leads the way with ground-breaking solutions that others aspire to. Our innovative approach to the tokenless market demonstrates that thousands of users are benefitting from our solutions all over the world. With users deployed across five continents, our customers benefit from a significantly reduced time to deploy and a zero footprint approach means there is no remote software deployment and administrators enjoy our comprehensive management tools allowing them to rapidly deploy up to 100,000 users per hour. Our design philosophy is based on re-using existing customer technology investments such as Microsoft Active Directory, simplifying the end user authentication experience while enhancing the overall security. With no hardware token manufacturing, distribution and maintenance costs as users can make use of existing mobile phone or Email technology the return on investment (ROI) is so much more acceptable to businesses and organizations. A zero carbon footprint is also very beneficial for environmentally responsible purchasers. We are truly providing solutions that have zero impact on our environment. SecurEnvoy distribute through the channel, providing customers the value added benefits of working with local partners. We have established a technical and sales infrastructure that supports most languages and cultures around the world. The business was officially incorporated in 2003 after preliminary, coding and testing in our labs. Over a decade has passed since our initial incorporation and we are very proud of our happy customer base across the five continents and with regional support for them. Business levels have more than doubled year on year due to our subscription sales model that is an acceptable route that allows our clients to budget more effectively. This model includes local support and annual subscriptions. Founded by Andrew Kemshall and Stephen Watts, the two founders work relentlessly to achieve business growth worldwide. This massive growth has been possible through the quality of people and the experience within the company both from sales and technical expansion. SecurEnvoy continues to shape the way millions of people plan their authentication requirements and purchasing decisions.
© 2015 SecurEnvoy All Rights reserved Page 5
Contents 1.0 Overview of Installation Files .................................................................................................... 6
1.1 SecurEnvoy Windows Login Agent ................................................................................. 6 2.0 SecurEnvoy Windows Login Agent Install & Configuration ........................................................... 7
2.1 Agent Functionality ....................................................................................................... 7
2.2 Installing and Configuring the SecurEnvoy Windows Login Agent (Standalone installation) 8 2.3 Installing and Configuring the SecurEnvoy Windows Login Agent (Group Policy Install) ... 10
3.0 User Experience ...................................................................................................................... 14 3.1 User Configuration................................................................................................................... 16
4.0 Emergency Access ................................................................................................................... 17
5.0 SecurPassword ........................................................................................................................ 18 5.1 Reset password with existing AD information ............................................................................ 19
5.2 User experience - Reset password with existing AD information ................................................. 20 5.3 Reset password with SecurEnvoy secret questions .................................................................... 21
5.4 User experience - Reset password with SecurEnvoy secret questions .......................................... 22 6.0 Offline Support (Soft Token) .................................................................................................... 23
6.1 SecurEnvoy server User configuration ....................................................................................... 23
6.2 Off-Line User experience .......................................................................................................... 24 Appendix ...................................................................................................................................... 26

© 2015 SecurEnvoy All Rights reserved Page 6
1.0 Overview of Installation Files
This agent is required if you are installing SecurAccess and it is required to directly authenticate upon
a Windows PC or a Windows server. This agent is also required if you are using SecurPassword and requires a Self Service Password Reset (SSPR) solution directly from a Windows PC or a Windows
server. A setup and MSI file are included to cater for standalone and Group Policy installation. This agent utilises the HTTP(S) protocol to communicate from the SecurEnvoy Windows logon agent
SecurEnvoy SecurAccess server.
1.1 SecurEnvoy Windows Login Agent
Note this agent is only required for SecurAccess and SecurPassword
Supported Microsoft Versions:
Windows XP
Windows Vista Windows 7
Windows 8 / 8.1 Windows 10
Windows 2003 server - all versions including Terminal Server configurations
Windows 2008 server - all versions including R2 and Terminal Server configurations Windows 2012 server - all versions including R2 and Terminal Server configurations
Note
For SecurAccess ONLY operation with the Windows Logon Agent (WLA), existing v6 WLA clients are supported, but this will not support the new VOICE token. For SecurPassword via the WLA, this MUST be upgraded at the same time as the SecurEnvoy Security Server is upgraded to v7.
Note
For SecurAccess ONLY operation with the Windows Logon Agent (WLA) can now support 2FA for a user’s laptop working offline. ONLY Soft Tokens are supported and allows users to 2FA whilst working in a disconnected state away from the company domain.

© 2015 SecurEnvoy All Rights reserved Page 7
2.0 SecurEnvoy Windows Login Agent Install & Configuration
Prior to installing the SecurEnvoy Windows Login Agent, it is essential that there is a network connection via https (or http if the network is trusted) between the Windows Login Agent and the
security server.
Confirm this is true by browsing to the following:
https://[my Security Server]/secserver example https://www.abc.com/secserver
You should get the following returned: “ERR, Unknown Flag”
2.1 Agent Functionality
All existing Microsoft logon capabilities are preserved; the SecurEnvoy agent provides a second factor
of authentication via HTTP(S) using a 6 digit passcode sent to the end user.
The SecurEnvoy Windows login Agent has the following functionality:
1. All users are authenticated to the Microsoft Domain and SecurEnvoy, the Microsoft domain
manages and authenticates the UserID and domain password and SecurEnvoy authenticates the UserID and 6 digit passcode. Only when access has been granted by both the Microsoft
Domain and SecurEnvoy is the user allowed access to the Microsoft environment.
2. Authentication can be provided by way of Group membership, where only a designated
Window group requires a 2FA logon. Thereby allowing other user groups to logon without 2FA. Group logic can be applied for users who are a member of a specific group or who are not a
member of a specific group. The two factor authentication is used for initial logon, lock workstation and screen lock.
3. SecurEnvoy Windows Login Agent has the ability to allow an “Emergency Access account” which will allow logon with a UserID and password. This account must be either a Domain or
local account upon the machine. This can be used when Server client communication has failed.
4. Users, who utilise a soft token for authentication, now have the ability to work offline and still use 2FA at time of logon. Users in this mode must use a soft token and authenticate once in a
connected state so that the SEED record can be copied locally to the laptop.
5. SecurPassword allows the user to reset their domain password using Two Factor authentication, the user will supply the 6 digit passcode and answer security question(s).
6. New connections feature, where a connection port can be specified to be protected or unprotected from 2FA. This is useful, where you want to 2FA external users but exclude
internal users.
© 2015 SecurEnvoy All Rights reserved Page 8
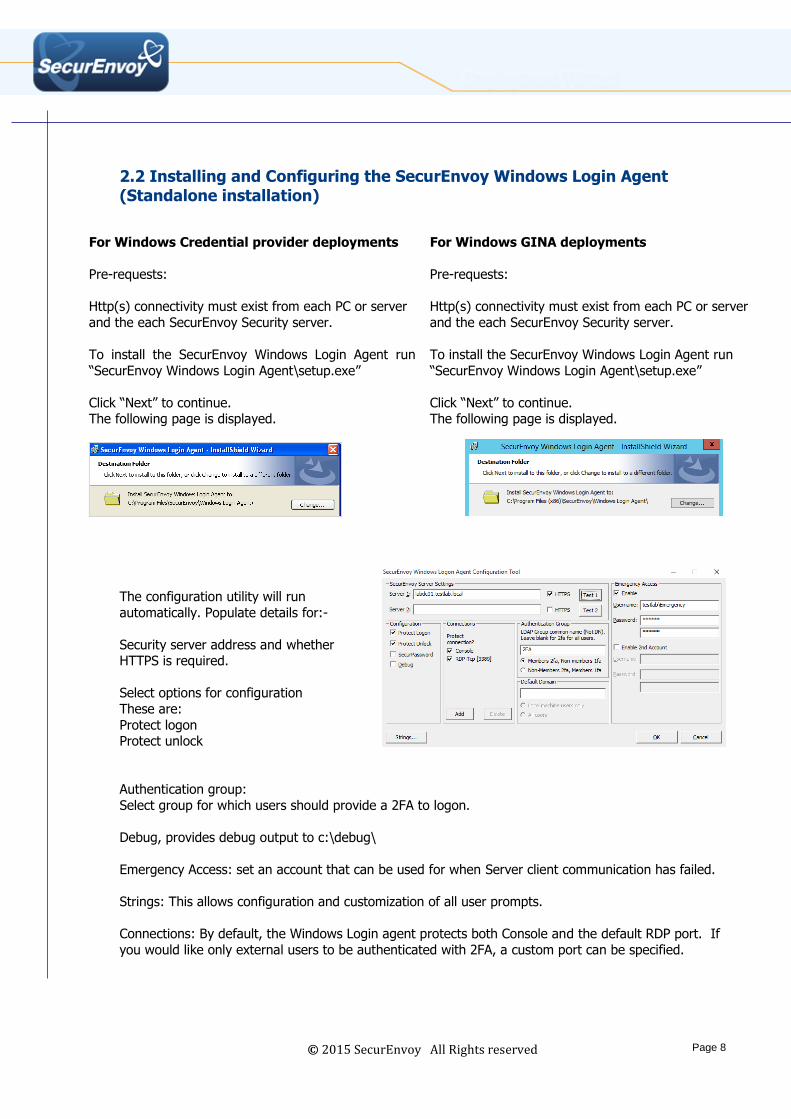
2.2 Installing and Configuring the SecurEnvoy Windows Login Agent (Standalone installation)
The configuration utility will run
automatically. Populate details for:-
Security server address and whether HTTPS is required.
Select options for configuration
These are:
Protect logon Protect unlock
Authentication group:
Select group for which users should provide a 2FA to logon.
Debug, provides debug output to c:\debug\
Emergency Access: set an account that can be used for when Server client communication has failed.
Strings: This allows configuration and customization of all user prompts.
Connections: By default, the Windows Login agent protects both Console and the default RDP port. If
you would like only external users to be authenticated with 2FA, a custom port can be specified.
For Windows Credential provider deployments
Pre-requests:
Http(s) connectivity must exist from each PC or server
and the each SecurEnvoy Security server.
To install the SecurEnvoy Windows Login Agent run
“SecurEnvoy Windows Login Agent\setup.exe”
Click “Next” to continue. The following page is displayed.
For Windows GINA deployments
Pre-requests:
Http(s) connectivity must exist from each PC or server
and the each SecurEnvoy Security server.
To install the SecurEnvoy Windows Login Agent run
“SecurEnvoy Windows Login Agent\setup.exe”
Click “Next” to continue. The following page is displayed.
© 2015 SecurEnvoy All Rights reserved Page 9
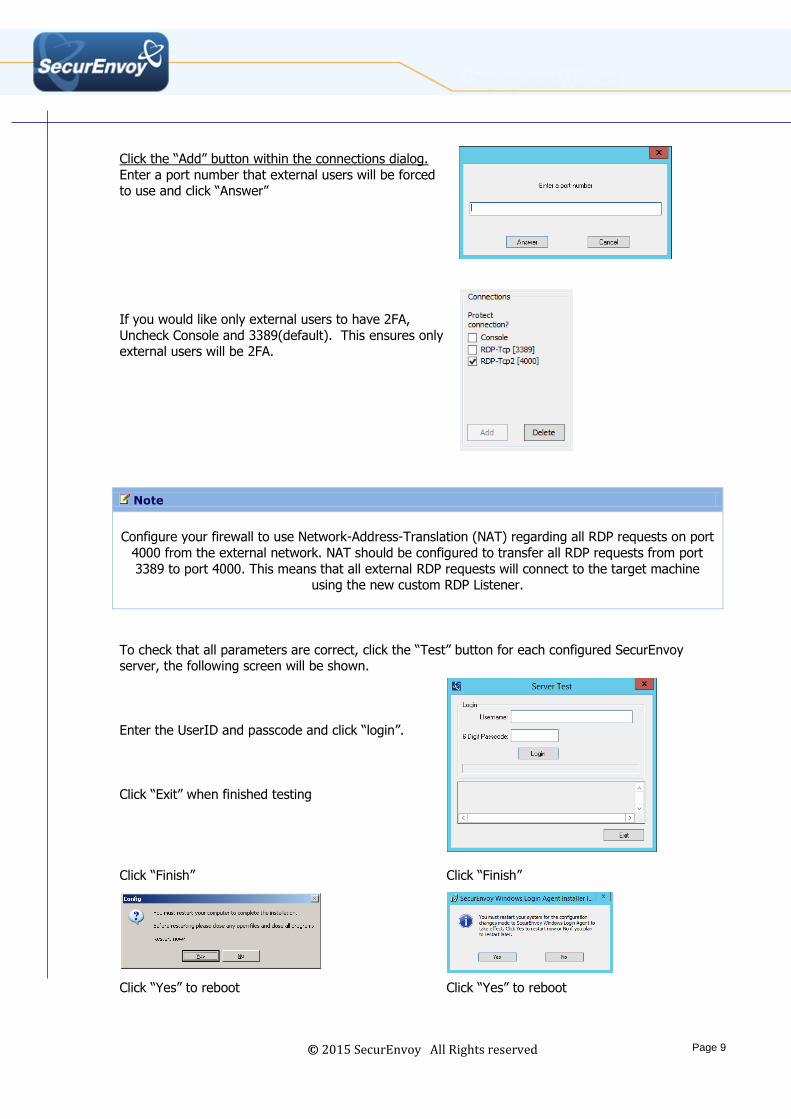
Click the “Add” button within the connections dialog.
Enter a port number that external users will be forced to use and click “Answer”
If you would like only external users to have 2FA,
Uncheck Console and 3389(default). This ensures only external users will be 2FA.
To check that all parameters are correct, click the “Test” button for each configured SecurEnvoy server, the following screen will be shown.
Enter the UserID and passcode and click “login”.
Click “Exit” when finished testing
Click “Finish”
Click “Yes” to reboot
Click “Finish”
Click “Yes” to reboot
Note
Configure your firewall to use Network-Address-Translation (NAT) regarding all RDP requests on port
4000 from the external network. NAT should be configured to transfer all RDP requests from port
3389 to port 4000. This means that all external RDP requests will connect to the target machine using the new custom RDP Listener.
© 2015 SecurEnvoy All Rights reserved Page 10
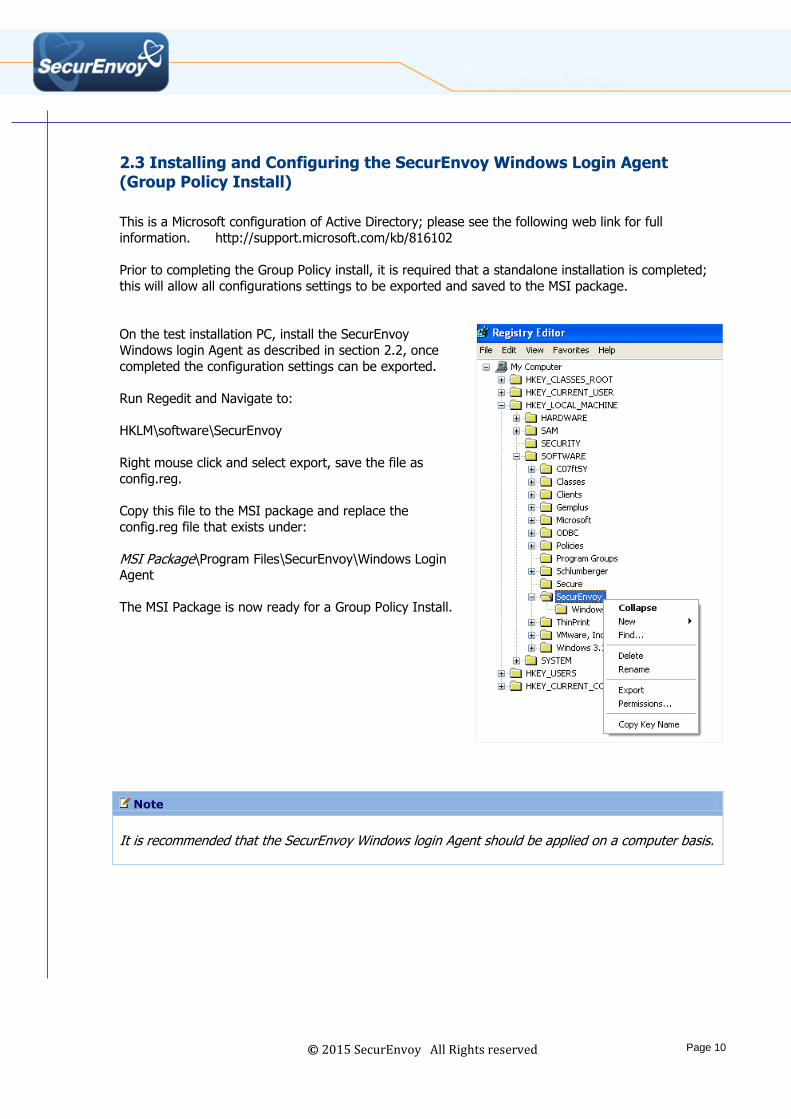
2.3 Installing and Configuring the SecurEnvoy Windows Login Agent (Group Policy Install)
This is a Microsoft configuration of Active Directory; please see the following web link for full
information. http://support.microsoft.com/kb/816102
Prior to completing the Group Policy install, it is required that a standalone installation is completed;
this will allow all configurations settings to be exported and saved to the MSI package.
On the test installation PC, install the SecurEnvoy
Windows login Agent as described in section 2.2, once
completed the configuration settings can be exported.
Run Regedit and Navigate to:
HKLM\software\SecurEnvoy
Right mouse click and select export, save the file as
config.reg.
Copy this file to the MSI package and replace the
config.reg file that exists under:
MSI Package\Program Files\SecurEnvoy\Windows Login Agent
The MSI Package is now ready for a Group Policy Install.
Note
It is recommended that the SecurEnvoy Windows login Agent should be applied on a computer basis.

© 2015 SecurEnvoy All Rights reserved Page 11
Windows 2003 Server Create a Distribution Point
To publish or assign a computer program, you must create a distribution point on the publishing server: Log on to the server computer as an administrator.
1. Create a shared network folder where you will put a copy of all the agent’s MSI install files
including the .msi file and all other associated files and directories. 2. Set permissions on the share to allow access to the distribution package.
3. Copy or install the package to the distribution point.
Create a Group Policy Object
To create a Group Policy object (GPO) to use to distribute the software package:
1. Start the Active Directory Users and Computers snap-in. To do this, click Start, point to
Administrative Tools, and then click Active Directory Users and Computers.
2. In the console tree, right-click your domain, and then click Properties.
3. Click the Group Policy tab, and then click New.
4. Type a name for this new policy (for example, Office XP distribution), and then press
ENTER.
5. Click Properties, and then click the Security tab.
6. Click to clear the Apply Group Policy check box for the security groups that you want to
prevent from having this policy applied.
7. Click to select the Apply Group Policy check box for the groups that you want this policy to
apply to.
8. When you are finished, click OK.
To Assign a Package
To assign a program to computers that are running Windows Server 2003, Windows 2000, or Microsoft Windows XP Professional, or to users who are logging on to one of these workstations:
1. Start the Active Directory Users and Computers snap-in. To do this, click Start, point to
Administrative Tools, and then click Active Directory Users and Computers.
2. In the console tree, right-click your domain, and then click Properties.
3. Click the Group Policy tab, select the group policy object that you want, and then click Edit.
4. Under Computer Configuration, expand Software Settings.
© 2015 SecurEnvoy All Rights reserved Page 12
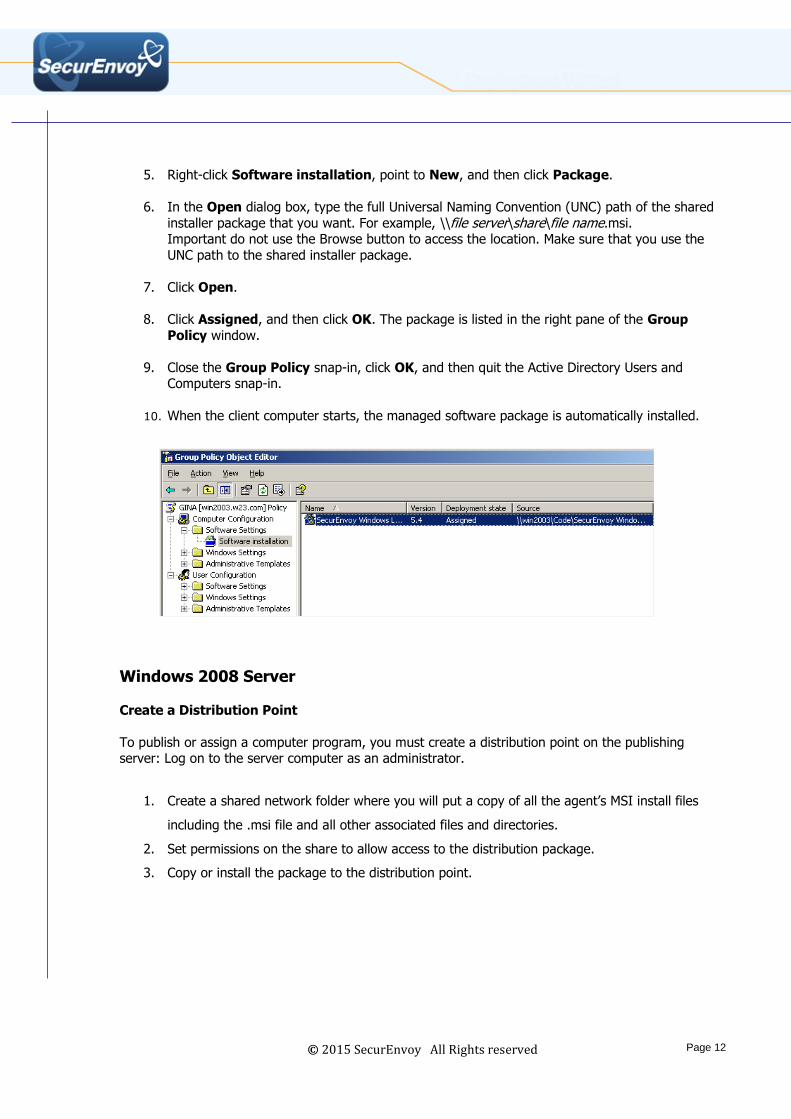
5. Right-click Software installation, point to New, and then click Package.
6. In the Open dialog box, type the full Universal Naming Convention (UNC) path of the shared
installer package that you want. For example, \\file server\share\file name.msi. Important do not use the Browse button to access the location. Make sure that you use the
UNC path to the shared installer package.
7. Click Open.
8. Click Assigned, and then click OK. The package is listed in the right pane of the Group
Policy window.
9. Close the Group Policy snap-in, click OK, and then quit the Active Directory Users and Computers snap-in.
10. When the client computer starts, the managed software package is automatically installed.
Windows 2008 Server
Create a Distribution Point
To publish or assign a computer program, you must create a distribution point on the publishing server: Log on to the server computer as an administrator.
1. Create a shared network folder where you will put a copy of all the agent’s MSI install files
including the .msi file and all other associated files and directories.
2. Set permissions on the share to allow access to the distribution package.
3. Copy or install the package to the distribution point.
© 2015 SecurEnvoy All Rights reserved Page 13
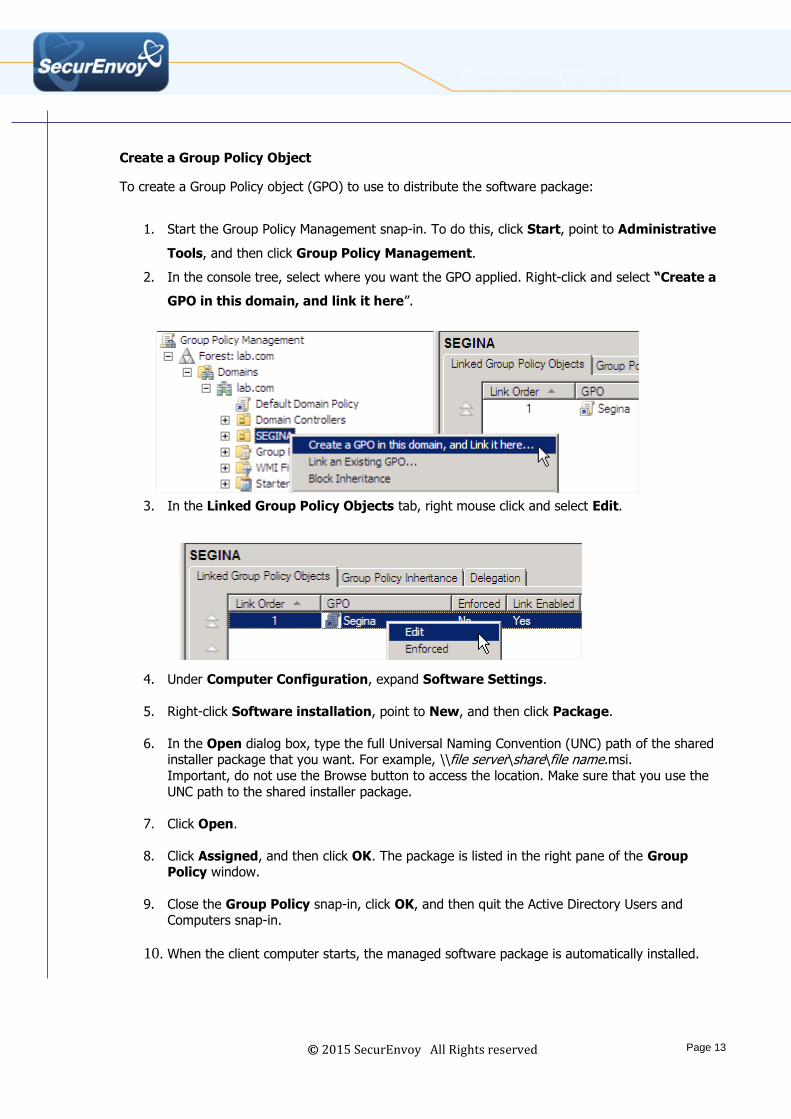
Create a Group Policy Object
To create a Group Policy object (GPO) to use to distribute the software package:
1. Start the Group Policy Management snap-in. To do this, click Start, point to Administrative
Tools, and then click Group Policy Management.
2. In the console tree, select where you want the GPO applied. Right-click and select “Create a
GPO in this domain, and link it here”.
3. In the Linked Group Policy Objects tab, right mouse click and select Edit.
4. Under Computer Configuration, expand Software Settings.
5. Right-click Software installation, point to New, and then click Package.
6. In the Open dialog box, type the full Universal Naming Convention (UNC) path of the shared installer package that you want. For example, \\file server\share\file name.msi.
Important, do not use the Browse button to access the location. Make sure that you use the
UNC path to the shared installer package.
7. Click Open.
8. Click Assigned, and then click OK. The package is listed in the right pane of the Group Policy window.
9. Close the Group Policy snap-in, click OK, and then quit the Active Directory Users and Computers snap-in.
10. When the client computer starts, the managed software package is automatically installed.
© 2015 SecurEnvoy All Rights reserved Page 14
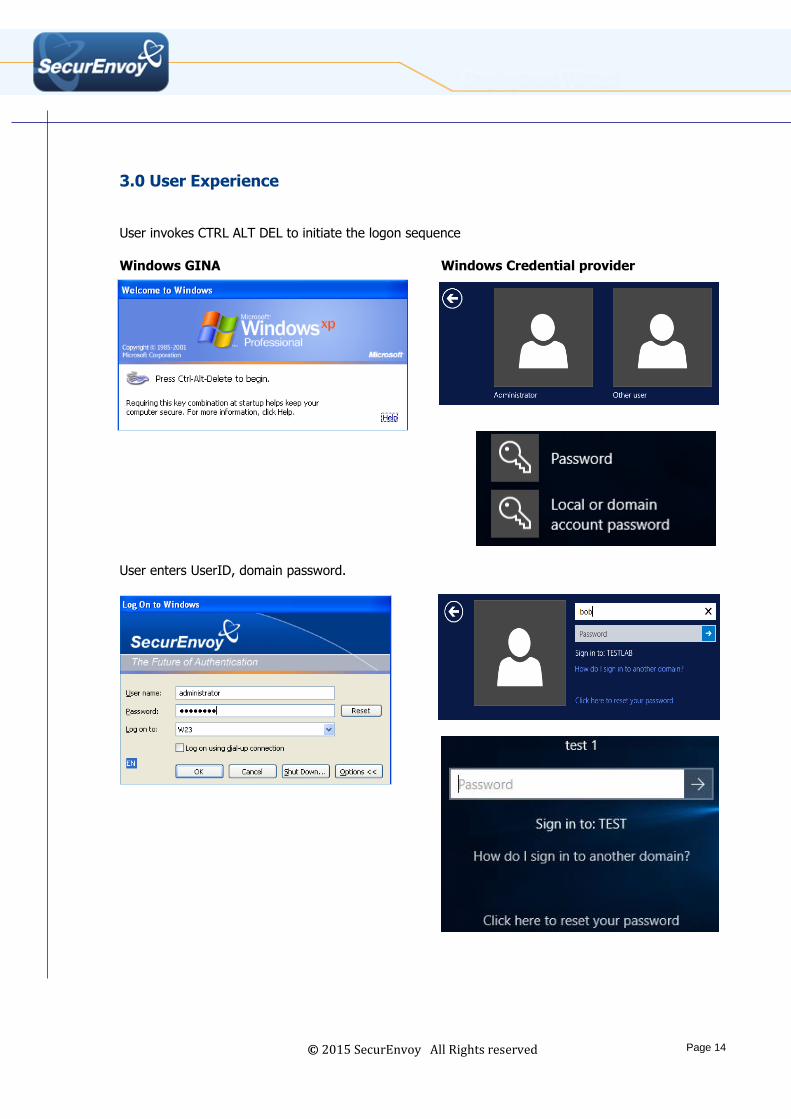
3.0 User Experience
User invokes CTRL ALT DEL to initiate the logon sequence
Windows GINA
Windows Credential provider
User enters UserID, domain password.
© 2015 SecurEnvoy All Rights reserved Page 15
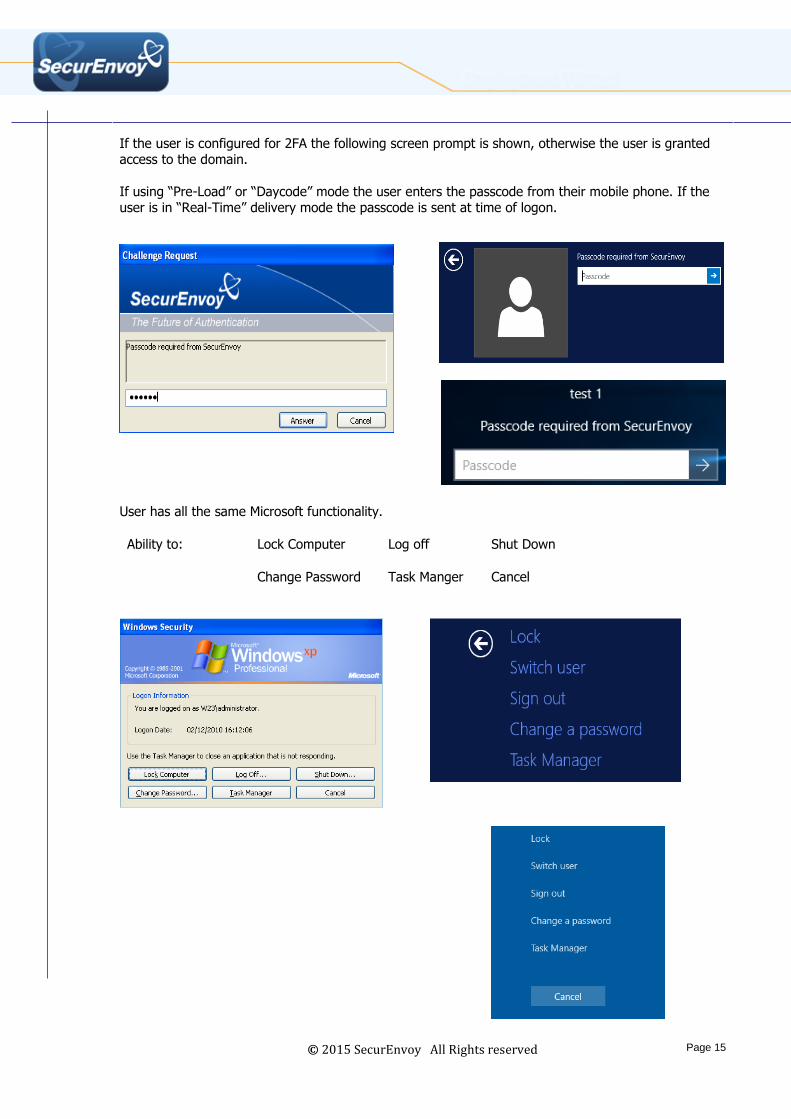
If the user is configured for 2FA the following screen prompt is shown, otherwise the user is granted access to the domain.
If using “Pre-Load” or “Daycode” mode the user enters the passcode from their mobile phone. If the user is in “Real-Time” delivery mode the passcode is sent at time of logon.
User has all the same Microsoft functionality.
Ability to:
Lock Computer
Log off
Shut Down
Change Password
Task Manger
Cancel

© 2015 SecurEnvoy All Rights reserved Page 16
3.1 User Configuration
User can access the SecurEnvoy Windows login Agent from the “Start All programs menu” or using
Windows search:
The following programs can be searched/selected; this requires Administrative permissions to achieve these tasks.
Config This executes the Config utility program, all settings can be configured, these are described in section 2.2
Disable This will disable the SecurEnvoy Windows Login Agent, a reboot is required to
confirm change, user will now authenticate with a Microsoft login.
Enable This will enable the SecurEnvoy Windows Login Agent, a reboot is required to confirm
change, user will now authenticate with a SecurEnvoy 2FA login.

© 2015 SecurEnvoy All Rights reserved Page 17
4.0 Emergency Access
SecurEnvoy Windows Login Agent has the ability to allow an “Emergency Access account” which will
allow logon with a UserID and password. This account must be either a Domain or local account upon the machine. This can be used when client/server communication has failed due to network, interface
card or server issue. The following screen shot will be displayed to indicate a timeout issue
Access can then be gained by logging in
with the emergency access account that was previously setup in section 2.2.
© 2015 SecurEnvoy All Rights reserved Page 18
5.0 SecurPassword
SecurPassword allows a user to reset their Microsoft Domain password using Two Factor
Authentication. In addition to the passcode, up to three attributes of data can be used to help validate
the authentication request for a password reset. Also the user can use security questions that were answered within the enrolment process. Any data that is held within the Directory Server can provide
further checks to the user’s credentials. Attributes like employee number, department etc can provide additional authentications parameters.
To enable SecurPassword it must be first enabled upon the SecurEnvoy Security server, as such a valid license must be installed. Enable the Allow SecurPassword checkbox must be ticked. The only
decision is to either use existing attributes to check for authentication, or use the security questions a user has enrolled with
User can be automatically sent a “Password expiry warning” via SMS, this feature will send out a SMS warning message at x days before their user password expires. (Default is 7 days). These settings are
configured upon the SecurEnvoy Security server(s).
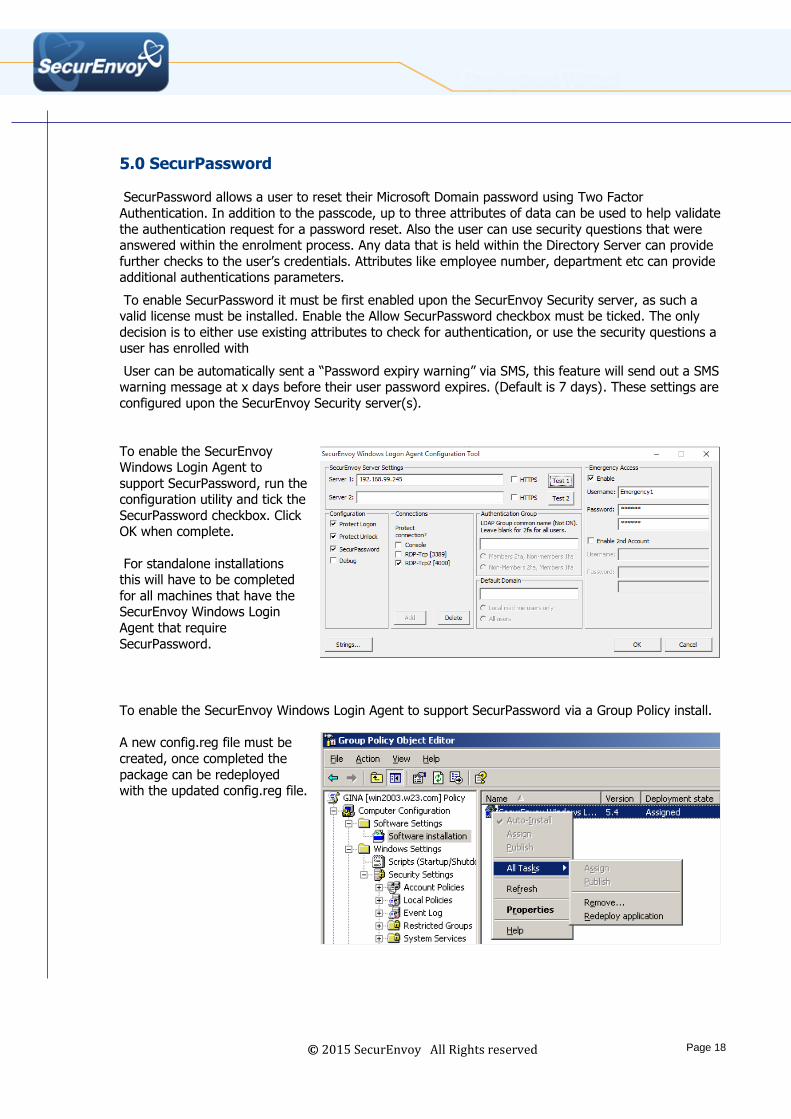
To enable the SecurEnvoy Windows Login Agent to
support SecurPassword, run the configuration utility and tick the
SecurPassword checkbox. Click OK when complete.
For standalone installations this will have to be completed
for all machines that have the SecurEnvoy Windows Login
Agent that require
SecurPassword.
To enable the SecurEnvoy Windows Login Agent to support SecurPassword via a Group Policy install.
A new config.reg file must be
created, once completed the
package can be redeployed with the updated config.reg file.
© 2015 SecurEnvoy All Rights reserved Page 19
5.1 Reset password with existing AD information
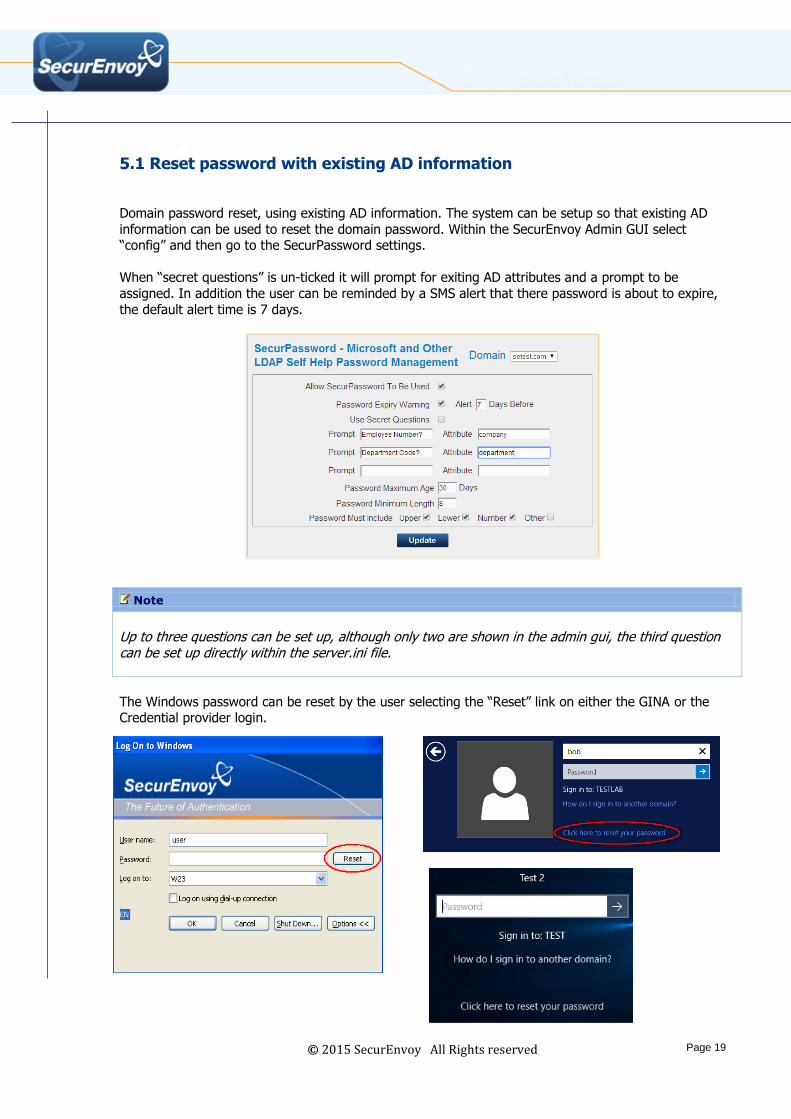
Domain password reset, using existing AD information. The system can be setup so that existing AD
information can be used to reset the domain password. Within the SecurEnvoy Admin GUI select “config” and then go to the SecurPassword settings.
When “secret questions” is un-ticked it will prompt for exiting AD attributes and a prompt to be
assigned. In addition the user can be reminded by a SMS alert that there password is about to expire,
the default alert time is 7 days.
The Windows password can be reset by the user selecting the “Reset” link on either the GINA or the Credential provider login.
Note
Up to three questions can be set up, although only two are shown in the admin gui, the third question can be set up directly within the server.ini file.

© 2015 SecurEnvoy All Rights reserved Page 20
5.2 User experience - Reset password with existing AD information
When the user selects the reset password link they will then be prompted to reply with answers as
shown below:
If a Domain password policy is in force The Gina or credential provider will display what components are required to make a good password.
When a user responds with the relevant component i.e. Upper case letter or numeric, the requirements that have been met will then be grayed out.
Note
The Password complexity prompt within the GINA or credential provider requires that the LDAP base is set. This can be configured directly within the server.ini file.
© 2015 SecurEnvoy All Rights reserved Page 21
5.3 Reset password with SecurEnvoy secret questions
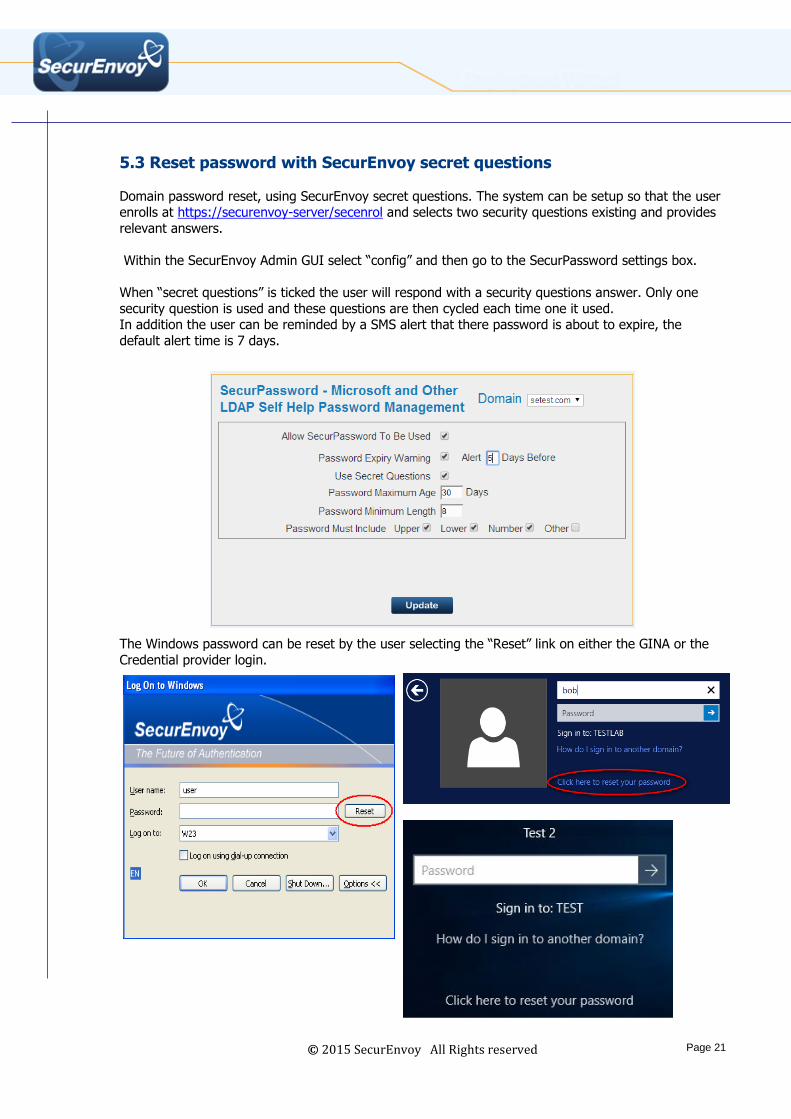
Domain password reset, using SecurEnvoy secret questions. The system can be setup so that the user enrolls at https://securenvoy-server/secenrol and selects two security questions existing and provides
relevant answers.
Within the SecurEnvoy Admin GUI select “config” and then go to the SecurPassword settings box.
When “secret questions” is ticked the user will respond with a security questions answer. Only one
security question is used and these questions are then cycled each time one it used. In addition the user can be reminded by a SMS alert that there password is about to expire, the
default alert time is 7 days.
The Windows password can be reset by the user selecting the “Reset” link on either the GINA or the
Credential provider login.
© 2015 SecurEnvoy All Rights reserved Page 22
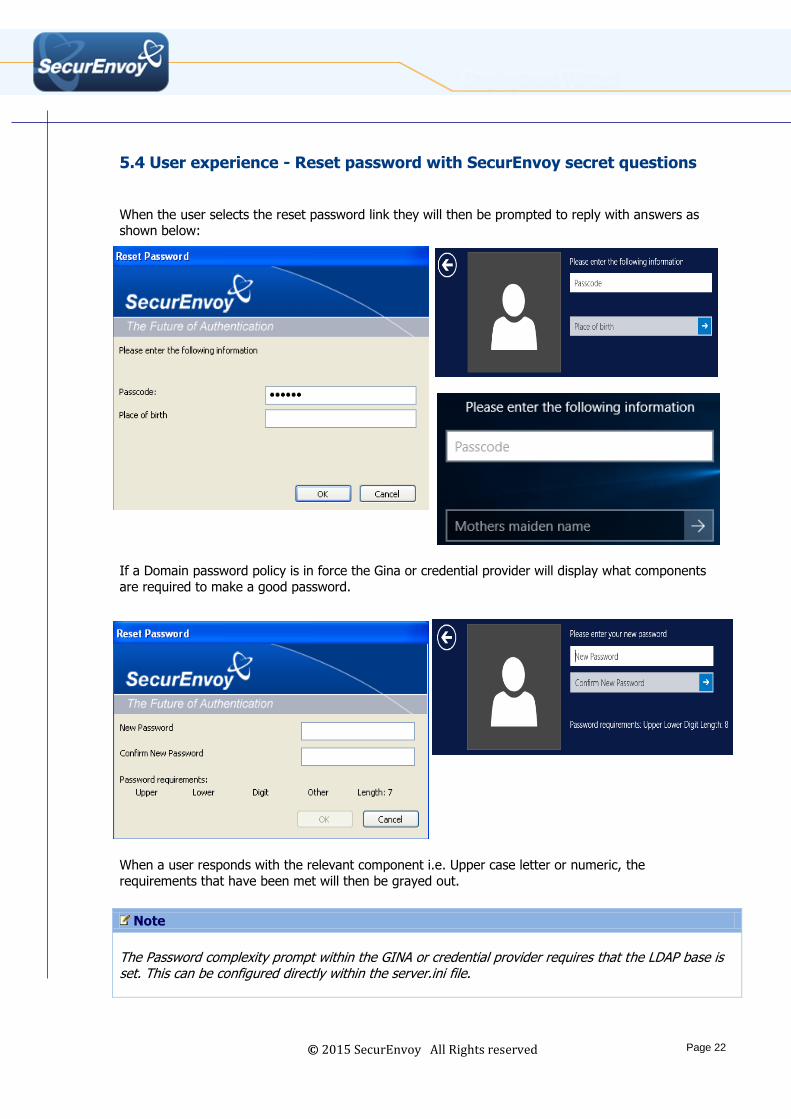
5.4 User experience - Reset password with SecurEnvoy secret questions
When the user selects the reset password link they will then be prompted to reply with answers as shown below:
If a Domain password policy is in force the Gina or credential provider will display what components
are required to make a good password.
When a user responds with the relevant component i.e. Upper case letter or numeric, the
requirements that have been met will then be grayed out.
Note
The Password complexity prompt within the GINA or credential provider requires that the LDAP base is set. This can be configured directly within the server.ini file.

© 2015 SecurEnvoy All Rights reserved Page 23
6.0 Offline Support (Soft Token)
To support users who are required to work in an offline state, the following are required:
User MUST be using a Soft Token User MUST be setup for Offline mode
User MUST have authenticated with Soft Token at least once, in a connected state (this action copies the SEED record from the server to the user’s machine)
If a user updates their Soft Token SEED record to a new one, they must authenticate with the new
Soft Token at least once, in a connected state
6.1 SecurEnvoy server User configuration
Setup the SecurEnvoy server to support offline passcodes for a Soft Token.
Launch the Admin GUI, Config
then select Admin GUI options. Select the domain you wish to
work with and finally select the checkbox “Display Off-line
Laptops”.
Once complete then select the user(s) that require this setup, within the user profile.
Select the checkbox “Off-line Laptop”
Click update when complete
This MUST be competed for all
users who require Off-Line passcodes support for a Soft
Token.
© 2015 SecurEnvoy All Rights reserved Page 24
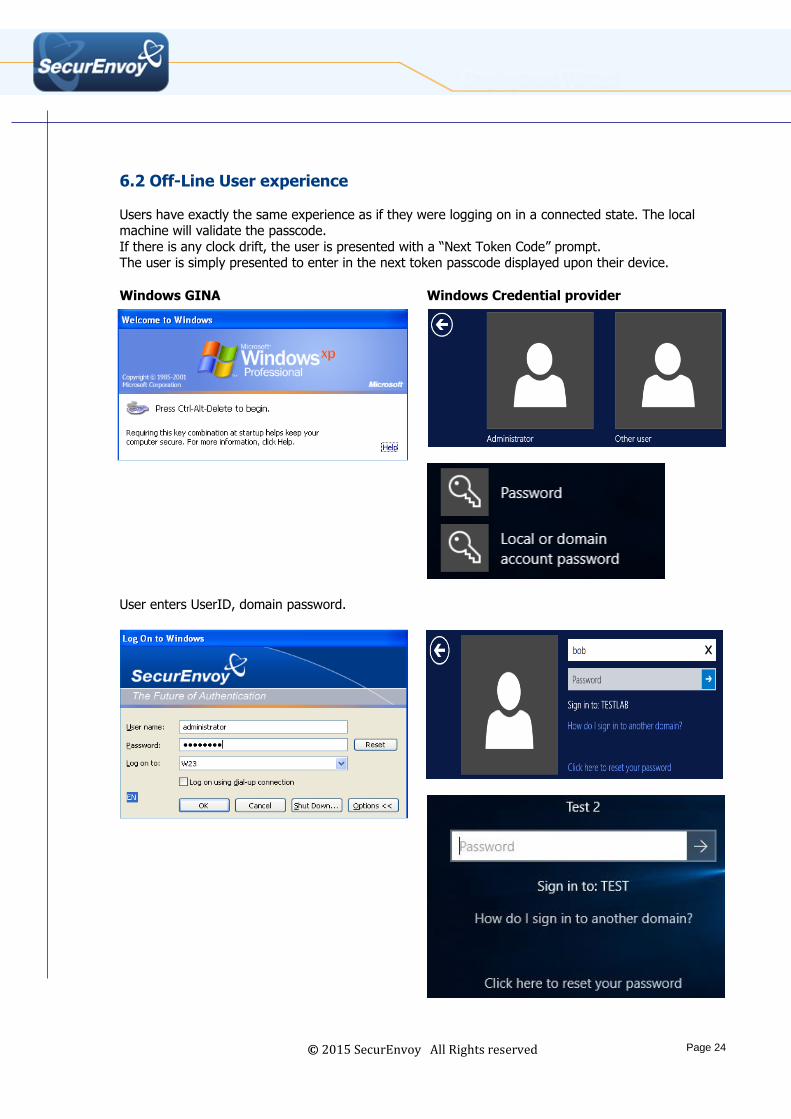
6.2 Off-Line User experience
Users have exactly the same experience as if they were logging on in a connected state. The local machine will validate the passcode.
If there is any clock drift, the user is presented with a “Next Token Code” prompt. The user is simply presented to enter in the next token passcode displayed upon their device.
Windows GINA
Windows Credential provider
User enters UserID, domain password.
© 2015 SecurEnvoy All Rights reserved Page 25
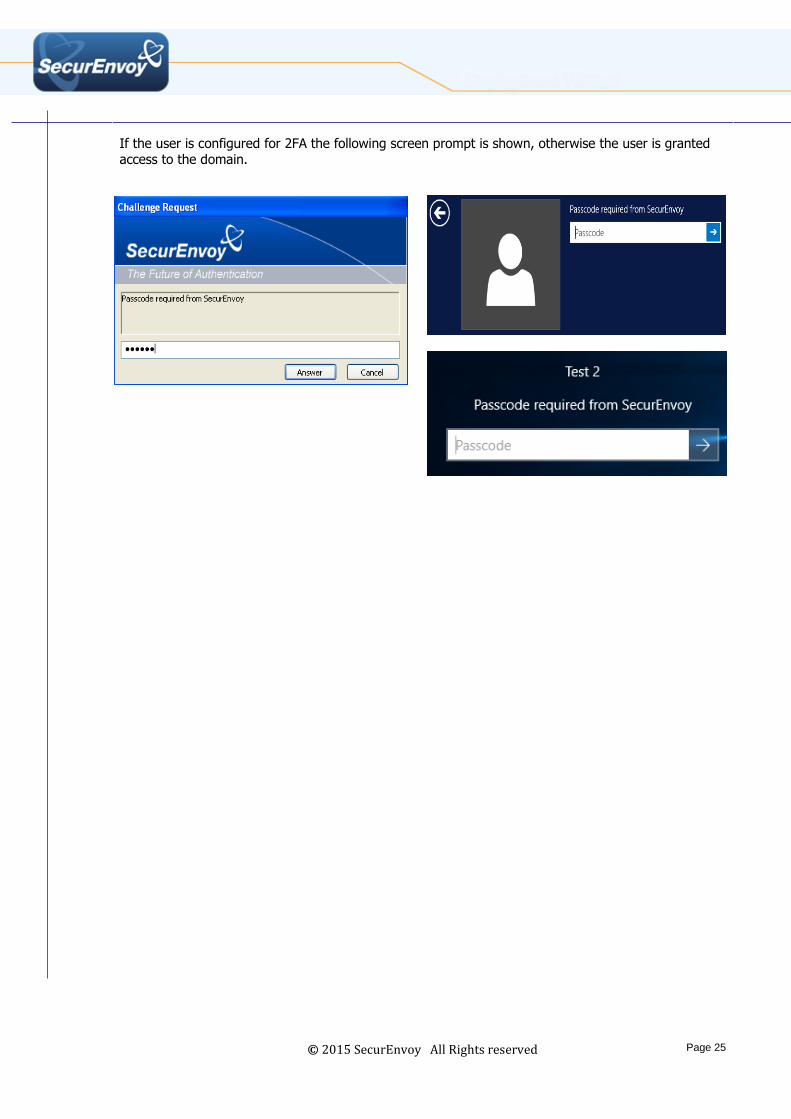
If the user is configured for 2FA the following screen prompt is shown, otherwise the user is granted access to the domain.

© 2015 SecurEnvoy All Rights reserved Page 26
Appendix