Section 6 Infection Control Procedures In the Operatory · Section 6 Infection Control Procedures...
14
Section 6 Infection Control Procedures In the Operatory TABLE OF CONTENTS Preparation of the Operatory 1 Preparing the Operatory for the Week 1 Preparing the Operatory for the Day 1 Preparing the Operatory for Each Patient 1 Protocols During Patient Care 4 Sterility of Instruments 4 High-Speed Evacuation System 4 Damage to Gloves during Treatment 4 Dropped Instruments 4 Cleanup of Operatory after Treatment 5 After Patient Treatment 5 Cleanup at the End of the Day 8 Broken Instruments 9 Storage and Transport of Contaminated Items 9 Disinfection 9 Disinfection of Surfaces 9 Disinfection of Equipment 9 Miscellaneous Equipment 10 Clinic Materials 11 Thermometers 11 Blood Pressure Cuffs 11 Weekly and Monthly Operatory Infection Control Procedures 11
Transcript of Section 6 Infection Control Procedures In the Operatory · Section 6 Infection Control Procedures...

Section 6 Infection Control Procedures In the Operatory
TABLE OF CONTENTS
Preparation of the Operatory 1
Preparing the Operatory for the Week 1
Preparing the Operatory for the Day 1
Preparing the Operatory for Each Patient 1
Protocols During Patient Care 4
Sterility of Instruments 4
High-Speed Evacuation System 4
Damage to Gloves during Treatment 4
Dropped Instruments 4
Cleanup of Operatory after Treatment 5
After Patient Treatment 5
Cleanup at the End of the Day 8
Broken Instruments 9
Storage and Transport of Contaminated Items 9
Disinfection 9
Disinfection of Surfaces 9
Disinfection of Equipment 9
Miscellaneous Equipment 10
Clinic Materials 11
Thermometers 11
Blood Pressure Cuffs 11
Weekly and Monthly Operatory Infection Control Procedures 11

UIC COLLEGE OF DENTISTRY INFECTION CONTROL MANUAL INFECTION CONTROL PROCEDURES IN THE OPERATORY SECTION 6
1
Preparation of the Operatory
Preparing the Operatory for the Week One day each week, an assigned employee will purge and disinfect the water system as follows:
Before proceeding, check the solids trap for the presence of any amalgam and, if found, empty amalgam scrap into the clinic’s designated receptacle. Amalgam scrap must be stored under water or in an “Amalgam Safe” which is treated with chemicals to absorb mercury vapor.
Preparing the Operatory for the Day • Clean and wash your hands.
• Verify that there is no water in the bottles.
Preparing the Operatory for Each Patient 1. Flush all water lines for 30 seconds before attaching handpieces to the lines.
2. If an ultrasonic scaler is to be used, flush the scaler line for 30 seconds before attaching the tip.
It has been shown that water bacteria multiply in the water lines, especially during periods of inactivity.
3. Cover the following items with PLASTIC BAGS of appropriate size (large,
small) if they will be touched at any time during treatment. • The unit is bagged with a large bag (Don’t bag the handpieces), and tied
loosely at the side. • The chair back is bagged with a large bag. • The computer keyboard is covered with a small bag. • The curing light tip is covered with a disposable plastic sheath. • The arm that holds the suction is covered with a small sheath.

UIC COLLEGE OF DENTISTRY INFECTION CONTROL MANUAL INFECTION CONTROL PROCEDURES IN THE OPERATORY SECTION 6
2
4. Cover the following items with PLASTIC WRAP (cover all strips) if they will be touched at any time during treatment.
• Light handle(s) • Light switch(es) • Ultrasonic scaler hose (if used) (2 feet from coupling) • X-ray viewer box light switch • Computer mouse • The adjustment handle under the seat of the operator chair
5. No bags or cover all strips are needed on the arms of the dental unit or the
hoses.
6. A tray cover or white PAPER square is used to cover: • AREA 2 • AREA 3
Any surface (horizontal or vertical) within three feet of the patient's mouth is considered contaminated after providing treatment that produces aerosols or splatter. Covering surfaces with impermeable barriers eliminates the need for disinfection of these surfaces after each treatment. Surfaces that are difficult to clean must be covered or wrapped with barriers such as impervious paper, clear plastic film, or bags.
7. Attach saliva ejector tip, high-speed evacuation tip, sterilized handpieces, and disposable three-way syringe tip. 8. Place a white tray cover on the bracket table.
9. Set up all items to be used in the planned procedure. Instruments and items that may or will contact the patient's mucous membranes must be disposable or sterilized prior to use. Inspect the integrity of each package containing sterile instruments/equipment. Open each package aseptically.
10. If a bridge, denture, or other prosthesis that has been fabricated is to be inserted into the patient's mouth, be sure that it has been adequately disinfected.
11. Whenever possible and appropriate, individual portions of material should be dispensed ahead of time and placed in AREA 2 or 3. This includes materials provided in a bottle, tube or jar. Materials supplied in bottles (e.g. hemostatic agents, adhesives) should be dispensed into a cup or into a disposable dappen

UIC COLLEGE OF DENTISTRY INFECTION CONTROL MANUAL INFECTION CONTROL PROCEDURES IN THE OPERATORY SECTION 6
3
dish. Items provided in a tube (e.g. impression material) should be dispensed onto a mixing pad, sterile gauze, or a glass slab. Dispensing materials ahead of time prevents contaminating the outside of bulk containers.
12. Equipment that is carried to the operatory from the dispensary must be bagged and placed in the correct AREA. Light-curing units must have their on/off switches covered with cover-all strips and the area of the light pen/gun that will be held must be covered with plastic wrap. Water baths cannot be adequately covered. The base will need surface disinfection during cleanup and the tub is sterilized after use. Amalgamator buttons must be covered with cover-all strips. Ultrasonic scalers must be covered with a large bag and the scaler handle covered with plastic wrap or a small bag. Shared items and equipment are potential sources of cross-contamination. Items that have been contaminated must be disinfected or sterilized before being used on a different patient.
13. Cabinet doors and drawers must be kept closed during treatment to avoid contaminating the contents.
14. ALL PERSONAL BELONGINGS ARE TO BE STORED IN THE LOCKER ROOM. Personal belongings are not permitted at the unit during regular clinic hours.
15. Patient coats are hung on the unit coat hook and purses or other packages are stored at the base of the dental unit.

UIC COLLEGE OF DENTISTRY INFECTION CONTROL MANUAL INFECTION CONTROL PROCEDURES IN THE OPERATORY SECTION 6
4
Protocols During Patient Care
Sterility of Instruments All instruments used in the mouth MUST have been sterilized or must be single-use, disposable. Instruments penetrating tissue must be sterile. "Cold sterilization" is not an acceptable method for general-purpose sterilization.
High-speed handpieces, nose cones, contra angles, low-speed motors, motor-to-angle adapters, reusable prophylaxis angles and all other dental instruments must be autoclaved before use in the mouth.
Blood, saliva, or gingival fluid may contaminate the exterior and interior of the handpiece and only heat treatment can assure the killing of all microbial contaminants.
High-Speed Evacuation System High-speed evacuation should be used when using the high-speed handpiece, three-way syringe, ultrasonic scaler, or whenever a procedure could cause splatter. Appropriate use of the high-speed evacuation system has been shown to reduce splatter and aerosol.
Damage to Gloves during Treatment If a glove is torn during patient treatment, both gloves must be removed, the hands washed, and a new pair of gloves put on. If the tear was caused by an instrument used in an invasive procedure, replace the instrument with a STERILE one.
Dropped Instruments An instrument that is dropped must not be picked up and reused.
If the instrument is essential for the procedure, either it must be sterilized or a sterilized replacement instrument must be obtained.

UIC COLLEGE OF DENTISTRY INFECTION CONTROL MANUAL INFECTION CONTROL PROCEDURES IN THE OPERATORY SECTION 6
5
Cleanup of Operatory after Treatment
After Patient Treatment SHARP WASTE IS EXTREMELY HAZARDOUS. HANDLE IT WITH GREAT CAUTION.
Following patient treatment, use the following protocol, in the order given, for cleaning-up:
1. Write up all forms and record entries (in AREA 4) relating to the treatment.
2. Complete all entries in the computer.
3. Remove gloves. Remove the first glove by grasping it at the base of the palm with the other hand
and pulling it off. Place the first glove into the palm of the gloved hand and close your fingers around it. Then slide the fingers of the ungloved hand, palm to palm, into the opening of the second glove at the wrist. Push your hand forward inside the glove until the glove pops off the palm of the second hand. Grasp the inside surface of the glove and pull it completely off. At no time should you touch the outside of either glove with your bare hands. Dispose of gloves in regular trash.
4. Wash your hands immediately.
5. Dismiss the patient.
6. Put on heavy-duty, nitrile rubber gloves.
Nitrile rubber is more puncture resistant than latex. Nitrile gloves may not prevent a puncture in your skin but they may prevent blood or other contamination on the instrument from entering the wound.
7. Discard needles and any disposable sharp instruments (e.g. scalpel blades, suture needles, broken instruments, endodontic instruments, used burs, orthodontic wires, and any item that could puncture skin) into the rigid biohazard (sharps) container at your unit. Use forceps to pick up these items. Be sure you can see the opening to the container as you drop the sharp into it. Sharps containers must remain on the unit countertop where they are readily visible and within horizontal reach of the user.
8. Remove all disposables from AREAS 1, 2, and 3 and discard into a rigid waste receptacle. If the item is such that blood or saliva can be squeezed out, the item is considered “regulated medical waste” and must be discarded in a red trash

UIC COLLEGE OF DENTISTRY INFECTION CONTROL MANUAL INFECTION CONTROL PROCEDURES IN THE OPERATORY SECTION 6
6
receptacle. If size permits, transfer the items to a plastic water cup to facilitate carrying to the red receptacle.
9. Hold the high-speed handpiece over the high-speed evacuator and activate the handpiece water line and air line (bur in) for 30 seconds before removing the handpiece.
10. Place handpieces into the transportation cassette and place them to the side.
11. Place all the dental instruments back into their cassettes in the correct order, removing all composite, amalgam and other non-biologic waste.
12. Disinfect all portable equipment and supplies with Cavicide disinfectant as follows: SPRAY with Cavicide disinfectant and WIPE clean of visible debris using paper towel. Then SPRAY again with Cavicide and KEPT MOIST for at least 5 minutes.
13. Remove un-used dental instruments from the sterilization pouch.
14. Return the dental instruments, handpieces and bur cassettes to sterilization.
15. If the sterilization window is closed, place all dental instruments, handpieces and bur cassettes in a large plastic bag. Do not contaminate the outside of the bag. Store bag in your locker overnight and promptly return instruments in the morning.
16. Return portable equipment to the supply room.
17. Remove ALL barriers, one at a time, from the unit and any portable equipment and discard into the plastic waste bag. When all barriers are removed, place the waste bag in a rigid waste receptacle. Avoid touching the contaminated side (outside) of the barriers against any clean surfaces.
18. Any surface which is visibly contaminated with blood and all surfaces within 3 a feet radius of the patient's mouth that were not covered during patient treatment, including cabinet doors, all hoses, and portable equipment that has become contaminated, must be SPRAYed with Cavicide disinfectant, WIPEd clean of visible debris, and then SPRAYed with Cavicide and KEPT MOIST for at least 5 minutes.
All surfaces within a 3 feet radius of the patient’s mouth are considered contaminated and are treated as clinical contact surfaces. All disinfectants take time to act—often 5 minutes or more. Using them on surfaces as you would use a furniture polish will not achieve disinfection. The surface must be wetted and it must remain wet for the full length of time required.

UIC COLLEGE OF DENTISTRY INFECTION CONTROL MANUAL INFECTION CONTROL PROCEDURES IN THE OPERATORY SECTION 6
7
19. Discard the paper towels and napkins.
20. Flush all vacuum lines with tap water to prevent drying of blood and debris in the lines.
21. Place the Cavicide spray bottle in the cabinet under the sink.
22. Remove gloves and discard.
23. Wash hands.
24. Remove facemask by grasping its elastic band at a point behind your head and bring the band over the top of your head. If the mask has ties, untie them. Do not allow the outside of the mask to come in contact with any skin. The mask must NEVER be left dangling from the neck, hanging from an ear or sitting on the chin.
25. Remove safety glasses or face shield by using two hands to grasp the earpieces just in front of the ear and lifting them off. Remove face shields by grasping behind the head, if it is the style that has a band encircling the head, or in a manner similar to safety glasses.
26. Wash safety glasses in the sink, rinse, and spray with the Cavicide disinfectant. Keep glasses moist with disinfectant for at least 5 minutes. Rinse and dry. If using magnifying loops then follow the manufacturers’ recommendations on the types of disinfectant compatible with their lenses.
27. While wearing gloves, wash safety glasses or face shield with regular soap and water and rinse well. Disinfect by spraying with Cavicide disinfectant and keeping the surfaces wet with the disinfectant for 5 minutes. Rinse and set aside to dry. Remove and dispose of gloves and wash hands.
28. Remove head covering by grasping it at the back of the head and remove by bringing your hand over the top of your head.
29. Remove gown such that your hands do not touch the contaminated outside. Remove gown carefully and then roll it in on itself so that the inside becomes the outside. Place soiled gown in proper receptacle.
30. Wash hands.

UIC COLLEGE OF DENTISTRY INFECTION CONTROL MANUAL INFECTION CONTROL PROCEDURES IN THE OPERATORY SECTION 6
8
31. If you leave the clinic area1 any time after beginning treatment of a patient, all personal protective equipment must be removed; i.e., gloves, mask, safety glasses or face shield, and head covering, and clinic gown.
Cleanup at the End of the Day
IT IS THE STUDENT'S RESPONSIBILITY TO KEEP THE OPERATORY AND UNIT CLEAN AT ALL TIMES.
1. Using heavy-duty, nitrile rubber gloves and Cavicide disinfectant, clean all operatory items and surfaces. This includes the dental chair, unit pedestal and arms, power module, and light post. Wipe the smooth surfaces with a paper towel and the irregular surfaces with a clean hand brush or denture brush.
2. Disinfect all surfaces by liberally spraying them with Cavicide disinfectant. Avoid aiming the spray directly at any control switches on the chair or light as a short circuit may result. Surfaces must remain wet for a minimum of 3 minutes.
Exposure time for full effectiveness Pathogens killed
3 Minutes
• Mycobacterium tuberculosis var: bovis (BCG) • Staphylococcus aureus • Pseudomonas aeruginosa • Salmonella enterica • Trichophyton mentagrophytes
2 Minutes
• Methicillin Resistant Staphylococcus aureus (MRSA) • Vancomycin Resistant Enterococcus faecalis (VRE) • Staphylococcus aureus with reduced susceptibility to vancomycin • Hepatitis B Virus (HBV) • Hepatitis C Virus (HCV) • Herpes Simplex Virus Types 1 and 2 • Human Immunodeficiency Virus (HIV-1) • Human Coronavirus-not associated with Severe Acute Respiratory Syndrome (SARS) • Influenza A2 Virus
1 The clinic area includes the supply windows and front desk. It does not include the elevators, escalators, bathrooms or any other area not mentioned above.

UIC COLLEGE OF DENTISTRY INFECTION CONTROL MANUAL INFECTION CONTROL PROCEDURES IN THE OPERATORY SECTION 6
9
3. Make sure the handpieces have been removed from the tubings and then purge the unit of water as follows. Hold the handpiece tubings and syringe over a sink, basin, bucket or high speed evacuation. Operate the dental unit's handpiece flush valve and syringe until all of the water has been purged from the unit. After purging with the flush valve, operate the foot control to purge any remaining water from the unit's control blocks. The Sterisil water purification system used at the College does not require emptying or removing bottles.
4. Clean the sink and amalgam trap. Empty amalgam scrap into the designated receptacle found in each dental unit.
5. Before removing the nitrile utility gloves, wash them just as you would wash your hands, and then dry them with paper towels. They can then be removed in a normal manner.
6. If gloves exhibit any signs of deterioration, replace them.
7. The power module, all surfaces of the operatory, and the sink must be left clean after patient treatment. No charts, paper towels, or other items may be left at the operatory. No items may be placed on the top of the operatory except and plastic wrap.
8. In order to permit adequate floor cleaning by the housekeeping staff, hoses must not be left on the floor, the chair must be raised to its highest position, and the foot controller placed on a paper towel on the seat.
Broken Instruments Broken equipment that has been contaminated with blood or other body fluids must be decontaminated and cleaned before being repaired in the laboratory or transported to the manufacturer for repair. If the item cannot be completely decontaminated, it must be labeled with a standard BIOHAZARD label, the parts of the equipment that remain contaminated must be noted, and the item placed into a leak proof heavy-duty container.
Storage and Transport of Contaminated Items If items such as models, dies, and bite registrations become contaminated, they are to be sprayed with Cavicide disinfectant, left wet for 5 minutes, rinsed, and placed into a clean container. Disposable containers must be used for one patient only and then discarded.

UIC COLLEGE OF DENTISTRY INFECTION CONTROL MANUAL INFECTION CONTROL PROCEDURES IN THE OPERATORY SECTION 6
10
Disinfection
Disinfection of Hard Surfaces Surface disinfection is done using the Cavicide disinfectant. Glutaraldehyde based compounds should not be used for surface disinfection due to their potential toxicity!
1. Clean the surface using the Cavicide and paper towels. 2. Spray the surface liberally with the Cavicide and make sure it remains moist for at
least 5 minutes. 3. Dry the surface with paper towels or allow it to air dry.
Disinfection of Equipment Glutaraldehyde or Cavicide is used for the disinfection of instruments and equipment that cannot be sterilized or will not penetrate tissues. Heavy-duty, nitrile rubber gloves and protective eyewear or face shields must be worn when mixing and/or using chemical sterilants or disinfectants. GLUTARALDEHYDE CAN CAUSE BLINDNESS AND SKIN SENSITIVITY and THE VAPOR IS TOXIC.
Note: With the availability of heat resistant products the use of chemical sterilization should not need to be utilized in the College of Dentistry.
1. Put on a pair of heavy-duty, nitrile rubber gloves and protective eyewear.
2. Clean and dry all instruments to be disinfected.
3. Immerse them for at least 5 minutes in the glutaraldehyde or Cavicide solution. It is important to use the basket to immerse items in order to avoid hazardous splatter that occurs when items are dropped into the solution. Timing begins when the last item is added to the solution.
When an item is added to the solution, the solution and everything in it become contaminated. Therefore, timing begins each time an item is added. Disinfection of DIRTY items will take much longer and complete disinfection may not be achieved. Therefore, soaking dirty items in disinfectant will reduce the hazard present during the later cleaning of these items, but they must NOT be considered disinfected.
4. Following disinfection, items must be rinsed with water, dried, and stored in a manner such that they will not become contaminated.

UIC COLLEGE OF DENTISTRY INFECTION CONTROL MANUAL INFECTION CONTROL PROCEDURES IN THE OPERATORY SECTION 6
11
Miscellaneous Equipment
Clinic Materials Various clinic materials need to be sterilized, disinfected or disposed. The following table indicates the treatment for these items.
Item Sterilize Disinfect Dispose Air-Water Syringe + + Air-Water Syringe tip +(Metal) +(Plastic) Alginate Spatula + + Anesthetic Syringe + Cement and Wax Spatulas + Composite Finishing Discs + Diamond Disc, Diamond and Carbide Burs + Dappen Dish +(Glass) +(Plastic) Face-Bow Bitefork + Fox Guide Plane + Glass Slab +
Item Sterilize Disinfect Dispose Hand Instruments + Handpieces + Impression Trays-Metal + Impression Trays-Plastic, Custom Acrylic + Matrix Retainer + Matrix Strips + Measuring Cups + Occlusal Rim Former + Occlusal Plane + Orthodontic Pliers + Plastic Brushes + + + Plastic Cheek Retractors + Plastic Rulers + Prophy Cups + Rubber Dam Forceps, Clamps, Metal Frame + Rubber Bowl + Rubber Polishing Points and Discs + Sable Brushes + Shade Guides + Wooden Wedges +

UIC COLLEGE OF DENTISTRY INFECTION CONTROL MANUAL INFECTION CONTROL PROCEDURES IN THE OPERATORY SECTION 6
12
Thermometers Only disposable thermometers (or those with disposable tips or sheaths) should be used to take body temperatures. Discard thermometer, tip or sheath, as appropriate. If a thermometer with a disposable tip or sheath is used, avoid contaminating the reusable portion. If this portion becomes contaminated it must be disinfected.
Blood Pressure Cuffs If a blood pressure cuff was used on a patient with dermatitis or open wounds and the cuff was not protected with a barrier, it must be sprayed with Cavicide disinfectant and kept moist for 5 minutes.
Weekly and Monthly Operatory Infection Control Procedures
Cleanup at the End of the Week Clean and disinfect housekeeping surfaces that are not disinfected daily, e.g. walls, fronts and tops of cabinets, base of dental unit and chair, inside of dental light shield, and junction box.
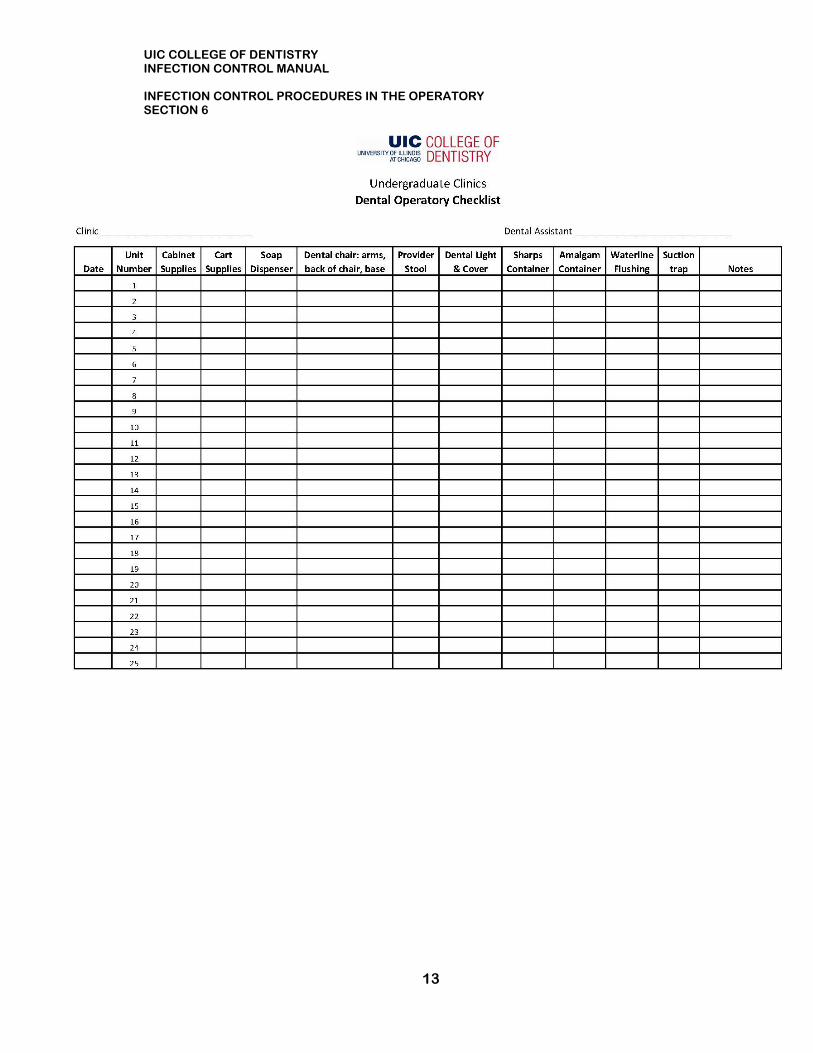
Cleanup at the End of the Month Clean and disinfect insides of drawers and cabinets. Complete monthly log duty sheet (available on following page).
UIC COLLEGE OF DENTISTRY INFECTION CONTROL MANUAL INFECTION CONTROL PROCEDURES IN THE OPERATORY SECTION 6
13