Secretary/District User Guide to...
42
DISTRICT USER GUIDE TO BEACON Dashboard & BEACON UPDATED 10/2011
Transcript of Secretary/District User Guide to...

DISTRICT USER
GUIDE TO
BEACON Dashboard & BEACON
UPDATED 10/2011

SECTION 1
A Guide to Screens in
BEACON Dashboard

BEACON Dashboard Log-In Screen
The district user side of the online job center is called
BEACON Dashboard
The web address is:
http://204.128.64.10:8152/webpaws/DP901.pgm
When the connect/login screen pops up, use your current
AS400/Crosspointe sign-ins to open the program.
Save the website to your favorites
and/or create an icon on your desktop
As your AS400 password changes,
so will the password for BEACON Dashboard
You will log in a second time to
BEACON Dashboard just as you do in the AS400/Crosspointe

BEACON Dashboard
Open BEACON Job Center to see and use your options
Profile Options
Message Area
DEPARTMENT SECRETARIES If you are responsible for more than one
department - please use your dropdown to choose the department that you wish to work in
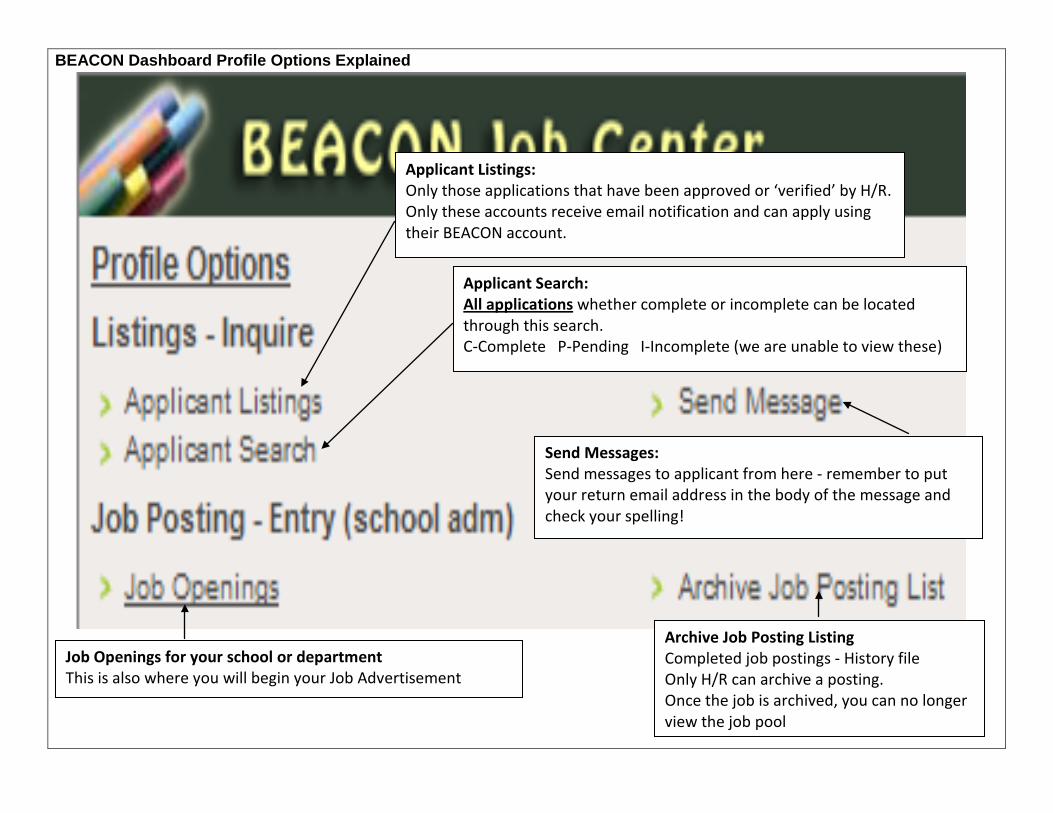
BEACON Dashboard Profile Options Explained
Send Messages: Send messages to applicant from here - remember to put your return email address in the body of the message and check your spelling!
Applicant Listings: Only those applications that have been approved or ‘verified’ by H/R. Only these accounts receive email notification and can apply using their BEACON account.
Job Openings for your school or department This is also where you will begin your Job Advertisement
Archive Job Posting Listing Completed job postings - History file Only H/R can archive a posting. Once the job is archived, you can no longer view the job pool
Applicant Search: All applications whether complete or incomplete can be located through this search. C-Complete P-Pending I-Incomplete (we are unable to view these)

Explanation of Applicant Listings screens – sorting and filters
Status Code Legend C - Application Complete P - Pending Verification H - Hired The default sort is the SSN
The areas match the column headings
Type of account can be T – TRANSFER (Transfers do not show an area of interest), N – NEW, P – PENDING, OR I - INCOMPLETE
May sort on any of these headings by clicking the name of the header Areas of Interest not sortable

Explanation of Applicant Listings
Applicant Listings will show only accounts that are ‘Completed’

Explanation of Applicant Listings - continued
You have the ability to sort by type of listing and within the listings

Explanation of Applicant Listings - continued
Expl an

Explanation of Applicant Search
Applicant Search allows you to see all accounts, Complete, Incomplete, New, Transfer, and Pending

Opening and Viewing a BEACON Account/Application
First, remember that Applicant Listings will show only completed accounts/applications. Applicant Search will show all regardless of the status of the account. There are several ways to locate your applicant’s account in BEACON. The must successful way is to enter in just the last 4 digit of the applicant’s ss. When entering the last name and/or the first name, spelling counts! If you spell the name differently than the applicant, you will not find the account. Begin with fewer letters in the last name and add more letters as the name drop down begins to narrow the list. One or two letters from the first name in addition to the partial last name will also help.
Select your applicant by clicking the link in the SSN column next to their name.
Remember to check the status – an I in the Status column means that the applicant has not finished and submitted their application. The district users cannot view an application with this status.

Opening and Viewing a BEACON Account/Application - continued An application that has been successfully submitted will open to look like this:
The best way to view the application is by opening the Factsheet. The Factsheet will include only the information for those sections of the application that have been approved by H/R – i.e. received email references, received transcripts, etc., as well as demographic information about the applicant.
The Factsheet will include only the information for those sections of the application that have been approved by H/R

An incomplete application(Status- I) that cannot be Submitted will look like this: Until the applicant completes all areas (this is denoted by a checkmark), they cannot submit their application and district users cannot view any part of it.

The Factsheet is a comprehensive page of information for an applicant
The PDF section of the Factsheet contains PDF’s uploaded to the account by
Human Resources. Double click to open.
Use the Back link to return to the account.

Click HR Notes/Applicant Screening/Follow Up to open a notes section for district users
To add information, click Add

The Document Status and Verification screen is an excellent tool for determining the extent of account completion for an account/application in a Pending Status. However, always check with H/R to see if documents that are listed as ‘Outstanding’ may have been received by H/R but have not been uploaded yet. Email references that have not been received must be followed up by the applicant.
For information that is outstanding, a link to the account area is provided. Click to go to the account area for further information about the missing document

Explanation of Send Message
Begin by typing in the first letter of the last name and each successive letter until the drop down list shows the name of the account that you will to send the message to. Select the correct name.
Remember to type your subject and then enter your message into the Message body area. Key points to remember: There is no spell check! Also the applicant will not know who sent the message or how to reply (if needed) unless you put your email address in the body of the message. The message will be sent to the applicant’s BEACON account homepage and also to their personal email address if it is listed in their BEACON account.

SECTION 2
A Guide to Job Postings
& Creating Ad Requests
on BEACON Dashboard

Open ‘Job Openings to view your ad(s). You will see only the ads for your School or Department from your Dashboard Homepage. NEVER assume that any applicant applying for a position through BEACON is automatically qualified! Always follow through with H/R.
Only those applicants who have completed the online application process will be eligible to apply for any open
positions through BEACON.

To view all current openings openings for the district, open the applicant side of BEACON and click Job Openings

Defining the Job Openings Columns
Denotes your school or
department number
This is the next available number
and is automatically
assigned to the ad by the system
See below for
additional information about
this area
The date the ad was created
The current status of the ad -
refer to the Status Code Legend
above
The school year that the ad is
being advertised in - this will be used to archive the ads properly
The person in H/R responsible for
creating the ad on DASHBOARD

Defining the Job Openings Columns – continued
This column shows that the ad
was actively advertised (Y).
The column will be blank to show
that the ad is pending
The name of the opening and any information that cannot be found in the
body of the advertisement such as
salary or number of positions
The number of applicants
who have applied online
for the position
A note area unique to the ad - Notes can be placed here by H/R or the school/department
- these are not viewable by the public
See below for additional information
about this area
The full ad can be viewed from here -
click ‘View’ to open
See below for additional
information about this area

Locating your Applicants - Additional Information for Request
Clicking on the highlighted numbers will open the applicant pool page
Each name is a link to that applicant’s online application information

Additional Information for Notes
The notes area will contain notes that are unique to the advertisement. H/R can add a note or the listing school or department can place notes here.
To add a note – click here

Additional Information for Actions
Click ‘View to open and view the ad as it looks as advertised

To terminate a request, click Term Request
A pop up will appear that requires a reason for termination – after you send the request, an email will be sent to Human Resources notifying them of a request to terminate an advertisement.
Until H/R confirms the Termination Request, the ad will appear in your Job Openings list with Term Reason. Upon confirmation by Human Resources, you will receive a return email telling you that the ad has been terminated. The terminated ad can now be found in the Archive Job Posting List.

Create an Ad Request
To create a new ad request, open the Job
Openings link Then click here:

Remember, you are only making a request for a job opening. It will not be viewable by the public until it is set up by H/R. Required Fields have a red Asterisk * Type of Transaction has only one choice at this time. Your School/Center will be automatically filled. (Dept. Secretaries who are responsible for more than one department should always make sure that they are filling out the Job Opening Request from the correct department number.) The School Year choice will always be the current school year. A new year will be added for openings that are being posted for the following year. The old year will be removed after the new school year has begun. The job title is a drop down. Find the correct job title and select to populate the field. For a position that requires more than one title, give the additional information in the Preferred Skills area and/or in the certifcation/qualifications field to provide this information for H/R.
Need more room? Add additional
information here
Job Titles are from
Crosspointe

Fill in the position months, hours, and the date that position is hirable based on the date of the leave, transfer/reclass, or new allocation date. H/R will enter the correct date based on the first day of advertising. For instructional short term positions, give the ending date of the short term in the short term field. Remember, we do not advertise temporary positions for support. Leave the Advertisement Expiration Date blank – to be completed by H/R. If there is/was an employee is the position, select existing position for additional fields to provide information about the person leaving the position. New Allocations will not require this information. Place instructional course codes with percentages or support requirements that you are looking for in this field. Give the type of position here For support positions, choose the type of personnel in the next field Click ‘Save and Continue’
Short term ending date belongs here

Your request will be incomplete until you send it.
This is a holding area for the school until the ad is ready to be sent. The ad will appear as Incomplete in the Job Openings until it is sent. While the ad remains in this pattern, the ad can be changed or deleted. H/R cannot place the ad out to the public for advertisement while in this queue.
If this is what you see, then you have not submitted the job advertisement to H/R to be published.

To submit the ad request, click ‘Send’. A pop-up will appear giving the sender the opportunity to keep the ad in the hold queue of Incomplete. Once the ‘OK’ button has been selected, the ad will no longer be available to the sender to make changes.
Once the ad as been sent to H/R, the ad will appear in the Job Postings as Pending (waiting for H/R approval). And email is generated by BEACON to H/R to notify them that there is an advertisement pending and required their attention. The only actions that are available to the school at this point are to view the ad or to Term the Request.

When H/R approves the request and places the job opening to the public, an email is sent to the school or department to notify them that the advertisement has been placed to the public. When the job opening ends (at 5 pm on the last day), an email is sent to the school or department notifying them that the advertisement has ended.

Applicant Pool – Viewing and Hiring To view your Applicant Pool, click the number in in the Request
Open each link (Name) to view Factsheet described in section 1 above Please note the VP (Veterans Preference) Column for any applicants with a ‘Y’ meaning that they are claiming their preference rights. In the column ‘Type’ is listed the type of applicant. New and Transfer are the only types of accounts. Current employees may have an account marked ‘New’.

Applicant Pool - Hiring
When an applicant has been selected for employment, drop down the ‘Response’ fields and choose ‘Interview/Hired’. A pop-up will appear and ‘OK’ must be selected to continue.
By selecting the ‘Interview/Hired’ response, the program will generate an email to the other applicants to let them know that the position has been filled.

Applicant Pool – Hiring – continued
The Recommendation for Employment Screen will appear next. Input the preferred Start Date. Click ‘Save’, ‘Return’, and finally ‘Send’

Applicant Pool – Hiring – continued
The applicant pool will now show that a
recommendation has been made.
H/R will follow through with the hiring process.

Archive Job Posting List
All Job Postings that are Hired (Complete) or Termed will reside in the Archive Job Post List.
SECTION 3
A Brief Explanation Guide to BEACON

Applicants cannot create multiple accounts unless they makeup Social Security numbers.
The applicant will create their account here Applicants can retrieve a forgotten User-Id or Password

The applicant cannot submit the application until they complete their application sections. Incomplete sections are shown as an ‘X’ The sections must all show ‘checked’ to be complete and then can be submitted.

Once the applicant has completed all of their application areas, they may ‘Submit’ the application. You can then see what information they have provided. However, they will be unable to make any changes to their information until H/R has completed the verification process.

The application now must be reviewed by H/R before the applicant can make any changes. - See Applicant Verification above
Once the application is marked by H/R as received, an email is generated to the applicant inviting them to view current job openings and apply for available positions. The applicant can now make changes to their online application.