SEB Server User Guide
85
SEB Server User Guide Andreas Hefti Jul 27, 2021
Transcript of SEB Server User Guide

SEB Server User Guide
Andreas Hefti
Jul 27, 2021


Contents
1 About 3
2 What is Safe Exam Browser (SEB)? 5
3 What is Safe Exam Browser Server (SEB Server)? 7
4 SEB Server Version 1.1.0 is out 9
5 SEB - SEB Server Compatibility 11
6 Install SEB Server 13
7 Getting started with SEB Server 15
8 Project Background 17
9 SEB Server User Guide 199.1 Table of Content . . . . . . . . . . . . . . . . . . . . . . . . . . . . . . . . . . . . . . . . . . . . . 19
9.1.1 Overview . . . . . . . . . . . . . . . . . . . . . . . . . . . . . . . . . . . . . . . . . . . . 199.1.2 Institution . . . . . . . . . . . . . . . . . . . . . . . . . . . . . . . . . . . . . . . . . . . . 269.1.3 User Accounts . . . . . . . . . . . . . . . . . . . . . . . . . . . . . . . . . . . . . . . . . 309.1.4 Learning Management System Setup . . . . . . . . . . . . . . . . . . . . . . . . . . . . . . 379.1.5 SEB Configurations . . . . . . . . . . . . . . . . . . . . . . . . . . . . . . . . . . . . . . . 439.1.6 Exams . . . . . . . . . . . . . . . . . . . . . . . . . . . . . . . . . . . . . . . . . . . . . . 589.1.7 Exam Monitoring . . . . . . . . . . . . . . . . . . . . . . . . . . . . . . . . . . . . . . . . 749.1.8 Troubleshooting . . . . . . . . . . . . . . . . . . . . . . . . . . . . . . . . . . . . . . . . . 81
i

ii
SEB Server User Guide
Master:
Development:
Contents 1

SEB Server User Guide
2 Contents

CHAPTER 1
About
The Safe Exam Browser Server web application simplifies and centralizes the configuration of Safe Exam Browserclients for exams. It interacts with a learning management or exam system for setting up and conducting e-assessmentswith Safe Exam Browser. It also improves security by allowing to monitor connected Safe Exam Browser clients inreal time during e-assessments.
3

SEB Server User Guide
4 Chapter 1. About

CHAPTER 2
What is Safe Exam Browser (SEB)?
Safe Exam Browser (SEB) is an application to carry out e-assessments safely. The freeware application is available forWindows, macOS and iOS. It turns any computer temporarily into a secure workstation. It controls access to resourceslike system functions, other websites and applications and prevents unauthorized resources being used during an exam.Safe Exam Browser can work with Open edX to control what a student can access during a Open edX quiz attempt.With the SEB Open edX plugin you activate the SEB support in Open edX and now only students using an approvedversion of SEB and the correct settings will be able to access the quiz in your Open edX course. The Safe ExamBrowser is offered under a Mozilla Public License and supported by the SEB Alliance.
5

SEB Server User Guide
6 Chapter 2. What is Safe Exam Browser (SEB)?

CHAPTER 3
What is Safe Exam Browser Server (SEB Server)?
While the interaction with SEB is well known in Learning Management Systems (LMS) like Open edX, Moodleetc. the SEB Server is an entirely new component to set up secured online exams. It interacts with the assessmentssystem/LMS as well as with SEB on exam clients.It supports exam scenarios on student owned devices (BYOD) andon managed devices.
SEB Server is a modern webservice with a REST API and a GUI service on top of it. SEB Server is written in Javaand uses Docker for installation and setup.
SEB Server provides a range of basic functionalities:
• Built-in institutional multitenancy
• Linking of multiple Learning Management Systems (LMS). Currently supported: Open edX
• Accessing the Course/Exam-API of a linked LMS to import a courses or exams for managing with SEB Server
• Creation and administration of SEB Client Configurations that can be used to startup a SEB and that containsSEB Server connection information for a SEB Client
• Creation and administration of SEB Exam Configurations that can be bound to an imported Exam to automati-cally configure a SEB Client that connects to an exam that is managed by SEB Server
• Automated SEB restriction on LMS side if the specified type of LMS supports the SEB restriction API
• Monitoring and administration of SEB Client connections within a running exam
The image below shows a very simplified diagram that locates the SEB Server in a setup with a Learning ManagementSystem (LMS) and the Safe Exam Browser (SEB). The SEB Server communicates with the LMS for managing andprepare exams as well as with the SEB Client to ensure a more automated and secure setup for high-stake exams.
7

SEB Server User Guide
8 Chapter 3. What is Safe Exam Browser Server (SEB Server)?

CHAPTER 4
SEB Server Version 1.1.0 is out
New features:
• Moodle integration part 1 (Course Access)
• Live proctoring with Jitsi Meet integration (Prototype)
• Deletion of user accounts
• Deletion of exams
• User registration rate limit
• Inform user about unpublished chances in exam configuration settings
• Added “Ignore SEB Service” attributes in exam configuration settings
• Additional monitoring indicator (WIFI and battery status)
• Notification events (experimental)
• Download/Export Connection Configuration from Exam page to start an exam directly “Export Exam Connec-tion Configuration”
Bugfixes:
• Monitoring table update, incorrect table rendering after status changed
• Remove caching for distributed setup
• Add lookup and automated master service allocation for distributed setup
Changes:
• “Client Configuration” is now named “Connection Configuration”
• “Export Exam Configuration” is now named “Export SEB Settings” and can be found in the “SEB Settings”view of an “Exam Configuration”
9
SEB Server User Guide
10 Chapter 4. SEB Server Version 1.1.0 is out

CHAPTER 5
SEB - SEB Server Compatibility
The table below shows available and upcoming SEB client versions that has SEB Server integration support and arecompatible with particular SEB Server version. There is an entry for each platform with a beta or testing release dateand a official release date.
SEB Server Version 1.0.X
Platform / OS Beta/RC Version Release VersionSEB Client for iOS
22. April 2020 - Version 2.1.50Q2 2021 - Version 2.5/3.0
SEB Client for Mac Q2 2021 - Version 3.1 Q2 2021 - Version 3.1SEB Client for Windows Q2 2020 - Version 3.1 Q4 2020 - Version 3.1
SEB Server Version 1.1.X
Platform / OS Beta/RC Version Release VersionSEB Client for iOS
22. April 2020 - Version 2.1.50Q2 2021 - Version 2.5/3.0
SEB Client for Mac Q2 2021 - Version 3.1 Q2 2021 - Version 3.1SEB Client for Windows April 2021 - Version 3.2 May 2021 - Version 3.2
11

SEB Server User Guide
12 Chapter 5. SEB - SEB Server Compatibility

CHAPTER 6
Install SEB Server
For a complete guide to install SEB Server please go to SEB Server Installation Guide
13

SEB Server User Guide
14 Chapter 6. Install SEB Server

CHAPTER 7
Getting started with SEB Server
For a complete SEB Server user guide please go to SEB Server User Guide
15

SEB Server User Guide
16 Chapter 7. Getting started with SEB Server

CHAPTER 8
Project Background
The SEB Server is currently build and maintained by the Swiss MOOC Service that is founded by leading Swissuniversities EPFL, ETH, SUPSI, USI and HES-SO. The Swiss MOOC Service was financially supported from 2018-2020 by the Swissuniversities´ P5 program.
17

SEB Server User Guide
18 Chapter 8. Project Background
CHAPTER 9
SEB Server User Guide
9.1 Table of Content
9.1.1 Overview
Safe Exam Browser Server (SEB Server) is a web-service application with the objective to help setting up and maintaine-assessments with Safe Exam Browser (SEB) in a centralized and more efficient manner. The SEB Server applicationcan be used by an institution or organization as a self-maintained, lightweight server application to organize and setuptheir e-assessments. For an organization or institution that wants to provides safe e-assessments with Safe ExamBrowser, SEB Server can help to organize this e-assessments more effectively, safely and in one place. FurthermoreSEB Server can be setup and run within a cloud infrastructure by general service provider to offer e-assessments withSEB and SEB Server as a service.
SEB Server comes with a built-in multi-tenancy functionality that allows to create and maintain institutions that areseparated by each other. This is most convenient for smaller groups of organizations or institutions that want to haveone self maintained SEB Server instance but need internal separation of institutions.
Since SEB Server is generally an administration tool, meaning used to do administration work and tasks to setup andmaintain e-assessments, there is yet just a built-in and lightweight user-account management where users can registeritself and get needed privileges assigned by already registered administrator users that has the privileges to maintainuser accounts. Currently there is no possibility to register with a third party account and/or single sign on.
SEB Server is written mainly in Java and uses Docker for installation and setup. For more information about thearchitecture and installation, please go to SEB Server Installation Guide
The key features of SEB Server are:
• Built-in multi-tenancy capabilities. Create and manage institutions as separated clients.
• Lightweight user-account management where users can register itself and get needed privileges assigned byalready registered administrator users that has the privileges to maintain user accounts.
• Track user activities within user-activity-logs for the whole SEB Server or the a client.
• Create, export and maintain SEB connection configurations. Those are needed to startup a Safe Exam Browserclient with and contain all information to connect securely to the SEB Server.
19

SEB Server User Guide
• Create and maintain SEB exam configurations. Those are sent to a SEB client on connection setup and containall SEB settings for a particular e-assessment.
• Setup and maintain Learning Management Systems (LMS) like Open edX or Moodle to be able to navigate andfind courses or quizzes on the LMS and to push access-restrictions to the LMS if supported by the LMS
• Import and maintain courses or quizzes form a LMS. Setup everything that is needed for an e-assessment that isbased on a course or quiz form the LMS
• Apply indicators to the exams to indicate incidences while monitoring running e-assessments.
• Monitor running e-assessment and have an overview of all connected SEB clients. Manage SEB client connec-tions and view logs sent by individual SEB clients.
Roles and Use-Cases
The SEB Server supports a simple role based privilege system where a role has read, modify and write privilegeson certain domain entities. The privileges for a role are pre-defined and cannot be changed by a user. But roles canbe combined for a user-account. A user-account for example can have the “Exam Administrator” and the “ExamSupporter” role active to be able to setup and support an exam (e-assessment) within one user-account.
Privileges for domain objects are categorized in read, modify and write rights. Write right includes creation anddeletion grants as well as activation grants in addition to the more restrict modify right that only allows to modifyalready created entities. They are also categorized in overall, institutional and owner privileges where overall meansfor all entities, over all available institutions and institutional means only the entities that belongs to the own institutionwhereas owner-privilege means the creator or assigned owner of an entity.
There currently exists four different roles. This reflect a good separation of concern within the SEB Server applicationadministration itself and the setup and maintaining work that has to be done for e-assessments with SEB. Below arethe names and a short description of each role.
SEB Server Administrator
This role is primarily to administer the SEB Server application, to create new and maintain available institutions anduser-accounts. In addition to that a SEB Server administrator also has overall read privileges for the most domains tobe able to analyze problems and help others to solve them.
A typical use-case for a SEB Server administrator would be to create a new institution and an institutional administratorfor this institution. Another use-case would be to maintain registered user accounts, to give more privileges. Or toentirely deactivate an existing user account.
Institutional Administrator
An institutional administrator has overall read access for its institution and is able to modify the institution properties aswell as create new or maintain existing user-accounts for the belonging institution. Furthermore an institutional admin-istrator is able to create and maintain learning management system (LMS) setups and SEB connection-configurationsfor the belonging institution.
A typical use-case for a institutional administrator would be to give the appropriate roles and privileges to newlyregistered users of the institution. Or another use-case would be to create and maintain SEB connection configurationsfor the institutions and setup and maintain learning management systems within the SEB Server and the belonginginstitution.
Exam Administrator
With this role a user is able to prepare an exam for an e-assessment with SEB. A exam administrator is able to viewall courses from all learning management systems that are setup for the belonging institution and find a particularcourse to import this course as an exam within SEB Server. This role is also able to create and maintain SEB examconfigurations that can then be assigned to an imported exam. After setting importing an exam, the role is able to
20 Chapter 9. SEB Server User Guide

SEB Server User Guide
setup all aspects of an exam like automated restrictions, allowed supporter and monitoring indicator, to name a few,and prepare the exam for an e-assessment.
A typical use-case for an exam administrator would be to create a SEB exam configuration within the templating andconfiguration section. Then to find a particular course or quiz from the learning management systems that is definedwithin the institution. This course or quiz can then be imported by the administrator as an exam. After import anexam administrator is able to prepare this exam for run and monitoring by attaching a exam configuration to it, prepareindicators to monitor incidences and specify the SEB access-restriction conditions for the course or quiz.
Exam Supporter
This role is to support a running exam within SEB Server. An exam supporter is able to see the running exams on thathe/she has an assignment and can open them either for monitoring or editing some exam attributes during the exam.
A typical use-case for an exam supporter would be when the time an exam is running, to overview the connecting SEBclients and manage them. While SEB server shows incidences or irregularities, a exam supporter can act on them andtake the appropriate actions if needed.
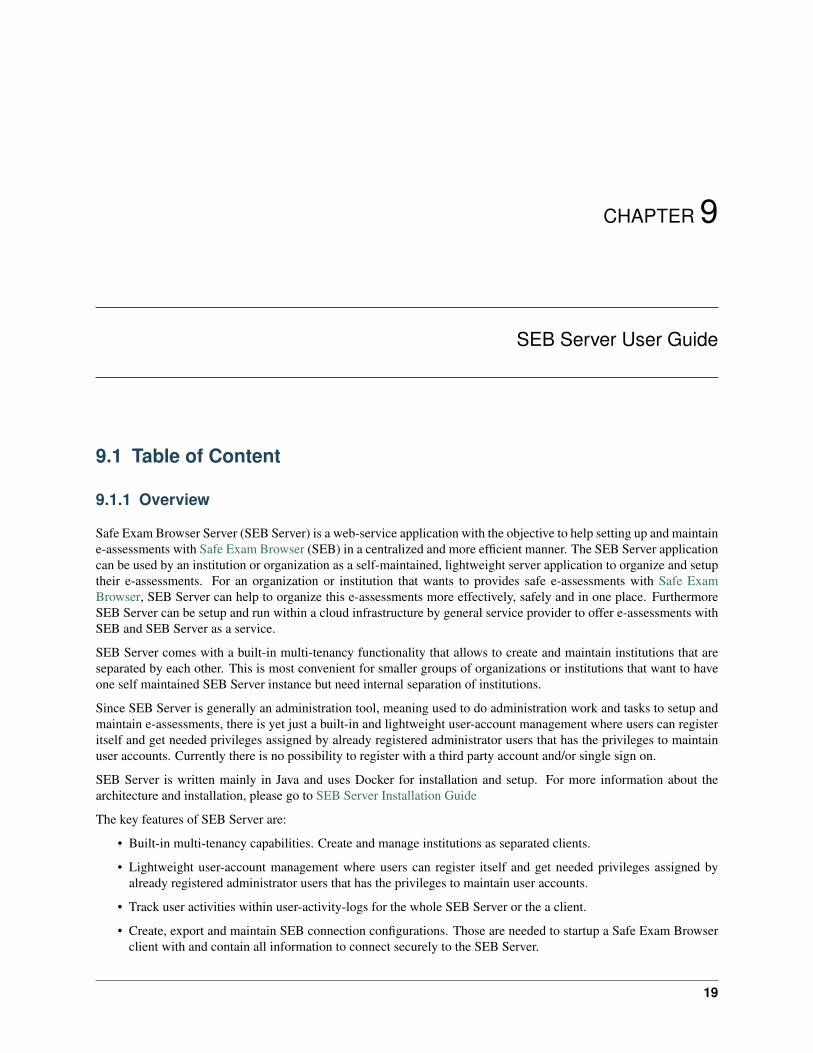
Sign Up / Sign In
What one will see first when applying to a SEB server application is the login-screen
If you are already registered you can use your username and password to log in. Or use the “Register” button to go thethe register page to create a new user-account. The newly created user account will only have the Exam Supporter roleassigned. If you need another role or more privileges, this must be given and granted by an institutional administratorof the belonging institution.
9.1. Table of Content 21
SEB Server User Guide
Fill in the register form and create a new account. After the user account has been successfully created, the applicationredirects to the login page for login. On the current version, e-mail confirmation is not a feature of the SEB Serverapplication and therefore the e-mail address is just informative by now.
With the “Time Zone” you can choose a specific time zone for your user-account. All dates and times will then beshowed within this time zone.
Graphical User Interface
After successful login, you will see the main graphical user interface of the SEB Server application. On the left handare the activities that can be done, categorized within some few main sections with its relating activities underneath.By selecting a activity, the main content section will show the activity content and the action that are possible for thisactivity on the right hand side.
22 Chapter 9. SEB Server User Guide

SEB Server User Guide
In the header above on the right hand, we see the username of the currently logged in user and an action button thesign out and go back to the login page.
The main content usually consist of a list or a form.
Lists
A list shows all the objects of a particular activity in a table page. A list has paging functionality and the list hasmore objects than fitting all on one page, a page navigation is shown at the bottom of the list with the information ofthe current page and the number of pages along with the page navigation that can be used to navigate forward andbackward thought the list pages.
Almost all lists have the ability to filter the content by certain column filter that are right above the correspondingcolumns. You can use the column filter input to filter the list and to narrow down a specific collection of content.Accordingly to the value type of the column, there are different types of filter:
• Selection, to select one instance of a defined collection of values (drop-down).
• Text input, to write some text that a value must contain.
• Date selection, To select a from-date from a date-picker. A date selection can also have an additional timeselection within separate input field
• Date range selection, To select a from- and a to-date within different inputs and a date-picker. A date rangeselection can also have an additional time range selection within separate input fields
9.1. Table of Content 23

SEB Server User Guide
A list can be sorted within a column by clicking in the column header. The order of sorting can be changed by clickingagain on the same column header of the sorted column. If sorting functionality is available for a column depends onthe column type. There are a few columns that do not have a sort functionality yet. Most columns have a short tool-tip description that pops up while the mouse pointer stays over the column header for a moment. A column tool-tipusually also explains how to use the column-related filter.
Forms
Forms are used for domain entity specific data input or presentation, like HTML Forms usually do. Forms appear inthree different ways within the SEB Server GUI:
• When a domain entity is first created in edit mode
• When a domain entity is modified also in edit mode
• And when a domain entity is just shown, in read-only mode
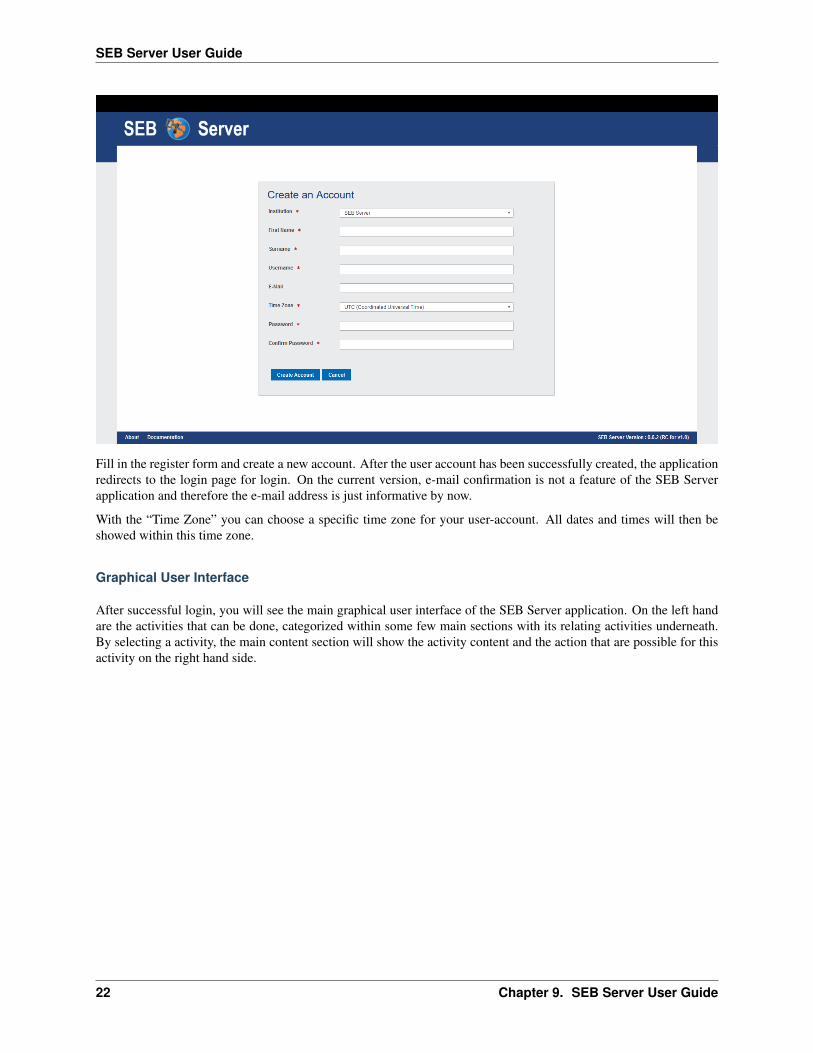
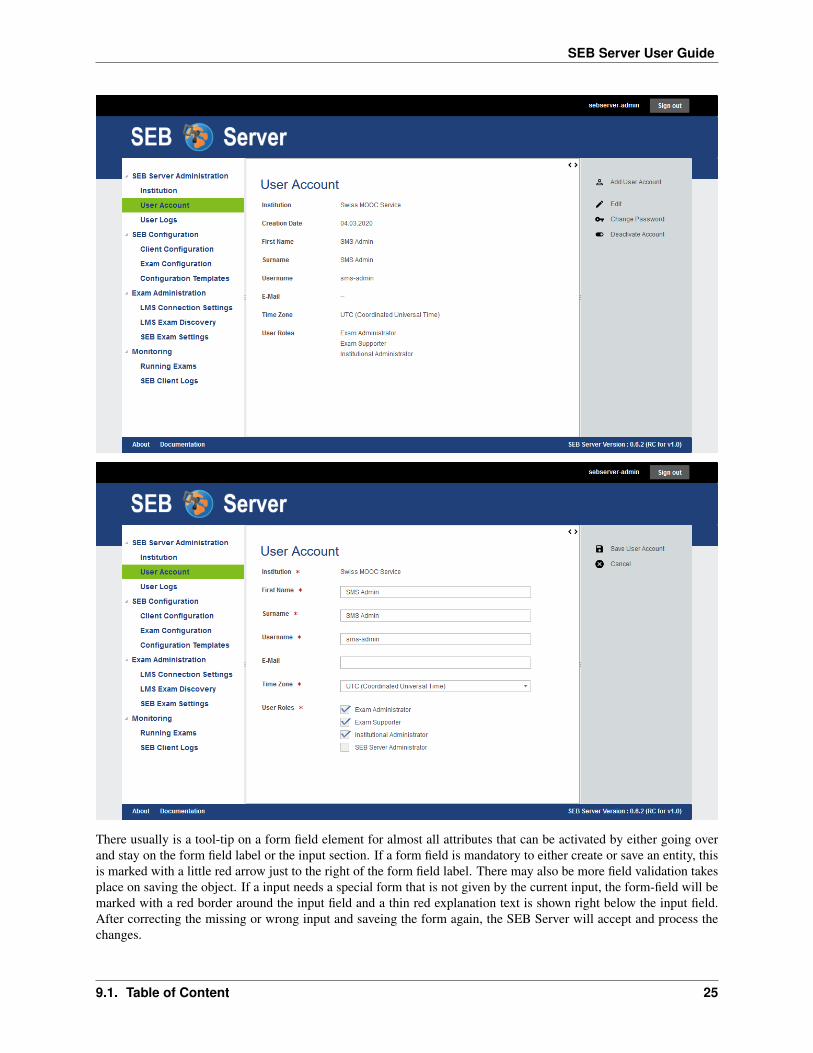
The following images shows the same form, once in read-only mode and once edit mode
24 Chapter 9. SEB Server User Guide
SEB Server User Guide
There usually is a tool-tip on a form field element for almost all attributes that can be activated by either going overand stay on the form field label or the input section. If a form field is mandatory to either create or save an entity, thisis marked with a little red arrow just to the right of the form field label. There may also be more field validation takesplace on saving the object. If a input needs a special form that is not given by the current input, the form-field will bemarked with a red border around the input field and a thin red explanation text is shown right below the input field.After correcting the missing or wrong input and saveing the form again, the SEB Server will accept and process thechanges.
9.1. Table of Content 25

SEB Server User Guide
Note: If you navigate away from a form in edit mode, the GUI will inform you about possible data loss on this actionand will prompt you to proceed or abort the action.
9.1.2 Institution
Overview
The institution section within SEB Server is used to support built-in multi-tenancy functionality to allow using SEBserver as a light-weight stand-alone server but with the possibility to separate operation completely within differentinstitutions.
Note: If a quick use-case based reference suites you better, just forward to the “Use Cases” section of this chapterbelow
Only the role of SEB Server administrator and institutional administrator are able to see and use this section. A SEBServer administrator is able to see the whole list of all existing institutions and to create new and maintain everyinstitution within a SEB Server, while a institutional administrator is only able to see the belonging institution and isable to modify this institution but not to change activity or create new institutions.
If a SEB server administrator clicks on the “Institution” section on the left hand menu, the application will show thea list of all available institutions. The list can be filtered with the filter above and can be sorted by clicking on thecolumn one would like to sort the list in.
Note: The possible actions are in the action pane on the right hand side and the actions that belongs to a list entry areonly active if a list entry is selected.
Currently an institution has a name, an optional url-suffix and an optional logo upload attribute.
• The Name is mandatory and must be unique within the SEB Server application.
• The URL-Suffix is optional and defines a suffix that can be used within the browser URL to access the SEBServer within this institution. The institution logo and theme will then be shown.
• The Logo upload where a image can be uploaded to be used as logo for the institution.
Note: The logo ideally should have a dimension around 300 pixel width and 80 pixel height to fit well into the logosection of the page. Currently only .png, .jpg and .jpeg image-files are supported.
26 Chapter 9. SEB Server User Guide

SEB Server User Guide
As an institutional administrator only the institution one belongs to can be seen and be modified by the user. The userwill see the institution form in view mode by clicking on the “Institution” section on the left hand menu and is ableto edit the attributes of the institution like changing the name of the institution or upload a new institutional logo. Aninstitutional administrator is not able to activate or deactivate its own institution, therefore a SEB Server administratorrole is needed.
Use Cases
Create a new Institution
9.1. Table of Content 27

SEB Server User Guide
Note: To create a new institution one need a SEB Server administrator role.
The SEB Server application is setup as a single instance but needs to support several institutions with the services thatmust be completely separated from each other. It should also be possible for an institution to have a separate, singlestart URL to access the application with a web-browser and have the own logo.
• Login as a SEB Server administrator and select the “Institution” menu-item from the left hand side menu.
• A list of all existing and available institutions will be shown.
• Select “Add Institution” form the right hand side action pane to create a new institution.
• The creation form will be shown and the user is able to define a name, url-suffix and or upload a logo for thenew institution.
• After giving all information, the new institution can either be saved and remains inactive until activation or canbe saved and automatically be activated within the same step. Use the “Save Institution” action on the right sideto just save the institution or the “Activate Institution” action the save and activate within the same step.
• In either case the form input will first be verified and if there is missing something or has wrong input, the saveaction will be postponed and the edit form will present the missing input within a red box and some inform textright below the input field for correction.
• If successfully saved, the application will show the form of the newly created institution in read only mode andif already activated other user, that are allowed to, can see the institution now.
Change the name/logo of an existing or own Institution
Note: This scenario differs in case of having a SEB Server administrator or institutional administrator role
As SEB Server administrator
• Login as a SEB Server administrator and select the “Institution” menu-item from the left hand side menu.
28 Chapter 9. SEB Server User Guide

SEB Server User Guide
• A list of all existing and available institutions will be shown. Use the filter above to find the institution to change.
• Select the institution and use the “Edit Institution” action on the right side action pane to open the institution inedit mode.
• To upload a new logo, click on the upload-icon just beside the logo input field. The application will show afile-picker dialog. Use the file-picker dialog to search and select the logo file. Use the “Upload” action-buttonto upload the selected file. The selected logo should appear as an image within the image upload input field ofthe institution form.
• Apply the changes and save the institution. If all given information is correct and nothing is missing, theapplication will. show the changed institution form in read only mode.
As an institutional administrator
• Login as an institutional administrator and select the “Institution” menu-item from the left hand side menu.
• The form of the own institution is shown in read-only mode. Use the “Edit Institution” action from the actionpane.
• The form of the own institution is now shown in the edit mode and the name or logo of the institution can bemodified.
• To upload a new logo, click on the upload-icon just beside the logo input field. The application will show afile-picker dialog. Use the file-picker dialog to search and select the logo file. Use the “Upload” action-buttonto upload the selected file. The selected logo should appear as an image within the image upload input field ofthe institution form.
• Apply the changes and save the institution. If all given information is correct and nothing is missing, theapplication will show the changed institution form in read only mode.
Activate / Deactivate an existing institution
An institution is shown to other users and ready for applying user-accounts and other entities only if it is active. Aninactive institution can only be seen by a institutional administrator of this institution or by a SEB Server administratorthat are able to see all institutions.
9.1. Table of Content 29

SEB Server User Guide
To activate an institution for the first Time one can either use the “Activate Institution” action form the action pane onthe right side within the read only mode of the institution form or with the same action on the edit mode while alsosaving the applied modifications of the form.
To deactivate an institution one can use the “Deactivate Institution” action form the action pane on the right side. Whenan institution is been deactivated, also all existing and active entities that belongs to this institution are deactivated too.This affects user-accounts, configurations and LMS Setups. On deactivation action, the application will search theaffected entities and will inform the administrator about the number of the affected entities and asks for confirmation.After Confirm the deactivation the institution and all affected entities will be deactivated. This means also the user-accounts that has not a institutional role or the SEB Server administration role, will not be able to login anymore.
9.1.3 User Accounts
Overview
The user-account section within SEB Server can be used to create new or modify user-accounts for other user or tomodify the own user account and changing the password. This section differs most for the different roles in SEBServer.
Note: If a quick use-case based reference suites you better, just forward to the “Use Cases” section of this chapterbelow
A user account always belongs to one institution and has some basic attributes;
• Institution: A combo- or single-selection to choose the institution the user account belongs to. This is manda-tory and one user-account can only belong to one institution.
• First Name: The first name of the user
• Surname: The surname of the user
• Username: The username within SEB Server. This name is used to login.
• E-Mail: The E-Mail address for the user. This currently has only informational purpose and is neither used toconfirm an account or to send automated mails.
• Time Zone: The time zone the user belongs to and to which the dates and times are converted to for display itto the user in the GUI. See also the note about time zone below.
• User Roles: A multi-selection input to define all roles a user account has. See also the note about roles below.
• Password: This password input field appears only while creating a new user-account or while self-register auser-account.
• Confirm Password: This password input field appears only while creating a new user-account or while self-register a user-account.
Note: The date and time values within the SEB Server are always stored in universal time (UTC) and converted fromand to the time zone a user account has defined. The time zone of the user account is usually labeled and the UTCtime is shown below if possible.
Note: The role selection is only displayed for user-accounts that has user-account modification privileges like SEBServer administrator and institutional administrator. Roles can be combined by selecting more then one role. For moreinformation about roles and each role see the section Roles and Use-Cases
30 Chapter 9. SEB Server User Guide

SEB Server User Guide
By selecting the “User Account” section on the left side menu, a SEB Server administrator will see a list of all user-accounts of all institution within a SEB Server instance. The filter above the list can be used to search a certain useraccount. Use the:
• Institution filter to select a certain institution and show only the user-accounts that belongs to this institution.
• First Name filter to search for user-accounts with the given occurrence of text in the First Name.
• Surname filter to search for user-accounts with the given occurrence of text in the Surname.
• User Name filter to search for user-accounts with the given occurrence of text in the Username.
• Mail filter to find an user-account by e-mail address
• Status filter to select the either and see either only active, only inactive or all user-accounts
To view all information of a user-account, double-click in a certain user-account entry from the list or select an entryfrom the list and use the “View User Account” action on the right action pain. The user account form will be shownin read only mode with all account information. To edit this user-account use the “Edit User Account” action on theright action pane. To change the password of the user
Use Cases
Register as a exam supporter
Registering as a new user is possible only within the SEB Server form-registration yet. Since the SEB Server is mainlya service for administrative work, there is no third party registration and login in place so far. A self-registered user-account has the single role of an Exam Supporter and since this user-account is not applied to an exiting exam andrunning, the user is only able to see and edit its own account settings. Another user with Exam Administrator role canthen assign the new user-account to an exam for support and monitoring. Or one other user-account with InstitutionAdministrator role can edit the new user-account and give it more privileges.
To register a new user-account follow the steps below
• Use a Web-Browser and go to the SEB Server login page by entering the SEB Server URL.
• Click the “Register” action on the login page that is shown right after the “Sign In” action.
9.1. Table of Content 31

SEB Server User Guide
• The application will show the registration form. See the image below.
• Enter all mandatory account data within the form and use the “Register” action to confirm.
• If there is missing or wrong data, the registration form will highlight the concerned input fields with a red borderand information text just below the field.
• If everything is accepted the user-account is created and the application forwards automatically to the loginpage.
• Sign in with the user credentials to check the account works correctly.
Once signed in, the user can see all sections for a Exam Administrator as shown in the image below. Because the useris not assigned to any Exam as a supporter yet, the “Exam Administration” and “Monitoring” sections are empty. Theuser is only able to change the account settings.
32 Chapter 9. SEB Server User Guide

SEB Server User Guide
Create new user-account
As a user with user-account write privileges (SEB Server administrator and institutional administrator) one can createnew user-account for others. This must usually be done if a particular user is not able to register itself for whateverreason or if internal policies prefere this kind of registration. A a user with with user-account write privileges you cancreate a new user-account as follows;
• Login to SEB Server application with your own account an click the “User Account” section on the left sidemenu.
• Use the “Add User Account” action from the action pane on the right hand-side to create a new user-account.
• Enter all mandatory account data within the form and use the “Register” action to confirm.
• If there is missing or wrong data, the registration form will highlight the concerned input fields with a red borderand information text just below the field.
• If everything is accepted the user-account is created and the application shows the user-account form in viewmode.
• Now the administrator can give the created user credentials directly to the user with the advice to immediatelychange the password.
Modify user-account
As a user with user-account write privileges (SEB Server administrator and institutional administrator) one can modifyuser-accounts of others while all other users can only modify its own account settings.
• Login to SEB Server application with your own account an click the “User Account” section on the left sidemenu.
• As a user with user-account write privileges one will see the list of all available user-accounts. Find the user-account that must be modified by using the filter above and double-click on the respective list entry to open theuser-account form in view mode
• Without user-account write privileges, a user will just see its own user-account form in view mode.
• Use the “Edit User Account” action from the action pain on the right to change to edit mode. Apply all neededmodifications and save the user-account by using the “Save User Account” action from the action pane.
9.1. Table of Content 33

SEB Server User Guide
• If there is missing or wrong data, the registration form will highlight the concerned input fields with a red borderand information text just below the field.
• If everything is accepted the user-account is created and the application shows the user-account form in viewmode.
Change password
As a user with user-account write privileges (SEB Server administrator and institutional administrator) one can changethe password also for others while all other users can only modify change its own password. The current passwordmust be known to change the password.
• Login to SEB Server application with your own account an click the “User Account” section on the left sidemenu.
• As a user with user-account write privileges will see the list of all available user-accounts. Find the user-accountthat must be modified by using the filter above and double-click on the respective list entry to open the user-account form in view mode
• Without user-account write privileges, a user will just see its own user-account form in view mode.
• Use the “Change Password” action on the right action pane to open the change password form.
• No you must fist give the correct old password and the new password then with confirmation.
• Use the “Save New Password action form the right action pane to save the new password settings.
• If you are changing your own password and everything is correct, the application will automatically log you outand prompt you to sign in with the new password.
• If you are changing the password of another user-account the application and everything is correct, the applica-tion direct you back to the user-account form in view mode and show a confirmation message.
Activate / Deactivate user-account
Users with user-account write privileges (SEB Server administrator and institutional administrator) are able to acti-vate/deactivate user-accounts of others. A inactive user-account prevent a user to sign-in. There are several differentways or places where the status of a user-account can be changed
34 Chapter 9. SEB Server User Guide

SEB Server User Guide
• On the list view while one list entry is selected, by using the “Activate User Account” or “Deactivate UserAccount” action from the action pain at the right side. There will be automatically appear the proper action inrelation to the selected list entry and whether it is already active or inactive.
• In the user-account form in view mode by using the “Activate User Account” or “Deactivate User Account”action from the action pain at the right side. There will be automatically appear the proper action in relation tothe current user-account.
• If one creates a new user-account there is the possibility to create and activate the user-account by using the“Activate User Account” action from the action pain on the right side.
• The same situation appears for inactive user-accounts in edit mode.
Delete a user-account
Users with user-account write privileges (SEB Server administrator and institutional administrator) are able to deleteuser-accounts of others.
Note: Please be aware that deletion means full deletion form the persistent storage, all data will be lost.
A user account can be deleted with all dependencies that belongs to the user-account. This includes:
• All exam configuration the user has created and is owner of
• All exams the user has created and is owner of and all dependencies of an exam to like indicators, configurationmappings and all monitoring data if present
• Login to SEB Server application with your own account an click the “User Account” section on the left sidemenu.
• As a user with user-account write privileges will see the list of all available user-accounts. Find the user-accountthat must be deleted by using the filter above and double-click on the respective list entry to open the user-account form in view mode.
• Use the “Delete User Account” action from the right action pane to open the deletion dialog.
9.1. Table of Content 35

SEB Server User Guide
• Within the delete dialog you are able to delete either
– Only the user-account with no dependencies at all (no selection)
– The user-account with all dependencies (Include all Dependencies)
– Or the user-account with only the exam dependencies, keeping the exam configurations (Include allExams)
• After you have made your choice, you can show a report that will show all dependencies that are deleted withinthe action. Use the “Show Report” action below the delete dialog to show the report or just use the “Delete”action to execute the delete.
• In the deletion report you are able to check carefully every object that will be deleted within the action.
36 Chapter 9. SEB Server User Guide

SEB Server User Guide
9.1.4 Learning Management System Setup
Overview
To be able to connect to a learning management system (LMS), to view and manage the courses provided by a LMSis an essential feature of the SEB Server. To setup an exam or e-assessment for SEB on SEB Server that is basedon a course from a LMS, we have to make a binding to the course on the LMS. This is also used to always get theactual course data from LMS like start- end-time, name and others. Another feature of SEB Server that needs a LMScommunication is the SEB restriction. A SEB restriction will restrict course access on the LMS only for connectionwith Safe Exam Browser and will also check if a Safe Exam Browser of trust is used and the right configuration isused by the Safe Exam Browser that was defines for the exam on the SEB Server.
Course API
This API, provided by the LMS, is used by the SEB Server to query the available courses and the needed data foreach course. This API is needed to be able to import a course from the LMS as an exam into SEB Server andconfigure the course as an e-assessment with SEB. Usually this API comes as a REST or SOAP API with the coreLMS implementation or a plugin.
SEB Server supports this course API’s so far:
• Open edX: The standard system Open edX REST API. The SEB Server uses the “courses” endpoints toget course data.
• Moodle (Course Access): The standard system Moodle REST API. The SEB Server uses the standardMoodle rest endpoints to get course data. Please note that a second Moodle integration part for SEBaccess restriction with Config-Key will follow together with a Moodle plugin in a future version of SEBServer
SEB restriction API
If the automated SEB restriction functionality is available for a LMS depends on the following requirements:
9.1. Table of Content 37

SEB Server User Guide
• There must exist a SEB integration plugin that offers an API to put and pull SEB restrictions in the form ofConfig-Keys and/or Browser-Exam-Keys To the LMS and a specific course on the LMS to restrict the access.Such a plugin may also offer additional restriction features like restricting on course section or course compo-nents or only for specified user roles.
• The SEB integration plugin must be installed on the LMS that is used by the SEB Server.
For more information about known SEB integration plugins that are supported by the SEB Server see Install SEBrestriction API plugin
Regardless if a supported LMS is missing the SEB integration plugin installation, the LMS can be used with the CourseAPI and a exam setup will be possible but without automated SEB restriction feature.
To be able connect to an LMS from SEB Server, we need to create an API access-acount on the LMS side that can beused by the SEB Server to access the API of the LMS. How to do this for the different supported types of LMS seeAPI Access Account on LMS After such an account was created the account credentials, username and password, canbe used by the SEB Server to connect to the LMS. Therefore we need to create a LMS Setup on the SEB Server.
A SEB Server administrator role will be able to see the institution to which the LMS Setup belongs to while aninstitutional administrator is only able to see and create LMS Setup for its own institution. The name of the LMSSetup should be unique and is to identify a LMS SEB Server internally. Use the “Type” selector to specify the type ofthe LMS to bind to the SEB Server within the LMS Setup. Currently supported are:
• Testing: This is for testing purposes only and can be used to mock a LMS to test exam settings. This typeprovides some mock-up courses within the LMS API of the SEB Server that can be seen in the LMS ExamLookup once the LMS text setup is active. This mock-up courses can be imported and configured as examslike they would exist. But note the a SEB client that is trying to connect to such a course would not be able toconnect to the LMS since it is not existing. But a SEB client is able to download the defined exam configurationfor testing.
• Open edX: This type is to bind an existing Open edX LMS system that is available on the Internet or intranet.The SEB Server tries to make use of the above described API’s of the Open edX system.
Note: If you want to use the automated SEB restriction feature too, the Open edX SEB Plugin mustbe installed properly on the LMS.
38 Chapter 9. SEB Server User Guide

SEB Server User Guide
• : Moodle: This type is to bind an existing Moodle LMS system that is available on the Internet or intranet.The SEB Server tries to make use of the described API’s of the Moodle system but there is currently no SEBrestriction plugin available that works with SEB Server. Note that Moodle integration is implemented partiallywithin SEB Server version 1.1.x. Only the course access feature is implemented and the course restrictionfeature will come with a future SEB Server release
The “LMS Server Address” is the root URL to connect to the LMS server with HTTP over the Internet or intranet.This is usually the the URL that is also used with the Browser to connect to the main page of the LMS system. Andadditionally the credentials that has been created with the creation of the API Access Account on LMS has to be set inthe LMS Setup the make the SEB Server able to securely connect to te LMS. The API credentials that consists of aclient-name and a client-secret must be used with the “LMS Server Username” and the “LMS Server Password” fieldsof the LMS Setup form on SEB Server.
If the SEB Server running behind a proxy server or a firewall between SEB Server den LMS, the additional proxysettings can be used to setup the proxy-connection.
Note: To Setup a Test LMS Setup (of type “Test”) only a correct URL pattern must be set like “http://test” forexample. And API credentials can be anything but must be set.
After all the settings for a LMS Setup has been set, one can use either the “Save LMS Setup” action to save the LMSSetup without activation or the “Activate LMS Setup” action to also activate the settings right after they has beensuccessfully saved. Anyway for both action there is a intial test that, additionally to the usual field validation that takesplace first, tries to connect to the LMS with the given API details. If the connection was’nt successful the SEB Serverwill inform the user about a possible reason of failure. Otherwise SEB Server shows a success message and the createdLMS Setup can be used.
Use the “Activate / Deactivate LMS Setup” action to activate an inactive LMS Setup or the deactivate a active LMSSetup.
Note: On deactivation of an LMS Setup, the system checks on depending object and will show a confirmation to theuser asking that all depending objects will also been deactivated. Depending objects of an LMS Setup are exams thathas been imported from the specified LMS Setup in the past.
Use Cases
Create a new LMS Setup for Open edX
A new Open edX system has been installed within your institution and to be able to use the system also for e-assessments with SEB and SEB Server, you have to bind the LMS to the SEB Server.
• If not already done, install the Open edX SEB Plugin on the Open edX system first.
• If you don’t already have an API access account on Open edX side, create one
• Sign into SEB Server with your institutional administrator role account.
• Navigate to “Exam Administration” / “LMS Setup” within the navigation on the left hand side.
• Use the “Add LMS Setup” action from the right action pane to open a LMS Setup creation form.
• Give a unique name to the new LMS Setup for internally identification.
• Set the main URL that points to the new LMS system. This is usually the the URL that is also used with theBrowser to connect to the main page of the LMS system
• Set the API credentials that has been creates within step two (client-id, secret).
9.1. Table of Content 39

SEB Server User Guide
• Use the “Activate LMS Setup” action on the right action pane to test, save and activate the new LMS Setupwithin one step.
Note: If some form attributes are missing or not correct, the SEB Server system will respond with the usual formvalidation errors. If the connection to the LMS is failing because of missing or wrong credentials or for any otherreason the system is not able to connect to the LMS the SEB Server will notify a error dialog to the user.
Change API Credentials of an Active LMS Setup
The API access account on the LMS has been expired and you have to create a new one or update the old one whichboth result in new API access credentials that has to be set on the existing LMS Setup on the SEB Server.
• Sign into SEB Server with your institutional administrator role account.
• Navigate to “Exam Administration” / “LMS Setup” within the navigation on the left hand side.
• Use the Filter above the list to find the specified LMS Setup.
• Select the LMS Setup from the list and use the “Edit LMS Setup” action from the right action pane to open theLMS Setup in edit mode.
• Set the new credentials and make sure, the LMS Setup is still active.
• Use the “Save LMS Setup” action form the right action pane to save the changes and test the connection.
Note: If some form attributes are missing or not correct, the SEB Server system will respond with the usual formvalidation errors. If the connection to the LMS is failing because of missing or wrong credentials or for any otherreason the system is not able to connect to the LMS the SEB Server will notify a error dialog to the user.
Deactivate LMS Setup
A LMS system that was running on your campus to provide e-assessment with SEB and SEB Server has been shout-down and you need to also deactivate the setup and exams on the SEB Server for this LMS.
• Sign into SEB Server with your institutional administrator role account.
40 Chapter 9. SEB Server User Guide

SEB Server User Guide
• Navigate to “Exam Administration” / “LMS Setup” within the navigation on the left hand side.
• Use the Filter above the list to find the specified LMS Setup.
• Select the specified LMS Setup from the list and use the “Deactivate LMS Setup” action from the right actionpane.
• Alternatively you can also double-click on the LMS Setup to fist go into the detailed view of the LMS setup anduse the “Deactivate LMS Setup” action there.
• The system informs you about the number of depending exams that also will be deactivated within the deacti-vation of the LMS Setup.
• Confirm the deactivation and notify that the LMS Setup now is listed as “Inactive” in the list.
• Navigate to “LMS Exam Lookup” to make sure the courses form the deactivated LMS Setup are not availableanymore.
• Navigate also to “Exam” and make sure that all previously imported exams from the deactivated LMS Setup arenot available anymore.
API Access Account on LMS
Create Open edX API Access Account
To be able to create an API access-account on Open edX you need a user-account with staff and administrationprivileges.
For Open edX Hawthorn and Ironwood versions following the steps below::
• Login to Open edX LMS Administration with an appropriate user-account that has administration rights. Andfind the Users section:
• Create a new User-Account that acts as an API account. The account must at least have the permissions to querythe course API of Open edX and to access the seb_openedx plugin permission.
• Make sure that “Staff” status is checked for the account.
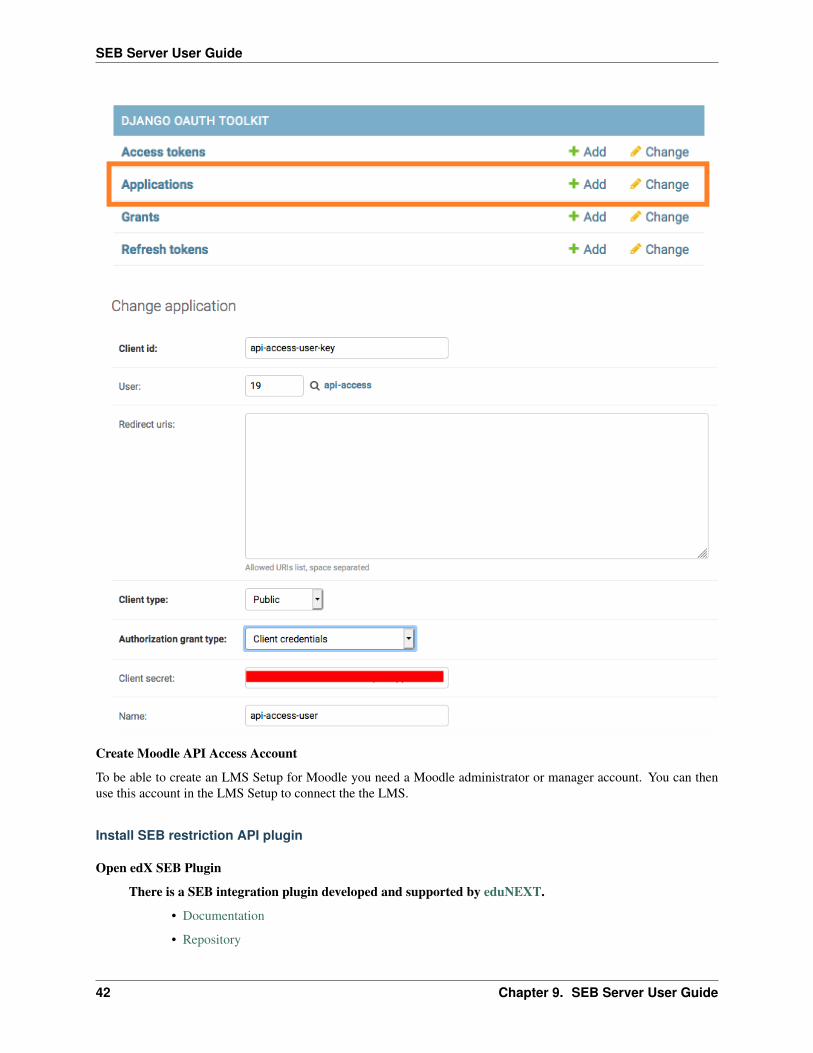
• Back in the administration homepage, find the OAUT2 - Client section and create a new API Client Access forthe given User-Account. The Client id and Client secret are automatically generated by Open edx.
Once the client registration was successful the client id and client secret can be used within the SEB Server to accessthe course- and SEB-restriction API of Open edX as described in the next step section
Note: Since Open edX Juniper is using Django Oauth Toolkit instead of Django Oauth Provider the last step in theabove guide looks slightly different. Please see below the last step for setting up on an Open edX Juniper version.
• Back in the administration homepage, find the DJANGO OAUTH TOOLKIT - Applications section and createa new API Application Access for the given User-Account. The Client id can be defined and the Client secret isautomatically be generated by Open edx.
9.1. Table of Content 41
SEB Server User Guide
Create Moodle API Access Account
To be able to create an LMS Setup for Moodle you need a Moodle administrator or manager account. You can thenuse this account in the LMS Setup to connect the the LMS.
Install SEB restriction API plugin
Open edX SEB Plugin
There is a SEB integration plugin developed and supported by eduNEXT.
• Documentation
• Repository
42 Chapter 9. SEB Server User Guide

SEB Server User Guide
9.1.5 SEB Configurations
There are two different kind of SEB specific configurations that must be defined and be put in place to support e-assessments with SEB and SEB Server. The is used to configure SEB with all needed information to securely connectto SEB Server and an Exam Configuration is used to configure SEB to access a running exam with SEB. The is onlyneeded at least once for an institution and must be deployed as start-configuration on a managed SEB setup or can beplaced as a download link within an internal trusted server, that automatically loads within the SEB application andconfigures the SEB to connect to the SEB Server.
An exam configuration, as the name implies, is done for an exam and contains most of the known configurationattributes from the latest SEB Configuration Tool Currently an exam configuration can only be applied to one Exambut can easily be copied to use with another exam. For detailed information about exam configuration see ExamConfiguration
Within Configuration Templates, it is possible to create templates for exam configuration. Within the current versionof SEB Server there is the possibility to define different default value(s) for each exam configuration attribute and alsoto define if the attribute is been shown in the exam configuration or not. This allows an Exam Administrator to createa exam configuration template for exams with context defines default values and also to be able to only see changethe attributes that are relevant for an exam configuration. This feature is currently in an experimental state and may bechanged and / or expanded within future releases of SEB Server. See Exam Configuration Templates
Connection Configuration
Overview
A connection configuration is needed to configure a SEB client to securely connect to the SEB Server and presenta list of available exams for selection. At least one connection configuration is needed for an institution that can beexported and deployed with a SEB on a managed device setup or can be made available within a download link on ainternal or trusted server. Another scenario would be to send the connection configuration to individual students permail with instructions on how to install SEB and start it with the configuration to automatically connect to the SEBServer. However, since the connection configuration is security relevant because it contains sensitive data to connectto SEB Server, there are different security level one can choose to apply within a internal safe e-assessment strategy.
The lowest level of security is to just have one not encrypted connection configuration for the whole institution andfor all e-assessments provided at this institution with SEB Server. In this case the sensitive data is more exposed to becompromised and misused by others because of the missing password protection and it also takes more effort to dealwith such an issue while there is only one connection configuration used by all e-assessments of the institution. If theone client configuration has been compromised and a misuse has been detected the concerned connection configurationcan be deactivated to prevent further misuse. A new one can be created and delivered or updated but since it is only oneconfiguration used for the institution all actual download links have to be updated and all students awaiting a preparedexam has to be informed and supported with the new configuration (link)
The currently highest level of security is to have encrypted and different connection configuration for differente-assessment. In this case the connection configuration is encrypted with a password that can be defined by ainstitutional- or exam-administrator while creating the connection configuration. Once the SEB loads such a con-nection configuration it will fist prompt the user about the password that must be given by the student to proceed andconnect to the SEB Server.
Usually a connection configuration can be created or maintained by an institutional administrator or by an examadministrator. Exam supporter role has no access to connection configurations and a SEB administrator is able to seeconnection configurations of other institutions but not to create or modify them.
You can see a list of all available connection configuration for an institution by going to the sub-section “ConnectionConfiguration” of the “Configuration” section on the menu on the left hand side.
9.1. Table of Content 43

SEB Server User Guide
The list shows the name, the date of creation and the status of the connection configurations in a column. With SEBServer administrator role also an institution column is shown because a SEB Server administrator is able to see allconnection configurations of all institutions. As usual, to filter the list use the filter inputs above and click on thelens symbol on the right to apply the filter and to clear the filter use the clear symbol right to the lens symbol. SeeGraphical User Interface for more information about the list navigation.
The image below shows the Connection Connection form in the edit mode. To view the fallback related attributes,check the “With Fallback” attribute or remove selection to hide all fallback related attributes.
Short description of all attributes of a connection configuration:
• Name: The name of the connection configuration used to maintain connection configurations within the SEB
44 Chapter 9. SEB Server User Guide

SEB Server User Guide
Server application.
• Configuration Purpose: Defines the configuration purpose as described in SEB Configuration section “UseSEB settings file for”. Starting an Exam; Will cause SEB to use this connection configuration settings onstartup but won’t change local SEB settings. Configuring a connection; Will cause SEB to use this connectionconfiguration settings and also save it as local SEB settings.
• Configuration Password: Used to encrypt the connection configuration with a password. A SEB client willprompt this password while loading a password protected connection configuration.
• With Fallback: Select this to see and define a fallback strategy for SEB clients using this connection configu-ration in case of SEB Server service unavailability.
• Fallback URL: Defines a start URL that is loaded by the SEB client in a fallback case.
• Connection Attempts: Defines the number of attempts a SEB client will try to unsuccessfully connect to theSEB Server service until it switches to the fallback case.
• Interval: Time interval (in milliseconds) a SEB client will wait after a unsuccessful connection attempt beforestarting a next connection attempt.
• Connection Timeout: A overall timeout for SEB Server service connection. After this timeout runs out, startingfrom fist connection attempt, SEB client will switches to the fallback case no matter if number of attempts hasexceeded or not.
• Fallback Password: If set, a SEB client will prompt for this password before switching into the fallback case.
• Quit Password: If set, a SEB client will prompt for this password when a user wants to exit SEB before infallback case or before the SEB client has loaded an exam.
A connection configuration may also contain and define a fallback strategy that takes place when SEB Server serviceis not available while a SEB client tries to connect to the SEB Server.
Note: A fallback case only takes place when SEB client is within the connection process (handshake) with the SEBServer and the SEB Server service is unavailable. If a SEB client is already connected to the SEB Server and the userhas started an exam, the SEB will just proceed with the exam even when the SEB Server connection is (temporarily)unavailable.
The fallback strategy contains some connection attributes that define until when a SEB client considering SEB Serverservice as unavailable as well as attributes that defines how a SEB client has to proceed in the fallback case. How aSEB client reacts to a fallback case differs on the configuration settings in the following ways:
• Connection configuration with “Configuring a Client” setting and no fallback strategy: Show warningmessage with options “retry” and “quit”.
• Connection configuration with “Configuring a Client” setting and fallback strategy: Show warning withoptions “retry”, “fallback” (load Fallback URL) and “quit”.
• Connection configuration with “Starting an Exam” setting and no fallback (without local client configuration):Show warning message with options “retry” and “quit”.
• Connection configuration with “Starting an Exam” setting and no fallback (with local client configuration):Show warning message with options “retry”, “load local settings” and “quit”.
• Connection configuration with “Starting an Exam” setting and fallback strategy: Show warning with op-tions “retry”, “fallback” (load Fallback URL) and “quit”.
9.1. Table of Content 45

SEB Server User Guide
Use Cases
Create Connection Configuration
As an Institutional Administrator you should create a new secure connection configuration for the upcoming semester.The setup shall operate with secure configurations because the configuration file may be exposed to the public Internet.And the setup shall also have a proper fallback strategy where SEB clients uses the a given start URL in fallback case.
• Sign in as an Institutional Administrator and select the “Connection Configuration” sub-menu of the “SEBConfiguration” main-menu on the left.
• Use the “Add Connection Configuration” on the right action pane to create a new connection configuration.
• Give the new connection configuration a name that not already exists and select “Start an Exam” for “Con-figuration Purpose”. This will ensure that a SEB client that uses this configuration will not override the localconfiguration that then can be used on fallback.
• Give a password to ensure security and to encrypt the connection configuration on export. A SEB client willprompt for the password while loading this configuration.
• Check “With Fallback” to show all the fallback related attributes.
• Define a fallback URL that will be used by a SEB client as start URL in the fallback case.
• Define also fallback case, how many connection attempts on what interval a SEB client shall try before goinginto fallback mode. You can also define a overall “Connection Timeout” if lapsed a SEB client will also go intothe fallback mode. A SEB client will fall-back on either the attempt or the timeout trigger.
• When a SEB client goes to fallback mode it will prompt the user as described in the case list above. To preventfurther fallback options with a password prompt, give a “Fallback Password” and / or a “Quit Password” that aSEB client will prompt on either the fallback- or the quit-option.
• After all details are correctly been entered, use the “Save Connection Configuration” action on the right actionpane to save the new connection configuration.
• Now the new connection configuration is created but not active for now and therefore cannot be exported yet.
Activate and export Connection Configuration
A connection configuration for the upcoming semester has been created so far but was not active until now becauseof security reasons. Now we want to activate this connection configuration and export it to make it accessible by adownload link on a public server.
• Sign in as an Institutional Administrator and select the “Connection Configuration” sub-menu of the “SEBConfiguration” main-menu on the left.
• Use the list filter and / or the list navigation to find the needed connection configuration.
• Double-click on the list entry or use the “View Connection Configuration” action on the right for a selected listrow, to show the details of a specific Connection configuration.
• Then either on the list or in the view mode of the form, use the “Activate Connection Configuration” action onthe right action pane to activate the connection configuration
• Now there is a “Export Connection Configuration” action in the detail view of the connection configuration.Use the “Export Connection Configuration” action to start a download dialog. Choose “Save As” and downloadthe file with the name “SEBServerSettings.seb”.
• This file can now be published as download-link within a public server where SEB user can click and start thedownload and startup of the SEB client automatically.
Deactivate a Connection Configuration
46 Chapter 9. SEB Server User Guide

SEB Server User Guide
The semester has ended and for security reasons we don’t want that SEB clients with a connection configuration forthe ended semester are able to connect to SEB Server anymore. For this we just have to deactivate the connectionconfiguration for that semester. A SEB client that connects with this connection configuration will then receive anHTTP 401 Unauthorized response.
• Sign in as an Institutional Administrator and select the “Connection Configuration” sub-menu of the “SEBConfiguration” main-menu on the left.
• Use the list filter and / or the list navigation to find the needed connection configuration and select the row ofthis connection configuration.
• Now use the “Deactivate Connection Configuration” action from the right action pane to deactivate the connec-tion configuration.
• The connection configuration is now deactivated and SEB client using this connection configuration are not ableto connect to SEB Server anymore.
Exam Configuration
Overview
An exam configuration defines all the SEB settings for an exam. A SEB client that is connecting to SEB Server andan exam defined by the SEB Server is downloading this exam configuration from SEB Server and reconfigure itselfbefore accessing the exam on the learning management system (LMS) and present it to the user.
Note: For more information and detailed description of the SEB settings, see SEB Configuration. Currently not allsettings are available and some has different uses. For details about differences see SEB Setting Differences
An exam administrator is able to create, modify and maintain exam configurations while the SEB Server administratorand the institutional administrator role have only read access either for all exam configurations or for the exam config-urations of the institution. A exam supporter role is able to see and modify only the exam configurations to which theuser-account is assigned as supporter.
To view the list of available exam configuration go the the sub-menu “Exam Configuration” within the menu “SEBConfigurations” on the left hand side. The list shows the name, the description and the status of the exam configu-rations in a column. With SEB Server administrator role also an institution column is shown because a SEB Serveradministrator is able to see all exam configurations of all institutions. As usual, to filter the list use the filter inputsabove and click on the lens symbol on the right to apply the filter and to clear the filter use the clear symbol right tothe lens symbol. See Graphical User Interface for more information about the list navigation.
9.1. Table of Content 47

SEB Server User Guide
To view details of a specific exam configuration either double-click on a list entry or select a list entry and use the“View Exam Configuration” action from the right action pane. In the detail view all general settings are shown andalso a list of exams that uses this exam configuration. In the current version of SEB Server, an exam configuration canonly be assigned to one exam.
Note: For the actual SEB Server version it is not possible to assign the same exam configuration to more then oneexam. This because it shall be possible to change configuration settings for running exams when no active SEB clientsare connected within the specified exam. This is manageable for one exam but is going to become confusing if moreexams are involved. But there is the possibility to copy an existing exam configuration to use the same for anotherexam.
The status of an exam configuration defines its visibility and assignment possibilities. If an exam configuration is stillin the creation process and shall not be to an exam yet, it should stay in the “Under Construction” status. This is thedefault status while creating a new exam configuration. Once a exam configuration is done and ready for assignment,one can change this status to “Ready To Use”. Exam configurations wihtin this status are available for selection andassignment on exams. When a exam configuration is assigned to an exam the status changes automatically to “In Use”and the SEB settings of the exam configuration will appear only in read mode for default.
48 Chapter 9. SEB Server User Guide

SEB Server User Guide
An exam configuration has a general settings part (like other domain objects has within SEB Server) that defines thename, description and status of the exam configuration that are used to maintain the exam configurations SEB Serverinternally. And a exam configuration has, separated from the general settings, the SEB settings that contains most ofthe SEB setting attributes as they are provided by the SEB.
Note: For more information and detailed description of the SEB setting attributes, see SEB Configuration. Currentlynot all settings are available and some has different uses. For details about differences see SEB Setting Differences
The SEB settings differ from the general form-settings also in how they are managed and stored on server-side. Unlikethe form-settings, the SEB settings are arranged like they are in the SEB Configuration Tool for Windows and theyare stored while modifying. This means, a entered value for an attribute is immediately sent to and stored by the SEBServer. There is no additional save action needed and no entered data will be lost. Instead the “Save / Publish Settings”can be used to store the current setting in a new revision in the history while also publish them to exams that uses thisexam configuration.
9.1. Table of Content 49

SEB Server User Guide
Note: Changes in SEB settings must be published to be available on exports, exams or other uses. Before publishingthey are not available for exams and SEB clients that connect to the SEB Server will still receive the last publishedversion of the SEB settings. To publish SEB setting changes use the “Save / Publish Settings” action from the rightaction pane.
Note: Currently there is an “Undo” function to revert the changed made to the last published state. But there is nopossibility yet to maintain the publishing history of a Exam Configuration but may be available in a future release ofthe SEB Server.
Since an exam configuration can only be used by one exam it may be convenient to quickly copy an existing examconfiguration that is in use and use the copy of this exam configuration for another exam or to just change the settingsto make a slightly different exam configuration. The “Copy Exam Configuration” action can always be used no matterin what state the exam configuration may be at the moment. By using this feature there will be a copy dialog shownas pop-up window where one has to give at least a new unique name for the copy. See copy-config-label for detailedstep by step guide.
A plain XML export of the SEB settings may be needed for testing. This is always possible by using the “ExportSEB Settings” action from the right action pane in the SEB settings view. This will start a usual browser downloaddialog handled by your browser to save or load the file. The default name of the file of a exam configuration is“SEBExamSettings.seb”.
SEB Server supports also the SEB Config-Key that is used to validate the SEB configuration on the LMS adds a highersecurity level to the exam. This supported if the specific type of LMS supports the automated SEB restriction feature.Anyways sometimes it may be needed to manually extract the SEB Config-Key for a exam configuration. Thereforeone can use the “Export Client-Key” action from the right action pane to generate the Config-Key form the actualsaved SEB settings revision of the exam configuration. The key will be presented by a pop-up dialog where it can becopied for further use.
50 Chapter 9. SEB Server User Guide

SEB Server User Guide
Use Cases
Create new Exam Configuration
For the upcoming semester you have to create several new exam configurations for the different kind of exams yourinstitution is going to provide during the semester.
• Sign into SEB Server with your exam administrator role account
• Navigate to the “Exam Configuration” menu within the SEB Configuration section on the left hand side.
• You see a list of all available exam configuration.
• Use the “Add Exam Configuration” action on the action pane on the right hand side to create a new examconfiguration
• The creation form at least needs a unique name for the exam configuration. You can also add a description orhint to recognize and find this configuration more easily later on.
• In the “Status” field you are able to choose if the configuration is still under construction and cannot be addedto exams yet, or if it is ready to use.
• Save the form with the “Save Exam Configuration” action on the right action pane to create the configuration.
• After successfully saved the new exam configuration use “Edit SEB Settings” to open all the SEB settings thatcan be defined for a exam.
• For more information about the individual SEB settings see SEB Configuration.
• In the SEB settings view use the “Save / Publish Settings” action to save your settings.
Note: Changes in SEB settings are automatically sent to the server and stored within the open working revision ofthe settings. To make a open working revision active and available for export, exams and other uses, you need to save/ publish this settings exclusively by using the “Save / Publish Settings” action. After using this action all the changesare saved in a historical revision and available for use. A new working revision will be created and all the changes
9.1. Table of Content 51

SEB Server User Guide
until then will go into the new working revision. To revert all the changes done since last save / publish use the “Undo”action.
Export SEB Settings
You want to test an exam configuration manually with a SEB client. Therefore you need to export the settings of anexisting exam configuration and load it with a SEB client or the SEB configuration tool.
• Sign into SEB Server with your exam administrator role account
• Navigate to the “Exam Configuration” menu within the SEB Configuration section on the left hand side.
• You see a list of all available exam configuration.
• Use the Filter above the list to narrow down the number of entries and to find a specific exam configuration.
• Open the exam configuration either by double-click on the list entry or be selecting the list entry and using the“View Exam Configuration” action.
• Open the SEB settings of the exam configuration by using the action on the right action pane.
• Use the “Export SEB Settings” action to start the export download.
• Save the file or open it directly with SEB
Import an Exam Configuration
There is an existing SEB configuration file once created with the SEB config tool that must be imported to use withSEB Server. The SEB configuration files where created with the SEB configuration tool and are all saved with thepurpose to start an exam (attribute).
• Sign into SEB Server with your exam administrator role account
• Navigate to the “Exam Configuration” menu within the SEB Configuration section on the left hand side.
• Use the “Import Exam Configuration” action from the right action pane to start an upload dialog.
• Within the upload dialog use the file selector to select the SEB configuration file for importing.
• Give a unique name for the imported exam configuration and a description (optional).
• If the original SEB configuration is password protected, give the password that is needed to decrypt the config-uration file.
• Use the OK action on the upload dialog to start the import.
• If the import was successful a new exam configuration with the given name exists.
Copy an Exam Configuration
Since an exam configuration can only be used by one exam you have periodically to create a copy of an existing examconfiguration that is already attached to an exam. The copy can then be used to either make first some changes to thesettings or add it directly to another exam that has to be configured for SEB.
• Sign into SEB Server with your exam administrator role account
• Navigate to the “Exam Configuration” menu within the SEB Configuration section on the left hand side.
• You see a list of all available exam configuration.
• Use the Filter above the list to narrow down the number of entries and to find a specific exam configuration.
• Open the exam configuration either by double-click on the list entry or be selecting the list entry and using the“View Exam Configuration” action.
• Use the “Copy Exam Configuration” action from the right action pane to open up the copy dialog.
52 Chapter 9. SEB Server User Guide

SEB Server User Guide
• Within the copy dialog give a new unique name for the new exam configuration and a description if needed.
• Use “With History” apply the whole history of the original exam configuration to be copied or let it uncheckedto just copy the last saved / published revision of the original.
• If all information is correct, use the “OK” button of the copy dialog to create the copy.
Note: If there where changes in the working revision of the exam configuration to copy, they will not be included inthe copy. Only saved / published changes are included in the copy.
Generate and Export the Config-Key of an Exam Configuration
Usually the SEB Config-Key that is used to validate the SEB configuration on the LMS is propagated automatically toa LMS by the SEB Server with the automated SEB restriction feature. But For testing purposes you need to generateand export the SEB Config-Key and set it manually on the LMS.
• Sign into SEB Server with your exam administrator role account
• Navigate to the “Exam Configuration” menu within the SEB Configuration section on the left hand side.
• You see a list of all available exam configuration.
• Use the Filter above the list to narrow down the number of entries and to find a specific exam configuration.
• Open the exam configuration either by double-click on the list entry or be selecting the list entry and using the“View Exam Configuration” action.
• Use the “Export Config-Key” action from the right action pane to generate the Config-Key and open a dialogthat presents this generated Config-Key.
• Mark the Config-Key hash in the dialog with double-click and copy it (ctrl+c) to the clip-board.
Note: If there where changes in the working revision of the exam configuration to create the Config-Key from,they will not be included in the generation of the Config-Key. Only saved / published changes are included in theConfig-Key generation.
Changing SEB Settings of an Exam Configuration in Use
There is an already fully configured exam within SEB Server that is currently running with a prepared exam configu-ration. You have now realized that some SEB settings are missing or wrong and has to be changed for the exam. Thisis possible but under some restrictions. See the note below.
Note: When a exam configuration is applied to a currently running exam, the exam configuration is in “Used”state and the SEB settings of the exam configuration are in read only mode. Changing the SEB settings of a examconfiguration during a running exam that has already connected clients can lead to unexpected behavior. SEB clientsthat has already been connected and are in a running session will work with the old configuration while SEB clients thatare connecting after a SEB settings change will work with the new configuration. Also the automated SEB restrictionwith the changed SEB Config-Key will be updated immediately after saving / publishing the configuration changes.This may also lead to unexpected behavior and eventually blocking of already connected SEB clients. Therefore SEBServer restricts the change of SEB settings for configurations that are attached to an exam that is currently running tobe only possible if there are no active SEB client connections for this exam at the moment when save / publish theSEB setting changes.
• Sign into SEB Server with your exam administrator role account
9.1. Table of Content 53

SEB Server User Guide
• To change the SEB Settings of an exam configuration that is attached to an currently running exam, make surethat there are no active SEB client connections. Go to the “Monitoring” section and find and view the concernedexam to make sure there are currently no active SEB client connections.
• Navigate to the “Exam Configuration” menu within the SEB Configuration section on the left hand side.
• You see a list of all available exam configuration.
• Use the Filter above the list to narrow down the number of entries and to find a specific exam configuration.
• Open the exam configuration either by double-click on the list entry or be selecting the list entry and using the“View Exam Configuration” action.
• See that you currently are not able to edit the SEB settings. There is only a “View SEB Settings” action thatopens the SEB settings in read-only mode.
• Use the “Edit Exam Configuration” action from the right action pane to open the edit mode of the exam config-uration.
• Change the status from “Used” to “Under Construction” to be able to edit the SEB settings again. There will bea message that tells you the implication with changing SEB settings within a exam configuration that is alreadyused by a running exam.
• After saving the exam configuration in “Under Construction” it is now possible to edit the SEB settings for thisexam configuration.
• Use the “Edit SEB Settings” action from the right action pane to open the SEB settings form in the edit mode.
• Apply your changes to the settings and use “Save / Publish Settings” to make the settings take affect and triggera configuration change to the exam. This will check first if there are currently no active SEB clients connectedwithin the running exam that uses this exam configuration. If there is one or more active SEB client connected,the action will deny and inform you about the the active SEB clients.
SEB Setting Differences
In the current version of SEB Server, there are some differences to some SEB settings as well as some SEB settingsthat are slightly different or not available at all on the SEB Server.
SEB settings currently not supported by the SEB Server
• Start URL: Since SEB Server has already been contacted by a SEB client when downloading the exam config-uration this is not used by the exam configuration on SEB Server. But this can be used as fallback URL in theConnection Configuration.
• Embedded Resource: There is currently no embedding supported within exam configurations on SEB Server.
• Additional Dictionaries: There are only the SEB client default dictionaries available in the current SEB Serverversion.
• Additional Resources: Additional resources are currently not available in the current SEB Server version.
• Embedded Certificates: There is currently no certificate management possible on current SEB Server version.
• Browser Exam Key: There is currently no possibility to generate the Browser Exam Key on the SEB Server.But an already generated Browser Exam Key may be used within the SEB restriction feature on the examconfiguration if this feature is supported by the LMS in use.
SEB settings that has a slightly different form or handling in SEB Server comparing to the SEB configurationtool
54 Chapter 9. SEB Server User Guide

SEB Server User Guide
• Download Directory OSX: Since it is not possible within a web-service to choose a local directory on a remotedevice this is just a text input where one has to give the full-path to the directory on the client device in textform.
• Log Directory OSX, Log Directory Win: Since it is not possible within a web-service to choose a local directoryon a remote device this is just a text input where one has to give the full-path to the directory on the client devicein text form.
• Permitted Processes / Executable: This is also just a text input field where one can give the name of the processin text form.
SEB settings from versions before 3.0 that are not supported anymore
• Permitted Processes / Window Handling Process
Exam Configuration Templates
With this feature you can create and manage templates for SEB exam configuration settings. You are able to mainlydefine default values for each SEB exam settings attribute for an exam config and you are also able to define whetherthe settings attribute shall be viewed on an exam configuration created from the template or if it shall be hidden.
Note: The exam configuration template feature is the most experimental feature in SEB Server for now and mychange for the upcoming releases.
To view all available exam configuration templates go to the “SEB Configuration” section and click on the “Config-uration Template” menu entry of the left menu pane. SEB Server will then present you a list of all available examconfiguration templates. You can filter and sort the list as usual to find a specific template by name for example.
To create a new exam configuration template use the “Add Configuration Template” action from the right action pane.You will see the creation form with a name and description for the new template. At least a unique name is mandatoryand the description is optional.
9.1. Table of Content 55

SEB Server User Guide
To create and save the new exam configuration template use the “Save Configuration Template” action from the rightaction pane. The template will be created with all default settings attribute and views and you will see the configurationtemplate view page. In the view page you will see the information of the template within the page header followingby a list of all exam configuration setting attributes available for a SEB exam configuration on the SEB Server. Thename of an attribute is composed of the internal attribute name followed by the display name of the attribute.
The type of the attribute defines the input field type and cannot be changed in any way. The view defines the tab onwhich the settings attribute is placed. And the group defines the named group where a settings attribute belongs to.
56 Chapter 9. SEB Server User Guide

SEB Server User Guide
Note: For now the “View” and “Group” properties of an settings attribute cannot be changed, just be set whetherthe settings attribute shall be shown on its defined view (tab) and within its defined position on the tab or if it shallbe hidden at all. In a future version of SEB Server it may possible to also place a settings attribute to another “View”and/or “Group” and also to a certain position of the view grid.
To attach or detach a particular settings attribute for the template from the view to show or hide it in the configurationsettings, select the specific settings attribute from the list and use either the “Remove From View” action when youwant to remove an attached one, or the “Attach To View” action when you want to attach a hidden settings attribute tothe default view.
To define a default value for a specific attribute, select the attribute from the list and use the “Edit Attribute” actionfrom the right action pane to open the settings attribute in edit mode. Or just double click on the specific list entry ofthe settings attribute.
In the settings attribute edit page you see general information about the attribute on the upper part of the page and onthe second part you see the input field if the settings attribute with the current default value set. To alter the defaultvalue just use the input field of the attribute to change the value and the change will automatically be set as new defaultvalue. If you want to reset the default value of the settings attribute to the original default value, use the “Set DefaultValues” action from the right action pane to do so. You are also able to attach or detach the settings attribute from theview here by using the “Remove From View” or “Attach To View” actions from the right action pane. To go back tothe exam configuration template view use the “View Configuration Template” action from the right action pane.
Back in the exam configuration template view you are able to create a new SEB exam configuration directly from thistemplate by using the “Create Exam Configuration” action from the right action pane. The application will present youa creation dialog within a pop-up where you can define a name and description for the new SEB exam configuration.At least a unique name is mandatory.
9.1. Table of Content 57
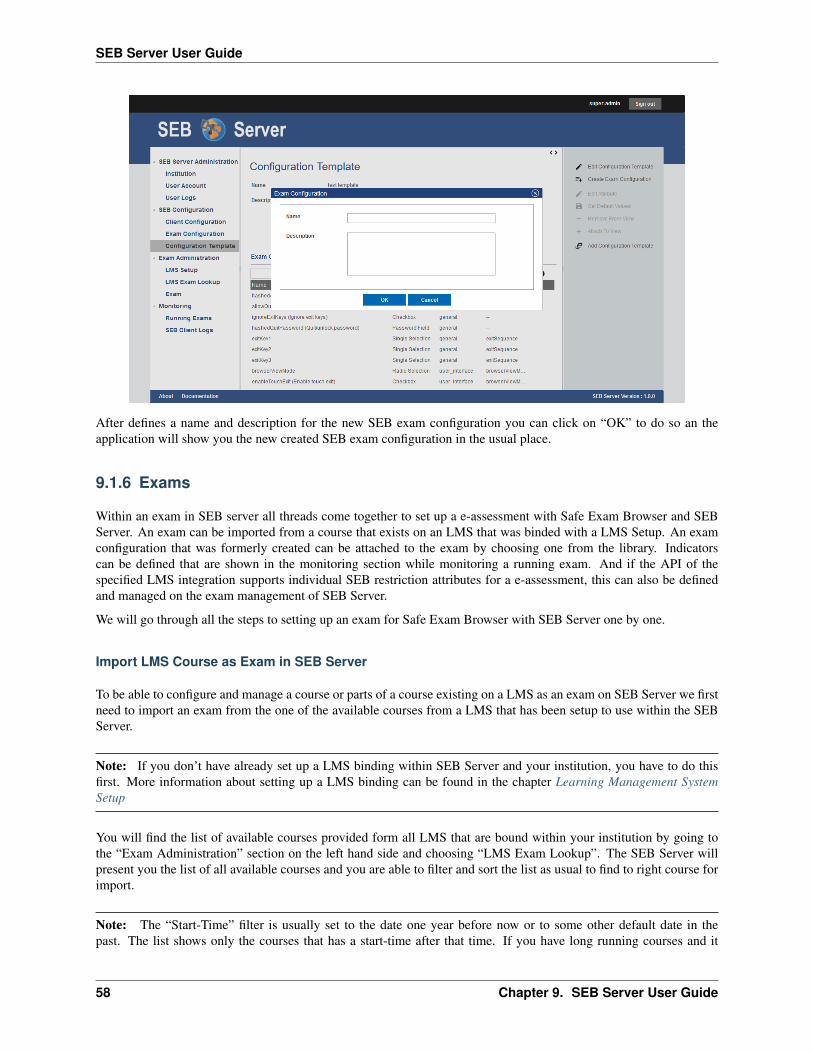
SEB Server User Guide
After defines a name and description for the new SEB exam configuration you can click on “OK” to do so an theapplication will show you the new created SEB exam configuration in the usual place.
9.1.6 Exams
Within an exam in SEB server all threads come together to set up a e-assessment with Safe Exam Browser and SEBServer. An exam can be imported from a course that exists on an LMS that was binded with a LMS Setup. An examconfiguration that was formerly created can be attached to the exam by choosing one from the library. Indicatorscan be defined that are shown in the monitoring section while monitoring a running exam. And if the API of thespecified LMS integration supports individual SEB restriction attributes for a e-assessment, this can also be definedand managed on the exam management of SEB Server.
We will go through all the steps to setting up an exam for Safe Exam Browser with SEB Server one by one.
Import LMS Course as Exam in SEB Server
To be able to configure and manage a course or parts of a course existing on a LMS as an exam on SEB Server we firstneed to import an exam from the one of the available courses from a LMS that has been setup to use within the SEBServer.
Note: If you don’t have already set up a LMS binding within SEB Server and your institution, you have to do thisfirst. More information about setting up a LMS binding can be found in the chapter Learning Management SystemSetup
You will find the list of available courses provided form all LMS that are bound within your institution by going tothe “Exam Administration” section on the left hand side and choosing “LMS Exam Lookup”. The SEB Server willpresent you the list of all available courses and you are able to filter and sort the list as usual to find to right course forimport.
Note: The “Start-Time” filter is usually set to the date one year before now or to some other default date in thepast. The list shows only the courses that has a start-time after that time. If you have long running courses and it
58 Chapter 9. SEB Server User Guide

SEB Server User Guide
may possible that a course has been stated a year or two ago, you habe to adapt this “Start-Time” filter to view thosecourses that has been started before.
You can view more details of a course by double-click on the specific list entry or by selecting the list entry and clickthe “Show LMS Exam Details” action form the action pain on the right hand side. The application will open a pop-upwith available detail information of the course.
To import a course as an exam find the specific course on the list by using the filter and select the list entry. Use the“Import As Exam” action from the action pane on the right hand side.
Note: If a course has already ended (End-Time passed) it is not possible to import this course and an appropriatemessage is shown.
On import, the application is creating an exam on SEB Server with a reference to the imported course on the LMS. Allcourse specific data like name, description, start-, end-time and course-identifier will not be stored on the SEB Serverbut always be referenced by the underling course. This means, that the course data has to be modified on the LMS sideas usual and the SEB Server always takes the actual data from the LMS for the course. This has the advantages of theprinciple of single responsibility and prevents synchronization issues.
You will see the creation page of the new exam with additional information:
• Name: Is the name of the course, defines on the LMS
• LMS Setup: Is the name of the LMS Setup on the SEB Server from which the course was imported
• Start-Time: Is the date and time when the exam is starting. This is defined on the LMS
• End-Time: Is the date and time when the exam ends. This is defined on the LMS
• LMS Exam Identifier: Is the identity of the course on the LMS (external identifier/primary key)
• LMS Exam URL: Is the start URL of the course/exam
You are now able to initially choose a type for the exam - “Exam Type” - that is currently only used for informationalpurpose and has no further restrictions or consequences on handling on in SEB Server.
9.1. Table of Content 59
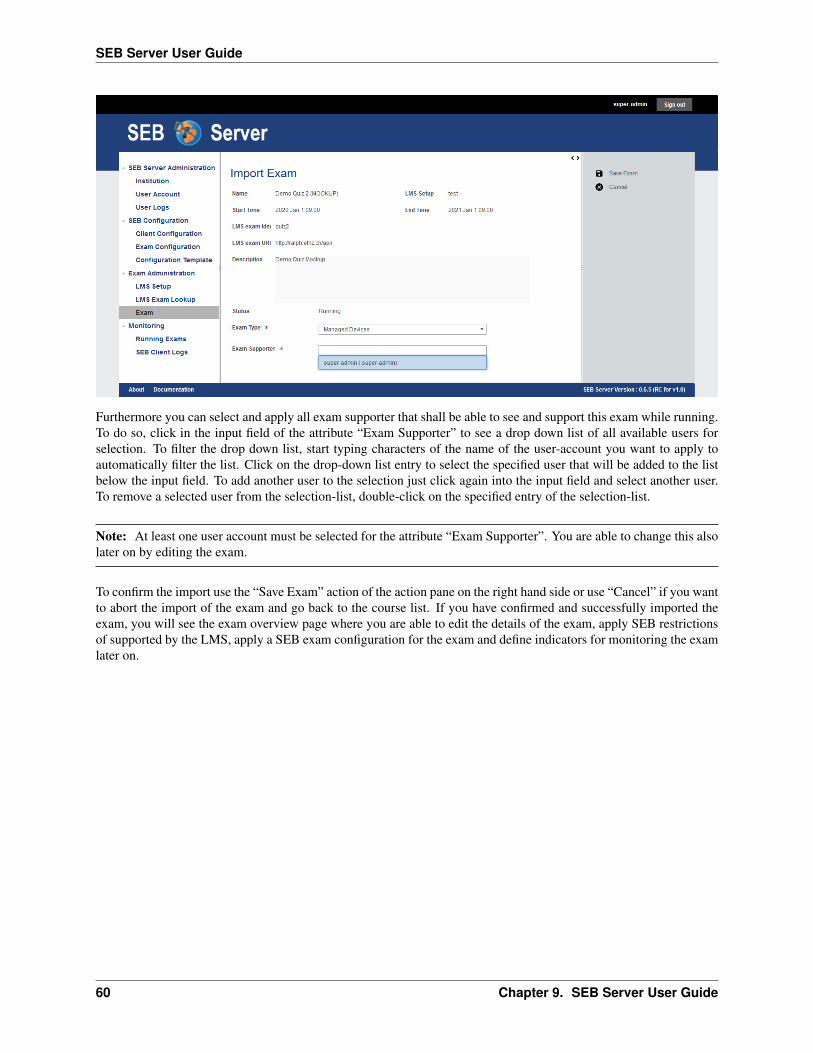
SEB Server User Guide
Furthermore you can select and apply all exam supporter that shall be able to see and support this exam while running.To do so, click in the input field of the attribute “Exam Supporter” to see a drop down list of all available users forselection. To filter the drop down list, start typing characters of the name of the user-account you want to apply toautomatically filter the list. Click on the drop-down list entry to select the specified user that will be added to the listbelow the input field. To add another user to the selection just click again into the input field and select another user.To remove a selected user from the selection-list, double-click on the specified entry of the selection-list.
Note: At least one user account must be selected for the attribute “Exam Supporter”. You are able to change this alsolater on by editing the exam.
To confirm the import use the “Save Exam” action of the action pane on the right hand side or use “Cancel” if you wantto abort the import of the exam and go back to the course list. If you have confirmed and successfully imported theexam, you will see the exam overview page where you are able to edit the details of the exam, apply SEB restrictionsof supported by the LMS, apply a SEB exam configuration for the exam and define indicators for monitoring the examlater on.
60 Chapter 9. SEB Server User Guide

SEB Server User Guide
How all this different aspects of the exam are defined and prepared is part of the next chapter.
Use Cases
Import a course as exam
To start setting up a course or quiz form an existing LMS as e-assessment with SEB and SEB Server you have to findthis course or quiz on the SEB Server and import it as exam. Define a type and apply exam supporter.
• Login as an exam administrator and go to the “LMS Exam Lookup” page under the “Exam Administration”section.
• If you are not sure if the LMS that runs your course has already been setup within the SEB server, go firstto the “LMS Setup” page and try to find the particular LMS in the list. If you can’t find it, please contact aninstitutional administrator or setup the LMS by yourself as described in Learning Management System Setup.
• Find your course or quiz by using the filter of the list and the list navigation as usual.
• Double click on the list entries to get all information about a particular course or quiz.
• Once you have found the course or quiz, select it on the list and use the “Import Exam” action on the right actionpane.
• The system will lead you to the exam import page where you see all the details of the course or quiz and whereyou can set a type and apply exam supporter before importing.
• Choose a type for the imported exam in the “Exam Type” selection. The type of an exam is currently justinformative hand will cause no restriction for the imported exam.
• Select as many exam supporter as you want to be able to support the running exam. Read above, how to findand select exam supporter with the drop down multi selection.
• When all is properly set, use the “Save Exam” action on the right action pane to save the exam and complete thetask.
9.1. Table of Content 61

SEB Server User Guide
Prepare Exam
This chapter is about setting up and prepare a already imported exam on SEB Server. If you don’t have imported acourse or quiz from LMS as an exam into SEB Server, please see the previous chapter for detailed guidance about hotto import an exam.
To find a specific exam that has already been imported, go to “Exam Administration” / “Exam” on the navigationmenu on the left hand side to see a list of all available exams. You are able to filter and sort the list as usual to find toright course for import.
Note: The “Start-Time” filter is usually set to the date one year before now or to some other default date in thepast. The list shows only the courses that has a start-time after that time. If you have long running courses and itmay possible that a course has been stated a year or two ago, you habe to adapt this “Start-Time” filter to view thosecourses that has been started before.
Double click on the list entry of the exam or select the list entry and use the “View Exam” action of the action painon the right hand side to open the exam in the detail view. Within the detail view of the exam you are able to editthe exam attribute, apply SEB exam configuration and indicators for monitoring as well as defining details of the SEBrestriction if this feature is available from the LMS.
Note: If an exam is already running but is missing some essential setup, this is noted by the system. In the examdetail view the system displays a red framed message on the top of the page that points out the missing configurationparts. A running exam with missing setup is also marked red in the lists to indicate that they are not ready to go andneed some missing setup or preparation.
At the beginning of the page - if there is no note - you see all the details of the exam.
• Name: Is the name of the course, defines on the LMS
62 Chapter 9. SEB Server User Guide

SEB Server User Guide
• LMS Setup: Is the name of the LMS Setup on the SEB Server from which the course was imported
• Start-Time: Is the date and time when the exam is starting. This is defined on the LMS
• End-Time: Is the date and time when the exam ends. This is defined on the LMS
• LMS Exam Identifier: Is the identity of the course on the LMS (external identifier/primary key)
• LMS Exam URL: Is the start URL of the course/exam
To edit the SEB Server relevant attributes you can use the “Edit Exam” action from the action pain on the right handside to switch to the exam edit mode. In the exam edit mode you can modify the type of the exam “Exam Type”. Theexam type has currently only informational character and has no implication on SEB Server side but may be used inthe future to apply to different exam scenarios for SEB Server and SEB. Here you can also manage the accounts thatshall be able to support and monitor the exam. To do so, use the multi combo selection within the “Exam Supporter”attribute. Click in the input field of the attribute “Exam Supporter” to see a drop down list of all available users forselection. To filter the drop down list, start typing characters of the name of the user-account you want to apply toautomatically filter the list. Click on the drop-down list entry to select the specified user that will be added to the listbelow the input field. To add another user to the selection just click again into the input field and select another user.To remove a selected user from the selection-list, double-click on the specified entry of the selection-list.
Apply SEB Exam Configuration
Just below the exam details you will find the list of applied SEB exam configurations. Currently the number of SEBexam configurations that can be applied to an exam is restricted to one since it is not yet possible to apply a SEB examconfiguration not just to the exam but also to a specific user or a specific group of users. This feature may come witha future release of seb server. But for now you are able to apply just one SEB exam configuration to the exam and thisconfiguration gets delivered to all the SEB clients that connect to the SEB server and participate to the exam.
To apply a SEB exam configuration to an exam use the “Add Exam Configuration” action on the right action pane.A pop-up will prompt you to select an SEB exam configuration by a drop-down selection. The drop-down box willpresent you all SEB exam configurations that are in state “Ready To Use” and that are not already used by anotherexam. If there are more SEB exam configurations in the selection as fitting into the drop-down box, you can eitherscroll the content of the drop-down box or start typing the name of SEB exam configuration to filter the list. Afterselecting a SEB exam configuration, the pop-up shows the description and the status of the selected configuration.
Note: If there are no SEB exam configurations available for applying, the application will note this within a pop-upmessage. In this case you can create a new one for this exam as described in Automated SEB Restriction
9.1. Table of Content 63

SEB Server User Guide
There is also the possibility to encrypt the SEB exam configuration by a password. This is done before the SEBconfiguration is send to a connecting SEB client. Since in the moste cases the SEB client connections are over HTTPS/ TSL there is alrady a good protection in place and an additional encryption of the SEB exam configuration is notrecommended. Anyways, if you decide the use the additional password encryption, the SEB client that receives theencrypted SEB exam configuration will prompt the user for the password to proceed and connect to the LMS.
Note: If you need to use the same SEB exam configuration for different exams, you can just make a copy of a SEBexam configuration that is already used by another exam. - To do so go the the “Exam Configuration” section and findthe specified SEB exam configuration by using the filter. If you have found the SEB exam configuration double-clickon the table entry to open the SEB exam configuration. Then use the “Copy Exam Configuration” action from theright action pane. A pop-up will prompt you the give a new name and optionally description for the copy. Click “OK”and the system will generate a copy of the original SEB exam configuration with the new name and description andwill lead you to the details page of the copy configuration.
Click the “OK” button on the pop-up to apply the selected SEB exam configuration. You will see the applied SEB examconfiguration in the list. If the automated SEB restriction feature is supported by the LMS of the exam, the applicationof a SEB exam configuration will automatically update the SEB restriction details with the generated Config-Key. SeeAutomated SEB Restriction for more information.
64 Chapter 9. SEB Server User Guide

SEB Server User Guide
When a SEB exam configuration is applied to the exam you are able to export the SEB exam configuration XMLin plain text or the generated Config-Key for testing purposes. Just select the SEB exam configuration in the list toactivate the action on the action pain on the right side and use the appropriate action. The SEB exam configurationexport action will instruct the browser to open a download dialog. How the download is applied is up the the browserof use. Usually you are able to either save the file or open it up with a application. If you have already installed theSafe Exam Browser on your device, the browser probably associates the download file already with the SEB clientapplication.
To just generate the Config-Key for testing purposes or to manually apply it on an LMS without the automated SEBrestriction feature you can use the “Export Config-Key” action to generate the key. The Config-Key is presented by apop-up and can be selected and copied to the clip-board. For more information about the Config-Key its purpose anduse, please visit the SEB documentation.
To remove an already applied SEB exam configuration from the exam, select the SEB exam configuration in the tableand use the “Delete Exam Configuration” action form the right action pane. If the automated SEB restriction featureis supported by the LMS of the exam, the removal of a SEB exam configuration will automatically update the SEBrestriction details and remove the Config-Key form the restriction details. See Automated SEB Restriction for moreinformation. Once you have removed a SEB exam configuration from the exam you are able to apply another one tothe exam.
You can navigate directly to the SEB exam configuration details page by double-click on the table entry of the SEBexam configuration. You will then see the details of the SEB exam configuration as well as a table of exams wherethis SEB exam configuration is used. Since for now it is only possible to apply one SEB exam configuration to oneexam, there is only one entry and you can quickly navigate back to the exam be also double-click on the table entry ofthe exam.
Use Cases
Apply or remove exam supporter
Exam supporter “Eric” was planed to support the upcoming exam but he cancelled for reasons of illness and examsupporter “Anie” will take over. Therefore you have to remove Eric from the exams supporter list while also addingAnie to the list. So she will be able to support the running exam.
9.1. Table of Content 65

SEB Server User Guide
• Login as an exam administrator and go to the “Exam” page under the “Exam Administration” section.
• Use the filter to find the exam on that you have to change the supporter assignments.
• Double click the list entry of the exam to go to the exam details page. Check if you are on the right exam.
• Use the “Edit Exam” action form the right action pane to go into the exam edit page.
• Find Eric’s user account on the list of selected exam supporter and use the minus sign icon on the entry toremove Eric from the list of exam supporter
• Click into the input field of the exam supporter selector and start typing the name of Anie’s account. The dropdown will present you all matching entries. Select Anie’s account to add it to the list of selected exam supporter.
• Use the “Save Exam” action on the right action pane to save and confirm the task. This will lead you also backto the exam details page.
• Check again if all exam supporter are correctly assigned for the exam.
Change the type of exam
Although the exam type has just informative character for now and did not affect the exam in any other way, you haveto change the type because your institution use the type information of the exam to set them into context.
• Login as an exam administrator and go to the “Exam” page under the “Exam Administration” section.
• Use the filter to find the exam on that you have to change the supporter assignments.
• Double click the list entry of the exam to go to the exam details page. Check if you are on the right exam.
• Use the “Edit Exam” action form the right action pane to go into the exam edit page.
• Use the drop down selection to change the type of the exam.
• Use the “Save Exam” action on the right action pane to save and confirm the task. This will lead you also backto the exam details page.
Apply a SEB exam configuration
• Login as an exam administrator and go to the “Exam” page under the “Exam Administration” section.
• Use the filter to find the exam on that you have to change the supporter assignments.
• Double click the list entry of the exam to go to the exam details page. Check if you are on the right exam.
• If the exam has already one exam configuration attached you have first to delete this attachment before beingable to attach another exam configuration. Use the “Delete Configuration” action from the right action pane toremove the attached exam configuration.
• Use the “Add Exam Configuration” action form the right action pane to open up the attachment dialog.
• If there is currently no exam configuration that can be attached to the exam, an information dialog will be showninstead of the attachment dialog.
• On the attachment dialog use the drop down selection to select the exam configuration you want to apply to theexam. The drop down selection shows the names of the available exam configurations and you can filter thisnames by start typing the name of the exam configuration you want to find in the input field of the selection.
• When you have selected a exam configuration the dialog shows you some additional information about the examconfiguration.
• If you want or need to put an password protected encryption to the exam configuration for this exam you cando so by give the password for the encryption also within the attachment dialog. Be aware that every SEBclient that will receive an encrypted exam configuration from the SEB Server will prompt the user to give thecorrect password. In most cases an encryption of the exam configuration is not needed, because a secure HTTPSconnection form SEB client to SEB Server is already in place.
66 Chapter 9. SEB Server User Guide

SEB Server User Guide
Delete an exam
If you have “Exam Administrator” privileges you are able to entirely delete an existing exam and its dependencies.
Note: Please be aware that deletion in this context means a fully removal of the data. The data will be lost and notrecoverable.
• Login as an exam administrator and go to the “Exam” page under the “Exam Administration” section.
• Use the filter to find the exam on that you have to delete.
• Double click the list entry of the exam to go to the exam details page. Check if you are on the right exam.
• Use the “Delete” action on the right action pane to open a deletion dialog.
• Within the delete exam dialog you see a list of a dependencies that also will be deleted. Please check themcarefully before deletion.
• Use the below action to either delete the exam or cancel the action and go back to the exam view.
Monitoring Indicators
For monitoring connected SEB clients, SEB server supports some indicators that can be defined within an exam andthat are shown and measured during an exam. When you import, the application automatically creates a default ping-indicator for the exam. You are able to modify this default indicator and also add some other indicators to the exam tobe able to get notified while monitoring a exam session.
The type of indicators are pre-defined within the SEB Server and restricts the number of available indicators that canbe used. Currently following indicators are supported:
• Last Ping Time: This indicator measures the time that has passed since the last ping from a specified SEB client was received by the SEB Server in milliseconds.This can be used to monitor constant SEB client connections and get notified when a SEB client connec-tion gets lost for some defined time or when a SEB client connection that has been list is back again. This
9.1. Table of Content 67

SEB Server User Guide
indicator is used as default indicator and automatically applied to the exam on import. You are able tomodify this indicator and also delete it but we recommend to have this basic indicator in place for everyexam.
• Errors: This indicator measures the number of error-logs a specified SEB client is sending to the SEB Server.
• Warnings: This indicator measures the number of warning-logs a specified SEB client is sending to the SEBServer.
You can define thresholds for each indicator. A threshold is defined by an indication-color and by a threshold-value.On the monitoring side, the indicator for each SEB client connection with change to the threshold color when themeasured indicator value has reached the threshold-value.
To add a new indicator to the exam you can use the “Add Indicator” action from the right action pane. In the indicatoredit page you are able to give the new indicator a name. This name will be displayed in the SEB client connection tableon monitoring section as column name for the column of this indicator. Then you are able to choose a “Type” thatspecifies the type of indicator. Choose this from a drop-down selection of supported indicators. If you have selectedone indicator type, a description will be shown just below the “Type” attribute.
You can define a “Default Color” for the indicator. An indicator which measured value has not reached any definesthreshold will be shown in this color on the SEB client connection table of the monitoring section.
Note: To select a color click on the brush-palette icon of the color input field to open up a color chooser pop-upwindow. Within the color chooser you can select one of the basic colors provided by the chooser or by defining thered, green and blue part of the color.
Below the default color you see a list of thresholds. Use the plus sign icon to add a new threshold to the list and on anexisting threshold use the minus sign icon to remove a particular threshold form the list. A threshold has a threshold-value and a threshold-color. The threshold value must be set in the format of the measured indicator value that isdescribed within the type description. This is usually an integer or floating-point number. The color for each thresholdcan be set using the color chooser tool by clicking on the brush-palette icon on the right side of each threshold. Thecolor chooser pop-up is the same as for the default color.
Note: In the monitoring section when the exam is running, an indicator will be shown within a column with givenname of the indicator in the SEB connection table. For each connection the measured indicator value will be displayed
68 Chapter 9. SEB Server User Guide

SEB Server User Guide
in the cell of the individual SEB client connection rows. If the measured indicator value for a particular SEB clientreaches a defined threshold, the cell will be displayed in the defined color of the threshold.
Use Cases
Add an indicator
• Login as an exam administrator and go to the “Exam” page under the “Exam Administration” section.
• Use the filter to find the exam on that you have to change the supporter assignments.
• Double click the list entry of the exam to go to the exam details page. Check if you are on the right exam.
• Use the “Add Indicator” action from the right action pane to create a new indicator. This will lead you to theindicator edit page.
• Set a name for the indicator and choose the type of indicator you want to use. Read the description above tolearn more about indicators and supported types of indicators.
• You can also define a default color for the indicator that is displayed on the monitoring page while the exam isrunning and a particular SEB client has no incidence as defined for this indicator.
• To select a color use the brush-palette icon on the right side of the color input field to open up a color chooserdialog.
• Now you can define some threshold for the indicator that will help you find incidents and get informed about onthe monitoring while the exam is running. To do so you can use the plus icon on the threshold list to add a newempty threshold to the list. You can choose a value for the threshold and a color that would indicate an overflowof the given value from the measured value of the indicator.
• To remove a already defined threshold from the list of threshold, use the minus icon on the right side of theparticular threshold.
• When everything is set up properly use the “Save Indicator” action to save the indicator and go back to the examdetails page.
• Back in the exam details page, you can check if your indicator is in the list and all thresholds are correctly setby going down to the indicators list of the exam.
Modify indicators
• Login as an exam administrator and go to the “Exam” page under the “Exam Administration” section.
• Use the filter to find the exam on that you have to change the supporter assignments.
• Double click the list entry of the exam to go to the exam details page. Check if you are on the right exam.
• Scroll down to the indicator section of the exam details page and find the indicator you want to modify.
• Double click on the indicator entry from the list to open the indicator edit page.
• In the indicator edit page modify the indicator for your new needs. Add / remove thresholds or change the nameor type of the indicator.
• To confirm your changes and save the indicator, use the “Save Indicator” action from the right action pane.
Delete an indicator
• Login as an exam administrator and go to the “Exam” page under the “Exam Administration” section.
• Use the filter to find the exam on that you have to change the supporter assignments.
• Double click the list entry of the exam to go to the exam details page. Check if you are on the right exam.
9.1. Table of Content 69

SEB Server User Guide
• Scroll down to the indicator section of the exam details page and find the indicator you want to delete.
• Select the indicator from the list ans use the “Delete Indicator” action from the right action pane to delete theindicator.
Automated SEB Restriction
If the corresponding LMS of an exam supports the automated SEB restriction feature, the SEB restriction can bemanaged within the exam details page. To navigate to the exam details page of an exam go to the “Exam” page underthe “Exam Administration”, find the specified exam in the list by using the list filter and double click on the list entryof the exam you want to open the details page.
In the exam details page you will see two action related to the SEB restriction feature on the right action pane.
Use the “Apply SEB Lock” on an exam that has not already locked the course for SEB on the LMS to do apply therestriction and lock the course or quiz for SEB access only. This will call the SEB course restriction API on the LMSand will send all information to lock the course on the LMS. On an exam where the restriction lock is already in place,use the “Release SEB Lock” action to remove the restriction in the LMS and unlock the course.
Note: If the exam is already running on import the system will automatically restrict the course on the LMS with theavailable restriction details.
Use the “SEB Restriction Details” action to open up a dialog to define all SEB restriction details that the LMS of theexam and its SEB course restriction API is supporting. There are two global restriction details that are SEB specificand should be supported by every LMS that serves a course restriction API for SEB. The Config Key and the BrowserExam Key. The Config Key is automatically generated by the exam configuration that is applied to the exam. And theBrowser Exam Key can be applied within a comma separated list if needed.
70 Chapter 9. SEB Server User Guide

SEB Server User Guide
SEB restriction on Open edX
To be able to use the SEB restriction feature with a Open edX LMS, you need to install the SEB Open edX pluginfrom eduNEXT. Please consult the documentation for installing the SEB Open edX plugin as well as for the use of alladditional supported restriction attributes.
Note: If you change the attached exam configuration either by changing the attachment or by changing the attributesof a attached exam configuration for an exam that has the SEB restriction in place, the Config Key generated from theexam config that is also changing, will automatically be updated on the LMS. Therefore such an action that triggersan update may take some more time to complete as when the restriction is not in place.
Use Cases
Modify SEB restriction details (Open edX)
• Login as an exam administrator and go to the “Exam” page under the “Exam Administration” section.
• Use the filter to find the exam on that you have to change the supporter assignments.
• Double click the list entry of the exam to go to the exam details page. Check if you are on the right exam.
• Use the “SEB Restriction Details” action from the right action pane to open the restriction details dialog.
• In the restriction details dialog you will see all supported restriction attributes and you can define the restrictionfor your needs.
• To apply the new restriction details use the “OK” action of the dialog or use the “Cancel” action to abort andclose the dialog.
• When the SEB restriction is active on the LMS, the system will automatically update the SEB restriction withthe new details on the LMS.
• If the SEB restriction is not active in this moment, the details will be saved and applied when the restriction isactivated.
9.1. Table of Content 71

SEB Server User Guide
Apply automated SEB restriction (Open edX)
• Login as an exam administrator and go to the “Exam” page under the “Exam Administration” section.
• Use the filter to find the exam on that you have to change the supporter assignments.
• Double click the list entry of the exam to go to the exam details page. Check if you are on the right exam.
• Use the “Apply SEB Lock” action from the right action pane to activate the SEB restriction lock for this courseon the LMS.
• Use the “Release SEB Lock” action from the right action pane to deactivate the SEB restriction lock for thiscourse on the LMS.
Note: If a SEB restriction lock is active on the LMS, every change on the exam or related components that willaffect a change on the restriction details will automatically be updated on the LMS. You don’t have to apply the SEBrestriction lock again for update.
Live Proctoring
To be able to use the integrated live proctoring feature with SEB and SEB Server you need an external meeting servicethat can be used by the SEB Server to automatically create meetings. If this feature is enabled, you are able to setup alive proctoring service for a specified exam that can be used in the monitoring later on while the exam is running andSEB clients are connected.
Note: This feature is still in a prototype state and not all functionality meight work as expected.
To be able to use the live proctoring features within SEB Server you need a external meeting service that scales outfor the need. Currently supported is Jitsi Meet with JWT token authentication enabled. A Zoom meeting serviceintegration is planed for a future release of SEB Server. To setup and configure a Jitsi Meet service for testing you canrefer to the Docker installation documentation
To setup a live proctoring service for an exam, go to the view page of the exam and use the “Proctoring Settings”action on the right action pain to open up the proctoring settings dialog.
72 Chapter 9. SEB Server User Guide

SEB Server User Guide
Within the proctoring settings dialog you are able switch the service on and off by using the “Proctoring enabled”checkbox. You also see if the proctoring service is enabled within the action icon that is either an eye when activeor a slashed eye when not active. To define and bind a service you have to chose a service type from the availableservice types. And you need to give the API access credentials like “Application Key” and “Secret” for the externalmeeting service. SEB Server will then try to connect to the meeting service with these credentials to automaticallycreate meetings/rooms for proctoring. Within the “Collecting Room Size” field you can define the number of maximalparticipants that shall be collected within one proctoring room. SEB Server will automatically create these collectingrooms while SEB clients are connecting to the running exam in the monitoring view.
After you have all the settings set, use “OK” to confirm the settings. SEB Server will then try to connect to the meetingservice with the given settings and check the access.
Another part of proctoring settings can be found in the “Exam Configuration” “SEB Settings”. There is a new tab withthe name “Proctoring” where all SEB settings for proctoring are available. These settings are directly used by a SEBclient that supports the proctoring feature.
9.1. Table of Content 73

SEB Server User Guide
9.1.7 Exam Monitoring
A key feature of the SEB Server is the ability to overview and monitor SEB clients that are connected to the SEB Serverand participate in a running exam. It is also possible to interact with individual SEB clients that are connected andsend them instructions, e.g.: to quit and reload for example. But the main focus lies on monitoring and the SEB Serverdon’t take automated actions but always only shows incidents as they are defined by indicators to a exam supporter. Aexam supporter then can take action.
As an exam supporter you see all running exams where you have been assigned to by an exam administrator in a list.
74 Chapter 9. SEB Server User Guide

SEB Server User Guide
To navigate to this list click on the “Running Exams” menu within the “Monitoring” category. And you will see thelist with the name of the exam, the type and start- and end-time of the exam. If the exam you looking for is not on thelist, please check the start-time filter and make sure that it is set before the start-time of the exam. If not, use the filterto set the date before the exams start-date and use the lens-symbol on the right to apply the new filter. If the exam youare looking for is still not on the list, please contact a exam administrator of your institution to get help and check ifyou are correctly assigned to the exam as an exam supporter.
To monitor an exam either double-click on the list entry of the exam or select the list entry and use the “Monitoring”action form the right action pane to navigate into the main page of exam monitoring.
On the the main page of exam monitoring you find a list of all SEB client connections that has been connected to theexam since the exam is running. There are some filter switches on the right action pane that may hide some canceledand/or closed SEB connections but you should see at least all active connections instantly.
The list is automatically sorted in the way that SEB connections with incidents came to the top of the list and are thensorted by the “User Name or Session” identifier criteria. The general SEB client connection attributes are:
• User Name or Session The user account or user session identifier sent by the LMS to the SEB client and fromSEB client to the SEB Server. This identifier may vary depending on the LMS that is involved. For Open edXit is the user account identifier (username).
• IP Address The IP address of the device the connected SEB client is running.
• Status The status of the SEB client connection.
This general attributes are followed by the indicator attributes of all indicator defined by the exam. The column nameof an indicator is the name of the indicator defines in the exam and the cell shows the measured value of the indicatorfor each SEB client connection and the cell is tinted in the color of the reached threshold also defined for each indicatoron the exam.
Instructions
Instructions are actions applied to one or more SEB client connections that also can apply a signal to a active SEBClient connection to instruct the SEB client to do a particular action on client side. In the monitoring view you can
9.1. Table of Content 75

SEB Server User Guide
select one ore more list entries with usual list (multi)selection by holding Ctrl or Shift key plus right mouse click(s).Currently there are two instructions.
• Quit SEB Client Sends a quit instruction to the SEB Client to quit the session. This can be applied to all activeSEB client connection with the “Quit all SEB Clients” action from the right action pane or to all selected SEBclient connections with the “Quit Selected SEB Clients” action.
• Mark As Canceled Can be applied to all inactive SEB client connections to enforce the inactive SEB clientconnection to “Canceled” state. This can be used to mark and remove inactive SEB client connection you don’twant to have on the main monitoring board anymore when the filter for canceled SEB client connections is setto hide.
Filter
There are some filter to hide/show SEB client connection of in particular states. These are located in the right actionpane has the name of the filter action that will be performed on click and the name of the effected connection status.With this actions you are able to toggle between hide and show SEB client connection of a particular state.
• Show/Hide Closed Use this to show or hide all SEB client connections that are currently in the “Closed” state.
• Show/Hide Requested Use this to show or hide all SEB client connections that are currently in the “Requested”state and are not responding anymore.
• Show/Hide Canceled Use this to show or hide all SEB client connections that are currently in the “Canceled”state.
Note: When a certain state filter is set to hide and a particular SEB client connection switches into that state, it willautomatically be hiding from the list.
Detailed View
To view more details of a particular SEB client connection either select the SEB client connection entry from the listand use the “View Details” action from the right action pane or just double-click the SEB client connection entry fromthe list. In the details view you also see all the attributes in a form and additional a list of all events and logs the SEBclient has sent to the SEB Server for this session so far.
76 Chapter 9. SEB Server User Guide

SEB Server User Guide
The table shows the event type that for all log-events is the log-level, The text and a value that has been sent with theevent. The Value may be empty and marked as “Not a Number” (NaN). In this table we also have the client- and theserver-time of the event. The client-time is the time the SEB client sends along with the event to the SEB Server andthe server time is the time the SEB Server got the event. With this it is also possible to see or overview temporarynetwork latency or other irregularities, when this two time values differs much.
In the detail view you are also able to use the instructions “Quit SEB Client” and “Mark as Canceled” for the selectedSEB client connection.
Live Proctoring
When the exam live proctoring feature is enabled for the running exam (see Live Proctoring), SEB Server will auto-matically create and collect connected SEB clients into so called collecting rooms. The size of this collecting roomscan be defined within the proctoring settings in the exam. One ore more proctor can then open such a collecting roomand SEB Server will join the proctor to the meeting where the participants of this room can be seen.
9.1. Table of Content 77

SEB Server User Guide
Within a live proctoring window you can user the enabled features of the used meeting service. And you are able tocommunicate with the SEB clients by using one or more of the following features:
• Start Audio Broadcast Will enforce the SEB clients within the particular room to enable receive audio and aproctor can speak to the students that are in the meeting.
• Start Video Broadcast Will enforce the SEB clients within the particular room to enable receive audio andvideo and proctor is shown to the students that are in the meeting and can speak to them as well.
• Enable Chat Will enforce the SEB clients within the particular room to enable the chat feature and a proctor isable to chat with all students in the meeting.
78 Chapter 9. SEB Server User Guide

SEB Server User Guide
Town-hall Feature
Beside the usual collecting room, there is a town-hall room feature. By using the “Open Townhall” action from theright action pane, SEB Server enforce all SEB clients that are in collecting rooms as well as new connecting SEBclients to leave their current meeting and join the town-hall meeting for as long as the town-hall is active. Withinthe town-hall a proctor has the same features as in the collecting room but can connect to all participants at the sametime. When the town-hall is closed all connected SEB clients are enforced to leave the town-room and go back to itscollecting room meetings again.
Single Room Feature
Another live proctoring feature can be found in the detailed monitoring view of one particular SEB client connection.The single room features allows a proctor to connect to a single participant and being able to view or communicationwith just this one participant. You can initiate this single room connection by using the “Single Room Proctoring”action on the right action pane. SEB Server will then enforce the involved SEB client to leave its collecting room andjoin a newly created room with the proctor. Within the single room a proctor has the same features as in the collectingroom to communicate with the student or participant. When the single room is closed the connected SEB clients isenforced to leave the single room and go back to its collecting room meetings again.
9.1. Table of Content 79

SEB Server User Guide
All SEB Client Logs
As an exam administrator as well as an exam supporter, you are able to search SEB client events for all exams thathave been run on the SEB Server and that you have access to within your user-account privilege settings. As an examsupporter you will only see the SEB client logs of the exams you are assigned to. To search all SEB client log events,go the the “Monitoring” section and click on the “SEB Client Logs” menu on the left menu pane. The SEB Serverwill show you a list of all SEB client logs ever happen and you have access to. You can filter and sort the list as usualby using the filter above to find all logs of an exam for example.
80 Chapter 9. SEB Server User Guide

SEB Server User Guide
To show a detailed view of a specific SEB client log, just double click on the list entry or select the specific list entryand use the “Show Details” action form the right action pane to open up a pop-up containing all related informationabout the SEB client log event.
Currently there is no export functionality to export all interessting SEB client logs to a CSV table for example. Butsuch a feature will probably come with a next version of SEB Server.
9.1.8 Troubleshooting
This page’s purpose is to collect frequently ask questions, problems and workarounds that are reported and known.There shall be at least a problem description, an optional explanation if needed, a solution description and the SEBServer version and domain information. For Example:
• Version : 1.0.0
• Domain : Exam Administration / Exam / Indicator
• Problem : This is an example problem description.
• Explanation : An explanation is not mandatory but shall be provided if you want to give some backgroundinformation to the problem.
• Solution : A description of the solution, workaround or upcoming fixes.
9.1. Table of Content 81