
SDK Manual - smarttv-alliance.org · - 6 - 3 System requirements, installation and usage 3.1 System...
43
Smart TV Alliance inc. 2012-2016 All rights are reserved. Reproduction or transmission in whole or in part, in any form or by any means, electronic, mechanical or otherwise, is prohibited without the prior written consent of the copyright owner SDK Manual Status: Final Version: 5.0 Date: Jan 15, 2016 Author: Smart TV Alliance inc. Category: Released Reference: SDKMAN
Transcript of SDK Manual - smarttv-alliance.org · - 6 - 3 System requirements, installation and usage 3.1 System...
Smart TV Alliance inc. 2012-2016 All rights are reserved. Reproduction or transmission in whole or in part, in any form or by any means, electronic, mechanical or otherwise, is prohibited without the prior written consent of the copyright owner
SDK Manual
Status: Final Version: 5.0 Date: Jan 15, 2016 Author: Smart TV Alliance inc. Category: Released Reference: SDKMAN

- 2 -
1 CHANGE HISTORY ....................................................................................................................... 3
2 INTRODUCTION ............................................................................................................................ 4
2.1 OVERVIEW ................................................................................................................................ 4 2.2 EMULATOR VIDEO/AUDIO FUNCTIONALITY .................................................................................... 5 2.3 DEFINITIONS ............................................................................................................................. 5
3 SYSTEM REQUIREMENTS, INSTALLATION AND USAGE ........................................................ 6
3.1 SYSTEM REQUIREMENTS ............................................................................................................ 6 3.2 INSTALLATION DETAILS ............................................................................................................... 6
3.2.1 Overall .............................................................................................................................. 6 3.2.2 Windows (7/8/10) ............................................................................................................. 6 3.2.3 Mac OS X (10.5+) ............................................................................................................ 7 3.2.4 Ubuntu Linux (10+) .......................................................................................................... 8 3.2.5 Open Source .................................................................................................................... 9 3.2.6 IDE Usage ........................................................................................................................ 9 3.2.7 Project creation basics ..................................................................................................... 9 3.2.8 Creating a dynamic project ............................................................................................ 11
3.2.8.1 Local Server configuration (dynamic project) ........................................................................... 11 3.2.8.2 Remote Server configuration (dynamic project) ....................................................................... 13
3.2.9 Importing Sample Code ................................................................................................. 14 3.2.10 Deploy to SDK (static/dynamic project) ......................................................................... 14 3.2.11 Code completion ............................................................................................................ 17 3.2.12 Code snippets ................................................................................................................ 19 3.2.13 Code validation .............................................................................................................. 19 3.2.14 Validation without the IDE .............................................................................................. 22 3.2.15 Console view.................................................................................................................. 24
3.3 EMULATOR USAGE ................................................................................................................... 26 3.3.1 Main menu ..................................................................................................................... 26 3.3.2 Settings .......................................................................................................................... 27
3.3.2.1 Emulator Selection ................................................................................................................... 27 3.3.2.2 Network Settings ...................................................................................................................... 29 3.3.2.3 Screen ..................................................................................................................................... 29
3.3.3 Add URL ........................................................................................................................ 30 3.3.4 Browser .......................................................................................................................... 31 3.3.5 UI issues ........................................................................................................................ 31 3.3.6 Debugging ...................................................................................................................... 31 3.3.7 Local Debugging with Webkit ........................................................................................ 31 3.3.8 Remote Debugging with Webkit .................................................................................... 31 3.3.9 Testing video content ..................................................................................................... 33
3.4 DIAL SERVICE AND CLIENT APPLICATIONS .................................................................................. 34 3.4.1 IOS DIAL client .............................................................................................................. 34
3.4.1.1 Build and Install ....................................................................................................................... 34 3.4.2 Android DIAL client ........................................................................................................ 36
3.4.2.1 Build and Install ....................................................................................................................... 36 3.4.2.2 Usage ...................................................................................................................................... 36
3.4.3 DIAL Testing ................................................................................................................... 38 3.5 SMART HOME EMULATOR ......................................................................................................... 40
3.5.1 Smart Home emulator configuration .............................................................................. 40 3.5.2 Adding an endpoint ........................................................................................................ 40 3.5.3 Adding a device to an endpoint ..................................................................................... 41 3.5.4 Configure a device ......................................................................................................... 41 3.5.5 Smart Home application ................................................................................................ 41
3.6 TROUBLESHOOTING ................................................................................................................. 42

- 3 -
1 Change History
Version Date Changes
1.0 2012-04-27
2.0 2013-03-15 Final for version 2.0
2.5 2013-08-27 Final for version 2.5
3.0 2014-01-23 Final for version 3.0
4.0 2015-02-04 Final for version 4.0
5.0 2016-01-15 Final for version 5.0
- 4 -
2 Introduction
2.1 Overview
Welcome to the Smart TV platform Software Development Kit (SDK). This kit will enable you to easily develop your App for the Smart TV platform. It supports Smart TV Alliance Specification 5.0, Smart TV Alliance Specification 4.0, Smart TV Alliance Specification 3.0, Smart TV Alliance Specification 2.5, and Smart TV Alliance Specification 2.0 application development. The SDK consists of the following parts:
this manual
other documentation regarding the Smart TV platform: guidelines and requirements, API reference, sample code (referenced by the guidelines).
SDK software, a package for one of the supported operating systems
example applications, which show a possible Smart TV platform application
multiscreen applications for Android and IOS that interact with the Smart TV Platform Finally, the SDK is targeted towards technical development. As such, some tasks like installing or using the SDK require some technical skill. A note with regards to the SDK performance: the SDK verifies your application against the Smart TV Alliance specification on regular PC hardware, it does not represent the actual performance of a Smart TV Alliance TV Device. An actual Smart TV Alliance TV Device, while adhering to the same specification, is limited with regards to resources and as such does not perform as fast as a PC. Please refer to the Smart TV Alliance guidelines which provide best practices to make your app perform well on the actual TV devices. This manual describes the software that is included, it consists largely of the following components:
Eclipse IDE - the integrated development environment in which you can easily develop your App, providing code assistance and validation features.
A code sample - included inside the IDE is a sample application that gives you a head start in the development of your new App.
Emulator - VirtualBox based virtual machine containing the actual TV device browsers - allows you to test your App with nearly the same feature set as the actual TV devices for quick feedback.
Debug tooling - allows you to debug your app by means of e.g. log viewing and Javascript tracing.
App validation – stand alone application (code) validation tooling to check your App against the Smart TV Alliance Specification
For best results, please carefully study this manual before and during your use of the SDK. Note: Smart TV Alliance SDK 5.0 replaces Smart TV Alliance SDK 4.0, SDK 3.0, SDK 2.5 and SDK 2.0 - the SDK 5.0 supports creating and validating applications for Smart TV Alliance Specification version 5.0, Smart TV Alliance Specification version 4.0, Smart TV Alliance Specification version 3.0, Smart TV Alliance Specification version 2.5 (which adds DIAL multiscreen) as well as Specification version 2.0. The Smart TV Alliance Specification is available in multiple versions. In general the lower version of the Specification has fewer features but a wider install-base. It is suggested to target this version (minimum version 2.0) of the specification for your application to assure the widest reach. To use advanced features of newer versions of the specification like multiscreen (supported from specification 2.5), you can use a specific identification method (refer to the developer guidelines documentation) to enable these features for specific TV devices complying with that Smart TV Alliance Specification version. From specification version 3.0 onwards you can use the capability mechanism to detect some optional features of the Smart TV Platform - this mechanism is also emulated inside the SDK.
- 5 -
2.2 Emulator video/audio functionality
This version of the SDK offers the following support for video and audio software-based emulation. Refer to the Smart TV Alliance specification for further details:
Streaming emulation o HTTP 1.1 with Range request o HTTP Live Streaming o MPEG-DASH streaming (ISOBMFF Live profile - as further defined by HbbTV
version 1.5) o Smooth Streaming
Video emulation (including support for the optional multiple audio tracks) o AVC/H264 in MP4 container (.mp4) o AVC/H264 in MPEG2-TS container (.ts)
Audio emulation o HE-AAC o MP3 o AC-3
For all other formats as described in the specification, although a Smart TV application can use them, the SDK emulator currently does not offer the functionality to test these formats. The list of supported formats in the SDK emulator will expand with future updates of the SDK software, please regularly check the https://developers.smarttv-alliance.org website for updates on the SDK software. Please also note that software emulation can never exactly match the video/audio functionality of a hardware platform (also refer to 3.3.9 ). Note that the AC-3 support is in “emulation mode,” which inserts a short silence every 3 minutes, which will not apply on actual televisions.
2.3 Definitions
DOM Document Object Model GIF Graphics Interchange Format JPEG Joint Photographic Experts Group (compression format) PNG Portable Network Graphics SDK Software Development Kit HTML HyperText Markup Language
- 6 -
3 System requirements, installation and usage
3.1 System requirements
The SDK software runs on a number of platforms. The platform has to conform to the following requirements:
Operating system (X86/AMD64 only): o Windows 7, Windows 8, Windows 10 o Mac OS X 10.5+ o Ubuntu 10+
Minimum memory 1.5 GB
2GHz X86/AMD64 based processor (AMD 64X2, Intel Core i5/i7 series, Core 2 Duo), i5 series preferred ; with preferably support for Intel VT-x or AMD-V technology
Resolution of 1280X1024 @ 32 bits - less is supported, but only scaled down
8 GB free disk space
Network connection (wireless or wired) (note: the OSX Mavericks/10.9 thunderbolt network interface is unsupported)
Java Runtime Environment: o Windows/Linux - JRE6 (1.6.X, newer versions are unsupported).
Download location: http://www.oracle.com/technetwork/java/javasebusiness/downloads/java-archive-downloads-javase6-419409.html#jre-6u30-oth-JPR
Make sure you install the 32-bit version for Windows) For Ubuntu Linux, please read the instructions below.
o Mac OSX – JRE6 or JRE7 if running Mac OSX Mountain Lion+ (newer JRE versions are unsupported)
Download location: JRE7 can be found at http://www.oracle.com/technetwork/java/javase/downloads/jre7-downloads-1880261.html
Virtualbox 5.0+ on linux, or 5.0+ (will be installed if not already existing on your system for Windows and Mac OS X only) - uninstall other/older versions prior to installation of the SDK.
o Download location (needed for Ubuntu/Linux only): https://www.virtualbox.org/wiki/Linux_Downloads
This manual is divided into separate parts for each supported operating system.
3.2 Installation Details
3.2.1 Overall
As a part of the SDK is based on a virtual machine, performance is heavily dependent upon the host machine capabilities. Typically, one of the influencing factors for performance is the availability of 'virtualization technology' such as Intel VT-x or AMD-V. In general, this needs to be enabled in the system bios after which a cold shutdown (battery removal) can be needed to apply the setting properly, depending on the system used. Not enabling or supporting virtualization technology will lead to diminished performance in most cases.
3.2.2 Windows (7/8/10)
For the installation, the "Smart_TV_Alliance_SDK_Win_X.Y.Z.exe" package is required.

- 7 -
1. Verify your system meets the requirements. Especially verify if you have installed the correct version of the Java Runtime Environment (see system requirements for download locations). Without this the installation will fail. Also verify if you have uninstalled older/other VirtualBox installations first - a new version will be installed automatically - this is required. Some virus-scanners may cause issues with the VirtualBox installation - it is recommended to temporarily disable these during the installation.
2. Download the installer package, "Smart_TV_Alliance_SDK_Win_X.Y.Z.exe" (e.g. "Smart_TV_Alliance_SDK_Win_5.0.0.exe")
3. Open the installer package by double-clicking on the exe file. 4. Follow the installation steps, the default installation directory is
"C:\Program Files\STA SDK" (or "C:\Program Files(X86)" for Windows 7/8/10) 5. When VirtualBox 5.0+ has not been installed on the system, a request will pop up asking if it
should be installed. VirtualBox is required for installation, answering no will give a warning and the emulator will not run. (Note: if your system uses a Proxy server, there could be issues downloading VirtualBox, please download and install VirtualBox prior to starting the SDK)
6. After the installation, you can find the program under "Start\Programs\Smart TV Alliance" Note: for Windows 7, 8 or 10 installation you will be required to have administrative privileges to install the SDK. A working Internet connection is required to download and install VirtualBox. Use of a proxy is not supported when installing the SDK. Default installation locations: Start Menu\Programs\Smart TV Alliance (STA SDK shortcuts) c:\Program Files\STA SDK\ (image files, Eclipse, sample app) Uninstallation: use (Start Menu\)Programs\Smart TV Alliance\Uninstall; note that any workspace you made under c:\Program Files (x86)\STA SDK\ will not be removed.
3.2.3 Mac OS X (10.5+)
For the installation, the "Smart_TV_Alliance_SDK_Mac_X.Y.Z.dmg" package is required.

- 8 -
1. Verify your system meets the requirements. Especially verify if you have installed the correct version of the Java Runtime Environment (see system requirements for download locations). Without this the installation will fail.
2. Download the installer package "Smart_TV_Alliance_SDK_Mac_X.Y.Z.dmg" (e.g. "Smart_TV_Alliance_SDK_Mac_5.0.0.dmg")
3. When clicking the dmg package, the disk image will get mounted and Finder will open the newly mounted folder in a new Window.
4. First install VirtualBox if not already installed on your system by opening the VirtualBox Installer package. This will install VirtualBox V5.0; if you have an older version you need to uninstall the included version instead by running the VirtualBox_Uninstall.Tool.
5. Drag and drop the Smart TV Alliance SDK.app to the Applications folder in Finder. Note that SDK 5.0 can be installed in parallel with SDK 1.0 and 2.0, but replaces SDK 2.5, SDK 3.0 and SDK 4.0 on OSX. When replacing SDK 2.5, SDK 3.0 or SDK 4.0 selecting “Keep Both” is unsupported.
6. Drag and drop the WebSamples dir to a folder of preference. 7. Click the Smart TV Alliance SDK.app from the Applications folder to start the SDK emulator
and Eclipse Uninstallation: Simply delete the Smart TV Alliance SDK.app from the Applications folder.
3.2.4 Ubuntu Linux (10+)
For the installation, the "Smart_TV_Alliance_SDK_Ubuntu_X.Y.Z.deb" package is required.
1. Verify your system meets the requirements. Especially verify if you have installed the correct version of VirtualBox 5.0+ (see system requirements for download locations) and default-jre. Without these the installation will fail.
- 9 -
2. Download the installer package "Smart_TV_Alliance_SDK_Ubuntu_X.Y.Z.deb" (e.g. "Smart_TV_Alliance_SDK_Ubuntu_5.0.0.deb"). The package works on both 32-bit and 64-bit versions of Ubuntu.
3. Ensure VirtualBox Manager application is not running during installation. 4. If you have installed previous versions of the SDK, you may have to remove the older SDK
first by either moving it out of place ('sudo mv /usr/share/sta-sdk /usr/share/sta-sdk.old') and optionally uninstalling it afterwards ('sudo dpkg -r sta-sdk').
5. Install the package from either the command line or e.g. GDebi Package Installer (for now, do not use Ubuntu Software Center): a. Commandline - use 'sudo dpkg -i <packagename>' b. GDebi - start gdebi-gtk and open/install the package
6. Follow the installation steps. 7. After installation you can find the Smart TV Alliance SDK 5.0 (or 'STA SDK') under
Applications/Programming/ Note: when installing the package through Ubuntu Software Center, a warning about the quality of the package can be returned in combination with some additional Lintian messages - this message can be safely ignored. Note: If after installing, some Eclipse IDE SDK plugin features are missing (such as Deploy to SDK), reinstall the SDK starting from step 4 above. Default installation locations: /usr/bin/run-sta-sdk (startup script) /usr/share/doc/sta-sdk/ (copyright, README and changelog) /usr/share/sta-sdk/ (image files, Eclipse, sample app) /usr/share/icons (icon files) /usr/share/applications (shortcut link) Uninstallation: Use e.g. Aptitude or Synaptic to uninstall the "sta-sdk" package. You may have to remove the /usr/share/sta-sdk folder manually afterwards for files created after installation.
3.2.5 Open Source
The STA SDK also consists of a number of Open Source support packages. The source code for these packages is available from the same download location as where you obtained the SDK binary installation. A separate license description document is available that lists the various licenses used in these Open Source packages.
3.2.6 IDE Usage
The Eclipse IDE is included in the release and includes special plugins to help with the app development process. There are two project types in the IDE:
Dynamic Web Project
Static Web Project Largely, the functionality you can use in both projects is the same. The difference applies mostly to the deployment options: the dynamic project is based on deployment to a Tomcat server, where the static project is based on deployment to the SDK emulator. What follows is a set of instructions on how to use the IDE plug-in for both project types. The window layout is the same for all Operating Systems - although file locations differ. Note: apps deployed to the SDK are required to have an index.html file for the SDK emulator to load them properly.
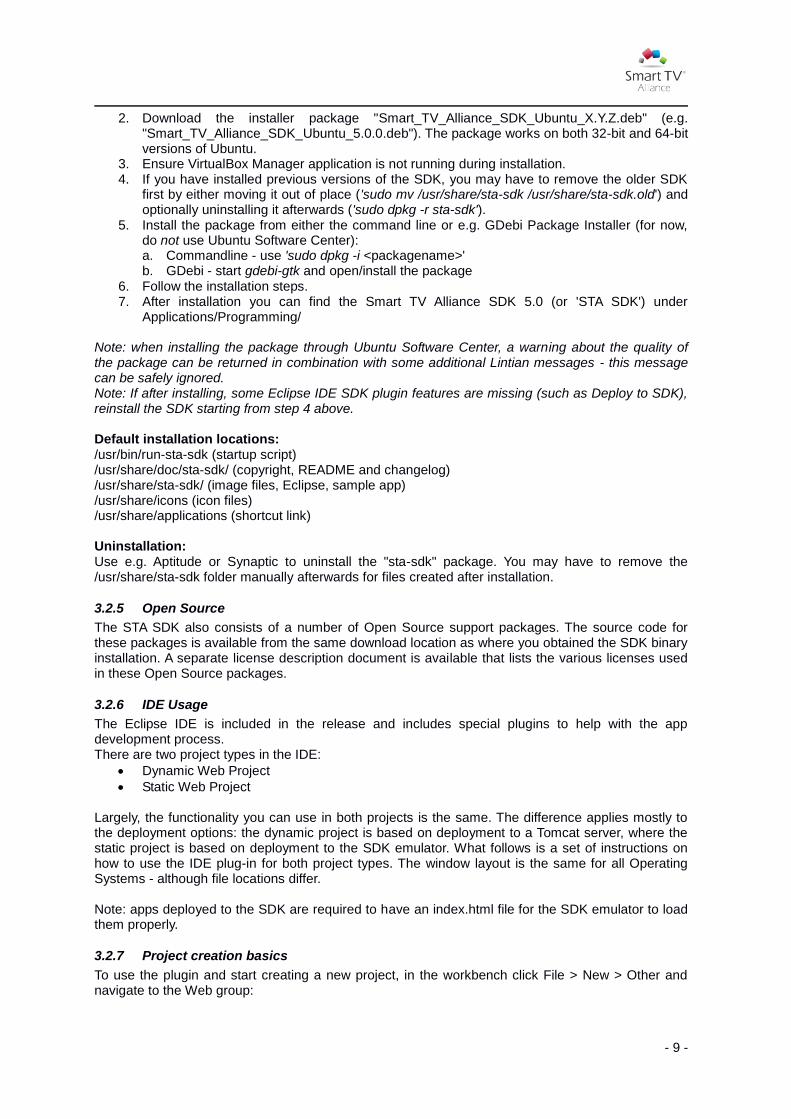
3.2.7 Project creation basics
To use the plugin and start creating a new project, in the workbench click File > New > Other and navigate to the Web group:
- 10 -
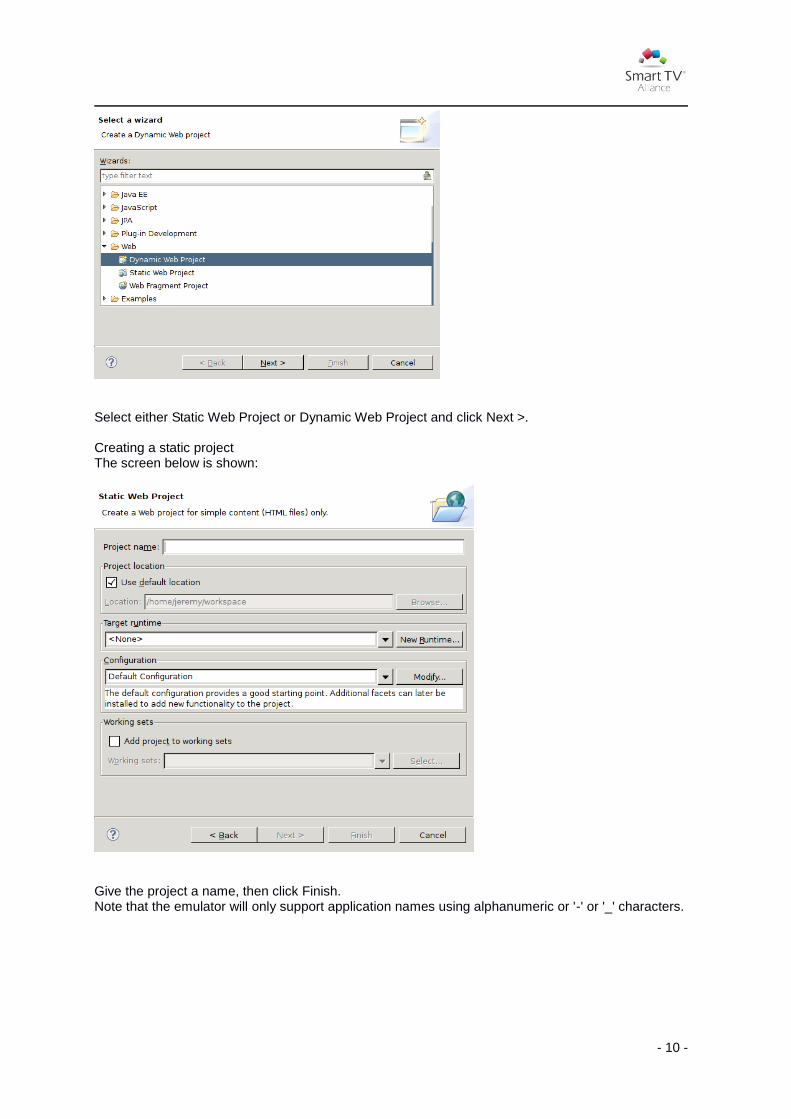
Select either Static Web Project or Dynamic Web Project and click Next >. Creating a static project The screen below is shown:
Give the project a name, then click Finish. Note that the emulator will only support application names using alphanumeric or '-' or '_' characters.

- 11 -
3.2.8 Creating a dynamic project
The screen below is shown:
Give a project name and click Finish Note that the emulator will only support application names using alphanumeric or '-' or '_' characters. In order to test a dynamic web project the content needs to be served by either a local tomcat server or a remote web server of some kind. For a remote web server SSH or SFTP access to the server and the URL or IP address of the server is required. For a local tomcat server tomcat is required on the host machine. The next two sections describe setting up the Eclipse project to use a local or remote web server.
3.2.8.1 Local Server configuration (dynamic project)
To use a local Tomcat server open the [Servers] tab/view by choosing Window > Show View > Other > Servers. Right-click and choose New > Server A new Server window appears. Select [Tomcat v7.0 Server]. If you want to add a new server, enter the new server name. Otherwise, enter the existing server name.
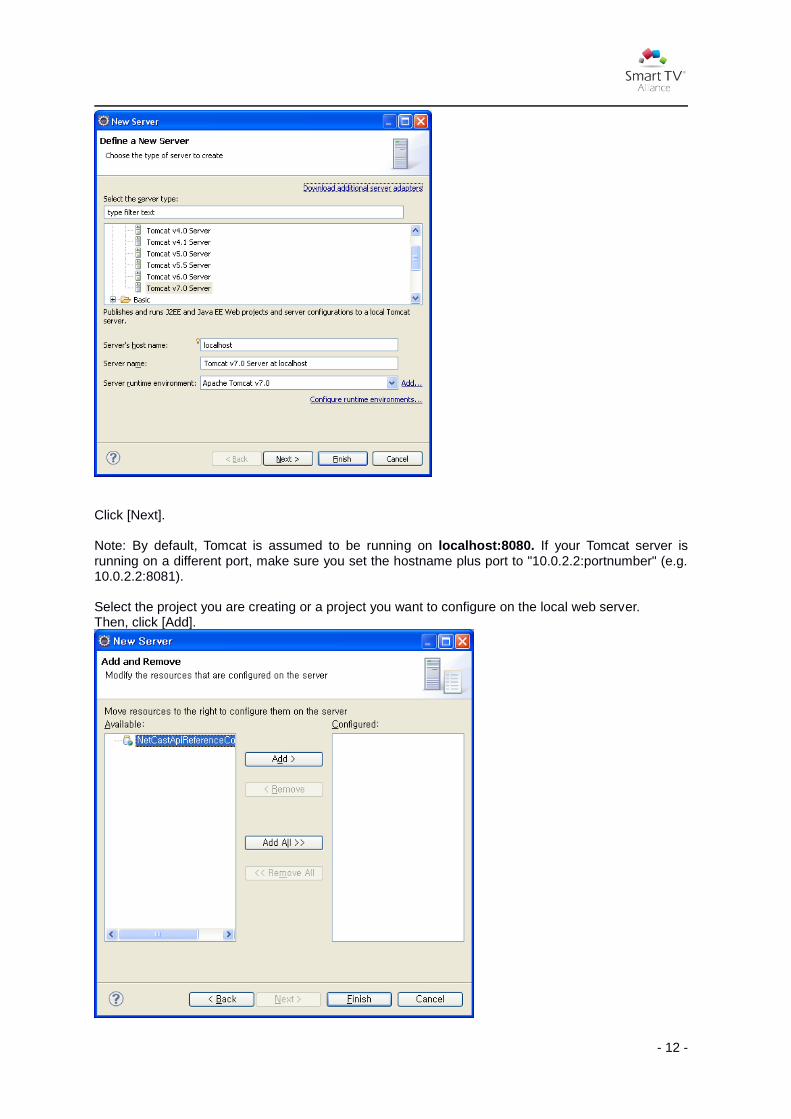
- 12 -
Click [Next]. Note: By default, Tomcat is assumed to be running on localhost:8080. If your Tomcat server is running on a different port, make sure you set the hostname plus port to "10.0.2.2:portnumber" (e.g. 10.0.2.2:8081). Select the project you are creating or a project you want to configure on the local web server. Then, click [Add].

- 13 -
The project is then configured on the server.
After you click finish, the project is opened and a new server is added successfully. Check that the project is configured on the server in the [Servers] tab/view.
In order to test a local tomcat server application in the SDK you will need to enter the URL as http://10.0.2.2:portnumber/projectname/ where portnumber is the port tomcat is listening on and projectname is the Eclipse project name. Project names can not contain spaces. The project can be tested by viewing http://localhost:portnumber/projectname/ on the host machine's web browser.
3.2.8.2 Remote Server configuration (dynamic project)
In order to use a web server on a remote machine a new Remote Systems configuration will be required for Eclipse to sync files to it. SSH or SFTP access to the remote web server is required.
- 14 -
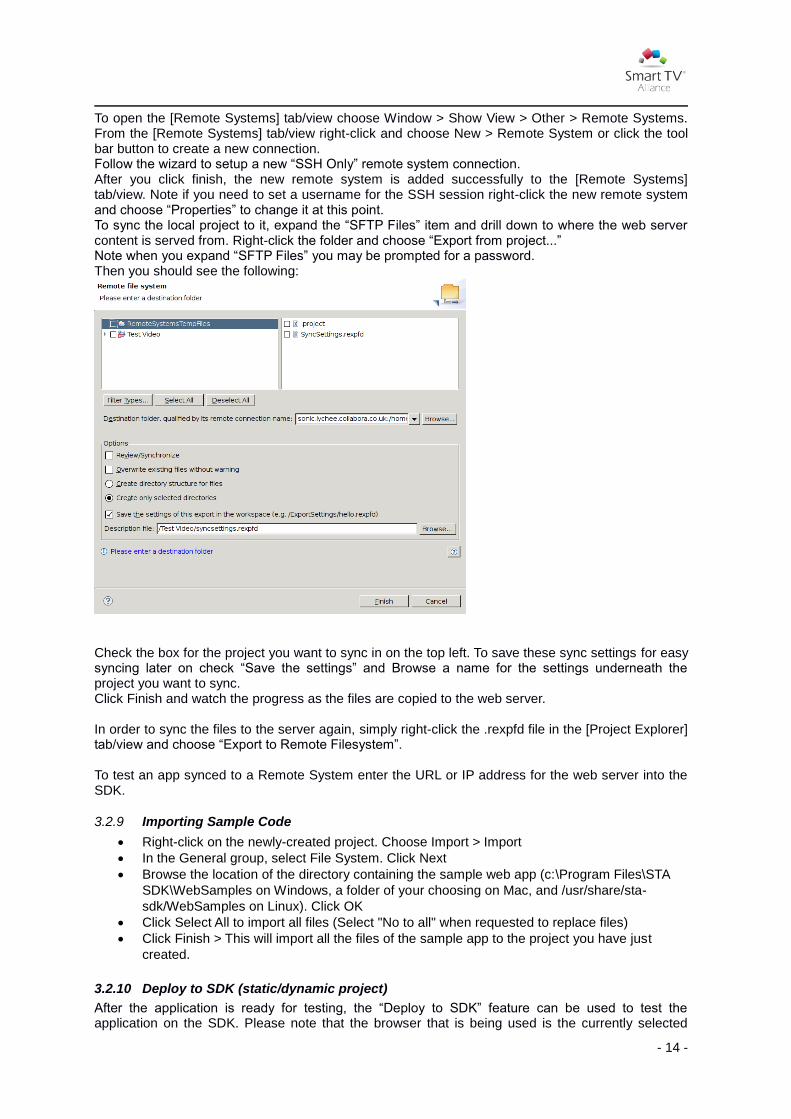
To open the [Remote Systems] tab/view choose Window > Show View > Other > Remote Systems. From the [Remote Systems] tab/view right-click and choose New > Remote System or click the tool bar button to create a new connection. Follow the wizard to setup a new “SSH Only” remote system connection. After you click finish, the new remote system is added successfully to the [Remote Systems] tab/view. Note if you need to set a username for the SSH session right-click the new remote system and choose “Properties” to change it at this point. To sync the local project to it, expand the “SFTP Files” item and drill down to where the web server content is served from. Right-click the folder and choose “Export from project...” Note when you expand “SFTP Files” you may be prompted for a password. Then you should see the following:
Check the box for the project you want to sync in on the top left. To save these sync settings for easy syncing later on check “Save the settings” and Browse a name for the settings underneath the project you want to sync. Click Finish and watch the progress as the files are copied to the web server. In order to sync the files to the server again, simply right-click the .rexpfd file in the [Project Explorer] tab/view and choose “Export to Remote Filesystem”. To test an app synced to a Remote System enter the URL or IP address for the web server into the SDK.
3.2.9 Importing Sample Code
Right-click on the newly-created project. Choose Import > Import
In the General group, select File System. Click Next
Browse the location of the directory containing the sample web app (c:\Program Files\STA
SDK\WebSamples on Windows, a folder of your choosing on Mac, and /usr/share/sta-
sdk/WebSamples on Linux). Click OK
Click Select All to import all files (Select "No to all" when requested to replace files)
Click Finish > This will import all the files of the sample app to the project you have just
created.
3.2.10 Deploy to SDK (static/dynamic project)
After the application is ready for testing, the “Deploy to SDK” feature can be used to test the application on the SDK. Please note that the browser that is being used is the currently selected
- 15 -
browser in the SDK. See below for instructions how to change the settings of the SDK to quickly change your browser type.
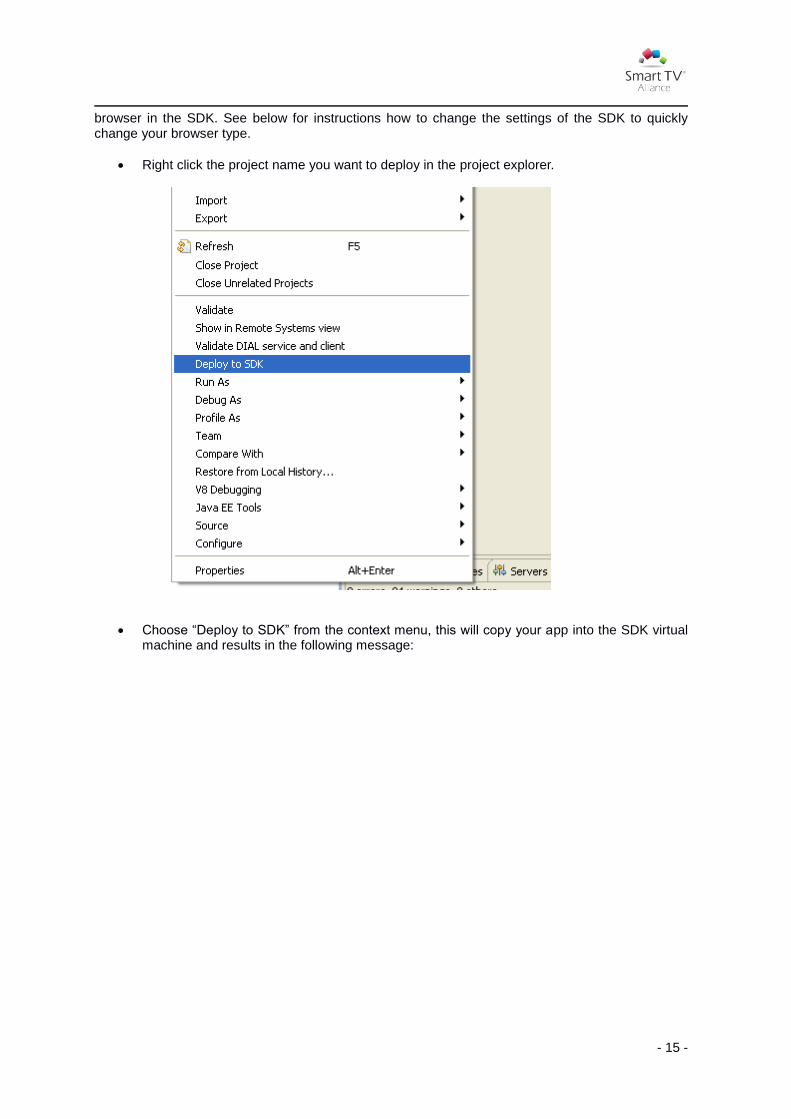
Right click the project name you want to deploy in the project explorer.
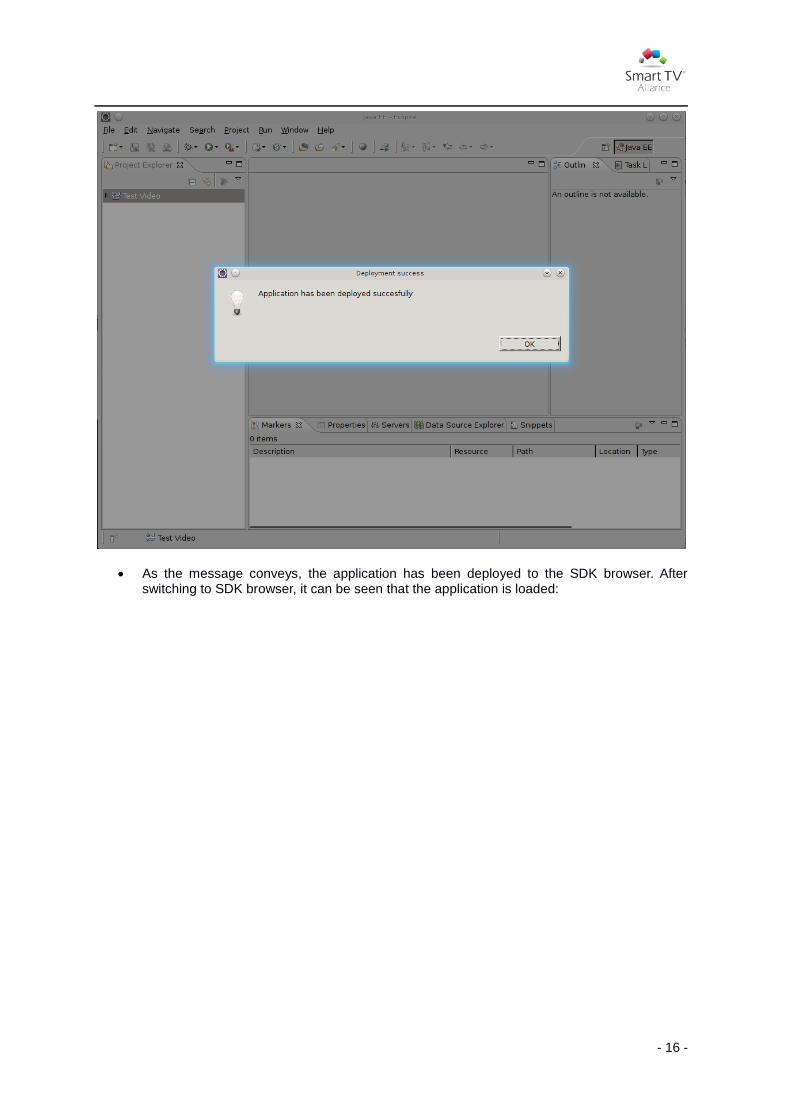
Choose “Deploy to SDK” from the context menu, this will copy your app into the SDK virtual machine and results in the following message:
- 16 -
As the message conveys, the application has been deployed to the SDK browser. After switching to SDK browser, it can be seen that the application is loaded:
- 17 -
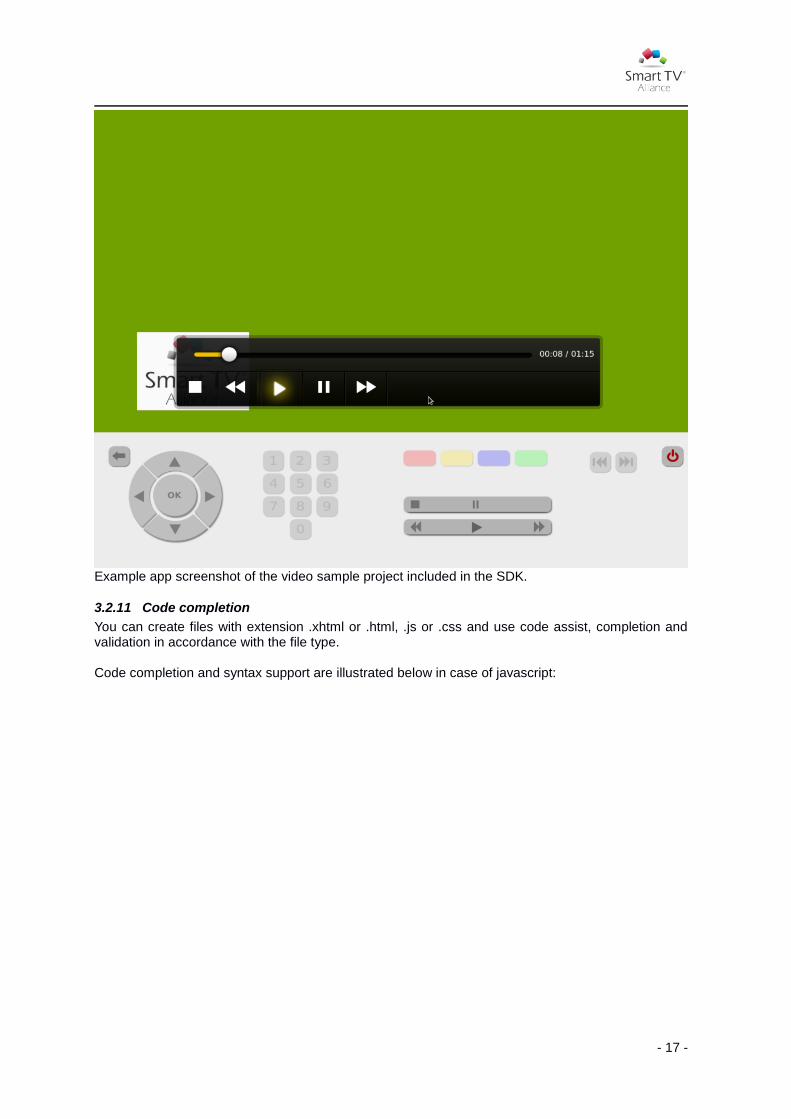
Example app screenshot of the video sample project included in the SDK.
3.2.11 Code completion
You can create files with extension .xhtml or .html, .js or .css and use code assist, completion and validation in accordance with the file type. Code completion and syntax support are illustrated below in case of javascript:

- 18 -
By typing Ctrl/Space in the editor a popup opens offering valid language options. The list of available options shortens with every character typed. By clicking an item in the popup an extra (yellow) help screen opens explaining the syntax of the selected item.

- 19 -
3.2.12 Code snippets
To insert code snippets, select the Snippets view, browse to a snippet and select (double click) to insert the snippet into the document that is currently open:
3.2.13 Code validation
Despite the presence of code assist / code completion or templates, there is no guarantee that the developer will not enter code that is incorrect. To force validation of your current document, right click and choose Validate.

- 20 -
To choose which version of the Smart TV Alliance specification to validate against, go to [Window > Preferences > Smart TV SDK > Validator]. Here you can choose the STA specification version and also specify a directory to save validation logs to for later viewing.
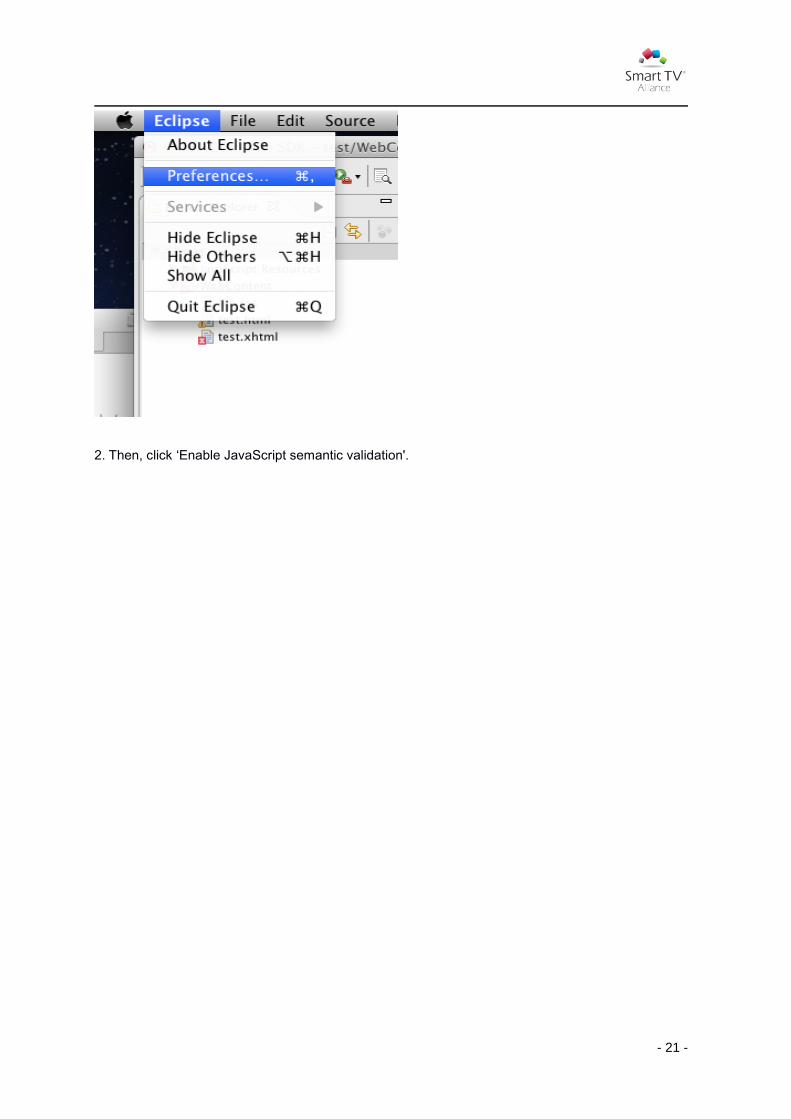
To enable Javascript runtime validation, follow the next steps: 1. Go to [Window] menu (under Mac OS X: [Eclipse]) and click [Preferences > JavaScript > Validator > Errors/Warnings].
- 21 -
2. Then, click ‘Enable JavaScript semantic validation'.

- 22 -
3. Click [OK]. To test app compliance with the Smart TV Alliance specification do the following:
1. Select one of the Javascript compliance check emulators from the Menu application as described in section 3.3.2.
2. Deploy the project to the emulator with Deploy to SDK as described in section 3.2.10 OR load the relevant URL in the emulator to debug an existing application.
3. Setup a debug configuration as described in section 3.3.8 and start debugging. 4. Exercise the application in the emulator and check for errors/warnings in the Problems view
OR (for an application that was loaded using a URL) in the Console view in Eclipse for errors/warnings found during the execution of a given code branch.
3.2.14 Validation without the IDE
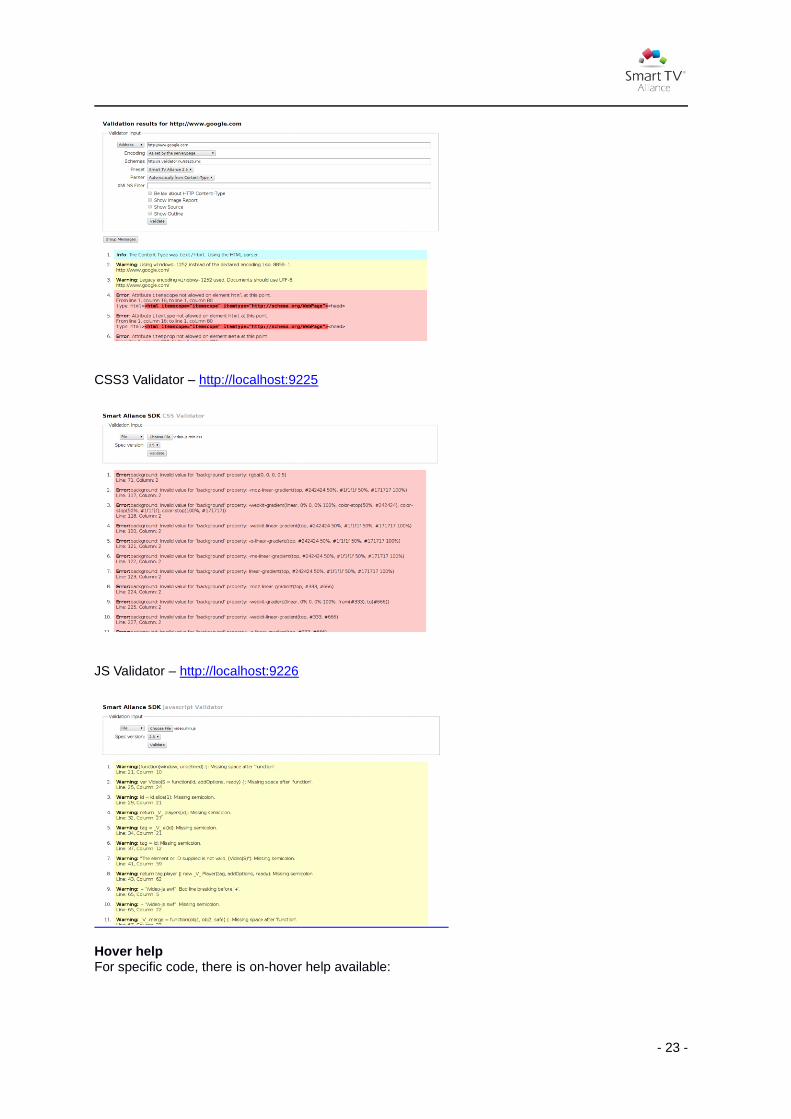
The included validators can be used outside of the Eclipse IDE by using a browser and visiting each validator's URL as noted below. Each Validator has an option to choose which STA spec to validate against. In the HTML5 validator it is called “Preset” in the others it is called “Spec”. Each validator has the option to validate a file uploaded or text pasted directly into the browser in a “Text Field” or “Text Area”. The HTML5 Validator can also validate a web URL.
HTML5 Validator – http://localhost:9224
- 23 -
CSS3 Validator – http://localhost:9225
JS Validator – http://localhost:9226
Hover help For specific code, there is on-hover help available:
- 24 -
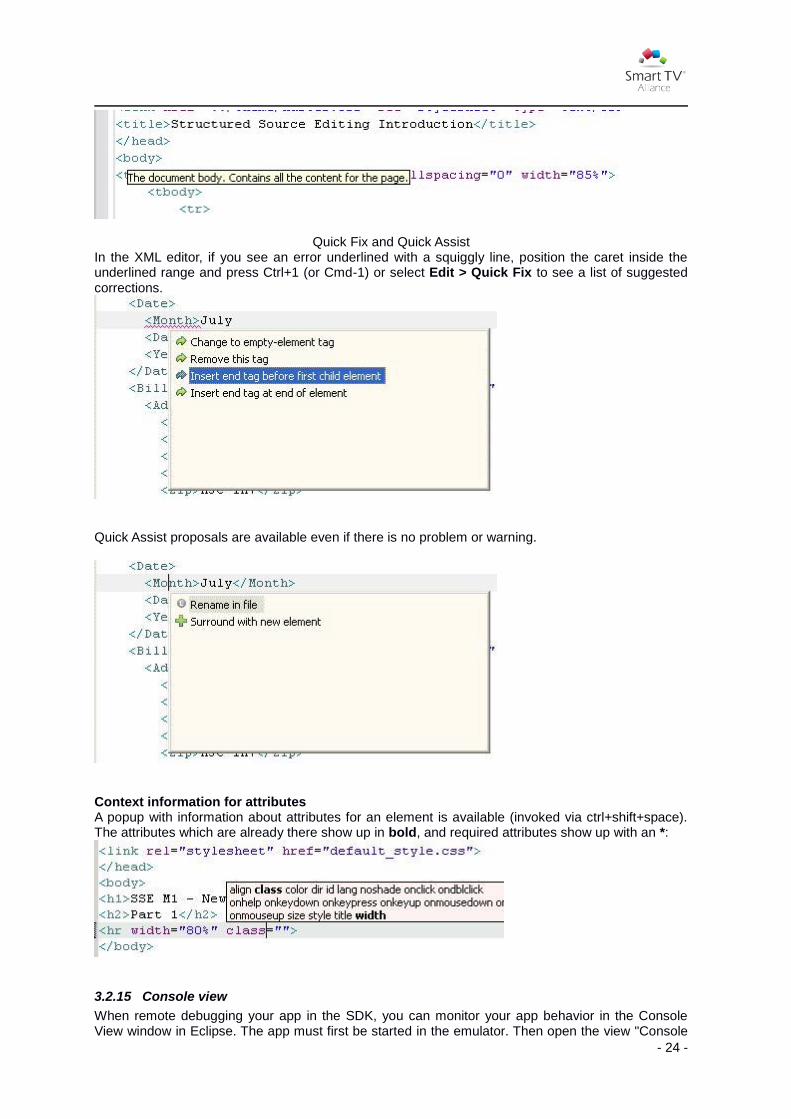
Quick Fix and Quick Assist In the XML editor, if you see an error underlined with a squiggly line, position the caret inside the underlined range and press Ctrl+1 (or Cmd-1) or select Edit > Quick Fix to see a list of suggested corrections.
Quick Assist proposals are available even if there is no problem or warning.
Context information for attributes A popup with information about attributes for an element is available (invoked via ctrl+shift+space). The attributes which are already there show up in bold, and required attributes show up with an *:
3.2.15 Console view
When remote debugging your app in the SDK, you can monitor your app behavior in the Console View window in Eclipse. The app must first be started in the emulator. Then open the view "Console

- 25 -
view" (or when it is not shown in the list of windows, go to Window/Show View/Console view) and on the tool bar of the view click on Display selected console and select the “Remote browser console” from the list. Note the Remote browser console will only be available if console.log has logged something in the running web app.
After starting a browser/emulator inside the SDK, you will see the log messages appear as above.
- 26 -
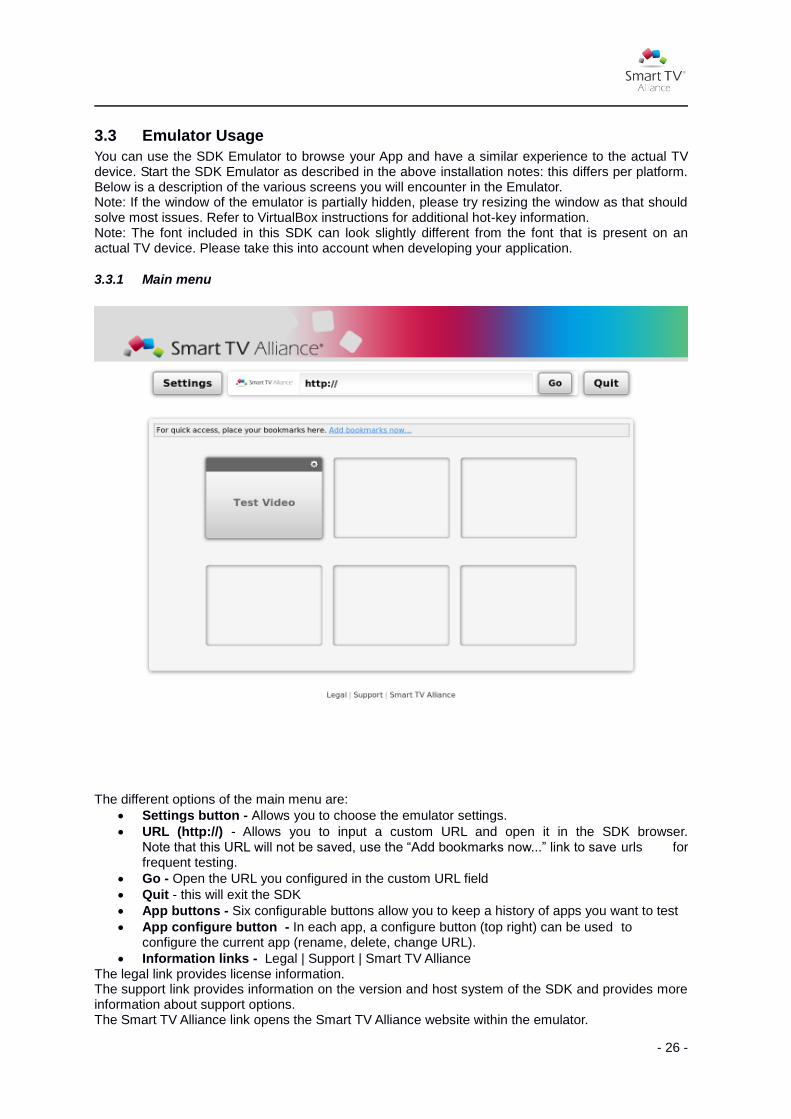
3.3 Emulator Usage
You can use the SDK Emulator to browse your App and have a similar experience to the actual TV device. Start the SDK Emulator as described in the above installation notes: this differs per platform. Below is a description of the various screens you will encounter in the Emulator. Note: If the window of the emulator is partially hidden, please try resizing the window as that should solve most issues. Refer to VirtualBox instructions for additional hot-key information. Note: The font included in this SDK can look slightly different from the font that is present on an actual TV device. Please take this into account when developing your application.
3.3.1 Main menu
The different options of the main menu are:
Settings button - Allows you to choose the emulator settings.
URL (http://) - Allows you to input a custom URL and open it in the SDK browser. Note that this URL will not be saved, use the “Add bookmarks now...” link to save urls for frequent testing.
Go - Open the URL you configured in the custom URL field
Quit - this will exit the SDK
App buttons - Six configurable buttons allow you to keep a history of apps you want to test
App configure button - In each app, a configure button (top right) can be used to configure the current app (rename, delete, change URL).
Information links - Legal | Support | Smart TV Alliance The legal link provides license information. The support link provides information on the version and host system of the SDK and provides more information about support options. The Smart TV Alliance link opens the Smart TV Alliance website within the emulator.
- 27 -
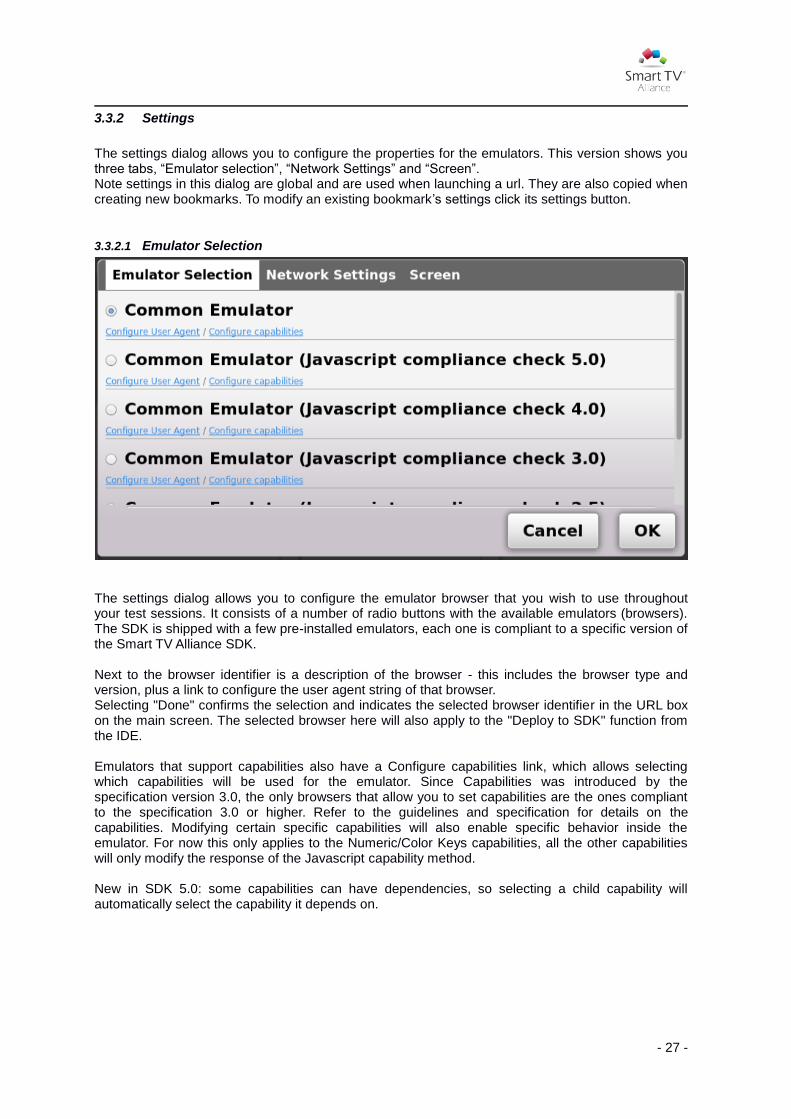
3.3.2 Settings
The settings dialog allows you to configure the properties for the emulators. This version shows you three tabs, “Emulator selection”, “Network Settings” and “Screen”. Note settings in this dialog are global and are used when launching a url. They are also copied when creating new bookmarks. To modify an existing bookmark’s settings click its settings button.
3.3.2.1 Emulator Selection
The settings dialog allows you to configure the emulator browser that you wish to use throughout your test sessions. It consists of a number of radio buttons with the available emulators (browsers). The SDK is shipped with a few pre-installed emulators, each one is compliant to a specific version of the Smart TV Alliance SDK. Next to the browser identifier is a description of the browser - this includes the browser type and version, plus a link to configure the user agent string of that browser. Selecting "Done" confirms the selection and indicates the selected browser identifier in the URL box on the main screen. The selected browser here will also apply to the "Deploy to SDK" function from the IDE. Emulators that support capabilities also have a Configure capabilities link, which allows selecting which capabilities will be used for the emulator. Since Capabilities was introduced by the specification version 3.0, the only browsers that allow you to set capabilities are the ones compliant to the specification 3.0 or higher. Refer to the guidelines and specification for details on the capabilities. Modifying certain specific capabilities will also enable specific behavior inside the emulator. For now this only applies to the Numeric/Color Keys capabilities, all the other capabilities will only modify the response of the Javascript capability method. New in SDK 5.0: some capabilities can have dependencies, so selecting a child capability will automatically select the capability it depends on.

- 28 -
- 29 -
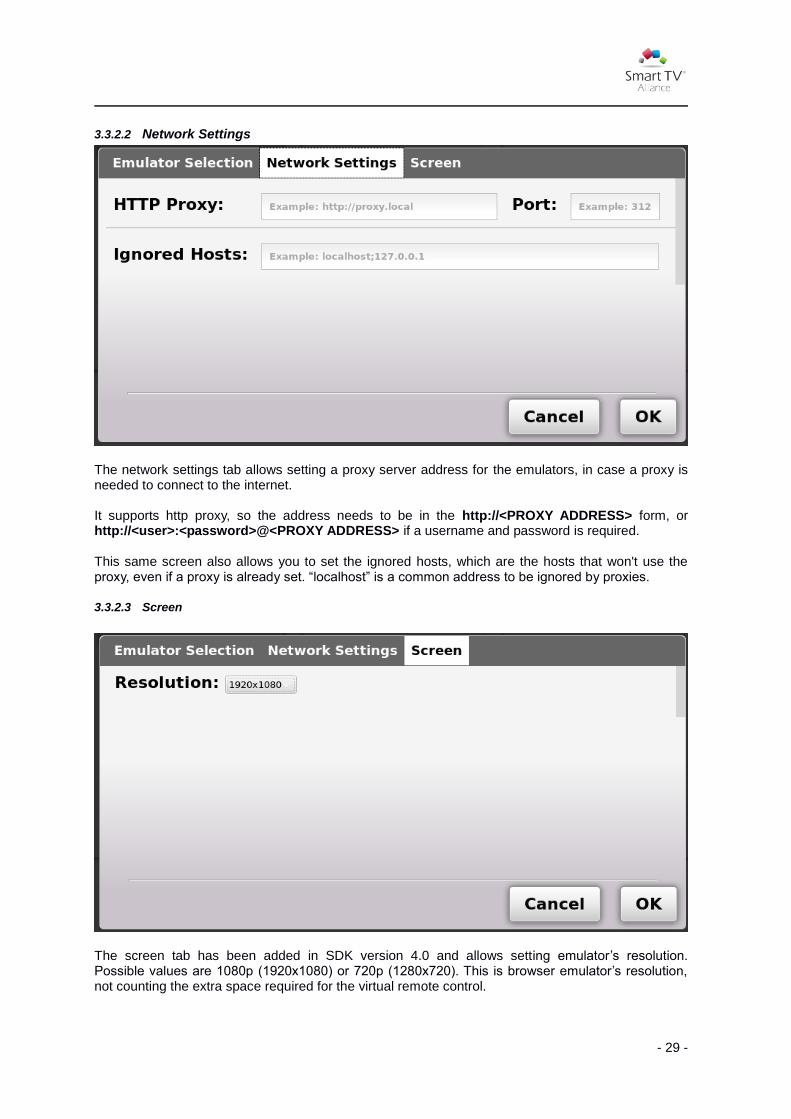
3.3.2.2 Network Settings
The network settings tab allows setting a proxy server address for the emulators, in case a proxy is needed to connect to the internet. It supports http proxy, so the address needs to be in the http://<PROXY ADDRESS> form, or http://<user>:<password>@<PROXY ADDRESS> if a username and password is required.
This same screen also allows you to set the ignored hosts, which are the hosts that won't use the proxy, even if a proxy is already set. “localhost” is a common address to be ignored by proxies.
3.3.2.3 Screen
The screen tab has been added in SDK version 4.0 and allows setting emulator’s resolution. Possible values are 1080p (1920x1080) or 720p (1280x720). This is browser emulator’s resolution, not counting the extra space required for the virtual remote control.

- 30 -
3.3.3 Add URL
When adding a new URL to the list by clicking “Add bookmarks now...” in the main screen, or when editing an existing URL by pressing the settings button next to one of the 6 URL buttons in the main screen, the above dialog appears. In this dialog you can configure the name and URL of the App you want to test. The bookmark name cannot contain spaces. Note bookmark creation copies [Emulator Selection], [Network Settings] and [Screen] settings from the global settings when the bookmark is created. Each bookmark has independent settings for each of these including the selected emulator, emulator user agent strings, emulator capabilities, proxy settings and screen resolution. These bookmark specific settings will be used whenever this bookmark is launched. Pressing the [Add] or [Update] button will save this setting. Pressing the [Close] button will cancel the current action. Clicking [Enable persistent cookies and local storage:] makes cookies persistent for the bookmark. Emulator Selection including capabilities and User Agent can be modified from the [Emulator Selection] tab. Proxy settings can be modified for the bookmark from the [Network Settings] tab. Screen resolution for the bookmark can be set from the [Screen] tab.Note that when deleting a bookmark, all bookmark specific settings (including cookies/local storage) are also removed.
- 31 -
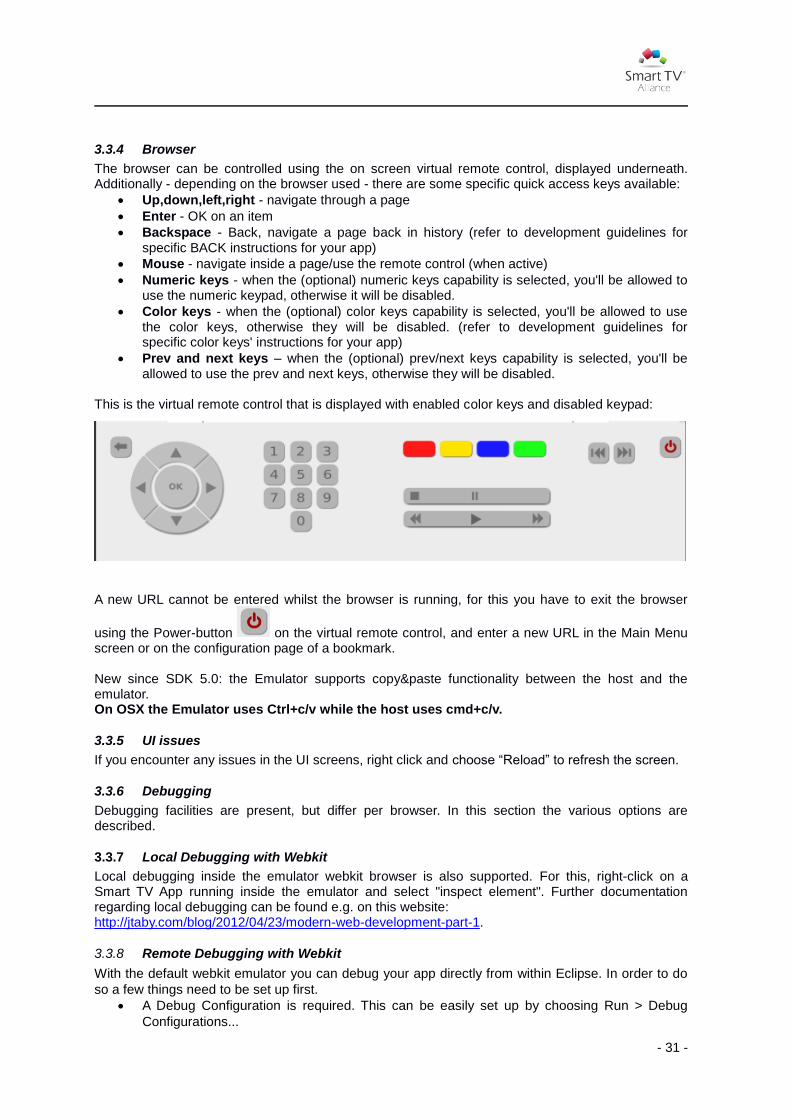
3.3.4 Browser
The browser can be controlled using the on screen virtual remote control, displayed underneath. Additionally - depending on the browser used - there are some specific quick access keys available:
Up,down,left,right - navigate through a page
Enter - OK on an item
Backspace - Back, navigate a page back in history (refer to development guidelines for specific BACK instructions for your app)
Mouse - navigate inside a page/use the remote control (when active)
Numeric keys - when the (optional) numeric keys capability is selected, you'll be allowed to use the numeric keypad, otherwise it will be disabled.
Color keys - when the (optional) color keys capability is selected, you'll be allowed to use the color keys, otherwise they will be disabled. (refer to development guidelines for specific color keys' instructions for your app)
Prev and next keys – when the (optional) prev/next keys capability is selected, you'll be allowed to use the prev and next keys, otherwise they will be disabled.
This is the virtual remote control that is displayed with enabled color keys and disabled keypad:
A new URL cannot be entered whilst the browser is running, for this you have to exit the browser
using the Power-button on the virtual remote control, and enter a new URL in the Main Menu screen or on the configuration page of a bookmark. New since SDK 5.0: the Emulator supports copy&paste functionality between the host and the emulator. On OSX the Emulator uses Ctrl+c/v while the host uses cmd+c/v.
3.3.5 UI issues
If you encounter any issues in the UI screens, right click and choose “Reload” to refresh the screen.
3.3.6 Debugging
Debugging facilities are present, but differ per browser. In this section the various options are described.
3.3.7 Local Debugging with Webkit
Local debugging inside the emulator webkit browser is also supported. For this, right-click on a Smart TV App running inside the emulator and select "inspect element". Further documentation regarding local debugging can be found e.g. on this website: http://jtaby.com/blog/2012/04/23/modern-web-development-part-1.
3.3.8 Remote Debugging with Webkit
With the default webkit emulator you can debug your app directly from within Eclipse. In order to do
so a few things need to be set up first.
A Debug Configuration is required. This can be easily set up by choosing Run > Debug
Configurations...

- 32 -
On the left side choose Webkit Protocol and click the “New launch configuration” button on
the top.
Set a name for the configuration and enter the host as localhost
NOTE: be sure to set the port to 9223.
Choose Protocol 1.0.
In the [Source] tab add “Workspace”
Click [Close] or [Debug] if you would like to start debugging immediately.
To start debugging click Run > Debug Configurations... and choose the configuration on the
left. Then click [Debug] to start debugging.
A new Virtual Project should appear in the [Projects] tab/view which is where all deployed
scripts can be found.
- 33 -
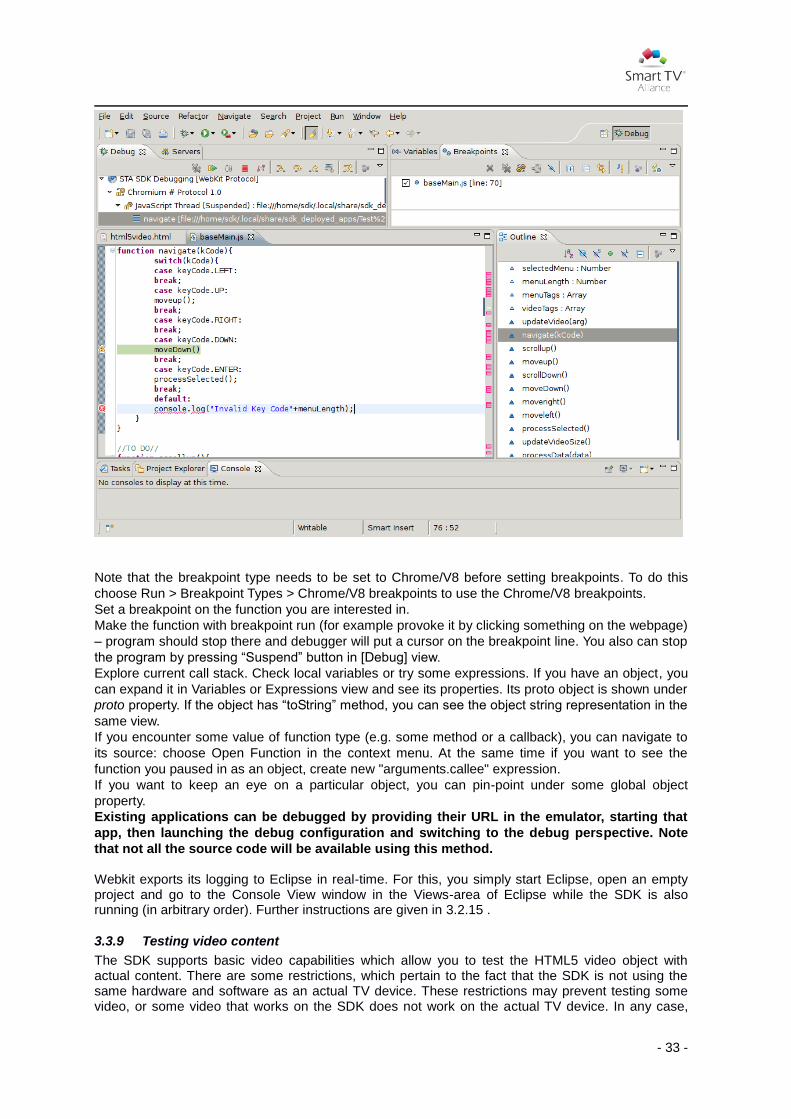
Note that the breakpoint type needs to be set to Chrome/V8 before setting breakpoints. To do this
choose Run > Breakpoint Types > Chrome/V8 breakpoints to use the Chrome/V8 breakpoints.
Set a breakpoint on the function you are interested in.
Make the function with breakpoint run (for example provoke it by clicking something on the webpage)
– program should stop there and debugger will put a cursor on the breakpoint line. You also can stop
the program by pressing “Suspend” button in [Debug] view.
Explore current call stack. Check local variables or try some expressions. If you have an object, you
can expand it in Variables or Expressions view and see its properties. Its proto object is shown under
proto property. If the object has “toString” method, you can see the object string representation in the
same view.
If you encounter some value of function type (e.g. some method or a callback), you can navigate to
its source: choose Open Function in the context menu. At the same time if you want to see the
function you paused in as an object, create new "arguments.callee" expression.
If you want to keep an eye on a particular object, you can pin-point under some global object
property.
Existing applications can be debugged by providing their URL in the emulator, starting that
app, then launching the debug configuration and switching to the debug perspective. Note
that not all the source code will be available using this method. Webkit exports its logging to Eclipse in real-time. For this, you simply start Eclipse, open an empty project and go to the Console View window in the Views-area of Eclipse while the SDK is also running (in arbitrary order). Further instructions are given in 3.2.15 .
3.3.9 Testing video content
The SDK supports basic video capabilities which allow you to test the HTML5 video object with actual content. There are some restrictions, which pertain to the fact that the SDK is not using the same hardware and software as an actual TV device. These restrictions may prevent testing some video, or some video that works on the SDK does not work on the actual TV device. In any case,

- 34 -
make sure your media conforms to the specifications outlined in the platform documentation. Host speed may also considerably influence the accuracy with which video can be tested. Additionally, follow these hints to make testing easier:
when testing HD content (>1280x720), try using a smaller window of max CIF size (352*288 pixels)
for larger window sizes (>quarter screen) lip sync issues may occur, test the content in a smaller window (e.g. 352*288 pixels)
the SDK was not designed as a demonstration platform: prolonged use of video content could lead to unexpected behaviour ; restarting the browser session or emulator will resolve any issues in most cases.
Certain subtitles and multiaudio features for MSS media are not supported in the SDK 5.0 release. These features are supported on applicable Smart TV Alliance TV Devices.
Playback progress/status is not always correctly updated when playing a media in the SDK 4.0 release.
3.4 DIAL service and client applications
A DIAL service has been added to the Smart TV Alliance SDK 3.0+. In order to use it, an example application has been created for each of iOS and Android platforms. Mobile devices running the client applications must be connected to the same network as the computer running the SDK. More information about DIAL can be found in the Smart TV Alliance Specification 2.5 (and later) and some background information is available here: http://www.dial-multiscreen.org/. Note the DIAL sample applications on the companion devices (tablet, phone) only support WiFi connectivity.
3.4.1 IOS DIAL client
3.4.1.1 Build and Install
The sdk-dial-client-ios already ships upnpx's source code to make building easier. To build the project, double click the .xcworkspace file. It should open XCode. Check that the DialApp target is enabled on the top left corner, besides the 'Run' and 'Stop' buttons. Then, go to Product -> Build on the menu bar and it should build both upnpx sources and then the Dial App. Deploying should be done just like any other iOS application, it can be done both to the simulator or an iOS device. Simply set the iOS targeted device or simulator in XCode and click 'Run'. Note that in order to deploy applications to an iOS device the developer should be enrolled in the Apple's iOS developer program. More instructions can be found at https://developer.apple.com/programs/ios/ Usage The application is composed of 2 screens. The first one is presented when it is opened and should list the services found on the network. There is a 'Refresh' button on the top right corner in case the user wants to force another DIAL services search.

- 35 -
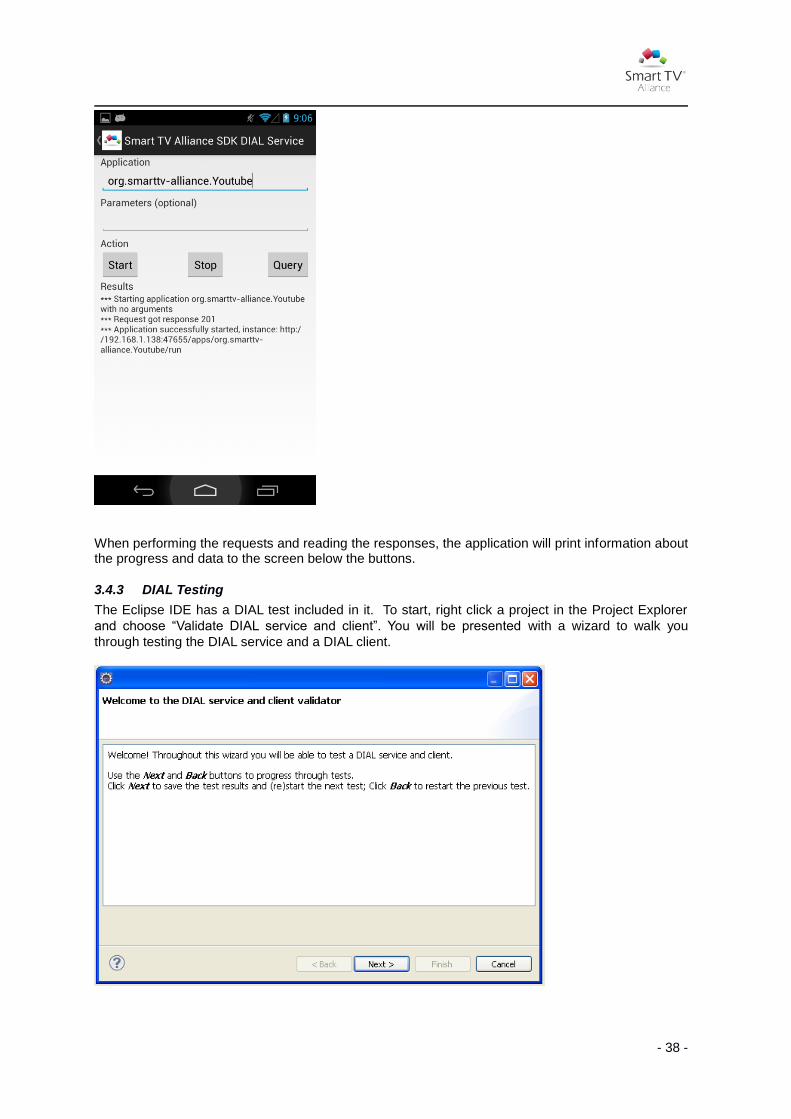
Upon clicking on one of the listed services, the user is taken to another screen shown below where it is possible to send the DIAL requests to the selected service. To use it, just type the name of the application and click on the corresponding button for the desired action. All apps added as bookmarks in the SDK emulator, including deployed apps are available as DIAL apps using the prefix 'org.smarttv-alliance.' for app names. For example a bookmark called Google would be launched by using the name 'org.smarttv-alliance.Google'. When sending the 'Start' request, the user can also add arguments by filling in the indicated text field. The launch parameters will be added to the application URL as a query string.
When performing the requests and reading the responses, the application will print information about the progress and data to the screen below “Results”.

- 36 -
3.4.2 Android DIAL client
3.4.2.1 Build and Install
In order to build the project, you need to have a recent Android SDK installed on your system For this application v22.0.1-685705 was used. You can get the SDK from: http://developer.android.com/sdk/index.html Once you have the SDK working, extract the source zip of sdk-dial-client-android to somewhere (not inside the Android SDK workspace!). Then, import the source into Eclipse using File -> Import -> Android -> Existing Android Code Into Workspace. This Application uses the Cling 1.x Library which is a UPnP-compatible software stack for Java environments. More information about Cling can be found at http://4thline.org/projects/cling/ Deploy to Android device In order to deploy to an Android device directly you have to get the device in debugging mode. To enable debugging mode, go to: Settings -> Developer Options -> Debugging -> USB debugging Note that if running a device with Android 4.2+, you first need to reveal the developer options in order to enable debugging mode. See http://developer.android.com/about/versions/jelly-bean.html#42-dev-options for more details. Next, connect the device to your computer by USB cable. Now, when doing a "Run As" operation, you should be able to see the device in the "Choose a running Android device" dialog. The first time, the device might prompt you if you allow the application to be installed, you have to accept this in order for the actual installation to take place. Export to Android application To export the application manually you have to follow these steps:
File -> Export -> Android/Export Android Application
Choose the Application SdkDialClient
Unless you have your own Android Signing Key, you can use the android debug key, found in $HOME/.android/debug.keystore on Linux/MacOS X (use Windows -> Preferences -> Android -> Build to find the location of the key on your Windows system).
Use 'android' as password for the key and click 'Next'.
Choose 'androiddebugkey' as Key Alias with 'android' as password and click next.
Choose the location of the target Android .apk file and click Finish. More Information about signing Android applications and creating own keys can be found here: http://developer.android.com/tools/publishing/app-signing.html Installing the Android application to a device Assuming you already have the .apk file available and you want to copy it to an android device, first you have to copy it to the device's SD card from your PC. Afterwards, install one of the numerous available apk installers in the Play Store ("Apk Installer" seems like a good candidate) and run it. It should find the SdkDialClient.apk file on the SD card and install it, you have to accept installation as usual.
3.4.2.2 Usage
Like the iOS client the Android application is composed of 2 screens. The first one is presented when it is opened and should list the services found on the network.
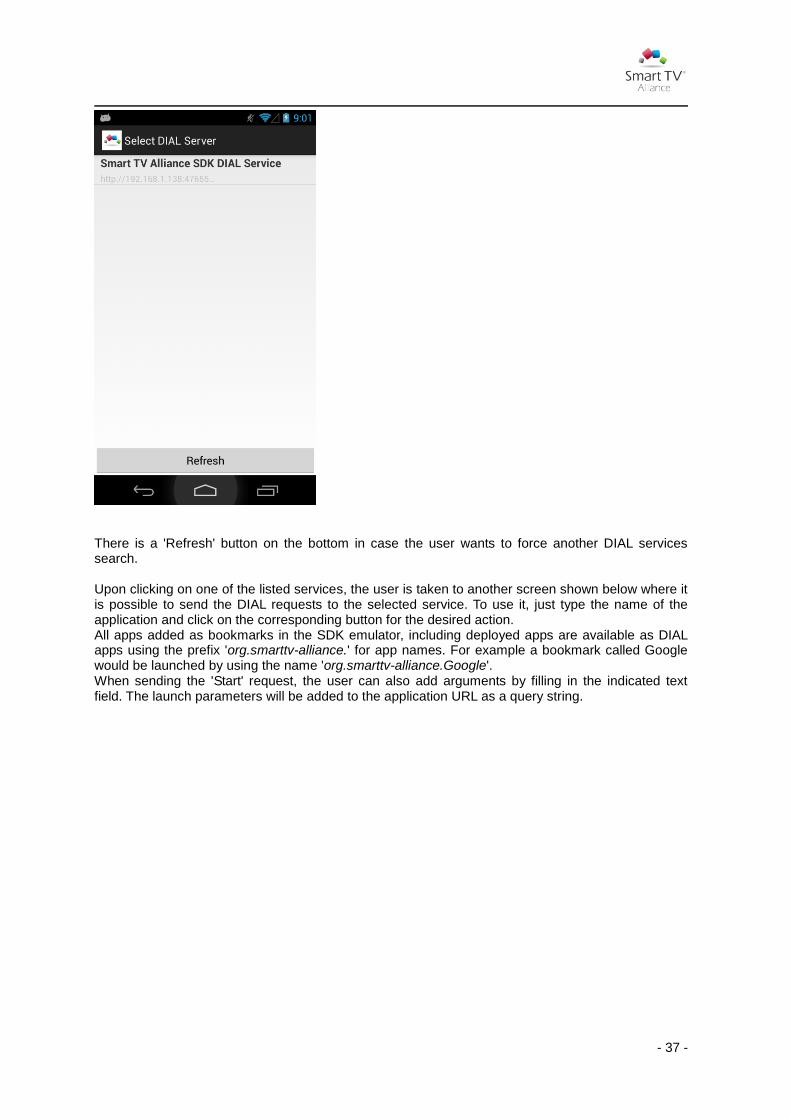
- 37 -
There is a 'Refresh' button on the bottom in case the user wants to force another DIAL services search. Upon clicking on one of the listed services, the user is taken to another screen shown below where it is possible to send the DIAL requests to the selected service. To use it, just type the name of the application and click on the corresponding button for the desired action. All apps added as bookmarks in the SDK emulator, including deployed apps are available as DIAL apps using the prefix 'org.smarttv-alliance.' for app names. For example a bookmark called Google would be launched by using the name 'org.smarttv-alliance.Google'. When sending the 'Start' request, the user can also add arguments by filling in the indicated text field. The launch parameters will be added to the application URL as a query string.
- 38 -
When performing the requests and reading the responses, the application will print information about the progress and data to the screen below the buttons.
3.4.3 DIAL Testing
The Eclipse IDE has a DIAL test included in it. To start, right click a project in the Project Explorer
and choose “Validate DIAL service and client”. You will be presented with a wizard to walk you
through testing the DIAL service and a DIAL client.

- 39 -
Each test will present some actions to take on the DIAL client, and once done either a pass, or a fail
mark will appear next to each step. The 'Retry Test' button will start the test over. The 'Next' button
proceeds to the next test. Once all tests have completed a log of the tests will be saved to the same
folder as the Validation tests have been configured to be saved to if the check box is marked on the
last page.
Note multiple test runs on the same day are combined within the same file.
Note on OSX that only the network interfaces connected when the Emulator started will be available
as a DIAL service. If any new interface is connected while the Emulator is running it is required to
restart the Emulator in order to use this connection from DIAL.
This is a test that is awaiting the user to perform the task described.
This is a passed test, notice the green check on the left side of the test name.
- 40 -
3.5 Smart Home Emulator
A Smart Home Emulator has been added to the Smart TV SDK 4.0+. Through the Smart Home
Emulator, various applications which employ the Smart Home Specification 1.0 can be developed
and verified. The Smart Home Emulator consists of modeled devices which are defined in the Smart
Home Specification 1.0. The basic configuration of the Smart Home Emulator can be manipulated in
the Setting Page. Various devices can be activated and configured on the network through the
Setting Page. Since the emulated devices are created on localhost, devices can be accessed directly
by the Websocket URL (ws://localhost:{port number}) in the SDK browser or application if the
Websocket port is known. Moreover, the devices can be discovered via the Network Service
Discovery function with URN prefix ‘upnp:urn:smarttv-alliance-org:service:smarthome’ according to
the Smart Home Specification 1.0. Please refer to the sample application of the Smart Home
Emulator.
3.5.1 Smart Home emulator configuration
The smart home emulator device settings page can be accessed by URL http://localhost:7880.
3.5.2 Adding an endpoint
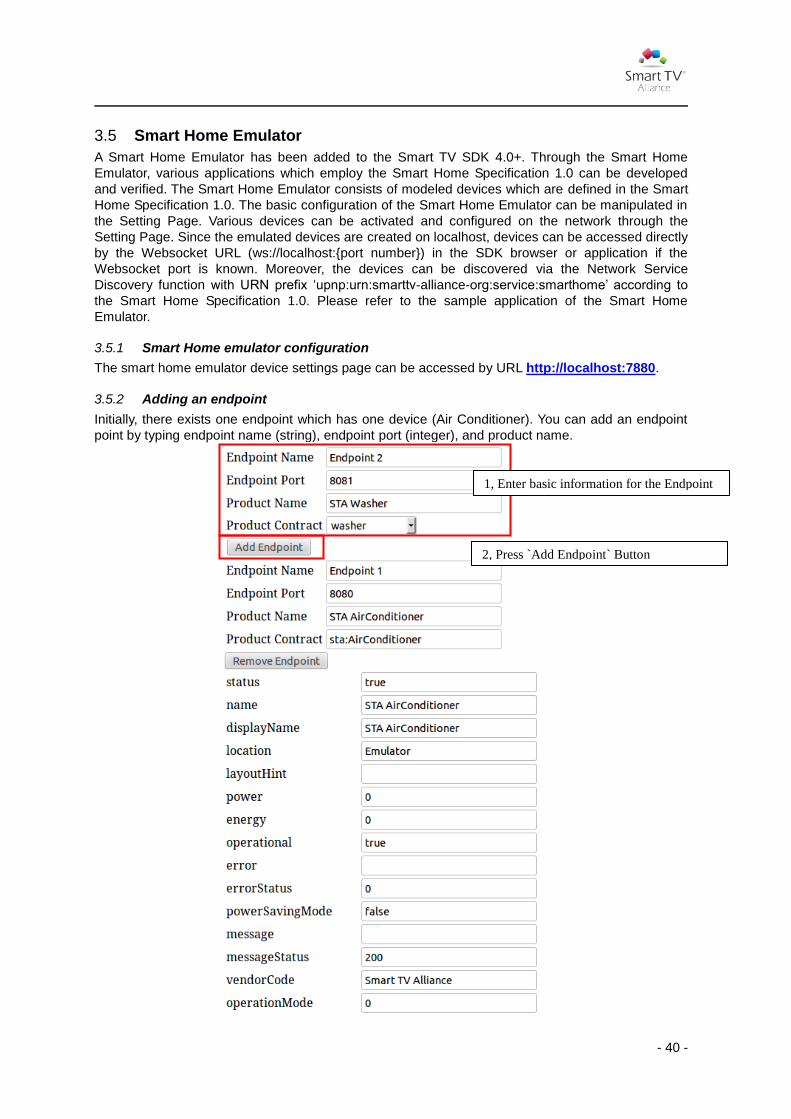
Initially, there exists one endpoint which has one device (Air Conditioner). You can add an endpoint
point by typing endpoint name (string), endpoint port (integer), and product name.
1, Enter basic information for the Endpoint
2, Press `Add Endpoint` Button

- 41 -
3.5.3 Adding a device to an endpoint
If you choose gateway as an endpoint, you can attach multiple devices to the endpoint through the
`Add Device` button, otherwise only one device would be automatically attached to the endpoint.
3.5.4 Configure a device
After the device is added, you can change the properties of the device. If you press the ‘Save’ button,
the changes would be applied to the Smart Home emulator.
3.5.5 Smart Home application
Once the emulator setting is done, close the setting page and run your smart home application on
SDK emulator. Also refer to the Smart TV Alliance smart home application sample, the JavaScript
library for easy Smart Home application development and further documentation which is available at
https://developers.smarttv-alliance.org/sdk-documentation.
1, Select device type and press `Add
Device` button
1, Change the value
2. Press ‘Save’ button
- 42 -
3.6 Troubleshooting
When you experience problems with running the SDK, please check possible symptoms and solutions below. More information is available online. Q: The SDK runs very slow. A: Verify you are running a system that conforms to the minimum/typical system requirements. A: Check system resources (memory, CPU usage). Q: I have problems installing under Windows 7 or 8 or 10 A: Verify you have administrative privileges while installing. Q: Upon installing the SDK under Windows, my virus-scanner reports a problem with 'nsscm.dll'. A: NsScm.dll is part of the NullSoft installer the SDK was built with. You can safely ignore this message. In general it is recommended to temporarily disable the virus-scanner during installation. Q: The STA SDK/VirtualBox appears not to work/install: I cannot start the emulator. A: Please disable any virus-scanners prior to the installation. These can cause the VirtualBox installation to silently fail. If this should occur, you can still install VirtualBox 5.X manually prior to starting the SDK (from http://virtualbox.org). A: Make sure you have uninstalled all prior versions of VirtualBox 5.X prior to installation. Earlier versions (<5.X) of VirtualBox are incompatible with this emulator. Reinstall the application. A: Try reinstalling and/or installing on a different system A: If your system uses a Proxy server, the SDK (Installation) is not fully supported. Please install on a system that does not require a proxy server for internet to function. Q: The video does not work in the SDK? A: Please make sure your HTTP server submits the mimetype of the video or audio, refer to the SDK guidelines for details. A: When testing, verify that you do not have a proxy server that caches the responses, this could present old testpages to the SDK browser. Q: The browser is started, but it takes a long time for the URL to load or the URL does not load A: Depending on the selected browser emulator, it could take longer for the URL to load. The loading process should generally complete in under a half minute. A: If your system uses a Proxy server, the SDK (Installation) is not fully supported. Please install on a system that does not require a proxy server for internet to function. Q: I enable mouse pointer integration in VirtualBox (virtualbox hostkey + I), issues occur in certain browsers. A: This is a known issue. Disable mouse integration temporarily using hostkey+I (e.g. Ctrl-Alt-I depending on your VirtualBox configuration; read the VirtualBox manual for more information). Q: The SDK window is too big for my screen A: Try scaling the window using (VirtualBox Host key)+C (typically Ctrl-Alt-C). Q: When running 'Validate DIAL service and client', no DIAL service is found in the wizard. A: Make sure that an IP address is assigned to the host. The DIAL service will listen for each connected interface (with an IP associated) and create a DIAL device for each one. Q: Why are no color keys and/or prev/next keys displayed in the Emulator A: Color keys and prev/next keys are not a mandatory feature of Smart TV Alliance TV devices, but an optional feature of some devices. For emulators from specification version 3.0 and later you can enable this optional feature so you can test color keys. Please also refer to the QA requirements document on https://developers.smarttv-alliance.org. Q: I cannot start the debugger in Eclipse and only get error “Broken pipe” or “Connection reset”. A: Please make sure that the app is running in the SDK emulator either by deploying to SDK or by running the app manually before starting debugging. Please refer to section 3.2.12 item 3. Q: I have other issues which are not described here

- 43 -
A: Please provide your feedback on the developers forum at the above website; it is valuable to us in improving the SDK. Q: My app cannot be deployed to the SDK. The error message pops up and says "Error code:415 The directory structure of application is not compliant". A: Please check to have an index.html file for the SDK emulator to load them properly. Q: Why are cookies gone after exit/resume an app in the SDK emulator? A: Persistent cookies do not work on SDK 4.0, please use HTML Local Storage. Since SDK 5.0, persistent cookies and local storage can be enabled via the bookmarks edit dialog. Q: I installed the SDK on Linux and “Deploy to SDK and other STA configuration options do not show up in Eclipse. A: Try uninstalling the SDK, removing the directory /usr/share/sta-sdk and installing the SDK again. Please make sure all of the hidden files are removed (e.g. “sudo apt-get remove sta-sdk” and then