SDC-33 - Sears Parts Direct Take pictures instantly ... without loading film. Congratulationson your...
37
SDC- 33 Digital Still Camera User's Guide I-_ For Windows=3.1 and Windows=95
Transcript of SDC-33 - Sears Parts Direct Take pictures instantly ... without loading film. Congratulationson your...

SDC- 33Digital Still Camera
User's Guide I-_For Windows=3.1 and Windows=95

Features
Take pictures instantly ... without loading film.Congratulationson your purchaseof Samsung'sstate-of-the-arteasy-to-usedigitalcamera.You can instantlytake a picture, loadthe pictureonto your PC, and output itimmediately throughyour monitoror printer.
Clean high-quality picture
w
$Transfer the pi_ure
A progressivescanningCCDimagesensorwith350thousandpixelsisusedto rendervividand clearpictures.
Large imagestoragecapacity
The built-in4MB internalflash memorywill holdup to 45 high quality(Standard)or 180reducedsize (Economy)pictures.

Printer
-Inkjet-Laser
-Dye Sublimation
Makeaninstantprintofasnapshot.Sendanemailcardtoyourfriend.
_,Createaphotocalendar.Livenupyourreportswithvividslideshows.Createanelectroniccatalogofproducts.
CD-ROMDisk Drive
Floppy Disk
t CreateanelectronicCD-ROMalbum.Savesouvenirpicturestofloppydisktogiveto friends.
ContentsGetti ng started
Features 1Precautions 3SafetyInstructions 5Locationof Controls 7
Getting Started 9,_Batteryinsertion 9
OperationBasicPictureTaking 11Setting Picture Mode 13Timer Photography 14Deleting Pictures 15Connectingto your PC 17,_AC Adaptor Usage 18Software Installation 19
Compactand portabledesignThecombinationof smallsizeandlightweightdesignmakeitperfecttocarryinyourpocket.
Others
Warning Messages 27Care and Maintenence 28
Troubleshooting 29Technical specifications 30Warranty 32
2

Precautions
RISK OF ELECTRIC SHOCKDO NOT OPEN
CAUTION:
TO REDUCE THE RISK OF ELECTRIC SHOCK, DO NOT
REMOVE COVER (OR BACK).NO USER SERVICEABLE PARTS INSIDE, REFER SERVICING
TO QUALIFIED SERVICE PERSONNEL.
To prevent electric shock, match wide blade of plug to wide slotand fully insert.
Pour eviter les chocs electriques, introduire la lame la plus large
de la fiche dans la bome correspondante de la prise et pousserjusq6 au fond.
/i_This symbol is intended to alert the user to the presence of
uninsulated dangerous voltage within the product's enclosure
that may be of sufficient magnitude to constitute a risk of fireor electric shock.
/_\\ This symbol is intended to alert the user to the presence ofimportant operating and maintenance instructions in the
literature accompanying this product.
3
NOTE: This equipment has been tested and found to comply with thelimits for a class B digital device, pursuant to pan 15 of the FCC Rules.These limits are designed to provide reasonable protection againstharmful interference in a residential installation. This equipmentgenerates, uses and can radiate radio frequency energy and, if notinstalled and used in accordance with the instructions, may causeharmful interference to radio communications.However, there is no guarantee that interference will not occur in aparticular installation.If this equipment does cause harmful interference to radio or televisionreception, which can be determined by turning the equipment off andon, the user is encouraged to try to correct the interference by one ormore of the following measures :- Reorient or relocate the receiving antenna.- Increase the separation between the equipment and receiver.- Connect the equipment into an outlet on a circuit different from that
to which the receiver is connected.
- Consult the dealer or an experienced radio/TV technician for help.
WARNING
The connection of a non-shielded equipment interface cable to thisequipment will invalidate the FCC Certification of this device and maycause interference levels that exceed the limits established by the FCCfor this equipment. If is the responsibility of the user to obtain and use ashielded equipment interface cable with this device. If this equipmenthas more than one interface connector, do not leave cables connectedto unused interfaces.
Changes or modifications not expressly approved by the manufacturercould void the user's authority to operate the equipment.
FOR CANADIAN USERS
This Class B digital apparatus meets all requirements of the CanadianInterference-Causing Equipment Regulations.Cet appareil num6rique de la Classe B respecte toutes tes exigences duReglement sur la materiel brouilleur du Canada.
4

SafetyInstructions
t=
=
=
=
=
6.
=
=
READ INSTRUCTIONS : All the safety and operating instructionsshould beread before the CAMERA is operated.
RETAIN INSTRUCTIONS : The safety and operating instructionsshould beretained for future reference.
HEED WARNINGS : All warnings on the CAMERAand in the operatinginstructionsshouldbe adheredto.
FOLLOW INSTRUCTIONS :All operating and maintenance instructionsshouldbe followed.
CLEANING : Do not use liquid or aerosol cleaners. Use a soft lint-free cloth.
ATTACHMENTS : Do not use attachmentsnot recommendedby theCAMERAproduct manufactureras they may be hazardous.
POWER SOURCES : The CAMERAshould be operated only from the type
of powersource indicated on the label.If you are not sum of the type of power supply at your home,consult yourappliancedealer or local powercompany.The CAMERAis intendedto beoperatedfrom batterypower,or othersources;refer to the operatinginstructions.
ACCESSORIES : Do not placethis CAMERAon an unstablecart, stand,tripod,bracketor table.The CAMERAmay fall, causingserious injury to
a child or adult, and seriousdamage to the unit. Useonly with a cart, standtripod, bracket,or table recommendedby the manufactureror sold with theCAMERA. Any mountingof the unit shouldfollowthe manufacturer'sinstructionsand should use a mountingaccessory recommendedby themanufacturer.
A. An applianceand cart combinationshouldbe movedwith care. Quick stops, excessiveforce and unevensurfacesmay cause the applianceand cart combinationto overturn.PORTABLECARTWARNING
(Symbolprovided by RETAC)
5

9,
10.
11.
12.
SERVICING : Do not attempt to service this CAMERA yourself.Opening or removing covers may expose you to dangerous voltage orother hazards. Refer all servicing to qualified service personnel.
DAMAGE REQUIRING SERVICE: Remove the batteries from this
CAMERA and refer servicing to qualified service personnel under thefollowing ccnditions:a. If any liquid has been spilled onto, or objects have fallen into the
CAMERA.
b. If the CAMERA has been exposed to rain or water.c. If the CAMERA does not operate normally by following the operating
instructions, adjust only those controls that are covered by theoperating instructions. Improper adjustment of other controls mayresult in damage and will often require extensive work by a qualifiedtechnician' to restore the CAMERA to its normal operation.
d. If the CAMERA has been dropped or the cabinet has been damaged.e. When the CAMERA exhibits a distinct change in performance, this
indicates a need for service.
REPLACEMENT PARTS : When replacement parts are required,be sure the service technician has used replacement pans specified bythe manufacturer and having the same characteristics as the originalpart. Unauthorized substitutions may result in fire, electric shock orother hazards.
SAFETY CHECK : Upon completion of any service or repairs to thisCAMERA, ask the service technician to perform safety checks todetermine that the CAMERA is in safe operating order.
6

Locationof Controls
Timer (page14)
Picture Mode (page13)STD: Total45 picturesECO: Total180pictures
PicturesRemainingPictures Taken
Battery level indicator (pages
Delete indicator (pages15-16'
Timer lamp (page14)
Operation ready indicator
Viewfinder
RS-232C
(page17)
DC input j(page18)
7
%
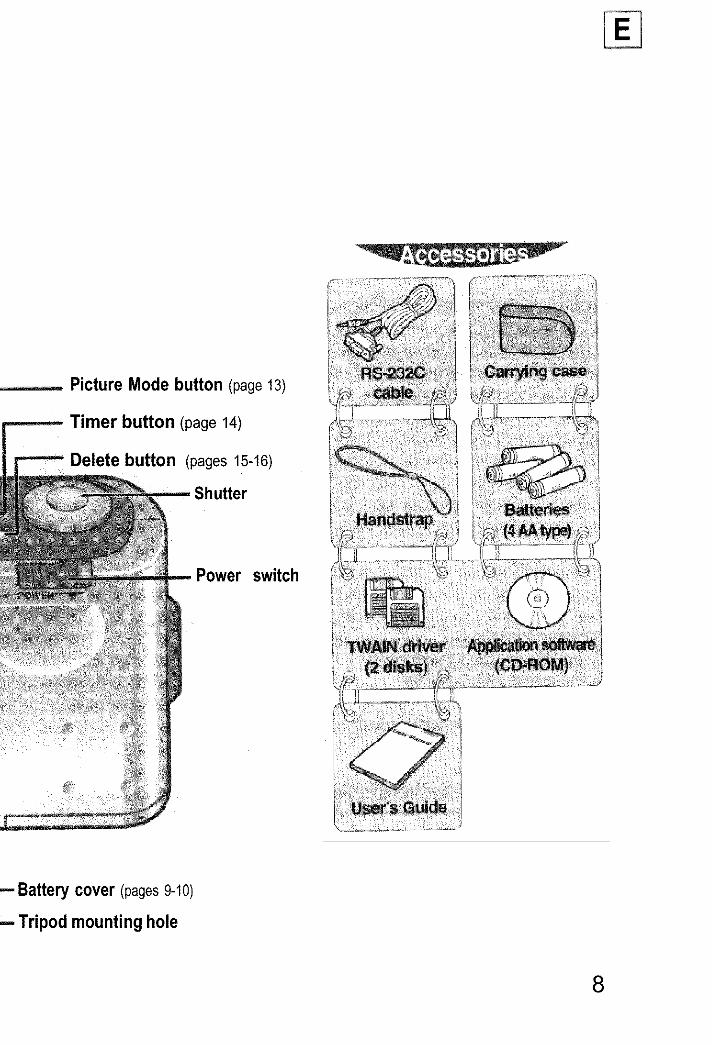
Picture Mode button (page 13)
Timer button (page 14)
Delete button (pages 15-16)
Power switch
•-Battery cover (pages 9-10)
=- Tripod mountinghole
8

GettingStarted
insertion
]
Locate the battery cover onthe bottom of the camera
and push it open In thedirection of the arrow.
Thread the thin end of the strap intothe hole on the side of the camera and
loop the large end of the strap around
it as shown in the figure.
9
3
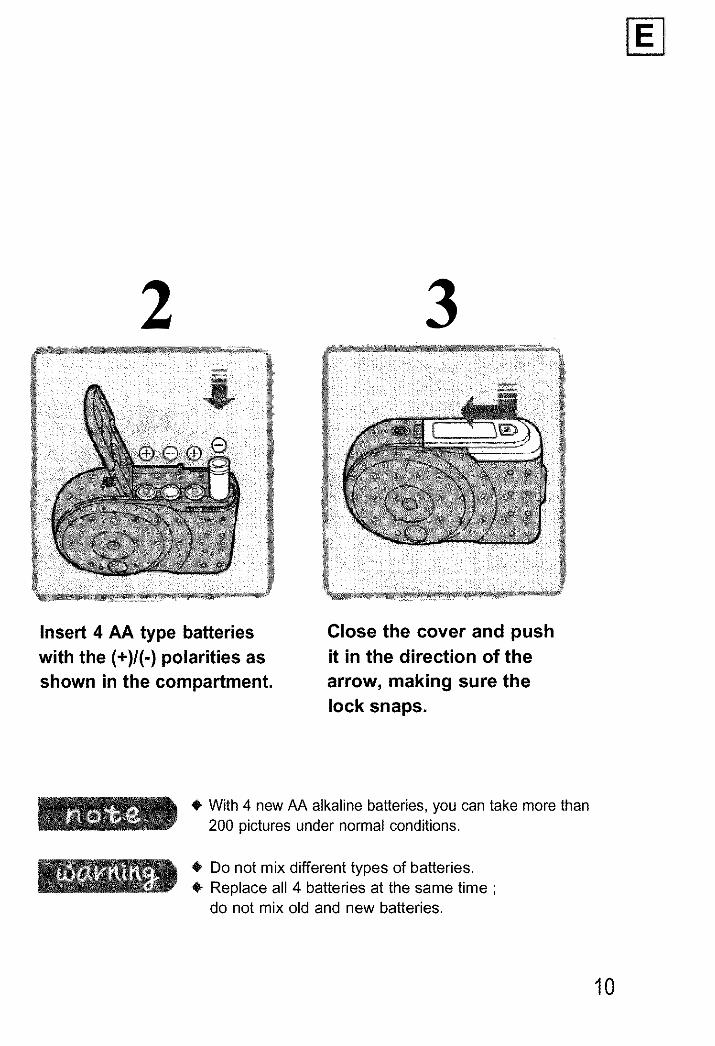
Insert 4 AA type batteries
with the (+)/(-) polarities as
shown in the compartment.
Close the cover and pushit in the direction of the
arrow, making sure the
lock snaps.
With 4 new AA alkaline batteries, you can take more than
200 pictures under normal conditions.
Do not mix different types of batteries.
Replace all 4 batteries at the same time ;do not mix old and new batteries.
10
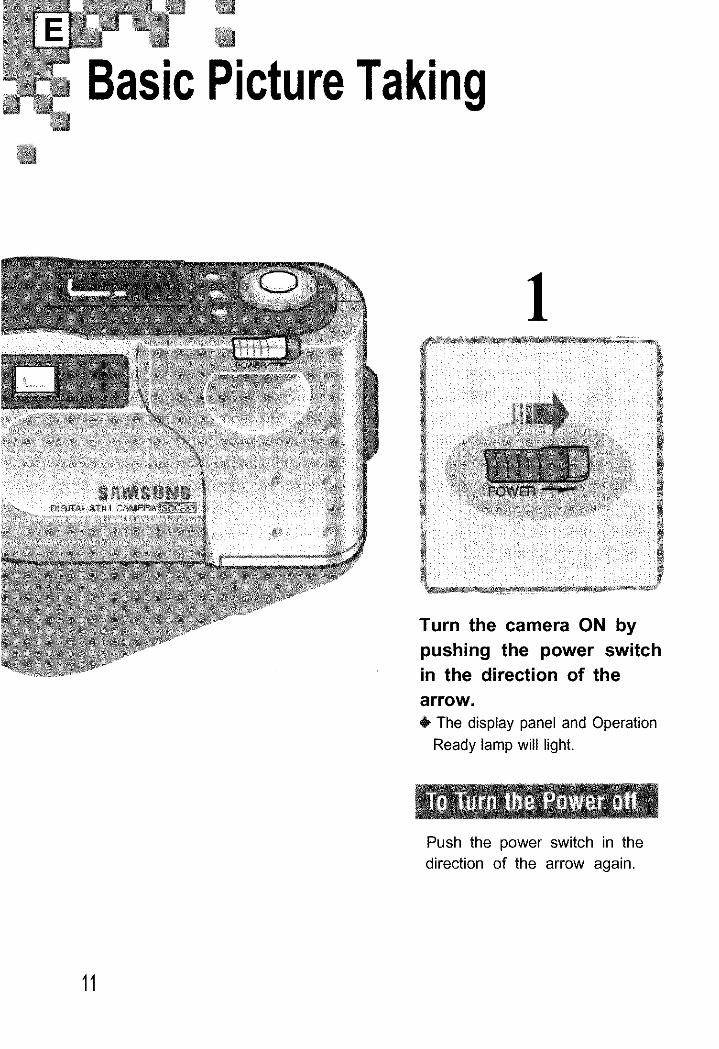
BasicPictureTaking_@
1
Turn the camera ON by
pushing the power switchin the direction of the
arrow.
i The display panel and Operation
Ready lamp will light.
Push the power switch in the
direction of the arrow again.
11

%
2 3
Look through the viewfinder
to center your subject.Make sure the subject is at least100cm(3.3 feet) away.
Press the shutter.
The timer lamp will flash one time.
_1,The operation ready indicator will
flash and the display panel willshow 'Pro _"-_'
• You can then take the next picture.
Auto Shut-off
If you do not operate the camera for more
than 3 minutes (10 minutes when hookedup to a PC), the camera automatically
turns itself off to save battery power.
12
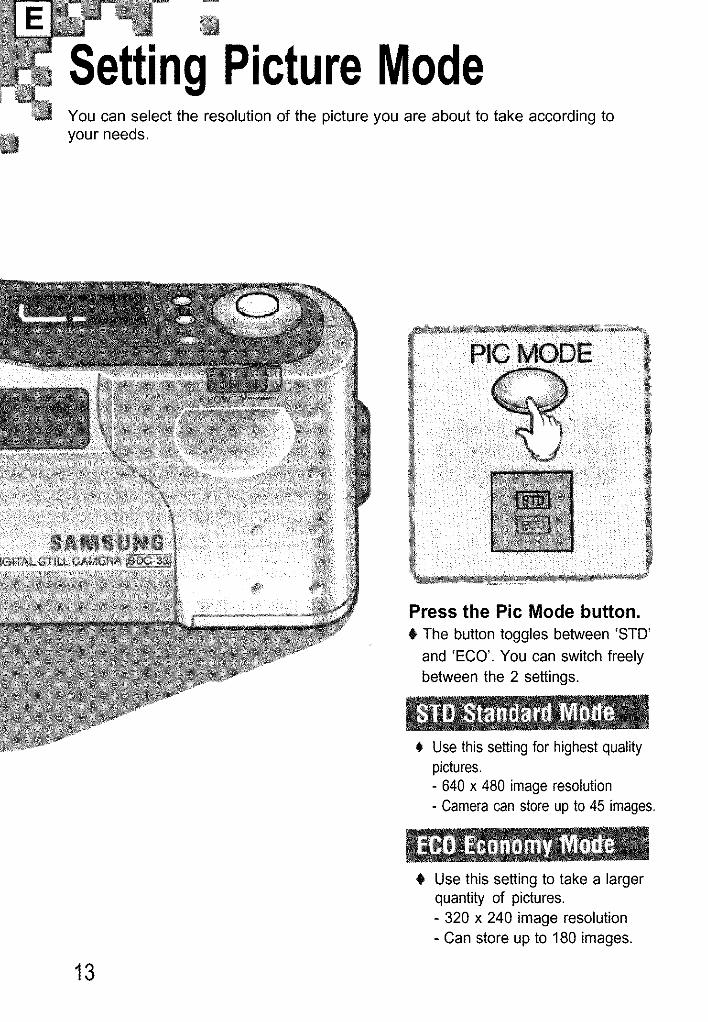
SettingPictureModeYou can select the resolution of the picture you are about to take according toyour needs.
Press the Pic Mode button.
The buttontoggles between 'STD'
and 'ECO'. You can switchfreely
between the 2 settings.
Use this setting for highest quality
pictures.- 640 x 480 image resolution
- Camera can store up to 45 images.
13
Use this setting to take a largerquantity of pictures.
- 320 x 240 image resolution
- Can store up to 180 images.

.....Time,",rPhotoaraohv_ lhls function allows you to take a p_cture of yourself or include yourself in a
group photo.
1
Press the Timer button.
Pressthe Timer button again tocancel.
2
Press the Shutter.
The timer iconon the display
panel and the timer lamp will flash•
The picture will be taken automatically
in 10 seconds.
If no operation is performed for 30 sec. after pressing
the Timer button, the timer function is automaticallycanceled.
The timer function cannot be canceled after pressingthe Shutter.
14

"ngPicturesYoucandeletethe lastpicturetakenor all the picturesfrom thecamera'smemory.
deleteone-by-one(startingfromlastpicturetaken)
1
Keep the Delete button
pressed for more than2 seconds.4, The 'DEL' icon will flash.
Press the Shutter.
Pictures Remaining willincrease by one and PicturesTaken will decrease by one.You can press the shutteragain to erase more pictures.
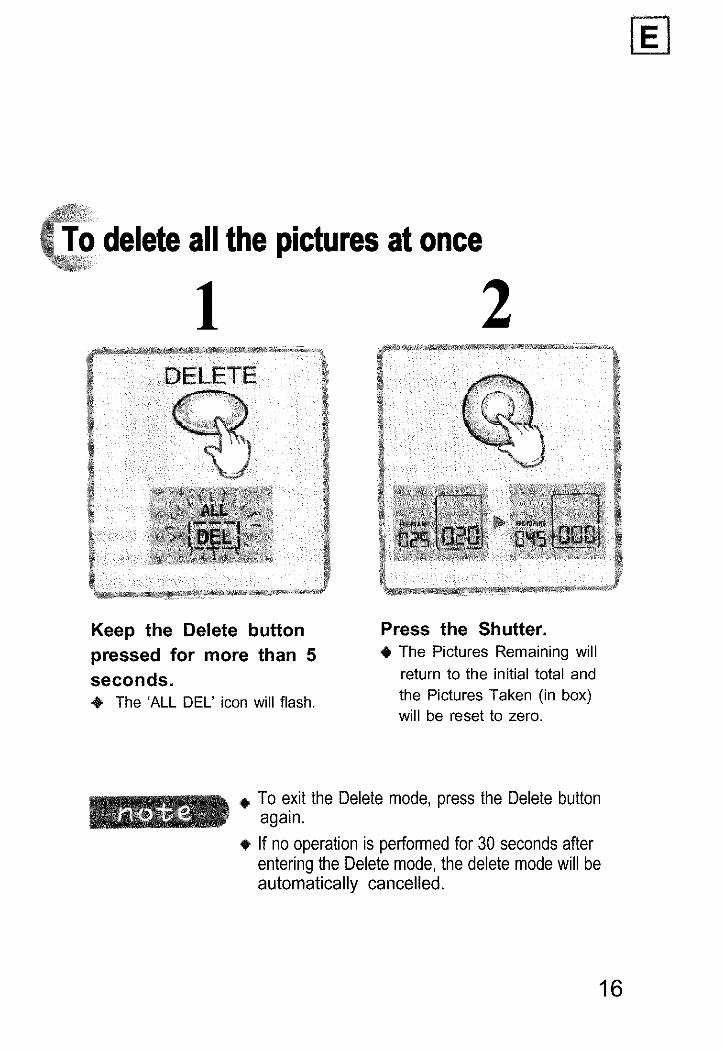
To deleteall the picturesat once
! 2
Keep the Delete button
pressed for more than 5seconds.• The 'ALL DEL' icon will flash.
Press the Shutter.
The Pictures Remaining will
return to the initial total and
the Pictures Taken (in box)will be reset to zero.
To exit the Delete mode, press the Delete buttonagain.
,_ If no operation is performedfor 30 seconds afterentering the Delete mode, the delete modewill beautomatically cancelled.
16

L;onnectlngto yourI-'t;
IBM CompatiblePC
Connect the PC cable
to the back of your PC.Connectto the 9-pin serialport (RS-232C)
4, If your PC only has a25-pin serial port available,you must use a FemaleDB25 to Male D89 serialport adaptor.
Connect the other end
of the PC cable to the
Serial port on theCamera.
'_ Before making any connections to the PC,
turn the camera power off first.
17

_, It is generally not necessary to use an AC adaptor ; however, for your
convenience, a DC input jack has been provided.
This camera will accept many commercially available AC adaptors.
You must purchase the AC adaptor separately.
The output of the AC adaptor must be 6V DC
and it must be rated at 500mA or higher.
The polarity of the AC adaptor output must be
correct "E_,,- _
The AC adaptor must have the following plug size •- 1.7mm inside diameter (_ end)
- 4.0mm outside diameter (e end)r EIAJ class 2 standards
,_ Using an AC adaptor will power the camera
but will not charge the batteries.
18

OUILWdlU III:_LdlIdLIUll
- You must have an IBM PC or compatible with Microsoft Windows®3.1 orWindows_95 installed and running.
- Have ready the supplied Twain Driver disk (There are separate disks for
Windows_95 and Windows_3.1),
Howto installtheTwainDriver
Insert the disk labeled 'Twain Driver' into yourfloppy disk drive 'A' or 'B'.(Choosethe appropriatediskfor youroperatingsystem)
For Windows_95 : Click the 'Start' button on the WindowsTaskbar.
For Windows_3.1 : Choose 'File' from the top menu.
Choose 'Run' from the menu.
Type in the following in the dialog'Enter'.
[(example) 'a:\setup' or'b:\setup' ]
box and hit
19

When you see the Start box, Click on 'Next' tocontinue the installation.
When you see the Finish box, Click on 'Finish' tocomplete the Twain Driver installation.
The above screens describe the installation
process for Windows _95. The screens for
Windows _3.1 will look slighty different, butthe overall process will be similar.
20

SoftwareInstallation
Have ready the supplied Application software CD-ROM.PC requirements;- CPU : IBM PC 496/586, PSI2 and compatible.- OS : Microsoft Windows_95 (recommended) or Windows_3.1- RAM : Minimum 8MB (16MB recommended)- VIDEO : VGA, SVGA or XGA Compatible video board with monitor set 16-bit
High color or 24-bit True color.- CD-ROM DRIVE
to installthe Applicationsoftware
Insert the Application software CD-ROM into yourCD-ROM drive.
For Windows_95 : Click the 'Start' button on theWindows Taskbar.
For Windows_3.1 : Choose 'File' from the top menu.
Choose 'Run' from the menu.
Type in the following in the dialog box and hit 'Enter'.- For Windows_95 : [ (example)'d:\setup32' ]
- For Windows_3.1 : I (example)'d:\setup16' I
If your CD-ROM drive is 'd'.
21

5When you see the following box, click on 'Next'.
Follow the instructions on the screen, and you will
see the following 'iPhoto Express' screen when the
installation is complete.(For Windows®3.1 the application software and the following screens
shown will be that of iPhoto Plus)
'iPhoto Express' screen
'iPhoto Expressi screen
'_ On some systems, steps 2-4 above are skipped
and you will automatically be taken to step 5 uponinsertion of the CD-ROM. It is recommended that
you go through the guided tour option available
towards the end of the installation process.(iPhoto Express only)
22

SoftwareInstallation
g AfterinstallingtheTwainDriverandApplicationsoftwareasdescribedintheimaes previouspages,youarereadyto downloadimagesfromthecamera.
Start the Application software.
(example) iPhoto Express image editor II
Choose 'Acquire' from the 'File' menu.Then, click on 'Select Source...'.
3e, For iPhoto Plus. choose 'Source'
from the 'File' menu.
When you see the following box, click on 'OK'.
Choose 'Acquire' from the 'File' menu. Then, Click on'Image". When you see following box, click on 'Acquire'.
Acquire Image Box
• For iPhoto Plus, only the first part of step 4 isnesessary.
23

The Twain driver dialog box will be displayed on the screen.
Click on the image(s) you want to download andhit 'Load'.
(Hint) To select all images at once, hit 'Select All'.
After all the images are downloaded, you can go back to theApplication software and edit the images, save to file, etc.
Click on 'Help' from the Menu of the Application software fordetails.
,_ You may use application software (image editor) other
than the one supplied with this camera, as long as it isTwain compliant. However, depending on your PC'ssystem resources, some application software may not
function properly. The above steps to download imagesmay vary depending on the application software used.
• For Windows®3.1 : If you have less than 16MB of RAM,
you may not be able to download all the pictures at once.Download a few at a time and save to disk before continuing.
t You can also delete images or take new pictures by following
the steps described above. In step 6 above, hit 'Delete' or'Shot' instead of 'Load'.
24
SoftwareInstallation
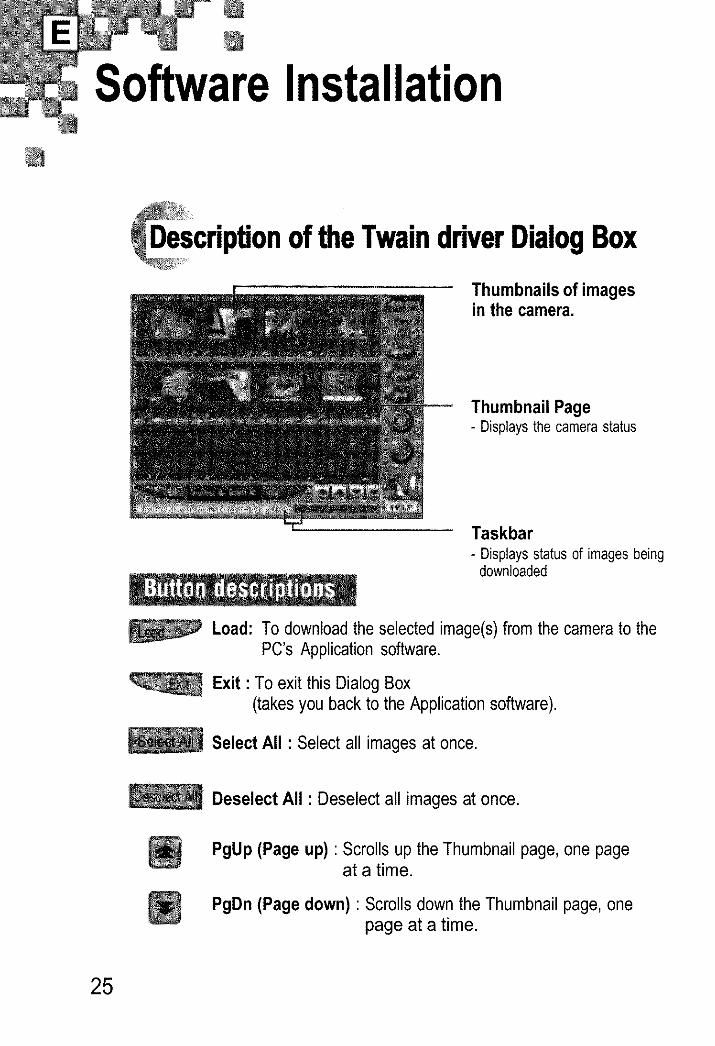
oftheTwaindriverDialogBox
Thumbnailsof imagesin the camera.
Thumbnail Page- Displays the camera status
Taskbar
- Displaysstatusof imagesbeingdownloaded
Load: To downloadthe selectedimage(s)from the camerato thePC's Applicationsoftware.
Exit : To exit this Dialog Box(takes you back to the Application software).
Select All : Select all images at once.
Deselect All : Deselect all images at once.
PgUp (Page up) ' Scrolls up the Thumbnail page, one pageat a time.
PgDn (Page down) ' Scrolls down the Thumbnail page, onepage at a time.
25

Row Up : Scrolls up the Thumbnailpage,one row at a time.
ROW Dn (Row down) : Scrolls down the Thumbnail page,one row at a time.
Options • Selectsthedata transferratebetweenthe PCand camera(Default is 56,000bps)
Update : Updatesthumbnails of shots taken from this Dialog Box.
Delete : Delete the selectedimage.
Shot : To take shots from this Dialog Box.
Timer :Sets the camerainto the self timerphotographymode.
Mode : Sets the picture(resolution)mode.
Battery :To checkthe batterylevelof the camera.
• The 'Shot', 'Timer' and 'Mode' buttons replicate the'Shutter', 'Timer' and 'Pic Mode' buttons on the camera.
26
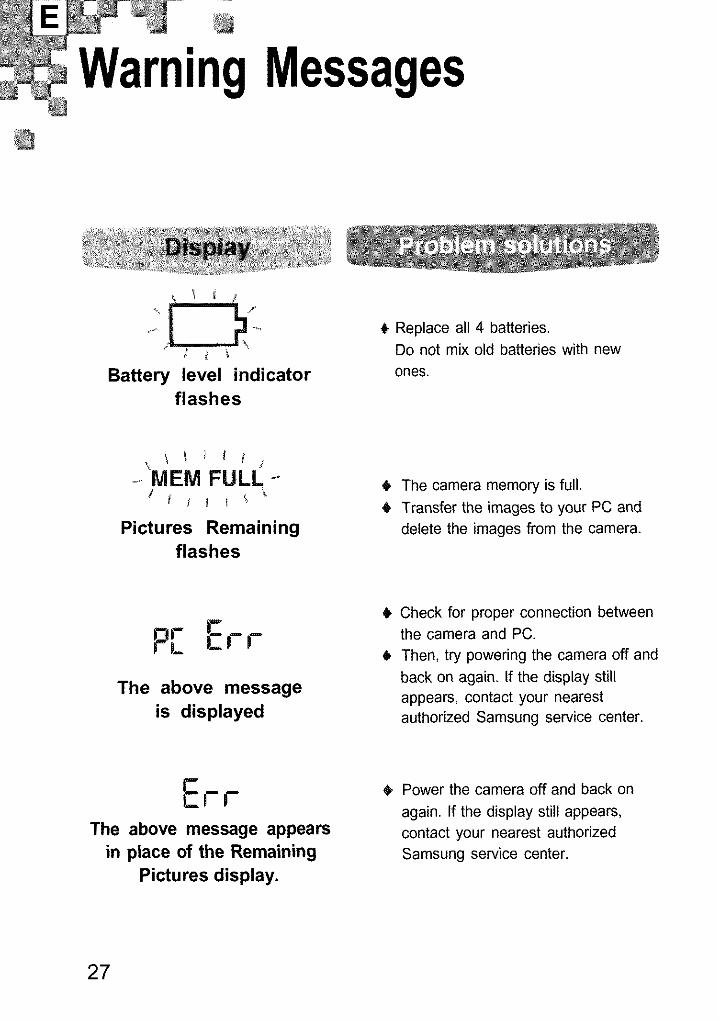
WarningMessages
_" D f
Battery level indicatorflashes
€ Replace all 4 batteries.
Do not mix old batteries with new
ones.
-MEM FULL-_
Pictures Remainingflashes
• The camera memory is full.
4_ Transfer the images to your PC and
delete the images from the camera.
The
p[ Err
above message
is displayed
6. Check for proper connection between
the camera and PC.
Then, try powering the camera off and
back on again. If the display still
appears, contact your nearest
authorized Samsung service center.
The above message appears
in place of the RemainingPictures display.
Power the camera off and back on
again. If the display still appears,
contact your nearest authorized
Samsung service center.
27
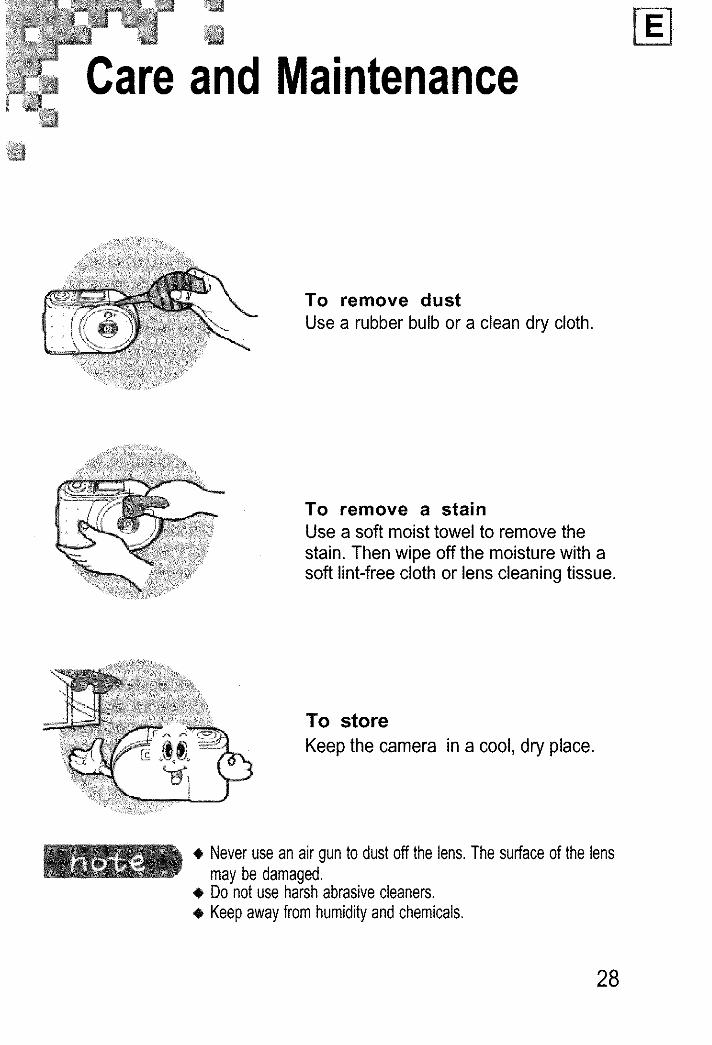
CareandMaintenance%
To remove dust
Use a rubber bulb or a clean dry cloth.
To remove a stainUse a soft moist towel to remove thestain. Then wipe off the moisture with asoft lint-free cloth or lens cleaning tissue.
To store
Keep the camera in a cool, dry place.
Neveruseanair gunto dustoff the lens.Thesurfaceof the lensmaybedamaged.
,_ Donotuseharshabrasivecleaners.4, Keepawayfromhumidityandchemicals.
28

roubleshootingBefore calling for service, check the following first
The camera does not power on.I Check that the batteries are inserted
properly. (See pages 9 -10)
The images cannot betransferred to the PC.• Check that the PC cable is connected
properly. (See page 17)
The camera suddenly shuts off.
You may have not operated the camera
for the last 3 minutes. (See page 12)
29

hn ical specifications
Image sensor
Image size
Color depth
Memory
Image capacity
Compression
Fixed focusing, F : 4.0, f : 6.0 mmLens(equivalentto 43ram on a 35ramcamera)
Range 100cm (3.3 feet) ~ infinity (_-_,)
Viewfinder Separateoptical
Shutter Auto electronic (1/4 ~ 1/8000second)
Exposure system Auto exposure
Color balance AutomaticWhite Balance
Sensitivity ISO 100
350 thousandpixel CCD
[STD]: 640x 480 pixels(VGA) [EGO]: 320x 240 pixels
24 bits true color (16 millioncolors)
4MB internalflash
Standard (STD) :45 images
Economy(ECO) : 180 images
StandardJPEG
30
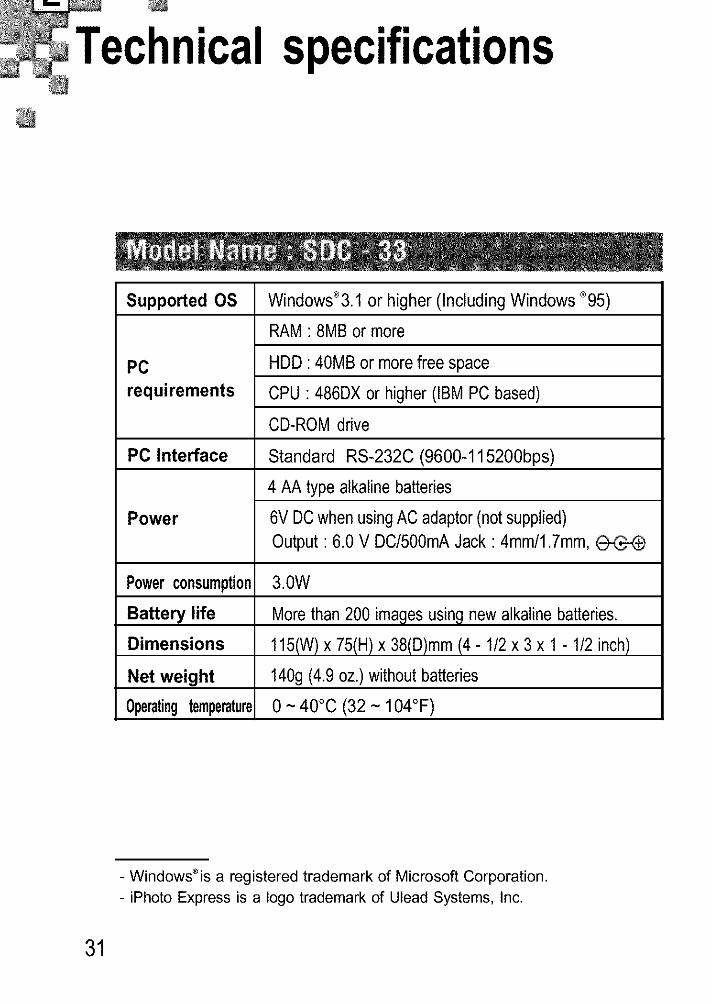
nicalspecifications
Supported OS
PC
requirements
PC Interface
Power
Powerconsumption
Battery life
Dimensions
Net weight
Operatingtemperature
Windows®3.1 or higher (Including Windows ®95)
RAM : 8MB or more
HDD : 40MB or more free space
CPU : 486DX or higher (IBM PC based)
CD-ROM drive
Standard RS-232C (9600-115200bps)
4 AA type alkaline batteries
6V DCwhenusingACadaptor(notsupplied)
Output : 6.0 V DC/500mAJack : 4ram/1.7ram,e-C_
3.0W
More than200 imagesusing new alkaline batteries.
115(W)x 75(H)x 38(D)mm(4- 1/2 x 3 x 1- 1/2 inch)
140g(4.9 oz.) without batteries
0 ~ 40°C (32 ~ 104°F)
- Windows®is a registered trademark of Microsoft Corporation.
- iPhoto Express is a logo trademark of Ulead Systems, Inc.
31

Warranty(forUSAusersonly)
SAMSUNGLIMITED WARRANTY
SAMSUNG ElectronicsAmerica Inc. (SEA), warrants that this product is free fromdefective material and workmanship.SEA further warrants that if product fails to operate properly within the specifiedwarranty period and the failure is due to improper workmanship or defective material,SEA will repair or replace the product at its option.All warranty repairs must be performed by a SEA authorized service center. The nameand address of the location nearest you can be obtained by calling toll free:1-800-SAMSUNG (1-800-726-7864).Labor1 year carry-inParts1 year
On carry-in models, transportation to and from the service center Is the customer'sresponsibility.
The original dated sales receipt must be retained by the customer and is the only
acceptable proof of purchase. It must be presented to the authorized service center.
EXCLUSIONS (WHAT IS NOT COVERED)
This warranty does not cover damage due to accident, fire, flood and/or otheracts of God; misuse, incorrect line voltage, improper installation, improper orunauthorized repairs, commercial use, or damage that occurs in shipping.Exterior and interior finish, lamps, and glass are not covered under this
warranty.Customer adjustments which are explained in the instruction manual are not
covered under the terms of this warranty. This warranty will automatically bevoided for any unit found with a missing or altered serial number. This warranty
is valid only on product purchased in the United States and Puerto Rico.
Some States do not allow the exclusions or limitations of incidental or
consequential damages, or allow limitations on how long an implied warranty
lasts, so the above limitations or exclusions may not apply to you. This warrantygives you specific legal rights, and you may also have other rights which varyfrom State to State.
32
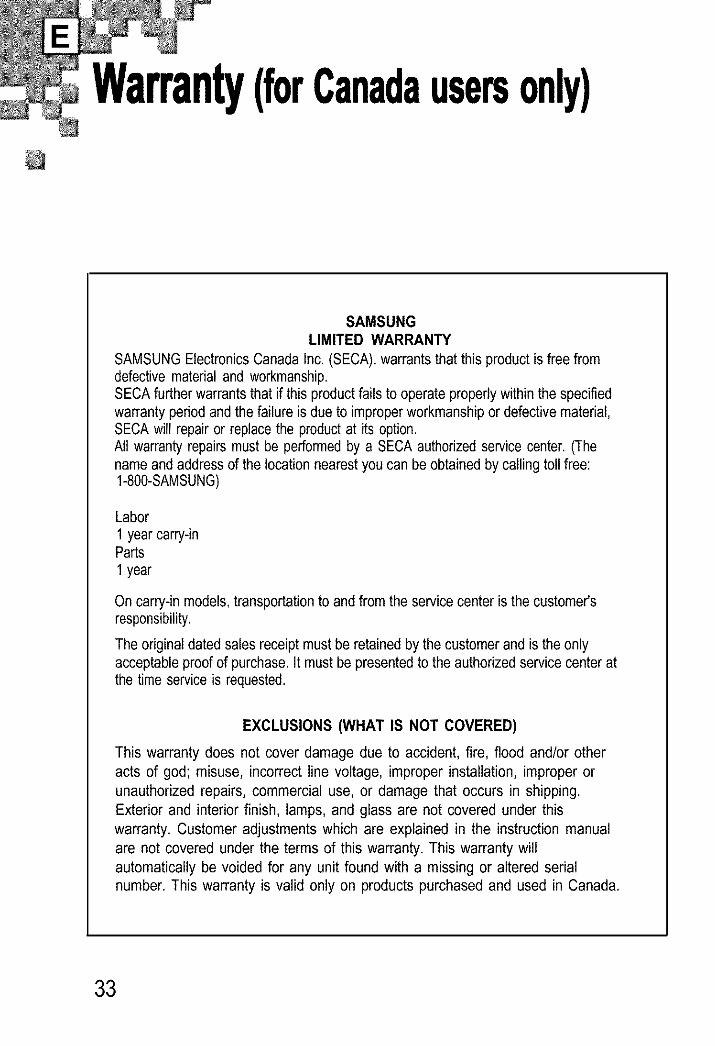
Warranty(forCanada only)
SAMSUNGLIMITED WARRANTY
SAMSUNG Electronics Canada Inc. (SECA),warrants that this product is free fromdefective material and workmanship.SECA further warrants that if this product fails to operate properly within the specifiedwarranty period and the failure is due to improper workmanship or defective material,SECA will repair or replace the product at its option.All warranty repairs must be performed by a SECA authorizedservice center. (Thename and address of the location nearest you can be obtained by calling toll free:1-800-SAMSUNG)
Labor
1 year carry-inParts
1 year
On carry-in models, transportation to and from the service center is the customer'sresponsibility.
The original dated sales receipt must be retained by the customer and is the onlyacceptable proof of purchase. It must be presented to the authorized service center atthe time service is requested.
EXCLUSIONS (WHAT IS NOT COVERED)
This warranty does not cover damage due to accident, fire, flood and/or other
acts of god; misuse, incorrect line voltage, improper installation, improper orunauthorized repairs, commercial use, or damage that occurs in shipping.
Exterior and interior finish, lamps, and glass are not covered under thiswarranty. Customer adjustments which are explained in the instruction manualare not covered under the terms of this warranty. This warranty will
automatically be voided for any unit found with a missing or altered serialnumber. This warranty is valid only on products purchased and used in Canada.
33

IMPORTANTNOTICE
Application SoftwareIt ishighlyrecommendedthatyouuseonlytheApplicationsoftwarethatwasincludedwiththiscamerafor downloadingimagesto yourPC:
- Windows®95 : iPhotoExpress (ver. 1.0)
- Windows®3.1 : iPhotoPlus (ver. 1.2)
The iPhotoExpressCD-ROM providedwith the camera
iPhotoPlus for Windows®3.1.
also includes
Downloading Images - for Windows®3.1 only
Even if you have morethan 8MB of RAMinstalledin your PC,
you may experiencecommunicationserror while downloadingmultiple
imagesat once. If this is the case, we suggestthe following:
1. Downloadonly a few images at a time.
2. Save those downloaded images.
3. Then, download more images.
If an erroroccurswhite downloading:1. Exit the TWAIN DRIVERscreen.
2. ACQUIRE the thumbnails again.
Rememberthat the maximumnumberof imagesthat the Application
softwarecan open at a given time depends on the amount of free memoryavailable.
The Applicationsoftwarealso needsto keep some buffer memory (usuallya few
MBs), so the actualavailablememorymay be less thanwhat is displayedby the
Application.
To increasethe number of images you can download at a time,you can try excluding SMARTDRV.EXEand EMM386.EXEfrom loading your system. However,
this could slow down your PC's disk operationsand disable DOS accessto upper memory.

Memo

THISCAMERAISMANUFACTUREDBY:
FOR SERVICE ASSISTANCE AND THE LOCATION OF
THE NEAREST A.S.C., PLEASE CALL:1-800-SAMSUNG (1-800-726-7864)
CODE NO:AD68-10793C