sql server Practica de Backup y Restore Grafico y Con Scripts
Save 01.12.08/ Print 01.12.08 T Database_Manual_MSSQL_EG.doc
© 2008 Q-DAS Inc., Q-DAS GmbH
[email protected] Tel. 248-299-4910
Q-DAS Database Manual Scripts for Microsoft SQL Server
Maintenance Procedure
Q-DAS Library Living Documentation
Last edited: 11/27/06
Version: EF

Save 01.12.08/ Print 01.12.08 T Database_Manual_MSSQL_EG.doc
© 2008 Q-DAS Inc., Q-DAS GmbH
[email protected] Tel. 248-299-4910
Database Manual Microsoft SQL Server
Page 1 / 28
Table of Contents
1 CREATING A NEW DATABASE------------------------------------------------------------------2
2 CREATING A NEW DATABASE USER --------------------------------------------------------6
3 INSTALLING THE Q-DAS TABLES ----------------------------------------------------------- 10
3.1 Q-DAS Tables (all Me x versions) -----------------------------------------------------------------------------------15
3.2 Support of additional fields on the values level in the database -----------------------------------------------16
4 CONNECTING QS-STAT TO AN MS-SQL-DATABASE--------------------------------- 24
5 OPTIMIZING THE QUERY TIME ON QS-STAT CLIENTS ------------------------------ 25
6 DATABASE MAINTENANCE PROCEDURE------------------------------------------------ 26
6.1 Time Testing with Reference Data ----------------------------------------------------------------------------------26
7 HISTORY OF CHANGES ------------------------------------------------------------------------- 27
Save 01.12.08/ Print 01.12.08 T Database_Manual_MSSQL_EG.doc
© 2008 Q-DAS Inc., Q-DAS GmbH
[email protected] Tel. 248-299-4910
Database Manual Microsoft SQL Server
Page 2 / 28
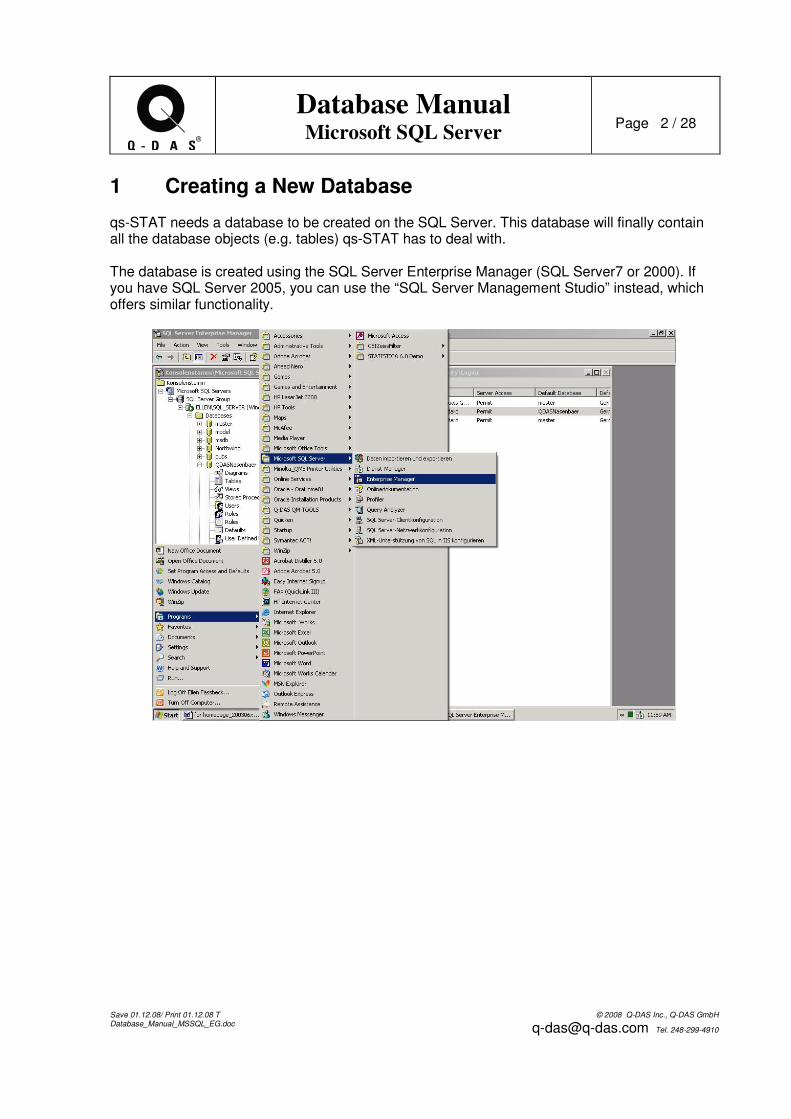
1 Creating a New Database qs-STAT needs a database to be created on the SQL Server. This database will finally contain all the database objects (e.g. tables) qs-STAT has to deal with. The database is created using the SQL Server Enterprise Manager (SQL Server7 or 2000). If you have SQL Server 2005, you can use the “SQL Server Management Studio” instead, which offers similar functionality.
Save 01.12.08/ Print 01.12.08 T Database_Manual_MSSQL_EG.doc
© 2008 Q-DAS Inc., Q-DAS GmbH
[email protected] Tel. 248-299-4910
Database Manual Microsoft SQL Server
Page 3 / 28
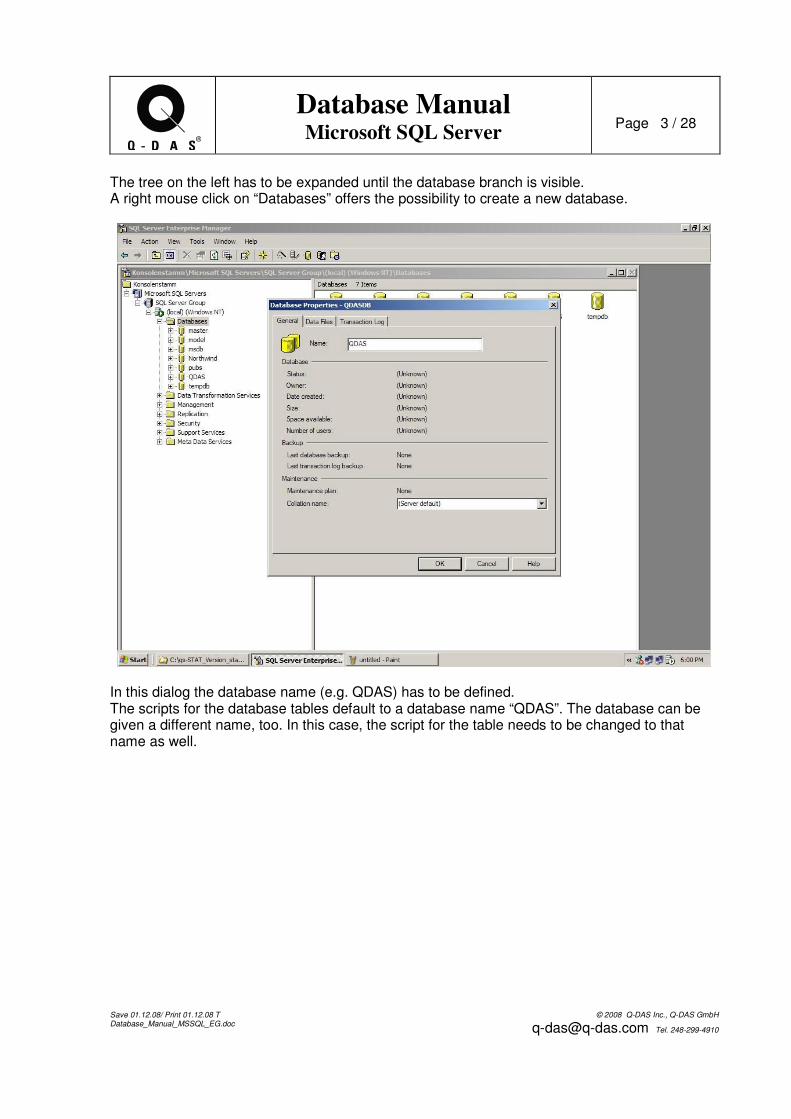
The tree on the left has to be expanded until the database branch is visible. A right mouse click on “Databases” offers the possibility to create a new database.
In this dialog the database name (e.g. QDAS) has to be defined. The scripts for the database tables default to a database name “QDAS”. The database can be given a different name, too. In this case, the script for the table needs to be changed to that name as well.
Save 01.12.08/ Print 01.12.08 T Database_Manual_MSSQL_EG.doc
© 2008 Q-DAS Inc., Q-DAS GmbH
[email protected] Tel. 248-299-4910
Database Manual Microsoft SQL Server
Page 4 / 28
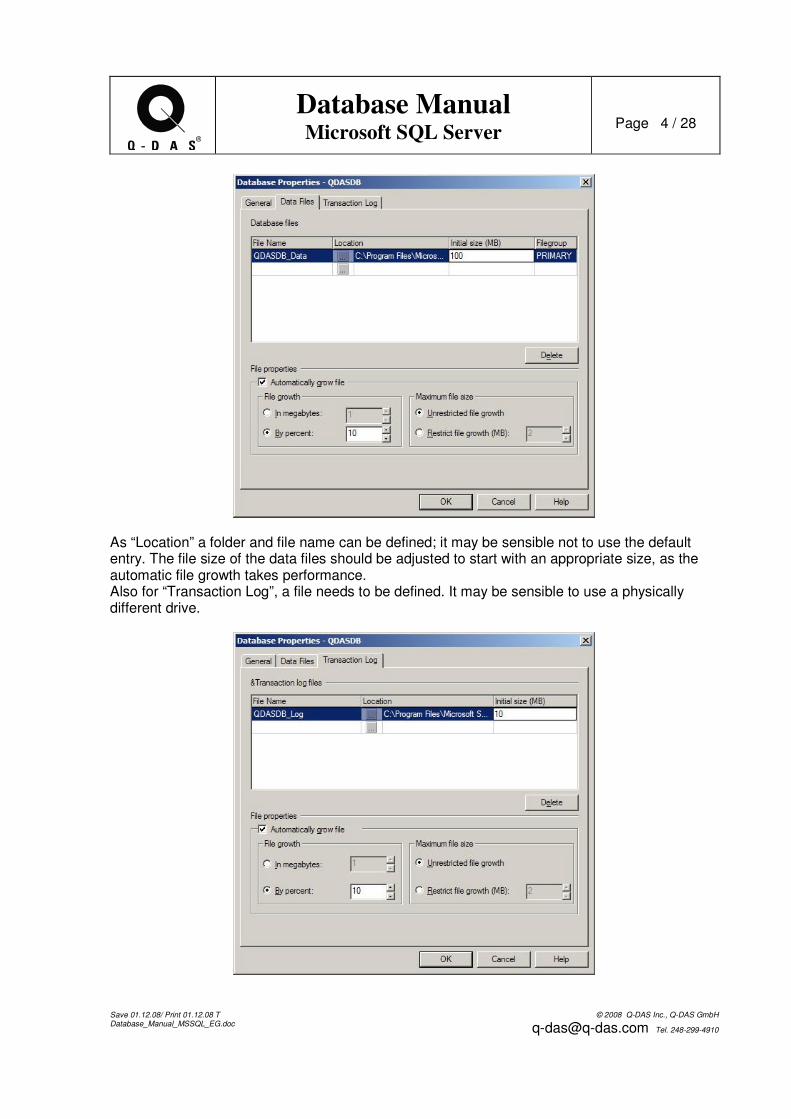
As “Location” a folder and file name can be defined; it may be sensible not to use the default entry. The file size of the data files should be adjusted to start with an appropriate size, as the automatic file growth takes performance. Also for “Transaction Log”, a file needs to be defined. It may be sensible to use a physically different drive.
Save 01.12.08/ Print 01.12.08 T Database_Manual_MSSQL_EG.doc
© 2008 Q-DAS Inc., Q-DAS GmbH
[email protected] Tel. 248-299-4910
Database Manual Microsoft SQL Server
Page 5 / 28
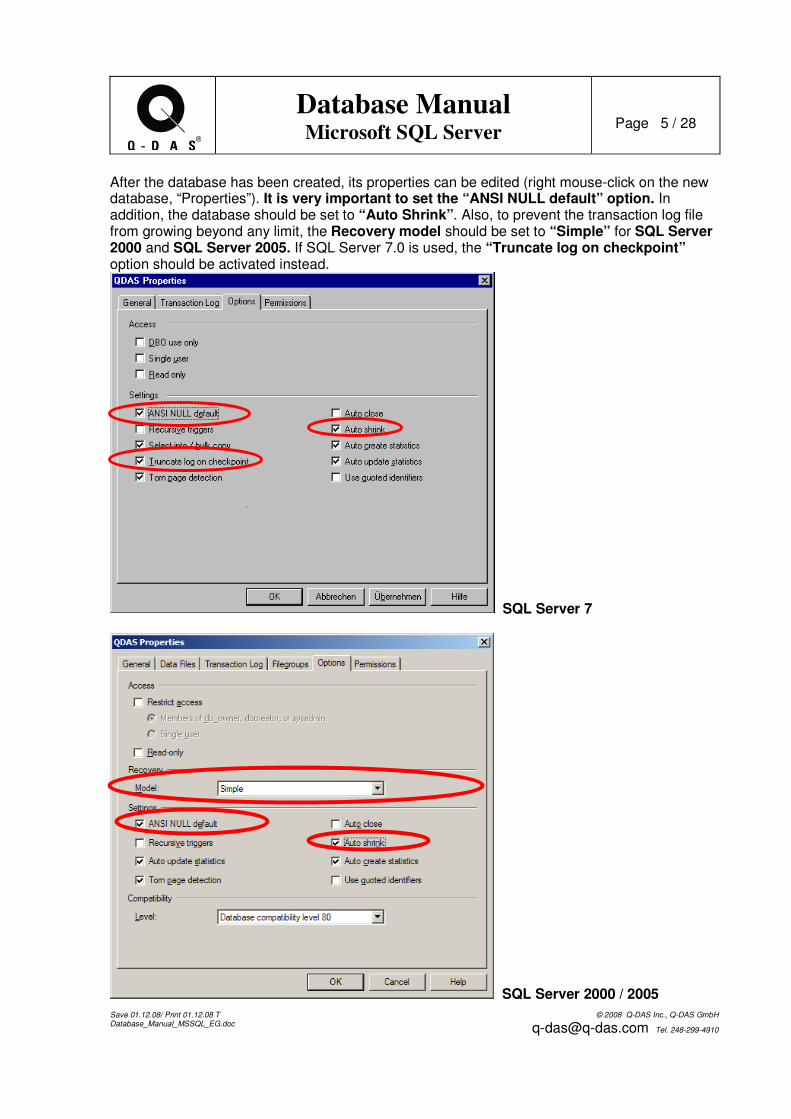
After the database has been created, its properties can be edited (right mouse-click on the new database, “Properties”). It is very important to set the “ANSI NULL default” option. In addition, the database should be set to “Auto Shrink”. Also, to prevent the transaction log file from growing beyond any limit, the Recovery model should be set to “Simple” for SQL Server 2000 and SQL Server 2005. If SQL Server 7.0 is used, the “Truncate log on checkpoint” option should be activated instead.
SQL Server 7
SQL Server 2000 / 2005
Save 01.12.08/ Print 01.12.08 T Database_Manual_MSSQL_EG.doc
© 2008 Q-DAS Inc., Q-DAS GmbH
[email protected] Tel. 248-299-4910
Database Manual Microsoft SQL Server
Page 6 / 28
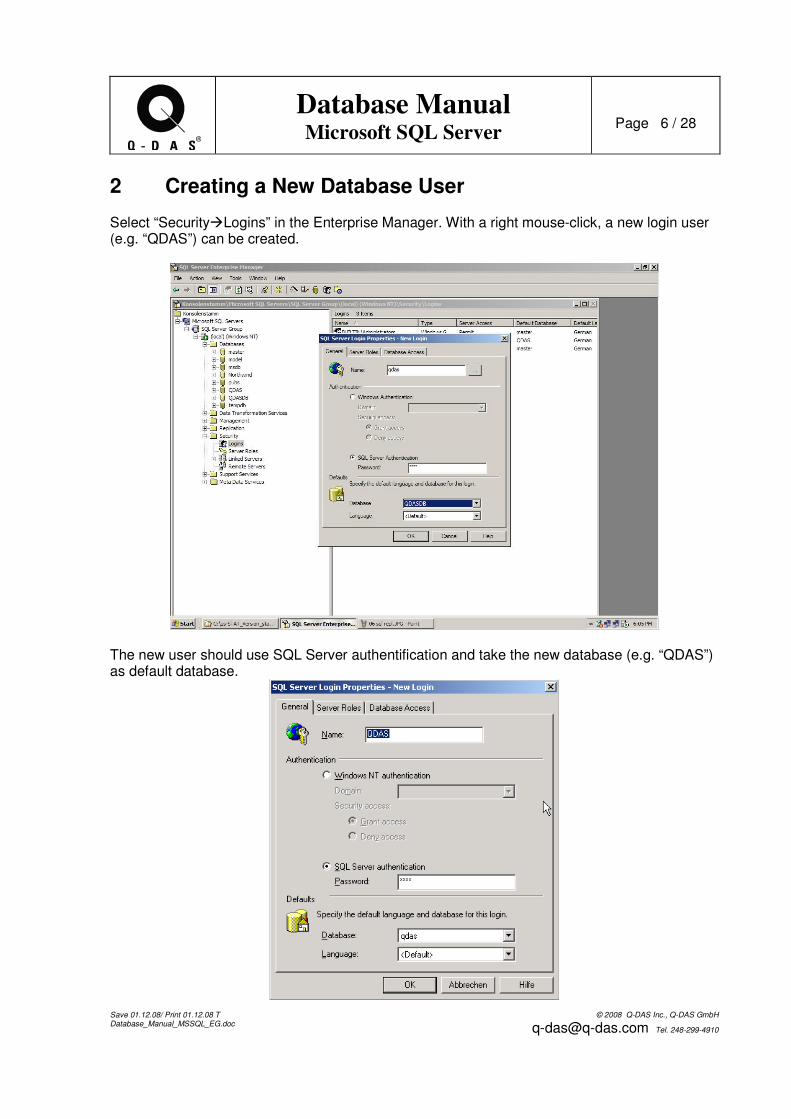
2 Creating a New Database User Select “Security�Logins” in the Enterprise Manager. With a right mouse-click, a new login user (e.g. “QDAS”) can be created.
The new user should use SQL Server authentification and take the new database (e.g. “QDAS”) as default database.
Save 01.12.08/ Print 01.12.08 T Database_Manual_MSSQL_EG.doc
© 2008 Q-DAS Inc., Q-DAS GmbH
[email protected] Tel. 248-299-4910
Database Manual Microsoft SQL Server
Page 7 / 28
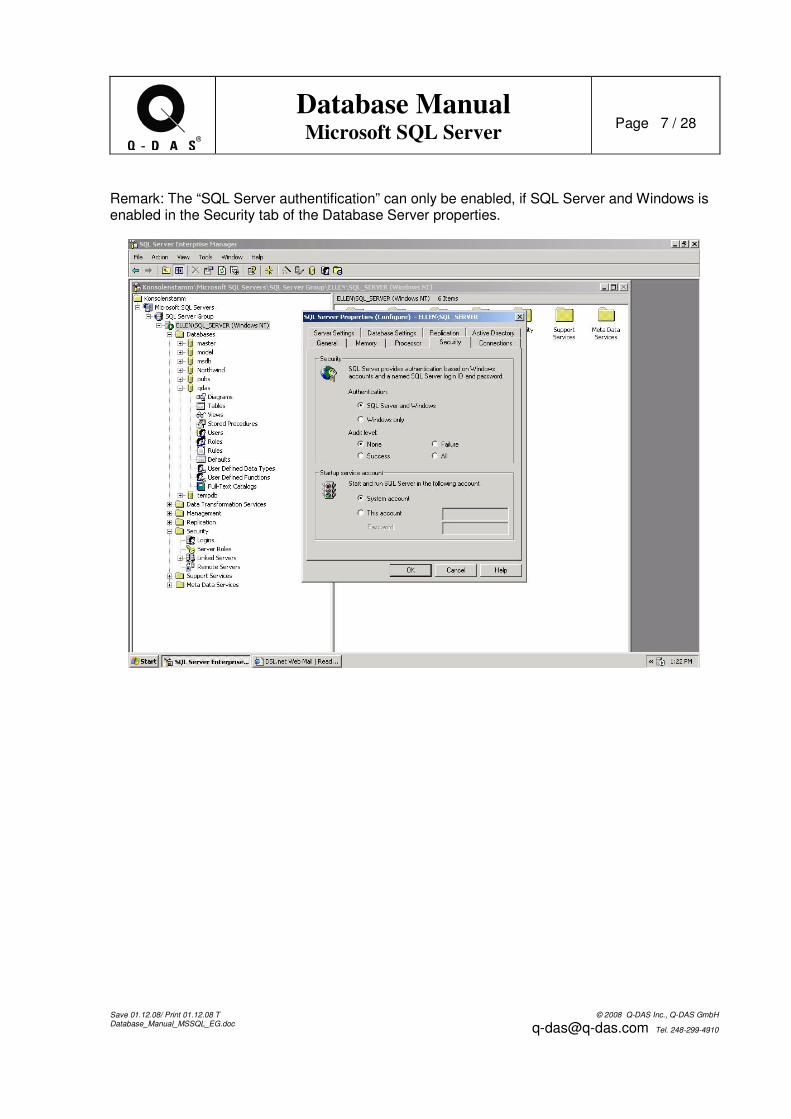
Remark: The “SQL Server authentification” can only be enabled, if SQL Server and Windows is enabled in the Security tab of the Database Server properties.

Save 01.12.08/ Print 01.12.08 T Database_Manual_MSSQL_EG.doc
© 2008 Q-DAS Inc., Q-DAS GmbH
[email protected] Tel. 248-299-4910
Database Manual Microsoft SQL Server
Page 8 / 28
Set the Server Role to “System Administrator” in order to be able to use SQL Profiler.
The user needs to have database permit for the new database and the “public” database role. The user should also be declared as “db_owner” of the new database.

Save 01.12.08/ Print 01.12.08 T Database_Manual_MSSQL_EG.doc
© 2008 Q-DAS Inc., Q-DAS GmbH
[email protected] Tel. 248-299-4910
Database Manual Microsoft SQL Server
Page 9 / 28
The new Login should now appear as a user for the new database in “Enterprise Manager”.

Save 01.12.08/ Print 01.12.08 T Database_Manual_MSSQL_EG.doc
© 2008 Q-DAS Inc., Q-DAS GmbH
[email protected] Tel. 248-299-4910
Database Manual Microsoft SQL Server
Page 10 / 28
3 Installing the Q-DAS Tables Q-DAS GmbH provides SQL Scripts which are recommended to create the tables and further database objects qs-STAT needs. The first command in each script provided by Q-DAS GmbH is “USE QDAS”. If a database name different from “QDAS” is used (See Chapter 1), this command needs to be modified to the desired name (use a simple ASCII editor like “Notepad”). In case of the necessity of using Unicode characters, e.g. with Asian languages, the scripts should be modified in the following manner: The “varchar” and “text” data types have to be replaced by “nvarchar” and “ntext” data types, which support Unicode. This can easily be achieved using Notepad’s replace function. If SQL Server 2000 or 2005 is used, it is also strongly recommended to install SQL Server 2000 Service Pack 3a. SQL scripts can be performed through the SQL Server Profiler. This program can be found in the Tools Menu in SQL Server Enterprise Manager.

Save 01.12.08/ Print 01.12.08 T Database_Manual_MSSQL_EG.doc
© 2008 Q-DAS Inc., Q-DAS GmbH
[email protected] Tel. 248-299-4910
Database Manual Microsoft SQL Server
Page 11 / 28
To load a SQL script, select “Open�SQL Script” in the File menu.
Open up the “Tables_ME_MSSQL.sql”. If the database name was created differently from “QDAS”, the “use QDAS” command at the beginning of this script needs to be changed into “use <actual database name>” using Notepad before opening and running the script. Also, it is recommended that a Q-DAS employee individually adjusts this script so that the database provides the optimum performance and uses as little disk space as possible.
Save 01.12.08/ Print 01.12.08 T Database_Manual_MSSQL_EG.doc
© 2008 Q-DAS Inc., Q-DAS GmbH
[email protected] Tel. 248-299-4910
Database Manual Microsoft SQL Server
Page 12 / 28
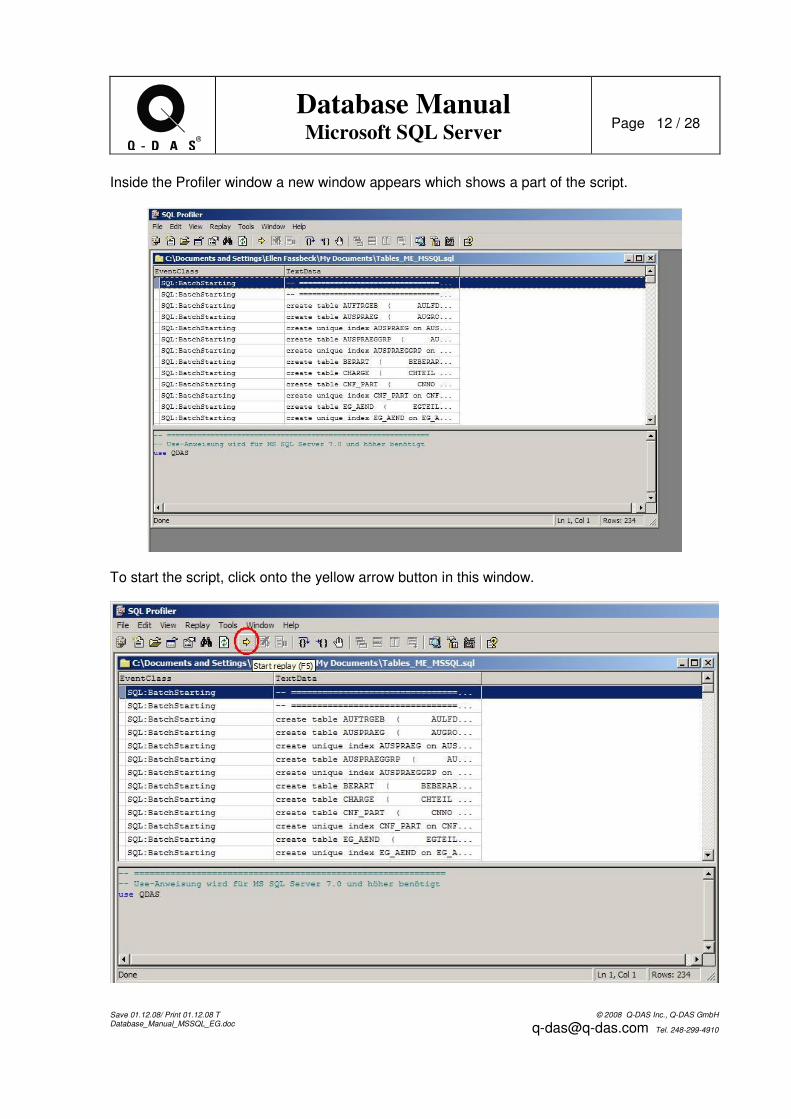
Inside the Profiler window a new window appears which shows a part of the script.
To start the script, click onto the yellow arrow button in this window.

Save 01.12.08/ Print 01.12.08 T Database_Manual_MSSQL_EG.doc
© 2008 Q-DAS Inc., Q-DAS GmbH
[email protected] Tel. 248-299-4910
Database Manual Microsoft SQL Server
Page 13 / 28
Log on with the new user using SQL Server authentication.
optional: turn the event log on
Save 01.12.08/ Print 01.12.08 T Database_Manual_MSSQL_EG.doc
© 2008 Q-DAS Inc., Q-DAS GmbH
[email protected] Tel. 248-299-4910
Database Manual Microsoft SQL Server
Page 14 / 28
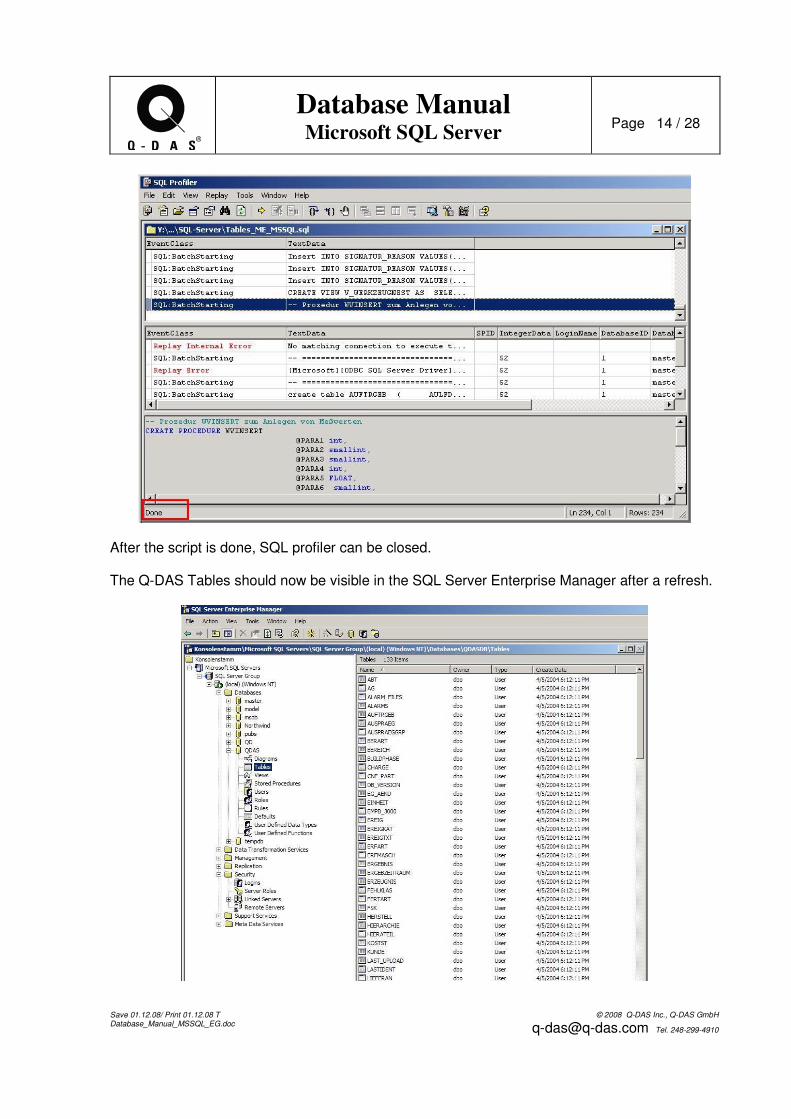
After the script is done, SQL profiler can be closed. The Q-DAS Tables should now be visible in the SQL Server Enterprise Manager after a refresh.

Save 01.12.08/ Print 01.12.08 T Database_Manual_MSSQL_EG.doc
© 2008 Q-DAS Inc., Q-DAS GmbH
[email protected] Tel. 248-299-4910
Database Manual Microsoft SQL Server
Page 15 / 28
3.1 Q-DAS Tables (all Me x versions) If you want to install the tables for qs-stat millennium on a fresh instance, run the script Tables_ME_MSSQL.sql. It is possible to customize the script by deleting unused columns in the CREATE statements of the parts table (TEIL) and characteristics table (MERKMAL) In table TEIL the following columns must not be deleted: TETEIL and the columns used in the upload program as key fields. In table MERKMAL the following columns must not be deleted: METEIL MEMERKMAL MEZYKLUS MEGLEITSTUMF MEPRUEFZST MEAUGROUP MEUPPERMERKMAL MEPRUEFORT MEUNTERSART MEPMGRUPPE and the columns used in the upload program as key fields. This script creates the new tables TEIL (parts table) and MERKMAL (characteristics table) and copies the contents of the old tables TEIL1, TEIL2, MERKMAL1, MERKMAL2, MERKMAL3 and MERKMAL_AD to the new tables. Further new tables are created and new columns added. If you want to update from an older version of qs-stat millennium, run the scripts Tables_Update_ME_MSSQL.sql and PARTCHARACTERISTIC_NEWFIELDS_MSSQL.SQL. If you use customized parts and characteristics tables (see above), you do not need the second script. Through Enterprise Manager, start SQL Server Line Profiler. Load the script file(s) you need and start it/them with the yellow arrow. Note: Using the script “Droptables_2000.sql” allows deletion of the created tables.

Save 01.12.08/ Print 01.12.08 T Database_Manual_MSSQL_EG.doc
© 2008 Q-DAS Inc., Q-DAS GmbH
[email protected] Tel. 248-299-4910
Database Manual Microsoft SQL Server
Page 16 / 28
3.2 Support of additional fields on the values level in the database
It is possible to add additional fields on the values level to the database that are not supported by qs-STAT itself but by the qs-STAT query tool. This means, these additional fields can be used for specific database queries and filters. This is only possible, if the “COPY” option in the Upload is turned on that allows copying data from a specific K-field on the characteristics or the parts level to the values level. If this is required, please contact Q-DAS for more information. The Q-DAS ASCII Data Transfer Format specifies two K-fields that will not be created by the default database scripts. These two fields are typically not used, but if in the database, would allow so save a very long text with each value. This would reduce the database performance in general. These two K-fields are K-fields K0009 (text) and K0011 (process parameter). If required these fields can be added to the database later on using Enterprise Manager.
Adding K0009 and K0011 to the Database: The columns for K0009 and K0011 need to be created in both database tables WERTEVAR and MEASVALUES with the column names “WV0009” and “WV0011” in both tables. Both fields need to be defined as a text data type and have a length 255 characters. After adding any fields to the values level table, the “wvinsert.sql” script needs to be run.

Save 01.12.08/ Print 01.12.08 T Database_Manual_MSSQL_EG.doc
© 2008 Q-DAS Inc., Q-DAS GmbH
[email protected] Tel. 248-299-4910
Database Manual Microsoft SQL Server
Page 17 / 28
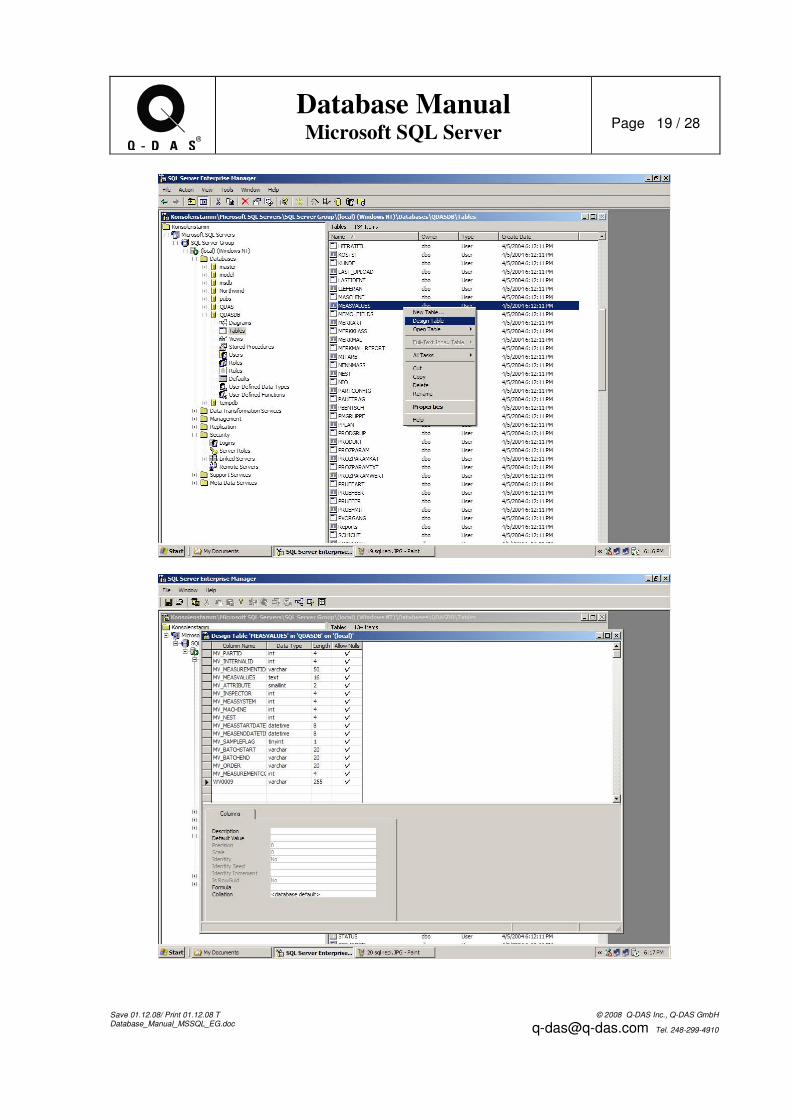
Find the WERTEVAR table, then do a right mouse click on it and select “Design table”

Save 01.12.08/ Print 01.12.08 T Database_Manual_MSSQL_EG.doc
© 2008 Q-DAS Inc., Q-DAS GmbH
[email protected] Tel. 248-299-4910
Database Manual Microsoft SQL Server
Page 18 / 28
Save 01.12.08/ Print 01.12.08 T Database_Manual_MSSQL_EG.doc
© 2008 Q-DAS Inc., Q-DAS GmbH
[email protected] Tel. 248-299-4910
Database Manual Microsoft SQL Server
Page 19 / 28

Save 01.12.08/ Print 01.12.08 T Database_Manual_MSSQL_EG.doc
© 2008 Q-DAS Inc., Q-DAS GmbH
[email protected] Tel. 248-299-4910
Database Manual Microsoft SQL Server
Page 20 / 28

Save 01.12.08/ Print 01.12.08 T Database_Manual_MSSQL_EG.doc
© 2008 Q-DAS Inc., Q-DAS GmbH
[email protected] Tel. 248-299-4910
Database Manual Microsoft SQL Server
Page 21 / 28
After adding any new fields on the values level to the database (tables WERTEVAR and MESVALUES), it is very important to run the “wvinsert.sql” script.

Save 01.12.08/ Print 01.12.08 T Database_Manual_MSSQL_EG.doc
© 2008 Q-DAS Inc., Q-DAS GmbH
[email protected] Tel. 248-299-4910
Database Manual Microsoft SQL Server
Page 22 / 28
Save 01.12.08/ Print 01.12.08 T Database_Manual_MSSQL_EG.doc
© 2008 Q-DAS Inc., Q-DAS GmbH
[email protected] Tel. 248-299-4910
Database Manual Microsoft SQL Server
Page 23 / 28
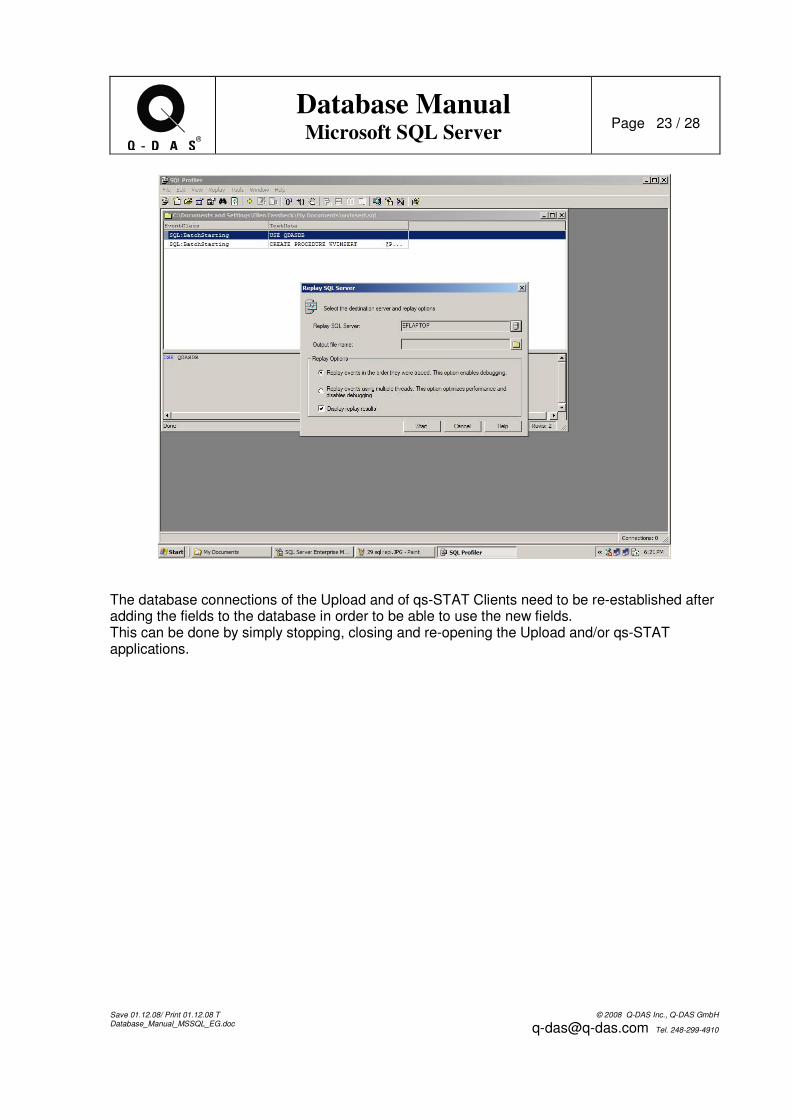
The database connections of the Upload and of qs-STAT Clients need to be re-established after adding the fields to the database in order to be able to use the new fields. This can be done by simply stopping, closing and re-opening the Upload and/or qs-STAT applications.

Save 01.12.08/ Print 01.12.08 T Database_Manual_MSSQL_EG.doc
© 2008 Q-DAS Inc., Q-DAS GmbH
[email protected] Tel. 248-299-4910
Database Manual Microsoft SQL Server
Page 24 / 28
4 Connecting qs-STAT to an MS-SQL-Database To establish a database connection to a MS-SQL database with qs-STAT, please open up qs-STAT ME on the “Client” computer. Open the “Databases”-window with the menu-function “Options/System settings/Databases“. With the “Choose connection”-icon, you can open the “Select Data Link File”-dialog. If there is no connection file available in this window yet, please enter your desired description as the “File name” and click on the “Open”-button.
The “Data Link Properties” window opens up and the “Provider” tab is selected. After a Data Link – file has been created, the “Data Link Properties” window opens up, which allows you to define the database-specific adjustments.
Save 01.12.08/ Print 01.12.08 T Database_Manual_MSSQL_EG.doc
© 2008 Q-DAS Inc., Q-DAS GmbH
[email protected] Tel. 248-299-4910
Database Manual Microsoft SQL Server
Page 25 / 28
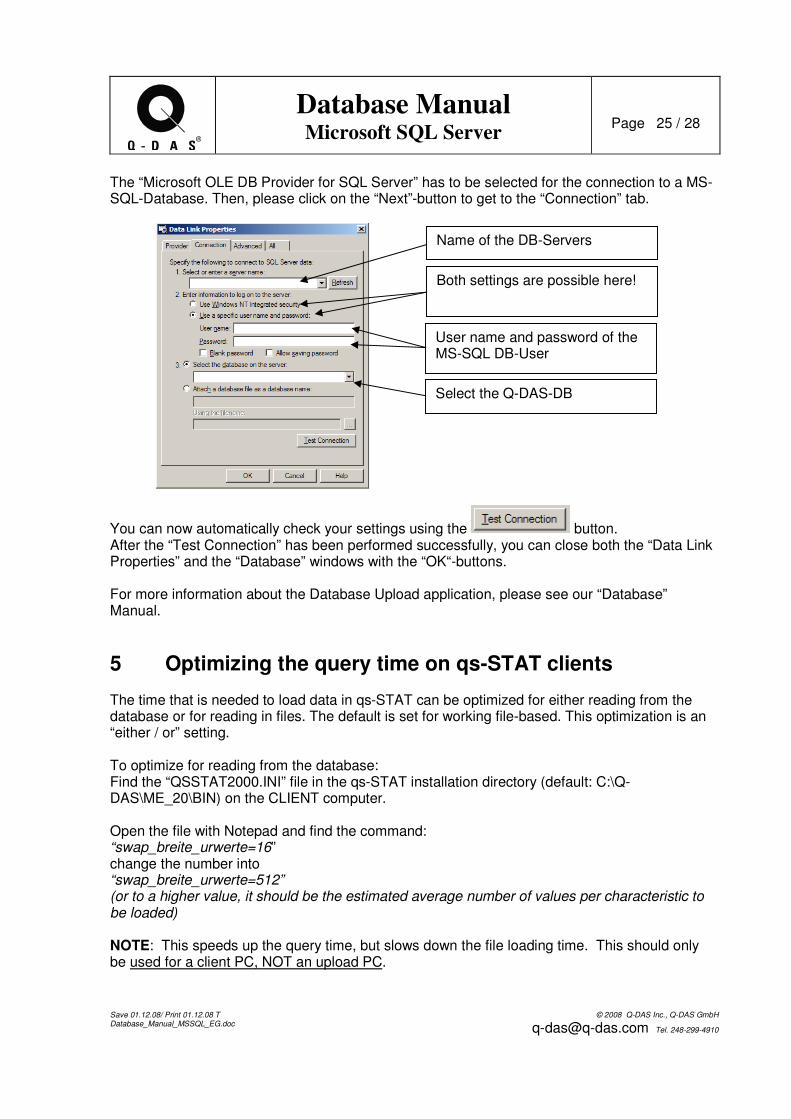
The “Microsoft OLE DB Provider for SQL Server” has to be selected for the connection to a MS-SQL-Database. Then, please click on the “Next”-button to get to the “Connection” tab.
You can now automatically check your settings using the button. After the “Test Connection” has been performed successfully, you can close both the “Data Link Properties” and the “Database” windows with the “OK“-buttons. For more information about the Database Upload application, please see our “Database” Manual.
5 Optimizing the query time on qs-STAT clients The time that is needed to load data in qs-STAT can be optimized for either reading from the database or for reading in files. The default is set for working file-based. This optimization is an “either / or” setting. To optimize for reading from the database: Find the “QSSTAT2000.INI” file in the qs-STAT installation directory (default: C:\Q-DAS\ME_20\BIN) on the CLIENT computer. Open the file with Notepad and find the command: “swap_breite_urwerte=16” change the number into “swap_breite_urwerte=512” (or to a higher value, it should be the estimated average number of values per characteristic to be loaded) NOTE: This speeds up the query time, but slows down the file loading time. This should only be used for a client PC, NOT an upload PC.
Name of the DB-Servers
Both settings are possible here!
User name and password of the MS-SQL DB-User
Select the Q-DAS-DB

Save 01.12.08/ Print 01.12.08 T Database_Manual_MSSQL_EG.doc
© 2008 Q-DAS Inc., Q-DAS GmbH
[email protected] Tel. 248-299-4910
Database Manual Microsoft SQL Server
Page 26 / 28
6 Database Maintenance Procedure
6.1 Time Testing with Reference Data Time tests must be performed on each database instance. Over the life of the database, the documented time tests will help with grading the database.
Test Part Predefined test parts will be used for half of the time tests. These test parts will include a part containing few characteristics with many values per characteristic, and a part containing many characteristics with a single value per characteristic. Procedure:
1. Upload each part separately. Record the time it takes for each upload. Also record the Upload PC specifications. (CPU, memory, etc.) 2. Query each part separately, from the same client machine. Record the time it takes for each query. Also record the client PC specifications. (CPU, memory, etc.) 3. Record these times in a text file. Name the text file “xx-xx-xx-test-part.txt”, including the date in which the tests were taken. 4. Place this file in the time-test folder, located in the maintenance directory.
Actual Data Actual data will be used for the other half of the time tests. Two existing parts from the database will be used, each representing the type of parts used for in the previous time test (a part containing few characteristics with many values per characteristic, and a part containing many characteristics with a single value per characteristic). Note: To collect this data, stop the upload process and collect some relevant files waiting to be uploaded. This will assure that the data does not get duplicated in the database. Procedure:
1. Upload each part separately. Record the time it takes for each upload. Also record the Upload PC specifications. (CPU, memory, etc.) 2. Query each part separately, from the same client machine. Record the time it takes for each query. Also record the client PC specifications. (CPU, memory, etc.) 3. Record these times in a text file. Name the text file “xx-xx-xx-real-part.txt”, including the date in which the tests were taken. 4. Place this file in the time-test folder, located in the maintenance directory.

Save 01.12.08/ Print 01.12.08 T Database_Manual_MSSQL_EG.doc
© 2008 Q-DAS Inc., Q-DAS GmbH
[email protected] Tel. 248-299-4910
Database Manual Microsoft SQL Server
Page 27 / 28
7 History of Changes The history of changes is customer specific. This chapter should include every change to the database configuration, hardware configuration or software configuration. It is highly recommended to document the changes for querying and saving specific parts in the database before and after the changes.