Scrap Wood Organizer - Kreg Tool
15
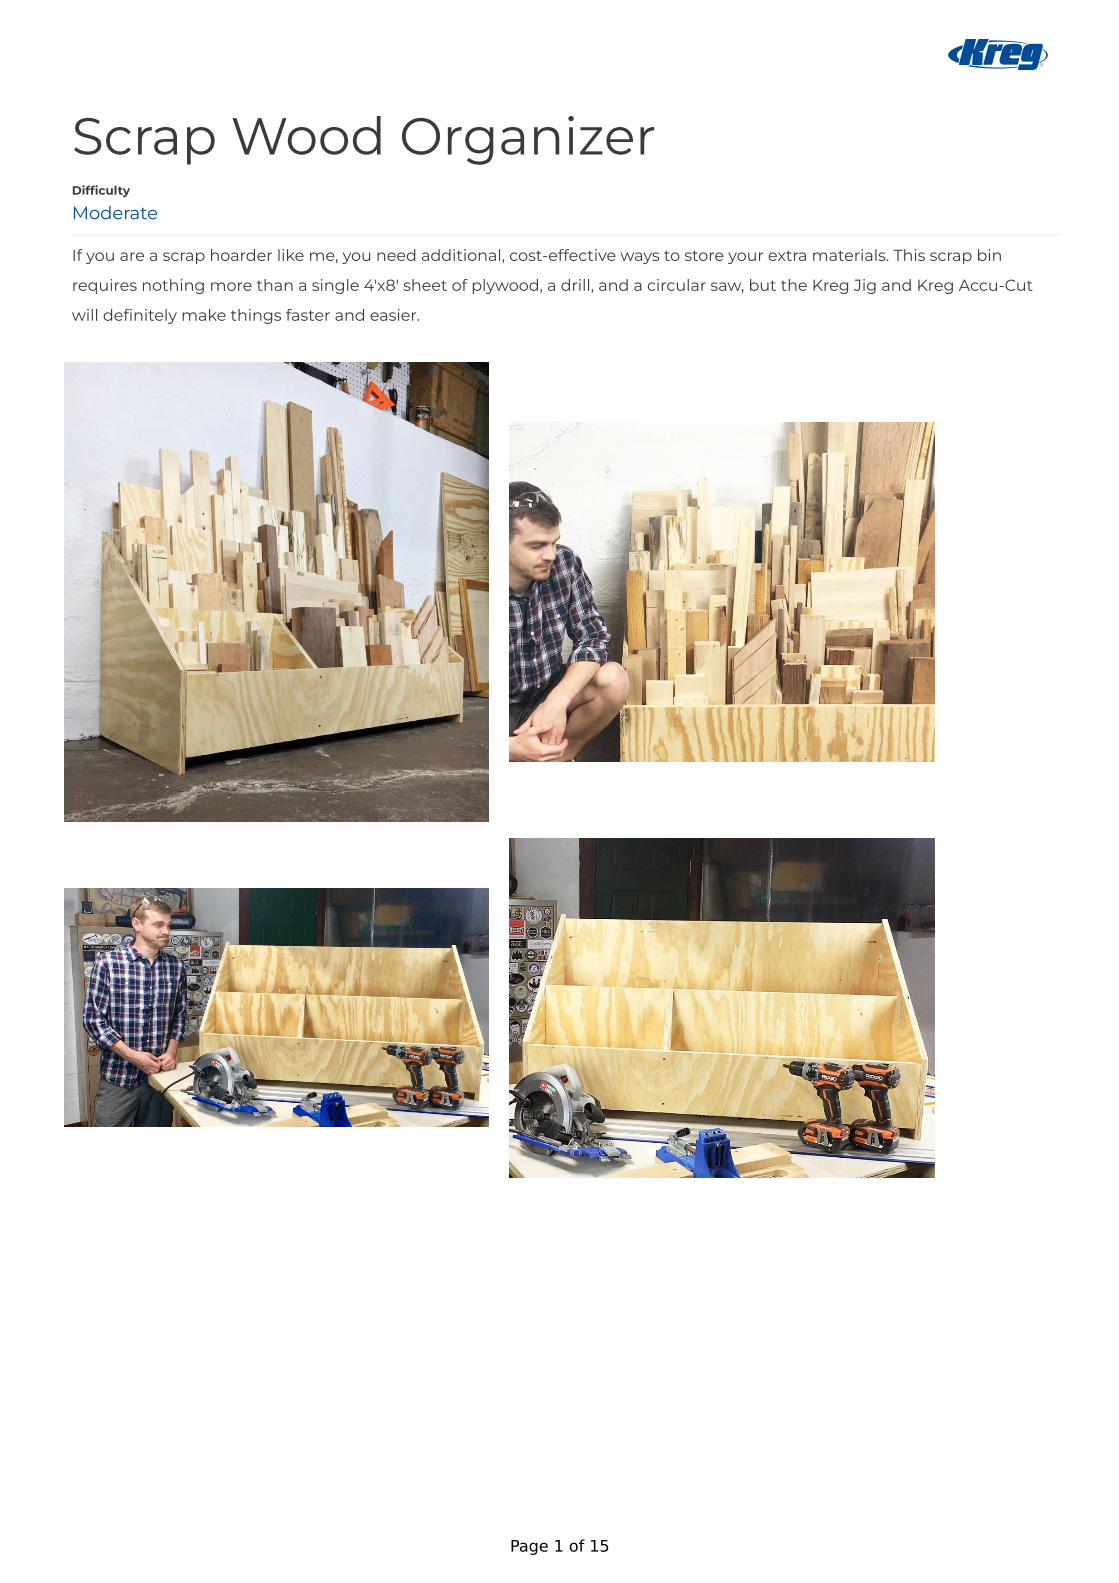
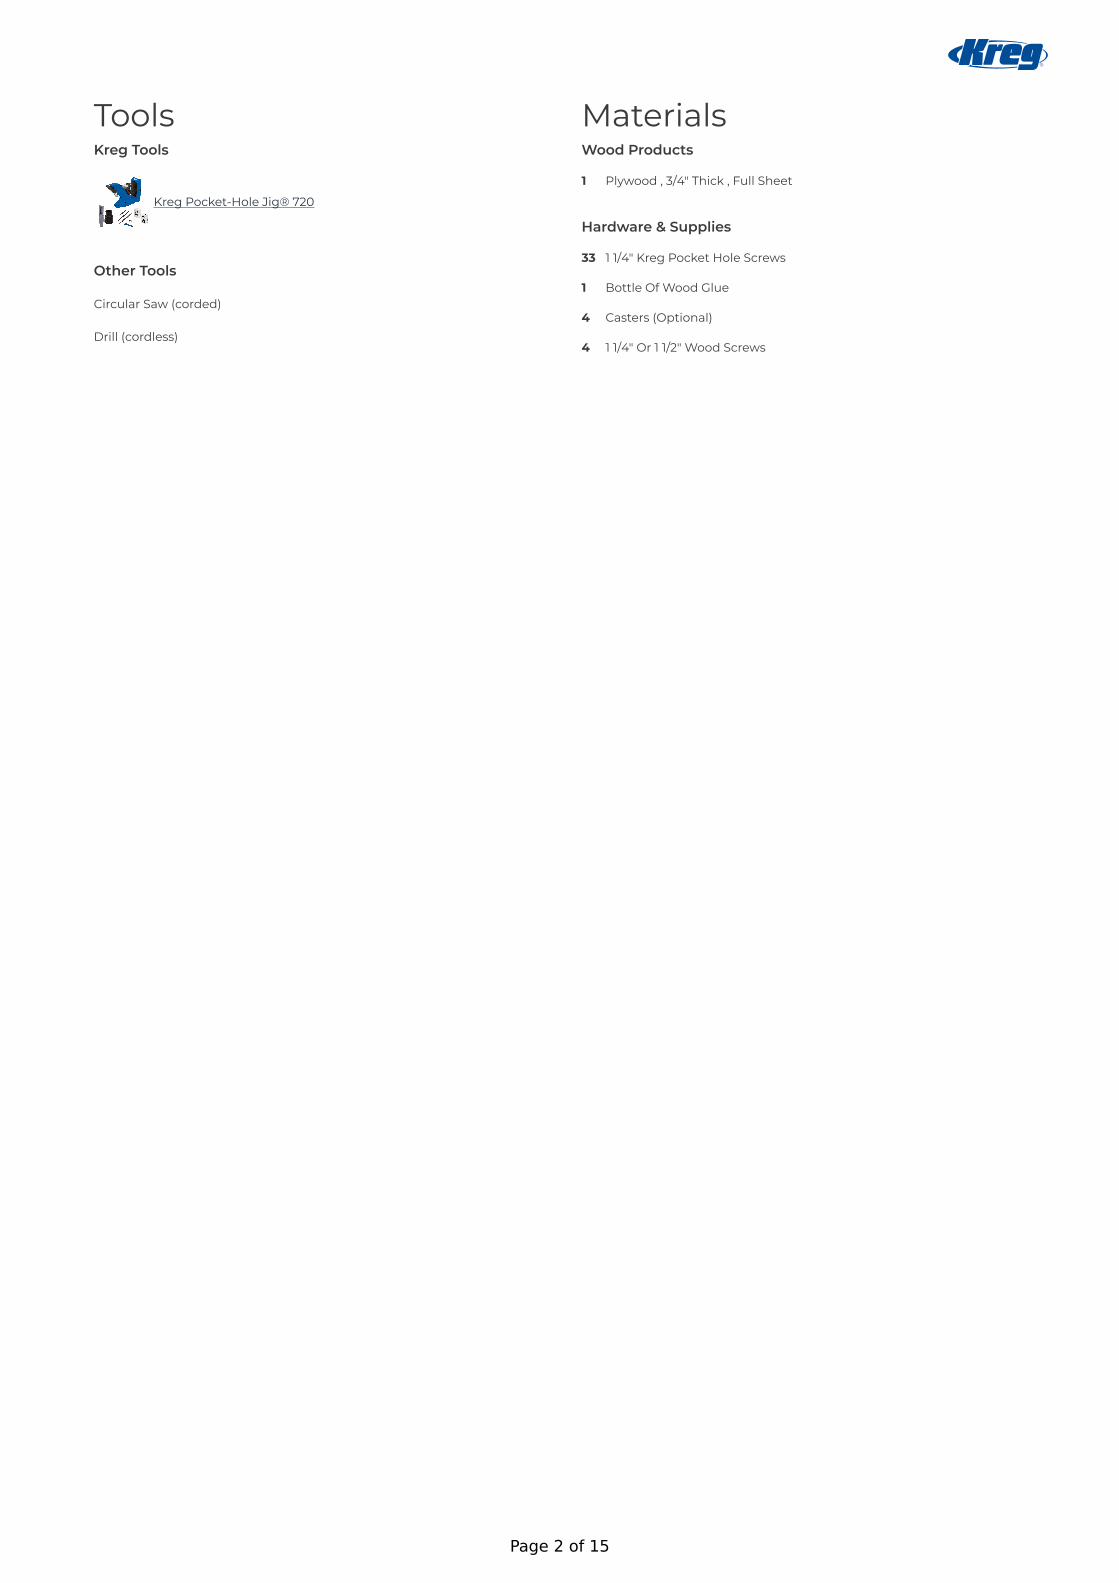
Scrap Wood Organizer If you are a scrap hoarder like me, you need additional, cost-effective ways to store your extra materials. This scrap bin requires nothing more than a single 4'x8' sheet of plywood, a drill, and a circular saw, but the Kreg Jig and Kreg Accu-Cut will definitely make things faster and easier. Difficulty Moderate Page 1 of 15
Transcript of Scrap Wood Organizer - Kreg Tool
Scrap Wood Organizer
If you are a scrap hoarder like me, you need additional, cost-effective ways to store your extra materials. This scrap bin
requires nothing more than a single 4'x8' sheet of plywood, a drill, and a circular saw, but the Kreg Jig and Kreg Accu-Cut
will definitely make things faster and easier.
Difficulty
Moderate
Page 1 of 15
ToolsKreg Tools
Kreg Pocket-Hole Jig® 720
Other Tools
Circular Saw (corded)
Drill (cordless)
MaterialsWood Products
Plywood , 3/4" Thick , Full Sheet1
Hardware & Supplies
1 1/4" Kreg Pocket Hole Screws33
Bottle Of Wood Glue1
Casters (Optional)4
1 1/4" Or 1 1/2" Wood Screws4
Page 2 of 15

Cut List & PartsBack , 3/4" X 24" X 48"1
Bottom , 3/4" X 20" X 48"1
Middle Divider , 3/4" X 14" X 48"1
Front , 3/4" X 8" X 48"1
Side Panel , 3/4" X 21 1/2" X 36"1
Center Divider (Off-cut) , See Plan For More Info.1
Page 3 of 15

DirectionsComplete Cut ListUsing the provided cut list and cut diagram, cut the 3/4" x 4' x 8' plywood sheet into the specified dimensions. A circular saw
and guide such as the Kreg Accu-Cut or Kreg Rip-Cut is recommended for precision. On the provided image, I listed the
recommended cutting order for your convenience.
1
Page 4 of 15

Split the Side PanelsPlace the 21.5" x 36" Side Panel sheet on your work surface. This will become two angled sides once cut. To achieve this,
identify one of the 36" sides and mark a notch 10" from a corner. Now repeat this process on the opposite corner. Draw a
diagonal line with a straight edge connecting the two marks and then split this large panel into two smaller ones using your
circular saw and edge guide.
2
Page 5 of 15

Drill Pocket HolesUsing your Kreg Jig and the cut diagram I provided, drill pocket holes in all thirty-three locations that were specified. They
are represented by red ovals in the reference image I made.
3
Page 6 of 15

Assemble Back to BottomLay your bottom panel (20x48) flat on your work surface with pocket holes facing up. It is not necessary to hide these pocket
holes because they will be covered with scraps and never seen. Stand the back panel (24x48) up on one side of the bottom
panel, spread glue on the joint for added strength, and screw them together with your drill using 1 1/4" Kreg Screws.
4
Page 7 of 15
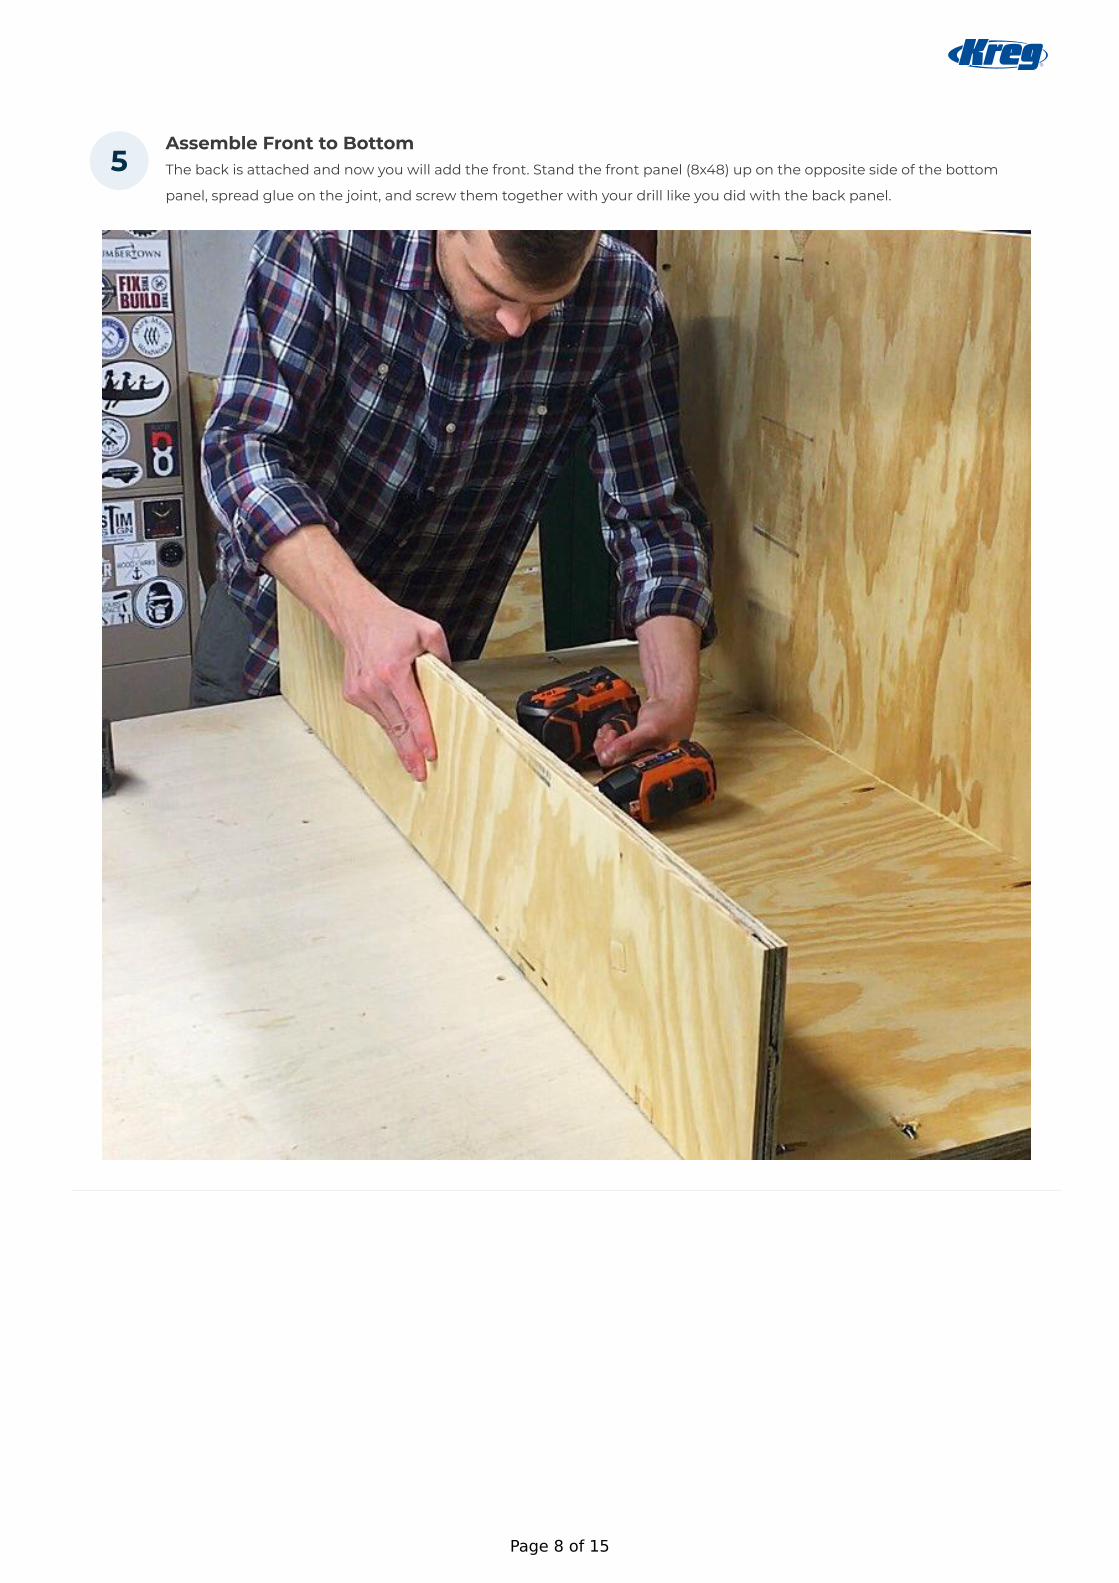
Assemble Front to BottomThe back is attached and now you will add the front. Stand the front panel (8x48) up on the opposite side of the bottom
panel, spread glue on the joint, and screw them together with your drill like you did with the back panel.
5
Page 8 of 15

Elevate ProjectAt this point, you should have the front and back attached to the bottom. Place scrap 2x material (or two layers of 3/4"
material) under both side of the piece, elevating it 1.5" above the work surface. This will act as a spacer and prevent you from
having to mark a 1.5" line across the bottom of each side panel (alternatively, you could lay the whole assembly on the back
panel instead of bottom and assemble it that way if you have no 1.5" thick material lying around).
6
Page 9 of 15

Attach SidesWith your back, bottom, and front piece elevated 1.5" above your work surface, spread glue on the ends and attach the two
side panels with your drill. Be sure to drive screws into the 6 pocket holes on the back, 4 on the bottom, and 4 on the front.
7
Page 10 of 15

Measure and Mark the MiddleWith the basic construction done, you now have some room for customizing this project to your preferences. I chose to
keep the back portion of my bin larger with two smaller compartments in the front so I picked the longer/skinnier off-cut as
my center divider. Measure your preferred center divider (mine was 8 1/16" wide, but yours will likely vary), and then measure
and mark that distance on the bottom panel and side panels (measuring from the front). This will identify the location of
your middle divider (14x48).
8
Page 11 of 15

Attach the MiddleAlthough you have already measured the width of your center divider and marked out the future location of the middle
divider, I advise lying your chosen center divider down on the bottom between the front and the middle as a spacer so you
can insure that it will fit snugly. With the middle divider placed in the bin with the pocket holes facing towards the back and
your center divider acting as a spacer, attach the middle divider to the bottom. Stand your spacer (center divider) upright on
one end and attach the middle divider to the side panel. Repeat this process for the other side panel. While this could all be
done by simply measuring and marking, using the center divider as a spacer will guarantee a snug-fitting center divider
later.
9
Page 12 of 15
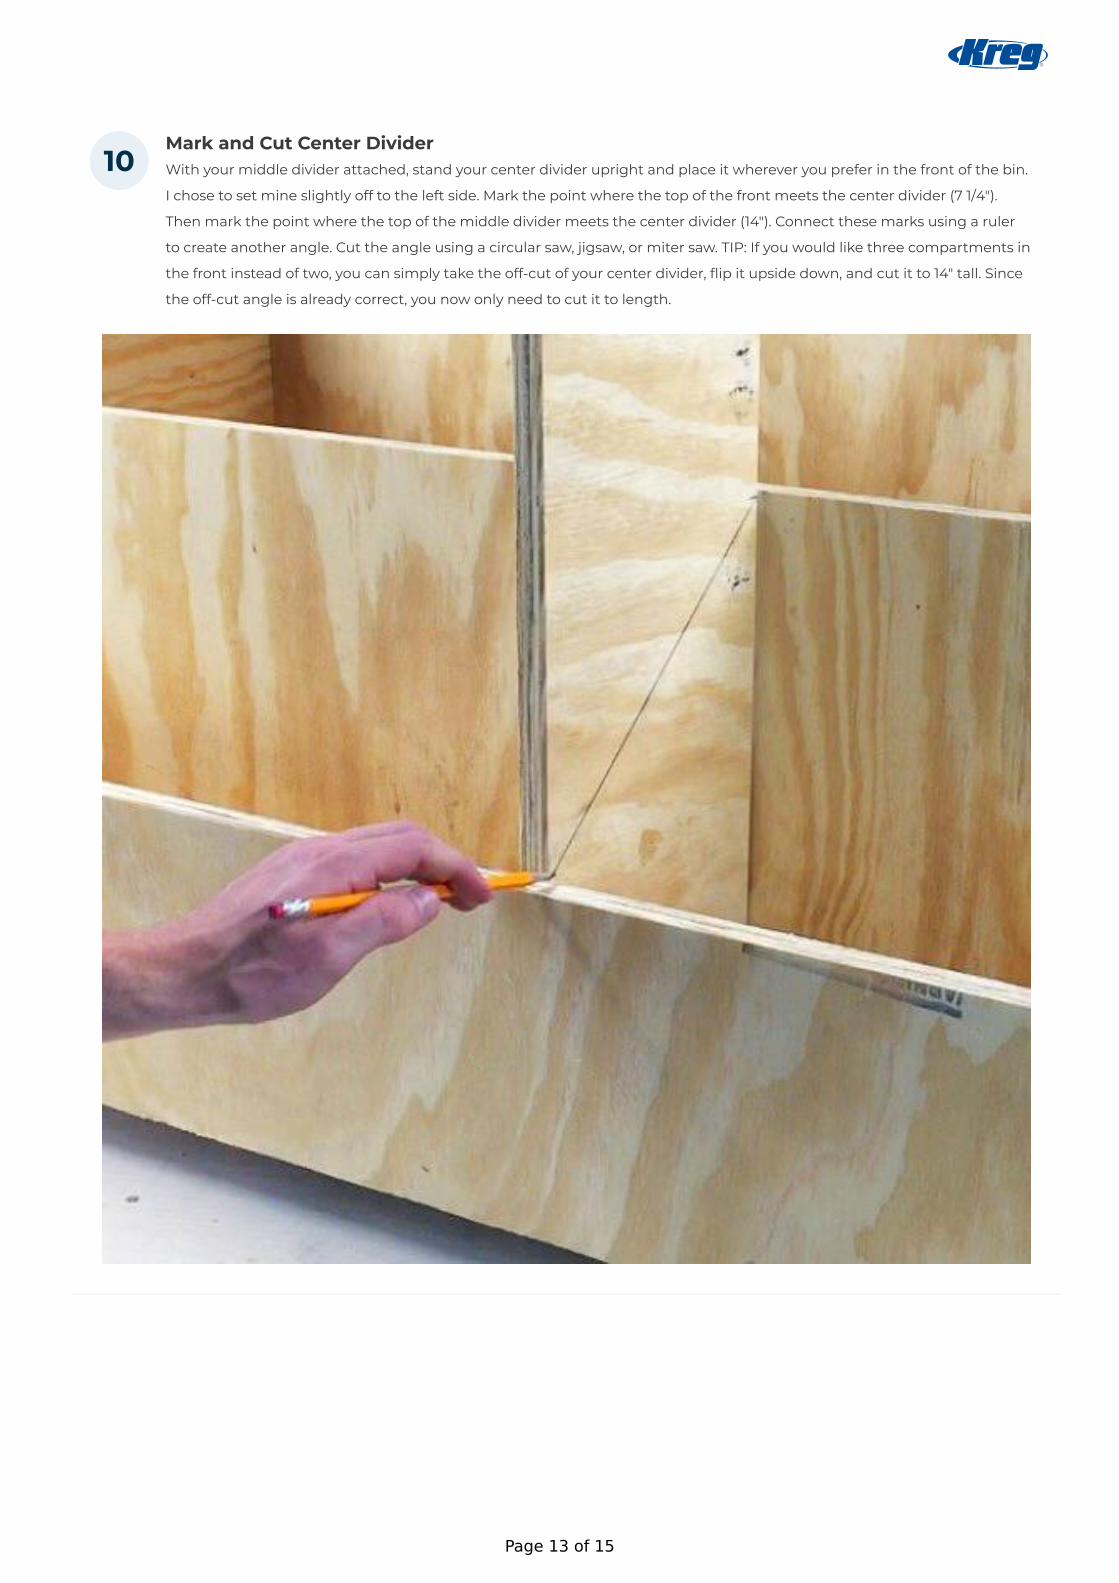
Mark and Cut Center DividerWith your middle divider attached, stand your center divider upright and place it wherever you prefer in the front of the bin.
I chose to set mine slightly off to the left side. Mark the point where the top of the front meets the center divider (7 1/4").
Then mark the point where the top of the middle divider meets the center divider (14"). Connect these marks using a ruler
to create another angle. Cut the angle using a circular saw, jigsaw, or miter saw. TIP: If you would like three compartments in
the front instead of two, you can simply take the off-cut of your center divider, flip it upside down, and cut it to 14" tall. Since
the off-cut angle is already correct, you now only need to cut it to length.
10
Page 13 of 15
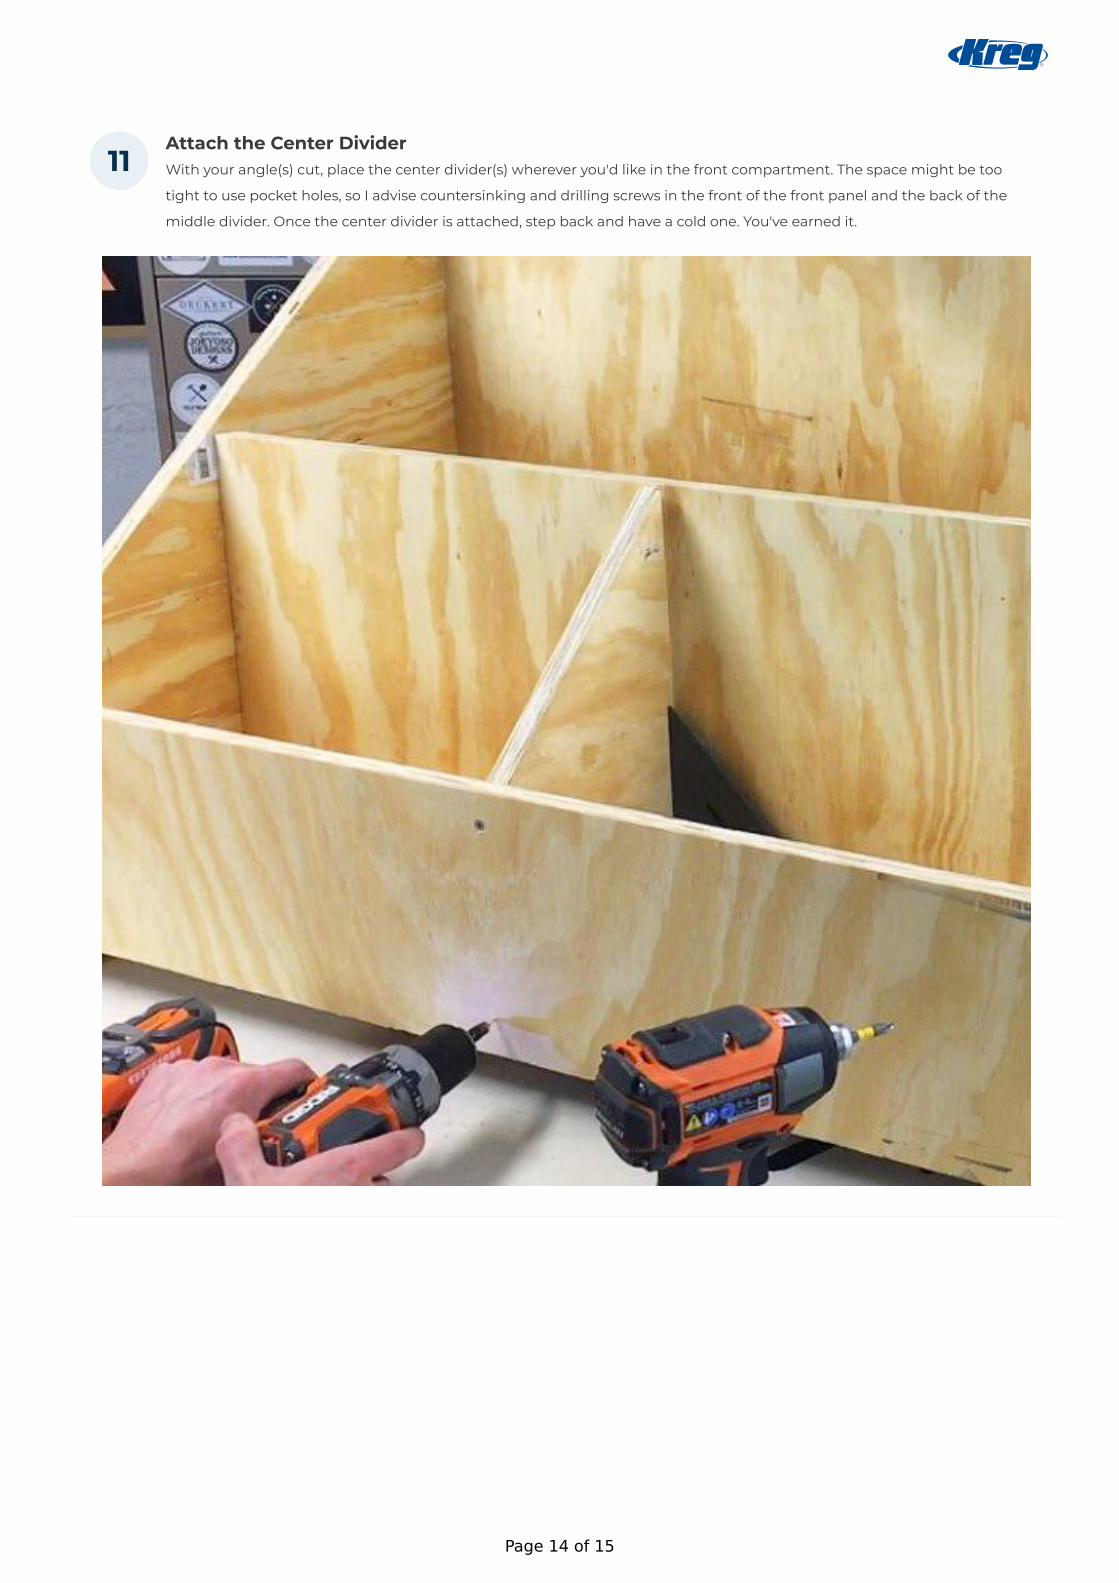
Attach the Center DividerWith your angle(s) cut, place the center divider(s) wherever you'd like in the front compartment. The space might be too
tight to use pocket holes, so I advise countersinking and drilling screws in the front of the front panel and the back of the
middle divider. Once the center divider is attached, step back and have a cold one. You've earned it.
11
Page 14 of 15

Customize (Optional)This design has the potential to be customized for your individual work preferences. Add casters to the bottom to make your
bin mobile. Use the extra scrap materials to make a compartment on the side for storing your tape measure and pencils.
Apply a finish for long-lasting durability. Make two bins and screw them together back-to-back to make a larger scrap bin.
The sky is the limit and I'm looking forward to seeing what you come up with!
Review the Entire PlanBefore beginning, be sure to review all 13 steps. This is good practice for all plans and will help avoid miscommunication
along the way. Also, I have linked the URL to my YouTube tutorial (can be found in "extras" tab) for those that prefer a more
visual demonstration. That video may clear up any questions you might have during this process. Now, get your safety
glasses on and let's build something.
12
13
Page 15 of 15