
Scout by - Fibre Mood
16
1/16 #Scout Scout by
Transcript of Scout by - Fibre Mood

1/16#Scout
Scout by

2/16#Scout
Here come the spring dresses! Scout is an airy, A l ine blouse dress with breast pockets. There are several versions:
ankle length or short, tied at the waist with a ribbon or worn loose without a ribbon. Anything is possible! The ankle length version includes side seam pockets while the short version is
made without pockets. To find out how to lengthen or shorten the pattern if you’ve decided on a different length than the
ones mentioned, have a look here.
2 - 14 years
Scout by

3/16#Scout
fabric used (in cm) collection
2 3 4 5 6 8 10 12 14
red and white striped fabric long dress, fabric width 145 cm 140 150 160 165 175 190 215 260 280
white fabric with stripes short dress, fabric width 150 cm* 125 125 135 135 140 150 150 160 220
* The pattern pieces are cut in another direction to get the vertical stripes. Comprehensive information about the fabrics in the Fibre Mood collection along with the accompanying fabric plans can be found here or on www.fibremood.com/en/fabrics.
finished garment measurements (in cm)
size chart
supplies
• Thread
• Iron-on interfacing: max. 25 cm
• Buttons (Ø 1.1 cm): see table
• Elastic: see table
• Fabric: see table
IMPORTANT
Adjust the fabric to be used based on these alterations.
CSsize (year) 2 3 4 5 6 8 10 12 14
CS (cm) 52 54 56 58 60 64 68 72 76
Chest (CS): measure horizontally around the fullest part of the chest.
size (year) 2 3 4 5 6 8 10 12 14
length (long dress) 67 73 78.5 84.25 90 101.5 113.25 124.75 136.5
length (short dress) 48.5 52.5 56.5 60.5 64.5 72.25 80.25 88 96
sleeve length* 35.5 40 43 45.75 47.25 51.75 56.25 61 65.75
1/2 chest measurement 36 37 37.75 38.75 39.75 41.75 43.75 45.75 47.75
1/2 hem circumference (long dress) 65.5 69.25 72.75 76.25 79.75 87 94 101.25 108.5
1/2 hem circumference (short dress) 53.75 56.25 59 61.5 64.25 69.5 74.75 80 85.5
* Including the shoulder length.
Compare the stated lengths to the measured or desired lengths. Lengthen or shorten the dress and/or the sleeves by cutting the pattern pieces at the indicated double lines and then spreading the pattern pieces out X cm from each other or overlapping them where needed. Make sure that the CF and CB lines and the side seams are always straight.
fabric used (in cm) standard 2 3 4 5 6 8 10 12 14
long dress fabric width 140 cm 140 150 160 165 175 195 245 260 280
short dress fabric width 140 cm 95 100 110 115 125 145 150 165 180
The corresponding fabric plan can be found on the last page.
elastic (in cm) 2 3 4 5 6 8 10 12 14
0.5 cm wide 30 31 32 33 34 36 38 40 42
buttons 2 3 4 5 6 8 10 12 14
long dress 7 7 8 8 8 10 11 12 14
short dress 5 6 6 7 7 8 9 10 10

4/16#Scout
fabric advice There are many, many fabrics that would work well with this dress. Depending on the effect you're going for, you can go for a stiffer cotton, denim, linen, etc. or a fabric with a fluid drape, such as viscose, cotton voile with a nice print, chambray, etc. Find out all the facts about the Fibre Mood fabric collection and the accompanying fabric plans here.
pattern pieces & seam allowances (in cm)
To sew the garment as described in the instructions, you need to draw the illustrated seam allowances around the paper pattern pieces before cutting them out.
Mark crucial points on the pattern piece:
• Mark the breast pocket, the tip of the sleeve split, the corners of the pocket opening and the position of the tunnel with a basting thread ( ) by using a needle and thread to indicate the middle of the ( ).
• Mark the position of the buttons with a basting thread ( ) by using a needle and thread to indicate the middle of the ( ).
• Mark the button holes with a basting thread ( ) by using needle and thread to indicate the sides ( ) the sides with a basting thread.
Indicate crucial points on the outline of the pattern:
• Nick the pattern paper and fabric at the places where a single vertical line (I) and double vertical lines (II) are indicated.
• Cut a small corner out of the fabric where a symbol is or on the finished hemline.
• Cut a small corner ( notch) out of the pieces that lie on the fabric fold to mark the middle of these pieces.
1. front: 2x
2. back: 1x on fabric fold
3. sleeve: 2x
4. wrist trim: 2x
5. collar: 2x on fabric fold
6. collar band: 2x on fabric fold
7. pocket: 4x
8. breast pocket: 2x
9. bias arm split: 2x
10. tunnel: 1x on fabric fold. You will need to draw this pattern piece (half of the tunnel) yourself. Draw a rectangle with the following measurements (in cm):
11. ribbon: 2x. You'll need to draw this pattern piece yourself. Draw a rectangle of 45x3 cm.
IMPORTANT
The pieces highlighted in light yellow have iron-on
interfacing attached to the wrong side.
size 2 3 4 5 6 8 10 12 14
height 2.5 2.5 2.5 2.5 2.5 2.5 2.5 2.5 2.5
width 35.5 36.75 38 39.25 40.25 43.75 45.75 48 50.25
5
5
6
6
2
1
3
79
4
811
10
1
1,51,5
1
11
1
11
1
1
1
1
1
1 1
1
1
1 1
1
1
1
11
1
1
11
1
0
0
00
0
0
0
0
000
0
0
00
0
00
00 0
0
00 0
0
size 2 3 4 5 6 8 10 12 14
height 3 3 3 3 3 3 3 3 3
width 45 45 45 45 45 45 45 45 45

5/16#Scout
sewing instructions
The method used to finish sewing the garment depends on the fabric used. The pieces are always sewn together with the right sides of the fabric matching exactly, unless stated otherwise.
1Press the top of the pocket (8) over, first by 1 cm and then pressing it over to the V notches. Sew in place right next to the edge.
Press the seam allowance (= 1cm) of the remaining 3 sides over to the wrong side.
F front
B back
RF right front
LF left front
right side
wrong side
iron-on interfacing
elastic
8
8
6/16#Scout
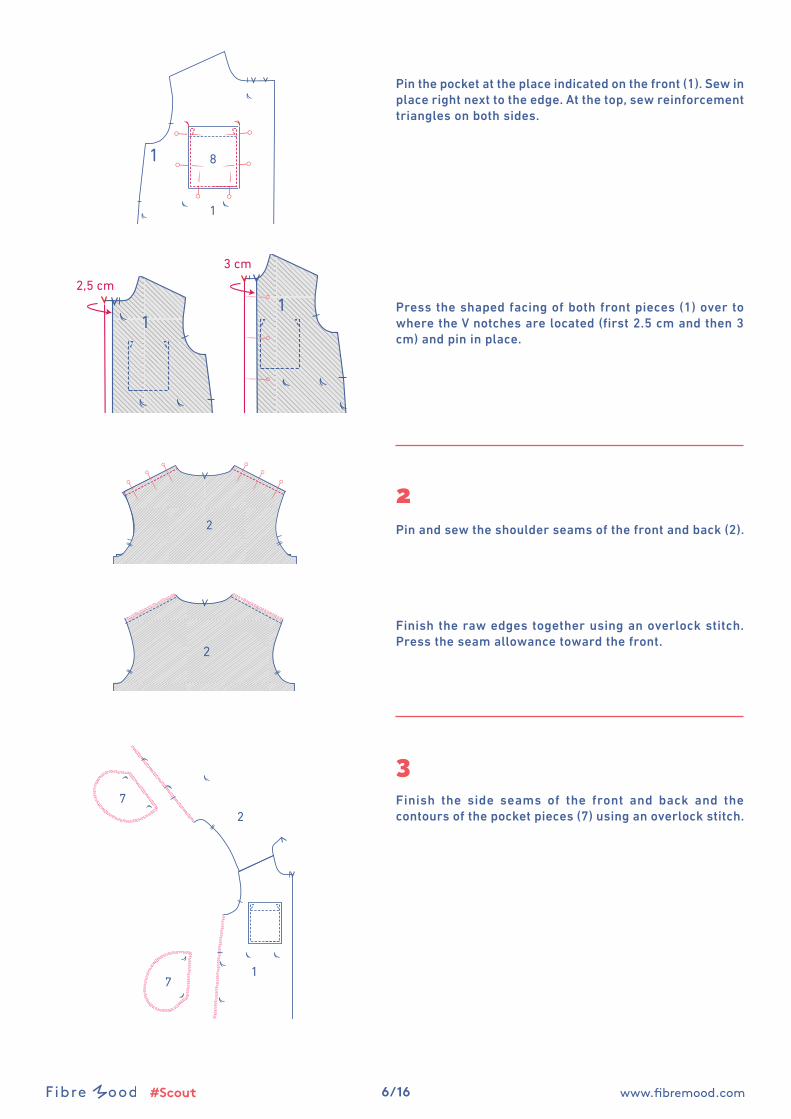
Pin the pocket at the place indicated on the front (1). Sew in place right next to the edge. At the top, sew reinforcement triangles on both sides.
Press the shaped facing of both front pieces (1) over to where the V notches are located (first 2.5 cm and then 3 cm) and pin in place.
2Pin and sew the shoulder seams of the front and back (2).
Finish the raw edges together using an overlock stitch. Press the seam allowance toward the front.
3Finish the side seams of the front and back and the contours of the pocket pieces (7) using an overlock stitch.
1 8
1
2,5 cm
3 cm
11
2
2
71
27

7/16#Scout
Pin the right-hand side of each of the pocket pieces to the side seam of the front and back with basting threads matching. Sew between the basting threads.
Fold the seam allowance of the front pocket piece out of the way and cut diagonally into the seam allowance of the front until just up to the basting thread.
Fold the pocket piece of the front and the seam allowance out of the way and sew the pocket at 2mm from the seam, sewing through all layers (= the pocket + the seam allow-ance folded over to the side of the pocket).
4Pin and sew the contour of the collars (5) together, except for the bottom. Grade and trim the seam allowance in the corners. Turn inside out.
7
1
2
7
1 7
71
9
95
8/16#Scout
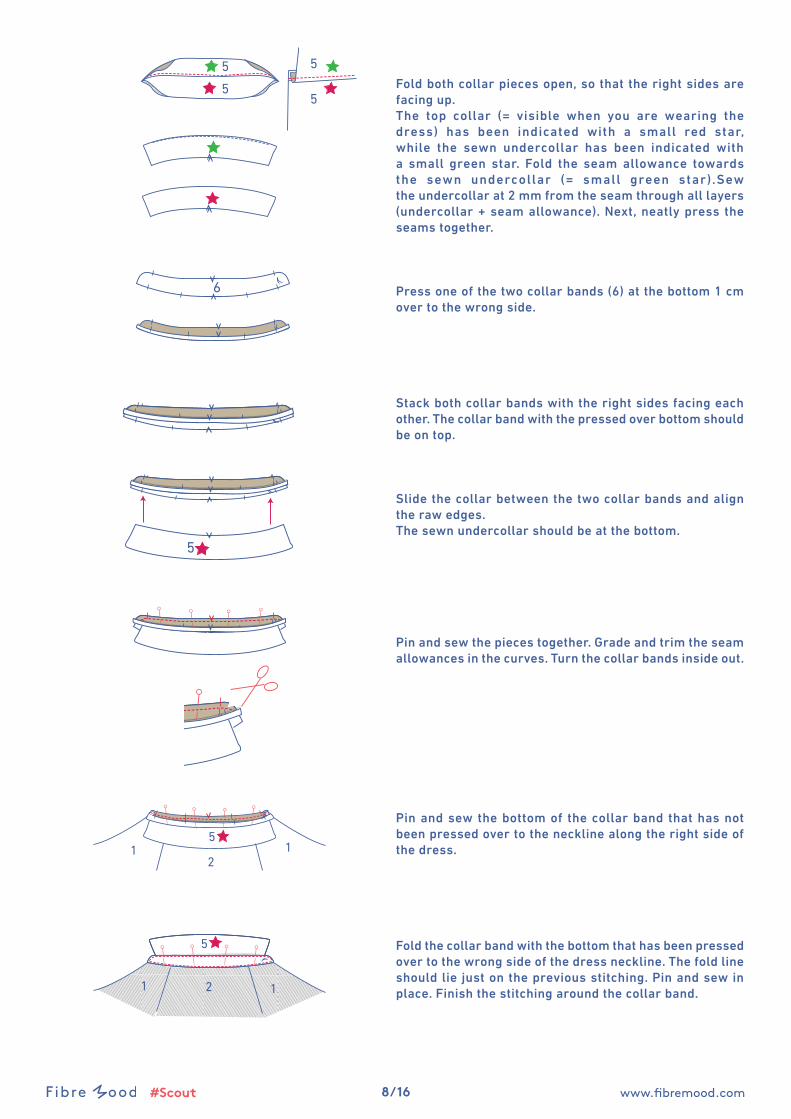
Fold both collar pieces open, so that the right sides are facing up.The top collar (= visible when you are wearing the dress) has been indicated with a small red star, while the sewn undercollar has been indicated with a small green star. Fold the seam allowance towards the sewn undercollar (= small green star).Sew the undercollar at 2 mm from the seam through all layers (undercollar + seam allowance). Next, neatly press the seams together.
Press one of the two collar bands (6) at the bottom 1 cm over to the wrong side.
Stack both collar bands with the right sides facing each other. The collar band with the pressed over bottom should be on top.
Slide the collar between the two collar bands and align the raw edges. The sewn undercollar should be at the bottom.
Pin and sew the pieces together. Grade and trim the seam allowances in the curves. Turn the collar bands inside out.
Pin and sew the bottom of the collar band that has not been pressed over to the neckline along the right side of the dress.
Fold the collar band with the bottom that has been pressed over to the wrong side of the dress neckline. The fold line should lie just on the previous stitching. Pin and sew in place. Finish the stitching around the collar band.
5
55
5
6
5
51 1
2
5
1 12

9/16#Scout
5Finish the sides of the sleeve (3) using an overlock stitch.
Cut the sleeve on the indicated line up to the basting thread.
Press the bias arm split (9) as follows:
• Start by pressing the bias in half lengthwise all the way down.
• Next, press the long sides until the raw edges line up with the centre line.
Open the sleeve split so that you end up with a single straight line. Slide the bias arm split under the sleeve with the right side facing up. Match the raw edges together and pull the sleeve a bit to the side at the basting thread. Sew a parallel line 0.5 cm from the raw edge. Only a few fabric threads have been sewn in place at the basting thread.
Fold the bias towards the right side of the sleeve and lay the fold line directly onto the previous stitching. Sew in place right next to the edge.
3
9
9
3
3
9
3 3 9
9

10/16#Scout
Fold the sleeve in half lengthwise, with the right side of the fabric facing inwards. Sew the tops of the biases together. Sew a diagonal line starting from the corner. Fold the sleeve back open.
Fold the bias at the front of the sleeve (i.e., the widest side of the sleeve hem, where the nicks of the fold are) over to the wrong side of the sleeve and sew the bias in place at 0.5 cm from the bottom.
Create the fold by matching all of the nicks in the direction indicated. Sew the folds in place at 0.5 cm from the edge.
Line up the sleeve cap with the armhole, matching the cor-responding marks. The single nick marks the front, while the double nick marks the back. The single nick at the top should perfectly line up with the shoulder seam.
Pin and sew in place.
1 cm 3
9
3
9
3
9
0,5 cm
3
90,5 cm
2
3
1
3
1 2

11/16#Scout
Finish the raw edges together using an overlock stitch.
6Pin and sew the side and underarm seams together above and below the pocket opening, always up to and from the basting threads. Move the seam allowance of the pocket pieces out of the way. Press the seam allowance open.
Pin the contours of the pocket pieces and sew up to and from the basting thread at 1.5 cm. Move the seam allow-ance of the side seams of the front and back out the way.
7Press 1 cm along the long side of the wrist trim (4) seam allowance (on the side where the buttons and buttonholes are located) over to the wrong side.
Fold the wrist trim in half lengthwise to where the V notches are located with the right side of the fabric faced inwards. Sew the short sides. Trim the seam allowance and turn right sides out.
3
1 2
4441
7
1
3
71
1,5 cm
4

12/16#Scout
4
3 Slide the wrist trim into the sleeve. Pin and sew the unpressed raw edge of the wrist trim to the bottom of the sleeve down the wrong side of the sleeve.
Fold the wrist trim towards the right side of the sleeve and lay the fold line (of the pressed over seam allowance) directly onto the previous stitching. Sew in place next to the edge.
8Press the long sides of the tunnel (10) 0.5 cm over. Press the short sides 1 cm over.
Pin the tunnel to the work piece. The top of the tunnel should line up with the basting threads. Sew the top and bottom in place at 2 mm from the edge of the long side.
10
0,5 cm
1 cm

13/16#Scout
11
1 cm
0,5 cm
Press 1 short side of the ribbon (11) over 1 cm to the wrong side. Then press the long sides 0.5 cm over. Fold in half and stitch all the way around at 2 mm from the edge.
Sew the unfinished short side of the ribbon to the ends of the elastic.
Thread the elastic with the ribbons through the tunnel.
9Fold the hem 1.5 cm over and fold back open.
Fold the raw edge to the pressed fold line and then fold once again. Sew in place right next to the edge.
11
11
11
1,5 cm
O,75 cm
1
1
2
2
O,75 cm
1
1
2
2 1
2

14/16#Scout
10Sew the buttons on at the indicated places. The top and bottom button are marked on the pattern. Divide the distance equally to determine the position of the other buttons.
Make the button holes so that they line up with the position of the buttons. The button should align with the top 1/3 of the button hole.

15/16#Scout
fabric plan for standard fabrics 140 cm wide
1. for the short version
for size 2 - 6 yFABRIC FOLD
SELVEDGE
2
1
4
6
8
9
3
65 5
for size 8 - 14 y
2
1
4
6 8
9
3
6 5 5FABRIC FOLD
SELVEDGE
This version has no seam pockets, no tunnel and no ribbon.

16/16#Scout
size 2 - 8 y
2. for the long version
2
1
11
7
4
6
8
9
3
6
7
10
5 5
size 10 - 14 y
1
11
4
8
9
3
10 2
7
7
6 6 5 5FABRIC FOLD
SELVEDGE
FABRIC FOLD
SELVEDGE