Schedule a New Course - California State University, Fullerton
38
CMS Campus Solutions 8.9 Schedule a New Course Business Process Guide
Transcript of Schedule a New Course - California State University, Fullerton
CMS Campus Solutions 8.9
Schedule a New Course
Business Process Guide

Campus Solutions 8.9Schedule a New Course
Date Last Updated 2/7/2008 1
Table of Contents
Scheduling a New Course Overview................................................................................................2 Before You Begin..............................................................................................................................3 If You Need Further Assistance........................................................................................................3 Scheduling a New Course ................................................................................................................4 Entering Basic Data for a New Class Section ..................................................................................5 Steps for Completing the Basic Data Page ......................................................................................6 Course Attributes..............................................................................................................................9 Variable Topics...............................................................................................................................11 Fields on the Basic Data Page that are not to be changed by Departments .................................12 Adding Meeting Information for Class Sections .............................................................................13 Fields on the Meeting Page that are not to be changed by Departments......................................17 Adding Enrollment Controls for Class Sections..............................................................................18 Fields on the Enrollment Control Page that may not be updated by Departments ........................19 Attaching Class Notes ....................................................................................................................20 Steps for Attaching Class Notes to Sections..................................................................................20 Fields on the Notes Page that may not be updated by Departments.............................................21 Viewing the Class Associations Page ............................................................................................22 Variable Unit Courses.....................................................................................................................23 Viewing the Class Components Page ............................................................................................24 Viewing Class Requisites ...............................................................................................................25 Adding a Multiple Component Course and Associating the Sections ............................................26 Combining Class Sections..............................................................................................................30 Update Sections of a Class ............................................................................................................31 Appendix A. Instructor Contact Hours and CS Number ................................................................33 Appendix B. Standard Meeting Patterns – Classroom “A” ............................................................35 Appendix B. Standard Meeting Patterns – Classroom “B” ............................................................36

Campus Solutions 8.9Schedule a New Course
Date Last Updated 2/7/2008 2
Scheduling a New Course Overview While most classes will already exist in the Maintain Schedule of Classes component because they will ha ve rolled from the Prior Term Copy pro cess, the Schedule New Course component allows you to s chedule a course that has no existing class section data scheduled for the term. There may be no data for the term merely because it wasn’t offered in the last like-term or it may not have been proposed or received course approval for offering. The request for a new course to be schedul ed could begin in a number of different ways. In most cases, the Scheduling Co ordinator will rece ive a new cou rse in the form of a Special or a course in the Ne w Course Proposal cycl e may have completed the review and approval cycle. Once the Scheduling Coordinator has created the new course in the Catalog, and made it available for a particular term, it will be available for scheduling as a class section.
If there are combined class es (cross- listed) that will share the sam e room/time/instructor, then you s hould enter a room/time/instructor for only ONE of the classes and leave the ot her ones blank. The Scheduling Office will complete the Combined Classes process.
If a class is going to be offered by Permission, the Student Specific checkbox must be checked. The department coordinator will give a student permission by entering the student’s CWID into the system utilizing Class Permission Numbers and that student will instantly be able to register in student self service for a class that is full or requires pre-requisites that the student does not meet.
The class roster Access must be set to “Approved” for instructors t o enter/view their grade rosters online.

Campus Solutions 8.9Schedule a New Course
Date Last Updated 2/7/2008 3
Before You Begin Prerequisites and Assumptions Before you can use the PeopleSoft Student Administ ration system to update or add class section data into the Schedule of Classes, it is a ssumed that each of the following conditions has been met:
The end user must have the necessa ry User ID and sec ured acces s to PeopleSoft.
The end user has a general working k nowledge of PeopleSoft navigation and
higher education terminology associated with the Schedule of Classes. Completion of the Campus Solutions Basics class is required.
The Scheduling Office must “open” ex ternal scheduling to Colleges and
Departments for the desired term. Materials Needed
Special form that has appropriate signatures Variable Topic form that has appropriate signatures
If You Need Further Assistance When you apply what you have learned to your specif ic tasks, y ou may have further questions. Here are the best ways to obtain assistance:
Use the Buddy System and seek help from another department coordinator in
your college or your co llege contact. They have m ost likely experienced a similar situation and can share their knowledge.
Take the online tutorial for “Scheduling a New Course.”
Call the Scheduling Office (ext. 2381) for further assistance.
Contact [email protected] for assistance.

Campus Solutions 8.9Schedule a New Course
Date Last Updated 2/7/2008 4
Scheduling a New Course To Schedule a New Course, first log into PeopleSoft and navigat e to the Schedule a New Course Component, as shown below.
Navigation:
Finding a New Course
Step 1 To find the course that you wish to add for a semester, enter (at a minimum) the Academic Institution, Term, Subject Area, and Catalog Nbr. In CMS the Term is set up: the first number represents the century (2); the next two numbers represent the year (08), and the final number represents the semester—1 for intersession, 3 for spring, 5 for summer, and 7 for fall. Therefore in this screenshot the term is for fall of 2008.

Campus Solutions 8.9Schedule a New Course
Date Last Updated 2/7/2008 5
Step 2 Click the button. If only the minimum fields are entered, then a list of all available course offerings within the subject will appear. Select the correct course offering. In this instance the search results produced both career offerings of Extended Education and Undergraduate. Select the Undergraduate offering to move on to the Scheduling a New Course component.
Entering Basic Data for a New Class Section

Campus Solutions 8.9Schedule a New Course
Date Last Updated 2/7/2008 6
The Basic Data page is t he first pag e to complete i n adding a n ew class section process. This pag e identifies the basi c data reco rded for a cla ss, in cluding To pic ID’s for Vari able Topi c course s, and Course Attributes. Information inh erited from the Catalog i s carried over to each section ad ded. Additional in formation m ust be entered a nd saved before a se ction i s actually scheduled.
DO NOT change or enter any fields not indicated in these procedures.
Steps for Completing the Basic Data Page
Each class component of a course is scheduled as a class section, with a unique Class Nbr (schedule number). The scroll area in the page h eader will show the number of class sections sch eduled. All s cheduled sections of a class are shown in the component as rows.
Class component indicates class activity type, such as lecture, lab, seminar, activity, or supervision. A class containing one activity type (component) will be scheduled using one section. A class with mixed activity types (mixed components) such as a lecture and a lab will have a section for the lecture and a separate section set up for the lab, but the two sections will be associated.
Component in CMS refers to a group of related pages that pertain to a certain task. Components can contain a single page or multiple pages.
Step 1 Enter the appropriate Session code. You can find the list by using the Look Up icon. Click on the session you want to use. The Start/End Dates will automatically populate, once the Session has been chosen. Save your work.

Campus Solutions 8.9Schedule a New Course
Date Last Updated 2/7/2008 7
Step2 Enter the Class Section number; this should always be in chronological
order and two digits. Use a leading zero on single digit numbers. Example: section 1 should be 01. If adding subsequent sections, the class section number MUST be unique for every class section of this
course. Click the Button. Before clicking the Save button, the Class Nbr is “0.” After clicking the Save button, the Class Nbr is programmatically assigned.

Campus Solutions 8.9Schedule a New Course
Date Last Updated 2/7/2008 8
Regular courses should be scheduled as sections 01 – 39. Honors sections should be scheduled as sections 40 – 49. Web sections should be scheduled as sections 50 – 55. High school sections should be scheduled as sections 60 – 69. Extension sections should be scheduled by UEE as sections 70 – 79. Irvine Campus sections should be scheduled as sections 80 – 89. International sections should be scheduled as sections 90 – 95.
Step3 The Associated Class must be the same as the section number. If
scheduling a class with only one component (activity) type, nothing will need to be done with the Associated Class number.
Step4 The Start/End Dates should only be modified after checking with the
Scheduling Office. The start and end dates on the Meetings tab, must be the same dates.
The start/end dates must be the same on the Basic Data and Meetings tabs pages. If they are not the same, the meeting pattern will not roll when the Term Roll process is done for the Schedule of Classes.
Step 5 Enter the appropriate Location. Use the Look Up icon for a list of
values. Most commonly used will be Fullerton, Irvine, Web, and GGC. Step 6 The Instruction Mode field will default to “P” (In-Person), when adding a
new section of a course. If the course is not taught in-person, change Instruction Mode from the list of valid values you will find in the .
Step 7 If the section should print in the published Schedule of Classes, leave the
box checked. If the section should not print in the published Schedule of Classes, indicate this by un-checking the Schedule Print check box. (This field defaults as checked.)

Campus Solutions 8.9Schedule a New Course
Date Last Updated 2/7/2008 9
Course Attributes Step 8 If the class section is an Honors course, a Class Attribute needs to be
added to the section.
Course Attributes are populated from the Course Catalog, but some may be changed or added at the section level. Course Level is one that would not be changed. Adding Honors to a class section would be the type of attribute that could be changed or added. If the section you are maintaining qualifies to be an Honors section, you would click on the button in Class Attributes to add a row.
Below are the current results of the Look Up for Course Attributes. While in the new row, click on the Button, and select HONR in the Results.

Campus Solutions 8.9Schedule a New Course
Date Last Updated 2/7/2008 10
HONR will appear in t he first field; then select the second button and select HONR again. You have now complet ed the necessary steps to add a s econd attribute to the new section. It would be the s ame procedur e if you were adding an attribute to a section that already existed. Step 9 Click on the button.

Campus Solutions 8.9Schedule a New Course
Date Last Updated 2/7/2008 11
Variable Topics
Variable T opic courses are always identi fied with a “T” suffix following th e Course Number as in AMST 471T. A v ariable topic course consists of a “generic” umbrella title at the course lev el serving as a placehol der for the specific topic title at the class level. Topics cannot exist independently. Each approved topi c is given an ID number and an as sociated topic title. These T opic ID’s are attached t o the cour se at the catalog level so there is an approved list to select from. At th e class level, when maintaining a Variable Topic section, click the Look Up button and select the variable topic to be offered in that section.
The result is what you see below:
When changing the topic, the same procedure is followed. Go into the Look Up, select a different number and the topic is changed to the new number. Save your work.

Campus Solutions 8.9Schedule a New Course
Date Last Updated 2/7/2008 12
Fields on the Basic Data Page that are not to be changed by Departments: Field Field Definition Values Class Nbr A unique, 5-digit number,
assigned by the system, once a new section is saved.
The system will sequentially assign this number.
Campus Always FUL Fullerton Location Fullerton Fullerton Campus Course Administration Not Used Not Used Fee Additional fee associated with
specific class section. Not to be confused with Course Fees
Academic Organization This field will populate from the Catalog Data to include the Course Subject area and COSAR Table value.
Defaults from Catalog
Academic Group Indicates the college to which the course belongs.
View only
Holiday Schedule Schedule of all holidays that will fall within that semester
Defaults from Term Table
Primary Instr Section Not Used Not Used Dynamic Date Calc Required
Check box indicating if this course is dynamically dated and thus requires different calculations
Can only be used with Regular Non-Standard and Self Support Non-Standard sessions. Schedulers should contact the Scheduling Office if a class section is dynamically dated.
Generate Class Mtg Attendance
Not Used Not Used
GL Interface Required Not Used Not Used Course Topic ID Used to identify the Topic
assigned to a Variable Topics course
Select Topic ID
Course Equivalent Course Group
Not Used Not Used
Class Attributes Automatically populated from Course Catalog data and are only updated for Honors class sections and Service Learning sections
Examples: CLEV = Course Level GE = General Education EXPR = Experimental Course

Campus Solutions 8.9Schedule a New Course
Date Last Updated 2/7/2008 13
Adding Meeting Information for Class Sections The Meetings page is the second page to complete in add ing a class section. This page identifies the meeting pattern information for a c lass, including Meeting Pattern, Start/End Dates, Facility ID, Instructor Assignment and section information carried over from the Basic Data page. This pag e is used to create the class meeting pattern(s) and assign faculty for each meeting pattern.
DO NOT change or enter any fields not indicated in these procedures.
Every attempt should be made to schedule all sections using the Standard University Scheduling Patterns (Appendix B).

Campus Solutions 8.9Schedule a New Course
Date Last Updated 2/7/2008 14
Step 1 All class sections must contain at least one Meeting Pattern. Enter the most
important meeting pattern first. Populate the meeting Pat field. Meeting patterns are pre-defined. For example: MWF, TTh, etc. Click the Button for a list of all meeting patterns. If the meeting pattern is TBA, the Pat field will be populated with “TBA.” Enter MW as an example. The MW in the
boxes will be checked automatically.
NEVER enter information in the Topic ID or Free Format
fields. These fields will NOT be used. Variable Topics will be assigned in the Basic Data page using the Course Topic ID field (described earlier).
Step 2 Select the start time for the meeting pattern by populating the Mtg Start field.
If it is 11:30 a.m., you may enter 11:30A and return and the Mtg Start and Mtg End fields will be populated for you because 11:30 a.m. to 12:45 p.m. on MW is a standard meeting time. Any time you use a standard start time, the pre-determined end time will default in the Mtg End field. The Start/End Date fields default from the class section Session Start-End dates on the Basic Data page. To accurately reflect the dates the class will meet, each meeting pattern can have unique start and end dates. All Start-End dates must fall within the session start-end dates. Modify the Start/End Date field if different from the Session Start/End dates.
Step 3 Enter the facility ID. You may use the drop down menu by clicking the
Button for a list of facilities. After defining the facility ID, click on the button. When changing a facility, completely delete the entry, click on the
button and then re-enter the new facility ID.

Campus Solutions 8.9Schedule a New Course
Date Last Updated 2/7/2008 15
Step 4 Because faculty assignments are linked to the meeting pattern, you can
assign a different instructor for each meeting pattern created. Because of the workload tied to the instructor, even though you have the capability to assign the same instructor to each meeting pattern, it isn’t always the best idea. The critical points to remember are:
⇒ All instructors should be listed on the first meeting pattern with their workload completed.
⇒ Make sure if you assign instructors again to additional meeting patterns that the Workload is changed to “Not Included” as it will already be counted in the first meeting pattern.
To assign an instructor, either enter the Emplid in the ID field or click the button to the right of the ID field. This will allow you to search for a faculty member by name. Once the ID field is populated, the faculty name will appear to the right. To change an existing instructor, DO NOT type over an existing instructor Emplid, but rather delete the row using the row button. Click on the
button. Now add the new instructor and save your work again. If you just type over an existing instructor Emplid, it can result in workload calculations that are not correct.
If you are unable to find the faculty member you want to assign to the class section, contact the Scheduling Office for assistance.

Campus Solutions 8.9Schedule a New Course
Date Last Updated 2/7/2008 16
Step 5 At CSUF, all Instructor Roles should be set as Primary. The Print box is defaulted to be checked. This indicates that this instructor will print in the published Schedule of Classes.
Step 6 Selecting the level of access to the grade roster. Use the Access field to specify one of the following access levels: Approve access allows the instructor to enter grades and approve the grade roster on the web, and Post the grades after approval. Giving an instructor Grade ability only, does not permit them to approve the grades or post them to the web—only the ability to assign a grade. It is up to the department which access to assign instructors. It is recommended that instructors be given Approve access.
Step 7 If you are not adding additional instructors to the specific meeting pattern, proceed to Step 8. To add additional instructors to the specific meeting pattern, click the insert a row button contained within the submenu “Instructors For Meeting Pattern,” as shown in the illustration below. If you add instructors, repeat steps 3 – 5.
When attaching two or more instructors to a single meeting pattern, you must adjust the load factor field for both faculty members so the total load factor is equal to 100%. Do not adjust the Work Load (unit) field; this will automatically calculate based on the Load Factor. This is illustrated below:
Step 8 Click on the button. You have completed the data entry for this page and may proceed to the Enrollme nt Control Page.

Campus Solutions 8.9Schedule a New Course
Date Last Updated 2/7/2008 17
Fields on the Meeting Page that are not to be changed by Departments: Field Field Definition Valid Values APDB Mapping Values (CS)
Link to reporting fields that calculate faculty workload using the course classification (CS) number and adjusted course credit units (CCU).
Event ID Assigned by the system upon saving for any class that has a facility assigned.
System assigned
APDB Mapping Values (Mtg)
Reporting link to enter APDB class values
Contact Hours View total course contact hours and weeks of instruction
View Only
CSU Instructor Type Not Used Not Used Contact Not Used Not Used Empl Rcd# Used for reporting purposes.
Relates job information to the instructor assignment class record.
Defaults
Job Code View Only View Only Assign Type Defaults Defaults APDB Dept ID Used for APDB reporting to specify
the Department of the instructor, from the Academic Organization Table
Default
App Load Check box indicating whether the assignment counts toward the instructor’s Total Term FTE%.
Default
Work Load System auto calculates default workload hours when you schedule classes based on the academic progress units or course component workload hours for the class.
Automatically calculates
Auto Calc Automatic calculation of workload. Default Assignment FTE% View only – represents the
particular assignment’s weight based on the 100T weekly workload hours or the 10T OEE workload hours for the assignment type
Auto calculated
Room Characteristics All room scheduling preferences must be made in College Net Resource 25.
Not Used

Campus Solutions 8.9Schedule a New Course
Date Last Updated 2/7/2008 18
Adding Enrollment Controls for Class Sections The Enrollment Control page is t he third page to complete in crea ting a class section. This page is used for the following tasks:
• Change the status of a class section • Attach consent required • Set the enrollment limit
Step 1 In the Class Status field select “Active” if you want the class to appear
online in student self service and in the published Schedule of Classes. A class must be active for student enrollment to occur. If you want to allow enrollment, but do not want a section to appear in student self service or in the published Schedule of Classes, then select “Active” but unselect the Schedule Print checkbox on the Basic Data page. Select “Tentative” only if there is a good possibility the class will not be offered. Tentative sections will not appear anywhere and students will not be allowed to enroll.

Campus Solutions 8.9Schedule a New Course
Date Last Updated 2/7/2008 19
All class Cancellations after publication of the Schedule of Classes must be submitted to the Scheduling Office on the Schedule Change Form.
Step 2 If students should be allowed to register only after receiving Department
or Instructor approval, select the “Dept Consent” in the Consent field. Do not use this field for any other type of registration restriction.
The Wait List Capacity field will be used at CSUF but is currently in the planning stage. When used, the department would enter a number in the Wait List Capacity field.
Step 3 The Enrollment Capacity field is defaulted based on last like-term data.
Change if applicable. Step 4 The Requested Room Capacity should only be changed by the
Scheduling Office. This number is used by Resource 25 to find a classroom.
Step 5 Click on the button.
Once a student has enrolled in a class section, you will not be able to change the Class Session or Class Association without dropping each student and re-enrolling them after the changes have been made. Consider what you do to each section carefully when maintaining your schedule, well before registration begins.
You have completed the data entry for this page and may proceed to the Notes page. Fields on the Enrollment Control Page that may not be updated by Departments:
Field Field Definition Valid Values 1st Auto Enroll Section 2nd Auto Enroll Section
Upon enrollment in the primary activity section, this feature will auto enroll the student in the associated activity section.
Do not use.
Requested Room Capacity
Do not use Do not use.
Minimum Enrollment Nbr
Do not use Do not use.
Resection to Section Do not use Do not use. Auto Enroll form Waitlist
Checkbox Do not use.
Cancel if Student Enrolled
Checkbox Do not use.

Campus Solutions 8.9Schedule a New Course
Date Last Updated 2/7/2008 20
Attaching Class Notes A class note is a note to students about a particular course or particular class sections. Class notes appear at the end of each subject in the publis hed “Schedule of Classes and are attached to each section in student se lf-service. This page is used to attach either an existing clas s note which may be edi ted or a free-for m tex t note to class sections.
If a note is meant to appear for each Class Section of a course, you must post the Note Nbr to each section individually.
Steps for Attaching Class Notes to Sections: Step 1 Use the right and left arrows if there is more than one section to locate the
appropriate section requiring the note. Step 2 If there are multiple notes, use the button to add a row for each note
required. Step 3 The system will automatically increment the sequence number. This number
controls what order the Notes are printed in. You can change the number if you wish.
Step 4 From the Print Location field, indicate that the class note should print After the class listing. This field can be used when printing a Schedule of Classes report, but does not affect the appearance of the note in Self-Service.

Campus Solutions 8.9Schedule a New Course
Date Last Updated 2/7/2008 21
Step 5 Option 1) If the Note you wish to enter is a standard note, then select the appropriate Note Nbr by using the Look Up icon. When you select the note, the corresponding text will auto-populate into the upper text box.
Step 6 Option 2) If the Note you wish to enter is not standard, then you can simply type the text you want into the Free Format Text box in the bottom portion of the page. This is an unnumbered Free Format note.
Step 7 Option 3) Edit a Standard Note. Enter a note number, click the Copy Note Button. Text is removed from the top box and copied into the lower box
where text can be changed or added. Click the button after editing the text. The note changes from a standard numbered note to a Free Format Text note (unnumbered).
Step 8 If you have entered a Note Nbr, but you wish to make some edits to the text of the standard note, then click the Copy Note button. The text is removed from the top box and copied into the lower box where text can be changed or
added. Click the button.
Free Format Text notes are section specific and roll from term to term. This type of note does not update the Notes table and therefore will not be assigned a permanent Note Nbr.
Step 9 To add additional class notes click the insert new row button.
To delete a class note, click on delete row button. Step 10 Click on the button. You have successfully completed editing or inserting a class section in the Maintain Schedule of Classes component. Fields on the Notes Page that may not be updated by Departments:
Field Field Definition Valid Values Sequence Number System creates a class notes sequence
number. This number determines the display order of the class notes for a section if there are multiple notes. You can override this number.
System Assigned
Even if Class not in Schedule
Not used Not used

Campus Solutions 8.9Schedule a New Course
Date Last Updated 2/7/2008 22
Viewing the Class Associations Page The Adjust Class Association component consists of three pages: Associations, Components, and Requisites. These pages are primarily view only for department coordinators but contain some valuable information. This Component compiles data from the catalog and may be used by the Scheduling Office for the following functions:
• Set variable unit cour ses to fixed u nits. (Contact the Sche duling Office if you req uire this type of change.)
• View the Grading Basis for a course. • View Contact Hours, Associated Class, and Requisites.

Campus Solutions 8.9Schedule a New Course
Date Last Updated 2/7/2008 23
Variable Unit Courses When a course is created in the catalog as a variable unit course, the department coordinator must, at the time of schedule building, determines if a class will be offered as variable unit(s) or fixed unit(s). If it is determined that the class will be offered as a fixed unit class, the department coordinat or must n otify the Scheduling Office that changes are required. To view this activity, navigate to the Adjust Class Associations component, displayed below.
Navigation:
Currently, this section is set as a variable unit section of 1-3 uni ts. A request may be made to change the section to fixed uni ts. The department should c ontact the Scheduling Office to request all changes to sections from variable to fixed units.

Campus Solutions 8.9Schedule a New Course
Date Last Updated 2/7/2008 24
Viewing the Class Components Page
The Class Components page indicates the Grading Basis for the section as well as the Graded Component and Primary Component. This is especially important when a course has multiple components. An additional feature of the Class Associations page is that for courses wit h multiple components (activity types/learning met hod) you are able to view the clas s associations—which class sections are a ssociated together. As with CHEM 120A, a section each of Lecture, Activity, and Lab would need to be associated together. This is demonstrated in the training guide for “Adding a Class with Mult iple Components” on page 26.
Campus Solutions 8.9Schedule a New Course
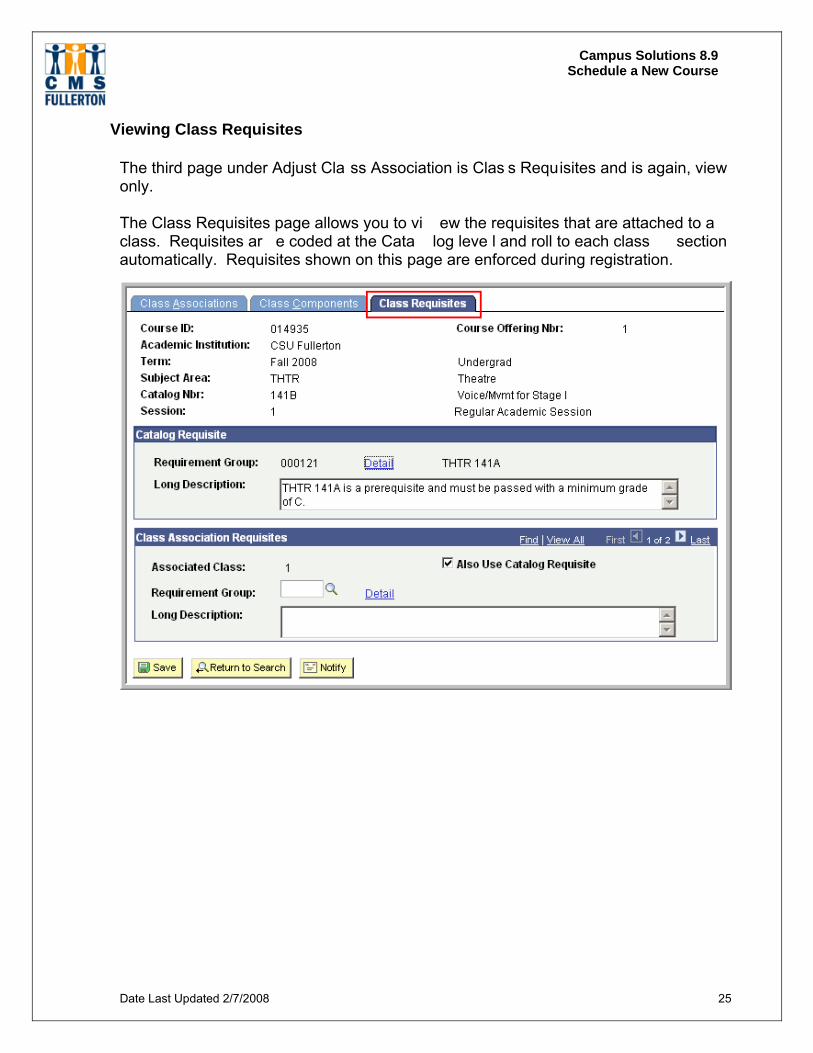
Date Last Updated 2/7/2008 25
Viewing Class Requisites The third page under Adjust Cla ss Association is Clas s Requisites and is again, view only. The Class Requisites page allows you to vi ew the requisites that are attached to a class. Requisites ar e coded at the Cata log leve l and roll to each class section automatically. Requisites shown on this page are enforced during registration.

Campus Solutions 8.9Schedule a New Course
Date Last Updated 2/7/2008 26
Adding a Multiple Component Course and Associating the Sections Navigation:
Navigate to Scheduling a New Course. CHEM 472A is a course that has two modes of instruction—a Lecture and Laboratory. In CMS they would actually end up with two sections making up class are then associated together. Step 1 As previously instructed, enter the basic information to produce the
desired class, in this case CHEM 472A and click the Save Button
Step 2 Enter the appropriate Session code. You can find the list by using the
Look Up icon. Click on the session you want to use. The Start/End Dates will automatically populate, once the Session has been chosen.
Click the Button. Step3 Enter the Class Section number; this should always be in chronological
order and two digits. Use a leading zero on single digit numbers. Example: section 1 should be 01. If adding subsequent sections, the class section number MUST be unique for every class section of this
course. Click the Button. Before clicking the Save button, the Class Nbr is “0.” After clicking the Save button, the Class Nbr is programmatically assigned.

Campus Solutions 8.9Schedule a New Course
Date Last Updated 2/7/2008 27
Step 2 The number in the Associated Class field should match the primary
component, which is usually the lecture. Use this number to associate the other components of the course—the activity and laboratory sections, which you will add using the button to add a new row.
Step 3 The Class type for the Primary Component will be input as Enrollment and
all subsequent components will be designated as Non-Enroll.

Campus Solutions 8.9Schedule a New Course
Date Last Updated 2/7/2008 28
Step 4 The Meetings page is completed as instructed earlier in this document for
courses that have a single component. See page 13. Step 5 The Enrollment Control page has some additions to make to complete
the associations task. Go to the Enrollment Control page.

Campus Solutions 8.9Schedule a New Course
Date Last Updated 2/7/2008 29
Step 6 Be sure you are on the Class Section that is the primary component. Go
to the 1st Auto Enroll Section field and enter the section number of the second section within the associated class grouping. In this case it would be section 02. Then t he third section number would be entered in the 2nd Auto Enroll Section number field if there were a third component type. In this case, there are only two— a Discus sion and a Lab. Therefore, when students register for secti on 01 they will automatically be r egistered in section 02. That will give them the Lecture and Laboratory. Because you associated the two sections as Association number 1 these two sections will be seen as a “group.”
Step 7 Click on the button. After you have completed the information
necessary in the Meetings page and any Notes, you will have completed the addition of a class that requires class associations.

Campus Solutions 8.9Schedule a New Course
Date Last Updated 2/7/2008 30
Combining Class Sections Combined Sections is the component that allows two or more classes to be scheduled in the same room, at the same time, with the same in structor. Classes must be created in the Schedule of Class es prior to combining the sections. For classes that will share the same room, time and instructor--only one class will have a room, time, and instructor assigned in t he Schedule of Classes. When combining these sections, the “Skip meeting p attern” box will be unchecked so t he s ystem will copy t he rooms/times/instructors so they will all be in synch. The Schedu ling Office and/or the contact in your dean’s office will assume re sponsibility for combining your cross-listed classes. Combining Sections will be used for cross-listed classes, distance education classes, and other classes t hat are grouped together in t he same space at the same time with the same instructor.

Campus Solutions 8.9Schedule a New Course
Date Last Updated 2/7/2008 31
Update Sections of a Class Navigation:
This screen shot demonstrates section information for a multi-component course. Note that both sections have the same class a ssociation number (1) and the first section auto-enrolls students in the second section.
This screen shot demonstrates section information for a single-component course. Note that class assoc iations for all sect ions are unique and ther e are no auto-enroll sections.

Campus Solutions 8.9Schedule a New Course
Date Last Updated 2/7/2008 32
This screen shot demonstrates class enrollment limits.
Note: When you click the Help button on a PeopleSoft page, it launches an HTML excerpt of PeopleBooks. While these excerpts may be useful for general descriptions of pages and fields, they are typically less useful for CSUF-specific processes than the Business Process Guides.

Campus Solutions 8.9 Schedule a New Course – Appendix A
Date Last Updated 2/7/2008 33
Appendix A. Instructor Contact Hours and CS Number The Course/Supervision (CS) classification number defines course characteristics norms based on the mode of instruction and the level of instruction. Each course is assigned a course classification (CS) number according to the type of instruction required. To calculate the Instructor Contact Hours take the Weekly Class Hours Per Unit Credit and multiply it by the number of units offered by the class.
Course Classification
Number
Course Type
APDB Code
Weekly Class
Hrs. Per Unit
Credit
Description Normal Class Side
LD UD GD
Workload K-Factor
C1 LEC 01 1 Large Lecture facility limits (50) - 1.0 C2 LEC 02 1 Lecture Discussion 40 40 40 1.0 C3 LEC 03 1 Lecture – Composition
Lecture – Counseling Lecture – Case Study
30 30 30 1.0
C4 SEM 04 1 Discussion 25 25 25 1.0 C5 SEM 05 1 Seminar 20 20 15 1.0 C6 SEM 06 1 Clinical Process 20 10 10 1.0 C7 ACT 07 2 Fine Arts & Science Activities 24 24 24 1.3 C8 ACT 08 2 Education Workshops & Social Science Activities 30 30 30 1.3 C9 ACT 09 2 Music Activity – Large Group 40 40 40 1.3
C10 ACT 10 2 Music Activity – Small Group 10 10 10 1.3 C11 ACT 11 2 Physical Education & Recreation Activities 30 30 30 1.3 C12 ACT 12 2 Speech, Drama, and Journalism Activities 20 20 20 1.3 C13 ACT 13 2 Technical Activities and Laboratories facility limits (24) 1.3 C14 ACT 14 2 Remedial Courses 15 15 15 1.3 C15 LAB 15 3 Technical Activities & Laboratories facility limits (24) 1.5 C16 LAB 16 3 Science Laboratories facility limits (24) 2.0 C17 LAB 17 3 Clinical Practice Laboratories – Off Campus 8 8 8 2.0

Campus Solutions 8.9 Schedule a New Course – Appendix A
Date Last Updated 2/7/2008 34
Course Classification
Number
Course Type
APDB Code
Weekly Class
Hrs. Per Unit
Credit
Description Normal Class Side
LD UD GD
Workload K-Factor
C18 ACT 18 3 Major Intercollegiate Sports 20 20 - 6.0 C19 ACT 19 3 Minor Intercollegiate Sports 20 20 - 3.0 C20 ACT 20 3 Major Performance 20 20 20 3.0 C21 ACT 20 3 Music Performance 40 40 40 3.0 S1 SUPV 48 n/a Independent Study, Studio Inst ruction, Supervi sed
Activities 48 48 48 n/a
S2 SUPV 36 n/a Independent Study, Field Work, Studio In struction, Supervised Activities
36 36 36 n/a
S3 SUPV 25 n/a Practice Te aching, Wo rk Study, Thesis P roject and Independent Study
- 25 25 n/a

Campus Solutions 8.9 Schedule a New Course – Appendix B
Date Last Updated 2/7/2008 35
Appendix B. Standard Meeting Patterns – Classroom “A”
MWF/TR Pattern in Morning
M W F T R 7:00a – 7:50 a 7:00a – 7:50 a 7:00a – 7:50 a 7:00a – 8:15a 7:00a – 8:15a 8:00a – 8:50a 8:00a – 8:50a 8:00a – 8:50a 8:30a – 9:45a 8:30a – 9:45a 9:00a – 9:50a 9:00a – 9:50a 9:00a – 9:50a 10:00a – 11:15a 10:00a – 11:15a
10:00a – 10:50a 10:00a – 10:50a 10:00a – 10:50a 11:30a – 12:45p 11:30a – 12:45p 11:00a – 11:50a 11:00a – 11:50a 11:00a – 11:50a 12:00p – 12:50p 12:00p – 12:50p 12:00p – 12:50p
Early Afternoon Combined with Single-Day Late Afternoon/Evening Classes
MW TR Friday-Only Classes 1:00p – 2:15p 1:00p – 2:15p 2:00p – 4:45p 2:30p – 3:45p 2:30p – 3:45p 5:00p – 7:45p M T W R
4:00p – 6:45p 4:00p – 6:45p 4:00p – 6:45p 4:00p – 6:45p 7:00p – 9:45p 7:00p – 9:45p 7:00p – 9:45p 7:00p – 9:45p
Early Afternoon Combined with Two-Day Late Afternoon/Evening Classes (See footnote)
MW TR Friday-Only Classes 1:00p – 2:15p 1:00p – 2:15p 2:00p – 4:45p 2:30p – 3:45p 2:30p – 3:45p 5:00p – 7:45p
MW TR 4:00p – 5:15p1 4:00p – 5:15p1 5:30p – 6:45p1 5:30p – 6:45p1 7:00p – 8:15p1 7:00p – 8:15p1 8:30p – 9:45p1 8:30p – 9:45p1
1This 75-minute, two-day pattern may be used in th e afternoon and evening, only if both 4:00 – 5:15 and the 5:30 – 6:45 of MW or T R are utilized to house two classes. Please avoid scheduling just MW 4:00 – 5:15 or MW 5:30 – 6:45. Example: Class 101 runs MW at 4:00 and Class 102 runs MW at 5:30; we refer to this as efficient classroom “stacking.” If you have to leave MW 4:00 or MW 5:30 vacant, use the three-hour, one-day option instead for each class. The same concept applies for th e evening time patterns.
Campus Solutions 8.9 Schedule a New Course – Appendix B
Date Last Updated 2/7/2008 36
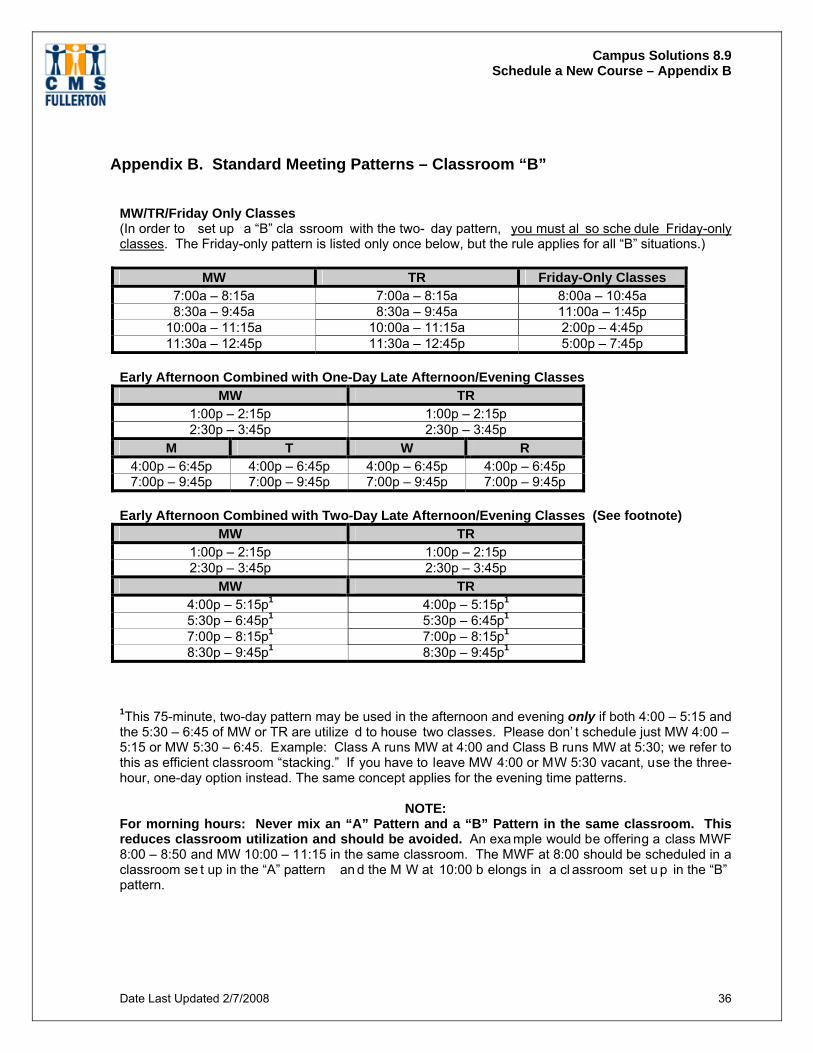
Appendix B. Standard Meeting Patterns – Classroom “B”
MW/TR/Friday Only Classes (In order to set up a “B” cla ssroom with the two- day pattern, you must al so sche dule Friday-only classes. The Friday-only pattern is listed only once below, but the rule applies for all “B” situations.)
MW TR Friday-Only Classes 7:00a – 8:15a 7:00a – 8:15a 8:00a – 10:45a 8:30a – 9:45a 8:30a – 9:45a 11:00a – 1:45p
10:00a – 11:15a 10:00a – 11:15a 2:00p – 4:45p 11:30a – 12:45p 11:30a – 12:45p 5:00p – 7:45p
Early Afternoon Combined with One-Day Late Afternoon/Evening Classes
MW TR 1:00p – 2:15p 1:00p – 2:15p 2:30p – 3:45p 2:30p – 3:45p
M T W R 4:00p – 6:45p 4:00p – 6:45p 4:00p – 6:45p 4:00p – 6:45p 7:00p – 9:45p 7:00p – 9:45p 7:00p – 9:45p 7:00p – 9:45p
Early Afternoon Combined with Two-Day Late Afternoon/Evening Classes (See footnote)
MW TR 1:00p – 2:15p 1:00p – 2:15p 2:30p – 3:45p 2:30p – 3:45p
MW TR 4:00p – 5:15p1 4:00p – 5:15p1 5:30p – 6:45p1 5:30p – 6:45p1 7:00p – 8:15p1 7:00p – 8:15p1 8:30p – 9:45p1 8:30p – 9:45p1
1This 75-minute, two-day pattern may be used in the afternoon and evening only if both 4:00 – 5:15 and the 5:30 – 6:45 of MW or TR are utilize d to house two classes. Please don’ t schedule just MW 4:00 – 5:15 or MW 5:30 – 6:45. Example: Class A runs MW at 4:00 and Class B runs MW at 5:30; we refer to this as efficient classroom “stacking.” If you have to leave MW 4:00 or MW 5:30 vacant, use the three-hour, one-day option instead. The same concept applies for the evening time patterns.
NOTE: For morning hours: Never mix an “A” Pattern and a “B” Pattern in the same classroom. This reduces classroom utilization and should be avoided. An exa mple would be offering a class MWF 8:00 – 8:50 and MW 10:00 – 11:15 in the same classroom. The MWF at 8:00 should be scheduled in a classroom se t up in the “A” pattern an d the M W at 10:00 b elongs in a cl assroom set u p in the “B” pattern.

Campus Solutions 8.9 Schedule a New Course – Appendix B
Date Last Updated 2/7/2008 37
NOTES: