Scenario Generation from the Zouave
31
THE ZOUAVE Yolnine One N11111bnr 2i1 NUAR7 19R7 Albumen by Vannerson tit Jones Photographic Artists; Richmond, Va of five Confederates. They are, left to right: Lt. Charles LeverMh, 2nd Co., Washington Artillery; Lt. Abe Leverich, 511 Co., Washington Artillery; Lt. Irilliam Palprey, 2nd and 4th Coo., Washington Artillery; Samuel Blanc, C.S.N.; and Lt. James McConnell, Co. £, 1st La. Heavy Artillery The Magazine of The American Civil Wargaming Society
Transcript of Scenario Generation from the Zouave

THE ZOUAVE Yolnine One N11111bnr 2i1 NUAR7 19R7
Albumen by Vannerson tit Jones Photographic Artists; Richmond, Va of five Confederates. They are, left to right: Lt. Charles LeverMh, 2nd Co., Washington Artillery; Lt. Abe Leverich, 511 Co., Washington Artillery; Lt. Irilliam Palprey, 2nd and 4th Coo., Washington Artillery; Samuel Blanc, C.S.N.; and Lt. James McConnell, Co. £, 1st La. Heavy Artillery
The Magazine of The American Civil Wargaming Society

RECREATING THE 'FOG OF WAR . By Brian Scherzer
Playing pre-set scenarios on a constant basis can become boring for even the most ardent ACW enthusiast, They tend to be fairly confining and predictable, taking away the 'joy" of the unknown. Most scenarios leave one stuck trying to undo mistakes made in deployment, etc. which were made by the historical commanders. In the same vein, I have come to dislike the idea of army lists such as exist in WRG Ancients and Rennaisance, simply because they artificially even out the sides, making the contest a push/pull event. That kind of situation does not realistically test the competency of the wargaming commander.
I believe, as do many of MY wargaming companions, that there is much fun in meeting for a day. knowing what the objective is, but having no clear idea on what the numerical or qualitative odds are. Flexibility and quick decision making are the hallmarks of the truly great generals. Why not try to create an atmosphere of uncertainty to test your mettle as a skilled tactician? The thrill of taking a numerically inferior force and defeating your opponent is the ideal in ego gratification. Such is a true accomplishment and adds greatly to the flavor and enjoyment of getting together around the game table.
A further plus for this type of get-together is that it eliminates one of the more irritating components of personality clashes between players. It seems, from my experience, that when there is no pre-set scenario to work with and garners are expected to show up for such a showdown, Onion players tend to try and field Berdan's sharpshooters, the Iron, Irish, and Vermont Brigades, while Confederate commanders unpack Robert E. Lee or Stonewall Jackson, along with Hood's Texas Brigade, A.P. Hill's Light Division, the Stonewall Brigade, and the Washington Artillery (all 5 companies!). It's amazing how soon we forget that there were lesser troops involved.
In almost all real life battles the commander, once initial orders were given, was left chewing his nails and developing ulcers wondering whether or not units would arrive in time, or 'even at the specified spot. It is this 'fog of war . that I am attempting to simulate with random factors.
Of course, one must decide how to throw random factors into a game without totally upsetting the purposes of a rules set. We use Johnny Reb rules, and have occassionally gamed with Rally 'Round the Flag. To my knowledge, the random conditions we use will work with most rules sets and any number of brigades, divisions, or corps. I accept that such conditions add time to the game, but our experiences using a division per side in an engagement show that all random conditions take a total of less than 10 minutes to determine. The added flavor is well worth such a small expenditure of time The factors listed in the enclosed tables cover historical trends and strengths in both Confederate and Union forces during certain time periods in a general way. While we play with one reinforced division per side, and the article is written that way, players may choose to convert to multiple regiments, brigades, divisions or even corps.
BEGINNING THE GAME
Each side, whether there are one or more players per side is irrelevent, starts the game off with 3 brigades, cavalry, and artillery of unknown strength. Because of the differences in forces during certain times of the war, the people playing must determine what theatre (eastern or western) and what time period (1861 - 1863 or 1864 - 1865) their engagement will be representing. The Factor Tables cover the following assumptions:

1. That Eastern theatre Confederate generals were superior to their Union counterparts.
2. That Western theatre generals for both sides were equal in skill for lack thereof).
3. That Confederate cavalry was far superior in morale and numbers in both theatres until 1864, at which time the quality and quantity gap was closed to a great extent.
4. That Union artillery was more numerous and had better guns than the Confederates during the entire war.
5. That the Union infantry were more numerous than the Confederates throughout the war.
8. That in the Eastern theatre, Confederate infantry had better morale, but that the Western theatre saw both sides relatively equal in their fighting skills.
14 you can accept the above listed premises, this type of scenario is for you, and a roster sheet most be made to keep track of your troops and their morale when setting up the Order of Battle. The random factors used by us include number of regiments per brigade, number of cavalry regiments, number of batteries, along with number and type of guns in each battery, and morale of all troops involved. I have also included an optional table that we use covering small arms. It is somewhat subjective and is meant for use by those who do not have the patience or reference sources to decide for themselves who should be armed with what. The tables covering all of these random factors are weighted to bring out ratios that are fairly consistent with history, yet leave room for possible advantages for one side or another. Our experiences using the tables in our own battles show that the six suppositions listed are brought out quite well, frequently making commanders rethink and adapt their strategy without giving either side severe advantages.
A vital note to remember is that terrain is all - important to Civil War scenarios and the use of our random factors since, often enough, it allowed a numerically inferior force to hold its own. Very few AEU battles were fought out in the open as in Napoleonic times. With woods, ravines, hills and terrain obstacles such as houses, fences, walls, and even earthworks being more often used than not, small arms fire tended to equal out even if one was superior to the other. Examples include the smoothbore musket and the shotgun, both of which were limited in range and accuracy. However, in the woods, such deficits were little noticed, and in some cases those weapons proved to be superior! To use the random factors listed in this article to best advantage, one must THINK and ACT as a smart Civil War general would have done.
Step number 1 is to make a roster sheet to keep track of your units and their weapon and morale status. At the top of a sheet of paper you should make the following column headings: Brigade Name Or Number, Unit Name, Unit Morale, Weapon. Since, in our way of playing, there can be no more than 15 regiments on a side, you need not have more lines than this for the infantry. The remainder of the page should be set aside for the cavalry, artillery, and generals, listing their appropriate status. However, before you begin, you must decide among the players which theatre and which time period your scenario will be fought in.
Having done this, it is time to begin rolling for random factors. You will only need one regular six sided die for all factors other than for artillery, which requires two dice. Roll the die for each general and check Table 1 for
the

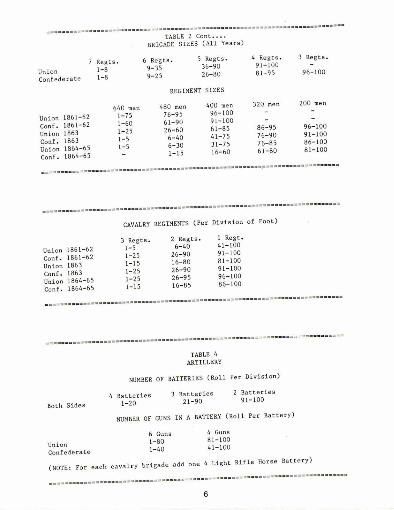
TABLE 1
RANDOM FACTORS FOR LEADERS FOR ENTIRE WAR PERIOD
TABLE 4 ARTILLERY CCMPOSITICN FOR ENTIRE wAR
Number of Batteries Per Side
Eastern Theatre
Die Roll: Union Die Roll: Conf. Union Roll; Coned. Roll:
1,2 = Poor (00) 1 . Poor 1001 1,2,3 . 2 Batteries 1,2,3,4 = 2 Batteries
3,4 = Average loll 2,3 . Average .1•1. 4,5,6 . 3 Batteries 5,6 = 3 Batteries
5,6 = Good 102i 4,5, . Good 021
No Excellent Generals 6 . Excellent (f3) Number of Guns In A Battery
Western Theatre 1,2, . 4 Guns 1,2,3,4 . 4 Guns
(Use the above Union 0.e rolls for both Sides) 3,4,5,6 . 6 Guns 5,6 = 6 Guns
Composition of Batteries 1861 - 1863 (Use 2 dice)
TABLE 2 (Western Theatre,
BRIGADE SIZE FACTORS FOR ALL YEARS Union Roll. 1861-63 Confed. Roll: 1861-63
(Per Brigade) 2 no 12 lb. Howitzers 2 = 10 lb. Parrots
3 = 6 lb. Rifles 3,4 . 3 inch Rifles Union Roll: Confed. Roll: 4,5 . 3 inch Rodmans 5,6 no 6 lb. SmoothbOre
1 = 305900. 1,2,3 . 3 Regts. 6,7 no 010, Smoothbore 7,8,0 = 12 lb. Napoleons
2,3,4,5 = 4 Roots. 4,5 . 4 Regts. 8-10 . 02)0. Napoleons 10 - 12 . 12 lb. Howitzers
= 5 9e390. 6 = 5 Regts. r 11,12 = 10 lb. Parrots
..=........--===.-====--.. ..-.-...... ....-- (Eastern Theatre) (Union Army Uses Western Rolls)
TABLE 3 Confederate Roll:
NUMBER OF CAVALRY REGIMENTS 2 . 6 lb. Smoothbores
1861 - 1863 3 = 12 lb. Howitzers
4,5 . 10 lb. Parrots
Union Roll: Confed. Roll. 6,7,8,9 I 12 lb. Napoleons
1,2,3 = I Reots. 1,2 . 1 Regts. 10,11,12 . 3 inch Rodmans
4,5,6 = 2 Roots. 3,4 = 2 Regts.
Only 2 CIA. Regts. Allowed 5,6 . 3 Regis.
..... ... . .. ..... ... ... ...
-- - ===. .... .. ..........e.= ..., ........
1864 - 1865
Union Roll. Conied. Roll:
TABLE 6 2,3 .30 lb. Parrot 2,3 . 10 lb. Parrot
RANDOM FACTORS FOR SMALL ARMS 4,5,6 . 3 inch Rodman 4,5,6 = 3 inch Rodman
7-12 = 12 lb. Napoleon 7-02 . 12 lb. Napoleon
Key to abbreolationa: 9851 0 Smoothbore Musket, RI = Rifled Musket, P = Pistol PLEASE NOTE: Union Ordnance was roughly the same In
C. Carbine, RC . Repeating Carbine, SG no Shotgun
MLC . Muzzle Loading Carbine, RR . Repeating Rifle
both theatres, so the same table applies. A western
Confederate force in this period should use the same
table as the 1861-63 Confederates.
Eastern Theatre Infantry
Union 80111 Confederate Roll: TABLES
= 58t1 = 531 1 1 RANK. FACTORS FOR TROOP MORALE
2,3,4,5 . RI 2 - 6 = RI
6 . RI (See Below) (Eastern Theatre Infantry)
(If 1864-65, roll again: 1-4 . RM, 5 . RC, 6 = OR) Union Roll: Confederate Roll.
1 1 = Militia = Green
Western Theatre Infantry 2 no Green 2,3,4,5 . Average
Union Roll: Confederate Roll: 3,4,5 . Average 6 . Elite
6 = Elite
1,2 = 5811 1,2,3 . sal 2,4,5,6 • 8101 4,5,6 I RH Western Theatre Infantry
(NOTE: In 1864-65 a roll of . 3 . for Confederates = RM) (Use the Union infantry die rolls for both sides)
Eastern Theatre Cavalry Cavalry 1861-63
Union Roll) Confederate Roll: (Use 091 same tables as for Eastern theatre Infantry)
1 - 6 . C 1,2
(NOTE: Union Cavalry of 1863-65 3,4 = 811 Cavalry 11364-65
are >rated with a RC 14 you roll 5 no MLC Union Roll: Confederate Roll.
a . 6 . on the die) U no NO . 1,2 . Green 1 . Green
3,4,5 . Average 2,3,4 . defrege
Western Theatre Cavalry 6 . Elite 5,6 no Elite
Union Roll. Confederate Roll:
(Sam. as above) I no p
2,3 no tILC
Artillery For Both Sides 1861-65
4,5,0 005 1 . Green 2,3,4,5 . Average
. Ellte

results. Next, roll to see how many regiments will be in each of the brigades, using Table 2. The next steps involve rolling to see how many cavalry regiments will be available (Table 3), how many batteries, the number and types of guns in each battery (Table 41, the morale of all troops (Table 51, and the type of small arms for each fighting unit (Table 6).
Having completed your Order of Battle (08) roster sheet, it's time to begin actual play. It is highly probable that each side has certain advantages and also areas of weakness. Players should not announce their OB results to opponents, leaving each side somewhat in the dark as to enemy strength in both numbers and arms.
The final portion of adding the 'fog of war involves placing the units on the table. In our games, we designate entry areas for each brigade, artillery battery, or cavalry regiment. Our only rule is that only one infantry brigade can enter the table at a certain area, meaning that we choose three entry points per army for our games. To make the game interesting and a challenge, such entrances should be on the far left side, the middle, and the far right side of your table edge. Artillery that is not attached to a brigade, and cavalry can enter at any designated area on your side of the table. We roll for each unit, a '5' or '6" allowing that particular unit to be activated. This gives you a 33% chance of getting all of your units on the table in any given turn, a highly unlikely possibility.
Such a random system is sure to throw monkey wrenches in even the best laid plans and leaves players in the same dilemna as the real commanders. We do not allow for a change of orders to be given to the brigade commanders until the 3rd turn, simulating a delay in knowledge from the front which division leaders usually had to deal with. Using our method of play, an army which is out-manned and out-gunned has a good chance of victory if they can get a sufficient force on the table early enough. An example of this was a recent game in which the Union force was outnumbered in cavalry AND infantry, plus had poorer morale in general than the Confederate force. Added to this was some poor die rolling which allowed the Rebels to get more infantry units on the table in the first turn. Fortunately, the Union force had both of its cavalry regiments enter the game on the first turn (and both had been lucky enough to roll well for morale), making it to the terrain objective before the Confederate foot. Further luck with the dice allowed the Federal cavalry to hold the objective until reinforced, winning the game!
There is certainly a need for players to keep on their toes and to write orders that allow for some independent decision making. It is the ability to be flexible and compensate in your plans that makes this type of scenario exciting. Think of how much more proud you will be of a single regiment that holds its own against superior odds in order to give the rest of the brigade time to be activated!
Future issues of THE 20UAVE will contain war table setups, complete with terrain maps and objectives, to assist members in playing random scenarios. For those who plan to use our scenarios, plan to acquire some HO scale railroad tracks, plenty of fences and buildings, and hills with more than one contour. As I said earlier in this article, terrain can make or break a real interest in a scenario. I think that you will become re-energized in your love of ACW miniature gaming. Remember that the tables on the next page represent actual historical trends, and while not totally representative of every engagement fought, are accurate when considering the Civil War as a whole. I would like to hear from members after they engage in battles with this concept, and would look forward to priniting accounts of your own scenarios with the system. Good luck in Your own "fog of war'!

THE ZOUAVE 1 Nb 2 March 1987
C, Ein IF I EL. CIN ,IFECATE IILI T1, [ , to,t ,, COW I1 Tuf . tref
The Magazine of The American Civil Wargaming Society

MORE ON "THE FOG OF WAR" By Brian Scherzer
In the first issue of THE 20UAVE I presented MY basic ideas on adding some uncertainty to current rules sets or pre-drawn scenarios. I further stated that our club uses "Johnny Reb' as our choice for rules- The article brought a fair number of letters from members who also use Johnny Rob, most asking for a way to add some measure of command control into the picture. I have to agree with those gamer; who feel that a major flaw in the rules is the lack of command, with regiments pretty much doing as they please.
In my readings of the battles of the Civil War, this was simply not the case. Many battles were lost or won because a corps, divisional, or brigade commander was slow to follow orders. 'Johnny Rob" seeks, whether intentionally or not, to make all generals equal unless they are leading a regiment not a very accurate portrayal of history. The problem facing me then was to find some way of rating the effectiveness of generals on the table. While some letters asked me to rate the actual performance of Civil War leaders, this would prove to be a cumbersome task due to the fact that there were over 1000 generals!
For the purposes of this article, I will merely attempt to give gamer; a basic foundation for using leadership skills, or lack thereof, in their randomly generated games as per my article in the last issue of THE 20UAVE. For more advanced gainers who have a lot of reference material, and who wish to employ the system in historical scenarios, the tables provided herein can be used once you have determined for yourself what rating a general should be given. Perhaps in the future, I will attempt to rate all of the generals, but the system must, for accuracy's sake, be carefully thought out. If command control is of great importance to you, I would refer you to STARS 'N BARS by Scotty Bowden. That set of rules has a truly incredible way of handling the problem, leaving garners faced with the best and the worst situations which would have been seen by real generals.
Of course, any random generation system that involves too many factors is likely to take away from the ease and jOY of using any rules set. Having already added a fair number of minutes to initial set-up times in my last article, I would like to keep any additional time for such to a minimum. To this end, the tables contained in this article are geared for those who would like to engage in non-historical battles or campaigns, where each side mirrors historical trends, but is not bound by pre-determined faults. Everyone in this type of engagement has a chance to be a Stonewall Jackson type of leader, or (heaven forbid!) a Gideon Pillow, based on both the luck of the dice and the percentage chance for quality leadership for the particular army, period of the war, and theatre.
It is important for me to start with certain assumptions. One is that the Rebel armies had better leaders than the Federals at the outbreak of the war. The Confederacy had a decided edge in the East, but began, during the middle of the war, to lose commanders such as Jackson. The Union fielded inferior generals in the beginning of the war, but began to find better leaders as the war dragged on. The western theatre was, perhaps, better balanced in the quality (or lack of same) than the East. Even there, attrition tore into the ranks of the better Southern generals, starting with the death of Albert Sidney Johnston, and culminating with the loss of Patrick Cleburne at the battle of Franklin.
In the meantime, Lincoln was looking for fighting generals. 1861 and 1862 saw politics deciding who would lead the northern forces. As the debacles mounted, Lincoln began sifting through his leaders, finding the likes of Grant, Sherman, Thomas, Sheridan, Wilson, and Hancock. As southern arms were faltering for lack of manpower and supplies, the Union was finding men who could exhibit a

desire to fight a relentless war of attrition. These facts are represented in the random tables.
For a randomly generated game, I decided to incorporate the effects that army, corps, division, and brigade leaders would have had on their troops, keeping simplicity in mind. To get closer to specifics, I added the time periods (1861-63 and 1964-65) and theatres (Western or Eastern). The final step before making the tables was to do a subjective analysis of the generals in the various departments and come to some conclusions regarding command ability percentages for each sub-group.
The following ratings, and their definitions will be found in the tables:
Exceptional - If an army or corps commander, he has a genius for developing and carrying through grand tactical movements. If a division or brigade leader, he is precise, highly dependable, and has a genius for tactical combat. Examples in history would be Lee, Sherman, Forrest, or Jackson.
Excellent - Denotes an army or corps commander who is prudent, but aggressive when an opportunity arises, sometimes showing genius in his abilities. If a division or brigade leader, he is very dependable and is likely to exploit any openings provided for him my an enemy's mistakes. Examples would be Grant, A.P. Hill, Thomas, and Sheridan.
Good - This is a general who, core often than not, can be depended to carry the fight to the enemy, but who may not be able to organize his command well enough to turn a battle into a complete rout of the enemy. Examples are Rosecrans at Stones River or Bragg at Chickamauga.
Average - The bulk of generals who showed no real initiative, but were able to carry out orders if circumstances were right.
Poor - These were often political generals or leaders who were given more troops to command than their talent dictated. Examples would be Hood as commander of the Army of Tennessee or McClellan as head of the Army of the Potomac. This classification would also refer to the less capable division or brigade leaders such as Gideon Pillow.
Refer to Table 1 in this article and roll 2 regular dice to see what command capability each of your army, corps, division, or brigade leaders has. If you are using Johnny Reb rules, Exceptional and Excellent generals would give a 43 to any unit they were personally directing, Good generals would give a 42, and Average generals would give a 41. Poor generals have no effect on troops that they personally lead.
Having determined your leader capability factors, you are ready for the battle. Using regular Johnny Rob rules, the tables included in this article will tell you whether or not you are able to have troops receive orders based on your factor rolls.
Table 2 is used to see whether or not your leader can 'activate the orders issued by or to him (Sorry Scotty Bowdin. I looked for some other term than "activate' and couldn't find one that would work!). This is the essence of a Civil War battle. The best laid plans could go awry because someone in the chain of command did not issue orders or did not follow them.
Using the basic Johnny Rob orders, YOU must roll 2 regular dice to activate Your initial orders, and must roll any time those orders are changed. Once orders are activated, troops will try to carry them out to the best of their ability. Familiarize yourself with the tables before reading any further.

.....
TABLE 1 LEADER COIIINNO ABILITY
1861 - 1863
Eastern Theatre Western Theatre
Ability Union Roll: Conf. Roll: Union Roll: Conf. Roll:
Exceptional . None 11,12 None None Excellent . 11,12 9,10, 11,12 10,11,12 Good = 9,10 7,8 8,9,10 7,8,9 Average . 5,6,7,8 4,5,6 4,5,6,7 3,4,5,6 Poor . 2,3,4 2,3 2,3 2
None None 10,11,12 11,12 7,8,9 9,10 4,5,6 5,6,7,8 2,3 2,3,4
TABLE 2 ACTIVATION OF ORDERS
Poor . 9 - 12; Average = 7 - 12; Good . 6 - 12; Excellent = 4 - 12; Exceptional =Automatic Activation.
Having read through the above tables, it is time to understand how this system will work with Johnny Rob rules. Orders are given at the beginning of the random 'Fog of War" engagement, and all commanders are assumed to have received orders prior to the first turn. If you are playing a game using all of the random factors listed in Issue RI (my article on the Fog of War) and are adding this section on command control, you will not be rolling for each regiment or battery to enter the table. Instead, roll for each BRIGADE, moving all elements of the origaoe onto the table at once if the die roll succeeds. However, to move forward ,ou must now rd): to see if the order for that brigade has been activated. You will add or subtract from each brigade order activation toll based on the -o:lowtng s4wtem ito simulate division, corps, or army commander effect). What , du -add c, subtract will depend on the size of your total force.
It :,,du are playing with more than one division per side, there will be a Pi "eader. :4 are playing with more than one corps per side, there will
arm , Ldrmrinder in addition to the corps leaders. These will have a DY adding the total positive or negative numbers to the brigade
1864 - 1865
Exceptional = 11,12 11,12 Excellent = 9,10 9,10 Good = 7,8 6,7,8 Average . 4,5,6 3,4,5 Poor = 2,3 2

leader activation roll. Army, corps, and divisional leaders will have the following effects:
Poor/ -2; Average/ -1; Good/ 0; Excellent/ Cl; Exceptional/ 02
By adding the cumulative numbers of superiors to the Brigade leader roll, YOU are simulating the effect of leadership in the chain of command. This may seem confusing at first, but is actually quite simple. Let's say that you are playing with one corps per side. The chain of command would include both a division and the corps leaders, so their net effect would be included in the Brigade roll. EXAMPLE: The Brigade leader is Average, the Division Leader in
Good, and the Corps leader is Good. The Division and Corps leaders each add a .1 to the Brigade activation roll, for a net effect of a .2. Since the Brigade leader would need a '7' or better to activate orders, you need only to roll a "5" or better with the added plusses. Remember that you may also have a negative net effect if the Division or Corps leaders are Poor!
Remember that you will no longer roll for each unit to enter the table at the beginning of the game. Instead, you will roll to activate an order to enter the table at a certain point (which should be specifically designated in the orders). This would simulate historical trends in that better generals managed to get their men to move faster. A quick reading of Stonewall Jackson's Valley Campaign will give you an idea of how important this can be!
Being able to move onto the table edge represents, in my system, marching to the field of battle. It is unlikely that all brigades will arrive-at the some time, causing a commander to make decisions based on what troops are currently available to him. However, making it to the table is merely a prelude to the battle. Having arrived, orders must be given as per the Johnny Reb rules, and you must roll to see whether or not such orders are activated. Until an order in the initial part of the game is activated, the brigade involved is assumed to have "Hold" orders. Once an order is activated, it stays in effect until a new order is issued and activated, or until units are forced into other conditions by battle events.
By using command control, garners are mirroring history. It will no longer be a sure thing that all brigades in a division will attack when told to, leaving the possibility that some of your units will 'go in unsupported'. When using more than one division, the result can play havoc with the best laid plans a true reproduction of the typical Civil War battle. I hope that you find this added "fog of war" as interesting as we have. It has helped us from becoming bored and has taught us to make the same kind of decisions real commanders had to make. When you have inferior generals, even if you have a superior force, it may be wise to go on the defensive!
THE BLUE AND THE GRAY and the brown, and the black, and the tan
Stephen A. Thomas 19th Century Miniatures
After many years of teaching, wargaming, and re-enacting, it has come to my attention that both the wargaming public and figure manufacturers are pretty much in the dark as regards the actual uniforms and colors of the basic ACW vintage infantryman. Perhaps I can shed some light on the topic while helping the

THE ZOUAVE II „„!,,,, 4 Winter 1988
• COLONEL FRANK C. ARMSTRONG This unique photograph shows Armstrong wnen he was a colonel ol the Louisiana IMP, in tate Mat or early 1862.. is the only general to have served both sides in the Civil Wah haNng been in the Union army dunno the battle of First Manassas. Having resigned From Federal army in August t 861. Arms.. served on the svaffs of Generals McIntosh and McCulloch. berg a law foot away when the letter net his death Cl Pea Rhge. Subsequently promo. to Colonel of the 3,d LovNiana Infantry, he was soon made commander of Me cavalry under Medina Price. Thereafter, Armstrong served under Forrest. Wheeler. S.D. Lee, and Chalmers, becomhg one of Forrest, most dependable leaders.
The Magazine of The American Civil Wargaming Society

RANDOM FACTORS TABLES FOR STARS N BARS, 3RD EDITION ORDERS OF BATTLE By Brian R. Scherzer
In our very first issue of THE ZOUAVE, some two years ago, we ran a set of random tables for use with JOHNNY RIB rules. Shortly thereafter, I began receiving requests to do a similar, but more exhaustive, set for S6183. Our decision was to wait for a period of time until there were enough new members who had not seen the first set that was based on JR1. Now is that time.
My rationale for devising the following random factors tables stems from my desire to occassionally play non-historical scenarios that still present realistic orders of battle. In this way, you are no longer bound to have the arguments over whether one's army is headed by R.E. Lee or Stonewall Jackson, and you are also not forced into situations that you, as the general, would not have placed yourself in in the first place. If you play a game with at least one corps per side, you will find that the random factors will give an accurate percentage chance of fielding an army representative of that period of the Civil War. To accomplish this, my tables were broken down to cover both the Eastern and Western theatres during the periods of 1861-62, 1863, and 1864-65. I suggest that one of the gassers roll a regular die to see what theatre and period of the war will be played on any given day. A 1, 2, or 3 will be Eastern, while a 4, 5, or 6 will make it a Western engagement. To determine what time period is involved, another roll is needed. A 1 or 2 will mandate 1861-62, a 3 or 4 will be 1863, and a 5 or 6 will represent 1864-65. The final determination should be the size of the forces involved, meaning army, corps, or division level engagements. Obviously, this should be mandated by the number of players and figures available.
The concept of randomly generated orders of battle is certainly not a new one. They, combined with a "fog of war" scenario, allow one to have some interesting battles where neither side is sure of what the opposing army consists of, either in number of men and guns or quality of troops. Most "fog of war"
battles are basically all-out brawls. ..the last troops on the table winning the engagement. There is a "fog of war" scenario included in this issue for use with 1583 rules that requires the use of the random tables, and we expect to print other such scenarios for use with different rules sets in the future.
All terminology used in the random factors tables is compatible with SNB3. Others who might want to use these tables for other rules sets have need only to change the terms. For example. if using J112, "Crack" and "Elite" would be the same as "Elite"; "Veteran Regular" and "Veteran" would be "Regular"; and all else would remain the same. If using RALLY ROUND THE FLAG, "Crack" and "Elite" would equal "Elite"; "Veteran Regular" would be the same as "Crack"; "Veteran" would equate to "Regular"; while "Green" and "Militia" would be the same as "Green . . All rolls should be done with two 10 sided dice, one representing tens, with the other representing single numbers.
The factors listed in the tables are well researched from reliable manuscripts and have been checked by several historians and other experts for relative accuracy. Historical perfection is difficult, if not impossible, to achieve when attempting to set up randomly generated tables. Instead, it was the author's desire to have the correct "feel" in each order of battle, and to allow variations of dissapointment and glee for the people rolling for their forces.
Once you have completed a sheet to keep track of your troops, you have merely to begin rolling, and once completed with this phase, should go right into a randomly generated battle using Stars 'N Bars. The order of battle sheet should contain enough lines for a division and its artillery, plus all of the necessary headings such as unit name, size, morale, weapons type, General's skill level, and General's influence level. Having done this, you are ready to either use one of our published "fog of war" scenarios or write your own. Good luck on the gaming table!

RANDOM FACTORS FOR USE WITH STARS 'N BARS
_ - = = == = == == === ==
TABLE 1 LEADER RATINGS
Army, Corps, and Division Commanders:
Eastern Theatre
Superior Excellent Good Mediocre Poor Despicable
Union 1861-62 1-10 11-15 16-35 36-70 71-90 91-100 Conf. 1861-62 1-15 16-20 21-60 61-80 81-95 96-100 Union 1863 1-12 13-20 21-40 41-70 71-90 91-100 Conf. 1863 1-20 21-25 26-65 66-80 81-95 96-100 Union 1864-65 1-15 16-30 31-45 46-75 76-95 96-100 Conf. 1864-65 1-20 21-30 31-50 51-75 76-90 90-100
Western Theatre
Union 1861-62 1-10 11-20 21-40 41-70 71-90 91-100 Conf. 1861-62 1-10 11-20 21-50 51-75 76-90 91-100 Union 1863 1-15 16-22 23-45 46-75 76-95 96-100 Conf. 1863 1-15 16-20 21-50 51-75 76-90 91-100 Union 1864-65 1-15 16-28 29-55 56-85 86-99 100 Conf. 1864-65 1-9 10-20 21-35 36-65 66-90 91-100
Brigade Commanders
Union 1861-63 Union 1864-65 Conf. 1861-63 Conf. 1864-65 Superior 1-9 1-17 1-28 1-17
INSPIRATIONAL IMPACT
Charismatic Inspirational Impersonal Uninspiring Union 1861-62 1-5 6-15 16-80 81-100 Union 1863 1-10 11-25 26-85 86-100 Union 1864-65 1-15 16-35 36-90 91-100 Conf.(Eastern)I861-62 1-10 11-30 31-85 86-100 Conf.(Eastern)1863 1-12 13-65 66-95 96-100 Conf.(Eastern)1864-65 1-9 10-50 51-89 90-100 Conf.(Western)1861-62 1-2 3-20 21-85 86-100 Conf.(Western)1863 1-10 11-25 26-85 86-100 Conf.(Western)1864-65 1-2 3-16 17-80 81-100
_
TABLE 2
DIVISION SIZES (All Years)
4 Brigades 3 Brigades 2 Rrigodr 1 Brigade Union 1-20 21-85 86-98 99-100 Confederate 1-15 16-80 81-95 96-100
5
.....=.... ..... ...... TABLE 2 Coot.
BRIGADE SIZES (All Years)
7 Union Confederate
Union 1861-62 Conf. 1861-62 Union 1863 Conf. 1863 Union 1864-65 Conf. 1864-65
Regts. 1-8 1-8
640 men 1-75 1-60 1-25 1-5 1-5 -
6 Regts . 5 Regts. 9-35 36-90 9-25 26-80
REGIMENT SIZES
480 men 400 men
76-95 96-100
61-90 91-100
26-60 61-85
6-40 41-75
6-30 31-75
1-15 16-60
4 Regts. 91-100 81-95
320 men
- 86-95 76-90 76-85 61-80
3 Regts.
96-100
200 men - -
96-100 91-100 86-100 81-100
.
=.-. . ----........ . . .. ... ... ........._...._......_.__.__....._..__ .. = .. ==.....
..........
TABLE 4 ARTILLERY
NUMBER OF BATTERIES (Roll Per Division)
4 Batteries 3 Batteries 2 Batteries
Both Sides 1-20 21-90 91-100
NUMBER OF GUNS IN A BATTERY (Roll Per Battery)
6 Guns 4 Guns
Union 1-80 81-100
Confederate 1-40 41-100
(NOTE. For each cavalry brigade add one 4 Light Rifle Horse Battery)
. .. ............
6
CAVALRY REGIMENTS (Per Division of Foot)
3 Regts. 2 Regts. I Soft.
Union 1861-62 1-5 6-40 41-100
Conf. 1861-62 1-25 26-90 91-100 81-100
Union 1863 1-15 16-80
Conf. 1863 1-25 26-90 91-100
Union 1864-65 1-25 26-95 96-100
Conf. 1864-65 1-15 16-85 86-100

TABLE 4 Cost... ARTILLERY BATTERY COMPOSITION
(Notes; SB smoothbore; LIGHT 6 lb. SB, 4 lb. Rifle, 10 lb. Parrot, 3' Rodman, 3" Ordoauce Sub, James Rifle, and 12 lb. B001teer at more then 5";
MEDIUM 12 lb. Hapoleon, Blekely aed Whitworth RIfles, 20 lb. Parrot, and 12 lb. Howitzer at leon thom 5"; HEAVY 24 lb. Howitzer)
Light Guns
Light Rifle
Median Some
Medium RIfle
Heavy Heavy Sues Rifle
Union (East & West) 1861-62 1-12 13-80 81-97 98-100 - -
Union (East & West) 1863 - 153 5499 100 - -
Unise (East S West) 1864-65 - 1-50 51-95 96-100 - -
Couf. (Western) 1861-62 1-60 61-82 83-98 99-lEO - -
Conf. (Westeem) 1863 1-35 36-63 64-96 97-98 99-100 - Conf. (Wentemn) 1864-65 1-8 9-28 29-99 100 - -
Conf. (Ranters) 1861-62 1-36 37-90 82-98 99 100 -
ConE. (Eastern) 1863 1-7 8-53 5495 96-99 500 -
ConE. (Eautern) 1864-65 - 1-42 43-92 93-98 99-100 -
Crark
TABLE 5 TROOP MOE LE Tnfae ry Brliedes
Elite Vet. Reg. Regular Green M010tie Union 1861-62 - 1-5 6-15 16-40 41-80 81-100 bios 1863 1-5 6-13 13-30 31-75 76-91 92-lOS Union 1864-65 1-7 8-19 20-39 40-85 86-95 96-ISO Cnnf.(Westers)1861-62 1-2 3-10 11-25 26-70 71-93 94-100 Cnnf.(Wentero)1863 1-5 6-20 21-44 45-85 86-96 97-100 Canf.(Western)1864-65 1-6 7-20 2 1-39 40-80 81-95 96-100 Conf.(Eaeters)1861-62 1-5 6-19 20-39 40-76 77-93 94-100 Conf.(Eaoters)1863 1-9 10-24 25-50 51-90 91-100 -
Conf.(iastern)1864-65 1-9 10-20 21-45 46-90 91-98 99-lOU
Cavalry Regimente
Union 1861-62 - - 1-10 11-35 36-90 91-lOU Union 1863 - 1-5 6-18 19-70 71-95 96-100 Usiun 1864-65 1-5 6-15 B 6-30 31-90 91-100 -
Cnnf. 1861-62 1-6 1-15 16-6 0 61-95 96-100 -
ConE. 1863 1-9 10-25 26-70 71-96 97-100 -
ConE. 1864-85 1-9 10-20 2 1-65 66-90 91-98 99-lOU
ARTILLERY BATTERIES
Union 1861-62 1-5 6-10 11-25 26-80 81-95 96-lOU Uninn 1863 1-7 8-19 20-40 41-90 91-100 -
Union 1864-65 1-9 9-20 21-50 5198 99-100 -
Conf. 1861-62 1-3 4-10 11-25 26-65 66-85 86-lOU ConE. 1863 1-4 5-12 13-29 30-75 76-95 96-lIE ConE. 1864-65 1-5 6-15 16-40 41-90 91-97 98-150
7

TABLE 6
RANDOM FACTORS FOR SMALL ARMS
Key To Abbreviations: 5811 RR = Repeating Rifle, C = Car
SBM
Union Foot (East)1861-63 1-19
Union Foot (East)1864-65 1-7
Union Foot (West)1861-63 1-24
Union Foot (West)1864-65 1-15
Goof. Foot (East)1861-63 1-21
Goof. Foot (East)1864-65 1-15
Coot. Foot (West)1861 -63 1-49
Goof. Foot (West)1864-65 1-39
Union Can. (East or West) 1861-63 Union Cav. (East or West) 1864-65 Conf. Cav. (East All Years) 1-10 Goof. Gas. (West All Years) 1-18
= Smoothbore Musket, RN = Rifled Musket, pine, RC = Repeating Carbine, SG = Shotgun.
RN RR C RC SG
20-100 - - - -
8-95 96-100 - - -
25-97 - - - -
16-97 98-100 - - -
22-100 - - - -
16-100 - - - -
50-100 - - - -
40-100 - - - -
- 1-96 97-100 -
- 1-75 76-100 -
11-49 - 50-87 - 88-100
19-30 - 31-69 - 70-100
,4L OF POO is an uncomp.icated and fast moving set of rules for playing iaval battles in the American Civil war. It is not just an ironclads pame. but a system to realistically aepict all aspects of that naval conflict. These rules are designed for playing 1:1200 scale miniatures with each piece being one vessel. Ship to ship combat. including large fleet actions with forts and land units can all be played in an evening. Well received at ORIGINS. ATLANTICON. HISTORICON. and regional conventions throughout the USA. AGE OF IRON will trios players hours of enjoyment and an accurate feeling for the ships that
orought abOUt the change from wood and sail into iron and steam.
$8.00 (Postage paid> Outside USA add $2.00.
TACTICAL CONFLICT SYSTEMS. 25 .I BeacEw000f Drive. East Greenwich. R.1. 02818
8

THE ZOUAVE Volume III Number 2 Summer 1989
The Magazine of The American Civil Wargaming Society

"CLEAR THE FIELD, BOYS!" - A DESIGNER SCENARIO FOR ANY RULES SET By Brian R. Scherzer
The New Orleans club has probably had its greatest fun playing what I call "designer. scenarios.. .randomly generated orders of battle, with all people having orders to simply take as each ground as possible. These tend to be all-day affairs and, since the mortality of the troops is fictitious, we tend to let regiments and brigades get decimated, all in the name of "Glory".
It doesn't matter what rules net you use or how many people participate. This article gives you the parameters to decide on the forces and gives the objectives of the battle. EVERYTHING else is up to the players.
To determine your orders of battle you must first decide how many units each person wants to handle. If playing OTR, these units will be brigades. If playing any of the other major rules sets, units will be regiments. If there is only going to be one person per side, I advise that each person field a lot of troops. If there are as many as 6 players per side, each should control a smaller number of troops.
You begin developing your order of battle by rolling for the size of each brigade present. If using a regimental level rules set, brigades must be broken down to regiments, with each brigade being divided into no less than 3 regiments, and no more than 7 regiments. If using JR or SNB3, the minimum size of a regiment would be 200 men, with the maximum being 600 men. Roll a six sided die (D6) and use the following table for each brigade, using the correct column for your rules set:
Die Roll Brigade Size (JR, SNB3) Brigade Size (RRTF) Brigade Size (OTR)
1200 1200
1200
1400 1200
1500
1600 1600
1800
1800 1600
1800
2000 2000
2100
2200 2400
2400
If you wish to throw a cavalry brigade or so into the fight, I suggest that you roll a 06, with a 4,5 or 6 allowing for the brigade. Roll for strength as with infantry. Next, you must determine the quality of each general's casting. Since RRIF rules do not have ratings for generals, such are not included in the table.
Die Roll JOHNNY RIB STARS 'N BARS 3110 ON TO RICHMOND
0 Poor Poltroon +1 Mediocre Cautious +1 Good Aggressive +1 Good Aggressive +2 Excellent Firebrand +2 Superior Exceptional
The final part of putting your OB together is Co determine what your artillery will consist of. Each brigade will have the chance of having between 4 and 6 guns. Roll a D6 for each brigade, a 1-3 being a 4 gun battery, while a 4-6 will be a 6 gun battery. For the sake of simplicity, we will only have two types of rifled guns and two kinds of smoothbores, leaving out fancier types and howitzers. To determine composition of the ENTIRE battery, roll a 56 and consult the table on the next page:
20
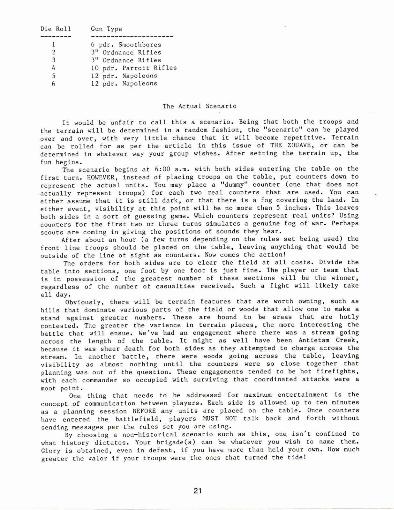
Die Roll Gun Type
6 pdr. Smoothbores 3" Ordnance Rifles 3" Ordnance Rifles 10 pdr. Parrott Rifles 12 pdr. Napoleons 12 pdr. Napoleons
The Actual Scenario
It would be unfair to call this a scenario. Being that both the troops and the terrain will be determined in a random fashion, the "scenario" can be played over and over, with very little chance that it will become repetitive. Terrain can be rolled for as per the article in this issue of THE ZOUAVE, or can be determined in whatever way your group wishes. After setting the terrain up, the
fun begins. The scenario begins at 6:00 a.m. with both sides entering the table on the
first turn. HOWEVER, instead of placing troops on the table, put counters down to represent the actual units. You may place a "dummy" counter (one that does not actually represent troops) for each two real counters that are used. You can either assume that it is still dark, or that there is a fog covering the land. In either event, visibility at this point will be no more than 5 inches. This leaves both sides in a sort of guessing game. Which counters represent real units? Using counters for the first two or three turns simulates a genuine fog of war. Perhaps scouts are coming in giving the positions of sounds they hear.
After about an hour (a few turns depending on the rules set being used) the front line troops should be placed on the table, leaving anything that would be outside of the line of sight as counters. Now comes the action!
The orders for both sides are to clear the field at all costs. Divide the table into sections, one foot by one foot is just fine. The player or team that is in possession of the greatest number of these sections will be the winner, regardless of the number of casualties received. Such a fight will likely take all day.
Obviously, there will be terrain features that are worth owning, such as hills that dominate various parts of the field or woods that allow one to make a stand against greater numbers. These are bound to be areas that are hotly contested. The greater the varience in terrain pieces, the more interesting the battle that will ensue. We've had an engagement where there was a stream going across the length of the table. It might as well have been Antietam Creek, because it was sheer death for both sides as they attempted to charge across the stream. In another battle, there were woods going across the table, leaving visibility as almost nothing until the counters were so close together that planning was out of the question. These engagements tended to be hot firefights, with each commander so occupied with surviving that coordinated attacks were a moot point.
One thing that needs to be addressed for maximum entertainment is the concept of communication between players. Each side is allowed up to ten minutes as a planning session BEFORE any units are placed on the table. Once counters have entered the battlefield, players MUST NOT talk back and forth without sending messages per the rules net you are using.
By choosing a non-historical scenario such as this, one isn't confined to what history dictates. Your brigade(s) can be whatever you wish to name them. Glory is obtained, even in defeat, if you have more than held your own. How much greater the valor if your troops were the ones that turned the tide!
21
THE ZOUAVE W 3 1990
ANOTHER QUIZ PHOTOGRAPH!
This is a truly tough one to identify and will probably require readers to do some extensive research, which, of course, is the purpose in our running this image on the front cover. Gamers need to link up the historical aspects of the Civil War with their miniatures activities. Whoever identifies this Union officer will receive an authentic Civil War photograph of a Union soldier.
The Magazine of The American Civil Wargaming Society
The Zoom
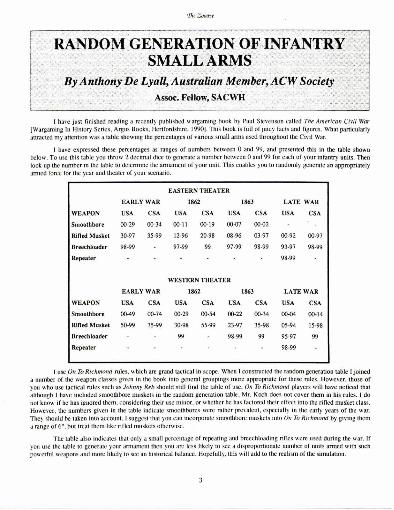
RANDOM GENERATION OF INFANTRY SMALL ARMS
By Anthony De Loll, Australian Member, ACW Society
Assoc. Fellow, SAC WA • . .
I have just finished reading a recent]) published wargaming book by Paul Stevenson called The American Civil War
[Wargaming In History Series, Argot Books. Hertfordshire, 19901. This book in full of juicy facts and figures. What particularly
attracted my . attention was a table showing the percentages of various small arms used throughout the Civil War.
I have expressed these percentages as ranges of numbers between 0 and 99, and presented this in the table shown
below. To use this table you throw 2 decimal dice to generate a number between Sand 99 for each of your infantry units. Then
look up the number in the table to determine the armament of your unit. This enables you to randomly generate an appropriately
atoned force for the year and theater of your scenario.
EARLY WAR
EASTERN THEATER
1862 1863 LATE WAR
WEAPON USA CSA USA CIA USA CSA USA CIA
Smoothbore 00-29 00-34 00-11 00-19 00-07 00-02 - -
Rifled Musket 30-97 35-99 12-96 20-98 08-96 03-97 00-92 00-97
Breechloader 98-99 - 97-99 99 97-99 98-99 93-97 98-99
Repeater - .. - - 98-99 -
WESTERN THEATER
EARLY WAR 1862 1863 LATE WAR
WEAPON USA CIA USA CSA USA CIA USA CSA
Smoothbore 00-49 00-74 00-29 00-54 00-22 00-34 00-04 00-14
Rifled Musket 50-99 75-99 30-98 55-99 73-97 35-98 05-94 15-98
Breechloader - - 99 - 98-99 99 95-97 99
Repeater - - - - - - 98-99
MC On To Richmond rules, which are grand tactical in scope. When I constructed the random generation tablet joined
a number of the weapon classes given in the book into general groupings more appropriate for these rules. However, those of
you who use tactical rules such as Johnny Re6 should still find the table of use. On To Richmond players will have noticed that
although I have included smoothbore muskets in the random generation table, Mr. Koch does not cover them in his rules. I do
not know if he has ignored them, considering their use minor, or whether he has factored their effect into the rifled musket class.
However, the numbers given in the table indicate smoothbores were rather pre, alent, especially in the early years of the war.
They should be taken into account. I suggest that you call incorporate smoothbore muskets into On To Richmond by giving them
a range of 6", bin treat them like rifled muskets otherwise.
The table also indicates that only a small percentage of repeating and breechloading rifles were toed diming the war. If
you use the table to generate your armament then you are less likely to see a disproportionate number of units armed with such
powerful weapons and more likely loser an historical balance. Hopefully, this will add to the realism of the simulation.
THE ZOUAVE Volume VIII, No.3 Fall, 1994 $4.50
John Singleton Mosby, 1833-1916 A scout for J.E.B. Stuart, Mosby organized the Partisan Rangers in
1863 and conducted guerrilla warfare in northern Virginia.
The Magazine of The American Civil Wargaming Society

Dicing for Unit Size by George Arnold
Inspiration comes from funny places. So does dissatisfaction.
Ever looked closely at orders of battle for a series of historical conflicts? Even the same army, fighting several battles over a period of time, is a living thing, constantly growing or shrinking. It's never completely the same, even from one battle to the next in the same campaign. Units are raised or disbanded, are attached or detached, or lose troops to sickness or casualties.
So, in our own campaigns, why field a car-bon-copy army every time out? The same units reappear time after time, in a way that is com-pletely unhistorical. How about a little variety?
Well, that's the dissatisfaction for me. I muster, for example, two finely organized ACW armies, onc Union, one Confederate. When I painted them, each and every infantry regiment consisted of twenty figures — each an indepen-dent battalion of twelve. I fought some battles and enjoyed them very much, until the above dissatisfaction crept in. This organization was just too clean and predictable.
Then, I read an article by Paul Koch, author of the On to Richmond rules. In the article, Koch explained how he deployed some methods of fighting "second day battles," or conflicts that came to the table in the middle of a battle, with a day's fighting already having occurred, though not in the actual game.
The trick was to whittle down the units involved (fairly) to reflect the casualties they'd suffered the day before, then to take command of them on the morning of the second day and to gamc away!
That concept gave me the inspiration to move away from the carbon-copy armies with which I'd been gaming. The time-honored solu-tion was obvious: Roll the bones. Get the dice involved.
My home-grown rules are different from On
To RichmmuZ so the following concept won't nec-essarily apply directly to On To Richmond or any other rules set. But I think the concept can be customized to match any set of rules or armies and can put some unpredictability into a battle (or especially a campaign) setup. For this aam-plc, I will refer to my own ACW armies, whose basic units remain individual regiments and battalions. Those units arc, of course, organized into brigades and the brigades are organized into divisions.
I madc the arbitrary decision that my Union brigades would muster from two to five regi-ments and Confederate brigades would have four to seven regiments. To decide how many regi-ments are in each brigade, I Luc the following charts:
USA.: 2 regiments on a 6D roll of 1; 3 regi-ments on a 6D roll of 2 or 3; 4 regiments on a 6D roll of 4 or 5; 5 regiments on a 6D roll of 6.
C.S.A.: 4 regiments on a 6D roll of 1; 5 regi-ments on a 6D roll of 2 or 3; 6 regiments on a 6D roll of 4 or 5; 7 regiments on a 6D roll oft).
After some experimentation, I devised the following chart (on page 12) for rolling 2D6 and fixing the number of stands per regiment (or bat-talion.) This chart applies to both the U.S. and Rebel armies, the only difference in their overall organizmion being the size of their brigades, which was already addressed in the previous chart.
Depending on the type of battle I am fight-ing, a unit of two stands is invariably an under-strength battalion, but a three-stand unit can be either a full-strength battalion or a reduced strength (usually veteran) regiment. Larger units are regiments.
Each unit gets its own command stand and
The Zouove, Fall 1994 • Page 11
Roll Number of Stands 2 2 3 8 4 3 5 4 6 6 7 5 8 7 9 4 10 3
12
the appropriate number of other stands to bring it to the strength noted on the chart above. For those who are interested, the average unit size using the above chart is five stands. The most common number of stand s that will come up on the chart, however, is four, which should appear
Canplete Line of 25M Miniature Mastopieas Fa American Civil War Collectors Doramists & %priers
Also: Napoleonic & Seven Years War Ranges. IMEL
: REA -gl 'Es*g:
Send $3.00 for catalogs and sample (additional samples $125 ea) to: Steven Phillips • 4761 N. Bear Canym • Timm, 42 85749
(602) 749-0703 • Trade impales welcome.
about twenty-two percent of the time. Units of two and ten stands appear only about three per-cent of the time each. The other unit sizes are spread percentage-wise between those high and low figures.
When I use these charts for my infantry units, I get brigades of varying numbers of regi-ments and regiments of varying numbers of stands. I can dice up a Union brigade of three units, consisting of seven, five, and three stands, for example. That could easily be a green brigade of two good-sized regiments and a flail-strength battalion.
In campaigning, I usually field twice as many brigades as I have stands to represent on the table and enter half of them at the beginning of the game, the others entering as the game develops. If a situation occurs in which more stands are engaged than I can represent, I simply shift the scale.
Usually, each of my stands represents 100 infantry. But I can have them represent 200 easily by doubling all the distance scales (100 yards becomes 200) and doubling the time scale (one hour becomes two hours). Movement lengths thus remain the same, but ranges are halved.
Charts based on the same principles as those above can be easily developed to set the size of your cavalry units and the number of your artillery batteries. You can also use such a system to randomly select the morale level of each unit, adding even more diversity to your Civil War armies.
After that, all you need is a method to keep crack of these brigades as they campaign. Your original units will lose stands to casualties and perhaps gain them through reinforcement. Their morale level also can change depending on their battle experience.
But, whatever happens, you will be fighting battles or campaigns with highly-individualized units, none of them quite like any other. No car-bon copies anywhere.
The Zeman., Fall 1994 • Page 12
THE zouAvE Volume X, No. 3 Fall, 1996 $5.50
Washington I. Warren, 1828 - 1909 First Sergeant, Company E, 22nd Iowa Infantry.
Great, great, great godfather of ACW Society member Rick Nance.
The Magazine of the American Civil War Gaming Society

Random Generic Scenario Generation
by Mark Piper
'T he following system details a method for ran-i. dom generation of scenarios for ACW
games.The aim is to allow games to simulate some of the pre-battle maneuvering and to also produce more interesting games. Unfortunately, there is nothing CO stop players from simulating West Point graduates by attempting to men the same flank, a sort of ACW 'take your partners, swing them around" concept.
STEP 1. Both sides should organize their armies first.
The armies could be the same; randomly generat-ed, perhaps by using cards with variants on a theme.
STEP 2. Both sides should set up the board, either
one terrain piece at a time or by general agree-ment. Each side should then roll a six-sided die. The highest die picks a table side (either of the two long sides.)
STEP 3. Next, the overall commanders on both sides
should decide (perhaps after a brief war council with other players) the "approach."
The approach options are: frontal attack, left flank attack, right flank attack, defend, withdraw.
Each option will generate different scenarios with different victory conditions. The order of march and/or cable top positions should be noted on paper. Generally, the attacker in a scenario will move first.
STEP 4. Having made their respective decisions, both
players should declare their choices. By consult-ing the table at the bottom of this page, the type of scenario to be played can be determined.
STEP 5. GENERATED SCENARIOS
A. Meeting Engagement 1 (Attack/Attack) The battle is played with each side deployed
anywhere up to 12" of the center line or either end of the table. Actual unit placement should be drawn on a map or a screen (e.g. boards from a board game) used to hide units from view. Alternatively, some form of block or counter could be used, perhaps in conjunction with dummy counters to facilitate hidden movement. Victory conditions should be based on casualties inflicted_
Player B Attack Left Flank Right Flank Defend Withdraw
Player A Attack M M M A/D R
Left Flank VA M M LF/D R
Right Flank R/A M M RF/D R
Defend D/A D/L D/R TA TA
Withdraw R R R TA TA
M = meeting engagement D/A = defend against frontal attack
VA = left flank attack vs. defend R = rearguard action
R/A = right flank attack vs. defend TA = try again
The Zouove, Fall 1996 • Page 22

B. Meeting Engagement 2 (Attack/Left Flank/Right Flank)
The battle is played as per Meeting Engagement 1 above, but in addition, the flank-ing player may deploy up to the edge of the table corresponding with his flanking movement (either left or right).
C. Left Flank Attack/Right Flank Attack vs. Defend)
The defender deploys first, up to 12" of the center of the board or up to 24" of the ends of the table. The attacker then deploys up to 12" of the respective left or right flank from the perspec-tive of the attacker. Victory conditions should be calculated by a combination of terrain and casu- Sid GS.
D. Defend Vs. Frontal Attack The defender deploys first, up to 12" of the
center of the board or the ends of the table. The attacker deploys second up to 12" oldie center of the table or within 24" of the edges. Victory is calculated by a combination of terrain and casu-alties.
E. Rearguard Action The retiring army must have 25% of iLS force
deployed within 12" of the center line oldie table. The remainder of the army should be in march column/limbered within 12" oldie center line. The attacker deploys within 12" oldie cen-ter line.
STEP 6. In any scenario where one side is considered
the defender, there is a chance that side will also be surprised by the other. A six-sided die is rolled by the defender.
a. Eastern Theatre: 6 = Surprised, the attacker sets up to the center line or flank.
1,2,3 = no move 4 = left 5 = right 6 = delayed/back
Distance is rolled:
1,2 = 6 inches 3,4 = 12 inches 5,6 = 18 inches
STEP 8. VICTORY CONDITIONS a. Terrain Objective - Points are assigned to
key terrain or vital ground; e.g., crossroads, towns, bridges, or fords dominating ground.
b. Casualties - (as per Fire &Fury rules):
1 victory point per enemy infantry stand killed or dispersed.
2 victory points per enemy cavalry stand killed or dispersed.
5 victory points per enemy artillery stand killed or dispersed.
5 victory points per enemy commander stand killed or wounded.
Stands that voluntarily leave by their own baseline are not counted toward victory points of the other side.
Overall, the side that has possession of the field at the end of the allotted time is considered to have achieved a strategic victory. Otherwise, a tactical victory goes to the side with the most points. If the points are the same, the game is considered a draw.
There you have it, a simple method for simulating pre-battle maneuvering and a way of generating a range of random scenarios. The intention was that this system should be generic and hopefully can be easily modified to suit any particular set of rules.
b. Western Theatre: 5,6 = as above
STEP 7. Once units are deployed, roll for placement
(optional):
The Zouove, Fall 1996 • Page 20

— e e ' '.,sof .• 5, . „:1,-:-..t. - - , , v ir . ,. , . .
,c. (..• - •
.•- ■ ' :: . . • . ' . ..
pi ■ • i 41 •'‘ .
f , , ...1,.... ,
, 4.4„, Al../ • cl .....A if
THE MAGAZINE OF AMERICAN CIVIL WAR - ii14 ............., HISTORY & MINIATURE WARGAMING
-
• AMP. °
.401rnmir •••••• ••• •••
CIINIWd441Vrff ..'7111M
'
'
1V.1 XeMPLI, ,0, 14 ak‘
• - • i . ,
_
, r rt ( 11 l' a (LILL L.... co =.4 s • \ .. . . ,.
T ,f 1 4' — - ' li fi 'ITT] ri
. _ _ e • .. ,..,. ;-,;i:1-3.4,<." .
Tail To,iFif.T.Tirr
, .:. .10,- ', • -hii 1--- eV. . L

ARTILLERY POINTS
QUALITY COST PER CREW GUN TYPE CREW COST MULTIPLIED
Militia 10 Light xl
Raw 30 Medium x2
Veteran 40 Heavy 02
Elite 60 Siege x3
One of the difficulties of historical miniatures and re-creating histori-cal battles is that the sides are not
always balanced, either due to the histori-cal situation or the varying skill level of the garners involved. One way to get around these difficulties is by playing hypothetical battles. But how do you insure that the opposing sides in such a battle are equal?
The idea of a point system for games is well known, especially with non-historical games such as Warharnmer. Thus, if such a system can work well when creating a fight between Space Ores and Turbo Marines, it can be used for the advantage of Civil War enthusiasts.
This system includes rules for the placement of terrain as well as the cost of creating a force of varying size. For a quick battle, players should purchase 400-000 points worth of forces. For corps-sized battles, 1500-1750 points works well, and for army-sized battle, players can select 3000-5000 points.
Finally. I would encourage players to modify this system or apply it to differ-ent scales of games. With some tweaking (mainly lathe points used for purchasing commanders), this system can easily be applied to Johnny Reb and other regimen-tal rules sets.
Players using this system pur-chase their force with a set number of points. Each figure they purchase, whether it is infantry, cavalry, artillery, or an officer, has a point cost Players may also spend points (or save them) another things such as fortifications, starting units off-table, or improving the forces level of supply.
ARTILLERY Artillery costs are dependent on the quality of the unit and the size of the gun. First determine the quality of the crew and multiply that cost by the size of the gun. A force may never consist of more batteries than infantry or cavalry (whichever is greater) brigades.
COMMANDERS -The cost of com-manders depends on their rank and their ability level. To determine the cost, multi-ply their Leader Rating with their rank multiple. This also means that leaders with a negative rating provide a discount la the cost of your army. This assumes the leaders will be used properly and fairly. If this could present a problem, do not allow officers with negative ratings. Leadership ratings range from -1010 +30 (average is +5 or (-10)
COMMANDERS
DIVISION: Multiply rating 52
CORPS: Multiply rating 53
ARMY: Multiply rating x5
SUPPLY- Units may choose to fol-low the normal game rules regarding run-ning out of ammunition. If this is the case, no points need lobe spent. A player may with however to spend his points to
create an improved supply line. An
COST improved supply
PER FIGURE line means that
2 units do not run out of ammunition the
4 first time they roll
6 doubles; instead, O they only run out of
ammunition the sec-
INFANTRY & CAVALRY POINTS
INFANTRY COST CAVALRY QUALITY PER FIGURE QUALITY
Militia 1 Militia
Raw 2 Raw
Veteran 3 Veteran
Elite 4 Elite
ZOIJAVE
SUPPLY
EXCELLENT SUPPLY
300 Points
ond time the unit FORTIFICATIONS - Players may
rolls doubles, also begin the game with fortifications and entrenchments in place. These may
be placed on units after everything for the
DELAYED ENTRY - game is set up. but must be purchased
Players may also before the game (i.e. when everything else
receive a discount on the cost of some is being purchased). Players may purchase
units by delaying their entry from the up to 10 levels of fortifications, but the
board. The number of turns units will be cost increases for each level purchased
delayed MUST be determined when par- beyond S. Fortifications are purchased by
chasing those units. It cannot be decided the inch. Remember that brigades usually
or altered once the game has begun. For contain four or more regiments (stands),
each turn a unit is delayed beyond the and units not completely in works receive
first, the purchasing player may deduct no benefit from them.
15% from its cost.
FORTIFICATION POINTS DELAY
Mult
DELAY
ply Unit Cost by: 01 a 111of tunas until arrival - 11
COST PER LEVEL PER INCH
I - 5 3 points
6-It 5 points
TERRAIN. Players may also lay
any available terrain down. A good guide-line is to place one piece of terrain for every two square feet of table space being
used. This does NOT mean the terrain must be evenly spaced; it simply tells the total number of terrain objects that will
boon the table. A player may choose, rather than place a new terrain piece, to "upgrade" a piece of terrain on the board.
Thus, if one side had previously placed a hill, a player can choose to make that hill
a heights rather than place a new terrain feature.
If a player selects a Stream, he
may place 24" of stream (no more than 1" wide) in a continuous line starting at one
board edge. Any further purchases of streams must then be connected to what
has already been placed. The stream is considered fordable and each player may choose to place one bridge across the
stream (this does not count as
terrain placement). As a rough guideline, each piece
of terrain (hills, woods, towns) should be roughly 25i2", but never let that interfere
with your enjoyment or the pieces of ter-rain you have available.
SETUP - Once Units have been purchased and terrain has been placed, players may now place their armies.
Starting with the Union player, each side alternates placing one unit on the board.
For small battles, players should alternate placing brigades: for larger battles, players should alternate placement by division.
Artillery should be placed when the final unit of its division is placed while officers are placed after all units have been setup.
Officers may begin the game anywhere on the board, but not within 6" of any enemy forces. These armies may be setup
anywhere along one table side as long as the units are within 18" of the map's edge. If this would put units less than 6" apart,
the unit may NOT be placed in that location
VICTORY - Players may choose the
duration their battle will last The sten-
daM battle length should be between 8-12 turns. Players may determine victory using mutually agreeable conditions or may use the system for determining vic-tors listed in the A NATION ON TRIAL rules booklet.
zw!„Ay,2