SCCM 2012 - Automation, Management and everything in · PDF fileSCCM 2012 How to guide...
52
SCCM 2012 How to guide deploying SCCM Client, setting up SUP and SCEP Hans Chr. Andersen
Transcript of SCCM 2012 - Automation, Management and everything in · PDF fileSCCM 2012 How to guide...

SCCM 2012 How to guide deploying SCCM Client, setting
up SUP and SCEP
Hans Chr. Andersen

P a g e | 1
Contents What is Configuration Manager? ...................................................................................................................... 2
Deploying SCCM Client ...................................................................................................................................... 3
Client push Installation .............................................................................................................................. 3
SUP Installation .......................................................................................................................................... 3
Logon Script Installation ............................................................................................................................ 3
Group Policy Installation ........................................................................................................................... 3
Sources ............................................................................................................................................................ 13

P a g e | 2
What is Configuration Manager? Configuration manager is a client management suite from Microsoft. With Configuration Manager, you can
will be able to control, monitor, secure, deploy and support at vast number of client devices from Windows,
Linux, Mac and Mobile devices. You get at number of reports to help you get an overview of your entire IT
infrastructure. I will be covering these areas in this How to Guide:
- Deploying SCCM Client.
- Setting up SUP1.
- Setting up SCEP2
1 System Center Update Publisher 2 System Center Endpoint Protection

P a g e | 3
Deploying SCCM Client Before we will be able to make SCCM 3and the client’s devices, talk together, we will have to deploying
some client software to our pc.
In this section, I will be covering how to deploy the Client through Client Push. In the chapter about SUP, I
will also be showing how you can deploy the SCCM Client through SUP/WSUS.
There are many other ways that you can deploy the SCCM Client. I have listed some of the ways here.
Client push Installation For client push to work you must set up an account that you make as a local administrator on all of your
client devices. You’ll have to allow File and Printer Sharing on the clients so that SCCM can access the
ADMIN$ share
SUP Installation This will be easiest to configure and give you less trouble the all of the other installation type. This is
because that you do not have to configure any Firewall Ports on the client. This is the only installation
method where you do not have to enable File and Printer Sharing and opening the firewall port associated
with that.
You will have to install WSUS on the SCCM server and after that point the clients through GPO to point to
the WSUS/SUP server.
Logon Script Installation When installing the client via Login Script, you will have to configure File and Printer Sharing and the
Firewall ports for this installation type to work. When you do a Logon Script Installation, you will be able to
specify parameters like Management Point, SMS Site code and Fallback Status Point when installing the
client. If you do not use any parameters, the client installation will automatically search Active Directory for
information about the Management Point. Alternatively, the client can use DNS or WINS to find the
Management Point.
Group Policy Installation When installing the client via Group Policy, you will have to configure File and Printer Sharing and the
Firewall ports for this installation type to work. When you do a Group Policy Installation, you will be able to
specify parameters like Management Point, SMS Site code and Fallback Status Point when installing the
client. If you do not use any parameters, the client installation will automatically search Active Directory for
information about the Management Point.
3 System Center Configuration Manager

P a g e | 4
Setting up boundaries
- Logon to you domain controller and start Server Manager.
- Go to Tools and choose Active Directory Sites and Services.
- Right click subnet and choose New Subnet.
- In prefix, type in your network prefix for example 192.168.0.0/24 and then choose a site object to
bind the subnet to.
Click OK.
- Logon to SCCM and start the SCCM Console.
- Right click “Active Directory Forest discovery” and choose Properties.

P a g e | 5
- Click ”Enable Active Directory Forest Discovery”
Click OK.
- Click Yes
- Go to Boundary Groups and click Create Boundary Group.

P a g e | 6
- Give the Boundary Group a name and the click Add.
- Choose both boundaries and click OK.

P a g e | 7
- Click on the References tab and choose “Use this boundary group for site assignment.”
- Click OK.

P a g e | 8
Client Push Installation I assume that you have already created an account called SCCMClientPush and configured it through Group
Policy to a member of the local administrator group on the client devices. If not you can see how to do this
in my first How to Guide.
Things that will need to be setup in this chapter are Active Directory Discovery and Client Push Installation
in SCCM.
Setting up Active Directory Discovery Before Configuration Manager can install the client via Client Push, you must have setup Active Directory
Discovery. As a default, the full discovery of system devices will run every 7 days and a delta discovery will
run every 5 minutes.
To do this do the following:
- Logon to SCCM Server and start the Console.
- Choose the Administration pane.
- Choose Hierarchy Configuration – Discovery methods.
- Choose Active Directory System Discovery and click on Properties in the wunderbar.
- Click on the start icon.

P a g e | 9
- Click on the Browse button and choose the OU where you have your client computers. The press
OK.
- Choose the Options pane.
- Put a check mark in both selection. What you do where is that you configure SCCM not to take old
machine from Active Directory into SCCM database. The default option is not to take in computers
that haven’t been logged in to the domain for more than 90 days and client computer that have
updated their password for 90 days or more.

P a g e | 10
- Go back to the General pane and check the Enable Active Directory System Discovery. Then choose
OK.
- Choose Yes to run a full discovery.
- It will take some time for the Discovery to run and the Clients to get into the SCCM database.
Verifying System Device Discovery works To verify that the discovery ran successful do the following.
- Logon to SCCM.
- Choose the Assets and Compliance pane.
- Choose Devices.
- Verify that you can see your client computers. If not take a look in the log file adsysdis.log file under
Drive letter:\Program Files\Microsoft Configuration Manager\Logs

P a g e | 11
Setting up Client Push Installation To setup Client Push Installation do the following:
- Logon to SCCM.
- Choose the Administration Pane.
- Choose Site Configuration.
- Then click on Client Installation Settings and choose Client Push Installation.
- Choose only Workstations.
- Go to the Accounts pane.

P a g e | 12
- Click on the star icon and choose New Account.
- Browse and choose the SCCMClientPush Account and type in the password and choose ok.
- In the main window, click OK.
- To see the installation progress log in the file CCMEXEC.LOG you will find the file in the following
path.
Drive letter:\Program Files\Microsoft Configuration Manager\Logs

P a g e | 13
Installing SCCM Client by using Software Update Point Using software update point as the way to deploy the the SCCM client is the most reliable. This is because
the only that will have to work on the client are the wsus agent and firewall opened to outside on port 443.
On the server side there are a little bit more work to be done before this works. This includes setting up
WSUS, installing the SUP role and configuring group policies to point at SCCM as the WSUS server.
In this section, I will be going through installing and configuring SCCM so that you can deploy the client
through the SUP role.
Installing Windows Server Update Services
- Logon to the SCCM server. - Go to add roles and features. - Click next until you get to Server Roles. - Choose Windows Server Update Service and then click Add Features in the wizard windows.
- Click Next.

P a g e | 14
- Click Next.
- Choose WSUS Services and Database. Click Next.
- Choose path for patch licensing files and click next.

P a g e | 15
- Type name of SQL Server and click Next
- Choose “Restart the destination server automatically if required.” Click install.

P a g e | 16
Adding SSL Certificate to WSUS Before installing the SUP role, we will be adding the SCCM webserver certificate to the website for WSUS.
- Logon to SCCM and start Server Manager.
- Go to Tools and choose Internet Information Service (IIS) Manager.
- Expand server name – Sites, right click WSUS Administration, and choose Edit bindings.

P a g e | 17
- Choose https and click Edit.
- Click Select.
- Choose the SCCM Web.

P a g e | 18
- If you in my case cannot see the name. The click on the view button and the under Details look for
Certificate Template Information here you should be able to see SCCM Web Server.
Click OK
’
- Click OK
- Restart the SCCM server before installing the SUP Role.
P a g e | 19
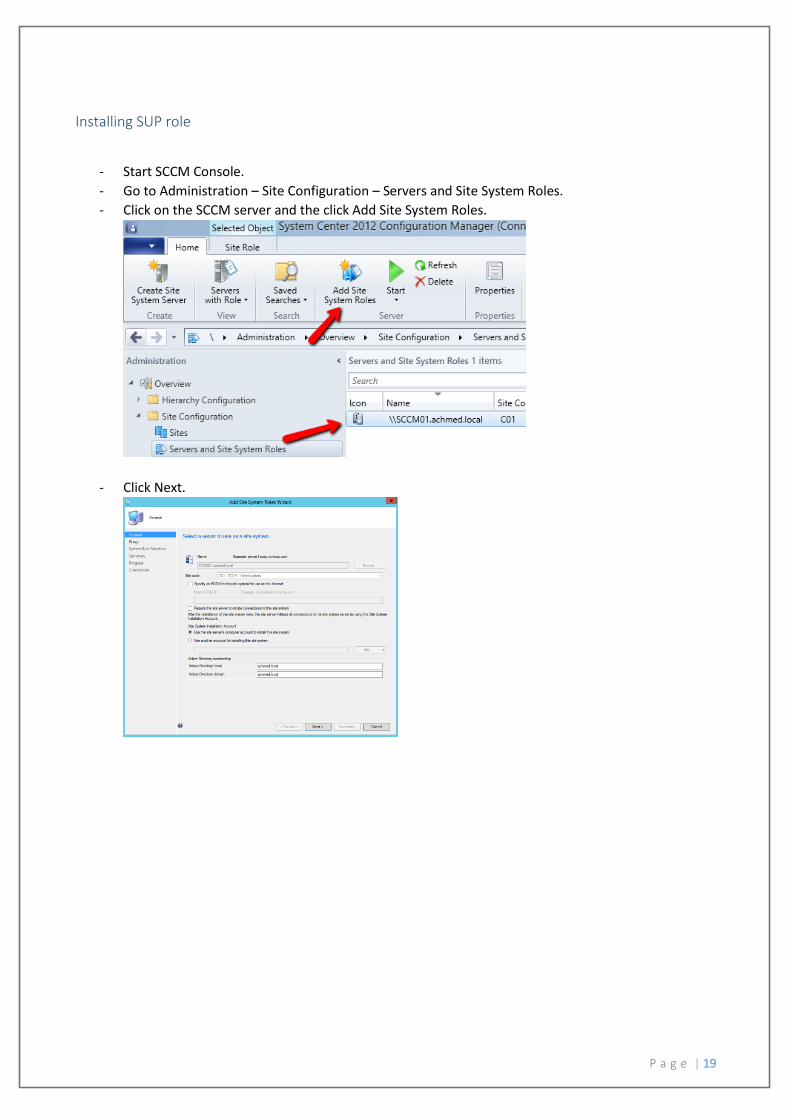
Installing SUP role
- Start SCCM Console.
- Go to Administration – Site Configuration – Servers and Site System Roles.
- Click on the SCCM server and the click Add Site System Roles.
- Click Next.

P a g e | 20
- Click Next.
- Choose Software update point. Click Next.

P a g e | 21
- Choose ”WSUS if configured to use ports 8530 and 8531….” And “Require SSL communication to
the WSUS server”.
Click Next.
- Click Next.

P a g e | 22
- Click Next.
- Choose to run every 1 day and then click next.
- Click NeXT.

P a g e | 23
- Click Next.

P a g e | 24
- Click All Products twice so all products are deselected. We will choose updates in another How to
Guide. Click Next.
- Select the languages appropriate to you environment and click next.

P a g e | 25
- Click Next.
- Click Close.

P a g e | 26
Setting WSUS configuration on clients Before we go ahead and choose to deploy the SCCM client via SUP, we need to point client devices to point
at the WSUS server. You can do this in different way either by using GPO 4 or GPP5. I will be showing how to
do this by using GPP. This is because of the new abilities in SCCM 2012 SP1 where you can have multiple
Software Update Points and provide fault tolerance without using NLB.
- Logon to your domain controller.
- Start Server Manager.
- Choose Tools and then Group Policy Management.
- Find your Computer Policy GPO and choose edit.
- Go to Registry under Computer Configuration – Preferences – Windows Settings.
4 Grout Policy Object 5 Group Policy Preferences

P a g e | 27
- Right click in the Registry windows and choose New – Registry Item.
- In registry properties choose the following:
o Action: Replace (If wsus server is already set it will be replace by these new settings)
o HIVE: Set to HKLM
o Key path: SOFTWARE\Policies\Microsoft\Windows\WindowsUpdate
o Value name: WUServer
o Value data: https://SCCM01.ACHMED.LOCAL:8531 (Set this to your WSUS Server)
o Click Apply and the click on Common.

P a g e | 28
o Choose Item-level targeting and then click Targeting.
o Choose New Item and then Registry Match.

P a g e | 29
o Click Item Options and choose Is Not.
o In hive select HKEY_LOCAL_MACHINE and in Key Path type
SYSTEM\CurrentControlSet\services\CcmExec
(This will detect if SCCM Client is already present on the system and only apply WSUS
settings if Key Path doesn’t exist on the client).
Click OK.
o Click OK.

P a g e | 30
- When back at the registry option right click and choose New – Registry Item
o In the Registry properties set the following:
Action: Replace.
Key path: Software\Policies\Microsoft\Windows\WindowsUpdate\AU
Value name: UseWUServer
Value type: REG_DWORD
Value data: 1
o Click on the Common tab.

P a g e | 31
o Choose Item-level targeting and then click Targeting.
o Choose New Item and then Registry Match.
o Click Item Options and choose Is Not.

P a g e | 32
o In hive select HKEY_LOCAL_MACHINE and in Key Path type
SYSTEM\CurrentControlSet\services\CcmExec
(This will detect if SCCM Client is already present on the system and only apply WSUS
settings if Key Path doesn’t exist on the client).
Click OK.
o Click OK.
o Restart the Client PC and validate that the setting has been inserted into the registry. You
may need to issue the gpupdate /force command to get the new settings applied right
away.

P a g e | 33
Set SCCM to deploy the SCCM by using SUP
- Logon to SCCM and start the Console.
- Go to Administration.
- Choose Site Configuration and the click sites.
- Choose Client Installation Settings – Software Update-Base Client Installation.
- Click “Enable software update-based client installation” and click OK.

P a g e | 34
Trigger Client WSUS installation To see the installation of the sccm client through WSUS do the following.
- Logon to a client.
- Start an elevated command prompt.
- Run the command gpudate /force.
- The run the command wuauclt /detectnow.
- Now wait a 5-10 seconds an look in the folder C:\windows\ and see if the folder CCMSETUP
appears. When the folder appears, go into to the folder and find the folder named LOGS and the
find the file CCMSETUP.LOG and open it.
- In the CCMSETUP.LOG, you can see the progress of the installation. I would suggest using the
CMTRACE.EXE program from the SCCM folder to view these files, as CMTRACE updates the log file
view when new things happens to the ccmsetup.log file.

P a g e | 35
SCCM Endpoint Protection With SCCM 2012 comes Endpoint protection for protecting clients against virus and malware. In this
chapter, I will be installing the Endpoint Protection Role, Settings Client Policies and Antimalware Policies.
- Logon to SCCM and open the console.
- Go to Assets and Compliance – Endpoint Protection – Antimalware Policies.
- Choose Create Antimalware Policies.
- Give the policy a name for example Custom SCEP Malware Policy and choose all the options below.
- You know have the option to set various settings like when to run a scheduled scan, what happens
to detected malware, real-time protection, etc.
- Go to Definition updates and set “Check for Endpoint Protection definitions at a specific interval” to
2 hours.
- All other settings we will just leave at the default value for now.
- Click OK.

P a g e | 36
- Click the Custom SCEP Malware Policy and the click on Deploy.
- Choose All Desktops and Server Clients.
Click OK.

P a g e | 37
Setting up Software Update for Endpoint Protection Before we deploy the endpoint client, to all of our client devices we must set up Software Updates to
download definitions updates.
- Logon to SCCM and open the console.
- Go to Administration – Site Configuration – Sites.
- Choose Configure Site Components and choose Software Update Point.
- Choose the Classifications tab.
- Choose Definition Updates.
- Choose the Products tab.

P a g e | 38
- Choose “Forefront Endpoint Protection 2010.”
- Go to the Sync Schedule tab.
- Change the Run every value to every 4 hours.
Click OK.

P a g e | 39
- Go to Software Library – Software Updates – Automatic Deployments Rules.
- Click Create Automatic Deployment Rule.
- Click on Manage Templates.
- Choose Definition Updates and click OK.

P a g e | 40
- In Name type: Automatic Deployment Rule - Endpoint Protection Definitions Updates
- Click Collection – Browse.
- Choose “All Desktops and Server Clients”
Click OK.

P a g e | 41
- Go to Deployment Package.
In name type: Endpoint Definition Updates.
In Package source: Type in the UNC path for a folder for the definition update in this example:
\\sccm01.achmed.local\source$\Endpoint Definitions
- Click Next.
- Click Add – Distribution Point.

P a g e | 42
- Select the Distribution point and click OK.
- Click Summary.
- Click Next and the creation starts. The click Close.

P a g e | 43
Adding System Center Endpoint Protection Role. We are now ready to add the Endpoint Protection Role, which will activate the feature within SCCM 2012.
- Logon to SCCM and open the console.
- Go to Administration – Site Configuration – Sites.
- Click on Add Site System Roles from the wunderbar.
- Click Next.
- Click Next.

P a g e | 44
- Choose Endpoint Protection point and Click OK to the Warning window. Then click next.
-
- Click “I accept the Endpoint Protection license terms”
Click Next.Click

P a g e | 45
- Click Next.
- Click Next.
- Click Close.

P a g e | 46
Setting up Custom Client Settings for Endpoint Protection
- Logon to SCCM and open the console.
- Go to Administration – Client Settings.
- Click on Create Custom Client Device Settings.
- Select Endpoint Protection from the custom settings list and then
in name type: Custom Endpoint Protection Settings.
- Select Endpoint Protection and the set “Manage Endpoint Protection on client computers” to Yes.
Click OK.

P a g e | 47
- Select “Custom Endpoint Protection settings” and click on Deploy.
- Select “All Desktop and Server Clients” and click OK.
- This will start the installation of the Endpoint Protection on all Client Devices in the “All Desktop
and Server Clients” device Collection.

P a g e | 48
Reporting Looking at different kinds of reporting for Endpoint Protection is available through Monitoring – Endpoint
Protection status pane. In this pane, you will be able to see if any malware are detected.
Alerts Getting alerts when malware/virus is detected.
To set up alerting up you have different options. Getting console alerts that will show up when you start
the console. The other option is to be, notified by e-mail when malware/virus is detected.
To setup in console alert
- Open the SCCM Console and go to Assets and Compliance – Device Collections.
- Right click the collection where SCEP is deployed to and choose Properties.

P a g e | 49
- Go to the pane Alerts and click Add.
- Under Endpoint protection, check all options. Choose OK.
- You are able to set various setting for when an alerts should be triggered and show the alert in the
Console. Click OK.
- If any malware/virus is detected you will be notified under Assets and Compliance – Overview.

P a g e | 50
Setting up e-mail subscriptions
- Start the SCCM Console.
- Go to Monitoring pane and the Overview – Alerts – Subscriptions.
- Right click Subscriptions and choose Configure Email Notification.
- Type in information needed to make the connection to your mail server. Click OK.
- Right click Subscriptions and choose Create Subscription.
- Type in a Subscription name, email addresses and choose what kind of malware alerts you would
like to get. In this example, I chose to get email notification if malware is detected in a collection.
- You are all done. You are now notified if any malware is detected.

P a g e | 51
Sources
Technet:
http://technet.microsoft.com/en-us/library/gg682041.aspx
Setting up WSUS setting with GPP:
http://blogs.technet.com/b/configmgrteam/archive/2013/03/27/group-policy-preferences-and-software-
updates-in-cm2012sp1.aspx
System Center Configuration Manager SP1 CU1:
http://support.microsoft.com/kb/2817245
FIX: Site assignments do not work in a System Center 2012 Configuration Manager site environment:
http://support.microsoft.com/kb/2841764